1
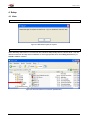
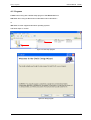
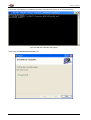
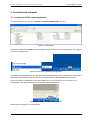
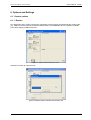
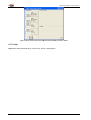
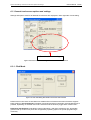
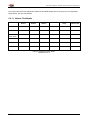
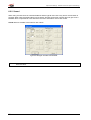
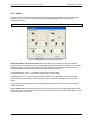
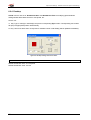
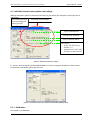
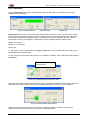
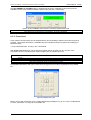
Ctw32 Touch-Driver for WinXP,WinVista,Win7 V1.3.xxx User’s Manual Contents - Serial Touchscreens (Citron IRTs) Document revision Rev. 001 002 003 004 005 006 007 Description First issue Adapted for driver version 1.0.013 IR Touch support from version 1.1.014 on Minor changes after proofreading. Modifications caused by separate x64/x86 versions: Changed storage directory Two different setup programs Hwheel feature disabled New feature from version 1.2.023 on: MultiTouch Click Mode with full support of Windows 7 gestures Support real Dualtouch with new touch firmware Reviser EFRE WHOP WHOP WHOP WHOP Date 2009-09-18 2009-10-13 2009-10-26 2009-11-06 2010-05-12 WHOP 2010-07-29 WHOP 2011-12-01 Exclusion of liability The contents of this manual serve for information purposes only. Citron GmbH reserves the right to change the contents of this manual without prior notice. While reasonable efforts have been made in the preparation of this manual to assure its accuracy, errors may occur. Therefore, Citron GmbH assumes no liability resulting from errors or omissions in this manual or from the use of the information contained herein. Citron GmbH appreciates suggestions with regard to improvements or corrections. This manual and the Software described herein are subject to copyright. © Copyright 2008 - 2011 CITRON GmbH, Anwaltinger Straße 14, 86165 Augsburg, Germany Tel. ++ 49 821 749450 FAX ++ 49 821 7494599 ALL RIGHTS RESERVED Document information File name: h:\manuals\ctw32\ctw32_en_r007.doc Date: 05.12.2011 14:54 Document revision: 6 Document reference: \\ntserv1\dokument\dformat.dot\cidoku.dot 2 Contents - Serial Touchscreens (Citron IRTs) User's Manual Ctw32 1 Contents 1 2 3 Contents .................................................................................................................................................3 System Requirements ............................................................................................................................4 Supported Touchscreens and Features .................................................................................................4 3.1 Serial Touchscreens (Citron IRTs).................................................................................................4 3.2 USB Touchscreens (Citron IRTs) ..................................................................................................4 3.3 Serial Touchscreens (IRTOUCHSYSTEMS Co. Ltd.) ................................................................4 3.4 Features .........................................................................................................................................5 4 Setup ......................................................................................................................................................6 4.1 Hints ...............................................................................................................................................6 4.2 Progress .........................................................................................................................................7 5 First start and overview ..........................................................................................................................9 5.1 Location of Ctw32 control application.............................................................................................9 5.2 How to use Ctw32.exe .................................................................................................................10 5.3 Calibration ....................................................................................................................................12 5.4 Help System .................................................................................................................................13 6 Options and Settings ............................................................................................................................15 6.1 General options ............................................................................................................................15 6.1.1 Rescan...................................................................................................................................15 6.1.2 Help........................................................................................................................................16 6.2 General touchscreen options and settings...................................................................................17 6.2.1 Click Mode .............................................................................................................................17 6.2.2 Sound.....................................................................................................................................20 6.2.3 Cursor ....................................................................................................................................21 6.2.4 Desktop..................................................................................................................................22 6.3 Individual touchscreen options and settings.................................................................................23 6.3.1 Calibration ..............................................................................................................................23 6.3.2 Advanced ...............................................................................................................................24 6.3.3 Press Level ............................................................................................................................25 3 System Requirements - Serial Touchscreens (Citron IRTs) 2 System Requirements - PC with Microsoft® Windows® XP/Vista/7 running Free COM Port (serial Touchscreen) or USB Port (USB Touchscreen) USE OF USB TOUCHSCREENS IS RESTRICTED TO I386 MACHINES DUE TO USB DRIVER! Screenshots taken in manual are from Windows XP and may look differently at your target system but with the same meaning. Logical differences between operating system versions will be mentioned. 3 Supported Touchscreens and Features 3.1 Serial Touchscreens (Citron IRTs) - IRT65-V1.x, IRT65-V2.x, IRT65-V3.x IRT84-V1.x, IRT84-V2.x IRT104-V4.1, IRT104-V5.x IRT121-V2.x, IRT121-V3.x IRT151-V1.x, IRT151-V2.x IRT170-V1.x IRT181-V1.x IRT190-V1.x IRT213-V1.x IRT240W-V1.x 3.2 USB Touchscreens (Citron IRTs) - IRT65-V3.3 IRT84-V2.1 IRT104-V5.2 IRT121-V3.1 IRT151-V2.3 IRT190-V1.x IRT213-V1.x IRT240W-V1.x 3.3 Serial Touchscreens (IRTOUCHSYSTEMS Co. Ltd.) - 4 E-Series Infrared Touchscreen with RS232/EIA-232E interface K-Series Infrared Touchscreen with RS232/EIA-232E interface L-Series Infrared Touchscreen with RS232/EIA-232E interface Supported Touchscreens and Features - Features User's Manual Ctw32 3.4 Features - - Supports up to 16 Touchscreens simultaneously with individual settings Multitouch support with full support of Windows 7 gestures (2 touch points) 3D feature (with capable touchscreen hardware) Integrated help system Mouse driver simulation with enhanced button modes: o Left and right mouse button simultaneously o Two mouse wheel modes o Exit mode and Dual Touch mode for Drag and Drop operations Landscape and portrait mounting setups Multiple screen setups Supports E-, L- and K-Series touchscreens of IRTOUCHSYSTEMS Co. Ltd. 5 Setup - Hints 4 Setup 4.1 Hints ADMINISTRATOR PRIVILEDGES ARE REQUIRED FOR RUNNING SETUP! figure 4-1: Administrator rights are required PLEASE RUN SETUP BEFORE ATTACHING TOUCHSCREEN! When attaching USB version of Touchscreen first, Windows will probably ask for a device driver. You can detach touchscreen and skip driver installation or select approperiate driver from FDTI_VCP directory of CTW32 installation medium: figure 4-2: driver file location for touchscreen preattachment 6 User's Manual Ctw32 Setup - Progress 4.2 Progress CTW32 comes along with a default setup program. Start SETUP.EXE from X64 folder when using 64-Bit versions of Windows Vista or Windows 7 or x86 folder for other supported Windows operating systems and follow steps on screen: figure 4-3: start setup program figure 4-4: Setup program 7 Setup - Progress Please wait until USB driver installation is finished. Command line window is closed automatically: figure 4-5: USB driver installation during Setup Close setup and attach touchscreen(s) now: 8 First start and overview - Location of Ctw32 control application User's Manual Ctw32 5 First start and overview 5.1 Location of Ctw32 control application All driver related files are stored in “PROGRAM FILES\CITRON GMBH\CTW32” directory: figure 5-1: ctw32 directory Ctw32 control application CTW32.EXE is integrated in startup folder and runs automatically for every logged on user as tray application. figure 5-2: ctw32 control application as tray application Use Ctw32 control application for first general system settings following driver installation and touchscreen attachment and afterwards whenever you like to change settings or attach additional touchscreens. Driver functionality is independent from control application, so you can quit it or even remove it from startup folder. Just open context menu in minimized state and select EXIT: figure 5-3: close Ctw32 control application in tray mode Restart it when needed from ctw32 directory. 9 First start and overview - How to use Ctw32.exe 5.2 How to use Ctw32.exe Left click on tray icon displays Citron Touch Control Center: Install Buttons Port Buttons Remove Buttons figure 5-4: Citon Touch Control Center after Setup Citron Touch Control Center (CTCC) has an explorer like operating philosophy modified for better touchscreen use. Current State window on left side contains all available communication ports for touchscreens (here COM1, COM3, COM4, COM6) presented by port buttons. Each port can be configured for touchscreen use seperately through corresponding install or remove button. With Install Driver button pressed communication port is exclusively opened for Citron touchscreen use if possible. Changed state is shown. “Double installation” is not possible. Install button will be disabled and remove button enabled: Driver opened for COM1. State displayed. Driver close for COM1 is enabled now. figure 5-5: Driver opened for COM1 Pressing Remove Driver button ends Ctw32 support for touchscreens on that port. All resources are released. Other applications can use communication port without interference. 10 User's Manual Ctw32 First start and overview - How to use Ctw32.exe When communication port is opened for driver use, any attached Citron touchscreen is recognized automatically and initialized with given settings. Touchscreens can be hotplugged at any time at open ports and will be recognized correctly. Type of detected touch, if any, is displayed in port button: COM1 open for driver use Touchscreen IRT151V2.2 detected/initialized Touchscreen works COM3 open for driver use no Touchscreen detected so far COM4 not open for driver use COM6 not open for driver use figure 5-6: COM1 open with touch/COM3 open without touch/COM4+6 closed Select an attached and running touchscreen by pressing corresponding port button. Current settings for selected touchscreen are displayed and can be altered at right side: Touchscreen at COM1 selected for displaying/altering settings Informations/Settings specific to selected touchscreen Informations/Settings for all attached touchscreens figure 5-7: Specific and common settings for IRT151-V2.2 attached at COM1 For detailed information about available settings see chapter “6 Options and Settings”. When touchscreen is displayed in corresponding port button as available and running but does not follow your finger a calibration is necessary. See next chapter “5.3 Calibration”. 11 First start and overview - Calibration 5.3 Calibration Citron Infrared Touchscreen technology does not need calibration due to changing hardware parameters like resistive or capacitive touchscreens. Nevertheless depending on system requirements touchscreen can be mounted in different ways so coordinate system of touchscreen may not be the same as coordinate system of PC graphics. Whenever moving finger within touchscreen leads to mouse cursor running in opposite direction one time calibration is necessary: figure 5-8: Start calibration After clicking “CALIBRATE” Select IRT Range is displayed. This is useful when touchscreen does not cover whole size of your graphics system e.g. in multiscreen setups. Default is covering whole screen: figure 5-9: Select monitor to which touchscreen is attached 12 User's Manual Ctw32 First start and overview - Help System After confirming range selection calibration window is displayed. Please touch screen at three given positions in successive order. CTW32 supports landscape and portrait touchscreen mounting setups: figure 5-10: calibration window with first touchpoint 5.4 Help System CTW32 has an integrated help system with three components. 1. Pressing F1 or Help button starts an animated demo explaining operating philosophy. Demo can be stopped with any key, mouse or touch input. figure 5-11: How to use demo 13 First start and overview - Help System 2. Animated demos are available as tooltips for explaining click modi in Click Mode: figure 5-12: Animated click mode tooltip 3. Default tooltips with extented informations are displayed when hoovering over operating elements: figure 5-13: Tooltip 14 User's Manual Ctw32 Options and Settings - General options 6 Options and Settings 6.1 General options 6.1.1 Rescan As it would slow down system performance significantly communication ports attached after system start (e.g. USB touchscreen) will not be detected automatically. Press Rescan button for update of available ports after hotplug of USB touchscreen: figure 6-1: Initiate communication port rescan Detection can take up to 60 seconds : figure 6-2: Updating setup of available communication port 15 Options and Settings - General options figure 6-3: New communication port COM6 from attached USB touchscreen added 6.1.2 Help Help button starts animated demo “How to use”. See 5.4 Help System. 16 Options and Settings - General touchscreen options and settings User's Manual Ctw32 6.2 General touchscreen options and settings Settings and options used for all attached touchscreens are displayed in lower right side of main dialog: General touchscreen settings figure 6-4: General touchscreen settings used for all attached touchscreens 6.2.1 Click Mode figure 6-5: click mode dialog with Double Touch Click mode selected Defines how mouse clicks are simulated. As standard Citron Infrared touchscreens firmware supports basic tracking of two touchpoints. Emulation of both left and right mouse button click simultaneously is possible, depending on selected click mode. Selected mode is shown by toggle state of button field. Dualtouch with Gestures mode allows usage of Windows 7 and above multitouch API. All possible gestures with up to two touch points are recognized by operating system. No special programming is necessary. 17 Options and Settings - General touchscreen options and settings How click modes work are explained in detail with animated tooltips when hoovering over corresponding toogle button. See 5.4 Help System. 6.2.1.1 Mouse Click Modes Click Mode Left mouse button Right mouse button Mouse Wheel Press Level Drag and Drop Move cursor without click Enter Yes No No Yes Yes Yes Exit Yes No No No No Yes Double Touch Click Yes No No No No Yes Wheelmouse Yes Yes Yes No No No Two Buttons Yes Yes No No No Yes Zcoord Yes No Yes Yes Yes Yes table 6-1: Comparision of click modes 1 with Press Level > 0 18 1 1 User's Manual Ctw32 Options and Settings - General touchscreen options and settings 6.2.1.2 Dual Touch Gestures Mode Following gestures are supported: Gesture Windows Usage Tap/Double Tap Click/Double Click Single Contact Dual Contact X X Drag 1 or 2 fingers up and down X X Selection/Drag Mouse Drag/Selection Drag 1 finger left/right X Press and Tap Right click Press on target and tap using a second finger X Zoom Zoom Move two fingers apart/toward each other X Rotate Application handled X Two-Finger-Tap Application handled Press and Hold Right click Flicks Default:Pan up/Pan Down/Back and Forward Move tow fingers in opposing direction or use one finger to pivot around another Tap two fingers at the same time (where the targets I the midpoint between the fingers) Press, wait for blue ring animation to complete, then release Make quick drag gestures in the desired direction Panning with Inertia Scrolling Gesture Action X X X X table 6-2: Supported multitouch gestures 19 Options and Settings - General touchscreen options and settings 6.2.2 Sound When using a mouse there is a tactical feedback and the typical click noise every time a mouse button is pressed. When using a keyboard there is a keystroke. Smooth touchscreen surface does not give such a feedback but it is important for user assurance and even essential for some click modes. CTW32 allows to simulate click noise for click events: figure 6-6: Dialog for accoustic click feed back TO AVAOID CONFUSION “NORMAL” CLICK SOUNDS ARE DISABLED WHEN DIALOG IS RUNNIG. YOU HERE THE JUST DONE SETTINGS. 20 Options and Settings - General touchscreen options and settings User's Manual Ctw32 6.2.3 Cursor Finger as touchpen has the advantage to be onboard always, but the drawback to be much larger than Windows cursor . To overcome or at least reduce the latter Ctw32 allows some cursor position manipulation settings. CLICK POSITION IS ALWAYS HOT SPOT OF W INDOWS CURSOR, NOT NECESSARILY FINGER TOUCH POINT. figure 6-7: Dialog allowing manipulation of cursor position Acceleration Border, Acceleration Factor allows Windows cursor to advance touch point towards screen borders. Useful feature as often used Windows elements (Start button, close button of maximized windows) resides in screen corners. Dependig on finger diameter those elements cannot be reached comfortably otherwise. Settings can be done seperately for each screen axis. Acceleration Border = 100% -> Acceleration starts right from axis middle Acceleartion Border = 50% -> Acceleration start half way from axis middle Acceleration Factor = 2 -> Speed doubles from acceleration border, that means hot spot of windows cursor reaches screen border whereas touch point is half way between accleration border and screen border. Feature is switched off by default because optimal settings depends on (touch) screen size, resolution, used application etc. Cursor Offset allows moving Windows cursor away from touch point, so it is visible. Useful with tiny GUI elements and click modes that do not generate a click event as soon as touch area is interrupted (e. g. 3D modes, Exit mode, Dual Touch). 21 Options and Settings - General touchscreen options and settings 6.2.4 Desktop CTW32 uses it’s own set of Doubleclick Area and Doubleclick Time as modifying global windows settings would affect attached mice or touchpads, too. How to use: st 1 way: Type in value(s) in edit field(s) and press corresponding Sync button. Corresponding touch slider will jump to appropriate position automatically. nd 2 way: Use touch slider when no keyboard is available. Value in edit field(s) will be updated immediately: figure 6-8: Desktop settings with touch sliders CHANGING DOUBLECLICK AREA WITH TOUCH SLIDER WILL RESULT IN SAME X AND Y AXIS SIZE. Default Doubleclick Area: 30 x 30 pixels Default Doubleclick Time: 700 ms 22 Options and Settings - Individual touchscreen options and settings User's Manual Ctw32 6.3 Individual touchscreen options and settings Settings and options specific to selected touchscreen (by port button) are displayed in upper right side of main dialog: Selected touchscreen (corresponding port button pressed) Individual touch settings Type of touchscreen Touchscreen firmware Size of infrared matrix 3D Feature: - if any, No of Pressure Sensors > 0 - current Press Level (Off if feature is deactivated) figure 6-9: Individual touchscreen settings E-, K and L-Series products of IRTOUCHSYSTEMS Co. Ltd. do not support all features of Citron GmbH touchscreens. Unavailable options are removed: figure 6-10: Individual touchscreen settings for IRTOUCHSYSTEMS products 6.3.1 Calibration See chapter “5.3 Calibration”. 23 Options and Settings - Individual touchscreen options and settings 6.3.2 Advanced Pressing Advanced button opens corresponding Advanced dialog which covers BeamTimeout and HWHEEL Zcoord Features: figure 6-11: Windows Vista/7 – Advanced dialog - Windows XP BeamTimeout in seconds is used to eliminate defective infrared beams of Citron touchscreens. When a beam is interrupted longer than given number of seconds (which is normally interpreted as a valid touch point) beam is regarded as defective and not considered for touch point calculation any more. Rest of touchscreen area can be used again. Feature allows usage of partially defective touchscreens. Default: 10 seconds Range: 5 – 120 seconds How to use: st 1 way: Type in value in edit field and press Sync Time button. Touch useable slider below will jump to appropriate position automatically. nd 2 way: Use touch slider below edit field when no keyboard is available. Value in edit field will be updated immediately: Beam Timeout changes automatically figure 6-12: Change Beam Timeout with touch slider Set toggle button Off in toggled state (button color green) will switch off Beam Timeout feature. Defective beams will not be removed from touch point calculation regardless how long they are interrupted: figure 6-13: Switch off Beam Timeout feature Useful when long interruption sequences are part of operating philosophy. Beam Timeout feature switched on also prevents detection of touchscreens’ defective beams. 24 Options and Settings - Individual touchscreen options and settings User's Manual Ctw32 Set Use HWHEEL for ZCCORD button in toggled state to send z coordinate of 3D touchscreens as HWHEEL mouse event instead of WHEEL mouse event (See 6.2.1 Click Mode): figure 6-14: Use of HWHEEL mouse event for z coordinate of ZCoord click mode FEATURE IS NOT SUPPORTED AT THE MOMENT. BUTTON IS DISABLED. 6.3.3 Press Level Citron Infrared Touchscreens can be equipped with a 3D unit allowing to detect how hard touch point is pressed. Ctw32 uses this feature, if available (See 6.3 Individual touchscreen options and settings), in two diffent ways. st nd 1 way is described here. 2 way in 6.2.1 Click Mode. With Press Level dialog user can set pressure strength that is necessary to do a “mouse” click. Unintended clicks by accidental touch area interuption are no problem any more. FEATURE ONLY MAKES SENSE WITH SOME CLICK MODES, SO IT IS ONLY DISPLAYED AND AVAILABLE WITH THOSE. SETTING A PRESSURE LIMIT OF 0 DISABLES FEATURE. Click Press Level button and open numerical touch keypad to enter value. Keyboard input is possible, too: figure 6-15: Set Pressure Limit Before running with new Press Level a confirmation dialog is displayed. Try to do a “click” on Test button to check, if pressure is in range for comfortable use: 25 Options and Settings - Individual touchscreen options and settings figure 6-16: Confirm set pressure level There is no default value, because comfortable values greatly depend on how touchscreen is mounted, weight of touchscreen monitor, ankle and position of usage etc. Suggested range: “Light”: 3 – 5 “Medium”: 8 – 15 “Heavy”: > 20 26 FAQ - Individual touchscreen options and settings User's Manual Ctw32 7 FAQ Q: I use an USB Serial Adapter. Serial port is recognized by Ctw32 but touch screen does not work. A: Ctw32 does not support USB serial adapters with Prolific® chipset, due to serial driver incompatibilities. USB serial adapters with FTDI® chipsets works properly. 27