1
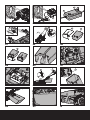
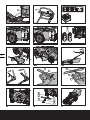
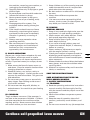
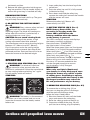
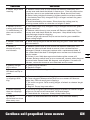
auto-adjusts to your walking speed
Cordless self-propelled lawn mower
Tondeuse à gazon autotractée sans fil
Cortacésped de autopropulsión inalámbrica
hElPliNE NUmbEr
1-866-354-worx (9679)
EN
P07
F
P20
ES
P35
WG789
1
2
3
4
5
6
7
8
6
11
17
9
10
19
18
a
15
16
A
B1
B2
14
C1
C2
b
c
D1
e
c
d
1
2
b
D2
D3
E1
f
5
E2
F
G1
2
1
G2
G3
H
2
e
I1
1
I2
J
17
12
K1
12
K2
L
2
2
6
13
9
M1
M2
N1
P-1
O-1
1
O-2
2
O-3
P-2
2
P-3
N2
O
P
R-0
R-2
R-4
R-1
R-3
R-5
Q
R
S
1
1. Upper handle
2. Safety bail
3. Safety key
4.Lower handle
5.Handle height adjustment lever
6.Locking cam lever
7. Safety guard
8.Battery housing cover
9. Side-discharge cover
10.Cutting height adjustment lever
11.Grass collection bag
12.Mulching plug (See K1)
13.Side-discharge chute (See M1)
14.Screw knob (See C2)
15.Battery pack (See B)
16.Charger (See B)
17.Work mode dial (See L)
18. CHARGED INDICATOR LIGHT (GREEN) (See B2)
7
19. CHARGING INDICATOR LIGHT (RED) (See B2)
Cordless self-propelled lawn mower
EN
TECHNICAL DATA
Power input
36V
Deck diameter
19’’ (48cm)
Cutting diameter
18"(46cm)
Front wheel diameter
7" (178mm)
Rear wheel diameter
8-1/4" (210mm)
Cutting height
1.5”-3.5” (38 – 88mm)
Cutting height positions
6
Grass collection capacity
1.6bushels(55L)
Battery type
Lead acid
Battery model
WA3220
Charging time
16 hrs
Charger model
WA3722
Charger rating
Input: AC 120V~60Hz,45W Output: 42.5V 1.0A
Machine weight
8
41.1kg (90.6lbs)
ACCESSORIES
Grass collection bag
Charger (WA3722)
Side-discharge chute
Mulching plug
Battery pack (WA3220)
Safety key 1
1
1
1
1
1
We recommend that you purchase your accessories from the same store that sold you the tool.
Use good quality accessories marked with a well-known brand name. Choose the type according
to the work you intend to undertake. Refer to the accessory packaging for further details. Store
personnel can assist you and offer advice.
Cordless self-propelled lawn mower
EN
SAFETY INSTRUCTIONS
WARNING! Some dust created by
power sanding, sawing, grinding,
drilling and other construction activities
contains chemicals known to the state of
California to cause cancer, birth defects
or other reproductive harm. Some
examples of these chemicals are:
• Lead from lead-based paints,
• Crystalline silica from bricks and cement
and other masonry products, and
• Arsenic and chromium from
chemically-treated lumber.
Your risk from these exposures
varies, depending on how often you
do this type of work. To reduce your
exposure to these chemical:
• Work in a well ventilated area,
• Work with approved safety equipment,
such as those dust masks that are specially
designed to filter out microscopic particles.
READ ALL INSTRUCTIONS
WARNING: When using electric lawn
mowers, basic safety precautions should
always be followed to reduce the risk of fire,
electric shock, and personal injury, including
the following:
WARNING: Risk of injury could occur if
the lawn mower is operated without the
catcher assembly attached.
WARNING: The use of any other accessory or
attachment might increase the risk of injury
CAUTION: For battery-operated
lawn mowers use only identical
replacement batteries. When reordering specify the battery type and
manufacturer model number. Devices
for retaining extension cords are also
available.
FOR ALL LAWN MOWERS
1) Avoid Dangerous Environment - Don’t
use lawn mowers in damp or wet
locations.
2) Don’t Use In Rain.
3) Keep Children Away - All visitors should
be kept a safe distance from work area.
4) Dress Properly - Do not wear loose
clothing or jewelry. They can be caught in
moving parts. Use of rubber gloves and
footwear is recommended when working
outdoors.
5) Use Safety Glasses - Always use face or
dust mask if operation is dusty.
6) Use Right Appliance - Do not use lawn
mower for any job except that for which it
is intended.
7) Don’t Force Lawn Mower - It will do the
job better and safer at the rate for which it
was designed.
8) Don’t Overreach - Keep proper footing
and balance at all times.
9) Stay Alert - Watch what you are doing.
Use common sense. Do not operate lawn
mower when you are tired.
10) Store Idle Lawn Mower Indoors - When
not in use, lawn mower should be stored
in an indoor dry and locked-up place - out
of reach of children.
11) Maintain Lawn Mower With Care - Keep
cutting edges sharp and clean for
best and safest performance. Follow
instructions for lubricating and changing
accessories. Inspect lawn mower cord
periodically and if damaged, have it
repaired by an authorized service facility.
Inspect extension cords periodically and
replace if damaged. Keep handles dry,
clean, and free from oil and grease.
12) Keep guards in place and in working
order.
13) Keep blades sharp.
14) Keep hands and feet away from cutting
deck.
15) Objects struck by the lawn mower blade
can cause severe injuries to persons. The
cutting area should always be carefully
examined and cleared of all objects prior
to each mowing.
16) If lawn mower strikes a foreign object,
follow these steps:
i) Stop lawn mower. Release the switch.
ii) Inspect for damage.
iii) Repair any damage before restarting
and operating the lawn mower.
17) Use identical replacement blades only.
Cordless self-propelled lawn mower
EN
9
SUPPLEMENT SA-BATTERY-OPERATED
LAWN MOWERS
a) Do not charge lawn mower in rain, or in
wet locations.
b) Do not use battery-operated lawn mower in
rain.
c) When replacing batteries, all batteries
should be replaced at the same time.
Mixing fresh and discharged batteries
could increase internal cell pressure and
rupture the discharge battery(ies). (Applies
to products employing more than one
separately replaceable primary battery.)
d) When inserting batteries into this product,
the proper polarity or direction must be
observed. Reverse insertion of batteries
can result in leakage or explosion. (Applies
to product employing more than one
separately replaceable primary battery.)
e) Remove or disconnect battery before
servicing, cleaning, or removing material
from the lawn mower.
10
For all battery-operated
products employing a detachable
or separable battery
a) Use only the following type and model
battery (ies): WA3220
b) Do not dispose of the battery(ies) in a
fire. The cell may explode. Check with
local codes for possible special disposal
instructions.
c) Do not open or mutilate the battery(ies).
Released electrolytes are corrosive and
may cause damage to the eyes or skin. It
may be toxic if swallowed.
d) Exercise care in handling batteries in order
not to short the battery with conducting
materials such as rings, bracelets, and
keys. The battery or conductor may
overheat and cause burns.
For a battery-operated lawn
mower employing a vented wet
cell battery supply intended to be
initially or periodically filled by
the user:
CAUTION: The electrolyte is a dilute sulfuric
acid that is harmful to the skin and eyes. It
is electrically conductive and corrosive. The
following procedures should be observed:
a) Wear full eye protection and protective
clothing.
b)If electrolyte contacts the skin, wash it off
immediately with water.
c)If electrolyte contacts the eyes, flush
thoroughly and immediately with water.
Seek medical attention.
Safe Practices for Walk-Behind
Mowers
I. GENERAL OPERATION
1. Read, understand, and follow all
instructions on the machine and in the
manual(s) before starting.
2. Do not put hands or feet near or under
the machine. Keep clear of the discharge
opening at all times.
3. Only allow responsible adults, who are
familiar with the instructions, to operate
this machine.
4. Clear the area of objects such as rocks,
wire, toys, etc., which could be thrown by
the blade. Stay behind the handle when
the engine (motor) is running.
5. Be sure the area is clear of bystanders
before operating. Stop machine if anyone
enters the area.
6. Do not operate machine barefooted or
while wearing sandals. Always wear
substantial footwear.
7. Do not pull machine backward unless
absolutely necessary. Always look down
and behind before and while mowing
backward.
8. Never direct discharged material toward
anyone. Avoid discharging material
against a wall or obstruction. Material
may ricochet back toward the operator.
Stop the blade when crossing gravel
surfaces.
9. Do not operate machine without the
entire grass catcher, discharge guard, rear
guard, or other safety protective devices
in place and working.
10. Never leave a running machine
unattended.
11. Stop the engine (motor), wait until the
blade comes to a complete stop, and then
remove the safety key before cleaning
Cordless self-propelled lawn mower
EN
the machine, removing grass catcher, or
unclogging the discharge guard.
12. Operate machine only in daylight or good
artificial light.
13. Do not operate machine while under the
influence of alcohol or drugs.
14. Never operate mower in wet grass.
Always be sure of your footing; walk;
never run.
15. Disengage the drive system, if so
equipped, before starting the engine
(motor).
16. If the machine should start to vibrate
abnormally, stop the engine (motor)
and check for the cause immediately.
Vibration is generally a warning of
trouble.
17. Always wear eye protection when
operating machine.
18. See manufacturer’s instructions for
proper operation and installation of
accessories. Only use accessories
approved by the manufacturer.
II. SLOPE OPERATION
Slopes are a major factor related to slip and
fall accidents, which can result in severe
injury. Operation on all slopes requires extra
caution. If you feel uneasy on a slope, do not
mow it.
1. Mow across the face of slopes; never up
and down. Exercise extreme caution when
changing direction on slopes.
2. Watch for holes, ruts, bumps, rocks, or
other hidden objects. Uneven terrain could
cause a slip and fall accident. Tall grass can
hide obstacles.
3. Do not mow on wet grass or excessively
steep slopes. Poor footing could cause a
slip and fall accident.
4. Do not mow near drop-offs, ditches, or
embankments. You could lose your footing
or balance.
III. CHILDREN
Tragic accidents can occur if the operator is
not alert to the presence of children. Children
are often attracted to the machine and the
mowing activity. Never assume that children
will remain where you last saw them.
1. Keep children out of the mowing area and
under the watchful care of a responsible
adult other than the operator.
2. Be alert and turn mower off if a child enters
the area.
3. Never allow children to operate the
machine.
4. Use extra care when approaching blind
corners, shrubs, trees, or other objects that
may block your view of a child.
IV. SERVICE
GENERAL SERVICE
1. Keep all nuts and bolts tight to be sure the
equipment is in safe working condition.
2. Never tamper with safety devices. Check
their proper operation regularly.
3. Keep machine free of grass, leaves, or
other debris build-up.
4. If you strike a foreign object, stop and
inspect the machine. Repair, if necessary,
before re- starting.
5. Never make any adjustments or repairs
with the engine (motor) running.
6. Check grass catcher components and the
discharge guard frequently and replace
with manufacturer’s recommended parts,
when necessary.
7. Mower blades are sharp. Wrap the blade or
wear gloves, and use extra caution when
servicing them.
8. Maintain or replace safety and instruction
labels, as necessary.
SAVE THESE INSTRUCTIONS
Safe Operation Practices for
Walk-Behind Mowers
1. Safety Instructions
1.1 Training
a) Read the operating and service instruction
manual carefully. Be thoroughly familiar
with the controls and the proper use of the
equipment.
b) Never allow children to operate a power
mower.
c) Keep the area of operation clear of all
persons, particularly small children, and
pets.
d) Do not use a mower for any job except that
Cordless self-propelled lawn mower
EN
11
for which it is intended.
1.2 Preparation
a)Thoroughly inspect the area where the
equipment is to be used and remove all
stones, sticks, wires, bones, and other
foreign objects.
b)Do not operate the equipment when
barefoot or wearing sandals. Always wear
substantial footwear.
c)Disengage the self-propelled mechanism
or drive clutch on units so equipped before
starting the motor.
d)Never attempt to make a wheel height
adjustment while the motor is running.
e)Mow only in daylight or in good artificial
light.
f)Never operate the equipment on wet grass.
Always be sure of your footing. Keep a firm
hold on the handle and walk, never run.
12
1.3 Operation
a)Do not put hands or feet near or under
rotating parts. Keep clear of the discharge
opening at all times.
b)Stop the blade(s) when crossing gravel
drives, walks, or roads.
c) After striking a foreign object, stop the
motor, unplug, thoroughly inspect the
mower for any damage, and repair the
damage before restarting and operating
the mower.
d) If the equipment should start to vibrate
abnormally, stop the motor and check
immediately for the cause. Vibration is
generally a warning of trouble.
e) Stop the motor and unplug whenever you
leave the equipment, before cleaning the
mower housing, and before making any
repairs or inspections.
f) Shut the motor off and wait until the blade
comes to a complete stop before removing
the grass catcher or before unclogging the
chute.
g) Mow across the face of slopes, never up
and down. Exercise extreme caution when
changing direction on slopes. Do not mow
excessively steep slopes.
h) Never operate the mower without proper
guards, plates, or other safety protective
devices in place.
i) Do not wash with a hose, avoid getting
water in motor and electrical connections.
1.4 Maintenance
a) Check the blade and the engine mounting
bolts at frequent intervals for proper
tightness.
b) Keep all nuts, bolts, and screws tight to
be sure the equipment is in safe working
condition.
c) Check bag frequently for deterioration and
wear, and replace worn bags. Check that
replacement bags comply with the original
manufacturer’s recommendations or
specifications.
d) Replace the blade if it is bent or cracked.
An unbalanced blade causes vibration
that could damage the motor drive unit or
cause personal injury.
e) Sharpen a dull blade equally at each end to
maintain the balance.
f) Clear the blade thoroughly and check its
balance by supporting it horizontally on a
thin nail through its center hole. The nail
should also be in a horizontal position. If
either end of the blade rotates downward,
remove some metal from the heavy or
lower end until the blade is balanced. It is
balanced when neither end drops.
Cordless self-propelled lawn mower
EN
SYMBOLS
Safety alert
Read the operator’s manual
Blade continues to rotate after
the machine is switched off. Wait
until all machine components
have completely stopped before
touching them.
Do not expose to rain or water
Do not burn
Do not dispose of batteries. Return
exhausted batteries to your local
collection or recycling point.
Contains lead-acid battery. Battery
must be recycled or disposed of
properly.
Slip on slope
KEEP HANDS AND FEET AWAY
GARDER MAINS ET PIEDS À DISTANCE
CPSC Danger label
Severing of toes or fingers-Rotary
mower blade.
Keep bystanders/children away.
Thrown objects from mower deck.
CHARGER SAFETY RULES
1. Plug the charger directly into an electrical
outlet. DO NOT ABUSE THE CORD. Never
carry charger by cord. Do not disconnect
the charger from the outlet or mower by
pulling it by the cord.
2.
CAUTION: To reduce the risk of fire,
electrical shock, or personal injury do
not attempt to use this charger with any
other product.
Likewise, do not attempt to charge the
mower with any other charger.
3. Do not service mower with charger or
safety key installed.
4. Do not operate a damaged charger. Replace
damaged cords or charger immediately
by calling the WORX Helpline at 1-866-3549679.
5. Always charge the mower in a dry area
protected from the weather. Do not expose
the mower or charger to rain. Do not charge
in wet locations. Do not charge mower
when temperature is above 104°F (40°C) or
below 41°F (5°C).
6. Keep the mower and charger away from
water, heat sources, (Such as radiators,
heaters, stoves...etc.) flames, or chemicals.
Be careful not to damage the charger cord,
by keeping cord away from sharp edges.
CHARGING PROCEDURE (See A, B1, B2)
1. Charging can be carried out either with the
battery FITTED (See A) or REMOVED from
the machine (See B1).
2. Plug in the charger connector into the
receptacle on the battery. (See A, B1).
3. Insert the plug of the charger into the wall
receptacle.
4. Press the button (a) on the charger for
several seconds till the red light come on
indicating that you have power and the
battery is being charged.(See B2).
5. The red light (19) will turn off and the green
light (18) will come on when charging
is complete (approximately 16 hours to
charge a fully discharged battery) (See B2)
6. After the battery is fully charged the green
light will turn on and stay on for 15 seconds
to indicate a full charge. After 15 seconds the
green light and charger will turn off to save
Cordless self-propelled lawn mower
EN
13
power.
Note: if the battery is defective, the
red light on the charger will flash.
The lights will only function when
the charger is connected to both the
battery and wall receptacle.
7. The charger is a smart charger and can
stay connected to the battery and wall
receptacle for extended periods of time
without fear of damaging the battery or
charger. The charger will automatically
cycle on and off periodically to ensure the
battery is fully charged.
The cam lever (6) pressure can be adjusted by
rotating the screw knob (14) clockwise/counterclockwise. DO NOT OVER TIGHTEN.
BATTERY CARE
The battery in your cordless lawnmower is a
36-volt sealed lead acid system. The mower
can be stored in any position without fear of
leakage.
• For optimal battery life and performance
the battery should be fully charged every 2
months during storage
• For optimal battery life and performance
the battery should be fully charged after
each use
• Store the battery in a cool dry location.
• The battery can be safely stored down to
14°F (-10°C).
• The battery does not need to be fully
discharged before recharging.
• Initially 2 to 3 charging cycles may
be required after purchase to achieve
maximum run time capacity.
The battery is maintenance free.
ADDITIONAL BATTERIES can be obtained
from the Customer Helpline 1-866-3549679.
3. FITTING/REMOVING BATTERY (See
E1, E2)
REMOVING BATTERY
Disconnect the battery connector (e), then
rotate the battery locking knob (d) counterclockwise. Remove the battery by lifting it out
of the mower by the battery handle. (See E2)
NOTE: Be careful not to drop the battery onto
your foot or on the ground when removing it.
14
ASSEMBLY/ADJUSTMENT
Warning! Do not connect the battery
and/or the safety key before product is
completely assembled.
1. ASSEMBLING THE HANDLE (See C1,
C2)
Remove the packaging endcap (see C1).
Raise the handle section into place and secure
by tightening the two locking cam levers.
Check that the handle is FULLY secured.
2. ASSEMBLING THE GRASSBAG (See
D1, D2 & D3)
1) Before starting to assemble the grass bag
to the frame (b), check that the grass bag is
positioned to slip over the frame.
2) Slide the grass bag onto the frame.
3) Assemble the top clips to the frame, then
assemble the two side clips and the bottom
clip.
FITTING BATTERY
Put the battery into the battery container,
connect the battery connector (e) and then
rotate the battery locking knob clockwise (d).
(See E1)
4. HANDLE ADJUSTMENT (See F)
The upper handle can be adjusted to 3
different height positions. Depress the locking
cam lever, set the upper handle to one of the
three height positions, and make sure to insert
the pin into the hole. Then release the locking
cam lever.
Note: Always check that the upper handle is
fixed firmly.
5. INSTALLING THE GRASS BAG (See
G1, G2 & G3)
FITTING
1) Turn the mower off, wait until blade stops
and remove safety key.
2) Raise the safety flap and hold it up, ensure
that the mulching insert has been removed.
3) Pick up the grass bag by the handle, and
position grass bag on the two lower
grommets (f) on the bottom edge of the
mower deck. Raise the bag to its full
Cordless self-propelled lawn mower
EN
horizontal position.
4) Release the safety guard to lock the grass
bag into position. Lift the handle slightly to
ensure the grass bag is installed securely.
REMOVING/EMPTYING
Lift the safety guard and hold it up. The grass
bag will drop automatically.
6. ADJUSTING THE CUTTING HEIGHT
(See H)
Warning! Stop, release safety bail and
wait until the motor stops before
adjusting height. The blade will continue to
rotate after the machine is switched off, a
rotating blade can cause injury.
Caution: Do not touch rotating blade.
For the first cutting of the season, a high
cutting adjustment should be selected.
The lawnmower can be set to 6 cutting heights
between 1.5” (38mm) and 3.5” (88mm)..
For this purpose, move the cutting height
adjustment lever outwards then choose the
preferred position. Each position will raise or
lower the mower to the desired height.
OPERATION
1. STARTING AND STOPPING (See I1, I2)
Warning! The blade will continue
to rotate for a few seconds after the
machine is switched off. Allow the motor/blade
to stop rotating before switching “on” again.
Do not rapidly switch off and on.
STARTING:
Warning! The battery is disconnected
from your lawn mower and you must
insert the connector into the battery socket
before use.
1) Insert safety key into the housing of the
switch box.
2) Push the safety key until it is fully seated
inside the housing.
3) Press down and hold the safety key,
squeeze the safety bail towards the handle
and the mower will start.
STOPPING
Release the safety bail. Mower will
automatically turn OFF.
2. BATTERY STATUS LED’S (See J)
NOTE: Battery Status LED’s are
not active in charging mode. The
Status LED’s will indicate the
battery condition when the button
on the battery is pressed.
The LED’s constantly senses and displays
the battery condition as follows:
Press the button “POWERTEST”,
the light button is illuminated.
When the three green lights are illuminated,
the battery is in a highly charged condition.
When two lights (
) are illuminated, the
battery is in a moderately charged condition.
When only one green light ( ) is
illuminated, the battery charge is depleted.
Before using your new mower for the
first time, it is recommended that the
unit be charged overnight to ensure
that the battery is fully charged.
IMPORTANT
When only one light is illuminated,
your battery is overly discharged, even
though the mower may still be capable
of cutting grass. Continuing to operate
your lawnmower with the battery in this
discharged condition may reduce the
life and performance of your battery.
3. REMOVING MULCHING PLUG (See K1)
To remove the mulching plug (12) so
that you can bag the grass or discharge
with the optional discharge chute,
follow the steps listed below:
1) Shut the mower off, wait until the blade
stops and remove the safety key.
2) Raise the safety guard and hold it up.
3) Grasp the middle of the plug, lift and
pull out the mulching plug completely.
Cordless self-propelled lawn mower
EN
15
4) The safety guard is spring loaded.
When you release it, the guard will
return to the closed position.
Note: The Pacesetter™ drive
system will operate with or without
the mower blade turned on.
4. INSTALLING MULCHING
PLUG (See K2)
1) Turn the mower off, wait until the blade
stops and remove the safety key.
2) Raise the safety guard and hold it up.
3) Slide the mulching plug (12) into
the discharge opening until it is
firmly in contact with the deck.
4) Release safety guard and ensure
it is properly closed.
8. MOWING TIPS
NOTE: Always inspect area where
mower is to be used and remove
all stones, sticks, wire, metal
and other debris which might be
thrown by the rotating blade.
1) Mow across the face of slopes, never
up-and-down. Exercise extreme caution
when changing direction on slopes. Do
not mow excessively steep slopes. Always
maintain good footing and balance.
2) Release safety bail to turn the mower
“OFF” when crossing any graveled area
(stones can be thrown by the blade).
3) Set mower at highest cutting height
when mowing on rough ground or
in tall weeds. Removing too much
grass at one time can cause circuit
breaker to trip, which stops mower.
4) If a grass bag is used during the fast
growing season, the grass may tend to
clog up at the discharge opening. Release
switch lever to turn mower “OFF” and
remove the safety key. Remove the grass
bag and shake the grass down to the back
end of the bag. Also clean out any grass
or debris which may be packed around the
discharge opening. Replace the grass bag.
5) If mower should start to vibrate
abnormally, release safety bail to turn
mower “OFF” and remove safety key.
Check immediately for cause of vibration.
Vibration is usually a warning sign of
trouble. Do not operate mower until
a service check has been made.
6) ALWAYS RELEASE SAFETY BAIL TO
TURN MOWER “OFF” AND REMOVE
SAFETY KEY WHEN LEAVING IT
UNATTENDED FOR ANY PERIOD OF TIME.
5. CUTTING MODE DIAL
SELECTION (See L)
QUIET MODE
Select QUIET mode (17) when mowing
in everyday conditions, removing
approximately 1 inch of grass at a time.
16
POWER MODE
Set the dial to POWER mode (17) when
cutting dense or overgrown grass.
6. INSTALLING SIDE-DISCHARGE
CHUTE (See M1 & M2)
Using the mulching insert and sidedischarge chute (13), the grass can be
discharged from the side of the machine.
To assemble the side-discharge insert, raise
the side-discharge cover (9) and hold it up,
position the side-discharge chute (13) onto
the hooks, then release the cover to lock
the side-discharge insert into position.
7. PacesetterTM Self-propel
Drive (See N1 & N2)
To operate the self-propel drive, squeeze
the Safety bail (2) toward the handle
and hold it, and then push both the
handle and the Safety bail (2).
To disengage the self-propel drive,
release the safety bail (2).
Note: The Pacesetter™ drive system
with rear wheel drive, automatically sets
the pace based on the operators walking
speed. Walk faster and the mower self
propels faster to match your pace.
9. MULCHING MOWING TIPS
While mulching, your new mower is
designed to cut the grass clippings into
small pieces and distribute them back into
the lawn. Under normal conditions, the
mulched grass will biodegrade quickly
Cordless self-propelled lawn mower
EN
to provide nutrients to the lawn.
Please review the following recommendations
for optimum mulching performance.
1) Avoid mowing when the grass is
wet from rain or dew. Wet grass may
form clumps which interfere with the
mulching action and reduce runtime.
The best time to mow grass is in
the late afternoon when the grass is
dry and the newly cut area will not
be exposed to direct sunlight.
2) For best mulching performance, set
the cutting height to remove about one
third of the grass blade length, ideally
no more than 1.5 inch at one time.
If the lawn is overgrown, it may be
necessary to increase the cut height to
reduce the pushing effort and prevent
overloading the motor. For extremely
heavy mulching, it is advisable to first
cut at a high cut height setting, and then
re-cut to the final cut height. Otherwise,
make narrower cuts and mow slowly.
NOTE: The motor is protected by a safety
cut out which is activated when the
blade becomes jammed or if the motor
is overloaded. The safety cut out will
only reset when the safety bail 2 is
released. Clear any obstruction and
wait for a few minutes for the safety
cut out to reset before continuing
to use the mower. At this time do
not operate the safety bail 2 as this
will prolong the reset time of the
safety cut out. If the mower cuts
out again increase the height of cut
to reduce the load on the motor.
3) For best performance, keep the mower
housing free of built-up grass. From time
to time turn off mower and wait for the
blade to come to a complete stop. Then
unplug the safety key and turn mower on
its side. Using an object such as a stick,
wipe out any accumulation of grass in
the blade area. Be careful of the sharp
edges of the blade. Clean often in wet,
new grass, and always after every use.
4) Certain types of grass or grass
conditions may require that an area be
mulched a second time to fully disperse
the grass throughout the lawn.
If cutting a second time, it is advisable
to cut perpendicular (across) the first
cut pattern. DO NOT CHANGE CUT
PATTERN IN ANY WAY THAT WOULD
CAUSE MOWING DOWN A HILL.
5) Change your cutting pattern from
week to week. This will help prevent
matting and graining of the lawn.
MAINTENANCE
Warning: Stop the mower
and remove the safety key
before removing the grass bag.
Note: To ensure long and reliable service,
perform the following maintenance
procedures regularly. Check for obvious
defects such as a loose, dislodged or a
damaged blade, loose fittings, and worn
or damaged components. Check that the
covers and guards are all undamaged and
are correctly attached to mower. Carry
out any necessary maintenance or repairs
before operating mower. If the mower
should happen to fail despite regular
maintenance, please call our customer
helpline for advice, 1-866-354-9679.
BLADE SHARPENING
KEEP THE BLADE SHARP FOR BEST MOWER
PERFORMANCE. A DULL BLADE DOES NOT
CUT GRASS CLEANLY OR MULCH PROPERLY.
WEAR PROPER EYE PROTECTION
WHILE REMOVING, SHARPENING,
AND INSTALLING BLADE. ENSURE
THAT SAFETY KEY IS REMOVED.
Sharpening the blade twice during a mowing
season is usually sufficient under normal
circumstances. Sand causes the blade to dull
quickly. If your lawn has sandy soil, more
frequent sharpening may be required.
REPLACE BENT OR DAMAGED
BLADE IMMEDIATELY.
WHEN SHARPENING THE BLADE:
1. Make sure blade remains balanced.
2. Sharpen the blade at the
original cutting angle.
Cordless self-propelled lawn mower
EN
17
3. Sharpen cutting edges on both ends of the
blade to keep it balanced, removing equal
amounts of material from both ends.
TO SHARPEN BLADE IN A VISE (See O)
1. Be sure the switch lever is released, the
blade has stopped and the safety key
removed before removing the blade.
2. Remove blade from mower.
See instructions for removing
and attaching blade.
3. Secure blade O-1 in a vise O-2.
4. Wear safety glasses and
heavy work gloves.
5. Carefully file the cutting edges
of the blade with a fine tooth file
O-3 or sharpening stone.
6. Check balance of blade. See
instructions for blade balancing.
7. Replace blade on mower and tighten
securely. Refer to instructions below.
18
BLADE BALANCING (See P)
Check balance of blade by placing
center hole in blade (P-1) over a nail
or screwdriver shank (P-2), clamped
horizontally in a vise (P-3). If either
end of the blade rotates downward, file
that end. Blade is properly balanced when
neither end drops and the blade stays level.
BLADE MAINTENANCE (See Q & R)
Replace your metal blade after 50 hours
mowing or 2 years, which ever is the
sooner-regardless of condition.
Follow these procedures to remove and
replace the blade. You will need garden
gloves (not provided) and a spanner wrench
(not provided) to remove the blade. Hold the
blade (R-2) and unscrew the blade nut (R-5)
counter-clockwise using a spanner wrench.
Remove blade nut (R-5), square washer (R-4),
insulator washer (R-3), and blade (R-2).
To re-assemble, first position the blade
with the cutting edges towards the
ground. Assemble the components.
Ensure that the edges of the insulator
washer hook over the edge of the blade.
Align the flats on the square washer
(R-4) with the flats on the shaft.
Then securely tighten the blade nut.
Note: If the blade and insulator
washer (R-3) are cracked or damaged,
replace with new ones.
STORAGE (See S)
Stop the mower and always remove
the safety key. Clean the exterior of the
machine thoroughly using a soft brush
and cloth. Do not use water, solvents or
polishes. Remove all grass and debris,
especially from the ventilation slots.
Turn the machine on its side and clean
the blade area. If grass cuttings are
compacted in the blade area, remove
with a wooden or plastic implement.
Store the mower in a dry place. Do not
place other objects on top of the mower.
To aid storage, press the handle
height adjustment knob, and fold
the upper handle forward.
TROUBLE SHOOTING
Problem
Solution
1. Mower doesn’t run
when switch lever is
activated.
A. Check to make sure safety key has been installed and is fully seated
and that button on switch housing is being completely pushed.
B. Release switch lever to turn mower off. Remove safety key, turn
mower over and check that blade is free to turn. Clear any obstruction.
If not free, return to an authorized servicer. Blade should turn freely.
C. Has battery been fully charged? Plug in charger and wait for green
light to come on.
Cordless self-propelled lawn mower
EN
Problem
Solution
2. Motor stops while
mowing.
A. Release switch lever to turn mower off. Remove safety key, turn
mower over and check that blade is free to turn. Clear any obstruction.
If not free, return to an authorized servicer. Blade should turn freely.
B. Raise cutting height of wheels to highest position and start mower.
C. Has battery been fully charged? Plug in charger and wait for green
light to come on.
D. Avoid overloading the mower. Slow down the cutting pace by
pushing mower slower or raise the cut height. Or both.
3. Mower runs but
cutting performance
is unsatisfactory, or
does not cut entire
lawn.
A. Has battery been fully charged? Plug in charger and wait for green
light to come on.”
B. Release switch lever to turn mower off. Remove safety key. Turn
mower over and check: Blade for sharpness - Keep blade sharp. Deck
and discharge chute for clogging.
C. Wheel height adjustment may be set too low for grass condition.
Raise cutting height.
4. Mower is too hard
to push.
A. Raise cutting height to reduce deck drag on grass. Check each wheel
for free rotation.
5. Mower is
abnormally noisy
and vibrates.
A. Release switch lever to turn mower off. Remove safety key. Turn
mower on side and check blade to ensure it has not been bent or
damaged. If blade is damaged, replace with a replacement blade. If
the underside of the deck is damaged return mower to a Authorized
service center.
B. If there is no visible damage to the blade and the mower still
vibrates: Release switch lever to turn mower off, remove safety key and
remove blade. Rotate blade 180 degrees and retighten. If mower still
vibrates, return the mower to an authorized service center.
6. Battery charger
LED’s not on.
A. Check plug connection.
B. Replace charger.
7. Battery charger
LED does not flip to
green.
A. Battery needs to be diagnosed. Take to authorized service center.
8. Mower not picking
up clippings with
bag.
A. Remove mulch plate when bagging.
B. Chute clogged. Release switch lever to turn mower off. Remove
safety key. Clear chute of grass clippings.
C. Too much cut grass. Raise cutting height of wheels to shorten length
of the cut.
D. Bag full. Empty bag more often.
9. When mulching
there are clippings
visible.
A. Too much cut grass. Raise cutting height of wheels to shorten length
of the cut. Do not cut off more than 1/3 of total length.
B. Check blade for sharpness. Always keep blade sharp.
10. Low or
diminished run-time
after many uses
A. Return to Authorized Service location - may need new battery.
Cordless self-propelled lawn mower
EN
19
Designed in Italy. Made in China
Conçu en Italie. Fabriqué en Chine
Diseñado en Italia. Fabricado en China
Copyright © 2010, Positec. All Rights Reserved.