1
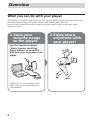
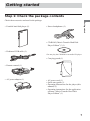
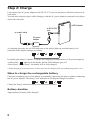
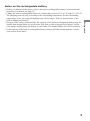
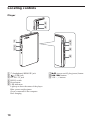
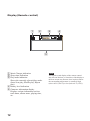
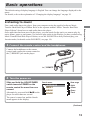
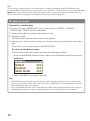
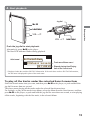
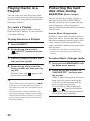
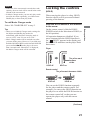
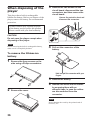
4-254-749-11(1)
The player
Portable Hard
Disk Player
Operating Instructions
HZ-WS2000
©2004 Sony Corporation
WARNING
To prevent fire or shock
hazard, do not expose the AC
power adaptor to rain or
moisture.
Do not install the AC power adaptor in a
confined space, such as a bookcase or
built-in cabinet.
To prevent fire, do not cover the AC power
adaptor with newspapers, table-cloths,
curtains, etc. And don’t place lighted candles
on the AC power adaptor.
To prevent fire or shock hazard, do not place
objects filled with liquids, such as vases, on
the AC power adaptor.
Certain countries may regulate disposal of
the battery used to power this product. Please
consult with your local authority.
The validity of the CE marking is restricted
to only those countries where it is legally
enforced, mainly in the countries EEA
(European Economic Area).
Before using this player, install
the application software on
your computer using the
supplied CD-ROM, and send
some music data to the player.
2
Table of Contents
B Adjusting the settings of the player
Overview
What you can do with your player ............. 4
Main features .............................................. 6
Getting started
Step 1: Check the package contents ........... 7
Step 2: Charge ............................................ 8
Locating controls ...................................... 10
Basic operations
Listening to music ....................................
1. Connect the remote control and the
headphones. ..........................................
2. Turn the power on. ................................
3. Select a track. .......................................
4. Start playback. ......................................
Using the FAVORITE ...............................
Playing tracks in a Playlist .......................
Protecting the hard disk drive during
exercise (Music Charger) .....................
Locking the controls (HOLD) ..................
Storing data other than audio files ............
13
13
13
14
15
18
20
20
21
22
B Sound options
Emphasizing the bass sound
(Bass Boost) ......................................... 23
Changing the sound quality (Equalizer) ... 23
Changing the display pattern ....................
Changing the backlight setting .................
Adjusting the display contrast ..................
Turning off the beep sound .......................
Starting playback from the last stopped
position (Resume) ...............................
Turning off the power automatically
(Auto Power Off) ..................................
Turning off the power after a specified
time (Sleep) ..........................................
Changing the display language .................
Initializing all settings in the menu ..........
Checking the hard disk usage ...................
Checking the firmware version .................
26
27
27
28
28
29
29
30
30
31
31
B Additional information
Setup menu items .....................................
Precautions ...............................................
Cleaning ....................................................
Notes on the power source .......................
When disposing of the player ...................
Troubleshooting ........................................
Messages ..................................................
Specifications ...........................................
Index .........................................................
32
34
35
35
36
37
40
41
42
B Various playback
Playing tracks repeatedly (Repeat play) ... 24
Playing tracks in random order
(Shuffle play) ........................................ 24
Playing the first portion of tracks in order
(Intro Scan play) ................................... 25
3
Overview
What you can do with your player
HZ-WS2000 is a portable hard disk player. You can play MP3 files sent to the player from your
personal computer using the supplied software and the dedicated USB cable.
Once you have stored your favorite songs in the player, take it with you and enjoy music
wherever you go!
1 Send your
favorite songs
to the player.
Use the supplied software
“Music Transfer Hard Disk
Player Edition” to send MP3
files from your computer to the
player.
Connect the AC power adaptor to the
player when connecting the player to
your computer.
4
2 Enjoy music
anywhere with
your player!
To disconnect the player from the computer
If your operating system is Windows XP, proceed as follows:
1 Double-click
on the task bar.
Overview
2 Click to select [USB Mass Storage Device], and then click [Stop].
3 Click to select [USB Mass Storage Device], and then click [OK].
4 Click [OK], and then disconnect the player from the computer.
For details, refer to the explanation on page 20 of the separate manual “Music Transfer Hard
Disk Player Edition.”
If your operating system is Windows 2000 or Windows Me, messages shown on the computer
display may differ from the above description. Follow the guidance of your operating system to
disconnect the player in a right way.
Notes
• First start your computer, and then connect the player to the computer. Before restarting your computer, you
should disconnect the player from the computer.
• The player may become hot in the following cases, but this is not a malfunction:
– while sending music files to the player which is connected to an wall outlet by the AC power adaptor
– while the player is being charged
5
Main features
• Compact, lightweight and highly portable
• Approximately 8 hours of continuous playback on a full battery charge
• Up to 375 audio files*1 can be stored in the player’s internal 1.5 GB*2 hard disk. You can also
use the player as an external hard disk drive for your computer to store a variety of data other
than audio files.
• MP3 files on your computer are sent to the player by simple and easy operations using the
supplied Music Transfer Hard Disk Player Edition software.
*1 For MP3 files encoded with 128 kbps, each having an average playing time of about four minutes. The
number of files varies according to the encoding bit rate and length (playing time) of MP3 files.
*2 The available capacity actually displayed will be less than 1.5 GB.
Notes
• Music you record is limited to private use only. Any other use requires the permission of the copyright
holders.
• Sony is not liable for failure in recording and damage to or erasure of recorded contents caused by
incomplete data transfer or data destruction due to problems with this product or your computer.
6
Getting started
Step 1: Check the package contents
Check the accessories enclosed in the package.
Getting started
• Portable hard disk player (1)
• Stereo headphones (1)
• CD-ROM (“Music Transfer Hard Disk
Player Edition”)* (1)
• Dedicated USB cable (1)
* Do not play the CD-ROM on an audio CD player.
• Carrying pouch (1)
• Remote control (1)
• AC power adaptor (1)
• AC power cord (1)
• Quick start guide (1)
• Operating Instructions for the player (this
manual) (1)
• Operating instructions for the application
software “Music Transfer Hard Disk
Player Edition” (1)
7
Step 2: Charge
First connect the AC power adaptor to the DC IN 5.2V jack on the player, and then connect to an
wall outlet.
You can start using the player while charging, with the AC power adaptor connected to the player
and to an wall outlet.
LED indicator
to DC IN 5.2V
jack
to an wall outlet
AC power
adaptor
As charging proceeds, the red LED indicator on the player lights up, and the battery level
indication in the display changes as follows:
It usually takes about 1.5 hours* to charge the completely drained battery to 80 percent capacity.
At this point, “
” appears in the display and the LED indicator goes off.
After about 1.5 more hours*, the battery will be fully charged.
* When charging at room temperature. It takes more time for charging if the surrounding temperature is low.
When to charge the rechargeable battery
Check the remaining power of the battery occasionally when using the player without connecting
the AC power adaptor. The battery level indication in the display changes as follows:
Charge the battery when the battery level indication becomes “
Battery duration
Approximately 8 hours (fully charged)
8
.”
Notes on the rechargeable battery
9
Getting started
• Before you dispose of the player, remove the built-in rechargeable battery for environmental
protection. For details, see page 36.
• Charge the built-in rechargeable battery at a temperature between 5°C (41°F) and 35°C (95°F).
The charging time will vary according to the surrounding temperature. (If the surrounding
temperature is low, the required charging time will be longer. This is a characteristic of the
built-in lithium-ion battery.)
• Because of the battery characteristics, the capacity of the built-in rechargeable battery may be
smaller than normal when it is used for the first time or after a long period of disuse. In this
case, charge and discharge the battery several times. The normal battery life will be restored.
• If the capacity of the built-in rechargeable battery drops to half the normal amount, consult
your nearest Aiwa dealer.
Locating controls
Player
4
5
1
2
3
6
7
8
9
1 i (headphones)/REMOTE jack
2
(USB) jack
3 DC IN 5.2V jack
4 HOLD switch
5 Reset button
6 LED indicators
Light up to show the status of the player.
Blue: power-on/play/pause
Green: connected to the computer
Red: charging
10
7 NX (power-on/off, play/pause) button
8 ., > buttons
9 VOL –, + buttons
Remote control
4
1 Display
2 Jog dial
Rotate to select.
5
2
6
Getting started
1
3
7
8
3 MENU/BACK button
4 i (headphones) jack
5 VOL –/+ lever
6 ./> lever
7 HOLD/POWER switch
8 FAVORITE button
Note
Push to enter.
Use only the supplied remote control. You cannot
operate this player with the remote control supplied
with other players.
11
Display (Remote control)
1
2
3
4
INTRO
SHUFFLE
5
1 Music Charger indication
2 Sleep timer indication
3 Play mode indication
Shows the currently selected play mode.
(Intro Scan play, Shuffle play, Repeat
play)
4 Battery level indication
5 Character information display
Displays various information such as
track name, album name, playing time,
etc.
12
Note
The liquid-crystal display of the remote control
may become unclear, or transition of the display to
the next screen may become slow in places where
the surrounding temperature is extremely high
(above 40°C (104°F)) or low (below 0°C (32°F)).
Basic operations
The default setting of display language is English. You can change the language displayed in the
menu.
For details, refer to the explanation of “Changing the display language” on page 30.
Listening to music
1. Connect the remote control and the headphones.
Connect the headphones to the remote
control, and connect the remote control to
the i/REMOTE jack on the player.
to i/REMOTE
2. Turn the power on.
Slide and hold the HOLD/POWER
switch towards POWER on the
remote control for more than one
second.
Alternatively, press and hold NX on the
player for more than one second.
The power is turned on, and the Search
menu appears in the display.
Search menu
NEWSONGS
ARTIST
ALBUM
GENRE
: New songs
: Artist
: Album
: Genre
: Track
(Continued)
13
Basic operations
First, send audio data to the player from your computer using the supplied software Music
Transfer Hard Disk Player Edition. Refer to the separate manual “Music Transfer Hard Disk
Player Edition” about how to send audio data to the player.
Once audio data has been stored in the player, you can search for the track you want to play by
artist, album, genre or track name. You can also play tracks in the Playlist you have created using
Music Transfer Hard Disk Player Edition, or use the FAVORITE to easily find and play your
favorite tracks (for details on the FAVORITE, see page 18).
Tip
You can use the resume function. Turn off the player by sliding and holding the HOLD/POWER switch
towards POWER for more than one second until you see “Good-bye” in the display or by pressing and holding
NX on the player with the resume function activated. When you turn on the player for the next time, the
player will be in the same status as immediately before being turned off (page 28).
3. Select a track.
Search for a track to play.
You can select from “NEWSONGS” (newly stored songs), “ARTIST,” “ALBUM,”
“GENRE” and “TRACK” in the Search menu.
1 Rotate the jog dial to select the menu item you want.
2 Push the jog dial.
The lower menu under the selected menu item appears.
3 Repeat steps 1 and 2 to narrow down your selection until you reach the track you want to
play.
To go back to the previous menu, press MENU/BACK.
To return to the Search menu
You can return to the initial Search menu by the following procedure:
1 Press and hold MENU/BACK for more than one second until the Setup menu appears.
Setup menu
SEARCH
REPEAT
SHUFFLE
INTRO SCAN
OFF
OFF
OFF
2 Select “SEARCH” and push the jog dial.
Tips
• “NEWSONGS” menu contains the tracks that were sent to the player the last time you connected the
player to your computer. These tracks will be left in the “NEWSONGS” menu until another new track
is sent to the player from your computer.
• Up to 39 alphanumerical characters can be displayed each for artist, album and track names; and up to
19 alphanumerical characters can be displayed for genre, if the track has ID3 TAG information.
14
4. Start playback.
Jog dial
NX
Basic operations
./>
VOL –/+
VOL –/+
./>
Push the jog dial to start playback.
Alternatively, press NX on the player.
The blue LED indicator flashes during playback.
Artist name*
Be Yourself Aiwa
01.M u s i c L o v e r s
03:11/05:23
Track name/Album name*
Elapsed playing time/Playing
time of the current track
* Displayed when the track has ID3 TAG information. If the track does not have ID3 TAG information,
the file name is displayed in place of the track name.
To play all the tracks under the selected Search menu item
Select the Search menu item you want, and then press NX on the player, or push and hold the
jog dial for more than one second.
The player starts playing all the tracks under the selected Search menu item.
For example, to play all the tracks in an album, select the album from the Search menu, and then
press NX on the player, or push and hold the jog dial for more than one second, to start playing
all the tracks, beginning with the first track, in the selected album.
15
Other operations
To
Go to the beginning of the next track
Go to the beginning of the current track
Go to the beginning of the preceding
tracks
Go to the beginning of the succeeding
tracks
Go backward or forward quickly
Adjust the volume*2
Pause playback
Turn off the player
Do this
Slide the ./> lever towards >
(press > on the player).
Slide the ./> lever towards .
(press . on the player).
Slide the ./> lever towards . repeatedly*1
(press . repeatedly on the player).
If you slide the ./> lever towards . (or press .
on the player) within two seconds from the beginning of the
track, play returns to the beginning of the preceding track,
not to the beginning of the current track.
Slide the ./> lever towards > repeatedly*1
(press > repeatedly on the player).
Slide and hold the ./> lever towards . or >
until you find the desired point
(press and hold . or > on the player).
Slide the VOL +/– lever towards + or –
(press VOL + or – on the player).
Push the jog dial (press NX on the player).
The blue LED indicator flashes rapidly.
Slide and hold the HOLD/POWER switch towards POWER
(or press and hold NX on the player) for more than one
second; “Good-bye” appears in the display, then the player
turns off.
Slide and hold the HOLD/POWER switch towards POWER
(or press and hold NX on the player) for more than four
seconds; “Shut down” appears in the display, then the player
turns off.*3
*1 It will be easier to play a desired track by using the Search menu rather than by sliding the ./> lever
a number of times (page 14).
*2 If you turn off the power with the volume level set to 16 or more, the volume level will automatically be set
to 15 next time you turn on the power.
*3 Only when operated on the rechargeable battery.
Tip
You can further reduce battery consumption if you slide and hold the HOLD/POWER switch towards POWER
(press and hold NX on the player) for more than 4 seconds until “Shut down” appears in the display. If you
turn off the player in this manner, however, it will take more time to start up the player next time you turn on
the player, and the resume function will be canceled.
If you turn off the player by sliding and holding the HOLD/POWER switch towards POWER (or pressing and
holding NX on the player) for more than one second until “Good-bye” appears in the display, the player
starts up more quickly and the resume function can be used. In this case, on the other hand, the battery duration
will be shorter than when you turn off the player by sliding and holding the HOLD/POWER switch (or
pressing and holding NX on the player) until you see “Shut down.”
16
If playback does not start
Check if the HOLD function is set to on (see page 21).
Tip
The LED indicators on the player flash as follows:
During play: Repeat turning on for about 0.3 second, and turning off for about 2.5 seconds
During pause: Repeat turning on for about one second, and turning off for about one second
Basic operations
17
Using the FAVORITE
To play a track in the
FAVORITE
Add the tracks you want to play frequently to
the FAVORITE, and you can find and play
those tracks easily using the FAVORITE.
1
2
To add a track to the
FAVORITE
1
2
Play the track you want, or select
the desired Search menu item.
If you select a menu item, all the tracks
in the menu item will be added to the
FAVORITE at one time.
Press FAVORITE, select “ENTER
FAVORITE,” and then push the jog
dial.
“ ENTERED !” appears in the display.
Tip
If you press and hold FAVORITE during playback,
the track currently playing enters in the
FAVORITE.
18
3
Press FAVORITE.
Rotate the jog dial to select
“ FAVORITE,” and then push the
jog dial.
Rotate the jog dial to select the
track you want to play, and then
push the jog dial.
Playback starts, and “ ” appears in the
display during playback.
Tip
To play all tracks in the FAVORITE, press NX on
the player or push and hold the jog dial for more
than one second after selecting “ FAVORITE” in
step 2.
To remove the currently
playing track from the
FAVORITE
1
2
2
3
4
5
2
Press FAVORITE.
Rotate the jog dial to select
“ERASE FAVORITE,” and then
push the jog dial.
The track is removed from the
FAVORITE.
To remove a selected track
from the FAVORITE
1
1
Press FAVORITE.
Rotate the jog dial to select
“ FAVORITE,” and then push the
jog dial.
3
4
Press and hold MENU/BACK until
the Setup menu appears.
Rotate the jog dial to select
“ERASE ALL FAVOR.,” and then
push the jog dial.
Rotate the jog dial to select “YES.”
Push the jog dial.
“ ERASED !” is displayed and all the
tracks are removed from the FAVORITE.
To cancel removing the tracks
Select “NO” in step 3.
Tip
Removing tracks from the FAVORITE does not
mean erasing those tracks from the player.
Rotate the jog dial to select the
track you want to remove.
Press FAVORITE.
Rotate the jog dial to select
“ERASE,” and then push the jog
dial.
“ ERASED !” is displayed and the
selected track is removed from the
FAVORITE.
19
Basic operations
3
Play the track you want to remove
from the FAVORITE.
To remove all the tracks from
the FAVORITE
Playing tracks in a
Playlist
You can create your own Playlist in which
you can arrange tracks of your choice in any
desired order by using Music Transfer Hard
Disk Player Edition.
To create a Playlist
See the separate manual “Music Transfer
Hard Disk Player Edition” for the procedure
of creating a Playlist.
To play tracks in a Playlist
1
2
3
4
Press FAVORITE.
Rotate the jog dial to select
“ PLAYLIST,” and then push the
jog dial.
Select the Playlist you want, and
then push the jog dial.
Rotate the jog dial to select the
track you want, and then push the
jog dial.
Playback starts, and “ ” appears in the
display during playback.
Tip
• To play all the tracks in the Playlist, press NX
on the player or push and hold the jog dial for
more than one second after selecting the Playlist
in step 3.
• You can edit (delete, change the name of, etc.)
your Playlist using the supplied software Music
Transfer Hard Disk Player Edition. For details,
see the separate manual “Music Transfer Hard
Disk Player Edition.”
20
Protecting the hard
disk drive during
exercise (Music Charger)
You can use the player during jogging or
other physical activities. Music Charger
function can effectively be used to prevent
sound skipping as well as unexpected
damage to the internal hard disk drive during
such activities.
How the Music Charger works
In Music Charger mode, the player retrieves
about four tracks* from the hard disk, stores
them in the temporary memory space called
cache, and plays only those tracks in the
cache repeatedly without accessing the hard
disk any more.
* For MP3 files encoded with 128 kbps, each
having an average playing time of about four
minutes
To enter Music Charger mode
1
2
Press and hold MENU/BACK until
the Setup menu appears.
Rotate the jog dial to select “M.
CHARGER OFF,” and then push
the jog dial.
It takes a while for the player to store as
many tracks as possible in the cache.
Tracks are stored beginning with the
track currently being played.
Then, the Music Charger indication
“ ” and “ ” appear in the display,
and the player starts playing the tracks
stored in the cache repeatedly.
Notes
• If the size of the current track exceeds the cache
capacity, the next track will be stored in the cache
instead of the current track.
• In Music Charger mode, you can only play tracks
stored in the cache repeatedly; you cannot enter
Shuffle play or Intro Scan play mode.
To exit Music Charger mode
Select “M. CHARGER ON” in step 2.
• When you exit Music Charger mode, settings for
the Repeat and Shuffle play modes are
maintained, while the Intro Scan play mode is
reset to “OFF,” even if it was set to “ON.”
• Music Charger mode will be retained even after
you turn off the power. However, if you slide and
hold the HOLD/POWER switch towards POWER
(press and hold NX on the player) for more
than 4 seconds until “Shut down” is displayed,
the Music Charger mode will be canceled.
(HOLD)
When carrying the player in a bag, HOLD
function can be used to prevent accidental
pressing of the buttons.
Slide the HOLD switch in the direction
to the arrow.
On the remote control, slide the HOLD/
POWER switch in the direction to HOLD (to
the left position).
All operation buttons are disabled. If you
press a button while the HOLD function is
on, “
HOLD” appears in the display and
the three LED indicators on the player flash
three times.
Player
HOLD
HOLD
HOLD off
The yellow mark
becomes
visible.
HOLD on
Remote control
The yellow mark becomes visible.
HOLD
POWER
HOLD off
HOLD
POWER
HOLD on
You can set the HOLD function separately
for the player and the remote control. For
example, you can set the HOLD function on
the player to on while the HOLD function on
the remote control off, so that you can
operate the player only with the remote
control.
(Continued)
21
Basic operations
Tips
Locking the controls
To release the HOLD function
Slide the HOLD switch in the direction
opposite to the arrow.
On the remote control, slide the HOLD/
POWER switch in the direction opposite to
HOLD (to the center position).
Storing data other
than audio files
You can store data on your computer to the
player’s built-in hard disk using Windows
Explorer. The player is displayed in
Windows Explorer as an external drive (for
example: as the D drive).
Notes
• You cannot operate Music Transfer Hard Disk
Player Edition at the same time when using the
files stored in the player by the data storage
function of the player.
If you try to operate Music Transfer Hard Disk
Player Edition while using those files in the
player, the error message “Cannot access the
Device/media.” will be displayed.
• Connect the AC power adaptor to the player when
connecting the player to your computer.
• If you initialize the player’s built-in hard disk, all
music files as well as information necessary for
the player to function as a music player are
erased.
22
B Sound options
Emphasizing the bass
sound (Bass Boost)
Changing the sound
quality (Equalizer)
1
Press and hold MENU/BACK until
the Setup menu appears.
You can select from the following equalizer
settings to obtain the sound quality that best
suits your taste.
Rotate the jog dial to select
“BASS BOOST.”
Setting
NORMAL
ROCK
Push the jog dial repeatedly to
select “BASS BOOST ON.”
POP
2
3
To cancel the bass boost
Select “BASS BOOST OFF” in step 3.
JAZZ
1
2
3
Press and hold MENU/BACK until
the Setup menu appears.
Rotate the jog dial to select
“EQUALIZER.”
Push the jog dial repeatedly to
select the desired sound quality.
To return to the original screen
Press MENU/BACK.
23
Sound options
To return to the original screen
Press MENU/BACK.
Sound quality
normal sound
powerful, clean sounds,
emphasizing low and high range
audio
light, bright sounds, emphasizing
high and middle range audio
percussive sounds, making the
bass and cymbal sound more
distinct
B Various playback
You can select the following playback
options from the Setup menu.
• Playing tracks repeatedly (Repeat
play)
• Playing tracks in random order
(Shuffle play)
• Playing the first portion of tracks in
order (Intro Scan play)
Playing tracks in
random order (Shuffle play)
You can play all the tracks under the selected
menu item in random order.
1
2
Playing tracks
repeatedly (Repeat play)
There are two types of Repeat play mode:
Setting
REPEAT TRACK
REPEAT ALL
Repeat play mode
Plays the current track
repeatedly.
Plays all the tracks under
the selected menu item
repeatedly.
3
Press and hold MENU/BACK until
the Setup menu appears.
Rotate the jog dial repeatedly to
select “SHUFFLE.”
Push the jog dial to select
“SHUFFLE ON.”
To return to the original screen
Press MENU/BACK.
To return to normal play mode
Select “SHUFFLE OFF” in step 3.
Note
1
2
3
Press and hold MENU/BACK until
the Setup menu appears.
Rotate the jog dial to select
“REPEAT.”
Push the jog dial repeatedly to
select “REPEAT TRACK” or
“REPEAT ALL.”
To return to the original screen
Press MENU/BACK.
To return to normal play mode
Select “REPEAT OFF” in step 3.
24
During Shuffle play, you cannot go back to the
beginning of the preceding track.
Playing the first
portion of tracks in
order (Intro Scan play)
Only the first 10 seconds of tracks are played
in order. It is convenient when searching for
a track by listening to the sound.
1
2
Rotate the jog dial to select
“INTRO SCAN.”
Push the jog dial repeatedly to
select “INTRO SCAN ON.”
Various playback
3
Press and hold MENU/BACK until
the Setup menu appears.
To return to the original screen
Press MENU/BACK.
To return to normal play mode
Select “INTRO SCAN OFF” in step 3.
You can also return to normal play mode by
pressing NX or push the jog lever on the
remote control during the Intro Scan play.
25
B Adjusting the settings of the player
Changing the display
pattern
1
2
3
Press and hold MENU/BACK until
the Setup menu appears.
Track number/Number of tracks under the
selected menu item
Track
02 / 04
128 kbps
03:11/05:23
Rotate the jog dial to select
“DISPLAY MODE.”
Bit rate
Push the jog dial repeatedly to
select “DISPLAY MODE 1” or
“DISPLAY MODE 2.”
DISPLAY MODE 1
Artist name Track name*1/Album name
Be Yourself Aiwa
01.M u s i c L o v e r s
03:11/05:23
Elapsed playing time/Playing
time of the current track*2
: New songs
: Artist
: Album
: Genre
: Track
: Favorite
: Playlist
26
DISPLAY MODE 2
Elapsed playing time/Playing
time of the current track*2
*1 If the track does not have ID3 TAG
information, the file name is displayed in
place of the track name.
*2 May not be displayed correctly depending
on the track being played, or
“– – : – – / – – : – –” may be displayed during
playback of a track recorded in variable bit
rate (VBR).
To return to the original screen
Press MENU/BACK.
Changing the
backlight setting
Adjusting the display
contrast
Setting
OFF
ON
1
1
2
3
Backlight
Always off
Turns on for 10 seconds after each
operation.
Press and hold MENU/BACK until
the Setup menu appears.
2
3
Rotate the jog dial to select
“BACKLIGHT.”
4
Rotate the jog dial to select
“CONTRAST,” and then push the
jog dial.
Rotate the jog dial to select the
contrast from “CONTRAST 0” to
“CONTRAST 7.”
Push the jog dial.
Adjusting the settings of the player
Push the jog dial repeatedly to
select “BACKLIGHT ON” or
“BACKLIGHT OFF.”
Press and hold MENU/BACK until
the Setup menu appears.
To return to the original screen
Press MENU/BACK.
To return to the original screen
Press MENU/BACK.
27
Turning off the beep
sound
You can turn off the beep sound of the
player.
1
2
3
Press and hold MENU/BACK until
the Setup menu appears.
Rotate the jog dial to select
“BEEP.”
Push the jog dial repeatedly to
select “BEEP OFF.”
To return to the original screen
Press MENU/BACK.
To turn on the beep sound
Select “BEEP ON” in step 3.
Tip
Even when the beep sound is set to off, if you slide
and hold the HOLD/POWER switch towards
POWER (press and hold NX on the player) for
more than four seconds (until “Shut down” is
displayed) to turn off the player, a beep will sound
the next time you turn on the player.
28
Starting playback
from the last stopped
position (Resume)
You can start playback from the position
where you stopped playback last time.
1
2
3
Press and hold MENU/BACK until
the Setup menu appears.
Rotate the jog dial to select
“RESUME.”
Push the jog dial repeatedly to
select “RESUME ON.”
To return to the original screen
Press MENU/BACK.
To cancel the resume function
Select “RESUME OFF” in step 3.
Note
The resume function will be canceled if you turn
off the player by sliding and holding the HOLD/
POWER switch towards POWER (or pressing and
holding NX on the player) for more than four
seconds until you see “Shut down” in the display.
Turning off the power
automatically
Turning off the power
after a specified time
(Auto Power Off)
(Sleep)
You can set the player to turn off
automatically if nothing has been operated
for 180 seconds during pause or after
playback finished (with Repeat play mode
off).
You can set the player to turn off
automatically after a certain period of time.
The time length can be specified between 5
and 120 minutes at 5 minutes step.
1
2
3
1
Press and hold MENU/BACK until
the Setup menu appears.
2
Rotate the jog dial to select “AUTO
PWR OFF.”
3
Rotate the jog dial to select
“SLEEP,” and then push the jog
dial.
Rotate the jog dial to specify the
time length until the player is
turned off.
To return to the original screen
Press MENU/BACK.
4
To cancel the auto power off function
Select “AUTO PWR OFF OFF” in step 3.
To return to the original screen
Press MENU/BACK.
After you exit the menu, the sleep timer
indication “ ” appears in the display.
Note
When the player is connected to your computer, the
player will not be turned off automatically even if
the auto power off function is set to on.
Push the jog dial.
To cancel the sleep timer function
Select “SLEEP OFF” in step 3, or turn off
the player.
29
Adjusting the settings of the player
Push the jog dial repeatedly to
select “AUTO PWR OFF ON.”
Press and hold MENU/BACK until
the Setup menu appears.
Changing the display
language
Initializing all settings
in the menu
You can change the language displayed in the
menu.
You can change all the settings in the menu
back to those at the time of purchase.
1
2
3
4
Press and hold MENU/BACK until
the Setup menu appears.
Rotate the jog dial to select
“LANGUAGE,” and then push the
jog dial.
Rotate the jog dial to select the
language you want.
Note
This operation does not erase any data stored in the
player. To erase audio files sent to the player, use
the supplied software Music Transfer Hard Disk
Player Edition.
1
2
Push the jog dial.
To return to the original screen
Press MENU/BACK.
3
4
Press and hold MENU/BACK until
the Setup menu appears.
Rotate the jog dial to select
“INITIAL SETTING,” and then push
the jog dial.
Rotate the jog dial to select “YES.”
Push the jog dial.
“INITIALIZED !” is displayed and all
the settings in the menu are initialized.
The Search menu appears in the display.
To cancel initializing
Select “NO” in step 3.
Note
If you initialized the setting in the menu, the
display language is reset to English.
Using the display language other than English, go
to step 3 in “Changing the display language” to
select it.
30
Checking the hard
disk usage
Checking the firmware
version
You can check the free space of the player’s
built-in hard disk.
1
1
2
Press and hold MENU/BACK until
the Setup menu appears.
Rotate the jog dial to select “HDD
INFORMATION,” and then push the
jog dial.
The free space of the hard disk is
displayed.
2
Press and hold MENU/BACK until
the Setup menu appears.
Rotate the jog dial to select
“FIRMWARE VERSION,” and then
push the jog dial.
The firmware version is displayed.
To return to the original screen
Press MENU/BACK repeatedly.
(Example)
Free space/Total amount
Adjusting the settings of the player
194 / 1350 MB
289 TRACKS
Total number of MP3
files
To return to the original screen
Press MENU/BACK repeatedly.
31
B Additional information
Setup menu items
You can change the player’s various settings by using the Setup menu.
To enter the menu, press and hold MENU/BACK until the Setup menu appears.
To return to the previous menu screen or to cancel the setting operation, press
MENU/BACK.
Items marked z are default settings.
Selecting playback mode (page)
Search for a track by artist, album, etc.(14)
Playing tracks repeatedly (24)
Playing tracks in random order (24)
Playing the first portion of tracks in order (25)
Setting the sound (page)
Emphasizing the bass sound (23)
Changing the sound quality (23)
32
Menu 1
SEARCH
z REPEAT OFF
REPEAT TRACK
REPEAT ALL
z SHUFFLE OFF
SHUFFLE ON
z INTRO SCAN OFF
INTRO SCAN ON
, Menu 2
NEWSONGS
ARTIST
ALBUM
GENRE
TRACK
—
—
Menu 1
, Menu 2
z BASS BOOST OFF
—
BASS BOOST ON
z EQUALIZER NORMAL
—
EQUALIZER ROCK
EQUALIZER POP
EQUALIZER JAZZ
Setting various functions (page)
Changing the display pattern (26)
Changing the backlight setting (27)
Adjusting the display contrast (27)
Turning off the beep sound (28)
Starting playback from the last stopped
position (28)
Turning off the power automatically (29)
Turning off the power after a specified
time (29)
z BEEP ON
BEEP OFF
z RESUME ON
RESUME OFF
z AUTO PWR OFF ON
AUTO PWR OFF OFF
SLEEP
z M. CHARGER OFF
M. CHARGER ON
LANGUAGE
Removing all the tracks from the
FAVORITE (18)
Initializing all settings in the menu (30)
ERASE ALL FAVOR.
INITIAL SETTING
Checking the hard disk usage (31)
HDD INFORMATION
Checking the firmware version (31)
FIRMWARE VERSION
, Menu 2
—
—
CONTRAST 0
CONTRAST 1
CONTRAST 2
z CONTRAST 3
CONTRAST 4
CONTRAST 5
CONTRAST 6
CONTRAST 7
—
—
—
z OFF
..
.
120
—
z ENGLISH
DEUTSCH
ESPAÑOL
FRANÇAIS
ITALIANO
РУССКИЙ
YES
z NO
YES
z NO
XXX / XXX MB
XXX TRACKS
VER X.XX
33
Additional information
Protecting the hard disk drive during
exercise (20)
Changing the display language (30)
Menu 1
z DISPLAY MODE 1
DISPLAY MODE 2
z BACKLIGHT ON
BACKLIGHT OFF
CONTRAST
Precautions
General
• Never use your player where it will be
subjected to extremes of light, temperature,
moisture or vibration.
• Never wrap your player in anything when
it is being used with the AC power adaptor.
Heat build-up in the player may cause
malfunction or damage.
• Do not pull the cords of the remote control
and the headphones forcibly.
• Do not put a hard object together with the
player into the carrying pouch. Doing so
will damage the finish of the player.
On heat build-up
Heat may build up in the player while
charging the built-in rechargeable battery or
if the player is used for an extended period of
time. This, however, is not a malfunction.
On mechanical noise
The player gives off mechanical noise while
operating, which is caused by the powersaving system of the player and it is not a
problem.
Notes on built-in hard disk
The built-in hard disk is formatted using the
FAT32 file system.
If you format the built-in hard disk using the
file system other than FAT32, the firmware
can be recovered but the player does not
operate normally. It is not recommended to
use the quick format method.
For details, refer to the separate manual
“Music Transfer Hard Disk Player Edition.”
Headphones
Road Safety
Do not use headphones while driving,
cycling, or operating any motorized vehicle.
It may create a traffic hazard and is illegal in
many areas. It can also be potentially
dangerous to play your player at a high
volume while walking, especially at
pedestrian crossings. You should exercise
extreme caution or discontinue use in
potentially hazardous situations.
Preventing hearing damage
Avoid using the headphones at a high
volume. Hearing experts advise against
continuous, loud and extended play. If you
experience a ringing in your ears, reduce the
volume or discontinue use.
On remote control
The remote control supplied with the player
is dedicated to the player only. You cannot
operate the player with a remote control
supplied with another player.
On USB cable
Be sure to use the USB cable supplied with
the player. Other USB cables may have
connectors in different shapes and cannot be
inserted to the player, or may cause a
malfunction. When the supplied USB cable
is damaged or lost, consult your nearest Aiwa
dealer.
34
Consideration for others
Keep the volume at a moderate level. This
will allow you to hear outside sounds and to
be considerate to the people around you.
Warning
If there is lightning when you are using your
player, take off the headphones immediately.
In case of failure of this player, consult your
Aiwa dealer without opening the casing.
Cleaning
Clean your player’s casing with a soft cloth
slightly moistened with water or a mild
detergent solution.
Note
Do not use any type of abrasive pad, scouring
powder or solvent such as alcohol or benzene as it
may mar the finish of the casing.
Cleaning the headphone plug
If the headphone plug is dirty, it may cause
noise or sound skipping. To ensure good
sound quality, clean the headphone plug
periodically with a soft, dry cloth.
Notes on the power
source
• Use only the AC power adaptor supplied.
Do not use any other AC power adaptor. It
may cause a malfunction.
Polarity of the plug
35
Additional information
• Do not touch the AC power adaptor with
wet hands.
• Connect the AC power adaptor to an easily
accessible wall outlet. Should you notice
an abnormality in the AC power adaptor,
disconnect it from the wall outlet
immediately.
• The player is not disconnected from the
AC power source (mains) as long as it is
connected to the wall outlet, even if the
player itself has been turned off.
• If you are not going to use the player for a
long time, be sure to disconnect the power
supply. To remove the AC power adaptor
from the wall outlet, grasp the adaptor
plug; never pull the cord.
• The AC power adaptor and the AC power
cord supplied with the player are dedicated
to the player. Do not connect them to a
device other than this player; doing so may
cause fire or shock hazard.
When disposing of the
player
3
This player has a built-in rechargeable
lithium-ion battery. Before you dispose of the
player, remove the battery for environmental
protection.
Certain countries may regulate disposal
of the battery used to power this product.
Please consult with your local authority.
CAUTION
Do not open the player except when
disposing of the player.
Note
Before removing the built-in rechargeable battery,
make sure it is completely drained.
Remove the two screws on the
circuit board, disconnect the two
connectors, and then remove the
circuit board.
Uncover the protective sheet and
disconnect the connectors.
1
2
4
Pull out the connector of the
battery.
To remove the lithium-ion
battery
1
Remove the three screws on the
side using a Philips screwdriver.
Hold and pull the connector with your
fingers.
5
6
2
Remove the cover.
Remove the battery.
Insulate the black and red cables
by wrapping them with an
adhesive tape, in case the cables
are disconnected from the
connector.
Note
Do not damage the cords by the pointed ends of
tweezers, etc.
36
Troubleshooting
If you experience any of the following difficulties while using your player, use this
troubleshooting guide to help you to remedy the problem. Should any problem persist, consult
your nearest Aiwa dealer.
For trouble concerning operations while connected to your computer, also refer to
“Troubleshooting” in the separate manual “Music Transfer Hard Disk Player Edition.”
Step 1: Check the symptoms in this “Troubleshooting” section.
Refer to the corresponding section in the following pages.
m
Step 2: Check the symptoms on the Aiwa official website.
Visit the local website of the region you live from the Aiwa global website
(http://www.aiwa.com/).
You can find updated support information about this product, frequently asked
questions and answers.
Additional information
m
Step 3: If the problem cannot be solved after checking the above
references
Consult your nearest Aiwa dealer.
(Continued)
37
Operation
Symptom
There is no sound.
Cause/Remedy
c The volume level is set to zero.
Increase the volume (page 16).
c The headphone plug is not fully connected.
Connect the headphone plug fully.
c The headphone plug is dirty.
Clean the headphone plug with a soft dry cloth.
c The audio data sent to the player has been destructed.
Send the audio data using Music Transfer Hard Disk Player Edition
again.
The buttons do not work.
c The HOLD function is set to on.
Release the HOLD function (page 21).
c The player contains moisture condensation.
Let your player sit for a few hours at room temperature.
c The built-in rechargeable battery is exhausted.
Charge the rechargeable battery (page 8).
The volume will not
c The HOLD function is set to on.
increase.
Release the HOLD function (page 21).
The sound is distorted, or
c The bit rate used when encoding the MP3 files was low.
there is noise in the playback
Send MP3 files encoded with a higher bit rate to the player.
sound.
c The Bass Boost function is turned on.
Turn off the Bass Boost function (page 23).
c The audio data itself contains noise.
Noise may have been introduced when creating audio data due to
the conditions of the computer. Check the source files you sent to
the player on your computer.
Playback stops suddenly.
c The built-in rechargeable battery is exhausted.
Charge the rechargeable battery (page 8).
c The player was turned off by the sleep timer function.
To continue playback, turn on the power.
c The ID3 TAG information for the track is written in the language
Erroneous display, or some
that is not supported by the player.
characters do not appear in
c User-created characters and some special characters may not be
the display.
displayed.
c The player is not functioning normally.
Reset the player (page 39).
c Music Charger function is activated.
The player does not play all
Exit from Music Charger mode (page 21).
the tracks stored in the player.
The three LED indicators flash c The HOLD function is set to on.
Release the HOLD function (page 21).
repeatedly.
c An AC power adaptor other than the supplied one is used.
Use only the AC power adaptor supplied with the player.
c The player is not functioning normally.
Disconnect the AC power adaptor from the player, turn off the
power, and then turn on the power again.
38
Built-in rechargeable battery
Symptom
Cause/Remedy
Battery life is short.
c The operating temperature is below 0°C (32°F).
Battery life becomes shorter in cold temperatures due to battery
characteristics. This is not a malfunction.
Other
Symptom
Cause/Remedy
The player gets warm.
c The player gets warm if it is used for an extended period of time,
when the USB cable is connected, or during charging the battery.
This is not a malfunction.
To reset the player
If your player does not operate normally, or if an error message such as “System file not found”
or “Track Error” appears repeatedly in the display, press the reset button on the rear of the player
with a pointed tool to reset the player.
If the problem is not solved even after you reset the player, connect the player to your computer,
erase all the tracks in the player using Music Transfer Hard Disk Player Edition, and then send
audio files to the player again.
Additional information
If this operation still does not solve the problem, perform the firmware recovery procedure
described in the separate manual “Music Transfer Hard Disk Player Edition.”
Note
Any data stored in the player will not be erased by pressing the reset button.
39
Messages
Message
Meaning
Remedy
Cannot Boot Trouble occurred within the Turn off the player and turn it back on again. Reset
hard disk, and the player
the player.
cannot start.
If the problem persists, consult your nearest Aiwa
dealer.
System file The system file required for Reset the player.
not found
normal operation has been If the problem persists, perform the firmware
erased or destroyed.
recovery procedure. For details, refer to the separate
manual “Music Transfer Hard Disk Player Edition.”
The player is connected to
This is not an error, but you cannot operate the player
USB
your computer using the
connected
while the player is connected to the computer.
USB cable.
An AC power adaptor other Use the supplied AC power adaptor.
Wrong
voltage
than the supplied one is
If the message still appears, disconnect the AC power
used.
adaptor from the AC outlet and consult your nearest
Aiwa dealer.
A 501st track was
The maximum number of tracks that can be entered
Favorite is
attempted to be added to
full
in the FAVORITE is 500. Remove unwanted tracks
the FAVORITE.
from the FAVORITE, and then add new tracks to the
FAVORITE.
No audio file has been sent Send music files from your computer to the player
No tracks
found
to the player.
using the supplied software “Music Transfer Hard
Disk Player Edition.”
Track Error An error occurred while the Turn off the player and turn it back on again. Reset
player was reading audio
the player.
files on its hard disk; thus
If the problem persists, perform the firmware
the player cannot play.
recovery procedure. For details, refer to the separate
manual “Music Transfer Hard Disk Player Edition.”
No playable There is no audio file
Send music files from your computer to the player
track exist
stored in the player.
using the supplied software “Music Transfer Hard
Disk Player Edition.”
A track already in the
You need not add the track to the FAVORITE.
Already
exists
FAVORITE has been
If you want to add the track again, remove it from the
attempted to be added to
FAVORITE, and then add it newly.
the FAVORITE again.
Charge the battery.
Low battery The built-in rechargeable
battery has been exhausted.
No Play List • No Playlist has been
Create a Playlist using the supplied software “Music
created.
Transfer Hard Disk Player Edition.” Add tracks to the
Found
• No track has been added
FAVORITE.
to the FAVORITE.
HOLD
The HOLD function is
Release the HOLD function (page 21).
activated.
An unavailable button has
Operate the player correctly.
Invalid
operation
been pressed.
40
Specifications
Supported audio file format
MP3 Bit rates: 32 - 320 kbps, VBR
Sampling frequencies:
16/22.05/24/32/44.1/48 kHz
Supported ID3 TAG versions:
1.0/1.1/2.2/2.3/2.4
Output
Headphones: Stereo mini-jack
Maximum power output
Headphones:
Approx. 6 mW + Approx. 6 mW (32 Ω)
(Approx. 2.7 mW + Approx. 2.7 mW (32 Ω))*
* For the customers in Europe except United
Kingdom.
Signal-to-noise ratio (S/N)
80 dB or more (DIN AUDIO)
Operating temperature
0°C - 40°C (32°F - 104°F)
Additional information
Power source
AC power adaptor (DC IN 5.2V jack):
100 - 240 V, 50/60 Hz
Battery life
Approx. 8 hours (fully charged)
Dimensions
Approx. 56 × 91 × 10.6 mm
(2 1/4 × 3 5/8 × 7/16 in.)
(w/h/d, excluding projecting parts)
Approx. 57.4 × 91 × 11.4 mm
(2 3/8 × 3 5/8 × 15/32 in.)
(w/h/d, including projecting parts)
Mass
Approx. 68 g (2.4 oz) (without accessories)
Accessories
See page 7.
Design and specifications are subject to change
without notice.
41
Index
J, K
Jog dial 11
A, B
Bass Boost 23
Battery (rechargeable) 8
Battery level indication 8
Charge 8
Remove 36
Beep 28
C
Changing the display language 30
Connection
AC power adaptor 8
Headphones 13
D
Display 12
Backlight 27
Contrast 27
Display pattern 26
E
Equalizer 23
F
FAVORITE 18
Firmware version 31
H
Hard disk
Protecting 20
Checking the usage 31
I
ID3 TAG 14, 15
Initializing 30
Intro Scan play 25
42
L
Listening to music 13
Locking the controls (HOLD) 21
M, N, O
MP3 4
Music Charger 20
Music Transfer Hard Disk Player Edition 4
P, Q
Playlist 20
Power
Auto power off 29
Turn off 16
Turn on 13
R
Repeat play 24
Reset 39
Resume 28
S
Search menu 13
Selecting a track 14
Setup menu 14
Shuffle play 24
Sleep 29
T, U
Troubleshooting 37
V
Volume 16
W
Windows Explorer 22
http://www.aiwa.com/
Sony Corporation Printed in Korea