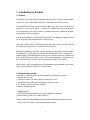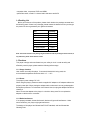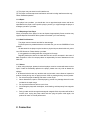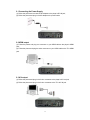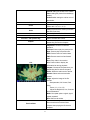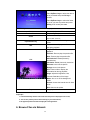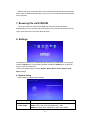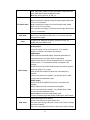
1
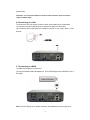
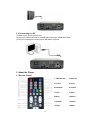
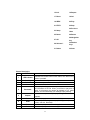
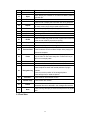
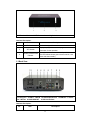
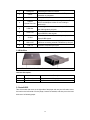
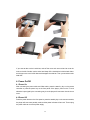
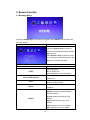
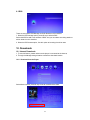
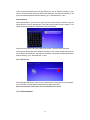
1080P High Definition
3.5" HDD Network Multimedia Player
H5
User Manual
www.eaget.cz
1
1. Introduction of Product
1.1 Preface
The EAGET H5 is a high definition multimedia player with NAS, wired & wireless network,
online video, internet radio, RSS news BT&PT downloading and DVB-T functions.
You can watch movies in the highest resolution(1080P) and in all common formats on your
television or home cinema system – including the corresponding multi-channel sound
(DTS, Dolby Digital). You can also watch your vacation pictures as a slideshow and listen
to your favorite music by this player.
It supports both MPEG2 & newer MPEG4 H.264 DVB-T and DMB-TH broadcast, enable
you to enjoy high quality digital television in every country;
With HDMI, YPbPr, SPDIF and Composite audio/video output ports, it provides you with
the most useful connections to TV, projector, audio system, etc.
By some simple settings, this player can be integrated into your network, either by LAN or
WLAN(optional). This will allow you to stream all multimedia files from you computers or
network storage. With USB hosts and card slot, you can also connect your portable hard
drives, USB flash drives or memory cards. We have also integrated the most popular BT
&PT download function for you to search and download movies on the Internet.
User friendly UI, easy to operate and all functions& settings are accessible by the remote
control. It will be a perfect match to your home theater!
1.2 System Requirements
To use the H5 multimedia player, please make sure the following requirements:
·Computer Requirements
1. A linking computer if you want to play or browse files on LAN.
2. Windows XP SP2 or Windows Vista operating system or above.
3. The frequency of CPU at 2.0 GHz or above.
4. Memory: 256 MB or above.
·TV Requirements
1. Support SD (standard definition) or HD (high definition) input signals.
2. With at least one input port of HDMI, YPbPr, AV.
·Need to install the Windows Media Player application software(with UPnP function) on
your computer if you want to use the LAN playback functions.
2
·Wi-Fi wireless network functions require an external USB Wi-Fi adaptor complies with
802.11n standard, and wireless network environment in your home.
1.3 Main Functions
Media Playback Functions
·Support almost all the video audio and image file formats and support 1080p high
definition video decoding;
·Support source decoding output and high definition audio, including DTS, Dolby 7.1
channel;
·Support BDMV, DVD ISO file playback, and support Blu-ray embedded subtitles and
gapless playback;
·Support subtitle adjusting including subtitle body color, subtitle outline line, size, position,
time offset, support plug-in subtitle and manual subtitle adding;
·Support photo slide show with background music, support picture zoom in/out, parallel
move and rotation;
·Support synchronized lyrics display when playing music.
·Support playback by NFS, SMB server.
Please refer to Chapter 15 for detailed media formats supported.
Network Functions
· It is can be served as a home use network storage server (NAS server, network-attached
storage server);
· Support fluent high definition playback through wireless network and support a variety of
wireless transmission ways comply with 802.11b n/g;
· Support SMB and NFS, enable to share the files in LAN with Windows and Linux system,
support automatic search and manual adding for SMB and NFS servers in LAN.
·Support BT, PT and eMule downloading, support FTP server function.
·Powerful online playback functions, including YouTube, RSS news, internet radio and so
on;
File Management Functions
Support files copy, delete, rename and other operations.
DVB-T Funxtions
With external USB tuner, H5 supports DVB-T and DMB-TH, it also supports terrestrial
digital television HD signals and EPG(Electronic Program Guide)
External Interfaces
·USB 3.0 Data Port (for computer connection);
·USB HOST x 2 (for USB storage devices connection);
·eSATA data port, for connection to external devices with ESATA port, but not for
connecting computers;
3
·composite video, component YPbPr and HDMI;
·optical fiber audio, coaxial 5.1 channel audio and stereo audio R/L
1.4 Packing List
Before you make use of the product, please check whether the package contents have
the following parts. If there is any shortage, please contact the dealer from who you bought
the product in time to guarantee your rights and interests.
Item
Quantity
H5 player
1 piece
HDMI cable
1 piece
A/V cable
1 piece
USB data cable
1 piece
remote control
1 piece
AA batteries
2 pieces
AC power adapter
1 piece
user manual
1 piece
Note: The actual contents in the package might be different from the packing list in this manual, if
any difference, please check with the vendor.
1.5 Cautions
This player’s design and manufacture has your safety in mind. In order to safely and
effectively use this player, please read the following before usage.
1.5.1 Usage Cautions
User should not modify this player. If commercial hard disk is being used, the
environmental temperature should be within +5 ~ +35 .
1.5.2 Power
The player’s power voltage: DC 12V.
When using this player, please connect the supplied AC adapter or AC adapter cable to the
player’s power jack. When placing the adapter cable, make sure it can not get damaged or
be subject to pressure. To reduce the risk of electric shock, unplug the adapter first before
cleaning it.
Never connect the adapter to the player in a humid or dusty area. Do not replace the
adapter or cable’s wire or connector.
1.5.3 Radio Interference
If not properly shielded, almost all electronic devices will get radio interference. Under
some conditions, your player might get interference.
The design of this player has followed the FCC/CE standard, and has followed the
following rules:
4
(1) This player may not cause harmful interference;
(2) This player could accept some interference received including interference that may
cause undesired operation.
1.5.4 Repair
If the player has a problem, you should take it to an appointed repair center and let the
specialists do the repair, never repair the player yourself, you might damage the player or
endanger yourself or your data.
1.5.5 Disposing of the Player
When you dispose of the player, be sure to dispose it appropriately. Some countries may
regulate disposal of electrical device, please consult with your local authority.
1.5.6 Hard Disk Cautions
The player uses an internal hard disk for data storage.
Physical impact may create bad sector in the hard disk, you can use CHKDSK to fix the
problem.
All data stored in the player may be lost due to physical impact, electrical shock, power
lost, HDD format etc. Please backup your data.
It is suggested to do defragment after a long period of usage.
Regularly backup the data in the hard disk so that it can be recovered in the event of
data corruption or loss. Our company takes no responsibility for loss of data stored on the
hard disk.
1.5.7 Others
1. When using this player, please do not let the player come into contact with water or other
liquid, if water is accidentally spilled on the player, please use a dry cloth to absorb the
spillage.
2. All electronics device are very sensitive and may be brittle, never vibrate or impact this
product violently during use, nor apply too much force on pressing the keys on this product.
² Do not let the player contacting with water or other liquid.
² Never disassemble, repair or refit this player by yourself. Any damage done will not be
included in the repair range.
² Do not press the buttons with too much force.
² Avoid hitting the player with hard object, avoid shaking, and keep away from magnetic
fields.
² During in static and the strong electromagnetic magnetic field, the product will be fail to
function, then unplug the power cable and then plug the power cable again, the
product will return to normal performance.
2. Connection
5
2.1 Connecting the Power Supply
(1) Follow the picture and connect the AC adaptor to the player’s DC IN jack;
(2) Follow the picture and plug in the AC adaptor to the power outlet.
2.2 HDMI output
(1) Follow the picture and plug one connector on your HDMI cable to the player’s HDMI
jack;
(2) Follow the picture and plug the other connector on your HDMI cable to the TV’s HDMI
jack.
2.3 A/V output
(1) Follow the picture and plug in the 3 color connector to the player’s A/V out jack;
(2) Follow the picture and plug in the 3 color connector to the TV’s A/V IN jack.
6
2.4 Y/Pb/Pr Component output
(1) Follow the picture and plug in the one connector to the player’s Y/Pb/Pr jack;
(2) Follow the picture and plug in the 3 color connector to the TV’s Y/Pb/Pr jack.
Helpful tips: As only the video signals and no audio signals are outputted in Y/PB/PR mode,
So please make audio output when using Y/PB/PR mode.
First method: use the audio output from the A/V OUT jack;
Second method: use the audio output from the SPDIF Coaxial or Optical jack.
2.5 Digital audio output
(1) Follow the picture and connect one end of coaxial/optical fiber cable to the coaxial
/optical fiber output port of this product(Not included in the Accessories)
(2) Follow the picture and connect the other end of coaxial/optical fiber cable to the coaxial
/optical fiber input port of corresponding power amplifier.(Not included in the Accessories)
(coaxial)
7
(optical fiber)
Helpful tips: To use the power amplifier to output the audio information, please set output in
settings as SPDIF output”.
2.6 Connecting to a LAN
To connect to a LAN you require a router or switch (Not included in the Accessories).
(1) Connect one of the crystal plugs on the cable to the player’s RJ45 socket;
(2) Connect the other crystal plug on the cable to LAN port on your router, switch, or hub
devices.
2.7 Connecting to a WAN
(1) Make sure the player is powered on;
(2) Plug the Wireless LAN USB Adapter (i.e. Wi-Fi USB Dongle) to the USB HOST port of
the player.
Note: The Wi-Fi Dongle is an optional accessory sold separately. And only support as
8
following:
Network chip Network type
RALINK3072
RTL 8191SU
NW360
RTL 8188SU
NW336
RTL 8188SU
NW338
RTL 8191SU
NW336
RTL 8191SU
Awu66N
RTL 8192SU
NW362
Helpful tips: the Wireless Network Card for USB is an optional and not all wireless Network cards
sold on the market can be used for this player. Please consult with the sales when you wish to
make the best use of this product.
2.8 Connecting to a USB Device
(Include: U-Disk, removable HDD, USB DVD ROM ect.)
(1) Make sure the player is powered on;
(2) Plug in the USB stick or USB HDD etc. to the USB HOST port of this player.
2.9 Connecting with eSATA removable storage devices (Not connecting with
computer)
(1) Connect one of the ESATA port on the cable to the player’s ESATA port;
(2) Connect the other ESATA port on the cable to ESATA port on the removable storage
devices.
9
2.10 Connecting to a PC
(1) Make sure the player is powered on;
(2) Plug in the squares connector of the USB cable to this player’s USB DEVICE port;
(3) Plug in the rectangular connector of the USB cable to computer.
3. About the Player
3.1 Remote Control
10
1. LED Indicator
2.Stand by
3.TV SYS
4.Home
5.Bookmark
6.Chapter
7.Zoom
8.Scale
9.Music
10.Moive
11.Subtitle
12.Audio
13.Eject
14.Mute
15.Info
16.Repeat
17.Photo
18.Ctrl
19.SEEK
20.Play
21.FF/FR
22.Stop
23.Setup
24.Previous
/Next
25.Pause
26.Return
27.OK
28.Navigation
key
29.Volume+/-
30.Number
keys
31.Delete
32.Goto
Button Description:
NO.
KEYS
FUNCTION
1
LED Indicator
2
3
4
Stand by
TV SYS
Home
5
Bookmark
6
Chapter
7
Zoom
8
Scale
9
Music
Zoom the image(zoom ratio:-3,-2,-1,0,1,2,3)
Press to adjust the image when play backing movie.(full
screen, real size, Standard).
Press it to rapidly enter into music applications.
10
Movie
Press it to rapidly enter into movie applications.
Indicates the remote control’s work status, LED blinks if any
bottom is pressed.
Press to enter standby mode or wake up.
Switch the output mode into video signals.
Return to the Main Interface.
Stop to play backing, press this key the system will be record
the information of the file. When you access to play back it
again, it will prompt you resume to playback or no. select
resume, the file will be keep your settings to play backing.
Choose the chaptes when you playbacking the file with the
chapters.
11
11
12
Subtitle
Audio
13
Eject
When Playing the contents of an USB DVD ROM, press to
eject the disc.
14
Mute
Turn on/off the sound.
15
Info
Press to hide or display the information bar during playback.
16
Repeat
Press to set the repeat mode.movie:(single repeat,repeat
all,close); music:(single,single repeat,repeat all,rand)
17
Photo
Press it to rapidly enter into photo applications.
18
Ctrl
19
20
Seek
Play
21
FF/FR
22
Stop
Press it to stop the media file being played at present.
23
Setup
Press it to rapidly enter into Setting Applications.
24
Previous/Next
Press to set subtitle options.
Press to select an audio track.
Press to bring up the File Manager toolbar.
Press to goes forward or backward by certain time.
Press it to play the current media file.
Press it in media play mode for FR/FF. Press PLAY to resume
to the normal mode.FF( X2,X4,X8, X16) FR()
Press to select the previous/Next file;
Press to select the Previous/Next Chapter when playing the
file has the chapters.
Press it during play to pause state and then press it once to
25
Pause
play the video in next frame every time. Press PLAY key to
return to normal play state.
26
Return
Return to the superior diretory and exit from play state.
27
Ok
Press to confirm current operation.
Press the navigation keys to operate the interface menu.
Press to adjust the sizes and vertical positions of plug-in
subtitles;
Press to move the position of the enlarged picture.
Press left/right key to rotate the picture.
28
Navigation key
29
Volume+/-
30
Number keys
31
Delete
Delete the character which input in the visual keyboard.
Delete the files which selected in the management interface.
32
Goto
Press it during video play to select a time period to be played
back.
Press to add or decrease the volume.
Press to enter the numeric.
3.2 Front View
12
1. IR Receiver Window
2.VFD Screen 3. stand by Switch
Interface Description:
No.
Item
Description
1
IR Receiver
Receive the signal from remote control.
2
VFD Screen
display the playback status and progress and other
information for the operation.
3
Stand by Switch& work
indicator
Press the bottom to enter into standby mode;
The LED indicate shows green when turned on, and
shows red when standby.
3.3 Back View
1. Colling Fan 2.eSATA 3.DC-IN 4.Coaxial/Optical Fiber 5.HDMI Out 6.YPbPr
Out 7.AV Out 8.LAN/USB HOST 9.USB 3.0 Interface
Interface Description:
No.
Item
Description
13
1
Colling Fan
Exhausting the heat from internal.
2
eSATA
Connect with an external device with eSATA port, not for
connection to computers
3
DC-IN
Power input: DC 12V.
4
Coaxial/
Optical Fiber Out
5
HDMI Out
Connecting to the video device and output HDMI audio
and video signals by this jack.
6
YPbPr Out
Connect to audio and video device by this jack, and
output PR/PB/Y video signals.
7
AV Out
Connect to audio and video device by this jack, and
output CVBS signals.
8
LAN/
USB HOST
9
USB 3.0
SPDIF Coaxial/Optical fiber output digital audio. (The
SPDIF coaxial/optical cables are not including in
attachment).
LAN: Connect to wire network by LAN jack
USB host: connecting external USB device by this jack.
Connect to computer by this jack.
3.4 Side View
1. Hard Drive Shield
2. Hard Drive Slot
Interface Description:
No.
Item
Description
1
Hard Drive Cover
Plug in Internal HDD by this jack.
2
Hard Drive Slot
To hold a internal 3.5” SATA hard drive
3.5 Install HDD
Take off the hard disk cover on the right side of the player and use your left hand to move
the hook on the left inside of for the player, insert the hard disk, and then put on the hard
disk cover. As following steps:
14
If you want to take out the hard driver, take off the cover and use one hand to move the
hook on the left of inside, use the other hand keep off the hard disk to hold the hard disk to
avoid it pop out to much to fall down and damage the hard driver. Then you can take out the
hard disk.
4. Power On/Off
4.1 Power On
After connecting the power cable and Video cable, press the stand by key on the remote
controller or press the power key on the front panel of the player, power on the TV and
select the input signal by the connecting way, then the player will soon enter into the home
menu.
4.2 Power Off
Press the power button on the front panel or press the standby key on the remote controller,
the player will soon enter standby mode, and the power indicator will turn red. Then unplug
the power cable to cut off the power supply.
15
5. Browse Function
5.1 Browsing Movie
Press the Left/Right keys on the remote controller to select MOVIE from the main menu
above the screen;
Browsing Movie
Instructions of Operations
Press the Up/Down keys to select the
device to be previewed and press the OK
key to access;
Press Up/Down keys to select the folder
or movie to be browsed and press the Ok
key to the full screen plan state.
The following buttons can be used to control video playback:
Pause and Ok key
Pause to playback the file.
FF/FR
FR: unsupported
FF: X2,X4,X8, X16,
Press repeatedly to select the speed.
Seek and left/right key
Press to goes forward or backward by
certain time.
Goto
Press it during video play to select a time
period to be played back.
Repeat
Set repeat options: single, single repeat,
repeat all.
Select and set the subtitle options.
Subtitle: Choose the subtitle between
different subtitles.
Encode: setting the encoding of the
subtitle.
Subtitle
Adjust: Adjust the time sync of the
subtitle.
Color: setting the color of the subtitle.
Size: setting the size of the subtitle.
16
Vertical: setting the vertical of the subtitle.
Place: setting the place of the subtitle(top,
bottom)
Outline color: setting the outline color of
the subtitle.
Audio
Press to select an audio track.
Zoom
Zoom in the image.
(Zoom ratio: 1,2,3,0,-1,-2,-3)
Scale
Setting the scale of the viewer.(full screen,
standard, Real size)
Info
View the information of the file.
Mute
Turn on/off the sound.
Volume+/- and up/down key
Add or decrease the volume.
Choose the chaptes when the
playbacking file with the chapters.
Chapter
Play/Pause Pause or continuous
playback.
Previous:Press to play the previous file.
Next: Press to play the previous file.
REV: Press to enter into rewind state.
FWD: Press to enter into fast forward
state.
Slow: Play video in slow motion.
Info: Press to hide or display the
information bar during playback.
Chapter: Choose the chaptes when you
playbacking the file with the chapters.
Audio: Select the audio track of the file.
Subtitle: Select and set the subtitle
options.
Ctrl
Image: adjust the image of the file.
Include:
Scale(standard, full Screen, Real
Size);
Zoom(-3,-2,-1,0,1,2,3)
Adjust the Brightness, Hue, Contrast
and the Saturation.
Mode: Set repeat options: signal, signal
repeat, repeat all.
Exit: Hide the ctrl toolbar.
Press to select the previous/Next file;
Press to select the Previous /Next
Previous/Next
Chapter when playing the file has the
chapters.
17
Stop playback the file.
Stop
5.1.1 Add a Plug in Subtitles
1. Download the subtitles which you need on the website;
2. Put the subtitle file to the same directory with the movie file;
3. Rename the subtitle. Keep the name is same as the movie file.
When playing the movie file, press the subtitle on the remote controller you will be able to
select the appropriate subtitle to display.
Helpful tips:
1.In case of messy codes displayed during playing some subtitle files, press Subtitle key to call out the
Subtitle menu and modify the corresponding character set codes and it will display normally;
2. In case of no audio output during playing some movies, switch the AUDIO to other channels and if it still
fails, please try to decode by power amplification; (Please refer to 2.5 Digital audio outputs; and refer to
7.1 system setting-Audio output).
3. All supported movie files will be displayed in this application.
5.2 Browsing Music
Press the Left/Right keys on the remote controller to select MUSIC from the main menu
above the screen.
Browsing Music
Instructions of Operations
Press Up/Down keys to select the device
to be previewed and press Ok key to
access;
Press Up/Down keys to select the folder
or music you want to preview and press
Ok key to play state.
When you are playing the music file, then
come into this interface, it will display as a
now playing item, select it and press ok
will rapidly enter into current playbacking
location.
The following buttons can be used to control music playback.
Pause and Ok key
Pause to playback the file.
18
Press to goes forward or backward by
certain time.
Seek and left/right key
Up/Down key
Add or decrease volume when playback
file.
Select the Previous/Next file in preview
interface.
Previous/Next
Play backing the previous or next file.
Set the repeat mode when playing music
file.
Repeat
Mute
Turn on/off the sound.
Volume+/- and up/down key
Add or decrease volume.
Play/Pause: Pause or continuous
playback.
Previous: Press to play the previous file.
Next: Press to play the previous file.
Stop: Stop to playback file.
Lyrics: Display or close the lyrics.
Ctrl
Play list: unsupported.
Mode: select the repeat mode of the
music file.
Exit: Hide the ctrl toolbar.
Stop
Stop playback the file.
Helpful tips:
1. The music support background play backing, when you play the music file, you can turn to other
interface and do other operations. But do not play backing the movie; it will be stop to playing music.
2. This player support show lyrics when playing music, you can add a lyrics file by yourself. The way is
same as the 5.1.1 add a plug in subtitles.
3. In this application, the player will display all supported music files.
5.3 Browsing Photos
Press the Left/Right keys on the remote controller to select photo from the main menu
above the screen;
Browsing Photos
Instructions of Operations
19
Press Up/Down keys to select the device
to be previewed and press Ok key to
access;
Press Up/Down keys to select the folder
or music you want to preview and press
Ok key to full screen plan state.
The following buttons can be used to control video playback.
Pause
Pause to playback the file.
Previous/Next
Play backing the previous or next file.
Zoom in or out the pictures. zoom ratio:
2X 4X 8X 16X fit
Zoom
Adjust the volume of the background
music.
Up and down key
Press to hide or display the information
bar during playback.
Info
Play/Pause: Pause or continuous
playback.
Previous: Press to play the previous file.
Next: Press to play the previous file.
Anticlockwise: Rotate pictures by
anticlockwise.
Clockwise: Rotate pictures by clockwise.
Decrease: zoom out the picture.
Enlarge: zoom in the picture.
Info: Press to hide or display the
information bar during playback.
Image: adjust the brightness, Hue,
Ctrl
Contrast, Saturation of the image.
Music: turn on or off the background
music.
Interval: choose the interval time for slide
show.
Exit: Hide the ctrl toolbar.
Stop
Stop playback the file.
Helpful tips:
1. It will automatically start the slide mode when the picture is displayed in full screen;
2. You can also preview pictures when listening to your favorite music;
3. All supported picture files will be displayed in this application.
6. Browse Files via Network
20
Select movie music or pictures option on the main interface and enter into the secondary
menu, there is a Network Browser option, and you can via here to browse the files shared
on the computer.
7. Browsing File via DVD ROM
When you connect an external DVD ROM, the system will be find the device
automatically, then you can enter into the secondary menu of the movie, Music and photo
option on the main menu to find the device and play.
8. Settings
The Setup menu allows you to personalize and configure the preferences for your player.
Press the Setup button on the remote controller or select the Settings icon on the main
menu to enter into setup menu.
There are six Setup options, including System, Movie, Music, Photo, Network, and
Share settings.
8.1 System Setting
Use this menu to configure audio settings.
Video Settings
Video output
Instructions of Operations
Select output resolution:
YPbPr: 1080i, 720p, 576i (Compatible PAL), 480i.
HDMI:Auto,1080p 60HZ,1080P 59HZ,1080P 50HZ,1080P
21
30HZ,1080p 24Hz,1080p 23.976Hz,1080i 60HZ,1080i 50HZ,720p
60HZ,720P 50HZ,576i(Compatible PAL),480i.
AV:NTSC_M,PAL_BG, PAL_M, PAL_N.
TV Aspect Ratio
Select TV Aspect Ratio:
16:9: Compress the image to convert the whole image. Select when
a 16:9 TV is connected.
16:10: Compress the image to convert the whole image. Select
when a 16:10 TV is connected.
4:3: Compress the image to convert the whole image. Select when
a 4:3 TV is connected.
OSD Scale
To adjust the display area and position, press ok to enter. Use the
direction keys to adjust the OSD scale, + is the center and white
rectangle is the border.
Color
To adjust color settings of the player, press OK to enter: full
RGB(0-255),Limit RGB(16-235).
To adjust audio output settings of the player, press OK to enter.
Analog output:
2-channel Analog: can be connected to the TV or amplifier.
Analog 5.1 Channel: connected to the amplifier.
HDMI Output:
HDMI audio to automatically detect: automatic identification of
connected devices, the output signal corresponding.
HDMI LPCM 2-channel: can be connected to the TV or amplifier.
HDMI LPCM 5.1/7.1 multichannel decode: connected to the
amplifier.
Audio output
AC3/DTS source+DTS-HD/TrueHD decode: connections amplifier,
decode to LPCM 5.1/7.1 output.
HDMI AC3/DTS/TrueHD/DTS-HD source: connected to the
amplifier.
Custom: connected to the amplifier, can manually set the audio
format of the source/decoder output.
SPDIF Output:
SPDIF AC3/DTS/TrueHD/DTS-HD source: connected to the
amplifier.
SPDIF LPCM 2-channel: connected to the amplifier.
Custom: connected to the amplifier, can manually set the audio
format of the source/decoder output.
Audio channel: choose the audio output mode.
You can choose among Analog output, HDMI output, SPDIF output.
Auto mode
Setting auto playing when starting.
Normal: Enter main menu when system start.
Play video: Auto playing video files in “auto movie” folder in storage
device when starting.
Play music: Auto playing music files in “auto music” folder in storage
22
device when starting.
Play photo: Auto playing photo files in “auto photo” folder in storage
device when starting.
Play music and photo: Auto playing files in “auto music” and “auto
photo” folder in storage device when starting.
Language
Update software
System info
Reset
To change display language, press ok to setting.
Software updates and views the current software version.
More detail update method please sees the Chapter 12.
To see the system information.
Select to restore factory defaults.
8.2 Movie Setting
Movie setting
Instructions of Operations
Select movie play
Set the repeat mode of movie play(single, single repeat, repeat all)
Blue-ray Disc auto
Turn on/off blue-ray disc auto play mode.
Movie file list ty
Adjust the movie file list ty mode, you can choose from list and cover
art.
8.3 Music Setting
Music setting
Select music play
mode
Instructions of Operations
Set the repeat mode of music play (Single, Single repeat, Repeat all,
Rand).
23
8.4 Photo Setting
Select time per slide on this interface: 3s, 5s, 10s, and 15s.
8.5 Changing Network Settings
8.5.1 Configure Ethernet
Auto obtain IP
You can get IP settings assigned automatically if your network supports, otherwise, you
need to configure it manually.
MANUAL IP Seeting
Select to manually input the IP Address, Subnet Mask, Default Gateway, and DNS Server
IP Address. In case of any questions about the settings, please go to the network
administrator for help.
8.5.2 Configure Wireless
Select the network card working status is open.
1. Select manage wireless network configuration and press ok key to access to the next
step.
2. Create new configuration file.
Select create new configuration file and press ok key to access to, then input wireless
network ID on the interface.
24
Select wireless password type to input the password, if it is no password here, select no
password to configure. Then the system will prompt wireless network configuration
successfully.
Return to the manage wireless network configuration interface, Choose the wireless ID,
you can edit or delete it.
3. Through the network card working mode-connect to wireless network.Choose the
wireless ID which you configured and press ok key to next step.
25
Input the password as the encryption method of the router. If there is no password of the
router, select no password and connect. When the connecting is successful, you will get an
IP address, if it is failed, you need to return and try it again.
You can also through select connect to new wireless network to find a wireless ID to
connect. If there is no wireless ID here you need. Please return and try it again.
8.6 Sharing
8.6.1 Connect to NFS server (only support on Linux system)
The list will show the connected NFS servers. When there is a NFS server on the LAN, you
may add it to the player's play list for user’s access.
1. Configuration of the PC
e.g. Access the Downloads folder on computer through the player.
Tap Applications-System Tools-Terminal to open the terminal tool. Input the command
as shown below, and press Ok complete.
After input was completed, it will bring up a blank dialog box; input the command as shown
below then click save and close the dialog box.
26
Turn back to the root dialog box, input the following command and press enter to executing
the command.
After executed the command, the configuration of the computer was completed.
2. Configuration of the Player
Add NFS server
NFS Host IP: Computer’s IP address which shared the files.
Folder Name: the shared file’s name.
Alias (optional): the share name of the shared files.
The NFS servers which was added the success will be appeared in the secondary menu of
27
the movie, music and pictures on the main menu, you can access and browse the files
which you shared on the computer.
In Settings-Share-connect to the NFS server, the NFS server which you added will
displaying on this interface, press Ok key, and you can modify or delete it.
8.6.2 Connect to the SMB Server
The list will show the connected SMB servers. When there is a SMB server on the LAN,
you may add it to the player's play list for user’s access.
1. Configuration of the PC
A. Share a file on computer and set access permissions for this folder, it needs read
permissions at least.
B. Tap the view your windows firewall settings and close the windows firewall.
C. Diagnose the SMB server.
Tap Start-Run, then input \\IP on computer or input \\the name of computer.
Then the Downloads folder which you shared will be appeared on the interface as following
picture, you can access to it and it is means that the SMB server was configured correct.
28
2. Configuration of the player.
Select Settings-Share-connect SMB server to add SMB server.
SMB Host IP: Computer’s IP address which shared the files.
Folder Name: the shared file’s name.
Username: the user name of the computer.
Password: the password of the name.
Alias (optional): the share name of the shared files.
The SMB server which was added the success will be appeared in the secondary menu of
the movie, music and photo options on the main menu as following picture, you can select
and access to browse.
29
In Settings-Share-connect SMB server, the SMB server which you add will displaying on
this interface, press Ok key, you can modify or delete it.
8.6.3 Connect to the UPNP Server
To achieve this function, first you need to install the related UPNP media server. Then
share the files to the H5-definition by this UPNP media server. e.g.: using the Windows
Media Player11 on windows xp to share the files.
After Window Media Play 11 has been installed, the steps of starting UPNP can be found
in the following:
1).Start Window Media Play 11 and select library-> media sharing.
2). Select settings on this interface and Select Allow new devices and computer
automatically (not recommended) item. The system will found the UPNP device on the
network automatically.
30
Select allow to making the device (the H5 HD player) is customized.
3). Select library->add to library.
4).On Add to library-Add to add the share files.
31
Then the UPNP server configures on computer is completed.
Note: you need to close the windows firewall, or you will not achieve the function of
the media file sharing.
2. Browsing the media files you shared on the computer.
H5 will automatically search the UPNP media server and the UPNP servers which were
added the success will appear in the secondary menu of the movie, music and photo
options on the main menu as following picture, you can select and access to browse.
8.6.4 Set the UPNP sharing
The player can be served as a UPNP server for network’s other UPNP devices to access to,
32
you can choose to on or off the service. When you use for this feature,
You need to go to system-file manager-storage location to select the share device first,
after sharing, other UPNP devices can visit these shared resources.
E.g.: Access to the player by the computer.
1) Tap My Computer-Management-Services and Applications-Services to find the
Universal plug and play Device Host service and start it.
2) Right click UPNP service and select Properties, set the startup type as Automatic.
33
If there is an UPNP device on the network, the system will automatically detect it.
8.6.5 Set the SMB sharing
The player can be used as SMB server and for other devices on the network to access, you
can choose to on or off the service. When you use for this feature, you need to go to
system-file manager-storage location to select the share device first.
When the SMB feature is on, it will prompt that the SAMBA server is running at the interface,
the access address, username and the password for client are also prompt at the interface.
34
Input the address as following on the address bar on the computer.
Address: \\AHHHA
Username: root
Password: smb123
Then you will be able to access to the shared device of the player.
35
Through my computer-tools-map network driver options to maping the shared device as a
driver on the computer.then you can access it rapidly on here.
36
8.6.6 Set the FTP sharing
The player can be used as FTP server and for other devices on the network to access, you
can choose to on or off the service.
When you use for this feature, you need to go to system-file manager-storage location to
select the share device first.
When the FTP feature is on, it will prompt that the FTP server is running at the interface,
the access address, username and the password for client are also prompt at the interface.
37
Input the address as following on the address bar on the computer.
Address: ftp: //the IP of the hdplayer
Username: hdplayer
Password: ftp123
Then you will be able to access to the shared device of the player.
38
8.6.7 Set the NFS Sharing (Used in the Linux System)
The player can be used as NFS server and for other devices on the network to access, you
can choose to on or off the service.
When you use this feature, you need to go to system-file manager-storage location to
select the shared device first.
When the NFS feature in on, it will prompt that the NFS server is running at the interface,
and the access address is also prompt at the interface.
Configuration of the PC
Create a new folder in the Linux system, such as a folder named share.
Tap applications-System Tools-Terminal to open Linux terminal tool.
As the prompts, type the command as following on the terminal tool box,.
Then the content of the shared device will be displayed in the share folder.then you can
access and browsing them.
9. IMS
39
Press left/right keys on the remote control, select Online application from the main
interface and press the OK key to enter.
These are three options YouTube, Internet Radio and RSS for your choose.
Note: some of the online content may vary with the software update.
9.1 YouTube
When the player was connected to the network, then you can connect to the YouTube
website to obtain the resources and browsing. Press OK key to see all contents of the
class.
This feature maybe unavailable in mainland of China.
9.2 Internet Radio
40
When the player is connected to the network, press ok key to see all contents of the class,
select the ratio station which you like and press OK key to listen to. When you listen to the
internet radio station, the following keys are valid:
Item
Description
Ok key
Press to play backing the ratio station.
During playback, Press to pause or continue play backing.
Return
Press to return to the upper menu.
Up/down key
Ctrl
Adjust the volume.
Play/pause: Pause or restart play backing, the internet radio is
real time play backing, when you restart to play, It will no longer
be playing from the paused.
Previous: Playback the previous ratio station.
Next: Playback the next ratio station.
Stop: stop the playback.
Lyrics: Not supported.
Playlist: Not supported.
Exit: Hidden the ctrl toolbar.
The internet radio support background play backing, when you play the Internet radio
station, you can exit the ratio play backing interface to do other operations. E.g. browsing
pictures, but do not play backing the movie and music.
When the internet radio station is playing, there will be a now playing option on the
secondary menu of the internet ratio station. Select it and press ok will rapidly enter into
current playbacking location.
41
9.3 RSS
There are two options RSS Manage and RSS Browse on this interface.
1. Select the RSS manage option; press Ok key to edit the RSS.
Select Add RSS to add a new address of RSS. And you can select an existing station to
edit or delete it on this interface.
2. Select the RSS browse option; Use this option to browsing the online news.
10. Downloads
10.1 Internet Downloads
1. To use this feature, please make sure the player is connected to the Internet;
2. Through the Manage-storage location to select the download location.
10.1.1 Download from the Player.
Select Movie-Internet, press Ok key to see all contents of the class.
42
There are three download resources (as different file size or different formats) for your
choose. Select and press Ok key to add the download task, after add it successfully, it will
prompt as add the download task successfully, go to “download task” in view.
Internet Search
Select Movie-Search, press Ok key enter into the internet search interface; input the
keywords of the movie on the keyboard. Then select go and press Ok key to search it. The
player will find and display the related resources automatically.
Select the found resource and press OK key to access, There are three download
resources (as different file size or different formats) for your choose. Select and press Ok
key to add the download task, after add it successfully, it will prompt as add the download
task successfully, go to “download task” in view.
10.1.2 Add Torrent
Select Manage-Add Torrent, press ok key to add torrent file. When there is a sign appear
on the interface, it means that the task have been added successful.
Note: the torrent files need to put in the root dictionary of the device.
10.1.3 Download Speed
43
Setting the download speed on this interface, Please input 1-999 to set the fastest speed,0
means the speed is random. But the speed limit only to internet downloads effectively.
10.1.4 Download Task
Select Manage-Download task, the download task of the player will be shown as a list
on this interface.
The player can adjust the download speed automatically, if the download task is timeout,
the task will stop to download, and new download task will start automatically.
When the download task is completed, it will be automatically cleared, and you can
access to storage location to view the downloaded files.
For the download task, you can Start/Stop and delete it. But only the stopped the
download tasks can be deleted.
10.2 The Third Party Download
Select Manage-third party download, there are three applications on this interface:
Transmission, MLdonkey, www.3322.org DDNS
44
10.2.1 www.3322.org DynamicDNS
Login on the www.3322.org DDNS website, and register a user on the website.
After registration, login on and register a new DDNS address for your own.
After register, Input the information on the player as the prompt:
45
User name: the user name you register on the www.3322.org website.
Password: the password you register on the www.3322.org website.
Host Name: the DDNS address you register on the www.3322.org website.
If there is no DDNS option on you router to set, you can through here to set the
DDNS address and used it in the WAN.
10.2.2 Transmission PT download
Download the Transmission terminal remote tool
from the website and is install it
on the computer.
Through manage-third party download to select the transmission service and open the
service on the player.
It will be prompt that the transmission open on the interface and the access address,
username and the password are also prompt on the interface.
There are three version of the transmission service (1.76, 1.93, and 2.04) for the player,
you can choose any of them to use.
Select the user name and password on the interface to change the username and the
password.
1. Use Download Function in the LAN
Method 1:
As the prompt, input the http://player’s IP: 9091 on the address bar of the computer. Then
input the username and the password. After login, then you can access to the device which
you shared.
46
E.g.: the player’s IP is 192.168.0.187, Input http://192.168.0.187:9091 on the address bar
of the computer.
The default user name is: admin
The default password is: admin
Input the username and the password to the next step.
Tap open to add the torrent files. Then the added task will be downloading
automatically.
Method 2:
1) Through start-program to open the transmission remote tool.
47
Select options-local settings or click the icon
on the interface to pop up local setting
dialogue box.
Host: player’s IP address. Eg: 192.168.0.187,
Port: 9091
After settled, tap the save and connect to the next step.
2) Add the BT or PT torrent files.
Tap the icon
to add the torrent file, after added, it will be download automatically.
2. Use Download Function in the WAN
1) Router settings
A, virtual server setting,
Setting the IP address and the port as following picture.after setup was completed click
save to save the settings. Then the router will be restart.
48
B, Dynamic DNS Settings:
Register a DDNS address on the website, e.g.: register on www.oray.cn, Input the host
name and the password as the following and click save to save the settings.
You can also register it on another website, as register on www.3322.org. It is depend
on your router supported. If you have already set ok on www.3322.org dynamicDNS of
player as mentioned on chapter 10.2.1. This step can be omitted.
2) When the router is set ok, turn on the transmission remote tool, and enter the DDNS
address and the port number on the dialog box as following picture. Then clicks save to
connection. Then you can add a torrent file to download.
49
Then you will be able to view and manage the downloaded content by logging on your
DDNS address as jianrong929.gicp.net.
10.2.3 MLDonkey
Through manage-third party download to select the MLDonkey service and open it.
When the MLDonkey feature is on, it will prompt that the MLDonkey services and the
access address, default user and the default password are also prompt in the interface.
And you can select recovery default to default the settings for this application.
As the prompt, input the http://player’s IP: 4080 on the address bar of the computer.
Then input the username and the password. After login, you will be access into the main
menu of the MLDonkey application.
E.g.: The player’s IP is 192.168.0.187, Input http://192.168.0.187:9091 on the address
bar of the computer.
50
User Name: admin
download.
Password: admin. Then will come into the main menu of MLDonkey
1. Transfers
View the download task on this interface.
51
2. Search
You can search for the resources which you need to download on this interface. Enter
the key words and click search begin to search. You can search it by name, extension or
another ways.
All related resources will be displayed on search result interface, select the file and click;
52
the download task will be started.
3. Servers
All the servers are displayed on this interface.
4. Statistics
53
Viewing the flow statistics of download and upload on this interface.
5. Options
Configure the parameters of MLDonkey on this interface.
6. help+
View the help command on this interface.
54
7. DL
On this interface you can input the resource links to add resources download.
1. Click the DL option; it will pop up a dialogue box to enter the user name and password.
2. Input the resources links and clicking input to add the task. And you can add multiple
tasks to download at the same time.
55
The seeds which you added successful will be prompted as added link to shown on the
below interface and it will beginning download. Then you can access to the transfers
interface to view the download task.
You can also through enter a download link to add the download task on dialog box as
shown below, then click input to start download the files.
56
11. File Management
All the devices and the contents will be displayed on this interface; you can choose to
browse them and use the left and right key to select the storage devices, the information of
the device will be displayed on this interface.
Press the ctrl key on the remote control to bring up the File Manager toolbar. Press the
left key to select/cancel file or folder, use the right key to select disk again.
11.1 Copy Files
E.g.: copy the file from my USB01 to My disk 4.
1 Select the source files.
57
Move the cursor to the file which you want to copy and press left key to select, the file
which you select will displayed as tick in front of the file.
Use the right key to select or cancel select the file or the folder, you can select the file or
folder as one or more at one time.
2. Selected the designation device.
Press the return key or the up key to return and use the navigation key to select the
destination device My disk 4.
3. Use the ctrl toolbar
After selected the destination device, press the ctrl key on the remote controller and
select copy to the next step. Then the system will be prompt as are you sure to copy
selected files/folders into current folder? Select yes to beginning copy the files, select no to
cancel. If there is a same file in the destination device, the system will prompt as overwrite
the file or folder, when the copy file was completed, you will be able to browse the files
which you copied in destination device.
58
11.2 Move Files
The way of move files is similar to copy file, please refer to 11.1 copy files. Press the ctrl
key on the remote controller and select cut to the next step. After executing move files, the
file will does not exist in the source device, but displayed in the designation device.
11.3 Delete Files
Select the files which you want to delete and press the left key to choose.
After select was completed, press the ctrl key on the remote controller and select the
delete to next step. You can also press the delete key on the remote control to delete the
selected files.
11.4 Rename the file
Select the file which you want to rename and press the ctrl key on the remote controller
and select rename to next step. Enter a new name and press ok to change it.
11.5 Select and Cancel Select the Files
If you want to select all the files, press the ctrl key on the remote controller and select all
option, all files in the directory will be selected.
As the same way, press the ctrl key on the remote controller and select cancel all, the
file which you selected will be canceled.
As the prompt, you can also use the left key to select or cancel select the files.
12. DTV (optional)
Need an external USB DVBT tuner(optional), then connect it to the player, press the
left and right key on the remote controller and select DTV to access to.
13. Upgrade Firmware
Through Settings-System-Upgrade software to enter into the update firmware interface,
you can select from update through internet or update through USB.
Use the Internet to upgrade, please ensure that the player is connected to the Internet.
The following step is the way to update through USB.
Step 1: connect USB device with update package to the player (the USB devices only
support for FAT32 and FAT16 formats), and ensure that the device has been detected by
the player.
Step 2: through setting-system-update software-update through USB. Press ok key and
select yes to update the firmware.
The whole installation will last for approximately 2 minutes; please wait for it patiently.
Remarks:
Never disconnect the power supply during installation;
Never unplug the external storage devices during installation.
59
Different Model of player cannot use the same firmware, please upgrading it with serious cautious.
Please contact your dealer or choose to visit our website for the latest firmware.
14. FAQ
Symptom
Solve methods
Can not work
Please check:
The plug has been plug into the power outlet.
The power switch on the player or stand by key on the remote
control is turned on.
The marked voltage of the player needs matches with the
local voltage.
No display
Please make sure the player and the TV are turned on.
Please make sure the player and the TV is already connected
Please make sure the video input signal of TV is correct.
If all are correct of the above, Please long press the advanced
key of remote control to restore the player to factory settings.
Fails to connected to a
wireless network or can
not search the wireless
network
Please make sure whether the external wireless card is plug
into right place.
Make sure is turned on wireless function on router.
Make sure the wireless network name and password
information is correct.
Make sure the player is in the router's wireless coverage.
With bad view
Can not play media files
No response of the remote
controller
Please check:
Select the output way according to the wiring of the player.
Select the correct TV input mode.
Check if the network connection is suddenly broken.
May be the player can not support the media formats.
Make sure the indicator of the remote control is flashing when
you press the button on it.
Please make sure whether the battery is installed in remote
control.
Make sure the battery has the power
If still have something wrong with the player, please contact with the service center.
15. Specifications
Main Processor:
Sigma Designs 8655
60
Supported Internal Hard
Drive:
Enclosure Color&Material:
Supported File System
Formats:
Data Interface:
Supported Networking
Protocol:
Power Adapter:
3.5” SATA hard drive up to 2TB
Steel Gray and Aluminum Alloy(Brushed Surface)
EXT3, FAT32 and NTFS
eSATA, USB 3.0(compatible with USB 2.0/1.1/1.0), USB 2.0 Host
TCP/IP, UPNP, Wi-Fi 802.11n(up to 300Mbps) and P2P
110-220V AC input, 12V/2A DC output
English, French, German, Spanish, Italian, Portuguese, Dutch,
Language Supported:
Greek, Polish, Russian, Swedish, Finnish, Japanese, Simplified
Chinese, Traditional Chinese, Korean
Video Output Interface:
composite video, component YPbPr and HDMI;
Audio Output Interface:
optical fiber audio, coaxial 5.1 channel audio and stereo audio R/L
High Definition: H.264, VC-1, Mpeg2-HD, DivxHD, XvidHD, MPG,
Supported Video Formats:
MPEG, TS, TP, MOV, M2TS, MKV, X.264, WMV9;
Standard Definition: MPEG-1, MPEG-2, MPEG-4, ISO, VOB
Supported Audio Formats:
MP3, WMA, WAV, OGG, AAC, LPCM, FLAC, AC3 and APE
Supported Image Formats:
JPG/JPEG, BMP, PNG, GIF, TIF, TIFF
Supported Subtitle
Formats:
Remote Control:
Operating Temperature:
Product and Packing Size:
sub, smi, ssa, ass, srt, idx + sub, PGS
full-function infrared remote control
5
to 50
208×169×60mm(product); 247×152×220mm(Packing)
1 External AC Power Adapter; 1 Composite AV Cable;
Accessory List:
1 HDMI 1.3 Quality Cable; 1 USB A-B Data Cable;
1 Remote Control; 2 AA Batteries; 1 User Manual.
Note: All the information contained in this manual was correct at the time of publication.
However, as our engineers are always updating and improving the product, your device’s
software may have a slightly different appearance or modified functionality than presented in this
manual.
61
Note: The Company has the right to changes the specifications of his products or designs
without further notification.
16. Copyrights and Trademarks
Copyrights
The Company reserves all patent, trademarks, copyright and other intellectual
property rights, and the content of User manual can not be reprinted without permission.
The software, music or movies owns the copyright are protected by the relevant laws,
Users who use this player to copy of such content need to bear the related legal
responsibility.
Trademarks
Manufactured under license under U.S. Patent #’s:5,451,942; 5,956,674;
5,974,380; 5,978,762; 6,487,535 & other U.S. and worldwide patents issued &
pending. DTS and DTS 2.0 + Digital Out are registered trademarks and the DTS
logos and Symbol are trademarks of DTS, Inc. © 1996-2008 DTS, Inc. All Rights
Reserved.
Manufactured under license from Dolby Laboratories.
Dolby and the double-D symbol are registered trademarks of Dolby Laboratories.
Declaration:
The copyright of this product is owned for the corresponding factory owner, and protect by
the "Copyright Law”, we sell the product are not means transfer or grant to the user any
rights of the copyright.
62