1
1080P High Definition
3.5” HDD DVR& Network Multimedia Player
M9
User Manual
www.eaget.com.cn
1.Introduction of Product
1.1 Preface
The EAGET M9 is a high definition multimedia player with network, download, DVB-T and
TV record functions!
You can watch movies in the highest resolution(1080P) and in all common formats on your
television or home cinema system – including the corresponding multi-channel sound
(DTS,
Dolby Digital). You can also watch your vacation pictures as a slideshow and listen to your
favorite music by this player.
It supports TV record, no longer miss your favorite sports events and television programs
and it also supports both MPEG2 & newer MPEG4 H.264 DVBT broadcast, enjoy high
quality digital television in every country.
With HDMI, YPbPr, SPDIF and Composite audio/video output ports, it provides you with
the
most useful connections to TV, projector, audio system, etc.
By some simple settings, this player can be integrated into your network, either by LAN or
WLAN(optional). This will allow you to stream all multimedia files from you computers or
network storage. With USB hosts and card slot, you can also connect your portable hard
drives, USB flash drives or memory cards. We have also integrated the most popular BT
download function for you to search and download movies on the Internet.
User friendly UI, easy to operate and all functions& settings are accessible by the remote
control. It will be a perfect match to your home theater!
1.2 Main Functions
DVB-T TV
·Supports Digital Video Broadcasting Terrestrial (DVB-T) TV reception;
·Supports double-tuner, allow to watch other programs while recording;
·Supports Electronic Program Guide (EPG), Teletext and subtitle;
·Supports loop out the DVB-T signal received from Aerial.
A/V Output
·HDMI V1.3 for high-definition video and digital audio;
·Composite & component video and stereo audio for analog audio-visual connection;
·YpbPr for audio-visual connection;
·S/PDIF coaxial & optical interface for high-fidelity digital audio;
·Adjustable video output resolution (NTSC, PAL, 480p, 576p, 720p, 1080i, 1080p)
A/V input
·Input the A/V signal from other device, then browse or recording it by this player.
Video Recording
·supports one key recording and scheduled recording, and save as MPEG-2
(.mpg,or .ts)format;
·supports time shifting function.
Multimedia Playback
·Supports major audio, video and image file formats (1080p HD video decoding)
·Movie format: AVI/MKV/TS/MPG/MP4/MOV/VOB/ISO/IFO/DAT/WMV/RM/RMVB
·Music format: MP3/OGG/WMA/WAV/AAC/FLAC
·Photo format: HD JPEG/BMP/GIF/TIF/PNG
·Photo slide show with background music
Network Function
·MMS:Support for receive broadcasting by network
·File sharing via Samba server
·IMS: (This is a third-party services that may be offed because of the policy issues)
support
·Internet channels,search video, weather and RSS news.
·In the browser, via UPNP and network item to access to computers on the LAN.
File Copy
·Supports copying & moving files among Card, USB, HDD, and Network
USB 2.0 Support
·USB DEVICE port (for computer connection)
·USB HOST portx2 (for USB storage devices)
Note: All the information contained in this manual was correct at the time of publication.
However, as our engineers are always updating and improving the product, your device’s
software may have a slightly different appearance or modified functionality than presented in this
manual.
1.3 Packing List
Before you make using the product, please check whether the colorful box packing has
the following parts. If there is shortage, please contact the dealer from who you bought the
product in time to guarantee your rights and interests.
TTEM
Quantity
EAGET M9 Player
1 Piece
Power Adapter
1 Piece
Remote Control
1 Piece
AA Battery
2 Pieces
AV Cable
1 Piece
USB Data Cable(A to Mini B)
1 Piece
HDMI Cable
1 Piece (optional)
User Manual
1 Piece
Note: The actual contents in the package might be different from the packing list in this manual, if
any difference, please check with the vendor.
1.4 Cautions
This player’s design and manufacture has your safety in mind. In order to safely and
effectively use this player, please read the following before usage.
1.4.1 Usage Cautions
User should not modify this player. If commercial hard disk is being used, the
environmental temperature should be within +5 ~+35 .
1.4.2 Power
The player’s power voltage: DC 12V.
When using this player, please connect the supplied AC adapter or AC adapter cable to
the player’s power jack. When placing the adapter cable, make sure it can not get
damaged or be subject to pressure. To reduce the risk of electric shock, unplug the adapter
first before cleaning it.
Never connect the adapter to the player in a humid or dusty area. Do not replace the
adapter or cable’s wire or connector.
1.4.3 Radio Interference
If not properly shielded, almost all electronic devices will get radio interference. Under
some conditions, your player might get interference.
The design of this player has followed the FCC/CE standard, and has followed the
following rules:
(1) This player may not cause harmful interference;
(2) This player could accept some interference received including interference that
may cause undesired operation.
1.4.4 Repair
If the player has a problem, you should take it to an appointed repair center and let the
specialists do the repair, never repair the player yourself, you might damage the player or
endanger yourself or your data.
1.4.5 Disposing of the Player
When you dispose of the player, be sure to dispose it appropriately. Some countries
may regulate disposal of electrical device, please consult with your local authority.
1.4.6 Hard Disk Cautions
The player uses an internal hard disk for data storage.
Physical impact may create bad sector in the hard disk, you can use CHKDSK to fix the
problem.
All data stored in the player may be lost due to physical impact, electrical shock, power
lost, HDD format etc. Please backup your data.
It is suggested to do defragment after a long period of usage.
Regularly backup the data in the hard disk so that it can be recovered in the event of
data corruption or loss. Our company takes no responsibility for loss of data stored on the
hard disk.
1.4.7 Others
1.When using this player, please do not let the player come into contact with water or
other liquid, if water is accidentally spilled on the player, please use a dry cloth to absorb
the spillage.
2. All electronics device are very sensitive and may be brittle, never vibrate or impact
this product violently during use, nor apply too much force on pressing the keys on this
product.
² Do not let the player contacting with water or other liquid.
² Never disassemble, repair or refit this player by yourself. any damage done will not be
included in the repair range.
² Do not press the buttons with too much force.
² Avoid hitting the player with hard object, avoid shaking, and keep away from magnetic
²
fields.
During in static and the strong electromagnetic magnetic field, the product will be fail to
function, then unplug the power cable and then plug the power cable again,the product
will return to normal performance.
2.Connection Instruction
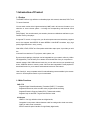
2.1 Connecting the Power Supply
(1) Follow the picture and connect the AC adaptor to the player’s DC IN jack;
(2) Follow the picture and plug in the AC adaptor to the power outlet.
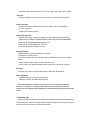
2.2 HDMI Out
(1) Follow the picture and plug one connector on your HDMI cable to the player’s HDMI jack;
(2) Follow the picture and plug the other connector on your HDMI cable to the TV’s HDMI jack.
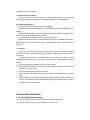
2.3 A/V Out
(1) Follow the picture and plug in the 3 color connector to the player’s A/V OUT jack;
(2) Follow the picture and plug in the 3 color connector to the TV’s A/V IN jack.
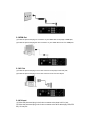
2.4 A/V Input
(1) Follow the picture and plug in the 3 color connector to the player’s A/V in jack;
(2) Follow the picture and plug in the 3 color connector to the other device’s(eg: DVB,STB
ect.) A/V out jack.
In this way you can use this product to record the contents of the DVD or other video
playback devices.
2.5 Y/Pb/Pr Component Out
(1) Follow the picture and plug in the 3 color connector to the player’s Y/Pb/Pr jack;
(2) Follow the picture and plug in the 3 color connector to the TV’s Y/Pb/Pr jack.
Audio Connection while using Y/Pb/Pr Video out:
First method: use the audio output from the A/V OUT jack;
Second method: use the audio output from the S/PDIF Coaxial or Optical fiber jack.
2.6 Connecting Digital Amplifier
(1) Follow the picture and plug one end of coaxial/ Optical fiber cable to the coaxial/ Optical
fiber output port of this product.
(2) Follow the picture and plug the other end of coaxial/ Optical fiber cable to the coaxial/
Optical fiber input port of corresponding power amplifier.
Note: Optical fiber and coaxial cable are not supplied.
(Coaxial)
(Optical Fiber)
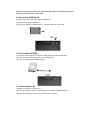
2.7 Connecting to a LAN
To connect to a LAN (Local Area Network) you require a router or switch (not supplied).
(1) Connect one of the crystal plugs on the cable to the player’s LAN socket;
(2) Connect the other crystal plug on the cable to LAN port on your router, switch, or hub
devices.
2.8 Connecting to a WLAN
(1) Make sure the player is powered on;
(2) Plug the Wireless LAN USB Adapter (i.e. Wi-Fi USB Dongle) to the USB HOST port of the
player.
Helpful tips: The Wi-Fi Dongle is an optional accessory sold separately and not all wireless
Network cards sold on the market can be used for this player. Please consult with the sales when
you wish to make the best use of this product.
2.9 Connecting a USB Device
(Include: U-Disk, removable HDD, USB DVD ROM ect.)
(1) Make sure the player is powered on;
(2) Plug in the USB stick or USB HDD etc. to the USB HOST port of this player.
2.10 Connecting SATA HDD
(1) Follow the picture and plug on end of the SATA cable to the player’s SATA jack;
(2) Follow the picture and plug another end to the SATA HDD.
Then you can through Brower-HDD to browse.
2.11 Connecting to a PC
(1) Make sure the player is powered on;
(2) Plug in the squares connector of the USB cable to this player’s USB DEVICE port;
(3) Plug in the rectangular connector of the USB cable to computer.
Helpful tips:
1. Open “My Computer” and a new disk symbol will appear and In this way, you can manage the
content on the built-in HDD of the player on your local PC.
2. Please refer to the computer instructions to format the hard disk. (It’s not recommended the
user to use other software to partition the hard disk of this player).
3. About the Player
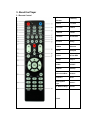
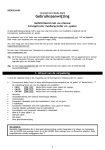
3.1 Remote Control
1.Remote
Indicator
2.Stand by
3.Zoom
4.TV SYS
5.Confirm
6.Select
7.Subtitle
8.Audio
9.Teletext
10.Timeshift
11.Pause
12.Play
13.Mute
14.Source
15.Edit
16.Repeat
17.EPG
18.Time REC
19.Stop
20.Eject
21.REC
22.FR/FF
23.Music
24.Setup
25.Previous/Next
26.Home
27.Return
28.OK
29.Navigation
Keys
30.Vol+/-
31. Numeric Keys
32.Goto
33.Info
Remote Control Description:
NO.
Item
1
2
3
4
5
Remote Indicator
Stand by
Zoom
TV SYS
Confirm
6
Select
7
8
Subtitle
Audio
9
Teletext DTV
10
Timeshift
11
Pause
12
13
14
Play
Mute
Source
15
Edit
16
Repeat
FUNCTION
Remote indicator.
Press to enter standby mode or wake up.
Zoom in the image.
Switch the output mode into video signals.
Press to add the selects to the play list.
Press it in copy menu to select the file to be copied and in
browse menu to select the file to be added into the Play List
Press to set subtitle options.
Press to select an audio track.
Press to open Teletext OSD if it is available in the
broadcasted stream of Digital Terrestrial TV.
Press to activate the time shift function.
Press it during play to pause state and then press it once to
play the video in next frame every time. Press play key to
return to normal play state.
Press it to play the current media file.
Turn on/off the sound.
Select the video source or DTV for the recording.
Press to enter into file edit menu.you can do rename and
delete the files operations.
When under the My Shortcuts interface,press to adjust the
network edit menu.
Press to set the repeat mode.
Press to enter the Electronic Program Guide which displays
an on-screen list of programs for the coming week when
watching
DTV.
Press it to rapidly enter into Time REC applications.
Press it to stop the media file being played at present.
Control the ejection of DVD floppy.
Start or pause REC, retap will select the length of the
video.( One key record OTR,you can select OTR30 MIN./60
MIN./90 MIN./120 MIN./180 MIN./240 MIN./off) when you
selected the off you can recording for a long time and
unrestricted.
Press it in media play mode for FR/FF. Press Play to resume
to the normal mode.
17
EPG DTV
18
19
20
Time REC
Stop
Eject
21
REC
22
FR/FF
23
Music
Press it to rapidly enter into music applications.
24
Setup
Press it to rapidly enter into Setting Applications.
25
Previous/Next
Press it during media file play for forward or backward for a
file;
Press to select the Previous/Next Chapter when playing the
file has the chapters.
26
Home
27
28
Return
OK key
Return to the Main menu.
Return to the superior diretory and exit from play state.
Press to confirm current operation.
29
30
31
Press the navigation keys to operate the menus on this
interface.
Press to adjust the sizes and vertical positions of plug in text
Navigation Keys subtitles;
press to during picture play to move the viewing position after
zooming in and out.
Press left/right key to rotate the picture.
Vol+/Press to add or decrease the volume.
Press to enter numeric input when changing settings.
Numeric Keys
Select the chapter when playing the file has the chapters.
32
Goto
Press it during video play to select a time period to be played
back.
33
Info
Press to hide or display the information bar during playback.
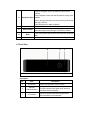
3.2 Front View
1. IR Receiver Window
2. Stand by Switch(indicator)
3. VFD Screen
Description:
No.
Item
1
IR Receiver
2
Stand by
Switch(indicator)
3
VFD Screen
Description
Receive the signal from remote control.
Press the bottom to enter into standby mode;
The LED indicator shows green when turned on,
and shows red when standby.
Display the playback status and progress and
other information for the operation.
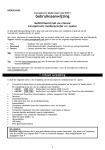
3.3 Back View
1.USB Device
2.Switch 3.LAN jack
4.HDMI jack
5.Coaxial/Optical fiber 6.AV OUT 7.YpbPr jack
8.AV IN
9.DC-IN
10.FAN
11.ANT IN/OUT
Interface Description:
No.
Interface
Operation instruction
1
USB Device
Connect to computer by this jack.
2
Power Switch
3
LAN
4
HDMI
5
Coaxial/
Optical Fiber
SPDIF Coaxial/Optical fiber output digital audio.
(The SPDIF coaxial/optical cables are not including
in attachment).
6
AV Out
Connect to audio and video device by this jack, and
output CVBS signals.
7
YPbPr Out
Connect to audio and video device by this jack, and
output PR/PB/Y video signals.
8
AV IN
Connect to audio and video device by this jack, and
input CVBS signals.
9
DC-IN
Power input: DC 12V.
10
Cooling Fan
Exhausting the heat from internal.
11
ANT IN/OUT
Input or output digital TV signals.
Switch on/off the power.
Connect to wire network by LAN jack.
Connecting to the video device and output HDMI
audio and video signals by this jack.
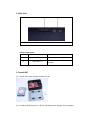
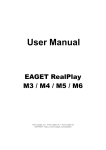
3.4 Side View
1. Extenal SATA Interface
2.USB Host ×2
Interface Description:
No.
Interface
1
External SATA Interface
2
USB HOST × 2
Operation instruction
Connect the external SATA HDD.
Connecting external USB device by
this jack.
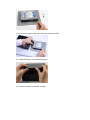
3.5 Install HDD
3.5.1 Loosen the screws and open the bottom cover.
3.5.2. Install the HDD (Put the 3.5” HDD on the bottom cover and tight it by the screws).
3.5.3 Connect the player’s data cable and power cable to the HDD.
3.5.4 Install the bottom cover as following picture:
3.5.5 Lock the screws on the bottom of player.
Then HDD installation is completed, as shown below:
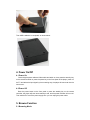
4. Power On/Off
4.1 Power On
Connecting the power cable and Video cable and switch on, then press the stand by key
on the remote controller or press the power key on the front panel of the player, power on
the TV and select the input signal by the connecting way, the player will soon enter into the
home menu.
4.2 Power Off
Press the power button on the front panel or press the standby key on the remote
controller, the player will soon enter standby mode, and the power indicator will turn red.
Then switch off to cut off the power supply then you can unplug the power cable.
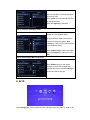
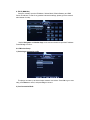
5. Browse Function
5.1 Browsing Movie
Press the Left/Right keys on the remote controller to select MOVIE from the main menu
above the screen;
Browsing Movie
Instructions of Operations
Press the Up/Down keys to select the
device to be previewed and press the OK
key to access;
Press Up/Down keys to select the folder
or movie to be browsed and press the Ok
key to the full screen plan state.
The following buttons can be used to control video playback:
Pause
Play
FF/FR
Pause to playback the file.
Restart to play the file which was paused.
FF: (1.5x,2X,4X,8X,16X,32X)
FR: (1x,1.5x,2X,4X,8X,16X,32X)
Press repeatedly to select the speed.
Press it during media file play for forward
Previous/Next
or backward for a file; Press to select the
Previous/Next Chapter when playing the
file has the chapters.
Number keys
Press to select the chapter when playing
the file has the chapters.
Goto
Press it during video play to select a time
period to be played back.
Zoom
Zoom in the image.
(Zoom ratio: 1X,2X,3X,4X,8X)
Subtitle
Select and set the subtitle options.
Audio
Press to select an audio track.
Repeat
Set repeat options:Repeat title, Repeat
all,repeat off.
Info
View the information of the file.
Mute
Turn on/off the sound.
Volume+/Stop
Add or decrease the volume.
Stop playback the file.
Helpful tips:
1.In case of messy codes displayed during playing some subtitle files, press Subtitle key to call
out the Subtitle menu and modify the corresponding character set codes and it will display
normally;
2. In case of no audio output during playing some movies, switch the Audio to other channels
and if it still fails, please try to decode by power amplification; (Please refer to 2.6 connecting to
a Digital Amplifier; and refer to 9.1 Change the Audio Settings)
3. All supported movie files will be displayed in this application.
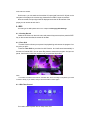
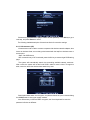
5.2 Browsing Music
Press the Left/Right keys on the remote controller to select MUSIC from the main menu
above the screen.
Browsing Music
Instructions of Operations
Press the Left/Right keys on the remote
controller to select MUSIC interface.
Press Up/Down keys to select the device
to be previewed and press Ok key to
access;
Press Up/Down keys to select the folder
or music you want to preview and press
Ok key to play state.
The following buttons can be used to control music playback.
Pause
Pause to playback the file.
Play
Restart to play the file which was paused.
Repeat
Set the repeat mode when playing music
file.(1,ALL,Repeat off
FR (1.5x,2X,4X,8X,16X,32X)
FR/FF
FF (1x,1.5x,2X,4X,8X,16X,32X)
Press repeatedly to select the speed.
Previous/Next
Find music files by page.
Up/down key
Select the Previous/Next file on the
preview interface.
Mute
Volume+/Stop
Turn on/off the sound.
Add or decrease the volume.
Stop playback the file.
Helpful tips: In this application, the player will display all supported music files.
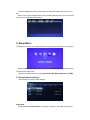
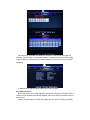
5.3 Browsing Photo
Press the Left/Right keys on the remote controller to select photo from the main menu
above the screen;
Browsing Photo
Instructions of Operations
Press the Left/Right keys on the remote
controller to select photo interface.
Press Up/Down keys to select the device
to be previewed and press Ok key to
access;
Press Up/Down keys to select the folder
or music you want to preview and press
Ok key to full screen plan state.
The following buttons can be used to control video playback.
PREV/NEXT
Zoom
View the previous or next picture.
Zoom in the image.
Zoom ratio: 2X,4X,8X,16X,fit
Navigation key
Press the Left/ Right keys to revolving the
previous pictures
When enlarged the image, you can move
around by navigation key.
Info
Hide or display the information bar during
playback.
Pause
Stop
Pause playback.
Stop playback.
Helpful tips:
1. It will automatically start the slide mode when the picture is displayed in full screen;
2. You can also preview pictures when listening to your favorite music;
3. All supported picture files will be displayed in this application.
5.4 Browsing All
In this mode, all supported files and folders (only support for music, photos, and movies
files) will be displayed.
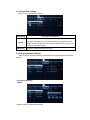
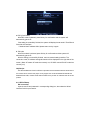
5.5 Browse the files via network
There are three ways to locate media files shared on your local network in the Network
menu. One is to browse through My_Shortcuts; the other is to browse through
My_Neighbors. And the third way is browse through workgroup.
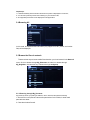
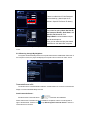
5.5.1 Browsing through My_Shortcuts
My Shortcuts: enter by inputting IP address, users’ name and the password directly.
1. Share a file on computer and set access permissions for this folder, it needs read
permissions at least.
2. Close the windows firewall.
My_Shortcuts
Instructions of Operations
Press the Up/Down keys on the remote
controller to select My_Shortcuts from the
network menu and press OK key to
access.
Press the EDIT button and select Add
option access.
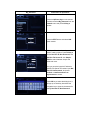
After the add item is selected, you will
enter IP setting window. Press OK key to
set the Net User ID, Net Password, and
Specific File Server IP. click Simple/
Detail to switch between simple and
advanced menu.
And you can also input the IP adress in
Specific File Server IP first,then input Net
User ID, Net Password, and press
confirm or comfirm and save to
myshortcuts to access.
Press OK key to select the dialog box, it
will pop up a visual key board.Use the
navigation key to input the characters for
setting Net User ID, Net Password.
If there is no Net User ID, Net Password
for the shared pc, please input the IP
adress in Specific File Server IP directly.
Select detail to setting Label, Net User ID,
Net Password, Domain, Host Name, and
Specific File Server IP. Click
Simple/Detail to switch between simple
and advanced options.
Then you can select and play the shared
media files on the destination computer.
You can also select modify to modify initial setting. Select delete for deletion and select return
to exit.
5.5.2 Browsing through My Neighbors
The system will automatically search the computer that has been installed with Transcode. If
the computer is found, the player will display the computer name in the list for users’ choice.
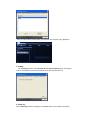
Transcode Server in PC
Transcode server is medial transition software. It need install in PC. And it is a communicate
bridge to connect Net Media Player and PC.
Install transcode Server
Double click the Transcode Server
and finish the installation.
Please execute the Transcode server as installation completed. And the icon will appear on
right of the status bar. Click the icon
Transcode server interface.
or tap Start-Program-Transcode Server to enter the
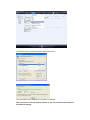
1
Transcode Status:
Display the status of Transcode Server on this interface.
2 Net share dialog:
Click Net share dialog and select the shared folder on the local PC. Press "Add" to add the
shared folder, press the "delete" to delete the selected folder.
The shared contents of the folder you can be browsed under the My_Neighbors.
Such as you add a folder named test movie on the local computer, you will browse the test
movie folder under the My_Neighbors of the player's. And the shared folder will appear a
shared symbol
on local computer.
Then you can access to the files which you shared on the computer by My_Neighbors.
3 Setting:
On the setting interface, select the Auto Run on system startup option, click Apply to
confirm, the software will running automatically when the computer boots up.
4 Event log:
On the Event log interface to display PC and Media player communication information.
5 About:
On the about interface view the software’s version information.
5.5.3 Browsing through WORKGROUP
The system will automatically search the network computer. If the computer is found, the
player will display the computer name in the list for users’ choice.
WORKGROUP
Instructions of Operations
Press Up/Down keys on the remote controller
to select the workgroup and press OK key to
access.
Press Up/Down keys to select the computer
you want to access and select the media file to
be played from the computer directory and
press OK key to play.
Helpful tips:
The working group or computer will not be displayed in the list subject to the different network
states sometimes. Then it’s recommended that you can preview by My_Shortcuts.
5.6 Browsing from DVD
When you connect an external DVD ROM, the system will be finding the device
automatically, then you can select DVD item in browser and find the file to play.
If you set the R/RW auto-play as on on Setup-System setting menu, then when the system
detects the DVD-ROM, it will be playing backs the disc automatically.
5.7 Browsing UPNP Files
Universal Plug and Play is a kind of system structure which is used for PC and equity
common equity network connection of intellectual device (or instrument), and it is
especially used in households.
UPNP that is installed in computer enables us to easily browse the files that are shared
on the internet. When using UPNP for entrance, the situation that your computer has used
UPNP service shall be confirmed. For a computer that is installed with Window xp system,
what you have to do is to update the Window Media Play to the 11th version, and then the
computer will get the UPNP agreement automatically.
After Window Media Play 11 has been installed, the steps of starting UPNP can be
found in the following:
1).Start Window Media Play 11 and select library->media sharing.
2). Select settings on this interface and Select Allow new devices and computer
automatically (not recommended) item. The system will found the UPNP device on the
network automatically.
Select allow to making the device (the HD player) is customized.
3). Select library->add to library.
4).On Add to library interface and Add to add the share files.
Then the UPNP server configures on computer is completed.
Note: you need to close the windows firewall, or you will not achieve the function of
the media file sharing.
Then you can select UPNP in Browser to access.
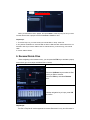
5.8 Play List
With Play List function, you can add your favorite media files into the list to play.
5.8.1 Add Music to the Play List
Add Music to the Play List
Instructions of Operations
Select HDD in browser column for
entrance. Then select music interface.
Press the Left/ Right keys to select the
file types of browser on the screen;
Press Up/Down keys to select
the files to be added into the Play List;
Press Select key to mark the files;
Press Confirm key to add the marked
files into the Play List.
After select background music in Setup-MISC-background music as playlist, when you are
browsing the photo, it will play the background music as in playlist automatically; if you save the
music and the photos in the same folder, and set the background music as the folder, when you
browsing it will play the music in folder.
5.8.2 Delete file from the playlist
If you wish to delete a file from the playlist, press the Select key to select, and then press
the Confirm key to confirm.
When you selected the files in playlist, then press Return, it will be prompt as “do you want
to leave without save to playlist” and select Confirm or Cancel to set it.
Helpful tips:
1. To use the Play List, you must format you internal HDD in “setup” mode first.
2. Only add the media files on internal HDD, the files in USB and other external device are not
allowed to add. If you need to add the files on external device, you should copy it in internal
HDD.
3. Cannot add the folders.
6. Rename/Delete Files
When navigating in the browser menu, you can press the Eidt key to activate a popup
menu where you can rename and delete files or folders.
Rename the files
Instructions of Operations
Press the Up/Down keys to select the files
which you want to rename.
Press the Edit key and select Rename
item.
Use the navigation key to input, press OK
to confirm.
Helpful tips:
The files in Play list will not be supported to rename. Because it is only as a link exists in
internal HDD.
Delete the files
Instructions of Operations
Press the Up/Down keys to select the files
which you want to delete.
Press the Edit keys to select delete item.
7. File Copy Menu
Select the File Copy item on the main menu to enter into the File Copy menu, it is allows you
to copy files between Removable Devices (Card, USB), HDD, and Network ect.
Steps
Step 1: Select the source and destination
device
Instructions of Operations
Press Up/Down keys to select the source
and targeted device from Source File and
destination File.
Press the Right key to next step.
Step 2: Select the source files
In the source device, select the files which
you want to copy.
Press select key on the remote controller
to select/cancel files.
Press the Right key to next step.
Step 3: Select the destination folder
Select the folder you want to save the
copied file in the targeted device.
And you can also create a new folder to
saved the copied files (select “New
directory”, it will pop-up Virtual keyboard
and named the folder).
Press Up/Down keys to select the folder,
press the Right key to execute the next
step.
Step 4: Select Copy or Move to proceed
Press Up/Down keys on the remote
controller to select the corresponding
operational functions and press OK key to
confirm and start to copy file.
8. AV IN
Press left/right key on the remote controller and select Audio and video in mode on the
main menu to access.
On this menu, you can watch and record the AV input signal from the A/V IN jack on the
rear panel of the player.the connect way please refers to 2.4 A/V input connections.
After connected, the input signal will be displayed under the AV IN interface of the
player,you can access to and view it.
8.1 REC
The setting of the REC please refer to the chapter 9.3 Changing REC Settings.
8.1.1 One-key Record
Select the AV IN item on the main menu and press ok key to access,then press the REC
key on the remote controller,the record will be start.
8.1.2 Time Shift
Time shift function allows you to pause live playbacking and resume the program from
the point you left it.
Press the Time Shift key to active time shift function. And it will saved automatically in
the cache of internal HDD, You can press Play button to resume the program. And you can
pause, fast forward, rewind the program until you press the Stop button.
Note:
1. The video recorded is not stored in the hard disk, when recording is completed, you need
to watch it timely, if you exited, and you will not be able to watch again.
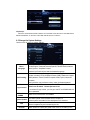
8.1.3 Edit Timer Record
You need to set the system time on setup menu first.
This media player has timer record function, you can set a time and stand by the player,
on your setted time it will be record automatically.After finished, it will power off and in
standby mode.
The schedule record menu allows you to edit, delete recording schedules and view all
schedule status and history. Select the schedule record icon on the main menu and
access.
1) Edit
Add a New Schedule
Press the left /right key on the remote control to select the Edit tab from the menu bar.
Select Add a New Schedule and press ok to enter.The schedule setting screen appears.
Use the left/right key on the remote control to move between fields and press the
up/down key to adjust each setting.
Source
Start Time
Length
Select the video source for the recording.
Enter the date and time of the recording. The years need to set in
setup-system setting-time menu, and the setting time must late for
the system time.
Enter the length of the recording.
Select how often you want the schedule to record. Choose from
Repeat
Once, Everyday, Mon-Fri, Mon-Sat or for an individual day of the
week.
Device
Select the stroage device.
Quality
Select the recording quality. Choose from HQ, SLP, EP, LP and
SP.
The higher the quality, the more space required on the hard drive.
See HDD Free Space on the left of the screen for details of how
long you can record for using each setting.
NICAM
NICAM setting.
Preview
This small preview window will show the current program of the
selected channel.
Edit the schedule
On this interface, you can edit the schedule you added already. Press OK to save it.
2) Delete Schedule
Press the left/right key on the remote control to select the Delete tab from the menu
bar. Select the schedule you want to delete and press the Enter button. A confirmation
message appears.
Select Cancel, Delete the selected schedule, or Delete all schedules. Press the OK
to confirm.
3) Status
Change the selected schedule status:
Press the left/right key on the remote control to select the Status tab from the menu bar.
The schedule list is displayed. Select a schedule and press the ok key.
When the source is from video1.
Select Enable the time by VPS , Enable the time by user’s setting or Pause the
selected schedule. Press the OK to confirm.
4) Viewing Recording History
Press the left/right key on the remote control to select the History tab from the menu
bar.
Here you can view a complete history of all recordings that were set. And you can press
the OK key to delete the selected history.
9. Setup Menu
The Setup menu allows you to personalize and configure the preferences for your player.
Select the Setup icon on the main menu or press the Setup key on the remote control
to enter into the setup menu.
There are six setup options, including Audio,Video,REC,Network,System,and MISC.
9.1 Changing Audio Settings
Use this menu to configure audio settings.
Night Mode:
Choose between Off/On/Comfort. If the option is turned on, the audio output volume
will be decreased to make you more comfortable.
HDMI Output:
Choose among RAW/LPCM DUAL CH/LPCM MULTI CH.
SPDIF Output:
Choose between RAW/LPCM DUAL CH. In raw mode,Dolby Digital,DTS,or MPEG
sound can be bypassed to the HDMI TV or Digital amplifier.
9.2 Changing Video Settings
Use this menu to configure video settings.
Video Settings
Instructions of Operations
Pan Scan 4:3: Display a wide picture on the entire screen and cuts off the
redundant portions. Select when a standard 4:3 TV is connected.
Letter Box 4:3: Display a wide picture with two black borders on the top
Aspect Ratio
and bottom of 4:3 screens. Select when a standard 4:3 TV is connected.
16:9: Compress the image to convert the whole image. Select when a 16:9
TV is connected.
16:10: Compress the image to convert the whole image. Select when a
16:10 TV is connected.
Zoom Out
Turn on this function can reduce the image display size.
Brightness
Adjust the level of brightness.
Contrast
Adjust the level of contrast.
Hue
Set the contrast of screen.
Saturation
Set the contrast of screen.
Digital Noise
reduction
Select auto to reduce the noise on the display and enhance view quality.
Select to adjust video output resolution: HDMI Auto, NTSC, PAL, 480P,
Video system
576P, 720P 50HZ, 720P 60HZ,1080I 50HZ, 1080I 60HZ, 1080P 50HZ and
1080P 60HZ
1080P 24HZ
Turn on this function, Playback the film files as 1080P-24HZ format will be
more smoothly.
9.3 Change REC settings
Use this menu to configure REC settings.
REC setting
Instructions of Operations
Quality
Select the recording quality. Choose from HQ, SLP, EP, LP and SP.
The higher the quality, the more space required on the hard drive. See
HDD Free Space on the left of the screen for details of how long you can
record for using each setting.
REC device
Select the stroage device(HDD or USB).
9.4 Changing Network Settings
Use this menu to configure Ethernet, LAN (Wireless Local Area Network) and PPPoE
settings.
9.4.1 Wired LAN Setup
a.DHCP
Select to obtain IP address automatically.
b. FIX IP (MANUAL)
Select to manually input the IP Address, Subnet Mask, Default Gateway, and DNS
Server IP Address. In case of any questions about the settings, please go to the network
administrator for help.
Use the Navigation and Number keys on the remote controller to input the IP address.
Press Ok key to confirm.
9.4.2 Wireless Setup
1). Selecting a connection profile
This player can store up to three wireless network connections. Press Ok to go to next
step, press Return to cancel, and press Play to connect.
2). Get Connection Mode
Choose among Infrastructure (AP) and Peer to Peer (Ad Hoc). Press Ok key to go to
next step, and press Return to cancel.
The following detailed description of these three kinds of connection settings.
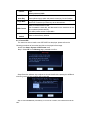
9.4.2.1 Infrastructure (AP)
Infrastructure mode is used to connect computers with wireless network adapters, also
known as wireless clients, to an existing wired network with the help from wireless router or
access point.
Step1: Get SSID Name
After connection way of AP is selected, press the Ok key to enter and get SSID setting
page.
The system will automatically search the surrounding available network resources.
After a while, the system will list the found SSID in table for users’ choice. Through this
table, users can select the wireless base station they want.
If the wireless base station has encryption, the password shall be input in relevant dialog
box. NONE means it is an open system network.
As a different way in WPA and WEP encryption, the Virtual keyboard for enter the
password will show as different.
After set up ok, the system will display the set result in Test OK and Show Net info
interface. The information of wireless base station is recorded here, such as SSID, safety
mode, IP address, subnet mask and preinstall gateway. Press the enter key to complete
the setting.
If obtained the IP address failed, please return and try it again.
9.4.2.2 Ad-Hoc Setup
Peer to Peer mode, which is also called Ad Hoc mode or computer-to-computer mode, is
used to connect wireless clients directly together, without the need for a wireless router or
access point.
Connect wireless network card with the system and carry out the following operations.
Step 1: Ad-Hoc Setup
After AD HOC way is selected, press ok key to enter Ad-Hoc setting page.
Directly press Play key and the system will automatically carry out Ad-Hoc setting based
on the default setting.
Related settings:
a. Wireless SSID (name of wireless)
Use the Virtual keyboard to input.
b. Wireless Security (select whether it is Open System or whether use WEP password to
enter)
Use the Virtual keyboard to input.
c. Host IP
After the setting is finished, press Play key to enter system setting.
If the setting is successfully finished, the system will display the set result in Test Ok and
Show Net info interface. The information of Ad-Hoc is recorded here, such as SSID, safety
mode, IP address, subnet mask and preinstall gateway. Press ok key to complete the
setting.
If obtained the IP address failed, please return and try it again.
9.4.2.3 WPS AP
Connect wireless network card with the system and carry out the following operations.
After WPS (AP) way is selected, press ok key to enter setting page.
There are two connection ways: PBC(Push button) or PIN(PIN code).
a. PBC (Push Button)
After PBC mode is selected, press Ok key for confirmation and the system will
automatically get the IP.
If the setting is successfully finished, the system will display the set result in Test OK and
Show Net info interface.
If obtained the IP address failed, please return and try it again.
b. PIN code
After PIN method is selected, press Ok key for confirmation and the system will
automatically get the IP.
After the setting is successfully finished, return to network setting interface. The
connection mode, IP address and signal intention will be displayed on the right side of the
screen. (Note: AP means AP mode has correctly run; AD HOC means AD HOC mode has
correctly run.)
Helpful tips:
The Wireless Network Card for USB is an optional and not all wireless Network cards sold on
the market can be used for this player. It only support the model as Realtek RTL8187B and
Realtek RTL8191SU, Please consult with the sales when you wish to make the best use of this
product.
9.4.3 PPPoE Setup
Dial connection
Input the user ID and password in corresponding dialog box, then select the Wired
interface for dial-up connection.
Helpful tips:
When the wire/wireless/ PPPoE network are connected at the same time, and obtained the
different IP address, on the front of the valid network there is a mark as .
9.5 Change the System Settings
Use this menu to configure system settings.
Menu
Language
Text Encoding
Select to choose the OSD (On-Screen Display) language.
Include:English,TraditionalChinese,Espanol,Francais,Deutsch,Italiano,
Dutch,Pyccknn, Simplified Chinese.
Press the Up/ Down keys to select the desired language.
Select to set the text encoding option (subtitle display),
Include: Unicode (UTF8),Simplified Chinese (GBK),Traditional Chinese
(BIG5),Western,Turkish,Central European,Greek,Cyrillic,Hebrew,SE
European.
Wrong selection may cause the messy codes of subtitle displayed.
Login Control
BT and
SAMBA
System Update
Time
Parental
Select to turn on/off the password protect for BT and SAMBA.
Default user ID:admin Default password:123
If you select off login control, you can go to the BT and SAMBA without
input a password.
Select to turn on/off the BT and SAMBA.
More detail update method please see the Chapter 12.
And the system information is also displayed on this interface.
System time setting.
Use the navigation key and number keys to set.
Select whether to classify the grade of the movie or the setting of the
Control
R/RW
Auto-Play
grade.
Default password: 0000
Automatic play of DVD.
Press up/down key to select and press the enter key for confirmation.
Angle Mark
During play back DVD files, you can select the different visual angles to
watch DVD. Press the Up/ Down keys to set the switches.
HDD Format
Select to format the built-in HDD.
After formatted the hard disk, the data saved on the hard disk will be
lost; so please operate carefully.
More detail please see the Chapter 9.5.1.
Restore
default
Select to restore factory defaults.
9.5.1 Format HDD
For users who wish to install a new SATA HDD into the player, please refer to the
following procedures to format the hard disk on the player before usage.
Access into Setup->System->HDD Format menu
Step 1: Select OK on the Warning page, press ok to confirm.
Step2:Press the up&down key to adjust the time shift buffer disc capacity(1hr=4GB and
max=4hr),press right key to select next to next step.
Step 3: Select Format and press ok key on the remote controller, then hard disk format will
start.
The formatting procedure will be finished within a few minutes. And then you can use the
hard disk properly on the player.
Note: HDD format will remove all data stored on the hard disk drive. Please take care and
backup your data in advance!
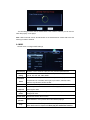
9.6 MISC
Use this menu to configure MISC settings.
Resume play
Slide show
timing
Transition
effect
Whether or not to continue to play from the point interrupted last time.
Time to switch over to the next slide when the pictures are played in slide form
(off, 2S, 5S, 10S, 30S, 1MIN, 2MIN
Transitional effect for picture switch when the pictures are played in slide
form(include: off, cross fade, left to right, top to bottom, waterfall, snake,
dissolve, strip left down,all effect shuffle .
Ken Burns
Animation effect for picture switch when the pictures are played in slide form.
Seamless
No middle pause when turn on this function during playback the
playback
Multi-segment DVD.
Background
music
Screen saver
Movie
preview
Play
Set to play the music in the Play List or music file in the present folder as the
background music.
Activate the screens saver function.
Select whether or not to preview the movies before playing it.
Select the class of the files you wish to auto play.
More detail sees the chapter 9.6.1 Auto play the media files function.
9.6.1 Auto play the media files function.
Only support for used in an external USB storage device.
1. Create three new folders as photo, music, video under the root of the external USB
device, and create a photo.txt, music.txt and video.txt file in the corresponding file folder,
Copy the files which you wish to automatically playback into the corresponding folder.
2. Through setup-MISC-play, select the class you wish to auto play.
3. After setting, connect the external USB to the player, and restart the player. Then the
system will come into the directory automatically to playback the media files.
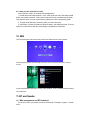
10. IMS
This is the third-party service and may be close off because of the policy issues.
Press left/right key select the enter IMS menu item on the main menu and press ok key to
access.
On this interface,there are Youku, search video, weather, Voole, and RSS News five items
for you browse.
11.BT and Samba
11.1 Web management and BT Download
To use this function, you need to format the Internal HD in Settings-> System-> Format
menu;
11.1.1 Login on Web Management Page
Please make sure player is connected to the network, and get the IP address of the
player under Setup->Network menu.
Tap the IP address (e.g.192.168.0.195) in the address bar of Internet Explore on your
PC.Then you can access the Web server on your PC.
Note: if the settings -> System -> Login control is set to on, the password to take effect.
The default user name is' admin ', default password is '123'.
If the login control is off, it will not need to enter a password and come into the main
interface directly, the main interface showing as blow:
11.1.2 Account Management
At Home page, select “Account Management” into Account Management page.
If click “Account Management” is not into this page, please ok Login control is set to ON.
Login password can be modified at here. Please setting password according your
favorite. Please input password twice and click “Enter” to confirm.
11.1.3 Visit Neighbor
Click Visit Neighbor on the home page of Neighbor Web.
All the devices are display here and you can click to visit.
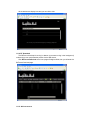
11.1.4 BT Download
The BitTorrent client btpd is running in daemon (a process running in the background)
mode and you can manipulate the process via the Web server.
Click BitTorrent Download on the home page of Neighbor Web, then you will enter the
BitTorrent Download page.
11.1.5 Add new torrent
Click Add new torrent on the BitTorrent Download page.
Click Browse to upload a torrent file, and click Yes to confirm.
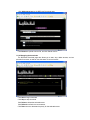
11.1.6 Managing the downloads
The BitTorrent Download page also allows you to start, stop, delete torrents, and set
priorities for torrents, as well as view the status of current torrents.
Click Start to begin download.
Click Stop to stop download.
Click Delete to delete the selected torrent.
Click Refresh to refresh the current status.
Click Down arrow to decrease the priority for the selected torrent.
Click Up arrow to increase the priority for the selected torrent.
11.1.7 Settings
Click Setting on the BitTorrent Download page to enter the BitTorrent Setting page.
In the BitTorrent Setting page, you can configure the following settings:
Set the maximum download rate.
Set the maximum upload rate.
Set the idle hours to start the next download automatically.
Set the seeding hours.
Set to delete the finished torrent files automatically or not.
Set the maximum number of simultaneous download tasks.
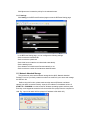
11.2 Network Attached Storage
This product may serve as the network storage device (NAS, Network-Attached
Storage). Put it into your family network to make it convenient for you to store and manage
the data on LAN.
Before using this function, please make sure the network (Ethernet or wireless
network) has been connected correctly. Input the \\IP address in the address column of
START UP-> RUNNING or on the browser of Windows operating system and then press
Enter key on the keypad to access the built-in hard disk on the player from the computer on
LAN. E.g., input \\192.168.0.195 if the player’s IP address is192.168.0.195.)
With this method, you can access into any partitions on the hard disk of the player, you
can manage, copy or store the data in the player on LAN.
You can also access the player's Internal HD (samba) by the chapter 11.1.3 Visit
Neighbor.
12. Upgrading Firmware
Firmware refers to the operating system (OS) on this product. Regularly upgrade the
firmware to the updated functions.
12.1 Upgrading firmware in setup menu
Please download the firmware programs with updated versions from the official
websites. And update firmware version as per the following steps:
Step 1: Prepare the external storage devices (such as SD card/removable
HDD/U-disk ect. but only support FAT32 and FAT16 formats)
Please extract the downloaded firmware programs with the updated version to the root
directory of external storage.
Step 2: Connect the external storage devices
Connect the prepared external storage devices onto the USB HOST port of the player.
Step 3: Enter into Software Upgrade menu
Enter into Setup->System->System Upgrade menu.
12.2 Upgrade method when the player unable enter into the main menu
Step1: Please extract the downloaded firmware programs with the updated version to
the root directory of external storage devices. (Such as SD card/removable HDD/U-disk ect.
but only support FAT32 and FAT16 formats)
Step 2: Connect the external storage devices onto the USB HOST port of the player.
Step 3: Unplug the power cable, hold down the standby button.
Step 4: Plug the power cable and approximately 5s loosen you hand which was
pressed the stand by buttom.
After the operation has been confirmed, the system will be restarted and the System
Upgrade interface will be displayed on the screen.
The whole installation will last for approximately 2 minutes; please wait for it patiently.
The player will be restarted after installation. Then you can use all functions of this player
normally and experience the unequalled multimedia enjoyment.
Remarks:
If installed error, unplug the power and re-installed;
Never disconnect the power supply during installation;
Never unplug the external storage devices during installation.
Different Model of player cannot use the same firmware, please upgrading it with serious
cautious.
Please contact your dealer or choose to visit our website for the latest firmware.
Note:
View the current software version; please enter into the Setup-> System -> System
Upgrade menu.
13. Others
13.1 Specifications
List of Supported ports:
²
USB 2.0 HOST port x 2
²
USB 2. 0 Slave port
²
Composite (CVBS) A/V jack
²
Component Y/Pb/Pr jack
²
HDMI V1.3 interface
²
Digital audio optical/ coaxial port
²
3-in-1 card reader
²
12V DC-IN
Multimedia formats supported:
i)
AVI/MKV/TS/M2TS/MPG/MOV/VOB/ISO/IFO/DAT/WMV/RM/RMVB,surport for
ii)
MP3/OGG/WMA/WAV/AAC/FLAC
iii)
HD JPEG/BMP, with unlimited resolution
720p/1080i/1080p
Video codes supported:
iv)
MPEG-1
v)
HD MPEG-2
vi)
HD MPEG-4 SP/ASP/AVC(H.264)
vii) WMV9(VC-1)
viii) Real Networks (RM/RMVB) 8/9/10, support for720p
Audio codes supported:
ix)
MP2/3, OGG Vorbis, FLAC, WMA Standard (DRM, and Advanced Profile not
supported), PCM, LPCM, AAC,RA
Subtitle formats supported:
x)
SRT, SMI, SSA,SUB, IDX+SUB
Network
Ethernet/
Wireless
network
10/100Mbps Auto-Negotiation Ethernet
IEEE 802.11b/g/n WLAN, at maximum 300Mbps (supported by
optional WLAN USB Adapter)
13.2 FAQ
Question 1:
My computer can not find the product.
Answer:
(1) Make sure the unit is in on status.
(2) make sure that the unit is connected with the computer
(3) Connected the product to the back of computer USB jack.
Question 2:
When I try to disconnect the USB device, I keep on getting “The device ‘Generic
volume’ cannot be stopped right now. Try stopping the device again later.” message,
what should I do?
Answer:
Close any program that might be accessing data on the player, including Windows® Explorer.
If it does not work, close all programs and wait for another 20 seconds, then try the green arrow
icon again. If it still does not work, you should shut down the player and disconnect the USB
cable.
Question 3:
I find new file names and folder names that I never created before or they have
strange gibberish names.
Answer:
Most likely, the player’s file allocation table (FAT) has been corrupted. This might be due to the
player shutting down (due to low battery power) while reading or writing to your computer by the
USB connection. Windows and Macintosh often write extra files to the hard disk such as
finder.def or System volume info. These are normal and will not do any harm to the player.
Question 4:
I used my player to transfer files back and forth between different computers. Will
defragmenting the player hard disk do any harm to it?
Answer:
Defraygmenting the player hard disk may be useful after having transferred many files to and
from the player. It is never harmful to use the defrayment on the player. Make sure no other
programs are running while using the Windows® defrayment utility. Make sure you have
connected the player with the external power adapter during this procedure.
Question 5:
My files have disappeared from the player.
Answer:
Make sure that you browse your files via the correct browser mode which means correct
filtered views such as Photos, Music, or Movies.
Question 6:
Why do some support's form picture can't display in picture browser?
Answer:
E.g., the JPEG format include many different models, and our product does not support the
gradual mode images, so you need for modify it to display it.
(1) Open the picture with Photoshop.
(2) Select "File" -> "Save As", select the image format is JPEG, input file name as following
picture, then click "Save."
(3) when click "Save" it will pop-up dialog box as shown below; select "Baseline ('standard')"
or "baseline optimized".
(4) Click "OK."
Question 7:
During power on, why does the TV will have a short flashing, blue screen or
screensaver?
Answer:
This is normal, when the system initializes, it will setup the corresponding parameters so it
can output the correct video signal to the TV, during the initializing time, the TV will receive
incorrect signals or the signals will not be stable and will cause the TV screen to flash, some
TV’s will treat this as no signal, and will display a blue screen or screensaver.
Question 8:
Why when I switch to Y/Pb/Pr 480p, 576p, 720p, 1080i, and 1080p, does the TV
screen display an unwatchable picture?
Answer:
Please check if your TV supports Y/Pb/Pr 480p, 576p, 720p, 1080i, and 1080p output, if
your TV does not support, please use the A/V signal display instead, press the TV SYSYEM
button on the remote control, then switch the TV’s video input to NTSC or PAL.
Question 9:
Why is there no sound on movie or music playback when using Y/Pb/Pr component
output?
Answer:
Y/Pb/Pr output is a video output only, and does not include sound signals. When using
Y/Pb/Pr output, please plug the A/V OUT or the S/PDIF jack to output sound.
Question 10:
Why does my player can not recognize HDD?
Answer:
First make sure it is installed correctly, and do not delete any partitions on computer.
If there is a bad area of you HDD, you need to back up the data first and re-install the driver
for the system.
Question 11:
Why the subtitles my added can not come out?
Answer:
First make sure the file name of the film and the subtitles are in same (Distinguish Capital
/small letters), and saved in the same folder.
13.3 Copyrights and Trademarks
Copyrights
The Company reserves all patent, trademarks, copyright and other intellectual property
rights, and the content of User manual can not be reprinted without permission. The software,
music or movies owns the copyright are protected by the relevant laws, Users who use this
player to copy of such content need to bear the related legal responsibility.
Trademarks
Manufactured under license under U.S. Patent #’s:5,451,942; 5,956,674;
5,974,380; 5,978,762; 6,487,535 & other U.S. and worldwide patents issued &
pending. DTS and DTS 2.0 + Digital Out are registered trademarks and the DTS
logos and Symbol are trademarks of DTS, Inc. © 1996-2008 DTS, Inc. All Rights
Reserved.
Manufactured under license from Dolby Laboratories.
Dolby and the double-D symbol are registered trademarks of Dolby Laboratories.
Declaration:
The copyright of this product is owned for the corresponding factory owner, and protect by
the "Copyright Law”, we sell the product are not means transfer or grant to the user any
rights of the copyright.