1
Cinedeck Extreme User Manual
Version 2.06
Cinedeck Extreme User Manual V 2.06
About this manual
Important!
This manual reflects the state of the Cinedeck Extreme hardware (1.0) and software
(2.0) at the time it was published. It will be updated frequently as new features are
implemented, and will not necessarily reflect legacy information. Legacy versions
of the hardware and software would be covered by the manual included with that
release.
What’s in the manual
This user manual describes the functions available in the Cinedeck software, as well
as relevant information regarding upgrades, hardware information such as pin definitions for connectors, interaction with 3rd party software such as NLEs, and further
technical information of interest to users.
The manual is divided into 4 parts
1) Table of contents.
2) General introduction to the Cinedeck Extreme
3) Menu function descriptions and notes
4) Appendices with processes for various tasks related to maintenance and
updates, as well as technical information, drawings, best practices notes
and FAQs.
Copyright and Trademark Notice.
All trademarks are the property of their respective owners.
Cinedeck is a trademark of Cinedeck LLC
ProRes is a trademark of Apple Computer Corporation
Avid Media Composer is a trademark of Avid Technology, Inc.
DNxHD is a trademark of Avid Technology, Inc.
Windows is a trademark of Microsoft Corporation
Contents
About this manual............................................................................................................................. 2
Copyright and Trademark Notice.................................................................................................... 2
What’s included.................................................................................................................. 7
Safety information............................................................................................................. 8
Support information.......................................................................................................... 9
First line troubleshooting, hardware............................................................................................................9
First line troubleshooting, software..............................................................................................................9
Hardware I/O.................................................................................................................... 10
Loading the SSD media.................................................................................................................................. 11
Cinedeck certified Batteries.......................................................................................................................... 11
Basic operation................................................................................................................. 11
Powering up the Cinedeck............................................................................................................................ 12
Hotswap of power input................................................................................................................................ 12
User Interface................................................................................................................... 13
General notes about the user interface......................................................................................... 13
Main user interface (recording)..................................................................................................... 13
Record start [record]........................................................................................................................................ 14
Record stop [stop]............................................................................................................................................ 14
Wired remote record start/stop [start][stop]......................................................................................... 14
Slate display [slate] Not currently enabled. ........................................................................................... 15
Safe Frame Display [safe]............................................................................................................................... 16
Safe frame on-off toggle [safe]........................................................................................................... 16
Safe frame preferences [setup]:[prefs]:[grid]..................................................................... 16
Letterbox Safe Frame Display [safe]+ [setup][input][letterbox]............................................. 17
Letterbox preview [letterbox]............................................................................................................... 17
Grid Display [grid]............................................................................................................................................. 18
Grid opacity and brightness [setup]:[preferences]:[grid].......................................................... 18
100% Display [100%]....................................................................................................................................... 19
Edge detection display [edge] .................................................................................................................. 20
Image Analysis [analysis]............................................................................................................................... 21
Image analysis, full window mode [overlay]...................................................................... 21
Waveform [waveform]............................................................................................................................ 22
Overlay inset mode [overlay]................................................................................................... 22
Display channel selection [Y] [R] [G] [B] [RGB].................................................................. 22
0-255 scale [255].......................................................................................................................... 23
100% scale [100%]....................................................................................................................... 23
IRE scale [IRE]................................................................................................................................. 23
Historgram [histogram].......................................................................................................................... 24
Historgram, overlay mode [overlay]..................................................................................... 24
Vectorscope [scope]................................................................................................................................ 25
Vectorscope 100% view [scope]:[100%].............................................................................. 25
Vectorscope, overlay mode [overlay]................................................................................... 25
Highlight Clipping [clipping]........................................................................................................................ 26
Highlight clipping [setup]:[preferences]:[clip]............................................................................... 26
Full Screen display [fullscreen]..................................................................................................................... 27
Full screen mode in main user interface [fullscreen].......................................................................... 27
Full screen mode in main user interface [fullscreen].......................................................................... 27
Full screen mode in playback interface. [fullscreen]........................................................................... 28
Setup Menu Tabs [setup]............................................................................................................................... 28
Playback user interface [play]...................................................................................................................... 29
Playback user interface [play]...................................................................................................................... 29
Playback file manager [play]:[open].......................................................................................................... 30
Touch screen lock [lock]................................................................................................................................. 30
Time Code Reset [TC reset]........................................................................................................................... 31
Time Code Reset Slider [TC reset]...................................................................................................... 31
Settings and Status displays......................................................................................................................... 32
Input status displays:............................................................................................................................... 32
Media status displays:............................................................................................................................. 32
Audio input status display..................................................................................................................... 33
Filename display........................................................................................................................................ 33
Time Code Status display...................................................................................................................... 33
Last take duration display [last].......................................................................................................... 34
Battery meter display.............................................................................................................................. 34
Audio levels display ................................................................................................................................ 34
headphone volume slider..................................................................................................................... 34
Audio options menu [ > ]...................................................................................................................... 35
Monitoring selection.................................................................................................................. 35
Volume sliders............................................................................................................................... 35
Performance metrics display ............................................................................................................... 36
GPS coordinates display ....................................................................................................................... 36
Playback user interface................................................................................................... 37
Transport controls............................................................................................................................................ 37
Fullscreen, playback mode [fullscreen]..................................................................................................... 37
Playback interface [play]................................................................................................................ 37
Playback file manager open [open]........................................................................................................... 38
Take delete [take delete]........................................................................................................................ 39
Take delete [take delete]........................................................................................................................ 39
File recovery [recover]............................................................................................................................ 39
File recovery, continued [recover]...................................................................................................... 40
Setup Menu Tabs [setup]................................................................................................ 41
Input preferences tab [setup]:[input]............................................................................................ 42
Input preferences tab [setup]:[input]........................................................................................................ 42
Signal input settings [setup]:[input] or {input status display}................................................. 42
Valid input selections.............................................................................................................................. 42
Application restart on settings change............................................................................................ 43
Application restart on settings change............................................................................................ 43
Input resolution......................................................................................................................................... 43
Input frame rate........................................................................................................................................ 44
Input pixel format..................................................................................................................................... 44
Input video source................................................................................................................................... 44
Input audio source................................................................................................................................... 45
Input preview options............................................................................................................................. 45
Input codec, quality, and file format (wrapper) options.......................................................... 45
Folder manager tab [setup]:[files]................................................................................................. 46
Folder manager tab [setup]:[files].............................................................................................................. 46
Folder creation [new project][new scene]....................................................................................... 46
Renaming folders.............................................................................................................................................. 47
Folder selection......................................................................................................................................... 47
Deleting folders......................................................................................................................................... 47
Time code Preferences Tab [setup][TC]......................................................................................... 49
Time code Preferences Tab [setup][TC].................................................................................................... 49
Internally generated time code [gen]............................................................................................... 49
Save time code at end of session. [save TC].................................................................................. 49
Generated drop frame time code [drop]......................................................................................... 50
Embedded SDI time code [SDI].......................................................................................................... 50
Embedded SDI time code auto-record, generic [generic]........................................................ 50
Embedded SDI time code auto-record, VITC [future]................................................................ 51
ExSync hardware timecode module [ExSync]................................................................................ 51
Hardware timecode module not found........................................................................................... 52
Time code offsets [offset +][offset -]............................................................................................... 52
Time code offsets [offset +][offset -]................................................................................................ 52
Time code display modes..................................................................................................................... 53
Show UTC or Local timecode [show UTC][show local]............................................................... 53
Convert preferences tab [setup][convert].................................................................................... 54
Convert tab [convert]...................................................................................................................................... 54
Input Up Down and Cross conversion modes [convert]:[input]............................................. 55
Single-output Down and Cross conversion modes [convert]:[output]........................................ 55
Simultaneous-output up, down, and cross conversion modes [convert]:[simul out].... 56
24p (23.98p actual) to 59i (59.97) output conversion [convert]:[output] .......................... 56
Update preferences tab [setup][update]...................................................................................... 57
Update preferences tab [setup]:[update]................................................................................................ 57
Troubleshooting the update process........................................................................................................ 57
Update preferences tab [setup]:[update]................................................................................................ 58
Adding feature license keys to the software.................................................................................. 58
License keys challenge code entry........................................................................................ 58
General preferences tab [setup][prefs]......................................................................................... 59
General Preferences [setup]:[prefs]............................................................................................................ 59
[main]............................................................................................................................................................ 59
[grid].............................................................................................................................................................. 59
[clip]............................................................................................................................................................... 59
[loss stop].................................................................................................................................................... 59
[GPS].............................................................................................................................................................. 59
[Mouse]........................................................................................................................................................ 59
[rec/stop]..................................................................................................................................................... 59
[3Gb/s out].................................................................................................................................................. 59
[Disable safe].............................................................................................................................................. 59
[drop stop].................................................................................................................................................. 59
[thumbs]....................................................................................................................................................... 59
[mouse exit]................................................................................................................................................ 59
[peak vu]...................................................................................................................................................... 59
[P not PsF]................................................................................................................................................... 59
[fan ctrl]........................................................................................................................................................ 60
[low]................................................................................................................................................... 60
[medium]......................................................................................................................................... 60
[high]................................................................................................................................................. 60
[auto]................................................................................................................................................. 60
[battery mon]............................................................................................................................................. 60
[Anton Bauer]................................................................................................................................ 60
[Digi View]....................................................................................................................................... 60
[restart app]................................................................................................................................................ 60
[exit app]...................................................................................................................................................... 60
[reset prefs]................................................................................................................................................. 60
[save prefs].................................................................................................................................................. 60
[load prefs].................................................................................................................................................. 60
Appendices:...................................................................................................................... 61
Field Operating System Restore (“Factory Reset”) Instructions:............................................... 61
Restoring the Cinedeck to factory settings:........................................................................................... 61
Cinedeck Operating System Field Restore Disk Update instructions......................................... 62
Updating the restore disk.............................................................................................................................. 62
Cinedeck Bootable BIOS Update Disk Creation Instructions...................................................... 63
Making the BIOS update USB thumb drive: ........................................................................................ 63
Breakout cable connections............................................................................................................ 64
Cinedeck I/O Pin Definitions: Serial numbers 500 and higher................................................... 65
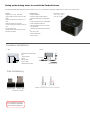
Setting up the docking station for use with the Cinedeck Extreme.......................................... 66
Care and feeding of SSD media...................................................................................................... 67
Restoring SSD media to “factory new” performance................................................................. 67
Special note regarding PhotoFast RAID media............................................................................. 67
Setting up new SSD media for use with the Cinedeck Extreme............................................. 68
Using the Patriot trim utility for Patriot Torqx SSD media........................................................ 70
Using the OCZ trim/garbage collection utility.......................................................................... 71
OCZ Vertex2 Secure Erase process for restoring SSD performance..................................... 72
Setting the battery meter COM port............................................................................................. 73
Codec installation on the MAC and PC.......................................................................................... 75
ProRes................................................................................................................................................................... 75
DNxHD (Quicktime)......................................................................................................................................... 75
DNxHD (MXF)..................................................................................................................................................... 75
CineForm.............................................................................................................................................................. 75
Uncompressed................................................................................................................................................... 75
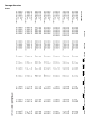
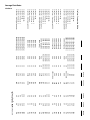
Average data rates........................................................................................................................... 76
Prores............................................................................................................................................................ 76
Avid DNxHD............................................................................................................................................... 77
CineForm..................................................................................................................................................... 78
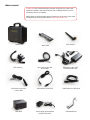
What’s included
In addition to the Cinedeck Extreme recorder, everything you need to get
started is included in the custom Pelican case, including media if you purchased any with your Cinedeck.
Please check to ensure that all expected contents are in the case. In the event
that anything is missing, please contact [email protected]
Pelican Case
WiFi antenna
Base stand
3pin Lemo to 3pin XLR
audio cable
WiFi antenna
Wall power supply with
localized power cord
2pin Lemo to 4pin XLR
power cable
USB cable for HDD dock
ESATA cable for HDD dock
HDD dock
Power supply with localized
plug for HDD dock
USB thumb drive
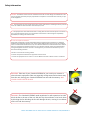
Safety information
CAUTION: The Federal Communications Commission warns the user that changes or modifications to the
unit not expressly approved by the party responsible for compliance could void the user's authority to operate the equipment.
FCC: This equipment has been tested and found to comply with limits for Class B digital device pursuant
to Part 15 of Federal Communications Commission (FCC) rules.
CE: This equipment has been tested and found to comply with the limits of the European Council Directive on the approximation of the law of the member states related to electromagnetic compatibility
(89/336/EEC) according to EN 55022 Class B.
CC and CE Compliance Statement
These limits are designed to provide reasonable protection against frequency interference in residential
installation. This equipment generates, uses and can radiate radio frequency energy, and if not installed or
used in accordance with the instructions, may cause harmful interference to radio communication. However,
there is no guarantee that interference will not occur in television reception, which can be determined by
turning the equipment off and on. The user is encouraged to try and correct the interference by one or
more of the following measures:
• Reorient or relocate the receiving antenna
• Increase the separation between the equipment and the receiver
• Connect the equipment into an outlet on a circuit different from that to which receiver is connected
WARNING: Take care of your Cinedeck EXTREME as you would your cameras or
other electronic equipment. Take care especially to keep water and moisture away
from the unit. Getting your Cinedeck EXTREME wet will void the warranty. AND
COULD CAUSE ELECTRIC SHOCK.
WARNING: The Cinedeck EXTREME needs ventilation for safe operation. DO NOT
block the fan at the rear of the unit. DO NOT lay the unit down on its back, thereby blocking the fan. Blocking the fan will damage the unit, causing it to overheat,
and it will void the warranty.
More information is available at www.cinedeck.com/warranty
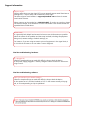
Support information
Support Hours:
Support office hours are 9am-6pm EST, but we generally answer email from 8am to
midnight EST, 7 days a week, and at odd hours of the night.
The direct support email address is: [email protected] and we do answer
email within minutes.
Phone support can be reached at +1-646-642-6985. If you do not reach us, please
do leave a message, as we endeavor to return calls within a few minutes within the
expanded hours noted above.
Please Note!
It is generally both helpful and essential to have as much information as possible
about the nature of the problem and the setup involved, including all equipment
being used, camera settings, Cinedeck settings, etc.
For instance, if you are using an esoteric piece of equipment in the signal chain, it
is critical that we know so we can make a correct diagnosis.
First line troubleshooting, hardware.
Is it plugged in?
Often the simplest things can make life difficult...always check the basics!
Is the power supply plugged in? battery charged? camera turned on? camera settings correct?
First line troubleshooting, software.
Have you matched your camera settings?
Often the simplest things can make life difficult...always check the basics!
Is the camera set to P and the Cinedeck to PSF? Is the camera actually a 24p signal, or 59i masquerading as 24p via pulldown?
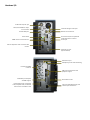
Hardware I/O
12–28V wide input DC jack
AUX 5/12V 500MA DC output
for accessories
RS-422 COM port*
Power switch
HDMI record in and monitor out
2 channel analogue audio input
Remote record connector
Per-channel line/mic and phantom
power switches for on-board
audio input
VGA for UI/preview clone on external VGA
monitor
Timecode sync port
(optional feature)
Wifi antenna port
Headphone jack for audio monitoring
Dual link/3G HDSDI
in and out
USB ports for field restore and
peripheral support
ESATA with port multiplier
and RAID support
Digital/analog audio, component
video, composite video, and RS 422
deck control* via breakout cable
Removable 2.5" SSD
LAN port networked storage, LAN
camera input and Internet
Basic operation
Loading the SSD media
NOTE: An SSD is not included in the Cinedeck EXTREME kit. It must be purchased separately. Please contact your dealer or email us at [email protected] for more information.
On the i/o panel on the right side of the Cinedeck EXTREME, you will see the slot for the SSD media. Slide
the SSD into the slot with the SSD connectors facing towards you.
Once the Cinedeck EXTREME recognizes the SSD, media information will appear in the upper right hand
corner of the screen.
Warning: Only SSD media purchased from Cinedeck are ready to use. Other SSDs must be prepared following the directions on page 9 to prevent error and data loss.
Cinedeck certified Batteries
Note: The Cinedeck requires high capacity, high drain batteries. The following batteries have been certified for use.
IDX: HL9, HL9S, HL10, HL10S, Endura Elite
Anton Bauer: Dionic HC & HCX
Powering up the Cinedeck
Note: we recommend that when you power up your Cinedeck EXTREME via the AC adapter, power brick,
or battery for the first time, you confirm that the voltage falls within the input range of 12 to 30V.
To safely disconnect the LEMO connector from the device, you must slide the sleeve of the
connector and then gently tug to remove the connector from the Cinedeck EXTREME.
IMPORTANT: There is a SAFETY LOCK on the LEMO connector to prevent it being accidentally removed
from the Cinedeck EXTREME. DO NOT pull any part of the AC Adapter other than the sleeve.
Turning on the Cinedeck Extreme:
The POWER BUTTON is located on the i/o panel on the left side of the Cinedeck EXTREME.
Press the POWER button and a green light will appear indicating it is ON. A blue light on the bottom
right hand corner on the front of the Cinedeck EXTREME will also be illuminated.
The Cinedeck EXTREME boots in approximately 45 seconds. A full on-off power cycle is approximately 55 seconds.
Hotswap of power input
NOTE: It is possible to switch between the AC Adapter and the batteries without turning off the
Cinedeck EXTREME.
User Interface
General notes about the user interface
The user interface has been designed with use in high pressure situations in mind, where a minimum of
interaction is desirable to operate the Cinedeck and in normal operation, every tool commonly needed
is readily at hand.
Most commonly used tools are accessible within one touch from the main screen. The touchscreen is
the main control surface for the interface, but there are also physical buttons for commonly used functions while in full screen preview mode.
Active (on) buttons are indicated by [text] and inactive buttons are indicated by {text}
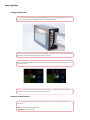
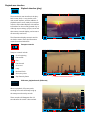
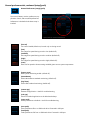
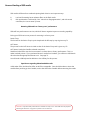
Main user interface (recording)
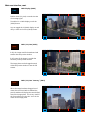
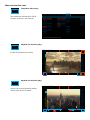
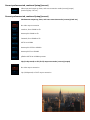
The main user interface is the record screen,
which includes displays with relevant information for the current input and output
settings, project, scene and take names,
timecode display, and access to all commonly
used tools.
long
lat
alt
temp
-74.0715 Frame 1080p YUV10
40.416
Fps
23.98
51.166
Codec CineForm 1.1MB/frame 27.3MB/s
72
manhattan_aerial
next: reel_2_002
Battery 97%
last take 1:40
Media 128GB
Free
126GB
Remain 92 min
record
slate
SDI
safe
grid
100%
edge
Touching information displays will take the
user to the relevant setup menu. ie touching
the timecode display invokes the timecode
setup menu. This is typical for most status
and information displays.
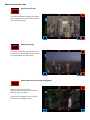
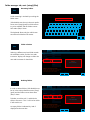
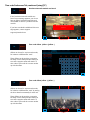
During record, there is a bright red border
around the preview image.
analysis
clipping
Phones
play
long
lat
alt
temp
fullscreen
lock
reset
-74.0715 Frame 1080i YUV10
40.416
Fps
25
51.166
Codec Prores HQ 1.1MB/frame 27.3MB/s
78
00:12:06:21
manhattan_aerial
next: reel_2_031
Battery 64%
last take 5:39
setup
stop
Media 128GB
Free
102GB
Remain 62 min
record
slate
SDI
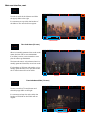
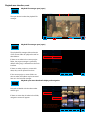
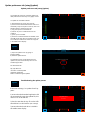
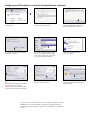
Buttons that are inaccessible such as [play]
and [setup] disappear.
safe
grid
100%
Certain dynamic information displays that are
only relevant during record appear, such as
data rate and system resource usage, buffer
status, and disk wait time display.
edge
analysis
clipping
Phones
2/2
0
This border will begin to flash bright yellow
when there is approximately 10GB of space
remaining on the media.
fullscreen
lock
long
lat
alt
temp
reset
-74.0715 Frame 1080p YUV10
40.416
Fps
23.98
51.166
Codec DNxHD 0.8MB/frame 20.3MB/s
84
00:05:15:04
manhattan_aerial
next: reel_2_031
stop
Battery 24%
last take 15:34
Media 128GB
Free
9GB
Remain 10 min
record
slate
SDI
safe
grid
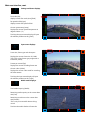
When there is less than 2GB of remaining
space, recording will stop automatically.
100%
edge
analysis
clipping
Phones
play
fullscreen
lock
reset
01:17:56:01
setup
stop
Main user interface, cont.
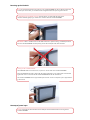
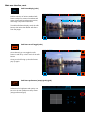
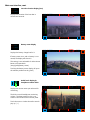
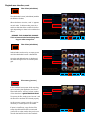
Record start [record]
record
To prevent accidental recordings, the button
must be held down for about 1/2 second before record will engage.
long
lat
alt
temp
-74.0715 Frame 1080p YUV10
40.416
Fps
23.98
51.166
Codec CineForm 1.1MB/frame 27.3MB/s
72
manhattan_aerial
next: reel_2_031
Battery 44%
last take 3:22
Media 128GB
Free
73GB
Remain 46 min
record
slate
SDI
safe
grid
100%
edge
analysis
clipping
Phones
play
fullscreen
lock
reset
00:12:06:21
setup
stop
Media 128GB
Free
73GB
Remain 46 min
record
Record stop [stop]
stop
To prevent accidentally stopping the recording, the button must be held down for about
1/2 second before stop will engage.
long
lat
alt
temp
-74.0715 Frame 1080p YUV10
40.416
Fps
23.98
51.166
Codec CineForm 1.1MB/frame 27.3MB/s
72
manhattan_aerial
next: reel_2_031
Battery 44%
last take 3:22
slate
SDI
safe
grid
100%
edge
analysis
clipping
Phones
play
record
fullscreen
lock
reset
00:12:06:21
setup
stop
Media 128GB
Free
73GB
Remain 46 min
record
Wired remote record start/stop [start][stop]
stop
When in ‘wired remote’ mode,
[setup]:[prefs]:{rec/stop}the record button
also acts as the stop button.
long
lat
alt
temp
-74.0715 Frame 1080p YUV10
40.416
Fps
23.98
51.166
Codec CineForm 1.1MB/frame 27.3MB/s
72
manhattan_aerial
next: reel_2_031
Battery 44%
last take 3:22
slate
SDI
safe
grid
Once record is engaged, the text in the record button will change to [stop]
100%
edge
analysis
clipping
Phones
play
fullscreen
lock
reset
00:12:06:21
setup
Main user interface, cont.
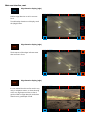
3D Preview mode selection [3D pre]
3D pre
Selects 3D previewing mode:
Side by Side, Left eye, Right eye
Main user interface, cont.
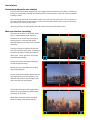
Safe Frame Display [safe]
safe
long
lat
alt
temp
Enables selection of various standard safe
frame overlays for common broadcast safe
areas, cinema and broadcast aspect ratios,
and image composition assistance.
-74.0715 Frame 1080p YUV10
40.416
Fps
23.98
51.166
Codec CineForm 1.1MB/frame 27.3MB/s
72
manhattan_aerial
Media 128GB
Free
73GB
Remain 46 min
Battery 44%
last take 3:22
next: reel_2_031
record
slate
SDI
1.85:1
2.35:1
16:9
4:3
2.39:1
safe
grid
100%
To enable safe frame display, touch the safe
button, then select the desired safe frame
from the popup.
edge
analysis
clipping
Phones
play
fullscreen
lock
reset
00:12:06:21
setup
stop
Media 128GB
Free
73GB
Remain 46 min
record
Safe frame on-off toggle [safe]
2.39:1
Once selected, you can toggle the safe
frame on and off by a short touch of the safe
button.
long
lat
alt
temp
-74.0715 Frame 1080p YUV10
40.416
Fps
23.98
51.166
Codec CineForm 1.1MB/frame 27.3MB/s
72
manhattan_aerial
Battery 44%
last take 3:22
next: reel_2_031
slate
SDI
safe
2.39:1
grid
A long touch will bring up the safe frames
pop-up again.
100%
edge
analysis
clipping
Phones
play
fullscreen
lock
reset
00:12:06:21
setup
stop
Safe frame preferences [setup]:[prefs]:[grid]
grid
input
files
TC
conv
input
prefs
Preferences for brightness and opacity can
be set in the user preferences setup menu.
[setup:preferences:grid]
main
grid
0.49
luma
0.90
clip
Main user interface, cont.
Letterbox Safe Frame Display [safe]+ [setup][input][letterbox]
safe
First you must choose a safe area setting as
shown on the previous page.
long
lat
alt
temp
-74.0715 Frame 1080p YUV10
40.416
Fps
23.98
51.166
Codec CineForm 1.1MB/frame 27.3MB/s
72
manhattan_aerial
Media 128GB
Free
73GB
Remain 46 min
Battery 44%
last take 3:22
next: reel_2_031
record
slate
SDI
1.85:1
2.35:1
16:9
4:3
2.39:1
safe
grid
100%
edge
analysis
clipping
Phones
play
fullscreen
lock
reset
00:12:06:21
setup
stop
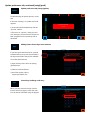
Letterbox preview [letterbox]
safe
letterbox
input
files
input
convert
input
prefs
source
fps
format
video
audio
options
codec
quality
wrapper
1080i
50
4:2:2 YUV8
SDI
Off
preview
CineForm
proxy
MXF
1080i
59.94
4:2:2 YUV10
HDMI
SDI 2 chan
flip preview
UNCOMP
LQ
mov
720p
60
4:4:4 RGB10
component
SDI 8 chan
letterbox
DNxHD
normal
composite
Balanced
ProRes
HQ
To enable letterboxing for preview, first you
must choose a safe area setting as shown
above.
Then in [setup][input] menu, letterbox must
be active.
PAL
NTSC
4444
AES 2chan
back
Letterbox preview [letterbox]
safe
letterbox
If both safe frame display and letterbox display are selected, you will see only the active
safe area in the preview window.
long
lat
alt
temp
-74.0715 Frame 1080p YUV10
40.416
Fps
23.98
51.166
Codec CineForm 1.1MB/frame 27.3MB/s
72
manhattan_aerial
next: reel_2_031
Battery 44%
last take 3:22
Media 128GB
Free
73GB
Remain 46 min
record
slate
SDI
2.39:1
grid
100%
edge
analysis
clipping
Phones
play
fullscreen
lock
reset
00:12:06:21
setup
stop
Main user interface, cont.
Grid Display [grid]
grid
Enables selection of various standard grid
overlays for image composition assistance.
long
lat
alt
temp
-74.0715 Frame 1080p YUV10
40.416 Fps
23.98
51.166 Codec CineForm 1.1MB/frame 27.3MB/s
72
Battery 44%
last take 3:22
manhattan_aerial
next: reel_2_031
Media 128GB
Free
73GB
Remain 46 min
record
slate
SDI
safe
To enable grid display, touch the grid button, then select the desired grid from the
popup
grid
100%
edge
analysis
clipping
Phones
fullscreen
play
lock
reset
00:12:06:21
setup
stop
Media 128GB
Free
73GB
Remain 46 min
record
Grid type [grid]
Once selected, you can toggle the grid display on and off by a short touch of the grid
button.
long
lat
alt
temp
-74.0715 Frame 1080p YUV10
40.416 Fps
23.98
51.166 Codec CineForm 1.1MB/frame 27.3MB/s
72
Battery 44%
last take 3:22
manhattan_aerial
next: reel_2_033
slate
SDI
2.39:1
A long touch will bring up the grid pop up
again.
100%
edge
analysis
clipping
Phones
play
fullscreen
lock
reset
00:15:26:03
setup
stop
Grid opacity and brightness [setup]:[preferences]:[grid]
grid
input
files
TC
conv
input
prefs
Parameters for brightness and opacity can
be set in the user preferences setup menu.
[setup:preferences:grid]
main
grid
0.49
luma
0.90
clip
Main user interface, cont.
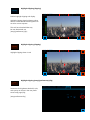
100% Display [100%]
100%
Enables 100% (1:1 pixel) or actual size view
of incoming signal.
long
lat
alt
temp
-74.0715 Frame 1080p YUV10
40.416
Fps
23.98
51.166
Codec CineForm 1.1MB/frame 27.3MB/s
72
manhattan_aerial
next: reel3_015.mov
Battery 44%
last take 3:22
Media 128GB
Free
73GB
Remain 46 min
record
slate
SDI
safe
To enable 1:1 or 100% display, touch the
[100%] button.
grid
100%
You can toggle the 1:1/100% display on and
off by a short touch of the [100%] button.
edge
analysis
clipping
Phones
play
fullscreen
lock
reset
00:12:06:21
setup
stop
Media 128GB
Free
73GB
Remain 46 min
record
100% (1:1) view [100%]
100%
In SD, the image would be letterboxed and
smaller than the preview window.
long
lat
alt
temp
-74.0715 Frame 1080p YUV10
40.416
Fps
23.98
51.166
Codec CineForm 1.1MB/frame 27.3MB/s
72
manhattan_aerial
next: reel3_015.mov
Battery 44%
last take 3:22
slate
SDI
safe
In HD, some of the image is outside the
boundary of the preview window.
grid
100%
The image plane can be dragged around
within the preview window to see the full
extents.
edge
analysis
clipping
Phones
play
fullscreen
lock
reset
00:12:06:21
setup
stop
Media 128GB
Free
73GB
Remain 46 min
record
100% (1:1) view “memory” [100%]
100%
When the image has been dragged out of
center, the next time 100% is enabled the
preview window will display the same shifted
area of the image plane. This is very useful if
the focus reference in the shot is not in the
center of the image plane.
long
lat
alt
temp
-74.0715 Frame 1080p YUV10
40.416
Fps
23.98
51.166
Codec CineForm 1.1MB/frame 27.3MB/s
72
manhattan_aerial
next: reel3_015.mov
Battery 44%
last take 3:22
slate
SDI
safe
grid
100%
edge
analysis
clipping
Phones
play
fullscreen
lock
reset
00:12:06:21
setup
stop
Main user interface, cont.
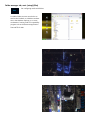
edge
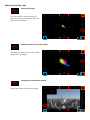
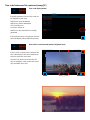
Edge detection display [edge]
Enables edge detection to aid in accurate
focus.
long
lat
alt
temp
-74.0715 Frame 1080p YUV10
40.416
Fps
23.98
51.166
Codec CineForm 1.1MB/frame 27.3MB/s
72
edge_test
next: test_005.mov
Battery 44%
last take 3:22
Media 128GB
Free
73GB
Remain 46 min
record
slate
SDI
safe
To enable edge detection tool display, touch
the [edge] button.
grid
100%
edge
analysis
clipping
Phones
play
fullscreen
lock
reset
00:12:06:21
setup
stop
Media 128GB
Free
73GB
Remain 46 min
record
Edge detection display [edge]
edge
The sharpness of the edges indicates areas
that are most in focus.
long
lat
alt
temp
-74.0715 Frame 1080p YUV10
40.416
Fps
23.98
51.166
Codec CineForm 1.1MB/frame 27.3MB/s
72
edge_test
next: test_005.mov
Battery 44%
last take 3:22
slate
SDI
safe
grid
100%
edge
analysis
clipping
Phones
play
fullscreen
lock
reset
00:12:06:21
setup
stop
Media 128GB
Free
73GB
Remain 46 min
record
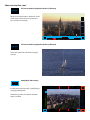
Edge detection display [edge]
edge
It is not advised that this tool be used in very
noisy or telephoto scenes, or when shooting
with a very high aperture value, as the algorithm used for edge detection works best
when there is good depth of field.
long
lat
alt
temp
-74.0715 Frame 1080p YUV10
40.416
Fps
23.98
51.166
Codec CineForm 1.1MB/frame 27.3MB/s
72
manhattan_aerial
next: reel3_009.mov
Battery 44%
last take 3:22
slate
SDI
safe
grid
100%
edge
analysis
clipping
Phones
play
fullscreen
lock
reset
00:12:06:21
setup
stop
Main user interface, cont.
Image Analysis [analysis]
analysis
Enables image analysis tools menu: Waveform
and Histogram (per channel or parade), and
Vectorscope.
long
lat
alt
temp
-74.0715 Frame 1080p YUV10
40.416
Fps
23.98
51.166
Codec CineForm 1.1MB/frame 27.3MB/s
72
manhattan_aerial
next: reel3_021.mov
Media 128GB
Free
73GB
Remain 46 min
Battery 44%
last take 3:22
record
slate
SDI
safe
To enable anlaysis tool display, touch the
analysis button, then select the desired analysis tool from the popup.
grid
100%
edge
Once selected, you can toggle the analysis
tools selection menu on and off by a short
touch of the analysis button.
A long touch will bring up the analysis tools
selection menu again.
histogram
scope
waveform
analysis
clipping
Phones
fullscreen
play
lock
reset
00:12:06:21
setup
stop
Media 128GB
Free
73GB
Remain 46 min
record
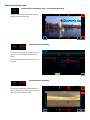
Image analysis, full window mode [overlay]
overlay
The analysis display tools may be displayed
either as full preview screen images or as an
inset overlay in the upper left corner.
long
lat
alt
temp
Full preview window mode
(overlay inset shown off, default setting)
-74.0715 Frame 1080p YUV10
40.416
Fps
23.98
51.166
Codec CineForm 1.1MB/frame 27.3MB/s
72
manhattan_aerial
next: reel3_021.mov
Battery 44%
last take 3:22
Y
slate
R
safe
G
grid
B
100%
RGB
edge
waveform
clipping
overlay
fullscreen
255
play
overlay
lock
reset
00:12:06:21
setup
stop
Media 128GB
Free
73GB
Remain 46 min
record
Image analysis, overlay inset mode [overlay]
Overlay inset mode shown on
long
lat
alt
temp
-74.0715 Frame 1080p YUV10
40.416
Fps
23.98
51.166
Codec CineForm 1.1MB/frame 27.3MB/s
72
manhattan_aerial
next: reel3_021.mov
Battery 44%
last take 3:22
Y
slate
R
safe
G
grid
B
100%
RGB
edge
waveform
clipping
overlay
fullscreen
255
play
lock
reset
00:12:06:21
setup
stop
Main user interface, cont.
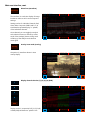
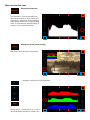
Waveform [waveform]
waveform
The waveform is a real-time display of image
luminance values to aid in correct exposure
settings.
long
lat
alt
temp
Settings can be for individual channels, Red,
Green, Blue, Composite (RGBY) and R, G, B
simultaneous separate display, or “parade,”
of the individual channels.
Once selected, you can toggle the analysis
tools selection menu on and off by a short
touch of the [analysis] button.A long touch
will bring up the analysis tools selection
menu again.
-74.0715 Frame 1080p YUV10
40.416
Fps
23.98
51.166
Codec CineForm 1.1MB/frame 27.3MB/s
72
manhattan_aerial
next: reel3_021.mov
Battery 44%
last take 3:22
Media 128GB
Free
73GB
Remain 46 min
record
Y
slate
R
safe
G
grid
B
100%
RGB
edge
waveform
clipping
overlay
fullscreen
255
play
lock
reset
00:12:06:21
setup
stop
Media 128GB
Free
73GB
Remain 46 min
record
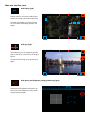
Overlay inset mode [overlay]
overlay
Composite (Y) waveform shown in inset
overlay display.
long
lat
alt
temp
-74.0715 Frame 1080p YUV10
40.416
Fps
23.98
51.166
Codec CineForm 1.1MB/frame 27.3MB/s
72
manhattan_aerial
next: reel3_021.mov
Battery 44%
last take 3:22
Y
slate
R
safe
G
grid
B
100%
edge
RGB
waveform
clipping
overlay
fullscreen
255
play
Y
lock
reset
00:12:06:21
setup
stop
Media 128GB
Free
73GB
Remain 46 min
record
Display channel selection [Y] [R] [G] [B] [RGB]
R
G
B
long
lat
alt
temp
-74.0715 Frame 1080p YUV10
40.416
Fps
23.98
51.166
Codec CineForm 1.1MB/frame 27.3MB/s
72
manhattan_aerial
next: reel3_021.mov
Battery 44%
last take 3:22
Y
slate
R
safe
G
grid
B
100%
RGB
edge
waveform
RGB
clipping
overlay
fullscreen
255
Display can be Y (composite) R [R], G [G], B [B]
or RGB [RGB] simultaneous “parade” view
play
lock
reset
00:12:06:21
setup
stop
Main user interface, cont.
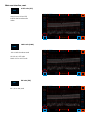
0-255 scale [255]
255
Heavy lines at 16 and 235
indicate the broadcast safe
values
long
lat
alt
temp
-74.0715 Frame 1080p YUV10
40.416
Fps
23.98
51.166
Codec CineForm 1.1MB/frame 27.3MB/s
72
manhattan_aerial
next: reel3_021.mov
Battery 44%
last take 3:22
Media 128GB
Free
73GB
Remain 46 min
record
Y
slate
R
safe
G
grid
B
100%
RGB
edge
waveform
clipping
overlay
fullscreen
255
play
lock
reset
00:12:06:21
setup
stop
Media 128GB
Free
73GB
Remain 46 min
record
100% scale [100%]
100%
-6% to 109% broadcast scale
long
lat
alt
temp
0%=16 on 0-255 scale
100%=235 on 0-255 scale
-74.0715 Frame 1080p YUV10
40.416
Fps
23.98
51.166
Codec CineForm 1.1MB/frame 27.3MB/s
72
manhattan_aerial
next: reel3_021.mov
Battery 44%
last take 3:22
Y
slate
R
safe
G
grid
B
100%
RGB
edge
waveform
clipping
overlay
fullscreen
100%
play
lock
reset
00:12:06:21
setup
stop
Media 128GB
Free
73GB
Remain 46 min
record
IRE scale [IRE]
IRE
IRE (-20 to 120) scale
long
lat
alt
temp
-74.0715 Frame 1080p YUV10
40.416
Fps
23.98
51.166
Codec CineForm 1.1MB/frame 27.3MB/s
72
manhattan_aerial
next: reel3_021.mov
Battery 44%
last take 3:22
Y
slate
R
safe
G
grid
B
100%
RGB
edge
waveform
clipping
overlay
fullscreen
100%
play
lock
reset
00:12:06:21
setup
stop
Main user interface, cont.
Historgram [histogram]
histogram
The Histogram is a real-time display of image luminance values to aid in correct exposure settings. Settings can be for individual
channels, Red, Green, Blue, Composite (RGB)
and R, G, B simultaneous separate display, or
“parade,” of the individual channels.
long
lat
alt
temp
-74.0715 Frame 1080p YUV10
40.416
Fps
23.98
51.166
Codec CineForm 1.1MB/frame 27.3MB/s
72
manhattan_aerial
next: reel3_021.mov
Battery 44%
last take 3:22
Media 128GB
Free
73GB
Remain 46 min
record
Y
slate
R
safe
G
grid
B
100%
RGB
edge
histogram
clipping
overlay
fullscreen
play
lock
reset
00:12:06:21
setup
stop
Media 128GB
Free
73GB
Remain 46 min
record
Historgram, overlay mode [overlay]
overlay
RGB Parade shown as inset overlay display.
long
lat
alt
temp
-74.0715 Frame 1080p YUV10
40.416
Fps
23.98
51.166
Codec CineForm 1.1MB/frame 27.3MB/s
72
manhattan_aerial
next: reel3_021.mov
Battery 44%
last take 3:22
Y
slate
R
safe
G
grid
B
100%
RGB
edge
histogram
clipping
overlay
fullscreen
play
lock
reset
00:12:06:21
setup
stop
Media 128GB
Free
73GB
Remain 46 min
record
Historgram, channel view [Y][R][G][B][RGB]
Y
R
G
B
long
lat
alt
temp
-74.0715 Frame 1080p YUV10
40.416
Fps
23.98
51.166
Codec CineForm 1.1MB/frame 27.3MB/s
72
manhattan_aerial
next: reel3_021.mov
Battery 44%
last take 3:22
Y
slate
R
safe
G
grid
B
100%
RGB
edge
histogram
RGB
clipping
overlay
fullscreen
Display can be Y (composite) R [R], G [G], B
[B] or RGB [RGB] simultaneous “parade” view
play
lock
reset
00:12:06:21
setup
stop
Main user interface, cont.
Vectorscope [scope]
scope
The vectorscope is a real-time display of
signal chrominance information to aid in setting correct color balance.
long
lat
alt
temp
-74.0715 Frame 1080p YUV10
40.416
Fps
23.98
51.166
Codec CineForm 1.1MB/frame 27.3MB/s
72
manhattan_aerial
next: reel3_021.mov
Battery 44%
last take 3:22
Media 128GB
Free
73GB
Remain 46 min
record
slate
safe
grid
100%
edge
scope
clipping
overlay
fullscreen
play
lock
reset
00:12:06:21
setup
stop
Media 128GB
Free
73GB
Remain 46 min
record
Vectorscope 100% view [scope]:[100%]
100%
The 100% tool [100%] can be used to aid in
viewing the ‘scope image.
long
lat
alt
temp
-74.0715 Frame 1080p YUV10
40.416
Fps
23.98
51.166
Codec CineForm 1.1MB/frame 27.3MB/s
72
manhattan_aerial
next: reel3_021.mov
Battery 44%
last take 3:22
slate
safe
grid
100%
edge
scope
clipping
overlay
fullscreen
play
lock
reset
00:12:06:21
setup
stop
Media 128GB
Free
73GB
Remain 46 min
record
Vectorscope, overlay mode [overlay]
overlay
Vectorscope shown as inset overlay display.
long
lat
alt
temp
-74.0715 Frame 1080p YUV10
40.416
Fps
23.98
51.166
Codec CineForm 1.1MB/frame 27.3MB/s
72
manhattan_aerial
next: reel3_021.mov
Battery 44%
last take 3:22
slate
safe
grid
100%
edge
scope
clipping
overlay
fullscreen
play
lock
reset
00:12:06:21
setup
stop
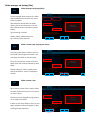
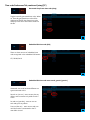
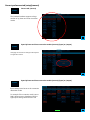
Highlight Clipping [clipping]
clipping
Enables highlight clipping tool display.
long
lat
alt
temp
-74.0715 Frame 1080p YUV10
40.416
Fps
23.98
51.166
Codec CineForm 1.1MB/frame 27.3MB/s
72
manhattan_aerial
Battery 44%
last take 3:22
next: reel_2_031
Media 128GB
Free
73GB
Remain 46 min
record
slate
SDI
Highlight clipping shows brightness values
above a certain threshhold of brightness as
an aid to correct exposure.
safe
grid
100%
This tool has a threshold that may
be user determined: see [setup]:[preferences]:[clip]
edge
analysis
clipping
Phones
play
fullscreen
lock
reset
00:12:06:21
setup
stop
Media 128GB
Free
73GB
Remain 46 min
record
Highlight clipping [clipping]
clipping
Highlight clipping shown in red.
long
lat
alt
temp
-74.0715 Frame 1080p YUV10
40.416
Fps
23.98
51.166
Codec CineForm 1.1MB/frame 27.3MB/s
72
manhattan_aerial
Battery 44%
last take 3:22
next: reel_2_031
slate
SDI
safe
grid
100%
edge
analysis
clipping
Phones
play
fullscreen
lock
reset
00:12:06:21
setup
stop
Highlight clipping [setup]:[preferences]:[clip]
clip
input
files
TC
conv
input
prefs
Parameters for brightness threshold, color,
and opacity can be set in the user preferences setup page [clip]
main
grid
cutoff
[setup:preferences:clip]
0.90
clip
back
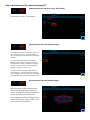
Main user interface, cont.
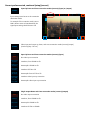
Full Screen display [fullscreen]
fullscreen
Enables full screen preview display and hides
user interface overlays on the preview both
in record and playback displays.
long
lat
alt
temp
-74.0715 Frame 1080p YUV10
40.416
Fps
23.98
51.166
Codec CineForm 1.1MB/frame 27.3MB/s
72
manhattan_aerial
next: reel_3_039
Battery 79%
last take 10:52
Media 128GB
Free
73GB
Remain 46 min
record
slate
SDI
safe
To invoke full screen display, touch the
fullscreen button in the UI or the physical
button adjacent to it.
grid
100%
edge
Full screen preview display hides user interface overlays on the preview.
To exit full screen display, press the physical full-screen button or touch and hold the
preview image for 2-3 seconds.
analysis
clipping
Phones
play
fullscreen
lock
reset
00:31:27:03
setup
stop
Full screen mode in main user interface [fullscreen]
fullscreen
Full screen mode with UI buttons hidden.
In fullscreen mode there is a small, dark gray
bar indicating the physical button location
for returning to the regular preview screen.
Full screen mode in main user interface [fullscreen]
fullscreen
Touching the display briefly will bring up the
soft buttons.
slate
safe
This is the same in record mode as well as
pause mode.
grid
100%
To exit full screen display, press the physical full-screen button or touch and hold the
preview image for 2-3 seconds.
edge
analysis
clipping
fullscreen
setup
Main user interface, cont.
Full screen mode in playback interface. [fullscreen]
fullscreen
When in full screen mode in playback, a brief
touch of the screen will bring up the transport controls momentarily.
slate
safe
grid
100%
edge
analysis
clipping
fullscreen
back
00:01:55:07
in/out
step
open
Full screen mode in playback interface. [fullscreen]
fullscreen
Full screen mode with safe frame and grid
overlays.
Setup Menu Tabs [setup]
setup
Invokes the setup menu tabs. [input][files][tc]
[output][update][prefs]
long
lat
alt
temp
-74.0715 Frame 1080p YUV10
40.416
Fps
23.98
51.166
Codec CineForm 1.1MB/frame 27.3MB/s
72
manhattan_aerial
next: reel_3_039
Battery 79%
last take 10:52
Media 128GB
Free
73GB
Remain 46 min
record
slate
SDI
safe
Preferences [prefs] is the default tab when
setup is invoked.
grid
100%
edge
analysis
clipping
Phones
play
fullscreen
lock
reset
00:31:27:03
setup
stop
Main user interface, cont.
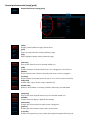
Setup Menu Tabs [setup]
setup
See: Preferences and Settings for full description of options in the prefs tab.
input
files
loss stop
drop stop
TC
conv
input
prefs
fan ctrl
battery meter
restart app
main
low
Anton Bauer
exit app
grid
Digi View
GPS
mouse
mouse exit
fan ctrl
3Gb/s out
Peak vu
high
3Gb/s out
P not Psf
clip
reset prefs
save prefs
Disable Safe
load prefs
[email protected] Version 2.0 release build 2.177
Playback user interface [play]
play
Invokes the playback user interface.
long
lat
alt
temp
-74.0715 Frame 1080p YUV10
40.416
Fps
23.98
51.166
Codec CineForm 1.1MB/frame 27.3MB/s
72
manhattan_aerial
next: reel_3_039
Battery 79%
last take 10:52
Media 128GB
Free
73GB
Remain 46 min
record
slate
SDI
safe
grid
100%
edge
analysis
clipping
Phones
play
fullscreen
lock
reset
00:31:27:03
setup
stop
Playback user interface [play]
play
The last clip recorded queued by default
when the play button is invoked.
long
lat
alt
temp
-74.0715 Frame 1080p YUV10
Fps
23.98
40.416
Codec CineForm high
51.166
72
manhattan_aerial
reel_2_031
Battery 79%
last take 2:54
Media 128GB
Free
73GB
Remain 46 min
slate
file
safe
grid
100%
edge
analysis
clipping
Phones
back
fullscreen
00:01:55:07
in/out
step
open
Main user interface, cont.
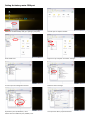
Playback file manager [play]:[open]
play
If there is no clip in the current project folder, the clip manager is opened by default.
If there are other projects or scenes with
clips, they can be opened from here.
test
reel_1
akbuk_farm
reel_2
manhattan aerial
reel_3
reel_4
reel_5
To delete or rename Project/Scene folders:
1) Folders cannot have takes inside, they must be empty
2) “Disable safe” must be selected in the Prefs tab
3) “Take delete” button must be unselected
new project
new scene
take delete
back
Touch screen lock [lock]
lock
Locks the touchscreen user interface.
long
lat
alt
temp
-74.0715 Frame 1080p YUV10
40.416
Fps
23.98
51.166
Codec CineForm 1.1MB/frame 27.3MB/s
72
manhattan_aerial
next: reel_2_031
Battery 44%
last take 3:22
Media 128GB
Free
73GB
Remain 46 min
record
slate
SDI
When the touchscreen lock is invoked, record,
stop TC reset and access to the setup menus
are disabled.
safe
grid
100%
This is designed to prevent unintentional starting or stopping of record etc.
edge
analysis
clipping
Phones
play
fullscreen
lock
reset
00:12:06:21
setup
stop
Media 128GB
Free
73GB
Remain 46 min
record
lock
When the touchscreen is locked, the text on
the lock button will change to “LOCKED”.
long
lat
alt
temp
-74.0715 Frame 1080p YUV10
40.416
Fps
23.98
51.166
Codec CineForm 1.1MB/frame 27.3MB/s
72
manhattan_aerial
next: reel_2_031
Battery 44%
last take 3:22
slate
SDI
safe
grid
100%
edge
analysis
clipping
Phones
play
fullscreen
LOCKED
reset
00:12:06:21
setup
stop
Main user interface, cont.
lock
To unlock, touch the lock button and slide
the popup slider to the right.
long
lat
alt
temp
-74.0715 Frame 1080p YUV10
40.416
Fps
23.98
51.166
Codec CineForm 1.1MB/frame 27.3MB/s
72
manhattan_aerial
next: reel_2_031
Battery 44%
last take 3:22
Media 128GB
Free
73GB
Remain 46 min
record
slate
SDI
safe
It is necessary to stay within the borders of
the slider or the unlock will not register.
grid
100%
edge
analysis
clipping
Phones
play
fullscreen
lock
reset
00:12:06:21
setup
stop
Media 128GB
Free
73GB
Remain 46 min
record
Time Code Reset [TC reset]
TC reset
When in internally generated time code mode,
resets the time code to zero: 00:00:00:00
If an offset is active, it sets timecode to zero
plus the offset. eg 01:00:00:00
long
lat
alt
temp
-74.0715 Frame 1080p YUV10
40.416
Fps
23.98
51.166
Codec CineForm 1.1MB/frame 27.3MB/s
72
manhattan_aerial
next: reel_2_031
Battery 44%
last take 3:22
slate
SDI
safe
grid
100%
The timecode reset is only relevant when in internally generated timecode, record run mode.
edge
analysis
If in hardware or SDI time code mode, or in internally generated free run or per take modes,
the TC reset button will not be visible.
clipping
Phones
play
fullscreen
lock
reset
00:12:06:21
setup
stop
Media 128GB
Free
73GB
Remain 46 min
record
Time Code Reset Slider [TC reset]
TC reset
To reset, touch the [TC reset] button and
slide the popup slider to the right.
long
lat
alt
temp
-74.0715 Frame 1080p YUV10
40.416
Fps
23.98
51.166
Codec CineForm 1.1MB/frame 27.3MB/s
72
manhattan_aerial
next: reel_2_031
Battery 44%
last take 3:22
slate
SDI
safe
It is necessary to keep the stylus within the
borders of the slider or the unlock will not
register.
grid
100%
edge
analysis
clipping
Phones
play
fullscreen
lock
reset
00:12:06:21
setup
stop
Main user interface, cont.
long
lat
alt
temp
-74.006
40.714
51
72
Settings and Status displays
Fan mode [fan]
displays current fan mode [auto][fixed]
long
lat
alt
temp
-74.0715 Frame 1080p YUV10
40.416
Fps
23.98
51.166
Codec CineForm 1.1MB/frame 27.3MB/s
72
manhattan_aerial
next: reel_2_031
Battery 44%
last take 3:22
Media 128GB
Free
73GB
Remain 46 min
record
slate
SDI
safe
fan speed in RPM [rpm]
displays current fan speed in RPM
grid
100%
Current system temp [temp]
Displays the current system temperature in
degrees Celsius (°C )
Touching the system status display will open
the relevant preferences tab, [prefs]
Frame
FPS
Codec
1080p YUV10
23.98
CF high
edge
analysis
clipping
Phones
play
fullscreen
lock
reset
00:12:06:21
setup
stop
Media 128GB
Free
73GB
Remain 46 min
record
Input status displays:
Frame size, frame type and colorspace
long
lat
alt
temp
-74.0715 Frame 1080p YUV10
40.416
Fps
23.98
51.166
Codec CineForm 1.1MB/frame 27.3MB/s
72
manhattan_aerial
next: reel_2_031
Battery 44%
last take 3:22
slate
SDI
Displays the current frame size: 2K, 1080,
720, NTSC or PAL; frame type:progressive or
interlaced. [frame]
safe
grid
100%
Frames per second [fps]
Displays the current recording frame rate
Current codec [Codec]
Displays the current codec used for encoding
the video stream.
edge
analysis
clipping
Phones
play
fullscreen
lock
reset
00:12:06:21
setup
stop
Media 128GB
Free
73GB
Remain 46 min
record
Touching the input status display will open
the relevant preferences tab, [input]
Media 119GB
Free
118GB
Remain 99 min
Media status displays:
Total media Capacity [Media]
long
lat
alt
temp
-74.0715 Frame 1080p YUV10
40.416
Fps
23.98
51.166
Codec CineForm 1.1MB/frame 27.3MB/s
72
manhattan_aerial
next: reel_2_031
Battery 44%
last take 3:22
slate
SDI
Remaining media capacity at the current data
rate [Free]
safe
grid
100%
Remaining record time at the current data
rate [Remain]
This is only accurate while shown during
record.
Touching the media display will open the
relevant preferences tab, [media]
edge
analysis
clipping
Phones
play
fullscreen
lock
reset
00:12:06:21
setup
stop
Main user interface, cont.
manhattan_aerial
Filename display.
next: reel_3_001.mov
While recording is paused, displays project
name and scene name with the next record
take increment.
long
lat
alt
temp
-74.0715 Frame 1080p YUV10
40.416
Fps
23.98
51.166
Codec CineForm 1.1MB/frame 27.3MB/s
72
manhattan_aerial
next: reel_2_031
Battery 44%
last take 3:22
Media 128GB
Free
73GB
Remain 46 min
record
slate
SDI
safe
ie. PROJECT and scene_increment.mov
grid
100%
During record, displays project name and
current take increment.
edge
analysis
Touching the file names display will open the
relevant preferences tab, [files]
clipping
Phones
play
00:00:00:00
fullscreen
lock
reset
00:12:06:21
setup
stop
Media 128GB
Free
73GB
Remain 46 min
record
Time Code Status display
While not recording, displays the current time
code in freerun modes, and the end time
code from the last take in record run modes.
long
lat
alt
temp
-74.0715 Frame 1080p YUV10
40.416
Fps
23.98
51.166
Codec CineForm 1.1MB/frame 27.3MB/s
72
manhattan_aerial
next: reel_2_031
Battery 44%
last take 3:22
slate
SDI
safe
grid
While recording, displays the current time
code value in all modes.
100%
edge
The display may be in SMPTE time code
UTC time, or local time. When recording to
CineForm, both SMPTE and UTC are written
as metadata to the file. In other codecs, currently only SMPTE timecode is written.
analysis
clipping
Phones
play
fullscreen
lock
reset
00:12:06:21
setup
stop
Media 128GB
Free
73GB
Remain 46 min
record
Touching the time code display will open the
relevant preferences tab, [tc]
Audio input status display.
SDI
long
lat
alt
temp
Shows current input setting for audio source:
-74.0715 Frame 1080p YUV10
40.416
Fps
23.98
51.166
Codec CineForm 1.1MB/frame 27.3MB/s
72
manhattan_aerial
next: reel_2_031
Battery 44%
last take 3:22
slate
SDI
safe
OFF (no levels meter display)
Two channel SDI [SDI2]
Eight channel SDI [SDI8]
Two channel balanced line level [Bal]
Two channel AES [AES2]
Four channel AES [AES4]
In the playback menu, this shows the output
source as the currently queued file. [file]
grid
100%
edge
analysis
clipping
Phones
play
fullscreen
lock
reset
00:12:06:21
setup
stop
Main user interface, cont.
Battery: 44%
Last take duration display [last]
Last take: 00:07:23:27
Displays the duration of the last take in
minutes and seconds.
long
lat
alt
temp
-74.0715 Frame 1080p YUV10
40.416
Fps
23.98
51.166
Codec CineForm 1.1MB/frame 27.3MB/s
72
manhattan_aerial
next: reel_2_031
Battery 44%
last take 3:22
Media 128GB
Free
73GB
Remain 46 min
record
slate
SDI
safe
grid
100%
edge
analysis
clipping
Phones
play
Battery: 44%
fullscreen
lock
reset
00:12:06:21
setup
stop
Media 128GB
Free
73GB
Remain 46 min
record
Battery meter display
Last take: 00:07:23:27
Displays the battery charge level in %.
long
lat
alt
temp
-74.0715 Frame 1080p YUV10
40.416
Fps
23.98
51.166
Codec CineForm 1.1MB/frame 27.3MB/s
72
manhattan_aerial
next: reel_2_031
Battery 44%
last take 3:22
slate
SDI
If battery meter is on, and no battery is connected, the display will show 0%
safe
grid
100%
This setting is user-selectable for either Anton
Bauer or IDX standards.
[setup][prefs][battery meter]
Touching the battery meter display will open
the relevant preferences tab, [prefs]
edge
analysis
clipping
Phones
play
-15-20-
fullscreen
lock
reset
00:12:06:21
setup
stop
Media 128GB
Free
73GB
Remain 46 min
record
Audio levels display &
headphone volume slider
Displays the current stereo pair selected for
monitoring.
long
lat
alt
temp
-74.0715 Frame 1080p YUV10
40.416
Fps
23.98
51.166
Codec CineForm 1.1MB/frame 27.3MB/s
72
manhattan_aerial
next: reel_2_031
Battery 44%
last take 3:22
slate
SDI
safe
The slider controls headphone monitoring
volume. The base setting for this is controlled in the windows sound control panel.
grid
100%
edge
Touch the arrow to invoke the audio controls
pop-up. [>]
analysis
clipping
Phones
play
fullscreen
lock
reset
00:12:06:21
setup
stop
Main user interface, cont.
Audio options menu [ > ]
SDI
Touch the arrow to invoke the audio controls pop-up.
long
lat
alt
temp
-74.0715 Frame 1080p YUV10
40.416
Fps
23.98
51.166
Codec CineForm 1.1MB/frame 27.3MB/s
72
Media 128GB
Free
73GB
Remain 46 min
Battery 44%
last take 3:22
next: reel_2_031
record
slate
SDI
reset all
monitor
+
Controls record audio levels both globally
and for individual channels as well as headphone monitoring volume.
Up to 8 active channels will be shown, depending on audio input settings.
-0
monitor
+
-0
monitor
+
-0
monitor
+
safe
-0
-5 -
-5 -
-5 -
-5 -
-10-
-10-
-10-
-10-
-15-
-15-
-15-
-15-
-20-
-20-
-20-
-20-edge
-30-
-30-
-30-
-30-
grid
100%
analysis
clipping
-
Channels that are not active will be “grayed
out”, eg darker and cannot be selected.
manhattan_aerial
Phones
play
-60-
-60-
1 2
global
lock
-
-
-60-
3 4
5 6
00:12:06:21
reset
-607 8
fullscreen
setup
stop
Media 128GB
Free
73GB
Remain 46 min
record
Monitoring selection
monitor
One stereo pair at a time may be monitored.
long
lat
alt
temp
-74.0715 Frame 1080p YUV10
40.416
Fps
23.98
51.166
Codec CineForm 1.1MB/frame 27.3MB/s
72
manhattan_aerial
Battery 44%
last take 3:22
next: reel_2_031
slate
SDI
reset all
Monitoring choice may be changed at any
time, including during record.
monitor
+
-0
monitor
+
-0
monitor
+
-0
monitor
+
safe
-0
-5 -
-5 -
-5 -
-5 -
-10-
-10-
-10-
-10-
-15-
-15-
-15-
-15-
-20-
-20-
-20-
-20-edge
-30-
-30-
-30-
-30-
grid
100%
analysis
clipping
Phones
2/2
0
-60-
lock
-
-60-
1 2
global
-
-60-
3 4
5 6
-607 8
fullscreen
00:12:06:21
reset
stop
Volume sliders
The volume sliders control volume much as
expected.
long
lat
alt
temp
-74.0715 Frame 1080p YUV10
40.416
Fps
23.98
51.166
Codec CineForm 1.1MB/frame 27.3MB/s
72
Media 128GB
Free
73GB
Remain 46 min
Battery 44%
last take 3:22
next: reel_2_031
record
slate
SDI
reset all
monitor
+
The base volume level for the headphone
monitoring is set in the windows control
panel:
“sounds and audio devices:playback:volume”
The sliders can be globally reset by touching
the [reset] button.
manhattan_aerial
-0
monitor
+
-0
monitor
+
-0
monitor
+
safe
-0
-5 -
-5 -
-5 -
-5 -
-10-
-10-
-10-
-10-
-15-
-15-
-15-
-15-
-20-
-20-
-20-
-20-edge
-30-
-30-
-30-
-30-
grid
100%
analysis
clipping
Phones
2/2
0
lock
-60-
1 2
global
reset
-60-
3 4
00:12:06:21
-60-
5 6
-607 8
fullscreen
stop
Main user interface, cont.
2/2
0
Performance metrics display
Indicates the status of encoding and disk
write buffers.
long
lat
alt
temp
-74.0715 Frame 1080p YUV10
40.416
Fps
23.98
51.166
Codec CineForm 1.1MB/frame 27.3MB/s
72
manhattan_aerial
next: reel_2_031
Battery 44%
last take 3:22
Media 128GB
Free
73GB
Remain 46 min
record
slate
SDI
safe
The upper number is the encoding buffer.
The left number is the current usage, and
the right number is the maximum usage
in the current session. If the left number
exceeds 20, encoding will stop.
The bottom number is the current number of disk write buffers. If that number
exceeds 20, encoding will stop. For some
SSDs, this is an indicator that they need to
be trimmed. see [trim]
long
lat
alt
temp
-74.006
40.714
51
72
grid
100%
edge
analysis
clipping
Phones
2/2
0
fullscreen
lock
reset
00:12:06:21
stop
GPS coordinates display
When a GPS device is plugged into the
Cinedeck (currently only Garmin USB GPS
devices are supported) and [GPS] is active
in [setup]:[prefs], the current GPS coordinates will be displayed.
long
lat
alt
temp
-74.0715 Frame 1080p YUV10
40.416
Fps
23.98
51.166
Codec CineForm 1.1MB/frame 27.3MB/s
72
manhattan_aerial
next: reel_2_031
Battery 44%
last take 3:22
Media 128GB
Free
73GB
Remain 46 min
record
slate
SDI
safe
grid
100%
edge
analysis
clipping
Phones
play
fullscreen
lock
reset
00:12:06:21
setup
stop
Playback user interface
play
Playback interface [play]
The second main user interface is the playback screen, which is very similar to the
main record interface, with the addition of
playback specific tools, mainly the transport
controls, and includes displays with relevant
information for the currently queued clip, includuing output settings, project, scene and
take names, timecode display, and access to
all commonly used tools.
long
lat
alt
temp
-74.0715 Frame 1080p YUV10
Fps
23.98
40.416
Codec CineForm high
51.166
72
manhattan_aerial
reel_2_031
Battery 79%
last take 2:54
Media 128GB
Free
73GB
Remain 46 min
slate
file
safe
grid
100%
edge
analysis
clipping
Phones
The information displays are static and do
not lead to menus, since the information
comes from the recorded file.
back
fullscreen
00:12:44:01
in/out
step
open
Transport controls
Transport controls include:
Go to beginning
Fast reverse
long
lat
alt
temp
-74.0715 Frame 1080p YUV10
Fps
23.98
40.416
Codec CineForm high
51.166
72
manhattan_aerial
reel_2_031
Battery 79%
last take 2:54
Media 128GB
Free
73GB
Remain 46 min
slate
file
safe
grid
Play
100%
Fast forward
edge
Go to end
analysis
clipping
Loop
Phones
fullscreen
Back-and-forth
in/out
Set in/out points
Step frame by frame
step
back
00:01:55:07
in/out
step
open
Fullscreen, playback mode [fullscreen]
fullscreen
When in playback, full screen mode,
touching the screen will briefly bring up
the transport and overlay controls.
slate
safe
grid
These controls will disappear after 2-3
seconds after the screen is last touched.
100%
edge
analysis
clipping
fullscreen
back
00:01:55:07
in/out
step
open
Playback user interface, cont.
Playback file manager open [open]
open
The open button invokes the playback file
manager.
long
lat
alt
temp
-74.0715 Frame 1080p YUV10
Fps
23.98
40.416
Codec CineForm high
51.166
72
manhattan_aerial
reel_2_031
Battery 79%
last take 2:54
Media 128GB
Free
73GB
Remain 46 min
slate
file
safe
grid
100%
edge
analysis
clipping
Phones
fullscreen
back
00:01:55:07
in/out
step
open
Playback file manager open [open]
open
The playback file manager allows selection
of the current folder for playback as well as
take deletion.
test
reel_1
akbuk_farm
reel_2
manhattan aerial
reel_3
reel_4
If there are no takes in the current project
folder, the project manager is opened by
default when [play] is selected from the main
interface.
If there are other projects or scenes with
takes, they can be opened from here.
reel_5
To delete or rename Project/Scene folders:
1) Folders cannot have takes inside, they must be empty
2) “Disable safe” must be selected in the Prefs tab
3) “Take delete” button must be unselected
new project
If the current project or scene folder contains no takes, the folders may be renamed
here as in the main file manager.
new scene
take delete
back
new scene
take delete
back
Playback open menu thumbnails display and navigation.
open
Each take is labeled with the take number
and file type. If there are more than 20 takes in the folder,
navigation arrows will appear.
test
reel_1
akbuk_farm
reel_2
manhattan aerial
reel_3
reel_4
reel_5
To delete or rename Project/Scene folders:
1) Folders cannot have takes inside, they must be empty
2) “Disable safe” must be selected in the Prefs tab
3) “Take delete” button must be unselected
new project
Playback user interface, cont.
Take delete [take delete]
take delete
The take delete button [take delete] enables
the deletion of takes.
When the button is active, a red “x” appears
on each take. To delete a take, press the x
and then slide the slider to either the left or
right depending on where in the window the
take is.
BEWARE! THIS CANNOT BE UNDONE!
Think at least twice before deleting takes.
Copy to other storage first.
test
reel_1
akbuk_farm
reel_2
manhattan aerial
reel_3
reel_4
reel_5
To delete or rename Project/Scene folders:
1) Folders cannot have takes inside, they must be empty
2) “Disable safe” must be selected in the Prefs tab
3) “Take delete” button must be unselected
new project
new scene
take delete
back
new project new scene
take delete
back
take delete
back
Take delete [take delete]
take delete
Deleted takes are shown by an empty space
until the take delete button is deselected.
test
reel_1
akbuk_farm
reel_2
manhattan aerial
reel_3
Once the take delete button is deselected,
the takes will again form an uninterrupted
grid.
reel_4
reel_5
To delete or rename Project/Scene folders:
1) Folders cannot have takes inside, they must be empty
2) “Disable safe” must be selected in the Prefs tab
3) “Take delete” button must be unselected
File recovery [recover]
recover
If the Cinedeck loses power while recording,
upon restarting the application, the file affected will show a “recover” button in place
of the thumbnail. *QUICKTIME FILES ONLY
test
reel_1
akbuk_farm
reel_2
manhattan aerial
reel_3
reel_4
To recover the file, simply press “recover” and
the file will be rewritten and closed properly.
As this process creates a new file, it may be
necessary to create space on the media.
If space is insufficient, copy all other files
except the affected file and its associated
.journal file to other media, then put the media with the bad file back in the Cinedeck.
reel_5
To delete or rename Project/Scene folders:
1) Folders cannot have takes inside, they must be empty
2) “Disable safe” must be selected in the Prefs tab
3) “Take delete” button must be unselected
new project
new scene
Playback user interface, cont.
File recovery, continued [recover]
recover
While the recovery is in process, the progress
bar will fill the screen.
File recovery [recover]
recover
Once the recovery is finished, the thumbnail
will be displayed and the file can be opened
normally in playback, or copied to other
media for editing.
test
reel_1
akbuk_farm
reel_2
manhattan aerial
reel_3
reel_4
reel_5
To delete or rename Project/Scene folders:
1) Folders cannot have takes inside, they must be empty
2) “Disable safe” must be selected in the Prefs tab
3) “Take delete” button must be unselected
new project
new scene
take delete
back
Setup Menu Tabs [setup]
setup
Invokes the setup menu tabs. [input][files][tc][convert][update][prefs]
long
lat
alt
temp
-74.0715 Frame 1080p YUV10
40.416
Fps
23.98
51.166
Codec CineForm 1.1MB/frame 27.3MB/s
72
manhattan_aerial
Battery 44%
last take 3:22
next: reel_2_031
Media 128GB
Free
73GB
Remain 46 min
record
slate
SDI
safe
grid
100%
edge
analysis
clipping
Phones
play
fullscreen
lock
reset
00:12:06:21
setup
stop
The prefs tab includes general preferences settings.
setup
The general preferences tab is the default
when setup is invoked.
input
files
loss stop
drop stop
TC
GPS
conv
input
prefs
fan ctrl
battery meter
restart app
main
low
Anton Bauer
exit app
grid
Digi View
mouse
mouse exit
fan ctrl
3Gb/s out
Peak vu
high
3Gb/s out
P not Psf
clip
reset prefs
save prefs
Disable Safe
load prefs
[email protected] Version 2.0 release build 2.177
Settings changes sometimes require application restart.
setup
Some setting changes require an application restart. This is preceeded by a warning,
“press ok to apply setting”
Settings changes that require restart in the
general preferences are:
[P not PsF]
[gps]
[reset prefs]
[restart app]
input
files
loss stop
drop stop
GPS
TC
conv
input
prefs
fan ctrl
battery meter
restart app
main
low
Anton Bauer
exit app
grid
Digi View
mouse
mouse exit
fan ctrl
3Gb/s out
Peak vu
high
3Gb/s out
P not Psf
Press OK to apply setting
OK
Disable Safe
[email protected] Version 2.0 release build 2.177
reset prefs
save prefs
load prefs
clip
Input preferences tab [setup]:[input]
Input preferences tab [setup]:[input]
setup
The user preferences tabs are where preferences and settings for input, output, time
code and general settings are selected.
long
lat
alt
temp
-74.0715 Frame 1080p YUV10
40.416
Fps
23.98
51.166
Codec CineForm 1.1MB/frame 27.3MB/s
72
manhattan_aerial
Battery 44%
last take 3:22
next: reel_2_031
Media 128GB
Free
73GB
Remain 46 min
record
slate
SDI
safe
grid
The setup button will take the user to the last
selected preferences tab.
100%
edge
If accessing the preferences tabs using the
info display shortcuts, the selected tab will be
that relevant to the info display.
analysis
clipping
Phones
play
fullscreen
lock
reset
00:12:06:21
setup
stop
Signal input settings [setup]:[input] or {input status display}
input
The input tab is where frame size, frame rate,
color space, video source, audio source as
well as codec, quality setting and file type
are selected.
There is a green indicator light that shows
when signal has been successfully synced to
the input source.
input
files
input
convert
input
prefs
source
fps
format
video
audio
options
codec
quality
wrapper
1080i
50
4:2:2 YUV8
SDI
Off
preview
CineForm
proxy
MXF
1080i
59.94
4:2:2 YUV10
HDMI
SDI 2 chan
flip preview
UNCOMP
LQ
mov
720p
60
4:4:4 RGB10
component
SDI 8 chan
letterbox
DNxHD
normal
composite
Balanced
Prores
HQ
PAL
NTSC
AES 2chan
4444
There are also options related to the signal
input preview.
back
Valid input selections
input
As selections are made for resolution, frame
rate, color space, input, audio, codec and
quality settings, and wrapper type, they influence the availability of other settings.
When DNx is selected, both MXF and MOV
are valid selections, whereas when ProRes,
CineForm or Uncompressed are selected,
only the MOV wrapper type is available.
input
files
input
convert
input
prefs
source
fps
format
video
audio
options
codec
quality
wrapper
1080i
50
4:2:2 YUV8
SDI
Off
preview
CineForm
proxy
MXF
1080i
59.94
4:2:2 YUV10
HDMI
SDI 2 chan
flip preview
UNCOMP
LQ
mov
720p
60
4:4:4 RGB10
component
SDI 8 chan
letterbox
DNxHD
normal
composite
Balanced
Prores
HQ
PAL
NTSC
AES 2chan
4444
back
Input preferences tab, cont. [setup]:[input]
Application restart on settings change
input
Some settings changes require a restart of
the application.
In the input settings page, application restart
is required for:
1) switching between compressed and uncompressed modes.
input
files
input
convert
input
prefs
source
fps
format
video
audio
options
codec
quality
wrapper
1080i
50
4:2:2 YUV8
SDI
Off
preview
CineForm
proxy
MXF
1080i
59.94
4:2:2 YUV10
HDMI
SDI 2 chan
flip preview
UNCOMP
LQ
mov
720p
60
4:4:4 RGB10
component
SDI 8 chan
letterbox
DNxHD
normal
composite
Balanced
Prores
HQ
PAL
NTSC
AES 2chan
4444
2) changes to the audio input
When time code is set to “Ambient”, all settings require restart to re-sync the time code.
back
Application restart on settings change
input
If an application restart is necessary to initialize the new setting, a dialog will appear
to inform the user.
input
files
input
convert
input
prefs
source
fps
format
video
audio
options
codec
quality
wrapper
1080i
50
4:2:2 YUV8
SDI
Off
preview
CineForm
proxy
MXF
1080i
59.94
4:2:2 YUV10
HDMI
SDI 2 chan
flip preview
UNCOMP
LQ
mov
720p
60
4:4:4 RGB10
component
SDI 8 chan
letterbox
DNxHD
normal
Prores
HQ
Press OK to apply setting
composite
PAL
Balanced
OK
NTSC
AES 2chan
4444
back
Input resolution
input
source
For HD settings, ensure your camera is set to
16x9 output.
Valid input resolutions are:
1080i (1920x1080 interlaced)
1080p (1920x1080 progressive)
1080psf (1920x1080 progressive segmented)
720p (1280x720, progressive)
PAL (720x576 interlaced)
NTSC (720x 480 interlaced)
input
files
input
convert
input
prefs
source
fps
format
video
audio
options
codec
quality
wrapper
1080i
50
4:2:2 YUV8
SDI
Off
preview
CineForm
proxy
MXF
1080i
59.94
4:2:2 YUV10
HDMI
SDI 2 chan
flip preview
UNCOMP
LQ
mov
720p
60
4:4:4 RGB10
component
SDI 8 chan
letterbox
DNxHD
normal
composite
Balanced
Prores
HQ
PAL
NTSC
AES 2chan
4444
back
Input preferences tab, cont. [setup]:[input]
Input frame rate
input
fps
Not all frame rates are available in all codecs.
If a codec or quality setting is not available
based on the input frame rate, there will be
no setting available in the codec or qualitycolumns.
Valid input frame rates are:
23.98p
50i
25p
5994i
29.97p 60i
50p
5994p
60p
Variable rates are not supported at this time.
input
files
input
convert
input
prefs
source
fps
format
video
audio
options
codec
quality
wrapper
1080i
50
4:2:2 YUV8
SDI
Off
preview
CineForm
proxy
MXF
1080i
59.94
4:2:2 YUV10
HDMI
SDI 2 chan
flip preview
UNCOMP
LQ
mov
720p
60
4:4:4 RGB10
component
SDI 8 chan
letterbox
DNxHD
normal
composite
Balanced
Prores
HQ
PAL
NTSC
AES 2chan
4444
back
Input pixel format
input
format
Pixel format selections are:
YCbCr or YUV, 8bit, 4:2:2
YCbCr or YUV, 10bit, 4:2:2
RGB 10 bit, 4:4:4
input
files
input
convert
input
prefs
source
fps
format
video
audio
options
codec
quality
wrapper
1080i
50
4:2:2 YUV8
SDI
Off
preview
CineForm
proxy
MXF
1080i
59.94
4:2:2 YUV10
HDMI
SDI 2 chan
flip preview
UNCOMP
LQ
mov
720p
60
4:4:4 RGB10
component
SDI 8 chan
letterbox
DNxHD
normal
composite
Balanced
Prores
HQ
PAL
NTSC
AES 2chan
4444
back
Input video source
input
video
Video source selections are:
3G HD SDI
Dual Link HD SDI
SD SDI
HDMI
Component
Composite (Y input on breakout)
input
files
input
convert
input
prefs
source
fps
format
video
audio
options
codec
quality
wrapper
1080i
50
4:2:2 YUV8
SDI
Off
preview
CineForm
proxy
MXF
1080i
59.94
4:2:2 YUV10
HDMI
SDI 2 chan
flip preview
UNCOMP
LQ
mov
720p
60
4:4:4 RGB10
component
SDI 8 chan
letterbox
DNxHD
normal
composite
Balanced
Prores
HQ
PAL
NTSC
AES 2chan
4444
back
Input preferences tab [setup]:[input]
Input audio source
input
audio
Audio source selections are:
Off
SDI embedded audio, 2 channels
SDI embedded audio, 4 channels
AES digital audio, 2 channels
AES digital audio, 4 channels
Balanced line level
(XLR input 1 & 2 on breakout cable)
input
files
input
convert
input
prefs
source
fps
format
video
audio
options
codec
quality
wrapper
1080i
50
4:2:2 YUV8
SDI
Off
preview
CineForm
proxy
MXF
1080i
59.94
4:2:2 YUV10
HDMI
SDI 2 chan
flip preview
UNCOMP
LQ
mov
720p
60
4:4:4 RGB10
component
SDI 8 chan
letterbox
DNxHD
normal
composite
Balanced
Prores
HQ
PAL
NTSC
AES 2chan
4444
Switching audio source selection requires an
application restart.
back
Input preview options
input
options
Input preview options are:
Preview on/off
Turns off live preview window
input
files
input
convert
input
prefs
source
fps
format
video
audio
options
codec
quality
wrapper
1080i
50
4:2:2 YUV8
SDI
Off
preview
CineForm
proxy
MXF
1080i
59.94
4:2:2 YUV10
HDMI
SDI 2 chan
flip preview
UNCOMP
LQ
mov
720p
60
4:4:4 RGB10
component
SDI 8 chan
letterbox
DNxHD
normal
composite
Balanced
Prores
HQ
Flip preview
PAL
For use when the Cinedeck is mounted upside down for some reason.
NTSC
AES 2chan
4444
Letterbox
Provides black letterbox mask for composition with non-16x9 aspect ratios.
back
Input codec, quality, and file format (wrapper) options
input
codec
quality
wrapper
Compressed codec selections are:
CineForm, all quality settings, .MOV
DNxHD: all bit rates, .MXF and .MOV
ProRes, all quality settings, (.MOV)
Uncompressed codec selections are:
CineForm Uncompressed RGB10 (.MOV)
Uncompressed RGB10 (MOV)
Switching between uncompressed and
compressed formats requires an application
restart
input
files
input
convert
input
prefs
source
fps
format
video
audio
options
codec
quality
wrapper
1080i
50
4:2:2 YUV8
SDI
Off
preview
CineForm
proxy
MXF
1080i
59.94
4:2:2 YUV10
HDMI
SDI 2 chan
flip preview
UNCOMP
LQ
mov
720p
60
4:4:4 RGB10
component
SDI 8 chan
letterbox
DNxHD
normal
composite
Balanced
Prores
HQ
PAL
NTSC
AES 2chan
4444
back
Folder manager tab [setup]:[files]
Folder manager tab [setup]:[files]
files
input
The file manager allows creation of a folder
and subfolder file structure for the organization of projects.
TC
files
project
convert
input
prefs
scene
test
reel_1
mugla_aydin
reel_2
Take names are derived from the folder
names, plus an auto-increment. The next
take is always shown in the take increment
display.
manhattan aerial
Typical naming would be:
To delete or rename Project/Scene folders:
1) Folders cannot have takes inside, they must be empty
2) “Disable safe” must be selected in the Prefs tab
3) “Take delete” button must be unselected
x
reel_3
Take 29
reel_4
auto-increment
reel_5
folder1_folder2_takeIncrement.mov
eg: Camera1_scene1_001.mov
new project
new scene
back
Folder creation [new project][new scene]
files
input
The [new project] button creates a new top
level folder, and a single scene folder is created within that folder at the same time.
The [new scene] button creates a new subfolder within the currently selected top level
folder.
Default naming for newly created project
and scene folders is an auto-incremented
number.
TC
files
project
convert
input
prefs
scene
test
reel_1
mugla_aydin
reel_2
manhattan aerial
x
reel_3
Take 29
reel_4
auto-increment
reel_5
To delete or rename Project/Scene folders:
1) Folders cannot have takes inside, they must be empty
2) “Disable safe” must be selected in the Prefs tab
3) “Take delete” button must be unselected
new project
new scene
back
Folder creation, cont.
files
input
When ceating scenes within a project folder,
the scene folder name will auto-increment if
no name is given.
convert
input
prefs
scene
test
reel_1
mugla_aydin
reel_2
manhattan aerial
The name may be changed as long as there
are no takes in the folder.
TC
files
project
x
reel_3
Take 29
reel_4
auto-increment
reel_5
If there are too many folders to show on one
page, navigation arrows will appear to allow
scrolling through the full list.
To delete or rename Project/Scene folders:
1) Folders cannot have takes inside, they must be empty
2) “Disable safe” must be selected in the Prefs tab
3) “Take delete” button must be unselected
new project
new scene
back
Folder manager tab, cont. [setup]:[files]
Renaming folders
files
Folder renaming is invoked by touching the
folder name.
test_scene
[Safe disable] must be on in the main preferences menu [setup][prefs] for folder renaming to be enabled, and the folders cannot
have takes (files) in them.
1
q
w
a
shift
The keyboard allows only the valid characters allowed in Windows file names.
2
z
space
3
e
s
x
4
r
d
c
5
t
f
6
y
g
v
b
7
u
h
n
8
i
j
9
o
k
m
.
0
p
clear
+
l
_
del
-
ok
cancel
Folder selection
files
input
Selecting a different top level folder reveals
the subfolders within, and the “next take
increment” display will change to reflect the
next take increment for that folder.
TC
files
project
convert
input
prefs
scene
test
reel_1
akbuk_farm
reel_2
manhattan aerial
x
reel_3
x
Take 1
reel_4
auto-increment
reel_5
To delete or rename Project/Scene folders:
1) Folders cannot have takes inside, they must be empty
2) “Disable safe” must be selected in the Prefs tab
3) “Take delete” button must be unselected
new project
new scene
back
Deleting folders
files
input
In order to delete folders, [Safe disable] must
be on in the main preferences menu [setup]
[prefs] and the folders cannot have takes
(files) in them.
An empty folder is indicated by “take 1”
displayed as the next take.
convert
input
prefs
scene
test
reel_1
akbuk_farm
reel_2
manhattan aerial
To delete, touch the red “x” and slide the
slider to the arrow. The “x” will not be visible
if safe mode is on.
TC
files
project
x
reel_3
x
Take 1
reel_4
auto-increment
reel_5
To delete or rename Project/Scene folders:
1) Folders cannot have takes inside, they must be empty
2) “Disable safe” must be selected in the Prefs tab
3) “Take delete” button must be unselected
new project
new scene
back
Folder manager tab, cont. [setup]:[files]
Pre-configuring media with folders
files
A suitable folder structure can also be created on the Cinedeck or a Windows workstation in the Windows Explorer, or on a mac
workstation if running an NTFS compatibility
program such as the shareware application
Tuxera NTFS for Mac.
Time code Preferences Tab [setup][TC]
Time code Preferences Tab [setup][TC]
TC
input
files
TC
source
mode
auto rec
gen
rec run
off
SDI
per take
offset +
There are three main sources of time code
available:
Ambient
free run
offset -
Internally generated
Embedded SDI (LTC, RP188, Serial)
ExSync hardware timecode module [ExSync]*
save tc
drop
show UTC
The time code tab allows the user to choose
the source for time code for the project and
other time code options.
convert
input
prefs
offsets
show local
*Timecode by Ambient GmbH
Internally generated time code [gen]
TC
gen
Generated time code has three different run
types associated with it:
Record run [rec run] - starts at zero plus any
offsets, and increments only while record is
active.
Per take run [per take] - starts at zero on
each take, plus any offsets
input
files
TC
source
mode
auto rec
convert
input
prefs
gen
rec run
off
SDI
per take
offset +
Ambient
free run
offset -
save tc
drop
show UTC
offsets
show local
Free run [free run] - starts at zero and runs
until the session is terminated or the TC
reset slider is used.
Save time code at end of session. [save TC]
TC
save TC
The save time code button [saveTC] enables
saving the end time code value when exiting
the session or restarting the application.
This is only relevant in generated time code
mode.
input
files
TC
source
mode
auto rec
convert
input
prefs
gen
rec run
off
SDI
per take
offset +
Ambient
free run
offset -
save tc
drop
show UTC
offsets
show local
Time code Preferences Tab, continued [setup][TC]
Generated drop frame time code [drop]
TC
drop
Toggles internally generated time code. When
on, internally generated time code will be
displayed as SMPTE drop frame time code,
and drop frame time code will be saved into
the file.
input
files
TC
source
mode
auto rec
convert
input
prefs
gen
rec run
off
SDI
per take
offset +
Ambient
free run
offset -
save tc
drop
show UTC
offsets
show local
back
Embedded SDI time code [SDI]
TC
SDI
There are three sources of embedded time
code recognized in the embedded SDI stream:
LTC, RP188, Serial
input
files
TC
source
mode
auto rec
convert
input
prefs
offsets
gen
plain
off
off
SDI
generic
offset +
Ambient
VITC
offset -
show UTC
show local
back
Embedded SDI time code auto-record, generic [generic]
TC
auto rec
Generated time code has three different run
types associated with it:
Record run [rec run] - starts at zero plus any
offsets, and increments only while record is
active.
Per take run [per take] - starts at zero on
each take, plus any offsets.
Free run [free run] - starts at zero and runs
until the session is terminated or the TC
reset slider is used.
input
files
TC
source
mode
auto rec
convert
input
prefs
offsets
gen
plain
off
off
SDI
generic
offset +
Ambient
VITC
offset -
show UTC
show local
back
Time code Preferences Tab, continued [setup][TC]
Embedded SDI time code auto-record, VITC [future]
TC
VITC
Auto record from VITC. Future feature.
input
files
TC
source
mode
auto rec
convert
input
prefs
offsets
gen
plain
off
off
SDI
generic
offset +
Ambient
VITC
offset -
show UTC
show local
back
ExSync hardware timecode module [ExSync]
TC
ExSync*
The hardware timecode module can be jammed
to an external LTC source. See appendices for
cable pin definition and cable types commercially
available.
The clock is the same as that in the Ambient
ACD301 master slate, so it is extremely precise.
With the Exsync module installed, the Cinedeck
can operate as the master clock for any device
capable of reading LTC time code.
The Exsync timecode module is designed for
momentary sync. DO NOT leave the source sync
cable plugged in or it will create system instabilty
and potentially crash the timecode module clock.
input
files
TC
source
mode
auto rec
convert
input
prefs
offsets
gen
off
SDI
offset +
ExSync*
offset -
show UTC
show local
back
*Timecode by Ambient
ExSync hardware timecode module [ExSync
TC
ExSync*
When switching to ExSync hardware timecode mode, the application will restart in
order to initialize the time code module and
sync to the outside source frame rate.
input
files
TC
source
mode
auto rec
convert
input
prefs
offsets
gen
off
SDI
offset +
ExSync*
If any changes are made to the signal input
settings, this will also require a restart to resync to the time code module.
press ok to apply setting
offset -
OK
show UTC
show local
*Timecode by Ambient
back
Time code Preferences Tab, continued [setup][TC]
Hardware timecode module not found
TC
ExSync*
If the “hardware timecode module not
found” error message appears, you do not
have an ExSync hardware timecode module installed or there is a problem with the
module.
long
lat
alt
temp
-74.0715 Frame 1080p YUV10
40.416
Fps
23.98
51.166
Codec CineForm 1.1MB/frame 27.3MB/s
72
manhattan_aerial
Media 128GB
Free
73GB
Remain 46 min
Battery 44%
last take 3:22
next: reel_2_031
record
slate
SDI
safe
grid
100%
hardware timecode module not found
If you have a module installed and this message appears, contact support.
edge
tap to dismiss
analysis
clipping
[email protected]
Phones
play
fullscreen
lock
00:00:00:00
reset
setup
stop
Time code offsets [offset +][offset -]
TC
offsets
Offsets can be set for any timecode mode,
for instance to differentiate “reels”.
These offsets can be positive or negative,
but keep in mind that timecode starting at
zero with a negative offset will result in a
time code of zero until the counter catches
up with the offset.
input
files
TC
source
mode
auto rec
gen
record run
SDI
per take
Ambient
free run
save tc
drop
convert
input
prefs
offsets
off
02 : 20 : 00 : 00
0
1
2
0
1
2
3
4
5
6
7
8
9
0
1
2
3
4
5
6
7
8
9
0
1
2
3
4
5
6
7
8
9
0
1
2
3
4
5
6
7
8
9
0
1
2
3
4
5
6
7
8
9
0
1
2
3
4
5
6
7
8
9
0
1
2
3
4
5
6
7
8
9
offset +
offset -
show UTC
show local
back
Time code offsets [offset +][offset -]
TC
offsets
Offsets can be set for any timecode mode,
for instance to differentiate “reels” by setting
the hour ahead incrementally for each reel.
long
lat
alt
temp
-74.0715 Frame 1080p YUV10
40.416
Fps
23.98
51.166
Codec CineForm 1.1MB/frame 27.3MB/s
72
manhattan_aerial
next: reel_2_031
Battery 44%
last take 3:22
Media 128GB
Free
73GB
Remain 46 min
record
slate
SDI
safe
grid
These offsets can be positive or negative,
but keep in mind that timecode starting at
zero with a negative offset will result in a
time code of zero until the counter catches
up with the offset.
100%
edge
analysis
clipping
Phones
play
fullscreen
lock
reset
02:20:00:00
setup
stop
Time code Preferences Tab, continued [setup][TC]
Time code display modes
TC
show UTC
Internally generated, free run time code can
be displayed in four ways:
SMPTE Non-drop: 00:00:00:00
SMPTE Drop frame: 00:00:00;00
UTC Time: hh.mm.ss
Local Time: hh.mm.ss
input
files
TC
source
mode
auto rec
convert
input
prefs
gen
record run
none
SDI
per take
offset +
Ambient
free run
offset -
save tc
drop
show UTC
offsets
SMPTE non-drop is default for internally
generated.
show local
If the external source is drop frame, then the
timecode display will be SMPTE drop frame.
back
Show UTC or Local timecode [show UTC][show local]
TC
show UTC
If [show UTC] or [show local] is selected, the
time code display in the record window will
show the respective actual time.
long
lat
alt
temp
-74.0715 Frame 1080p YUV10
40.416
Fps
23.98
51.166
Codec CineForm 1.1MB/frame 27.3MB/s
72
manhattan_aerial
next: reel_2_031
Battery 44%
last take 3:22
Media 128GB
Free
73GB
Remain 46 min
record
slate
SDI
safe
grid
Currently only CineForm records the UTC
time as metadata. Other codecs will record
only the SMPTE time code.
100%
edge
analysis
clipping
Phones
play
fullscreen
lock
reset
16 : 45 : 32
setup
stop
Convert preferences tab [setup][convert]
Convert tab [convert]
convert
The Cinedeck hardware supports a large
number of up, down and cross conversion
modes.
input
files
TC
conv
input
output
simul out
24p->59i out
none
none
none
off
1080 to ltrbx
SD down
letterbox
down
letterbox
down
on
1080 to ana
SD down
anamorphic
down
anamorphic
down
720 to ltrbx
SD down
720 to 1080
center cut
down
720 to ana
SD down
720p to 1080p
cross
letterbox SD
up to 1080
anamorphic
720p up
ana SD
up to 1080
anamorphic
1080i up
input
prefs
pillarbox
720p up
Pillarbox
1080i up
back
Input Up Down and Cross conversion modes [convert]:[input] or [output]
convert
Changing the conversion settings mode requires
an application restart.
input
files
TC
conv
input
output
simul out
24p->59i out
none
none
none
off
on
input
prefs
1080 to ltrbx
SD down
letterbox
down
letterbox
down
1080 to ana
SD down
anamorphic
down
anamorphic
down
720 to ltrbx
SD down
720 to 1080
center cut
down
press ok to apply setting
720 to ana
SD down
720p to 1080p
cross
OK
letterbox SD
up to 1080
anamorphic
720p up
ana SD
up to 1080
anamorphic
1080i up
pillarbox
720p up
pillarbox
1080i up
back
Input Up Down and Cross conversion modes [convert]:[input] or [output]
convert
Input settings must be set to the conversion
destination mode.
For example. if the coversion mode is set to
1080 downconvert to letterboxed SD, the
signal input setting should be set to SD.
prefs
files
TC
conv
input
input
resolution
frame rate
pixel format
video src
audio src
options
codec
quality
wrapper
1080p
23.98
4:2:2 YUV8
SDI
off
Preview
CineForm
Low
MXF
1080i
29.97
4:2:2 YUV10
HDMI
SDI 2 Ch
Flip Preview
Uncomp
Medium
MOV
4:4:4 RGB10
Component
SDI 8 Ch
Letterbox
DNxHD
High
Composite
Balanced
ProRes
Film Scan 1
720p
PAL
NTSC
AES 2 Ch
Film Scan 2
back
Convert preferences tab, continued [setup][convert]
Input Up Down and Cross conversion modes [convert]:[input] or [output]
convert
Input settings must be set to the conversion
destination mode.
long
lat
alt
temp
-74.0715 Frame NTSC
40.416
Fps
29.97
51.166
Codec CineForm
72
manhattan_aerial
next: reel_2_031
Battery 44%
last take 3:22
Media 128GB
Free
73GB
Remain 46 min
record
slate
SDI
safe
For example. if the coversion mode is set to
1080 downco nvert to letterboxed SD, the
signal input setting should be set to SD.
grid
100%
edge
analysis
clipping
Phones
play
convert
fullscreen
lock
reset
00:12:06:21
Video input and output up, down, and cross conversion modes [convert]:[output]
[simul out][24p->59i out]
input
Input Up Down and Cross conversion modes [convert]:[input]
none
No video input conversion
1080 to ltrbx
SD down
Letterbox, from HD1080 to SD
1080 to ana
SD down
Anamorphic HD1080 to SD
720 to ltrbx
SD down
Letterbox HD720 to SD
720 to ana
SD down
Anamorphic from HD720 to SD
letterbox SD
up to 1080
ana SD
up to 1080
output
none
letterbox
Letterbox video input up conversion
Anamorphic video input up conversion
Single-output Down and Cross conversion modes [convert]:[output]
No video output conversion
Letterbox, from HD1080 to SD
anamorphic
Anamorphic HD1080 to SD
720 to 1080
Letterbox HD720 to HD1080
setup
stop
Convert preferences tab, continued [setup][convert]
convert
Video input and output up, down, and cross conversion modes [convert]:[output]
[simul out][24p->59i out]
Convert preferences tab, continued [setup][convert]
Simultaneous-output up, down, and cross conversion modes [convert]:[simul out]
Simul out
none
letterbox
down
anamorphic
down
centercut
down
No video output conversion
Letterbox, from HD1080 to SD
Anamorphic HD1080 to SD
Centered, from HD1080 to SD
720p to
1080p cross
HD720 to HD1080
anamorphic
1080i up
Anamorphic HD720 to HD1080
pillarbox
720p up
Anamorphic SD to HD1080i
pillarbox
1080i up
pillarbox HD720 to HD1080 upconvert
24p (23.98p actual) to 59i (59.97) output conversion [convert]:[output]
24p->59i out
off
No video output conversion
on
24p (23.98pactual) to 59.97i output conversion
Update preferences tab [setup][update]
Update preferences tab [setup]:[update]
The update tab opens the software update [update] and feature license key entry [keys] menus.
long
lat
alt
temp
-74.0715 Frame 1080p YUV10
40.416
Fps
23.98
51.166
Codec CineForm
72
manhattan_aerial
Battery 44%
last take 3:22
next: reel3_015.mov
Media 3GB
Free
3GB
Remain
record
slate
SDI
To update the Cinedeck software:
1) download the zip archive from the FTP
2) ensure that the download software doesn’t automatically unzip the zip file or that any anti-virus
software doesn’t quarantine any files.
3) copy the zip file to a thumb drive.
4) remove any usb or media drive from the
cinedeck.
5) power up the cinedeck
6) Once the Cinedeck software has loaded, insert
the USB thumb drive with the update zip file on it
into a USB port and wait for the drive to appear
in the Media status display.
safe
grid
100%
edge
analysis
clipping
Phones
play
fullscreen
lock
reset
00:12:06:21
setup
stop
update
input
files
TC
conv
update
prefs
7) Open the update menu by going to
[setup]:[update]
8) Press the update button.
The software will exit to Windows while the
update runs, then automatically return to the
Cinedeck application.
Insert USB key and press update
update
FTP download info:
keys
ftp://ftp.dbox.com
username: cinedeckupdate
password: update123
folder: Cinedeck Program Update
back
Troubleshooting the update process
update
If the error message, “no update found” appears:
long
lat
alt
temp
-74.0715 Frame 1080p YUV10
40.416
Fps
23.98
51.166
Codec CineForm 1.1MB/frame 27.3MB/s
72
manhattan_aerial
next: reel3_015.mov
Battery 44%
last take 3:22
Media 3GB
Free
3GB
Remain
record
slate
SDI
safe
1) ensure that the download application did
not automatically unzip the update file, this
often occurs in the Mac OS.
grid
No update found
100%
tap to dismiss
edge
2) check to see that the zip file on the USB
thumb drive is a valid archive (not corrupt)
3) ensure that the thumb drive is visible in
the media status display.
analysis
clipping
Phones
play
fullscreen
lock
reset
00:12:06:21
setup
stop
Update preferences tab, continued [setup][prefs]
Update preferences tab [setup]:[update]
update
Troubleshooting the update process, continued.
long
lat
alt
temp
-74.0715 Frame 1080p YUV10
40.416
Fps
23.98
51.166
Codec CineForm 1.1MB/frame 27.3MB/s
72
manhattan_aerial
Battery 44%
last take 3:22
next: reel3_015.mov
Media 3GB
Free
3GB
Remain
record
slate
SDI
safe
If the error message, “no update.exe found”
appears:
grid
No update.exe found
100%
tap to dismiss
edge
1) ensure that the downloaded zip file has
“upd.exe” inside it.
2) If there is no “upd.exe”, check your antivirus settings to be sure that the file has not
been stripped from the update zip file on
download.
analysis
clipping
Phones
play
fullscreen
lock
reset
00:12:06:21
setup
stop
Adding feature license keys to the software
keys
If you have purchased licences for optional
software features, they must be activated in
the keys menu before they will be available.
input
files
TC
FullStream
3D basic
3D advanced
conv
prefs
update
toggle the features you need, send the request
code to [email protected], then enter the
response code
request code: 0030 1d08 e1b3 0000 0000
To activate these features:
1) Open the keys menu from the [setup]:
[update] menu.
2) Select the desired feature.
0
1
2
3
4
5
6
7
8
9
a
b
c
d
e
f
del
3) email the request code to:
[email protected]
back
License keys challenge code entry
keys
When you have received a reply with the
license code from support, enter the code
into the license code field using the keypad.
input
files
TC
FullStream
3D basic
3D advanced
conv
prefs
update
toggle the features you need, send the request
code to [email protected], then enter the
response code
request code: 0030 1d08 e1b3 0000 0000
0
1
2
3
4
5
6
7
8
9
a
b
c
d
e
f
del
back
General preferences tab [setup][prefs]
General Preferences [setup]:[prefs]
prefs
input
files
loss stop
drop stop
TC
conv
input
prefs
fan ctrl
battery
meter
restart app
main
low
Anton Bauer
exit app
grid
Digi View
GPS
mouse
mouse exit
fan ctrl
3Gb/s out
Peak vu
high
3Gb/s out
P not Psf
Disable Safe
clip
reset prefs
save prefs
load prefs
[email protected] Version 2.0 release build 2.177
main
grid
clip
loss stop
[main]
Displays general preferences page, shown above.
[grid]
Opens grid and safe frame overlay preferences page.
[clip]
Opens highlight clipping overlay preferences page
[loss stop]
Stops record when input loss is detected (default, on)
grid
[GPS]
Enables awareness of Garmin GPS devices if one is plugged in to the USB port
mouse
[Mouse]
Shows mouse pointer if desired. Generally used when a mouse is plugged in .
rec/stop
[rec/stop]
Shows separate record/stop buttons in main UI. Turn off for remote record/stop.
3Gb/s out
[3Gb/s out]
Enables 3GB/s output on BNC output A (default, off)
disble safe
[Disable safe]
When on, allows delete or renaming of folders when empty, and take delete.
drop stop
[drop stop]
Stops record when dropped frames on input is detected (default, on)
thumbs
mouse exit
[thumbs]
Enables thumbnail display in playback file manager.
[mouse exit]
Enables right-click program exit when mouse is plugged in.
peak vu
[peak vu]
Enables peak view instead of meter view in audio meters.
P not Psf
[P not PsF]
Enables true progressive (p) input rather than progressive segmented frame (psf)
General preferences tab, continued [setup][prefs]
General Preferences [setup]:[prefs]
Prefs
Fan control, Battery monitor preferences, application control, and save/load preferences.
Preferences is the default tab when setup is
invoked.
input
files
loss stop
drop stop
TC
GPS
conv
input
prefs
fan ctrl
battery meter
restart app
main
low
Anton Bauer
exit app
grid
Digi View
mouse
mouse exit
med
3Gb/s out
Peak vu
high
3Gb/s out
P not Psf
Disable Safe
clip
reset prefs
save prefs
load prefs
[email protected] Version 2.0 release build 2.177
fan ctrl
low
medium
high
auto
[fan ctrl]
Fan control enable (default on) Control only on during record.
[low]
Sets target fan speed during record to low (default off)
[medium]
Sets target fan speed during record to medium (default off)
[high]
Sets target fan speed during record to high (default off)
[auto]
Auto sets fan speed to lowest setting available given current system temperature.
battery mon
[battery mon]
Battery level monitoring enable. (default off)
Anton Bauer
[Anton Bauer]
Selects Anton Bauer standard monitoring. (default off)
Digi View
restart app
exit app
reset prefs
save prefs
load prefs
[Digi View]
Selects IDX standard monitoring. (default off)
[restart app]
Restarts the application. Useful for troubleshooting.
[exit app]
Exits the Cinedeck application to the Windows desktop.
[reset prefs]
Resets preferences to defaults. Useful for troubleshooting.
[save prefs]
Saves preferences file to a USB thumb drive if inserted in USB port
[load prefs]
Loads preferences file from a USB thumb drive if inserted in USB port
Appendices:
Field Operating System Restore (“Factory Reset”) Instructions:
In the case of problems with the operation of the Cinedeck, there are some issues that are related to the operating system and may most simply be
solved by resetting the Cinedeck to its factory settings. This is usually the result of changing settings or installing 3rd party software that is not compatible with the Cinedeck version of the Windows Embedded operating system.
In general, it is a good idea to keep your restore disk up to date so that in the case of a field restore, your software will be current without installing it
separately.
The software update file is located at:
address:ftp://ftp.dbox.com
username: cinedeckupdate
password: update123
Folder: Cinedeck Program Update
Restoring the Cinedeck to factory settings:
NB: This will erase files you have saved or created on the C: drive previously, including any programs installed that are not part of the Cinedeck environment.
1)
Insert the OS restore thumb drive in one of the two USB ports located on the right end
panel of the Cinedeck.
2)
Power on the Cinedeck
3)
Let the restore run through fully. You will see a progress bar to indicate time remaining.
4)
When the restore is complete and the cursor is flashing at the bottom of the screen,
(about 3-4min) power off the Cinedeck by holding down the power switch for 3-4
seconds.
5)
Remove the USB thumb drive.
NB: At this point, make sure you have a fresh battery or wall power for the Cinedeck.
6)
7)
8)
9)
10)
11)
Power on the cinedeck
Let the Cinedeck start up completely and the Cinedeck software load.
Go to setup:prefs
Press “reset prefs” (this is simply for good measure)
Go to setup:prefs
Press “exit app”
NB: Skip steps 12 through 14 if there is no firmware update dialog pop-up; you can simply launch the cinedeck program from the desktop instead.
12) On the screen in Windows Desktop, there may be a firmware upgrade dialog pop-up window.
13) Press “ok” to update the firmware
NB: Do not shut down or power off the Cinedeck while the firmware upgrade runs!!
It will damage the device.
14)
Once the firmware upgrade has completed, it will prompt you to press ‘restart’ to
complete the process.
15)
It may be necessary to modify the battery meter COM port setting if you do not see a reading in the
battery meter display when a battery is connected and the battery meter preferences setting is on.
SEE: “Setting the battery meter COM port” in this guide.
Please email [email protected] if you have any issues or need help with this process.
Cinedeck Operating System Field Restore Disk Update instructions
NB: In general, it is a good idea to keep your restore disk up to date so that in the case of a field restore, your software will be current without installing it separately.
The restore disk update file is located at:
ftp://ftp.dbox.com
username: cinedeckupdate
password: update123
Folder: Restore Disk Update
NB We suggest an FTP client like filezilla or similar for the download. It is ~850MB (total OS replacement)
Installation instructions: Ideally this is done on a Windows PC, or on the Cinedeck with keyboard and mouse.
Updating the restore disk
1)
2)
3)
4)
5)
6)
7)
8)
9)
Download the image zip archive “xpe full.zip” from the ftp.
Extract the contents of the zip file “xpe_full.zip” to the desktop of the Cinedeck.
Remove USB or Media drive from the Cinedeck.
Insert the restore disk in the USB port on the Cinedeck
The restore disk should show up as the D: drive
In the Windows Explorer, navigate to D:\home\partimag and delete the folder “xpe-full”
(remember, you can plug in a USB mouse to make this easier)
Copy the “xpe-full” folder from the desktop to: D:\home\partimag\
Leave the thumb drive in the usb port
Push the power button on the side of the Cinedeck and let it shut down.
Cinedeck Bootable BIOS Update Disk Creation Instructions
Download location for the BIOS update disk components:
ftp://ftp.dbox.com
username: cinedeckupdate
password: update123
Folder: BIOS_disk
Making the BIOS update USB thumb drive:
[COMMANDS shown in Blue]
1) Format the thumb drive:
1.
Open a command prompt window
2.Type: DISKPART This will start the disk partition program.
3.Type: LIST DISK This will list the available disk partitions to format.
4.
The size of the partitions will tell you which partition is the USB thumb drive.
It should be the smallest by far.
NB! You will be formatting the drive, which will erase ALL data!
Be sure you choose the correct drive, the USB thumb drive, not your 10TB video RAID!!
2) Select the correct disk, usually DISK1, then type:
1.
CLEAN
2.
CREATE PARTITION PRIMARY
3.
FORMAT FS=FAT32 QUICK
If for some reason this last command fails, right-click “my computer” in the Windows Explorer
and select: “computer management.” In computer management, select “disk management,”
then right click the partition you created and select “format.” In the format dialog, select
“FAT32” and “quick format”.
4.
ACTIVE
5.
ASSIGN
6.
EXIT
3) Once the above is complete, Unzip the contents of “BIOS_update_disk.zip” to a temporary copy all files and folders to the new partition on the thumb drive.
4) After the copy is complete, Open a command prompt window and type
1.
D: (or the stick drive letter, if not D:)
2.
CD UTILS\WIN32
3.
MAKEBOOT.BAT
Follow the instructions from the MAKEBOOT program to complete the task.
5) Eject the thumb drive Windows using the “safely remove hardware” button on the
Windows task bar.
Please contact [email protected] if you have about this process.
folder, then
Breakout cable connections
RS 422 Deck Control
XLR Analog
Audio Out
XLR Analog
Audio Out
XLR Analog
Audio In
XLR Analog
Audio In
RY in
Y in
BY in
Ref In
RY Out
Y Out
BY Out
AES/EBU in
AES/EBU out
Cinedeck I/O Pin Definitions: Serial numbers 500 and higher.
Setting up the docking station for use with the Cinedeck Extreme
The Cinedeck eSATA & USB Docking Station easily connects all 2.5" or 3.5" SAT hard drives, allowing PC or MAC system to instant access and store data.
Features:
Specifications:
• Dimension: (L x W x H)
•Supports all 2.5" & 3.5" SATA HDDs
• Model#: ST0005U
• Interface: SATA to eSATA / USB 2.0
• USB 2.0 Transfer Rate: up to 480 Mbps
5.12" × 3.55" x 2.56”
130 × 90 × 65 mm
•Supports USB 2.0 Transfer speed up to 480
Mbps
•Supports eSATA I/II Transfer speed up to 3
Gbps
•Windows and Mac OS Compatible
•Compact Docking Station Design maximizes
Heat
Dissipation & Exhaust
•Patented Design: HDD Ejection Mechanism
(Max)
• eSATA Transfer Rate: up to 3 Gbps (Max)
• SATA Compatible: SATA I & II
• HDD Compatible: All 2.5” or 3.5” SATA
• OS Compatible:
Windows Vista/ XP/ 2003/ 200/ NT/ 98/
95
Mac 10.3 or later
• Material: ABS Plastic
• Power: 12V/2A
•Windows Vista Ready!
Hardware Installation
1. TOP
1
2. BACK
2
3
4
1. Push button to release HDD
from
SATA connector
2. Button
5
3. For 2.5" HDD
4. For 3.5" HDD
5. Power and Access LED
Power switch
DC jack
USB port to PC host
eSATA port to PC host
Disk Installation
Install 2.5" HDD
Install 3.5" HDD
Hard Drive not included*
NOTE: Hard drive(s) not propertly formatted or partitioned
will not work with enclosures.
Patented design for HDD removal from docking unit
Care and feeding of SSD media
SSD media is different from traditonal spinning hard drives in two important ways.
1)
2)
Low level formatting has an adverse affect on the flash media
Disk optimization is achieved by “trim” rather than “degragmentation”, and with certain
controllers, the “secure erase” process.
Restoring SSD media to “factory new” performance
SSDs will lose performance over time, which will have a negative impact on recording capability.
Each type of SSD has its own process for returning it to factory new:
Patriot Torqx
The Process for the Patriot Torqx is quite simple and the full step-by-step is given on p71
OCZ Vertex
The process for the OCZ Vertex is similar to that of the Patriot Torqx and is given on p72
OCZ Vertex2 (and other Sandforce-based controllers)
Sandforce-based SSDs must be “secure erased” to return them to factory performance. This is a
rather involved process. If you purchased Vertex 2 media from Cinedeck, you will have a USB thumb
drive that has the appropriate software on it. See page 73.
You will need a USB keyboard in addition to the USB key for this process.
Special note regarding PhotoFast RAID media
Unlike other SSDs, the PhotoFast SSDs are NOT hot-swappable. Care should be taken to insert the
media before powering up the Cinedeck, and to shut down the Cinedeck before removing the media.
WARNING: Only SSD media purchased from Cinedeck are ready to use. Other SSDs must be prepared
following the directions on page 69 to prevent error and data loss.
Setting up new SSD media for use with the Cinedeck Extreme
SSD media purchased from any other vendor must be prepared before use with the Cinedeck EXTREME to disable write caching on
the device and to format it using the correct file system. All data on the SSD will be lost in preparation for use with the Cinedeck
EXTREME. Perform these functions on the Cinedeck EXTREME itself, rather than attempting to perform them on a computer; this is
necessary to ensure proper functionality.
NOTE: A USB mouse can be connected to the Cinedeck EXTREME to perform these functions without using the touchscreen and is
recommended for ease of operation.
Boot up the Cinedeck EXTREME, quit to the OS by tapping exit in the main PREFERENCES page. [setup][prefs][exit app] Insert the new
SSD to be prepared, and follow the instructions below. In order to context-click using the touchscreen, hold down on one spot for
2-3 seconds. (This is equivalent to right-clicking with a mouse.)
WARNING: Failure to follow these proceFollow these steps to prepare a new SSD:
dures will result in improper operation and
may cause future data loss in operation.
1. Click start.
2. Click My Computer.
3. On the window that appears, click the
large button labeled Folders.
4. In the window below, context-click
(by holding in place on the touchscreen
or right clicking with an attached
mouse) on My Computer.
5. In the context menu that appears,
click Manage.
6. In the window that appears, click
Disk Management.
7. In the pane that appears, contextclick on Disk 1 (NOT Disk 0), your new
SSD. Confirm
that size of the device to make sure it
is the SSD and not the onboard unit
storage.
8. In the context menu that appears,
click Properties.
9. In the window that appears, click the
Hardware tab.
10. At the bottom of the Hardware tab,
click Properties.
Setting up new SSD media for use with the Cinedeck Extreme, continued
11. In the window that appears, click
the Policies tab.
12. On the Policies page, UNCHECK Enable write caching on the disk.
13. With Enable write caching on the
disk now UNCHECKED, click OK on the
bottom of the window to confirm.
14. Click OK on the bottom of the Hardware page to confirm.
15. Context-click again on Disk 1 (NOT
Disk 0), your new SSD. Confirm that size
of the device to make sure it is the SSD
and not the onboard unit storage.
16. In the context menu that appears, click Format.
17. In the window that appears confirm
that
File system is set to NTFS, and check the
box for Perform a quick format.
WARNING: This is not optional for SSD
drives. You must perform a quick format.
18. With Perform a quick format
checked, click OK to confirm.
19. In the window that appears, click OK
again to format the SSD. Formatting the
SSD will be rapid.
The SSD is now set for proper operation and formatted for use with the Cinedeck
EXTREME. You may close all windows and relaunch the Cinedeck software by
double tapping on the cinedeck.exe application on the desktop, or by restarting
the unit.
Using the Patriot trim utility for Patriot Torqx SSD media
Using the OCZ trim/garbage collection utility
The OCZ trim or garbage collection utility can be used with the following SSDs
1)
2)
3)
4)
5)
Vertex (not Vertex2)
Vertex Turbo
Vertex EX
Agility series
Solid 2 series
OCZ Vertex2 Secure Erase process for restoring SSD performance
The secure erase process can be used with the following SSDs
1)Vertex2
2)
Vertex LE
3)Agility2
Setting the battery meter COM port
Exit to the windows desktop and go to [start][my computer]
This will open an explorer window
Select folder view
Right-click “my computer” and select “manage”
This will open the management window
Select the device manager
Expand the “ports (COM & LPT)” menu
Double-click the “USB serial port (COMxx)” item
This opens the device properties window
Setting the battery meter COM port, continued
Select the “port settings” tab, then select “advanced”
properties
from the “COM Port Number” pulldown, select port 6
Ignore the “(in use)” notation
Exit the advanced settings tab by selecting “ok”
Exit the COM properties settings tab by selecting “ok”
input
files
loss stop
drop stop
GPS
TC
conv
input
prefs
fan ctrl
battery mon
restart app
main
low
Anton Bauer
exit app
grid
Digi View
mouse
mouse exit
med
3Gb/s out
Peak vu
high
3Gb/s out
P not Psf
Disable Safe
clip
reset prefs
save prefs
load prefs
[email protected] Version 2.0 release build 2.177
Close the management tab, then restart the Cinedeck.
-74.0715 Frame 1080p YUV10
40.416
Fps
23.98
51.166
Codec CineForm 1.1MB/frame 27.3MB/s
72
manhattan_aerial
next: reel_2_031
Battery 44%
last take 3:22
Media 128GB
Free
73GB
Remain 46 min
With a battery attached, open the [setup][prefs] tab,
select battery type and select [battery mon]
record
slate
safe
grid
100%
edge
analysis
clipping
fullscreen
play
lock
reset
00:12:06:21
setup
Go back to the main UI and the battery meter should
show a % value.
stop
Codec installation on the MAC and PC
Codec download locations for playback of material recorded on the Cinedeck:
ProRes
Apple quicktime codecs for Mac and PC
PC: http://support.apple.com/downloads/Apple_ProRes_QuickTime_Decoder_1_0_for_Windows
Mac: http://support.apple.com/downloads/Apple_ProRes_QuickTime_Decoder_1_0_for_Mac
DNxHD (Quicktime)
Avid Quicktime Codecs for Mac and PC
mac/pc: http://avid.custkb.com/avid/app/selfservice/search.jsp?DocId=372311
Uncompressed Codec for Mac and PC
Mac/PC: http://www.cinedeck.com/customercare/downloads/quicktime_codecs
DNxHD (MXF)
Avid MXF Codecs for Mac
mac/pc: http://avid.custkb.com/avid/app/selfservice/search.jsp?DocId=372311
Uncompressed Codec for Mac and PC
Mac/PC: http://www.cinedeck.com/customercare/downloads/quicktime_codecs
CineForm
Cineform Quicktime Codecs for Mac and PC
Mac/PC: http://estore.cineform.com/neoplayer.aspx
Uncompressed
Uncompressed Codec for Mac and PC
In the C:/Cinedeck/Cinedeck_extras folder on the Cinedeck
or
Mac/PC: http://www.cinedeck.com/customercare/downloads/uncompressed_codecs
Average data rates
Prores
Average Data Rates
Avid DNxHD
Average Data Rates
CineForm
Cineform -‐ High Cineform -‐ Film Scan 1
Cineform -‐ Film Scan 2
Cineform -‐ Keyscan CineForm -‐ Uncompressed 444
Cineform -‐ Medium
Cineform -‐ High Cineform -‐ Film Scan 1
Cineform -‐ Film Scan 2
CineForm -‐ Uncompressed 422
CineForm -‐ Uncompressed RAW
Cineform -‐ High Cineform -‐ Film Scan 1
Cineform -‐ Film Scan 2
Cineform -‐ Keyscan CineForm -‐ Uncompressed 444
Cineform -‐ Medium
Cineform -‐ High Cineform -‐ Film Scan 1
Cineform -‐ Film Scan 2
CineForm -‐ Uncompressed 422
CineForm -‐ Uncompressed RAW
2048x1152 (24p/25p)
2048x1152 (24p/25p)
2048x1152 (24p/25p)
2048x1152 (24p/25p)
2048x1152 (24p/25p)
1080 -‐ (30P)
1080 -‐ (30P)
1080 -‐ (30P)
1080 -‐ (30P)
1080 -‐ (30P)
1080 -‐ (30P / 60i)
1080 -‐ (30P / 60i)
1080 -‐ (30P / 60i)
1080 -‐ (30P / 60i)
1080 -‐ (30p/60i)
1080 -‐ (30p)
1080 -‐ (24p/25p)
1080 -‐ (24p/25p)
1080 -‐ (24p/25p)
1080 -‐ (24p/25p)
1080 -‐ (24p/25p)
1080 -‐ (24p/25p/50i)
1080 -‐ (24p/25p/50i)
1080 -‐ (24p/25p/50i)
1080 -‐ (24p/25p/50i)
1080 -‐ (24p/25p/50i)
1080 -‐ (24p/25p)
Resolu6on
RAW
RAW
RAW
RAW
RAW
4:4:4
4:4:4
4:4:4
4:4:4
4:4:4
4:2:2 / RAW
4:2:2 / RAW
4:2:2 / RAW
4:2:2 / RAW
4:2:2
RAW
4:4:4
4:4:4
4:4:4
4:4:4
4:4:4
4:2:2 / RAW
4:2:2 / RAW
4:2:2 / RAW
4:2:2 / RAW
4:2:2
RAW
Chroma
12
12
12
12
12
12
12
12
12
12
10 / 12
10 / 12
10 / 12
10 / 12
10
12
12
12
12
12
12
10 / 12
10 / 12
10 / 12
10 / 12
10
12
Bit Depth
109
146
182
219
680
246
307
369
442
2240
115
154
192
230
1244
750
205
256
307
369
1792 / 1866
96
128
160
192
995 / 1037
600
Bit Rate
(Mbps)
49
66
82
98
306
111
138
166
199
1008
52
69
86
104
560
338
92
115
138
166
840
43
58
72
86
467
270
File Size
GB/Hour
156
117
94
78
25
69
56
46
39
7.6
148
111
89
74
14
23
83
67
56
46
9
178
133
107
89
16
28
128 GB
Minutes
312
234
187
156
50
139
111
93
77
15
296
222
178
148
27
46
167
133
111
93
18
356
267
213
178
33
57
256 GB
Minutes
609
457
365
305
98
271
217
181
151
30
579
434
347
289
54
89
326
260
217
181
36
694
521
417
347
64
111
500 GB
Minutes
CineForm Compression Modes
Cineform -‐ Medium
Cineform -‐ High Cineform -‐ Film Scan 1
Cineform -‐ Film Scan 2
CineForm -‐ Uncompressed RAW