1
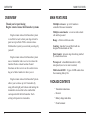
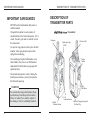
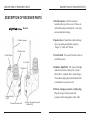
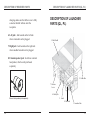
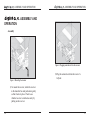
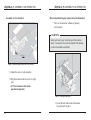
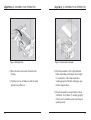
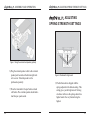
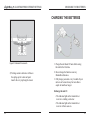
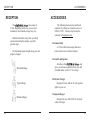
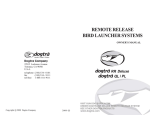
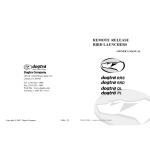
CONTENTS
OVERVIEW
2
MAIN FEATURES
3
PACKAGE CONTENTS
3
IMPORTANT SAFEGUARDS
4
DESCRIPTION OF TRANSMITTER PARTS
5
DESCRIPTION OF RECEIVER PARTS
8
DESCRIPTION OF LAUNCHER PARTS(QL, PL) 11
ASSEMBLY AND OPERATION
14
ADJUSTING SPRING STRENGTH
SETTINGS
21
CHARGING THE BATTERIES
23
RECEPTION
26
ACCESSORIES
27
BASIC MAINTENANCE
28
WARRANTY AND REPAIR INFORMATION
29
1
OVERVIEW
OVERVIEW
Thank you for purchasing
Dogtra remote release bird launcher systems
Dogtra remote release bird launcher system
is an effective tool to train your dogs to hold a
point or stop to flush. With a remote release
bird launcher system you can train your dogs by
yourself.
Dogtra remote release bird launcher system
uses a transmitter and a receiver to release the
launcher from a remote location. Sound
functions on the receiver can be used to train a
dog or to find a launcher in heavy cover.
Dogtra remote release bird launcher System
allows you to release up to 16 launchers by
using left and right jack buttons and turning the
transmitter selector dial to the number that
corresponds with the bird launcher. Each
setting will operate two launchers.
MAIN FEATURES
MAIN FEATURES
Multilple releasers : up to 16 launchers
controlled from one transmitter
Multiple sound modes : a receiver emits a duck
call and beep sound
Range : effective within one mile
Scenting : launcher box and bird cradle are
designed for maximum air flow
Quiet launch : prevents dogs from being startled
by a loud release noise
Waterproof : a handheld transmitter is fully
waterproof (receiver is water resistant)
Multi colored LED : 3 types of LED colors show
the remaining battery life
PACKAGE CONTENTS
Transmitter and antenna
Receiver
Battery charger and cables
Owner's manual
2
3
DESCRIPTION OF TRANSMITTER PARTS
IMPORTANT SAFEGUARDS
IMPORTANT SAFEGUARDS
DO NOT use the bird launcher until you have
read this manual.
Transport the launcher in a safe position. It
should either have the bird cradle open or if it is
closed, the safety pin must be inserted to lock
the release latch.
DESCRIPTION OF
TRANSMITTER PARTS
Transmitter
1. Antenna
2. Indicator Light
(LED)
To store for long periods of time, place the bird
launcher in the open position to prevent the
springs from weakening.
To avoid danger, keep the bird launcher away
from children. Never leave a set bird launcher
unattended. The bird cradle can pop open with
significant force.
Do not look down upon it or into it during the
launch process because you may be injured as
the bird cradle opens up.
7. Beeper
Button
8. Duck
Call Button
WARNING
Use caution when using a bird launcher. Keep
your head away from the top of the launcher
when it is loaded. You could be injured if
the dummy or bird is accidentally launched.
4
3. Selector Dial
5. Left
Launcher button
6. Right
Launcher button
4. Battery Charging Receptacle
/ Rubber Plug
5
DESCRIPTION OF TRANSMITTER PARTS
1. Antenna : A 2 Antenna is supplied with
Dogtra RR Deluxe transmitter. The
antenna must be fastened to the
transmitter before using the unit.
2. Indicator light(LED) : The color of the
light indicates the status of battery life.
(Green = full, Amber = medium, Red =
needs charge) The indicator light glows
when buttons are pressed as well.
DESCRIPTION OF TRANSMITTER PARTS
6. Right launcher button : Right launcher
button releases the launcher connected to
the right jack of the receiver.
7. Beeper button : Beeper button activates
the speaker horn on the receiver to emit a
loud beep sound.
8. Duck call button : Duck call button
activates the speaker horn on the receiver
to emit a series of quacks.
3. Selector dial : By turning the selector dial
you can control the desired launchers (one
to eight).
4. Battery charging receptacle / rubber
plug : Plug the charger cable jack into this
receptacle when charging the collar. After
charging, make sure the rubber cover is
fully seated so that dirt will not enter the
receptacle.
5. Left launcher button : Left launcher
button releases the launcher connected to
the left jack of the receiver.
6
7
DESCRIPTION OF RECEIVER PARTS
DESCRIPTION OF RECEIVER PARTS
Receiver
1. Flexible Antenna
DESCRIPTION OF RECEIVER PARTS
1. Flexible antenna : Flexible antenna is
located on the top of the receiver. Please do
not bend the antenna forcibly for it can cause
serious reduction in range.
2. Speaker horn : Sound horn emits loud beep
tone or quacking sound when you press
“beeper” or “duck call” button.
2. Speaker Horn
3. On/off switch : Press on/off switch to turn on
and off the power.
3. On/Off Switch
6. Left Jack
7. Right Jack
5. Battery charging receptacle / rubber plug :
Plug the charger cable jack into this
receptacle when charging the collar. After
4. Indicator Light
(LED)
8. External Speaker Jack
8
4. Indicator light(LED) : The color of the light
indicates the status of battery life. (Green =
full, Amber = medium, Red = needs charge)
The indicator light glows when buttons from
a transmitter are pressed as well.
5. Battery Charging Receptacle
/ Rubber Plug
9
DESCRIPTION OF RECEIVER PARTS
charging, make sure the rubber cover is fully
seated so that dirt will not enter the
receptacle.
6. Left jack : Jack located on the left side
where a launcher can be plugged.
DESCRIPTION OF LAUNCHER PARTS (QL, PL)
DESCRIPTION OF LAUNCHER
PARTS (QL, PL)
1. Bird Cradle
7. Right jack : Jack located on the right side
where another launcher can be plugged.
8. External speaker jack : Jack for an external
loud peaker, which can be purchased
separately
2. Cradle Bar
7. Release
Lever
6. Safety Pin
External loud speaker (sold separately)
5. Latch
4. Solenoid
10
3. Launcher Box
11
DESCRIPTION OF LAUNCHER PARTS (QL, PL)
DESCRIPTION OF LAUNCHER PARTS (QL, PL)
Launcher size
(Launcher) - for quail
- 8.6 4.5 4.3
- Excellent choice for quail and pigeons
(Launcher)- for pheasant
- 13.2 6.9 6.9
- Handles large birds with ease
1. Bird cradle : Bird cradle holds a dummy or
bird for launching.
2. Cradle bar : Cradle bar supports a bird cradle.
3. Launcher box : Launcher box contains large
holes for maximum air flow and scenting
possibilities.
4. Solenoid : Solenoid activates the launcher by
pulling the latch when the launcher button is
pressed.
5. Latch : Latch holds the bird cradle closed when
it is set for launch.
6. Safety pin : Insert safety pin to the hole in the
latch to prevent the bird launcher launching
accidentally.
7. Release lever : Release lever holds bird cradle
when it is set for launch
12
13
ASSEMBLY AND OPERATION
ASSEMBLY AND OPERATION
ASSEMBLY AND
OPERATION
Assembly
Figure 2. Plugging solenoid cord into the receiver.
Figure 1. Mounting the receiver
2) Plug the solenoid cord into the receiver’s
left jack
1) To mount the receiver, attach the receiver
to the launcher box and push down gently
so that it locks in place. Check to see
whether receiver is attached securely by
pulling on the receiver.
14
15
ASSEMBLY AND OPERATION
Assembly for two launchers
ASSEMBLY AND OPERATION
How to launch the Dogtra remote release bird launchers
First, test the launcher without any dummy
or bird inside.
WARNING
Keep your head away from the top of the launcher
when it is loaded. You could be injured if the dummy
or bird is launched accidentally.
Figure 3. Assembling two launchers in one receiver
1) Mount the receiver to the launcher.
2) Plug the solenoid cord into receiver’s right
jack.
(A 15 feet extension cable can be
purchased separately)
Figure 4. Closing the launcher.
1) Close the bird cradle inside the launcher
box and hold it in place.
16
17
ASSEMBLY AND OPERATION
Figure 5. Setting the latch.
2) Place the release lever under the latch roller
bearing.
3) Turn the receiver on. Make sure that the safety
pin has been pulled out.
ASSEMBLY AND OPERATION
Figure 6. Remote launcher released.
4) Press the transmitter’s left or right launcher
button depending on which jack (left or right)
it’s connected to. The remote launcher is
working properly if the bird cradle pops open
like the diagram above.
5) Press the transmitter’s beeper button or duck
call button. You’ll know it’s working properly
if the receiver sound horn emits a loud beep or
quacking sound.
18
19
ASSEMBLY AND OPERATION
ADJUSTING SPRING STRENGTH SETTINGS
ADJUSTING
SPRING STRENGTH SETTINGS
Figure 7. Using the external loud speaker (optional)
6) Plug the external speaker cable to the external
speaker jack located on the bottom right side
of a receiver. External speaker can be
purchased separately.
7) Press the transmitter’s beeper button or duck
call button. The external speaker should emit a
loud beep or quack sound.
20
Figure 8. Positioned for high launch
1) The bird launcher is shipped with the
springs adjusted in the bottom setting. This
setting gives you the high launch. Turning
clockwise will move the springs down for a
higher launch: the very bottom being the
highest.
21
ADJUSTING SPRING STRENGTH SETTINGS
CHARGING THE BATTERIES
CHARGING THE BATTERIES
Figure 9. Positioned for low launch
2) Turning counter-clockwise will move
the springs up for a low and quiet
launch: the very top being the lowest.
1. Charge the unit about 10 hours before using
the unit for the first time.
2. Do not charge the batteries near any
flammable substances.
3. Fully charge your units every 3 months if your
units are to be stored away for more than a
couple of months or longer.
Recharge the unit if :
The indicator light on the transmitter or
receiver is emitting a red color.
The indicator light on the transmitter or
receiver will not come on.
22
23
CHARGING THE BATTERIES
Battery Charging Procedure
Note : The unit has a partial charge when it
leaves the Dogtra facility, upon receipt of the
launcher systems, be sure to give it a full 10-hour
initial charge before the first use.
1. Attach the charging cables to both the
transmitter and receiver(s), as shown on
page 23.
CHARGING THE BATTERIES
4. After charging, cover the battery charging
receptacles with the rubber plugs on the
transmitter and receiver.
NOTE : Only use Dogtra-approved batteries,
chargers, and accessories for your Dogtra
RR Deluxe System. When a charger is not in
use, disconnect it from the power source.
2. Plug the charger into a 120-volt wall outlet.
(Use a 230-volt European charger for Europe.)
When properly plugged in, all indicator lights
should glow red. During the charging process,
the unit will shut off. Once the battery cable is
unplugged from the unit after a full charge,
you will need to turn the unit on again before
use.
3. Full charge period for the units is 10 hours.
The lights will stay red during the charging
process. After 10 hours, unplug the charger.
Now the unit is fully charged to use.
24
25
ACCESSORIES
RECEPTION
RECEPTION
The
has a range of
1 mile. Depending on the way you use your
transmitter, the transmitter range may vary.
Hold the transmitter away from your body
and avoid touching the antenna, to get the
greatest range.
For maximum signal strength, keep your unit
properly charged.
ACCESSORIES
The following items may be purchased
separately by calling our customer service at
(888) 811-9111. You may also browse the
selection at shop.dogtra.com.
Extension Cable
A 15 foot cable allows longer distances
between the receiver and the launcher.
External Loud Speaker
Maximum Range
Attaches to the
and
gives you increase sound for windy days and
extended marks (cord 4 1/2 feet long)
Field Auto Charger
Typical Range
Minimum Range
26
Designed for use with the 12-volt cigarette
lighter in your car.
European Charger
Designed for use with 230V AC electrical
outlets in Europe.
27
BASIC MAINTENANCE
BASIC MAINTENANCE
Be sure that the rubber charging plugs are
always secured when the collar is in use. If your
plugs break or are ripped, please contact
Customer Service at [email protected] or
(888) 811-9111 to obtain replacements.
After each session, carefully inspect your
unit for any missing parts, or casing damage.
Broken casings on either the receiver or
transmitter may affect the waterproof guarantee
of the unit. The transmitter antenna should be
secured and tight for optimum performance.
Rinse the unit after each session and clean off
any dirt or debris.
Storage Maintenance
Your unit should be fully charged for 10
hours before extended storage. During storage,
the unit should be charged every 3 months for
10 hours, and once before the first use.
When traveling, try to store your units in
room or slightly warmer temperatures, do not
transport the unit exposed in extreme climates.
Troubleshooting:
If you have any questions or concerns, you
may direct your inquiries to [email protected] or
call (888) 811-9111.
28
WARRANTY AND REPAIR INFORMATION
WARRANTY AND REPAIR INFORMATION
1-Year Comprehensive Warranty
Dogtra Company provides the original purchaser with a 1YEARWARRANTY for the iQ Series, EF3000Gold, RRDeluxe, YS300,
and YS500. The warranty begins from the date of purchase. For the first
year, coverage is for Parts, Labor, and Accessories.
After the first year, the cost of Parts, Accessories, Labor fees, and
Shipping fees incurred are thecustomer’s responsibility. Labor fees will be
variable depending on the extent of the work required.
To Qualify for the Dogtra Warranty
All products must be registered and/or a proof of purchase is required to
initiate repair work under warranty. To register your Dogtra product, log
onto our website at www.dogtra.com, click on the warranty registration
link, and fill out the required information. Registration must be completed
within 30 days of purchase. If you do not have access to a computer, you
can call our toll free number at 1-888-811-9111, and one of our customer
service representatives will register the product for you. If you were
unable to register your product within 30 days of purchase, we will accept
all products for repair with a proof of purchase. We strongly recommend
keeping the original receipt. If your product is not registered and a proof
of purchase is not available at the time of service, Dogtra will estimate the
age of the unit by the serial number. Serial number estimates can differ
from the actual purchase date. A serial number estimate is the only method
of determining an approximate date of purchase without product
registration or a proof of purchase.
Not Covered Under Warranty
Dogtra DOES NOT offer warranty for products that have been bought
secondhand or as a resold product.
29
WARRANTY AND REPAIR INFORMATION
Dogtra DOES NOT replace defective units or provide refunds for products
purchased from us after 30 days from the date of purchase.
Dogtra DOES NOT cover the cost of shipping outside of the Continental
United States.
Issues of replacement and refunds on units purchased less than 30 days
from an authorized dealer must be addressed to the dealer directly. If the
products purchased from an authorized dealer are after 30 days from the
date of purchase, please send the units to Dogtra for service and repair.
Dogtra DOES NOT cover the cost of repairs and replacements due to
misuse by the owner or dog, improper maintenance, and/or lost units. Any
water damage on the Water Resistant Transmitters of the 175NCP,
180NCP, 200NCP series, 1400NCP Series, 1500NCP Series, and iQ, and
the Water Resistant Receivers of the RRS, RRD, and RR Deluxe, will not
be covered. All replacement costs for either the transmitter or receiver will
be the owner’s responsibility.
The warranty is void if the unit has been altered or an unauthorized person
has damaged the unit while attempting repair work.
Battery replacement by the customer during the first year of the 1-Year
Comprehensive Warranty is not recommended. If the customer chooses to
replace the batteries, any damage to the unit during the change-out by the
owner will void the warranty.
The removal of serial numbers from any Dogtra prodcuts will void the
warranty.
Dogtra reserves the right to retain and discard any parts or accessories that
have been found damaged upon replacement and repair.
WARRANTY AND REPAIR INFORMATION
The cost of shipping products under warranty back to Dogtra is the
customer’s responsibility. Dogtra is not responsible for units damaged or
lost in transition to Dogtra. Dogtra is not responsible for loss of training
time or inconvenience while the unit is in for repair work. Dogtra does not
provide loaner units or any form of compensation during the repair period.
A copy of the sales receipt showing the purchase date may be required
before warranty work is initiated.
Please include a brief explanation outlining the problem and include your
name, address, city/state/zip code, daytime phone number, evening phone
number, and email address. Or you can visit our website at
www.dogtra.com for a service request form. If the repair costs are not
covered under warranty, we will call you for payment information and
authorization. For any questions concerning your Dogtra products, call us
toll free at 1-888-811-9111, M-F 8:30AM - 4:00PM, Pacific Standard
Time, or email us at [email protected] for specific repair inquiries.
Send repair units to :
Dogtra Company / Repairs
22912 Lockness Avenue
Torrance, CA 90501
U.S.A.
Procedure for Repair Work
If the unit is malfunctioning, please refer to the “Trouble Shooting Guide”
in the Owner’s Manual and call customer service at 1-888-811-9111, for
technical support, before sending it to Dogtra for Service.
30
The diagrams and representations in the manual may differ slightly from
the actual product depending on the model type.
31