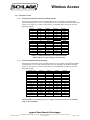
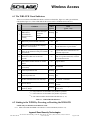
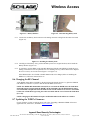
1
Wireless Access
CONFIGURING & OPERATING INSTRUCTIONS
SCHLAGE
WIRELESS ACCESS
SYSTEM
(WAS)
The most current version of this document is available for download at:
http://www.ir-swa.com
P/N: M053-007-D
Wireless Access
Schlage
Ingersoll Rand Security Technologies
245 W. Roosevelt Road, Building 7, Suite 48
West Chicago, IL 60185
main: 800-313-2962 (630-876-5680)
technical support: 866-322-1237
fax: 630-293-4257
web: ir-swa.com
Copyright © 2003-2006 Ingersoll Rand, all rights reserved.
No part of this document can be reproduced, transmitted, or transcribed in any form by electrical, mechanical, optical, manual, or
otherwise without the prior written consent of Ingersoll Rand. Ingersoll Rand reserves the right to alter or revise the content of
this document as needed to support future product revisions, without obligation to notify any persons of specific changes.
The use of trademarks, trade names, or other product identification is solely for reference purposes. All other product brand
names are trademarks or registered trademarks of their respective holders.
Ingersoll Rand believes the information in this document to be accurate and reliable. Ingersoll Rand does not guarantee results
from the use of this information. Ingersoll Rand assumes no responsibility, obligation, or liability for the information presented in
this document.
Ingersoll Rand Security Technologies
245 W. Roosevelt Road, Bldg 7, Suite 48, West Chicago, IL 60185 / (800) 313-2962 / (630) 293-4257 fax
P/N: M053-007-D
www.ir-swa.com
Page 2 of 60
Wireless Access
CONFIGURING & OPERATING INSTRUCTIONS
NOTE: This manual is intended to be used after the Schlage Wireless Access Modules have been installed. Each
Schlage Wireless Access module has its own installation manual. Use this manual to configure and operate your
system.
TABLE OF CONTENTS
1.
2.
3.
4.
5.
6.
7.
Schlage Wireless Access System (WAS) ............................................................................................................6
Panel Interface Module (PIM)............................................................................................................................7
2.1 How to determine the version of PIM PCB ...................................................................................................8
2.2 The PIM Indicators ......................................................................................................................................10
2.3 How to Set an RF Channel ..........................................................................................................................11
2.4 Putting the PIM-TD2, PIM-TD4 and PIM-EXP into Link Mode ................................................................14
2.5 What Happens if the PIM Loses DC Power ................................................................................................14
2.6 Using the PIM Reset Switch........................................................................................................................14
2.7 PIM Tamper Switch Operation....................................................................................................................14
2.8 Updating the PIM’s Firmware .....................................................................................................................15
Panel Interface Module Expander (PIM-EXP)...............................................................................................16
WA Series Integrated Lockset (WA5200 or WA5600) ...................................................................................17
4.1 The WA5200/WA5600 Audio/Visual Indicators ........................................................................................18
4.2 Linking a WA5200/WA5600 to a WPIM....................................................................................................19
4.3 Testing a WA5200/WA5600 .......................................................................................................................20
4.4 Installing/Replacing a WA5200/WA5600 Battery Pack (K380-001)..........................................................21
4.5 Battery Override ..........................................................................................................................................21
4.6 Changing the RF Channel............................................................................................................................21
4.7 Updating the MIRL’s Firmware ..................................................................................................................22
WA Exit Trim (WA993)....................................................................................................................................23
5.1 The WA993 Audio/Visual Indicators ..........................................................................................................23
5.2 Linking the WA993 to a WPIM ..................................................................................................................24
5.3 Testing the WA993......................................................................................................................................25
5.4 Installing/Replacing the WA993 Battery Pack (K380-001) ........................................................................26
5.5 Re-linking a WA993 and WPIM .................................................................................................................26
5.6 Changing the RF Channel............................................................................................................................26
5.7 Updating a WA993’s Firmware...................................................................................................................26
Outdoor Wireless Reader Interface (WRI-OTD) ...........................................................................................27
6.1 The WRI-OTD Visual Indicators ................................................................................................................28
6.2 Linking to the WPIM by Powering or Resetting the WRI-OTD .................................................................28
6.3 Testing the WRI-OTD .................................................................................................................................29
6.4 Re-linking a WRI-OTD and WPIM.............................................................................................................30
6.5 Changing the RF Channel............................................................................................................................30
6.6 Updating a WRI-OTD’s Firmware ..............................................................................................................30
Indoor Wireless Reader Interface (WRI-IN) ..................................................................................................31
7.1 The WRI-IN Visual Indicators ....................................................................................................................32
Ingersoll Rand Security Technologies
245 W. Roosevelt Road, Bldg 7, Suite 48, West Chicago, IL 60185 / (800) 313-2962 / (630) 293-4257 fax
P/N: M053-007-D
www.ir-swa.com
Page 3 of 60
Wireless Access
7.2 Linking to the WPIM by Powering the WRI-IN..........................................................................................32
7.3 Testing the WRI-IN .....................................................................................................................................33
7.4 Re-linking a WRI-IN and WPIM.................................................................................................................34
7.5 Changing the RF Channel............................................................................................................................34
7.6 Updating the WRI-IN’s Firmware ...............................................................................................................34
8. Wireless Portable Readers, Version 2 (WPR2) ...............................................................................................35
8.1 The WPR2 Audio/Visual Indicators ............................................................................................................36
8.2 Turning the WPR2 On .................................................................................................................................36
8.3 Linking or Re-Linking to the WPIM by Resetting the WPR2.....................................................................36
8.4 Testing the WPR2........................................................................................................................................37
8.5 Replacing the WPR2 Battery Pack, K380-001 ............................................................................................37
8.6 Changing the RF Channel............................................................................................................................38
8.7 Updating the WPR2’s Firmware..................................................................................................................38
9. Wireless Status Monitor (WSM) ......................................................................................................................39
9.1 The WSM Visual Indicators ........................................................................................................................40
9.2 Linking to the WPIM by Resetting the WSM..............................................................................................40
9.3 Replacing the WSM Battery Pack, K380-001 .............................................................................................41
9.4 Re-linking an WSM and WPIM ..................................................................................................................42
9.5 Changing the RF Channel............................................................................................................................42
9.6 Updating the WSM’s Firmware...................................................................................................................42
10.
Modular Integrated Reader Lock (MIRL)..................................................................................................43
10.1
The MIRL Audio/Visual Indicators.........................................................................................................43
10.2
Linking the MIRL to a WPIM .................................................................................................................44
10.3
Testing the MIRL ....................................................................................................................................45
10.4
Installing/Replacing the MIRL Battery Pack (K380-001) .......................................................................46
10.5
Battery Override ......................................................................................................................................46
10.6
Changing the RF Channel........................................................................................................................46
10.7
Updating the MIRL’s Firmware ..............................................................................................................46
11.
Wireless Exit Trim Kit (WEXK)..................................................................................................................47
11.1
The WEXK Audio/Visual Indicators.......................................................................................................48
11.2
Linking the WEXK to a WPIM ...............................................................................................................48
11.3
Testing the WEXK ..................................................................................................................................49
11.4
Installing/Replacing the WEXK Battery Pack (K380-001) .....................................................................50
11.5
Battery Override ......................................................................................................................................50
11.6
Re-linking a WEXK and WPIM ..............................................................................................................51
11.7
Changing the RF Channel........................................................................................................................51
11.8
Updating the WEXK’s Firmware ............................................................................................................51
12.
Wireless Portable Readers (WPR) ...............................................................................................................52
12.1
The WPR Audio/Visual Indicators ..........................................................................................................52
12.2
Turning the WPR On ...............................................................................................................................53
12.3
Linking or Re-Linking to the WPIM by Powering the WPR...................................................................53
12.4
Testing the WPR......................................................................................................................................53
12.5
Replacing the WPR Battery Pack, K380-001 ..........................................................................................54
12.6
Changing the RF Channel........................................................................................................................55
Ingersoll Rand Security Technologies
245 W. Roosevelt Road, Bldg 7, Suite 48, West Chicago, IL 60185 / (800) 313-2962 / (630) 293-4257 fax
P/N: M053-007-D
www.ir-swa.com
Page 4 of 60
Wireless Access
12.7
Updating the WPR’s Firmware................................................................................................................55
13.
Other Important Information.......................................................................................................................56
13.1
Knowing When to Change the RF Channel.............................................................................................56
13.2
Configuring the Schlage Wireless AccessTM System...............................................................................56
13.3
Extended Unlock .....................................................................................................................................56
13.4
Why Swipe a Card When the Power Is Disconnected? ...........................................................................57
13.5
Presenting a HID iCLASS Proximity Card..............................................................................................57
14.
Contacting Technical Support......................................................................................................................58
15.
FCC Compliance, ACA Compliance, & Warnings.....................................................................................59
15.1
FCC Compliance .....................................................................................................................................59
15.2
ACA Compliance.....................................................................................................................................59
15.3
Warnings..................................................................................................................................................59
16.
Revision History.............................................................................................................................................60
Ingersoll Rand Security Technologies
245 W. Roosevelt Road, Bldg 7, Suite 48, West Chicago, IL 60185 / (800) 313-2962 / (630) 293-4257 fax
P/N: M053-007-D
www.ir-swa.com
Page 5 of 60
Wireless Access
1. Schlage Wireless Access System (WAS)
Every access control system that uses Schlage Wireless Access contains two different types of modules
(Figure 1-1):
• at least one Wireless Panel Interface Module (WPIM), and
• at least one Schlage Wireless Access Point Module (WAPM)
Figure 1-1 – Schlage Wireless Access System Block Diagram
The Schlage Wireless Access product line contains several different expressions of each module (Table 1-1).
Schlage Wireless Access Module
Name
Acronym
Type
PIM
WPIM
Panel Interface Module
PIM-EXP
WPIM
Panel Interface Module Expander
WA5200/WA5600
WAPM
WA Series Modular Locksets
WA993
WAPM
WA Exit Trim
WRI-OTD
WAPM
Outdoor Wireless Reader Interface
WRI-IN
WAPM
Indoor Wireless Reader Interface
Wireless Portable Reader, Version 2*
WPR2
WAPM
Wireless Status Monitor*
WSM
WAPM
MIRL
WAPM
Modular Integrated Reader Lock
WEXK
WAPM
Wireless Exit Trim Kit
Wireless Portable Reader*
WPR
WAPM
*
Not evaluated by UL.
Table 1-1 – Schlage Wireless Access Product Line
Manual
Section
Page
2
7
3
16
4
17
5
23
6
27
7
31
8
35
9
39
10
43
11
47
12
52
The WPIM is wired to the access control panel and ideally is installed very close to the access control panel.
The WPIMs installation location is determined by the location of the WAPMs with which it will
communicate using RF.
The WAPM is installed at the access point where access will be controlled and/or monitored. Depending on
the application and which WAPM is used, some wiring at the access control point may be required.
Regardless of which WPIM or WAPM module is used, the communication link between the WPIM and
WAPM is always RF.
This manual describes the configuration and operation of all the WPIMs and WAPMs in the Schlage
Wireless Access Product Line.
Ingersoll Rand Security Technologies
245 W. Roosevelt Road, Bldg 7, Suite 48, West Chicago, IL 60185 / (800) 313-2962 / (630) 293-4257 fax
P/N: M053-007-D
www.ir-swa.com
Page 6 of 60
Wireless Access
2. Panel Interface Module (PIM)
The Panel Interface Module (PIM) is a product in the Schlage Wireless Panel Interface Module (WPIM)
category. The PIM is the wireless interface to an access control panel. Table 2-1 & Table 2-2 show the PIM
sales models and their major specifications.
Sales
Model
PIM-TD2
Closed
Enclosure
Opened
Enclosure
Extender
PIM-EXP
Antenna
internal “c”
or
remote
(ANT-REM-IN)
(ANT-REM-I/O)
(ANT-REM-I/O+6DB)
Table 2-1 – PIM Enclosure Variations
Ingersoll Rand Security Technologies
245 W. Roosevelt Road, Bldg 7, Suite 48, West Chicago, IL 60185 / (800) 313-2962 / (630) 293-4257 fax
P/N: M053-007-D
www.ir-swa.com
Page 7 of 60
Wireless Access
MODEL*
ENCLOSURE
MAXIMUM
NUMBER
OF WAPMs
LOCATION
PIM-TD2
plastic
2
indoor
PIM-TD4
plastic
4
indoor
PIM-485-OTD
plastic
16
indoor
PIM-EXP
n/a
2
indoor
ANT-REM-IN
plastic
n/a
indoor
ANT-REM-I/O
plastic
n/a
ANT-REM-I/O+6DB
plastic
n/a
indoor
outdoor
indoor
outdoor
ACCESS CONTROL PANEL
INTERFACE/DESCRIPTION
Magnetic (clock & data) or
Wiegand (data1/data0)
Magnetic (clock & data) or
Wiegand (data1/data0)
RS485
(OEM specific protocol)
Magnetic (clock & data) or
Wiegand (data1/data0)
Optional remote omnidirectional antenna (0 DB gain)
Optional remote omnidirectional antenna (0 DB gain)
Optional remote directional
panel antenna (6 DB gain)
* An AU prefix on a model number represents an Australian version of the product (i.e. AUPIM-TD2)
Table 2-2- PIM Sales Model Table
2.1 How to determine the version of PIM PCB
There are two versions of the PIM printed circuit board (PCB): RS232 (Figure 2-1) and RS485 (Figure
2-2).
The version of PIM PCB being installed can be identified by observing which connectors are installed on
the PCB. Compare the board being installed to Figure 2-1 and Figure 2-2.
2.1.1 PIM-TD2/TD4/EXP PCB (Figure 2-1)
If the RS232, 9-pin connector, J5, is installed and the RS485, 5-pin terminal block, J7, is missing then
it is a PIM-TD2/TD4/EXP PCB.
2.1.2 PIM-485-OTD PCB (Figure 2-2)
The PIM-485-OTD PCB can be uniquely identified in one of two ways:
•
If the RS232, 9-pin connector, J5, is installed and the RS485, 5-pin terminal block, J7, is
installed it is a PIM-485-OTD PCB
•
If the Access Point A, 8-pin panel connector, J3 and the Access Point B, 8-pin panel
connector, J4, are missing it is a PIM-485-OTD PCB
Ingersoll Rand Security Technologies
245 W. Roosevelt Road, Bldg 7, Suite 48, West Chicago, IL 60185 / (800) 313-2962 / (630) 293-4257 fax
P/N: M053-007-D
www.ir-swa.com
Page 8 of 60
Wireless Access
Figure 2-1 – PIM-TD2 & PIM-EXP Printed Circuit Board (PCB)
Figure 2-2 – PIM-485-OTD Printed Circuit Board (PCB)
Ingersoll Rand Security Technologies
245 W. Roosevelt Road, Bldg 7, Suite 48, West Chicago, IL 60185 / (800) 313-2962 / (630) 293-4257 fax
P/N: M053-007-D
www.ir-swa.com
Page 9 of 60
Wireless Access
2.2 The PIM Indicators
There are five LEDs on the PIM PCB: CR15 (green), CR7 and CR10 (red), CR6 and CR9 (green and
red). These LEDs indicate the current status of the PIM-TD2/PIM-TD3/PIM-EXP (Table 2-3) or
PIM-485-OTD (Table 2-4) and the WAPMs linked to it.
CR 15
(green)
PIM-TD2/PIM-TD4/PIM-EXP LED Indication
CR7, 10
CR6, 9
(red)
(green – red)
blinking
NA
green
on
NA
green
off
NA
NA
blinking
Condition
Normal
Operation
Tamper On (Door
Open)
Tamper Off
1 blink
PIM is not powered or PIM is
defective
Trouble: Low Battery
2 blinks
Trouble: No RF Communication
3 blinks
Trouble: Reader Tamper
4 blinks
Trouble: Lock Motor Stall
5 blinks
Trouble: Cache Memory Used
blinking
NA
CR9 flash green & red
Link, Access Point A
blinking
NA
Link, Access Point B
blinking
NA
blinking
blinking
NA
NA
CR6 flash green & red
CR6 & CR9 green flash on every good
transmission- Red flash on any bad
transmission. Goes on for about 20
seconds.
1 red flash per transmission
blinks off momentarily
Packet-Error-Rate test during
linking
PIM transmitting RF data
PIM receiving RF data
Table 2-3 - PIM-TD2/PIM-TD4/PIM-EXP LED Indicators
CR 15
(green)
PIM-485-OTD LED Indication
CR7, 10
CR6, 9
(red)
(green – red)
Condition
Tamper On (Door
Open)
blinking
NA
green
on
NA
green
off
NA
NA
PIM is not powered or PIM is
defective
NA
PIM receiving RS485 data
NA
PIM transmitting RS485 data
blinking
blinking
blinking
CR7
blinks
CR10
blinks
NA
blinking
NA
blinking
blinking
NA
NA
CR6 & CR9 flash green & red
CR6 & CR9 green flash on every good
transmission- Red flash on any bad
transmission. Goes on for about 20
seconds.
1 red flash per transmission
blinks off momentarily
Normal
Operation
Tamper Off
Linking WAPM as determined by
CDT
Packet-Error-Rate test during
linking
PIM transmitting RF data
PIM receiving RF data
Table 2-4 – PIM-485-OTD LED Indicators
Ingersoll Rand Security Technologies
245 W. Roosevelt Road, Bldg 7, Suite 48, West Chicago, IL 60185 / (800) 313-2962 / (630) 293-4257 fax
P/N: M053-007-D
www.ir-swa.com
Page 10 of 60
Wireless Access
2.3 How to Set an RF Channel
First determine if you have a United States or Australian PIM:
If your PIM model number is PIM-TD2, PIM-TD4, PIM-EXP, or PIM-485-OTD, then you have a United
States PIM. Go to section 2.3.1.
If your PIM model number is AUPIM-TD2, AUPIM-TD4, AUPIM-EXP, or AUPIM-485-OTD, then you
have an Australian PIM. Go to section 2.3.2.
2.3.1 United States Version
2.3.1.1 United States Non Dynamic Channel Switching (default)
In the United States version of Schlage Wireless Access products, one of fifteen RF channels can
be set using DIP switch SW7 on the PIM (Figure 2-1 or Figure 2-2). Table 2-5 shows how to set
the PIM’s SW7 to select the desired RF channel:
Channel
1
1
2
3
4
5
6
7
8
9
10
11
12
13
14
15
Switch 1
up
up
up
up
up
up
up
up
down
down
down
down
down
down
down
down
Switch 2
up
up
up
up
down
down
down
down
up
up
up
up
down
down
down
down
Switch 3
up
up
down
down
up
up
down
down
up
up
down
down
up
up
down
down
Switch 4
up
down
up
down
up
down
up
down
up
down
up
down
up
down
up
down
Table 2-5 – DIP Switch Setting to Select the RF Channel
NOTE: The first two switch settings select Channel 1.
Ingersoll Rand Security Technologies
245 W. Roosevelt Road, Bldg 7, Suite 48, West Chicago, IL 60185 / (800) 313-2962 / (630) 293-4257 fax
P/N: M053-007-D
www.ir-swa.com
Page 11 of 60
Wireless Access
2.3.1.2 United States Dynamic Channel Switching
When using the United States version of Schlage Wireless Access products in the dynamic
channel switching mode, one of five RF channel groups can be set using DIP switch SW7 on the
PIM (Figure 2-1 or Figure 2-2). Table 2-6 shows how to set the PIM’s SW7 switches to select
the desired RF channel:
Channel Group
1, 6, 11
1, 6, 11
2, 7, 12
3, 8, 13
4, 9, 14
5, 10, 15
1, 6, 11
2, 7, 12
3, 8, 13
4, 9, 14
5, 10, 15
1, 6, 11
2, 7, 12
3, 8, 13
4, 9, 14
5, 10, 15
Switch 1
up
up
up
up
up
up
up
up
down
down
down
down
down
down
down
down
Switch 2
up
up
up
up
down
down
down
down
up
up
up
up
down
down
down
down
Switch 3
up
up
down
down
up
up
down
down
up
up
down
down
up
up
down
down
Switch 4
up
down
up
down
up
down
up
down
up
down
up
down
up
down
up
down
Table 2-6 – DIP Switch Setting to Select the RF Channel Group
When the PIM is wired to the panel, power is applied, and the RF Channel is set, the PIM is
ready to enter Link Mode.
Ingersoll Rand Security Technologies
245 W. Roosevelt Road, Bldg 7, Suite 48, West Chicago, IL 60185 / (800) 313-2962 / (630) 293-4257 fax
P/N: M053-007-D
www.ir-swa.com
Page 12 of 60
Wireless Access
2.3.2 Australian Version
2.3.2.1 Australian Non Dynamic Channel Switching (default)
When using the Australian version of Schlage Wireless Access products in the non dynamic
channel switching mode, one of seven RF channels can be set using DIP switch SW7 on the PIM
(Figure 2-1 or Figure 2-2). Table 2-7 shows how to set the PIM’s SW7 switches to select the
desired RF channel:
Channel
9
9
9
9
9
9
9
9
9
9
10
11
12
13
14
15
Switch 1
up
up
up
up
up
up
up
up
down
down
down
down
down
down
down
down
Switch 2
up
up
up
up
down
down
down
down
up
up
up
up
down
down
down
down
Switch 3
up
up
down
down
up
up
down
down
up
up
down
down
up
up
down
down
Switch 4
up
down
up
down
up
down
up
down
up
down
up
down
up
down
up
down
Table 2-7 – DIP Switch Setting to Select the RF Channel
NOTE: The first ten switch settings select Channel 9.
2.3.2.2 Australian Dynamic Channel Switching
When using the Australian version of Schlage Wireless Access products in the dynamic channel
switching mode, one of two RF channel groups can be set using DIP switch SW7 on the PIM
(Figure 2-1 or Figure 2-2). Table 2-8 shows how to set the PIM’s SW7 switches to select the
desired RF channel:
Channel Group
9, 12, 15
9, 12, 15
9, 12, 15
9, 12, 15
9, 12, 15
9, 12, 15
9, 12, 15
9, 12, 15
9, 12, 15
9, 12, 15
10, 14
9, 12, 15
9, 12, 15
9, 12, 15
10, 14
9, 12, 15
Switch 1
up
up
up
up
up
up
up
up
down
down
down
down
down
down
down
down
Switch 2
up
up
up
up
down
down
down
down
up
up
up
up
down
down
down
down
Switch 3
up
up
down
down
up
up
down
down
up
up
down
down
up
up
down
down
Switch 4
up
down
up
down
up
down
up
down
up
down
up
down
up
down
up
down
Table 2-8 – DIP Switch Setting to Select the RF Channel Group
When the PIM is wired to the panel, power is applied, and the RF Channel is set, the PIM is
ready to enter Link Mode.
Ingersoll Rand Security Technologies
245 W. Roosevelt Road, Bldg 7, Suite 48, West Chicago, IL 60185 / (800) 313-2962 / (630) 293-4257 fax
P/N: M053-007-D
www.ir-swa.com
Page 13 of 60
Wireless Access
2.4 Putting the PIM-TD2, PIM-TD4 and PIM-EXP into Link Mode
Note: To put a PIM-485-OTD into Link Mode the Configuration & Demonstration
Tool (CDT) must be used. Refer to the appropriate PIM addendum manual for
specific instructions.
The Link Mode allows 2 WAPMs to be linked to a PIM-TD2 or PIM-EXP. The Link Mode allows 4
WAPM’s to be linked to a PIM-TD4. Only one WAPM can be linked at a time.
2.4.1 Once the RF Channel has been set (Section 2.3) on the PIM, press and release switch S1 to link
Access Point A (AP A) or switch S2 to link Access Point B (AP B).
2.4.2 The corresponding PIM LED (CR9 for S1; CR6 for S2) flashes red and green. This indicates that the
PIM is in Link Mode. To abort Link Mode, press the same switch again.
When the PIM is powered, the RF Channel is set, and the PIM is in Link Mode,
the system is ready for the WAPM to initiate linking.
Now, proceed to the appropriate section of this manual to link the desired WAPM
to this PIM.
2.5 What Happens if the PIM Loses DC Power
All of the configuration and linking information is stored in non-volatile memory in the PIM. Therefore if
PIM DC power is lost or cycled, upon restoring DC power, the PIM will continue operation with the
same configuration and linking information. There is no need to re-configure or re-link.
2.6 Using the PIM Reset Switch
The Reset Switch, S3 (Figure 2-1 or Figure 2-2), is used if the PIM does not seem to be working properly.
Pressing the Reset Switch has the same effect as cycling DC power to the PIM.
2.7 PIM Tamper Switch Operation
The PIM Tamper Switch, SW1 (Figure 2-1 or Figure 2-2), senses if the PIM enclosure door is open or
closed.
PIM Enclosure
Door
PIM
Access Point A
PIM
Access Point B
Trouble Signal
Trouble Signal
Extended Unlock for
Access Point A
&
Access Point B
constant green
inactive
inactive
works if enabled
blinking green
active
active
does not work even if enabled
PIM LED
CR15
closed
(i.e. no tamper)
open
(i.e. tamper)
*
*
*
this assumes that no other trouble is present from either Access Point
Table 2-9 – PIM Tamper Switch Operation
The Trouble signal is asserted (activated) for both PIM Access Points when a PIM enclosure door is
opened. Any PIM enclosure door opening, even if for maintenance, is considered a tamper condition.
When the PIM enclosure door is open the Extended Unlock feature (section 13.3) will not work (i.e.
temporarily disabled) even if the feature is configured to be enabled under normal operation (i.e. no PIM
tamper). This was done to make system testing, maintaining, and commissioning easier.
Ingersoll Rand Security Technologies
245 W. Roosevelt Road, Bldg 7, Suite 48, West Chicago, IL 60185 / (800) 313-2962 / (630) 293-4257 fax
P/N: M053-007-D
www.ir-swa.com
Page 14 of 60
Wireless Access
2.8 Updating the PIM’s Firmware
The PIM Programming Connector, J2 (Figure 2-1 or Figure 2-2) is used to install a new version of the
PIM firmware into the PIM. If a new firmware version is required, please refer to the “Upgrading a
WAPM or WPIM’s Firmware” application note, A664-010-x, available at www.ir-swa.com.
Ingersoll Rand Security Technologies
245 W. Roosevelt Road, Bldg 7, Suite 48, West Chicago, IL 60185 / (800) 313-2962 / (630) 293-4257 fax
P/N: M053-007-D
www.ir-swa.com
Page 15 of 60
Wireless Access
3. Panel Interface Module Expander (PIM-EXP)
The Panel Interface Module Expander (PIM-EXP) is a product in the Schlage Wireless Panel Interface
Module (WPIM) category. The PIM-EXP installs in a PIM-TD2 enclosure and provides the ability to
interface 1 or 2 additional Schlage Wireless Access Point Modules (WAPM) to an Access Control Panel.
Figure 3-1 shows the PIM-TD2 enclosure with PIM-EXP installed.
NOTE: A PIM-TD2 with a PIM-EXP installed is the same as a PIM-TD4.
Figure 3-1 – PIM-EXP PCB Location in a PIM-TD2 Making a PIM-TD4
Since configuration and operation of a PIM-EXP is identical to a PIM-TD2 use Section 2 and replace PIM
with PIM-EXP where ever found.
Ingersoll Rand Security Technologies
245 W. Roosevelt Road, Bldg 7, Suite 48, West Chicago, IL 60185 / (800) 313-2962 / (630) 293-4257 fax
P/N: M053-007-D
www.ir-swa.com
Page 16 of 60
Wireless Access
4. WA Series Integrated Lockset (WA5200 or WA5600)
The WA Series Integrated Lockset is a product in the Schlage Wireless Access Point Module (WAPM)
category. Cylindrical (WA5200) and mortise (WA5600) lockset versions are available. AUWA5200 and
AUWA5600 are Australian versions of the WA series integrated locksets.
Note: In this section, WA refers to a WA5200, a WA5600, an AUWA5200, or an AUWA5600.
Figure 4-1 – WA5200 Locked Side (Outside)
Figure 4-2 – WA5200 Unlocked Side (Inside)
Figure 4-3 – WA5600 Locked Side (Outside)
Figure 4-4 – WA5600 Unlocked Side (Inside)
Ingersoll Rand Security Technologies
245 W. Roosevelt Road, Bldg 7, Suite 48, West Chicago, IL 60185 / (800) 313-2962 / (630) 293-4257 fax
P/N: M053-007-D
www.ir-swa.com
Page 17 of 60
Wireless Access
4.1 The WA5200/WA5600 Audio/Visual Indicators
Action
1
2a
2b
2c
2d
2e
3
4
5
6
7
8
LED Indications
WA is powered and then displays
software version number
WA Relocks (motor runs)
If linking, WA sends a link request
(up to 3 times per RF channel)
looking for a WPIM in link mode
If linking, WA & WPIM do an
Packet-Error-Rate test for about 20
seconds
If linking, WA linked successfully
and indicates the RF Channel on
which it linked
Or if linking, WA not linked
successfully
Card swiped and not read, if iCLASS
reader see section 13.5
Card swiped and read, if iCLASS
reader see section 13.5
No RF communications with card
swipe
Access denied
Access granted, WA unlocks (motor
runs)
WA Relocks (motor runs)
*
*
MIRL
Sounder
X red flashes then Y green flashes*
none
1 red flash
1 green flash;
then 1 red flash
once for each link request sent
flashes for each RF transmission:
green flash for a good transmission
red flash for a bad transmission
1 beep
**
none
none
*
Z green flashes
Z beeps
2 red flashes
1 long beep
none
none
none
1 beep
1 red flash – immediate
none
2 red flashes – delayed about 1-15
seconds
1 beep
1 green flash
none
1 red flash
1 beep
X = major software version number (any number is possible)
Y = minor software version number (any number is possible)
**
Z = RF channel number that the WA linked on (1-15)
Table 4-1 – WA5200/WA5600 (WA) Indicators
Ingersoll Rand Security Technologies
245 W. Roosevelt Road, Bldg 7, Suite 48, West Chicago, IL 60185 / (800) 313-2962 / (630) 293-4257 fax
P/N: M053-007-D
www.ir-swa.com
Page 18 of 60
Wireless Access
4.2 Linking a WA5200/WA5600 to a WPIM
NOTE: Only one WAPM can be linked at a time.
4.2.1 If the WA does not have a Battery Pack installed, install one now (section 4.4).
4.2.2 Make certain that the WPIM to be linked to is in the Link Mode (Section 2.3.2).
4.2.3 To initiate the linking process:
4.2.3.1 Open the door.
4.2.3.2 Activate and hold down the inside lever to create a Request to Exit Condition.
4.2.3.3 While holding down the lever (Request to Exit), present a card to the card reader (refer to section
4.3).
4.2.3.4 Continue to hold down the lever (Request to Exit) until the WA LED’s start to blink indicating
that the link process has begun (approximately 8 seconds), then release the lever.
4.2.3.5 Close the door.
4.2.4 During linking, the WPIM’s LED (CR6 or CR9, depending on the door being linked) and the WA
LED blinks green (some intermittent red may be seen) for about 20 seconds while the WA & WPIM
determine the integrity of the selected RF channel.
4.2.5 If the WA & WPIM determine that the RF channel can be used, then the linking is completed
successfully and the WPIMs LED (CR6 or CR9, whichever was flashing) turns solid green. The WA
LED then blinks green and the sounder beeps. The number of green blinks and beeps indicates the
linked RF channel number. If this occurs go to the next step, section 4.2.6.
If the WA & WPIM determine that the RF signal quality is not acceptable then the link fails and the
WA LED blinks red twice and the sounder beeps several times rapidly (Table 4-1). The WPIM will
stay in the Link Mode and the WPIM LED (CR6 or CR9) returns to alternating green and red. If this
happens, move either the PIM, or change RF channels and try the link process again (Section 4.2).
4.2.6 After a successful link the WA is now ready to be tested for normal operation.
NOTE: No other WPIM can be in Link Mode during this process.
Figure 4-5 – WA Transceiver Cover
Figure 4-6 – WA Battery Pack Removal/Installation
Ingersoll Rand Security Technologies
245 W. Roosevelt Road, Bldg 7, Suite 48, West Chicago, IL 60185 / (800) 313-2962 / (630) 293-4257 fax
P/N: M053-007-D
www.ir-swa.com
Page 19 of 60
Wireless Access
Figure 4-7 – WA Battery Pack (K380-001)
4.3 Testing a WA5200/WA5600
4.3.1 Proximity Card Reader Models
4.3.1.1 Place the card flat to and within 1 to 3 inches of the upper part of the Proximity Reader (Figure
4-8). The reader sounder beeps.
NOTE: For HID iCLASS reader versions of the WA see section 13.5, page 57, below.
Figure 4-8 - Presenting a Proximity Card to a WA
4.3.1.2 The green LED flashes and the lock will unlock.
4.3.1.3 Turn the Lever and open the door.
4.3.1.4 Shortly after the green flash, there is a red flash and sounder beep signifying relock.
4.3.2 Magnetic Stripe Reader Models
4.3.2.1 Place the card at the top of the Magnetic Stripe Reader. The card’s magnetic stripe should be
facing towards the right and the long edge of the card should be facing the door. With the card at
the center of the reader’s slot, swipe the card through the slot. The reader sounder beeps.
Figure 4-9 - Presenting a Magnetic Card to a WA
4.3.2.2 The green LED flashes and the lock will unlock.
Ingersoll Rand Security Technologies
245 W. Roosevelt Road, Bldg 7, Suite 48, West Chicago, IL 60185 / (800) 313-2962 / (630) 293-4257 fax
P/N: M053-007-D
www.ir-swa.com
Page 20 of 60
Wireless Access
4.3.2.3 Turn the Lever and open the door.
4.3.2.4 Shortly after the green flash, there is a red flash and sounder beep signifying relock.
4.3.3 Indication of an Unsuccessful Card Read
The best indication of an unsuccessful valid card read is when the WA’s internal sounder does not
beep, indicating that the card was not read.
If an invalid card is read, the WA’s red LED flashes twice and the internal sounder beeps once.
In both cases the WA remains locked.
4.4 Installing/Replacing a WA5200/WA5600 Battery Pack (K380-001)
Approximately one month prior the end of the WA Battery Pack life, a Low Battery Trouble signal is
indicated at the WPIM (Table 2-4) and a Trouble signal will be sent to the access control panel. To
install or replace the WA Battery Pack, remove the WA Transceiver Cover (Figure 4-5). If replacing,
disconnect the old WA Battery Pack. If installed, remove the Battery Bracket. If replacing, remove the
old Battery Pack (Figure 4-6). Install the new Battery Pack, install the Battery Bracket, and connect the
Battery Pack (Figure 4-7). Install the WA Transceiver Cover (Figure 4-5). Depending on how long the
Battery Pack was disconnected, the WA may or may not go through its power-up sequence. In either
case the WA will stay linked to its WPIM. There is no need to re-link.
NOTE: No other WPIM can be in Link Mode during this process.
4.5 Battery Override
If the WA Battery Pack fails, a standard 9.0V battery, 522 or equivalent, may be used together with a
Battery Override Supply Cable (9VBOC) to power the WA so the door can be opened with a valid card.
The Battery Override Cable plugs to the Battery Override Connector found on the lower part of the Card
Reader Base Plate after removing the Card Reader Cover (Figure 4-10).
NOTE: If the Card Reader Base Plate has a Tamper Switch that is activated when the Reader Cover is
removed, then the Card Reader is disabled. Tamper Switch must be manually held closed (simulating
the cover being installed) for the Card Reader to operate.
Figure 4-10 – WA Battery Override
4.6 Changing the RF Channel
At the WPIM, change DIP switch SW7 to the desired new RF channel (Section 2.3), place the PIM in
Link Mode (see Section 2.3.2), then re-link the desired MIRL (Section 4.2).
NOTE: The WPIM’s RF channel DIP switch (SW7) is read when the WPIM enters the Link Mode.
If the DIP switch is changed while the WPIM is in the Link Mode, then the WPIM must be taken
Ingersoll Rand Security Technologies
245 W. Roosevelt Road, Bldg 7, Suite 48, West Chicago, IL 60185 / (800) 313-2962 / (630) 293-4257 fax
P/N: M053-007-D
www.ir-swa.com
Page 21 of 60
Wireless Access
out of Link Mode and put back into Link Mode for the new RF channel to be selected. The WPIM
is taken out of Link Mode by pressing the switch associated with the Access Point that is in the Link
Mode (S1 or S2).
NOTE: Changing the RF channel will require all WAPMs linked to the PIM to be re-linked.
4.7 Updating the WA’s Firmware
If a new firmware version is required, please refer to the “Upgrading a WAPM or WPIM’s Firmware”
application note, A664-010-x, available at www.ir-swa.com.
Ingersoll Rand Security Technologies
245 W. Roosevelt Road, Bldg 7, Suite 48, West Chicago, IL 60185 / (800) 313-2962 / (630) 293-4257 fax
P/N: M053-007-D
www.ir-swa.com
Page 22 of 60
Wireless Access
5. WA Exit Trim (WA993)
The WA Exit Trim (WA993) is a product in the Schlage Wireless Access Point Module (WAPM) category.
AUWA993 is an Australian version of the WA exit trim.
Note: In this section, WA993 refers to either a WA993 or an AUWA993.
Figure 5-1 – WA993 Locked Side (Outside) Figure 5-2 – WA993 Unlocked Side (Inside)
5.1 The WA993 Audio/Visual Indicators
Action
1
2a
2b
2c
2d
2e
3
4
5
6
7
8
WA993 is powered and then displays
software version number
WA993 Relocks (motor runs)
If linking, WA993 sends a link
request (up to 3 times per RF
channel) looking for a WPIM in link
mode
If linking, WA993 & WPIM do an
Packet-Error-Rate test for about 20
seconds
If linking, WA993 linked
successfully and indicates the RF
Channel on which it linked
Or if linking, WA993 not linked
successfully
Card swiped and not read
Card swiped and read
No RF communications with card
swipe
Access denied
Access granted, WA993 unlocks
(motor runs)
WA993 Relocks (motor runs)
*
*
LED Indications
WA993
Sounder
X red flashes then Y green flashes*
none
1 red flash
1 beep
1 green flash;
then 1 red flash
once for each link request sent
none
flashes for each RF transmission:
green flash for a good transmission
red flash for a bad transmission
none
**
*
Z green flashes
Z beeps
2 red flashes
1 long beep
none
none
none
1 beep
1 red flash – immediate
none
2 red flashes – delayed about 1-15
seconds
1 beep
1 green flash
none
1 red flash
1 beep
X = major software version number (any number is possible)
Y = minor software version number (any number is possible)
**
Z = RF channel number that the WA993 linked on (1-15)
Table 5-1 – WA993 Indicators
Ingersoll Rand Security Technologies
245 W. Roosevelt Road, Bldg 7, Suite 48, West Chicago, IL 60185 / (800) 313-2962 / (630) 293-4257 fax
P/N: M053-007-D
www.ir-swa.com
Page 23 of 60
Wireless Access
5.2 Linking the WA993 to a WPIM
NOTE: Only one WA993 can be linked at a time.
5.2.1 If the WA993 does not have a Battery Pack installed, install one now (section 5.4).
5.2.2 Make certain that the WPIM to be linked to is in the Link Mode (Section 2.3.2).
5.2.3 To initiate the linking process:
5.2.3.1 Open the door.
5.2.3.2 Push the crash bar to create a Request to Exit condition.
5.2.3.3 While holding the crash bar to activate the Request to Exit switch, present a card to the card
reader (refer to section 5.3).
5.2.3.4 Continue to hold the crash bar (Request to Exit) until the WA993 LED’s start to blink indicating
that the link process has begun (approximately 8 seconds), then release the lever.
5.2.3.5 Close the door.
5.2.4 During linking, the WPIM’s LED (CR6 or CR9, depending on the door being linked) and the WA993
LED blinks green (some intermittent red may be seen) for about 20 seconds while the WA993 &
WPIM determine the integrity of the selected RF channel.
5.2.5 If the WA993 & WPIM determine that the RF channel can be used, then the linking is completed
successfully and the WPIMs LED (CR6 or CR9, whichever was flashing) turns solid green. The
WA993 LED then blinks green and the sounder beeps. The number of green blinks and beeps
indicates the linked RF channel number. If this occurs go to the next step, section 5.2.6.
If the WA993 & WPIM determine that the RF signal quality is not acceptable then the link fails and
the WA993 LED blinks red twice and the sounder beeps several times rapidly (Table 5-1). The WPIM
will stay in the Link Mode and the WPIM LED (CR6 or CR9) returns to alternating green and red. If
this happens, move either the PIM, or change RF channels and try the link process again (Section 5.2).
5.2.6 After a successful link, the WA993 is now ready to be tested for normal operation.
NOTE: No other WPIM can be in Link Mode during this process.
Figure 5-3 – WA993 Transceiver Cover
Figure 5-4 – WA993 Battery Pack
Removal/Installation
Ingersoll Rand Security Technologies
245 W. Roosevelt Road, Bldg 7, Suite 48, West Chicago, IL 60185 / (800) 313-2962 / (630) 293-4257 fax
P/N: M053-007-D
www.ir-swa.com
Page 24 of 60
Wireless Access
Figure 5-5 – WA993 Battery Pack (K380-001)
5.3 Testing the WA993
5.3.1 Proximity Card Reader Models
5.3.1.1 Place the card flat to and within 1 to 3 inches of the Proximity Reader (Figure 5-6).
Figure 5-6 - Presenting a Proximity Card to a WA993
5.3.1.2 The green LED flashes and the lock will unlock.
5.3.1.3 Turn the Lever and open the door.
5.3.1.4 Shortly after the green flash, there is a red flash and sounder beep signifying relock.
5.3.2 Magnetic Stripe Reader Models
5.3.2.1 Place the card at the top of the Magnetic Stripe Reader. The card’s magnetic stripe should be
facing towards the right and the long edge of the card should be facing the door. With the card at
the center of the reader’s slot, swipe the card through the slot.
Figure 5-7 - Presenting a Magnetic Card to a WA993
5.3.2.2 The green LED flashes and the lock will unlock.
5.3.2.3 Turn the Lever and open the door.
5.3.2.4 Shortly after the green flash, there is a red flash and sounder beep signifying relock.
Ingersoll Rand Security Technologies
245 W. Roosevelt Road, Bldg 7, Suite 48, West Chicago, IL 60185 / (800) 313-2962 / (630) 293-4257 fax
P/N: M053-007-D
www.ir-swa.com
Page 25 of 60
Wireless Access
5.3.3 Indication of an Unsuccessful Card Read
The best indication of an unsuccessful valid card read is when the WA993’s internal sounder does not
beep, indicating that the card was not read.
If an invalid card is read, the WA993’s red LED flashes twice and the internal sounder beeps once.
In both cases the WA993 remains locked.
5.4 Installing/Replacing the WA993 Battery Pack (K380-001)
NOTE: If you want to re-link when changing the WA993 Battery Pack, follow the procedure in section
5.2, page 24.
Approximately one month prior the end of the WA993 Battery Pack life, a Low Battery Trouble signal is
indicated at the WPIM (Table 2-4) and a Trouble signal will be sent to the access control panel. To
install or replace the WA993 Battery Pack, remove the WA993 Transceiver Cover (Figure 5-3). IF
replacing, disconnect the old WA993 Battery Pack. If installed, remove the Battery Bracket. If replacing,
remove the old Battery Pack (Figure 5-4). Install the new Battery Pack, install the Battery Bracket, and
connect the Battery Pack (Figure 5-5). Install the WA993 Transceiver Cover (Figure 5-3). Depending on
how long the Battery Pack was disconnected, the WA993 may or may not go through its power-up
sequence. In either case the WA993 will stay linked to its WPIM. There is no need to re-link.
5.5 Re-linking a WA993 and WPIM
To re-link a WA993 and WPIM, follow the instructions in Section 5.2.
5.6 Changing the RF Channel
At the WPIM, change DIP switch SW7 to the desired new RF channel (Section 2.3), place the PIM in
Link Mode (see Section 2.3.2), then re-link the desired WA993 (Section 5.5).
NOTE: The WPIMs RF channel DIP switch (SW7) is read when the WPIM enters the Link Mode.
If the DIP switch is changed while the WPIM is in the Link Mode, then the WPIM must be taken
out of Link Mode and put back into Link Mode for the new RF channel to be selected. The WPIM
is taken out of Link Mode by pressing the switch associated with the Access Point that is in the Link
Mode (S1 or S2).
NOTE: Changing the RF channel will require all WAPMs linked to the PIM to be re-linked.
5.7 Updating a WA993’s Firmware
If a new firmware version is required, please refer to the “Upgrading a WAPM or WPIM’s Firmware”
application note, A664-010-x, available at www.ir-swa.com.
Ingersoll Rand Security Technologies
245 W. Roosevelt Road, Bldg 7, Suite 48, West Chicago, IL 60185 / (800) 313-2962 / (630) 293-4257 fax
P/N: M053-007-D
www.ir-swa.com
Page 26 of 60
Wireless Access
6. Outdoor Wireless Reader Interface (WRI-OTD)
The Outdoor Wireless Reader Interface (WRI-OTD-12VDC) is a product in the Schlage Wireless Access
Point Module (WAPM) category. AUWRI-OTD-12VDC is an Australian version of the outdoor wireless
reader interface.
Note: In this section, WRI-OTD refers to either a WRI-OTD-12VDC or an AUWRI-OTD-12VDC.
Figure 6-1 – Front of the WRI-OTD
Figure 6-2 – Inside the WRI-OTD
Figure 6-3 – WRI-OTD Printed Circuit Board (PCB)
Ingersoll Rand Security Technologies
245 W. Roosevelt Road, Bldg 7, Suite 48, West Chicago, IL 60185 / (800) 313-2962 / (630) 293-4257 fax
P/N: M053-007-D
www.ir-swa.com
Page 27 of 60
Wireless Access
6.1 The WRI-OTD Visual Indicators
There are two LEDs on the WRI-OTD PCB: a red Power LED (LED1, Figure 6-3) and a green/red State
LED (LED2, Figure 6-3). These LEDs indicate the current status of the WRI-OTD (Table 6-1).
LED Indication
Condition
1
Normal operation,
WRI-OTD is
powered & the
microprocessor is
running
Tamper On (WRIOTD’s door open
or external
tamper)
Tamper Off
LED1
(green)
LED2
(green – red)
blinking
off
on
off
2
PIM is not powered or PIM is defective
off
NA
3
WRI-OTD is powered and then displays
software version number
on
X red flashes then Y green flashes*
on
1 green flash; then 1 red flash once for
each link request sent
on
flashes for each RF transmission: green
flash for a good transmission, red flash
for a bad transmission
on
Z green flashes
on
2 red flashes
4
4a
4b
4c
WRI-OTD sends a link request (up to 3
times per RF channel) looking for a WPIM
in link mode
If linking, WRI-OTD & WPIM do an
Packet-Error-Rate test for about 20
seconds
If linking, WRI-OTD linked successfully
and indicates the RF Channel on which it
linked
Or, if linking, WRI-OTD not linked
successfully
**
5
Card swiped and not read
blinking
off
6
Card swiped and read
blinking
off
7
No RF communications with card swipe
blinking
1 red flash – immediate
8
Access denied
blinking
9
Access granted, WRI activates Strike &
Auxiliary Relays
blinking
*
*
2 red flashes – delayed about 1-15
seconds
green stays on as long as the Strike Relay
is activated
X = major software version number (any number is possible)
Y = minor software version number (any number is possible)
**
Z = RF channel number that the WRI-OTD linked on (1-15)
Table 6-1 – WRI-OTD LED Indicators
6.2 Linking to the WPIM by Powering or Resetting the WRI-OTD
NOTE: Only one WAPM can be linked at a time.
6.2.1 Make certain that that WPIM to be linked to is in the Link Mode (Section 2.3.2).
Ingersoll Rand Security Technologies
245 W. Roosevelt Road, Bldg 7, Suite 48, West Chicago, IL 60185 / (800) 313-2962 / (630) 293-4257 fax
P/N: M053-007-D
www.ir-swa.com
Page 28 of 60
Wireless Access
6.2.2 Reset the WRI-OTD by either cycling the WRI-OTD power (J3, Figure 6-3) or by pressing and
releasing the WRI-OTD Reset Switch (S1, Figure 6-3). After displaying the firmware version number
on LED2, the WRI-OTD attempts to link with a WPIM.
6.2.3 During linking, the WPIMs LED (CR6 or CR9, depending on the portal (WRI-OTD) being linked)
blinks green (some intermittent red may be seen) and the WRI LED2 blinks green (some intermittent
red may be seen) for about 20 seconds while the WRI-OTD & WPIM determine the integrity of the
selected RF channel.
6.2.4 If the WRI-OTD & WPIM determine that the RF channel can be used, then the linking is completed
successfully and the WPIMs LED (CR6 or CR9, whichever was flashing) turns solid green. LED2 of
the WRI-OTD then blinks green. The number of green blinks indicates the linked RF channel number.
If the WRI-OTD & WPIM determine that the RF signal quality is not acceptable then the link fails
and the WRI-OTD LED2 blinks red twice (Table 6-1). The WPIM will stay in the Link Mode. If this
happens, move either the WRI-OTD, PIM, or change RF channels and try the link process again
(Section 6.2.1).
6.2.5 Close and secure the WRI-OTD enclosure cover.
6.2.6 The WRI-OTD is now ready to be tested for normal operation.
6.3 Testing the WRI-OTD
If the WRI-OTD was installed with all of its peripherals then there are 8 tests that need to be run before
commissioning the WRI-OTD for operation. If a WRI-OTD peripheral was not installed, then that
particular test can be skipped.
6.3.1 Tamper Switch
The WRI-OTD Tamper Switch (SW1, Figure 6-3) monitors the WRI-OTD enclosure door position.
If the WRI-OTD enclosure door is open a tamper condition is generated. To test the operation of this
switch, open the WRI-OTD enclosure door, if an External Tamper is wired, make certain the circuit is
open or remove the Tamper Input (J2, Figure 6-3) connection, the WRI-OTD LED1 should be
flashing green. Press SW1 using a finger or non-conductive tool. The WRI-OTD LED1 should be a
constant green for as long as the switch is pressed.
If it was removed, remember to replace the Tamper Input (J2, Figure 6-3) connection.
NOTE: The External Tamper Input is wired in parallel with the WRI-OTD Tamper Switch (SW1),
therefore in order to test the WRI-OTD Tamper Switch (SW1), the Tamper Input (J3) must be in the
non-Tamper (pressed) state (i.e. open circuit).
6.3.2 External Tamper
Do this test if an external tamper switch is wired to the WRI-OTD Tamper Input (J2, Figure 6-3).
Open the WRI-OTD enclosure door. Press and hold SW1 using a finger or non-conductive tool. When
the external tamper switch is closed, the WRI-OTD LED1 should be flashing green. When the
external tamper switch is open, the WRI-OTD LED1 should be a constant green.
NOTE: The External Tamper Input is wired in parallel with the WRI-OTD Tamper Switch (SW1),
therefore in order to test the External Tamper, the WRI-OTD Tamper Switch must be in the nonTamper (pressed) state.
6.3.3 Request to Exit
Do this test if a Request to Exit device is wired to the WRI-OTD Portal Inputs (J7-3 & 4, Figure 6-3).
Using either the Schlage Configuration and Demonstration Tool (CDT) or the Access Control Panel
software (ACP Software), verify that activating the Request to Exit device causes a request to exit to
be sent to the CDT or ACP software. Also verify that the request to exit is removed when the
Request to Exit device goes inactive.
Ingersoll Rand Security Technologies
245 W. Roosevelt Road, Bldg 7, Suite 48, West Chicago, IL 60185 / (800) 313-2962 / (630) 293-4257 fax
P/N: M053-007-D
www.ir-swa.com
Page 29 of 60
Wireless Access
6.3.4 Door Position
Do this test if a Door Position device is wired to the WRI-OTD Portal Inputs (J7-5 & 6, Figure 6-3).
Using either the Schlage Configuration and Demonstration Tool (CDT) or the Access Control Panel
software (ACP Software), verify that the CDT or ACP software can monitor the door’s position by
opening and closing the door.
6.3.5 Strike Relay
Do this test if an electrical lock or load is connected to the WRI-OTD Strike Portal Output (J8-1, 2,
and/or 3, Figure 6-3). Using either the Schlage Configuration and Demonstration Tool (CDT) or the
Access Control Panel software (ACP Software), verify that Strike Portal Output can control the
electrical lock or load.
6.3.6 Auxiliary Relay
Do this test if an electrical lock or load is connected to the WRI-OTD Auxiliary Portal Output (J8-4,
5, and/or 6, Figure 6-3). Using either the Schlage Configuration and Demonstration Tool (CDT) or the
Access Control Panel software (ACP Software), verify that Auxiliary Portal Output can control the
electrical lock or load.
6.3.7 Card Reader 1
Do this test if a card reader or keypad is connected to the WRI-OTD Card Reader 1 (J4, Figure 6-3)
connector. Using either the Schlage Configuration and Demonstration Tool (CDT) or the Access
Control Panel software (ACP Software), verify that the card reader or keypad is sending the correct
data.
6.3.8 Card Reader 2
Do this test if a card reader or keypad is connected to the WRI-OTD Card Reader 2 (J5, Figure 6-3)
connector. Using either the Schlage Configuration and Demonstration Tool (CDT) or the Access
Control Panel software (ACP Software), verify that the card reader or keypad is sending the correct
data.
6.4 Re-linking a WRI-OTD and WPIM
To re-link a WRI-OTD and WPIM, follow the instructions in Section 6.2.
6.5 Changing the RF Channel
At the WPIM, change DIP switch SW7 to the desired new RF channel (Section 2.3), place the WPIM in
Link Mode (see Section 2.3.2), then re-link the desired WRI-OTD (Section 6.2).
NOTE: The WPIMs RF channel DIP switch (SW7) is read when the WPIM enters the Link Mode.
If the DIP switch is changed while the WPIM is in the Link Mode, then the WPIM must be taken
out of Link Mode and put back into Link Mode for the new RF channel to be selected. The WPIM
is taken out of Link Mode by pressing the switch associated with the Access Point that is in the Link
Mode (S1 or S2).
NOTE: Changing the RF channel will require all WAPMs linked to the WPIM to be re-linked.
6.6 Updating a WRI-OTD’s Firmware
If a new firmware version is required, please refer to the “Upgrading a WAPM or WPIM’s Firmware”
application note, A664-010-x, available at www.ir-swa.com.
Ingersoll Rand Security Technologies
245 W. Roosevelt Road, Bldg 7, Suite 48, West Chicago, IL 60185 / (800) 313-2962 / (630) 293-4257 fax
P/N: M053-007-D
www.ir-swa.com
Page 30 of 60
Wireless Access
7. Indoor Wireless Reader Interface (WRI-IN)
The Wireless Reader Interface (WRI-IN) is a product in the Schlage Wireless Access Point Module (WAPM)
category. AUWRI-IN-12VDC is an Australian version of the indoor wireless reader interface.
Note: In this section, WRI-IN refers to either a WRI-IN-12VDC or an AUWRI-IN-12VDC.
Figure 7-1 – Front of the WRI-IN
Figure 7-2 – Inside the WRI-IN
Figure 7-3 – WRI-IN Printed Circuit Board (PCB)
Ingersoll Rand Security Technologies
245 W. Roosevelt Road, Bldg 7, Suite 48, West Chicago, IL 60185 / (800) 313-2962 / (630) 293-4257 fax
P/N: M053-007-D
www.ir-swa.com
Page 31 of 60
Wireless Access
7.1 The WRI-IN Visual Indicators
Depending on how the Card Reader is interfaced to the WRI-IN, the LED on the Card Reader may
display some WRI-IN status conditions (Table 7-1).
Condition
1
2
3a
3b
3c
WRI-IN is powered and then displays
software version number
WRI-IN sends a link request (up to 3 times
per RF channel) looking for a WPIM in
link mode
If linking, WRI-IN & WPIM do an
Packet-Error-Rate test for about 20
seconds
If linking, WRI-IN linked successfully and
indicates the RF Channel on which it
linked
Or, if linking, WRI-IN not linked
successfully
Card Reader LED
Y green flashes*
1 green flash each link request sent
flashes for each RF transmission: green
flash for a good transmission, red flash
for a bad transmission
**
Z green flashes
2 red flashes
4
Card swiped and not read
5
Card swiped and read
red to green to red
6
No RF communications with card swipe
red to green to red
7
Access denied
red to green to red
8
Access granted, WRI-IN activates Strike
& Auxiliary Relays
*
solid red
green stays on as long as the Strike Relay
is activated
Y = minor software version number (any number is possible)
**
Z = RF channel number that the WRI-IN linked on (1-15)
Table 7-1 – WRI-IN LED Indicators
7.2 Linking to the WPIM by Powering the WRI-IN
NOTE: Only one WAPM can be linked at a time.
7.2.1 Make certain that that WPIM to be linked to is in the Link Mode (Section 2.3.2).
7.2.2 Reset the WRI-IN by cycling the WRI-IN power (Figure 7-3). The WRI-IN attempts to link with a
WPIM.
7.2.3 During linking, the WPIMs LED (CR6 or CR9, depending on the portal (WRI-IN) being linked)
blinks green (some intermittent red may be seen) and the WRI-IN Card Reader LED may blink green
(some intermittent red may be seen) for about 20 seconds while the WRI-IN & WPIM determine the
integrity of the selected RF channel.
7.2.4 If the WRI-IN & WPIM determine that the RF channel can be used, then the linking is completed
successfully and the WPIMs LED (CR6 or CR9, whichever was flashing) turns solid green. The
WRI-IN Card Reader LED may then blink green. The number of green blinks indicates the linked RF
channel number.
Ingersoll Rand Security Technologies
245 W. Roosevelt Road, Bldg 7, Suite 48, West Chicago, IL 60185 / (800) 313-2962 / (630) 293-4257 fax
P/N: M053-007-D
www.ir-swa.com
Page 32 of 60
Wireless Access
If the WRI-IN & WPIM determine that the RF signal quality is not acceptable then the link fails and
the WRI-IN Card Reader LED may blink red twice (Table 7-1). The WPIM will stay in the Link
Mode. If this happens, move either the WRI-IN, PIM, or change RF channels and try the link process
again (Section 7.2.1).
7.2.5 Close and secure the WRI-IN enclosure cover.
7.2.6 The WRI-IN is now ready to be tested for normal operation.
7.3 Testing the WRI-IN
If the WRI-IN was installed with all of its peripherals then there are 6 tests that need to be run before
commissioning the WRI-IN for operation. If a WRI-IN peripheral was not installed, then that particular
test can be skipped.
7.3.1 Tamper Switch
The WRI-IN Tamper Switch (Figure 7-3) monitors the WRI-IN enclosure cover position. If the WRIIN enclosure cover is open a tamper condition is generated. To test the operation of this switch, make
certain that the WRI-IN is linked to a PIM, open the WRI-IN enclosure cover, if an External Tamper
is wired, make certain the circuit is open or remove the Tamper Input (J2, Figure 7-3) connection, the
PIM’s Trouble LED (CR7 or CR10) should be flashing 3 red blinks. Install the WRI-IN cover. The
PIM’s Trouble LED (CR7 or CR10) should not be flashing 3 red blinks for as long as the WRI-IN’s
cover is installed. Note: The Trouble LED may be flashing other trouble codes, just make certain it is
not flashing the Tamper error code: 3 red blinks.
If it was removed, remember to replace the Tamper Input (Figure 7-3) connection.
NOTE: The External Tamper Input is wired in parallel with the WRI-IN Tamper Switch (SW1),
therefore in order to test the WRI-IN Tamper Switch, the Tamper Input must be in the non-Tamper
(pressed) state (i.e. open circuit).
7.3.2 External Tamper
Do this test if an external tamper switch is wired to the WRI-IN Tamper Input (Figure 7-3). Make
certain that the WRI-IN is linked to a PIM. Install the WRI-IN enclosure cover. When the external
tamper switch is closed, the PIM’s Trouble LED (CR7 or CR10) should be flashing 3 red blinks.
When the external tamper switch is open, the PIM’s Trouble LED (CR7 or CR10) should not be
flashing 3 red blinks for as long as the switch is pressed. Note: The Trouble LED may be flashing
other trouble codes, just make certain it is not flashing the Tamper error code: 3 red blinks.
NOTE: The External Tamper Input is wired in parallel with the WRI-IN Tamper Switch, therefore in
order to test the External Tamper, the WRI-IN Tamper Switch must be in the non-Tamper (pressed)
state.
7.3.3 Request to Exit
Do this test if a Request to Exit device is wired to the WRI-IN Portal Inputs (Figure 7-3). Using either
the Schlage Configuration and Demonstration Tool (CDT) or the Access Control Panel software
(ACP Software), verify that the activating the Request to Exit device causes a request to exit to be
sent to the CDT or ACP software. Also verify that the request to exit is removed when the Request
to Exit device goes inactive.
7.3.4 Door Position
Do this test if a Door Position device is wired to the WRI-IN Portal Inputs (Figure 7-3). Using either
the Schlage Configuration and Demonstration Tool (CDT) or the Access Control Panel software
(ACP Software), verify that the CDT or ACP software can monitor the door’s position by opening and
closing the door.
Ingersoll Rand Security Technologies
245 W. Roosevelt Road, Bldg 7, Suite 48, West Chicago, IL 60185 / (800) 313-2962 / (630) 293-4257 fax
P/N: M053-007-D
www.ir-swa.com
Page 33 of 60
Wireless Access
7.3.5 Strike Relay
Do this test if an electrical lock or load is connected to the Strike Portal Output (Figure 7-3). Using
either the Schlage Configuration and Demonstration Tool (CDT) or the Access Control Panel
software (ACP Software), verify that Strike Portal Output can control the electrical lock or load.
7.3.6 Card Reader
Do this test if a card reader or keypad is connected to the Card Reader (Figure 7-3) connector. Using
either the Schlage Configuration and Demonstration Tool (CDT) or the Access Control Panel
software (ACP Software), verify that the card reader or keypad is sending the correct data.
7.4 Re-linking a WRI-IN and WPIM
To re-link a WRI-IN and WPIM, follow the instructions in Section 7.2.
7.5 Changing the RF Channel
At the WPIM, change DIP switch SW7 to the desired new RF channel (Section 2.3), place the WPIM in
Link Mode (see Section 2.3.2), then re-link the desired WRI-IN (Section 7.2).
NOTE: The WPIMs RF channel DIP switch (SW7) is read when the WPIM enters the Link Mode.
If the DIP switch is changed while the WPIM is in the Link Mode, then the WPIM must be taken
out of Link Mode and put back into Link Mode for the new RF channel to be selected. The WPIM
is taken out of Link Mode by pressing the switch associated with the Access Point that is in the Link
Mode (S1 or S2).
NOTE: Changing the RF channel will require all WAPMs linked to the WPIM to be re-linked.
7.6 Updating the WRI-IN’s Firmware
If a new firmware version is required, please refer to the “Upgrading a WAPM or WPIM’s Firmware”
application note, A664-010-x, available at www.ir-swa.com.
Ingersoll Rand Security Technologies
245 W. Roosevelt Road, Bldg 7, Suite 48, West Chicago, IL 60185 / (800) 313-2962 / (630) 293-4257 fax
P/N: M053-007-D
www.ir-swa.com
Page 34 of 60
Wireless Access
8. Wireless Portable Readers, Version 2 (WPR2)
The Wireless Portable Reader, Version 2 (WPR2) is a product in the Schlage Wireless Access Point Module
(WAPM) category (Figure 9-1 and Figure 9-2). AUWPR2 is an Australian version of the wireless portable
reader.
Note: In this section, WPR2 refers to either a WPR2 or an AUWPR2.
Figure 9-1 – WPR2 with Proximity Reader
Figure 9-2 -WPR2 with Magnetic Reader
Figure 9-3 – Inside the WPR2
Ingersoll Rand Security Technologies
245 W. Roosevelt Road, Bldg 7, Suite 48, West Chicago, IL 60185 / (800) 313-2962 / (630) 293-4257 fax
P/N: M053-007-D
www.ir-swa.com
Page 35 of 60
Wireless Access
8.1 The WPR2 Audio/Visual Indicators
Action
1
2a
2b
2c
2d
3
4
5
6
7
8
WPR2
Sounder
LED Indication
WPR2 is powered and then displays
software version number
If linking, WPR2 sends a link
request (up to 3 times per RF
channel) looking for a WPIM in link
mode
If linking, WPR2 & WPIM do an
Packet-Error-Rate test for about 20
seconds
If linking, WPR2 linked successfully
and indicates the RF Channel on
which it linked
Or if linking, WPR2 not linked
successfully
Card swiped and not read, if iCLASS
reader see section 13.5
Card swiped and read, if iCLASS
reader see section 13.5
No RF communications
X red flashes then Y green flashes*
none
1 green flash;
then 1 red flash
once for each link request sent
none
flashes for each RF transmission:
green flash for a good transmission
red flash for a bad transmission
none
Z green flashes**
Z beeps*
2 red flashes
1 long beep
none
none
none
1 beep
1 red flash – immediate
1 long red flash – delayed about 1-15
Invalid card swiped
seconds
Valid card swiped
W seconds long green flash***
Low WPR2 Battery
3 fast red flashes
*
X = major software version number (any number is possible)
*
Y = minor software version number (any number is possible)
**
Z = RF channel number that the WPR2 linked on (1-15)
***
W = green LED stays on for the re-latch time
none
1 beep
none
3 beeps
Table 9-8-1 – WPR2 Indicators
8.2 Turning the WPR2 On
The WPR2 does not have an On/Off switch and is always powered as long as a Battery Pack is
connected. When the WPR2 is turned on, Action 1, Table 9-8-1 occurs. Actions 2a, 2b, 2c, and/or 2d will
only occur if the WPR2 is being linked (Section 8.3).
8.3 Linking or Re-Linking to the WPIM by Resetting the WPR2
NOTE: Only one WAPM can be linked at a time.
8.3.1 Make certain that that WPIM to be linked to is in the Link Mode (Section 2.3.2).
8.3.2 Use the Phillips screwdriver to remove WPR2 cover. There are 4 cover screws, one in each corner
(Figure 9-1 or Figure 9-2).
8.3.3 Locate the Reset Switch WPR2 PCB (Figure 9-3). Momentarily press the reset switch. After
displaying the software version number on the LEDs, the WPR2 will enter the Link Mode (Table
9-8-1, actions 2a or 2b).
NOTE: Some legacy (older) versions of the WPR2 had a Link Switch (slide switch) next to the
Reset Switch. If a Link Switch is present, make certain that the Link Switch’s position is
toward the Reset Switch before pressing the Reset Switch. The Link Switch can left in this
position all the time.
Ingersoll Rand Security Technologies
245 W. Roosevelt Road, Bldg 7, Suite 48, West Chicago, IL 60185 / (800) 313-2962 / (630) 293-4257 fax
P/N: M053-007-D
www.ir-swa.com
Page 36 of 60
Wireless Access
8.3.4 During linking, the WPIMs LED (CR6 or CR9, depending on the WPR2 being linked) blinks green
(some intermittent red may be seen) and the WPR2 LED (Figure 9-1 or Figure 9-2) blinks green
(some intermittent red may be seen) for about 20 seconds while the WPR2 & WPIM determine the
integrity of the selected RF channel.
8.3.5 If the WPR2 & WPIM determine that the RF channel can be used, then the linking is completed
successfully and the WPIMs LED (CR6 or CR9, whichever was flashing) turns solid green. The
WPR2 LED blinks green and the sounder beeps. The number of blinks and flashes indicate the RF
channel linked. If the WPR2 & WPIM determine that the RF signal quality is not acceptable, then the
link fails and the WPR2 LED blinks red twice and the sounder beeps once (Table 9-8-1). The WPIM
will stay in the Link Mode. If this happens, move either the WPR2, PIM, or change RF channels and
try the link process again (Section 8.3.1).
8.3.6 Re-install the WPR2 cover. The cover should go on easy with no interferences. Replace the 4 cover
screws, one in each corner (Figure 9-1 or Figure 9-2).
8.3.7 The WPR2 is now ready to be tested for normal operation.
8.4 Testing the WPR2
8.4.1 Magnetic Stripe Card Reader Models
8.4.1.1 Insert a valid card and slide it down the slot keeping its back edge against the back of the
reader’s slot throughout the entire swipe. The reader sounder beeps.
8.4.1.2 The green LED will flash.
8.4.2 Proximity Card Reader Models
8.4.2.1 Place a valid card flat to and within 1 to 3 inches of the upper part of the Proximity Reader. The
reader sounder beeps.
8.4.2.2 The green LED will flash.
8.4.3 Indication of an Unsuccessful Card Read
The best indication of an unsuccessful valid card read is when the WPR2’s internal sounder does not
beep, indicating that the card was not read correctly. If an invalid card is read, the WPR2’s red LED
displays a long flash and the internal sounder beeps once.
8.5 Replacing the WPR2 Battery Pack, K380-001
Approximately one month prior the end of the WPR2’s Battery Pack life, a Low Battery Trouble signal is
indicated at the WPIM (Table 2-4), a Trouble signal will be sent to the access control panel, and the
WPR2 will provide a visual and audible indication (Table 9-8-1, action 7) consisting of a long red LED
flash and three sounder beeps.
The WPR2’s low battery indication (Table 9-8-1, action 8) will occur whenever the WPR2’s battery is
low and:
• the WPR2’s Battery Pack is connected (after action 1, Table 9-8-1),
• every 2 hours of non-use while turned on, or
• any card is read at the WPR2’s reader.
It is then time to replace the WPR2’s Battery Pack:
8.5.1 Use the Phillips screwdriver to remove WPR2 cover. There are 4 cover screws, one in each corner
(Figure 9-1 or Figure 9-2).
8.5.2 If a Battery Pack is being replaced, locate the used Battery Pack (Figure 9-3). Remove the four
Battery Retainer Screws (Figure 9-4). Disconnect the used Battery Pack (Figure 9-5).
Ingersoll Rand Security Technologies
245 W. Roosevelt Road, Bldg 7, Suite 48, West Chicago, IL 60185 / (800) 313-2962 / (630) 293-4257 fax
P/N: M053-007-D
www.ir-swa.com
Page 37 of 60
Wireless Access
Figure 9-4 – Battery Retainer
Figure 9-5 – Disconnecting Battery Pack
8.5.3 Connect the new Battery Pack connector to the mating connector coming from the transceiver board
(Figure 9-6).
Figure 9-6 - Installing New Battery Pack
8.5.4 Carefully pack the battery wires, position the Battery Pack in its original location, and re-install the
Battery Retainer (Figure 9-4).
8.5.5 To continue to use the WPR2 on the same RF channel and with the same WPIM, re-install the cover,
making certain that no wires are pinched. The cover should go on easy with no interferences. Replace
the 4 cover screws, one in each corner (Figure 9-1 or Figure 9-2).
If the WPR2 needs to be re-linked or the RF channel needs to be changed, before re-installing the
WPR2 cover, follow the instructions in 9.6.
8.6 Changing the RF Channel
At the WPIM, change DIP switch SW7 to the desired new RF channel (Section 2.3), place the WPIM in
Link Mode (see Section 2.3.2), then re-link the desired WPR2 (Section 8.3).
NOTE: The WPIMs RF channel DIP switch (SW7) is read when the WPIM enters the Link Mode.
If the DIP switch is changed while the WPIM is in the Link Mode, then the WPIM must be taken
out of Link Mode and put back into Link Mode for the new RF channel to be selected. The WPIM
is taken out of Link Mode by pressing the switch associated with the Access Point in the Link Mode
(S1 or S2).
NOTE: Changing the RF channel will require all WAPMs linked to the PIM to be re-linked.
8.7 Updating the WPR2’s Firmware
If a new firmware version is required, please refer to the “Upgrading a WAPM or WPIM’s Firmware”
application note, A664-010-x, available at www.ir-swa.com.
Ingersoll Rand Security Technologies
245 W. Roosevelt Road, Bldg 7, Suite 48, West Chicago, IL 60185 / (800) 313-2962 / (630) 293-4257 fax
P/N: M053-007-D
www.ir-swa.com
Page 38 of 60
Wireless Access
9. Wireless Status Monitor (WSM)
The Wireless Status Monitor (WSM) is a product in the Schlage Wireless Access Point Module (WAPM)
category. AUWSM is an Australian version of the wireless status monitor.
Note: In this section, WSM refers to either a WSM or an AUWSM.
Figure 10-1 – Wireless Status Monitor
Figure 10-2 – WSM Battery Pack (K380-001)
Figure 10-3 – Transceiver Control Module with Cover
Removed
Ingersoll Rand Security Technologies
245 W. Roosevelt Road, Bldg 7, Suite 48, West Chicago, IL 60185 / (800) 313-2962 / (630) 293-4257 fax
P/N: M053-007-D
www.ir-swa.com
Page 39 of 60
Wireless Access
9.1 The WSM Visual Indicators
NOTE: LED assembly must be installed on the GRN_LED & RED_LED connections of J3 in order
for any visual indicators to be seen (see Fig. 10-3).
1
2a
2b
2c
2d
2e
Action
WSM is powered and then displays
software version number
WSM is ready to start linking
If linking, WSM sends a link request
(up to 3 times per RF channel)
looking for a WPIM in link mode
If linking, WSM & WPIM do an
Packet-Error-Rate test for about 20
seconds
If linking, WSM linked successfully
and indicates the RF Channel on
which it linked
Or if linking, WSM not linked
successfully
*
*
LED Assembly on J3
X red flashes then Y green flashes*
1 red flash
1 green flash;
then 1 red flash
once for each link request sent
flashes for each RF transmission:
green flash for a good transmission
red flash for a bad transmission
**
Z green flashes
2 red flashes
X = major software version number (any number is possible)
Y = minor software version number (any number is possible)
**
Z = RF channel number that the WSM linked on (1-15)
Table 10-9-1 – WSM Visual Indicators
9.2 Linking to the WPIM by Resetting the WSM
NOTES:
♦ Only one WAPM can be linked at a time.
♦ The WSM Battery Pack must be installed before linking (Section 9.3).
♦ Leaving the WSM cover off for extended periods of time with the Battery Pack
connected will shorten the expected battery life.
9.2.1 Make certain that that WPIM to be linked to is in the Link Mode (Section 2.3.2).
9.2.2 If the WSM cover is installed, use a Phillips screwdriver to remove WSM cover. There are 4 cover
screws, one in each corner (Figure 10-3).
9.2.3 Find, press, and release the WSM Reset Switch located below and to the left side of J4 (Figure 10-3).
9.2.4 During linking, the WPIMs LED (CR6 or CR9, depending on the WAPM being linked) blinks green
(some intermittent red may be seen) and the LED Assembly blinks green (some intermittent red may
be seen) for about 20 seconds while the WSM & WPIM determine the integrity of the selected RF
channel.
9.2.5 If the WSM & WPIM determine that the RF channel can be used, then the linking is completed
successfully and the WPIMs LED (CR6 or CR9, whichever was flashing) turns solid green. The LED
Assembly then blinks green. The number of green blinks indicates the linked RF channel number.
If the WSM & WPIM determine that the RF signal quality is not acceptable then the link fails and the
LED blinks red twice (Table 10-9-1). The WPIM will stay in the Link Mode. If this happens, move
either the WSM or PIM, or change RF channels and try the link process again (Section 9.2).
Ingersoll Rand Security Technologies
245 W. Roosevelt Road, Bldg 7, Suite 48, West Chicago, IL 60185 / (800) 313-2962 / (630) 293-4257 fax
P/N: M053-007-D
www.ir-swa.com
Page 40 of 60
Wireless Access
9.2.6 Re-install the WSM cover, making certain that no wires are pinched. The cover should go on easy
with no interferences. Replace the 4 cover screws, one in each corner (Figure 10-1).
9.2.7 The WSM is now ready for normal operation.
9.3 Replacing the WSM Battery Pack, K380-001
Approximately one month prior the end of the WSM’s Battery Pack life, a Low Battery Trouble signal is
indicated at the WPIM (Table 2-4), a Trouble signal will be sent to the access control panel.
NOTE: Make certain no WPIMs are in the Link Mode when replacing the WSM Battery Pack or
the WSM may inadvertently link to the wrong WPIM.
NOTE: Leaving the WSM cover off for extended periods of time with the Battery
Pack connected will shorten the expected battery life.
9.3.1 Use a Phillips screwdriver to remove WSM cover. There are 4 cover screws, one in each corner
(Figure 10-1).
9.3.2 Locate the used Battery Pack (Figure 10-4), disconnect the used Battery Pack, and remove the used
Battery Pack from its Velcro Strips.
Figure 10-4 – Removing the Used Battery Pack
9.3.3 Install the Battery Pack into the Transceiver Control Module enclosure using the Velcro provided
AND connect the Battery Pack Connector to its mating connector that is factory connected to J4
(Figure 10-5).
Figure 10-5 – New Battery Pack Installed
9.3.4 To continue to use the WSM on the same RF channel and with the same WPIM, make certain that no
WPIMs are in the Link Mode, then press and release the WSM Reset Switch located below and to the
left side of J4 (Figure 10-5). This insures that the WSM has started properly. Re-install the WSM
cover, making certain that no wires are pinched. The cover should go on easy with no interferences.
Replace the 4 cover screws, one in each corner (Figure 10-1).
If the WSM needs to be re-linked or the RF channel needs to be changed, before re-installing the
WSM cover, follow the instructions in Section 9.1 or Section 9.4.
NOTE: No other WPIM can be in Link Mode during this process.
Ingersoll Rand Security Technologies
245 W. Roosevelt Road, Bldg 7, Suite 48, West Chicago, IL 60185 / (800) 313-2962 / (630) 293-4257 fax
P/N: M053-007-D
www.ir-swa.com
Page 41 of 60
Wireless Access
9.4 Re-linking an WSM and WPIM
To re-link a WSM and WPIM follow the instructions in Section 9.1.
9.5 Changing the RF Channel
At the WPIM, change DIP switch SW7 to the desired new RF channel (Section 2.3), place the PIM in
Link Mode (see Section 2.3.2), then re-link the desired WSM (Section 9.4).
NOTE: The WPIMs RF channel DIP switch (SW7) is read when the WPIM enters the Link Mode.
If the DIP switch is changed while the WPIM is in the Link Mode, then the WPIM must be taken
out of Link Mode and put back into Link Mode for the new RF channel to be selected. The WPIM
is taken out of Link Mode by pressing the switch associated with the Access Point that is in the Link
Mode (S1 or S2).
NOTE: Changing the RF channel will require all WAPMs linked to the PIM to be re-linked.
9.6 Updating the WSM’s Firmware
If a new firmware version is required, please refer to the “Upgrading a WAPM or WPIM’s Firmware”
application note, A664-010-x, available at www.ir-swa.com.
Ingersoll Rand Security Technologies
245 W. Roosevelt Road, Bldg 7, Suite 48, West Chicago, IL 60185 / (800) 313-2962 / (630) 293-4257 fax
P/N: M053-007-D
www.ir-swa.com
Page 42 of 60
Wireless Access
10. Modular Integrated Reader Lock (MIRL)
The Modular Integrated Reader Lock (MIRL) is a product in the Schlage Wireless Access Point Module
(WAPM) category.
Figure 10-1 – MIRL Locked Side (Outside) Figure 10-2 – MIRL Unlocked Side (Inside)
10.1 The MIRL Audio/Visual Indicators
Action
1
2a
2b
2c
2d
2e
3
4
5
6
7
8
LED Indications
MIRL is powered and then displays
software version number
MIRL Relocks (motor runs)
If linking, MIRL sends a link request
(up to 3 times per RF channel)
looking for a WPIM in link mode
If linking, MIRL & WPIM do an
Packet-Error-Rate test for about 20
seconds
If linking, MIRL linked successfully
and indicates the RF Channel on
which it linked
Or if linking, MIRL not linked
successfully
Card swiped and not read, if iCLASS
reader see section 13.5
Card swiped and read, if iCLASS
reader see section 13.5
No RF communications with card
swipe
Access denied
Access granted, MIRL unlocks
(motor runs)
MIRL Relocks (motor runs)
*
*
MIRL
Sounder
X red flashes then Y green flashes*
none
1 red flash
1 green flash;
then 1 red flash
once for each link request sent
flashes for each RF transmission:
green flash for a good transmission
red flash for a bad transmission
1 beep
**
none
none
*
Z green flashes
Z beeps
2 red flashes
1 long beep
none
none
none
1 beep
1 red flash – immediate
none
2 red flashes – delayed about 1-15
seconds
1 beep
1 green flash
none
1 red flash
1 beep
X = major software version number (any number is possible)
Y = minor software version number (any number is possible)
**
Z = RF channel number that the MIRL linked on (1-15)
Table 10-1 – MIRL Indicators
Ingersoll Rand Security Technologies
245 W. Roosevelt Road, Bldg 7, Suite 48, West Chicago, IL 60185 / (800) 313-2962 / (630) 293-4257 fax
P/N: M053-007-D
www.ir-swa.com
Page 43 of 60
Wireless Access
10.2 Linking the MIRL to a WPIM
NOTE: Only one WAPM can be linked at a time.
10.2.1 If the MIRL does not have a Battery Pack installed, install one now (section 4.4).
10.2.2 Make certain that the WPIM to be linked to is in the Link Mode (Section 2.3.2).
10.2.3 To initiate the linking process:
10.2.3.1 Open the door.
10.2.3.2 Activate and hold down the inside lever to create a Request to Exit Condition.
10.2.3.3 While holding down the lever (Request to Exit), present a card to the card reader (refer to section
4.3).
10.2.3.4 Continue to hold down the lever (Request to Exit) until the MIRL LED’s start to blink indicating
that the link process has begun (approximately 8 seconds), then release the lever.
10.2.3.5 Close the door.
10.2.4 During linking, the WPIM’s LED (CR6 or CR9, depending on the door being linked) and the MIRL
LED blink green (some intermittent red may be seen) for about 20 seconds while the MIRL & WPIM
determine the integrity of the selected RF channel.
10.2.5 If the MIRL & WPIM determine that the RF channel can be used, then the linking is completed
successfully and the WPIMs LED (CR6 or CR9, whichever was flashing) turns solid green. The
MIRL LED then blinks green and the sounder beeps. The number of green blinks and beeps indicates
the linked RF channel number. If this occurs go to the next step, section 4.2.6.
If the MIRL & WPIM determine that the RF signal quality is not acceptable then the link fails and the
MIRL LED blinks red twice and the sounder beeps several times rapidly (Table 4-1). The WPIM will
stay in the Link Mode and the WPIM LED (CR6 or CR9) returns to alternating green and red. If this
happens, move either the PIM, or change RF channels and try the link process again (Section 4.2).
10.2.6 After a successful link the MIRL is now ready to be tested for normal operation.
NOTE: No other WPIM can be in Link Mode during this process.
Figure 10-3 – MIRL Transceiver Cover
Figure 10-4 – MIRL Battery Pack
Removal/Installation
Ingersoll Rand Security Technologies
245 W. Roosevelt Road, Bldg 7, Suite 48, West Chicago, IL 60185 / (800) 313-2962 / (630) 293-4257 fax
P/N: M053-007-D
www.ir-swa.com
Page 44 of 60
Wireless Access
Figure 10-5 – MIRL Battery Pack (K380-001)
10.3 Testing the MIRL
10.3.1 Proximity Card Reader Models
10.3.1.1 Place the card flat to and within 1 to 3 inches of the upper part of the Proximity Reader (Figure
4-8). The reader sounder beeps.
NOTE: For HID iCLASS reader versions of the MIRL see section 13.5, page 57, below.
Figure 10-6 - Presenting a Proximity Card
10.3.1.2 The green LED flashes and the lock will unlock.
10.3.1.3 Turn the Lever and open the door.
10.3.1.4 Shortly after the green flash, there is a red flash and sounder beep signifying relock.
10.3.2 Magnetic Stripe Reader Models
10.3.2.1 Place the card at the top of the Magnetic Stripe Reader. The card’s magnetic stripe should be
facing towards the right and the long edge of the card should be facing the door. With the card at
the center of the reader’s slot, swipe the card through the slot. The reader sounder beeps.
10.3.2.2 The green LED flashes and the lock will unlock.
10.3.2.3 Turn the Lever and open the door.
10.3.2.4 Shortly after the green flash, there is a red flash and sounder beep signifying relock.
10.3.3 Indication of an Unsuccessful Card Read
The best indication of an unsuccessful valid card read is when the MIRL’s internal sounder does not
beep, indicating that the card was not read.
If an invalid card is read, the MIRL’s red LED flashes twice and the internal sounder beeps once.
In both cases the MIRL remains locked.
Ingersoll Rand Security Technologies
245 W. Roosevelt Road, Bldg 7, Suite 48, West Chicago, IL 60185 / (800) 313-2962 / (630) 293-4257 fax
P/N: M053-007-D
www.ir-swa.com
Page 45 of 60
Wireless Access
10.4 Installing/Replacing the MIRL Battery Pack (K380-001)
Approximately one month prior the end of the MIRL Battery Pack life, a Low Battery Trouble signal is
indicated at the WPIM (Table 2-4) and a Trouble signal will be sent to the access control panel. To
install or replace the MIRL Battery Pack, remove the MIRL Transceiver Cover (Figure 4-5). IF
replacing, disconnect the old MIRL Battery Pack. If installed, remove the Battery Bracket. If replacing,
remove the old Battery Pack (Figure 4-6). Install the new Battery Pack, install the Battery Bracket, and
connect the Battery Pack (Figure 4-7). Install the MIRL Transceiver Cover (Figure 4-5). Depending on
how long the Battery Pack was disconnected, the MIRL may or may not go through its power-up
sequence. In either case the MIRL will stay linked to its WPIM. There is no need to re-link.
NOTE: No other WPIM can be in Link Mode during this process.
10.5 Battery Override
If the MIRL Battery Pack fails, a standard 9.0V battery, 522 or equivalent, may be used together with a
Battery Override Supply Cable (9VBOC) to power the MIRL so the door can be opened with a valid card.
The Battery Override Cable plugs to the Battery Override Connector found on the lower part of the Card
Reader Base Plate after removing the Card Reader Cover (Figure 4-10).
NOTE: If the Card Reader Base Plate has a Tamper Switch that is activated when the Reader Cover is
removed, then the Card Reader is disabled. Tamper Switch must be manually held closed (simulating
the cover being installed) for the Card Reader to operate.
Figure 10-7 – MIRL Battery Override
10.6 Changing the RF Channel
At the WPIM, change DIP switch SW7 to the desired new RF channel (Section 2.3), place the PIM in
Link Mode (see Section 2.3.2), then re-link the desired MIRL (Section 4.2).
NOTE: The WPIM’s RF channel DIP switch (SW7) is read when the WPIM enters the Link Mode.
If the DIP switch is changed while the WPIM is in the Link Mode, then the WPIM must be taken
out of Link Mode and put back into Link Mode for the new RF channel to be selected. The WPIM
is taken out of Link Mode by pressing the switch associated with the Access Point that is in the Link
Mode (S1 or S2).
NOTE: Changing the RF channel will require all WAPMs linked to the PIM to be re-linked.
10.7 Updating the MIRL’s Firmware
If a new firmware version is required, please refer to the “Upgrading a WAPM or WPIM’s Firmware”
application note, A664-010-x, available at www.ir-swa.com.
Ingersoll Rand Security Technologies
245 W. Roosevelt Road, Bldg 7, Suite 48, West Chicago, IL 60185 / (800) 313-2962 / (630) 293-4257 fax
P/N: M053-007-D
www.ir-swa.com
Page 46 of 60
Wireless Access
11. Wireless Exit Trim Kit (WEXK)
The Wireless Exit Trim Kit (WEXK) is a product in the Schlage Wireless Access Point Module (WAPM)
category.
Figure 11-1 – WEXK Locked Side (Outside)
Figure 11-2 – WEXK Unlocked Side
(Inside)
Ingersoll Rand Security Technologies
245 W. Roosevelt Road, Bldg 7, Suite 48, West Chicago, IL 60185 / (800) 313-2962 / (630) 293-4257 fax
P/N: M053-007-D
www.ir-swa.com
Page 47 of 60
Wireless Access
11.1 The WEXK Audio/Visual Indicators
Action
1
2a
2b
2c
2d
2e
3
4
5
6
7
8
LED Indications
WEXK
Sounder
WEXK is powered and then displays
software version number
WEXK Relocks (motor runs)
If linking, WEXK sends a link
request (up to 3 times per RF
channel) looking for a WPIM in link
mode
X red flashes then Y green flashes*
none
1 red flash
1 beep
1 green flash;
then 1 red flash
once for each link request sent
none
If linking, WEXK & WPIM do an
Packet-Error-Rate test for about 20
seconds
If linking, WEXK linked successfully
and indicates the RF Channel on
which it linked
Or if linking, WEXK not linked
successfully
Card swiped and not read, if iCLASS
reader see section 13.5
Card swiped and read, if iCLASS
reader see section 13.5
No RF communications with card
swipe
flashes for each RF transmission:
green flash for a good transmission
red flash for a bad transmission
none
Access denied
Access granted, WEXK unlocks
(motor runs)
WEXK Relocks (motor runs)
*
*
**
*
Z green flashes
Z beeps
2 red flashes
1 long beep
none
none
none
1 beep
1 red flash – immediate
none
2 red flashes – delayed about 1-15
seconds
1 beep
1 green flash
none
1 red flash
1 beep
X = major software version number (any number is possible)
Y = minor software version number (any number is possible)
**
Z = RF channel number that the WEXK linked on (1-15)
Table 11-1 – WEXK Indicators
11.2 Linking the WEXK to a WPIM
NOTE: Only one WEXK can be linked at a time.
11.2.1 If the WEXK does not have a Battery Pack installed, install one now (section 5.4).
11.2.2 Make certain that the WPIM to be linked to is in the Link Mode (Section 2.3.2).
11.2.3 To initiate the linking process:
11.2.3.1 Open the door.
11.2.3.2 Hold the crash bar down to create a Request to Exit condition.
11.2.3.3 While holding the crash bar down to activate the Request to Exit switch, read a card to the card
reader (refer to section 5.3).
11.2.3.4 Continue to hold down the crash bar (Request to Exit) until the WEXK LED’s start to blink
indicating that the link process has begun (approximately 8 seconds), then release the lever.
11.2.3.5 Close the door.
Ingersoll Rand Security Technologies
245 W. Roosevelt Road, Bldg 7, Suite 48, West Chicago, IL 60185 / (800) 313-2962 / (630) 293-4257 fax
P/N: M053-007-D
www.ir-swa.com
Page 48 of 60
Wireless Access
11.2.4 During linking, the WPIM’s LED (CR6 or CR9, depending on the door being linked) and the WEXK
LED blink green (some intermittent red may be seen) for about 20 seconds while the WEXK &
WPIM determine the integrity of the selected RF channel.
11.2.5 If the WEXK & WPIM determine that the RF channel can be used, then the linking is completed
successfully and the WPIMs LED (CR6 or CR9, whichever was flashing) turns solid green. The
WEXK LED then blinks green and the sounder beeps. The number of green blinks and beeps
indicates the linked RF channel number. If this occurs go to the next step, section 5.2.6.
If the WEXK & WPIM determine that the RF signal quality is not acceptable then the link fails and
the WEXK LED blinks red twice and the sounder beeps several times rapidly (Table 5-1). The WPIM
will stay in the Link Mode and the WPIM LED (CR6 or CR9) returns to alternating green and red. If
this happens, move either the PIM, or change RF channels and try the link process again (Section 5.2).
11.2.6 After a successful link, the WEXK is now ready to be tested for normal operation.
NOTE: No other WPIM can be in Link Mode during this process.
Figure 11-3 – WEXK Transceiver Cover
Figure 11-4 – WEXK Battery Pack
Removal/Installation
Figure 11-5 – WEXK Battery Pack (K380-001)
11.3 Testing the WEXK
11.3.1 Proximity Card Reader Models
11.3.1.1 Place the card flat to and within 1 to 3 inches of the upper part of the Proximity Reader (Figure
4-8). The reader sounder beeps.
NOTE: For HID iCLASS reader versions of the WEXK see section 13.5, page 57, below.
Ingersoll Rand Security Technologies
245 W. Roosevelt Road, Bldg 7, Suite 48, West Chicago, IL 60185 / (800) 313-2962 / (630) 293-4257 fax
P/N: M053-007-D
www.ir-swa.com
Page 49 of 60
Wireless Access
Figure 11-6 - Presenting a Proximity Card
11.3.1.2 The green LED flashes and the lock will unlock.
11.3.1.3 Turn the Lever and open the door.
11.3.1.4 Shortly after the green flash, there is a red flash and sounder beep signifying relock.
11.3.2 Magnetic Stripe Reader Models
11.3.2.1 Place the card at the top of the Magnetic Stripe Reader. The card’s magnetic stripe should be
facing towards the right and the long edge of the card should be facing the door. With the card at
the center of the reader’s slot, swipe the card through the slot. The reader sounder beeps.
11.3.2.2 The green LED flashes and the lock will unlock.
11.3.2.3 Turn the Lever and open the door.
11.3.2.4 Shortly after the green flash, there is a red flash and sounder beep signifying relock.
11.3.3 Indication of an Unsuccessful Card Read
The best indication of an unsuccessful valid card read is when the WEXK’s internal sounder does not
beep, indicating that the card was not read.
If an invalid card is read, the WEXK’s red LED flashes twice and the internal sounder beeps once.
In both cases the WEXK remains locked.
11.4 Installing/Replacing the WEXK Battery Pack (K380-001)
NOTE: If you want to re-link when changing the WEXK Battery Pack, follow the procedure in section
5.2, page 24.
Approximately one month prior the end of the WEXK Battery Pack life, a Low Battery Trouble signal is
indicated at the WPIM (Table 2-4) and a Trouble signal will be sent to the access control panel. To
install or replace the WEXK Battery Pack, remove the WEXK Transceiver Cover (Figure 5-3). IF
replacing, disconnect the old WEXK Battery Pack. If installed, remove the Battery Bracket. If replacing,
remove the old Battery Pack (Figure 5-4). Install the new Battery Pack, install the Battery Bracket, and
connect the Battery Pack (Figure 5-5). Install the WEXK Transceiver Cover (Figure 5-3). Depending on
how long the Battery Pack was disconnected, the WEXK may or may not go through its power-up
sequence. In either case the WEXK will stay linked to its WPIM. There is no need to re-link.
11.5 Battery Override
If the WEXK Battery Pack fails, a standard 9.0V battery, 522 or equivalent, may be used together with a
Battery Override Supply Cable (9VBOC) to power the WEXK so the door can be opened with a valid
card. The Battery Override Cable plugs to the Battery Override Connector found on the lower part Card
Reader Base Plate after removing the Card Reader Cover (Figure 11-7).
Ingersoll Rand Security Technologies
245 W. Roosevelt Road, Bldg 7, Suite 48, West Chicago, IL 60185 / (800) 313-2962 / (630) 293-4257 fax
P/N: M053-007-D
www.ir-swa.com
Page 50 of 60
Wireless Access
NOTE: If the Card Reader Base Plate has a Tamper Switch that is activated when the Reader Cover is
removed, then the Card Reader is disabled. Tamper Switch must be manually held closed (simulating
the cover being installed) for the Card Reader to operate.
Figure 11-7 – WEXK Battery Override
11.6 Re-linking a WEXK and WPIM
To re-link a WEXK and WPIM, follow the instructions in Section 5.2.
11.7 Changing the RF Channel
At the WPIM, change DIP switch SW7 to the desired new RF channel (Section 2.3), place the PIM in
Link Mode (see Section 2.3.2), then re-link the desired WEXK (Section 5.5).
NOTE: The WPIMs RF channel DIP switch (SW7) is read when the WPIM enters the Link Mode.
If the DIP switch is changed while the WPIM is in the Link Mode, then the WPIM must be taken
out of Link Mode and put back into Link Mode for the new RF channel to be selected. The WPIM
is taken out of Link Mode by pressing the switch associated with the Access Point that is in the Link
Mode (S1 or S2).
NOTE: Changing the RF channel will require all WAPMs linked to the PIM to be re-linked.
11.8 Updating the WEXK’s Firmware
If a new firmware version is required, please refer to the “Upgrading a WAPM or WPIM’s Firmware”
application note, A664-010-x, available at www.ir-swa.com.
Ingersoll Rand Security Technologies
245 W. Roosevelt Road, Bldg 7, Suite 48, West Chicago, IL 60185 / (800) 313-2962 / (630) 293-4257 fax
P/N: M053-007-D
www.ir-swa.com
Page 51 of 60
Wireless Access
12. Wireless Portable Readers (WPR)
The Wireless Portable Reader (WPR) is a product in the Schlage Wireless Access Point Module (WAPM)
category (Figure 8-1).
Figure 8-1 – Wireless Portable Reader (WPR) with Proximity Reader
12.1 The WPR Audio/Visual Indicators
Action
1
2a
2b
2c
2d
3
4
5
6
7
8
LED Indication
WPR is powered and then displays
software version number
If linking, WPR sends a link request
(up to 3 times per RF channel)
looking for a WPIM in link mode
If linking, WPR & WPIM do an
Packet-Error-Rate test for about 20
seconds
If linking, WPR linked successfully
and indicates the RF Channel on
which it linked
Or if linking, WPR not linked
successfully
Card swiped and not read, if iCLASS
reader see section 13.5
Card swiped and read, if iCLASS
reader see section 13.5
No RF communications
X red flashes then Y green flashes*
1 green flash;
then 1 red flash
once for each link request sent
flashes for each RF transmission:
green flash for a good transmission
red flash for a bad transmission
WPR
Sounder
none
none
none
Z green flashes**
Z beeps*
2 red flashes
1 long beep
none
none
none
1 beep
1 red flash – immediate
1 long red flash – delayed about 1-15
Invalid card swiped
seconds
Valid card swiped
W seconds long green flash***
Low WPR Battery
3 fast red flashes
*
X = major software version number (any number is possible)
*
Y = minor software version number (any number is possible)
**
Z = RF channel number that the WPR linked on (1-15)
***
W = green LED stays on for the door unlock time
none
1 beep
none
3 beeps
Table 8-12-1 – WPR Indicators
Ingersoll Rand Security Technologies
245 W. Roosevelt Road, Bldg 7, Suite 48, West Chicago, IL 60185 / (800) 313-2962 / (630) 293-4257 fax
P/N: M053-007-D
www.ir-swa.com
Page 52 of 60
Wireless Access
12.2 Turning the WPR On
The WPR is turned On & Off using the On/Off switch located on the WPR cover (Figure 8-1). When the
WPR is turned on, Action 1, Table 8-12-1 occurs. Actions 2a, 2b, 2c, and/or 2d will only occur if the
WPR is being linked (Section 12.3).
12.3 Linking or Re-Linking to the WPIM by Powering the WPR
NOTE: Only one WAPM can be linked at a time.
12.3.1 Make certain that that WPIM to be linked to is in the Link Mode (Section 2.3.2).
12.3.2 Make certain that the WPR is turned off using the On/Off switch (Figure 8-1).
12.3.3 With the WPR turned off, swipe or present a card at the WPR card reader (Figure 8-1).
12.3.4 Use the Phillips screwdriver to remove WPR cover. There are 4 cover screws, one in each corner
(Figure 8-1).
12.3.5 Locate the Door Position Switch Connector on the WPR PCB (Figure 8-2, DPS1). Temporarily short
the two terminals of the Door Position Switch Connector. While keeping these two terminals shorted,
turn on the WPR using the On/Off switch (Figure 8-1). A slide switch is provided on some units for
this purpose. Keep the two terminals shorted until the WPR enters the Linking Mode (Table 8-12-1,
actions 2a or 2b). Once the WPR is in the Linking Mode, remove the short.
Figure 8-2 – WPR PCB Connectors – WPR Original Version
12.3.6 During linking, the WPIMs LED (CR6 or CR9, depending on the WPR-2 being linked) blinks green
(some intermittent red may be seen) and the WPR-2 LED (Figure 8-1) blinks green (some intermittent
red may be seen) for about 20 seconds while the WPR & WPIM determine the integrity of the
selected RF channel.
12.3.7 If the WPR & WPIM determine that the RF channel can be used, then the linking is completed
successfully and the WPIMs LED (CR6 or CR9, whichever was flashing) turns solid green. The
WPR LED blinks green and the sounder beeps, the number of blinks and flashes indicate the RF
channel linked.
If the WPR & WPIM determine that the RF signal quality is not acceptable then the link fails and the
WPR LED blinks red twice and the sounder beeps once (Table 8-12-1). The WPIM will stay in the
Link Mode. If this happens, move either the WPR or PIM, or change RF channels and try the link
process again (Section 12.3.1).
12.3.8 Re-install the WPR cover, making certain that no wires are pinched. The cover should go on easy with
no interferences. Replace the 4 cover screws, one in each corner (Figure 8-1).
12.3.9 The WPR is now ready to be tested for normal operation.
12.4 Testing the WPR
12.4.1 Magnetic Stripe Card Reader Models
12.4.1.1 Insert a valid card and slide it down the slot keeping its back edge against the back of the
reader’s slot throughout the entire swipe. The reader sounder beeps.
12.4.1.2 The green LED will flash when a valid card is read.
Ingersoll Rand Security Technologies
245 W. Roosevelt Road, Bldg 7, Suite 48, West Chicago, IL 60185 / (800) 313-2962 / (630) 293-4257 fax
P/N: M053-007-D
www.ir-swa.com
Page 53 of 60
Wireless Access
12.4.2 Proximity Card Reader Models
12.4.2.1 Place a valid card flat to and within 1 to 3 inches of the upper part of the Proximity Reader. The
reader sounder beeps.
12.4.2.2 The green LED will flash when a valid card is read.
12.4.3 Indication of an Unsuccessful Card Read
The best indication of an unsuccessful valid card read is when the WPR’s internal sounder does not
beep, indicating that the card was not read correctly.
If an invalid card is read, the WPR’s red LED displays a long flash and the internal sounder beeps
once.
12.5 Replacing the WPR Battery Pack, K380-001
Approximately one month prior to the end of the WPR’s Battery Pack life, a Low Battery Trouble signal
is indicated at the WPIM (Table 2-4), a Trouble signal will be sent to the Access Control Panel, and the
WPR will provide a visual and audible indication (Table 8-12-1, action 7) consisting of a long red LED
flash and three sounder beeps.
The WPR’s low battery indication (Table 8-12-1, action 8) will occur whenever the WPR’s battery is low
and:
• the WPR is turned on (after action 1, Table 8-12-1),
• every 2 hours of non-use while turned on, or
• any card is read at the WPR’s reader.
It is then time to replace the WPR’s Battery Pack:
12.5.1 Use the Phillips screwdriver to remove WPR cover. There are 4 cover screws, one in each corner
(Figure 8-1).
12.5.2 Locate the used Battery Pack (Figure 8-6), disconnect the used Battery Pack (Figure 8-4), remove the
used Battery Pack from its Velcro Strips (Figure 8-3)
12.5.3 Attach a new Battery Pack to the housing using the Velcro strips (Figure 8-3& Figure 8-4).
Figure 8-3 – WPR Battery Pack Velcro Strips
Figure 8-4 – WPR Battery Pack Positioned
12.5.4 Connect the battery connector to the mating connector coming from the transceiver board (Figure 8-5
& Figure 8-6).
Figure 8-5 – WPR Battery Connector
Figure 8-6 – WPR Battery Pack Connected
Ingersoll Rand Security Technologies
245 W. Roosevelt Road, Bldg 7, Suite 48, West Chicago, IL 60185 / (800) 313-2962 / (630) 293-4257 fax
P/N: M053-007-D
www.ir-swa.com
Page 54 of 60
Wireless Access
12.5.5 To continue to use the WPR on the same RF channel and with the same WPIM, re-install the cover,
making certain that no wires are pinched. The cover should go on easy with no interferences. Replace
the 4 cover screws, one in each corner (Figure 8-1).
If the WPR needs to be re-linked or the RF channel needs to be changed, before re-installing the WPR
cover, follow the instructions in Section 12.2 or Section 12.6.
12.6 Changing the RF Channel
At the WPIM, change DIP switch SW7 to the desired new RF channel (Section 2.3), place the WPIM in
Link Mode (see Section 2.3.2), then re-link the desired WPR (Section 12.2).
NOTE: The WPIMs RF channel DIP switch (SW7) is read when the WPIM enters the Link Mode.
If the DIP switch is changed while the WPIM is in the Link Mode, then the WPIM must be taken
out of Link Mode and put back into Link Mode for the new RF channel to be selected. The WPIM
is taken out of Link Mode by pressing the switch associated with the Access Point in the Link Mode
(S1 or S2).
NOTE: Changing the RF channel will require all WAPMs linked to the PIM to be re-linked.
12.7 Updating the WPR’s Firmware
If a new firmware version is required, please refer to the “Upgrading a WAPM or WPIM’s Firmware”
application note, A664-010-x, available at www.ir-swa.com.
Ingersoll Rand Security Technologies
245 W. Roosevelt Road, Bldg 7, Suite 48, West Chicago, IL 60185 / (800) 313-2962 / (630) 293-4257 fax
P/N: M053-007-D
www.ir-swa.com
Page 55 of 60
Wireless Access
13. Other Important Information
13.1 Knowing When to Change the RF Channel
The RF Channel should be changed if the system encounters interfering transmissions (most noticeably
when the system attempts to Link and cannot or when a card swipe results in a “no communication”
indication at the Access Point).
Try re-linking on a different RF channel. If the WAPM and WPIM do not re-link on the new channel, try
another channel. For more detailed information, see the Schlage Wireless Access Troubleshooting
Guide, available from Schlage.
If the WAPM and WPIM do not re-link, the WAPM reverts to the RF channel it was set at prior to
disconnecting the WAPM power. However, the WAPM will not communicate with the WPIM on the
original RF channel until the WPIMs DIP switch SW7 is reset to the original RF channel and the WPIM
is taken into and out of Link Mode.
13.2 Configuring the Schlage Wireless Access System
There are several configurable features in each WAPM & WPIM. These are programmed through the
WPIM using a PC and the Schlage Configuration & Demonstration Tool downloaded from the website
www.ir-swa.com under the Schlage Wireless Access “Support” section.
The configurable features are:
•
•
•
•
•
•
•
•
•
•
•
Heartbeat time (default: 10 minutes)
Relock time (default: 3 seconds)
Re-latch on: timer, door opening, or door closing (default: timer)
Card conversion (default: none)
Polarity of the Request-to-Exit (RTE) signal (default: low = RTE)
Polarity of Trouble signal (default: low = trouble)
Polarity of Door Position Switch (DPS) signal (default: low = closed)
Extended Unlock: enabled or disabled (default: enabled)
Fail Lock/Unlock on loss of RF
Cache Mode
WAPM Query times for unlock response
13.3 Extended Unlock
Extended unlock is a feature that permits a Schlage Wireless Access Point Module (WAPM) to stay in an
indefinite unlock state. Normally a card is swiped at a WAPM and if it is a valid card, the Access Point
will unlock for a short period of time (seconds) and then automatically relock. This is considered a
momentary unlock.
A WPIM and WAPM can be configured (section 13.2) to respond to extended unlocks from an access
control panel. The WPIM monitors the state of the access control panel strike relay. When the strike
relay is energized without the WPIM presenting card data (i.e. no card swipe has occurred or a Request to
Exit) to the Access Control Panel, then the next time the WAPM communicates with the WPIM (card
swipe, door state change, request to exit, or heartbeat), the WPIM will tell the WAPM to unlock its portal
(door, gate, etc.) indefinitely.
When the WPIM detects that the strike relay is de-energized, then the next time the WAPM
communicates with the WPIM (card swipe, door state change, request to exit, or heartbeat), the WPIM
will tell the WAPM to lock its portal (door, gate, etc.) indefinitely.
The extended unlock feature is most likely to be used to implement a timed unlock. For instance,
wanting a business’ main entry doors unlocked during normal business hours (i.e. 8-5).
Ingersoll Rand Security Technologies
245 W. Roosevelt Road, Bldg 7, Suite 48, West Chicago, IL 60185 / (800) 313-2962 / (630) 293-4257 fax
P/N: M053-007-D
www.ir-swa.com
Page 56 of 60
Wireless Access
Note: The exact time that the Access Point will be unlocked or locked depends on the frequency of RF
activity between the WAPM and the WPIM. Generally the WAPM is in a low power mode (i.e. sleeping)
and therefore the WPIM can only communicate with the WAPM when the WAPM initiates the
communication. The Heartbeat time will determine the maximum time that it will take for a WAPM to
respond to the start or end of an extended unlock. For instance, let’s say that the Heartbeat time is set to
10 minutes and that we want the Access Point to be unlocked from 8-5. We would program the access
control panel to unlock the Access Point at 7:50 and lock it at 5:00. The WAPM would unlock sometime
between 7:50 & 8:00 and would lock sometime between 5:00 & 5:10.
13.4 Why Swipe a Card When the Power Is Disconnected?
When linking or re-linking certain WAPMs, the instructions say to present or read a card after the power
has been removed. Why do you need to do this?
Most of the time a WAPM is in a very lower power mode to conserve energy and extend battery life.
Therefore when power is removed, if a WAPM is in its low power mode, it will stay powered for several
minutes due to capacitance in the DC regulator on the PCB. Swiping a card will cause the WAPM to go
to a high power mode which will collapse any residual power. This will insure that the WAPM will start
from reset when power is reapplied.
If a card is not swiped and power is reapplied, no damage is done, but if power has only been removed for
a short time, the WAPM (specifically the WPR) will not reset. The WAPM will just continue to operate
as if power had never been removed. If the WAPM does not reset when power is reapplied, then the
WAPM link mode will not be entered, which may have been the primary reason for cycling power.
13.5 Presenting a HID iCLASS Proximity Card
When a HID iCLASS card is initially presented to a HID iCLASS version of a WAPM (WA52XX,
WA56XX, MIRL, WEXK, WISI, or WPR only), the reader LEDs will alternate green and red for about
2-3 seconds, this indicates that the WAPM’s iCLASS reader is turning on. The iCLASS card is read at
the end of the red/green blinking sequence, therefore the iCLASS card must remain in front of the
iCLASS reader until the red/green blinking sequence stops and a short beep is heard.
Ingersoll Rand Security Technologies
245 W. Roosevelt Road, Bldg 7, Suite 48, West Chicago, IL 60185 / (800) 313-2962 / (630) 293-4257 fax
P/N: M053-007-D
www.ir-swa.com
Page 57 of 60
Wireless Access
14. Contacting Technical Support
For questions regarding Schlage Wireless Access:
www.ir-swa.com
main: 800-313-2962 (630-876-5680)
technical support: 866-322-1237
fax: 630-293-4257
Ingersoll Rand Security Technologies
245 W. Roosevelt Road, Bldg 7, Suite 48, West Chicago, IL 60185 / (800) 313-2962 / (630) 293-4257 fax
P/N: M053-007-D
www.ir-swa.com
Page 58 of 60
Wireless Access
15. FCC Compliance, ACA Compliance, & Warnings
15.1 FCC Compliance
•
The United States and Canada versions of these devices have been authorized by the FCC Rules and
Industry Canada for use in the United States and Canada.
•
This device complies with the limits for a Class B digital device and a Class B intentional radiator,
pursuant to Part 15 of the FCC Rules and with RSS-210 of Industry Canada. Operation is subject to
the following two conditions: (1) This device may not cause harmful interference, and (2) this
device must accept any interference received, including interference that may cause undesired
operation.
•
The Schlage Wireless Access System Component must be installed by qualified professionals or
contractors in accordance with FCC part 15.203, Antenna Requirements.
•
Do not use any antenna other than the one provided with the unit.
15.2 ACA Compliance
•
The Australian versions of these devices have been authorized by the Australian Communications
Authority (ACA).
15.3 Warnings
•
RF Exposure - To comply with FCC RF exposure requirements for mobile transmitting devices this
transmitter should only be used or installed at locations where there is normally at least a 20 cm
separation between the antenna and all persons.
•
Do not co-locate and operate in conjunction with any other antenna or transmitter.
•
Use only the Battery Pack specified in this instruction manual.
•
Do not subject Battery Pack to fire or high temperatures.
•
Do not attempt to recharge, short out or disassemble Battery Pack.
•
Follow local regulations for alkaline battery disposal.
•
Immediately remove the batteries and discontinue use if:
- the product is impacted after which the interior is exposed, or
- the product emits a strange smell, heat, or smoke.
•
Changes or modifications not expressly approved by Ingersoll Rand Security & Safety could void the
users authority to operate the equipment.
Ingersoll Rand Security Technologies
245 W. Roosevelt Road, Bldg 7, Suite 48, West Chicago, IL 60185 / (800) 313-2962 / (630) 293-4257 fax
P/N: M053-007-D
www.ir-swa.com
Page 59 of 60
Wireless Access
16. Revision History
Version
X1.0
001
X02
Date
11/12/01
11/15/01
11/20/01
002
X03.0
003
11/27/01
12/14/01
12/18/01
004
02/27/02
005
05/23/02
006
06/10/02
x007
007
10/31/02
11/05/02
x008
x008.1
008
009
01/08/03
01/15/03
01/16/03
2/20/03
010
08/13/03
011
12/8/03
012
06/24/04
013
A
10/01/04
10/22/04
B
C
12/16/04
01/26/06
D
09/20/06
Changes
preliminary in house release for comments
changed protected/unprotected to locked/unlocked, released for publication (IRL)
added WPR section, grammar edits, added power off card swipe explanation,
added FCC & warning section
released for publication (IRL, WPR)
added WRI section, corrected numbering in Table 4-1, changed logos
corrected grammar in WRI section, edited figure 5-3, released for publication
(IRL, WPR, WRI)
corrected zip code, corrected WRI Door Position section, changed Wireless to
Wireless for product names, changed WSI to WISI, added WISI section, added
what happens if link process fails for each WAPM, changed low battery to dead
battery time to 1 month, added copyright boilerplate after title page, released for
publication
added UL footnote to table 1-1, added WUSI section, added IRL cylindrical &
mortise reference, added 1-15 second access denied reference, updated PIM
section for new PIM enclosure and PCB versions, released for publication
grammar edits, changed WUSI & WPR Visual Indicator Tables, added note about
WISI reader will not work if WISI Tamper is active, changed WISI battery
installation section to use a connector, released for publication
added IRL Standard Mortise information
edited IRL Battery Pack replacement & IRL linking sections, released for
publication
added MIRL section
modified MIRL linking and battery install sections
released for publication
changed VBOSC to VBOC (battery override cable), added tamper switch note for
MIRL battery override operation, removed PIM-ELEV version, added PIM version
with pull-up resistors
added WCM section, changed references to an orange LED on PIM during linking
to blinking green LED, updated WCM figures
minor edits, removed IRL section & IRL references, removed PIM & PIME sales
models references, removed original PIM PCB references, removed ANT-6DBYAGI references, updated WISI figure with MIRL reader, updated WPR figure
with MIRL reader & plastic handle
added WEXK section, added link switch instructions to WPR sections, added
instructions about using iCLASS versions of the MIRL/WEXK/WISI/WPR,
updated PIM sales model chart, added firmware updating sections
added WPR2 section
Changed Logo, changed product name WUSI to WRI-IN, changed product name
of WCM to WSM. Removed WISI product.
removed ANT-REM-I/O-MAST, minor grammar edits/re-formatting,
changed various nomenclature and contact info throughout the manual, added
WA5200/WA5600/WA993 sections, updated battery pack references (K380-001),
added Australian model information, changed Ingersoll-Rand to Ingersoll Rand,
changed Security & Safety to Security Technologies, removed address from cover
page, changed wyreless to wireless, removed all ™’s, changed
www.wyrelessaccess.com to www.ir-swa.com
changed technical support # to 866-322-1237
Ingersoll Rand Security Technologies
245 W. Roosevelt Road, Bldg 7, Suite 48, West Chicago, IL 60185 / (800) 313-2962 / (630) 293-4257 fax
P/N: M053-007-D
www.ir-swa.com
Page 60 of 60