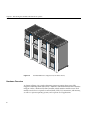
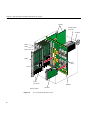
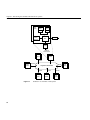
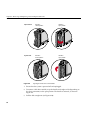
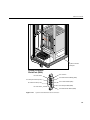
1
SGI™ 2400 and 2800 Server
Owner’s Guide
Document Number 007-4192-001
CONTRIBUTORS
Written by Mark Schwenden and Pablo Rozal
Illustrated by Dan Young and Cheri Brown
Production by Amy Swenson and Linda Rae Sande
Engineering contributions by David Alexander, Ted Wong, Sam Sengupta,
Bob Marinelli, Rob Bradshaw, Steve Whitney, Jim Ammon, Richard Singer, and
Ben Fathi
© 1999, Silicon Graphics, Inc.— All Rights Reserved
The contents of this document may not be copied or duplicated in any form, in whole
or in part, without the prior written permission of Silicon Graphics, Inc.
RESTRICTED RIGHTS LEGEND
Use, duplication, or disclosure of the technical data contained in this document by
the Government is subject to restrictions as set forth in subdivision (c) (1) (ii) of the
Rights in Technical Data and Computer Software clause at DFARS 52.227-7013
and/or in similar or successor clauses in the FAR, or in the DOD or NASA FAR
Supplement. Unpublished rights reserved under the Copyright Laws of the United
States. Contractor/manufacturer is SGI, 1600 Amphitheatre Pkwy., Mountain View,
CA 94043-1351.
Shielded Cables
This product requires the use of external shielded cables in order to maintain
compliance with Part 15 of the FCC rules.
FCC Warning
This equipment has been tested and found compliant with the limits for a Class A
digital device, pursuant to Part 15 of the FCC rules. These limits are designed to
provide reasonable protection against harmful interference when the equipment is
operated in a commercial environment. This equipment generates, uses, and can
radiate radio frequency energy and, if not installed and used in accordance with the
instruction manual, may cause harmful interference to radio communications.
Operation of this equipment in a residential area is likely to cause harmful
interference, in which case users will be required to correct the interference at their
own expense.
For additional FCC information, refer to the Interference Handbook 1993 Edition
prepared by the Federal Communications Commission. This booklet can be obtained
SGI™ 2400 and 2800 Server Owner’s Guide
Document Number 007-4192-001
by writing to the U.S. Government Printing Office, Superintendent of Documents,
Mail Stop SSOP, Washington, D.C. 20402-9328, ISBN 0-16-041736-8.
VDE 0871/6.78
This equipment has been tested to and is in compliance with the Level A limits per
VDE 0871.
International Special Committee on Radio Interference (CISPR)
This equipment has been tested to and is in compliance with the Class A limits per
CISPR publication 22, Limits and Methods of Measurement of Radio Interference
Characteristics of Information Technology Equipment; Germany’s BZT Class A
limits for Information Technology Equipment; and Japan’s VCCI Class 1 limits.
Canadian Department of Communications Statement
This digital apparatus does not exceed the Class A limits for radio noise emissions
from digital apparatus as set out in the Radio Interference Regulations of the
Canadian Department of Communications.
Attention
Cet appareil numerique n’emet pas de perturbations radioélectriques dépassant les
normes applicables aux appareils numériques de Classe A préscrites dans le
Règlement sur les interferences radioélectriques établi par le Ministère des
Communications du Canada.
Manufacturer’s Regulatory Declarations
This workstation conforms to several national and international specifications and
European directives as listed on the “Manufacturer’s Declaration of Conformity,”
which is included with each computer system and peripheral. The CE insignia
displayed on each device is an indication of conformity to the European
requirements.
Your workstation has several governmental and third-party approvals, licenses, and
permits. Do not modify this product in any way that is not expressly approved by
Silicon Graphics, Inc. If you do, you may lose these approvals and your
governmental agency authority to operate this device.
TUV
R
geprufte
Sicherheit
NRTL/C
VCCI Class 1 Statement for Japan
Chinese Class A Regulatory Notice
IRIX is a registered trademark and SGI, the SGI logo, Origin Vault, S2MP, IRIS
InSight, and XIO are trademarks of Silicon Graphics, Inc. CrayLink is a trademark of
Cray Research, Inc. VME is a trademark of Motorola. UNIX is a registered trademark
in the United States and other countries, licensed exclusively through X/Open
Company, Ltd.
Contents
List of Figures
ix
List of Tables xiii
About This Guide xv
Finding the Information You Need xvi
SGI 2400 and 2800 Server Owner’s Guide xvii
IRIX Admin: Software Installation and Licensing Guide
IRIS InSight Online Documentation and Help xvii
Online Man Pages xvii
Release Notes xviii
World Wide Web Accessible Documentation xviii
Conventions xix
1.
2.
Introducing the SGI 2400 and 2800 Server Systems 1
System Features 1
Hardware Overview 4
About the SGI 2400 and 2800 9
CrayLink Interconnect 11
XIO Slots 12
Distributed Shared Address Space (Memory and I/O)
IRIX 13
Chassis Tour 15
Overview 15
Board Configuration and Layout
xvii
12
20
v
Contents
Major Components 21
System Controller 22
BaseIO Board 25
CPU Node Board 26
Router Boards 30
Power Distribution Unit (PDU)
CrayLink Interconnect 32
PCI Carrier Assembly 34
3.
Interface and Cabling Information 35
The Ethernet Interface Connection 36
Standard Serial Ports 38
Standard SCSI Connector 40
4.
System Configurations 43
Overview 43
Basic System Configurations 44
Rackmount Configurations 47
Multirack Configurations 53
5.
System Configuration and Operation 59
Connecting Your Terminal 60
SCSI Configuration Requirements 62
Loading the Single Connector Assembly (SCA) Drives Into the System
Loading the CD-ROM 66
Connecting Your System to an Ethernet Network 68
Initially Powering On the System 69
Booting Your System 73
Installing the Operating System 76
Powering Off the System 76
Resetting Your System 77
6.
vi
32
Removing and Replacing Customer-Replaceable Units 79
General Information 81
Safety Information 81
63
Contents
General Procedures 82
Powering Off a Rackmount System 82
Opening the Drive Door 89
Opening the Cable Cover Door 90
Specific Procedures 91
Removing a Drive Module 91
Removing the Facade 94
Removing the System Controller and CD-ROM Module
XIO Board Slots 98
7.
Using the System Controller 99
MMSC 99
MMSC Front Panel Display 100
MMSC Assembly 104
MSC Front Panel 109
Understanding the MSC LEDs and Switches
MSC Features and Functions 113
MSC Status Messages 115
112
8.
System Maintenance and Troubleshooting 117
Maintaining Your Hardware and Software 117
Hardware Dos and Don’ts 117
Software Dos and Don’ts 118
System Problem Catagories 118
XIO Board Slots Not Functioning 118
Physical Inspection Checklist 119
MSC Shutdown 120
Fixing the MSC Shutdown 120
Recovering from a System Crash 121
A.
System Specifications 123
Index
96
125
vii
List of Figures
Figure i
Figure ii
Figure iii
Figure iv
Figure 1-1
Figure 1-2
Figure 1-3
Figure 1-4
Figure 1-5
Figure 1-6
Figure 1-7
Figure 2-1
Figure 2-2
Figure 2-3
Figure 2-4
Figure 2-5
Figure 2-6
Figure 2-7
Figure 2-8
Figure 2-9
Figure 2-10
Figure 2-11
Figure 3-1
Figure 3-2
Figure 3-3
Figure 4-1
Figure 4-2
Information Sources for the SGI 2400 and 2800 Rackmount System xvi
System Owner’s Guide xvii
IRIX Admin: Software Guide xvii
IRIS InSight Icon xvii
SGI 2400 Rackmount Server System 2
SGI 2400 Multirack System Configuration Example 3
SGI 2400 Multirack Configuration (Four Racks Shown) 4
SGI 2400 Rackmount Chassis (Side Panel Removed) 6
Rackmount Server Functional Block Diagram 7
A Look Inside the Module Chassis 8
Modules in an SGI 2400 or 2800 System 10
SGI 2400 and 2800 Rackmount System (Front View) 16
SGI 2400 and 2800 Rackmount Rear View 17
Board Configuration and Layout for System Module 21
MSC and Display 23
MMSC Display (for Entire Rack) 24
BaseIO Board 25
Node Board Positioning in the Chassis 28
Front View of Node Board Showing Bulkhead 29
System Router Boards 31
CrayLink Interconnect, Xpress Link, and Crosstown Cables 33
Optional PCI Carrier Assembly 34
Standard Ethernet on SGI 2400 and 2800 Rackmount 37
Serial Port Location and Pinouts 39
68-Pin SCSI Connector 42
Basic Module Configurations 45
SGI 2400 Rackmount Configuration Examples 46
ix
List of Figures
Figure 4-3
Figure 4-4
Figure 4-5
Figure 4-6
Figure 4-7
Figure 4-8
Figure 4-9
Figure 5-1
Figure 5-2
Figure 5-3
Figure 5-4
Figure 5-5
Figure 5-6
Figure 5-7
Figure 5-8
Figure 5-9
Figure 6-1
Figure 6-2
Figure 6-3
Figure 6-4
Figure 6-5
Figure 6-6
Figure 6-7
Figure 6-8
Figure 6-9
Figure 6-10
Figure 6-11
Figure 6-12
Figure 7-1
Figure 7-2
Figure 7-3
Figure 7-4
Figure 7-5
x
Single Server Module in a Rack with Four Vault Drive Boxes 49
16P SGI 2400 Server 51
16P SGI 2400 Rackmount Server with Xpress Links 52
32P Configuration 54
32P with Express Links 55
64P Configuration 56
SGI 2800 128P Configuration 57
Connecting a Terminal 61
Installing an SCA Drive 64
SCSI Hardwire Addresses for the SGI 2400 and 2800 Server Module 65
Installing a CD-ROM Into an SGI 2400 or 2800 Chassis 67
Connecting an Ethernet to the System 68
Connecting the System Power Cable 70
Turning On the PDU 71
Powering On the System (Rear View of Chassis) 72
Entry-Level System Controller Key Positions 74
Customer-Replaceable Units (CRUs) for the SGI 2400 or 2800 Server 80
Turning Off the Module Controller 83
Powering Off a Rackmount Module 84
Powering Off the Multimodule Controller 85
Turning Off the PDU 87
Turning Off a Multirack Configuration 88
Opening the Drive Front Door on a Rackmount System 89
Opening the Cable Cover Door 90
Opening the Disk Drive Unit Module 92
Removing the Drive 93
Removing the Facade from a System Module 95
Removing the System Controller and CD-ROM 97
MMSC Functional Block Diagram 100
MMSC and Front Panel 101
MMSC Display 102
Action Menu Selection for MMSC Display 103
MMSC Cabling 105
List of Figures
Figure 7-6
Figure 7-7
Figure 7-8
Figure 7-9
Figure 7-10
MMSC to MMSC 10BaseT Ethernet Cabling (2 racks) 106
MMSC to 10BaseT-Hub 1BaseT Ethernet Cabling (2 racks) 107
Processor Assembly Location in Rack 108
MSC Status Panel, Serial Connector, and Switches 109
System Controller Rear Serial Connector 111
xi
List of Tables
Table 2-1
Table 2-2
Table 3-1
Table 3-2
Table 4-1
Table 4-2
Table 4-3
Table 7-1
Table A-1
Table A-2
SGI 2400 and 2800 Major Components 18
BaseIO Connectors 26
Ethernet 100-BASE T Ethernet Port Pin Assignments 36
68-Pin Single-Ended, High-Density SCSI Pinouts 40
Single Module Chassis Configurations 47
Dual Module Chassis Configuration 48
Multiple-Rack Configurations 53
System Controller Messages 115
Physical and Environmental Specifications 123
Electrical and Cooling Specifications 124
xiii
About This Guide
Welcome to the SGI 2400 and 2800 server systems. The SGI 2400 and 2800 Server Owner’s
Guide is your complete guide to operating your rackmount system. Specifically, it tells
you how to
•
set up your SGI 2400 and 2800 rackmount server and turn it on
•
install peripherals
•
install and remove software
•
diagnose hardware problems
•
replace faulty parts
•
correctly maintain your system
Refer to this guide to set up the system, install hardware options, or find a solution when
you suspect there is a hardware problem. Basic information on installing software is also
included. For more advanced information on installing software, refer to IRIX Admin:
Software Installation and Licensing.
The system and the procedures in this guide are designed so that you may maintain and
repair part of the system without the help of a trained technician. However, do not feel
that you must work with the hardware yourself. You can always contact your service
provider to have an authorized service person work with the hardware.
xv
About This Guide
Finding the Information You Need
The SGI 2400 and 2800 ships with the following sources of information, as shown in
Figure i.
•
IRIX Admin: Software Installation and Licensing
•
IRIX Release Notes (on the CD)
•
IRIS InSight online documentation and help
D
D oc
o T
V c
o
i
V lu T t l e
ol m i t
um e l e l i
n
e Nu l i e
C m ne 1
on b
te er 2
nts
Hard Copy
Documentation
Online
IRIS InSight
CDs
Desktop Help
Figure i
Information Sources for the SGI 2400 and 2800 Rackmount System
The following sections contain information on options that can help you get your system
up and running and help you become productive as soon as possible.
xvi
About This Guide
SGI 2400 and 2800 Server Owner’s Guide
SGI 2200 Server
Owner's Guide
Figure ii
System Owner’s Guide
Refer to this manual (see Figure ii) to set up the system and install hardware options, or
to find solutions when you suspect there is a hardware problem. In addition, it contains
basic information on installing and removing optional software.
IRIX Admin: Software Installation and Licensing Guide
Doc Title line 1
Doc Title line 2
Volume Number
Volume Contents
Figure iii
IRIX Admin:
Software Guide
The IRIX Admin: Software Installation and Licensing guide is the complete reference guide
on using the installation program, inst, to install software. For information on using the
Software Manager to install software, refer to the online Personal System Administration
Guide.
IRIS InSight Online Documentation and Help
The online documentation package is called IRIS InSight. The InSight icon is shown in
Figure iv. To view the manuals, go to the Help toolchest and choose “Online Books.” You
will see bookshelves for end-user, developer, and administration manuals that ship
online with the system. Double-click on a book to open it.
Figure iv
IRIS InSight Icon
For a description and listing of the manuals that are available to purchase in hard copy,
double-click on the Documentation Catalog.
Online Man Pages
Your system comes with a set of IRIX man pages, formatted in the standard UNIX “man
page” style. These are found online on the internal system disk (or CD-ROM) and are
displayed using the man command. For example, to display the man page for the
Add_disk command, enter the following command at a shell prompt:
man Add_disk
Important system configuration files as well as commands are documented on man
pages. References in the documentation to these pages include the name of the command
and the section number in which the command is found. For example, “Add_disk(1)”
refers to the Add_disk command and indicates that it is found in section 1 of the IRIX
reference.
xvii
About This Guide
For additional information about displaying reference pages using the man command,
see man(1).
In addition, the apropos command locates man pages based on keywords. For example,
to display a list of man pages that describe disks, enter the following command at a shell
prompt:
apropos disk
For information about setting up and using apropos, see apropos(1) and makewhatis(1M).
Release Notes
You can view the release notes for a variety of SGI products and software subsystems
using one of two utilities:
relnotes
Text-based viewer for online release notes.
grelnotes
Graphics viewer for online release notes.
To see a list of available release notes, type the following at a shell prompt:
relnotes
For more information, see the relnotes(1) and grelnotes(1) man pages.
World Wide Web Accessible Documentation
SGI makes its manuals available in a variety of formats via the World Wide Web (WWW).
Using your Web browser, open the following URL:
http://techpubs.sgi.com/library
Enter a keyword search, or search by title to find the information or manual you need.
xviii
About This Guide
Conventions
The SGI 2400 and 2800 Server Owner’s Guide uses these conventions:
•
References to documents are in italics.
•
References to other chapters and sections within this guide are in quotation marks.
•
Names of IRIX man pages or commands that you type at the shell prompt are in
italics as are IRIX filenames.
•
Steps to perform tasks are in numbered sentences. When a numbered step needs
more explanation, the explanation follows the step.
xix
Chapter 1
1. Introducing the SGI 2400 and 2800 Server Systems
The SGI 2400 and 2800 rackmount servers provide a highly configurable system
architecture that is available in a single rackmount or multirack setup. Each rackmount
system consists of 2 to 16 CPUs, 64 MB to 32 GB of main memory and can provide a wide
variety of I/O interfaces (see Figure 1-1). The SGI 2400 server system uses up to four
racks (64 CPUs) but does not use a metarouter. The SGI 2800 multiple rack (or multirack)
metarouter configuration has up to 256 processors and up to 512 GB of main memory (see
Figure 1-2 and Figure 1-3).
System Features
The SGI 2400 or 2800 servers are ideal for evolving applications requiring expansion
capability as requirements grow. Some of the server’s features include:
•
significantly lower entry system costs (with pay-as-you-grow expandability)
•
support of a large number of processors (up to 256)
•
high bandwidth I/O connectivity
•
higher total memory capacity (up to 512 GB of main memory)
•
optional connectivity to third-party peripheral connector interface (PCI) boards
•
superscalar 64-bit CPUs (two on each Node board) support advanced memory
latency tolerance features such as out-of-order execution and advanced branch
prediction to address real-world application demands
•
large variety of peripheral connectivity options
•
XIO boards providing additional I/O, mass storage connections, and graphics
capabilities
1
Chapter 1: Introducing the SGI 2400 and 2800 Server Systems
Figure 1-1
2
SGI 2400 Rackmount Server System
System Features
Figure 1-2
SGI 2400 Multirack System Configuration Example
3
Chapter 1: Introducing the SGI 2400 and 2800 Server Systems
Figure 1-3
SGI 2400 Multirack Configuration (Four Racks Shown)
Hardware Overview
As shown in Figure 1-4, a single rackmount system can consist of up to two fully
integrated and independent subsystems—Module A and Module B. Each of the modules
in Figure 1-4 has a dedicated System Controller, which monitors module status. Each
module can also have a separate set of hard disks, CPUs, I/O connections, and memory,
as well as a separate operating system, and a separate set of applications.
4
Hardware Overview
The modules communicate using the high-speed (1600 MB/sec) CrayLink Interconnect
link. The CrayLink Interconnect (also known as the interconnection fabric) link consists
of a set of high-speed routing switches and cabling that enables multiple connections to
take place simultaneously. Using the CrayLink Interconnect, hardware resources
(including main memory) can be shared and accessed by other modules in the
configuration. For more information on the CrayLink Interconnect see “CrayLink
Interconnect” on page 11.
Note: Not all rack systems have two fully self-contained modules; some may have only
one; some configurations may have as many as 16 modules. For more information on the
different rack configurations, see Chapter 4, “System Configurations.”
Figure 1-5 provides an overall block diagram of an SGI 2400 server rack system. The
major hardware components include the:
•
CPU and memory (Node) board
•
Router board
•
BaseIO board
•
XIO slots
For a description of these components, see Chapter 2, “Chassis Tour.”
The rear module diagram shown in the top portion of Figure 1-5 appears in the back of
the chassis between the Node boards and fan tray. This diagram provides a map that tells
system installers where to install Node boards and XIO boards into the system. Use this
diagram to help correspond the Node boards and XIO blocks in the block diagram to
their actual physical location in the chassis. For more information on how to read this
diagram, see “Board Configuration and Layout” on page 20 in Chapter 2.
Figure 1-6 shows how some of the major hardware components connect inside a system
module. All these components interface using a common midplane with connections
made to both the front and the back.
5
Chapter 1: Introducing the SGI 2400 and 2800 Server Systems
Module B
Fault
1.7
VDC
2.4
VDC
3.3
VDC
Link
Statu
s
1
2
3
4
5
6
CrayLink
interconnect
1
Module A
CrayLink
interconnect
Figure 1-4
6
SGI 2400 Rackmount Chassis (Side Panel Removed)
Hardware Overview
XIO 2
Node 1
Node 2
Node 3
Node 4
Node slots
Block Diagram
XIO 3
XIO 5
XIO 7
XIO 9
XIO 11
Router 1
XIO 4
XIO 6
XIO 8
XIO 10
XIO 12
Router 2
XIO 1
Rear Module Diagram
XIO slots
Node 1
External connections
(to router boards in
other chassis)
Router
1
Module A
External connections
(to router boards in
other chassis)
Figure 1-5
XBOW
1
XIO
XBOW
0
XIO
XBOW
1
XIO
Node 3
Node 4
Router
2
Node 1
External connections
(to router boards in
other chassis)
XIO
Node2
Module B
External connections
(to router boards in
other chassis)
XBOW
0
Router
1
Node 2
Node 3
Router
2
Node 4
Rackmount Server Functional Block Diagram
7
Chapter 1: Introducing the SGI 2400 and 2800 Server Systems
Routers
Module System
Controller
CD-ROM
Node 4
Node 3
Node 2
Node 1
Xbow
ASICs
Hub
64-bit
processors
Midplane
Rear of module
Figure 1-6
8
I/O board
A Look Inside the Module Chassis
About the SGI 2400 and 2800
About the SGI 2400 and 2800
As illustrated in Figure 1-7, the server is a number of processing modules linked together
by the CrayLink Interconnect. Each processing module contains either one or two
processors, a portion of main memory, a directory to maintain cache coherence, and two
interfaces: one that connects to I/O devices and another that links system nodes through
the CrayLink Interconnect.
Cache coherence is the ability to keep data consistent throughout a system. In the
symmetrical multiprocessor (SMP) server system, data can be copied and shared among
all the processors and their caches. Moving data into a cache may cause the cached copy
to become inconsistent with the same data stored elsewhere. The cache coherence
protocol is designed to keep data consistent and to propagate the most recent version of
the data to wherever it is being used.
9
Chapter 1: Introducing the SGI 2400 and 2800 Server Systems
Node
Node
board
64-bit
CPU
64-bit
CPU
Cache
Cache
Directory/
Main
Memory
XIO
Hub
Router
to
CrayLink
Interconnect
Node
board
Node
board
Router
Node
board
Router
Router
CrayLink Interconnect
Router
Node
board
Figure 1-7
10
Router
Router
Node
board
Router
Node
board
Modules in an SGI 2400 or 2800 System
Node
board
About the SGI 2400 and 2800
The CrayLink Interconnect links modules to one another. The CrayLink Interconnect
may appear to be a type of super data bus, but it differs from a bus in several important
ways. A bus is a resource that can only be used by one processor at a time. The CrayLink
Interconnect is a mesh of multiple, simultaneous, dynamically allocatable connections
that are made from processor to processor as they are needed. This web of connections
differs from a bus in the same way that multiple dimensions differ from a single
dimension: if a bus is a one-dimensional line, then the CrayLink Interconnect is a
multidimensional mesh.
The SGI 2400 and 2800 servers are highly scalable - the SGI 2400 server can range in size
from 2 to 32 processors while the SGI 2800 goes from 34 to 128 processors. As you add
modules, you add to and scale the system bandwidth. These servers are also modular, in
that they can be increased in size by adding standard modules to the CrayLink
Interconnect.
The SGI 2400 and 2800 architecture achieves this scalable processing power primarily by
using the following technology:
•
CrayLink Interconnect
•
XIO slots
•
Distributed shared memory
•
new IRIX operating system
CrayLink Interconnect
The SGI 2400 and 2800 modules are connected by the CrayLink Interconnect (also known
as the interconnection fabric). The CrayLink Interconnect is a set of switches, called
routers, that are linked by cables in various configurations, or topologies. Here are some
key features that define the server’s interconnection fabric:
•
The CrayLink Interconnect is a mesh of multiple point-to-point links connected by
the routing switches. These links and switches allow multiple transactions to occur
simultaneously. The interconnect is not limited by contention
•
The links permit extremely fast switching (a peak rate of 1600 MB/sec
bidirectionally, 1600 MB/sec in each direction).
•
The CrayLink Interconnect does not require arbitration.
•
More routers and links are added as nodes are added, increasing the CrayLink
Interconnect’s bandwidth.
11
Chapter 1: Introducing the SGI 2400 and 2800 Server Systems
The CrayLink Interconnect provides a minimum of two separate paths to every pair of
SGI 2400 or 2800 modules. This redundancy allows the system to bypass failed routers
or broken fabric links. Each fabric link is additionally protected by a CRC code and a
link-level protocol, which retry any corrupted transmissions and provide fault tolerance
for transient errors.
XIO Slots
The XIO cardcage allows you to install additional I/O type boards (such as ultra-SCSI,
fibre channel, FDDI, and graphics interface) into the SGI 2400 or 2800 chassis. In addition,
an optional PCI carrier assembly allows users to install up to three PCI boards into each
SGI 2400 or 2800 base module. XIO uses the same physical link technology as the
CrayLink Interconnect, but uses a protocol optimized for I/O traffic.
The XIO features are:
•
high bandwidth—1600 MB/sec (peak)
•
concurrent transfers
•
real-time performance
•
future expandability
Distributed Shared Address Space (Memory and I/O)
The SGI 2400 and 2800 employ a distributed shared memory system architecture where
main memory is split among the Node boards. Rather than appearing as one fast
memory, main memory is “distributed” over the configuration, with a little piece of the
memory near each processor. Thus the name “distributed shared memory.” A directory
memory keeps track of information necessary for hardware coherency and protection.
This differs from previous-generation SGI systems, in which memory is centrally located
on and only accessible over a single shared bus. By distributing the SGI 2400 and 2800
memory among processors, memory latency is reduced. Accessing memory near a
processor takes less time than accessing remote memory. Although physically
distributed, all of main memory is available to all processors.
12
About the SGI 2400 and 2800
The SGI 2400 and 2800 memory is located in a single shared address space. Memory
within this space is distributed amongst all the processors, and is accessible over the
CrayLink Interconnect. I/O devices are also distributed within a shared address space;
every I/O device is universally accessible throughout the system.
IRIX
The new 64-bit IRIX operating system is based on UNIX System V, Release 4, distributed
software technology. IRIX supports modular computing, providing availability and
throughput on small, one-to-four processor systems. It also supports scalability,
performance, resilience, and throughput on large systems with tens or hundreds of
processors and hundreds of gigabytes of memory.
13
Chapter 2
2. Chassis Tour
This chapter provides an overview of the rackmount system chassis and a description of
the controls, connectors, and indicators.
Overview
Figure 2-1 and Figure 2-2 show the major parts of the SGI 2400 and 2800 rackmount
system. These parts are briefly described in Table 2-1.
15
Chapter 2: Chassis Tour
2
Optional disk
modules
System controller/
4 drive module door
Multimodule
System Controller
logic module
5 CD-ROM drive
1
Module B
6 Module System
Controller (MSC)
7 Multimodule System
Controller (MMSC)
display
8 SCSI drive box door
9 Intake baffle
3 System disk
10 Facade
11
1
Module A
CrayLink
Interconnect
12 Cable bail
13 Router board
14 Cable comb cover
17 Connector cover
15 Cable comb
16 Door
Figure 2-1
SGI 2400 and 2800 Rackmount System (Front View)
Note: In Figure 2-1, the side panel is removed for clarity.
16
Overview
18 Multimodule system
controller (MMSC)
19 Power distribution
unit (PDU)
20 PDU power switch
PDU off
PDU on
21 Node boards
22 BaseIO
23 XIO slots
25 Main power switch
24 XIO cable guide
ON
Figure 2-2
OFF
SGI 2400 and 2800 Rackmount Rear View
Note: In Figure 2-2, the side panel is removed for clarity.
17
Chapter 2: Chassis Tour
Table 2-1
18
SGI 2400 and 2800 Major Components
Component
Description
1. Module A/Module B
The modules shown in Figure 2-1 are independent computing
subsystems with a separate set of CPUs (central processing
units) disks, System Controller, and I/O connections. There
can be up to two modules in a rack and up to sixteen modules
in a multirack configuration.
2. Optional SCA disk
modules
Each module can house up to five SCA (single connector
attachment) drives (including the system disk). The disks are
single-ended, ultra SCSI drives with a transfer rate of
40 MB/sec.
3. System disk
The system disk contains the operating system and other key
software directories. The system disk must be installed in the
drive position shown in Figure 2-1. Note that the system disk
is oriented differently than the other drives in the system. See
“Loading the Single Connector Assembly (SCA) Drives Into
the System” on page 63 for additional information.
4. System
controller/drive
module door
This door should be kept closed to prevent dust and other
possible contaminants from affecting the drive performance.
5. CD-ROM drive
The CD-ROM is standard with each system and is used to load
the operating system and software applications.
6. Module System
Controller
The module System Controller (MSC) is an independent,
microprocessor-controlled device that powers on and helps
boot the system. The MSC also contains a key switch for
turning on and turning off the module.
7. Multimodule System
Controller
display
The multimodule System Controller (MMSC) display is an
intelligent keypad interface that can control all the system
modules in a rack. The MMSC display (also known as the
full-feature System Controller—FFSC) has greater
functionality than the MSC display. There can only be one
display per rack configuration.
8. SCSI drive box
This drive box enclosure provides six half-height 3.50-inch
drives and two full-height, 5.25-inch drive slots for
single-ended and SCSI drives.
Overview
Table 2-1 (continued)
SGI 2400 and 2800 Major Components
Component
Description
9. Intake baffle
This baffle helps enable proper airflow through the rack. Note
that the top of the rack has a vent as well. Airflow is generally
pulled in from the top and middle of the rack and exhausted
through the back and bottom of the rack.
10. Facade
The removable facade covers the power supply and router
boards for a module chassis.
11. CrayLink Interconnect This is the physical link that enables the different modules in a
cabling
rack to communicate and share resources. The CrayLink
Interconnect cable is made up of delicate copper strands. Be
careful when handling this cable.
12. Cable bails
The cable bails hold the CrayLink Interconnect cable in place
to prevent the cable from excessive bending, which can cause
damage.
13. Router board
The router board ports provide high-speed (1600 MB/sec)
connectivity between Node boards.
There are three types of Router boards: a Null Router, a Star
Router, and a Rack Router board. These router boards are
described in “Router Boards” on page 30.
14. Cable comb cover
This removable cover hides the CrayLink Interconnect cable
inside the rack chassis.
15. Cable comb
The comb holds the CrayLink Interconnect in place when the
cable is tucked into the grooves
16. Cable door
The cable door hides the CrayLink Interconnect routing
between modules.
17. Connector cover
The connector cover protects the router board ports and
cabling.
18. Multimodule System
Controller
The MMSC located in the rear of the chassis is a separate
microprocessor-controlled unit that interfaces the individual
MSCs and MMSCs from other systems.
19. Power distribution
unit (PDU)
The PDU is the central power source for the rack. All the
modules and peripherals connect to the PDU. Note that the
PDU has a separate power switch.
19
Chapter 2: Chassis Tour
Table 2-1 (continued)
SGI 2400 and 2800 Major Components
Component
Description
20. PDU switch
The PDU switch is the main circuit breaker for the entire rack
assembly.
21. Node board
The Node board is the main processing board in the SGI 2400
or 2800 system. It contains one or two 64-bit CPUs, the hub
(which provides an interface to the I/O subsystem and the
CrayLink Interconnect), a portion of main memory, as well as
directory memory. Each node board can support from 64 MB
to 4 GB of memory. A single-rack system can have between one
to eight Node boards. A multiple-rack system can have up to
64 Node boards.
22. BaseIO board
This board provides basic I/O functions for the system, such as
serial ports, (fast) Ethernet, and single-ended wide SCSI.
A dedicated slot in the XIO cardcage houses the BaseIO board.
This board cannot be installed in any of the other XIO
expansion slots.
23. XIO slot cardcage
The XIO cardcage allows you to install additional I/O boards
in the SGI 2400 and 2800 chassis.
24. XIO cable guide
The XIO cable guide management helps to ensure proper
laying out of cables in the rear of the chassis.
25. Module power switch These switches power on and off the individual modules.
Board Configuration and Layout
There is a direct correlation between the number of Node boards that are installed and
the number of XIO slots that can be activated.
If a system module has only one Node board, then only six of the twelve XIO slots are
activated. When two Node boards are installed, all twelve of the XIO slots can be
activated, if the Node boards are positioned in the correct slots.
Figure 2-3 diagrams the Node board-to XIO board correlation. The Node boards and
their corresponding XIO board slots are indicated with either a circle or triangle. When
Node 1 is present, IO slots 1 through 6 (designated by a circle) are activated. When
Node 2 is also present, then IO slots 7 through 12 (designated by a triangle) are activated.
20
Major Components
Node boards 3 and 4 also have corresponding XIO slots indicated by a circle or a triangle.
For example, if Node boards are installed in slots 1 and slot 3, then only the
corresponding XIO slots (1 through 6) are activated.
IO4
IO6
IO8
IO10
IO12
IO2
Node 1
Node 2
Node 3
Node 4
Node slots
Figure 2-3
IO3
IO5
IO7
IO9
IO11
Router
IO1
Router
XIO slots
Board Configuration and Layout for System Module
Major Components
This section describes major hardware components for the SGI 2400 and 2800 rack, which
includes the following:
•
System Controller
•
BaseIO board
•
CPU Node board
•
Router board
•
Power distribution unit (PDU)
•
CrayLink Interconnect cable
•
PCI carrier assembly
21
Chapter 2: Chassis Tour
System Controller
There are two types of System Controllers used in the servers—a single module System
Controller (MSC) and a multimodule System Controller (MMSC) and display. The MSC
does not have the same functional abilities as the MMSC. For detailed information on
operating the System Controller, see Chapter 7, “Using the System Controller.”
MSC and Display
The MSC and display (Figure 2-4) provide environmental and status monitoring for an
individual system module.
MMSC and Display
The MMSC and display (see Figure 2-5) are the single-point administration interface for
the rackmount configuration. The individual module controllers are tied to the
multimodule controller through an eight-pin serial connection from the module to the
multimodule controller board in the rack.
The MMSC and display are two separate units as shown in Figure 2-1 and Figure 2-2.
There should only be one multimodule display per configuration to act as the
single-point administration for the rack configuration. In addition, in a multirack
configuration, the rack with the MMSC and display should always be placed in the
leftmost position (see Figure 1-2 and Figure 1-3 in Chapter 1).
Caution: The front panel display provides a convenient method to power on, shutdown,
reset, and to issue a nonmaskable interrupt (NMI) to the entire rack configuration. Use
extreme care when issuing these commands from the display. Make sure that all affected
users are notified before a system-wide command is executed.
22
Major Components
Module
NMI
switch
Module
reset switch
Fan hi-speed
indicator
LED
AC OK LED
DC OK LED
Ambient
overtemperature
LED
8-digit
LED display
Security
key switch
8-pin mini DIN
diagnostic
port
ic
Diagnost
Port
Standby
On
Diagnostic
Figure 2-4
MSC and Display
23
Chapter 2: Chassis Tour
Display panel
Menu/Cancel
Focus
A
c
t
i
v
i
t
y
1.0
100
75
50
25
0
Action
Power Up Irix
Power Down
Power Cycle
NMI
Reset
0
View
OS View
Configure
1 2 3 4 5 6 7
Processors
user system intr io graphics
Current target module all
Cursor placement
Execute
Figure 2-5
24
MMSC Display (for Entire Rack)
Major Components
BaseIO Board
The BaseIO board provides the basic I/O connections for the system. Figure 2-6 shows
the BaseIO board and Table 2-2 describes the connector functions.
68-pin SCSI
connector
Additional
serial port
tty_1
Console
tty_2
Serial console port
Interrupt out
Interrupt in
1 2 3 4
RX
LEDs
1 = SCSI
2 = 100Mb/s
3 = DUP
4 = Link
LEDs
TX
Ethernet
Ethernet
connector LEDs
Figure 2-6
BaseIO Board
25
Chapter 2: Chassis Tour
Table 2-2 lists a description of the connectors on the BaseIO.
Table 2-2
BaseIO Connectors
Connector Type
Connector Description
Connector Function
100-Base T
8-pin Jack
100-Mb per second Ethernet
Serial
9-pin DIN
RS-232 and 422 Serial
SCSI
68-pin (FAST-20)
Ultra SCSI (Single-ended)
CPU Node Board
Figure 2-7 shows the location of the CPU Node board in the chassis. The Node board is
the main processing board in the SGI 2400 and 2800 systems. An individual system
module may have up to four Node boards. Figure 2-7 also shows the required Node
board slot positions in a module. The first Node board must be installed in the rightmost
slot (as you face the rear of the chassis). Additional Node boards are added sequentially
to the left.
The Node board consists of these major components:
•
64-bit CPU microprocessors
•
sixteen slots of main memory
•
eight slots of optional directory memory
•
one Hub ASIC
64-bit Processors
The superscalar 64-bit CPU is the main processor for the SGI 2400 and 2800 servers. There
can be one or two 64-bit CPUs on each Node board. You may hear a module or rack
referred to as an 8“P” or 16“P” system. The P stands for processor. An 8P system has
eight processors.
Main Memory
The SGI 2400 and 2800 use SDRAMs mounted on dual inline memory modules (DIMMs)
for main memory. A CPU Node board can have from 64 MB to 4 GB of main memory.
Memory upgrades are available in 64, 128, and 512 MB increments.
26
Major Components
Premium Directory Memory
The optional premium directory DIMMs are required only for configurations with more
than 16 Node boards. These directory memory DIMMs maintain cache coherence in large
system configurations. Cache coherence helps provide data consistency when multiple
processors need to access the same piece of memory.
Hub
The Hub ASIC on the Node board is the primary communication link between the 64-bit
processor, the I/O subsystem, the main memory, and the CrayLink Interconnect. The
Hub also interfaces with directory memory, which is responsible for maintaining cache
coherence.
Status LEDs
Figure 2-8 shows the bulkhead on the front of the Node board. The LEDs provide status
information for the individual boards.
27
Chapter 2: Chassis Tour
Node 3
Node 4
Figure 2-7
28
Node 2
Node 1
Node Board Positioning in the Chassis
Major Components
Bulk
head
LEDs
Compression
mounting
bolt
Compression
mounting
bolt
Figure 2-8
Front View of Node Board Showing Bulkhead
29
Chapter 2: Chassis Tour
Router Boards
The Router board (see Figure 2-9) is a multiported, bidirectional data packet controller
that can transport up to 1600 MB/sec per port (in each direction). Each system module
can have one, two, or no Router boards (depending on the number of Node boards that
are present). The router interfaces with the hubs on Node boards and allows the 64-bit
processors on one Node board to directly access the main memory located on other Node
boards. There are four types of Router boards:
•
Null Router
•
Star Router
•
Rack Router
•
Cray Router
If a module has only one Node board, no Router is required. A Router board is required
only when there are two or more Node boards.
Note: The Null and Star Router boards are primarily used in SGI 2100 or 2200 deskside
systems. The deskside is equivalent to an individual module in a rackmount system.
30
Major Components
One external
port that
connects
only to companion
rack Router
board port
Null Router Board
Figure 2-9
Star Router Board
Three external
Router ports for
interconnection
fabric
Rack Router Board
System Router Boards
Null Router Board
The Null router board is used in deskside systems with only two Node boards. The Null
router provides a low-cost method to connect two Node boards. The Null Router board
cannot be used for CrayLink Interconnect linking, and it does not have any external
router connectors.
31
Chapter 2: Chassis Tour
Star Router Board
The Star Router board is used in deskside systems that have three or four Node boards.
The Star Router is always paired with a Rack Router board for proper operation. This
cost-effective router board provides connections with all the Node boards in a module
but cannot be used for CrayLink Interconnect linking. The Star Router has one external
connector which connects to a port on the companion CrayLink Interconnect router
board through a jumper.
Rack Router
The Rack Router boards provide CrayLink Interconnection in a rack system. This router
board can support configurations with up to 64 processors (see Chapter 4, “System
Configurations”). The Rack Router has six ports that route data at up to 1600 MB/sec
(per port). Three of the ports connect internally. The fourth, fifth, and sixth ports can
connect external routers ports on different modules.
Cray Router
The Cray Router chassis (not shown) is used for CrayLink connectivity for configurations
with up to 128 processors. The Cray Router comes in two modules that house additional
router boards to provide interconnection fabric support for systems with more than
64 processors.
Power Distribution Unit (PDU)
The PDU supplies 220 volts for the rack and provides a common AC connection source
for all the modules and other peripheral devices.
Note: The power supply in the system module is auto-ranging from 110 to 220 volts.
CrayLink Interconnect
The CrayLink Interconnect and the Xpress link s are the cabled interface that runs
between Rack Router boards (see Figure 2-10). These cables provide a high speed
(1600 MB/sec), scalable interconnection between different modules. These cables also
supply physical link redundancy so that if a link fails, another link can take its place.
32
Major Components
Crosstown cable
CrayLink Interconnect and Xpress Links cable
Figure 2-10
)) ) ))
)
) ) ) ) ) ))
))
)))
) ) )) ))
)
))
))
)
)
)
)) )
)))
) ) ) )))
))
)
)
)
))))))))))))))))))))))) ))))))
) ) ) ) ))))))
)))
) ))
))
)))))))))) ) ) ) )
))
))) )
)
)
)
) )) )
))))
CrayLink Interconnect, Xpress Link, and Crosstown Cables
Cautionary Guidelines
You generally should not handle the sensitive CrayLink Interconnect and Xpress link
cables; they are very delicate. Observe the following guidelines if you need to move these
cables:
•
Avoid bending the cables more than a 1.25-inch radius.
•
Avoid stepping on the cables.
•
Avoid “hot plugging” in or removing cables while both server modules are up and
running. This can hang or crash the entire SGI 2400 or 2800 configuration.
Caution: Additional router cable connections should be performed only by Silicon
Graphics-certified personnel.
Xpress Links
The Xpress links provide greater system bandwidth, as they supply additional
1600 MB/sec routing paths. The Xpress links connect to Router board ports that are not
being used by the CrayLink Interconnect cables. For additional information on the use of
Xpress links, see Chapter 4, “System Configurations.”
33
Chapter 2: Chassis Tour
Crosstown Cable
The crosstown cables are similar to the CrayLink Interconnect and Xpress cables, so the
same cautionary guidelines apply. The crosstown cables are encased in a plastic-ribbed
coating and are slightly more ruggedized. The cables are used to connect to external
peripherals and provide the same I/O performance as the CrayLink Interconnects and
Xpress link cables.
PCI Carrier Assembly
The peripheral connector interface carrier assembly can house up to three third-party
PCI boards (see Figure 2-11). Two of the PCI boards can be full-size boards. The third PCI
slot accepts only half-size boards. The PCI carrier assembly provides up to 75 watts of
power.
Figure 2-11
34
Optional PCI Carrier Assembly
Chapter 3
3. Interface and Cabling Information
When your SGI 2400 or 2800 rackmount system is initially set up in the work area, a
trained system support engineering (SSE) technician should configure and connect it.
Your SGI 2400 or 2800 rackmount system is fully functional as a standalone server using
Ethernet, modem, optional ATM, HIPPI, or other interconnect technologies.
Proper configuration and interconnection of any optional XIO interconnect cables or
hardware can be accomplished by the SSE at initial system installation or when an
upgrade is ordered.
35
Chapter 3: Interface and Cabling Information
The Ethernet Interface Connection
The system comes with a single 100 Base-T 8-pin Ethernet connector. Optional boards
supporting additional Ethernet connectors are available.
Table 3-1 shows the cable pinout assignments for the Ethernet 100-BASE T Ethernet port.
Table 3-1
Ethernet 100-BASE T Ethernet Port Pin Assignments
Pin
Assignment
1
TRANSMIT+
2
TRANSMIT–
3
RECEIVE+
4
(Reserved)
5
(Reserved)
6
RECEIVE–
7
(Reserved)
8
(Reserved)
Figure 3-1 shows the location of the standard Ethernet connector on the rackmount
system.
There are two LEDs on the RJ-45 Ethernet. The top (green) LED lights only when the
system is transmitting. The bottom (yellow) LED lights whenever it sees any packet on
the wire, including packets not destined for your system.
The four LEDS above the RJ-45 Ethernet connector have the following functions:
36
•
The yellow LED on the far left (LED 1) lights to indicate SCSI activity on the BaseIO
single-ended SCSCI connector.
•
The green LED (LED 2) lights to indicate 100 MB-per-second packet activity.
•
The yellow LED on the right (LED 3) indicates when the Ethernet is operating at full
duplex rates of transfer or receive.
•
The green LED on the far right (LED 4) shows the Ethernet link test. It lights when
link state is valid.
The Ethernet Interface Connection
1
2
3
4
Pin 1
Pin 2
Pin 3
Pin 4
Pin 5
Pin 6
Pin 7
Pin 8
Transmit +
Transmit Receive +
Reserved
Reserved
Receive Reserved
Reserved
100 Base-T connector
Figure 3-1
Standard Ethernet on SGI 2400 and 2800 Rackmount
37
Chapter 3: Interface and Cabling Information
Standard Serial Ports
Each SGI 2400 and 2800 rackmount system comes with two standard 9-pin serial ports.
These ports can support either RS-232 or RS-422 interface devices. Figure 3-2 shows the
location and pinouts for a serial port. Optional additional serial ports are also available.
The RS-232 standard recommends the use of cables no longer than 50 feet (15.2 meters).
This standard should also be applied to the RS-422 connections. Longer runs increases
the possibility of line noise which can affect data transmission and cause errors. For cable
runs longer than 50 feet (15.2 meters), use an appropriate extender device.
Note: Do not run cables through areas that are electrically noisy, such as places s where
large electric motors, welding apparatus, or X-ray machines operate. Bury outside wiring
in conduit, as lighting strikes can damage the system.
38
Standard Serial Ports
Console
serial port
Serial port
Pin 5 Ground
Pin 4 Data
Terminal
Ready (DTR)
Pin 3 Transmit
Data (TD)
Pin 2 Receive
Data (RD)
Pin 9 Ringing
Indicator (RI)
Pin 8 Clear
to Send (CTS)
Pin 7 Request to
Send (RTS)
Pin 6 Data Set
Ready (DSR)
Pin 1 Data Carrier
Detect (DCD)
Figure 3-2
Serial Port Location and Pinouts
39
Chapter 3: Interface and Cabling Information
Standard SCSI Connector
A single, external 68-pin SCSI connector is provided on the BaseIO panel (see Figure 3-3).
This connector supports both Ultra SCSI and SCSI-2 devices. The connector sends
single-ended SCSI signals only.
Optional additional SCSI ports can be implemented using XIO option boards.
The hyphen preceding a signal name indicates that the signal is low. Note that 8-bit
devices that connect to the P cable leave the following signals open: -DB(8), -DB(9),
-DB(10), -DB(11), -DB(12), -DB(13), -DB(14), -DB(15), -DB(P1). All other signals are
connected as shown in Table 3-2.
Table 3-2
40
68-Pin Single-Ended, High-Density SCSI Pinouts
Signal Name
Pin Number
Pin Number
Signal Name
Ground
1
35
-DB(12)
Ground
2
36
-DB(13)
Ground
3
37
-DB(14)
Ground
4
38
-DB(15)
Ground
5
39
-DB(P1)
Ground
6
40
-DB(0)
Ground
7
41
-DB(1)
Ground
8
42
-DB(2)
Ground
9
43
-DB(3)
Ground
10
44
-DB(4)
Ground
11
45
-DB(5)
Ground
12
46
-DB(6)
Ground
13
47
-DB(7)
Ground
14
48
-DB(P)
Ground
15
49
Ground
Standard SCSI Connector
Table 3-2 (continued)
68-Pin Single-Ended, High-Density SCSI Pinouts
Signal Name
Pin Number
Pin Number
Signal Name
Ground
16
50
Ground
TERMPWR
17
51
TERMPWR
TERMPWR
18
52
TERMPWR
Reserved
19
53
Reserved
Ground
20
54
Ground
Ground
21
55
-ATN
Ground
22
56
Ground
Ground
23
57
-BSY
Ground
24
58
-ACK
Ground
25
59
-RST
Ground
26
60
-MSG
Ground
27
61
-SEL
Ground
28
62
-C/D
Ground
29
63
-REQ
Ground
30
64
-I/O
Ground
31
65
-DB(8)
Ground
32
66
-DB(9)
Ground
33
67
-DB(10)
Ground
34
68
-DB(11)
41
Chapter 3: Interface and Cabling Information
SCSI connector (68-pin)
Figure 3-3
42
Pin 1
Pin 35
Pin 34
Pin 68
68-Pin SCSI Connector
Chapter 4
4. System Configurations
This chapter briefly describes some of the many configurations that are possible with the
highly modular and scalable SGI 2400 and SGI 2800 server systems.
Overview
No matter which SGI 2400 or 2800 system you have, each configuration contains the
following major hardware:
•
CPU Node boards with 64-bit processors
•
main memory (which is located on the Node board)
•
a Router board(s)
•
a BaseIO board (which provides the system I/O ports such as serial, Ethernet, and
SCSI interfaces)
•
single-connector assembly (SCA) drive bay(s) for single-ended, ultra SCSI drive
installation
•
a drive box (Vault)
The SGI 2400 or 2800 chassis is housed in a rack system that comes with a multimodule
System Controller (MMSC) and display, and also provides cable management hardware
for CrayLink Interconnect and XIO cables.
Note: Additional system modules or individual hardware components can be added to
suit growing computational and I/O requirements.
43
Chapter 4: System Configurations
Basic System Configurations
Figure 4-1 and Figure 4-2 shows various system configurations based on the number of
processors in the system. These figures provide information on the type of Router
board(s) that are required to support that configuration. The diagrams also show how the
SGI 2400 server system expands from a basic building block module to a multimodule,
multirack configuration.
As Figure 4-1 shows, a base module (also known as the SGI 2200 server) supports 1 to 8
processors. To go beyond eight processors, a rackmount system is needed. Figure 4-2
shows a configurations with more than 16 processors or 8 Node boards requiring at least
two rack systems. Larger configurations with 32 processors or 16 Node boards require
four racks. The largest configurations (SGI 2800 systems) with greater than 64 processors
not only require even more racks, but also a different type of Router hardware called a
metarouter or Cray Router (see Figure 4-2). For additional information on routers, see
Chapter 2, “Chassis Tour.”
44
Basic System Configurations
Number of
Node Boards
Schematic
Router Board
Types
Configuration
1 Node Board
(up to 2 processors)
64-bit Processor
64-bit Processor
2 Node Boards
(up to 4 processors)
N
N
N
None
N
NR
N
N
R
SR
Null Router
Board
3 Node Boards
(up to 6 processors)
Router Board
Star Router
Board
IR1 Jumper
IR1 Jumper
N
N
N
R
SR
4 Node Boards
(up to 8 processors)
Router Board
Star Router
Board
N
IR1 Jumper
IR1 Jumper
N
N
N
R
R
N
N
R
R
N
N
N
8 Node Boards
Rackmount System
(up to 16 processors)
Router Board
Router Board
Router Board
Router Board
With Xpress Links
N = Node Board
Figure 4-1
NR = Null Router Board
SR = Star Router Board
R = Router Board
Basic Module Configurations
45
Chapter 4: System Configurations
Number of
Node Boards
Schematic
Configuration
8 Node Boards
(up to 16 processors)
Rack System
R
R
R
R
With Xpress Links
R
R
16 Node Boards
(up to 32 processors)
Multi Rack System
R
R
R
R
R
R
With Xpress Links
R
R
R
R
R
R
R
R
R
R
R
R
R
R
R
Figure 4-2
46
R
32 Node Boards
(up to 64 processors)
Multi Rack System
SGI 2400 Rackmount Configuration Examples
Rackmount Configurations
Rackmount Configurations
Figure 4-3 through Figure 4-5 show different single rackmount SGI 2400 configurations.
The single rackmount systems have either one or two modules. Table 4-1 and Table 4-2
summarize the range of hardware components that can be supported by either a one or
two-module configuration.
Table 4-1
Single Module Chassis Configurations
Hardware Component
Number Range
CPU Node boards
1 to 4
64-bit CPUs
2 to 8
Main memory per Node board
64 MB to 4 GB (using 256 MB memory DIMMs)
Main memory per chassis
64 MB to 16 GB (using four Node boards)
Number of internal SCA drives
1 to 5
Number of usable XIO slots
6 or 12 for a single-module chassis;
Number of Vaults
1 to 4 (one Vault comes standard with the rack).
I/O interfaces
- One (single-ended) SCSI connector
- Two DB-9 RS-232 or RS-422 serial connectors
- Two hardware interrupt lines
- One 10/100Base-T Ethernet connector
47
Chapter 4: System Configurations
Table 4-2
Dual Module Chassis Configuration
Hardware Component
Number Range
CPU Node boards
2 to 8
64-bit CPUs
2 to 16
Main memory per Node board
64 MB to 4 GB (using 256 MB memory DIMMs)
Main memory per chassis
128 MB to 32 GB (using eight Node boards)
Number of internal SCA drives
2 to 10
Number of usable XIO slots
Up to 24 for a dual-module chassis
Number of Origin Vaults
1 only
I/O interfaces
- One to two (single-ended) SCSI connector
- Two or four DB-9 RS-232 or RS-422
serial connectors
- Two or four hardware interrupt lines
- One to two 10/100Base-T Ethernet connector
Figure 4-3 shows a single-module rackmount server system. This configuration can
house up to four Vault drive boxes and two to eight CPUs. If desired, this rack can be
cabled to other racks using the CrayLink Interconnect. This allows the other SGI systems
in the configuration to have high-speed access to those drives.
48
Rackmount Configurations
Drive
enclosure
door
Drive
enclosures
CPU
module
Figure 4-3
Single Server Module in a Rack with Four Vault Drive Boxes
49
Chapter 4: System Configurations
Figure 4-4 shows a 16P (or 16 CPU) rackmount system attached with CrayLink
Interconnect cabling. This configuration requires two Rack Router boards in each
module and supports a maximum of sixteen CPUs. In this system setup, the hardware
resources (such as main memory and disk storage capacity) from one module can be
quickly and efficiently accessed by the other system module.
Note: It is possible to have a 16P configuration without CrayLink Interconnect cabling;
however, the modules cannot share resources or communicate using the fast
1600-MB/sec transmission link. This type of configuration normally uses a different
router board, either a Null Router or Star Router. For more information on the different
types of router boards, see Chapter 2, “Chassis Tour.”
Figure 4-5 shows a 16P configuration using a combination of CrayLink Interconnect
cabling and Xpress links. The Xpress links can effectively double the interconnect
bandwidth within a rack by providing additional 1600-MB/sec routing paths.
50
Rackmount Configurations
Node
boards
Midplane
Router
boards
R1 R2
R3 R4
Figure 4-4
16P SGI 2400 Server
51
Chapter 4: System Configurations
Node
boards
Midplane
Router
boards
R1 R2
Xpress
links
R3 R4
Figure 4-5
16P SGI 2400 Rackmount Server with Xpress Links
Note: Xpress links can double interconnect bandwidth in single rack systems.
52
Multirack Configurations
Multirack Configurations
Sample SGI 2400 or 2800 multirack configurations are shown in Figure 4-6 through
Figure 4-9. These can be large system configurations requiring a significant amount of
floor space, along with special power and cooling considerations. The multirack
configuration can have between 8 and 256 processors, up to 512 GB of main memory, and
up to 192 XIO slots through 16 separate system modules. If you are considering
expanding your current configuration, be sure to consult the Site Preparation Guide for
your system, along with your facilities engineer, a reputable electrician, and your SGI
system support engineer (SSE).
Table 4-3 lists the number of various hardware components that can be supported
through a multirack configuration.
Table 4-3
Multiple-Rack Configurations
Hardware Component
Number Range
Number of racks
2 to 16
CPU Node boards
2 to 64
64-bit CPUs
4 to 256
Main memory per Node board
64 MB to 4 GB (using 256-MB memory DIMMs)
Main memory per chassis
128 MB to 32 GB (using eight Node boards)
Main memory (entire configuration)
128 MB to 512 GB
Number of internal SCA drives
5 to 80
Number of XIO slots
24 to 192
Figure 4-6 and Figure 4-7 show two examples of 32P (or processor) configurations. These
systems require two racks, along with the necessary CrayLink Interconnect cabling. Each
of the racks has two modules, and each module has four Node boards and two Router
boards. This configuration simply doubles the 16P configuration by adding a second
(16P) rack.
53
Chapter 4: System Configurations
Note: It is possible for a configuration to have between 4 and 32 processors. The 16P and
32P configurations are used because they represent the maximum number of processors
for one- or two-rack systems.
The configuration shown in Figure 4-7 uses Xpress links to increase the transmission
throughput between modules and racks. The Xpress links provide additional data
routing, which reduces potential transmission latency.
In Figure 4-7, all the available router ports are used. To go beyond a 32 processor
configuration, the Xpress links must be removed and more CrayLink Interconnect cables
must be installed. Figure 4-8 represents a 64P configuration which is simply a double of
the previous 32P system.
Node
boards
Router
boards
R1 R2
R3 R4
Figure 4-6
54
32P Configuration
R1 R2
R3 R4
Multirack Configurations
Node
boards
Router
boards
R1 R2
R1 R2
R3 R4
R3 R4
Xpress
Links
Figure 4-7
32P with Express Links
55
Chapter 4: System Configurations
This configuration consists of four racks, eight system modules, and 32 Node boards. As
Figure 4-8 shows, all of the available Router ports are now in use. The 64P configuration
is the largest one that can be supported using the Rack Router board. To go beyond 64P,
requires the use of a meta router chassis. With a meta router, configurations of up to 128P
are possible (see Figure 4-9).
Node
boards
Midplane
Router
boards
Figure 4-8
56
64P Configuration
Multirack Configurations
32p
1
5
32p
2
3
6
7
4
8
1
5
2
3
6
7
4
8
1
2 3
4
5
6 7
8
Cray Router
32p
1
5
Figure 4-9
32p
2
6
3
7
4
8
1
5
2
6
3
7
4
8
SGI 2800 128P Configuration
57
Chapter 5
5. System Configuration and Operation
This chapter describes how to configure and operate your system correctly.
Warning: The rackmount system operates on 200-240 VAC. Use extreme caution
when working around this voltage. Never install or remove power cords without first
turning off the equipment.
Caution: The rackmount system can weigh up to 750 pounds when fully configured.
Use at least two people to move the system chassis and take care that the system does not
tip or become unbalanced. Also use at least two people to move the monitors. Be sure to
practice proper lifting techniques.
Customer maintenance is limited to the outside of the chassis, which contains the
peripherals. No user-serviceable parts are found within the chassis.
Note: This product requires the use of external shielded cables in order to maintain
compliance with Part 15 of the FCC rules.
59
Chapter 5: System Configuration and Operation
Connecting Your Terminal
The SGI 2400 or 2800 rackmount server requires a customer-supplied American Standard
Code for Information Interchange (ASCII) terminal. Note the following caution before
attempting to connect your terminal.
Caution: Before plugging the terminal into either a 120 VAC or a 220 VAC outlet, be sure
that the electrical rating on the UL-CSA label is in either the 100 to 120 VAC or the 200 to
240 VAC range, whichever applies.
Note: When using a terminal in locations that do not have either a 120 VAC or a 220 VAC
outlet, contact your SGI system support engineer before plugging in the terminal power
cable. Use only the specified cable to connect the terminal to the system chassis.
The server uses PC-style serial cables. You cannot use older style SGI serial cables. See
“Standard Serial Ports” on page 38 for cable pinout information.
Note: This product requires the use of external shielded cables in order to maintain
compliance with Part 15 of the FCC rules. Serial cables from different vendors are not
compatible. Verify the pinout of your cable before making the connection.
Use the following procedure to connect the ASCII terminal to your system:
1.
Go to the back of the system chassis and verify that the system power switch,
located in the lower right corner, is off (see Figure 5-7 as required).
2. Make sure that the power switch on the terminal is turned off and that the power
cord is not connected to an outlet.
3. Attach the end of the terminal cable with the 25-pin connector to the corresponding
connector at the rear of the terminal.
4. Locate the main module I/O panel at the rear of the chassis.
5. Attach the end of the cable with the 9-pin D-subconnector to the serial connector
labeled “Console Port” on the module I/O panel, as shown in Figure 5-1.
6. Attach the terminal power cord to the rear of the terminal and to the appropriate
power source.
Refer to IRIX Admin: System Configuration and Operation for more information about
configuring your terminal.
60
Connecting Your Terminal
Console
port
Terminal
Figure 5-1
Connecting a Terminal
61
Chapter 5: System Configuration and Operation
SCSI Configuration Requirements
All SGI 2400 and 2800 rackmount systems are configured with one or two internal SCSI
drive bays using single-attachment connector (SCA) drives (see Figure 5-2). These drives
must all be single-ended, Ultra SCSI. These Ultra SCSI drives are capable of transmitting
up to 40 MB/sec. In addition, the rackmount can house from one to four optional drive
box enclosures (Origin Vault) to support other types of drives such as differential or
single-ended SCSI drives (see Chapter 2, “Chassis Tour,” for additional information).
Note: The difference between single-ended and differential SCSI channels is defined as
follows: a single-ended SCSI channel pairs each signal line with a ground line.
Differential SCSI channels pair each signal line with a second signal that is the balanced
inverse of the first. This configuration makes differential SCSI less susceptible to signal
degradation due to noise and more suitable for remote (longer) cabling.
The maximum allowable length for single-ended (standard) SCSI cabling is 19.6 feet
(6 meters). This length reflects the combined lengths of both the internal and the external
cables. The maximum allowable length for differential SCSI is 80 feet (25 meters). As with
the single-ended SCSI, this length is the sum of both the internal and the external cables.
(A wide SCSI bus supports a maximum of sixteen devices, including the M SCSI
controller board. A narrow SCSI bus supports a maximum of eight SCSI devices,
including the controller.)
Note: The most common reasons for SCSI device failure are insufficient noise margins
due to exceeding the maximum cable length, cable impedance mismatches, or a
combination of both. If you are having trouble with certain devices, particularly external
devices, be sure that you have not exceeded the maximum SCSI cable length.
Always use the shortest cable possible. Route external cables away from the potential
damage of foot traffic, cleaning, and so on.
If you have additional questions about SCSI connections and cable lengths, contact your
SGI representative.
Note: To operate multiple external SCSI devices, you must order SCSI XIO boards that
plug into the XIO cardcage.
62
Loading the Single Connector Assembly (SCA) Drives Into the System
Loading the Single Connector Assembly (SCA) Drives Into the System
The SGI 2400 and 2800 use an SCA sled assembly for mounting into the drive bay. Disk
drive modules are aligned vertically at the front of the chassis, as shown in Figure 5-2.
Note that the leftmost disk drive—the system drive—is oriented differently from the
others.
The drive bays in the modules use single-ended, ultra SCSI drives only. The server’s SCSI
drive box enclosure can support other types of drives, depending on how the box is
configured.
To insert a disk module, follow these steps:
1.
If necessary, snap the handle to the open position so that it is centered, as shown in
Figure 5-2.
2. If you are adding a drive, remove the drive filler plate that covers the drive slot you
want to use.
3. Align the new disk module with the drive guide, as shown in Figure 5-2.
4. Gently but firmly slide the disk module on the guides over the pin.
5. When the disk module is all the way in, snap the handle right to the closed position,
as shown in Figure 5-2. In the case of the system disk module, which is upside
down relative to the other drives, snap the handle left.
63
Chapter 5: System Configuration and Operation
Blank
SCA drive
Figure 5-2
64
Installing an SCA Drive
Handle in
closed position
Loading the Single Connector Assembly (SCA) Drives Into the System
The SCSI IDs for the SCA drives are hardwired into the server’s midplane. Figure 5-3
shows the assigned addresses. The internal SCSI bus is also terminated directly on the
midplane.
SCA drive 2
SCSI ID 2
CD-ROM
SCSI ID 6
Figure 5-3
SCA drive 1
SCSI ID 1
SCA drive 4
SCSI ID 4
SCA drive 3
SCSI ID 3
SCA drive 5
SCSI ID 5
SCSI Hardwire Addresses for the SGI 2400 and 2800 Server Module
65
Chapter 5: System Configuration and Operation
Loading the CD-ROM
The CD-ROM installs vertically into the chassis. Follow these instructions to load the
CD-ROM into the drive:
1.
Press the eject button to release the CD-ROM carrier (see Figure 5-4).
2. Hold the CD-ROM diskette by the edges and place it into the holder clips as shown
in Figure 5-4.
3. Insert the CD-ROM carrier into the drive.
66
Loading the CD-ROM
Retainers
Retainers
Figure 5-4
Installing a CD-ROM Into an SGI 2400 or 2800 Chassis
67
Chapter 5: System Configuration and Operation
Connecting Your System to an Ethernet Network
Each server comes with a 100BaseT Ethernet connector on each rack. Some racks may
have two Ethernet connector ports (one on each system module). Follow these
instructions to connect an Ethernet drop to your system.
1.
Locate the Ethernet line, then route it to the rear of the chassis.
2. Plug the cable into the applicable connector (see Figure 5-5).
Figure 5-5
68
Connecting an Ethernet to the System
Initially Powering On the System
Initially Powering On the System
If you are powering on the system for the first time, or if the system is completely shut
down, use these procedures to power on the server.
The multimodule System Controller (MMSC) display can be used to power on and
power off the entire rack configuration after initial power on (see Chapter 7, “Using the
System Controller”).
1.
Verify that the system power switch, located in the lower rear of the system chassis,
is turned off.
2. Insert the PDU system power cable into the 200-240 VAC wall receptacle (see
Figure 5-6).
Warning: The SGI 2400 and 2800 rackmount systems operate on 200-240 VAC.
Use extreme caution when working around this voltage. Never install or remove
power cords without first turning off the equipment.
3. Connect the power cord(s) of the system module(s) into either of the top two
(20-amp) receptacles of the PDU (see Figure 5-6).
Caution: The system modules must be plugged into the PDU that is supplied with
the rack. Do not use a power source outside of the chassis. The CrayLink Interconnect
cabling scheme requires that the system modules share a common AC ground. This
helps prevent damage to internal hardware components.
4. Connect the MMSC power cord to the PDU.
5. If the monitors and peripherals are equipped with voltage select switches, verify
that they are set for the appropriate AC voltage.
6. Connect the power cords from the monitor(s) and additional peripherals to the
appropriate three-pronged grounded outlets.
7. Turn on the system power switch (see Figure 5-7).
8. Turn on the system modules (see Figure 5-8).
9. Turn on the monitors, followed by any attached peripherals.
Note: All internal storage devices are automatically powered on by the System
Controller.
10. Boot the system as described in “Booting Your System” on page 73.
69
Chapter 5: System Configuration and Operation
PDU power cable plug
220 Volt
power source
Figure 5-6
70
Connecting the System Power Cable
Initially Powering On the System
PDU power
switch
PDU off
PDU on
Figure 5-7
Turning On the PDU
71
Chapter 5: System Configuration and Operation
Module power switch
ON
Figure 5-8
72
OFF
Powering On the System (Rear View of Chassis)
Booting Your System
Booting Your System
Boot your system by performing the following steps:
1.
Power on the system, as described in the preceding section, “Powering On the
System.”
2. Go the front the chassis module and insert the system key into the key switch,
located to the right of the module System Controller’s (MSC) display. Turn the key
switch to the On position (see Figure 5-9).
Note: The MSC begins the power-on sequence. The green power-on LED, located
above the function buttons, lights to indicate that power has been applied to the
system midplane. The amber fault LED then lights to indicate that power has been
supplied to the MSC. The fault LED goes out when the MSC has successfully
initialized and the power-on tests have completed.
3. Repeat this process with additional modules as required.
73
Chapter 5: System Configuration and Operation
Module
NMI
switch
Module
reset switch
Fan hi-speed
indicator
LED
AC OK LED
DC OK LED
Ambient
overtemperature
LED
8-digit
LED display
Security
key switch
8-pin mini DIN
diagnostic
port
ic
Diagnost
Port
Standby
On
Diagnostic
Figure 5-9
74
Entry-Level System Controller Key Positions
Booting Your System
The system’s progress can be monitored on the MSC’s display. As the module
powering on, you should see the messages similar to the following:
POWER ON
VERS x.xx (PROM version number)
MOD (module number, such as MOD 1, etc)
Note: Do not press any of the front panel buttons while the system is booting.
Pressing the buttons during this process will abort the boot arbitration sequence.
When the power-on tests have completed, you will see this message on the system
console:
Starting up the system...
To perform System Maintenance instead, press Esc.
4. To reconfigure your system or to list your system’s hardware, press Esc within five
seconds.
Note: If you do not press Esc within five seconds, the system boot and display the
login prompt. If this happens, login, shut down the system using the “System
Shutdown” command from the System Maintenance menu, and then restart it when
prompted.
When the System Maintenance menu appears, type 5 to select “Enter Command
Monitor.”
5. When the >> prompt appears, type hinv then press Enter to display the hardware
inventory of your system.
Note: See the IRIX Admin: System Configuration and Operation manual for information
on reconfiguring your system.
6. Quit the Command Monitor by typing exit at the >> prompt.
7. The System Maintenance menu reappears. Type 1 to select the “Start System”
command. The system boots and displays the login prompt.
75
Chapter 5: System Configuration and Operation
Installing the Operating System
The basic IRIX operating system is factory installed on your system disk. No software
installation is required. If additional software is desired, it must be downloaded either
locally (using a CD-ROM drive) or remotely over the network. See the IRIX Admin: Disks
and Filesystems manual for additional information about mounting and configuring
drives. Refer to the IRIX Admin: Software Installation and Licensing manual for the detailed
steps required to download the software.
Note: A copy of the IRIX operating system is supplied with the system on a compact
disc. Place the CD in a secure place in case you need to reinstall the operating system.
Powering Off the System
The system should be powered off only for routine maintenance or repair. You can power
your rack system off in a number of ways.
•
Bring the system down from a shell.
–
Become superuser by typing /bin/su and pressing Enter.
–
Enter your superuser password, if prompted.
–
When you see the superuser prompt (#), type /etc/shutdown and press Enter.
–
A message similar to the following appears on the screen:
Okay to power off the system now.
Press any key to restart.
•
Use the (MMSC) display to shutdown the rack (see Chapter 7, “Using the System
Controller”).
Turn off the power switches for the system and the peripherals in the following order:
76
•
printer (if installed)
•
terminals
•
system modules
•
rack PDU
Resetting Your System
Resetting Your System
You can reset the system using the MMSC display (see Chapter 7, “Using the System
Controller”).
You can also reset your individual system modules by turning the key switch on the
System Controller to the Diagnostics position. Use the scroll buttons to bring up the Reset
menu. Press the Menu button to activate the menu, then press the Execute button to reset
the system. If the system is completely unresponsive, use only the Reset function, not the
main power switch, to reboot your system. If your system responds to input, use the
shutdown option in the System Maintenance menu or the halt command.
77
Chapter 6
6. Removing and Replacing Customer-Replaceable Units
This chapter describes the installation and removal procedures for customer-replaceable
units (CRUs) in the SGI 2400 and 2800 rackmount systems. The CRUs are hardware
components that can be safely removed by an end user without undue exposure to high
electrical power potentials. CRUs are limited to the following major components (see
Figure 6-1):
•
drive modules
•
module System Controller (MSC)
Warning: Do not attempt to remove or replace hardware components (such as
boards) that are not listed above. This system uses internal electrical power that is
hazardous if the equipment is improperly disassembled. Failure to heed this warning
may not only void the system warranty but could cause personal injury.
79
Chapter 6: Removing and Replacing Customer-Replaceable Units
System disk
Optional drives
System
controller
CD-ROM
Blank drive panels
Facade
Cable bail
Figure 6-1
80
Customer-Replaceable Units (CRUs) for the SGI 2400 or 2800 Server
General Information
General Information
Read the following subsections for additional safety information and required tools.
Safety Information
Before beginning the replacement procedures, observe these precautions.
Warning: This equipment uses electrical power internally that is hazardous if the
equipment is improperly disassembled. Board removal and replacement should be
performed only by SGI-certified personnel.
Caution: Do not attempt to move CrayLink Interconnect cables. These cables are made
of sensitive copper strands and insulation material that can be damaged if they are
excessively bent, stretched, or stepped on.
This equipment is extremely sensitive and susceptible to damage by electrostatic
discharge (ESD) which is caused by the buildup of electrical static potential on clothing
and other materials. Use proper ESD preventive measures and observe these
precautions:
•
Wear a properly grounded wrist strap when connecting and disconnecting
peripherals.
•
Be sure that you and all the electrical equipment you handle are at ground potential
to avoid damage from ESD. Do not rely on the power source ground; the ground is
lost when the system is disconnected from the power source.
•
Keep boards in their antistatic bags until you are properly grounded to the chassis
ground with a ground strap.
•
Do not use an ohmmeter or a digital voltmeter on a board.
81
Chapter 6: Removing and Replacing Customer-Replaceable Units
General Procedures
This section describes related activities that are common to most CRU installation and
removal procedures for the SGI 2400 and 2800 rackmount chassis.
Powering Off a Rackmount System
You can either power off an individual module or power off the entire rack configuration
using the multimodule System Controller (MMSC). If you power off an individual
module, the other module(s) in the configuration can still operate fully.
Powering Off an Individual Module System
Use these procedures to power off a module in a rack:
1.
Ensure and verify that the desired file systems are backed up and make sure that all
users are off the target system.
2. Become superuser, then shut down the system software as follows:
# shutdown -y g0
3. Turn the module controller key switch to the Standby position (see Figure 6-2).
82
General Procedures
Security key switch
Standby (Off)
Figure 6-2
Turning Off the Module Controller
Caution: The “Standby” mode does not turn power completely off to the module.
Voltage is still present in the system.
4. Power off the module. The switch is located in the rear of the chassis, near the
AC power cord receptacle (see Figure 6-3). Disconnect the system from the power
source.
83
Chapter 6: Removing and Replacing Customer-Replaceable Units
Module power switch
ON
Figure 6-3
84
Powering Off a Rackmount Module
OFF
General Procedures
Powering Off a Single Rack Configuration
Use these procedures to power off a single-rack system.
1.
Power off the individual system modules, see “Powering Off an Individual Module
System” on page 82.
2. Power off the MMSC display (see Chapter 7, “Using the System Controller” for
additional information).
Display panel
Menu/Cancel
Focus
A
c
t
i
v
i
t
y
1.0
100
75
50
25
0
Action
Power Up Irix
Power Down
Power Cycle
NMI
Reset
0
View
OS View
Configure
1 2 3 4 5 6 7
Processors
user system intr io graphics
Current target module all
Cursor placement
Execute
Figure 6-4
Powering Off the Multimodule Controller
3. Turn off power to the power distribution unit (PDU), see Figure 6-5.
85
Chapter 6: Removing and Replacing Customer-Replaceable Units
Powering Off a Multi-Module Rack Configuration
See Chapter 7, “Using the System Controller” then use these procedures to completely
power down an entire multi-rack configuration.
1.
Power down the individual system modules (see “Powering Off an Individual
Module System” on page 82).
2. Power off the individual racks. It is recommended that you start from the rightmost
rack and then continue with the rack to the left. This helps ensure a cleaner and
more efficient shutdown process.
3. Turn off the rack with the MMSC last (see Figure 6-6).
4. Turn off the PDU on the last rack (see Figure 6-5).
86
General Procedures
PDU power
switch
PDU off
PDU on
Figure 6-5
Turning Off the PDU
87
Chapter 6: Removing and Replacing Customer-Replaceable Units
Turn off the rack
with the multi-module
display LAST!!!!
Figure 6-6
88
Turning Off a Multirack Configuration
General Procedures
Opening the Drive Door
Use these procedures to open the drive door on a rackmount system:
1.
Swing open the drive door as shown in Figure 6-7. When closing the door, push it
all the way in to engage the plastic tab on the bottom of the door.
Note: The door should normally be in the closed position to help keep out dust and
other possible contaminants from the drives and MSC.
Figure 6-7
Opening the Drive Front Door on a Rackmount System
89
Chapter 6: Removing and Replacing Customer-Replaceable Units
Opening the Cable Cover Door
The cable cover door (see Figure 6-8) provides aesthetic shielding for the CrayLink
Interconnect cabling on the rackmount chassis and between side-by-side rackmount
systems.
Cable cover door for
Craylink Interconnect
Figure 6-8
90
Opening the Cable Cover Door
Specific Procedures
Specific Procedures
The following section provides instructions for replacing the customer-replaceable units
(CRUs). To replace a CRU, use Figure 6-1 to identify the appropriate unit and its position
in the chassis. Then proceed to the appropriate section and perform the steps.
Removing a Drive Module
Disk drive modules are aligned vertically at the front of the chassis. Note that the
leftmost disk drive—the system drive—is oriented differently from the others as shown
in Figure 6-9.
91
Chapter 6: Removing and Replacing Customer-Replaceable Units
Optional Disk
Handle in
closed position
Handle in
open position
System Disk
Handle in
closed position
Handle in
open position
Figure 6-9
1.
Opening the Disk Drive Unit Module
Ensure that the system is powered off and unplugged.
2. To remove a disk drive module, snap the handle to the right or left (depending on
the drive orientation) to the open position. The handle is centered, as shown in
Figure 6-9.
3. Pull the disk straight out (see Figure 6-10).
92
Specific Procedures
Handle in
closed position
Figure 6-10
Handle in
open position
Removing the Drive
93
Chapter 6: Removing and Replacing Customer-Replaceable Units
To insert a disk module, follow these steps:
1.
Ensure that the system is powered off and unplugged.
2. If necessary, snap the handle to the open position so that it is centered, as shown in
Figure 6-10.
3. If you are adding a drive, remove the drive filler plate that covers the drive slot you
want to use.
4. Align the new disk module with the drive guide, as shown in Figure 6-9.
5. Gently but firmly slide the disk module on the guides over the pin. When the disk
module is all the way in, it snaps.
6. When the disk module is in all the way, snap the handle right to the closed position,
as shown in Figure 6-10. In the case of the system disk module, which is upside
down relative to the other drives, snap the handle left.
7. Use the packaging for the new disk module to repackage the old disk module.
Removing the Facade
The facade must be taken off before you can remove the System Controller and CD-ROM
assembly. Use these procedures to remove the facade:
1.
Lift off the cable bales that hold the CrayLink and Xpress link cables in place.
2. Remove the CrayLink Interconnect and Xpress link cables from the Rack Router
board ports (as required).
Caution: Be sure that the connectors are labeled before you remove them, so that
you know where to replug them afterwards.
3. Remove the screw that secure the facade to the chassis (see Figure 6-11).
4. Lift up to disengage the facade from the chassis; then pull it straight out.
5. Reverse these steps to install the facade.
94
Specific Procedures
9/64
Allen
head
screw
Figure 6-11
Fau
lt
1.7
VDC
2.4
VDC
3.3
VDC
Fau
lt
Link
1.7
Stat
VDC
2.4
VDC
3.3
VDC
us
1
2
3
Link
Stat
us
1
2
4
5
3
6
Connec
4
Actuatiotor
7-64
5
n
Hex
6
Connec
Actuatiotor
7-64
n
Hex
Removing the Facade from a System Module
95
Chapter 6: Removing and Replacing Customer-Replaceable Units
Removing the System Controller and CD-ROM Module
The System Controller and CD-ROM drive are packaged together in one assembly. To
replace either component, you must remove and insert an entire new assembly.
Caution: Do not attempt to remove the MMSC and display. This procedure should only
be performed by Silicon Graphics-certified personnel.
1.
Power off the system (see “Powering Off a Rackmount System” on page 82).
2. Remove the facade (see “Removing the Facade” on page 94).
3. Remove and reserve the screws that hold the assembly in place, as shown in
Figure 6-12.
4. Insert the new assembly, using the reserved screws.
5. Repackage the old assembly.
96
Specific Procedures
Figure 6-12
Removing the System Controller and CD-ROM
97
Chapter 6: Removing and Replacing Customer-Replaceable Units
XIO Board Slots
Each system comes with a mimimum of 12 XIO board slots. Various types of optional
interface boards are supported in the XIO slots. These may include
•
peripheral component interface (PCI)
•
high-performance parallel interface (HIPPI)
•
Fibre Channel
•
ATM
There are certain installation restrictions that must be followed when XIO boards are
installed or removed. Failure to follow these configuration rules may result in system or
peripheral malfunction.
Always
•
Keep the BaseIO (IO6S or IO6G) board installed in XIO slot 1
•
Fill the top XIO slots first (XIO slots 3 and 5 should be filled first)
•
Have the PCI module installed in XIO slot 2
Never
98
•
Move the BaseIO (IO6S or IO6G) board to a slot other than XIO 1
•
Have a SCSI board installed in XIO slot 2
•
Have an XIO board installed in an unsupported slot (see “Board Configuration and
Layout” on page 20)
Chapter 7
7. Using the System Controller
This chapter describes how to use the two system controller types in a rackmount system.
•
multimodule System Controller (MMSC) and display
•
module System Controller (MSC) and display
The MMSC in a rackmount system is an intelligent communcations device that can
monitor one or more system “modules” within a rack.
The MSC in a deskside system or a rackmounted system “module” is less sophisticated
than the MMSC. Each MSC in a rack reports to and can be controlled by the MMSC.
MMSC
The MMSC subsystem is composed of two main components:
•
the MMSC itself
•
the front display and input panel
•
10BaseT Ethernet hub (only in systems with three or more racks)
99
Chapter 7: Using the System Controller
The MMSC’s front display and input panel interface is only necessary in the primary rack
of a fabric-interconnected multiple-rack system.
A MMSC must be installed in each rack in a fabric-interconnected multiple-rack system.
Figure 7-1 shows a functional block diagram of the MMSC.
Power Control Infrastructure
Power Control Interface
Display panel
Processor
RAM
ROM
(Bootstrap)
Menu/Cancel
Focus
A
c
t
i
v
i
t
y
100
75
50
25
0
Action
0
Graph
Irix OS View
Configure
Display/
Input
controller
1 2 3 4 5 6 7
Processors
User System intr io Graphics
0.4.1 Oct 23 1996 14:04:38
MMSC System Bus
MMSC
IO Ports
Current target rack all bay all
MSC A
MSC B
Sys Console-In
Sys Console-Out
Ext. Modem-or-Spare
Spare
Cursor placement
Ethernet
controller
Execute
Figure 7-1
MMSC to MMSC
interface 10Base-T
MMSC Functional Block Diagram
MMSC Front Panel Display
The MMSC assembly in each rack interfaces with the local MSC RS-232 interface on each
system installed in that rack (see Figure 7-2). The “satellite” processor assembly(s)
interfaces to the master MMSC (with the front panel display). The processor assemblies
in multirack configurations communicate directly via a 10BaseT Ethernet connection.
This scheme provides access to every MMSC and MSC in a fabric-interconnected
multirack system.
Note that the MMSC Ethernet is a closed Ethernet system used by the MMSCs only.
100
MMSC
Multimodule
controller
To other
Multimodule
controllers
Multimodule
controller
display
Figure 7-2
MMSC and Front Panel
101
Chapter 7: Using the System Controller
The front display and input panel mounts on a cross section piece above the lower front
air intake baffle (see Figure 7-3). The front display panel’s color TFT (thin film transisitor)
screen measures approximately 4 inches high and 5-1/2 inches wide (10.2 cm x 14 cm).
The panel’s input device consists of six push button switches:
•
one to control menu selection
•
one to execute selections
•
four to position the cursor (up, down, right, and left)
Display panel
Menu/Cancel
Focus
A
c
t
i
v
i
t
y
1.0
100
75
50
25
0
Action
Power Up Irix
Power Down
Power Cycle
NMI
Reset
0
View
OS View
Configure
1 2 3 4 5 6 7
Processors
user system intr io graphics
Current target module all
Cursor placement
Execute
Figure 7-3
MMSC Display
With these buttons you can navigate and execute menu options listed on the display.
Communication between multiple fabric-linked rack systems is accomplished with a
10BaseT Ethernet connection. This allows you to communicate with and control system
modules (via their MSC) in other racks from a single location.
Caution: The front panel display provides a convenient method to power on, shutdown,
reset, and to issue a nonmaskable interrupt (NMI) to the entire rack configuration. Use
extreme care when issuing these commands from the display. Make sure that all affected
users are notified before a system-wide command is executed.
102
MMSC
Powering On a Rack
Follow these instructions to power on an entire rack configuration through the MMSC
display.
1.
Select the “Focus” menu on the display using the direction keys, then press the
Enter key.
Make sure that the “Al” option is highlighted
2. Go to the “Action” menu on the display using the direction keys (see Figure 7-4).
3. Select the “Power Up” option and press the Enter key.
Focus
Action
View
Configure
Power Up
Power Down
Power Cycle
NMI
Reset
1.0
Figure 7-4
Current target module all
Action Menu Selection for MMSC Display
103
Chapter 7: Using the System Controller
Resetting the Rack System
Follow these instructions to reset an entire rack configuration through the MMSC
display.
1.
Select the “Focus” menu on the display using the direction keys, then press the
Enter key.
Make sure that the “All” option is highlighted
2. Go to the “Action” menu on the display using the direction keys (see Figure 7-4).
3. Select the “Reset” option and press the Enter key.
Powering Down the Rack
Follow these instructions to power down an entire rack configuration through the
MMSC display.
1.
Select the “Focus” menu on the display using the direction keys, then press the
Enter key.
Make sure that the “All” option is highlighted
2. Go to the “Action” menu on the display using the direction keys (see Figure 7-4).
3. Select the “Power Down” option and press the Enter key.
MMSC Assembly
The MMSC mounts internally in the rack without removing any boards in the system.
Figure 7-5, Figure 7-6, and Figure 7-7 show MMSC cabling configuration examples.
Figure 7-8 shows the location of the MMSC in relation to other components in the rack
system. The processor assembly can interconnect directly to:
104
•
the RS-232 System Controller interface on the back of each system module installed
in the rack
•
the front display and input panel
•
additional MMSCs in adjacent racks via 10BaseT Ethernet
MMSC
UPPER BAY
CONSOLE
ALTERNATE CONSOLE
LOWER BAY
BASE I/O TTY1
TEST
Multimodule system
controller (MMSC)
UPPER BAY
BASE I/O TTY1
Alternate console
IO3
IO4
LOWER BAY
IO5
IO6
IO7
IO8
IO9
IO1
0
IO1
IO11
2
Console
Figure 7-5
MMSC Cabling
105
Chapter 7: Using the System Controller
Multimodule
System
Controller
Multimodule
System
Controller
Top view
Special "null," "jumper," or "patch" 10baseT cable (018-0625-001)
Figure 7-6
106
MMSC to MMSC 10BaseT Ethernet Cabling (2 racks)
MMSC
Multimodule
System
Controller
10BaseT Hub
Multimodule
System
Controller
Multimodule
System
Controller
Top view
Standard 10BaseT cable (018-0700-001)
Figure 7-7
MMSC to 10BaseT-Hub 1BaseT Ethernet Cabling (2 racks)
107
Chapter 7: Using the System Controller
The MMSC interfaces listed above are augmented by system console in-and-out RS-232
connectors and a modem connector. Note that when the MMSC is connected to the
RS-232 interface on a system mounted in the rack, you may not use the eight-pin DIN
connector on the front of a system module’s MSC.
Multimodule
System
Controller
Figure 7-8
108
Processor Assembly Location in Rack
MSC Front Panel
MSC Front Panel
The MSC front panel is shown in Figure 7-9.
Module
NMI
switch
Module
reset switch
Fan hi-speed
indicator
LED
AC OK LED
DC OK LED
Ambient
overtemperature
LED
8-digit
LED display
Security
key switch
8-pin mini DIN
diagnostic
port
ic
Diagnost
Port
Standby
On
Diagnostic
Figure 7-9
MSC Status Panel, Serial Connector, and Switches
109
Chapter 7: Using the System Controller
The MSC provides environmental monitoring for safe operation of the deskside system.
The MSC connects to the system midplane via a transition or “bridge” board and
provides easy user access to switches and displays at the front of the deskside system.
In the lower right section on the back of the deskside system is a DB-9 alternate console
diagnostic port serial connector that is a direct mirror of the 8-pin diagnostic connector
on the front panel. Figure 7-10 shows the location and pinouts of the 9-pin rear-mounted
MSC diagnostic connector.
Note: You may not connect serial devices to both the front MSC diagnostic port and rear
MSC diagnostic serial connector at the same time. The connectors are wired through the
same circuitry and cannot accept or send signals through both ports at the same time.
110
MSC Front Panel
System Controller
serial port
System Controller
Serial Port (DB-9)
Pin 1 Ground
Pin 6 Not Used
Pin 2 Data Terminal Ready (DTR)
Pin 7 Request to Send (RTS)
Pin 3 Transmit Data (TXD)
Pin 8 Clear to Send (CTS)
Pin 4 Request Data (RXD)
Pin 9 Not Used
Pin 5 Data Carrier Detect (DCD)
Figure 7-10
System Controller Rear Serial Connector
111
Chapter 7: Using the System Controller
Understanding the MSC LEDs and Switches
The System Controller has one keyswitch, two push buttons, and four LED indicators.
The following paragraphs provide information on the use or significance of each control
or indicator.
The Front Panel Keyswitch selects Standby, On, or Diagnostic status for the system.
The System Reset push button initiates a system-wide reset of the deskside. The
keyswitch must be in the diagnostic position to use this button.
The Non-Maskable Interrupt (NMI) switch issues a reset signal to all Node boards in the
system. The keyswitch must be in the diagnostic position to use this button.
The AC Power OK green LED lights when the system is plugged into an outlet and the AC
circuit breaker is turned on. The Controller is receiving DC voltage (V_5 Aux) through
the midplane, as are other boards that require it.
The DC Power OK green LED lights three and one-half seconds after the keyswitch is
turned to the On position. This indicates the system power supply is enabled and
operating properly.
The Fan Speed High amber warning LED lights when the fans are running at high speed,
which may be an indication that ambient temperature is higher than optimal or a
non-critical fan has failed. When a non-critical fan fails, the remaining fans are set at full
speed to compensate. In this case, a service call should be placed immediately.
The Over Temperature Fault amber warning LED lights when the controller’s incoming
air temperature or fan failure detection causes a shutdown of the system. If the
environmental temperature exceeds the system’s tolerance, or if a critical fan fails, the
controller shuts down the system. In some cases, a service call should be placed
immediately. See the section “MSC Shutdown” in Chapter 8 for tips on how to
troubleshoot this problem area.
112
MSC Features and Functions
MSC Features and Functions
The MSC has the following basic features and functions:
•
Issues a reset signal at power-on.
•
A front panel-mounted keyswitch provides a soft power-off to standby condition.
•
A front panel-mounted push-button system reset switch.
•
A front panel-mounted push-button non-maskable interrupt (NMI) switch.
•
Monitors ambient incoming air temperature into the system and adjusts fan speed
accordingly (two speeds). A soft power-off of the system results when ambient
temperature becomes too high for safe operation.
•
LED display of ambient over-temperature conditions.
•
NVRAM for storing configuration information (1024 x 8 bits).
•
Monitors fan rotation and automatically increases to high speed fan operation when
a fan fails. Signals an impending shutdown when a single critical fan fails, or two or
more non-critical fans fail.
•
LED display of high fan speed and possible fan tray failure (fan high-speed LED).
•
LED display of power supply operation. AC OK LED indicates AC voltage applied
to system. DC OK indicates all power supply DC voltages (+12 V, +5 V, +3.45 V),
and remote DC voltages (3.3 V, 2.4 V, 1.6 V) are present with no error conditions in
the system. The DC OK LED does not indicate regulation or accuracy of the DC
voltages present.
•
Provides a 100-Kbps bidirectional communication path between the MSC,
mid-plane, and Hub ASIC IO space on each Node board in the system. This
communication path allows the MSC to receive system status messages from all
Node boards in a system, and to provide status messages from the MSC and all
Node boards in a system. This communication path is referred to as the I2C
interface.
113
Chapter 7: Using the System Controller
114
•
Provides ability to request the system serial number and configuration information
via the I2C Interface.
•
Eight-digit alphanumeric status display. This display is updated by the System
Controller or the Node cards in the system via the I2C interface.
•
Provides a seven-wire 9600 bps alternate console diagnostic port for off-line
configuration and troubleshooting. Also communicates with the Node board(s)
when the IO console port or a system console is not available or functional. This
interface also supports the minimum requirements for modem support.
•
Software Reset, NMI, and soft power-off commands through the alternate console
diagnostic port.
•
Supports alternate console diagnostic port command line power supply voltage
margining. Margining allows the 3.45-V or 5-V outputs of the power supply to be
moved 5% higher or lower independently. This does not effect remote regulated
termination voltages (1.6 V, 2.4 V, router 3.3 V).
•
Supports alternate console diagnostic port command-line regulated termination
voltage margining for the termination voltages 1.6 V, 2.4 V, and 3.3 V, (all
termination voltages will be margined 5% higher or lower together, not
independently). This does not affect the power supply voltages.
•
Sends early warning high priority interrupt (Panic Interrupt) to all Node boards
warning of impending shutdown due to AC power fail, ambient over-temperature
or the switch being placed in the standby position.
•
Provides an interlock (removable keyswitch) to prevent unauthorized personnel
from turning the system to on or standby, and to limit operation of the System Reset
and NMI functions. The software password allows access and permissions through
the alternate diagnostic console port.
MSC Status Messages
MSC Status Messages
The MSC front panel has an eight-character LED readout that supplies information about
system status. Table 7-1 gives a list of MSC messages and an explanation of what the
impacts may be.
Table 7-1
System Controller Messages
Message
Meaning of Message
SYS OK
The system is operating normally.
R PWR UP
The system is being powered on remotely via the MSC serial
connection.
POWER UP
The system is being powered on from the front panel switch.
PFW FAIL
The power supplied to the system has failed or dropped below
acceptable parameters. The system has shut down.
PS OT FL
The system’s power supply temperature has exceeded safety
limits and the system has shut down.
PS FAIL
The internal power supply has failed and the system has shut
down.
OVR TEMP
The system’s temperature has exceeded acceptable limits and
the system has shut down.
KEY OFF
The MSCs switch has been turned to standby.
RESET
The MSC’s switch has been turned to the diagnostic position,
and the reset has been button pushed.
NMI
The MSC’s switch has been turned to the diagnostic position,
and the non-maskable interrupt (NMI) button pushed.
M FAN FL
More than one fan has failed and the system has shut down.
R PWR DN
The system has been powered off from a remote location.
PWR CYCL
The system has received the command to power cycle from the
console or a remote user.
HBT TO
The system has registered a heart beat time-out. A
non-maskable interrupt is generated, followed by a system
reset.
115
Chapter 7: Using the System Controller
Table 7-1 (continued)
116
System Controller Messages
Message
Meaning of Message
FAN FAIL
A system fan has failed. If it is fan 1, 2, or 3, the system shuts
down. A service call should be placed as soon as possible.
POK FAIL
A power OK failure occurred on an unidentified board.
Chapter 8
8. System Maintenance and Troubleshooting
This chapter contains hardware-specific information that can be helpful if you are having
trouble with your SGI 2400 or 2800 rackmount server.
Maintaining Your Hardware and Software
This section gives you some basic guidelines to follow to keep your hardware and
software in good working order.
Hardware Dos and Don’ts
To keep your system in good running order, follow these guidelines:
•
Do not enclose the system in a small, poorly ventilated area (such as a closet), crowd
other large objects around it, or drape anything (such as a jacket or blanket) over it.
•
Do not place terminals on top of the system chassis.
•
Do not connect cables or add other hardware components while the system is
turned on.
•
Do not power off the system frequently; leave it running overnight and on
weekends, if possible.
•
Do not leave the key switch in the Diagnostics position.
•
Do not place liquids, food, or heavy objects on the system, terminal, or keyboard.
•
Ensure that all cables are plugged in completely.
•
Ensure that the system has power surge protection.
•
Route all external cables away from foot traffic.
117
Chapter 8: System Maintenance and Troubleshooting
Software Dos and Don’ts
When your system is up and running, follow these guidelines:
•
Do not turn off power to a system that is currently running software.
•
Do not use the root account unless you are performing administrative tasks.
•
Make regular backups (weekly for the whole system, nightly for individual users)
of all information.
•
Protect all accounts with a password. Refer to the IRIX Admin: Backup, Security, and
Accounting Manual for information about installing a root password.
System Problem Catagories
The behavior of a system that is not working correctly falls into three broad categories:
Operational
You are able to log in to the system, but it does not respond as usual.
Marginal
You are not able to start up the system fully, but you can reach the
System Maintenance menu or PROM monitor.
Faulty
You cannot reach the System Maintenance menu or PROM monitor.
If the behavior of your system is operational or marginal, first check for error messages
on the MSC display, then perform a physical inspection using the checklist in the
following section. If all the connections seem solid, restart the system. If the problem
persists, run the diagnostic tests from the System Maintenance menu or PROM Monitor.
See your IRIX Admin: System Configuration and Operation manual for more information
about diagnostic tests.
If your system is faulty, turn the power to the main unit off and on. If this does not help,
contact your system administrator.
XIO Board Slots Not Functioning
If not all the XIO board slots are functioning, verify your system module has the required
number of CPU Node boards and that the boards are installed in the appropriate slot. See
Chapter 2, “Chassis Tour” for additional information
118
Physical Inspection Checklist
Physical Inspection Checklist
Check every item on this list:
•
Make sure the terminal and main unit power switches are turned on.
•
If the system has power, check the System Controller display for any messages, then
reset the system.
Before you continue, shut down the system and turn off the power.
Verify these connections:
•
The terminal cable is connected securely to the rear of the terminal and to the
appropriate connector on the BaseIO panel.
•
The terminal power cable is securely connected to the terminal at one end and to the
power source at the other end.
•
The keyboard cable is securely connected to the keyboard at one end and to the
terminal at the other end.
•
The system power cable is securely installed in the receptacle in the system chassis
and in the proper AC outlet.
•
The network cable is connected to the appropriate port and that the key or lock used
to secure the network connection is engaged.
•
Serial port cables are securely installed in their corresponding connectors.
When you finish checking the hardware connections, turn on the power to the main unit
and then to the terminal; then reboot the system. If your system continues to fail, restore
the system software and files using the procedures described in the IRIX Admin: Backup,
Security, and Accounting manual. If the system fails to respond at all, call your service
organization.
119
Chapter 8: System Maintenance and Troubleshooting
MSC Shutdown
Under specific circumstances, the MSC may shut down the system. Usually this occurs
when the operating environment becomes too warm because of fan failure, high ambient
temperatures, or a combination of the two.
The System Controller will automatically shut down the system and light the “Over
Temperature Fault” LED if any of the following situations occur:
•
failure of two or more of the system’s nine fans
•
failure of one fan plus a high ambient temperature
•
failure of any (critical) fan directly responsible for cooling the power supply or a
router board
•
an unacceptably high ambient temperature
Only the last situation can be dealt with completely by the end user. The first three
require a service call by a qualified support technician.
Fixing the MSC Shutdown
If you determine that a critical fan or fans have failed, you should immediately place a
service call. The system is not usable until the faulty fan(s) are replaced.
If the problem involves the combined failure of a single noncritical fan and a high
ambient temperature, you should place a service call. You may be able to keep the system
running by lowering the ambient temperature of the operating environment while
waiting for service.
You could
•
lower the air conditioning temperature
•
move the system to a cooler environment
•
use a portable fan(s) to circulate more air around the system
•
use a portable air-conditioner to lower the temperature of the system
If the problem is simply a high ambient temperature, you will need to either lower the
work environment temperature or move the system to an area with a lower ambient
temperature.
120
Recovering from a System Crash
Recovering from a System Crash
Your system might have crashed if it fails to boot or respond normally to input devices
such as the keyboard. The most common form of system crash is terminal lockup—a
situation where your system fails to accept any commands from the keyboard.
Sometimes when a system crashes, data may be damaged or lost.
Using the methods described in the following paragraphs, you can fix most problems
that occur when a system crashes. You can prevent additional problems by recovering
your system properly after a crash.
The following list presents a number of ways to recover your system from a crash. The
simplest method, rebooting the system, is presented first. If it fails, go on to the next
method, and so on. Here is an overview of the different crash recovery methods:
•
rebooting the system
Rebooting usually fixes problems associated with a simple system crash.
•
restoring system software
If you do not find a simple hardware connection problem and you cannot reboot the
system, a system file might be damaged or missing. In this case, you need to copy
system files from the installation tapes to your hard disk. Some site-specific
information might be lost.
•
restoring from backup tapes
If restoring system software fails to recover your system fully, you must restore
from backup tapes. Complete and recent backup tapes contain copies of important
files. Some user- and site-specific information might be lost.
Refer to your IRIX Admin: Backup, Security, and Accounting manual for instructions for
each of the recovery methods listed above.
121
Appendix A
A. System Specifications
Table A-1 and Table A-2 provide technical specifications for the SGI server system.
Table A-1
Physical and Environmental Specifications
Parameter
Specification
Dimensions
Installed:
length
width
height
39” (99 cm)
29” (74 cm)
73” (185 cm)
Shipping:
length
width
height
81” (206 cm)
47” (120 cm)
49” (125 cm)
Weight:
minimum (empty rack)
maximum (full rack)
shipping (maximum)
300 lbs (136 kg)
750 lbs (340 kg)
900 lbs (408 kg)
Floor Loading:
minimum
maximum
38 lb/ft2 (185 kg/m2)
95 lb/ft2 (466 kg/m2)
Air Temperature:
operating (< 5000 ft)
operating (> 5000 ft)
non-operating
41° to 95° F (5° to 35° C)
41° to 86° F (5° to 30° C)
Thermal Gradient:
maximum
18° F (10° C) per hour
Altitude:
operating
non-operating
10,000 ft (3,048 m) MSL, maximum
40,000 ft (12,192 m) MSL, maximum
−4° to 140° F (−20° to 60° C)
123
Appendix A: System Specifications
Table A-2
Electrical and Cooling Specifications
Parameter
Specification
Voltage:
187-264 Volts, 1-phase
Watts
(from-the-wall):
maximum
5750 watts
Power Factor:
minimum
0.98
Inrush Current:
maximum
400
Frequency:
Heat Output:
124
47-63 Hertz
maximum
19,550 Btu/hr (1.63 ton AC load)
Index
A
F
amber warning LED, 112
ambient incoming air, 113
apropos command, xviii
fan failure detection, 112
field replaceable unit
identifying, 91
field replaceable units, 79
C
G
commands
apropos, xviii
grelnotes, xviii
makewhatis, xviii
man, xvii
relnotes, xviii
critical fan, 112
D
DC OK LED, 113
documentation, xvii
available via the World Wide Web, xviii
release notes, xviii
General procedures, 82
grelnotes command, xviii
H
hardware
maintenance of, 117, 118
Help, xvii
I
InSight documentation, xvii
E
L
electrostatic, 81
environmental monitoring, 110
environmental temperature, 112
ESD, 81
LED readout on MSC, 115
125
Index
M
maintenance, 117
makewhatis command, xviii
man command, xvii
messages from System Controller, 115
soft power-off, 113
soft power-off commands, 114
System Controller
front panel, 109
messages, 115
serial connectors, 110
system reset switch, 113
system-wide reset, 112
N
NMI switch, 112
non-critical fan, 112
non-maskable interrupt, 113
O
online documentation, xvii
P
Powering down the system, 82
Power source, disconnecting, 83
R
rear-mounted System Controller connector, 110
release notes, viewing, xviii
relnotes command, xviii
removable keyswitch, 114
RS-232 standard, 38
S
safety information, 81
shielding, 90
126
W
Weight, 123
World Wide Web
documentation available via, xviii
SGI URL (address), xviii