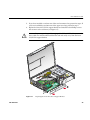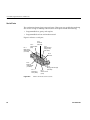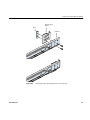
1
Silicon Graphics® Tezro™ Visual Workstation
Hardware User’s Guide:
Rackmount Configuration
007-4643-003
CONTRIBUTORS
Written by Matt Hoy, Francisco Razo, Dick Brownell, and Mark Schwenden
Illustrated by Dan Young
Production by Karen Jacobson
Engineering contributions by Charles Alexander, David Diederichs, Jeff Milo, Dave North, Jim Passint, Paul Pedersen, Keith Rich, Bruce Shifrin,
Gary Spilde, Brian Stickney, and Michael Wright
COPYRIGHT
© 2003-2004 Silicon Graphics, Inc. All rights reserved; provided portions may be copyright in third parties, as indicated elsewhere herein. No
permission is granted to copy, distribute, or create derivative works from the contents of this electronic documentation in any manner, in whole
or in part, without the prior written permission of Silicon Graphics, Inc.
LIMITED RIGHTS LEGEND
The electronic (software) version of this document was developed at private expense; if acquired under an agreement with the USA government
or any contractor thereto, it is acquired as "commercial computer software" subject to the provisions of its applicable license agreement, as
specified in (a) 48 CFR 12.212 of the FAR; or, if acquired for Department of Defense units, (b) 48 CFR 227-7202 of the DoD FAR Supplement; or
sections succeeding thereto. Contractor/manufacturer is Silicon Graphics, Inc., 1500 Crittenden Lane, Mountain View, CA 94043-1351.
TRADEMARKS AND ATTRIBUTIONS
Silicon Graphics, SGI, the SGI logo, IRIX, O2, Octane, Onyx2, and Origin are registered trademarks, and NUMAlink, O2+, Octane2, Stereo View,
Tezro, and VPro are trademarks of Silicon Graphics, Inc., in the United States and/or other countries worldwide. Supportfolio is a trademark
and service mark of Silicon Graphics, Inc., in the United States and/or other countries worldwide.
MIPS is a trademark of MIPS Technologies, Inc., used under license by Silicon Graphics, Inc. Primus is a trademark of Primus Knowledge
Solutions Inc. Spaceball is a trademark of the Logitech group.
For regulatory and compliance information, see Appendix C, “Safety and Regulatory Information.”
Record of Revision
007-4643-003
001
May 2003
Original Publication
002
September 2003
Engineering Revisions
003
March 2004
Engineering Revisions
iii
Contents
Figures .
.
.
.
.
.
.
.
.
.
.
.
.
.
.
.
.
.
.
.
.
.
.
.
.
. xi
Tables .
.
.
.
.
.
.
.
.
.
.
.
.
.
.
.
.
.
.
.
.
.
.
.
.
. xv
.
.
.
.
.
.
.
.
.
.
.
.
.
.
.
.
.
.
.
.
.
.
.
.
.
.
.
.
.
.
.
.
.
.
.
.
.
.
.
.
.
.
.
.
.
.
.
.
.
.
.
.
.
.
.
.
.
.
.
.
.
.
.
.
.
.
.
.
.
.
.
.
.
.
.
.
.
.
.
.
.
.
.
.
.
.
.
.
.
.
.
.
.
.
.
.
.
.
.
.
.
.
.
.
.
.
.
.
.
.
.
.
.
.
.
.
.
.
.
.
.
.
.
.
.
.
xvii
xvii
xviii
. xix
. xx
. xx
About This Guide.
Chapter Descriptions
Related Publications
Conventions . .
Product Support .
Reader Comments .
1.
Installation and Operation Procedures .
Setting Up the Workstation . . . . .
Checking Your Shipment . . . .
Lifting the Workstation . . . . .
Getting Acquainted . . . . . .
Installing the Workstation . . . .
Cabling the Workstation . . . . .
Using the Workstation . . . . . .
Powering On the Workstation . . .
Using the IRIX Interactive Desktop . .
Using the System Manager . . . .
Powering Off the Workstation . . .
Powering Off with the Power Button
Powering Off from the Toolchest .
Restarting from the Toolchest . .
.
.
.
.
.
.
.
.
.
.
.
.
.
.
.
.
.
.
.
.
.
.
.
.
.
.
.
.
.
.
.
.
.
.
.
.
.
.
.
.
.
.
.
.
.
.
.
.
.
.
.
.
.
.
.
.
.
.
.
.
.
.
.
.
.
.
.
.
.
.
.
.
.
.
.
.
.
.
.
.
.
.
.
.
.
.
.
.
.
.
.
.
.
.
.
.
.
.
.
.
.
.
.
.
.
.
.
.
.
.
.
.
.
.
.
.
.
.
.
.
.
.
.
.
.
.
.
.
.
.
.
.
.
.
.
.
.
.
.
.
.
.
.
.
.
.
.
.
.
.
.
.
.
.
.
.
.
.
.
.
.
.
.
.
.
.
.
.
.
.
.
.
.
.
.
.
.
.
.
.
.
.
.
.
.
.
.
.
.
.
.
.
.
.
.
.
.
.
.
.
.
.
.
.
.
.
.
.
.
.
.
.
.
.
.
.
.
.
.
.
.
.
.
.
.
2.
System Overview .
System Features .
.
.
.
.
.
.
.
.
.
.
.
.
.
.
.
.
.
.
.
.
.
.
.
.
.
.
.
.
. 21
. 21
007-4643-003
.
.
.
.
.
.
.
.
.
.
.
.
.
.
1
1
2
2
2
4
5
9
10
11
12
13
14
16
18
v
Contents
3.
vi
System Components . . . . . . . . .
External Components . . . . . . . .
Front Panel Components. . . . . .
Rear Panel Components . . . . . .
Internal Components . . . . . . . .
Processors . . . . . . . . . .
Memory DIMMs . . . . . . . .
IO9 Board . . . . . . . . . .
Internal Hard Disk Drives . . . . .
DVD-ROM Drive . . . . . . . .
VPro™ Graphics Board . . . . . .
PCI Buses . . . . . . . . . .
Power Supply . . . . . . . . .
Optional Components, Peripherals, and Upgrades.
PCI Boards . . . . . . . . . . .
Memory Upgrades. . . . . . . . .
Graphics Options . . . . . . . . .
Storage Options . . . . . . . . .
Displays. . . . . . . . . . . .
Peripherals . . . . . . . . . . .
.
.
.
.
.
.
.
.
.
.
.
.
.
.
.
.
.
.
.
.
.
.
.
.
.
.
.
.
.
.
.
.
.
.
.
.
.
.
.
.
.
.
.
.
.
.
.
.
.
.
.
.
.
.
.
.
.
.
.
.
.
.
.
.
.
.
.
.
.
.
.
.
.
.
.
.
.
.
.
.
.
.
.
.
.
.
.
.
.
.
.
.
.
.
.
.
.
.
.
.
.
.
.
.
.
.
.
.
.
.
.
.
.
.
.
.
.
.
.
.
.
.
.
.
.
.
.
.
.
.
.
.
.
.
.
.
.
.
.
.
.
.
.
.
.
.
.
.
.
.
.
.
.
.
.
.
.
.
.
.
.
.
.
.
.
.
.
.
.
.
.
.
.
.
.
.
.
.
.
.
.
.
.
.
.
.
.
.
.
.
.
.
.
.
.
.
.
.
.
.
.
.
.
.
.
.
.
.
.
.
.
.
.
.
.
.
.
.
.
.
.
.
.
.
.
.
.
.
.
.
.
.
.
.
.
.
.
.
.
.
. 22
. 22
. 23
. 24
. 27
. 28
. 28
. 30
. 30
. 31
. 32
. 32
. 33
. 34
. 34
. 35
. 35
. 35
. 36
. 36
.
.
.
.
.
.
.
.
.
.
.
.
.
.
.
.
.
.
.
.
.
.
.
.
.
.
.
.
.
.
.
.
.
.
.
.
.
.
.
.
.
.
.
.
.
.
.
.
.
.
.
.
.
.
.
.
.
.
.
.
.
.
.
.
.
.
.
.
.
.
.
.
.
.
.
.
.
.
.
.
.
.
.
.
.
.
.
.
.
.
.
.
.
.
.
.
.
.
.
.
.
.
.
.
.
.
.
.
.
.
.
.
.
.
.
.
.
.
.
.
.
.
.
.
.
.
.
.
.
.
.
.
.
.
.
.
.
.
.
.
.
.
.
.
.
.
.
.
.
.
.
.
.
.
.
.
.
.
.
.
.
.
.
.
.
.
.
.
.
. 37
. 37
. 40
. 42
. 42
. 46
. 52
. 53
. 55
. 57
. 59
. 63
. 67
Installing and Removing System Components
Safety Instructions . . . . . . . . .
Accessing Internal System Components . . .
PCI and PCI-X Cards . . . . . . . .
Installing a Card . . . . . . . .
Removing a Card . . . . . . . .
Disk Drives . . . . . . . . . . .
Installing a Disk Drive . . . . . .
Removing a Disk Drive . . . . . .
Memory . . . . . . . . . . . .
Installing a DIMM
. . . . . . .
Removing a DIMM . . . . . . .
L1 Controller Display . . . . . . . .
007-4643-003
Contents
Power Supplies . . . . . .
Reading the Power Supply LEDs
Replacing the Power Supply. .
.
.
.
.
.
.
.
.
.
.
.
.
.
.
.
.
.
.
.
.
.
.
.
.
.
.
.
.
.
.
.
.
.
.
.
.
.
.
.
.
.
.
.
.
.
.
.
.
. 72
. 73
. 74
4.
Troubleshooting . . . .
Troubleshooting Chart . .
L1 Controller Error Messages
SGI Electronic Support . .
.
.
.
.
.
.
.
.
.
.
.
.
.
.
.
.
.
.
.
.
.
.
.
.
.
.
.
.
.
.
.
.
.
.
.
.
.
.
.
.
.
.
.
.
.
.
.
.
.
.
.
.
.
.
.
.
.
.
.
.
.
.
.
.
.
.
.
.
A.
Technical Specifications and Pinouts . . .
Physical and Environmental Specifications. .
Power Supply Specifications . . . . . .
I/O Connector Specifications . . . . .
Ethernet 10/100/1000BaseT Port . . .
Keyboard and Mouse Connectors . . .
Serial Ports. . . . . . . . . .
External SCSI Port Connector . . . .
Stereo Jack Connector Conductor . . .
USB Type A Connector . . . . . .
VPro™ Graphics Board I/O Port Specifications
Graphics Board Scan Rates . . . . .
DVI-I Video Port . . . . . . . .
Stereo View Port . . . . . . . .
Genlock Port . . . . . . . . .
Swap Ready Port . . . . . . . .
Rack Specifications . . . . . . . .
.
.
.
.
.
.
.
.
.
.
.
.
.
.
.
.
.
.
.
.
.
.
.
.
.
.
.
.
.
.
.
.
.
.
.
.
.
.
.
.
.
.
.
.
.
.
.
.
.
.
.
.
.
.
.
.
.
.
.
.
.
.
.
.
.
.
.
.
.
.
.
.
.
.
.
.
.
.
.
.
.
.
.
.
.
.
.
.
.
.
.
.
.
.
.
.
.
.
.
.
.
.
.
.
.
.
.
.
.
.
.
.
.
.
.
.
.
.
.
.
.
.
.
.
.
.
.
.
.
.
.
.
.
.
.
.
.
.
.
.
.
.
.
.
.
.
.
.
.
.
.
.
.
.
.
.
.
.
.
.
.
.
.
.
.
.
.
.
.
.
.
.
.
.
.
.
.
.
.
.
.
.
.
.
.
.
.
.
.
.
.
.
.
.
.
.
.
.
.
.
.
.
.
.
.
.
.
.
.
.
.
.
.
.
.
.
.
.
.
.
.
. 87
. 88
. 89
. 90
. 92
. 93
. 94
. 96
. 98
. 99
.100
.100
.101
.103
.104
.105
.106
B.
Rackmounting Rail Installation Instructions .
Space Requirements . . . . . . . .
Rackmounting Hardware. . . . . . .
Preparing the Slide Rail Assemblies . . . .
.
.
.
.
.
.
.
.
.
.
.
.
.
.
.
.
.
.
.
.
.
.
.
.
.
.
.
.
.
.
.
.
.
.
.
.
.
.
.
.
.
.
.
.
.
.
.
.
.
.
.
.
.107
.107
.108
.109
007-4643-003
.
.
.
.
.
.
.
.
79
80
81
83
vii
Contents
viii
Preparing the Module . . . . . . . . . . .
Determining Where to Attach the Slide Rail in the Rack
Attaching the Slide Rail to the Rack . . . . . .
Installing Clip Nuts in Rack Rails . . . . . .
Installing Modules in the Rack . . . . . . .
Adjusting the Position of the Rackmounted Module .
Removing a Module from a Rack. . . . . . . .
.
.
.
.
.
.
.
.
.
.
.
.
.
.
.
.
.
.
.
.
.
.
.
.
.
.
.
.
.
.
.
.
.
.
.
.
.
.
.
.
.
.
.
.
.
.
.
.
.
.
.
.
.
.
.
.
.
.
.
.
.
.
.
.
.
.
.
.
.
.
112
113
114
117
118
120
121
C.
Safety and Regulatory Information . . .
General Safety Information . . . . .
Manufacturer’s Regulatory Declarations .
System Numbers . . . . . . . .
Manufacturer’s Declaration of Conformity .
CE Notice . . . . . . . . . .
Electromagnetic Emissions Notices . . .
Industry Canada Notice (Canada Only)
VCCI Notice (Japan Only) . . . .
Chinese Class A Regulatory Notice . .
Korean Class A Regulatory Notice . .
Shielded Cables . . . . . . . . .
Electrostatic Discharge . . . . . . .
Lithium Battery Statement . . . . .
Laser Compliance Statements . . . . .
.
.
.
.
.
.
.
.
.
.
.
.
.
.
.
.
.
.
.
.
.
.
.
.
.
.
.
.
.
.
.
.
.
.
.
.
.
.
.
.
.
.
.
.
.
.
.
.
.
.
.
.
.
.
.
.
.
.
.
.
.
.
.
.
.
.
.
.
.
.
.
.
.
.
.
.
.
.
.
.
.
.
.
.
.
.
.
.
.
.
.
.
.
.
.
.
.
.
.
.
.
.
.
.
.
.
.
.
.
.
.
.
.
.
.
.
.
.
.
.
.
.
.
.
.
.
.
.
.
.
.
.
.
.
.
.
.
.
.
.
.
.
.
.
.
.
.
.
.
.
125
125
127
127
128
128
128
129
129
130
130
130
131
131
132
D.
Dual-User Option Information . . . . . . . . .
PowerDuo Option Requirements . . . . . . . . .
General Setup Information . . . . . . . . . .
Connecting a Monitor to the Workstation Expansion Enclosure
Keyboard and Mouse Connection . . . . . . . .
Enabling PowerDuo Software. . . . . . . . . .
Returning the System to Single-User Use . . . . . .
Configuring the USB Keyboard and Mouse . . . . . .
Mounting the Second Drive . . . . . . . . . .
Adding Swap Space . . . . . . . . . . . .
.
.
.
.
.
.
.
.
.
.
.
.
.
.
.
.
.
.
.
.
.
.
.
.
.
.
.
.
.
.
.
.
.
.
.
.
.
.
.
.
.
.
.
.
.
.
.
.
.
.
.
.
.
.
.
.
.
.
.
.
.
.
.
.
.
.
.
.
.
.
.
.
.
.
.
.
.
.
.
.
.
.
.
.
.
.
.
.
.
.
133
134
134
134
137
139
139
140
141
142
.
.
.
.
.
.
.
.
.
.
.
.
.
.
.
.
.
.
.
.
.
.
.
.
.
.
.
.
.
.
.
.
.
.
.
.
.
.
.
.
.
.
.
.
.
.
.
.
.
.
.
.
.
.
.
.
.
.
.
.
007-4643-003
Contents
Adding Users . . . . . . . . . . . .
Selecting the Head on Which a Program Runs . . .
Operating Tips for Dual User Systems . . . . .
Configuring the PS/2 Keyboard and Mouse . .
Reconfiguring the Keyboard and Mouse Manually
Index
007-4643-003
.
.
.
.
.
.
.
.
.
.
.
.
.
.
.
.
.
.
.
.
.
.
.
.
.
.
.
.
.
.
.
.
.
.
.
.
.
.
.
.
.
.
.
.
.
.
.
.
.
.
.
.
.
.
.
.
.
.
.
.
.
.
.
.
.
.
.
.
.
.144
.145
.145
.147
.148
.
.
.
.
.
.
.
.
.
.
.
.151
ix
Figures
Figure 1-1
Figure 1-2
Figure 1-3
Figure 1-4
Figure 1-5
Figure 1-6
Figure 1-7
Figure 1-8
Figure 1-9
Figure 1-10
Figure 1-11
Figure 1-12
Figure 1-13
Figure 1-14
Figure 1-15
Figure 1-16
Figure 1-17
Figure 1-18
Figure 1-19
Figure 1-20
Figure 1-21
Figure 2-1
Figure 2-2
Figure 2-3
Figure 2-4
Figure 2-5
Figure 2-6
007-4643-003
Front View of the Workstation
Rear View of the Workstation.
.
.
.
.
.
.
.
.
.
.
.
.
.
.
.
.
.
.
.
.
.
.
3
3
Connecting the Keyboard and Mouse Cables . . .
Connecting the Ethernet Cable . . . . . . .
Connecting the Monitor Cable . . . . . . .
Connecting the Power Cable . . . . . . . .
Cabling a Dual-enclosure Workstation . . . . .
Powering On the Workstation . . . . . . .
Login Screen . . . . . . . . . . . .
Peripheral Icons. . . . . . . . . . . .
Toolchest Menu. . . . . . . . . . . .
Console Window . . . . . . . . . . .
System Shutdown Notifier . . . . . . . .
Power Button and Reset Button . . . . . . .
Shutdown Caution Message . . . . . . . .
Shutdown System Window . . . . . . . .
System Shutdown Notifier . . . . . . . .
Restart Notifier . . . . . . . . . . . .
System Shutdown Notifier . . . . . . . .
Power Off/Restart Notifier . . . . . . . .
Restart Notifier . . . . . . . . . . . .
Single- and Dual-enclosure Rackmount Workstations .
Front Panel Components . . . . . . . . .
Rear Panel Components . . . . . . . . .
System Architecture . . . . . . . . . .
DIMM Sockets and Pairs . . . . . . . . .
Internal Hard Disk Drives and DVD-ROM Drive . .
.
.
.
.
.
.
.
.
.
.
.
.
.
.
.
.
.
.
.
.
.
.
.
.
.
.
.
.
.
.
.
.
.
.
.
.
.
.
.
.
.
.
.
.
.
.
.
.
.
.
.
.
.
.
.
.
.
.
.
.
.
.
.
.
.
.
.
.
.
.
.
.
.
.
.
.
.
.
.
.
.
.
.
.
.
.
.
.
.
.
.
.
.
.
.
.
.
.
.
.
5
6
7
8
9
10
11
12
12
13
14
15
16
17
17
18
19
19
19
22
23
26
27
29
31
xi
Figures
Figure 2-7
Figure 3-1
Figure 3-2
Figure 3-3
Figure 3-4
Figure 3-5
Figure 3-6
Figure 3-7
Figure 3-8
Figure 3-9
Figure 3-10
Figure 3-11
Figure 3-12
Figure 3-13
Figure 3-14
Figure 3-15
Figure 3-16
Figure 3-17
Figure 3-18
Figure 3-19
Figure 3-20
Figure 3-21
Figure 3-22
Figure 3-23
Figure 3-24
Figure 3-25
Figure 3-26
Figure 3-27
Figure 3-28
Figure 4-1
Figure A-1
Figure A-2
Figure A-3
xii
Power Supply Location . . . . . . . . . . . . .
Removing the Enclosure Cover . . . . . . . . . .
Installing the Enclosure Cover . . . . . . . . . . .
PCI and PCI-X Card Slots Located in the Rear Panel . . . .
Removing the Lower PCI/PCI-X Support Bracket . . . . .
Removing a Blanking Plate. . . . . . . . . . . .
Installing the Card and Retaining Screw . . . . . . . .
Replacing the Lower PCI/PCI-X Support Bracket . . . . .
Removing the Lower PCI/PCI-X Support Bracket . . . . .
Removing the Retaining Screw and Extracting the Card . . .
Installing a Blanking Plate . . . . . . . . . . . .
Replacing the Lower PCI/PCI-X Support Bracket . . . . .
Disk Drive Location . . . . . . . . . . . . . .
Installing a Disk Drive . . . . . . . . . . . . .
Removing a Disk Drive . . . . . . . . . . . . .
Layout of DIMM Slots and Local Memory Banks . . . . .
Opening the Enclosure Cover to Install DIMMs . . . . . .
Removing the Plastic Air Baffle . . . . . . . . . .
Inserting a DIMM . . . . . . . . . . . . . .
Opening the Enclosure Cover to Remove DIMMs . . . . .
Removing the Plastic Air Baffle . . . . . . . . . .
Removing a DIMM . . . . . . . . . . . . . .
L1 Controller Display on the Front Panel. . . . . . . .
Opening the Enclosure Cover to Access the L1 Controller Display
Removing the L1 Controller Display Panel . . . . . . .
Installing an L1 Controller Display Panel . . . . . . .
Power Supply Location . . . . . . . . . . . . .
Removing the Power Supply . . . . . . . . . . .
Installing the Power Supply . . . . . . . . . . .
Full Support Sequence . . . . . . . . . . . . .
Rear Panel Connectors . . . . . . . . . . . . .
Ethernet 10/100/1000BaseT Port Pinout . . . . . . . .
PS/2 Keyboard and Mouse Port Pinout . . . . . . . .
. 33
. 40
. 41
. 42
. 43
. 44
. 44
. 45
. 47
. 48
. 49
. 50
. 52
. 54
. 56
. 58
. 59
. 60
. 61
. 63
. 64
. 65
. 67
. 68
. 69
. 70
. 72
. 75
. 77
. 83
. 91
. 92
. 93
007-4643-003
Figures
Figure A-4
Figure A-5
Figure A-6
Figure A-7
Figure A-8
Figure A-9
Figure A-10
Figure A-11
Figure B-1
Figure B-2
Figure B-3
Figure B-4
Figure B-5
Figure B-6
Figure B-7
Figure B-8
Figure B-9
Figure B-10
Figure B-11
Figure D-1
Figure D-2
Figure D-3
007-4643-003
Serial Port Pinouts and Locations. . . . . . . . .
External SCSI Port Pin Number Locations . . . . . .
Stereo Jack Connector Conductors . . . . . . . .
USB Type A Connector Pin Number Locations . . . . .
DVI-I Port Pinout and Location . . . . . . . . .
Stereo View Port Pinout . . . . . . . . . . .
Genlock Port Pinout . . . . . . . . . . . .
Swap Ready Port Pinout . . . . . . . . . . .
Separating the Chassis Rail from the Slide Rail . . . . .
Attaching the Rear Mounting Bracket to the Slide Rail . .
Attaching Chassis Rails to the Module Chassis . . . . .
Mounting Hole Pattern of Rack Vertical Rails . . . . .
Placing the Bar Nuts on the Rack Rails . . . . . . .
Attaching the Slide Rail to the Rack . . . . . . . .
Installing Clip Nuts in Rack Rails . . . . . . . .
Pressing the Safety Latches . . . . . . . . . .
Securing the Module to the Rack . . . . . . . . .
Releasing the Safety Latches . . . . . . . . . .
Releasing the Slide Latches . . . . . . . . . .
Connecting a Monitor to the Workstation Expansion Enclosure
USB Keyboard and Mouse Connected Directly to the Tezro
Enclosure . . . . . . . . . . . . . . .
Second Keyboard and Mouse Connected via Optional USB
Extender . . . . . . . . . . . . . . . .
.
.
.
.
.
.
.
.
.
.
.
.
.
.
.
.
.
.
.
.
. 94
. 96
. 98
. 99
.101
.103
.104
.105
.109
.111
.112
.113
.115
.116
.117
.119
.120
.122
.123
.136
.
.137
.
.138
xiii
Tables
Table 3-1
Table 3-2
Table 4-1
Table 4-2
Table A-1
Table A-2
Table A-3
Table A-4
Table A-5
Table A-6
Table A-7
Table A-8
Table A-9
Table A-10
Table A-11
Table A-12
Table A-13
Table A-14
Table A-15
Table A-16
Table B-1
Table B-2
Table D-1
007-4643-003
DIMMs and Bank Pairs . . . . .
LED Status and Power Supply Condition
.
.
.
.
.
.
.
.
.
.
.
.
.
.
. 57
. 73
Troubleshooting Chart . . . . . . . .
L1 Controller Messages . . . . . . .
Physical and Environmental Specifications . .
Power Supply Specification . . . . . .
Workstation Connectors . . . . . . .
Ethernet Connector Pin Assignments . . .
Keyboard and Mouse Port Pinout . . . .
Serial Port Pinout . . . . . . . . .
SCSI VHDCI Pin Assignments . . . . .
Stereo Jack Connector Conductor Assignments
USB Type A Connector Pin Assignments . .
Supported VPro Graphics Board Scan Rates .
DVI-I Video Port Pinout . . . . . . .
Stereo View Pinout Assignments . . . . .
Genlock Pinout Assignments . . . . . .
Swap Ready Pinout Assignments . . . .
Short Rack Specifications . . . . . . .
Tall-rack Specifications . . . . . . .
Space Requirements . . . . . . . .
Rackmounting Hardware . . . . . . .
Dual User Task Specific Information . . . .
.
.
.
.
.
.
.
.
.
.
.
.
.
.
.
.
.
.
.
.
.
.
.
.
.
.
.
.
.
.
.
.
.
.
.
.
.
.
.
.
.
.
.
.
.
.
.
.
.
.
.
.
.
.
.
.
.
.
.
.
.
.
.
.
.
.
.
.
.
.
.
.
.
.
.
.
.
.
.
.
.
.
.
.
.
.
.
.
.
.
.
.
.
.
.
.
.
.
.
.
.
.
.
.
.
. 80
. 81
. 88
. 89
. 90
. 92
. 93
. 95
. 96
. 98
. 99
.100
.102
.103
.104
.105
.106
.106
.107
.108
.146
xv
About This Guide
Welcome to the user’s guide for the Silicon Graphics© Tezro™ visual workstation:
rackmount configuration. Your new workstation offers VPro™ graphics and a
high-bandwidth architecture in a convenient rackmount form-factor.
This guide shows you how to set up, use, and troubleshoot your system. This guide is
provided for all end-users and SGI technical support staff. Most of the hardware tasks are
relatively simple and require no previous computer knowledge. A few tasks are more
difficult; they are easier to perform if you have some computer hardware experience.
Chapter Descriptions
The following topics are covered in this guide:
007-4643-003
•
Chapter 1, “Installation and Operation Procedures” provides instructions for
unpacking and setting up your new workstation. It also explains how to power the
workstation on, log in, access programs, and power off the workstation.
•
Chapter 2, “System Overview” describes the parts of the workstation and gives an
overview of how they work together. It also provides configuration information and
describes optional components.
•
Chapter 3, “Installing and Removing System Components” provides instructions
for installing and removing parts of the system. If the part you wish to add or
replace does not appear in this chapter, contact your SGI service representative.
•
Chapter 4, “Troubleshooting” provides recommended actions if problems occur
with your rackmounted workstation. It also includes information about available
support options.
•
Appendix A, “Technical Specifications and Pinouts,” provides size, weight, and
power consumption specifications for the system. It also lists environmental
specifications and connector pinouts.
•
Appendix B, “Rackmounting Rail Installation Instructions,” provides instructions
for mounting your workstation in a standard 19-in. rack.
xvii
About This Guide
•
Appendix C, “Safety and Regulatory Information,” provides a list of safety
instructions to follow when installing, operating, or servicing the system. It also
lists all regulatory information related to use of the workstation in the United States
and other countries.
•
Appendix D, “Dual-User Option Information,” presents information applicable to
the setup and operation of the dual-user or “PowerDuo” option for the Silicon
Graphics Tezro visual workstation. It covers connecting hardware, enabling
software, and general operation rules.
Related Publications
For complete information on installing software, see the online Personal System
Administration Guide. It is located on your desktop in Toolchest > Help > Online Books. For
more advanced information, see the online IRIX Admin: Software Installation & Licensing
Guide. For system administration information, see the SGI_Admin section of the online
bookshelf.
It is always a good idea to back up your system. For instructions on backing up your
system, see the online Personal System Administration Guide.
You can obtain SGI documentation, release notes, or man pages in the following ways:
•
See the SGI Technical Publications Library at http://docs.sgi.com. Various formats
are available. This library contains the most recent and most comprehensive set of
online books, release notes, man pages, and other information.
•
If it is installed on your SGI system, you can use InfoSearch, an online tool that
provides a more limited set of online books, release notes, and man pages. With an
IRIX system, select Help from the Toolchest, and then select InfoSearch. Or you can
type infosearch on a command line.
•
You can also view release notes by typing either grelnotes or relnotes on a
command line.
•
You can also view man pages by typing man <title> on a command line.
SGI systems include a set of IRIX man pages, formatted in the standard UNIX “man
page” style. Important system configuration files and commands are documented on
man pages. These are found online on the internal system disk (or CD-ROM) and are
displayed using the man command. For example, to display the man page for the
Add_disk command, type the following on a command line:
man Add_disk
xviii
007-4643-003
About This Guide
References in the documentation to these pages include the name of the command and
the section number in which the command is found. For example, “Add_disk(1)” refers
to the Add_disk command and indicates that it is found in section 1 of the IRIX
reference.
For additional information about displaying man pages using the man command, see
man(1).
In addition, the apropos command locates man pages based on keywords. For example,
to display a list of man pages that describe disks, type the following on a command line:
apropos disk
For information about setting up and using apropos, see apropos(1) and
makewhatis(1M).
Conventions
The following conventions are used throughout this document:
007-4643-003
Convention
Meaning
Command
This fixed-space font denotes literal items such as commands, files,
routines, path names, signals, messages, and programming language
structures.
variable
The italic typeface denotes variable entries and words or concepts
being defined. Italic typeface also is used for book titles.
user input
This fixed-space font denotes literal items that the user enters in
interactive sessions. Output is shown in nonbold, fixed-space font.
[]
Brackets enclose optional portions of a command or directive line.
...
Ellipses indicate that a preceding element can be repeated.
man page(x)
Man page section identifiers appear in parentheses after man page
names.
GUI element
This font denotes the names of graphical user interface (GUI)
elements such as windows, screens, dialog boxes, menus, toolbars,
icons, buttons, boxes, fields, and lists.
xix
About This Guide
Product Support
SGI provides a comprehensive product support and maintenance program for its
products, as follows:
•
If you are in North America, contact the Technical Assistance Center at
1 800 800 4SGI or contact your authorized service provider.
•
If you are outside North America, contact the SGI subsidiary or authorized
distributor in your country.
Reader Comments
If you have comments about the technical accuracy, content, or organization of this
document, contact SGI. Be sure to include the title and document number of the manual
with your comments. (Online, the document number is located in the front matter of the
manual. In printed manuals, the document number is located at the bottom of each
page.)
You can contact SGI in any of the following ways:
•
Send e-mail to the following address:
[email protected]
•
Use the Feedback option on the Technical Publications Library website:
http://docs.sgi.com
•
Contact your customer service representative and ask that an incident be filed in the
SGI incident tracking system.
•
Send mail to the following address:
Technical Publications
SGI
1500 Crittenden Lane, M/S 535
Mountain View, California 94043
SGI values your comments and will respond to them promptly.
xx
007-4643-003
Chapter 1
1. Installation and Operation Procedures
This chapter shows you how to set up and use your Silicon Graphics® Tezro™ visual
workstation in the following sections:
•
“Setting Up the Workstation” on page 1
•
“Using the Workstation” on page 9
Setting Up the Workstation
This section covers the following topics:
007-4643-003
•
“Checking Your Shipment” on page 2
•
“Lifting the Workstation” on page 2
•
“Getting Acquainted” on page 2
•
“Installing the Workstation” on page 4
•
“Cabling the Workstation” on page 5
1
1: Installation and Operation Procedures
Checking Your Shipment
The following basic components are included in the shipment:
•
Workstation enclosure(s)
•
Keyboard and mouse
•
Monitor and monitor cable
•
Operating system CDs
•
Power cables
•
Anti-static wrist-strap
Any optional components ordered will also be shipped with your system. If any of the
components you ordered are damaged or missing, contact your support provider.
Lifting the Workstation
The workstation enclosure weighs approximately 18 kg (40 lb). SGI highly recommends
that two people lift the unit when it must be moved. Lift the unit by placing your hands
under the bottom edges of the enclosure.
Getting Acquainted
To become familiar with your workstation, see the following figures:
2
•
Figure 1-1, which shows front views of the single- and dual-enclosure workstation.
•
Figure 1-2, which shows rear views of the single- and dual-enclosure workstation.
007-4643-003
Setting Up the Workstation
Figure 1-1
Front View of the Workstation
L
R
L
L
R
R
Figure 1-2
007-4643-003
Rear View of the Workstation
3
1: Installation and Operation Procedures
After you have set up your workstation and logged in, see the following resources for
more information:
•
From the Toolchest, select System > System Manager for information on the
workstation’s hardware and software.
•
From the Toolchest, select System > System Manager > About This System to
learn about your system’s serial number, IP address, operating system, and more.
Installing the Workstation
The workstation can be mounted in an optional SGI rack, a standard 19-in. rack, or placed
on a table top. If you do not wish to mount your workstation in a rack, place it on a sturdy
surface with adequate clearances for cooling. Then proceed to the next section.
For instructions on installing your workstation in a rack, see Appendix B. After you have
installed the workstation enclosure(s) in the rack, proceed to the next section.
4
007-4643-003
Setting Up the Workstation
Cabling the Workstation
To cable the workstation, follow these steps:
1.
Connect the keyboard and mouse cables, as shown in Figure 1-3.
L
R
Figure 1-3
Connecting the Keyboard and Mouse Cables
Note: The workstation in Figure 1-3 is shown with the optional USB and audio boards.
Your workstation may or may not be equipped with these boards.
007-4643-003
5
1: Installation and Operation Procedures
2. Connect the Ethernet cable to the Ethernet port on the IO9 card, as shown in
Figure 1-4.
L
R
Figure 1-4
Connecting the Ethernet Cable
Note: The workstation in Figure 1-4 is shown with the optional USB and audio boards.
Your workstation may or may not be equipped with these boards.
3. Connect the monitor cable as follows (see Figure 1-5):
•
Connect the monitor-to-graphics cable to the monitor.
•
Connect the monitor-to-graphics cable to the DVI-I video connector on the back
of your workstation.
Note: The workstation can be connected to a variety of monitors. Your monitor and
monitor cable may differ from those shown. If your monitor has multiple inputs,
ensure that the source switch is set to the correct input port.
6
007-4643-003
Setting Up the Workstation
21-inch or
24-inch
monitor
AC
IN
L
DVI-I to VGA
cable
Figure 1-5
R
Connecting the Monitor Cable
Note: The workstation in Figure 1-5 is shown with the optional USB and audio boards.
Your workstation may or may not be equipped with these boards.
007-4643-003
7
1: Installation and Operation Procedures
4. Connect the power cables to your workstation and monitor and then plug them into
approved electrical outlets. See Figure 1-6.
L
R
Figure 1-6
Connecting the Power Cable
Note: The workstation in Figure 1-6 is shown with the optional USB and audio boards.
Your workstation may or may not be equipped with these boards.
5. Connect any remaining peripheral cables as needed. For cabling instructions, see
the documentation that came with your peripherals.
6. If you are installing a dual-enclosure workstation, proceed to the next step. If your
are installing a single-enclosure workstation, proceed to the next section.
7. Connect the system interconnect cable between the first and second enclosures as
follows (see Figure 1-7):
a.
Ensure that the locking tabs on both ends of the cable are in the open position
(swung away from the connector base).
b. Carefully insert the cable into the system interconnect port on the rear of the
first enclosure. Secure the cable in the connector by closing the locking tab.
c.
8
Carefully insert the other end of the cable into the system interconnect port on
the rear of the second enclosure. Secure the cable in the connector by closing the
locking tab.
007-4643-003
Using the Workstation
Second enclosure
First enclosure
L
R
System interconnect cable
L
R
Figure 1-7
Cabling a Dual-enclosure Workstation
8. Connect a power cable to the second enclosure (see Figure 1-6).
9. If present, connect cables to the option boards installed in second enclosure.
You have finished setting up your workstation. Proceed to the next section.
Using the Workstation
This section provides information about using your workstation in the following
sections:
007-4643-003
•
“Powering On the Workstation” on page 10
•
“Using the IRIX Interactive Desktop” on page 11
•
“Using the System Manager” on page 12
•
“Powering Off the Workstation” on page 13
9
1: Installation and Operation Procedures
Powering On the Workstation
Press the power button on workstation as shown in Figure 1-8. If your workstation is
equipped with an optional second enclosure, also press the power button on the second
enclosure. Then power on your monitor.
Power button with LED
Figure 1-8
Powering On the Workstation
A green LED flashing on the front of the workstation indicates that the system is booting.
The monitor may remain blank for a few moments. If your system does not boot, see
Chapter 4, “Troubleshooting.”
If your system is booting for the first time, you will see a login screen similar to the
example shown in Figure 1-9.
10
007-4643-003
Using the Workstation
Figure 1-9
Login Screen
If you have a login account, double-click the icon with your login name. If you do not
have a login account, double-click EZsetup and then follow the instructions for creating
a personal login account and setting up the networking software. Then you can begin
using the IRIX interactive desktop to create a personal work area and communicate with
other users on your network.
Using the IRIX Interactive Desktop
After you have logged in, you are ready to use the IRIX interactive desktop. By default,
several icons appear on your desktop: a folder icon representing your home directory, a
dumpster icon, and icons for any peripherals you installed, examples of which are shown
in Figure 1-10.
The peripheral icons show the current state of the respective devices. For example, if you
insert a music CD into the optional DVD-ROM drive, the icon changes. When you
double-click the icon, it opens CD Player, a utility that allows you to play music from a
compact disc.
007-4643-003
11
1: Installation and Operation Procedures
Figure 1-10
Peripheral Icons
The Toolchest, located at the top left corner of your screen, provides access to system
functions, applications, hardware and software information, and documentation. See
Figure 1-11.
Note: For a complete description of the Toolchest, select Help > InfoSearch from the
Toolchest, and type Desktop Users Guide.
Figure 1-11
Toolchest Menu
Using the System Manager
From the Toolchest, select System > System Manager to display the System Manager,
which shows your workstation’s hardware and software information.
From the Toolchest, select Help to display the library of online documentation. If your
workstation is turned off and you cannot access online documentation, this printed
guide contains all the information you need. You can also access this guide and most
manuals, man pages, and release notes in the SGI Technical Publications Library at
http://docs.sgi.com, and by using InfoSearch.
12
007-4643-003
Using the Workstation
From the Toolchest, select Help > InfoSearch and type the name of the desired book or
topic to search online books, man pages, and release notes that cover end-user, developer,
and system administrator information.
The small box next to the Toolchest is the Console window, as shown in Figure 1-12. It
appears as a small box because it is minimized. You can open it to its full size by clicking
it. Many system status and error messages appear in this window.
Figure 1-12
Console Window
If you click in the Console window, an IRIX shell appears, where you can type IRIX
commands. For information on IRIX commands, select Help > Online Books >
SGI_End User > Desktop Users Guide > Using IRIX Commands from the Toolchest.
Powering Off the Workstation
You can shut down, power off, or restart your workstation in several different ways,
which are explained in the following sections:
007-4643-003
•
“Powering Off with the Power Button” on page 14
•
“Powering Off from the Toolchest” on page 16
•
“Restarting from the Toolchest” on page 18
13
1: Installation and Operation Procedures
Powering Off with the Power Button
To power off your workstation with the power button, follow these steps:
1.
Press the power button on the front of your workstation (see Figure 1-8).
Within a few seconds, a shutdown notifier appears, as shown in Figure 1-13. Within
a minute, the system powers off automatically.
Figure 1-13
System Shutdown Notifier
2. Turn off your monitor by pressing the monitor power button.
If your system does not power off and you do not see any activity for several
minutes, press the power button again.
Note: If you press the power button a second time, the system should power off
immediately, but this method does not perform a clean shutdown. Avoid using this
method unless the system does not respond for several minutes after you first press
the power button.
14
007-4643-003
Using the Workstation
If pressing the power button a second time does not work, use a paper clip or pin to
press the reset switch, shown in Figure 1-14. If the system still fails to power off,
unplug the power cable from the back of your workstation and contact your service
provider.
NMI switch
Reset switch
Power button
Figure 1-14
Power Button and Reset Button
Note: The NMI switch shown in Figure 1-14 is used by SGI field engineers to diagnose
problems. Do not press this button unless directed by SGI service personnel.
007-4643-003
15
1: Installation and Operation Procedures
Powering Off from the Toolchest
If you have root level access to the workstation, you can shut down your system from the
Toolchest as follows:
1.
From the Toolchest, select System > System Shutdown.
After a few seconds, a shutdown caution message appears, as shown in Figure 1-15.
Figure 1-15
16
Shutdown Caution Message
007-4643-003
Using the Workstation
2. Click the Power Off the System check box.
The Shutdown the system window appears. At this point, you can shut down and
power off the system or configure it to restart at a designated time, as shown in
Figure 1-16.
Figure 1-16
Shutdown System Window
3. Click OK to shut down and power off the system.
The shutdown notifier appears, as shown in Figure 1-17. After a few seconds, the
system powers off.
Figure 1-17
007-4643-003
System Shutdown Notifier
17
1: Installation and Operation Procedures
Restarting from the Toolchest
If you have root level access to the workstation, you can restart the system from the
Toolchest.
1.
From the Toolchest, select System > Restart.
After a few seconds the restart notifier appears, as shown in Figure 1-18.
Figure 1-18
18
Restart Notifier
007-4643-003
Using the Workstation
2. Click OK in the restart notifier.
The shutdown notifier appears, as shown in Figure 1-19.
Figure 1-19
System Shutdown Notifier
After a brief delay, the power off/restart notifier appears, as shown in Figure 1-20.
Figure 1-20
Power Off/Restart Notifier
3. Click Restart.
The restart notifier informs you that the system is coming up (restarting), as shown in
Figure 1-21.
Figure 1-21
007-4643-003
Restart Notifier
19
Chapter 2
2. System Overview
This chapter provides general information about the rackmount configuration of the
Silicon Graphics® Tezro™ visual workstation in the following sections:
•
“System Features” on page 21
•
“System Components” on page 22
System Features
This workstation is a high-performance system. It provides VPro™ graphics, 64-bit MIPS
processors, and a high-bandwidth architecture in a convenient rackmount form factor.
Features of the system include the following:
007-4643-003
•
High-speed system architecture, available with 1, 2, or 4 processors.
•
VPro graphics with dual-channel, dual-head, and digital media options.
•
Scalable system memory, with capacities from 512 MB to 16 GB.
•
Ultra3 SCSI internal hard-disk drives, which provide large internal storage
capacities and fast access times.
•
Two PCI/PCI-X compatible card buses with three available slots (four buses and
seven available slots in dual-enclosure configurations).
•
IO9 system I/O board for efficient control of internal and external I/O.
•
Single- or dual-enclosure factory configuration. The optional second enclosure
provides additional memory and PCI-X capacity and can also be configured with a
graphics or digital media board. See Appendix D for information on using an
additional graphics board, monitor, keyboard and mouse.
21
2: System Overview
Figure 2-1
Single- and Dual-enclosure Rackmount Workstations
System Components
The components of the workstation are covered in the following sections:
•
“External Components” on page 22
•
“Internal Components” on page 27
External Components
This section describes the front and rear panels of the workstation and the optional
second enclosure in the following sections:
22
•
“Front Panel Components” on page 23
•
“Rear Panel Components” on page 24
007-4643-003
System Components
Front Panel Components
The front panel of the workstation has the following components (see Figure 2-2):
•
L1 controller display. A liquid crystal display (LCD) displays status and error
messages generated by the L1 controller.
Note: See the SGI L1 and L2 Controller Software User’s Guide (007-3938-00x) and “L1
Controller Error Messages” on page 81 for more information on the L1 controller.
•
Power button with LED. Press this button to power on the workstation. The LED
illuminates green when the internal components are on.
•
Reset switch. Activate this recessed switch with a paperclip to reset the
workstation. The reset will cause a memory loss. (To perform a reset without losing
memory, see the NMI switch information that follows.)
•
NMI switch. Activate the recessed NMI (non-maskable interrupt) switch with a
paperclip to reset the system without losing memory. Register data and memory are
stored in a /var/adm/crash file.
•
Service-required LED. This LED illuminates yellow to indicate that a component
has failed or is not operating properly, but the workstation is still operating.
•
Failure LED. This LED illuminates red to indicate that a failure has occurred and
that the workstation is down.
L1 controller display
NMI switch
Service-required LED
Failure LED
Reset switch
Power button
Figure 2-2
007-4643-003
Front Panel Components
23
2: System Overview
Note: The first and second enclosures of a dual-enclosure system have the same front
panel components.
Rear Panel Components
This section describes the rear panel connectors, PCI/PCI-X slots, and LEDs of the
workstation enclosures (see Figure 2-3). The rear panel of the first workstation enclosure
has the following components:
•
Power connector. This connector connects the workstation enclosure(s) to an AC
power outlet.
•
Console port. This DB-9 serial port (console and diagnostic port) connects a system
console to the L1 controller.
•
Serial port 1. This DB-9 RS-232/RS-422 serial port connects a serial device such as a
printer to the workstation.
•
L1 port (USB type B). This connector is not used.
•
System interconnect. This system interconnect cable connects the two enclosures of
a dual-enclosure workstation. This connection is made with an interconnect cable at
1.6 GB/s in each direction.
–
•
System interconnect LED. The connector has two LEDs, one that illuminates
yellow and one that illuminates green (located to the right of the connector).
The yellow LED indicates that the workstation enclosures are powered on. The
green LED indicates that the connection between the enclosures is functioning.
PCI/PCI-X slots (bus 1, slot 1; bus 1, slot 2; bus 2, slot 1; bus 2, slot 2). These slots
are labeled from bottom to top PCI 1, PCI 2, PCI 3, and PCI 4. Two of these slots are
on one bus, and two slots are on another. These are 64-bit slots that can house
33-MHz and 66-MHz PCI cards or 66-MHz, 100-MHz, or 133-MHz PCI-X cards. (See
SGI Supportfolio at http://support.sgi.com for an updated list of supported cards.)
The bottom-most slot of the first enclosure always contains an IO9 PCI card.
The serial daughtercard provides the following connectors:
24
•
Two PS/2 ports (keyboard and mouse). These ports connect a PS/2 keyboard and
mouse to the system.
•
Serial ports 2, 3, and 4. These three DB-9 RS-232/RS-422 serial ports connect serial
devices such as printers to the system.
007-4643-003
System Components
Note: The serial daughter-board is not available in the second enclosure of a
dual-enclosure workstation.
The factory-installed IO9 board provides the following connectors:
•
Real-time interrupt input and output. RTO (output) enables the compute module
to interrupt an external device. RTI (input) enables an external device to interrupt
the workstation.
•
Ethernet port (10/100/1000 Mbits). This auto-negotiating
10BaseT/100BaseT/1000BaseT twisted-pair Ethernet port connects the workstation
to an Ethernet network.
•
External SCSI connector. This 68-pin VHDCI external SCSI port connects SCSI
devices to the workstation. See SGI Supportfolio at http://support.sgi.com for an
updated list of supported SCSI devices.
The rear panel of the optional second workstation enclosure has the following
components:
•
Power connector. This connector connects the enclosure(s) to an AC power outlet.
•
Console port. This DB-9 serial port (console and diagnostic port) enables you to
connect a system console to the L1 controller.
•
Serial port 1. This connector is not functional unless an IO9 board is installed in the
enclosure. When an IO9 board is present, this DB-9 RS-232/RS-422 serial port
connects a serial device to the workstation.
•
L1 port (USB type B). This connector is not used.
•
System interconnect connector. This connector joins the two enclosures of a
dual-enclosure workstation. This connection is made with a cable at 1.6 GB/s in
each direction.
–
007-4643-003
System interconnect LED. The connector has two LEDs, one that illuminates
yellow and one that illuminates green (located to the right of the connector).
The yellow LED indicates that the workstation enclosures are powered on. The
green LED indicates that the connection between the enclosures is functioning.
•
PCI/PCI-X slots (bus 1, slot 1; bus 1, slot 2; bus 2, slot 1; bus 2, slot 2). These slots
are identical to those in the first enclosure.
•
Additional graphics or digital media option board. The second enclosure may or
may not contain a graphics or digital media option board.
25
2: System Overview
StereoView
Swap
ready Monitor
Genlock
Keyboard
Console port
Mouse
Ethernet port
RTO (output)
RTI (input)
External SCSI
connector
PCI 4
PCI 3
CONSOLE
2
3
4
PCI 2
1
XIO
L1 PORT
NUMALINK
PCI 1
First Enclosure
Power connector
NUMAlink LEDs
L1 port
Serial
port 2
Serial port 1
Serial
port 3
Serial
port 4
NUMAlink port
Console port
PCI 4
PCI 3
PCI 2
PCI 1
Second Enclosure
(optional)
NUMAlink LEDs
Power connector
L1 port
NUMAlink port
Serial port 1
Figure 2-3
26
Rear Panel Components
007-4643-003
System Components
Internal Components
The workstation is based on a node board/interface board pair. The node board supplies
connectivity and power to the memory DIMMs and processor(s). The remainder of the
system components are connected to the interface board, as shown in Figure 2-4.
Memory/
L2
CPU
Directory
CPU
L2
3.2GB/s
1.6 GB/s
Bedrock
ASIC
1.6 GB/s
NUMAlink connection to
optional second enclosure
3.2 GB/s full-duplex
(1.6 GB/s each direction)
CPU
L2
CPU
L2
VPro
Graphics
PCI bus 2 slot 2
Speakers
Optional
PCI
Bus 2audio
Slot 1
PIC
ASIC
PCI bus 1 slot 2
PCI bus 1 slot 1
Ethernet port
SCSI port
Serial ports
RTI port
RTO port
PS2 Keyboard and mouse
DVD/CD-ROM
IO9
SCSI port
Two disks
Figure 2-4
007-4643-003
L1 system control
USB port
Console port
System Architecture
27
2: System Overview
The following sections contain more information about the internal components of the
workstation:
•
“Processors” on page 28
•
“Memory DIMMs” on page 28
•
“IO9 Board” on page 30
•
“Internal Hard Disk Drives” on page 30
•
“DVD-ROM Drive” on page 31
•
“VPro™ Graphics Board” on page 32
•
“PCI Buses” on page 32
•
“Power Supply” on page 33
Processors
The first workstation enclosure is available with 1, 2, or 4 R16000 MIPS processors. Each
processor has a total of 64 KB of onboard cache and 4 MB of external cache. The optional
second enclosure does not contain any processors.
Memory DIMMs
The single-enclosure workstation can be configured with a minimum of 512 MB of
memory and a maximum of 8 GB of memory. The dual-enclosure workstation can be
configured with up to 16 GB of memory. The workstation uses double data rate
synchronous dynamic random access memory (DDR SDRAM).
The memory DIMMS are installed in eight DIMM sockets on the system node board. The
DIMM sockets are numbered 0 through 7 (see Figure 2-5). The sockets are grouped into
four pairs of two DIMMs. The DIMM pairs are numbered as follows:
28
•
DIMM pair 1: slots 0 and 1
•
DIMM pair 2: slots 2 and 3
•
DIMM pair 3: slots 4 and 5
•
DIMM pair 4: slots 6 and 7
007-4643-003
System Components
Figure 2-5
Slot 7
Slot 5
Slot 3
Slot 1
DIMM pair 4
DIMM pair 3
DIMM pair 2
DIMM pair 1
Slot 6
Slot 4
Slot 2
Slot 0
DIMM pair 4
DIMM pair 3
DIMM pair 2
DIMM pair 1
DIMM Sockets and Pairs
The following configuration rules apply to the memory banks and DIMMs in your
system:
007-4643-003
•
DIMM pair 1 must be present.
•
DIMMs in the same DIMM pair must be the same density. For example, if DIMM 0
is 512 MB, then DIMM 1 must be 512 MB.
•
DIMMs must be installed in pairs.
•
DIMM pairs should be added in sequence. For example, if there are DIMMs
installed in pair 1, the next DIMMs should be installed in pair 2.
•
The minimum amount of memory for a 1-processor workstation is 512 MB; the
minimum for a 2- or 4-processor workstation is 1 GB.
29
2: System Overview
•
The maximum memory configuration for a single-enclosure workstation is 8 GB;
dual-enclosure workstations have a maximum memory capacity of 16 GB.
For information on removing or installing memory DIMMs, see “Memory” on page 57.
IO9 Board
The IO9 is the full-length PCI board installed in PCI bus 1, slot 1. It provides the following
I/O connectors and interfaces for the workstation:
•
Internal IDE connector for the optional DVD-ROM drive
•
Internal SCSI connector for the internal hard disk drive(s)
•
External SCSI connector for optional external drives
•
Real-time interrupt in and out (RTI and RTO) connectors
•
10/100/1000BaseT Ethernet connector (RJ45)
The serial daughtercard, which provides three serial ports and two PS/2 ports on the rear
of the workstation, is controlled by the IO9 board. The IO9 board also contains the
NVRAM and time-of-day clock for the system.
Both single-enclosure and dual-enclosure workstations are limited to one IO9 board.
For technical specifications and pinout of these connectors, see Appendix A, “Technical
Specifications and Pinouts”.
Internal Hard Disk Drives
The workstation supports one or two internal hard disk drives, which are located on the
left side of the front of the workstation (see Figure 2-6). These Ultra 160 SCSI drives
provide large storage capacities and fast access times.
The hard disk drives in the workstation are sled mounted. The drive sleds provide a safe
and easy way to install and remove the drives without tools. The drive sleds also
provides a positive, locking connection to the SCSI backplane, which connects the disk
drives to the IO9 board.
The disks are numbered 1 and 2, with 1 being the bottom disk and 2 being the top. The
SCSI ID number of each disk must correspond with these drive numbers. Disk 1 is the
30
007-4643-003
System Components
system disk, which has the IRIX operating system installed on it. Your workstation will
not function without the system disk.
For information on removing or installing an internal hard disk drive, see “Disk Drives”
on page 52.
DVD-ROM drive
Disk drives
Figure 2-6
Internal Hard Disk Drives and DVD-ROM Drive
DVD-ROM Drive
Your workstation supports an optional internal DVD-ROM drive. The DVD-ROM drive
is capable of reading the following formats:
•
DVD-RAM
•
DVD-R
•
Single layer (DVD-5)
•
Dual layer (DVD-9)
•
CD-ROM (audio and data)
The drive is installed in the half-height drive bay above the hard disk drives, as shown
in Figure 2-6.
007-4643-003
31
2: System Overview
VPro™ Graphics Board
The VPro graphics board is located at the rear of your workstation. It connects to the back
side of the PCI riser board.
The VPro graphics board has the following features:
•
128 MB of onboard SDRAM.
•
Analog RGB and TMDS video on a single DVI-I monitor port.
•
Additional ports for Swap ready, Stereo View, and Genlock signals.
The VPro graphics board supports an optional Dual Channel Display daughterboard
which is equipped with two DVI-I monitor ports. The daughterboard connects to the
underside of the VPro graphics board and allows you to display data across two
monitors at once. For more information about the optional Dual Channel Display
daughterboard, contact your SGI sales representative or visit http://www.sgi.com.
For more information on the VPro graphics board and Dual Channel Display I/O ports,
see “VPro™ Graphics Board I/O Port Specifications” in Appendix A.
PCI Buses
The workstation provides slots for four 64-bit, 3.3-V PCI-X boards. The boards are
installed in slots on the PCI riser board. The slots are divided into 2 busses:
•
PCI bus 1 has two slots, numbered 1 and 2. Bus 1, slot 1 always contains the IO9
card.
Note: The IO9 board is a full-length PCI board that runs at 66 MHz. Installing a
PCI-X board on the same bus as the IO9 will force the PCI-X board to run at 66 MHz.
•
PCI Bus 2 has two slots, numbered 1 and 2.
•
Bus 1, slot 1 is the lowest slot. Bus 2, slot 2 is the highest slot.
•
These slots are labeled PCI 1, PCI 2, PCI 3, and PCI 4 on the outside of the enclosure.
PCI 1 corresponds to Bus 1, slot 1. PCI 4 corresponds to Bus 2, slot 2.
The optional second enclosure also contains a PCI riser board. The slot numbering and
bus speeds are identical to those in the base enclosure.
32
007-4643-003
System Components
See “PCI Boards” on page 34 or contact your SGI sales representative for a list of
available PCI boards.
Power Supply
The power supply for the workstation is located in the right front corner of the chassis,
as shown in Figure 2-7.
Power supply
Figure 2-7
Power Supply Location
The power supply accepts 110/220 VAC input and provides up to 500 watts of power at
12 VDC, 5 VDC, and -12 VDC. For detailed information about the power supply
specifications, see Appendix A, “Technical Specifications and Pinouts.” For installation
and removal instructions for the power supply, see “Power Supplies” on page 72.
007-4643-003
33
2: System Overview
Optional Components, Peripherals, and Upgrades
Various optional components, peripherals, and upgrades are available for your
workstation. The following sections give a brief overview of some of the available
products:
•
“PCI Boards” on page 34
•
“Memory Upgrades” on page 35
•
“Graphics Options” on page 35
•
“Storage Options” on page 35
•
“Displays” on page 36
•
“Peripherals” on page 36
PCI Boards
The following are some of the PCI boards that are available for your workstation:
•
SCSI boards:
Dual-port Ultra3 SCSI LVD or single-ended SCSI adapter
•
Fibre Channel boards:
Single-port 1-Gbit Fibre Channel board with optical or copper connector
Single- and dual-port 2-Gbit Fibre Channel boards with optical connectors
•
Networking boards:
33- and 64-MHz, 64-bit single-port ATM boards
1-port copper gigabit Ethernet adapter
1-port 1000BaseSX gigabit Ethernet adapter
•
Media boards:
DMediaPro DM8 Audio I/O PCI option
DMediaPro DM10 IEEE1394 Digital Audio/Video option
DMediaPro DM6 Standard-definition video I/O option
See SGI Supportfolio at http://support.sgi.com for an updated list of available cards.
34
007-4643-003
Optional Components, Peripherals, and Upgrades
Memory Upgrades
The following memory upgrades are available for the workstation:
•
512-MB DIMM pair
•
1-GB DIMM pair
•
2-GB DIMM pair
Note: The single-enclosure workstation supports a maximum of eight memory DIMMs
totalling eight GB. The dual-enclosure workstation can contain sixteen memory DIMMs,
totalling 16 GB. Memory DIMMs must be installed in pairs of the same size.
Graphics Options
The following are some of the optional graphics components available with your
workstation:
•
Dual-Channel Display daughterboard. This card attaches to the graphics board
and allows data to be displayed across two monitors. It has two DVI-I video ports.
•
Dual-head VPro™ graphics option. Dual-enclosure workstations can be
configured with a second VPro graphics board.
Storage Options
The following storage upgrades are available for the workstation:
•
Additional Internal Ultra SCSI hard disk drives
•
External SCSI DAT drive
•
Internal DVD-ROM drive
In addition to the items listed above, various other storage solutions are available from
SGI. For more information, contact your SGI sales representative.
007-4643-003
35
2: System Overview
Displays
The following displays are available with the workstation:
•
22-in. SGI cathode ray tube (CRT) monitor
•
24-in. SGI CRT monitor
•
Silicon Graphics flat panel display
Peripherals
The following peripherals are available with the workstation:
•
3-button mouse
•
Beeping keyboard
•
Speakers
For a complete list of available components, contact your SGI sales representative or see
the following website:
http://www.sgi.com/peripherals/workstation/index.html
36
007-4643-003
Chapter 3
3. Installing and Removing System Components
This chapter provides safety instructions to follow when using and maintaining your
workstation. It also describes how to install and remove some of the components of the
workstation. If the component you want to remove or install does not appear in this
chapter, please contact your service provider. The following information is covered in
this chapter:
•
“Safety Instructions” on page 37
•
“Accessing Internal System Components” on page 40
•
“PCI and PCI-X Cards” on page 42
•
“Disk Drives” on page 52
•
“Memory” on page 57
•
“L1 Controller Display” on page 67
•
“Power Supplies” on page 72
Safety Instructions
Before you perform any type of maintenance to your system, read the following safety
instructions:
007-4643-003
•
Follow all warnings and instructions marked on the product and noted in this and
other documentation included with the product.
•
Unplug this product from the wall outlet before you clean it. Do not use liquid
cleaners or aerosol cleaners. Use a damp cloth for cleaning.
•
Do not use this product near water.
•
Do not place this product or components of this product on an unstable cart, stand,
or table. The product may fall, causing serious damage to the product.
37
3: Installing and Removing System Components
•
Slots and openings on the cabinet and components are provided for proper
ventilation of the product. These slots and openings must not be blocked or
covered. This product should never be placed near or over a radiator or heat
register, or in a built-in installation unless proper ventilation is provided.
•
This product should be operated from the type of power indicated on the marking
label. If you are not sure of the type of power available, consult your dealer or local
power company.
•
Do not allow anything to rest on the power cord. Do not locate this product where
persons will walk on the cord.
•
Do not use extension cords with your SGI system.
•
Never push objects of any kind into this product through cabinet slots because they
may touch dangerous voltage points or short out parts that could result in a fire or
electric shock.
•
Never spill liquid of any kind on the product.
•
Do not attempt to service this product yourself except as noted in this guide.
Opening or removing covers of internal components may expose you to dangerous
voltage points or other risks. Refer all servicing to qualified service personnel.
•
Unplug this product from the wall outlet and refer servicing to qualified service
personnel under the following conditions:
–
If the power cord or plug is frayed or damaged.
–
If the product has been exposed to rain, water, or other type of liquid.
–
If the product does not operate normally when the operating instructions are
followed.
Note: Adjust only those controls that are covered by the operating instructions,
because improper adjustment of other controls may result in damage and will
often require extensive work by a qualified technician to restore the product to
normal condition.
•
38
–
If the product has been dropped or the cabinet has been damaged.
–
If the product exhibits a distinct change in performance, which indicates a need
for service.
Only qualified service personnel should replace a soldered lithium battery in the
workstation, and only with the same type or an equivalent type recommended by
007-4643-003
Safety Instructions
the manufacturer. Please see the “Lithium Battery Statement” on page 131 for more
information. The battery can explode if it is replaced incorrectly.
•
!
007-4643-003
Use only the proper type of power supply cord set (provided with the system) for
this unit.
Caution: Electronic equipment can be irreparably damaged by electrostatic discharge
(ESD). Always follow these preventive measures when you handle a system component:
- Remove a component from its antistatic bag only when you are ready to install it.
- If you handle a component before installation, do not place it on surfaces that produce
ESD (carpeting, for example) or near devices that create static electricity.
- Attach a static wrist strap to a grounded connection on your system when you install
or remove a component.
39
3: Installing and Removing System Components
Accessing Internal System Components
Follow these steps to remove and replace the enclosure cover and access internal
components:
1.
Power off the system. For instructions on how to power off the system, see “Using
the Workstation” in Chapter 1.
2. Disconnect all of the cables at the rear of the enclosure.
Warning: Components may be hot. To avoid injury, allow the components to cool
for approximately five minutes before you proceed with these instructions.
3. If your system is rackmounted, remove the four screws that secure the enclosure to
the front and rear rails of the rack.
4. With the help of another person, slide the enclosure out of the rack and place it on a
sturdy table or other suitable work surface.
5. Remove the ten Phillips screws and open the hinged cover (see Figure 3-1).
L
L
R
R
Figure 3-1
40
Removing the Enclosure Cover
007-4643-003
Accessing Internal System Components
6. Follow the instructions in this chapter for adding/removing the internal
components such as PCI cards or memory DIMMs.
7. After completing the procedure(s) needed, close the cover and install the ten
phillips screws that were removed in step 5 (see Figure 3-2).
8. If your system is rackmounted, proceed to the next step. If your system in not
rackmounted, proceed to step 11.
9. With the help of another person, slide the enclosure back into the rack.
10. Install the four screws you removed in step 3.
11. Connect all of the cables to the rear of the enclosure.
12. Power on the system. For instructions on how to power on the system, see “Using
the Workstation” in Chapter 1.
L
L
R
Figure 3-2
007-4643-003
R
Installing the Enclosure Cover
41
3: Installing and Removing System Components
PCI and PCI-X Cards
The workstation supports both PCI and PCI-X cards. The following procedure describes
how to install and remove a PCI or PCI-X card from the workstation. This procedure
applies to both the first enclosure and the optional second enclosure. Figure 3-3 shows
the location of the PCI and PCI-X card slots in both the first and second enclosures.
For an updated list of supported PCI and PCI-X cards, see SGI Supportfolio at
http://support.sgi.com.
This section explains how to perform the following procedures:
•
“Installing a Card” on page 42
•
“Removing a Card” on page 46
CONSOLE
1
2
L1 PORT
XIO
3
PCI 4
Bus 2, slot 2
PCI 3
Bus 2, slot 1
(optional audio)
PCI 2
Bus 1, slot 2
PCI 1
Bus 1, slot 1
(IO9)
4
NUMALINK
Figure 3-3
PCI and PCI-X Card Slots Located in the Rear Panel
Installing a Card
To install a PCI or PCI-X card, follow these steps:
1.
Remove the enclosure from the rack and open the hinged cover. See “Accessing
Internal System Components” on page 40 for complete instructions.
Warning: Components may be hot. To avoid injury, allow the components to cool
for approximately five minutes before you proceed with these instructions.
42
007-4643-003
PCI and PCI-X Cards
2. If you are installing a card in one of the two lower slots, remove the four Phillips
screws that secure the lower PCI/PCI-X support bracket to the enclosure (see
Figure 3-4).
L
R
Figure 3-4
007-4643-003
Removing the Lower PCI/PCI-X Support Bracket
43
3: Installing and Removing System Components
3. If a blanking plate covers the slot where you will install the card, remove the
retaining screw and blanking plate (see Figure 3-5).
R
Figure 3-5
R
Removing a Blanking Plate
4. Align the card with the slot you want to install it in. Push the card firmly into the
connector until it is properly seated and install the retaining screw (see Figure 3-6).
Figure 3-6
44
Installing the Card and Retaining Screw
007-4643-003
PCI and PCI-X Cards
5. If you have installed a card into one of the two lowermost slots, proceed to step 6. If
you have installed the card into one of the upper two slots, proceed to step 7.
6. Replace the lower PCI/PCI-X support bracket and install the four Phillips screws
that secure it to the enclosure (see Figure 3-7).
!
Caution: To prevent pinching and damaging of the IDE and SCSI cables, ensure that
these cables are tucked underneath the IO9 card and safely away from the lower
PCI/PCI-X support bracket.
L
R
Figure 3-7
007-4643-003
Replacing the Lower PCI/PCI-X Support Bracket
45
3: Installing and Removing System Components
7. Close the hinged cover on the enclosure and install the ten Phillips screws (see
Figure 3-2 on page 41).
8. If your system is rackmounted, proceed to the next step. If your system is
free-standing, proceed to step 11.
9. With the help of another person, slide the enclosure back into the rack.
10. Install the screws that secure the enclosure to the front and rear rails of the rack.
11. Reconnect all of the cables to the rear of the system.
12. Power on the system. For instructions on how to power on the system, see “Using
the Workstation” in Chapter 1.
Removing a Card
To remove a PCI or PCI-X card, follow these steps:
1.
Remove the enclosure from the rack and open the hinged cover. See “Accessing
Internal System Components” on page 40 for complete instructions.
Warning: Components may be hot. To avoid injury, allow the components to cool
for approximately five minutes before you proceed with these instructions.
46
007-4643-003
PCI and PCI-X Cards
2. If you are removing a card from one of the two lower slots, remove the four Phillips
screws that secure the lower PCI/PCI-X support bracket to the enclosure (see
Figure 3-8).
L
R
Figure 3-8
007-4643-003
Removing the Lower PCI/PCI-X Support Bracket
47
3: Installing and Removing System Components
3. Remove the retaining screw of the card you want to remove. Firmly grasp the edge
of the card and pull straight out to extract the card (see Figure 3-9). Place the card on
an ESD-safe surface.
Figure 3-9
Removing the Retaining Screw and Extracting the Card
4. If you are replacing the card you removed, proceed to “Installing a Card” on
page 42. Start with step 4 in that procedure to begin the card replacement. If you are
not replacing the card you removed, proceed to the next step.
48
007-4643-003
PCI and PCI-X Cards
5. Install a blanking plate in the slot and secure it with a screw (see Figure 3-10).
R
Figure 3-10
007-4643-003
R
Installing a Blanking Plate
49
3: Installing and Removing System Components
6. If you removed it, replace the lower PCI-PCI-X support bracket and install the four
Phillips screws that secure it to the enclosure (see Figure 3-11).
L
R
Figure 3-11
Replacing the Lower PCI/PCI-X Support Bracket
7. Close the hinged cover on the enclosure and install the ten Phillips screws (see
Figure 3-2 on page 41).
8. If your system is rackmounted, proceed to the next step. If your system is
free-standing, proceed to step 11.
9. With the help of another person, slide the enclosure back into the rack.
50
007-4643-003
PCI and PCI-X Cards
10. Install the screws that secure the enclosure to the front and rear rails of the rack.
11. Reconnect all of the cables to the rear of the system.
12. Power on the system. For instructions on how to power on the system, see “Using
the Workstation” in Chapter 1.
007-4643-003
51
3: Installing and Removing System Components
Disk Drives
The workstation enclosure can contain one or two sled-mounted Ultra 160 SCSI disk
drives (see Figure 3-12). This section explains how to install and remove a disk drive.
DVD-ROM drive
Disk drives
Figure 3-12
52
Disk Drive Location
007-4643-003
Disk Drives
Installing a Disk Drive
To install a disk drive, follow these steps:
1.
Open the bezel door on the left of the front panel as far as it will open. If there is
another drive or and empty sled in the bay you will install the new drive in, remove
it. See “Removing a Disk Drive” on page 55 for complete instructions.
2. Position the drive sled so that it engages the bay guide rails and, with the locking
handle fully swung open, gently push the sled into the bay until the locking handle
engages with left side of the bay opening (see Figure 3-13A).
Note: If you will have only one disk drive in your system, it should be located in the
bottom-most slot.
3. Swing the locking handle towards the chassis until the locking handle engages the
latch as shown in Figure 3-13B and Figure 3-13C.
4. Close the bezel door as shown in Figure 3-13D.
007-4643-003
53
3: Installing and Removing System Components
A
B
C
D
Figure 3-13
54
Installing a Disk Drive
007-4643-003
Disk Drives
Removing a Disk Drive
To remove a disk drive, follow these steps:
1.
If you are replacing a data drive, ensure that the drive has spun down before you
remove it.
2. If you are replacing the system drive, you must first halt the operating system using
a command such as /etc/shutdown or /etc/halt and then power off the
system.
3. Open the bezel door located on the left side of the front panel of the enclosure as
shown in Figure 3-14A. (Make sure that you open the door as far as it will open.)
4. To remove the drive, depress the locking handle with your forefinger (see
Figure 3-14B); then swing open the locking handle until the drive disconnects from
the backplane (see Figure 3-14C).
5. Carefully slide the drive sled out of the bay (see Figure 3-14D) and place it on a flat
ESD-safe surface. Do not use the handle to pull the drive out of the bay.
6. If you are replacing the drive, see “Installing a Disk Drive” on page 53 for
installation instructions. If you are not replacing the disk drive, install an empty
drive sled to maintain proper airflow.
7. Close the bezel door; then power on the system.
007-4643-003
55
3: Installing and Removing System Components
A
B
C
D
Figure 3-14
56
Removing a Disk Drive
007-4643-003
Memory
Memory
Memory is contained on small cards called DIMMs (dual inline memory modules). Each
workstation enclosure can contain two, four, six, or eight DIMMs. The DIMMs are
installed in eight slots located on the system node board.
These eight DIMM slots are organized into a group of even-numbered slots 0, 2, 4, and 6
and a group of odd-numbered slots 1, 3, 5, and 7, as shown in Figure 3-15 on page 58.
DIMMs are installed one per slot, and two at a time, so that the two DIMMs installed
provide local memory for the same pair of banks. For example, you can install a DIMM
in slot 0 and another in slot 1 (this adds memory to bank pairs 0 and 1). Table 3-1 lists the
DIMM slots and the corresponding bank pairs to which local memory is provided when
DIMMs are installed:
Table 3-1
DIMMs and Bank Pairs
DIMM in Slot
Number
Provides Local Memory for
Bank Pair Numbers
0a
0 and 1
1
0 and 1
2
2 and 3
3
2 and 3
4
4 and 5
5
4 and 5
6
6 and 7
7
6 and 7
a. The first two DIMMs must be installed in DIMM slot 0
and DIMM slot 1.
When installing DIMMs, you must follow these rules:
007-4643-003
•
Memory must be added and removed in two-DIMM increments only.
•
The two DIMMs that make up a bank pair must be the same memory size; however,
each pair of DIMMs can be a different memory size from another pair.
57
3: Installing and Removing System Components
•
The first two DIMMs must be installed in DIMM slot 0 and DIMM slot 1.
Subsequent DIMM pairs can be installed in any order, but for consistency they
should be installed in the next available DIMM slots.
•
The DIMMs used in the workstation are not compatible with the DIMMs used in
Origin 200, SGI 2000 series, Onyx2, or Octane systems.
Figure 3-15
!
Slot 7
Slot 5
Slot 3
Slot 1
DIMM pair 4
DIMM pair 3
DIMM pair 2
DIMM pair 1
Slot 6
Slot 4
Slot 2
Slot 0
DIMM pair 4
DIMM pair 3
DIMM pair 2
DIMM pair 1
Layout of DIMM Slots and Local Memory Banks
Caution: Electronic equipment can be irreparably damaged by electrostatic discharge
(ESD). Always follow these preventive measures when you handle a system component:
- Remove a component from its antistatic bag only when you are ready to install it.
- If you handle a component before installation, do not place it on surfaces that produce
ESD (carpeting, for example) or near devices that create static electricity.
58
007-4643-003
Memory
- Attach a static wrist strap to a grounded connection on your system when you install
or remove a component.
Installing a DIMM
To install a DIMM, follow these steps:
1.
Remove the enclosure from the rack. See “Accessing Internal System Components”
on page 40 for complete instructions.
Warning: Components may be hot. To avoid injury, allow the components to cool
for approximately 5 minutes before you proceed with these instructions.
2. To access the DIMMs, remove the ten Phillips screws and open the hinged cover (see
Figure 3-16).
L
L
R
R
Figure 3-16
007-4643-003
Opening the Enclosure Cover to Install DIMMs
59
3: Installing and Removing System Components
3. Remove the plastic air baffle covering the DIMMs (see Figure 3-17).
Air baffle
Figure 3-17
Removing the Plastic Air Baffle
4. Install a DIMM as follows (see Figure 3-18):
a.
Open the ejector latches on the DIMM sockets.
b. Grasp the DIMM by its edges and carefully remove it from its antistatic
package.
c.
Align the three notches on the bottom edge of the DIMM with the keyed socket.
d. Insert the bottom edge of the DIMM into the socket, and then press straight
down on the DIMM until it seats correctly. Use extreme care when you install a
DIMM. If you apply too much pressure, you can damage the socket.
60
e.
Push the plastic ejector latches down to secure the DIMM (see Figure 3-18).
When the DIMM is fully seated in the connector, the ejector latches will snap
into place.
f.
Repeat steps a through e to install the second DIMM.
007-4643-003
Memory
Ejector latch
Ejector latch
Figure 3-18
007-4643-003
Inserting a DIMM
61
3: Installing and Removing System Components
5. Replace the plastic air baffle.
6. Close the hinged cover on the enclosure and install the ten Phillips screws (see
Figure 3-2 on page 41).
7. If your system is rackmounted, proceed to the next step. If your system is
free-standing, proceed to step 10.
8. Using two people, slide the enclosure back into the rack.
9. Install the screws that secure the enclosure to the front and rear rails of the rack.
10. Reconnect all of the cables to the rear of the system.
11. Power on the system. For instructions on how to power on the system, see “Using
the Workstation” in Chapter 1.
62
007-4643-003
Memory
Removing a DIMM
To remove a DIMM, follow these steps:
1.
Remove the enclosure from the rack. See “Accessing Internal System Components”
on page 40 for complete instructions.
Warning: Components may be hot. To avoid injury, allow the components to cool
for approximately 5 minutes before you proceed with these instructions.
2. To access the DIMMs, remove the ten Phillips screws shown in Figure 3-19 and open
the hinged cover.
L
L
R
R
Figure 3-19
007-4643-003
Opening the Enclosure Cover to Remove DIMMs
63
3: Installing and Removing System Components
3. Remove the plastic air baffle covering the DIMMs (see Figure 3-20).
Air baffle
Figure 3-20
Removing the Plastic Air Baffle
4. Remove a DIMM as follows (see Figure 3-21):
a.
Lift the two ejector latches simultaneously to disengage the DIMM from its
connector.
b. Carefully grasp the ends of the DIMM and pull it straight up and out of the
guide rails.
Note: Hold the DIMM only by its edges. Be careful not to touch its components
or gold edge connectors.
c.
Place the DIMM on an ESD-safe surface.
d. Repeat steps a through c to remove the other DIMM in the pair.
64
007-4643-003
Memory
Ejector latch
Ejector latch
Figure 3-21
007-4643-003
Removing a DIMM
65
3: Installing and Removing System Components
5. If you are replacing the DIMMs you removed, proceed to “Installing a DIMM” on
page 59.
6. Replace the plastic air baffle.
7. Close the hinged cover on the enclosure and install the ten Phillips screws (see
Figure 3-2 on page 41).
8. If your system is rackmounted, proceed to the next step. If your system is
free-standing, proceed to step 11.
9. Using two people, slide the enclosure back into the rack.
10. Install the screws that secure the enclosure to the front and rear rails of the rack.
11. Reconnect all of the cables to the rear of the system.
12. Power on the system. For instructions on how to power on the system, see “Using
the Workstation” in Chapter 1.
66
007-4643-003
L1 Controller Display
L1 Controller Display
The L1 controller, which is used to monitor and manage the workstation, has a display
located on the front panel as shown in Figure 3-22. Every workstation enclosure is factory
shipped with an L1 controller display. This section describes how to replace an L1
controller display panel.
L1 controller display
Figure 3-22
L1 Controller Display on the Front Panel
To replace an L1 controller display, follow these steps:
1.
Remove the enclosure from the rack. See “Accessing Internal System Components”
on page 40 for complete instructions.
Warning: Components may be hot. To avoid injury, allow the components to cool
for approximately five minutes before you proceed with these instructions.
007-4643-003
67
3: Installing and Removing System Components
2. To access the area where the L1 display is replaced, remove the ten Phillips screws
and open the hinged cover (see Figure 3-23).
L
L
R
R
Figure 3-23
Opening the Enclosure Cover to Access the L1 Controller Display
3. Remove the front bezel by unscrewing the two Phillips screws that hold the bezel to
the enclosure (see Figure 3-24A).
4. Hold the L1 display cover with one hand. Remove the single Phillips screw that
holds the L1 display cover to the chassis (see Figure 3-24B). Gently separate the L1
display cover from the chassis.
5. Remove the two Phillips screws that hold the L1 controller display panel to the L1
display protective cover (see Figure 3-24C).
6. Gently disconnect the L1 controller cable from the connector on the L1 controller
display (see Figure 3-24D).
68
007-4643-003
L1 Controller Display
A
B
Hook slots
D
C
Figure 3-24
007-4643-003
Removing the L1 Controller Display Panel
69
3: Installing and Removing System Components
7. Connect the L1 controller cable to the new L1 controller display. Ensure that the red
stripe on the cable is to your left (see Figure 3-25A).
8. Align the two screw holes on the L1 controller display with the holes on the L1
display protective cover; then install the two Phillips screws that secure the display
to the cover (see Figure 3-25B).
A
B
Red stripe
C
D
A
Hook slots
Figure 3-25
70
Installing an L1 Controller Display Panel
007-4643-003
L1 Controller Display
9. Align the hooks on the L1 display cover with the slots on the front of the chassis.
Hold the L1 display against the chassis and install the Phillips screw that secures it
(see Figure 3-25C).
10. Install the bezel on the front of the system. Secure it with the two Phillips screws
you removed earlier (see Figure 3-25D).
11. Close the hinged cover on the enclosure and install the ten Phillips screws (see
Figure 3-2 on page 41).
12. If your system is rackmounted, proceed to the next step. If your system is
free-standing, proceed to step 15.
13. Using two people, slide the enclosure back into the rack.
14. Install the screws that secure the enclosure to the front and rear rails of the rack.
15. Reconnect all of the cables to the rear of the system.
16. Power on the system. For instructions on how to power on the system, see “Using
the Workstation” in Chapter 1.
007-4643-003
71
3: Installing and Removing System Components
Power Supplies
Each workstation enclosure contains one power supply (see Figure 3-26). This section
provides the following information:
•
“Reading the Power Supply LEDs” on page 73
•
“Replacing the Power Supply” on page 74
Power supply
Figure 3-26
72
Power Supply Location
007-4643-003
Power Supplies
Reading the Power Supply LEDs
The LED located on the front (towards the top) of the power supply indicates the
condition of the power supply. Table 3-2 lists the conditions the LED indicates.
Table 3-2
LED Status and Power Supply Condition
LED Status
Power Supply Condition Indicated
Off
This indicates that the power supply is not receiving AC power. Possible
causes: the system is not plugged in correctly or a electrical fuse has blown.
Amber
This indicates fault condition for one of the following reasons:
- The voltage limit has been exceeded.
- The temperature limit has been exceeded.
- The current limit has been exceeded.
007-4643-003
Blinking green
The power supply is receiving AC power, but the main primary DC power has
not yet activated.
Green
The power supply is operating properly.
73
3: Installing and Removing System Components
Replacing the Power Supply
To replace the power supply, follow these steps:
1.
Power off the system as described in the “Using the Workstation” on page 9.
2. Remove the power supply as follows:
a.
Swing open the bezel door located on the right side of the front panel. Remove
the two Phillips screws on the screen cover (see Figure 3-27A).
b. Swing open the screen cover (see Figure 3-27B).
c.
Disengage the power supply from the power supply bay by pushing the
interior release button to the right and pulling up and out on the green-colored
handle lock (see Figure 3-27C).
d. Gently pull the power supply out of the chassis until it clears the bay (see
Figure 3-27D). Place the power supply on an ESD-safe surface.
!
74
Caution: When pulling out the power supply from the chassis, do not disturb
the power supply fan ribbon cable.
007-4643-003
Power Supplies
A
B
Ribbon cable
Bezel door
D
C
Figure 3-27
007-4643-003
Removing the Power Supply
75
3: Installing and Removing System Components
3. Install the replacement power supply as follows:
a.
Move the handle on the replacement power supply to the fully open position.
Align the power supply with the bay opening and gently slide it into the bay
(see Figure 3-28A).
Caution: When installing the power supply, ensure that the power supply does
not clip or pinch the power supply fan ribbon cable.
b. Push in and down on the green-colored handle to fully seat the power supply
(see Figure 3-28B).
c.
!
Close the screen cover (see Figure 3-28C).
Caution: When closing the screen cover, make sure that the cover does not clip
or pinch the power supply fan’s ribbon cable.
d. Install the two Phillips screws that secure the screen cover and close the bezel
door (see Figure 3-28D).
4. Power on the system, as described in the “Using the Workstation” on page 9.
76
007-4643-003
Power Supplies
A
B
Ribbon cable
C
D
Screen cover
Bezel door
Figure 3-28
007-4643-003
Installing the Power Supply
77
Chapter 4
4. Troubleshooting
If you are experiencing problems with your Silicon Graphics® Tezro™ visual
workstation, and are unable to resolve them using the information in this chapter, contact
your service provider:
•
If you are located in North America, contact the Technical Assistance Center at
1 800 800 4SGI. SGI personnel will guide you through the troubleshooting process.
•
If you are located outside of North America, contact your local SGI subsidiary or
authorized distributor.
This chapter provides the following sections to help you troubleshoot your system:
007-4643-003
•
“Troubleshooting Chart” on page 80
•
“L1 Controller Error Messages” on page 81
•
“SGI Electronic Support” on page 83
79
4: Troubleshooting
Troubleshooting Chart
Table 4-1 lists recommended actions for problems that can occur on your system. For
problems that are not listed in this table, use the SGI Electronic Support system (see “SGI
Electronic Support” on page 83) or contact your SGI system support engineer (SSE).
Table 4-1
Troubleshooting Chart
Problem Description
Recommended Action
The system will not power on.
Ensure that the power cord of the PDU is seated
properly in the power receptacle.
Ensure that the PDU circuit breaker is on.
Ensure that the power switch at the rear of the
module is on (position 1).
Check the power input connection on the rear of the
module.
View the L1 display; see Table 4-2 if an error message
is present.
If the L1 controller is not running, contact your SSE.
80
The system will not boot the operating
system.
Contact your SSE.
The service-required LED illuminates on
either workstation enclosure.
View the L1 display of the failing enclosure; see
Table 4-2 for a description of the error message.
The failure LED illuminates on either
workstation enclosure.
View the L1 display of the failing module; see
Table 4-2 for a description of the error message.
If the green or yellow LED of the
NUMAlink port is not illuminated on a
dual-enclosure workstation.
Ensure that the NUMAlink cable is seated properly
on the workstation enclosures.
The PWR LED of a populated PCI slot is
not illuminated.
Reseat the PCI card.
The fault LED of a populated PCI slot is
illuminated (on).
Reseat the PCI card. If the fault LED remains on,
replace the PCI card.
The amber LED of a disk drive is on.
Replace the disk drive.
007-4643-003
L1 Controller Error Messages
L1 Controller Error Messages
Table 4-2 lists error messages that the L1 controller generates and displays on the L1
display. This display is located on the front of the workstation and expansion module.
Note: In Table 4-2, a voltage warning occurs when a supplied level of voltage is below
or above the nominal (normal) voltage by 10 percent. A voltage fault occurs when a
supplied level is below or above the nominal voltage by 20 percent.
Table 4-2
L1 Controller Messages
L1 System Controller Message
Message Meaning and Action Needed
Internal voltage messages:
ATTN: x.xV high fault limit reached @ x.xxV
30-second power-off sequence for the module.
ATTN: x.xV low fault limit reached @ x.xxV
30-second power-off sequence for the module.
ATTN: x.xV high warning limit reached @
x.xxV
A higher than nominal voltage condition is
detected.
ATTN: x.xV low warning limit reached @ x.xxV A lower than nominal voltage condition is
detected.
ATTN: x.xV level stabilized @ x.xV
A monitored voltage level has returned to
within acceptable limits.
Fan messages:
007-4643-003
ATTN: FAN # x warning limit reached @ xx
RPM
A fan has increased its RPM level. Check the
ambient temperature. Ensure that adequate
front and rear clearance is provided for proper
air flow. Check to see if the fan stabilizes.
ATTN: FAN # x stabilized @ xx RPM
An increased fan RPM level has returned to
normal.
ATTN: FAN # x fault limit reached @ xx RPM
A fan is not meeting its minimum RPM level.
Check to see if a fan has failed.
81
4: Troubleshooting
Table 4-2
L1 Controller Messages (continued)
L1 System Controller Message
Message Meaning and Action Needed
Temperature messages:
ATTN: TEMP # advisory temperature reached
@ xxC xxF
The temperature within the enclosure is greater
than target temperature and the fans are
running at 80% of maximum RPM.
Lower the ambient temperature of the room.
Ensure that adequate front and rear clearance is
provided for proper air flow. Check for air-flow
obstructions.
ATTN: TEMP # critical temperature reached
@ xxC xxF
The temperature within the enclosure is 6 °C
greater than target temperature and the fans are
running at 100% RPM.
Lower the ambient temperature of the room.
Ensure that adequate front and rear clearance is
provided for proper air flow. Check for air-flow
obstructions.
ATTN: TEMP # fault temperature reached
@ xxC xxF
The temperature within the enclosure is 10 °C
greater than target temperature and the fans are
running at 100% RPM.
Lower the ambient temperature of the room.
Ensure that adequate front and rear clearance is
provided for proper air flow. Check for air-flow
obstructions.
Temperature stable message:
ATTN: TEMP # stabilized @ xxC/xxF
The ambient temperature at the module’s air
inlet has returned to an acceptable level.
Power off messages:
82
Auto power down in xx seconds
The L1 controller has registered a fault and is
shutting down. The message displays every
five seconds until shutdown.
Base module appears to have been powered
down
The L1 controller has registered a fault and has
shut down.
007-4643-003
SGI Electronic Support
SGI Electronic Support
SGI Electronic Support provides system support and problem-solving services that
function automatically, which helps resolve problems before they can affect system
availability or develop into actual failures. SGI Electronic Support integrates several
services so they work together to monitor your system, notify you if a problem exists,
and search for solutions to the problem.
Figure 4-1 shows the sequence of events that occurs if you use all of the SGI Electronic
Support capabilities.
1
Customer's system
e-mail
2
6
Page or e-mail
alert
Implement
solution
View the case
solutions
3
SGI global
customer support
center
5
Supportfolio Online
SGI customer and
SGI support engineer
4
SGI Knowledgebase
Figure 4-1
007-4643-003
Full Support Sequence
83
4: Troubleshooting
The sequence of events can be described as follows:
1.
Embedded Support Partner (ESP) monitors your system 24 hours a day.
2. When a specified system event is detected, ESP notifies SGI via e-mail (plain text or
encrypted).
3. Applications that are running at SGI analyze the information, determine whether a
support case should be opened, and open a case if necessary. You and SGI support
engineers are contacted (via pager or e-mail) with the case ID and problem
description.
4. SGI Knowledgebase searches thousands of tested solutions for possible fixes to the
problem. Solutions that are located in SGI Knowledgebase are attached to the
service case.
5. You and the SGI support engineers can view and manage the case by using
Supportfolio Online as well as search for additional solutions or schedule
maintenance.
6. Implement the solution.
Most of these actions occur automatically, and you may receive solutions to problems
before they affect system availability. You also may be able to return your system to
service sooner if it is out of service.
In addition to the event monitoring and problem reporting, SGI Electronic Support
monitors both system configuration (to help with asset management) and system
availability and performance (to help with capacity planning).
84
007-4643-003
SGI Electronic Support
The following three components compose the integrated SGI Electronic Support system:
SGI Embedded Support Partner (ESP) is a set of tools and utilities that are embedded in
the IRIX operating system. ESP can monitor a single system or group of systems for
system events, software and hardware failures, availability, performance, and
configuration changes, and then perform actions based on those events. ESP can detect
system conditions that indicate potential problems, and then alert appropriate personnel
by pager, console messages, or e-mail (plain text or encrypted). You also can configure
ESP to notify an SGI call center about problems; ESP then sends e-mail to SGI with
information about the event.
SGI Knowledgebase is a database of solutions to problems and answers to questions
that can be searched by sophisticated knowledge management tools. You can log on to
SGI Knowledgebase at any time to describe a problem or ask a question. Knowledgebase
searches thousands of possible causes, problem descriptions, fixes, and how-to
instructions for the solutions that best match your description or question.
Supportfolio Online is a customer support resource that includes the latest information
about patch sets, bug reports, and software releases.
The complete SGI Electronic Support services are available to customers who have a
valid SGI Warranty, FullCare, FullExpress, or Mission-Critical support contract. To
purchase a support contract that allows you to use the complete SGI Electronic Support
services, contact your SGI sales representative. For more information about the various
support contracts, see the following website:
http://www.sgi.com/support/customerservice.html
For more information about SGI Electronic Support, see the following website:
http://www.sgi.com/support/es
007-4643-003
85
Appendix A
A. Technical Specifications and Pinouts
This chapter contains technical information about the rackmount configuration of the
Silicon Graphics® Tezro™ visual workstation. The following topics are covered:
007-4643-003
•
“Physical and Environmental Specifications” on page 88
•
“Power Supply Specifications” on page 89
•
“I/O Connector Specifications” on page 90
•
“VPro™ Graphics Board I/O Port Specifications” on page 100
•
“Rack Specifications” on page 106
87
A: Technical Specifications and Pinouts
Physical and Environmental Specifications
Table A-1 shows the physical and environmental specifications for the workstation
enclosure.
Table A-1
Physical and Environmental Specifications
Feature
Specification
Dimensions
Height: 8.8 cm (3.44 in.)
Width: 43.36 cm (17.06 in.)
Depth: 67.05 cm (26.4 in.) (including bezel)
Weight
Minimum: 17.9 kg (39.5 lb)
Maximum: 19.3 kg (42.5 lb)
Power requirements
50-60 Hz and 100-120/200-240 VAC
Voltage and frequency
100-240 VAC, 50-60 Hz, 7-3 A, 430 W
Temperature tolerance
(operating)
+5 oC (41 oF) to +45 oC (113 oF) 1500 m (5000 ft) ASL or less
Temperature tolerance
(non-operating)
-40 oC (-40 oF) to +60 oC (140 oF)
Relative humidity
10% to 95% RH, non-condensing
Heat dissipation
1900 Btu/hr maximum
Maximum altitude
+5 oC (41 oF) to +35 oC (95 oF) 1500 m (5000 ft) ASL to 3000 m
(10,000 ft) ASL
Sea level to 3,000 m (10,000 ft.)operating
Sea level to 12,200 m (40,000 ft.)non-operating
Vibration, sine sweep (operating)
0.25 G, 5-500-5 Hz
Vibration, sine sweep
(non-operating)
0.5 G, 3-200-3 Hz
Vibration, random (operating)
0.10 Grms for 15 minutes
Vibration, random (non- operating) 1.15 Grms for 15 minutes
Shock, half-sine wave (operating)
88
30 G, 3 msec (vertical); 15 G, 3 msec. (horizontal)
007-4643-003
Power Supply Specifications
Table A-1
Physical and Environmental Specifications (continued)
Feature
Specification
Shock, trapezoidal wave
(non-operating)
30 G, 200 in./sec.
Sound power
5.6 bels up to +25 oC (77 oF)
Power Supply Specifications
Table A-2 shows the power supply specification for the rack-mountable workstation
Table A-2
007-4643-003
Power Supply Specification
Feature
Specification
Input voltage rating
120/240 VAC auto-sensing (~563W)
89
A: Technical Specifications and Pinouts
I/O Connector Specifications
Table A-3 and Figure A-1 list the non-proprietary connectors that are located on the rear
panel of the workstation. This section discusses these ports.
Table A-3
Workstation Connectors
Port
Connector
Pin Assignments
Ethernet port (IO9 only)
RJ-45
See Figure A-2 on page 92
Keyboard and mouse ports 9-pin mini-DIN
See Figure A-3 on page 93 and
Table A-5 on page 93
Serial ports 1 through 4a
DB9
See Figure A-4 on page 94
L1 console port
DB9
See Figure A-4 on page 94
External SCSI port (with
IO9 only)
SCSI 68-pin VHDCI
See Figure A-5 on page 96 and
Table A-7 on page 96
RT interrupt input and
output ports (IO9 only)
Stereo jack
See Figure A-6 on page 98 and
Table A-8 on page 98
USB-A port on optional
USB card
USB-A
See Figure A-7 on page 99 and
Table A-9 on page 99
a. Serial ports 2, 3, and 4 and the keyboard and mouse reside on a daughtercard. This daughtercard is
only present in the first enclosure of the workstation.
90
007-4643-003
I/O Connector Specifications
StereoView
Swap
ready DVI-I Video
Genlock
Keyboard
Console port
Mouse
Ethernet port
RTO (output)
RTI (input)
External SCSI
connector
PCI 4
PCI 3
CONSOLE
2
3
4
PCI 2
1
L1 PORT
XIO
NUMALINK
PCI 1
L1 port
Serial port 1
Figure A-1
007-4643-003
Serial
port 2
Serial
port 3
Serial
port 4
Rear Panel Connectors
91
A: Technical Specifications and Pinouts
Ethernet 10/100/1000BaseT Port
The Ethernet port is located on the IO9 board. The workstation auto-selects the Ethernet
port speed and type (duplex vs. half-duplex) when the workstation is booted, based on
what it is connected to. Figure A-2 shows the Ethernet port.
Pin 4
Pin 3
Pin 5
Pin 6
Pin 2
Pin 7
Pin 1
Figure A-2
Pin 8
Ethernet 10/100/1000BaseT Port Pinout
Table A-4 shows the cable pinout assignments for the Ethernet port.
Table A-4
92
Ethernet Connector Pin Assignments
10/100BaseT Ethernet
Pinouts
10/100BaseT Ethernet
Pinouts
1000BaseT Ethernet
Pinouts
1000BaseT Ethernet
Pinouts
Pin
Assignment
Pin
Assignment
1
Transmit +
1
Transmit/Receive 0+
2
Transmit –
2
Transmit/Receive 0–
3
Receive +
3
Transmit/Receive 1+
4
Not used
4
Transmit/Receive 2+
5
Not used
5
Transmit/Receive 2–
6
Receive –
6
Transmit/Receive 1–
7
Not used
7
Transmit/Receive 3+
8
Not used
8
Transmit/Receive 3–
007-4643-003
I/O Connector Specifications
Keyboard and Mouse Connectors
The workstation uses keyboards and mice that are PS/2-compatible. The combined
current draw of the keyboard and mouse is limited to 0.5 A at +5 V. Figure A-3 shows an
example of the 6-pin mini-DIN connectors to which the keyboard and mouse connect.
6
5
4
3
1
Figure A-3
2
PS/2 Keyboard and Mouse Port Pinout
Table A-5 shows the pinout assignment for the keyboard and mouse ports.
Table A-5
007-4643-003
Keyboard and Mouse Port Pinout
Pin
Assignment
1
Keyboard/mouse data
2
(Reserved)
3
Ground
4
Keyboard/mouse power (+5 V)
5
Keyboard/mouse clock
6
(Reserved)
93
A: Technical Specifications and Pinouts
Serial Ports
The workstation features four 9-pin serial ports. These ports are capable of transferring
data at rates as high as 230 kbps. Other features of the ports include the following:
•
Programmable data, parity, and stop bits
•
Programmable baud rate and modem control
Figure A-4 shows a serial port.
Pin 2
Receive data
(RD)
Pin 3
Transmit
data (TD)
Pin 1
Data carrier
detect (DCD)
(not used)
Pin 4
Data terminal
ready (DTR)
(not used)
Pin 5
Ground
Pin 6
Data set
ready (DSR)
(not used)
Pin 7
Request to
send (RTS)
Figure A-4
94
Pin 9
Ringing indicator (RI)
(not used)
Pin 8
Clear to send
(CTS)
Serial Port Pinouts and Locations
007-4643-003
I/O Connector Specifications
Table A-6 shows pinout assignments for the 9-pin male DB-9 connector.
Serial Port Pinout
Table A-6
007-4643-003
Pin
Assignment
Description
1
DCD
Data carrier detect
2
RXD
Receive data
3
TXD
Transmit data
4
DTR
Data terminal ready
5
GND
Signal ground
6
DSR
Data set ready
7
RTS
Request to send
8
CTS
Clear to send
9
RI
Ring indicator
95
A: Technical Specifications and Pinouts
External SCSI Port Connector
Figure A-5 shows the external SCSI VHDCI connector pin locations for the external SCSI
connector. This connector is used on the IO9 PCI card. Table A-7 lists the pin assignments
for this SCSI connector.
96
34
1
68
35
Figure A-5
External SCSI Port Pin Number Locations
Table A-7
SCSI VHDCI Pin Assignments
Pin Number
Signal Name
Pin Number
Signal Name
1
+DB (12)
35
-DB (12)
2
+DB (13)
36
-DB (13)
3
+DB (14)
37
-DB (14)
4
+DB (15)
38
-DB (15)
5
+DB (P1)
39
-DB (P1)
6
+DB (0)
40
-DB (0)
7
+DB (1)
41
-DB (1)
8
+DB (2)
42
-DB (2)
9
+DB (3)
43
-DB (3)
10
+DB (4)
44
-DB (4)
11
+DB (5)
45
-DB (5)
12
+DB (6)
46
-DB (6)
13
+DB (7)
47
-DB (7)
14
+DB (P0)
48
-DB (P0)
15
Ground
49
Ground
16
DIFFSENS
50
Ground
007-4643-003
I/O Connector Specifications
Table A-7
007-4643-003
SCSI VHDCI Pin Assignments (continued)
Pin Number
Signal Name
Pin Number
Signal Name
17
TERMPWR
51
TERMPWR
18
TERMPWR
52
TERMPWR
19
Reserved
53
Reserved
20
Ground
54
Ground
21
+ATN
55
-ATN
22
Ground
56
Ground
23
+BSY
57
-BSY
24
+ACK
58
-ACK
25
+RST
59
-RST
26
+MSG
60
-MSG
27
+SEL
61
-SEL
28
+CD
62
-CD
29
+REQ
63
-REQ
30
+IO
64
-IO
31
+DB (8)
65
-DB (8)
32
+DB (9)
66
-DB (9)
33
+DB (10)
67
-DB(10)
34
+DB (11)
68
-DB (11)
97
A: Technical Specifications and Pinouts
Stereo Jack Connector Conductor
Figure A-6 shows the stereo jack connector conductors that are used for the RT interrupt
input and RT interrupt output ports of the IO9 PCI card. Table A-8 lists the conductor
assignments for the stereo jack connector.
Ring
Tip
Sleeve
98
Figure A-6
Stereo Jack Connector Conductors
Table A-8
Stereo Jack Connector Conductor Assignments
Conductor
Function
Tip
+5 V
Ring
Interrupt (active low)
Sleeve
Chassis ground and cable shield
007-4643-003
I/O Connector Specifications
USB Type A Connector
Figure A-7 shows the USB type A connector that is used on the optional USB PCI card.
Table A-9 lists the pin assignments.
1 2 3 4
007-4643-003
Figure A-7
USB Type A Connector Pin Number Locations
Table A-9
USB Type A Connector Pin Assignments
Signal
Color
Pin Number
VCC
Red
1
-Data
White
2
+Data
Green
3
Ground
Black
4
99
A: Technical Specifications and Pinouts
VPro™ Graphics Board I/O Port Specifications
This section provides specifications for the following boards and ports:
•
“Graphics Board Scan Rates” on page 100
•
“DVI-I Video Port” on page 101
•
“Stereo View Port” on page 103
•
“Genlock Port” on page 104
•
“Swap Ready Port” on page 105
Graphics Board Scan Rates
Table A-10 lists the resolutions and frequencies supported by the graphics board.
Table A-10
100
Supported VPro Graphics Board Scan Rates
Resolution
Refresh Rate
1024x768
60 Hz,75 Hz, and 96 Hz-stereo
1280x1024
59, 60, 72, 75, 85 Hz, and 96 Hz-stereo
1280x1024
100 Hz Stereo (also through DCD-2)
1280x720
60 and 72 Hz
1280x1024
30 Hz interlaced
1280x960
30 Hz interlaced
1600x1024
83 Hz
1600x1200
60, 72, and 75 Hz
1920x1035
30 Hz interlaced
1920x1080
30 Hz interlaced
1920x1200
60 Hz
1920x1200
25 and 30 Hz
007-4643-003
VPro™ Graphics Board I/O Port Specifications
DVI-I Video Port
Figure A-8 shows the DVI-I video port and Table A-11 shows the port pinout
assignments for DVI-I port(s).
C1 C2
1
8
9
C5
17
24
C3 C4
Figure A-8
007-4643-003
DVI-I Port Pinout and Location
101
A: Technical Specifications and Pinouts
Table A-11
102
DVI-I Video Port Pinout
Pin
Assignment
Pin
Assignment
1
DATA 2-
16
HOT_POWER
2
DATA2+
17
DATA 0-
3
SHIELD 2/4
18
DATA 0+
4
DATA 4-
19
SHIELD 0/5
5
DATA 4+
20
DATA 5-
6
DDC_CLOCK
21
DATA 5+
7
DDC_DATA
22
SHIELD CLOCK
8
VSYNC
23
CLOCK -
9
DATA 1-
24
CLOCK +
10
DATA1+
C1
A_RED
11
SHIELD 1/3
C2
A_GREEN
12
DATA 3-
C3
A_BLUE
13
DATA 3+
C4
HYNSC
14
DDC_POWER
C5
A_GROUND2
15
A_GROUND1
C6
A_GROUND3
007-4643-003
VPro™ Graphics Board I/O Port Specifications
Stereo View Port
The following diagram shows the Stereo View port.
1
3
2
Figure A-9
Stereo View Port Pinout
Table A-12 shows the cable pinout assignments for the Stereo View port on the graphics
board.
Table A-12
007-4643-003
Stereo View Pinout Assignments
Pin
Assignment
1
+12 VDC output to Stereo View device
2
Ground
3
Stereo left/right Eye signal (1=left, 0=right) (STEREO_LEFT)
103
A: Technical Specifications and Pinouts
Genlock Port
The following diagram shows the Genlock port.
1
2
Figure A-10
Genlock Port Pinout
Table A-13 shows the cable pinout assignments for the Genlock port on the graphics
board.
Table A-13
104
Genlock Pinout Assignments
Pin
Assignment
1
Genlock input/output video or 3.3-V TTL signal levels
2
Signal - return ground
007-4643-003
VPro™ Graphics Board I/O Port Specifications
Swap Ready Port
The following diagram shows the Swap Ready port.
2
1
Figure A-11
Swap Ready Port Pinout
Table A-14 shows the cable pinout assignments for the Swap ready port on the graphics
board.
Table A-14
007-4643-003
Swap Ready Pinout Assignments
Pin
Assignment
1
Swapbuffer gang sync open Collector I/O
2
Signal return ground
105
A: Technical Specifications and Pinouts
Rack Specifications
The workstation can be mounted in any industry-standard 19-in. rack. The following
specification are for short (17U) and tall (39U) SGI racks.
Note: One U is 1.75 in. (4.45 cm).
Table A-15 lists the specifications of the short rack.
Table A-15
Short Rack Specifications
Characteristic
Specification
Height
36.06 in. (916 mm)
Width
25.38 in. (645 mm)
Depth
40.63 in. (1032 mm)
Weight (maximum)
488 lb (221 kg)
Shipping weight (maximum)
563 lb (255 kg)
Table A-16 lists the specifications of the tall rack.
Table A-16
106
Tall-rack Specifications
Characteristic
Specification
Height
75.82 in. (1925.83 mm)
Width
23.62 in. (599.95 mm)
Depth
41.25 in. (1048 mm)
Weight (maximum)
1,100 lb (499 kg)
Shipping weight (maximum)
1,281 lb (581 kg)
007-4643-003
Appendix B
B. Rackmounting Rail Installation Instructions
This appendix provides instructions for installing your Silicon Graphics® Tezro™ visual
workstation in a rack in the following sections:
•
“Space Requirements” on page 107
•
“Rackmounting Hardware” on page 108
•
“Preparing the Slide Rail Assemblies” on page 109
•
“Preparing the Module” on page 112
•
“Determining Where to Attach the Slide Rail in the Rack” on page 113
•
“Attaching the Slide Rail to the Rack” on page 114
•
“Installing Clip Nuts in Rack Rails” on page 117
•
“Installing Modules in the Rack” on page 118
•
“Adjusting the Position of the Rackmounted Module” on page 120
Space Requirements
Table B-1 specifies the space requirements for the workstation when it is installed in a
19-inch rack.
Table B-1
007-4643-003
Space Requirements
Feature
Specification
Height
3.46 in. (8.79 cm)
Width
19.0 in. (48.3 cm)
Depth
27.0 in. (68.6 cm)
Required front clearance for module
8.25 in. (20.96 cm)
107
B: Rackmounting Rail Installation Instructions
Table B-1
Space Requirements (continued)
Feature
Specification
Required rear clearance for module
10.00 in. (25.40 cm)
Required front clearance for rack
36 in. (91 cm)
Required rear clearance for rack
36 in. (91 cm)
Note: The measurements listed in Table B-1 are for a single-enclosure workstation.
Rackmounting Hardware
Table B-2 lists the hardware that you will need to mount the module in a 19-in. rack.
Table B-2
Rackmounting Hardware
Hardware Type
108
Quantity
(per enclosure) Usage
Slide rail assembly (includes
chassis rail)
2
Allows the enclosure to slide in and out of rack.
(The left and right slides are identical.)
2-in. rear mounting bracket
2
Mounts the slide rails to the rear rack rails.
(The left and right brackets are identical.)
10-24 x 1/4-in. Phillips screw
10
Secures the chassis rails to the module.
10-32 x 1/2-in. Phillips screw
Shoulder washer
Bar nut
8
8
4
Secures the slide rails to the rack rails.
10-32 x 1/2-in. Phillips screw
Bar nut
4
2
Secures the slide rails to their mounting
brackets.
10-32 clip nut
2
Provides a threaded hole for fastening the
module front panel to the rack rails.
10-32 x 1/2-in. Phillips screw
2
Fastens the module front panel to the clip nut.
007-4643-003
Preparing the Slide Rail Assemblies
Preparing the Slide Rail Assemblies
The slide rail assembly consists of a chassis rail and a slide rail. You need to separate the
chassis rail from the slide rail so that you can install a mounting bracket to the slide rail
and attach the chassis rail to the module chassis (see “Preparing the Module” on
page 112). To separate the chassis rail from the slide rail, follow these steps:
1.
Remove the two slide rail assemblies and the rear mounting brackets from the
shipping container.
2. Extend each slide rail assembly until the safety latch snaps into place.
3. Press the safety latch and remove the chassis rail from the slide rail, as shown in
Figure B-1.
Safety latch
Slide rail
Safety latch
Chassis rail
Figure B-1
007-4643-003
Separating the Chassis Rail from the Slide Rail
109
B: Rackmounting Rail Installation Instructions
4. Place one of the mounting brackets on the back of the slide rail, as shown in
Figure B-2. Adjust the position of the mounting bracket on the slide rail according to
the depth of the rack.
5. Place a bar nut behind the mounting bracket. Secure the mounting bracket to the
slide rail by inserting two 10-32 x 1/2-in. screws through the slide rail mounting
bracket into the bar nut, as shown in Figure B-2.
6. Repeat steps 4 and 5 to attach a mounting bracket to the other slide rail.
110
007-4643-003
Preparing the Slide Rail Assemblies
Rear mounting
bracket
Barnut
Slide rail
Figure B-2
007-4643-003
Attaching the Rear Mounting Bracket to the Slide Rail
111
B: Rackmounting Rail Installation Instructions
Preparing the Module
To attach the chassis rails to the module, follow these steps:
1.
Place the module on a flat, stable surface.
2. Using five 10-24 x 1/4-in. screws, attach one of the chassis rails to the right side of
the module chassis. Ensure that the rail is installed in the correct direction (see
Figure B-3).
!
Caution: Use only the 1/4-in. (0.64 cm) length screws. Longer screws damage
internal components of the chassis.
3. Repeat Step 2 to mount the second rail to the left side of the module chassis.
Figure B-3
112
Attaching Chassis Rails to the Module Chassis
007-4643-003
Preparing the Module
Determining Where to Attach the Slide Rail in the Rack
The module requires two units (U) of space within the rack. (One unit is equivalent to
1.75 in. [44.5 cm].) To determine where you should install the slide rails in the rack, you
must count mounting holes. Each U contains three mounting holes; therefore, in the 2U
of space that the module occupies, there are six mounting holes. The bottom hole of the
2U space is hole 1. The top mounting hole in the 2U space is hole 6. See Figure B-4.
Note: Modules in the rack are identified by the lowest U number they occupy. For
example, in Figure B-4 the module resides in U5 (the fifth unit within the rack).
8
8
7
7
6
6
5
5
4
4
3
3
2
2
1
1
5th hole
2U
2nd hole
5th hole
2U
2nd hole
Figure B-4
Mounting Hole Pattern of Rack Vertical Rails
To determine how many mounting holes you must count, use the following formula:
3 x (the lowest U number that the module will occupy) - 2. For example, when you want
to install the module in locations U9 and U10, count 25 mounting holes (3 x 9 - 2) starting
from the bottom of the rack. The 25th hole is the first mounting hole of U9.
007-4643-003
113
B: Rackmounting Rail Installation Instructions
Attaching the Slide Rail to the Rack
To attach the slide rail to the rack, follow these steps:
Tip: The slide rails must be level in the rack. To ensure that you install the slide rails
correctly, carefully count the mounting holes on all of the rack rails (two front rails and
two rear rails).
1.
Locate eight 10-32 x 1/2-in. Phillips screws, eight shoulder washers, and four bar
nuts.
2. Place one of the bar nuts inside the rack and align it with the second and third holes
of the selected 2U of space (see Figure B-5).
Note: The holes in the bar nuts are not centered. The bar nuts need to be oriented so
that the holes are closest to the inside edge of the rack rails. See Figure B-5.
3. Insert two screws with shoulder washers through the rack rail to hold the bar nut in
place. Do not be tighten the screws at this time.
4. Repeat Steps 2 and 3 to install the remaining three bar nuts on the other three rack
rails (front and rear of rack).
114
007-4643-003
Preparing the Module
6
Barnut
5
2U of space
4
3
2
1
Inside edge
6
5
4
3
2
1
Figure B-5
007-4643-003
Placing the Bar Nuts on the Rack Rails
115
B: Rackmounting Rail Installation Instructions
5. Insert the front and rear brackets of one of the slide rails between the rack rails and
the bar nuts, as shown in Figure B-6.
6. Tighten the screws on the front- and rear-ends of the rails. Do not tighten firmly at
this time, because all screws will be firmly tightened once the module is installed in
the rack.
7. Repeat steps 5 and 6 to attach the second slide rail to the other side of the rack.
7
7
6
6
5
5
4
4
3
3
2
2
1
1
Tighten
screws
Barnut
Rack rail
Slide rail
Figure B-6
116
Attaching the Slide Rail to the Rack
007-4643-003
Preparing the Module
Installing Clip Nuts in Rack Rails
Clip nuts secure the modules to the rack. To install the clip nuts, slide the clip nuts over
the fifth hole of the selected 2U of space on each of the front rails. See Figure B-7 for
details.
8
5th hole
7
6
2U space
5
4
3
6
2
1
5
Figure B-7
007-4643-003
Installing Clip Nuts in Rack Rails
117
B: Rackmounting Rail Installation Instructions
Installing Modules in the Rack
To install a module in the rack, follow these steps:
Note: Step 2 requires two people.
1.
Fully extend the left and right slide rails from the rack until they lock into place.
2. With one person holding each side of the module, align the chassis rails of the
module with the slide rails of the rack.
3. Slide the chassis rails into the slide rails until the chassis rails are stopped by the
safety latches.
4. Press the safety latches on both sides of the module to fully seat the chassis rails into
the slide rails (see Figure B-8).
5. Firmly tighten all screws (the eight screws that secure the slide rails to the rack
rails).
118
007-4643-003
Preparing the Module
6
5
4
3
2
1
Slide rail extended,
locked in place
Safety latch
6
5
Safety latch
4
3
2
1
Push
latches
Figure B-8
007-4643-003
Pressing the Safety Latches
119
B: Rackmounting Rail Installation Instructions
6. Secure the module to the rack by inserting a 10-32 x 1/2-in. Phillips screw in the top
hole of each chassis ear (see Figure B-9).
01
9
8
7
6
5
4
3
2
1
10-32 x 1/2-in. screws
Figure B-9
Securing the Module to the Rack
Adjusting the Position of the Rackmounted Module
Once the module is installed in the rack, you can make minor adjustments to its position
in the rack (upward and side-to-side). To adjust the position of the module, loosen the
front mounting screws, adjust the module to the desired position, and then tighten the
mounting screws.
!
120
Caution: Do not lift the module by its bezel; it is not designed to handle the weight of
the module. Instead, use the chassis ears to move the module (see Figure B-10).
007-4643-003
Removing a Module from a Rack
Removing a Module from a Rack
To remove a module from the rack, follow these steps:
1. Power off the module. For instructions on how to power off the module, see
“Powering Off the Workstation” on page 13.
2. Disconnect all of the cables at the rear of the module.
Warning: Components may be hot. To avoid injury, allow the components to cool
for approximately five minutes before you proceed with these instructions.
3. Remove the two screws that secure the system to the front rails of the rack.
4. Carefully pull the module out of the rack until it is stopped by the safety latches.
5. With one person holding each side, release the safety latches on both sides of the
module and pull it out of the slide rails (see Figure B-10).
6. Place the module on a flat, stable surface.
007-4643-003
121
B: Rackmounting Rail Installation Instructions
6
5
Safety latch
4
3
2
1
Push
latches
6
5
4
3
2
1
Slide extended,
locked in place
Safety latch
Figure B-10
122
Releasing the Safety Latches
007-4643-003
Removing a Module from a Rack
7. To slide the slide rails back into the rack, push down on the slide latches as shown in
Figure B-11.
Note: Before you can reinstall a module into the rack, you must fully extend the slide
rails from the rack until they lock into place.
Slide latch
Figure B-11
007-4643-003
Releasing the Slide Latches
123
Appendix C
C. Safety and Regulatory Information
The following sections and illustrations present information that may be important to the
operation of your Silicon Graphics® Tezro™ visual workstation.
This appendix provides safety information and regulatory specifications for your system
in the following sections:
•
“General Safety Information” on page 125
•
“Manufacturer’s Regulatory Declarations” on page 127
•
“System Numbers” on page 127
•
“Manufacturer’s Declaration of Conformity” on page 128
•
“Manufacturer’s Declaration of Conformity” on page 128
•
“CE Notice” on page 128
•
“Electromagnetic Emissions Notices” on page 128
•
“Shielded Cables” on page 130
•
“Electrostatic Discharge” on page 131
•
“Lithium Battery Statement” on page 131
•
“Laser Compliance Statements” on page 132
General Safety Information
Read and follow these instructions carefully:
1.
Follow all warnings and instructions marked on the product and noted in the
documentation included with this product.
2. Unplug this product before cleaning. Do not use liquid cleaners or aerosol cleaners.
Use a damp cloth for cleaning.
3. Do not use this product near water.
007-4643-003
125
C: Safety and Regulatory Information
4. Do not place this product or components of this product on an unstable cart, stand,
or table. The product may fall, causing serious damage to the product.
5. Slots and openings in the system are provided for ventilation. To ensure reliable
operation of the product and to protect it from overheating, these openings must
not be blocked or covered. This product should never be placed near or over a
radiator or heat register, or in a built-in installation, unless proper ventilation is
provided.
6. This product should be operated from the type of power indicated on the marking
label. If you are not sure of the type of power available, consult your dealer or local
power company.
7. Do not allow anything to rest on the power cord. Do not locate this product where
persons will walk on the cord.
8. Never push objects of any kind into this product through cabinet slots as they may
touch dangerous voltage points or short out parts that could result in a fire or
electric shock. Never spill liquid of any kind on the product.
9. Do not attempt to service this product yourself except as noted in this guide.
Opening or removing covers of node and switch internal components may expose
you to dangerous voltage points or other risks. Refer all servicing to qualified
service personnel.
10. Unplug this product from the wall outlet and refer servicing to qualified service
personnel under the following conditions:
126
•
If the power cord or plug is damaged or frayed.
•
If liquid has been spilled into the product.
•
If the product has been exposed to rain or water.
•
If the product does not operate normally when the operating instructions are
followed. Adjust only those controls that are covered by the operating
instructions since improper adjustment of other controls may result in damage
and will often require extensive work by a qualified technician to restore the
product to normal condition.
•
If the product has been dropped or the cabinet has been damaged.
•
If the product exhibits a distinct change in performance, indicating a need for
service.
007-4643-003
Manufacturer’s Regulatory Declarations
11. Replace the lithium batteries on the PCI boards only with the same type or an
equivalent type recommended by the manufacturer. Discard used batteries
according to the manufacturer’s instructions. There is a danger of explosion if the
battery is incorrectly replaced.
12. Use only the proper type of power supply cord set (provided with the system) for
this unit.
13. Do not attempt to move the system alone. Always use at least two people to move a
rack.
14. Keep all system cables neatly organized in the cable management system. Loose
cables are a tripping hazard that cause injury or damage the system.
Manufacturer’s Regulatory Declarations
The rackmount configuration of the Silicon Graphics® Tezro™ visual workstation
conforms to several national and international specifications and European Directives
listed on the “Manufacturer’s Declaration of Conformity.” The CE insignia displayed on
each device is an indication of conformity to the European requirements.
!
Caution: Each SGI system has several governmental and third-party approvals, licenses,
and permits. Do not modify this product in any way that is not expressly approved by
SGI. If you do, you may lose these approvals and your governmental agency authority
to operate this device.
System Numbers
The CMN (model) number for the system is shown on the system label on the unit. The
series number is on the serial number label on the back of the system. You may need both
the series number and CMN number to obtain the Manufacturer’s Declaration of
Conformity from SGI.
007-4643-003
127
C: Safety and Regulatory Information
Manufacturer’s Declaration of Conformity
Look at the regulatory label on the system to determine your CMN (model) number. The
serial number label determines your series number. You may need both of these numbers
to identify your Manufacturer’s Declaration of Conformity.
To obtain the Manufacturer’s Declaration of Conformity from SGI, you must either
provide the CMN number to your local SGI sales representative or contact the Technical
Assistance Center at 1 800 800 4SGI.
CE Notice
The “CE” symbol indicates compliance of the device to directives of the European
Community. A “Declaration of Conformity” in accordance with the standards has been
made and is available from SGI upon request.
Electromagnetic Emissions Notices
This equipment has been tested and found to comply with the limits of a Class A device,
pursuant to Part 15 of the FCC Rules. Operation is subject to the following two
conditions:
•
This device may not cause harmful interference.
•
This device must accept any interference received, including interference that may
cause undesired operation.
Note: These Class A limits are designed to provide reasonable protection against
harmful interference when the equipment is operated in a commercial environment. This
equipment generates, uses, and can radiate radio frequency energy and, if not installed
and used in accordance with the instruction manual, may cause harmful interference to
radio communications. Operation of this equipment in a residential area is likely to cause
harmful interference, in which case users will be required to correct the interference at
their own expense.
128
007-4643-003
Electromagnetic Emissions Notices
If this equipment does cause harmful interference to radio or television reception, which
can be determined by turning the equipment off and on, try to correct the interference
with one or more of the following measures:
!
•
Reorient or relocate the receiving antenna.
•
Increase the separation between the equipment and receiver.
•
Connect the equipment to an outlet on a circuit different from that to which the
receiver is connected.
•
Consult the dealer or an experienced radio/TV technician for help.
Caution: Changes or modifications to the equipment not expressly approved by the
party responsible for compliance could void the user’s authority to operate the
equipment.
This device also complies with Class A electromagnetic emissions limits of C.I.S.P.R.
Publication 22, Limits and Methods of Measurement of Radio Interference
Characteristics of Information Technology Equipment.
Industry Canada Notice (Canada Only)
This Class A digital apparatus meets all requirements of the Canadian
Interference-Causing Equipment Regulations.
Cet appareil numérique német pas de perturbations radioélectriques dépassant les
normes applicables aux appareils numériques de Classe A préscrites dans le Règlement
sur les interferences radioélectriques établi par le Ministère des Communications du
Canada.
VCCI Notice (Japan Only)
007-4643-003
129
C: Safety and Regulatory Information
Chinese Class A Regulatory Notice
Korean Class A Regulatory Notice
Shielded Cables
Silicon Graphics Tezro visual workstations are FCC-compliant under test conditions that
include the use of shielded cables between the system and its peripherals. Your system
and any peripherals that you purchase from SGI have shielded cables. Shielded cables
reduce the possibility of interference with radio, television, and other devices. If you use
any cables that are not from SGI, ensure that they are shielded. Telephone cables do not
require shielding.
Optional monitor cables that are supplied with your system use additional filtering
molded into the cable jacket to reduce radio frequency interference. Always use the cable
that is supplied with your system. If your monitor cable becomes damaged, obtain a
replacement cable from SGI.
130
007-4643-003
Electrostatic Discharge
Electrostatic Discharge
SGI designs and tests its products to be immune to the effects of electrostatic discharge
(ESD). ESD is a source of electromagnetic interference and can cause problems that range
from data errors and lockups to permanent component damage.
While you are operating the system, it is important that you keep all the covers and
doors, including the plastics, in place. The shielded cables that came with the system and
its peripherals should be installed correctly, with all thumbscrews fastened securely.
An ESD wrist strap may be included with some products, such as memory or PCI
upgrades. Use the wrist strap when you install these upgrades to prevent the flow of
static electricity; it is designed to protect your system from ESD damage.
Lithium Battery Statement
Only qualified service personnel should replace a soldered lithium battery in the Silicon
Graphics Tezro visual workstation.
Warning: Replace the battery with the same or equivalent type as recommended by
the manufacturer, or the battery could explode. Discard used batteries according to the
manufacturer’s instructions.
Warning: Advarsel!: Lithiumbatteri - Eksplosionsfare ved fejlagtig håndtering.
Udskiftning må kun ske med batteri af samme fabrikat og type. Léver det brugte
batteri tilbage til leverandøren.
Warning: Advarsel: Eksplosjonsfare ved feilaktig skifte av batteri. Benytt samme
batteritype eller en tilsvarende type anbefalt av apparatfabrikanten. Brukte batterier
kasseres i henhold til fabrikantens instruksjoner.
007-4643-003
131
C: Safety and Regulatory Information
Warning: Varning: Explosionsfara vid felaktigt batteribyte. Anvãnd samma
batterityp eller en ekvivalent typ som rekommenderas av apparattillverkaren. Kassera
anvãnt batteri enligt fabrikantens instruktion.
Warning: Varoitus: Päristo voi räjähtää, jos se on virheellisesti asennettu. Vaihda
paristo ainoastaan laitevalmistajan suosittelemaan tyyppiin. Hävitä käytetty paristo
valmistajan ohjeiden mukaisesti.
Warning: Vorsicht!: Explosionsgefahr bei unsachgemäßen Austausch der Batterie.
Ersatz nur durch denselben oder einen vom Hersteller empfohlenem ähnlichen Typ.
Entsorgung gebrauchter Batterien nach Angaben des Herstellers.
Laser Compliance Statements
The CD-ROM or DVD-ROM drive in this computer system is a Class 1 laser product. The
drive’s classification label is located on the unit.
132
007-4643-003
Appendix D
D. Dual-User Option Information
The following sections and illustrations present information that is applicable to the
setup and operation of the dual-user option for the dual-head, dual-processor or higher
rackmount version of the Silicon Graphics Tezro visual workstation. This is known as the
PowerDuo option.
The following sections and illustrations present information that is applicable to the
setup and operation of the dual-user option for the rackmount version of the Silicon
Graphics Tezro visual workstation.
Setup, configuration, and use of the option is covered in the following sections:
007-4643-003
•
“PowerDuo Option Requirements” on page 134
•
“General Setup Information” on page 134
•
“Connecting a Monitor to the Workstation Expansion Enclosure” on page 134
•
“Keyboard and Mouse Connection” on page 137
•
“Enabling PowerDuo Software” on page 139
•
“Returning the System to Single-User Use” on page 139
•
“Configuring the USB Keyboard and Mouse” on page 140
•
“Mounting the Second Drive” on page 141
•
“Adding Swap Space” on page 142
•
“Adding Users” on page 144
•
“Selecting the Head on Which a Program Runs” on page 145
•
“Operating Tips for Dual User Systems” on page 145
133
D: Dual-User Option Information
PowerDuo Option Requirements
In order to fully function as a dual-user system, your Tezro rackmount workstation must
have the following:
•
Dual-head graphics (two graphics boards)
•
Two or four system processors
•
A USB PCI card
•
A second monitor
•
A second keyboard and mouse
•
A second hard drive (not required but highly recommended)
General Setup Information
Read and follow these instructions carefully:
1.
Follow all warnings and instructions marked on the product and noted in the
documentation included with this product.
2. A USB PCI card is required for this option. The USB card can be installed in either
enclosure. If you need to install the USB PCI card, see “PCI and PCI-X Cards” in
Chapter 3 for instructions.
3. If your Tezro dual-user option has been set up by SGI professional services you may
be ready to start working.
4. Use the information in this appendix if you need to setup or reconfigure the system.
Connecting a Monitor to the Workstation Expansion Enclosure
Use the Digital Video Interface-Integrated (DVI-I) to VGA cable to connect the DVI-I
(analog and digital) VPro graphics board to a VGA connector on a VGA CRT monitor.
Optional digital LCD monitors use a digital DVI-D cable. See Figure D-1 on page 136 for
an example.
Your dual-user option may be ordered with a choice of monitor types and/or sizes
depending on your application and system requirements.
134
007-4643-003
Connecting a Monitor to the Workstation Expansion Enclosure
Tezro VPro graphics expansion enclosures use the DVI monitor connector on the rear to
connect using either of the following:
!
•
Digital (LCD) display DVI-D connection cable
•
Analog DVI-A cable to a CRT or LCD display
Caution: Ensure that the electrical rating on the monitor label matches the outlet voltage
range (100–120 VAC or 220–240 VAC) before you plug in the monitor.
When you use a monitor in locations that do not have the appropriate outlets, contact
your SGI system support engineer (SSE) before plugging in the monitor power cable.
Plug in and turn on your monitor as described in the documentation that accompanies
your monitor.
Note: If you are using a monitor that was not shipped with your workstation and it has
adjustable RGB connectors, ensure that they are in the 75-ohm position; otherwise, the
monitor displays incorrect colors.
007-4643-003
135
D: Dual-User Option Information
AC
IN
DVI-I to VGA
cable
Figure D-1
136
L
R
Connecting a Monitor to the Workstation Expansion Enclosure
007-4643-003
Keyboard and Mouse Connection
Keyboard and Mouse Connection
Your dual-user option is shipped with a 101-key USB keyboard and a USB mouse. You
may plug the keyboard and mouse directly into the USB connectors of the workstation
expansion enclosure (see Figure D-2), or you can use an optional USB extender (not a
standard part of the dual-user upgrade) that allows you to place the keyboard and mouse
up to 328.68 feet (100 m) from the workstation (see Figure D-3).
L
R
Keyboard
USB type A
connectors
Mouse
Figure D-2
USB Keyboard and Mouse Connected Directly to the Tezro Enclosure
You can have one keyboard and one mouse for each Tezro workstation enclosure (a
maximum of two per system). The second keyboard/mouse option is always USB. The
optional local extender (LEX) receives AC power from the power distribution unit (PDU)
in the rack. A 6-ft. (1.82-m) adapter cable connects the extender’s power adapter to the
PDU. The remote extender (REX) does not use an external power source.
007-4643-003
137
D: Dual-User Option Information
Power
distribution
unit (PDU)
R
R
R
R
USB ports
9.84 ft (3 m)
USB type B
connector
LEX
ST
HO
1
6-ft
(1.82 m)
adapter cable
K
LIN
Power
adapter
WER
PO
RJ45
connector
30 ft (9.1 m)
REX
USB type A
connectors
Keyboard
RJ45
connector
Mouse
USB Type A connector
USB Type B connector
Figure D-3
138
Second Keyboard and Mouse Connected via Optional USB Extender
007-4643-003
Enabling PowerDuo Software
Enabling PowerDuo Software
To enable PowerDuo operation, you must back up your original Xservers file and then
install a new Xservers file. Use the following steps to enable this functionality:
1.
From the system Toolchest select Desktop, then select Open UNIX Shell.
Become superuser by typing su.
2. At the prompt, type:
cp /var/X11/xdm/Xservers /var/X11/xdm/Xservers.1key
3. At the prompt, type:
cp /var/X11/xdm/Xservers.3key /var/X11/xdm/Xservers
Open the Xservers file using vi (or another line editor) and delete the :2 line. The two
remaining lines should appear similar to the following:
:0 secure /usr/bin/X11/X :0 -boards 0 -devdir /dev/input -bs ...
:1 secure /usr/bin/X11/X :1 -boards 1 -devdir /dev/input1 -bs ...
4. Save the file, then type exit to exit superuser mode.
5. Restart the system. Your system is enabled for two users after the system is
restarted.
There is now a separate login for each monitor.
Returning the System to Single-User Use
To configure your PowerDuo system to function as a dual-head, single-user system (that
is, for both monitors to be used simultaneously by one person), use the following
instructions:
1.
Log in to the system on head 0 as root:
From the Toolchest click on Desktop, then select Open a UNIX Shell.
2. At the prompt, type:
cp /var/X11/xdm/Xservers.1key /var/X11/xdm/Xservers
3. Gracefully shut down the system.
007-4643-003
139
D: Dual-User Option Information
4. Unplug the second keyboard and mouse.
5. Restart the system.
Configuring the USB Keyboard and Mouse
The ioconfig(1m) command establishes logical device numbers for each keyboard
and mouse connected to the workstation. When the system first initializes the USB
hardware, it scans each USB bus looking for devices. Later in the boot process, the
ioconfig(1m) command assigns device IDs based on the contents of the file
/etc/ioconfig.conf.
If the device is already represented in ioconfig.conf, the associated device ID is
assigned. If the device is new (not already in ioconfig.conf), a new device ID is
allocated and assigned, and a corresponding entry is appended to the ioconfig.conf
file.
Each line in the ioconfig.conf file is a two-column entry. The left column is the
numeric logical device ID (0 in our example), and the right column is the hardware path
pointing to the device. Note the following example:
0 /hw/module/001c01/IXbrick/xtalk/15/pci-x/1/1a/usb/1/keyboard
0 /hw/module/001c01/IXbrick/xtalk/15/pci-x/1/1b/usb/1/mouse
The device IDs are unique only among devices of a given type. Different device types
may use overlapping device IDs.
For USB devices, the hardware path is divided into two parts: the USB controller
prefix, and the USB relative path. The controller prefix is the portion of the
path up to and including the component “usb.” Note the following example:
/hw/module/001c01/IXbrick/xtalk/15/pci-x/1/usb
The controller prefix encodes the hardware components leading to the USB
controller. In the previous example, the controller path indicates that there is a USB
controller at PCI bus 1 of the expansion enclosure located at 001c01.
The USB relative path is the portion of the path after the “usb” component. This
path indicates the path leading from the controller to the actual device. The path is a
series of numeric components terminated with a device type. The numeric components
represent USB hub port numbers.
140
007-4643-003
Mounting the Second Drive
Multiple numeric components represent multiple layers of USB hubs, with the leftmost
component representing the root hub, or the hub built into the USB controller.
The following example indicates a keyboard device attached to port 1 of a hub, which is
attached to port 1 of the root hub:
.../usb/1/keyboard
The following example shows a mouse attached to port 2 of the same hub:
.../usb/2/mouse
You can use the hinv command to display the ID of a device. See the hinv(1) man page
for additional information. Note that the hinv command only confirms the presence of
the devices.
The device ID of a keyboard or mouse determines under which /dev/input directory
the keyboard or mouse is placed. A keyboard or mouse with device ID 0 will be placed
under /dev/input (for historical reasons), while a device (such as the expansion
enclosure) with an ID of 1 will be placed under /dev/input1.
When the X Window System server starts, the -devdir option controls which directory
is searched for input devices. By default, /dev/input is used. The XWindow System
server configuration file is:
/var/X11/xdm/Xservers
:0 secure /usr/bin/X11/X :0 -boards 0 -devdir /dev/input -bs ...
:1 secure /usr/bin/X11/X :1 -boards 1 -devdir /dev/input1 -bs ...
Note that it is the second line in the file that activates the second keyboard and the default
Xservers file has only one line (without -devdir).
Mounting the Second Drive
For the second drive to be usable, it needs to be mounted. To mount the drive, follow
these steps:
1.
Log in to the system as root.
2. Go to Toolchest > System > System Manager > Hardware and Devices > Disk
Manager. You will see a list of installed disk drives.
3. Select the drive you wish to mount, and click the Mount button.
007-4643-003
141
D: Dual-User Option Information
4. Select a file system to mount (the default choice will usually be correct).
5. Click Next.
6. In the window that appears, type a mount point. For example, /disk2.
7. Click Next.
8. Check the box that says Let local users change filesystem contents.
9. Click Next.
10. Check the box that says Mount every time the system starts.
11. Click Next.
12. Double check the settings, and, if they look correct, click OK.
Tip: The settings will include one that says Contents of existing directory will be
hidden. This refers to the contents of the directory on which the drive is being
mounted (/disk2, for example), and should be fine.
13. Click OK to close the window that reports successful completion.
14. Click Close to close the Disk Manager window.
15. Select File > Exit to exit the System Manager window.
The disk is now mounted.
Adding Swap Space
The following procedure is a recommendation for creating a swap file on the optional
second drive. Create more swap space only if you believe the swap space on the system
disk is insufficient and you know how much more swap space you want to add.
Note: The swap space on the system disk must have a different priority number than the
swap space on the second (option) disk.
To set up additional swap space, determine the amount of swap space on the system disk,
and use that as a guideline to determine how much swap space to add.
142
007-4643-003
Adding Swap Space
1.
Log in to the system as root.
2. Go to Toolchest > System > System Manager > System Performance > Swap
Manager.
3. When the Swap Manager window appears, note the amount of swap space
currently configured on the system disk (this information will be shown in the
Physical column).
4. Click Add.
5. Click Next.
The Add Real Swap Space dialog box appears. (Read all the information in every
dialog box.)
6. Type in your chosen amount of swap space. You may enter the same amount that
was on the system disk (typically 128 MB) or you can enter a different value.
7. Select the filesystem that represents the disk to which you have chosen to add the
swap file, for example, /dev/dsk/sks0d2s7.
Note: At this point you can choose to add additional swap space to either disk.
8. Click Next.
9. Click OK to confirm your settings.
10. Click OK to acknowledge completion.
11. Click Close to close the Swap Manager window.
You are finished adding swap space.
For additional information on adding swap space, go to Toolchest > Help > Online
Books > SGI Admin. See IRIX Admin: System Configuration and Operation (refer to
Chapter 6, “Configuring Disk and Swap Space”) and IRIX Admin: Disks and Filesystems.
007-4643-003
143
D: Dual-User Option Information
Adding Users
It is recommended that you place additional user accounts on the second (option) disk.
To add an additional user, follow these instructions:
1.
Log in to the system as root.
2. Go to Toolchest > System > System Manager > Security and Access Control.
3. Click the Add a User Account icon.
The dialog box appears. Read the information in this and every dialog box before
proceeding.
4. Click Next.
5. Type a username for the new user.
6. Click Next.
7. Type the new user’s full name.
8. Click Next.
9. Press Next to accept the Local Account default.
10. Choose one of the Password options.
11. Click Next.
12. If you chose to add a password, enter it now (in both boxes), then click Next.
13. To accept the unique, automatically generated User ID (number), click Next.
14. To accept the default Primary Group for the new user, click Next.
15. In the Home Directory window, remove the default /usr/people/username
directory.
Because it is recommended that you place all users on the second (option) disk,
rather than the system disk, replace the default /usr/people/username
directory with the home directory of the new user on the option disk.
To do this, type the path to a location on the disk to which you wish to add the new
users. For example, /disk2/username.
16. Select Verify and create as needed.
17. Click Next.
144
007-4643-003
Selecting the Head on Which a Program Runs
18. To accept the default shell program, csh, click Next.
19. Confirm that the settings are correct, and click OK.
You are finished adding the new user.
Selecting the Head on Which a Program Runs
During an interactive session with the Window Manager, you can use the DISPLAY
environment variable to control the head on which newly started graphics programs run.
When DISPLAY is set to :0.0, programs you start run on head 0 (the primary head);
when it is set to :1.0, programs you start run on head 1 (the secondary head).
For convenience, the default startup files (.login, .profile) for root and guest
shells set DISPLAY to a reasonable initial value, if it is not already set. Each head has a
toolchest that can be used to launch graphics programs. Each toolchest has the DISPLAY
variable in its environment set to the correct value for the head on which it appears, so
any application you launch from a toolchest inherits this DISPLAY value, and thus
appears on the same head as the toolchest from which it was invoked.
Similarly, programs started by clicking an icon appear on the head from which you
launched them.
Once a program has been launched, it is not possible to move it from one head to another
from the Window Manager.
Operating Tips for Dual User Systems
Your Tezro rackmount workstation is normally used by a single operator. This section
contains tips and cautions for “Duo” system users. Be sure to check your system release
notes for any additional information that might pertain to dual users.
When using the workstation as a Duo system, keep this information in mind:
007-4643-003
•
Simultaneous use of head 0 and head 1 by users in the same login account is not
supported.
•
System start up, shut down, and warning messages appear only on the primary
head, as does the System Maintenance Menu.
145
D: Dual-User Option Information
•
When using the Toolchest > Find menu, do not use File QuickFind or Host
QuickFind, as these appear simultaneously on both the primary and secondary
heads. Instead, use Toolchest > Find > Search For Files.
•
If a System Administration tool launched from the desktop does not complete a
function, despite being supplied with the root password, the same application may
currently be running under a second account on the Duo system. Table D-1
provides a list of additional dual-user task specific information.
Table D-1
Dual User Task Specific Information
Action/Task
Instructions
Determine the head on which
you are running
From Toolchest > Desktop select Open UNIX Shell.
At the prompt, type printenv DISPLAY.
Look for the listing DISPLAY = 0.0 or DISPLAY = 1.0 .
Head 0 is the primary head.
Head 1 is the secondary head.
System administration tasks
Use head 0.
Logging in to a remote system
from the secondary head
(head 1)
In head 1 Toolchest > Desktop select Open UNIX Shell
Log in to the remote system. Type:
rlogin guest@remotehost
At the prompt, type: setenv DISPLAY localhost:1
(where localhost is the name of your system).
The remotely displayed information from the remote host will
now display to the secondary head (head 1). Without entering
this command, the remotely displayed information would
display to the primary head (head 0).
When using rsh, use:
rsh user@remotehost -display localhost:1
(where localhost is the name of your system).
This command causes the output to appear on head 1.
To run an application on a remote host and display it on
head 1, use:
rsh remotehost applicationname -display localhost:1
(where localhost is the name of your system and
applicationname is the application you are running).
146
007-4643-003
Operating Tips for Dual User Systems
Table D-1
Dual User Task Specific Information (continued)
Action/Task
Instructions
Determine the head on which
you are running
From Toolchest > Desktop select Open UNIX Shell.
At the prompt, type printenv DISPLAY.
Look for the listing DISPLAY = 0.0 or DISPLAY = 1.0 .
Head 0 is the primary head.
Head 1 is the secondary head.
Using an icon to launch an
application
Launch the application from the head you want to use. The
icon always appears on the head from which it was launched.
Changing a monitor setting
After changing the setting, always log out and then log back in.
Hot plugging a mouse,
keyboard or other serial device.
Hot plugging any serial device is not supported. (Hot
plugging is attaching a device while the system is running.)
Using audio when the Duo
system is enabled
Audio is not supported when the Duo system is enabled.
Power off or disconnect speakers when the Duo system is
enabled.
Configuring the PS/2 Keyboard and Mouse
Tezro rack mounted workstations come standard with two PS/2 ports which are
normally used for the first keyboard and mouse. The second keyboard and mouse are
normally connected to a PCI based USB card as shown in Figure D-2 on page 137. This
USB card is normally in the base enclosure, but will work as well in the expansion
enclosure.
Note: The PS/2 ports are only active on the base module since the workstation
expansion enclosure has no IO9 card (which enables PS/2 functionality).
Following are typical ioconfig.conf file entries showing device IDs of 0 and 1
applying to PS/2 and USB keyboard/mouse pairs:
0
0
1
1
007-4643-003
/hw/module/001c01/IXbrick/xtalk/15/pci-x/0/1/keyboard
/hw/module/001c01/IXbrick/xtalk/15/pci-x/0/1/mouse
/hw/module/001c01/IXbrick/xtalk/15/pci-x/1/1a/usb/2/mouse
/hw/module/001c01/IXbrick/xtalk/15/pci-x/1/1b/usb/2/keyboard
147
D: Dual-User Option Information
As listed in the previous section, the device IDs of 0 and 1 apply to PS/2 and USB as a
single group rather than being 0 for both.
The default for Tezro is PS/2 before USB, however, the workstation can be manually
configured either way (see “Reconfiguring the Keyboard and Mouse Manually” on
page 148).
In the Tezro rack mounted workstation, PS/2 is the primary keyboard/mouse
connection. If you are altering the workstation’s keyboard/mouse configuration,
consider the following setup information:
The keyboard/mouse entries in /etc/ioconfig.conf are added automatically
during hardware discovery at boot time. By default, the PS/2 entries will get
automatically added first, followed by the USB entries.
At subsequent reboots, the existing entries in /etc/ioconfig.conf will not be
changed, but any additional entries will be added using the next higher logical device
numbers. In some SGI systems the USB connections take precedence over the PS/2
connections.
Reconfiguring the Keyboard and Mouse Manually
If it becomes necessary to reconfigure the keyboard or mouse layout, manual
configuration is necessary. Reasons for reconfiguration may include the following:
•
Adding a new keyboard and mouse
•
Moving a keyboard and mouse
To reconfigure the keyboard and mouse setup, follow these steps:
1.
Add or move devices as necessary and edit the /etc/ioconfig.conf file to
reflect the correct order (or remove this file to get the default ordering assigned).
2. Run /sbin/ioconfig -f /hw to apply step 1 and check the resulting
/etc/ioconfig.conf file for correctness. To make any additional changes repeat
step 1.
3. Run /usr/gfx/stopgfx to shut down the graphics subsystem. Restart the
graphics subsystem using the command /usr/gfx/startgfx to implement the
ioconfig.conf file changes.
148
007-4643-003
Operating Tips for Dual User Systems
Note: The stopgfx/startgfx sequence requires remote access since the
keyboard/mouse are disabled by issuing the stopgfx command.
Steps 1 and 2 allow you to bind the devices in your new configuration to the correct IDs.
Because a keyboard and mouse with the same ID are put in the same /dev/inputX
directory, you must ensure that the keyboard and mouse pair used by a given X server
has the same ID.
Note: If the ioconfig command fails to find any of the devices you expect to see in the
/etc/ioconfig.conf file, rebooting the system is recommended.
Running the ioconfig command or rebooting the system causes new keyboards and
mice to be added to the ioconfig.conf files using the next higher device IDs. Steps 1
and 2 are only needed if you change the device IDs.
To move keyboards or mice to different ports, follow steps 1 and 2. Otherwise the old
location information remains (within the ioconfig.conf file) even after the new
positions are added.
Note: If you boot the system in this mode and plug in a keyboard or mouse after the
system is running, you must restart the graphics system (repeat steps 2 and 3 from the
previous sequence) to use the devices.
If the ioconfig.conf file needs to be re-created using all the default device IDs,
rename or remove the ioconfig.conf file and reboot the system. At system startup all
operational devices plugged into the system are put into a new ioconfig.conf file.
007-4643-003
149
Index
A
D
adding or replacing disk drives, 52
adding or replacing memory, 57
adding swap space, 142
adding users, 144
device ID, 140
device ID of a keyboard or mouse, 141
DIMM installation, 59-61
DIMM removal, 63-65
DIMMs
adding or replacing, 57
features, 28
disk drive installation, 53
disk drive removal, 55
disk drives
adding or replacing, 52
documentation, online, 12
dumpster icon, 11
DVI monitor connector, 135
B
booting up, 10
C
cable
ethernet, 6
keyboard, 5
monitor, 7
mouse, 5
commands, IRIX, 13
connector
LINK, 24, 25
connector pin assignment
SCSI VHDCI, 96
stereo jack, 98
USB type A, 99
customer service, xx
007-4643-003
E
electrostatic discharge (ESD), 131
Embedded Support Partner (ESP), 85
enclosure
layout, 27
error messages, 81
ESD (electrostatic discharge), 131
ESP, 85
Ethernet connector, 25
external SCSI connector, 25
151
Index
F
File QuickFind, 146
folder icon, 11
front view, workstation, 3
H
hard disk drive
mounting, 141
hard disk drives
features, 30
hinv command, 141
Host QuickFind, 146
I
icons, 11
InfoSearch, 13
install
disk drive, 53
memory, 59-61
ioconfig(1m) command, 140
IRIX commands, 13
IRIX Interactive desktop, 13
K
keyboard, connecting, 5
Knowledgebase, 85
LCD monitors, 134
lifting, workstation, 2
LINK connector, 24, 25
lithium battery warning statements, 131-132
login, 10
M
memory
adding or replacing, 57
installation, 59-61
removal, 63-65
monitor
powering on, 10
monitor types, 134
mounting the option drive, 141
mouse, connecting, 5
N
NMI button, 15
O
online documentation, 12
option drive
mounting, 141
options, 34
P
L
L1 console port, 24, 25
L1 controller
error messages, 81
152
PCI boards
features, 32
PCI/PCI-X card slots, 24, 25
peripheral icon, 11
007-4643-003
Index
power button, 15
powering off
procedure, 13-17
primary head
selecting, 145
product support, xx
PS/2 as the primary keyboard/mouse, 148
R
rack mounting
hardware kit, 108
reconfigure the keyboard or mouse, 148
remove
disk drive, 55
memory, 63-65
reset button, 15
restart, 18-19
RTO and RTI connectors, 25
S
safety, 37-??
See also ESD.
SCSI connector, external, 25
SCSI VHDCI
connector pin assignments, 96
Search For Files, 146
secondary head
selecting, 145
selecting the primary or secondary head, 145
SGI Knowledgebase. See Knowledgebase
shut down, 13-17
stereo jack
connector pin assignments, 98
Supportfolio Online, 85
007-4643-003
swap space
adding, 142
System Components, 21
System Manager, 12
T
technical support, xx
Toolchest
restart, 18-19
shut down, 16-17
system functions, 12
troubleshooting
L1 controller error messages, 81
problems and recommended actions, 80
U
upgrades, 34
USB extender, 137
USB keyboard, 137
USB mouse, 137
USB type A
connector pin assignments, 99
users
adding, 144
V
VGA CRT monitor, 134
VPro graphics board
features, 32
153
Index
W
workstation
front view, 3
login, 10
powering off, ??-17
powering on, 10
setting up, 5
shutting down, 13-17
154
007-4643-003