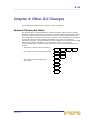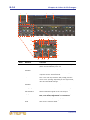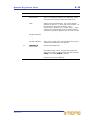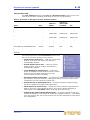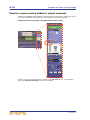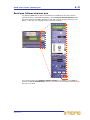
1
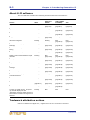
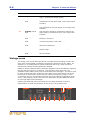
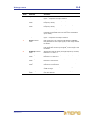
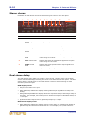
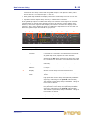
Midas Digital Consoles Addendum B — G-II to PRO Series Live Audio Systems and XL8 Live Performance System Owner’s Manuals MUSIC Group Research UK Limited, Klark Industrial Park, Walter Nash Road, Kidderminster. Worcestershire. DY11 7HJ. England. Tel: +44 1562 741515 Fax: +44 1562 745371 Email: [email protected] Website: www.midasconsoles.com PRO Series and XL8 — Owner’s Manuals DOC07-MDSV2ADDENDUM Issue A — October 2012 © MUSIC Group IP Limited © 2012 MUSIC Group IP Ltd. Technical specifications and appearances are subject to change without notice and accuracy is not guaranteed. MIDAS and KLARK TEKNIK are part of the MUSIC Group (music-group.com). B-iii Contents Contents . . . . . . . . . . . . . . . . . . . . . . . . . . . . . . . . . . . . . . . . . . iii Licences . . . . . . . . . . . . . . . . . . . . . . . . . . . . . . . . . . . . . . . . . . .v Chapter 1 Introducing Generation-II . . . . . . . . . . . . . . . . . . . . . . 1 Which manuals are affected by G-II? . . . . . . . . . . . . . . . . . . . . . . . . . 1 About G-II software . . . . . . . . . . . . . . . . . . . . . . . . . . . . . . . . . . . . . 2 Chapter 2 Internal Effects . . . . . . . . . . . . . . . . . . . . . . . . . . . . . . 3 Ambience reverb Chamber reverb . Hall reverb . . . . Plate reverb . . . . Vintage room . . . Stereo chorus . . Dual stereo delay Matrix mixer . . . Chapter 3 . . . . . . . . . . . . . . . . . . . . . . . . . . . . . . . . . . . . . . . . . . . . . . . . . . . . . . . . . . . . . . . . . . . . . . . . . . . . . . . . . . . . . . . . . . . . . . . . . . . . . . . . . . . . . . . . . . . . . . . . . . . . . . . . . . . . . . . . . . . . . . . . . . . . . . . . . . . . . . . . . . . . . . . . . . . . . . . . . . . . . . . . . . . . . . . . . . . . . . . . . . . . . . . . . . . . . . . . . . . . . . . . . . . . . . . . . . . . . . . . . . . . . . . . . . . . . . . . . . . . . . . . . . . . . . . . . . . . . . . . . . . . . . . . . . . . . . . . . .3 . .4 . .5 . .7 . .8 . 10 . 10 . 12 Advanced Navigation . . . . . . . . . . . . . . . . . . . . . . . . . 19 About the advanced navigation features . . . . . . . . . . . . . . . . . . . . . . 19 Activating the advanced navigation features . . . . . . . . . . . . . . . . . . . 21 Chapter 4 Other G-II Changes . . . . . . . . . . . . . . . . . . . . . . . . . . 23 Dynamic EQ internal effect . . . . . . . . . . . . . . . . . . . . . . . Stereo Graphic EQ effect . . . . . . . . . . . . . . . . . . . . . . . . . Hardware Safe screen (PRO Series and XL8) . . . . . . . . . . . Diagnostics screen . . . . . . . . . . . . . . . . . . . . . . . . . . . . . Select follows solo . . . . . . . . . . . . . . . . . . . . . . . . . . . . . Solo and pan link mode added to stereo linking options . . . Preferences screen updated . . . . . . . . . . . . . . . . . . . . . . . Polarity reverse switch added to output channels . . . . . . . . Send pan follows channel pan . . . . . . . . . . . . . . . . . . . . . Output channel names on GEQ rack . . . . . . . . . . . . . . . . . New scene and show warning messages in automation . . . . Show timestamp in Files list . . . . . . . . . . . . . . . . . . . . . . Wireless remote control via iPad . . . . . . . . . . . . . . . . . . . . New Console Overview screen . . . . . . . . . . . . . . . . . . . . . Values displayed on GUI and LCD select buttons . . . . . . . . Midas Digital Consoles Addendum B .. .. .. .. .. .. .. .. .. .. .. .. .. .. .. . . . . . . . . . . . . . . . . . . . . . . . . . . . . . . . . . . . . . . . . . . . . . . . . . . . . . . . . . . . . . . . . . . . . . . . . . . . . 23 . 27 . 29 . 30 . 33 . 33 . 34 . 36 . 37 . 38 . 38 . 39 . 39 . 40 . 41 B-iv Contents Midas Digital Consoles Addendum B Licences The following are the license agreements applicable to the Midas Digital Equipment. End-User Licence Agreement for Midas™ and Klark Teknik™ Software IMPORTANT - Please read this document carefully before using this Midas™ or Klark Teknik™ Product. This is an agreement governing your use of software or other machine instructions already installed on this Midas™ or Klark Teknik™ Product, as well as other software that we provide for installation on this Product. The Midas™ or Klark Teknik™ Product will not operate in accordance with its documentation without this software. THIS AGREEMENT ("AGREEMENT" OR "LICENCE") STATES THE TERMS AND CONDITIONS UPON WHICH MUSIC GROUP IP LTD. ("COMPANY") OFFERS TO LICENSE THE INSTALLED FIRMWARE, SOFTWARE AND/OR PROGRAMS ("the SOFTWARE") WITH THE MIDAS™ OR KLARK TEKNIK™ CONSOLE OR SIGNAL PROCESSING PRODUCT ("PRODUCT") IN WHICH IT HAS BEEN INSTALLED BY, OR FOR WHICH IT IS PROVIDED BY, THE COMPANY. BY USING THIS PRODUCT YOU WILL BE AGREEING TO BECOME BOUND BY THE TERMS OF THIS LICENCE. IF YOU DO NOT AGREE TO THE TERMS OF THIS LICENCE, DO NOT USE THIS PRODUCT AND PROMPTLY RETURN THE PRODUCT TO THE PLACE WHERE YOU OBTAINED IT FOR A FULL REFUND. You agree to notify any persons whom you permit to operate this Product of the terms of this Licence, and to require them to comply with these terms. The Software is licensed, not sold, to you for use only under the terms of this Licence, and the Company reserves all rights not expressly granted to you. The Company retains ownership of all copies of the Software itself, and all proprietary parts of it, including those stored on or in the Product. 1. Licence: Subject to the terms and conditions of this agreement, the Company grants you, and other persons you permit to operate the Product, a personal, limited, non-exclusive, non-transferable licence to use the Software only on the single Product unit in which it has been installed. 2. Restrictions: (a) The Software, and the accompanying written materials, are copyrighted and contain trade secrets and other proprietary matter, including confidential information relating to the specifications and performance characteristics of this Product. Save for such elements as may be licensed to the Company, as described in paragraph 5, all rights to copyrights, trade marks and trade secrets in the Software, or any modifications to it, are owned by the Company. Unauthorised use or copying of the Company's proprietary Software, or any portion thereof, or copying of those written materials, is prohibited. (b) You may not create, market, distribute, or transfer copies of the Company's proprietary Software, or any part of it, to others, or duplicate, rent, lease or loan that Software, or any part of it, except that you may transfer that Software installed in this Product in conjunction with the sale, transfer, loan, rent or lease of this Product, and subject at all times to this Licence. YOU MAY NOT REVERSE ENGINEER, DECOMPILE, DISASSEMBLE, EXTRACT OR SEPARATE OUT, MODIFY, ADAPT, PORT, OR TRANSLATE THE SOFTWARE, DERIVE THE SOURCE CODE OF THE SOFTWARE OR CREATE DERIVATIVE WORKS BASED ON THE SOFTWARE OR ANY ACCOMPANYING WRITTEN MATERIALS, save as is allowed by licences pertaining to component parts of the Software which are licensed by third parties, as described under paragraph 5, or otherwise by law. (c) In the event you violate any term of this Licence, all rights granted herein will automatically and immediately terminate and you must stop using the Software and destroy any copies of the Software. 3. Limited Warranty: Subject to your installation of any Software updates issued by the Company as described herein, and the condition below, the Company warrants that the Software will operate in compliance with the Software's material specifications and documentation for a period of 90 days from your purchase of this Product. The Software is provided "as is" and the Company does not warrant that the operation of the Software will meet your requirements or operate free from error. To the greatest extent permissible by law, the Company DISCLAIMS ALL WARRANTIES AND CONDITIONS, EITHER EXPRESS OR IMPLIED, INCLUDING THE WARRANTIES OF MERCHANTABILITY, FITNESS FOR A PARTICULAR PURPOSE, NON-INFRINGEMENT OF THIRD PARTY RIGHTS OR CAPABILITY OF CORRECTLY PROCESSING PROVIDING AND/OR RECEIVING DATE INFORMATION. You understand that the Company may update or revise the Software but in so doing incurs no obligation to furnish such updates to you. However, the Company may in its discretion make updates available from time to time upon such terms and conditions as it shall determine. It is a condition of the above warranty that you install any such Software updates, as may be issued from time to time by the Company for the Software, in accordance with the Company's instructions, and if you do not do so such warranty will cease to apply. You may view current Software updates at http://www.klarkteknik.com and http://www.midasconsoles.com. 4. Limited Liability: THE ENTIRE RISK ARISING OUT OF YOUR USE OR PERFORMANCE OF THE SOFTWARE REMAINS WITH YOU. THE LIABILITY OF THE COMPANY FOR ANY CLAIMS ARISING OUT OF THIS LICENCE AND/OR BASED UPON THE SOFTWARE, REGARDLESS OF THE FORM OF ACTION, AND INCLUDING WORK STOPPAGE, PRODUCT FAILURE OF MALFUNCTION OR ANY OTHER COMMERCIAL LOSS OR DAMAGE, SHALL NOT EXCEED THE COST OF THE LICENCE FEE FOR THE SOFTWARE OR THE COST OF THIS PRODUCT. SUBJECT TO THE PROVISIONS OF APPLICABLE LAW, IN NO EVENT SHALL THE COMPANY BE LIABLE FOR ANY LOSS OF DATA, LOST OPPORTUNITY OR PROFITS, COST OF COVER OR SPECIAL, INCIDENTAL, CONSEQUENTIAL, OR INDIRECT DAMAGES, EVEN IF YOU ADVISE THE COMPANY OF THE POSSIBILITY OF SUCH DAMAGES. THIS IS A FUNDAMENTAL TERM OF THIS AGREEMENT AND YOU ACKNOWLEDGE THAT THE AMOUNT YOU PAID FOR THE SOFTWARE AND/OR THE PRODUCT REFLECTS THIS ALLOCATION OF RISK. NOTHING IN THIS PARAGRAPH PURPORTS TO EXCLUDE OR LIMIT THE COMPANY'S LIABILITY FOR DEATH OR PERSONAL INJURY CAUSED BY NEGLIGENCE OR ANY OTHER LIABILITY WHICH CANNOT BE EXCLUDED OR LIMITED BY LAW. 5. Other Third-Party Computer Programs: As referred to herein, the term "Software" refers only to proprietary Midas™ or Klark Teknik™ software, owned by the Company, that has been provided to you for installation on, or already installed in, a Product. In addition to the Software, you may have also been provided, at no additional charge, with a version of the widely-available GNU Linux Operating System, which is a modular operating system made up of hundreds of individual software components, each of which was written, and the copyright and other rights in which are owned individually, by various parties (collectively, "the GNU Linux Programs"). Each component has its own applicable end user licence agreement, and many of these agreements permit you to copy, modify, and redistribute the applicable software, but you must review the on-line documentation that shares a directory or otherwise accompanies each of the GNU Linux Programs provided to you for the specific terms and conditions. Nothing in this Licence limits your rights under, or grants you rights that supersede, the terms of any other applicable end user licence agreement. If you wish to receive a computer-readable copy of the source code for any of the GNU Linux Programs that have been provided with your Midas™ or Klark Teknik™ Product, send a cheque or money order (no cash accepted), your address and [£10.00] to cover the cost of optical media, postage and handling, to: MUSIC Group Research UK Limited ATTN: Linux Programs CD for Midas™/Klark Teknik™ Walter Nash Road, Kidderminster. Worcestershire. DY11 7HJ. England. In your request, indicate your Product's name and model number, serial number and version/release information. In your request, also indicate the relevant Software version/release information. This offer, made pursuant to the GNU Linux Programs' end user licence agreements, may expire according to the terms of those agreements, in which case your cheque will be returned to you or destroyed at our option. Please note that the GNU Linux Programs that may be available to you under this offer consists of the GNU Linux Operating System components only and none of the proprietary application software developed by Midas or Klark Teknik is included. Other updated Linux distributions containing application software are widely available from a variety of Internet sources, and are often available at minimal or no cost. 6. Termination: This Licence will terminate immediately if you violate any of the Licence terms. Upon termination you must discontinue use of the Software, and either destroy, erase or return to Company all copies of the Software in your possession, custody or control, including those in or on the Product. 7. General: This Licence constitutes the entire agreement between you and the Company with respect to this Software and, save in the case of fraud, supersedes any other communication (including advertising). Company reserves all rights not expressly granted to you in this licence. If any provision of this Licence is held unenforceable, that provision shall be enforced to the maximum extent permissible so as to give effect the intent of this Licence, and the remainder of this Licence shall continue in full force and effect. This Licence shall be governed by English law and the Courts of England and Wales will have exclusive jurisdiction to hear and decide any dispute concerning it or its formation. No breach by you of any provision of this Licence shall be waived or discharged except with the express written consent of the Company and no failure or delay by the Company to exercise any of its rights under this Licence shall operate as a waiver thereof and no single or partial exercise of any such right shall prevent any other or further exercise of that or any other right. You acknowledge that the Company could be irreparably damaged if the terms of this Licence were not specifically enforced, and agree that the Company may seek appropriate equitable remedies with respect to breaches of this Licence, including injunctive relief, in addition to such other remedies as the Company may otherwise have available to it under applicable laws. GNU General Public License (GPL) For details of the Third Party Software License Attribution, Copyright and Terms and Conditions and Notices, and the GNU LESSER GENERAL PUBLIC LICENSE, see the Midas Digital Equipment GNU General Public License (GPL) Booklet part number DOC04-GPL issue A. B-1 Chapter 1: Introducing Generation-II This addendum is intended to provide users with information and operating instructions applicable to the enhancements and new features incorporated in the new Generation-II (G-II) software for Midas Digital Consoles (PRO1, PRO2, PRO2C, PRO3, PRO6, PRO9 and XL8). Note: As the PRO1 was initially introduced to the market as a fully G-II-equipped system, it may only be mentioned briefly in this addendum. Note: The PROb consoles are not affected by G-II. Note: Throughout this addendum the PRO3, PRO6 and PRO9 are collectively referred to as PRO Series. Which manuals are affected by G-II? To help you keep track of the latest versions of the Midas Digital Console Owner’s Manuals, refer to the following table. Table 1: Addendum history and latest manual versions for Midas Digital Consoles Addendum A - PROb Live Audio System For The PRO Series (Part Number DOC07-PROBADDENDUM, Issue A, Dec. 2010) Addendum B — G-II Software (This Document) PRO1 (part number DOC02DL1SERIES, Issue A, Jun. 2012) N/A Yes PRO2 (part number DOC02DL2SERIES, Issue A, Oct. 2012) N/A Yes PRO3, PRO6* and PRO9 (part number DOC02-PROSERIES, Issue A, Sep. 2010) Yes Yes XL8 (part number DOC02-XL8, Issue B, Apr. 2010) N/A Yes Midas Digital Console Owner’s Manual * The owner’s manual for the PRO6 (part number DOC02-DL3) reached issue C (June 2010) before it was superseded by the PRO Series Owner’s Manual, which includes the PRO3 and PRO9. Midas Digital Consoles Addendum B B-2 Chapter 1: Introducing Generation-II About G-II software The G-II software contains the following enhancements and new features: PRO2 and PRO2C PRO Series (PRO3, PRO6 and PRO9) XL8 Feature PRO1 Eight internal effects Existing New (page B-3) New (page B-3) New (page B-3) Dynamic EQ internal effect Existing Existing New (page B-23) New (page B-23) Hardware Safe screen Existing Existing New (page B-29) New (page B-29) Diagnostics screen Existing New (page B-30) Existing Existing Advanced navigation Existing Existing New (page B-19) New (page B-19) Select follows solo (independent of fader flip) Existing New (page B-33) New (page B-33) New (page B-33) Solo and mirror link pan added to stereo linking Existing New (page B-33) New (page B-33) New (page B-33) Preferences screen updated Existing Existing New (page B-34) New (page B-34) Polarity reverse switch added to output channels Existing New (page B-36) New (page B-36) New (page B-36) Send pan follows channel pan Existing New (page B-37) New (page B-37) New (page B-37) Output channel names on GEQs Existing New (page B-38) New (page B-38) New (page B-38) New automation scene and show warnings Existing New (page B-38) New (page B-38) New (page B-38) Show timestamp in file list Existing New (page B-39) New (page B-39) New (page B-39) Parameter values displayed on GUI and LCD select buttons Existing Existing New (page B-41) New (page B-41) Wireless remote control via iPad Existing New (page B-39) New (page B-39) New (page B-39) Stereo GEQ effect New (page B-27) New (page B-27) New (page B-27) New (page B-27) Console Overview screen Existing Existing New (page B-40) N/A G-II logo on splash screen On power up, the GUI displays the text “Generation-II” directly under the logo to show that the console is running the G-II software. Existing New New New Trademark attribution notices iPad is a trademark of Apple Inc., registered in the U.S. and other countries. Midas Digital Consoles Addendum B B-3 Chapter 2: Internal Effects This chapter details the following eight internal effects of the G-II software: • Ambience reverb (see below) • Chamber reverb (see “Chamber reverb” on page B-4) • Hall reverb (see “Hall reverb” on page B-5) • Plate reverb (see “Plate reverb” on page B-7) • Vintage room reverb (see “Vintage room” on page B-8) • Stereo chorus (see “Stereo chorus” on page B-10) • Dual stereo delay (see “Dual stereo delay” on page B-10) • Matrix mixer (see “Matrix mixer” on page B-12) Ambience reverb The ambience reverb adds warmth and depth to source material without adding the obvious artefacts commonly associated with artificial reverbs. It simulates smaller rooms using diffuse early reflections with the additional flexibility of separate reverb tail level and decay control. Reflective surface materials and air absorption properties can be simulated by adjusting the high and low frequency cut amount and high frequency damping. If the global tap option is enabled the pre-delay parameter units will change from milliseconds to musical note durations as they do with the current effect units. 1 2 3 15 14 4 12 6 5 11 10 9 8 7 Item Element Function 1 input meter Two adjacent 11-LED columns — one each for left and right — comprise the input meters. 2 Mix control knob Adjusts the dry/wet signal ratio. 3 Modulation control knob Specifies the combined rate and depth of modulation applied the reverb tail. 4 In switch Switches the Plate Reverb effect in/out. Midas Digital Consoles Addendum B B-4 Chapter 2: Internal Effects Item Element Function 5 Audition button This momentary-action button triggers a short internally generated sound to aid reverb evaluation (as a check). 6 output meter Two adjacent 11-LED columns — one each for left and right — comprise the output meters. 7 HF Cut control knob High frequency cut control knob applies a 6dB/Oct low pass filter to the input signal, in the range 200Hz to 20kHz. 8 LF Cut control knob Low frequency cut control knob applies a 6dB/Oct high pass filter to the input signal, in the range 10Hz to 500Hz. 9 HF Damp control knob High frequency damping, progressively reduces the high frequency content over time, in the range 1kHz to 20kHz. 10 Tall Gain control knob Increases the level of the reverb tail, between off and 0dB. 11 Diffusion control knob Increases the density of both the early reflections and reverb tail, between 0 and 100%. 12 Decay control knob Adjusts the decay time relative to the room size, from minimum to maximum. 13 Size control knob Specifies the room size (also affects decay), from small to large. 14 Predelay control knob Specifies the time before the reverb begins, between 0ms and 200ms. Chamber reverb The chamber reverb emulates the sound of echo chambers found in early recording studios. This is characterised by a rapid build up of reflection density within a small to medium sized space coupled with a relatively colourless and smooth decay. Reflective surface materials and air absorption properties can be simulated by adjusting the high and low frequency cut amount and high frequency damping. Low frequency decay and cross-over parameters allow relative control over the low band reverb tail length. This can be used to either simulate real room responses, which often have a longer decay time at low frequencies, or alternatively can be useful to reduce low frequency energy in a live environment where it may already be present due to the natural reverberation of the venue. If the global tap option is enabled the pre-delay parameter units will change from milliseconds to musical note durations as they do with the current effect units. 1 16 2 3 15 14 4 13 6 5 12 11 10 9 8 7 Midas Digital Consoles Addendum B B-5 Hall reverb Item Element Function 1 input meter Two adjacent 11-LED columns — one each for left and right — comprise the input meters. 2 mix control knob Adjusts the dry/wet signal ratio. 3 modulation control knob Specifies the combined rate and depth of modulation applied the reverb tail. 4 contour time control knob Controls the time over which the reflection density increases during the initial portion of the reverb tail. 5 lf x-over control knob Specifies the cross-over frequency for the low frequency decay (lf decay), in the range 20Hz – 500Hz. 6 output meter Two adjacent 11-LED columns — one each for left and right — comprise the output meters. 7 Audition button This momentary-action button triggers a short internally generated sound to aid reverb evaluation (as a check). 8 hf cut control knob High frequency cut control knob applies a 6dB/Oct low pass filter to the input signal, in the range 200Hz to 20kHz. 9 lf cut control knob Low frequency cut control knob applies a 6dB/Oct high pass filter to the input signal, in the range 10Hz to 500Hz. 10 hf damp control knob High frequency damping, progressively reduces the high frequency content over time, in the range 1kHz to 20kHz. 11 lf decay control knob Specifies the ratio of decay for low frequency content, in the range 0.5 – 2.0. 12 diffusion control knob Increases the density of both the early reflections and reverb tail, between 0 and 100%. 13 decay control knob Adjusts the decay time relative to the room size, from minimum to maximum. 14 size control knob Specifies the room size (also affects decay), from small to large. 15 pre delay control knob Specifies the time before the reverb begins, between 0ms and 200ms. 16 In switch Switches the Plate Reverb effect in/out. Hall reverb The hall reverb simulates the response of a real concert hall adding a sense of space to the source material with less initial density than a chamber reverb. The slower build up of reflections and generally longer decay times associated with this type of algorithm allows for increased clarity of the source, while offering a richer more lush overall sound that is less dense in character. This effect features contour controls to adjust the envelope shape during the initial portion of the reverb tail and also the time over which the reflection density increases. Reflective surface materials and air absorption properties can be simulated by adjusting the high and low frequency cut amount and high frequency damping. Low frequency decay and cross-over parameters allow relative control over the low band reverb tail length. This can be used to either simulate real room responses, which often have a Midas Digital Consoles Addendum B B-6 Chapter 2: Internal Effects longer decay time at low frequencies or alternatively can be useful to reduce low frequency energy in a live environment where it may already be present due to the natural reverberation of the venue. If the global tap option is enabled the pre-delay parameter units will change from milliseconds to musical note durations as they do with the current effect units. 1 2 3 17 16 4 15 5 6 14 13 7 12 8 9 11 10 Item Element Function 1 input meter Two adjacent 11-LED columns — one each for left and right — comprise the input meters. 2 mix control knob Adjusts the dry/wet signal ratio. 3 modulation control knob Specifies the combined rate and depth of modulation applied the reverb tail. 4 contour time control knob Controls the time over which the reflection density increases during the initial portion of the reverb tail, between fast and slow. 5 contour envelope control knob Controls the time over which the reflection density increases during the initial portion of the reverb tail, between fast and slow. 6 lf x-over control knob Specifies the cross-over frequency for the low frequency decay (lf decay), in the range 20Hz – 500Hz. 7 in switch Switches the Plate Reverb effect in/out. 8 audition button This momentary-action button triggers a short internally generated sound to aid reverb evaluation (as a check). 9 output meter Two adjacent 11-LED columns — one each for left and right — comprise the output meters. 10 hf cut control knob High frequency cut control knob applies a 6dB/Oct low pass filter to the input signal, in the range 200Hz to 20kHz. 11 lf cut control knob Low frequency cut control knob applies a 6dB/Oct high pass filter to the input signal, in the range 10Hz to 500Hz. 12 hf damp control knob High frequency damping, progressively reduces the high frequency content over time, in the range 1kHz to 20kHz. 13 lf decay control knob Specifies the ratio of decay for low frequency content, in the range 0.5 – 2.0. 14 diffusion control knob Increases the density of both the early reflections and reverb tail, between 0 and 100%. Midas Digital Consoles Addendum B B-7 Plate reverb Item Element Function 15 decay control knob Adjusts the decay time relative to the room size, from minimum to maximum. 16 size control knob Specifies the room size (also affects decay), from small to large. 17 pre delay control knob Specifies the time before the reverb begins, between 0ms and 200ms. Plate reverb The plate reverb effect simulates the actual plate reverb devices that were used in studios in the 1960s and 1970s. They were literally a plate of metal that was suspended under tension with a transudcer to transmit audio to the plate while two or more contact microphones were attached to the plate to pick up the results. The plate reverb has a very rapid build up of reflections and, as a result, is very dense initially with a fairly smooth decay characteristic. For this reason it is typically the first reverb choice for percussion instruments. Reflective surface materials and air absorption properties can be simulated by adjusting the high and low frequency cut amount and high frequency damping. Low frequency decay and cross-over parameters allow relative control over the low band reverb tail length. This can be used to either simulate real room responses, which often have a longer decay time at low frequencies, or alternatively can be useful to reduce low frequency energy in a live environment where it may already be present due to the natural reverberation of the venue. Enabling the global tap option will change the pre-delay parameter units from milliseconds to musical note durations as they do with the current effect units. 1 2 3 15 14 4 13 12 11 5 10 7 6 9 8 Item Element Function 1 input meter Two adjacent 11-LED columns — one each for left and right — comprise the input meters. 2 mix control knob Adjusts the dry/wet signal ratio. 3 modulation control knob Specifies the combined rate and depth of modulation applied the reverb tail. 4 lf x-over control knob Adjusts the cross-over frequency for the low frequency decay, in the range 20Hz to 500Hz. 5 in switch Switches the Plate Reverb effect in/out. 6 audition button This momentary-action button triggers a short internally generated sound to aid reverb evaluation (as a check). Midas Digital Consoles Addendum B B-8 Chapter 2: Internal Effects Item Element Function 7 output meter Two adjacent 11-LED columns — one each for left and right — comprise the output meters. 8 hf cut control knob High frequency cut control knob applies a 6dB/Oct low pass filter to the input signal, in the range 200Hz to 20kHz. 9 lf cut control knob Low frequency cut control knob applies a 6dB/Oct high pass filter to the input signal, in the range 10Hz to 500Hz. 10 hf damp control knob High frequency damping, progressively reduces the high frequency content over time, in the range 1kHz to 20kHz. 11 lf decay control knob Adjusts the ratio of decay for low frequency content, between 0.5 and 2.0. 12 diffusion control knob Increases the density of both the early reflections and reverb tail, between 0 and 100%. 13 decay control knob Adjusts the decay time relative to the room size, from minimum to maximum. 14 size control knob Specifies the room size (also affects decay), from small to large. 15 pre delay control knob Specifies the time before the reverb begins, between 0ms and 200ms. Vintage room The vintage room reverb effect provides an incredibly natural sounding reverb in the style of the earliest digital reverberators that became popular during the 1980s. Its strength is in recreating natural acoustic ambiences with a very warm and dense characteristic without sounding particularly artificial. Reflective surface materials and air absorption properties can be simulated by adjusting the high and low frequency cut amount. Low frequency decay and cross-over parameters allow relative control over the low band reverb tail length. This can be used to either simulate real room responses, which often have a longer decay time at low frequencies or alternatively can be useful to reduce low frequency energy in a live environment where it may already be present due to the natural reverberation of the venue. High frequency decay and cross-over parameters provide additional control over the high band reverb tail length. Enabling the global tap option will change the pre-delay parameter units from milliseconds to musical note durations as they do the current effect units. 1 14 13 12 11 2 3 10 9 4 8 5 6 7 Midas Digital Consoles Addendum B B-9 Vintage room Item Element Function 1 input meter Two adjacent 11-LED columns — one each for left and right — comprise the input meters. 2 lf x-over control knob Adjusts the cross-over frequency for the low frequency decay. 3 hf x-over control knob Adjusts the cross-over frequency for the high frequency decay. 4 in switch Switches the Vintage Room reverb effect in/out. 5 audition button This momentary-action button triggers a short internally generated sound to aid reverb evaluation (as a check). 6 output meter Two adjacent 11-LED columns — one each for left and right — comprise the output meters. 7 hf cut control knob High frequency cut control knob applies a 6dB/Oct low pass filter to the input signal, in the range 200Hz to 20kHz. 8 lf cut control knob Low frequency cut control knob applies a 6dB/Oct high pass filter to the input signal, in the range 10Hz to 500Hz. 9 hf decay control knob Adjusts the ratio of decay for high frequency content, between 0.1 and 1.0. 10 lf decay control knob Adjusts the ratio of decay for low frequency content, between 0.1 and 10.0. 11 density control knob Increases the reflection density of the reverb tail, between 0 and 100%. 12 decay control knob Adjusts the decay time relative to the room size, from minimum to maximum. 13 size control knob Specifies the room size (also affects decay), from small to large. 14 pre delay control knob Specifies the time before the reverb begins, between 0ms and 200ms. Midas Digital Consoles Addendum B B-10 Chapter 2: Internal Effects Stereo chorus Emulation of dual stereo chorus but with having two units in one rack space. 1 2 3 4 5 6 7 8 9 11 10 Item Element Function 1 in switch Switches the stereo chorus effect in/out. 2 stereo input switch Changes the operation to be stereo in and stereo out. 3 Preset slow switch Sets a slow rate with minimal depth. 4 Preset deep switch Sets a slow rate with maximum depth. 5 Preset medium switch Sets a medium rate with minimal depth. 6 Preset fast switch Sets a fast rate with minimal depth. 7 depth control knob Adjusts the amount of modulation applied to the pitch in the range 0 to 100%. 8 rate control knob Adjusts the speed of modulation applied to the pitch in the range 0.1Hz to 2Hz. 9 width control knob Adjusts the stereo spread of the output signal from mono to stereo. 10 mix control knob Adjusts the dry/wet signal ratio. 11 Meters Input and output meters. Dual stereo delay The dual stereo delay effect is a simpler, more concise, version of the current delay device with the advantage of having two units in one effect device rack space. The dual stereo delay is a dual stereo in and dual stereo out device with metering for each discrete input and output. BPM display mode: • Tempo is accurate to 0.1 bpm. • With global tap enabled the display shows global tempo regardless of delay time setting. • With global tap disabled the display shows the equivalent tempo assuming a delay of one beat. For example, if the delay time is 500ms the tempo is calculated as 60/0.5 = 120 bpm. • Up/down buttons adjust local or global tap tempo by 0.1 bpm. Millisecond display mode: • With global tap enabled the display shows current delay (in milliseconds) based on global tempo and selected musical interval. For example, if a 1/8 dot interval is Midas Digital Consoles Addendum B B-11 Dual stereo delay selected on the delay control and the global tempo is 120 bpm the delay value shown will be 0.75 x 60/120 bpm = 375 ms. • With global tap disabled the display shows the actual delay time set on the unit. • Up/down buttons adjust delay units by 1 millisecond increments. If the global tap option is enabled the delay time rotaries will change from seconds (milliseconds) to musical note durations as they do with the current effects units. However, the seven-segment LED display will continue to follow the display mode selected. Also, if the global tap option is enabled the tap button on the unit will not affect the global tempo and should be greyed out. 1 2 3 4 5 6 7 8 9 10 Item Element(s) Function 1 On/off switch Switches the delay effect in or out. 2 delay time controls The control knob adjusts the delay time in the range 0 seconds to 2 seconds in 5 milliseconds increments. In global tap mode, adjusts the note intervals. Switching the X2 switch changes the delay time scale to 0 seconds to 4 seconds in 10 millisecond intervals. 3 tap button Use this button to tap in the delay time or tempo manually. 4 up and down buttons Increases/decreases the delay time by 1 millisecond 0.1 bpm 5 Display Shows current delay time and selected unit. 6 feedback control knob Adjusts the delay feedback loop gain in the range 0 to 100%. 7 lf cut controls This low frequency control knob applies a 6dB/Oct high pass filter to the delay and optionally feedback signal (by switching on the post fb switch below). The default is post-delay and pre-feedback. Range is from 10Hz to 500Hz. 8 hf cut controls This high frequency control knob applies a 6dB/Oct low pass filter to the delay and optionally feedback signal (by switching on the post fb switch below). The default is post-delay and pre-feedback. Range is from 200Hz to 20kHz. 9 mix control knob Adjusts the dry/wet signal ratio. 10 Meters Input and output meters. Midas Digital Consoles Addendum B B-12 Chapter 2: Internal Effects Matrix mixer The matrix mixer is an eight mono I/O device with discrete metering for each input and output. The display of the matrix mixer comprises controls that duplicate the equivalent ones on the control surface and can be used as an alternative method of operation. You can link the output EQ settings across channels and also link odd and even outputs as a stereo pair, which is a GUI-only function. Unlike the other internal effects, the matrix mixer has two screens (input and output), which require specific navigational methods (see “Navigating the input and output screens” on page 16). Both screens provide an overview of the other to save you having to navigate between them in order to obtain incidental information. Note: The global tap option does not apply to the matrix mixer. Input screen The input screen shows the signal level, delay and output send contributions for the inputs and, to the right, an overview of the outputs with facility for muting. 8 1 2 7 6 9 5 3 4 Item Element Function 1 level control knob Continuous adjustment of the input level from 4 (infinity) to +10dB. 2 Meter 11-segment meter for showing the input channel level. 3 Up/down arrows Increases/decreases the input delay time (shown in milliseconds and metres) in 0.01 millisecond increments. You can also type in the value in the fields. 4 Phase switch Adjusts the input signal phase by 180°. 5 delay control knob Adjusts the input delay time within the range 0ms to 50ms in 0.01 ms increments. 6 MUTE switch Mutes the input channel. Midas Digital Consoles Addendum B B-13 Matrix mixer Item Element Function 7 Yellow box Shows which controls are currently assigned to the assignable controls panel. 8 Meter 11-segment meter for showing the output channel level. 9 MUTE switch Mutes the output channel. >> To switch an output mix send on/off You can have any combination of the eight outputs contributing to each input. To switch an output on/off, navigate to the desired output using the left/right navigation (see “Navigating the input and output screens” on page 16) and click the associated button in the assignable controls panel. Midas Digital Consoles Addendum B B-14 Chapter 2: Internal Effects Output screen The output screen shows the output channel controls with a detail area underneath for the selected. An inputs section to the left provides an input overview, with facility for muting. 3 4 5 6 7 1 8 2 9 10 11 27 26 12 25 24 23 13 22 14 21 20 15 16 17 19 18 Midas Digital Consoles Addendum B B-15 Matrix mixer Item Element Function 1 Meter 8-segment meter for showing the input channel level. 2 MUTE switch Mutes in input channel. 3 Meter 8-segment meter for showing the output channel level. 4 MUTE switch Mutes the output channel. 5 Phase switch Adjusts the output signal phase by 180°. 6 EQ switch Switches the output channel EQ in/out. 7 LNK switch Links the EQ of the local output channel to the adjacent output channel to the right. 8 LNK switch See “Stereo linking” on page 17. 9 Output channel identifier Shows the name of the currently selected output and indicates, by its background colour, which pair it belongs to. 10 Input contributions panel Shows the level contributions of the eight input channels for the selected output channel. However, when a pair of output channels are stereo linked, its function changes (see “Stereo linking” on page 17.). 11 Graph Displays the EQ envelope of the selected output channel. 12 width control knob Adjusts the filter width of the EQ band for the selected output channel, in the range 0.1 – 3.0 Oct. 13 frequency control knob Adjusts the filter frequency of the selected EQ band for the selected output channel, using the same frequency ranges as the standard input channel EQ. 14 gain control knob Adjusts the filter gain of the selected EQ band for the selected output channel, in the range -16dB to +16dB. 15 delay controls Provides adjustment of the output delay via control knob or up/down arrows for the selected output channel, in the range 0ms – 500ms. Delay time accuracy is to 0.01 millisecond. Delay is also shown as a distance (metres). 16 level control knob Continuous signal level adjustment of the selected output channel, from 4 (infinity) to +10dB. 17 Meter 8-segment meter for showing the level of the selected output channel. 18 MUTE switch Mutes the selected output channel. 19 Phase switch Adjusts the output signal phase by 180° on the selected output channel. 20 high button Switches the EQ controls to work with the High EQ band on the selected output channel. 21 hi mid button Switches the EQ controls to work with the Hi-Mid EQ band on the selected output channel. 22 lo mid button Switches the EQ controls to work with the Lo-Mid EQ band on the selected output channel. 23 low button Switches the EQ controls to work with the Low EQ band on the selected output channel. 24 SHAPE button Selects the shelving mode for the high and low EQ bands on the selected output channel. For information on the shelving modes, see “EQ (E zone)” on page 266. Midas Digital Consoles Addendum B B-16 Chapter 2: Internal Effects Item Element Function 25 Icon Identifies the currently selected EQ shelving mode (see “EQ (E zone)” on page 266). Default parametric icon is . 26 EQ switch Switches the EQ in/out for the selected channel. 27 eq link LED Illuminates to indicate that the EQ is on for the selected channel. Navigating the input and output screens The up and down navigation arrow buttons on the Matrix Mixer operate in the same way as on any internal effect (see “Rack and unit control navigation” on page 174). However, as this effect is unique in that it has two screens, the left and right buttons function in a slightly different manner, as described in this section. Navigation button Function Scrolls consecutively down through the input screen sections (input, alignment and output mix sends) and then left to right through the outputs of the output screen, crossing over screens in between. See Figure 1 on page 17. Scrolls in the opposite direction to the right arrow button. Midas Digital Consoles Addendum B B-17 Matrix mixer Figure 1: Scrolling order of right arrow navigation button Stereo linking Clicking a stereo linking button (LNK) stereo links the local pair of output channels, so that the input mix send controls operate as pan on the left (odd numbered) output channel and level on the right (even numbered) output channel, which is similar to the normal mix sends on the console. B D A C E Stereo linking a pair of output channels (for example, outputs 1 and 2) Click the local stereo link button (A) to link the two outputs, so that output 1 (B) now becomes panning (C) and output 2 (D) remains as signal level (E). Midas Digital Consoles Addendum B B-18 Chapter 2: Internal Effects Midas Digital Consoles Addendum B B-19 Chapter 3: Advanced Navigation This chapter explains how the following advanced navigation modes — which are already used on the PRO2, PRO2C and PRO1 — have been incorporated into the PRO3, PRO6, PRO9 and XL8. • Collapsed flip • Effects (FX) navigation • GEQ navigation • Mix control association (MCA) mode About the advanced navigation features The following table shows the implementation of the advanced navigation features for all of the Midas Digital Consoles and the subsections give a brief description of the main ones. Table 1: G-II advanced navigation features across the Midas Digital Console range Feature PRO1 PRO2 and PRO2C PRO3 PRO6 PRO9 XL8 Flip Existing Existing Existing Existing Existing Existing, but no flip button Collapsed flip Existing Existing Existing Existing Existing New FX N/A* Existing New New New New GEQ Existing Existing New New New New MCAs N/A Existing New New New New Outputs on VCA faders Existing Existing Not required Not required Not required Not required Outputs on input faders Existing Existing Not required Not required Not required Not required Assign (extend) inputs to VCA faders Existing Existing Not required Not required Not required Not required Assign (extend) outputs to VCA faders Existing Existing N/A N/A N/A Not required Home Existing Existing New New New New * The PRO1 does not have an equivalent of the FX button. Flip In flip mode, channel faders become the mix send contributions to any selected output channel. Midas Digital Consoles Addendum B B-20 Chapter 3: Advanced Navigation Collapsed flip With flip in operation, channels not assigned to the selected bus are hidden. FX In FX advanced navigation mode, if you select an aux send that is patched to an effect, that effect will appear on the GUI. GEQ In GEQ advanced navigation mode the faders underneath the VCA groups also operate as GEQ faders. The role of the LCD select buttons in the VCA groups section change to display their local fader assignments; the left and right arrow buttons are used to scroll the faders of the GEQ. GEQ 200 GEQ 250 GEQ 315 GEQ 400 GEQ 500 GEQ 630 GEQ 800 GEQ 1k Typical LCD button assignments in the VCA groups section when in GEQ advanced navigation mode (for example, on a PRO6) MCA In MCA advanced navigation mode the faders underneath the VCA groups operate as mix control associates (MCAs), where the aux sends on multiple input channels have an associated master fader that provides overall control. This is similar to how a VCA fader operates on the main channel faders and MCA faders also have the same names and channel members as the VCAs. Home Selecting the advanced navigation home button changes the GUI screens to their default displays. Midas Digital Consoles Addendum B Activating the advanced navigation features B-21 Activating the advanced navigation features Both the PRO Series and XL8 use the LCD buttons in their respective population groups section to momentarily change their role and act as the advanced navigation buttons, which are then available for selection. Note: You cannot have both the GEQ and MCA advanced navigation features active at the same time. >> To activate/deactivate an advanced navigation feature on the PRO Series 1 In the channel select section, press and hold down the asterisk (*) button (see Figure 1). After about one second the LCD buttons in the population groups section should show their advanced navigation assignments. 2 Do one of the following: 3 • To activate an advanced navigation feature, press the desired button while still holding down asterisk (*) button. For example, to activate the effects feature, press the FX button (see Figure 1). • To deactivate an advanced navigation feature, press the button of the desired active feature while still holding down asterisk (*) button. Release the asterisk (*) button. The population groups section should revert to its normal role. FX B A FX GEQ MCA HOME 2 1 Figure 1: Activating and selecting the advanced navigation buttons (for example, on a PRO6). When an advanced navigation mode is active, its associated LCD button displays a dark background (A) and, when inactive, the background is blue (B). Midas Digital Consoles Addendum B B-22 Chapter 3: Advanced Navigation >> To activate/deactivate an advanced navigation feature on the XL8 1 In any input select section, press and hold down the asterisk (*) button (see Figure 2). After about one second the LCD buttons in the population group section should show their advanced navigation assignments. 2 Do one of the following: 3 • To activate an advanced navigation feature, press the desired button while still holding down asterisk (*) button. For example, to activate flip, press the FLIP button (see Figure 2). • To deactivate an advanced navigation feature, press the button of the desired active feature while still holding down asterisk (*) button. Release the asterisk (*) button. The population group section should revert to its normal role. FLIP A B FLIP FX GEQ MCA HOME 2 1 Figure 2: Activating and selecting the advanced navigation buttons on an XL8. When an advanced navigation mode is active, its associated LCD button displays a dark background (A) and, when inactive, the background is blue (B). Midas Digital Consoles Addendum B B-23 Chapter 4: Other G-II Changes This chapter deals with the other changes in the G-II software. Dynamic EQ internal effect The dynamic EQ is a 4-band parametric dynamic equaliser, which is able to provide frequency selective compression or expansion. The dynamic EQ features proportional-q filters that, when boosting or cutting by small amounts, reduce the bandwidth of the filter compared to the setting at maximum cut/boost. Filter coefficients are calculated at the audio rate to provide a lightning fast attack time, which is essential for transparent operation. Each band features a full-band EQ type that switches out the EQ filter so that the band operates as a non-frequency selective, or 'full-band' compressor/expander. Flexible routing options allow for the following configuration modes: • One chain of stereo 4-band processing. • Two chains of stereo 2-band processing. • Four chains of stereo single-band processing. Band 1 Band 2 Band n Band n Band n Band n Band 1 Band 2 Band 3 Band 4 Midas Digital Consoles Addendum B Band 3 Band 4 B-24 Chapter 4: Other G-II Changes 1 2 3 5 6 7 4 8 18 17 9 16 10 11 15 14 13 12 Item Element Function 1 MODE button Selects the routing configuration. Audio routing paths are illustrated by item 18. 2 Band selection indicator Shows the selected routing configuration mode. 3 Limit curve Shows the minimum cut/maximum boost EQ response for the selected band. 4 Dynamic curve Shows the real time dynamic EQ response curve. This curve will vary between flat (no EQ) and the outer curve (full EQ) depending on the signal level, ratio and threshold settings. 5 IN button and LED indicator Switches the individual band on/off. 6 comp/exp meter Shows the current cut/boost of the selected EQ band. 7 LSN button and LED indicator Sidechain listen button that routes the bandpass filtered sidechain signal to the unit output. 8 EQ type Selects the type of equaliser (shown in item 9) from Bell, Low Shelf, High Shelf and Full Band. 9 Name field Shows the currently selected EQ type. 10 WIDTH control knob Sets the bandwidth of the EQ band and sidechain filter for the selected band. Midas Digital Consoles Addendum B B-25 Dynamic EQ internal effect Item Element Function 11 FIXED button and LED indicator Forces selected band to use a fixed EQ gain, so that when it is enabled it behaves as a static EQ. This is useful for previewing the effect of the EQ curve. 12 RATIO control knob Sets the ratio of the compression or expansion applied to the selected band. The centre position produces a ratio of 1:1, which will have no effect. As the control is turned anti-clockwise, more compression is applied, up to a ratio of 25:1. If the control is turned clockwise from the centre position, expansion is gradually applied up to the ratio of 1:25. 13 FAST REL. button and LED indicator Enables fast envelope release setting. 14 FREQ control knob Sets the centre frequency of the selected EQ band. 15 BELOW button and LED indicator Sets whether the compressor/expander operates above (off) or below (on) the threshold (see Figure 1 “Transfer characteristics” on page 26). 16 THRESHOLD control knob Sets the threshold level. 17 Meter Shows the level of the sidechain signal relative to the threshold setting, that is, it shows the signal level within the frequency region selected by the frequency (FREQ) and width (WIDTH) controls. 18 Band I/O Shows the audio routing path between inputs, outputs and the four EQ bands. Midas Digital Consoles Addendum B B-26 Chapter 4: Other G-II Changes Above Threshold Compression ( Below = off, Ratio = comp ) Above Threshold Expansion ( Below = off, Ratio = exp ) Output Level Output Level threshold Input Level Below Threshold Compression ( Below = on, Ratio = comp ) Output Level threshold Input Level Below Threshold Expansion ( Below = on, Ratio = exp ) Output Level threshold Input Level threshold Input Level Figure 1: Transfer characteristics Midas Digital Consoles Addendum B B-27 Stereo Graphic EQ effect Stereo Graphic EQ effect The Stereo Graphic EQ effect is based on the console’s internal GEQ effect and has two of these that can be stereo linked. For more information on the GEQ effect, see the console’s Owner’s Manual. A B C The two GEQs can be stereo linked using the LINK button (B). The YES LED (C) illuminates to show that the two GEQs are stereo linked and the NO LED (A) illuminates when the GEQs are operating independently of each other. To navigate the channels and controls of the GEQs, use the assignable control buttons and the left/right arrow buttons (see Figure 2 on page 28). Midas Digital Consoles Addendum B B-28 Chapter 4: Other G-II Changes A B G C F D E Figure 2: Stereo GEQ navigation. A. Shows the GEQ controls section when currently selected. Selection is via the left/right arrow buttons (E). B. GEQ fader. C. White background indicates current selection. D. GEQ fader group identifier. Group selection is via its corresponding fader button (F). E. Left and right navigation buttons for scrolling through the fader groups and control sections. F. Assignable control buttons for direct access to their associated fader group. When a control section is selected, their assignments change to the buttons of that section. G. Control knob. Assigned to a GEQ fader when a fader group is selected or a control knob when a control section is selected. Midas Digital Consoles Addendum B Hardware Safe screen (PRO Series and XL8) B-29 Hardware Safe screen (PRO Series and XL8) Important: Safes are intended for emergency use only and are not to be confused with scope. Safes prevent certain controls from being recalled with a scene. The control surface of the PRO Series and XL8 consoles have dedicated channel safes sections where you can activate/deactivate their associated safes. However, a Hardware Safe screen, which has been to the GUI, also lets you do this, but in addition provides an overview of the status of all safes on the console. The Hardware Safe screen shows all of the available safes for the every channel and also the VCAs. The screen has a key to help you identify each safe type, as shown in the following diagram. The Hardware Safe screen (the example shown is from a PRO1) showing the key to the channel safe parameters. Click KEY to open the Key window. >> To open the Hardware Safe screen At the GUI, choose homeAutomationHardware Safe. Midas Digital Consoles Addendum B B-30 Chapter 4: Other G-II Changes >> To switch a safe on/off Do one of the following: • At the GUI’s Hardware Safe screen, click the desired safe to switch it on/off. This can be done for any safe. • Use the appropriate button in the channel safes section with the appropriate channel assigned to the control surface. • At the GUI’s VCA Groups screen, click the desired safe button. Diagnostics screen The GUI menu of the PRO2 now includes a Diagnostics option (highlighted right), which opens the Diagnostics screen. This screen provides an overview of the current health and status of the system by displaying real-time connectivity of the system, the health of connected nodes and whether or not a device is configured. The status LED at the top of the screen, which is constantly displayed while the control centre is switched on, is linked to the status of individual items on the Diagnostics screen. If there is a problem, you can click the status LED to open the Diagnostics screen and see what is causing the error. 1 2 3 4 5 An example of the Diagnostics screen Midas Digital Consoles Addendum B B-31 Diagnostics screen Item Element Description 1 Console column This column contains boxes that represent the internal processes of the PRO1 Control Centre, such as the control surface, master controller, DSP, Audio IO and GUI. If any of these develop an error condition the colour of the boxes will change to red. Clicking the DL271 DSP Board box will open a Diagnostics Inspector window (see “About the Diagnostics Inspector window” on page 32). 2 Link column This column shows the health of the physical connection of each AES50-compatible device and the PRO1 Control Centre. Clicking a link will open a Diagnostics Inspector window (see “About the Diagnostics Inspector window” on page 32). 3 Configured column This column shows any AES50 devices, such as a IDL251 Audio System I/O, that have been detected as connected to the system and are also configured for the system. Clicking one of these devices will open a Diagnostics Inspector window (see “About the Diagnostics Inspector window” on page 32). 4 Unconfirmed column This column shows any AES50 devices, such as a IDL251 Audio System I/O, that have been detected as connected to the system, but have not been configured during the patching procedure. Clicking one of these devices will open a Diagnostics Inspector window (see “About the Diagnostics Inspector window” below). To configure a device, see “Setting up the I/O rack devices” on page 39. 5 CONFIG button Opens the AES50 Device Configuration window (see Figure 9 “Typical AES50 Device Configuration window” on page 39) The colour of each device, together with its link (if applicable), indicates its current status, as shown in the following table. State Midas Digital Consoles Addendum B Description Unit status Connection of active link Connection of inactive link Both the unit and link are green Good Good Good Unit is green and the link is red Good Bad Not known Unit is red and the link is green Malfunction Good Not known Both the unit and link are red Not known Bad Bad B-32 Chapter 4: Other G-II Changes There is also an amber condition, which means that the item(s) is in error, but is not contributing to the audio. About the Diagnostics Inspector window Clicking an item in the Diagnostics screen will open its Diagnostics Inspector window, which provides detailed information, particularly if the item has an error condition. Typical PRO Series Diagnostics Inspector window with the ‘ignore’ buttons at the lower right corner The ‘ignore’ buttons of the Diagnostics Inspector window let you configure the PRO Series to ignore errors on selected/all items. This is an important feature because there may be times when you are quite happy to work with a known error(s), but will want to know when a new error occurs. Note: Diagnostic Inspector windows are primarily for use by Midas service and software engineers. By providing useful information, such as device health and status, they aid fault diagnosis and rectification, and may help solve any problems that may arise. Apart from using the ‘ignore’ buttons, it is unlikely that operators of the DL251/ DL252 Audio System I/O will ever need to use this function. An example of DL271 DSP Board Diagnostics screen An example of DL251 device Diagnostics screen showing an error condition >> To ignore/unignore error condition Click the desired item that is in an error condition and then click IGNORE/UNIGNORE SELECTED. Its text colour should change to black to show that it is being ignored. Click IGNORE/UNIGNORE SELECTED again to highlight the error condition. Midas Digital Consoles Addendum B B-33 Select follows solo To ignore all error conditions, click IGNORE ALL. Click UNIGNORE ALL to highlight all error conditions. Select follows solo There are two new select follow solo options Input Select Follows Solo and Output Select Follows Solo, both of which are independent of fader flip. These new solo options replace Select follows solo on consoles that already had this option. For information on their function, see “The new User tab” on page B-35. Solo and pan link mode added to stereo linking options Solo and pan linking mode have been added to the stereo linking options. These options have been added to the new-look Linking tab (Preferences Link screen) and also the Stereo Linking Options window. B A The new solo and pan link mode stereo linking options on the Linking tab of the GUI menu’s Preferences option (A) and the Stereo Linking Options window (B). >> To open the Linking tab At a GUI screen, choose homePreferencesGeneral and click the title of the User tab to open it. Pan Link options The Pan Link Mode function has four options, which do the following on stereo linked channels: • Independent — Pan controls and front-back panning in surround modes are not linked. • LR Mirror — Pan values are mirrored between the left/right channels and, in surround modes, front-back panning is linked. Midas Digital Consoles Addendum B B-34 Chapter 4: Other G-II Changes • FB Mirror — Pan values are not linked and, in surround modes, front-back panning is mirrored and left-right panning is linked. • Mirror Both — Pan values are mirrored between the left/right channels and, in surround modes, are also mirrored front-back. Preferences screen updated The new tab-based Preferences screen replaces the old one. Also, the linking screen (stereo linking options), which was accessed via the GUI menu’s home PreferencesLinking option, is now included on the Linking tab. You can still access the Preferences screen is still accessed via the GUI menu’s homePreferencesGeneral option and also directly via the monitors/preferences button (press twice) in the screen access panel (containing trackball). Tabs on the new-style Preferences screen Midas Digital Consoles Addendum B B-35 Preferences screen updated The new User tab The User Interface section of the User tab (Preferences User screen) lets you set some of the consoles’ operating parameters to suit your own preferences. Table 1: Overview of alterations to User Interface section PRO Series (PRO3, PRO6 and PRO9) XL8 Option PRO1 PRO2 and PRO2C Display Rotary Values Existing Existing Existing Existing Fast Zone Delay Control Existing Existing Existing Existing Input Select Follows Solo Existing Was “Select Follows Solo” Was “Select Follows Solo” Was “Select Follows Solo” Output Select Follows Solo Existing Was “Select Follows Solo” Was “Select Follows Solo” Was “Select Follows Solo” Automate Paging Existing Existing Existing Existing Touch Navigation of Detail Area Existing Existing New New Send Pan Follows Channel Pan Existing Existing New New Use Global Tap as Global Meters Pre Existing Existing New New Flash Global Tap Continuously Existing Existing New New Collapsed Flip (Hide Unassigned Channels) Existing Existing New New The following describes the User Interface options that are new or have been altered on the consoles. • Input Select Follows Solo — when you solo an input channel, such as an aux return, this channel is automatically selected. • Output Select Follows Solo — when you solo an output channel, such as a matrix, this channel is automatically selected. • Touch Navigation of Detail Area — choose this option to navigate the local detail area on the control surface to the GUI detail area when one of its touch-sensitive controls is operated. • Send Pan Follows Channel Pan — if a channel is contributing to a stereo mix bus (for example, stereo aux channel), choosing this option will cause the pan for the contribution to mirror that of the channel pan. • Use Global Tap as Global Meters Pre — choose this option to change the tap function to operate as a global meters pre button. • Flash Global Tap Continuously — choose this option so that the tap button will flash to reflect the current global tap tempo; this value is always displayed (in milliseconds) in the tap tempo section at the top of the GUI screen. • Collapsed Flip (Hide Unassigned Channels) — choose this option so that only channels assigned to a mix bus will be visible when flipped to that bus. This affects solo, such that any AFL solo is derived post- the aux send contribution level (and its pan if applicable). Midas Digital Consoles Addendum B B-36 Chapter 4: Other G-II Changes Polarity reverse switch added to output channels A phase switch has been added to bus trim section (configuration detail area) on the aux send, matrix and master channels of the PRO Series and XL8 consoles. Important: Down-converting a showfile will lose this setting. Polarity reverse switch (highlighted), added to the bus trim section. This example shows the Console Overview screen of the a PRO6. Midas Digital Consoles Addendum B B-37 Send pan follows channel pan Send pan follows channel pan The pre and post buttons have been added to the PRO Series and XL8 consoles (already existing on the PRO1 and PRO2), and a send pan follows channel button has been added to the PRO2, PRO Series and XL8 consoles (already existing on the PRO1). These are only available on the auxes and matrices. A B C This example shows the send pan follows channel (A) and pre (C) and post (B) buttons for set all contributions, added to the bottom of the configuration detail (on the GUI) on a PRO6 Midas Digital Consoles Addendum B B-38 Chapter 4: Other G-II Changes Output channel names on GEQ rack GEQ names and their patching sources have been added to the Graphic EQs screen. A A name and patching source text field (A), whose background colour is user-configurable, has been added to each GEQ on the Graphic EQs screen New scene and show warning messages in automation G-II software includes two new warnings in automation. One warning appears when you try and recall the safe scene and the other appears when you try to save a show with no scenes stored. The ‘recalling the safe scene’ warning, which appears when you select the ‘now’ scene either via control surface or GUI Midas Digital Consoles Addendum B B-39 Show timestamp in Files list The ‘saving a show with no scenes’ warning, which appears when you click SAVE on the GUI’s Automation screen Show timestamp in Files list The files in listed on the Files screen now have a timestamp. A A. File timestamps Wireless remote control via iPad The PRO2, PRO Series and XL8 now include an on-board DHCP server, which permits remote control of any MIDAS digital console wirelessly from an Apple iPad, via any standard Ethernet-equipped wireless router. Midas Digital Consoles Addendum B B-40 Chapter 4: Other G-II Changes New Console Overview screen The PRO Series has a new Console Overview screen, which replaces the Meters screen. (This screen already exists on the PRO1 and PRO2. The XL8 has two options for the default mix bay screen, which remain unchanged.) This example shows the Console Overview screen on the PRO6 Midas Digital Consoles Addendum B Values displayed on GUI and LCD select buttons B-41 Values displayed on GUI and LCD select buttons Control and fader values have been added to the GUI and the LCD select buttons on the control surface. Control knob values displayed on the effects screen On the PRO Series and XL8 consoles the control values are displayed above the assignable control knobs for the effects. A This example shows control knob values (A) above the assignable controls of the Stereo GEQ effect on a PRO6 As, uniquely, the XL8 has LCD select buttons in the assignable controls panel, the values are displayed above these buttons. Values displayed on LCD select buttons On the PRO Series and XL8 consoles, all LCD select buttons with a fader underneath will display the fader’s value (dB) at the bottom of the button, but only while its fader is being operated. The LCD select buttons in assignable controls section of the XL8 now have the value of the assigned parameter displayed at the bottom of the button. Midas Digital Consoles Addendum B B-42 Chapter 4: Other G-II Changes Midas Digital Consoles Addendum B Thank you for reading through this Addendum. We hope you found it useful. Please feel free to send us your comments. Our contact details and website address can be found at the front of this document. © 2012 MUSIC Group Research UK Limited Klark Industrial Park, Walter Nash Road, Kidderminster. Worcestershire. DY11 7HJ. England. Tel: +44 1562 741515, Fax: +44 1562 745371 Email: [email protected] Website: www.midasconsoles.com