1
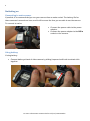
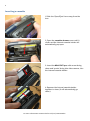
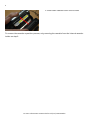
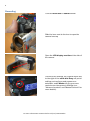
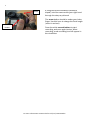
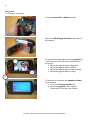
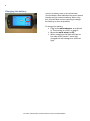
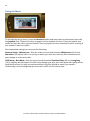
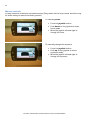
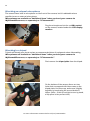
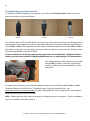
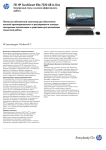
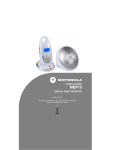
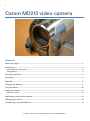
1 Canon MD215 video camera Contents Before you begin: ..................................................................................................................................................................... 2 Switching on .............................................................................................................................................................................. 3 Connecting to mains power ....................................................................................................................................................... 3 Using battery .................................................................................................................................................................................... 3 Inserting a cassette ................................................................................................................................................................. 4 Recording .................................................................................................................................................................................... 6 Playback ....................................................................................................................................................................................... 8 Charging the battery .............................................................................................................................................................. 9 Using the Menu ....................................................................................................................................................................... 10 Advanced controls ................................................................................................................................................................. 11 Manual controls.............................................................................................................................................................................. 12 Attaching an external microphone .................................................................................................................................13 Attaching to a tripod .............................................................................................................................................................13 Transferring recorded material...................................................................................................................................... 14 For more information see www.shef.ac.uk/cics/creativemedia 2 Before you begin: 1. 2. 3. 4. 5. Canon MD215 video camera Power adaptor Power cable Battery Mini DV Cassette (not supplied) 1 2 3 4 5 Note - Cassette tapes are not supplied with the camera kit, and must be purchased. They can be bought (at the time of writing) from the Student Union shop, or at most electronics stores. Any brand is usable in the camera, as long as they are Mini DV format. You will also need a firewire cable to transfer your footage to a computer. If you require a firewire cable, see page 14 for more information. For more information see www.shef.ac.uk/cics/creativemedia 3 Switching on Connecting to mains power If possible, it is recommended you run your camera from a mains socket. The battery life for these cameras is around one hour, and it will increase the time you are able to use the camera. To connect to mains: Connect the power cable to the power adaptor. Connect the power adaptor to the DC in socket on the camera. Using battery If using battery: Connect battery at back of video camera by sliding it upward until both terminals click together. For more information see www.shef.ac.uk/cics/creativemedia 4 Inserting a cassette 1. Slide the 'Open/Eject' lever away from the lens. 2. Open the cassette drawer cover until it clicks, and the internal cassette holder will automatically pop open. 3. Insert the Mini DV Tape, with arrow facing down and 'spools' facing into video camera, into the internal cassette holder. 4. Squeeze the internal cassette holder together to close (it will automatically go down). For more information see www.shef.ac.uk/cics/creativemedia 5 5. Close outer cassette cover until it clicks. To remove the cassette repeat the process, only removing the cassette from the internal cassette holder on step 3. For more information see www.shef.ac.uk/cics/creativemedia 6 Recording Turn the mode dial to Camera mode. Slide the lever next to the lens to open the camera lens cap Open the LCD display monitor at the side of the camera. There are two settings, on a switch above and to the right of the mode dial. Easy will put all settings such as focus and exposure on automatic, and P Mode will give you more controls over the camera's settings (see "Advanced controls" and "Manual controls" for more details). For more information see www.shef.ac.uk/cics/creativemedia 7 Zoom Record button If using the camera handheld (without a tripod), hold the camera with your right hand through the strap as pictured. The zoom button should be under your index finger. Use this lever to change the focal length (zoom in and out) Press the white record button to start recording, and once again to stop. When recording, a red recording icon will appear in the viewfinder. For more information see www.shef.ac.uk/cics/creativemedia 8 Playback To view your tape back: Turn the mode dial to Camera mode. Open the LCD display monitor at the side of the camera. 1 2 To operate the tape player, use the joystick (1) - the onscreen icons (2) show what controls are active. Move the joystick up to play/pause Move the joystick left to rewind Move the joystick right to fast forward Move the joystick down to stop 3 To increase or decrease the speaker volume in the camera: Press the function button (3) Move the joystick left or right to descrease or increase the volume. For more information see www.shef.ac.uk/cics/creativemedia 9 Charging the battery There is a battery icon on the viewfinder (circled below) that indicates how much power remains on the camera's battery. When very low, this will flash red as a warning to charge the battery as soon as possible. To charge the battery: Plug in the mains adaptor, as outlined in "Connecting to mains" on page 3. Move the mode wheel to Off. When charging a red light will flash on the side of the camera - once fully charged this will change to a solid red light. For more information see www.shef.ac.uk/cics/creativemedia 10 Using the Menu To activate the set-up menu, press the function button and move down to the bottom icon with the joystick (See "Playback" section on page 8 for the location of these). Press the joystick as a button to open the menu (pictured above). Use the joystick to move around the menu, pressing it as a button to select an option. We recommend setting the camera to the following: Camera Setup - Widescreen - Sets the video record mode between Widescreen (16:9) and Standard (4:3) aspect ratio. It is up to you which you record in, but keep this consistent so all your footage is in the same ratio. VCR Setup - Rec Mode - Sets the record mode between Standard Play (SP) and Long Play (LP). Long Play will allow you to fit 50% more footage on a tape, but video and audio quality will be significantly worse. It is only recommended that Long Play should be used if you need to continuously record footage that you know will not fit on a 60 minute tape. For more information see www.shef.ac.uk/cics/creativemedia 11 Advanced controls If operating the camera on Easy mode (see "Recording" on page 6), most settings will be automatically set, with the camera calculating optimum settings for the light conditions. If in P Mode, however, you will be able to change several settings on the camera. While in camera mide (see "Recording" on page 6) press Function. The menu is then controlled using the joystick. (See "Playback" on page 8).Moving the joystick up and down will move through the menu, and left and right between the different settings displayed at the bottom of the screen. The first icon sets a series of recording presets, including settings optimised for night, portraits, snow, sports, beach, etc. Program AE is the setting that allows you to alter the settings individually yourself. The next sets the white balance (the way the camera works out colours in different light conditions). The settings are auto white balance, presets for outdoors and Tungsten lighting, and evaluate white balance. To do the latter, select this icon, point the camera at something predominantly white (such as a piece of paper or white wall), and press the joystick as a button. The fourth icon sets various effects, including fades, black and white, sepia and mosaic modes. It is strongly recommended that you do not use these in filming, and add any effects such as these when you edit your footage (in post-production). However it is useful to know where this setting is, in case a previous user has added any of these effects and you need to remove them. For more information see www.shef.ac.uk/cics/creativemedia 12 Manual controls In many instances, autofocus and autoexposure (Easy mode) will be all you need, but there may be times when you want to set these yourself. To manually focus: Press the joystick button. Push down on the joystick to select focus mode. Move the joystick left and right to change the focus. To manually change the exposure: Press the joystick button. Push up on the joystick to select exposure mode. Move the joystick left and right to change the exposure. For more information see www.shef.ac.uk/cics/creativemedia 13 Attaching an external microphone The camera has a built in microphone on the front of the camera, but it is advisable where possible to use an external microphone. Microphones are available as "additional items" when you book your camera via MyRooms&Resources, or separately as "IC Accessories". Plug the microphone into the red Mic socket on the camera, located under the LCD display monitor. Attaching to a tripod Tripods will steady your shots and are a recommended piece of equipment when videomaking. Microphones are available as "additional items" when you book your camera via MyRooms&Resources, or separately as "IC Accessories". First remove the tripod plate from the tripod. 1 On the bottom of the camera there are two holes that correspond with the screws on the tripod plate. Line these up, and screw it tightly together by hand using the screw labelled 1 below. (Note - if this is too tight to turn by hand, a 20p piece is the perfect size). For more information see www.shef.ac.uk/cics/creativemedia 14 Transferring recorded material To transfer recorded material to a computer, you will need a firewire cable. There are three main connections, as pictured below: 3 Pin 6 Pin 9 Pin The cameras have a 3 Pin socket. What connection you will need on the other end will depend on the socket on the computer you plan to use. Most Information Commons desktop machines will need a 3 Pin - 6 Pin cable, whereas the Information Commons laptops will need a 3 Pin - 3 Pin. If you plan on using your own computer you may need any of these, or may not have Firewire at all. If in doubt please ask a member of staff. Firewire Cables for IC laptops and desktop machines are available as "additional items" when you book your camera via MyRooms&Resources, or separately as "IC Accessories". The cable attaches to the camera in the socket labelled DV (circled), under the LCD display monitor, with the other end attaching to your computer. To capture the material you would use editing software such as Windows MovieMaker, Adobe Premiere, iMovie or Final Cut Pro. The details vary of how you would do this - see www.shef.ac.uk/cics/creativemedia/ for Quick Tips guides for these programmes, that will give detailed instruction on how to do this. Note - Capturing from tape takes as long as the footage you want to capture - if you recorded an hour, for example, it will take an hour. For more information see www.shef.ac.uk/cics/creativemedia