1
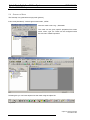
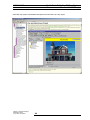
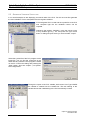
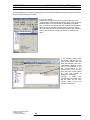
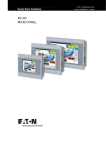
Quick Start Guideline
XV-2xx 5.7" Systems
Document M001789-01.DOC
Edition 01/2007
Quick Start Guideline XV-2xx Systems
Copyright
MICRO PANEL
Copyright notice
Keep this document for future usage!
These documents are the property of Micro Innovation AG who is entitled to the exclusive copyright.
Change of contents, duplication or reproduction of these documents as also distribution to third parties
is only permitted with written permission of Micro Innovation AG.
Micro Innovation AG assumes no liability for any damages which results from insufficient usage of the
documentation or from any wrong or missing information from within.
Micro Innovation AG reserves itself the right to change this documentation partially or in whole.
All brand and product name are registered trademarks or copyrights of respective owner.
Intended Use
Hardware, software, operating system and drivers may only be used in the described
cases of application and only in connection with the components recommended by
Micro Innovation AG and with the original accessory.
Warning !
Defects that occur through inappropriate treatment or usage of the products or
components are excluded from the warranty.
No security relevant functions in sense of person or machine protection are allowed to
be realized with these components or via communication.
No liability is assumed for damages which result from a failure or malfunction of the
components.
All data indicated in this document are not assured characteristics in a legal sense.
2
Subject to technical changes
M001789-01.DOC
© by Micro Innovation
MICRO PANEL
XV-2xx 5.7" Systems
Table of Contents
Table of Contents
1
General Information ............................................................................................4
1.1
2
Document Index .......................................................................................................4
Hardware Structure .............................................................................................5
2.1
2.2
2.3
Equipment Variants ..................................................................................................5
Scope of Supply XV200 ...........................................................................................5
Overview of Connections .........................................................................................6
2.3.1
2.3.2
3
Commissioning of the Unit.................................................................................8
3.1
3.2
3.3
3.4
Apply the Windows license sticker ...........................................................................8
General Remarks to Wiring ......................................................................................8
Power Up of the Unit ................................................................................................8
Ethernet..................................................................................................................10
3.4.1
3.4.2
3.4.3
4
Examining and Adjusting of the IP-Address of the Unit .........................................11
Wiring.......................................................................................................................12
Test the Ethernet Connection..................................................................................12
The first PLC Program ...................................................................................... 13
4.1
4.2
4.3
4.4
4.5
5
Compact Flash ..........................................................................................................7
Connection Power Supply .........................................................................................7
Installation of the PLC Runtime license points .......................................................13
Installation of the PLC Runtime System on the Unit ..............................................14
Programming the PLC–Programs with MXpro .......................................................17
Download of THE PROGRAM to the Unit ..............................................................19
Symbol-File Configuration ......................................................................................21
The first GALILEO Project ................................................................................ 26
5.1
5.2
5.3
5.4
5.5
5.6
5.7
5.8
5.9
Generate new Project.............................................................................................26
Select Unit ..............................................................................................................27
Select PLC .............................................................................................................27
Generate Mask.......................................................................................................28
Generate Variable Structure...................................................................................30
Generate Display Object ........................................................................................33
Compile Project ......................................................................................................34
Simulate Project on the PC ....................................................................................35
Download Project to the Unit..................................................................................35
5.9.1
5.9.2
5.9.3
Open FTP-Connection to the Unit ...........................................................................35
Setup FTP Path in GALILEO...................................................................................36
Download of a Project .............................................................................................38
Subject to technical changes
M001789-01.DOC
© by Micro Innovation
3
Quick Start Guideline XV-2xx Systems
General Information
MICRO PANEL
1 GENERAL INFORMATION
This documentation should facilitate the introduction to the handling of the XV200 panel from Micro
Innovation. In order to ensure a fast commissioning of the unit it is necessary to follow the
explanations and references carefully.
The commissioning of the unit, communication, PC program usage and project generation with
GALILEO and MXpro will be described step by step.
For the description in this documentation the following versions of GALILEO and MXpro were used:
• GALILEO V5.3.0
• MXpro V2.3.3 SP1
The illustrated pictures and described functions can differ if newer or different versions of the
programs are used.
Furthermore for the display of printscreens a monochrom unit was used.
For the color variant no changes in functionality apply.
1.1
[1]
[2]
[3]
[4]
DOCUMENT INDEX
Topic
Hardware manual
Installation
Network
Windows CE
Document
Hardware description XV200 5.7“ system
Installation manual and general wiring reference
Networking
MICRO PANEL with Windows CE
It is also part of the GALILEO help
Docu-Number
M001045
M000193
M000191
M000173
(The index is not exclusive)
On this website you can find theses helpful documentations http://support.microinnovation.com
4
Subject to technical changes
M001789-01.DOC
© by Micro Innovation
MICRO PANEL
Quick Start Guideline XV-2xx Systems
Hardware Structure
2 HARDWARE STRUCTURE
2.1 EQUIPMENT VARIANTS
The XV200 5.7" system is available in the following types:
Type
MK2-232-57BAS-x-1x
MK2-230-57MPN-x-1x
MK2-230-57CNN-x-1x
XV-252-57MPN-x-1x
XV-252-57CNN-x-1x
2.2
Interface variant
system port, not galvanically separated RS232
MPI, not galvanically separated
CAN, not galvanically separated
MPI, not galvanically separated
CAN, not galvanically separated
SCOPE OF SUPPLY XV200
Standard scope of supply:
1 enclosure MICRO PANEL XV200 5.7"
1 Micro Panel XV200:
- XV2-232-57BAS-x-xx (with RS232-interface),
- XV2-230-57CNN-x-xx (with CAN-interface) or
- XV2-230-57MPN-x-xx (with MPI-interface)
8 fixing clips (for equipment installation)
8 grub screws (for equipment installation)
1 seal cord (for equipment installation)
1 power supply plug
1 resistive touch pen
Subject to technical changes
M001789-01.DOC
© by Micro Innovation
5
Quick Start Guideline XV-2xx Systems
Hardware Structure
2.3
MICRO PANEL
OVERVIEW OF CONNECTIONS
Connection blind XV-230-57xxx
Ethernet
Field bus
(option MPI)
Supply
Connection blind XV-232-57BAS
System port
(RS232)
Ethernet
Supply
Connection blind XV-252-57XXX-1-X
Service side
Compact Flash
DIAG
BFL
USB Device
The ports DIAG and BFL are exclusively for service usage
The ports Ethernet, field bus or (system port) and power supply are found seen from the back to the
right of the unit.
The port for the USB-interface is found on the left side of the unit.
6
Subject to technical changes
M001789-01.DOC
© by Micro Innovation
MICRO PANEL
Quick Start Guideline XV-2xx Systems
Hardware Structure
2.3.1 COMPACT FLASH
The CF-card (OS-flash) includes the operating system for the unit and is mandatory for operation. The
OS-flash may only be inserted when the power is off.
For tue guarantee of a troublefree operation we recommend the use of the CFcards offered by Micro innovation. When using CF-cards of other suppliers
Micro innovation delines any support as well as responceablity for any
consequential damages.
Data loss.
If a CF-card is removed during operation of the unit a data loss or coruption
can occur.
-
only incert or remove CF-cards in power off status.
secure the CF-card with the slot interlock.
writing to the CF-card should be avoided. With simultaneous voltage drop
this can lead to data loss.
2.3.2 CONNECTION POWER SUPPLY
Connection plug: Phoenix Contact MSTB 2.5/3-ST-5.08
Phoenix Contact Art.Nr 1757022;
It is included in the delivery
(Perspective from the wiring view)
+24VDC GND
0V
+24 VDC
Power supply +24VDC
GND
Ground, connect the plug blind (does not need to be connected)
0V
Power supply 0V (potential free)
Subject to technical changes
M001789-01.DOC
© by Micro Innovation
7
Quick Start Guideline XV-2xx Systems
Commissioning of the Unit
3
MICRO PANEL
COMMISSIONING OF THE UNIT
3.1 APPLY THE WINDOWS LICENSE STICKER
For legal reasons you are obligates to attach the provided license sticker to
the panel. Proceed as described in the Windows license paper.
.
Î
3.2 GENERAL REMARKS TO WIRING
To guarantee a troublefree operation special care with the wiring is necessary.
The values concerning EMP as specified in the technical data can be kept only
if the appropriate references and wiring are obeyed. The wiring must be layed
separately to power cables or be separated by double or intensified isolation.
Î Further information: Hardware manual XV200 5.7“ system ([1] see chapter 1.1)
3.3 POWER UP OF THE UNIT
1
Put the in the delivery included OS-flash (enclosed CF-card of the unit) in the CF slot:
Data loss.
If a CF-card is removed during operation of the unit a data loss or coruption
can occur.
-
only incert or remove CF-cards in power off status.
secure the CF-card with the slot interlock.
writing to the CF-card should be avoided. With simultaneous voltage drop
this can lead to data loss.
Service front of the unit (left: CF-Slot-interlock open, right: closed)
1.1 Open the CF-slot interlock.
1.2 Place the CF-card in the Compact Flash-slot.
1.3 Close the CF-slot interlock.
2
8
Connect the power supply to the unit (properties of the power supply cable, see chapter „2.3.2
Connection Power Suppl“):
Subject to technical changes
M001789-01.DOC
© by Micro Innovation
MICRO PANEL
-
Quick Start Guideline XV-2xx Systems
Commissioning of the Unit
The unit will boot.
On the unit a window will appear.
3
If the information window does not appear and instead the text „No card in CF-Slot 0 detected“ is
displayed then:
3.1 Turn off the power.
3.2 Check the CF-card if it placed in correctly.
3.3 Turn on the power again.
4
Close the information window that appears on the unit after booting.
Subject to technical changes
M001789-01.DOC
© by Micro Innovation
9
Quick Start Guideline XV-2xx Systems
Commissioning of the Unit
MICRO PANEL
3.4 ETHERNET
The Ethernet interface of the unit is used for engineering the visualization “GALILEO” as also
programming the PLC with “MXpro”. To commission the communication between the unit and the PC
follow the next described steps.
An IP-Address always consists out of a network and computer address. The network mask specifies
which bits belong to the network and which do not.
Select for the unit a free computer address from
the local network. You can determine the network
address of your PC under start Æ setting Æ
network and telecommunications connections Æ
properties Æ characteristics. Select out of the list
Internet protocol (TCP/IP) and press the button
properties.
Setting of the network card of the PC
Example:
IP-Address PC:
IP-Address
:
SubNetMask
:
192.168.0.71
255.255.255.0
This means:
Network-Address
Computer-Address
:
:
192.168.0
71
Select an IP-Adresse for the unit:
Network-Address
: 192.168.0
Computer-Address : 72 (Number between 1-254 and not any already used in
the local network)
Æ IP-Address unit:
IP-Address
: 192.168.0.72
SubNetMask
: 255.255.255.0
Attention
The usage of the same address twice can cause critical network problems!
10
Subject to technical changes
M001789-01.DOC
© by Micro Innovation
MICRO PANEL
Quick Start Guideline XV-2xx Systems
Commissioning of the Unit
3.4.1 EXAMINING AND ADJUSTING OF THE IP-ADDRESS OF THE UNIT
Power up the unit. If an information window appears after booting please close it.
After Windows CE has booted from the OS-flash press the Start button and change to the menu
Programs Æ Control Panel. Open the icon Network with a double click.
A window Network Configuration will open. Select
the desired IP address and subnet mask. Use the
gateway only when needed then push OK.
The IP address and subnet mask must be consistant to the network configuration of
the PC respectively the company network. In doubt ask your network administrator.
Subject to technical changes
M001789-01.DOC
© by Micro Innovation
11
Quick Start Guideline XV-2xx Systems
Commissioning of the Unit
MICRO PANEL
A window will then open with the question „Do you want to restart now?“ Acknowledge this with “yes”.
The panel will now restart the system with the new IP address.
3.4.2 WIRING
Connect the unit directly to the PC with an ethernet crossover cable. If you use an ethernet hub or
switch us a 1-to-1 patch cable.
3.4.3 TEST THE ETHERNET CONNECTION
To test the connection open the “Dos-Shell” on your PC over Start
Æ Programs Æ Accessories and ping the IP address of the unit.
Test the connection to the unit with “Ping”
If the unit does not answer then contact your network administrator.
Î Further information: Hardware manual XV200 5.7“ system ([1] see chapter 1.1)
Î Further information: MICRO PANEL with Windows CE ([4] see chapter 1.1)
12
Subject to technical changes
M001789-01.DOC
© by Micro Innovation
MICRO PANEL
4
Quick Start Guideline XV-2xx Systems
The first PLC Program
THE FIRST PLC PROGRAM
If you would like to use the unit without the internal PLC functionality then please jump over this
chapter and continue with chapter 5 “The First GALILEO project”
This chapter consists of a basic application which shows the programming with MXpro and the special
communication between PLC and HMI in a MICRO PANEL XV200.
4.1 INSTALLATION OF THE PLC RUNTIME LICENSE POINTS
The PLC runtime additionally needs license points on the unit.
Here you have acquired a license paper. Over the website :
www.microinnovation.com/license
an activation code will be generated after you have entered you license code and serial number of
panel.
Follow the steps as given in the internet.
The activation code has to be entered in the license menu of the panel (START -> PROGRAMS ->
CONTROL PANEL -> LICENSE).
After that the license point of the device will be increased.
Subject to technical changes
M001789-01.DOC
© by Micro Innovation
13
Quick Start Guideline XV-2xx Systems
The first PLC Program
MICRO PANEL
4.2 INSTALLATION OF THE PLC RUNTIME SYSTEM ON THE UNIT
Requirement:
Die MXpro Software (CoDeSys) must be installed correctly on the PC.
The OS-flash included in the unit does not have the PLC runtime installed. The PLC runtime can be
installed on the OS-flash with the tool „SetupTargetFirmware“.
Procedure:
Start the tool „SetupTargetFirmware“ on your PC through clicking StartÆProgramsÆMicro
InnovationÆMXpro V2.3.3 SP1ÆTargetFirmwareÆTargetFirmwareWinCE_V2.40.exe
After starting the setup the follow the dialog until the following window appears.
Select the desired installation type and execute the next steps:
•
14
FTP Installation (suggested routine: The installation of the PLC runtime is done over FTP.
Required step:
- Ensure that the unit is connected to your PC over ethernet.
- Start the unit.
- Start the FTP-server on the unit over clicking Start Æ Programs Æ Communications Æ FTP
Server.
- Follow the setup on the PC further unit the following dialog window appears.
Subject to technical changes
M001789-01.DOC
© by Micro Innovation
MICRO PANEL
•
Quick Start Guideline XV-2xx Systems
The first PLC Program
-
Select „OS 2…“ and click on the button “further >”.
Enter the IP-address of the unit.
-
Continue the setup procedure.
After finishing the installation restart the unit to start the PLC runtime.
Compact Flash Installation: The installation of the PLC runtime applies directly to the OS-flash.
(Supplied CF-card of the unit).
Required steps:
- Insert the OS-flash in into the card adapter of your PC.
- Continue the setup routine on your PC until the following dialog appears.
Subject to technical changes
M001789-01.DOC
© by Micro Innovation
15
Quick Start Guideline XV-2xx Systems
The first PLC Program
•
MICRO PANEL
Select the compact flash root in the directory through selecting the disk (disk character).
Continue with the setup.
After completing the installation put the OS-flash back in the unit. (The unit has to have power
off).
Start the unit new to start the PLC-runtime.
Installation to a local directory: all files of the PLC runtime will be installed to a local directory
on your PC.
Required steps:
- Fully complete setup.
- Copy the whole contents of the directory “XV200” (you can find it in the newly created
directory on you PC) manually in the main directory on the OS-flash (supplied CF-card of the
unit).
- Start the unit new to start the PLC-runtime.
After successfully installation of the PLC runtime and reboot of the unit a status display for the PLC
runtime will appear (after clicking “PL…” in the program menu).
If a visualization is already installed and running the on unit and covering the status display you can
stop the visualization with help of the button (next to the USB-device port).
16
Subject to technical changes
M001789-01.DOC
© by Micro Innovation
MICRO PANEL
Quick Start Guideline XV-2xx Systems
The first PLC Program
4.3 PROGRAMMING THE PLC–PROGRAMS WITH MXPRO
Requirements:
The MXpro software (CoDeSys) must be installed correctly on your PC and started. On the unit the
PLC runtime must be installed correctly.
Over ÆFileÆNew you can start a new project
Before you can start programming you have to select the unit type in the Dialog window “Target
Setting”.
Target Settings
Please select the target „XV2-200-Vx.x.x“.
In the dialog window that appears acknowledge with “OK”.
In the following dialog window you can now generate a programming unit. In the shown example the
new block “PLC_PRG” in the programming language “ST” is generated.
Generation of a new programming unit
Subject to technical changes
M001789-01.DOC
© by Micro Innovation
17
Quick Start Guideline XV-2xx Systems
The first PLC Program
MICRO PANEL
After that you can open the programming unit “PLC_PRG” in the register “POUs” and write a basic line
of code:
hmiCounter:=hmiCounter+1;
Declaration and statement windows of the programming unit PLC_PRG
After entering “hmiCounter:=hmiCounter+1;“ and pressing “Return” a dialog window for variable
declaration appears. Select the variable type “INT” and press OK
In the declaration field the variable „hmiCounter“ is displayed.
Select in the menu Project Æ Rebuild All to compile the project. If the test program compiles error free
then it is ready to be downloaded.
18
Subject to technical changes
M001789-01.DOC
© by Micro Innovation
MICRO PANEL
Quick Start Guideline XV-2xx Systems
The first PLC Program
4.4 DOWNLOAD OF THE PROGRAM TO THE UNIT
Select in the menu OnlineÆCommunication Settings and generate a new communication channel.
Select „TCP/IP (Level 2 Route“) from the possibilities and give the communication connection a name
e.g. “Panel_XV200” and Acknowledge the dialog with OK.
Enter in the field “Address” the IPaddress of your unit (e.g. 192.168.0.72).
To do this you have to double click on
“localhost” and put in the IP-address and
press return to end the input.
Make sure that in the menu Online>Simulation
is
deactivated
(no
checkmark should be visible)!
Subject to technical changes
M001789-01.DOC
© by Micro Innovation
19
Quick Start Guideline XV-2xx Systems
The first PLC Program
MICRO PANEL
Afterwards you can download the program over OnlineÆLogin. You can start the program with
OnlineÆStart.
To have the PLC permanent on the unit you have to generate a boot project. If this is
not done then the program is lost when the power is turned off. To save a boot
project on the unit make sure you are logged in (OnlineÆLogin) and then select
OnlineÆBoot Project.
Further topics to the PLC can be found in the helpful documentation to MXpro.
20
Subject to technical changes
M001789-01.DOC
© by Micro Innovation
MICRO PANEL
Quick Start Guideline XV-2xx Systems
The first PLC Program
4.5 SYMBOL-FILE CONFIGURATION
The communication between controller and a possible visualization is done over a symbolic address
of the variables. To be able to do that a symbol configuration has to be generated. Furthermore the
through this process generated symbol file can also be used as a variable import file for the
visualization. Through the import of the symbol file in the visualization all generated variables name
(symbols) in the PLC are known to the visualization and do not have to be entered again.
The symbol file is used as the basis of communication. The contents of the symbol file are configured
in the PLC-development platform. When compiling the symbol file is then generated and when
downloading the program to the PLC also the symbol file is downloaded.
Out of performance reasons it is suggested that only variables that are needed in the
visualization should be exported to the symbol file. Thus the variable field should be
structured. This can be applied as example by defining a global variable area where
the variables are separated between variables for visualization and variables that
are not used in the visualization.
Procedure:
In case you have not saved the PLC project yet, save the project via the menu FileÆSave as… on
you PC.
Generation of a new variable list:
•
Under the project tree click on the register “Resources”
- The resource-project tree will open.
•
In the resource-project tree open the directory “Resource/Global Variables”.
•
Click with the right mouse button the entry „Global Variables“ and select „Insert Object…“.
Subject to technical changes
M001789-01.DOC
© by Micro Innovation
21
Quick Start Guideline XV-2xx Systems
The first PLC Program
•
MICRO PANEL
In the dialog window that appears enter the desired name of the variable list and confirm with
pressing OK.
Set up the symbol configuration for the symbol file:
•
Ensure that the function “Simulation” in the menu “Online” is not active (no checkmark is to be
seen)
•
Click in the menu ProjectÆOptions… and select the category “Symbol Configuration” and
activate the point “Generate Symbol File”
- With the function “Generate Symbol File” a symbol file will be generated every time the project
is compiled.
22
Subject to technical changes
M001789-01.DOC
© by Micro Innovation
MICRO PANEL
•
Quick Start Guideline XV-2xx Systems
The first PLC Program
Define from which objects the variables should be taken to export into the symbol file:
- Click on the button „Generate Symbol File…“.
- In general all objects are selected. That is why you should deactivate for all objects the option
„Export variables of this object“.
Subject to technical changes
M001789-01.DOC
© by Micro Innovation
23
Quick Start Guideline XV-2xx Systems
The first PLC Program
-
•
MICRO PANEL
In the object tree open the subdirectory „Resource\Global Variables“.
Select the variable list that you would like to export.
Activate the option „Export variables of this object“ and confirm with OK.
Confirm the project options with OK.
Allocate the needed variables for the visualization to the global variables specified for visualization:
•
24
In the POU-project tree double click on the programming unit in which are the variables that you
would like to allocate to the variable list.
Subject to technical changes
M001789-01.DOC
© by Micro Innovation
MICRO PANEL
Quick Start Guideline XV-2xx Systems
The first PLC Program
•
Put the cursor in the variable that you would like to allocate.
•
Click in the menu EditÆAuto declare…
- The window “Declare Variable” will open.
•
Select the class„Class“ „VAR_GLOBAL“.
•
Select under “Variable List” the variables list you would like to allocate to.
•
Confirm the adjustments with OK.
Compile and download the PLC project to the unit:
•
Click in the menu ProjectÆRebuild All to compile the project.
•
Click in the menu OnlineÆLogin to log into the unit.
•
Click in the menu OnlineÆStart to start the PLC project on the unit.
•
Click in the menu Online Æ Create Boot project to save the project on the unit.
•
Click in the menu OnlineÆLogout to log off of the unit.
The performance of visualization (Refresh cycle) can be increased by grouping the
individual SPS variables in data structures „Struct“ or data fields „array“. The data
structures and data fields are transferred in a communication package between the
MXpro runtime system and Galileo runtime system, individual variables are sent in
individual packages behind each other.
Further topics to PLC you may find in the helpful MXpro documentation.
Subject to technical changes
M001789-01.DOC
© by Micro Innovation
25
Quick Start Guideline XV-2xx Systems
The first GALILEO Project
5
MICRO PANEL
THE FIRST GALILEO PROJECT
It consists of a simple application which should show the projecting of the connection of the HMI to the
PLC of the MICRO PANEL XV200.
Requirements:
The GALILEO visualization software must be installed correctly.
5.1
GENERATE NEW PROJECT
Start the GALILEO software. The first step is to generate a new HMI project.
Menu Project Æ New.
In the now appearing window “New Project” you should first create a new project directory.
Example : MyFirst
This is used to generate a hierarchical overview when have more than one project.
With this button a new
directory is generated.
Enter the name.
Hereupon the folder must be opened. Following this you should enter in the input field the desired file
name.
Example : MyFirst
26
Subject to technical changes
M001789-01.DOC
© by Micro Innovation
MICRO PANEL
5.2
Quick Start Guideline XV-2xx Systems
The first GALILEO Project
SELECT UNIT
The window “Unit Type” is opened automatically when a new project is generated. It can also be
opened over the menu ConfigurationÆUnit Type… and at a later time edited.
Select the unit type:
For
the
selection
field
“Format” the option landscape
is chosen whereby the unit
will be used in horizontal
operation.
You can work with 256
colours (grey levels). 5
colours of that are displayed.
5.3 SELECT PLC
The window “Select PLC” will also be opened automatically when a new project is generated. It can be
opened over the menu ConfigurationÆSelect PLC… and edited later.
Depending on the unit type CAN, MPI or RS232 different communication types are available. Select
under “Add” the communication to the PLC.
The following example uses
the
integrated
PLC
as
controller type. Also more
than one controller can be
selected. So that one PLC
can be connected over MPI
(Onboard) and another one to
the
internal
PLC
over
CoDeSys (local).
To keep in mind is the
different types of addressing
the variables.
After confirmation
Selection of the integrated PLC: CoDeSys (local)
With OK the new project is configured.
Subject to technical changes
M001789-01.DOC
© by Micro Innovation
27
Quick Start Guideline XV-2xx Systems
The first GALILEO Project
MICRO PANEL
5.4 GENERATE MASK
The first step is to generate an empty mask (picture).
Index mask (Standard) Æ select right mouse button „NEW“:
Give the mask a name e.g.: „Startmask“
The mask can be given specific properties like screen
saver, colour, type, etc. These can be configured under
the sub menu “Mask Properties”
Following this you can insert objects into the mask using the object list.
Object list
28
Subject to technical changes
M001789-01.DOC
© by Micro Innovation
MICRO PANEL
Quick Start Guideline XV-2xx Systems
The first GALILEO Project
GALILEO help system with detailed examples and instructions to every object.
Subject to technical changes
M001789-01.DOC
© by Micro Innovation
29
Quick Start Guideline XV-2xx Systems
The first GALILEO Project
5.5
MICRO PANEL
GENERATE VARIABLE STRUCTURE
In our small example we are displaying a numeral value of the PLC. For this we must first generate
the used variables. This is acompished over the register variables.
If the intergrated PLC is used and the symbol file of the PLC
was compiled right the the variables names can be
imported.
Change to the register „Variables“; move the mouse cursor
to any variable type e.g. “bit” and press the right mouse
button. A dialog will open where you have to select “Import”.
Select the symbol file of the PLC program as the
import file. You can find the symbol file in the
same directory where the PLC program is saved
on the PC. Confirm the dialog with pressing the
“Start” button. Also see chapter “„4.5 SymbolFile Configuration“.
Through the import of the PLC variable „hmiCounter“ from Type WORD
the variable is inserted into the variable list. The red marking of the
variable shows that a addressing to the PLC has already occured
30
Subject to technical changes
M001789-01.DOC
© by Micro Innovation
MICRO PANEL
Quick Start Guideline XV-2xx Systems
The first GALILEO Project
To use variables from another controller type or to use variables without using the import function you
have to use the following procedure:
E.g. a byte variable:
Position the mouse cursor on the variable type “Byte” and
press the right mouse button and select “New”. Then enter the
variable name. Thus the variable is generated but marked
blue. The colour blue means that the variable has no address
and thus has no possible communication to as PLC. This is
how you generate a local visualization variable. With a double
click on the variable a property window to the variable will
open.
In the property dialog under
the register “Address” you can
click on the empty field and
enter the address of the PLC.
This address depends on the
type of PLC selected. If you
are communicating to the
internal PLC you must also
enter the name of the symbol
file. (This only applies to
global PLC variables!)
Through a double click
automatically the same name
will be taken as the PLC
variable name as the one
entered in GALILEO.
Subject to technical changes
M001789-01.DOC
© by Micro Innovation
31
Quick Start Guideline XV-2xx Systems
The first GALILEO Project
MICRO PANEL
When
communicating
to
another controller the address
has to be entered specific to
the protocol. In the dialog “Set
Address” you can see and
select
the
possible
nomenclature
needed.
According to the desired
nomenclature the following
input fields for addressing the
variables are possible.
The displayed example shows the address of a variable
for a S7 controller over MPI. The nomenclature of a
variable is selected out of the data block of the controller.
The address is herewith select as DB12 byte 144.
After following the address the variable in the variables list is marked red (=addressed).
32
Subject to technical changes
M001789-01.DOC
© by Micro Innovation
MICRO PANEL
Quick Start Guideline XV-2xx Systems
The first GALILEO Project
5.6 GENERATE DISPLAY OBJECT
To not get any error message in the example delete the addressed variables which are not address in
the PLC project. You can do this by marking the variable and pressing “delete”
Insert an object of the type “Value Entry/Display” in the start mask:
To do this you have to click in the object list on
and then draw via mouse and pressed mouse
button the object in the desired size and position on the start mask.
Through a double click on the new generated object field the property window appears. Select from
the variable list the desired variable and confirm the dialog with OK.
Subject to technical changes
M001789-01.DOC
© by Micro Innovation
33
Quick Start Guideline XV-2xx Systems
The first GALILEO Project
MICRO PANEL
Value entry/Display object with linked variable. (-88888)
We have finished our small project and now want to go to the next step of the project; compiling and
downloading to the unit.
5.7 COMPILE PROJECT
Via the menu BuildÆCompile or over the button
the project will be compiled. The compiling
procedure is protocolled in a display window. Eventual errors will be displayed red. Through scrolling
the detailed error message can then be read.
34
Subject to technical changes
M001789-01.DOC
© by Micro Innovation
MICRO PANEL
Quick Start Guideline XV-2xx Systems
The first GALILEO Project
5.8 SIMULATE PROJECT ON THE PC
Via menu BuildÆStart Project Inspector or over the button
you can start the simulation of the
project on your PC.
PC Simulation of the project (Project Inspector)
5.9 DOWNLOAD PROJECT TO THE UNIT
Now the generated project should be downloaded and on started on the unit.
5.9.1 OPEN FTP-CONNECTION TO THE UNIT
To get a connection between the PC and the unit you must start the FTP server on the panel.
To start the FTP server you must select on the panel StartÆProgramsÆCommunicationÆFTPServer
The FTP serve is now started and ready!
The FTP server can also be started automatically when the panel is booted. To
change the Window CE start up behaviour please look in the GALILEO help “Micro
Panels with Windows CE”
Î Further information: Network in Short ([3] See chapter 1.1)
Î Further information: MICRO PANEL with Windows CE ([4] See chapter 1.1)
Subject to technical changes
M001789-01.DOC
© by Micro Innovation
35
Quick Start Guideline XV-2xx Systems
The first GALILEO Project
MICRO PANEL
5.9.2 SETUP FTP PATH IN GALILEO
To be able to download the project to the destination the destination parameters for the project
transfer to the unit must be generated. Change to the download dialog via the menu
BuildÆDownload(local,FTP,…) or over the button
.
In the window “Download” click on the
button “FTP path”. The window “FTP
Connections” will appear.
Click on “New Connection”. The window “Properties :
FTP-Connection” will appear.
36
Subject to technical changes
M001789-01.DOC
© by Micro Innovation
MICRO PANEL
Quick Start Guideline XV-2xx Systems
The first GALILEO Project
Enter a title, the IP-address of the unit and the directory for the download to the panel. With a click on
“Browse” you should already find the directory path of the Storage Card of the panel. But for this an
active connection and the IP-address of the panel must exist.
Click on “OK” to save the new parameters.
The connection with its title should now be selectable. Click on the desired connection and confirm
with “Close”.
The selected FTP path can now be seen
in the field “Local/FTP path”
Subject to technical changes
M001789-01.DOC
© by Micro Innovation
37
Quick Start Guideline XV-2xx Systems
The first GALILEO Project
MICRO PANEL
5.9.3 DOWNLOAD OF A PROJECT
After the visualization project has been generated and compiled and the target settings have been
completed you can now start the project download to the panel. For this select the menu
BuildÆDownload(local,FTP,…) or press the button
.
The download dialog appears.
Start the project download over the button “Download”. During the project transfer you can see the
progress. Eventual you will be asked if you want to also download updates of the operating system or
visualization runtime (GRS) over dialogs.
If the project transfer is completed the following dialog will be displayed. Select now “Start GRS”
(GRS = GALILEO Runtime System) to start the visualization project on the unit.
38
Subject to technical changes
M001789-01.DOC
© by Micro Innovation
MICRO PANEL
Quick Start Guideline XV-2xx Systems
The first GALILEO Project
While the GRS starts status information will be displayed. Following that your designed mask will be
displayed.
Display of the start mask from the project MyFirst.
When the PLC program is started on the panel the value must be constantly changing.
If there is no connection to the PLC then a cyclic error message will be displayed with the information
which variables are without communication.
We wish you lots of success and fun with your XV200!
Subject to technical changes
M001789-01.DOC
© by Micro Innovation
39
Quick Start Guideline XV-2xx Systems
The first GALILEO Project
MICRO PANEL
Micro Innovation AG
Spinnereistr 8-14
CH-9008 St. Gallen
Switzerland
Tel
:
Fax
:
email
:
homepage :
40
++41- 71 243 24 24
++41- 71 243 24 90
[email protected]
http://www.microinnovation.com
Subject to technical changes
M001789-01.DOC
© by Micro Innovation