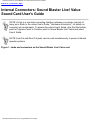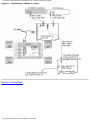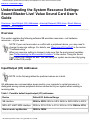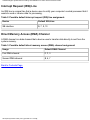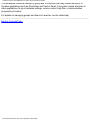
1
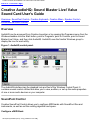
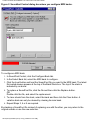
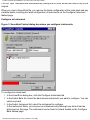
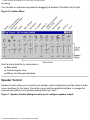
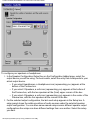
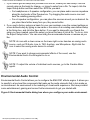
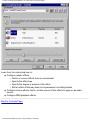
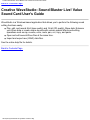
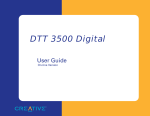
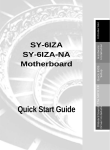
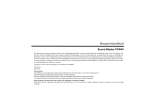
Contents: Sound Blaster Live! Value Sound Card User's Guide
Sound Blaster Live! Value Sound Card User's Guide
Safety Instructions
Introduction
Setup
Using the Sound Card
Software
Troubleshooting
Specifications
Internal Connectors
Regulatory
Information in this document is subject to change without notice.
© 1998-2000 Creative Technology Ltd. All rights reserved.
Trademarks used in this text: Sound Blaster and Blaster are registered trademarks, and the Sound Blaster Live! logo, the Sound Blaster PCI logo, EMU10K1, E-mu Environmental
Modeling, Environmental Audio, Creative Multi Speaker Surround, and DynaRAM are trademarks of Creative Technology Ltd. in the United States and/or other countries. E-Mu and
SoundFont are registered trademarks of E-mu Systems, Inc. Microsoft, Windows, and Windows NT are registered trademarks of Microsoft Corporation.
Other trademarks and trade names may be used in this document to refer to either the entities claiming the marks and names or their products. Creative Technology Ltd. disclaims any
proprietary interest in trademarks and trade names other than its own.
This product is covered by one or more of the following U.S. patents:
4,506,579; 4,699,038; 4,987,600; 5,013,105; 5,072,645; 5,111,727; 5,144,676; 5,170,369; 5,248,845; 5,298,671; 5,303,309; 5,317,104; 5,342,990; 5,430,244; 5,524,074; 5,698,803;
5,698,807; 5,748,747; 5,763,800; 5,790,837.
Version 1.00
July 2000
file:///C|/Terrys/index.htm [1/2/2001 1:47:24 PM]
Using the Sound Card: Sound Blaster Live! Value Sound Card User's Guide
Back to Contents Page
Using the Sound Card: Sound Blaster Live! Value
Sound Card User's Guide
Using Sound Blaster Live! Value
Running MS-DOS games in Microsoft Windows
Selecting the Best Audio Options in a Game
Understanding the Installation Program in Windows 98 Second Edition
Understanding the System Resource Settings
Understanding the Environment Variables
Determining Resources
MS-DOS Mode Utilities
Changing Audio Card Settings
Creative Diagnostics
Back to Contents Page
file:///C|/Terrys/usage.htm [1/2/2001 2:09:34 PM]
Understanding the Environment Variables: Sound Blaster Live! Value Sound Card User's Guide
Back to Contents Page
Understanding the Environment Variables: Sound
Blaster Live! Value Sound Card User's Guide
Overview • CTSYN Environment Variable • BLASTER Environment Variable
Overview
Environment variables are used to pass hardware configuration information to the software in
your system. For MS-DOS, your audio card includes the following:
● CTSYN Environment Variable
● BLASTER Environment Variable
CTSYN Environment Variable
The CTSYN environment variable points to the location of the CTSYN.INI file, which usually
resides in the Windows directory. The syntax for this variable is as follows:
CTSYN=path
where path is the location of the CTSYN.INI file.
BLASTER Environment Variable
The BLASTER environment variable specifies the base I/O address, IRQ line, and DMA
channels of the SB interface. Its syntax is:
BLASTER=A220 I5 D1 H5 P330 T6
The parameters in the command are as follows.
This
Parameter
Specifies
Axxx
SB interface’s base I/O address.
Ix
IRQ line used by the audio interface.
Dx
First DMA channel used by the audio interface.
Hx
Second DMA channel used by the audio interface.
Pxxx
MPU-401 UART interface’s base I/O address.
file:///C|/Terrys/env_var.htm (1 of 2) [1/2/2001 2:09:42 PM]
Understanding the Environment Variables: Sound Blaster Live! Value Sound Card User's Guide
Tx
Card type. x must be 6.
Back to Contents Page
file:///C|/Terrys/env_var.htm (2 of 2) [1/2/2001 2:09:42 PM]
Regulatory: Sound Blaster Live! Value Sound Card User's Guide
Back to Contents Page
Regulatory: Sound Blaster Live! Value Sound Card
User's Guide
Safety Information • Notice for the USA • Notice for Canada • Compliance • Declaration of
Conformity
Safety Information
CAUTION: This device is intended to be installed by the user in a CSA/TUV/UL certified/listed
IBM AT or compatible personal computers in the manufacturer’s defined operator access area.
Check the equipment operating/installation manual and/or with the equipment manufacturer to
verify/confirm if your equipment is suitable for user-installed application cards.
ATTENTION: Ce carte est destiné à être installé par l’utilisateur, dans un ordinateur compatible
certifié CSA/TUV/UL ou listé IBM AT, à l’intérieur de la zone définie par le fabricant. Consulter
le mode d’emploi ou le fabricant de l’appareil pour vérifier ou confirmer si l’utilisateur peut y
installer lui-même des cartes périphériques.
Notice for the USA
FCC Part 15: This equipment has been tested and found to comply with the limits for a Class B
digital device, pursuant to Part 15 of the FCC Rules. These limits are designed to provide
reasonable protection against harmful interference in a residential installation. This equipment
generates, uses, and can radiate radio frequency energy and, if not installed and used in
accordance with the instructions, may cause harmful interference to radio communications.
However, this notice is not a guarantee that interference will not occur in a particular
installation. If this equipment does cause harmful interference to radio or television reception,
which can be determined by turning the equipment off and on, the user is encouraged to try
one or more of the following measures:
● Reorient or relocate the receiving antenna.
● Increase the distance between the equipment and receiver.
● Connect the equipment to an outlet on a circuit different from that to which the receiver is
connected.
● Consult the dealer or an experienced radio/TV technician.
CAUTION: To comply with the limits for the Class B digital device, pursuant to Part 15 of the
FCC Rules, this device must be installed in computer equipment certified to comply with the
Class B limits.
All cables used to connect the computer and peripherals must be shielded and grounded.
file:///C|/Terrys/regs.htm (1 of 3) [1/2/2001 2:09:56 PM]
Regulatory: Sound Blaster Live! Value Sound Card User's Guide
Operation with non-certified computers or non-shielded cables may result in interference to
radio or television reception.
Modifications
Any changes or modifications not expressly approved by the grantee of this device could void
the user’s authority to operate the device.
Notice for Canada
This apparatus complies with the Class "B" limits for radio interference as specified in the
Canadian Department of Communications Radio Interference Regulations.
Cet appareil est conforme aux normes de CLASSE "B" d’interference radio tel que spe’cifie’ par
le Ministère Canadien des Communications dans les règlements d’interfe’rence radio.
Compliance
This product conforms to the following Council Directive:
● Directive 89/336/EEC, 92/31/EEC (EMC)
Declaration of Conformity
According to the FCC96 208 and ET95-19
Name:
Creative Labs Inc.
Address: 901 McCarthy Boulevard
Milpitas, CA. 95035
United States
Tel: (408) 428-6600
declares under its sole responsibility that the product
Trade Name:
Creative Labs
Model Number: CT4830
has been tested according to the FCC / CISPR22/85 requirement for Class B devices and
found compliant with the following standards:
EMI/EMC: ANSI C63.4 1992, FCC Part 15 Subpart B
This device complies with part 15 of the FCC Rules.
Operation is subject to the following two conditions:
file:///C|/Terrys/regs.htm (2 of 3) [1/2/2001 2:09:56 PM]
Regulatory: Sound Blaster Live! Value Sound Card User's Guide
1. This device may not cause harmful interference, and
2. This device must accept any interference received, including interference that may cause
undesirable operation.
Ce matériel est conforme à la section 15 des régles FCC.
Son Fonctionnement est soumis aux deux conditions suivantes:
1. Le matériel ne peut étre source D’interférences et
2. Doit accepter toutes les interférences reques, Y compris celles pouvant provoquer un
fonctionnement indésirable.
Compliance Manager
Creative Labs, Inc.
June 9, 1999
Back to Contents Page
file:///C|/Terrys/regs.htm (3 of 3) [1/2/2001 2:09:56 PM]
MS-DOS Mode Utilities: Sound Blaster Live! Value Sound Card User's Guide
Back to Contents Page
MS-DOS Mode Utilities: Sound Blaster Live! Value
Sound Card User's Guide
Overview • SBECFG.EXE • SBEMIXER.EXE • SBESET.EXE • SBEGO.EXE
Overview
The SB Live! Value card includes a few MS-DOS utilities. These utilities require the SB Live!
DOS driver SBEINIT.COM to be loaded.
SBECFG.EXE
Use the SBECFG.EXE utility to obtain the hardware settings and the status of the SB Live!
Value card.Typing SBECFG.EXE at the command prompt displays the following hardware
settings:
● PCI Hardware Settings: Port, IRQ
● Sound Blaster Emulation: Port, IRQ, DMA
● MPU-401 Emulation (GM, Roland MT-32/LAPC-1) Emulation: Port
● Adlib Emulation: Port
The emulation settings appear only if they are enabled.
SBEMIXER.EXE
Use SBEMIXER.EXE to change the volume levels of the MPU-401 instrument set used on the
SB Live! card. You can use SBEMIXER.EXE from the command line—useful for advanced
users who want to set up batch files with particular volume levels—or within the SBEMIXER
screen. The settings for SBEMIXER.EXE are independent of the Creative Mixer settings in
Windows 98 Second Edition.
To set SBEMIXER values in the command line:
At the DOS prompt, type the SBEMIXER command in a single line. Its syntax is:
SBEMIXER [/S:x] [/W:x] [/C:x] [/M:x] [/?]
where square brackets [ ] denote optional parameters, and:
This
Parameter
Specifies
file:///C|/Terrys/msdos.htm (1 of 3) [1/2/2001 2:10:42 PM]
MS-DOS Mode Utilities: Sound Blaster Live! Value Sound Card User's Guide
/S:x
Synth volume. x can be a value from the range 0 to 127.
/W:x
Wave volume. x can be a value from the range 0 to 127.
/C:x
CD audio volume. x can be a value from the range 0 to 127.
/M:x
Synth MT-32/LAPC-1 mode. For x, 0 is Off, 1 is On.
/?
View a short description of the parameters.
An example of an SBEMIXER command is
SBEMIXER /S:64 /W:120 /C:50 /M:0
which corresponds to "set the synth volume to 64, the Wave volume to 120, the CD audio
volume to 50, and turn off the Synth MT-32/LAPC-1 mode".
To set SBEMIXER values within the Mixer screen:
At the DOS prompt, type
SBEMIXER
The interactive editor mode allows you to change the mixer settings with the mouse, <Tab>,
<PgUp>, <PgDn>, or arrow keys.
Use the Save button to save the settings for the next session.
SBESET.EXE
Use SBESET.EXE to manually configure SB resources or disable SB Emulation. By default, SB
Emulation in DOS follows the Windows settings. For example, if you disable SB Emulation in
Windows, in the next boot to DOS SB Emulation in DOS disabled. Under rare circumstances
you may need to manually reconfigure DOS SB Emulation, for example, if there is conflict in
DOS before it can boot to Windows. SBESET.EXE is run from the command line.
To set SBESET values in the command line:
At the DOS prompt, type the SBESET command in a single line. Its syntax is:
SBESET [-Axxx] [-Ix] [-Dx] [-Hx] [-Pxxx] [-dx] [-wx]
where square brackets [ ] denote optional parameters, and:
This
Parameter
Specifies
-Axxx
SB interface’s base I/O address.
-Ix
IRQ line used by the audio interface.
-Dx
First DMA channel used by the audio interface.
file:///C|/Terrys/msdos.htm (2 of 3) [1/2/2001 2:10:42 PM]
MS-DOS Mode Utilities: Sound Blaster Live! Value Sound Card User's Guide
-Hx
Second DMA channel used by the audio interface.
-Pxxx
MPU-401 UART interface’s base I/O address.
-dx
SB Emulation mode. For x, 1 is Off, 0 is On.
-wx
Set x to 1 to use the Windows-assigned resource configuration.
Set x to 0 to use (your) user-assigned resource configuration
NOTE: See "Understanding the System Resource Settings" for a list of the possible
values.
An example of an SBESET command is
SBESET -A240 -I5 -D3 -w0
which corresponds to "set the SB interface’s base I/O address to 240, the IRQ line used by the
audio interface to 5, the First DMA channel used by the audio interface to 3, and use the
Windows-assigned resource configuration".
SBEGO.EXE
Use this to confirm whether SB16 Emulation is properly installed and working.
Back to Contents Page
file:///C|/Terrys/msdos.htm (3 of 3) [1/2/2001 2:10:42 PM]
Safety Instructions: Sound Blaster Live! Value Sound Card User's Guide
Back to Contents Page
Safety Instructions: Sound Blaster Live! Value
Sound Card User's Guide
WARNING: Use of controls, adjustments, or procedures other than those
specified in this documentation may result in exposure to shock, electrical
hazards, and/or mechanical hazards.
●
●
●
●
●
●
●
Read and understand all instructions before using the sound card.
To reduce the risk of electric shock, do not immerse the sound card in water or any other
liquid.
Never disassemble the sound card. This action could result in electrical shock.
Service or repair work should be done by a qualified service person. Incorrect reassembly
can cause electric shock.
To keep from damaging your sound card, avoid exposing it to moisture and extreme
temperatures.
Do not attempt to disassemble, short circuit, or subject the sound card to high
temperatures or fire.
Use of an accessory attachment not provided or recommended by Creative Technology
Ltd. may cause fire, electric shock, or injury.
Back to Contents Page
file:///C|/Terrys/safety.htm [1/2/2001 2:11:47 PM]
Introduction: Sound Blaster Live! Value Sound Card User's Guide
Back to Contents Page
Introduction: Sound Blaster Live! Value Sound
Card User's Guide
Overview • Features and Benefits • System Requirements • Getting More Information
Overview
With the Sound Blaster Live!— the most powerful sound card ever—taking the industry by
storm, Creative now introduces Sound Blaster Live! Value for the mainstream market. The
casual PC entertainment enthusiasts and even the non-gaming music lovers can now enjoy the
wonders of Sound Blaster Live!’s Environmental Audio. Sound Blaster Live! Value offers the
same quality and performance of the highly successful Sound Blaster Live!—without the
extended Digital I/O card—with features and performances surpassing professional audio
equipment. Sound Blaster Live! Value incorporates the superior surround-sound rendering of
Environmental Audio™ to create sound so real it has to be Live! You'll enjoy music productions
so dynamic like you're right in the middle of an orchestra. The Sound Blaster Live! Value
hardware-accelerated Environmental Audio Extensions™ (EAX™), supporting new titles, offers
an experience that goes beyond 3D Audio. Add the ability to enhance all your existing games
and legacy audio with true digital processing and it will blow your home theater away!
Features and Benefits
The Sound Blaster Live! Value Sound Card has the following features and benefits:
● Hollywood-Quality Audio Re-creation
With professional-quality synthesizers and digital I/O, Sound Blaster Live! Value provides
audio fidelity that rivals movie theaters with digital sound. Excellent overall audio fidelity is
achieved with an average Noise Floor of -120 dB, a level unheard of in the PC industry.
● Powerful Audio Processing Engine
The EMU10K1™ audio processor is the most powerful integrated music, audio and effects
engine available. Every signal is processed at 32-bit, 192 dB, 48 kHz using 8-point
interpolation to smoothen the sound, instantly improving any audio source. Apply
real-time effects including Reverb, Chorus, Flanger, Echo, and Pitch Shifter, that rival
stand-alone expensive professional effects processors.
●
●
Environmental Audio™ Enhances Existing Contents
Experience depth and realism beyond existing 3D audio. Apply preset environments such
as hall, cave or underwater that can be applied to your existing games and applications
for incredibly true sound. Game environmental settings also make your existing games
come "alive" instantaneously.
Multiple Speaker Output
file:///C|/Terrys/intro.htm (1 of 3) [1/2/2001 2:11:53 PM]
Introduction: Sound Blaster Live! Value Sound Card User's Guide
●
●
●
●
Produce surround-sound audio on your PC with built-in support for two or four analog
speakers.
512-Voice Music Synthesis
512-voice capability goes beyond the quality and performance available in most
professional music equipment. Using host memory, you can choose from E-mu's 2 MB, 4
MB, or 8 MB SoundFont® professional-quality sample banks for music reproduction. Or
use up to 32 MB of memory for amazing SoundFont music fidelity. All these without
sacrificing on CPU utilization.
Sound Blaster PCI Standard
You can be assured of near-perfect Sound Blaster compatibility on the PCI bus while
enjoying all its benefits. It works with the existing MS-DOS®-based and Windows®-based
titles, completely replacing your existing ISA sound card.
Environmental Audio Extensions™ (EAX™)/Broad Driver Support
Environment Audio Extensions is an open standard that allows the broadest support from
software developers. Supports Microsoft DirectSound®, DirectSound3D, and derivative
technologies. Advanced architecture is ready for the coming generations of WDM, DLS,
and IEEE 1394/Firewire devices.
Sound Blaster Live! Web site - www.sblive.com
Exciting new applications and developer support will be available on the Sound Blaster
Live! Web site. For instant access to the latest applications, enhancements, drivers, and
more, visit www.sblive.com.
System Requirements
For Creative software, your card requires at least:
●
●
●
●
●
●
●
Pentium® class 133 MHz or equivalent processor
Windows 98 Second Edition, Windows Millennim Edition, Windows NT 4.0 or Windows
2000
32 MB RAM for Windows 98 Second Edition, Windows Millennim Edition, Windows NT
4.0,
64 MB RAM for Windows 2000
115 MB of free hard disk space
One free PCI bus slot
Powered speakers or external amplifier
CD-ROM drive required for software installation
Sound Blaster Live! Value gives you an estimate of the hard disk space required when you
select it on the installation screen. Some applications may require a system configuration
greater than that listed above. Refer to online documentation (README or HLP files) or
specifications on the outer box for details.
file:///C|/Terrys/intro.htm (2 of 3) [1/2/2001 2:11:53 PM]
Introduction: Sound Blaster Live! Value Sound Card User's Guide
Getting More Information
See the online User’s Guide for MIDI specifications and connector pin assignments, as well as
instructions on using the various applications in your audio package. To access the online
User's Guide, click the Start button, point to Programs, point to Creative, point to Sound Blaster
Live! Value and select User's Guide.
Back to Contents Page
file:///C|/Terrys/intro.htm (3 of 3) [1/2/2001 2:11:53 PM]
Setup: Sound Blaster Live! Value Sound Card User's Guide
Back to Contents Page
Setup: Sound Blaster Live! Value Sound Card
User's Guide
Installing the Card and Related Peripherals
Positioning Your Speakers
Connecting Creative PC-DVD
Installing Software
Back to Contents Page
file:///C|/Terrys/setup.htm [1/2/2001 2:12:02 PM]
Installing Software: Sound Blaster Live! Value Sound Card User's Guide
Back to Contents Page
Installing Software: Sound Blaster Live! Value
Sound Card User's Guide
Installing the Software in Windows 98 Second Edition/Windows Millennium Edition
Installing the Software in Windows NT 4.0
Installing the Software in Windows 2000
Back to Contents Page
file:///C|/Terrys/instalsw.htm [1/2/2001 2:12:05 PM]
Using Sound Card Software: Sound Blaster Live! Value Sound Card User's Guide
Back to Contents Page
Using Sound Card Software: Sound Blaster Live!
Value Sound Card User's Guide
SB Live! Experience
Creative Launcher
Creative AudioHQ
Creative WaveStudio
Creative Recorder
Creative PlayCenter
Back to Contents Page
file:///C|/Terrys/software.htm [1/2/2001 2:12:24 PM]
Creative AudioHQ: Sound Blaster Live! Value Sound Card User's Guide
Back to Contents Page
Creative AudioHQ: Sound Blaster Live! Value
Sound Card User's Guide
Overview • SoundFont Control • Creative Keyboard • Creative Mixer • Speaker Control •
Environmental Audio Control
Overview
AudioHQ can be accessed from Creative Launcher or by opening the Programs menu from the
Windows taskbar-click the Start button, point to Programs, point to Creative, point to Sound
Blaster Live! Value, and then click AudioHQ. AudioHQ uses the familiar Windows group to
display the icon for each utility.
Figure 1. AudioHQ control panel.
The AudioHQ interface has the standard look and feel of the Windows Control Panel. It
contains several control utilities that allow you to view, audition, or set up the audio properties
of one or more audio devices on your computer.
SoundFont Control
Creative SoundFont Control allows you to configure MIDI banks with SoundFont files and
instruments, as well as set the caching algorithm and space.
Configure a MIDI Bank
file:///C|/Terrys/audiohq.htm (1 of 10) [1/2/2001 2:12:27 PM]
Creative AudioHQ: Sound Blaster Live! Value Sound Card User's Guide
Figure 2. Soundfont Control dialog box where you configure MIDI banks.
To configure a MIDI bank:
1. In SoundFont Control, click the Configure Bank tab.
2. In the Select Bank list, select the MIDI bank to configure.
3. Click the Load button and load the SoundFont file you want to the MIDI bank. The latest
file loaded always appears at the top of the Bank Stack box. The top of the stack is
indicated by an arrow.
4. To replace a SoundFont file, click the file and then click the Replace button.
OR
Double-click the file, and select the replacement.
5. To clear a bank from the stack, select the bank and then click the Clear button. A
variation bank can only be cleared by clearing its main bank.
6. Repeat Steps 3, 4 or 5 as required.
By stacking a SoundFont file instead of replacing one with the other, you may return to the
original sounds or use the new selection.
file:///C|/Terrys/audiohq.htm (2 of 10) [1/2/2001 2:12:27 PM]
Creative AudioHQ: Sound Blaster Live! Value Sound Card User's Guide
You can "spot" hide particular instruments by loading one or more SoundFont files on top of the
original.
When you clear a SoundFont file, you remove the latest configuration of the main bank and any
variation banks, including the latest configuration of instruments on the Configure Instrument
tabbed page.
Configure an Instrument
Figure 3. Soundfont Control dialog box where you configure instruments.
To configure an instrument:
1. In the SoundFont dialog box, click the Configure Instrument tab
2. In the Select Bank list, select the bank whose instruments you want to configure. You can
select any bank.
3. In the Select Instrument list, select the instrument to configure.
In the Instrument Stack, you may see an instrument entry although you did not load an
instrument on this page. The instrument can be found in a bank loaded on the Configure
Bank tabbed page.
file:///C|/Terrys/audiohq.htm (3 of 10) [1/2/2001 2:12:27 PM]
Creative AudioHQ: Sound Blaster Live! Value Sound Card User's Guide
4. Click the Load button and load a SoundFont or single-instrument (for example, .WAV) file.
The last file loaded always appears at the top of the Instrument Stack with an arrow
pointing to it.
5. To clear an instrument from the stack, select the instrument and then click the Clear
button.
6. For faster processing of SoundFont files, the files are loaded into memory. You need to
set the maximum amount of cache memory your SoundFont files can occupy, so that
your system performance does not suffer from insufficient memory.
NOTE: Setting the maximum amount of cache memory for SoundFont files does not
mean setting aside or reserving the space. The space can still be used by your
computer or other files if needed.
SoundFont Caching
Figure 4. Soundfont Control dialog box where you configure other soundfont settings.
To specify the caching algorithm:
file:///C|/Terrys/audiohq.htm (4 of 10) [1/2/2001 2:12:27 PM]
Creative AudioHQ: Sound Blaster Live! Value Sound Card User's Guide
●
On the Options tabbed page of the SoundFont Control dialog box, select an algorithm
from the SoundFont Cache list.
To set the amount of cache for SoundFont files:
● On the Options tabbed page of the SoundFont Control dialog box, move the SoundFont
Cache slider to set the amount of cache.
SoundFont Device
To change the SoundFont device
● On the Options tabbed page of the SoundFont dialog box, select the new device from the
SoundFont Device list.
Creative Keyboard
Creative Keyboard allows you to play musical notes on various instruments much like a
composer would play notes on a piano (or other instrument) while creating or arranging music.
To edit the sound, use Vienna SoundFont Studio or another sound editor.
Figure 5. Creative Keyboard options dialog box where you configure its settings.
MIDI Input
To select a MIDI input device:
1. In the Select MIDI In box in the Options dialog box, click the correct MIDI port.
2. Click the OK button.
file:///C|/Terrys/audiohq.htm (5 of 10) [1/2/2001 2:12:27 PM]
Creative AudioHQ: Sound Blaster Live! Value Sound Card User's Guide
You can now use the external MIDI input device to test your sound creation.
You can use external MIDI input devices to audition your MIDI banks and instruments. First,
connect a MIDI input device to your audio card and then select that device in Creative
Keyboard.
Test an Instrument
To test an instrument:
1. In Creative Keyboard, click the bank and the instrument you want.
2. Click the keys on the keyboard to test the sound. If you have an external MIDI input
device, you will probably find it easier to use it instead.
Tips
●
●
●
●
To select multiple notes to play simultaneously, use your right mouse button to click the
keys—which will be marked by black dots.
To release the keys, right-click them one by one, or click the All Notes Off button for
simultaneous release.
To slide across the keyboard, drag the mouse.
If the playback’s sustain is too long, click the All Notes Off button.
To test instruments with MIDI controllers:
1. In Creative Keyboard, click the MIDI controller you want to use.
2. Specify a value in the Controller Value box or drag the slider to the value.
3. Click the keys on the keyboard to test the sound. If you have an external MIDI input
device, it may be easier to use.
If you do not like the effects on your instrument, click the Reset Controllers button to set the
MIDI controllers to their default values.
If the playback is sustained too long, click the All Notes Off button.
To silence all MIDI sustain sounds:
● In Creative Keyboard, click the All Notes Off button. All the black points on the keyboard
are removed.
Creative Mixer
Creative Mixer allows you to control, combine, and manipulate sound from various audio
sources. You can control the volume of an audio source while running other Windows
applications, and you can select and mix different audio sources during playback and
file:///C|/Terrys/audiohq.htm (6 of 10) [1/2/2001 2:12:27 PM]
Creative AudioHQ: Sound Blaster Live! Value Sound Card User's Guide
recording.
You can hide or unhide device panels by dragging the borders of the Mixer left or right.
Figure 6. Creative Mixer
See the online help file for instructions in
● Basic tasks
● Customizing the view
● Mixing, recording and playback
Speaker Control
Speaker Control allows you to specify your speaker output configuration and the setup of audio
source positions for the output. It provides you an intuitive graphical interface to arrange the
audio sources about you to get the panning effects you want.
Figure 7. Speaker Control dialog box where you configure speaker output.
file:///C|/Terrys/audiohq.htm (7 of 10) [1/2/2001 2:12:27 PM]
Creative AudioHQ: Sound Blaster Live! Value Sound Card User's Guide
To configure your speakers or headphones
1. In the Speaker Configuration Output box on the Configuration tabbed page, select the
output device you will be using. For best results, select the entry that corresponds to your
actual output device.
❍ If you select Headphones, a Headphones icon (representing you) appears at the
bottom of the Preview box.
❍ If you select 2 Speakers, a sofa icon (representing you) appears at the bottom of
the Preview box, with the two speakers at the (front) upper corners of the box.
❍ If you select 4 Speakers, a sofa icon (representing you) appears in the center of the
Preview box, with the four speakers at the corners of the box.
2. For the selected output configuration, the last used setup appears in the Setup box. A
setup preset stores the relative positions of audio sources under the selected speaker
output configuration. You can have same-named setups across different speaker output
configurations the setups can have different settings from one another. Select the setup
you want.
file:///C|/Terrys/audiohq.htm (8 of 10) [1/2/2001 2:12:27 PM]
Creative AudioHQ: Sound Blaster Live! Value Sound Card User's Guide
3. If you cannot get the setup that you want from the list, create your own setup—use the
current setup as the basis for change—or import a setup from a file. To import, click the
Import Setup button and then select the .SPS file you want.
❍ For headphones or 2-speaker configuration, you can place audio sources anywhere
along the top border of the Preview box. Try dragging the audio source icon and
hear the resulting panning effect.
❍ For a 4-speaker configuration, you can place the sources around you as desired. As
you place them further away from you, they sound softer.
4. If you used a factory setup as a basis for your own revisions, save the revised settings as
a user-defined setup by typing a new name or the name of an existing user-defined setup
in the Setup box, and click the Save button. If you want to share with your friends the
setup you have created, export the setup (you must first save it) into a file. To do so, click
the Export Setup button. You can save using the recommended name or rename as you
like.
NOTE: An icon with a down-arrow on the lower-right corner denotes an analog audio
source, such as CD Audio, Line In, TAD, Auxiliary, and Microphone. Right-click the
icon to select the analog audio device to activate.
NOTE: If you want to change environmental effects of the sound, use the
Environmental Audio Control applet to do so.
NOTE: To adjust the volume of individual audio sources, go to the Creative Mixer
applet.
Environmental Audio Control
Environmental Audio Control allows you to configure the EMU10K1 effects engine. It allows you
to specify to a low level the components that make up the audio elements that in turn make up
an environment. An environment is the modeling of a real-world experience. We have provided
some entertainment, gaming and concert hall environments to get you started with.
Figure 8. Environmental Audio dialog box where you configure your audio environment.
file:///C|/Terrys/audiohq.htm (9 of 10) [1/2/2001 2:12:27 PM]
Creative AudioHQ: Sound Blaster Live! Value Sound Card User's Guide
Learn from the online help how to:
● Configure master effects
❍ Add to or remove effects from an environment
❍ Specify the effect type
❍ Specify the degree or amount of the effect
❍ Edit an effect all the way down to its parameters or building blocks
● Configure source effects, that is, set the amount of the effects to apply on an audio
source.
● Configure MIDI playback effects
Back to Contents Page
file:///C|/Terrys/audiohq.htm (10 of 10) [1/2/2001 2:12:27 PM]
Troubleshooting: Sound Blaster Live! Value Sound Card User's Guide
Back to Contents Page
Troubleshooting: Sound Blaster Live! Value Sound
Card User's Guide
Most Common Problems • Uninstalling and Reinstalling the Audio Drivers • Problems Installing
Software • Problems With Sound • Problem with Surround Mixer • Insufficient SoundFont
Cache • Problems With Joystick • Resolving I/O Conflicts • Problems in Windows NT 4.0
Most Common Problems
Table 1. Most common problems encountered by users
For This Problem
Go to Section
In Windows 98 Second Edition/Windows Millennium Edition,
Problems Installing Software
the installation does not start automatically after the CD-ROM
is inserted.
There is unexpected excessive environmental sound or
effects when an audio file is being played.
Problems With Sound
No sound from the headphones.
Problems With Sound
In a 4-speaker configuration, there is no sound from the rear
speakers.
Problems With Sound
No sound from the speakers.
Problems With Sound
No audio output when playing digital files such as.WAV, MIDI
files or AVI clips.
Problems With Sound
No audio output when playing CD-Audio.
OR
No audio output when playing DOS games that require a
CD-ROM.
Problems With Sound
Panning a source sometimes turns off its sound.
Problems With Sound
Unwanted change of mixer settings with every change of
Super-Environment presets.
Problem with Surround Mixer
There is insufficient memory to load SoundFonts.
Insufficient SoundFont Cache
The joystick port is not working.
Problems With Joystick
file:///C|/Terrys/trouble.htm (1 of 8) [1/2/2001 2:12:47 PM]
Troubleshooting: Sound Blaster Live! Value Sound Card User's Guide
The joystick is not working properly in some programs.
Problems With Joystick
Conflicts between your audio card and another peripheral
device
Resolving I/O Conflicts
Uninstalling and Reinstalling the Audio Drivers
Microsoft Windows 98 Second Edition/Windows Millennium Edition/Windows 2000
Operating System
Reinstalling the Audio Drivers From the Installation Disc
You may want to reinstall the audio drivers if you think they have been corrupted. To do so:
1. Insert the installation disc into your CD-ROM drive.
2. Follow the instructions on the screen until you are prompted for a Full or Custom
Installation.
3. Click the Custom Installation button.
4. In the following dialog box, clear all check boxes, and then click the OK button.
5. Follow the instructions on the screen to finish the reinstallation.
Uninstalling the Audio Drivers
1. Click the Start button, select Settings, and then click Control Panel.
2. Doubled-click the Add/Remove Programs icon.
3. On the Install/Uninstall tabbed page, select the Sound Blaster Live! Value entry, and then
click the Add/Remove button.
4. In the Creative Uninstaller dialog box, select the Windows Drivers check box, and then
click the Next button.
5. Click the Yes button.
6. Restart your computer when prompted.
Microsoft Windows NT 4.0 Operating System
Reinstalling the Audio Drivers From the Installation Disc
You may want to reinstall the audio drivers if you think they are corrupted. To do so:
1. Insert the installation disc into your CD-ROM drive.
2. Run the UPDPCINT.EXE program from the AUDIO\Language\NT4DRV folder of your
CD- ROM drive, where Language is the language of the software that you want to install.
3. Restart your computer when prompted. You may be prompted to restart more than once.
4. If a Windows NT 4.0 Service Control Manager error message appears, see "Resolving
I/O Conflicts" in the section "Troubleshooting".
file:///C|/Terrys/trouble.htm (2 of 8) [1/2/2001 2:12:47 PM]
Troubleshooting: Sound Blaster Live! Value Sound Card User's Guide
Removing Unused Sound Blaster Drivers
You may want to remove unused Sound Blaster ISA and PCI audio drivers after you have
removed the cards from your computer. To remove the drivers, use the procedure in the
previous section, "Reinstalling the Audio Drivers From the Installation Disc".
Problems Installing Software
In Windows 98 Second Edition/Windows Millennium Edition, the installation does not
start automatically after the CD-ROM is inserted.
The AutoPlay feature in your Windows 98 Second Edition/Windows Millennium Edition system
may not be enabled.
To start the installation program through the My Computer shortcut menu:
1. Double-click the My Computer icon on your Windows desktop.
2. In the My Computer window, right-click the CD-ROM drive icon.
3. On the shortcut menu, click AutoPlay and follow the instructions on the screen.
To enable AutoPlay through Auto Insert Notification:
1. Click the Start button, select Settings, and then click Control Panel.
2. In the Control Panel window, double-click the System icon.
3. In the System Properties dialog box, click the Device Manager tab and select your CDROM drive.
4. Click the Properties button.
5. In the Properties dialog box, click the Settings tab and select Auto Insert Notification.
6. Click the OK button to exit from the dialog box.
Problems With Sound
There is unexpected excessive environmental sound or effects when an audio file is
being played.
The last selected preset is an inappropriate environment for the current audio file.
To switch to an appropriate environment:
1. Open Environmental Audio Control applet.
OR
Display Creative Launcher at the top or bottom of your screen (bring your mouse pointer
to the top edge of the screen to display Launcher). Then, click the Environments tab.
2. In the Environment list, select "No effects" or an appropriate environment.
No sound from the headphones.
file:///C|/Terrys/trouble.htm (3 of 8) [1/2/2001 2:12:47 PM]
Troubleshooting: Sound Blaster Live! Value Sound Card User's Guide
Check the following:
● The headphones are connected to the Line Out jack.
● In the Speaker applet (click the AudioHQ icon on the taskbar, and then click the Speaker
icon), make sure the Output field is set to Headphones.
(In the Environment deck of Surround Mixer, make sure that the Speaker entry is
Headphones.)
In a 4-speaker configuration, there is no sound from the rear speakers.
Check the following:
● The rear speakers are connected to the audio card’s Rear Out jack.
● If you are playing sound from one of these sources.
❍ CD Audio
❍ Line In
❍ TAD
❍ Auxiliary (AUX)
❍ Microphone
To solve the problem:
1. In (Surround Mixer's Mixer deck or) Creative Mixer’s Play Control view, make sure the
check box of the source being played is unmuted, that is, enabled.
2. In the Record Control view, make sure the corresponding check box is also selected.
(For Surround Mixer, select the same source as the record source.)
For example, if you are playing DVD games or movies, make sure in (the Mixer deck of
Surround Mixer or) Creative Mixer you unmute the Auxiliary device in the (audio device panel
or) Play Control view and select the Auxiliary device in the (record panel or) Record Control
view. For more details, see "Connecting Creative PC-DVD" in the section "Setup".
●
If you have changed environments, go to the Record Control view of Creative Mixer and
make sure that the check boxes of your active sources are selected.
(For Surround Mixer, make sure that your active sources are unmuted.)
No sound from the speakers.
To solve the problem:
● Check that you have connected your speakers to your card's output.
● Check that you have unmuted the correct source in Mixer deck.
● If both these conditions have been met and you still do not get any sound, click the red
plus sign above the VOL control and check whether the Digital Output Only check box is
selected.
If it is, you are in the Digital Output Only mode and so must connect to digital speakers to
hear the sound from your audio card.
See the section on Digital Output Only in Surround Mixer’s online help for more information.
file:///C|/Terrys/trouble.htm (4 of 8) [1/2/2001 2:12:47 PM]
Troubleshooting: Sound Blaster Live! Value Sound Card User's Guide
No audio output when playing digital files such as.WAV, MIDI files or AVI clips.
Possible causes:
● The speaker volume knob (if any) is not set properly.
● The external amplifier or speakers are connected to the wrong jack.
● There is a hardware conflict.
● The output selection in the Configuration tabbed page of the Speaker applet is incorrectly
selected.
(The Speakers selection in the Environment deck of Surround Mixer is incorrectly
selected.)
● The Original Sound sliders in either the Master and Source tabbed pages of the
Environmental Audio applet are set at or near 0%.
Check the following:
● The speakers’ volume control knob, if any, is set at mid-range. Use (Surround Mixer or)
Creative Mixer to adjust the volume, if necessary.
● The powered speakers or external amplifier are connected to the card’s Line Out or Rear
Out jack.
● No hardware conflict between the card and a peripheral device. See "Resolving I/O
Conflicts" in the section "Troubleshooting".
●
●
The output selection in the Speaker applet corresponds to your speaker or headphone
configuration.
(The Speakers selection in the Environment deck of Surround Mixer corresponds to your
speaker or headphone configuration.)
The Original Sound sliders in either or both the Master and Source tabbed pages of the
Environmental Audio applet are set to 100%.
No audio output when playing CD-Audio.
OR
No audio output when playing DOS games that require a CD-ROM.
To solve this problem:
● Make sure the CD audio cable between the CD-ROM drive and the audio card is
connected.
Panning a source sometimes turns off its sound.
Sometimes when I pan an analog audio input source to the left or to the right, the sound from
that source will go off.
Possible cause:
● Digital Output Only mode and conflicting left-right balances in two mixers
This occurs when you are in the Digital Output Only mode and the source’s left-right
balance in a software mixer application other than Surround Mixer (for example, the
Windows Volume Control application) is at the opposite end compared to the position to
file:///C|/Terrys/trouble.htm (5 of 8) [1/2/2001 2:12:47 PM]
Troubleshooting: Sound Blaster Live! Value Sound Card User's Guide
which you have panned the source in the Environment deck of Surround Mixer. For
example, the CD Audio balance in Windows Volume Control is on the left but in Surround
Mixer you have panned the CD Audio to the right.
To solve the problem:
● Open that other mixer, and center the balances for all the audio input sources.
This ensures that your analog sources will not turn silent when you pan them in Surround
Mixer.
Problem with Surround Mixer
Unwanted change of mixer settings with every change of Super-Environment presets.
To solve the problem:
● Dissociate the mixer settings.
1. In the Preset deck, click the Surround Mixer title in the upper-left corner.
The system menu appears, with a command Dissociate Mixer Settings.
2. To dissociate mixer settings, make sure the command is checked.
Insufficient SoundFont Cache
There is insufficient memory to load SoundFonts.
This may occur when a SoundFont-compatible MIDI file is loaded or played.
Cause: There is insufficient memory allocated to SoundFonts.
To allocate more SoundFont cache:
● On the Options tabbed page of the SoundFont Control applet, move the SoundFont
Cache slider to the right.
The amount of SoundFont cache you can allocate depends on the system RAM available.
If there is still insufficient system RAM available:
● On the Configure Banks tabbed page of the SoundFont Control applet, select a smaller
SoundFont bank from the Select Bank box.
The smallest SoundFont bank available is 2 MB (2GMGSMT.SF2).
NOTE: The trade-off of a smaller SoundFont bank is its lower sound quality.
file:///C|/Terrys/trouble.htm (6 of 8) [1/2/2001 2:12:47 PM]
Troubleshooting: Sound Blaster Live! Value Sound Card User's Guide
Problems With Joystick
The joystick port is not working.
The audio card’s joystick port conflicts with the system’s joystick port.
To solve this problem:
● Disable the audio card’s joystick port and use the system port instead. For details, see
"Enabling/Disabling Gameport Joystick Interface" in the section "Changing Audio Card
Settings".
NOTE: Do not attempt to make changes to the BIOS unless you have experience with
system software.
The joystick is not working properly in some programs.
The program may use the system processor timing to calculate the joystick position. When the
processor is fast, the program may determine the position of the joystick incorrectly, assuming
that the position is out of range.
To solve this problem:
● Increase your system's 8 bit I/O recovery time of the BIOS setting, usually under the
Chipset Feature Settings section. Or, if available, you may adjust the AT Bus speed to a
slower clock. If the problem persists, try a different joystick.
Resolving I/O Conflicts
Conflicts between your audio card and another peripheral device may occur if your card and
the other device are set to use the same I/O address.
To resolve I/O conflicts, change the resource settings of your audio card or the conflicting
peripheral device in your system using Device Manager in Windows.
If you still do not know which card is causing the conflict, remove all cards except the audio
card and other essential cards (for example, disk controller and graphics cards). Add each card
back until Device Manager indicates that a conflict has occurred.
To resolve hardware conflicts in Windows:
1. Click the Start button, point to Settings, and then click Control Panel.
2. In the Control Panel window, double-click the System icon.
3. In the System Properties dialog box, click the Device Manager tab.
4. Under the Sound, Video And Game Controllers entry, select the conflicting audio card
driver—indicated by an exclamation mark (!)—and click the Properties button.
5. In the Properties dialog box, click the Resources tab.
file:///C|/Terrys/trouble.htm (7 of 8) [1/2/2001 2:12:47 PM]
Troubleshooting: Sound Blaster Live! Value Sound Card User's Guide
6. Make sure that the Use Automatic Settings check box is selected, and click the OK
button.
7. Restart your system to allow Windows to reassign resources to your audio card and/ or
the conflicting device.
NOTE: You can also refer to the Troubleshooting section in the Help file of Windows.
Problems in Windows NT 4.0
A Service Control Manager error message appears with one or more other error
messages at system restart.
This occurs after you remove an audio card from your computer after you have successfully
installed the Sound Blaster Live! Value card. Windows is trying to match the drivers to the
removed audio card.
To solve this problem:
1. Log on to your computer as Administrator.
2. Click the Start button, point to Settings, and then click Control Panel.
3. Double-click the Multimedia icon, and then click the Devices tab.
4. In the list, remove from under these entries
5. ❍ Audio Devices
❍ MIDI Devices And Instruments
❍ the items other than
❍ Audio for Creative SB Live!
❍ MIDI for Creative SB Live!
❍ MIDI for Creative S/W Synth
5. Click the OK button to close the dialog box. The drivers are removed.
Back to Contents Page
file:///C|/Terrys/trouble.htm (8 of 8) [1/2/2001 2:12:47 PM]
Specifications: Sound Blaster Live! Value Sound Card User's Guide
Back to Contents Page
Specifications: Sound Blaster Live! Value Sound
Card User's Guide
Features • Connectivity
Features
PCI Bus Mastering
● PCI Specification Version 2.1 compliant
● Bus mastering reduces latency and speeds up system performance
EMU10K1
● Advanced hardware accelerated digital effects processing
● 32-bit digital processing while maintaining a 192 dB dynamic range
● Patented 8-point interpolation that achieves the highest quality of audio reproduction
● 64-voice hardware wavetable synthesizer
● Professional-quality digital mixing and equalization
● Up to 32 MB of sound RAM mapped to host memory
Stereo Digitized Voice Channel
● True 16-bit Full Duplex operation
● 16-bit and 8-bit digitizing in stereo and mono modes
● Playback of 64 audio channels, each at an arbitrary sample rate
● ADC recording sampling rates: 8, 11.025, 16, 22.05, 24, 32, 44.1 and 48 kHz
● Dithering for 8-bit and 16-bit recording
AC ’97 Codec Mixer
● Mixes EMU10K1 audio sources and analog sources such as CD Audio, Line In,
Microphone, Auxiliary, TAD and PC Speaker
● Selectable input source or mixing of various audio sources for recording
● 16-bit Analog-to-Digital conversion of analog inputs at 48 kHz sample rate
Volume Control
● Software record and playback control of Master, Digitized Voice, and inputs from MIDI
device, CD Audio, Line, Microphone, Auxiliary, TAD, PC Speaker, SPDIF,
Wave/DirectSound device, and CD Digital (CD SPDIF)
● Separate bass and treble control
● Front and Rear Balance control
file:///C|/Terrys/specs.htm (1 of 2) [1/2/2001 2:13:06 PM]
Specifications: Sound Blaster Live! Value Sound Card User's Guide
●
Muting and balance control for individual playback sources
E-mu Environmental ModelingTM
● Realistic 3D experience that increases depth and breadth in perceived audio
● Highly accurate positioning of audio objects in 3D space
● Exceptional reproduction of various ambient and environmental effects
DynaRAMTM
● Dynamically allocating host memory for storing and processing sound samples
● Need not rely on onboard audio card memory
Creative Multi Speaker SurroundTM (CMSSTM)
● Multi-speaker technology
● Professional-quality panning and mixing algorithm
● Independent multiple sounds can be moved and placed around a listener
Connectivity
Audio Inputs
● One line-level analog Line input via stereo jack on rear bracket
● One mono Microphone analog input via stereo jack on rear bracket
● CD_IN line-level analog input via 4-pin Molex connector on card
● AUX_IN line-level analog input via 4-pin Molex connector on card
● TAD line-level analog input via 4-pin Molex connector on card
● CD_SPDIF digital input via 2-pin Molex connector on card, accepting sampling rates of
32, 44.1 and 48 kHz.
Audio Outputs
● Two line-level analog outputs via stereo jacks on rear bracket, Front and Rear Line-Outs
● Stereo headphone (32-ohm load) support on Front Line-Out
Interfaces
● MB_PRO 2x5 pin header
● PC_SPK 1x2 pin header
● AUD_EXT 2x20 pin header
● DIGITAL OUT jack
Back to Contents Page
file:///C|/Terrys/specs.htm (2 of 2) [1/2/2001 2:13:06 PM]
Internal Connectors: Sound Blaster Live! Value Sound Card User's Guide
Back to Contents Page
Internal Connectors: Sound Blaster Live! Value
Sound Card User's Guide
NOTE: A Jack is a one-hole connecting interface whereas a connector consists of
many pins. Refer to the online User’s Guide, "Hardware Information", for details on
connector pin assignments. To access the online User's Guide, click the Start button,
point to Programs, point to Creative, point to Sound Blaster Live! Value and select
User's Guide.
NOTE: Line Out and Rear Out jacks can be used simultaneously to power 4 channel
speaker systems.
Figure 1. Jacks and connectors on the Sound Blaster Live! Value card
file:///C|/Terrys/connect.htm (1 of 2) [1/2/2001 2:13:13 PM]
Internal Connectors: Sound Blaster Live! Value Sound Card User's Guide
Back to Contents Page
file:///C|/Terrys/connect.htm (2 of 2) [1/2/2001 2:13:13 PM]
Connecting Creative PC-DVD: Sound Blaster Live! Value Sound Card User's Guide
Back to Contents Page
Connecting Creative PC-DVD: Sound Blaster Live!
Value Sound Card User's Guide
When you are playing your DVD movies or games:
If your Encore Dxr2 or MPEG2 decoder card is connected to an external Dolby Digital (AC- 3)
decoder such as Desktop Theater 5.1, either:
● Disconnect the Sound Blaster Live! card’s Aux In connector from the decoder card’s
Audio Out connector (Highly recommended),
OR
● Mute the Aux Input in (Surround Mixer) or the Creative Mixer’s Play Control view.
If your decoder card is not connected to an external Dolby Digital (AC-3) decoder, it is
recommended that you:
1. Connect the Sound Blaster Live! card’s Aux In connector to the decoder card’s Audio Out
connector.
2. Select (that is, unmute) the Aux Input in (Surround Mixer or) the Creative Mixer’s Play
Control view.
You may need to select this configuration when playing certain DVD games with Dolby
Digital video clips.
If you:
● Get distorted or no audio at all (Reason: Your CD-ROM or DVD-ROM drive does not fully
comply to SPDIF specifications),
OR
● Are playing games in Windows 98 Second Edition MS-DOS mode (that is, pure DOS
mode),
do the following:
1. Connect the CD In connector to the Analog Audio jack of the CD-ROM or
DVD-ROM drive.
2. In (Surround Mixer or) the Play Control view of Creative Mixer, unmute the CD
Audio device and mute the CD Digital device.
If you connect to the Digital Audio and Analog Audio jacks of the same CD-ROM or DVD- ROM
drive, make sure that in (Surround Mixer or) the Play Control view of Creative Mixer, unmute
only one or the other of CD Audio or CD Digital but not both.
To open (Surround Mixer) or the mixer, bring your pointer to the top of the screen to display
Creative Launcher, click the (Sound Blaster Live! Value or) AudioHQ tab, and then click the
(Surround Mixer or) Mixer icon.
file:///C|/Terrys/pcdvd.htm (1 of 2) [1/2/2001 2:16:58 PM]
Connecting Creative PC-DVD: Sound Blaster Live! Value Sound Card User's Guide
Figure 1. Connecting Creative PC-DVD.
Back to Contents Page
file:///C|/Terrys/pcdvd.htm (2 of 2) [1/2/2001 2:16:58 PM]
Determining Resources: Sound Blaster Live! Value Sound Card User's Guide
Back to Contents Page
Determining Resources: Sound Blaster Live! Value
Sound Card User's Guide
To find the current SB Live! SB16 Emulation resources in Windows 98 Second Edition:
1. Click the Start button, point to Settings, and then click Control Panel.
2. In the Control Panel window, double-click the System icon.
3. In the System Properties dialog box, click the Device Manager tab.
4. Double-click Creative Miscellaneous Devices, and then double-click Creative SB Live!
SB16 Emulation.
5. Click the Resources tab.
You can use the information in the resource list to help you configure MS-DOS games for use
with the SB Live! Value card.
The resource list may show three entries of "Input/Output Range" and two entries of "Direct
Memory Access". They correspond to the sequence of entries in Table 1 and Table 3 in the
section "Understanding the System Resource Settings". If the number of entries do not match,
a good estimate of the identity of the device is its I/O address or DMA channel.
To find the current SB Live! SB16 Emulation resources in MS-DOS mode:
1. Switch to your SB Live! DOS driver directory, that is:
C:\PROGRA~1\CREATIVE\SBLIVE\DOSDRV
2. Type SBECFG and then press Enter
NOTE: The MS-DOS driver SBEINIT.COM must be running for SBECFG.EXE to work
properly.
Some older games may have difficulty detecting the SB Live! card at certain resource settings.
Typically, these games would expect the card to be at a fixed set of resources and would fail to
load if those resources are not detected. If you have older MS-DOS games that do not work
properly, try changing the SB Live! SB16 Emulation configuration. Use the following as a guide:
Problem: Sound Blaster emulation is not recognized.
Resource: Try switching the SB Emulation IRQ between 5 and 7, use DMA channel 1, use SB
interface port 220.
Problem: The MPU-401emulation is not recognized.
file:///C|/Terrys/determin.htm (1 of 2) [1/2/2001 2:17:12 PM]
Determining Resources: Sound Blaster Live! Value Sound Card User's Guide
Resource: Try using Port address 330.
Back to Contents Page
file:///C|/Terrys/determin.htm (2 of 2) [1/2/2001 2:17:12 PM]
Understanding the System Resource Settings: Sound Blaster Live! Value Sound Card User's Guide
Back to Contents Page
Understanding the System Resource Settings:
Sound Blaster Live! Value Sound Card User's
Guide
Overview • Input/Output (I/O) Addresses • Interrupt Request (IRQ) Line • Direct Memory
Access (DMA) Channel
Overview
This section explains the following software SB emulation resources—not hardware
resources— of your card.
NOTE: If your card encounters a conflict with a peripheral device, you may need to
change its resource settings. For details, see "Resolving I/O Conflicts" in the section
"Troubleshooting".
When any resource setting is changed, make sure that the environment variables
(see "Understanding the Environment Variables" in the section "Using the Sound
Card) reflect the changes as well. You can view your system environment by typing
SET at the DOS prompt.
Input/Output (I/O) Addresses
NOTE: In the following tables the preferred values are in bold.
I/O addresses are communication areas used by your computer’s central processor to
distinguish among various peripheral devices connected to your system when sending or
receiving data.
Table 1. Possible default input/output (I/O) addresses.
Device
Default I/O Address Range
SB interface
220H to 22FH 240H to 24FH 260H to 26FH 280H to 28FH
MPU-401 UART MIDI interface
300H to 301H 310H to 311H 320H to 321H 330H to 331H
Stereo music synthesizer
388H to 38BH
file:///C|/Terrys/resource.htm (1 of 2) [1/2/2001 2:17:15 PM]
Understanding the System Resource Settings: Sound Blaster Live! Value Sound Card User's Guide
Interrupt Request (IRQ) Line
An IRQ line is a signal line that a device uses to notify your computer’s central processor that it
wants to send or receive data for processing.
Table 2. Possible default interrupt request (IRQ) line assignment.
Device
Default IRQ Line
SB interface
5, 7, 9, 10
Direct Memory Access (DMA) Channel
A DMA channel is a data channel that a device uses to transfer data directly to and from the
system memory.
Table 3. Possible default direct memory access (DMA) channel assignment.
Usage
Default DMA Channel
First DMA channel
0, 1, 3
Second DMA channel
5, 6, 7
Back to Contents Page
file:///C|/Terrys/resource.htm (2 of 2) [1/2/2001 2:17:15 PM]
Changing Audio Card Settings: Sound Blaster Live! Value Sound Card User's Guide
Back to Contents Page
Changing Audio Card Settings: Sound Blaster Live!
Value Sound Card User's Guide
Overview • Enabling/Disabling Gameport Joystick Interface • Enabling/Disabling Other Features
Overview
You might want to disable interfaces that you are not using to free up resources, for example,
when you do not have enough IRQ lines.
Enabling/Disabling Gameport Joystick Interface
The Gameport Joystick interface on your audio card can be enabled or disabled in Windows.
To enable or disable the interface in Windows:
1. Click the Start button, point to Settings, and then click Control Panel.
2. In the Control Panel window, double-click the System icon.
3. In the System Properties dialog box, click the Device Manager tab.
4. Double-click Sound, Video And Game Controllers, and then select Creative Gameport
Joystick.
5. Click the Properties button.
6. In the Properties dialog box:
If you have an Original Configuration (Current) check box:
● To enable the interface, make sure that the check box is selected.
To disable it, clear the check box.
If you have a Disable In This Hardware Profile check box:
● To enable the interface, clear the check box.To disable it, make sure that the
check box is selected.
7. Click OK to restart Windows and for the change to take effect.
When the Gameport Joystick interface is disabled, the entry in Device Manager has a red
cross.
file:///C|/Terrys/changing.htm (1 of 2) [1/2/2001 2:18:00 PM]
Changing Audio Card Settings: Sound Blaster Live! Value Sound Card User's Guide
Enabling/Disabling Other Features
Use the applets under Creative AudioHQ to enable or disable features such as Stereo
Enhancement Effect.
To open an AudioHQ applet from the Sound Blaster menu
Click the Start button on the taskbar, point to Programs, point to Creative, point to Sound
Blaster Live! Value, and then click AudioHQ.
Check out the applets within the AudioHQ window.
To open an AudioHQ applet from Creative Launcher
Click Creative Launcher at the top or bottom of your computer screen, and then click the
AudioHQ tab.
Check out the applets indicated by the icons in the second row of Launcher.
Back to Contents Page
file:///C|/Terrys/changing.htm (2 of 2) [1/2/2001 2:18:00 PM]
Using Sound Blaster Live! Value: Sound Blaster Live! Value Sound Card User's Guide
Back to Contents Page
Using Sound Blaster Live! Value: Sound Blaster
Live! Value Sound Card User's Guide
Every bundled application provides online help to guide you along when you use it.
For further information, value-added tips, tricks and plug-ins, check the SB Live! owners’ Web
site frequently at http://www.sblive.com.
A fast way of getting to the Web site is to click the right-most button (the Environmental Audio
icon) on Creative Launcher.
Figure 1. Creative Launcher.
Creative Launcher is a one-stop shortcut to quickly start your applications and get to the
Creative and the SB Live! owners’ Web site. To display Launcher, bring your pointer to the top
of the screen.
For details on how to use the Launcher, see its online help.
Back to Contents Page
file:///C|/Terrys/usingSBL.htm [1/2/2001 2:18:34 PM]
Creative Launcher: Sound Blaster Live! Value Sound Card User's Guide
Back to Contents Page
Creative Launcher: Sound Blaster Live! Value
Sound Card User's Guide
Overview • Options • Groups
Overview
Creative Launcher allows you to organize your desktop and open Creative applications quickly.
Figure 1. Creative Launcher.
Creative Launcher is installed at the top of your screen. If it does not appear, move your mouse
pointer to the top of the screen and Launcher should appear. Creative Launcher consists of the
system menu icon (the Creative logo at the top left corner), the Web site icon, group tabs, and
the group items. The Environmental Audio icon is on the right.
Options
To set the options for the Launcher:
1. Click the System Menu icon on Launcher, and then click Properties.The Properties dialog
box appears.
2. Select or clear the desired options.
3. Click the OK button to apply the changes to the Launcher.
Groups
You can place three types of items in Launcher:
● Subgroups
● Shortcuts
● Plug-ins
A subgroup is an item within a group that may contain more items.
A plug-in is a Creative software module that is integrated into Launcher. Examples are the
Volume Control Plugin and the Command Line Plugin.
file:///C|/Terrys/launcher.htm (1 of 2) [1/2/2001 2:58:27 PM]
Creative Launcher: Sound Blaster Live! Value Sound Card User's Guide
The installation creates a number of group tabs in Launcher that may contain shortcuts to
Creative applications such as PlayCenter and Control Panel. It may also contain shortcuts to
other applications for your hardware settings, volume control, help files, or demonstration
programs by Creative.
For details on managing groups and items in Launcher, see its online help.
Back to Contents Page
file:///C|/Terrys/launcher.htm (2 of 2) [1/2/2001 2:58:27 PM]
Installing the Card and Related Peripherals: Sound Blaster Live! Value Sound Card User's Guide
Back to Contents Page
Installing the Card and Related Peripherals: Sound
Blaster Live! Value Sound Card User's Guide
Installing the Sound Card • Installing Related Peripherals
Installing the Sound Card
WARNING: Do not force the audio card into the slot. If it does not fit properly,
gently remove it and try again.
1. Switch off your system and all peripheral devices.
2. Touch a metal plate on your system to ground yourself and to discharge any static
electricity, and then unplug the power cord from the wall outlet.
3. Remove the cover from your system.
4. Remove the metal plate from an unused PCI expansion slot in your system and put the
screw aside, to be used later.
5. Align the audio card with the vacant PCI expansion slot. Press the card gently and evenly
into the slot as shown. Ensure that the card sits firmly inside the PCI expansion slot.
6. Secure the card to the expansion slot with a screw.
7. Replace the cover onto your system.
8. Plug the power cord back into the wall outlet, and switch on the system.
Figure 1. Securing the audio card to the PCI expansion slot.
file:///C|/Terrys/installc.htm (1 of 3) [1/3/2001 10:04:12 AM]
Installing the Card and Related Peripherals: Sound Blaster Live! Value Sound Card User's Guide
NOTE: The joystick connector on your audio card is identical to that on a standard PC
game control adapter or the game I/O connector. You can connect any analog
joystick with a 15-pin D-shell connector or any device compatible with the standard
PC joystick. To use two joysticks, you need a Y-cable splitter.
Installing Related Peripherals
If you are playing games in Windows 98 Second Edition MS-DOS mode (that is, pure DOS
mode), you must make sure the CD In connector and the Analog Audio connector of the
CD-ROM or DVD-ROM drive are connected
In addition, if you get distorted audio, do not connect the CD SPDIF connector to the Digital
Audio connector of the CD-ROM or DVD-ROM drive.
If you connect to the Digital Audio and Analog Audio connectors of the same CD- ROM or
DVD-ROM drive, make sure that in Surround Mixer or the Play Control view of SB Live! Mixer
unmute only one or the other of CD Audio or CD Digital but not both.
Figure 2. Connecting other devices.
file:///C|/Terrys/installc.htm (2 of 3) [1/3/2001 10:04:12 AM]
Installing the Card and Related Peripherals: Sound Blaster Live! Value Sound Card User's Guide
Back to Contents Page
file:///C|/Terrys/installc.htm (3 of 3) [1/3/2001 10:04:12 AM]
Positioning Your Speakers: Sound Blaster Live! Value Sound Card User's Guide
Back to Contents Page
Positioning Your Speakers: Sound Blaster Live!
Value Sound Card User's Guide
If you are using four speakers, place them such that they form the corners of a square with you
exactly in the center (as in Figure 1) and that they are angled toward you. Make sure the
computer monitor is not blocking the path of your front speakers. You may want to adjust the
relative positions of the speakers until you get the audio experience you like best. If you have a
subwoofer, place the unit in a corner of the room for the best bass experience.
Figure 1. Recommended speaker positions for the 4-speaker configuration.
Back to Contents Page
file:///C|/Terrys/position.htm [1/3/2001 10:04:38 AM]
Running MS-DOS games in Microsoft Windows: Sound Blaster Live! Value Sound Card User's Guide
Back to Contents Page
Running MS-DOS games in Microsoft Windows:
Sound Blaster Live! Value Sound Card User's
Guide
Overview • From the MS-DOS box in Windows• In the Windows 98 Second Edition MS-DOS
mode
Overview
Legacy games in the market have been designed for only MS-DOS. SB Live! Value supports
MS- DOS games. There are two ways to play MS-DOS games.
From the MS-DOS box in Windows
This is the recommended method.
To open the box:
● Click the Start button on the taskbar of Windows, point to Programs, and then click
MS-DOS Prompt.
In the Windows 98 Second Edition MS-DOS mode
There could be times when you do not want to or cannot run a game from the MS-DOS box.
The game may be incompatible with Windows 98 Second Edition, or there is insufficient system
resources to play the game with Windows 98 Second Edition loaded. In such cases, use the
MS-DOS mode, in which only the real-mode portions of Windows 98 Second Edition are
loaded.
To restart the system in MS-DOS mode when you are already in Windows 98 Second Edition:
● Click the Start button on the taskbar, and then click Shutdown.
● Click the Restart The Computer In MS-DOS Mode option button, and then click the OK
button.
To start the system in MS-DOS mode at system startup:
● At startup as Windows 98 Second Edition is loading, hold the F8 key.
● At the startup menu, choose the Command Prompt Only option, and then press <Enter>.
Back to Contents Page
file:///C|/Terrys/running.htm [1/3/2001 10:05:13 AM]
Selecting the Best Audio Options in a Game: Sound Blaster Live! Value Sound Card User's Guide
Back to Contents Page
Selecting the Best Audio Options in a Game: Sound
Blaster Live! Value Sound Card User's Guide
Overview • Music Options • Digital Audio Options
Overview
Most MS-DOS–based games that provide sound have some procedure for audio setup. These
procedures generally present you with a list of popular audio cards or audio devices from which
to choose.
The methods used by games to present audio options can vary greatly. Some may present a
single choice that corresponds to a particular audio device, that is, Sound Blaster, Sound
Blaster 16, Roland Sound Canvas, and so on. Others will provide an option for music and
digital audio separately; for example, General MIDI music with Sound Blaster digital audio. In
such a case, there are often two separate menus to configure.
Some games allow you to set the MIDI port address and IRQ for music and sound. Make sure
that these settings correspond to the values displayed by SBECFG.EXE or the Resources
tabbed page of the Creative SB Live! SB16 Emulation Properties dialog box.
There are games that offer MPU-401/Roland (General MIDI or MT-32/LAPC-1) as an option.
Often these games allow you to set the MIDI port address. Make sure that they match the MIDI
address in the Resources list on Resources tabbed page of the Creative SB Live! SB16
Emulation Properties dialog box. The same values can be found under "MPU-401 (General
MIDI, Roland MT-32/LAPC-1) Emulation", displayed by SBECFG.EXE in MS-DOS mode.
Remember to enable the MT-32 MIDI patch with the SBEMIXER program if you select Roland
MT-32 or LAPC- 1 for music.
Music Options
Most MS-DOS games offer a menu choice for sound when they start up. If you have a choice
between General MIDI and MT-32, always choose General MIDI, since it will provide you with
the best sound quality. If you need to use MT-32, you must first switch from the General MIDI
instrument set (the default) to the MT-32 instrument set using SBEMIXER. Be sure to switch
back to the General MIDI set when you are finished using the MT-32 instrument set.
file:///C|/Terrys/select.htm (1 of 2) [1/3/2001 10:05:39 AM]
Selecting the Best Audio Options in a Game: Sound Blaster Live! Value Sound Card User's Guide
Digital Audio Options
SB Live! supports Sound Blaster, Sound Blaster Pro, Sound Blaster 16, and Adlib digital audio
emulation. If an application provides all these as options, specify the choices in this order:
1. Sound Blaster 16
2. Sound Blaster Pro
3. Sound Blaster
4. Adlib
Back to Contents Page
file:///C|/Terrys/select.htm (2 of 2) [1/3/2001 10:05:39 AM]
Understanding the Installation Program in Windows 98 Second Edition Sound Blaster Live! Value Sound Card User's Guide
Back to Contents Page
Understanding the Installation Program in Windows
98 Second Edition: Sound Blaster Live! Value
Sound Card User's Guide
Overview • The AUTOEXEC.BAT File Settings • The CONFIG.SYS File Settings
Overview
The installation program modifies your AUTOEXEC.BAT and CONFIG.SYS files.
The AUTOEXEC.BAT File Settings
The installation program adds the following statements to the AUTOEXEC.BAT file:
SET CTSYN=C:\WINDOWS
SET BLASTER=A220 I5 D1 H5 P330 T6
C:\PROGRA~1\CREATIVE\SBLIVE\DOSDRV\SBEINIT.COM
The first two statements set up the environment variables for your audio card. For an
explanation of the variables, see "Understanding the Environment Variables" in the section
"Using the Sound Card".
The third statement runs the SBEINIT.COM driver. SBEINIT.COM is the SB Live! MS-DOS
driver. It is required for the SB Live! Value card to function properly under MS-DOS mode. The
syntax for the statement is as follows:
<SB Live! path>\SBEINIT.COM
SBEINIT.COM requires that the HIMEM.SYS and EMM386.EXE files are loaded. If needed, the
installation program adds the necessary HIMEM.SYS and EMM386.EXE lines to your
CONFIG.SYS file, creating the file if it is not present.
On the rare occasion a program does not work with expanded memory, simply add the NOEMS
parameter to your memory manager. For example:
DEVICE=C:\WINDOWS\EMM386.EXE NOEMS
if C:\WINDOWS is your Windows directory.
You may load this driver into high memory in the AUTOEXEC.BAT file, even though the default
is not. For example:
LOADHIGH=C:\PROGRA~1\CREATIVE\SBLIVE\DOSDRV\SBEINIT.COM
file:///C|/Terrys/understa.htm (1 of 2) [1/3/2001 10:05:54 AM]
Understanding the Installation Program in Windows 98 Second Edition Sound Blaster Live! Value Sound Card User's Guide
Do not remove the memory manager altogether. Do not attempt to load SBEINIT.COM into
high memory when using the NOEMS option if SBEINIT.COM fails to run SBELOAD.EXE or
SBECFG.EXE.
In the rare case that an MS-DOS game will not work with a memory manager, you will not be
able to use the SB Live! Value card with the game.
The CONFIG.SYS File Settings
The installation program adds the following statements to the CONFIG.SYS file:
DEVICE=C:\WINDOWS\HIMEM.SYS
DEVICE=C:\WINDOWS\EMM386.EXE
Back to Contents Page
file:///C|/Terrys/understa.htm (2 of 2) [1/3/2001 10:05:54 AM]
Creative Diagnostics: Sound Blaster Live! Value Sound Card User's Guide
Back to Contents Page
Creative Diagnostics: Sound Blaster Live! Value
Sound Card User's Guide
Creative Diagnostics is an application that allows you to test the audio functions of your sound
card easily. With Creative Diagnostics, you can check your system's ability to:
● playback digital audio.
● record digital audio.
● playback MIDI on your sound card's internal MIDI synthesizer.
● playback audio CDs.
See the instructions in Creative Diagnostics for details.
Back to Contents Page
file:///C|/Terrys/diagnost.htm [1/3/2001 10:06:17 AM]
SB Live! Experience: Sound Blaster Live! Value Sound Card User's Guide
Back to Contents Page
SB Live! Experience: Sound Blaster Live! Value
Sound Card User's Guide
Congratulations! You have successfully installed Sound Blaster Live! Value. To enhance your
experience, it is highly recommended that you run the SB Live! Experience.
SB Live! Experience
Demonstrates the many wonderful experiences Sound Blaster Live! can give you.
● To run SB Live! Experience, bring your pointer to the top of the screen to display Creative
Launcher, click the Sound Blaster Live! Value tab, and then click the SB Live! Experience
icon. On the opening screen, click to select the topic that interests you.
Back to Contents Page
file:///C|/Terrys/sblive.htm [1/3/2001 10:06:44 AM]
Creative WaveStudio: Sound Blaster Live! Value Sound Card User's Guide
Back to Contents Page
Creative WaveStudio: Sound Blaster Live! Value
Sound Card User's Guide
WaveStudio is a Windows-based application that allows you to perform the following sound
editing functions easily:
● Play, edit, and record 8-bit (tape quality) and 16-bit (CD quality) Wave data. Enhance
your Wave data or create unique sounds with various special effects and editing
operations such as rap, reverse, echo, mute, pan, cut, copy, and paste.
● Open and edit several Wave files at the same time.
● Import and export raw (.RAW) data files.
See the online help file for details.
Back to Contents Page
file:///C|/Terrys/wavestud.htm [1/3/2001 10:06:57 AM]
Creative Recorder: Sound Blaster Live! Value Sound Card User's Guide
Back to Contents Page
Creative Recorder: Sound Blaster Live! Value
Sound Card User's Guide
Recorder is a Windows-based application that allows you to record sounds and music from
various input sources (for example, microphone and audio CD) and save them as Wave (.wav)
files.
Figure 1. Creative Recorder
Useful features include:
● AVRL (Automatic Recording Volume Level) - allows you to limit the recording volume
level, so that distortion will not occur if the recording volume is too loud.
● Peak Indicator - warns you if the recording volume level is too high.
To run Recorder, bring your pointer to the top of the screen to display Creative Launcher, click
the Programs tab, and then click the Recorder icon.
For details on how to use Recorder, see its online help.
Back to Contents Page
file:///C|/Terrys/recorder.htm [1/3/2001 10:07:13 AM]
Creative PlayCenter: Sound Blaster Live! Value Sound Card User's Guide
Back to Contents Page
Creative PlayCenter: Sound Blaster Live! Value
Sound Card User's Guide
PlayCenter allows you to play most types of media— multimedia files (MIDI, Wave, etc.), audio
CDs, and Video CDs—using a single player. Just insert or select your media and PlayCenter
does the rest.
Figure 1. Creative PlayCenter which lets you play most types of media files.
To run PlayCenter, bring your pointer to the top of the screen to display Creative Launcher,
click the Programs tab, and then click the PlayCenter icon.
For details on how to use PlayCenter, see its online help.
Back to Contents Page
file:///C|/Terrys/playcent.htm [1/3/2001 10:07:32 AM]
Installing Software in Windows 98 Second Edition/Windows Millennium Edition: Sound Blaster Live! Value Sound Card User's Guide
Back to Contents Page
Installing Software in Windows 98 Second
Edition/Windows Millennium Edition: Sound Blaster
Live! Value Sound Card User's Guide
After you have installed the card and switched on your system:
● When the Add New Hardware Wizard dialog box appears, click the Cancel button.
Repeat this step when the Add New Hardware Wizard dialog box appears again.
When you install the applications, the specific audio drivers for your card will be installed.
To install the applications:
1. Insert the installation disc into your CD-ROM drive. The AutoPlay screen appears.
2. Follow the instructions on the screen to complete the installation.
Back to Contents Page
file:///C|/Terrys/ins98nWM.htm [1/3/2001 10:14:49 AM]
Installing Software in Windows NT 4.0: Sound Blaster Live! Value Sound Card User's Guide
Back to Contents Page
Installing Software in Windows NT 4.0: Sound
Blaster Live! Value Sound Card User's Guide
Installing the Software • Setting Up Joystick Drivers in Windows NT 4.0
NOTE: You cannot install more than one Sound Blaster audio card of the same type
on your computer.
Installing the Software
The software installation in NT 4.0 includes the installation of audio drivers.
1. Insert the installation disc into your CD-ROM drive. The AutoPlay screen appears.
2. Follow the instructions on the screen to complete the installation.
Setting Up Joystick Drivers in Windows NT 4.0
1.
2.
3.
4.
5.
6.
7.
8.
9.
Log on to your computer as Administrator.
Click the Start button, point to Settings, and then click Control Panel.
Double-click the Multimedia icon, click the Devices tab, and then click the Add button.
In the List of Drivers box of the Add dialog box, select Unlisted Or Updated Driver, and
then click the OK button.
Insert the Windows NT 4.0 CD-ROM which contains the JOYSTICK.SYS file into the CDROM drive.
In the Install Driver dialog box, type
E:\DRVLIB\MULTIMED\JOYSTICK\X86
if E:\ is the CD-ROM drive letter, and then click the OK button.
In the Add Unlisted Or Updated Driver dialog box, click Analog Joystick Driver, and then
click the OK button.
In the Microsoft Joystick Configuration dialog box, click the OK button.
Restart your computer when prompted.
Back to Contents Page
file:///C|/Terrys/instalnt.htm [1/3/2001 10:14:55 AM]
Installing Software in Windows 2000: Sound Blaster Live! Value Sound Card User's Guide
Back to Contents Page
Installing Software in Windows 2000: Sound Blaster
Live! Value Sound Card User's Guide
After you have installed the card and switched on your system, Windows 2000 automatically
detects the card and installs the basic audio drivers. When you install the applications, the
specific audio drivers for your card will be installed.
To install the applications:
1. Insert the installation disc into your CD-ROM drive. The AutoPlay screen appears.
2. Follow the instructions on the screen to complete the installation.
Back to Contents Page
file:///C|/Terrys/inst2000.htm [1/3/2001 10:15:06 AM]