1
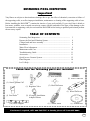
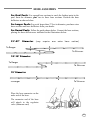
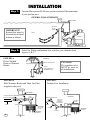
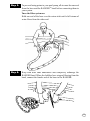
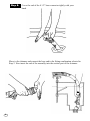
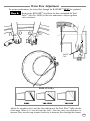
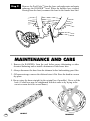
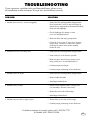
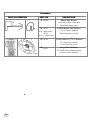
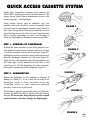
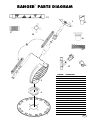
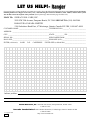
Ranger™
Owner’s Manual
and Quick Assembly
Instructions
Ranger™
AUTOMATIC ABOVEGROUND POOL CLEANER
THANK YOU FOR PURCHASING THE BARACUDA® RANGER™.
YOUR RANGER™ HAS BEEN DESIGNED AND MANUFACTURED
TO BE EASILY INSTALLED AND TO PROVIDE YEARS OF
LOW MAINTENANCE OPERATION.
PRIOR TO INSTALLING YOUR NEW RANGER™, PLEASE DO THE FOLLOWING:
1) Complete and return the warranty card.
2) Record your purchase information on the spaces provided below.
3) Attach your invoice (or a copy) to this page.
These actions will insure prompt warranty service, should it be required. Simply present your owner’s manual, along with the invoice at any of our
authorized warranty centers nationwide.
RECORD YOUR BARACUDA RANGER POOL CLEANER DATA HERE:
Date of Purchase _______________________________________________________________________________________________________
Purchased From ________________________________________________________________________________________________________
City
State/Province
Zip/Postal Code
Serial No.(located on underside of machine head) _____________________________________________________________________________
BARACUDA RANGER LIMITED WARRANTY
This BARACUDA RANGER was carefully inspected before shipment from our warehouse. Upon unpacking, if any part proves defective or missing, please notify your
dealer immediately. Please consult owner’s manual for complete instructions on the installation and operation of your BARACUDA RANGER.
ZODIAC POOL CARE, INC. WARRANTS THE RANGER POOL CLEANER AGAINST ALL MANUFACTURING DEFECTS AND ALL WEAR AND TEAR FOR
(1) YEAR. ALL WARRANTIES ARE EFFECTIVE FROM THE DATE OF PURCHASE.
Should this product prove defective in workmanship, materials or wear during the applicable warranty period, the consumer’s sole and exclusive remedy shall be such
repair or replacement of the product as provided below.
THIS LIMITED WARRANTY EXCLUDES THE FOLLOWING:
1. Discoloration of the BARACUDA® RANGER™ pool cleaner. This is caused by reaction to ultraviolet rays and the chemicals used in the pool water. Discoloration
does not affect the operating ability of the BARACUDA RANGER. Therefore, this Limited Warranty does not cover the replacement of discolored parts.
2. Damage to or malfunction of the unit resulting from excess chlorination or improper water chemistry balance.
3. Replacement of parts which fail or become defective as a result of improper installation, negligence, misuse, abuse or tampering by unauthorized repair personnel.
4. Age, pool water imbalance, and improper installation can cause vinyl pool liners to become brittle or unduly wrinkled. Corrosion of the supporting walls and/or
irregularities in the pool base may also cause liner failure. The use of this product in such an environment is at the pool owner’s risk. Therefore, the pool owner hereby releases the manufacturer from any and all claims for damage where these conditions exist.
5. The RANGER is designed for use in aboveground pools only. If unit is used in any other application, the pool owner hereby releases the manufacturer from any and
all claims. This misuse will void all warranty on the unit.
THE LIMITED WARRANTY PROVIDED HEREIN IS THE SOLE AND EXCLUSIVE WRITTEN WARRANTY WITH RESPECT TO THE BARACUDA
RANGER POOL CLEANER. ALL IMPLIED WARRANTIES IMPOSED BY APPLICABLE LAW, INCLUDING ANY IMPLIED WARRANTY OF
MERCHANTABILITY OR FITNESS FOR A PARTICULAR PURPOSE, WITH RESPECT TO EACH COMPONENT OF THE BARACUDA RANGER ARE
LIMITED TO THE DURATION OF THE EXPRESS LIMITED WARRANTY WITH RESPECT TO SUCH COMPONENT. SOME STATES DO NOT ALLOW
LIMITATIONS ON HOW LONG AN IMPLIED WARRANTY LASTS, SO THE ABOVE LIMITATION MAY NOT APPLY TO YOU.
In no event shall Zodiac Pool Care, Inc. be liable in contract or in tort, or under any other legal theory, for lost profits or revenues, loss of use or similar economic loss,
or for indirect, special, incidental, consequential or similar damages, even if it has been advised of the possibility of such claim. Some states do not allow the exclusion
or limitation of incidental or consequential damages, so the above limitation or exclusion may not apply to you.
No claim under this Limited Warranty will be recognized unless the registration card, included in your box, is completed and returned within fifteen (15) days of the
purchase date. Only the original purchaser may submit a claim under this Limited Warranty. Purchaser’s claims against Zodiac Pool Care, Inc., shall be limited to those
claims which may be asserted under the Limited Warranty relating to any defect, malfunction or wear of the RANGER.
To obtain warranty replacements or repair, the unit should be returned, freight prepaid, to an authorized warranty center or directly to: Zodiac Pool Care, Inc., 2028
NW 25th Avenue, Pompano Beach, FL 33069. Call for authorization at (800) 937-7873, in Canada (888) 647-4004. When submitting a claim, always supply serial number, evidence of purchase date, retailer and a brief description of the problems/defects encountered. Zodiac Pool Care, Inc. reserves the right to repair or replace all defective or worn parts covered by this Limited Warranty and return same to purchaser, freight collect.
Zodiac Pool Care, Inc. assumes no responsibility for any warranties or representations made by other individuals or businesses beyond the express terms contained in
this Limited Warranty.
This warranty gives you specific legal rights, and you may also have other rights which vary from state to state
For sale and use in the United States, Canada and Mexico only. This pool cleaner is not warranted or guaranteed outside of the United States, Canada or Mexico.
This pool cleaner is covered by one or more of the following Canadian and U.S. patents and Canadian registered design:
U.S. patent nos. 4642 833, 4742 593, 5450 645, 5418 995 and 4982 754.
Canadian patent nos. 1254 105, and 1256 262
Other Patents Pending.
2
SWIMMING POOL INSPECTION
Important
Vinyl liners are subject to deterioration or damage due to age, the effect of chemicals, corrosion or failure of
the supporting walls; as well as improper installation, maintenance or cleaning of the supporting walls or base.
Before installing the RANGER™, examine the interior of your pool carefully. If your vinyl liner is brittle or
has stones, wrinkles, roots or metal corrosion in contact with the underside of the liner, or has damage to the
base material or supporting walls, do not install the RANGER before having a qualified professional perform
the necessary repairs.
TABLE OF CONTENTS
Swimming Pool Inspection...................................................................
Prepare the Pool and Filtration System ................................................
Cleaner head and hose assembly ..........................................................
Installation ............................................................................................
Water Flow Adjustment ........................................................................
Maintenance and Care ..........................................................................
Troubleshooting Guide .........................................................................
Accessories ...........................................................................................
Quick Access Cassette System .............................................................
Parts Diagram .......................................................................................
Let Us Help...........................................................................................
3
4
4
6
9
10
11
11
12
14
15
Check that the following parts are included:
(1) Hose Protector
(1) Hose Connector
(1) Above-ground Cuff
(1) Regulator Valve
(3) Hose Deflectors
(1) Wheel Deflector
(1) Pool PulseTM
(10) Hose Lengths
(2) 45-degree Installation
Adapter Elbows
(1) Cleaner Head
(1) Slotted Disc
If assistance is required, call 1-888-786-7797. In Canada, please call 1-888-647-4004.
3
PREPARE THE POOL AND FILTER SYSTEM
Step 1:
Manually vacuum your pool.
Step 2:
Backwash or clean your filter according to the manufacturer’s
instructions.
Step 3:
Empty debris from the skimmer basket and the pump strainer basket.
Step 4:
Divert the return flow directional fitting toward the bottom of
the pool. (This prevents the pressure of the return water flow
from influencing the natural movement of the cleaner hose.)
Note: If your pool is equipped with a main drain, turn it off.
ASSEMBLY
RANGER™ Head Unit
Slide the disc over the base of the footpad. Be sure it fits properly in the grooves provided.
Slide the wheel deflector on to the female end of the hose that will attach to the cleaner
head.
Female End
Wheel Deflector
4
HOSE ASSEMBLY
For Oval Pools: Use enough hose sections to reach the farthest point in the
pool from the skimmer, plus two to three hose sections. Position the hose
deflectors as shown below.
For Larger Pools: For pools larger than 27 feet in diameter, purchase extra
hose sections and hose deflectors from your dealer.
For Round Pools: Follow the guide shown below. Connect the hose sections,
placing the hose deflectors as indicated in the illustrations below.
21’-27’
Diameter
(may
require
one
extra
hose
section)
To Ranger
To Skimmer
15’-18’ Diameter
To Ranger
To Skimmer
12’ Diameter
To Ranger
To Skimmer
Place the hose connector on the
male end of the hose.
The connector end of the hose
will attach to the regulator
valve.(Skimmer end)
5
INSTALLATION
Step 1:
Turn the filter system off. (Be sure you have turned off the main drain,
if your pool has one.)
GENERAL POOL SCHEMATIC
SKIMMER
IMPORTANT!
Return flow must be
directed toward pool
bottom as shown.
RETURN
FLOW
INLET
POOL
FILTER
PUMP
Step 2:
Select the fitting combination best suited to your skimmer from
figures A, B, C.
FIGURE A
Direct Method
Remove Skimmer
Basket
SKIMMER
CAUTION:
The regulator valve
MUST be used on
all installations
HOSE CONNECTOR
VALVE
ABOVE GROUND
SKIMMER CUFF
FIGURE B
With Skimmer Basket and Skim Vac Plate
(supplied with pool)
FIGURE C
Vacuum Line Installation
SKIMMER
ABOVE GROUND SKIMMER CUFF
HOSE CONNECTOR
SKIMMER
2-45°
FITTINGS
HOSE CONNECTOR
VACUUM
FITTING
SUPPLIED
WITH POOL
HOSE
HOSE
VALVE
SKIMMER
VACUUM
PLATE
SKIMMER
BASKET
6
COVER
PLATE
VALVE
45°
FITTING
SKIMMER
BASKET
Step 3:
To prevent losing prime to your pool pump, all air must be removed
from the hose and the RANGER™ head before connecting them to
your system.
Turn the filter system on.
Hold one end of the hose over the return inlet until a full stream of
water flows from the other end.
Step 4:
Keep both hose ends underwater and completely submerge the
RANGER head. When the bubbles have stopped flowing from the
head, connect the female end of the hose to the RANGER.
7
Step 5:
Cover the end of the 4 1/2” hose connector tightly with your
hand.
Move to the skimmer and connect the hose end to the fitting combination selected in
Step 2. Now insert the end of the assembly into the suction port of the skimmer.
8
Water Flow Adjustment
For proper performance, the water flow through the RANGER™ MUST be regulated.
Step 6:
Remove the RANGER™ head from the hose and attach the Pool
Pulse™ (Part No. 44805) to the hose underwater. Adjust regulator
valve as shown.
VALVE
CAP
POOL PULSE TM
IDEAL
TOO HIGH
TOO LOW
Adjust the regulator valve until the blue indicator of the Pool Pulse™ falls into the
clear range (when it is viewed from the side). Turn the valve cap clockwise to
increase flow; turn the cap counter-clockwise to decrease flow through the cleaner.
9
Step 7:
Remove the Pool Pulse™ from the hose end underwater and again
submerge the RANGER™ head. When the bubbles have stopped
flowing from the head, reconnect the head to the female hose end.
MAINTENANCE AND CARE
1. Remove the RANGER™ from the pool before super chlorinating or other
chemical balancing and re-install a minimum of four hours later.
2. Always disconnect the hose from the skimmer before backwashing your filter.
3. Off season storage: remove the disk and store it flat. Store the head in a warm
dry place.
4. Always store the hoses straight (in the original box if possible). Never coil the
hose. (Coiled hose may be straightened with hot water or by laying in the
sun on a warm deck for several hours).
10
CORRECT
X
INCORRECT
TROUBLESHOOTING
If you experience a problem with your Baracuda Ranger, please review
the installation section and ensure all steps have been followed correctly.
PROBLEM
SOLUTION
1. Machine does not move, or moves sluggishly.
• Ensure ideal flow is being attained using pool pulse.
Note: In water 600 F or less, it may be necessary to
increase flow to compensate for the reduced flexibility
of the hose and diaphragm.
• Check diaphragm for damage or wear
(see Care and Maintenance).
• Backwash filter and empty pump basket.
• Check for air in system. If water level in pump
basket drops, check hose connections, tighten
all fittings at pump, check gasket in pump
basket for wear.
2. Machine does not cover entire pool.
• Ensure ideal flow is being attained using pool pulse.
• Point return jets as far down as possible.
• Make sure hose does not have memory from
being coiled (see Care and Maintenance).
• Confirm proper hose length
• Confirm proper positioning of hose deflectors.
3. Machine sticks on ladder.
• Ensure ideal flow is being attained using pool pulse.
• Remove ladder if possible
• Install large wheel deflector
4. Machine sticks in steps.
• Ensure correct amount of hose is being used
(see Assembly). Shorten if neccessary.
• Reduce flow to low side of ideal range.
• Install large wheel deflector
5. Machine stays on walls or edge of pool.
• Reduce flow to low side of ideal range.
• Confirm proper positioning of hose deflectors.
If further assistance is required, please call 1-888-786-7797.
In Canada, call 1-888-647-4004
11
ACCESSORIES
PART ILLUSTRATION
PART NO.
DESCRIPTION
1. 24100
Return Line Diverter
Use when no other return inlet
directional fittings exist.
1
2. 90155
(for 2" return inlet)
2. 90153
(for 11/2" return inle)
2
3
4
12
Eyeball Return Line Diverter
Use to replace standard
directional inlet eyeballs
3. 26705
Leaf Catcher w/ 4 1/2" Connector
Use when heavy debris
or leaf situations exist.
4. 46155
Large Wheel Deflector
Use when extra clearance needed
at steps or other obstacles.
QUICK ACCESS CASSETTE SYSTEM
Unlike other competitive automatic pool cleaners, the
RANGER™ has the Quick Access Cassette System. This
unique feature allows almost instantaneous access to the
one moving part – the diaphragm.
Large foreign objects, such as children’s toys, tree
branches and rocks, should be removed manually from
your pool prior to operating an automatic pool cleaner. In
the event a foreign object does not get manually removed
and a blockage occurs, the Quick Access Cassette System
allows you the opportunity to remove the blockage or
check the diaphragm for damage in minutes at poolside.
FIGURE 1
STEP 1. REMOVAL OF DIAPHRAGM
Holding the frame assembly in one hand, grasp the cassestte handnut firmly and turn it counter-clockwise (Figure
1). Pull the complete cassette out of the frame (Figure 2).
Holding the cassette at each end, unscrew the cassette pipe
from the diaphragm chamber two full turns (Figure 3).
Grasp the lip of the diaphram and pull the diaphram out.
(The inner pipe will be attached and will make a loud
noise Figure 4). Pull the diaphram off of the inner pipe,
leaving the retaining ring on the diaphram (Figure 5).
STEP 2. EXAMINATION
FIGURE 2
FIGURE 3
Inspect the diaphragm for the blockage or damage. If
damage is evident, i.e., a cut or hole on the sides of the
diaphragm, return it, along with head of the unit
(excluding hoses), to your authorized Baracuda
warranty station for replacement.
If a blockage is apparent, grasp it and remove it. If this can’t
be done, a garden hose may be used to flush the obstacle
through. Do not use any sharp objects to probe or push
an obstruction as this may damage the diaphragm.
FIGURE 4
FIGURE 5
13
STEP 3. DIAPHRAGM ASSEMBLY
FIGURE 6
Prior to reinstalling the diaphragm, rinse the
diaphragm and the inner extension pipe thoroughly
to remove any grit or algae. Attach the diaphragm to
the inner extension pipe using the retaining ring
(Figure 6).
Slide the inner extension pipe into the diaphram
chamber.
FIGURE 7
Pressing on the underside of the diaphragm’s ridges,
push the diaphragm into the chamber (Figure 7).
Holding the cassette at each end, tighten the cassette
pipe until snug. Do not overtighten. (Figure 8).
Insert the cassette into the frame assembly and twist
the handnut clockwise until it locks into place
(Figure 9).
FIGURE 8
FIGURE 9
14
NOTE: The indicator line on the handnut will line up
with the center ridge on the frame assembly.
RANGER™ PARTS DIAGRAM
19
1
17
13
2
18
16
3
11
4
15
8
9
12
14
10
PART NO.
5
6
7
DESCRIPTION
1. 46055
Wheel Deflector - Medium
2. 72062
Cassette Pipe w/Handnut
3. 74000
Compression Ring
4. 81741
Diaphragm Chamber
5. 44310
Frame Assembly
6. 72855
Footpad
7. 48131
Disc
8. 73406
Threaded Inner Extension
9. 81600
Diaphragm Retaining Ring
10. 81710
Diaphragm
11. 72098
Cassette Complete
12. 58505
Regulator Valve - Complete
13. 44805
Pool PulseTM
14. 22410
45˚ Elbow (2)
15. 33800
Hose Protector
16. 64700
Above-ground ValveCuff
17. 33205
4 1/2” Connector
18. 24209
Hose Deflector (3 Pack)
19. 38205
White Hose Section
15
LET US HELP!If you are having a coverage problem you cannot solve, mail or fax us the following information along with a sketch of your pool shape,
including dished out or hopper areas if they exist, and indicating the location of skimmers, inlets, ladders, and the filter system.
Also include a brief description of the problem. (Send a photocopy and retain this page for future use.)
MAIL TO: ZODIAC POOL CARE, INC.
2028 NW 25th Avenue, Pompano Beach, FL 33069 OR FAX TO: (954) 486-2044
BARACUDA CANADA LIMITED
1260 Lakeshore Road East, #7 Mississaga, Ontario Canada L5E 3B8 1-888-647-4004
CUSTOMER NAME: ____________________________________TELEPHONE NO: (_______) ___________________
ADDRESS: ________________________________________________________________________________________
CITY: _________________________________________________STATE: ___________ ZIP: _____________________
SERIAL NO.:___________________________________________PURCHASED FROM: _________________________
POOL SIZE:____________________________________________PUMP SIZE (H.P.):____________________________
FILTER (circle one):
SAND
D.E.
CARTRIDGE
FILTER SIZE (or Model No.)_________________________
Indicate problem:
Zodiac Pool Care, Inc. 2028 NW 25th Avenue, Pompano Beach, Florida 33069
1-800-937-7873
Baracuda Canada Limited 1260 Lakeshore Road East, #7 Mississaga, Ontario Canada L5E 3B8
1-888-647-4004
© Copyright 2001
http://www.baracuda.com
95095