1
Moneris Vx810 Duet
OPERATING MANUAL
Software Version 3.36A
Documentation v1.1.01
Documentation Date: November 19, 2010
® Moneris and the Moneris Solutions design are registered trademarks of Moneris Solutions Corporation. All other marks or
registered trademarks are the marks or registered trademarks of their respective owners.
Copyright – © 2010 Moneris Solutions, 3300 Bloor Street West, Toronto, Ontario, M8X 2X2
All Rights Reserved. This manual shall not wholly or in part, in any form or by any means, electronic, mechanical, including
photocopying, be reproduced or transmitted without the authorized consent of Moneris Solutions.
For informational purposes only. Neither Moneris Solutions Corporation (“Moneris”) nor any of its affiliates shall be liable for
any direct, indirect, incidental, consequential or punitive damages arising out of use of any of the information contained in this
guide. Neither Moneris or any of its affiliates nor any of our or their respective licensors, licensees, service providers or suppliers
warrant or make any representation regarding the use or the results of the use of the information, content and materials contained
in this guide in terms of their correctness, accuracy, reliability or otherwise.
Your credit and/or debit card processing is separately governed by the Terms and Conditions of your Moneris VISA Merchant
Agreement, your Moneris MasterCard Merchant Agreement and/or your Moneris Debit Card and Terminal Agreement
(collectively the “Merchant Agreements”), as applicable with Moneris. It is the merchant’s responsibility to ensure that proper
card processing procedures are followed at all times. Please refer to your Merchant manuals and the Terms and Conditions of
your Merchant Agreement(s) for details. The Moneris Merchant Operating Manual is available for free download at
moneris.com/en/Support/Downloads/MerchantManuals.aspx.
Table of Contents
CHAPTER 1.
CHAPTER 2.
INTRODUCTION
1
1.1.
Getting Started
1
1.2.
Learning About the Terminal
1
1.3.
Caring for your Moneris Hardware
1
1.3.1.
Caring for the Terminal
1
1.3.2.
Caring for the Base
2
FEATURES AND PROCEDURES
3
2.1.
Standard Features
3
2.1.1.
Language Selection for Display, Receipts and Reports
3
2.1.2.
Card Information Security
4
2.1.3.
The Menu Feature
4
2.1.4.
Demo Mode
2.2.
2.3.
21
Optional Features
22
2.2.1.
Chip Cards
23
2.2.2.
Contactless Cards
23
2.2.3.
Signatureless Transactions
24
2.2.4.
Tip Processing
24
2.2.5.
Cashback
25
2.2.6.
Clerk ID Prompting and Clerk Sub-Totalling
25
2.2.7.
Invoice Number Prompting
26
2.2.8.
Personalized Receipts
26
2.2.9.
PAN Fraud Control
26
2.2.10. The Manager Password
26
2.2.11. Multi-Terminal Reporting
27
2.2.12. Private Label Cards
27
2.2.13. Corporate Cards
28
2.2.14. The Ernex Programs
28
Procedures
28
2.3.1.
Powering Up the Vx810 Duet
29
2.3.2.
Powering Down the Vx810 Duet
30
2.3.3.
Loading Paper in the Integrated Printer
30
2.3.4.
Selecting the Terminal Language
30
2.3.5.
Taking a Manual Imprint of a Credit Card
31
2.3.6.
Responding to Basic Transaction Prompts
32
Moneris Vx810 Duet Operating Manual v1.1.01
i
Table of Contents
CHAPTER 3.
2.3.7.
Entering a Tip Amount
33
2.3.8.
Entering a Cashback Amount on a Debit Transaction
34
2.3.9.
Entering the Clerk ID
35
2.3.10. Entering an Invoice Number
35
2.3.11. Finding a Transaction's Sequence and Orig Auth Numbers
35
2.3.12. Signing Credit Card Receipts
36
2.3.13. Reprinting Receipts
36
2.3.14. Printing a Cash Receipt
37
2.3.15. Entering Alphabetic Characters and Punctuation
37
2.3.16. Cancelling a Transaction
39
2.3.17. Cancelling a Report
39
2.3.18. Changing the Manager Password
39
2.3.19. Requesting a Code 10 Authorization
40
2.3.20. Dealing With Disputed Debit Transactions
40
THE MONERIS VX810 HARDWARE
41
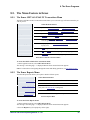
3.1.
The Moneris Vx810 Duet Terminal
41
3.2.
Setting up the Terminal
41
3.3.
The Communications Base
42
3.4.
The Communications Cables
42
3.4.1.
The Dial Communications Cable
42
3.4.2.
The Ethernet Communications Cable
43
3.5.
The Terminal Keypad
43
3.5.1.
Alphanumeric Keys
43
3.5.2.
The Function Keys
43
3.6.
The Magnetic Stripe Card Reader
45
3.7.
The Chip Card Reader
45
3.8.
The Integrated Printer
46
3.9.
The External PINpad
46
3.9.1.
Setting up the External PINpad
46
3.9.2.
Transactions With the PINPad
47
3.10. The Modular Contactless Reader
CHAPTER 4.
ii
47
3.10.1. Contactless Transactions Allowed
47
3.10.2. Maximum Contactless Dollar Value (CDV)
47
CONFIGURING YOUR TERMINAL
49
4.1.
Using Quick Setup
49
4.1.1.
50
Options for Each Parameter
Moneris Vx810 Duet Operating Manual v1.1.01
Table of Contents
4.1.2.
Parameters
50
Configuring Communications
51
4.2.1.
Configuring Dial Communications
51
4.2.2.
Configuring Dynamic IP Communications
52
4.2.3.
Configuring Static IP Communications
53
4.2.4.
Configuring Dial Backup Support for IP
54
4.3.
Configuring Your Merchant ID and Terminal ID
54
4.4.
Configuring the External PINPad
55
4.5.
Configuring the Modular Contactless Reader
55
4.6.
Configuring Receipt Printing
56
4.6.1.
Enable the Printer
56
4.6.2.
Configure Receipt Headers and Footers
56
4.6.3.
Enable Large Amount Printing
56
4.6.4.
Enable Printing of Customer Copies
56
4.6.5.
Enable Re-Printing of Customer Copies
56
4.6.6.
Configure the Print Prompt Beep Delay
56
4.2.
4.7.
4.8.
4.9.
Configuring Tip Processing
57
4.7.1.
Basic Tip Processing
57
4.7.2.
Enhanced Tip Processing
57
4.7.3.
Gratuity Guidelines Printing on Pre-Authorization Receipts
57
4.7.4.
Tip Percentage on Purchases
58
Configuring the Cashback Feature
58
4.8.1.
Cashback Amount Prompting on Debit Transactions
58
4.8.2.
Changing Cashback Amounts
58
4.8.3.
Setting the Cashback Limit
58
Configuring Clerk ID Prompting and Clerk Sub-Totalling
58
4.9.1.
Clerk ID Prompting
58
4.9.2.
Using a Default Clerk ID
58
4.9.3.
Clerk Sub-Totalling
59
4.9.4.
Adding Clerk IDs (including the Default Clerk ID)
59
4.9.5.
Deleting Clerk IDs
59
4.10. Configuring Invoice Number Prompting
60
4.11. Configuring Multi-Terminal Reporting
60
4.11.1. Adding a Terminal Name
60
4.11.2. Deleting a Terminal Name
61
4.12. Configuring Private Label Cards
Moneris Vx810 Duet Operating Manual v1.1.01
61
iii
Table of Contents
4.13. Configuring Corporate Cards
CHAPTER 5.
CHAPTER 7.
iv
4.13.1. Enabling the Corporate Card Feature
62
4.13.2. Enabling Tax Amount Prompting
62
4.13.3. Configuring Tax Type and Tax Registration Numbers
62
4.14. Initializing Your Terminal
62
FINANCIAL TRANSACTIONS
65
5.1.
Card and Transaction Types
65
5.2.
Transaction General Guidelines
65
5.3.
Card Entry Options
66
5.3.1.
Magnetic Stripe Cards - Swipe
66
5.3.2.
Chip Cards - Insert
66
5.3.3.
Contactless Cards - Tap
66
5.3.4.
Manual Entry
66
Transaction Procedures
66
5.4.1.
Processing a Purchase
67
5.4.2.
Processing a Refund
67
5.4.3.
Processing a Correction (Void)
67
5.4.4.
Processing a Pre-Authorization
68
5.4.5.
Processing a Pre-Authorization Completion
69
5.4.6.
Processing a Pre-Authorization Deletion
70
5.4.7.
Processing an Advice
70
5.4.8.
Transacting a Purchase on a Corporate Card
71
5.4.9.
Transacting a Payment on a Private Label Card
72
5.4.10. Manually Processing Credit Card Transactions
73
5.4.
CHAPTER 6.
62
ADMIN TRANSACTIONS
75
6.1.
Logging On
75
6.2.
Logging Off
75
6.3.
Re-Initializing the Terminal
76
6.4.
Demo Mode Transactions
76
6.4.1.
Financial Transactions
76
6.4.2.
Functions
77
6.4.3.
Entering Demo Mode
77
6.4.4.
Exiting Demo Mode
78
REPORTS
79
7.1.
Stored Transactions Report
79
7.2.
Merchant Sub-Totals Report
79
Moneris Vx810 Duet Operating Manual v1.1.01
Table of Contents
7.3.
CHAPTER 8.
Clerk Sub-Totals Report
80
7.3.1.
For One or More Clerks
80
7.3.2.
For All Clerks
81
7.4.
Deposit Totals Report
81
7.5.
Multi-Terminal Deposit Totals Report
81
7.6.
Pre Auth Transactions Report
82
7.7.
Tip Report
82
7.8.
Batch Totals Report
83
7.9.
Terminal Parameters Report
83
7.10. EMV Parameters Report
83
7.11. Private Label Card Transactions on Reports
84
THE ERNEX PROGRAMS
85
8.1.
Enabling Ernex
85
8.2.
Ernex Transactions
85
8.2.1.
Activate or Load Value on an Ernex Card
85
8.2.2.
Ernex Transaction With a Balance Due
86
8.2.3.
Voiding an Ernex Gift or Loyalty Transaction
86
8.2.4.
Ernex Card Inquiry
87
8.2.5.
Reprinting an Ernex Receipt
88
8.3.
8.4.
8.5.
8.6.
Gift Card Transactions
88
8.3.1.
Ernex Purchase With a Gift Card
88
8.3.2.
Deactivate an Ernex Gift Card
89
8.3.3.
Ernex Refund With a Gift Card
89
Loyalty Card Transactions
90
8.4.1.
Purchase With an Ernex Loyalty Card (Point Accumulation)
90
8.4.2.
Deactivate an Ernex Loyalty Card
91
8.4.3.
Refund with an Ernex Loyalty Card
91
8.4.4.
Ernex Redemption With a Loyalty Card
92
The Menu Feature in Ernex
93
8.5.1.
The Ernex GIFT & LOYALTY Transactions Menu
93
8.5.2.
The Ernex Reports Menu
93
8.5.3.
The Ernex Setup Menu
94
Ernex Admin Transactions
94
8.6.1.
Ernex Batch Close
94
8.6.2.
Initialization to the Ernex Host
95
Moneris Vx810 Duet Operating Manual v1.1.01
v
Table of Contents
8.7.
8.8.
8.9.
CHAPTER 9.
Ernex Reports
96
8.7.1.
Ernex Transaction List
96
8.7.2.
Ernex Transaction Inquiry
96
8.7.3.
Clerk Sub-Totals Report for Ernex Transactions
97
8.7.4.
Configuration List for Ernex
98
Ernex Configuration
99
8.8.1.
Ernex Printer and Receipt Parameters
99
8.8.2.
Ernex Merchant Parameters
99
8.8.3.
Ernex Communications Parameters
101
8.8.4.
Ernex Terminal Parameters
102
8.8.5.
Adding Clerk IDs to the Ernex Gift & Loyalty Application
103
8.8.6.
Deleting Clerk IDs From the Ernex Gift & Loyalty Application
103
Ernex Demo Mode
104
8.9.1.
Entering Ernex Demo Mode
104
8.9.2.
Exiting Ernex Demo Mode
104
END-OF-DAY PROCEDURE
107
9.1.
Processing a Batch Close
107
9.1.1.
Merchant Close
107
9.1.2.
System Close
108
9.2.
Processing a Batch Clear
108
9.3.
Processing a Batch Review
108
9.4.
Processing a Multi-Terminal Batch Close
109
9.4.1.
By Terminal Name
109
9.4.2.
For All Terminals
110
CHAPTER 10. TROUBLESHOOTING
vi
111
10.1. Additional Documentation
111
10.2. Telephone Assistance
111
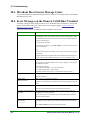
10.3. Merchant Direct Secure Message Centre
112
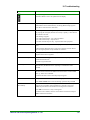
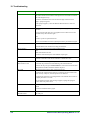
10.4. Error Messages on the Moneris Vx810 Duet Terminal
112
10.5. Ernex Error Messages on the Vx810 Duet Terminal
117
10.6. Solving Hardware Problems
117
Moneris Vx810 Duet Operating Manual v1.1.01
1. Introduction
1.1. Getting Started
You must prepare your terminal before you process transactions:
1. Set up the hardware.
2. Configure the terminal.
3. Initialize the terminal.
4. Log on to the Moneris Host.
Once the terminal is ready to use, practice performing transactions in Demo Mode to ensure that any
errors made while learning to perform transactions do not affect your business account.
1.2. Learning About the Terminal
The Moneris Vx810 Duet is an all-in-one POS solution consisting of the lightweight Vx810 terminal,
incorporating a display screen and keypad, that connects to the Duet base containing the printer and
communications hardware. The Duet can be operated with two optional devices: an external PINPad and
a modular contactless reader.
The display screen displays prompts for you to respond to as well as other prompts for the customer.
During transactions that require customer input, you will need to pass the PINPad back and forth so that
you and the customer can view prompts and respond to them using the keypad.
The Vx810 Duet supports magnetic stripe and chip cards for debit and credit transactions, contactless
cards for credit (and some debit) transactions, and magnetic stripe cards for purchasing card transactions.
To introduce yourself to the terminal, read these sections:
•
Moneris Vx810 Duet Hardware
•
Features and Procedures
•
Demo Mode
•
The Menu Feature
1.3. Caring for your Moneris Hardware
Proper care of your terminal and base will help ensure uninterrupted service. Here are some
recommendations for maintaining the hardware in good working order:
IMPORTANT: Misuse of equipment can result in replacement liability.
•
DO clean the hardware components with a dry or slightly damp cloth rinsed in a mild soap solution.
•
Do NOT use solvents, detergents, cleaning fluids or abrasives on any of the hardware components.
•
Avoid spilling liquids on components.
•
Do NOT expose components to extreme temperatures.
1.3.1. Caring for the Terminal
•
Clean the Magnetic Stripe Reader (MSR) periodically, using a Moneris POS cleaning card. These
cards can be ordered online at shopmoneris.com or by phone at 1-866-421-1666.
Note: Do NOT use the MSR cleaning card in the Chip Card Reader.
Moneris Vx810 Duet Operating Manual v1.1.01
1
1. Introduction
•
It is recommended that merchants obtain their POS stationery and paper rolls from Moneris to ensure
that these supplies comply with the applicable specifications. Contact the Moneris Merchant Service
Centre to obtain additional supplies for your terminal or order online at shopmoneris.com.
•
Load the paper into the printer correctly.
1.3.2. Caring for the Base
Avoid unnecessary movement of the base to prevent accidental disconnection of the power cables.
IMPORTANT: You must use the exact power adaptor provided with the terminal by Moneris
Solutions. Failure to do so may affect the operability of, or cause damage to the terminal. Moneris
Solutions shall have no liability whatsoever for a failure to follow these instructions.
2
Moneris Vx810 Duet Operating Manual v1.1.01
2. Features and Procedures
The Vx810 Duet terminal can be set up to access and process a variety of transactions for a variety of
card types. The terminal supports magnetic stripe and chip cards for debit and credit transactions,
contactless cards for credit (and some debit) transactions, and magnetic stripe cards for purchasing card
transactions.
2.1. Standard Features
These features are available and enabled on all Moneris Vx810 Duet terminals.
•
Language selection
•
Card information security
•
Communications status
•
Menu-driven interface
•
Demo Mode
2.1.1. Language Selection for Display, Receipts and Reports
The Moneris Vx810 Duet 8300 supports two language selections: 1) Merchant Language and 2)
Customer Language.
Merchant Language
Supported languages:
1. English
2. French
Used to:
1. display merchant prompts
2. print merchant copies of receipts
3. print reports
Initial setting:
Set on the Moneris Host.
Changing the language:
The Merchant Language can be changed at any time. For details, see Selecting the Terminal Language.
Customer Language
Supported languages:
1. English
2. French
Used to:
1. display customer prompts
Moneris Vx810 Duet Operating Manual v1.1.01
3
2. Features and Procedures
2. print copies of customer receipts
Initial setting:
Default is set by the Merchant Language but is set for each individual transaction based on the Language
Code on the customer's card.
Changing the language:
If the Language Code is not present on the customer's card or if the code is neither English nor French,
the customer is prompted to select either English or French. For details, see Selecting the Terminal
Language.
2.1.2. Card Information Security
To reduce the risk of fraudulent card use, masking and/or truncation are applied to card numbers and
expiry dates printed on receipts and reports.
Masking replaces a card's numbers (except for the last 4) with *'s. For example, the card number 1234
5678 9012 3456 is printed as ************3456 .
If a card number is truncated, only the last 4 digits are printed. For example, the card number 1234 5678
9012 3456 appears as 3456.
Card Numbers on Receipts
Numbers of debit, credit and gift cards are always masked on both Merchant and Customer copies of
transaction receipts.
Card Numbers on Reports
Card numbers are truncated on all reports containing transaction details.
Reports that require the manager password, e.g. Batch Review, display the entire card number but the
resulting report prints the truncated card number.
Expiry Date on Receipts
The credit card expiry date is not printed on receipts for credit card transactions.
Expiry Date on Reports
The credit card expiry date is printed in full on all reports containing transaction details.
2.1.3. The Menu Feature
All transactions and functions can be accessed through menus and sub-menus starting at the applications
menu.
Navigating through menus
To scroll down:
Select the
icon (press the first purple key on the left) to move down to the next menu screen.
To scroll up:
1. Press the CORR key to change the direction of the arrow on the display screen.
2. Select the
4
icon (press the first purple key on the left) to move up to the next menu screen.
Moneris Vx810 Duet Operating Manual v1.1.01
2. Features and Procedures
To select an item:
Press the function key beside the menu item (e.g., on the transactions menu, press F1 to select Purchase).
Navigating through parameters
To move to the next feature:
•
Select Next.
To move back to the last feature displayed
•
Select Previous.
Changing the value of a parameter
1. Select Edit.
2a. Select Next to scroll through the values and select Slct to select a displayed value.
OR
2b. Key in a new value and press OK.
3. Select Next to move to the next feature.
When you are finished making changes:
1. Select Exit. The "Save Changes?" prompt appears.
2. Select OK. The menu re-appears.
Icons displayed on the menus
Icon
Indicates:
CommServer is being used for Ethernet
communications
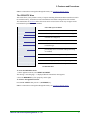
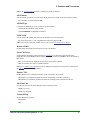
The Applications Menu
The applications menu gives you access to the applications available on the terminal. When the terminal
is not performing any transactions or functions and has been idle for a pre-set period of time, it displays
the applications menu.
MM/DD/YY
HH:MM
F1
DEBIT & CREDIT
F2
GIFT & LOYALTY
F3
F4
The Applications Menu
To access the applications menu from any screen:
•
Press the * (ASTERISK) key.
Note: For instructions on navigation through the menus, see Navigating through menus.
Moneris Vx810 Duet Operating Manual v1.1.01
5
2. Features and Procedures
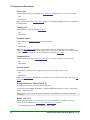
The Transactions (DEBIT & CREDIT) Menu
This transactions menu allows you to select the type of transaction you want to process. The menu also
provides access to the CONFIGURATION menu (press the OK key) and to the REPORTS menu (press
the 1st purple key on the right). Some menu items may not appear on the terminal until a specific feature
is enabled.
MM/DD/YY
HH:MM
Select this menu item to:
Purchase
process a Credit or Debit Purchase
Pre Auth
open the Pre Auth menu
Refund
process a Credit or Debit Refund
Advice
process a Credit Advice
Correction
Batch Close
Batch Review
Batch Clear
process a Credit or Debit Correction (void)
process a Batch Close
search for a transaction in the open batch
clear the batch on the terminal
The Transactions Menu
To access the transactions (DEBIT & CREDIT) menu:
1. On the applications menu, select DEBIT & CREDIT.
To return to the applications menu:
•
Press the * (ASTERISK) key.
Note: For instructions on navigation through the menus, see Navigating through menus.
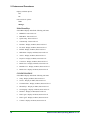
The Pre Auth Menu
This menu allows you to select the type of pre-authorization transaction you wish to process.
Pre Auth
Pre Auth
Completion
Select this menu item to:
process a Pre-Authorization
process a Pre-Authorization Completion
Del Pre Auth
process a Pre-Authorization Deletion
Pre-Auth Rpt
print the Pre-Auth Transactions Report
The Pre Auth Menu
To access the Pre Auth menu:
1. On the applications menu, select DEBIT & CREDIT.
The message "Activating App..." is displayed then the transactions menu appears.
2. Select Pre Auth.
To return to the applications menu:
•
6
Press CANC ANNUL then press the * (ASTERISK) key.
Moneris Vx810 Duet Operating Manual v1.1.01
2. Features and Procedures
Note: For instructions on navigation through the menus, see Navigating through menus.
The REPORTS Menu
This menu allows you to produce a variety of reports containing information about transactions stored in
the terminal memory, transactions stored on the Moneris host and the configuration of the terminal.
The terminal must be initialized before this menu can be accessed. Some items may not appear on the
terminal until a specific feature is enabled.
Select this report to obtain:
REPORTS
a list of all transactions in the terminal memory
Stored Trans
a list of deposit totals by card and transaction type
Deposit Totals
a list of totals for one or more clerks (only active if
clerk IDs are configured)
Clerk SubTotals
a Deposit Totals report for one or more terminals
Multi Terminal
a list of totals in the current batch by card and
transaction type
Merch SubTotals
a list of tip activity in the current batch by clerk and
period (only active if Clerk IDs and Tip Processing
are enabled)
Tip Report
Terminal Parms
a list of the current settings for each parameter
Terminal Stats
a list of the number of occurrences of error situations
a list of chip program parameters by card type
EMV Param Rpt
data on the last transaction if a chip card was used
EMV Diagnostics
The REPORTS Menu
To access the REPORTS menu:
1. On the applications menu, select DEBIT & CREDIT.
The message "Activating App..." is displayed then the transactions menu appears.
2. Press the REPORTS key (first purple key on the right).
To return to the applications menu:
Press CANC ANNUL then press the * (ASTERISK) key.
Note: For instructions on navigation through the menus, see Navigating through menus.
Moneris Vx810 Duet Operating Manual v1.1.01
7
2. Features and Procedures
The CONFIGURATION Menu
This menu allows you to configure a number of features and procedures and perform administrative
functions.
CONFIGURATION
Setup
Servers
Terminal Name
Menus/Keys
Set Language
Select this menu item to:
configure parameters on the terminal
configure server/clerk IDs
configure multi-terminal names
configure password level on menus
set the display language
Initialize
initialize the terminal to the Moneris host
Host Logon
log the terminal on to the Moneris host
Host Logoff
log the terminal off of the Moneris host
About
Contrast
display application version information (press OK to exit)
increase or decrease the contrast of the display
(The display changes immediately.)
The CONFIGURATION Menu
To access the CONFIGURATION menu:
1. On the applications menu, select DEBIT & CREDIT.
The message "Activating App..." is displayed then the transactions menu appears.
2. Press OK.
To return to the applications menu:
•
Press CANC ANNUL then press the * (ASTERISK) key.
Note: For instructions on navigation through the menus, see Navigating through menus.
8
Moneris Vx810 Duet Operating Manual v1.1.01
2. Features and Procedures
The Setup Menu
This menu allows you to set values for a number of parameters on your terminal. Some menu items may
not appear on the terminal until a specific feature is enabled.
Select this menu item to:
SETUP
Demo
Printer
enter and exit Demo Mode
configure the receipt format
Terminal
configure features on the terminal
Merchant
configure merchant-related parameters
Comm
configure communications-related parameters
Host
configure communications type parameters
Merchant IDs
configure additional receipt parameters
IP Hosts
Do Not Use
Lock Kbd
Do Not Use
Date/Time
Do Not Use
Cashback
Edit Cards
configure Cashback parameters
Do Not Use
The Setup Menu
To access the Setup menu:
1. On the applications menu, select DEBIT & CREDIT.
The message "Activating App..." is displayed then the transactions menu appears.
2. Press OK to display the CONFIGURATION menu.
3. Select Setup.
4. At the "Password:" prompt, key in the manager password and press OK.
To return to the applications menu:
•
Press CANC ANNUL then press the * (ASTERISK) key.
Note: For instructions on navigation through the menus, see Navigating through menus.
Terminal Parameters (Edit Terminal Menu)
The Edit Terminal menu allows you to edit Terminal parameters.
Transactions menu (DEBIT & CREDIT) > CONFIGURATION menu (pres OK) > Setup menu >
Terminal > Edit Terminal menu
IMPORTANT: Do Not Edit the parameters in this menu unless directed by Moneris. Only some of
the menu's parameters are listed below. You can ignore all other parameters.
Pin Baud
Configures the terminal baud for use in standalone mode or with the external PINPad.
Moneris Vx810 Duet Operating Manual v1.1.01
9
2. Features and Procedures
Key in 2 for standalone (default).
Key in 5 for PINPad.
Pin Format
Configures the terminal format for use in standalone mode or with the external PINPad.
Key in 0 for standalone (default).
Key in 4 for PINPad.
Tip% nn.nn
Sets a predetermined percentage of tip automatically added to Purchase transaction amounts (0-9999). If
set to 0 (default) no tip is added.
Key in a percentage and press OK.
Tip Processing
Enables/disables tip prompting on Purchase, Pre-Authorization Completion and Advice transactions.
Enables/disables printing of the tip line on Pre-Authorization transaction receipts.
None (default)
On - Prompt
Sug Tip% 1 nn
default = 15
Sug Tip% 2 nn
default = 20
Sug Tip% 3 nn
default = 25
Determine suggested tip amounts for gratuity guidelines printed on Pre-Authorization receipts.
Note: The Tip Processing and Gratuity Guide? parameters must be enabled.
Determine the suggested tip amounts displayed when Enhanced Tip Processing is enabled
(EnhancedTipProc parameter is set to On).
Note: If all 3 parameters are set to 0, selecting % on Enhanced Tip Processing prompts the customer to
key in a % amount. The Gratuity Guide? parameter does not need to be enabled for Enhanced Tip
Processing use.
Key in a percentage and press OK.
Manager Pwd
Changes the manager password.
Key in a password and press OK.
Clrk/Srvr Mode
Enables/disables the Clerk Id: prompt.
0 - None (default)
2 - Prompt
10
Moneris Vx810 Duet Operating Manual v1.1.01
2. Features and Procedures
Note: If the Use Def. Clrk? parameter is enabled, the prompt is disabled.
Idle Timeout
Sets the number of seconds of error message display before the terminal returns the card entry prompt.
Key in number of seconds and press OK.
PINPad Type
Configures the PINPad type, if one is connected to the terminal.
Select None for standalone mode (default)
Select SC5000EMV if a PINPad is connected
PABX Code
Sets the value of the PABX prefix that must be dialled to access an outside line.
Key in the prefix (min. 1, max. 4 alphanumeric characters) and press OK.
Note: This value is listed as the "PABX Access Code" on the Terminal Parameters Report.
Histories Limit
Do Not change this parameter unless directed to do so by Moneris.
Show CB Choices
Enables/disables the display of debit transaction Cashback pre-set amounts on the terminal and, if
applicable, the external PINPad. On the terminal, customers can also select Other to key in an amount of
their choice.
On - pre-set amounts are displayed for selection by the customer (default)
Off - the customer must key in a Cashback amount
Note: The CashBack Option parameter must be enabled. The desired pre-set amounts are configured via
the Amt 1, Amt 2 and Amt 3 parameters.
Enable CTLS
Enables/disables use of a modular contactless reader connected to the terminal.
On (default if your Moneris merchant account is configured for contactless reader use)
Off (default if your Moneris merchant account is NOT configured for contactless reader use)
Idle Time Fmt
Sets the time format of the clock displayed on the transactions menu.
24 Hr (e.g. 14:24)
12 Hr (e.g. 02:24pm)
Terminal Beep
Enables/disables key beeping.
On (default)
Off
Moneris Vx810 Duet Operating Manual v1.1.01
11
2. Features and Procedures
Process Tax
Enables/disables tax amount prompting on Purchasing Card transactions (the "xST Amt: $" prompt).
On
Off (default)
Note: You must enable the Commercial on? parameter. The Tax Type (xST) parameter is configured on
the Moneris host.
Trning Settle?
Enables/disables settlement during Demo Mode.
On
Off (default)
CashBack Option
Enables/disables the Cashback Option on Debit transactions.
On
Off (default)
Note: The Show CB Choices parameter must be enabled. You can configure the pre-set Cashback
amounts (Amt 1, Amt 2, Amt 3) that are displayed for selection by the customer. You can also configure
the maximum dollar amount the customer can request as Cashback (Amt Limit).
Commercial On?
Enables/disables processing of Purchasing Cards (a.k.a., Commercial Cards or Corporate Cards).
On
Off (default)
Gratuity Guide?
Enables/disables printing of three suggested tip amounts on Pre-Authorization receipts.
On
Off (default)
Note: The Tip Processing parameter must be enabled. You can configure the amounts via the three Sug
Tip% parameters.
Receipt Parameters Menu (Edit PCT)
The Edit PCT menu allows you to edit Printer parameters.
Transactions menu (DEBIT & CREDIT) > CONFIGURATION menu (press OK) > Setup menu >
Printer > Edit PCT menu
IMPORTANT: Only some of the menu's parameters are listed below. You can ignore all other
parameters.
Header Line 2 to 5
The third through sixth lines of text that appear after your merchant name and address at the top of
receipts. You may also edit the Header Line 1 and Header Line 6 parameters.
Key in alphanumeric text (max. 40 characters) and press OK.
12
Moneris Vx810 Duet Operating Manual v1.1.01
2. Features and Procedures
Footer 1 to 3
The text that appears at the bottom of the receipt. You may also edit the Footer 4 parameter.
Key in alphanumeric text (max. 40 characters) and press OK.
Customer Copy
Determines whether to print a Customer copy of the receipt after the Merchant copy on credit non-EMV
(non-chip) transactions.
None - no customer copy prints
Confirm – “Prt Cust Cpy?” prompts for confirmation to print copy (YES/NO)
Automatic - automatically prints the customer copy (default)
Note: The customer copy is always printed for Debit and EMV (chip) transactions and, when set to
Confirm, the terminal does not prompt. On signatureless transactions, the customer copy may or may not
be printed depending on the card being used and how your terminal is configured
Reprnt Cust Copy
Determines whether a Customer copy of the receipt is printed in addition to the Merchant copy when
reprinting receipts.
None - only the Merchant copy prints (default)
Confirm - "Prnt Cust Copy?" prompts for confirmation to print the Customer copy (YES/NO)
Automatic (both the Merchant copy and the Customer copy will print)
Note: On signatureless transactions, the Customer copy is always printed instead of the Merchant copy.
Prompt Beep Delay
Number of seconds to wait after beeping and displaying the “Tear Receipt; Press OK key” message
before printing the customer receipt.
Key in the number of seconds and press OK.
Default = 120 seconds.
Enable Printer
Enables/disables the printer.
On (default)
Off
Note: Selecting Off results in the "printer disabled" message any time a report should be printed or
"Printer Error" any time a financial transaction is attempted.
Large Amt Print
Determines whether to print double-wide characters for amount lines, the Sequence number and the
Original Auth #.
On (default)
Off
Moneris Vx810 Duet Operating Manual v1.1.01
13
2. Features and Procedures
Merchant Parameters (Edit Format Menu)
Use the Edit Format menu to edit Merchant parameters.
Transactions menu (DEBIT & CREDIT) > CONFIGURATION menu (press OK) > Setup menu >
Merchant > Edit Format menu
IMPORTANT: Only some of the menu's parameters are listed below. You can ignore all other
parameters.
Term Id
The Moneris Terminal ID.
Key in the Terminal ID and press OK.
Merch Num.
Your Moneris Merchant ID.
Key in the Merchant ID and press OK.
Default Clerk
The Clerk ID that will be used for all transactions when the Use Def. Clrk? parameter is enabled.
Key in the alphanumeric Clerk ID and press OK.
GST Tax Reg #
QST Tax Reg #
PST Tax Reg #
HST Tax Reg #
Your tax registration number for the tax type.
Key in your alphanumeric tax registration number and press OK.
Tax Type
The type of tax you are required to apply to all purchases.
0 - No Tax (default)
1 - HST
2 - GST Only
3 - PST/GST
4 - QST/GST
EnhancedTipProc
Enables/disables the Enhanced Tip Processing feature.
On
Off (default)
TipNone
Enables/disables the display of the No Tip option on Enhanced Tip Processing.
14
Moneris Vx810 Duet Operating Manual v1.1.01
2. Features and Procedures
On
Off (default)
Note: The EnhancedTipProc parameter must be enabled.
Ask Inv Num?
Enables/disables the Invoice #: prompt.
On
Off (default)
Chip on PreAuth
Enables/disables the use of chip cards for Pre-Authorization transactions. This parameter does not affect
the use of magnetic stripe cards for Pre-Authorization transactions.
On
Off (default)
Note: Many chip cards require a PIN instead of a signature from the cardholder. If a chip and PIN card is
used during a Pre-Authorization, the cardholder MUST be present to enter their PIN during the
transaction. For this reason, some businesses may wish to disable the use of chip cards for PreAuthorization transactions. If the Chip on PreAuth parameter is set to Off, the "Swipe Card" prompt
appears instead of the "Swipe or Insert Card" prompt during a Pre-Authorization, and you can swipe the
card even if it is a chip card.
DispEMVPreAuth
Do Not change this parameter unless directed to do so by Moneris.
Use Def. Clrk?
Enables/disables the automatic use of the Default Clerk ID.
On
Off (default)
Note: The Default Clerk parameter must be configured.
Dial Communications Parameters (Edit CPT Menu)
Use the Edit CPT menu to edit dial communications parameters.
Transactions menu > CONFIGURATION menu (press OK) > Setup menu > Comm > Edit CPT
menu
IMPORTANT: Some parameters cannot be edited unless the terminal batch is empty. If the "Edit
Not Allwd Batch Not Empty" message appears, perform a Batch Close then try editing the
parameter again.
Pri Auth Phone
The Moneris phone number is automatically loaded into this parameter during initialization.
If blank, key in the Moneris authorization phone number and press OK.
Sec Auth Phone
The Moneris phone number is automatically loaded into this parameter during initialization.
Moneris Vx810 Duet Operating Manual v1.1.01
15
2. Features and Procedures
Pri Sett Phone
The Moneris phone number is automatically loaded into this parameter during initialization.
Sec Sett Phone
The Moneris phone number is automatically loaded into this parameter during initialization.
Pri Init Phone
The Moneris initialization phone number.
If blank, key in the Moneris initialization phone number and press OK.
Sec Init Phone
This is the same value as Pri Init Phone.
Baud Rate
Sets the data transmission rate of the dial modem.
300 BAUD
1200 BAUD (default)
2400 BAUD
4800 BAUD
9600 BAUD
14400 BAUD
Mdm FastConnect
Do Not change this parameter unless directed by Moneris.
Blind Dial
Allows the terminal to dial without checking for a dial tone.
On
Off (default)
Dial Type
Sets the dial type.
Tone (default)
Pulse
Moneris Host Parameters (Edit Hosts Menu)
Use the Edit Hosts menu to edit Moneris Host parameters.
Transactions menu > CONFIGURATION menu (press OK) > Setup menu > Host > Edit Hosts
menu
IMPORTANT: Some parameters cannot be edited unless the terminal batch is empty. If the "Edit
Not Allwd Batch Not Empty" message appears, perform a Batch Close then try editing the
parameter again.
16
Moneris Vx810 Duet Operating Manual v1.1.01
2. Features and Procedures
Comm Link Type
Sets the primary communications type.
Dial - sets dial as the primary communications type
CommServer - sets Ethernet as the primary communications type (default)
Alternate Dial - Do Not Use
ECRi - Do Not Use
Backup Support
If the terminal is configured for Ethernet communications, this parameter can be used to switch the
terminal to dial communications if Ethernet communication is not available.
Note: The dial communications cable must be connected to the Duet base and a functioning telephone
line before the terminal can successfully use dial communications as a backup.
None - If Ethernet communication is not available, the terminal cannot process transactions (default)
Auto Backup - If Ethernet communication is not available, the terminal displays "IP Connection
Failed" then automatically attempts to use the dial line to communicate with the Moneris Host.
Prompt Backup - If Ethernet communication is not available, the terminal displays "Use Backup Com
Confirm". Select Yes to have the terminal attempt to use the dial line to communicate with the Moneris
Host OR select NO to cancel the transaction. The "IP Connection Failed" message appears then the
terminal display the transactions menu.
Switch Backup - Moneris does NOT recommend using this setting. If Ethernet communication is not
available, the terminal switches to dial communications and stays on dial communications until this
parameter is changed to None, Auto Backup or Prompt Backup.
Use Backup - The terminal always uses dial communications.
Settle Comm Type
Sets the primary communications type for settlement. This must match the Comm Link Type parameter
value.
Dial - sets dial as the primary communications type
CommServer - sets Ethernet as the primary communications type
Alternate Dial - Do Not Use
ECRi - Do Not Use
Card Imprt
Enables/disables the “Imprint Card Press OK Key” prompt. This prompt may appear during a Purchase or
Refund transaction.
Key in 0 to turn the feature off
Key in 1 to turn the feature on
Additional Merchant Parameters (Edit MIT Menu)
Use the Edit MIT menu to edit additional merchant-related parameters.
Transactions menu (DEBIT & CREDIT) > CONFIGURATION menu (press OK) > Setup menu >
Merchant IDs > Edit MIT menu
IMPORTANT: Only some of the menu's parameters are listed below. You can ignore all other
parameters.
Moneris Vx810 Duet Operating Manual v1.1.01
17
2. Features and Procedures
Merchant Number
Do Not Change .
Header Line 1
First line of text that appears after your merchant name and address at the top of receipts. You can also
edit the Header Lines 2 through 5 parameters.
Key in alphanumeric text (max. 40 characters) and press OK.
Header Line 6
Second line of text that appears after your merchant name and address at the top of receipts. You can also
edit the Header Lines 2 through 5 parameters.
Key in alphanumeric text (max. 40 characters) and press OK.
Footer 4
Last line of text that appears at the bottom of receipts. You can also edit the Footer Lines 1 through 3
parameters.
Key in alphanumeric text (max. 40 characters) and press OK.
Ethernet Communications Parameters (Edit ECT Menu)
Use the Edit ECT menu to display the Ethernet communications parameters.
Transactions menu (DEBIT & CREDIT) > CONFIGURATION menu (press OK) > Setup menu >
IP Hosts > Edit ECT
IMPORTANT: Do Not Edit the parameters in this menu unless directed by Moneris. Only some of
the menu's parameters are listed below. You can ignore all other parameters.
Pri Auth URL
The URL is automatically loaded into this parameter during initialization.
Pri Auth Port
The port number is automatically loaded into this parameter during initialization.
Sec Auth URL
The URL is automatically loaded into this parameter during initialization. This is the same value as
Pri Auth URL.
Sec Auth Port
The port number is automatically loaded into this parameter during initialization. This is the same value
as Pri Auth Port.
Pri Sett URL
The URL is automatically loaded into this parameter during initialization. This is the same value as
Pri Auth URL.
Pri Sett Port
The port number is automatically loaded into this parameter during initialization. This is the same value
as Pri Auth Port.
18
Moneris Vx810 Duet Operating Manual v1.1.01
2. Features and Procedures
Sec Sett URL
The URL is automatically loaded into this parameter during initialization. This is the same value as
Pri Auth URL.
Sec Sett Port
The port number is automatically loaded into this parameter during initialization. This is the same value
as Pri Auth Port.
Cashback Parameters (Cashback Menu)
Use the Cashback menu to configure parameters related to the Cashback feature.
Transactions menu (DEBIT & CREDIT) > CONFIGURATION menu (press OK) > Setup menu >
Cashback menu
Amt 1 ($10)
default = $10
Amt 2 ($20)
default = $20
Amt 3 ($30)
default = $30
Determine the dollar amounts displayed on the terminal when the customer selects the Cashback option
on Debit transactions. The value displayed in brackets (e.g., ($10)) is the parameter's current value.
Select the parameter, key in the new dollar value (must be a multiple of 10) then press OK.
Note: The Cashback feature must be enabled (Cashback Option parameter set to On). Each Amt
parameter has an allowable range, which is displayed when editing. The range is calculated based on the
dollar amounts of the other Amt parameters.
Hint: If you are increasing the amounts, start at Amt 3 then set Amt 2 followed by Amt 1 to avoid
overlapping ranges.
Amt Limit ($40)
default = $40
The maximum dollar amount customers can request (key in) if they do not select a pre-set Cashback
amount. The value displayed in brackets ($40) is the parameter's current value.
Select the parameter, key in the new dollar value (must be a multiple of 10) then press OK.
Note: The Cashback feature must be enabled (Cashback Option parameter set to On). The maximum
value for this parameter is $990.
Menu and Editing Parameters (Menu Config Menu)
The Menu Config menu allows you to determine the menu items that are displayed and which of these
require the manager password for access.
Transactions menu (DEBIT & CREDIT) > CONFIGURATION menu (pres OK) > Menus/Keys >
Menu Config menu
IMPORTANT: Some parameters cannot be edited unless the terminal batch is empty. If the "Edit
Not Allwd Batch Not Empty" message appears, perform a Batch Close then try editing the
parameter again.
Moneris Vx810 Duet Operating Manual v1.1.01
19
2. Features and Procedures
Display on Menu options:
Yes
No
Password-Level options:
None
Manager
Main Menu/Keys
Select Slct to display and edit the following sub-items:
•
REPRINT - Password Level
•
REPORTS - Password Level
•
Quick Setup - Password Level
•
Cash Receipt - Password Level
•
Purchase - Display on Menu; Password Level
•
Pre Auth - Display on Menu; Password Level
•
Refund - Display on Menu; Password Level
•
Mail/Phone - Display on Menu; Password Level
•
Advice - Display on Menu; Password Level
•
Payment - Display on Menu; Password Level
•
Correction - Display on Menu; Password Level
•
Batch Close - Display on Menu; Password Level
•
Batch Review - Display on Menu; Password Level
•
Batch Clear - Display on Menu; Password Level
CONFIGURATION
Select Slct to display and edit the following sub-items:
20
•
Setup - Display on Menu; Password Level
•
Servers - Display on Menu; Password Level
•
Terminal Name - Display on Menu; Password Level
•
Menus/Keys - Display on Menu; Password Level
•
Set Language - Display on Menu; Password Level
•
Initialize - Display on Menu;Password Level
•
Host Logon - Display on Menu; Password Level
•
Host Logoff - Display on Menu; Password Level
•
Contrast - Display on Menu; Password Level
Moneris Vx810 Duet Operating Manual v1.1.01
2. Features and Procedures
SETUP
Select Slct to display and edit the following sub-items:
•
Cashback - Display on Menu; Password Level
•
Edit Tables - Display on Menu; Password Level
Pre Auth
Select Slct to display and edit the following sub-items:
•
Pre-Auth Rpt - Display on Menu; Password Level
The following items are not editable:
•
Quick Setup
•
Phone
•
Terminal
•
Communications
•
IP Hosts
•
REPRINT
•
REPORTS
•
CONFIGURE SERVER
•
DOWNLOAD
•
TERM DOWNLOAD
•
BATCH HIST RPTS
2.1.4. Demo Mode
Demo Mode allows you and your employees to practice operating the Moneris Vx810 Duet terminal
WITHOUT affecting your terminal total amounts, your financial accounts or your customers’ accounts.
Note: Demo Mode is available only if you close your terminal batches on the terminal (Merchant Close).
If your terminal uses System Close, you cannot use Demo Mode. (See Processing a Batch Close.)
While the terminal is in Demo Mode:
•
The DEMO icon (
menu).
•
All financial transaction types that are supported on your terminal can be performed in Demo Mode.
•
All financial transactions will be approved.
•
The message “APPROVED DEMO” will be displayed on the screen.
•
All transactions will be stored in the terminal’s memory while you remain in Demo Mode.
•
All receipts for demo transactions and reports on demo totals will have a DEMO banner printed
across the top.
•
The initial transaction amount must be $1.00 or less.
•
If you wish to add a tip to the Purchase amount, the tip amount must be $1.00 or less.
) is displayed on the left side of the screen on all menus (except the applications
Moneris Vx810 Duet Operating Manual v1.1.01
21
2. Features and Procedures
•
If you select or key in a Cashback amount during a Debit Purchase, only $1.00 is added to the
transaction amount regardless of which Cashback amount is selected or keyed in.
•
If you change parameter values while the terminal is in Demo Mode, those changes will NOT be
cleared when you exit Demo Mode. Parameter values affect the way the terminal works in both Live
Mode and Demo Mode. Any changes you make in Demo Mode will also affect the way the terminal
works when you perform live transactions.
•
If you power off the terminal while it is in Demo Mode, it will still be in Demo Mode when you
power it up.
For instructions on using Demo Mode, see:
•
Transactions Available in Demo Mode
•
Entering Demo Mode
•
Exiting Demo Mode
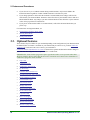
2.2. Optional Features
These features may be available on your terminal depending on the configuration of your Merchant ID on
the Moneris Host. If a feature is available on your terminal and you want to use it, you must enable and
configure it. If you do not want to use a feature, you can disable it.
Contact the Moneris Merchant Service Centre to discuss these options and determine whether changes to
your Merchant ID configuration are required in order to enable them.
IMPORTANT: Some of these programs require agreements with a service provider other than
Moneris Solutions. Please ensure that the necessary agreements are in place before attempting to
enable those programs on the terminal.
22
•
Chip Cards
•
Contactless Cards
•
Signatureless Transactions
•
Tip Processing
•
Cashback (Debit transactions)
•
Clerk IDs and Clerk Sub-Totalling
•
Invoice Number Prompting
•
Personalized Receipts
•
PAN Fraud Control
•
Manager Password
•
Multi-Terminal Reporting
•
Private Label Cards
•
Corporate Cards
•
Ernex Gift Program
•
Ernex Loyalty Program
•
Moneris Gift Program
•
Moneris Loyalty Program
Moneris Vx810 Duet Operating Manual v1.1.01
2. Features and Procedures
2.2.1. Chip Cards
Cards with a chip in them, called "chip cards," must be inserted into the chip card reader and left in the
reader for the entire transaction. The terminal will prompt you when it is time to remove the chip card
from the chip card reader.
Chip cards can be customized by the card issuer to have different applications and methods of verifying
the cardholder, so different chip cards may have different prompts. Some prompt for a PIN (like a debit
card), while others prompt for a signature on the receipt (like a magnetic stripe credit card).
If the chip card prompts for a PIN, the cardholder must enter their PIN. If the PIN is wrong, they will be
prompted to retry. If they forget their PIN, cancel the transaction, request another form of payment and
direct the cardholder to contact the card issuer.
Note: Not all chip card types are currently supported. If you insert an unsupported chip card, you will be
prompted to swipe the card. If you swipe a supported chip card, you will be prompted to insert the chip
card.
If the transaction cannot be completed with the chip card, request another form of payment, and tell the
cardholder to contact the card issuer.
As a best practice, always look for "VERIFIED BY PIN" on the Merchant copy of the receipt. If
"VERIFIED BY PIN" appears, no signature is required. If a signature line appears, the cardholder MUST
sign the receipt.
Identifying a Chip Card
Every time a cardholder presents a card:
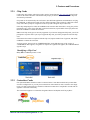
2.2.2. Contactless Cards
If an optional modular contactless reader is connected to the Vx810 Duet terminal and your merchant
account is configured for it, you can process transactions with contactless cards. Customers can simply
tap or wave their card in front of a contactless reader and a transaction is completed in seconds with no
signature verification or PIN entry.
The Vx810 Duet supports two Contactless Programs: MasterCard PayPass and Visa payWave.
Moneris Vx810 Duet Operating Manual v1.1.01
23
2. Features and Procedures
To process a transaction with a contactless card, look for the PayPass and payWave
logos. When prompted, the customer taps the card on the contactless reader where the
Contactless logo is located.
The card does not need to touch the reader but must be within 0.5 in. (1.1 cm) of it.
The card must be tapped or waved by itself (e.g., the customer cannot leave the card
in their wallet and wave it in front of the reader).
If the card does not work or is unsupported:
•
If the card is also a chip card, insert it into the chip card reader.
•
If that doesn’t work, try swiping the card on the magnetic stripe card reader (look for the magnetic
stripe).
To configure the modular contactless reader, see Configuring the Contactless Reader.
To set up the modular contactless reader, see The Modular Contactless Reader.
2.2.3. Signatureless Transactions
A "signatureless" transaction is a swiped or tapped Purchase for which a cardholder signature is not
required because the Purchase amount is at or below the card's maximum Signatureless Dollar Value
(SDV). Depending on the card type and how your terminal is configured, receipts may or may not print
for a signatureless transaction.
Maximum Signatureless Dollar Value (SDV)
To determine the maximum SDV for a card, print an EMV Parameters Report and locate the Contactless
CVM Limit parameter under the report's section for the card. An SDV of 9999 means there is no
maximum limit.
See Signing Credit Card Receipts.
2.2.4. Tip Processing
Tip Processing on the Vx810 Duet has a number of features.
Basic Tip Processing
You can configure the terminal to prompt customers for a tip amount on Purchase, Pre-Authorization
Completion and Advice transactions. If the customer enters a tip amount greater than 0, the amount is
printed on the receipt below the base amount. For tip amount entry by customers on receipts, Basic Tip
Processing prints a blank tip line below the base amount on Pre-Authorization receipts.
Note: Tip Processing is skipped on Signatureless Transactions.
Enhanced Tip Processing
This feature gives customers the option of keying in an amount or a percentage when prompted for a tip
on Purchases. If a customer opts for a percentage, the terminal displays up to three pre-configured
selectable percentage amounts. You can also configure your terminal to give customers a No Tip option.
Note: On Pre-Authorizations and Pre-Authorization Completions, Enhanced Tip Processing works the
same way as Basic Tip Processing.
IMPORTANT: Enhanced Tip Processing is not available if an external PINPad is connected to
your terminal.
24
Moneris Vx810 Duet Operating Manual v1.1.01
2. Features and Procedures
Gratuity Guidelines
You can configure the terminal to print suggested tip amounts on the Merchant copy of Pre-Authorization
receipts. The tip amounts are calculated on the base amount using three pre-configured percentage
amounts.
Tip Percentage on Purchases
You can configure your terminal to automatically add a pre-set tip percentage to all Purchase
transactions. Tip Percentage is calculated on the base amount and printed on the receipt.
Note: Tip Percentage is skipped on Signatureless Transactions.
IMPORTANT: Tip Processing is not available when an external PINPad is connected to your
terminal. On magnetic stripe credit cards, the tip is added automatically WITHOUT customer
acceptance.
For customer tip entry procedures, see Entering a Tip Amount.
To configure Tip Processing, see Configuring Tip Processing.
2.2.5. Cashback
This feature gives your customers the option of withdrawing cash from their debit account when they
make a Purchase at your place of business. You provide the cash to your customer and your business
account is reimbursed for the amount of the Cashback when the Batch Close transaction is processed.
Cashback is available only on Debit Purchases.
When customers choose to receive cash back, the terminal prompts them to:
•
select a pre-set Cashback amount,
•
manually key in another amount, or
•
skip Cashback altogether.
IMPORTANT: The choice of manually keying in another Cashback amount is not available when
an external PINPad is connected to your terminal. The available selections on the PINPad are four
pre-set non-configurable amounts.
Your terminal is configured with three pre-set Cashback amounts ($10, $20, $30), but you can change
these to amounts of your choice. You terminal is also configured with a limit that is applied when
customers manually key an amount instead of selecting a pre-set amount ($40), but you can change it to
an amount of your choice.
For Cashback customer entry procedures, see Entering a Cashback Amount.
To configure the Cashback feature on the terminal, see Configuring Cashback.
2.2.6. Clerk ID Prompting and Clerk Sub-Totalling
This feature allows you to set up individual Clerk IDs on your terminal. Clerk IDs are unique identifiers
that a terminal operator keys in when prompted each time he/she performs a transaction.
This allows you to produce Clerk Sub-Totals Reports that track financial totals and number of
transactions by clerk. Using this feature also allows you to produce Tip Reports in order to track tip
activity by individual clerk.
Each Clerk ID can have one to six alphanumeric characters (punctuation and special characters are not
allowed). A maximum of 255 Clerk IDs can be added for one Merchant ID. Once Clerk IDs are set up
and associated with your Merchant ID, they can be used on any handheld terminal that has been
configured using your Merchant ID.
Moneris Vx810 Duet Operating Manual v1.1.01
25
2. Features and Procedures
IMPORTANT: Clerk Subtotals must be cleared on a regular basis (weekly is recommended). If
not, the Moneris Host will automatically clear the totals when the number of transactions for a card
type processed by a Clerk ID reaches 10,000.
Default Clerk ID
A default Clerk ID can be set up on your terminal to be automatically used on all transactions (no Clerk
ID prompting). When this feature is enabled, all transactions performed on that terminal will be added to
the Default Clerk ID’s totals regardless of which operator performs the transaction.
For the Clerk ID Prompting procedure, see Entering the Clerk ID.
To configure Clerk Mode on your terminal, see Configuring Clerk Mode.
2.2.7. Invoice Number Prompting
This feature enables a prompt to key in an Invoice Number for every Credit and Debit financial
transaction. If this feature is enabled, you have the option of entering an Invoice Number or bypassing the
prompt by simply pressing OK when the prompt appears.
The Invoice Number can be up to 10 characters long and any combination of alphabetic and numeric
characters (punctuation and special characters are not allowed).
If a Private Label Card or a Purchasing Card is used, the Invoice Number can be up to 7 characters long
only and you cannot bypass the prompt.
For Invoice Number Prompting procedures, see Entering an Invoice Number.
To enable Invoice Number Prompting, see Configuring Invoice Number Prompting.
2.2.8. Personalized Receipts
You can configure your terminal to print receipts with personalized headers and footers. You can
configure up to six headers and four footers. The language in which receipt text is printed is based on
your terminal's Language Selection configuration.
You can also configure your terminal to print receipts with double-wide characters for amount lines and
the Sequence Number and Approval Code lines.
In addition, you can configure your terminal to determine whether a Customer copy of the receipt should
be printed after the Merchant copy on credit non-EMV (non-chip) transactions.
To configure your terminal's receipt printing, see Configuring Receipt Printing.
2.2.9. PAN Fraud Control
To reduce the fraudulent use of credit cards, this security feature prompts you to key in the last four digits
of a credit card number after the card has been swiped. PAN Fraud Check then compares the keyed-in
digits to the information contained in the card’s magnetic stripe or chip to confirm that the numbers are
valid. If the numbers are invalid, the transaction cannot continue.
This feature is enabled on the Moneris Host.
For PAN Fraud Control procedures, see Responding to Basic Transaction Prompts.
2.2.10. The Manager Password
The Manager Password restricts access to various terminal functions as well as financial transactions that
impact your financial account (e.g. refunds and voids).
IMPORTANT: You, the merchant, are solely responsible for the security of the Manager
Password at all times. If your Manager Password is compromised, change the password
immediately.
26
Moneris Vx810 Duet Operating Manual v1.1.01
2. Features and Procedures
There are a number of factors that affect whether the terminal prompts for a Manager Password, including
how the terminal is set up on the Moneris Host and how you have configured the use of passwords on the
terminal.
Note: On some functions, the "Password:" prompt may still appear regardless of your terminal's
configuration.
To change the Manager Password, see Changing the Manager Password.
To configure the use of passwords on your terminal, see Menu and Editing Parameters (Menu
Config Menu).
2.2.11. Multi-Terminal Reporting
If you have more than one terminal associated with your Merchant Number operating in one location,
Multi-Terminal Reporting allows you to perform a Batch Close and print a Deposit Totals Report on all
your terminals or a sub-set of the terminals from a single terminal.
In order to use Multi-Terminal Reporting, you must set up a Terminal Name on each terminal you want to
include in the function. At any time, you can add a new Terminal Name or delete a Terminal Name.
IMPORTANT: When doing a multi-terminal Batch Close and running the Multi-Terminal Deposit
Totals Report, totals are cleared on the terminal on which the functions are performed, but are
NOT cleared on the other associated terminals.
To configure Multi-Terminal Reporting, see Configuring Multi-Terminal Reporting.
To use Multi-Terminal Reporting, see Processing a Multi-Terminal Batch Close and MultiTerminal Deposit Totals Report.
Terminal Names
If you have more than one terminal operating in one location, you can use this feature to identify
individual terminals by assigning a unique alphanumeric name to each terminal.
If you are using Multi-Terminal Batch Close, a Terminal Name must be assigned to each terminal you
want to include in Multi-Terminal Reporting and Batch Close.
To enable Multi-Terminal reporting and add/delete Terminal Names, see Configuring MultiTerminal Reporting.
2.2.12. Private Label Cards
The Private Label feature allows you to offer your customers a credit card that can be used exclusively in
your store(s).
Purchases
All standard financial transactions can be processed using a Private Label Card. For example, a Private
Label Card Purchase transaction follows the same steps as a regular credit card Purchase with one
possible additional step: the "Promo Code:" prompt may appear. Promo codes (or promotion codes) are
supplied to you by the Private Label Card Issuer.
Payments
There is one transaction that is unique to Private Label Cards. The Payment transaction is used to apply a
dollar amount towards the balance on a cardholder's Private Label Card.
Reporting
Private Label Card transactions appear as a separate card type on all reports that include credit card
transactions.
Moneris Vx810 Duet Operating Manual v1.1.01
27
2. Features and Procedures
To configure Private Label Cards on the terminal, see Configuring Private Label Cards.
To transact a Payment on a Private Label Card, see Transacting a Payment on a Private Label
Card.
2.2.13. Corporate Cards
Corporate Cards (also known as Purchasing Cards) are a special type of credit card that provides
enhanced reporting data to help cardholders with cost allocation, tax compliance and account reconciliation.
If the terminal is configured to accept Corporate Cards, it prompts for a Customer Reference Number and
tax amounts when a Corporate Card is entered on a transaction. The Customer Reference Number and tax
amounts are printed on receipts and also appear on the cardholder's monthly statement from the Corporate
Card issuer.
To enable and configure this feature, see Configuring Corporate Cards.
To transact a Purchase on a Corporate Card, see Transacting a Purchase on a Corporate Card.
2.2.14. The Ernex Programs
The Ernex programs allow you to offer your customers an electronic card-based program that is activated
and processed through the Moneris Vx810 Duet terminal. There are two programs available:
•
Gift Cards: This program allows you to offer your customers stored-value gift cards for pre-defined
dollar values as well as variable-value cards and rechargeable cards. The program is available for
small businesses as the Moneris Gift Card program and as a customized program for national chains.
•
Loyalty Points: This program allows you to reward customer loyalty by awarding points based on
the dollar value of purchases a cardholder makes. The program is available for small businesses as
the Moneris Loyalty Card program and as a customized program for national chains.
All transactions, administrative and configuration functions begin at the GIFT & LOYALTY transactions
menu.
2.3. Procedures
Listed below are some of the more common procedures followed on the Vx810Duet.
For other, more specific procedures, see Financial Transactions, Admin Transactions, Reports, End-ofDay Procedure and Demo Mode Transactions.
•
Powering up the terminal
•
Powering down the terminal
•
Loading paper in the printer
•
Selecting the terminal language
•
Taking a manual imprint of a credit card
•
Transaction prompts:
Responding to basic transaction prompts
Entering a tip amount
Entering a Cashback amount on a debit transaction
Entering the Clerk ID
Entering an Invoice Number
28
Moneris Vx810 Duet Operating Manual v1.1.01
2. Features and Procedures
•
Receipts:
Finding a transaction's Sequence and Orig Auth numbers
Signing credit card receipts
Reprinting a receipt
Printing a cash receipt
•
Entering alphabetic characters and punctuation
•
Cancelling a transaction
•
Cancelling a report
•
Terminal security:
Changing the manager password
Requesting a Code 10 Authorization
Dealing with disputed debit transactions
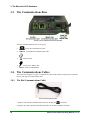
2.3.1. Powering Up the Vx810 Duet
The Moneris Vx810 Duet terminal does not have an ON/OFF switch.
The Vx810 Duet 2-part Power Cable
IMPORTANT: You must use the exact power adaptor and cable provided with the terminal base
by Moneris Solutions. Failure to do so may affect the operability of, or cause damage to, the
terminal and/or charging base.
To power up (or turn on) the terminal base:
1. Plug the power adaptor cable into the power port (
) on the base.
2. Plug the power cable into the power adaptor.
3. Plug the other end of the power cable into a power source, e.g. a wall jack or a power bar.
Moneris Vx810 Duet Operating Manual v1.1.01
29
2. Features and Procedures
The terminal is ready when the applications menu appears.
Note: For power up instructions when an external PINPad is connected to the terminal, see The External
PINpad.
2.3.2. Powering Down the Vx810 Duet
The Moneris Vx810 Duet terminal does not have an ON/OFF switch.
To power down (or turn off) the terminal, simply unplug the power cable from the power source, e.g. a
wall jack or a power bar. The screen will go blank and the backlight will turn off.
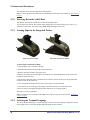
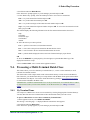
2.3.3. Loading Paper in the Integrated Printer
Paper well open and empty
Paper well open with roll of paper
To load a paper roll into the terminal:
1. Open the paper well at the front of the base.
2. Push the printer latch up and towards the back of the base.
3. Remove the paper roll that is in the paper well.
4. Place the new paper roll into the paper well with the loose end unrolling from the bottom of the roll
towards the front of the base.
5. Pull the loose end of the paper towards the front of the base at least one inch (2.2 cm) past the metal
teeth at the front of the paper well.
6. Close the printer lid and press firmly on it to ensure that it is securely latched.
7. Tear off the loose end of the paper by pulling it down then sideways across the metal teeth.
8. Press the 3 key to feed paper through the printer and ensure it is working properly.
The printer is ready to print again.
Note: If the printer ran out of paper in the middle of a receipt or report, you may be able to reprint the
receipt or report.
2.3.4. Selecting the Terminal Language
The text on the terminal display, receipts and reports can be in one of two languages: English or French.
One language can be selected for the Merchant and another for the Customer.
30
Moneris Vx810 Duet Operating Manual v1.1.01
2. Features and Procedures
Selecting the Merchant Language
The Merchant Language is used on merchant terminal prompts, the merchant copy of receipts and reports.
The language is initially set on the Moneris Host but it can be changed anytime through the
CONFIGURATION menu.
IMPORTANT: The language can be changed only AFTER the terminal's first initialization.
To change the Merchant Language:
1. On the applications menu, select DEBIT & CREDIT.
The transactions menu appears.
2. Press OK to access the CONFIGURATION menu.
3. Scroll down and select Set Language.
4. Select ENG (English) or FRN (French).
5. Press CANC ANNUL then press the * (ASTERISK) key to return to the applications menu.
Selecting the Customer Language
The Customer Language is used on customer terminal prompts and customer copies of receipts. By
default, the language is the same as the Merchant Language but is set for each individual transaction
based on the Language Code on the customer's card. When the terminal detects the code, it switches to
that language for the duration of the transaction. When the transaction is complete, the terminal reverts to
the Merchant Language.
If a Language Code is not present on the card or if it is neither English nor French, the terminal prompts
the customer to select either English or French.
To change the Customer Language on the terminal:
1. You or the customer swipes or inserts the card .
2. At the "Select Language" prompt, the customer selects ENG or FRN.
The selected language is used for the duration of the transaction.
To change the Customer Language on the PINPad:
1. The customer swipes or inserts the card.
2. At the "SELECT" prompt, the customer selects ENGLISH or FRENCH.
The selected language is used for the duration of the transaction.
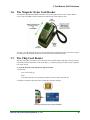
2.3.5. Taking a Manual Imprint of a Credit Card
If the "Imprint Card Press OK Key" prompt appears:
1. Take an imprint of the customer's credit card using the imprinter and the appropriate paper Sales Draft
(e.g., a Visa Purchase paper sales draft for a Purchase on a Visa card). Ensure that the Card Number,
Issue Date, Expiry Date and Cardholder Name are legible.
2. Print the transaction date and amount on the paper sales draft.
Note: If the transaction amount is over your Merchant Floor Limit, call the Moneris Credit Voice
Authorization number to obtain a Voice Authorization Number for the transaction and record the Voice
Authorization Number on the paper sales draft.
3a. To process a Purchase, have the cardholder sign the sales draft. Ensure the signature matches the
signature on the card. If not, contact the Moneris Merchant Service Centre.
OR
3b. To process a Refund, sign the sales draft yourself.
Moneris Vx810 Duet Operating Manual v1.1.01
31
2. Features and Procedures
4. Provide the customer with the Cardholder Copy of the Sales Draft and retain the Merchant Copy for
your records.
5. Press OK to continue the transaction.
2.3.6. Responding to Basic Transaction Prompts
Merchant Prompts
If this prompt appears ...
Take this action
Customer Press OK to Continue
Pass the terminal to the customer, who follows the
prompts.
Return to Clerk
Retrieve the terminal and press OK to continue.
Last 4 Digits
Key in the last four digits of the card number and press
OK.
Exp Date (MMYY)
Key in the card's expiry date (MMYY) and press OK.
Validation Code
Key in the three- or four-digit validation code on the
back of the card and press OK.
Code present?
If the code is not there, select No. If the code is not
readable, select Xread.
Promo Code:
Key in the six-digit Private Label promotion code and
press OK.
Merchant Prompts on the Terminal with the PINPad
If this prompt appears ...
Take this action
Swipe Card
Pass the PINPad to the customer for card entry.
Approved OK to Continue
Retrieve the PINPad and press OK on the terminal to
complete the transaction.
Customer Prompts
32
If this prompt appears ...
Take this action
Customer Press OK to Continue
Press OK.
Select Language
Select ENG (English) or FRN (French).
Select Appl:
Select a displayed application by pressing the
corresponding function key (F1, F2, etc.)..
<Application name>-OK?
Select Yes to confirm use of the displayed application.
Purchase Amount OK?
Check the Purchase amount and select Yes to accept it.
Purchase Total OK?
Check total Purchase + Cashback + Tip Amount and
select Yes to accept it.
Select Account:
Select CHQ (Chequing) or SAV (Savings).
Moneris Vx810 Duet Operating Manual v1.1.01
2. Features and Procedures
If this prompt appears ...
Take this action
Enter PIN & OK:
Key in PIN (Personal Identification Number) and press
OK.
Remove Card
Remove the chip card from the reader.
Return to Clerk
Return the device to you.
Customer Prompts on the PINPad
If this prompt appears ...
Take this action
Wait for PINPAD (on the terminal)
Follow the prompts on the PINPad.
SELECT
Select ENGLISH or FRENCH.
SALE OK?
Check the Purchase amount and press OK to accept it.
TOTAL OK?
Check total Purchase + Cashback + Tip Amount and
select Yes to accept it.
PLEASE REMOVE CARD
Remove the chip card from the reader on the PINPad
and return the PINPad to you.
2.3.7. Entering a Tip Amount
Basic Tip Processing
If Basic Tip Processing is enabled on the terminal, the customer is prompted as shown below on
Purchase, Pre-Authorization Completion and Advice transactions.
On the Standalone Vx810
1. "Tip: $0.00" appears on the terminal.
2a. The customer (or in some cases you) keys in a tip amount to add to the transaction and presses OK to
continue the transaction with the tip added.
OR
2b. The customer presses OK without keying in a tip amount and the transaction continues with no tip
added.
With the External PINPad
1. "ADD TIP?" appears on the PINPad.
2a. The customer selects YES to add a tip amount to the transaction.
At the "ENTER TIP + OK" prompt, the customer keys in a tip amount and presses OK to continue the
transaction with the tip added.
OR
2b. The customer selects NO and the transaction continues with no tip added.
Note: Tip Processing is skipped on Signatureless Transactions.
Moneris Vx810 Duet Operating Manual v1.1.01
33
2. Features and Procedures
Enhanced Tip Processing
If Enhanced Tip Processing is enabled on the terminal, the customer is prompted as shown below on
Purchase transactions.
Note: On Pre-Authorizations and Pre-Authorization Completions, Enhanced Tip Processing works the
same way as Basic Tip Processing.
IMPORTANT: Enhanced Tip Processing is not available if an external PINPad is connected to
your terminal.
1. "Tip Type:" appears on the terminal.
2a. The customer selects %.
If three configured suggested percentages appear with an Other selection, the customer selects the
desired tip percentage OR selects Other, keys in a tip percentage and presses OK to continue the
transaction with the tip added accordingly.
If no tip percentages have been configured on the terminal, the "Tip %:" prompt appears, and the
customer keys in a tip percentage then presses OK to continue the transaction with the tip added
accordingly.
OR
2b. The customer selects $.
At the "Tip:" prompt, the customer keys in a tip amount and presses OK to continue the transaction with
the tip added.
OR
2c. The customer selects No Tip (selection is available only if the No Tip option is enabled on the
terminal) and the transaction continues with no tip added.
IMPORTANT: Basic Tip Processing must be enabled in order for Enhanced Tip Processing to
work.
To configure Tip Processing, see Configuring Tip Processing.
2.3.8. Entering a Cashback Amount on a Debit Transaction
If the Cashback option is enabled on the terminal, the customer is prompted as follows on Debit Purchase
transactions.
Standalone Vx810
1. The "Cashback?" prompt appears on the terminal.
2a. The customer selects Yes.
Three pre-set amounts appear with an Other selection.
If the customer selects a pre-set amount, the transaction continues with the amount added to the Purchase.
If the customer selects Other, the "Cash:" prompt appears, and the customer keys in a cash amount then
presses OK to continue the transaction with the amount added to the Purchase.
If the customer selects Other and the keyed in amount exceeds the maximum Cashback allowed, an "Out
of range" message appears and the customer is prompted to key in another amount.
OR
2b. The customer selects No and the transaction continues with no Cashback amount added.
34
Moneris Vx810 Duet Operating Manual v1.1.01
2. Features and Procedures
With the External PINPad
1. The "CASHBACK?" prompt appears on the PINPad.
2a. The customer selects YES.
Four pre-set amounts appear, the customer selects the desired amount and the transaction continues with
the amount added to the Purchase.
OR
2b. The customer selects NO and the transaction continues with no Cashback added.
IMPORTANT: The choice of manually keying in another Cashback amount is not available when
an external PINPad is connected to your terminal. The available selections on the PINPad are four
pre-set non-configurable amounts.
Note: The Cashback amount is withdrawn from the same account used for the Purchase transaction.
To configure the Cashback option, see Configuring Cashback.
2.3.9. Entering the Clerk ID
If Clerk ID Prompting is enabled, the terminal prompts you as shown below on all transactions.
1. The "Clerk Id:" prompt appears on the terminal.
2. Key in a Clerk ID (1-6 digits) and press OK to continue the transaction.
Note: You are required to key in a Clerk ID when prompted for one.
To configure Clerk ID prompting, see Configuring Clerk Mode.
2.3.10. Entering an Invoice Number
If Invoice Number Prompting is enabled, the terminal prompts you for an Invoice ID on credit card and
debit transactions.
1. The "Invoice Id:" prompt appears on the terminal.
2a. Key in an alphanumeric Invoice ID up to 10 characters long and press OK to continue the transaction.
OR
2b. Press OK to bypass the prompt.
Note: If prompted for an Invoice Number during a Corporate Card Purchase transaction, you must key in
a number with a maximum of 7 characters..
To configure Invoice Number Prompting, see Configuring Invoice Number Prompting.
2.3.11. Finding a Transaction's Sequence and Orig Auth Numbers
Sequence Number
A transaction’s Sequence Number is printed on the receipt for all transactions. The Sequence Number is
the first 6 of the last 7 digits of the Seq # printed on the receipt. For example, if the Seq # on a receipt is
0001234560, the Sequence Number is 123456.
The Sequence Number is used to select transactions from the terminal memory to process Corrections,
Pre-Authorization Completions and Pre-Authorization Deletions, to reprint receipts and to use the Batch
Review function.
To process a Pre-Authorization Completion or Deletion:
•
Use the Sequence Number printed on the Pre-Authorization receipt.
Moneris Vx810 Duet Operating Manual v1.1.01
35
2. Features and Procedures
Note: If you do not have the Pre-Authorization receipt, print the Pre-Auth Transactions Report to obtain
the Sequence Number.
To process a Correction (transaction void):
•
Use the Sequence Number printed on the receipt of the transaction you want to void.
Note: If you do not have the original receipt, use the Batch Review function to obtain the Sequence
Number.
Orig Auth #
A transaction’s Orig Auth # is printed on the
receipt for all transactions. The Orig Auth #
is the 6-digit Appr Code printed on the
receipt (e.g., 654321).
The Orig Auth # is used to select transactions
from the terminal memory to process
Refunds.
To process a Refund:
•
Use the Orig Auth # (Appr Code) on
the receipt of the transaction you want to
refund.
2.3.12. Signing Credit Card Receipts
General Guidelines
•
If a signature line appears on the
Merchant copy of a receipt, the
cardholder MUST sign the receipt.
•
If NO SIGNATURE REQUIRED or
VERIFIED BY PIN appears on the
Merchant copy of a receipt, a signature
is not required.
•
If a signature line appears on the
Customer copy of a receipt, you (the
merchant) must sign the receipt.
Signatureless Transactions
A "signatureless" transaction is a swiped or tapped Purchase for which a cardholder signature is not
required because the Purchase amount is at or below the card's maximum Signatureless Dollar Value
(SDV). Depending on the card type and how your terminal is configured, receipts may or may not print
for a signatureless transaction.
To configure receipt printing, see Configuring Receipt Printing.
2.3.13. Reprinting Receipts
This function prints a duplicate Merchant copy of receipts.
Note: To have the function print the Customer copy of a receipt as well as the Merchant copy, enable the
Rprnt Cust Copy parameter (see Configuring Receipt Printing).
36
Moneris Vx810 Duet Operating Manual v1.1.01
2. Features and Procedures
To reprint a receipt:
1. On the applications menu, select DEBIT & CREDIT.
The message "Activating App..." is displayed then the transactions menu appears.
2. Press the REPRINT key (second purple key from the right).
The REPRINT menu appears.
3a. To reprint the Merchant Copy of the last transaction receipt, select Last Receipt.
OR
3b. To reprint a different receipt, select Any Receipt, key in the transaction's Sequence Number and press
OK.
The terminal prints the Merchant Copy of the receipt.
Note: On signatureless transactions, this function always prints the Customer copy of the receipt.
4. If the "Prnt Cust Copy?" prompt appears:
a. Select Yes to print the Customer Copy of the receipt.
OR
b. Select No to return directly to the transactions menu.
2.3.14. Printing a Cash Receipt
Use this function to print a receipt for a cash purchase.
To print a cash receipt:
1. On the applications menu, select DEBIT & CREDIT.
The message "Activating App..." is displayed then the transactions menu appears.
2. Press 9 to print a cash receipt.
If the "Clerk Id:" prompt appears, key in your Clerk ID and press OK.
The "Amount: $" prompt appears.
3. Key in the amount of the purchase and press OK.
4. If the "Tip: $0.00" prompt appears:
a. The customer can key in a tip amount and press OK.
OR
b. You can press OK to print a Tip line and Total line on the cash receipt.
2.3.15. Entering Alphabetic Characters and Punctuation
Keying in Alphabetic Characters
1. Press the number key with the character you want to display.
2. Press the ALPHA key repeatedly until the character appears on the screen.
Moneris Vx810 Duet Operating Manual v1.1.01
37
2. Features and Procedures
To key in
this text:
Press these keys on the
keypad:
T
H
A
N
K
8 ALPHA
4 ALPHA ALPHA
2 ALPHA
6 ALPHA ALPHA
5 ALPHA ALPHA
[space]
0 ALPHA ALPHA
Y
O
U
9 ALPHA ALPHA
ALPHA
6 ALPHA ALPHA
ALPHA
8 ALPHA ALPHA
1 ALPHA
.
[period]
Note: Use the CORR key to delete single characters.
Keying in Punctuation and Special Characters
38
KEY
CHARACTER
1
. (period or dot)
\ (backslash)
2
~ (tilde)
3
%
4
@ (at sign)
5
/ (slash)
6
?
7
[
8
]
9
{
*
* (asterisk)
, (comma)
' (apostrophe)
" (quotation mark)
}
0
- (hyphen)
(space)
+
&
Moneris Vx810 Duet Operating Manual v1.1.01
2. Features and Procedures
KEY
CHARACTER
#
# (pound or number sign)
=
:
$
^
Note: These are not allowed in Clerk IDs or Invoice Numbers.
2.3.16. Cancelling a Transaction
To cancel a transaction:
•
Press CANC ANNUL.
The terminal prints the Merchant Copy of the receipt with TRANS CANCELLED on it, if configured,
prints the Customer Copy of the receipt with TRANS CANCELLED on it and returns to the transactions
menu.
Note: Once the terminal has begun communicating with the Moneris host (i.e., once the "Processing"
message is displayed) the transaction can no longer be cancelled.
2.3.17. Cancelling a Report
To cancel a report:
1. Press CANC ANNUL.
If the report has begun printing, the terminal stops printing the report and returns to the REPORTS menu.
Note: The Terminal Stats report continues to print until the report is finished.
2. Press CANC ANNUL to return to the transaction menu.
2.3.18. Changing the Manager Password
IMPORTANT: For security purposes, we strongly recommend you change your terminal's
temporary Manager Password to a secure password of your own. The password should not be
changed until after the terminal's first initialization.
To change the Manager Password:
1. On the applications menu, select DEBIT & CREDIT.
The transactions menu appears.
2. Press OK to access the CONFIGURATION menu.
3. Select Setup, key in the current manager password or the temporary password 123456, and press OK.
4. Select Terminal.
5. Select Next until “Manager Pwd” appears.
6. Select Edit, key in your new password and press OK.
Note: The password must be 5-10 digits long and must consist of numbers only.
7. Select Exit then select OK to save changes.
8. Press CANC ANNUL then press the * (ASTERISK) key to return to the applications menu.
See The Manager Password.
Moneris Vx810 Duet Operating Manual v1.1.01
39
2. Features and Procedures
2.3.19. Requesting a Code 10 Authorization
During a transaction, if you feel that a customer, card or transaction is suspicious and needs investigating,
call the Moneris Merchant Service Centre and state that the call is a Code 10. This will alert the Moneris
agent without alarming your customer. The operator will ask you some "Yes/No" questions and then
provide instructions.
Reasons for calling in a Code 10 include:
•
the signature on the credit card does not seem to match the signature on the receipt.
•
the card appears to have been tampered with.
•
the name on the card is inconsistent with the person’s gender.
•
the customer is purchasing an unusual number of expensive items.
•
the customer’s purchases seem randomly selected, with little regard for size, quality or value.
•
the customer seems nervous or signs slowly with uncertainty.
2.3.20. Dealing With Disputed Debit Transactions
Do not attempt to resolve or compensate a cardholder for a disputed Debit transaction. Refer the
Cardholder to their Financial Institution.
40
Moneris Vx810 Duet Operating Manual v1.1.01
3. The Moneris Vx810 Hardware
3.1. The Moneris Vx810 Duet Terminal
The terminal consists of:
•
a hand-held terminal with:
• an integrated PINPad
• a backlit display
• a keypad
• a magnetic stripe reader
• a chip card reader
•
a communications base with:
• an integrated printer
• ports for communications and peripherals
• a power port
•
an optional external PINPad
•
an optional modular contactless reader
3.2. Setting up the Terminal
Follow these three steps to set up the terminal hardware:
1. Connect the power cable to the base.
2. Connect the communications cable(s) to the base.
3. Check the printer for paper:
a. From the applications menu, select DEBIT & CREDIT.
b. Press the 3 key to see if paper appears.
Note: If no paper appears, load a paper roll in the printer.
Moneris Vx810 Operating Manual v1.1.01
41
3. The Moneris Vx810 Hardware
3.3. The Communications Base
The Ports on the Vx810 Duet Communication Base
The Duet communications base has 5 (five) ports:
•
•
- for the dial communications cable
10BaseT - for the Ethernet communications cable
•
- DO NOT USE
•
- for the power adaptor cable
•
RS232 - for the external PINPad
3.4. The Communications Cables
The Vx810 Duet supports two types of communication, dial and IP, and has a separate port on the Duet
base for each type of communications cable.
3.4.1. The Dial Communications Cable
The Dial Communications Cable
1. Plug one end of the dial communications cable into the dial port (
) on the base.
2. Plug the other end of the dial communications cable into an analog telephone wall jack.
42
Moneris Vx810 Duet Operating Manual v1.1.01
3. The Moneris Vx810 Hardware
3.4.2. The Ethernet Communications Cable
The Ethernet Communications Cable
1. Plug one end of the Ethernet communications cable into the 10BaseT port on the base.
2. Plug the other end of the Ethernet communications cable into an Ethernet wall jack or a router.
When the terminal is not performing any transactions or functions, and has been idle for a pre-set period
of time, the terminal will display the applications menu.
3.5. The Terminal Keypad
The Vx810 Duet Keypad and Purple Function Keys
The terminal keypad contains alphanumeric keys and function keys.
3.5.1. Alphanumeric Keys
These keys allow you to enter amounts for transactions, text for receipt messages and selection criteria for
reports. Some alphanumeric keys also act as function keys (see below).
3.5.2. The Function Keys
NAME
ALLOWS YOU TO...
F1 to F4
•
select the option displayed on the right-hand side of the display
screen beside the function key
Purple
keys
•
select the icon displayed on the bottom of the display screen
above the purple key
Moneris Vx810 Duet Operating Manual v1.1.01
43
3. The Moneris Vx810 Hardware
NAME
Arrow
Key
ALLOWS YOU TO...
•
scroll down or up.
•
The first purple key on the left, located under the arrow icon (
or
Reprint
Key
•
Reports
Key
•
ALPHA
•
).
launch the REPRINT menu.
The second purple key from the right.
launch the REPORTS menu.
The first purple key on the right.
enter alphabetic characters for personalized receipt text, Clerk
IDs, etc.
Located in the middle of the row of purple keys.
CANC
ANNUL
•
cancel a transaction,
•
return to the transaction menu after completing a transaction and
•
return to the previous menu when performing ADMIN
functions.
The red key located at the bottom left of the keypad.
CORR
•
clear the last character or number entered (by the cardholder or
the merchant),
•
return to the previous cardholder prompt if no value is currently
displayed for the cardholder prompt,
•
clear the value displayed when a prompt is first displayed and
•
change the direction of the arrow icon above the 1st purple
function key.
The yellow key located at the bottom centre of the keypad.
OK
•
confirm the data input is complete,
•
confirm the data displayed is correct and
•
display the CONFIGURATION menu if pressed when the
terminal is at the transactions menu.
The green key located at the bottom right of the keypad.
44
3
•
advance the paper in the printer.
6
•
access the Quick Setup menu.
9
•
print a Cash Receipt.
* (asterisk)
•
return to the applications menu.
Moneris Vx810 Duet Operating Manual v1.1.01
3. The Moneris Vx810 Hardware
3.6. The Magnetic Stripe Card Reader
The Magnetic Stripe Reader (MSR) is located in a slot on the right-hand side of the terminal. When a
card is swiped, the MSR reads the information encoded on the card's magnetic stripe.
To swipe a card, the magnetic stripe must be down and facing towards the terminal. Cards can be swiped
from the back of the terminal forwards or from the front of the terminal backwards.
3.7. The Chip Card Reader
The chip card reader is located in a slot in the front of the terminal. When a chip card is inserted, the chip
card reader reads the information on the card's chip (e.g., whether to prompt for a PIN or print a signature
line on the receipt).
To correctly insert the chip card into the chip card reader:
1. Ensure that:
a. the card is facing up
AND
b. the chip end of the card is pointing towards the terminal’s chip card reader slot.
2. Slide the card into the chip card reader slot until the card stops sliding in.
Inserting a Chip Card in to the Chip Card Reader
Moneris Vx810 Duet Operating Manual v1.1.01
45
3. The Moneris Vx810 Hardware
IMPORTANT: Leave the chip card in the reader for the entire transaction.
3. When the "Remove Card" prompt appears, pull the card gently out of the chip card reader.
3.8. The Integrated Printer
A thermal printer is integrated with the Moneris 810 Duet base. It prints black text on white, one-part
thermal paper.
To order additional paper rolls, see Assistance. To load a paper roll in the printer, see Loading
Paper in the Printer.
3.9. The External PINpad
If you ordered the optional Vx810 external PINPad, please confirm that you
have received the PINPad and the attached PINPad power cable.
If an optional Vx810 external PINPad is connected to the Vx810 Duet and
your merchant account is configured for it, customers must use the PINpad
during transactions requiring their input to key in information while you keep
the terminal in front of you.
3.9.1. Setting up the External PINpad
1. Locate the PINPad cable (attached to the external PINPad).
2. Plug the RS232 connector into the RS232 port on the back of the terminal base. Plug the power
connector into the power port ( ) on the back of the base in the unlock position. Turn the plug counterclockwise to put it in the lock position.
3. Locate the power cable and the power adaptor cable. Plug the power cable into the power adaptor
cable. Plug the other end of the power adaptor cable into the power port box in the middle of the PINPad
power cable. Insert the connector at a right angle to the box then turn it counter-clockwise to lock it in
place.
4. Plug the other end of the power cable into a power source.
46
Moneris Vx810 Duet Operating Manual v1.1.01
3. The Moneris Vx810 Hardware
Recommendations: Always plug the power cable into the power source last to avoid power surges. Use a
power bar with surge protection where possible.
IMPORTANT: You must use the exact power adaptor and cables provided by Moneris Solutions to
work with the Moneris Vx810 terminal and PINPad. Failure to do so may affect the operability of
or cause damage to the equipment.
5. While the terminal and PINPad are powering up, wait until you see “WELCOME/BONJOUR” on the
PINPad and “No AIDs Found” on the terminal.
6. Press OK on the PINPad and wait for the applications menu to appear (DEBIT & CREDIT, GIFT &
LOYALTY).
3.9.2. Transactions With the PINPad
1. Begin the transaction on the Vx810 Duet terminal.
2. When "Swipe Card:" appears on the terminal, pass the PINPad to the customer for card entry (see
Procedures).
3. When "Wait for PINPad" appears on the terminal, the customer follows the prompts on the PINPad.
4. When "Approved OK to Continue" appears on the terminal, retrieve the PINPad, press OK on the
terminal and complete the transaction on the terminal following the prompts.
3.10. The Modular Contactless Reader
If an optional modular contactless reader is connected to the
Vx810 Duet terminal and your merchant account is configured
for it, you can process contactless transactions. In a contactless
transaction, the customer taps a contactless card on the
contactless reader instead of swiping or inserting it.
Note: If an optional external PINPad is connected to the
Vx810 Duet, the contactless reader is connected to the PINpad
instead of to the terminal.
3.10.1. Contactless Transactions Allowed
Contactless cards can be tapped on a contactless reader for
credit Purchases and Refunds only if the amount is at or below
the maximum Contactless Dollar Value (CDV).
3.10.2. Maximum Contactless Dollar Value (CDV)
To determine the maximum CDV for a card, print the EMV Parameters Report and locate the
Contactless Trans Limit parameter under the report's record for the card. A CDV of 9999 means there is
no maximum limit.
Moneris Vx810 Duet Operating Manual v1.1.01
47
4. Configuring Your Terminal
Your Vx810 Duet terminal can be set up to accept and process a variety of cards including debit cards,
credit cards, Private Label credit cards, and Corporate (a.k.a. Purchasing) credit cards. The terminal can
also be set up to support gift card programs and loyalty programs.
Before you begin using your terminal to process transactions, you must configure it, inputting any special
values and parameters needed for the options you want to use. Before you start, ensure you have the
following information available:
•
your Merchant ID
•
your Terminal ID
1. Configure the communications parameters.
2. Configure your Merchant ID and Terminal ID.
2. If applicable, configure the optional external PINPad.
3. If applicable, configure the optional modular contactless reader.
4. Select the standard features and the optional features you intend to use on the terminal.
5. Configure the selected features:
•
Receipt printing
•
Tip Processing
•
Cashback
•
Clerk IDs and Clerk Sub-Totalling
•
Invoice Prompting
•
Multi-Terminal Reporting
•
Private Label Cards
•
Corporate Cards
Note: Some terminal parameters can be edited using the Quick Setup menu (see below).
6. Initialize your terminal.
7. Print a Terminal Parameters Report.
4.1. Using Quick Setup
The Quick Setup menu provides quick access to a number of popular terminal configuration parameters.
See the list of parameters below.
To access Quick Setup:
1. On the applications menu, select DEBIT & CREDIT.
The message "Activating App..." is displayed then the transactions menu appears.
2. From the transactions menu, press 6.
The "Password:" prompt appears.
3. Key in the manager password and press OK.
The first Quick Setup menu appears.
Moneris Vx810 Duet Operating Manual v1.1.01
49
4. Configuring Your Terminal
4.1.1. Options for Each Parameter
•
View (display and edit parameters)
•
Print (print a list of parameters in the sub-menu and their current values)
4.1.2. Parameters
These parameters can also be found on other menus. For instructions on editing the parameters, refer to
the section for the menu indicated in parentheses beside the parameter.
Phone
PABX Code (also found in the Edit Terminal menu)
MONC Primary (also found in the Edit CPT menu as Pri Auth Phone)
MONC Secondary (also found in the Edit CPT menu as Sec Auth Phone)
MONC Settle (also found in the Edit CPT menu as Pri Sett Phone)
MONC Sec. Settle (also found in the Edit CPT menu as Sec Sett Phone)
Blind Dial (also found in the Edit CPT menu)
Terminal
MONC Term Id (also found in the Edit Format menu)
MONC Merch Num (also found in the Edit Format menu)
Tip Processing (also found in the Edit Terminal menu)
Clrk/Srvr Mode (also found in the Edit Terminal menu)
Customer Copy (also found in the Receipt Parameters menu)
Header Line 1 to 6 (also found in the Receipt Parameters menu and the Edit MIT menu)
Terminal Beep (also found in the Edit Terminal menu)
Communications
Do Not Use
IP Hosts
Pri Auth URL (also found in the Edit ECT menu)
Pri Auth Port (also found in the Edit ECT menu)
Sec Auth URL (also found in the Edit ECT menu)
Sec Auth Port (also found in the Edit ECT menu)
Pri Sett URL (also found in the Edit ECT menu)
Pri Sett Port (also found in the Edit ECT menu)
Sec Sett URL (also found in the Edit ECT menu)
Sec Sett Port (also found in the Edit ECT menu)
50
Moneris Vx810 Duet Operating Manual v1.1.01
4. Configuring Your Terminal
4.2. Configuring Communications
The terminal can communicate with the Moneris host over Ethernet and dial communications.
•
Dial communications
•
IP communications with dynamic addressing
•
IP communications with static addressing
•
Dial backup support for IP communications
IMPORTANT: You must contact Moneris before changing from one communications type to
another. Changes may be required on the Moneris Host to allow the terminal to communicate
successfully using the new communications type.
4.2.1. Configuring Dial Communications
If your terminal will communicate with the Moneris Host over a standard analog telephone line, you must
set up these parameters.
WARNING: Due to data security issues, terminals using dial communications must use a true
analog phone line connecting to a public switched telephone network. Analog telephone adaptors
(ATAs) and digital phone service over IP communications (e.g. VoIP) must NOT be used as an
alternative to dial communications.
Moneris recommends installing a dedicated telephone line for the terminal to ensure transactions are
processed quickly and reliably. Sharing the line with another device (e.g., a fax machine) can cause
communications problems. Line splitters and filters are not recommended.
Note: The dial communications cable must be connected before attempting to communicate with the
Moneris Host.
1. Ensure the dial cable is connected to the base and an analog telephone wall jack.
2. Set the Comm Link Typ parameter:
a. On the applications menu, select DEBIT & CREDIT.
The message "Activating App..." is displayed then the transactions menu appears.
b. Press OK to access the CONFIGURATION menu.
c. Select Setup, key in the manager password and press OK.
d. Scroll down and select Host.
"Comm Link Typ" appears on the Edit Hosts menu.
e. Make sure Comm Link Typ is set to Dial. If yes, skip to step g. If no, proceed to step f.
f. Select Edit, select Next until Dial appears then select Slct.
g. Select Exit. If prompted to save changes, select OK.
h. Press CANC ANNUL then press the * (ASTERISK) to return to the applications menu.
3. If you need to dial a prefix (e.g., a 9) to connect to an outside line:
a. On the applications menu, select DEBIT & CREDIT.
The message "Activating App..." is displayed then the transactions menu appears.
b. Press OK to access the CONFIGURATION menu.
c. Select Setup, key in the manager password and press OK.
d. Scroll down and select Terminal.
e. Select Next until "PABX Code" appears.
Moneris Vx810 Duet Operating Manual v1.1.01
51
4. Configuring Your Terminal
f. Select Edit, key in the prefix number (e.g., 9) then press OK.
g. Select Exit then select OK to save changes.
h. Press CANC ANNUL then press the * (ASTERISK) to return to the applications menu.
4. Enter the initialization phone number:
a. On the applications menu, select DEBIT & CREDIT.
The message "Activating App..." is displayed then the transactions menu appears.
b. Press OK to access the CONFIGURATION menu.
c. Select Setup, key in the manager password and press OK.
d. Scroll down and select Comm then select Next until "Pri Init Phone" appears.
e. Select Edit, key in the initialization phone number as follows then press OK.
If your merchant number begins Key in:
with:
00301
1-888-699-7299
00302
1-888-358-8602
00304
1-888-332-8433
f. Select Exit then select OK to save changes.
g. Press CANC ANNUL then press the * (ASTERISK).
4.2.2. Configuring Dynamic IP Communications
If your terminal will communicate with the Moneris Host over the Internet using Public IP with dynamic
IP addressing, you must set up these parameters.
Note: If the terminal is configured to use Ethernet communications and dial backup is available, the
terminal will attempt to use dial communications when Ethernet communication is not available.
Note: The terminal's MAC address can be found on the yellow sticker on the bottom of the Duet base.
1. Ensure the Ethernet cable is connected to the base and the wall jack.
2. Set the Comm Link parameters:
a. On the applications menu, select DEBIT & CREDIT.
The message "Activating App..." is displayed then the transactions menu appears.
b. Press OK to display the CONFIGURATION menu.
c. Select Setup, key in the manager password and press OK.
d. Scroll down and select Host.
e. Scroll to the following parameters and edit them:
Comm Link Type - set to "CommServer".
Settle Comm Type - set to "CommServer".
If you wish to configure dial backup, set the Backup Support parameter to "Auto Backup" or "Prompt
Backup" (see “Configuring Dial Backup Support for IP” below). If dial is set up as backup, the
terminal will attempt to use dial communications when Ethernet communication is not available.
f. Select Exit then select OK to save changes.
g. Press CANC ANNUL then press the * (ASTERISK) to return to the applications menu.
52
Moneris Vx810 Duet Operating Manual v1.1.01
4. Configuring Your Terminal
3. Set the dynamic IP Settings parameters:
a. While the applications menu is displayed, press the 2 key.
b. Key in the manager password and press OK.
c. Press the Ethernet Config key (
) then select IP. "IP Settings" appears.
d. Select Edit then select DHCP.
e. Select Exit then select Yes to save changes.
CommServer restarts and the terminal reboots back to the applications menu.
4.2.3. Configuring Static IP Communications
If your terminal will communicate with the Moneris Host over the Internet using Public IP with static IP
addressing, you must set up these parameters.
Note: If the terminal is configured to use Ethernet communications and dial backup is available, when
Ethernet communication is not available the terminal will attempt to use dial communications.
Note: The terminal's MAC address can be found on the yellow sticker on the bottom of the Duet base.
1. Disconnect the Ethernet cable from the base BEFORE completing these steps.
2. Set the Comm Link parameters:
a. On the applications menu, select DEBIT & CREDIT.
The message "Activating App..." is displayed then the transactions menu appears.
b. Press OK to display the CONFIGURATION menu.
c. Select Setup, key in the manager password and press OK.
d. Scroll down and select Host.
e. Scroll to the following parameters and edit them:
Comm Link Type - set to "CommServer".
Settle Comm Type - set to "CommServer".
If you wish to configure dial backup, set the Backup Support parameter to "Auto Backup" or "Prompt
Backup" (see “Configuring Dial Backup Support for IP” below). If dial is set up as backup, the
terminal will attempt to use dial communications when Ethernet communication is not available.
f. Select Exit then select OK to save changes.
g. Press CANC ANNUL then press the * (ASTERISK) to return to the applications menu.
3. Set the static IP Settings parameters.
a. At the applications menu, press the 2 key.
b. Key in the manager password and press OK.
c. Press the Ethernet Config key (
) then select IP. "IP Settings" appears.
d. Select Edit then select Static.
e. If your Ethernet network requires the parameters listed below, perform steps f and g for each
parameter. Otherwise skip to step h.
f. Select Next to view these parameters.
g. Select Edit to key in the address for each of these parameters. To key in a period (.), press the
number 1 key then the ALPHA key twice. Contact your Internet Service Provider (ISP) to determine
the addresses.
Moneris Vx810 Duet Operating Manual v1.1.01
53
4. Configuring Your Terminal
IP Address
Subnet Mask
Gateway IP Add
DNS1 IP Address
DNS2 IP Address (your Ethernet network may not require this parameter)
h. Select Exit then select Yes to save changes. CommServer restarts and the terminal reboots back to
the applications menu.
4. Reconnect the Ethernet cable to the base and the wall jack.
4.2.4. Configuring Dial Backup Support for IP
Dial Communications as Automatic Backup for IP
With this configuration, the terminal will automatically attempt to use dial communications when
Ethernet communication is not available.
1. Finish setting up communications for IP as above.
2. Plug in the dial cable and follow the steps for Dial Setup under Configuring Dial Communications.
Note: Dial communications must be configured for Dial Backup to work.
3. On the applications menu, select DEBIT & CREDIT.
4. Press OK to access the CONFIGURATION menu.
5. Select Setup, key in your manager password and press OK.
6. Scroll down and select Host.
7. Select Next until “Backup Support” appears.
8. Select Edit, select Next until “Auto Backup” appears then select Slct.
9. Select Exit then select OK to save changes.
10. Press CANC ANNUL then press the * (ASTERISK) key to return to the applications menu.
Other Backup Support Options
None - Dial backup is disabled (default)
Prompt Backup - The terminal prompts for confirmation before attempting dial
Switch Backup - Do Not Use
Use Backup - Do Not Use
4.3. Configuring Your Merchant ID and Terminal ID
To configure your Merchant ID and Terminal ID:
1. On the applications menu, select DEBIT & CREDIT.
"Activating App" appears followed by the transactions menu.
2. Press OK to access the CONFIGURATION menu.
3. Select Setup, key in the manager password and press OK.
4. Scroll down and select Merchant.
“Term Id” appears.
54
Moneris Vx810 Duet Operating Manual v1.1.01
4. Configuring Your Terminal
5. Select Edit, key in the Terminal ID (the eight-digit number starting with 28 found on the back of the
terminal, e.g. 28123456) and press OK.
6. Select Next until “Merch Num” appears.
7. Select Edit, key in your 13-digit Moneris Merchant ID (e.g. 0030212345678) and press OK.
Note: Your Moneris Merchant ID was provided to you when Moneris contacted you to confirm your
terminal order. If you currently have a 9-digit merchant number beginning with a 1, 2 or 4, simply add
0030 to the beginning (i.e., 123456789 becomes 0030123456789).
8. Select Exit then select OK to save changes.
9. Press CANC ANNUL then press the * (ASTERISK) key to return to the applications menu.
4.4. Configuring the External PINPad
If you have set up an external PINPad for use with your terminal, follow the instructions below to
configure it on your terminal.
IMPORTANT: You must configure the external PINPad on your terminal BEFORE you initialize
your terminal for the first time.
To configure the external PINPad:
1. On the applications menu, select DEBIT & CREDIT.
"Activating App" appears followed by the transactions menu.
2. Press OK to access the CONFIGURATION menu.
3. Select Setup, key in the manager password and press OK.
4. Select Terminal. “Pin Baud” appears on the Edit Terminal menu.
5. Select Edit, key in 5 and press OK.
6. Select Next until “Pin Format” appears.
7. Select Edit, key in 4 and press OK.
8. Select Next until “PINpad Type” appears.
9. Select Edit then select Next until “SC5000EMV” appears.
10. Select Slct. The “Initialize PINpad” message appears.
11. Select Exit and press OK.
12. Press CANC ANNUL then press the * (ASTERISK) key to return to the applications menu.
4.5. Configuring the Modular Contactless Reader
If you have set up an optional modular contactless reader for use with your terminal, follow the
instructions below to configure it on your terminal.
To configure the contactless reader:
1. On the applications menu, select DEBIT & CREDIT.
"Activating App" appears followed by the transactions menu.
2. Press OK to access the CONFIGURATION menu.
3. Select Setup, key in your manager password and press OK.
4. Select Next until “Enable CTLS” appears.
5. Make sure “Enable CTLS” is set to On. If yes, skip to step 7. If no, proceed with step 6.
Moneris Vx810 Duet Operating Manual v1.1.01
55
4. Configuring Your Terminal
6. Select Edit then select On.
7. Select Exit. If prompted to save changes, press OK.
8. Press CANC ANNUL then press the * (ASTERISK) key to return to the applications menu.
4.6. Configuring Receipt Printing
There are several parameters you can edit to configure what your receipts will look like and how they will
print.
For receipt-related procedures, see Finding Sequence and Orig Auth Numbers, Signing Credit
Card Receipts, Reprinting Receipts and Printing a Cash Receipt.
4.6.1. Enable the Printer
Use the Enable Printer parameter to enable/disable the integrated printer. The printer is enabled by
default.
4.6.2. Configure Receipt Headers and Footers
Use these parameters to configure the lines of text you want to appear at the top of your receipts: Header
Line 1, Header Line 2 to 5, Header Line 6.
Use these parameters to configure the lines of text you want to appear at the bottom of your receipts:
Footer 1 to 3, Footer 4.
All the parameters are blank by default.
4.6.3. Enable Large Amount Printing
Use the Large Amt Print parameter to enable/disable printing of double-wide characters for amount lines
and the Sequence number and Approval Code lines.
4.6.4. Enable Printing of Customer Copies
Use the Customer Copy parameter to enable/disable and configure printing of Customer copies of
receipts from non-chip transactions. By default, the terminal is configured to print Customer copies
automatically.
4.6.5. Enable Re-Printing of Customer Copies
Use the Reprnt Cust Copy parameter to enable/disable and configure re-printing of Customer copies of
receipts in addition to Merchant copies. Re-printing of customer copies is disabled by default.
4.6.6. Configure the Print Prompt Beep Delay
Use the Prompt Beep Delay parameter to configure the number of seconds you want the terminal to wait
before printing the Customer copy after beeping and displaying the "Tear Receipt; Press OK key" prompt.
56
Moneris Vx810 Duet Operating Manual v1.1.01
4. Configuring Your Terminal
4.7. Configuring Tip Processing
4.7.1. Basic Tip Processing
To enable Basic Tip Processing:
1. Set the Tip Processing parameter to On - Prompt.
2. Set the Tip % nn.nn parameter to 0.
Note: Tip Processing is skipped on Signatureless Transactions.
4.7.2. Enhanced Tip Processing
Note: On Pre-Authorizations and Pre-Authorization Completions, Enhanced Tip Processing works the
same way as Basic Tip Processing.
IMPORTANT: Enhanced Tip Processing is not available if an external PINPad is connected to
your terminal.
To enable Enhanced Tip Processing:
1. Set the EnhancedTipProc parameter to On.
2. Set the Tip Processing parameter to On - Prompt.
IMPORTANT: Basic Tip Processing must be enabled in order for Enhanced Tip Processing to
work.
To enable the No Tip option:
1. Make sure Enhanced Tip Processing is enabled.
2. Set the TipNone parameter to On.
To configure the suggested tip percentage amounts:
1. Make sure Enhanced Tip Processing is enabled.
2. Set any of the Sug Tip% 1 nn, Sug Tip% 2 nn and Sug Tip% 3 nn parameters to the desired percentage
amount (e.g., for 15%, key in 15).
Note: If all three parameters are set to 0, the customer is prompted for a percentage amount if he/she
selects the percentage option on tip prompting.
4.7.3. Gratuity Guidelines Printing on Pre-Authorization Receipts
To enable printing of Gratuity Guidelines:
1. Set the Gratuity Guide? parameter to On.
2. Set all of the Sug Tip% 1 nn, Sug Tip% 2 nn and Sug Tip% 3 nn parameters to a value greater than 0
(e.g., for 15%, 20% and 30%, key in 15, 20 and 30).
3. Set the Tip Processing parameter to On - Prompt.
Note: Both the Enhanced Tip Processing feature and the Gratuity Guidelines feature make use of the Sug
Tip% parameters when enabled. However, these features operate independently of each other, and you do
not need to enable Gratuity Guideline Printing in order for Enhanced Tip Processing to use these
parameters.
Moneris Vx810 Duet Operating Manual v1.1.01
57
4. Configuring Your Terminal
4.7.4. Tip Percentage on Purchases
To configure Tip Percentage:
1. Set the Tip % nn.nn parameter to a value greater than 0 (e.g., for 15%, key in 1500).
2. Set the Tip Processing parameter to On - Prompt.
Note: Tip Percentage is skipped on Signatureless Transactions.
IMPORTANT: Tip Percentage is not available when an external PINPad is connected to your
terminal. On transactions with magnetic stripe credit cards, tip is automatically added WITHOUT
customer confirmation.
For Tip Processing customer entry procedures, see Entering a Tip Amount.
4.8. Configuring the Cashback Feature
4.8.1. Cashback Amount Prompting on Debit Transactions
To enable Cashback prompting:
1. Set the CashBack Option parameter to On.
2. Make sure the Show CB Choices parameter is set to On.
IMPORTANT: The choice of manually keying in another Cashback amount is not available when
an external PINPad is connected to your terminal. The available selections on the PINPad are four
pre-set non-configurable amounts.
4.8.2. Changing Cashback Amounts
To change the pre-set Cashback amounts:
1. Set any of the Amt 1, Amt 2 and Amt 3 parameters to new amounts of your choice.
2. Make sure the CashBack Option parameter is set to On.
4.8.3. Setting the Cashback Limit
To change the pre-set Cashback limit:
•
Set the Amt Limit parameter to a new amount of your choice.
For Cashback customer entry procedures, see Entering a Cashback Amount.
4.9. Configuring Clerk ID Prompting and Clerk SubTotalling
4.9.1. Clerk ID Prompting
To enable the Clerk ID prompt:
•
Set the Clrk/Srvr Mode parameter to Prompt.
For the Clerk ID prompting procedure, see Entering the Clerk ID.
4.9.2. Using a Default Clerk ID
To automatically use the same Clerk ID for all transactions (no ID prompting):
1. Set the Clrk/Srvr Mode parameter to None.
58
Moneris Vx810 Duet Operating Manual v1.1.01
4. Configuring Your Terminal
2. Add the Clerk ID to your terminal (see “Adding Clerk IDs” below).
3. Set the Use Def. Clrk? parameter to On.
4. Set the Default Clerk parameter to the Clerk ID added in step 2.
Note: Clerk ID prompting must be disabled in order to use a default Clerk ID. Before setting a Clerk ID
as the default, you must add it to your terminal.
IMPORTANT: If you have more than one terminal, you must configure the Default Clerk ID on
each terminal individually.
4.9.3. Clerk Sub-Totalling
To enable Clerk Sub-Totalling on your terminal to produce Clerk Sub-Totals Reports:
1. Set the Clrk/Srvr Mode parameter to Prompt.
2. Add Clerk IDs as needed (see “Adding Clerk IDs” below).
4.9.4. Adding Clerk IDs (including the Default Clerk ID)
Use this function to add the Clerk IDs to be associated with your Merchant ID. The terminal must
communicate with the Moneris Host in order to complete this function.
The Clerk IDs you enter here can be entered at the "Clerk Id" prompt during transactions and will be used
in Clerk Sub-Totals Reports.
1. On the applications menu, select DEBIT & CREDIT.
The message "Activating App..." is displayed then the transactions menu appears.
2. Press OK to display the CONFIGURATION menu.
3. Select Servers.
If the "Password:" prompt appears, key in the manager password and press OK.
The CONFIGURE SERVER menu appears.
4. Select Add Server to add a Clerk ID.
The "Clerk ID:" prompt appears.
5. Key in the Clerk ID to be added and press OK. For help, see Entering Alpha Characters and
Punctuation.
The "Clerk ID:" prompt re-appears.
To continue adding Clerk IDs, repeat step 5. You can add a maximum of 20 Clerk IDs at one time.
Note: When 20 Clerk IDs have been entered for addition, the terminal communicates with the Moneris
Host to add the Clerk IDs to the host.
6. When all the Clerk IDs have been entered for addition, press CANC ANNUL.
The "Send to Host?" prompt appears.
7. Select Yes to send the Clerk IDs to the Moneris Host for addition.
The terminal communicates with the Moneris Host then displays "APPROVED" and beeps.
8. Press OK to return to the CONFIGURE SERVER menu.
9. Press CANC ANNUL twice to return to the transaction menu.
4.9.5. Deleting Clerk IDs
Use this function to remove Clerk IDs associated with your Merchant ID. The terminal must
communicate with the Moneris Host in order to complete this function.
Moneris Vx810 Duet Operating Manual v1.1.01
59
4. Configuring Your Terminal
The Clerk IDs you remove here can no longer be entered at the "Clerk Id" prompt during transactions and
cannot be used in Clerk Subtotal Reports.
1. On the applications menu, select DEBIT & CREDIT.
The message "Activating App..." is displayed then the transactions menu appears.
2. Press OK to display the CONFIGURATION menu.
3. Select Servers.
If the "Password:" prompt appears, key in the manager password and press OK.
The CONFIGURE SERVER menu appears.
4. Select Delete Server to delete a Clerk ID.
The "Clerk ID:" prompt appears.
5. Key in the Clerk ID to be removed and press OK. For help, see Entering Alpha Characters and
Punctuation.
The "Clerk ID:" prompt re-appears.
To continue removing Clerk IDs, repeat step 5. You can remove a maximum of 20 Clerk IDs at one time.
Note: When 20 Clerk IDs have been entered for removal, the terminal communicates with the Moneris
Host to remove the Clerk IDs from the Host.
6. When all the Clerk IDs have been entered for removal, press CANC ANNUL.
The "Send to Host?" prompt appears.
7. Select Yes to send the Clerk IDs to the Moneris host for removal.
The terminal communicates with the Moneris Host then displays "APPROVED" and beeps.
8. Press OK to return to the CONFIGURE SERVER menu.
9. Press CANC ANNUL twice to return to the transaction menu.
4.10. Configuring Invoice Number Prompting
When Invoice Number Prompting is enabled, your terminal prompts you for an Invoice Number during
Credit Card and Debit transactions ("Invoice Id:").
To enable Invoice Number Prompting:
•
Set the Ask Inv Num? parameter to On.
For Invoice Number Prompting procedures, see Entering an Invoice Number.
4.11. Configuring Multi-Terminal Reporting
To use Multi-Terminal Reporting, you must set up a Terminal Name on each terminal you want to
include in the multi-terminal Batch Close and reporting process (see Processing a Batch Close and MultiTerminal Deposit Totals Report). You can delete a Terminal Name at any time.
4.11.1. Adding a Terminal Name
Use this function to set up a Terminal Name associated with your Merchant Number on a terminal you
want to include in Multi-Terminal Reporting. The terminal must communicate with the Moneris Host in
order to complete this function.
1. On the applications menu of the terminal for which you want to add a name, select DEBIT &
CREDIT.
The message "Activating App..." is displayed then the transactions menu appears.
2. Press OK to display the CONFIGURATION menu.
60
Moneris Vx810 Duet Operating Manual v1.1.01
4. Configuring Your Terminal
3. Select Terminal Name.
If the "Password:" prompt appears, key in the manager password and press OK.
The Term Name Config menu appears.
4. Select Add Terminal to add the terminal name.
The "Terminal Name:" prompt appears.
5. Key in the terminal name for this terminal and press OK. For help, see Entering Alpha Characters and
Punctuation.
The "Send to Host?" prompt appears.
6. Select Yes to send the terminal name to the Moneris Host to be added to and associated with your
Merchant Number.
The terminal communicates with the Moneris Host then displays "APPROVED" and beeps.
8. Press OK to return to the Term Name Config menu.
9. Press CANC ANNUL twice to return to the transactions menu.
4.11.2. Deleting a Terminal Name
Use this function to delete a terminal's Terminal Name, disassociate the name from your Merchant
Number and make the terminal no longer available for Multi-Terminal Reporting. The terminal must
communicate with the Moneris Host in order to complete this function.
1. On the applications menu of the terminal whose name you want to delete, select DEBIT & CREDIT.
The message "Activating App..." is displayed then the transactions menu appears.
2. Press OK to display the CONFIGURATION menu.
3. Select Terminal Name.
If the "Password:" prompt appears, key in the manager password and press OK.
The Term Name Config menu appears.
4. Select Del Terminal to delete the terminal name.
The "Delete Now?" prompt appears.
5. Select Yes to send the terminal name to the Moneris Host to be deleted from and disassociated with
your Merchant Number.
The terminal communicates with the Moneris Host then displays "APPROVED" and beeps.
6. Press OK to return to the Term Name Config menu.
7. Press CANC ANNUL twice to return to the transaction menu.
4.12. Configuring Private Label Cards
The terminal does not require additional configuration in order to process Private Label credit cards.
However, before using Private Label cards you must:
•
Contact Moneris to obtain a list of Private Label card Issuers.
•
Contact the Private Label card Issuer and arrange for service from them.
•
Notify Moneris that you will be using this service to ensure that your terminal's initialization
parameters are updated on the Moneris Host.
•
Re-Initialize your terminal.
Moneris Vx810 Duet Operating Manual v1.1.01
61
4. Configuring Your Terminal
4.13. Configuring Corporate Cards
4.13.1. Enabling the Corporate Card Feature
To enable the terminal to accept Corporate Cards:
•
Set the Commercial On? parameter to On.
4.13.2. Enabling Tax Amount Prompting
To enable the terminal to prompt for a tax amount on Corporate Card transactions:
1. Set the Commercial On? parameter to On.
2. Set the Process Tax parameter to On.
3. Configure the applicable tax type and tax registration number as shown below.
4.13.3. Configuring Tax Type and Tax Registration Numbers
When you enable the terminal to prompt for a tax amount on Corporate Card transactions, you need to
configure the type of tax you are required to charge (based on your geographic location) and the related
Tax Registration Number(s). This configuration determines the type of tax the terminal prompts for and
the number that appears on customer monthly statements.
To configure Tax Type and Tax Registration Numbers:
1. Set the Commercial On? parameter to On.
2. Set the Process Tax parameter to On.
3. Set the Tax Type parameter to the applicable tax type.
4. In one or more of the Tax_Type parameters, key in the tax registration number as appropriate.
To process a Purchase on a Corporate Card, see Transacting a Purchase on a Corporate Card.
4.14. Initializing Your Terminal
This function sends information about the terminal to the Moneris Host and receives additional
parameters and information from the host. The instructions below are for initializing your terminal for the
FIRST time. For instructions on performing subsequent initializations, see Re-Initializing Your Terminal.
IMPORTANT: If you have set up an optional external PINPad for use with your terminal, you
must configure it on the terminal BEFORE following the initialization instructions below.
To initialize your terminal:
1. On the applications menu, select DEBIT & CREDIT.
The message "Activating App..." is displayed then the transactions menu appears.
2. Configure the Terminal ID and your Merchant ID in the terminal (see Configuring Your Merchant and
Terminal IDs).
3. Initialize the terminal:
a. On the applications menu, select DEBIT & CREDIT.
b. Press OK to access the CONFIGURATION menu.
c. Scroll down and select Initialize.
d. When “Retain IDs?” appears, select Yes.
62
Moneris Vx810 Duet Operating Manual v1.1.01
4. Configuring Your Terminal
e. When “Transmitting…”, “Receiving…” and “Please wait” appear on the terminal, please wait while
the terminal communicates with Moneris. When the initialization is finished, “Init Successful” appears
then the transactions menu appears.
f. If you have set up and configured an external PINPad, “Restart Required Press OK” appears on the
PINPad display. Press OK on the PINPad and proceed to step g. If you are operating the Vx810 in
standalone mode, skip to step 4.
g. When “Transmitting…”, “Receiving…” and “Please wait” appear on the terminal, please wait while
the terminal communicates with the Moneris Host and until the re-start is complete. “Init Successful”
appears on the terminal and “WELCOME/BONJOUR” appears on the PINPad shortly after. The
terminal is then returned to the transactions menu.
4. Do a Host Logon:
a. On the transactions menu, press OK to access the CONFIGURATION menu.
b. Scroll down and select Host Logon.
c. Key in the manager password and press OK.
“Logon Success” appears then the transactions menu appears.
5. Press the * (ASTERISK) key to return to the applications menu.
Your terminal is now ready to process transactions.
Moneris Vx810 Duet Operating Manual v1.1.01
63
5. Financial Transactions
5.1. Card and Transaction Types
A financial transaction involves the transfer of funds between a cardholder's account and your own
business account. For example, a credit card Purchase transaction moves funds from the credit
cardholder's account to your business account, and a debit card Refund moves funds from your business
account to the debit cardholder's chequing or savings account.
The Moneris Vx810 Duet terminal can process various financial transactions on a number of card types.
The matrix below displays the supported card types and the transactions each card type supports.
Transaction /
Magnetic Stripe Cards
Chip Cards
Card Type
Contactless
Cards
Private Label
Cards
Debit
Credit
Debit
Credit
Credit
Credit
Purchase
Y
Y
Y
Y
Y
Y
Refund
Y
Y
Y
Y
Y
Y
Correction (Void)
Y
Y
Y
Y
N
Y
Pre-Authorization
N
Y
N
Y
N
Y
Pre-Authorization
Completion
N
Y
N
Y
N
Y
Pre-Authorization
Deletion
N
Y
N
Y
N
Y
Advice
N
Y
N
Y
N
N
Payment
N
N
N
N
N
Y
IMPORTANT: It is the merchant’s responsibility to ensure that proper card processing
procedures are followed at all times. Please refer to your Merchant manuals and the Terms &
Conditions of your Merchant Agreement for details.
The Moneris Merchant Operating Manual, covering MasterCard and Visa procedures, is available
for free download at www.moneris.net/en/Support/Downloads/MerchantManuals.aspx. Scroll down
to the 'Other' section and select "Merchant Operating Manual".
5.2. Transaction General Guidelines
When performing financial transactions, follow these general guidelines:
1. Determine the transaction to be processed (i.e., Purchase, Refund, etc.).
2. Establish the means of payment (i.e., debit or credit).
3. Identify the card entry method and enter the card data on the POS device accordingly (see Card Entry
Options).
4. Follow the terminal prompts (see Transaction Procedures).
5. Process receipts (see Signing Credit Card Receipts).
Note: Terminal prompts may vary depending on variables such as terminal setup, merchant setup and
card type.
Moneris Vx810 Duet Operating Manual v1.1.01
65
5. Financial Transactions
5.3. Card Entry Options
5.3.1. Magnetic Stripe Cards - Swipe
•
Look for the magnetic stripe on the back of the card.
•
When “Swipe Card:”, “Insert or Swipe Card:” or “Swipe, Tap, or Insert Card:” appears on the
terminal or PINPad, swipe the card on the magnetic stripe reader and follow the prompts.
5.3.2. Chip Cards - Insert
•
Look for the chip on the card.
•
When “Swipe Card:” or “Insert or Swipe Card:” appears on the terminal or PINPad, you or the
customer inserts the card in the chip card reader.
Note: If an optional external PINpad is connected to the Vx810 Duet, the card must be inserted in the
external PINPad’s chip card reader.
•
When prompted, the customer keys in his/her PIN.
•
The chip card must remain inserted in the reader until the “Remove Card” prompt appears on the
display.
Note: Unless the device prompts otherwise, do not swipe a chip card even if it has a magnetic stripe.
5.3.3. Contactless Cards - Tap
•
Look for the MasterCard PayPass® or Visa payWave™ label on the card.
•
When “Swipe, Tap, or Insert Card:” appears on the terminal or PINPad, the customer taps the card on
the modular contactless reader.
Note: The card does not need to touch the reader but must be within 0.5 in. (1.1 cm) of it. The card
must be tapped by itself (i.e., not in a wallet).
•
If the card does not work or is unsupported, try inserting it in the chip card reader (if it is a chip card)
or swiping the card on the terminal.
5.3.4. Manual Entry
See Manually Processing Credit Card Transactions.
5.4. Transaction Procedures
Follow the procedures in this section to process these transactions:
66
•
Purchase
•
Refund
•
Correction
•
Pre-Authorization
•
Pre-Authorization Completion
•
Pre-Authorization Deletion
•
Advice
•
Purchase on a Corporate Card
•
Payment on a Private Label (Purchasing) Card
Moneris Vx810 Duet Operating Manual v1.1.01
5. Financial Transactions
•
Manual Credit Transactions
5.4.1. Processing a Purchase
Follow the procedure below to process the sale of goods using a debit or credit card.
To process a Purchase:
1. On the applications menu, select DEBIT & CREDIT.
The message "Activating App..." appears followed by the transactions menu.
2. To begin the transaction, select Purchase.
If the "Password:" prompt appears, key in the manager password and press OK.
3. Key in the Purchase amount and press OK.
4. Follow the prompts on the terminal.
If prompted for a Clerk ID ("Clerk Id:"), see Entering the Clerk ID.
If prompted for an Invoice Number ("Invoice Id:"), see Entering an Invoice Number.
If prompted for Tip Entry, see Entering a Tip Amount.
If prompted for a Cashback amount ("Cashback?"), see Entering a Cashback Amount.
5. Process receipts (see Personalized Receipts and Signing Credit Card Receipts).
Note: If processing the Purchase on a Private Label Card, you may be prompted for a Promo Code. To
process a Purchase on a Corporate Card, see Processing a Purchase on a Corporate Card.
For details on basic prompts, see Responding to Basic Transaction Prompts.
5.4.2. Processing a Refund
Follow the procedure below to credit a customer's account for a previous debit or credit Purchase.
To process a Refund:
1. On the applications menu, select DEBIT & CREDIT.
The message "Activating App..." appears followed by the transactions menu.
2. To begin the transaction, select Refund.
If the "Password:" prompt appears, key in the manager password and press OK.
3. Key in the Refund amount and press OK.
4. When the “ORIG AUTH #:” prompt appears, key in the 6-digit Appr Code printed on the original
receipt and press OK (see Finding Sequence and Orig Auth Numbers).
5. Follow the remaining prompts on the terminal.
If prompted for a Clerk ID ("Clerk Id:"), see Entering the Clerk ID.
If prompted for an Invoice Number ("Invoice Id:"), see Entering an Invoice Number.
6. Process receipts (see Personalized Receipts and Signing Credit Card Receipts).
Note: If processing the Refund on a Private Label Card, you may be prompted for a Promo Code.
For details on basic prompts, see Responding to Basic Transaction Prompts.
5.4.3. Processing a Correction (Void)
Follow the procedure below to correct (void) a previous Purchase or Refund transaction processed on a
debit or credit card.
Note: The correction MUST be performed in the same batch as the original transaction.
Moneris Vx810 Duet Operating Manual v1.1.01
67
5. Financial Transactions
To process a Correction:
1. On the applications menu, select DEBIT & CREDIT.
The message "Activating App..." appears followed by the transactions menu.
2. To begin the transaction, select Correction.
If the "Password:" prompt appears, key in the manager password and press OK.
If prompted for a Clerk ID ("Clerk Id:"), see Entering the Clerk ID.
3a. To correct the last transaction performed on the terminal:
A. Select Yes.
B. Select Yes again to confirm the displayed transaction is the one you want to correct.
OR
3b. To correct a different transaction:
A. Select No.
B1. To retrieve the transaction by Sequence Number, select Seq#, key in the 6-digit Sequence Number
printed on the original receipt and press OK (see Finding Sequence and Orig Auth Numbers).
OR
B2. To retrieve the transaction by card number, select Acct#, key in the last 4 digits of the card number
and press OK.
C. Select Yes to confirm the displayed transaction is the one you want to correct.
4. Follow the remaining prompts on the terminal.
If prompted for an Invoice Number ("Invoice Id:"), see Entering an Invoice Number.
5. Process receipts (see Personalized Receipts and Signing Credit Card Receipts).
Note: If processing the Correction on a Private Label Card, you may be prompted for a Promo Code.
For details on basic prompts, see Responding to Basic Transaction Prompts.
5.4.4. Processing a Pre-Authorization
Follow the procedure below to authorize a temporary amount when the final amount of a credit card
Purchase is not known.
To process a Pre-Authorization:
1. On the applications menu, select DEBIT & CREDIT.
The message "Activating App..." appears followed by the transactions menu.
2. To begin the transaction, select Pre Auth.
If the "Password:" prompt appears, key in the manager password and press OK.
3. On the Pre Auth menu, select Pre Auth again.
4. Key in the Pre-Authorization amount and press OK.
5. Follow the prompts on the terminal.
If prompted for a Clerk ID ("Clerk Id:"), see Entering the Clerk ID.
If prompted for an Invoice Number ("Invoice Id:"), see Entering an Invoice Number.
6. Process receipts (see Personalized Receipts and Signing Credit Card Receipts).
Note: If Tip Processing is enabled, a blank Tip line is printed on the receipt below the base amount. If a
signature line is printed on the Pre-Authorization receipt, the cardholder MUST sign the receipt.
68
Moneris Vx810 Duet Operating Manual v1.1.01
5. Financial Transactions
7. When the final amount of the purchase is known, process a Pre-Authorization Completion for the final
amount using the same card number (see “Processing a Pre-Authorization Completion” below).
Note: If processing the Pre-Authorization on a Private Label Card, you may be prompted for a Promo
Code.
For details on basic prompts, see Responding to Basic Transaction Prompts.
5.4.5. Processing a Pre-Authorization Completion
Follow the procedure below to complete a Pre-Authorization once the final amount is known.
Note: A Completion must be performed on the same Vx810 terminal using the same card number. The
card does not need to be present.
To process a Pre-Authorization Completion:
1. On the applications menu, select DEBIT & CREDIT.
The message "Activating App..." appears followed by the transactions menu.
2. To begin the transaction, select Pre Auth.
If the "Password:" prompt appears, key in the manager password and press OK.
3. On the Pre Auth menu, select Completion.
4. Key in the 6-digit Sequence Number printed on the Pre-Authorization transaction’s receipt and press
OK (see Finding Sequence and Orig Auth Numbers).
If the message "No Record Found" appears, repeat step 3.
The terminal displays the following information about the Pre-Authorization:
Seq#:
Card Name
Transaction Type
Card Number
Amount
5. Compare the displayed information to the Pre-Authorization's receipt. If the information matches,
select Yes (to cancel the Completion, select No).
Note: If the displayed Pre-Authorization is not the one you want, select Next to display the next PreAuthorization in the terminal memory. Repeat until the transaction you want is displayed.
If prompted for a Clerk ID ("Clerk Id:"), see Entering the Clerk ID.
If prompted for an Invoice Number ("Invoice Id:"), see Entering an Invoice Number.
6. When the Pre-Authorization amount and the "New Amt:" prompt appear:
a. To change the Pre-Authorization amount, key in the amount and press OK.
OR
b. To continue the transaction with the original amount, press OK.
Note: If Tip Processing is enabled and the cardholder has entered a tip amount on the Pre-Authorization
receipt's Tip line and you want the Tip amount printed on a separate line on the Completion's receipt,
press OK to key in the amount at the Tip prompt as shown below.
7. Follow the remaining prompts on the terminal.
If prompted for Tip Entry, see Entering a Tip Amount. If you chose to print the Tip amount on a
separate line (step 6) above, key in this amount at the Tip prompt.
8. Process receipts (see Personalized Receipts and Signing Credit Card Receipts).
Moneris Vx810 Duet Operating Manual v1.1.01
69
5. Financial Transactions
Note: If processing the Pre-Authorization Completion on a Private Label Card, you may be prompted for
a Promo Code.
For details on basic prompts, see Responding to Basic Transaction Prompts.
5.4.6. Processing a Pre-Authorization Deletion
Follow the procedure below to delete a Pre-Authorization in the terminal memory before it is completed.
To process a Pre-Authorization Deletion:
1. On the applications menu, select DEBIT & CREDIT.
The message "Activating App..." appears followed by the transactions menu.
2. To begin the transaction, select Pre Auth.
If the "Password:" prompt appears, key in the manager password and press OK.
3. On the Pre Auth menu, select Del Pre Auth.
4. Select the method to retrieve the Pre-Authorization you want to delete:
a. To retrieve by Sequence Number:
A. Select Seq #.
B. Key in the 6-digit Sequence Number printed on the Pre-Authorization transaction’s receipt and
press OK (see Finding Sequence and Orig Auth Numbers). If the message "No Record Found"
appears, repeat step 3.
OR
b. To retrieve by Account Number:
A. Select Acct#.
B. Key in the last 4 digits of the credit card number and press OK.
The terminal displays the following information about the Pre-Authorization:
Seq#:
Card Name
Transaction Type
Card Number
Amount
5. Compare the displayed information to the Pre-Authorization's receipt. If the information matches,
select Yes (to cancel the Deletion, select No).
Note: If the displayed Pre-Authorization is not the one you want, select Next to display the next PreAuthorization in the terminal memory. Repeat until the transaction you want is displayed.
6. Follow any remaining prompts.
7. Process receipts (see Personalized Receipts and Signing Credit Card Receipts).
Note: If processing the Pre-Authorization Deletion on a Private Label Card, you may be prompted for a
Promo Code.
For details on basic prompts, see Responding to Basic Transaction Prompts.
5.4.7. Processing an Advice
Follow the procedure below to complete a voice-authorized Purchase on a credit card.
70
Moneris Vx810 Duet Operating Manual v1.1.01
5. Financial Transactions
To process an Advice:
1. On the applications menu, select DEBIT & CREDIT.
The message "Activating App..." appears followed by the transactions menu.
2. To begin the transaction, select Advice.
If the "Password:" prompt appears, key in the manager password and press OK.
3. At the "Amount:" prompt, key in the transaction amount and press OK.
If prompted for a Clerk ID ("Clerk Id:"), see Entering the Clerk ID.
If prompted for an Invoice Number ("Invoice Id:"), see Entering an Invoice Number.
4. Follow the terminal prompts below:
a. At the “Auth #:” prompt, key in the Voice Authorization Number that you wrote on the paper sales
draft when you called the Moneris Merchant Service Centre for Voice Authorization and press OK.
b. At the “Account #:” prompt, key in the card number and press OK.
c. At the “Exp Date (MMYY):” prompt, key in the card’s expiry date and press OK.
5. Follow the remaining terminal prompts.
If prompted for Tip Entry, see Entering a Tip Amount.
6. Process receipts (see Personalized Receipts and Signing Credit Card Receipts).
For details on basic prompts, see Responding to Basic Transaction Prompts.
5.4.8. Transacting a Purchase on a Corporate Card
Follow the procedure below to transact a Purchase on a Corporate Card. Corporate Cards are also referred
to as Purchasing Cards.
Note: If Tip Entry has been enabled for credit cards, the cardholder must perform some of the steps. The
bold text below indicates the additional steps required for a Corporate card transaction.
To transact a purchase on a Corporate Card:
1. On the applications menu, select DEBIT & CREDIT.
The message "Activating App..." appears followed by the transactions menu.
2. Select Purchase.
If the "Password:" prompt appears, key in the manager password and press OK.
The "Amount: $
0.00" prompt appears.
3. Key in the amount of the purchase and press OK.
If prompted for a Clerk ID ("Clerk Id:"), see Entering the Clerk ID.
If prompted for an Invoice Number ("Invoice #:"), key in the Invoice Number (max. 7 alphanumeric
characters) and press OK, or simply press OK to leave this blank.
The "Swipe or Insert Card:" prompt appears.
4a. Swipe the credit card on the terminal.
If the "Last 4 Digits:" prompt appears, key in the last 4 digits of the card number and press OK.
OR
4b. Manually process the transaction:
A. Key in the card number.
The "Exp Date (MMYY):" prompt appears.
Moneris Vx810 Duet Operating Manual v1.1.01
71
5. Financial Transactions
B. Key in the card's expiry date and press OK.
The "Validation Code:" prompt appears.
If the "Imprint Card Press OK Key" prompt appears, you must take a manual imprint of the credit
card. For help, see Taking a Manual Imprint of a Credit Card.
C. Key in the validation code found on the back of the card and press OK.
If you do not have the validation code, press OK and, when the "Code present?" prompt appears,
select No.
If the "Customer Press OK To Continue" prompt appears, the cardholder must respond to the
cardholder prompts. For help, see Entering a Tip Amount.
If the "Select Language" prompt appears, select ENGL for English or select FREN for French.
The cardholder receipt will be printed in the selected language.
The xST Amt: entry screen appears.
5. Key in the tax amount and press OK, or simply press OK to leave this blank.
The "Reference #:" entry screen appears,
6. Key in the customer reference number (max. 16 alphanumeric characters) and press OK, or
simply press OK to leave this blank.
If the "Promo Code:" prompt appears, key in the promotion code (max. 6 alphanumeric characters)
supplied to you by the Private Label card provider and press OK, or simply press OK to leave this
blank.
The terminal communicates with the Moneris Host.
7. Please wait while the terminal processes the transaction.
The "APPROVED" message appears.
The "Tear Receipt Press OK Key" message is displayed while the Merchant Copy of the receipt is printed
then the terminal begins beeping.
8. Tear off the Merchant Copy of the receipt and give it to the cardholder to sign.
9. Press OK to stop the beeping and print the Customer Copy of the receipt, or simply press CANC
ANNUL to stop the beeping and return to the transactions menu.
If the Customer Copy of the receipt is printed, give it to the cardholder then press OK to return to the
transactions menu.
5.4.9. Transacting a Payment on a Private Label Card
This transaction allows a cardholder to make a payment towards the balance on their Private Label credit
card.
To transact a payment on a Private Label card:
1. On the applications menu, select DEBIT & CREDIT.
The message "Activating App..." appears followed by the transactions menu.
2. Select Payment.
If the "Password:" prompt appears, key in the manager password and press OK.
The "Amount: $0.00" prompt appears.
3. Key in the amount of the payment and press OK.
If prompted for a Clerk ID ("Clerk Id:"), see Entering the Clerk ID.
If prompted for an Invoice Number ("Invoice #:"), key in the Invoice Number (max. 7 alphanumeric
characters) and press OK, or simply press OK to leave this blank.
The "Swipe or Insert Card:" prompt appears.
72
Moneris Vx810 Duet Operating Manual v1.1.01
5. Financial Transactions
4a. Swipe the private label credit card on the terminal.
If the "Last 4 Digits:" prompt appears, key in the last 4 digits of the card number and press OK.
OR
4b. Manually process the transaction:
A. Key in the card number.
The "Exp Date (MMYY): prompt appears.
B. Key in the card's expiry date and press OK.
The "Validation Code:" prompt appears.
If the "Imprint Card Press OK Key" prompt appears, you must take a manual imprint of the credit
card. For help, see Taking a Manual Imprint of a Credit Card.
C. Key in the validation code found on the back of the card and press OK.
If you do not have the validation code, press OK and, when the "Code present?" prompt appears,
select No.
If the "Select Language" prompt appears, select ENGL for English or select FREN for French.
The Customer Copy of the receipt will be printed in the selected language.
If the "Promo Code:" entry screen appears, key in the promotion code (max. 6 alphanumeric
characters) supplied to you by the Private Label card provider and press OK, or simply press OK to
leave this blank.
The terminal communicates with the Moneris Host.
5. Please wait while the terminal processes the transaction.
The APPROVED message appears.
The "Tear Receipt Press OK Key" message is displayed while the Merchant Copy of the receipt is printed
then the terminal begins beeping.
6. Tear off the Merchant Copy of the receipt and give it to the cardholder to sign.
7. Press OK to stop the beeping and print the Customer Copy of the receipt, or simply press CANC
ANNUL to stop the beeping and return to the transactions menu.
If the Customer Copy of the receipt is printed, give it to the cardholder then press OK to return to the
transactions menu.
5.4.10. Manually Processing Credit Card Transactions
In order to process credit card Purchases and Refunds manually you must have a paper sales draft for the
card type (e.g., a Visa sales draft for a Purchase on a Visa card) and an imprinter. Contact the Moneris
Merchant Service Centre to obtain these supplies if you do not have them.
IMPORTANT: Debit transactions CANNOT be processed manually.
To manually process a credit card transaction when the terminal is down:
When the terminal is down, report the problem to the Moneris Merchant Service Centre and use one of
the following procedures to complete a credit card Purchase or Refund transaction:
•
If the transaction amount is less than your floor limit, see “Manually Processing Credit Card
Transactions UNDER the Floor Limit” below.
•
If the transaction amount is higher than your floor limit, “Manually Processing Credit Card
Transactions OVER the Floor Limit” below.
Note: Floor limits are established by Moneris. Contact your Moneris account manager for more
information.
Moneris Vx810 Duet Operating Manual v1.1.01
73
5. Financial Transactions
Manually Processing Credit Card Transactions UNDER the Floor Limit
While the terminal is down:
•
Take an imprint of the customer's Credit Card.
When the terminal is functioning properly again:
1. Process a Purchase or Refund transaction on the terminal for the amount on the sales draft. You will
need to key in the card number, expiry date and validation code (3 or 4 digit V-code on the back of the
credit card).
2. Attach the Merchant Copy of the terminal's receipt to the Merchant Copy of the sales draft and retain
the two copies for your records.
Manually Processing Credit Card Transactions OVER Floor Limit
While the terminal is down:
1. Take an imprint of the customer's credit card.
2. Call the Moneris Merchant Service Centre to obtain a Voice Authorization Number for the transaction
and record the Voice Authorization Number on the paper sales draft.
When the terminal is functioning properly again:
1. Process an Advice transaction on the terminal for the amount on the sales draft. You will need to key in
the card number, expiry date, validation code (3 or 4 digit V-code on the back of the credit card) and
Voice Authorization Number.
2. Attach the Merchant Copy of the terminal's receipt to the Merchant Copy of the sales draft and retain
the two copies for your records.
74
Moneris Vx810 Duet Operating Manual v1.1.01
6. Admin Transactions
•
Logging On
•
Logging Off
•
Re-Initializing the Terminal
•
Demo Mode
•
Demo Mode Transactions
•
Entering Demo Mode
•
Exiting Demo Mode
6.1. Logging On
If the "Host Logon Required" prompt appears, you must log on before you can perform transactions on
the terminal.
To log on to the terminal:
1. On the applications menu, select DEBIT & CREDIT.
The transactions menu appears.
2. Press OK to access the CONFIGURATION menu.
3. Scroll down and select Host Logon.
4. At the "Password:" prompt, key in the manager password and press OK.
The terminal communicates with the Moneris Host, displays "Logon Successful" then returns to the
transactions menu.
The terminal is now ready to process transactions. If this is your first time using the terminal, we suggest
using Demo Mode to practice performing transactions.
Note: To ensure unauthorized transactions cannot be processed, the terminal should be logged off at the
end of the business day.
6.2. Logging Off
To ensure unauthorized transactions cannot be processed, your terminal should be logged off at the end of
the business day.
To log off the terminal:
1. On the applications menu, select DEBIT & CREDIT.
The transactions menu appears.
2. Press OK to access the CONFIGURATION menu.
3. Scroll down and select Host Logoff.
The terminal communicates with the Moneris Host, displays "Logoff Successful" then returns to the
transactions menu.
Note: To process transactions again, the terminal must be logged on.
Moneris Vx810 Duet Operating Manual v1.1.01
75
6. Admin Transactions
6.3. Re-Initializing the Terminal
This function sends information about the terminal to the Moneris Host and receives additional
parameters and information from the host.
If changes have been made to your terminal configuration or your merchant account, the terminal may
display 'Init Required' or the Merchant Service Centre may call and ask you to re-initialize your terminal.
To re-initialize the terminal:
1. On the applications menu, select DEBIT & CREDIT.
The message "Activating App..." is displayed then the transactions menu appears.
2. Press OK to display the CONFIGURATION menu.
3. Scroll down and select Initialize.
If the "Password:" prompt appears, key in the manager password and press OK.
4. At the "Retain Settings?" prompt, select Yes.
The terminal communicates with the Moneris Host (this may take a few minutes). When the initialization
is complete, the transactions menu re-appears.
5. If the "Host Logon Required" prompt appears, log on to the terminal (see “Logging On” above).
Note: For instructions on initializing your terminal the first time, see Initializing Your Terminal.
6.4. Demo Mode Transactions
Most transactions can be practiced in Demo Mode on the terminal:
•
Financial Transactions
•
Reporting Functions
•
Administrative Functions
•
Shortcuts
When using Demo Mode, keep in mind the following points:
•
Transactions that cannot be performed do not appear on the terminal screen while in Demo Mode.
•
The terminal can NOT perform a Batch Close in Demo mode. You can clear transactions from the
Demo Mode batch by using the Batch Clear function while in Demo Mode or by selecting Yes at the
"Clear Batch" prompt when you exit Demo Mode.
•
Demo transactions are limited to a maximum amount of $1.00.
•
If Tip Processing is enabled, the maximum tip amount in Demo Mode is $1.00.
•
If Cashback is enabled, the maximum Cashback amount in Demo Mode is $1.00.
•
The maximum final total amount (Purchase + Tip + Cashback) is $3.00.
6.4.1. Financial Transactions
The following financial transactions are available during Demo Mode regardless of the type of card used.
Purchasing Cards (i.e., Corporate Cards) cannot be used while in Demo Mode.
76
•
Purchase
•
Refund
•
Correction
•
Pre-Authorization
Moneris Vx810 Duet Operating Manual v1.1.01
6. Admin Transactions
•
Pre-Authorization Completion
•
Pre-Authorization Deletion
•
Advice
6.4.2. Functions
Reporting Functions
Admin Functions
Shortcuts
Stored Tran Rpt
Reprint
3 = Paper feed
Deposit Totals
Demo
6 = Quick Setup
Clerk SubTotals
Batch Review
9 = Cash Receipt
Multi Terminal
Batch Clear
OK = Configuration menu
Merch SubTotals
* = Applications menu
Terminal Parms
Terminal Stats
EMV Param Rpt
EMV Diagnostics
Pre-Auth Rpt
The following Setup functions should NOT be used in Demo Mode although they are available:
•
Printer
•
Comm
•
Host
•
Merchant IDs
•
IP Hosts
•
Date/Time
6.4.3. Entering Demo Mode
Demo Mode can be activated only on terminals that have been configured, initialized and logged on.
IMPORTANT: You must close the current batch before you can enter Demo Mode. Do NOT clear
the batch.
Ensure that you exit Demo Mode before processing actual financial transactions. Transactions
processed in Demo Mode will NOT affect your terminal totals, financial accounts or customer
accounts.
To enter Demo Mode:
1. On the applications menu, select DEBIT & CREDIT.
The message "Activating App..." is displayed then the transactions menu appears.
2. Press OK to display the CONFIGURATION menu.
3. Select Setup.
If the "Password:" prompt appears, key in the manager password and press OK.
4. On the Setup menu, select Demo.
Moneris Vx810 Duet Operating Manual v1.1.01
77
6. Admin Transactions
5. At the "Demo Mode" prompt, select On.
If the "Batch Not Empty Clear Batch" message appears, the terminal has transactions in terminal
memory and you must follow the steps below:
a. Select No. The "TRANS CANCELLED" message appears.
b. Press OK to return to the Setup menu then press CANC ANNUL two times to return to the
transactions menu.
c. Perform a Batch Close then try entering Demo Mode again.
IMPORTANT: Do NOT select Yes. If you do, the batch will be deleted and you will lose all
transactions in the batch in the terminal memory. You will be unable to close that batch and will
be out of balance with the Moneris Host.
The terminal displays "DEMO MODE ON" then the Setup menu re-appears with the DEMO icon (
displayed on the left side of the screen.
)
6. Press CANC ANNUL two times to return to the transactions menu.
IMPORTANT: Ensure that you exit Demo Mode before processing actual financial transactions.
Transactions processed in Demo Mode will not affect your terminal totals, financial accounts and
customers’ accounts.
6.4.4. Exiting Demo Mode
To exit Demo Mode:
1. On the applications menu, select DEBIT & CREDIT.
The message "Activating App..." is displayed then the transactions menu appears.
2. Press OK to display the CONFIGURATION menu.
3. Select Setup.
If the "Password:" prompt appears, key in the manager password and press OK.
4. On the Setup menu, select Demo.
5. At the "Demo Mode" prompt, select Off.
If the "Batch Not Empty Clear Batch" message appears, the terminal has Demo transactions in terminal
memory and you must do the following:
•
Select Yes.
The terminal displays "BATCH DELETED" and all Demo transactions in the terminal memory
are deleted.
The "DEMO MODE OFF" message is displayed then the Setup menu re-appears WITHOUT the DEMO
icon displayed on the left side of the screen.
6. Press CANC ANNUL two times to return to the transactions menu.
IMPORTANT: All transactions performed on the terminal as of this point will be in normal mode
and WILL affect your terminal totals, your financial accounts and your customers’ accounts.
78
Moneris Vx810 Duet Operating Manual v1.1.01
7. Reports
•
Stored Transactions
•
Merchant Sub-Totals
•
Clerk Sub-Totals
•
Deposit Totals
•
Multi-Terminal Deposit Totals
•
Pre-Auth Transactions
•
Tip
•
Batch Totals
•
Terminal Parameters
•
EMV Parameters
•
Private Label Card Transactions on Reports
7.1. Stored Transactions Report
This report prints a detailed list of all transactions for the current batch in the terminal's memory, sorted
by date. The report also prints transaction type totals sorted by card type and grand totals sorted by
transaction type.
Note: This report does not include Pre-Authorization transactions. These transactions are listed in The
Pre-Auth Transactions Report.
To print the Stored Transactions Report:
1. On the applications menu, select DEBIT & CREDIT.
The message "Activating App..." is displayed then the transactions menu appears.
2. Press the REPORTS key (first purple key on the right).
If the "Password:" prompt appears, key in the mapager Password and press OK.
3. Select Stored Tran.
The "Rpt Period:" prompt appears.
4a. To print transactions and totals for a specific date:
a. Select Date.
b. At the "Date (YYYYMMDD):" prompt, key in the date and press OK.
4b. To print all transactions and totals:
a. Select All.
The terminal prints the Stored Transactions report and returns to the REPORTS menu.
5. Press CANC ANNUL to return to the transactions menu.
7.2. Merchant Sub-Totals Report
This report prints totals of all transaction types in the current batch on the Moneris Host. Transaction type
totals are sorted by card type and grand totals are sorted by transaction type. The report does NOT close
the batch.
Moneris Vx810 Duet Operating Manual v1.1.01
79
7. Reports
To print the Merchant Sub-Totals Report:
1. On the applications menu, select DEBIT & CREDIT.
The message "Activating App..." is displayed then the transactions menu appears.
2. Press the REPORTS key (first purple key on the right).
If the "Password:" prompt appears, key in the manager password and press OK.
3. Scroll down and select Merch SubTotals.
The terminal communicates with the Moneris Host.
4. If the terminal displays "APPROVED," press OK.
The terminal prints the report and returns to the REPORTS menu.
5. Press CANC ANNUL to return to the transactions menu.
7.3. Clerk Sub-Totals Report
This report prints totals for all transactions in the current batch on the Moneris Host processed by one or
more Clerks or by all Clerks. Transaction type totals are sorted by card type and grand totals are sorted by
transaction type, by Clerk ID.
Note: Clerk IDs must be set up for your merchant account on the Moneris Host before this report can be
used (see Clerk Mode).
IMPORTANT: Clerk Subtotals must be cleared on a regular basis (weekly is recommended). If
not, the Moneris Host will automatically clear the totals when the number of transactions for a card
type within a Clerk ID reaches 10,000.
7.3.1. For One or More Clerks
To print the Clerk Sub-Totals Report for one or more Clerks:
1. On the applications menu, select DEBIT & CREDIT.
The message "Activating App..." is displayed then the transactions menu appears.
2. Press the REPORTS key (first purple key on the right).
If the "Password:" prompt appears, key in the manager password and press OK.
3. Select Clerk SubTotals.
4. At the "Clerk Id:" prompt, key in the Clerk ID and press OK.
Note: You must enter a Clerk ID.
The "Add Another Clerk?" prompt appears.
5a. To print sub-totals only for the keyed-in Clerk ID, select No.
OR
5b. To print sub-totals for more Clerk IDs, select Yes then repeat steps 4 and 5 for each additional Clerk
ID.
6. At the "Clear Totals?" prompt, select No.
The terminal communicates with the Moneris Host then prints the report and returns to the first
REPORTS menu screen.
7. Press CANC ANNUL to return to the transactions menu.
80
Moneris Vx810 Duet Operating Manual v1.1.01
7. Reports
7.3.2. For All Clerks
To print the Clerk Sub-Totals Report for all Clerks:
1. On the applications menu, select DEBIT & CREDIT.
The message "Activating App..." is displayed then the transactions menu appears.
2. Press the REPORTS key (first purple key on the right).
If the "Password:" prompt appears, key in the manager password and press OK.
3. Select Clerk SubTotals.
4. At the "Clerk Id:" prompt, press the (*) ASTERISK key then press OK.
5. When the "Add Another Clerk?" prompt appears, select No.
6. At the "Clear Totals?" prompt, select No.
The terminal communicates with the Moneris Host then prints the report and returns to the REPORTS
menu.
7. Press CANC ANNUL to return to the transactions menu.
7.4. Deposit Totals Report
This report prints totals for all transactions in closed batches on the Moneris Host. Transaction type totals
are sorted by card type and grand totals are sorted by transaction type.
To print the Deposit Totals Report:
1. On the applications menu, select DEBIT & CREDIT.
The message "Activating App..." is displayed then the transactions menu appears.
2. Press the REPORTS key (first purple key on the right).
If the "Password:" prompt appears, key in the manager password and press OK.
3. On the REPORTS menu, select Deposit Totals.
The terminal communicates with the Moneris Host.
4. If the terminal displays "APPROVED", press OK.
The terminal prints the report and returns to the REPORTS menu.
5. Press CANC ANNUL to return to the transactions menu.
7.5. Multi-Terminal Deposit Totals Report
This report prints totals for all transactions in closed batches on the Moneris Host, for all terminals.
Transaction type totals are sorted by Terminal Name then by card type; overall transaction type totals are
sorted by card type; grand totals are sorted by transaction type.
Note: Terminal Names must be set up for your merchant account on the Moneris Host before this report
can be used (see Configuring Multi-Terminal Reporting).
To print the Multi-Terminal Deposit Totals Report:
1. On the applications menu, select DEBIT & CREDIT.
The message "Activating App..." is displayed then the transactions menu appears.
2. Press the REPORTS key (first purple key on the right).
If the "Password:" prompt appears, key in the manager password and press OK.
3. Select Multi Term.
The "Terminal Name:" prompt appears.
4a. To print the report for a specific terminal, key in the Terminal Name, press OK and proceed to step 5.
OR
Moneris Vx810 Duet Operating Manual v1.1.01
81
7. Reports
4b. To print the report for all terminals, press the (*) ASTERISK key, press OK and proceed to step 6.
5. At the "Add Another Terminal?" prompt, select Yes, repeat step 4 until you have added all the desired
terminals (maximum 20) then press No.
6. At the "Deposit Ttls" prompt, select Yes.
The terminal prints the report and returns to the REPORTS menu.
7. Press CANC ANNUL to return to the transactions menu.
7.6. Pre Auth Transactions Report
This report prints details of all open Pre-Authorization transactions in the terminal memory (i.e., PreAuthorizations that have not been completed).
To print the Pre Auth Transactions Report:
1. On the applications menu, select DEBIT & CREDIT.
The message "Activating App..." is displayed then the transactions menu appears.
2. Select Pre Auth.
3. At the Pre Auth menu, select Pre-Auth Rpt.
If the "Password:" prompt appears, key in the manager password and press OK.
The terminal prints the report and returns to Pre Auth menu.
4. Press CANC ANNUL to return to the transactions menu.
7.7. Tip Report
This report prints tip activity for a given Clerk or for all Clerks, for a given date or for the current batch.
Clerk totals are sorted by card type and totalled for all cards; overall totals for all Clerks are sorted by
card type and totalled for all cards.
Note: Tip Processing must be enabled and Clerk IDs must be set up for your merchant account on the
Moneris Host before this report can be used (see Tip Processing and Clerk Mode).
To print the Tip Report:
1. On the applications menu, select DEBIT & CREDIT.
The message "Activating App..." is displayed then the transactions menu appears.
2. Press the REPORTS key (first purple key on the right).
If the "Password:" prompt appears, key in the manager password and press OK.
3. On the REPORTS menu, select Tip Report.
The "Clrk Rpt Opt" prompt appears.
4a. To print the report for a specific Clerk, select One and proceed to step 5.
OR
4b. To print the report for all Clerks, select All and proceed to step 6.
5. At the "Clerk Id:" prompt, key in the Clerk ID and press OK.
6. At the "Rpt Period:" prompt:
a. To print the report for a specific date, select Date and, at the "Date (YYYYMMDD):" prompt, key
in the date and press OK.
OR
b. To print the report for all tip activity in the current batch, select All.
The terminal prints the report and returns to the REPORTS menu.
82
Moneris Vx810 Duet Operating Manual v1.1.01
7. Reports
7. Press CANC ANNUL to return to the transactions menu.
7.8. Batch Totals Report
This report is printed as part of the Merchant Batch Close process but can be printed WITHOUT closing
the batch.
To print the Batch Totals Report:
1. On the applications menu, select DEBIT & CREDIT.
The message "Activating App..." is displayed then the transactions menu appears.
2. Scroll down and select Batch Close.
If the "Password:" prompt appears, key in the manager password and press OK.
3. At the "Close Type?" prompt, select Sngl.
The terminal communicates with the Moneris Host and prints the Batch Totals section of the Batch Close
Report.
4. At the "Prt Stored Trans?" prompt, select No.
5. At the "Close Batch?" prompt, select No.
The terminal displays a "Batch Close Failed" message, finishes printing the report with the message on it
and returns to the transactions menu.
7.9. Terminal Parameters Report
This report provides a printout of the current parameter configuration on the terminal. Included in the
printout are:
•
software revision number (Application ID),
•
terminal identification information (Terminal Serial #:),
•
PINPad configuration,
•
features enabled from the CONFIGURATION menu, including Terminal Parameters, Debit
Parameters and Tip Parameters,
•
Tip Processing setup (Tip Parameters),
•
receipt setup (Receipt Parameters) and
•
communications parameters (Dial Parameter and Ethernet Parameters).
To print the Terminal Parameters Report:
1. On the applications menu, select DEBIT & CREDIT.
The message "Activating App..." is displayed then the transactions menu appears.
2. Press the REPORTS key (first purple key on the right).
If the "Password:" prompt appears, key in the manager password and press OK.
3. On the REPORTS menu, select Terminal Parms.
The terminal prints the report and returns to the REPORTS menu.
4. Press CANC ANNUL to return to the transactions menu.
7.10. EMV Parameters Report
This report prints a list of EMV parameters and their values by EMV card record number.
Moneris Vx810 Duet Operating Manual v1.1.01
83
7. Reports
To print the EMV Parameters Report:
1. On the applications menu, select DEBIT & CREDIT.
The message "Activating App..." is displayed then the transactions menu appears.
2. Press the REPORTS key (first purple key on the right).
If the "Password:" prompt appears, key in the manager password and press OK.
3. On the REPORTS menu, scroll down and select EMV Param Rpt.
The terminal prints the report and returns to the REPORTS menu.
4. Press CANC ANNUL to return to the transactions menu.
7.11. Private Label Card Transactions on Reports
Private Label Card transactions appear as a separate card type on all reports that include credit card
transactions. These are:
84
•
Stored Transactions
•
Merchant Sub-Totals
•
Clerk Sub-Totals
•
Deposit Total
•
Multi-Terminal Deposit Totals
•
Batch Review
Moneris Vx810 Duet Operating Manual v1.1.01
8. The Ernex Programs
The Ernex programs allow you to offer your customers an electronic card-based program that is activated
and processed through the Moneris Vx810 Duet terminal. There are two programs available:
•
Gift Cards: This program allows you to offer your customers stored-value gift cards for pre-defined
dollar values as well as variable-value cards and rechargeable cards. The program is available to
small businesses as the Moneris Gift Card program and to national chains as a customized program.
•
Loyalty Points: This program allows you to reward customer loyalty by awarding points based on
the dollar value of purchases a cardholder makes. The program is available to small businesses as the
Moneris Loyalty Card program and to national chains as a customized program.
All transactions, and administrative and configuration functions begin at the GIFT & LOYALTY
transactions menu.
8.1. Enabling Ernex
To enable an Ernex program on your terminal:
1. Contact Moneris Solutions.
If you wish to have a gift or loyalty program set up for a national chain, you will also need to contact
Ernex.
2. Initialize the terminal to the Moneris Host.
3. Key in the Ernex parameter values:
a. Key in your Moneris Merchant ID, Moneris Terminal ID and Ernex Terminal ID.
b. Key in the Ernex device type: 7O (capital letter “o”).
c. Key in the Ernex Route Code: 67.
4. Initialize the terminal to the Ernex Host.
8.2. Ernex Transactions
8.2.1. Activate or Load Value on an Ernex Card
To activate or load additional value on a Moneris gift card:
1. On the applications menu, select GIFT & LOYALTY.
The message "Activating App..." is displayed then the transactions menu appears.
2. Select Activate/Load.
The "Swipe or Enter Card" prompt appears.
3a. Swipe the gift or loyalty card.
OR
3b. Key in the loyalty card number and press OK.
The terminal displays the last four digits of the card number.
If the "Enter CVC" prompt appears, key in the 3-digit validation code on the back of the card and press
OK.
If the "Clerk ID" prompt appears, key in the Clerk ID and press OK.
Moneris Vx810 Duet Operating Manual v1.1.01
85
8. The Ernex Programs
If the "Enter Amount" prompt appears, key in the dollar amount to be loaded on the card and press
OK.
If prompted, key in the additional transaction information and press OK.
If the "Invoice Number" prompt appears, key in the Invoice Number and press OK. The terminal
displays "Approved".
The terminal displays "Balance Due" then the "Press OK Key" prompt appears.
4. To complete the transaction, follow the steps under “Ernex Transaction With a Balance Due” below.
8.2.2. Ernex Transaction With a Balance Due
Gift card purchases, activations and reloads can be paid for with more than one payment type to cover
transactions when there is a balance due. For example, if the total amount due is $50 and a gift card has
only $30 remaining on it, the balance due of $20 can be paid for with cash.
When the terminal displays the "Balance Due $###.##" message followed by the "Press OK key"
prompt:
1. Press OK.
The "Select Payment For Balance Due" prompt appears.
2. Use the terminal’s function keys to select the payment type:
For payment by debit or credit card, select DbCr.
For payment by gift card, select Gift.
For payment by cash, select Cash.
For payment by split tender, select Splt.
The terminal displays "Approved" or "Tear Receipt" and prints the Customer Copy of the receipt then
displays the "Press OK key" prompt.
3. Press OK to print the Merchant Copy of the receipt.
4. If you selected:
DbCr: The terminal begins a Purchase transaction (debit or credit) beginning at the "Swipe or Insert
Card" prompt.
Gift: The terminal begins an Ernex Gift Card Purchase transaction beginning at the "Swipe or Enter
Card" prompt.
Cash: The transaction is complete.
Splt: The terminal begins a Purchase transaction (debit or credit) beginning at the "Swipe or Insert
Card" prompt.
The transaction is completed when the balance due is $0.
8.2.3. Voiding an Ernex Gift or Loyalty Transaction
Follow the procedure below to void a gift or loyalty card transaction.
IMPORTANT: This transaction must be performed in the same batch and for the same amount as
the original transaction.
To void an Ernex transaction:
1. On the applications menu, select GIFT & LOYALTY.
The message "Activating App..." is displayed then the transactions menu appears.
86
Moneris Vx810 Duet Operating Manual v1.1.01
8. The Ernex Programs
2. Select Void.
The "Password:" prompt appears.
3. Key in the manager password and press OK.
The "Swipe or Enter Card" prompt appears.
4. Swipe the gift or loyalty card.
If the "Enter CVC" prompt appears, key in the 3-digit validation code on the back of the card and press
OK.
If the "Clerk ID" prompt appears, key in the Clerk ID and press OK.
The "Ernex Ref Number" prompt appears.
5. Key in the original reference number from the gift card or loyalty card transaction receipt and press
OK.
If the "Invoice Number" prompt appears, key in the Invoice Number and press OK.
The terminal displays "Approved" and prints the Customer Copy of the receipt, then the "Press OK key"
prompt appears.
6. Press OK to print the Merchant Copy of the receipt and return to the GIFT & LOYALTY transactions
menu.
8.2.4. Ernex Card Inquiry
Display or print a Moneris gift card or loyalty card balance and expiry date.
To process and Ernex card inquiry:
1. On the applications menu, select GIFT & LOYALTY.
The message "Activating App..." is displayed then the transactions menu appears.
2. Select Card Inquiry.
The "Swipe or Enter Card" prompt appears.
3a. Swipe the gift card or loyalty card.
OR
3b. Key in the gift card number or the loyalty card number and press OK.
The terminal displays the last four digits of the card number.
If the "Enter CVC" prompt appears, key in the 3-digit validation code on the back of the card and press
OK.
If the "Clerk ID" prompt appears, key in the Clerk ID and press OK.
The "Card Inquiry 000 Inquiry Complete" prompt appears.
4. Press OK.
The terminal displays the Card Balance and Card Status then the "Press OK key" prompt appears.
5. Press OK.
The "Print Receipt?" prompt appears.
6. To print the receipt, select Yes.
OR
To skip printing the receipt, select No.
The terminal returns to the GIFT & LOYALTY transactions menu.
Moneris Vx810 Duet Operating Manual v1.1.01
87
8. The Ernex Programs
8.2.5. Reprinting an Ernex Receipt
This function prints a duplicate of a gift or loyalty receipt.
To reprint an Ernex receipt:
1. On the applications menu, select GIFT & LOYALTY.
The message "Activating App..." is displayed then the Ernex transactions menu appears.
2. Press the reprint key (second purple key from the right).
3. Select the receipt you wish to print:
To print the most recent receipt, select Last Receipt.
To print an earlier receipt, select Any Receipt.
The "Ernex Ref Number" prompt appears.
4. Key in the reference number and press OK.
The terminal reprints the Customer Copy of the receipt.
Note: The card number on the reprinted receipt will be masked, i.e., only the last four digits will be
printed in the clear. For example, *************1234.
8.3. Gift Card Transactions
8.3.1. Ernex Purchase With a Gift Card
Follow the procedure below to process the sale of goods or services using a Moneris gift card.
To process an Ernex Purchase with a gift card:
1. On the applications menu, select GIFT & LOYALTY.
The message "Activating App..." is displayed then the transactions menu appears.
2. Select Purchase.
The "Total Amount" prompt appears.
3. Key in the total amount and press OK.
The "Swipe or Enter Card" prompt appears.
4a. Swipe the gift card.
OR
4b. Key in the gift card number and press OK.
If the "Password:" prompt appears, key in the manager password and press OK.
The "Enter CVC" prompt appears.
5. Key in the 3-digit validation code on the back of the card and press OK.
If the "Clerk ID" prompt appears, key in the Clerk ID and press OK.
If prompted, key in the additional transaction information and press OK.
If the "Invoice Number" prompt appears, key in the Invoice Number and press OK.
The terminal displays "Approved" and prints the Customer Copy of the receipt.
6. If the terminal displays "Balance Due $###.##", follow the Ernex Transaction With a Balance Due
instructions to complete the transaction.
The "Press OK key" prompt appears.
88
Moneris Vx810 Duet Operating Manual v1.1.01
8. The Ernex Programs
7. Press OK to print the Merchant Copy of the receipt and return to the GIFT & LOYALTY transactions
menu.
8.3.2. Deactivate an Ernex Gift Card
Follow the procedure below to deactivate a Moneris gift card.
IMPORTANT: Once the gift card is deactivated, it can never be used again.
To deactivate a Moneris gift card:
1. On the applications menu, select GIFT & LOYALTY.
The message "Activating App..." is displayed then the transactions menu appears.
2. Select Deactivate.
The "Swipe or Enter Card" prompt appears.
3. Swipe the gift card.
The terminal displays the last four digits of the card number then the "Enter CVC" prompt appears.
4. Key in the 3-digit validation code on the back of the card and press OK.
If the "Clerk ID" prompt appears, key in the Clerk ID and press OK.
If prompted, key in the additional transaction information and press OK.
If the "Invoice Number" prompt appears, key in the Invoice Number and press OK.
The terminal displays "Approved" and prints the Customer Copy of the receipt then displays "Press OK
key".
5. Press OK to print the Merchant Copy of the receipt.
The "Transfer Balance to New Card?" prompt appears.
6a. To move the remaining balance to a new gift card:
a. Select Yes.
b. Proceed with step 3 in the Activation instructions using the new gift card.
IMPORTANT: A balance can be transferred only from and to variable amount gift cards.
6b. To deactivate the card and delete the balance:
a. Select No.
The gift card can no longer be used.
The terminal returns to the GIFT & LOYALTY transactions menu.
8.3.3. Ernex Refund With a Gift Card
Follow the procedure below to refund a gift card transaction. This credits a cardholder’s gift card for a
previous gift card Purchase transaction.
To process an Ernex Refund with a gift card:
1. On the applications menu, select GIFT & LOYALTY.
The message "Activating App..." is displayed then the transactions menu appears.
2. Select Refund.
The "Total Amount" prompt appears.
3. Key in the refund amount and press OK.
The "Swipe or Enter Card" prompt appears.
4. Swipe the gift card.
The "Enter CVC" prompt appears.
Moneris Vx810 Duet Operating Manual v1.1.01
89
8. The Ernex Programs
5. Key in the 3-digit validation code on the back of the card and press OK.
If the "Clerk ID" prompt appears, key in the Clerk ID and press OK.
If prompted, key in the additional transaction information and press OK.
The "Ernex Ref Number" prompt appears.
6a. Key in the original reference number from the Gift Card transaction receipt and press OK.
OR
6b. Press OK to leave this blank.
If the "Invoice Number" prompt appears, key in the Invoice number and press OK.
The terminal displays "Approved" and prints the Customer Copy of the receipt then displays the "Press
OK key" prompt.
7. Press OK to print the Merchant Copy of the receipt and return to the GIFT & LOYALTY transactions
menu.
8.4. Loyalty Card Transactions
8.4.1. Purchase With an Ernex Loyalty Card (Point Accumulation)
Follow the procedure below to process an accumulation of loyalty points with a Purchase by credit card,
debit card or cash; or with a credit Pre-Authorization, Pre-Authorization Completion or Advice.
IMPORTANT: When to awards points for a Pre Auth transaction:
Award points when you perform a Pre-Authorization if you know that you will NOT have the
loyalty card available later when you perform the Pre-Authorization Completion.
Award points when you perform the Pre-Authorization Completion if you know that you WILL
have the loyalty card available at that time.
To process a Purchase with an Ernex loyalty card:
1. Complete the Purchase, Pre-Authorization, Pre-Authorization Completion or Advice transaction that
will accumulate points (see Transaction Procedures).
2. On the applications menu, select GIFT & LOYALTY.
The message "Activating App..." is displayed then the transactions menu appears.
3. Select Refund.
The "Total Amount" prompt appears.
4. Key in the total amount and press OK.
The "Swipe or Enter Card" prompt appears.
Note: Consult your manager to determine the dollar amount to be entered (e.g., before taxes or including
tip amount) to award points.
5. Swipe the loyalty card.
OR
Key in the card number and press OK.
If the "Clerk ID" prompt appears, key in the clerk ID and press OK.
If prompted, key in the additional transaction information and press OK.
If the "Benefit Amt" prompt appears, key in the benefit amount to be awarded and press OK.
If the "Invoice Number" prompt appears, key in the Invoice Number and press OK.
90
Moneris Vx810 Duet Operating Manual v1.1.01
8. The Ernex Programs
The terminal displays "Approved" and prints the Customer Copy of the receipt then the "Press OK key"
prompt appears.
6. Press OK to print the Merchant Copy of the receipt and return to the GIFT & LOYALTY transactions
menu.
8.4.2. Deactivate an Ernex Loyalty Card
Follow the procedure below to deactivate a Moneris loyalty card.
IMPORTANT: Once the loyalty card is deactivated, it can never be used again.
To deactivate an Ernex loyalty card:
1. On the applications menu, select GIFT & LOYALTY.
The message "Activating App..." is displayed then the transactions menu appears.
2. Select Deactivate.
The "Swipe or Enter Card" prompt appears.
3. Swipe the loyalty card.
OR
Key in the loyalty card number and press OK.
The terminal displays the last four digits of the card number.
If the "Clerk ID" prompt appears, key in the clerk ID and press OK.
If prompted, key in the additional transaction information and press OK.
If the "Invoice Number" prompt appears, key in the Invoice number and press OK.
The terminal displays "Approved" and prints the customer copy of the receipt then displays "Press OK
key".
4. Press OK to print the merchant copy of the receipt and returns to the GIFT & LOYALTY transactions
menu.
8.4.3. Refund with an Ernex Loyalty Card
Follow this procedure to remove points from a cardholder’s account when a Purchase that qualified for
points is refunded (see Transaction Procedures).
To process a Refund with an Ernex loyalty card:
1. Complete the Refund transaction.
2. On the applications menu, select GIFT & LOYALTY.
The message "Activating App..." is displayed then the transactions menu appears.
3. Select Refund.
The "Total Amount" prompt appears.
4. Key in the refund amount and press OK.
The "Swipe or Enter Card" prompt appears.
5. Swipe the loyalty card.
OR
Key in the card number and press OK.
If the "Clerk ID" prompt appears, key in the Clerk ID and press OK.
If prompted, key in the additional transaction information and press OK.
If the "Benefit Amt" prompt appears, key in the benefit amount from the original loyalty card
transaction receipt and press OK.
Moneris Vx810 Duet Operating Manual v1.1.01
91
8. The Ernex Programs
The "Ernex Ref Number" prompt appears.
6. Key in the original reference number from the loyalty card transaction receipt and press OK.
OR
Press OK to leave this blank.
If the "Invoice Number" prompt appears, key in the invoice number and press OK.
The terminal displays "Approved" and prints the Customer Copy of the receipt, then the "Press OK key"
prompt appears.
7. Press OK to print the Merchant Copy of the receipt and return to the GIFT & LOYALTY transactions
menu.
8.4.4. Ernex Redemption With a Loyalty Card
Follow the procedure below to process a payment for goods and services using a Moneris loyalty card.
To process an Ernex Redemption with a loyalty card:
1. On the applications menu, select GIFT & LOYALTY.
The message "Activating App..." is displayed then the transactions menu appears.
2. Select Redemption.
The "Swipe or Enter Card" prompt appears.
3. Swipe the loyalty card.
OR
Key in the card number and press OK.
If the "Clerk ID" prompt appears, key in the Clerk ID and press OK.
If prompted, key in the additional transaction information and press OK.
The "Enter Amount" prompt appears.
4. Key in the total amount and press OK.
If the "Invoice Number" prompt appears, key in the Invoice Number and press OK.
The terminal displays "Approved" and prints the Customer copy of the receipt, then the "Press OK key"
prompt appears.
Note: If the terminal displays a "Balance Due" message, follow the steps in Ernex Transaction With a
Balance Due.
5. Press OK to print the Merchant Copy of the receipt and return to the GIFT & LOYALTY transactions
menu.
92
Moneris Vx810 Duet Operating Manual v1.1.01
8. The Ernex Programs
8.5. The Menu Feature in Ernex
8.5.1. The Ernex GIFT & LOYALTY Transactions Menu
The Ernex GIFT & LOYALTY transactions menu allows you to select the type of Ernex transaction you
wish to process.
MM/DD/YY
Select this menu item to:
HH:MM
Purchase
perform a gift card Purchase OR a loyalty card Purchase
Refund
perform a gift card Refund OR a loyalty card Refund
Redemption
perform a loyalty card Redemption
Activate/Load
activate a gift card OR load additional value on a gift card
Deactivate
deactivate a gift card or loyalty card, OR transfer a balance
from one gift card to another
Card Inquiry
display or print the balance and expiry date of a gift card or a
loyalty card
Void
void any gift card or loyalty card transaction
Clerk Admin
add and delete Clerk IDs to your gift or loyalty program
Setup
configure GIFT & LOYALTY program parameters
Ernex GIFT & LOYALTY Transactions Menu
To access the GIFT & LOYALTY transactions menu:
1. On the applications menu, select GIFT & LOYALTY.
The message "Activating App..." is displayed then the Ernex transactions menu appears.
Note: For instructions on navigating through the menus and editing parameters, see The Menu Feature.
8.5.2. The Ernex Reports Menu
The Ernex Reports menu allows you to print a number of Ernex reports.
MM/DD/YY
HH:MM
Trans List
Trans Inquiry
Clerk Subtotals
Batch Close
Config List
Select this menu item to:
print a list of all Ernex transactions in the terminal memory
print the Transaction Inquiry Report
print a list of totals for one or more clerks
(only active if Clerk Mode is configured)
close the Ernex batch
print a list of the current settings for each parameter
The Ernex Reports Menu
To access the Ernex Reports menu:
1. On the applications menu, select GIFT & LOYALTY.
The message "Activating App..." is displayed then the Ernex transactions menu appears.
2. Press the Reports key (first purple key on the right).
Moneris Vx810 Duet Operating Manual v1.1.01
93
8. The Ernex Programs
Note: For instructions on navigating through the menus and editing parameters, see The Menu Feature.
8.5.3. The Ernex Setup Menu
The Ernex Setup menu allows you to set values for a number of Ernex parameters on your terminal. Some
items may not appear on the terminal until a specific feature is enabled.
MM/DD/YY
HH:MM
Printer
Merchant
Select this menu item to:
configure the Ernex receipt format
configure a variety of Ernex features
Comm
Do Not Use
IP Hosts
Do Not Use
Terminal
configure a variety of Ernex features
Initialization
About
Date/Time
Demo
initialize the terminal to the Ernex Host
displays Ernex application version information (press OK to exit)
Do Not Use
enter and exit Ernex Demo Mode
The Ernex Setup Menu
To access the Ernex Setup menu:
1. On the applications menu, select GIFT & LOYALTY.
The message "Activating App..." is displayed then the Ernex transactions menu appears.
2. Select Setup.
If the "Password:" prompt appears, key in the manager password and press OK.
Note: For instructions on navigating through the menus and editing parameters, see The Menu Feature.
8.6. Ernex Admin Transactions
8.6.1. Ernex Batch Close
This function closes a Moneris gift/loyalty card batch on the terminal and the Ernex Host, and prints a
detailed transaction report.
To close an Ernex batch:
1. On the applications menu, select GIFT & LOYALTY.
The message "Activating App..." is displayed then the transactions menu appears.
2. Press the Reports key (first purple key on the right).
The Ernex Reports menu appears.
3. Select Batch Close.
If the "Clerk ID" prompt appears, key in the Clerk ID and press OK.
The terminal communicates with the Ernex Host then the "Print Details Report?" prompt appears.
4a. To include details for each transaction in the printed Batch Summary Report, select Yes. This
produces the same report as a Transaction Inquiry performed for all transactions in the current batch.
OR
94
Moneris Vx810 Duet Operating Manual v1.1.01
8. The Ernex Programs
4b.To print only totals in the report, select No.
The terminal prints the Batch Summary Report, communicates with the Ernex Host then returns to the
Reports menu.
5. Press the CANC ANNUL key to return to the GIFT & LOYALTY transactions menu.
8.6.2. Initialization to the Ernex Host
This function sends information about the terminal to the Ernex Host and receives additional parameters
and information from the Host. If you are setting up your terminal for the first time, follow the “First
Initialization” instructions below.
If changes have been made to your Ernex configuration or your Ernex account, the terminal may display
"Initialization Required" or the Merchant Service Centre may call and ask you to re-initialize your
terminal. Follow the “Re-Initialization” instructions below.
First Initialization
This function MUST be performed once after completing configuration in order to use your terminal to
process gift card or loyalty card transactions.
To perform the first Ernex initialization on your terminal:
1. On the applications menu, select GIFT & LOYALTY.
The message "Activating App..." is displayed then the transactions menu appears.
2. Select Setup.
The "Password:" prompt appears.
3. Key in the manager password and press OK.
4. On the Setup menu, select Initialization.
The "Ernex Term ID" prompt appears.
5. Key in the Ernex Terminal ID and press OK.
The terminal completes the initialization and returns to the Setup menu.
6. Press CANC ANNUL to return to the GIFT & LOYALTY transactions menu.
Re-Initialization
If changes have been made to your Ernex configuration or your Ernex account, the terminal may display
'Initialization Required' or the Merchant Service Centre may call and ask you to re-initialize your
terminal.
To re-initialize your terminal:
1. On the applications menu, select GIFT & LOYALTY.
The message "Activating App..." is displayed then the transactions menu appears.
2. Select Setup.
The "Password:" prompt appears.
3. Key in the manager password and press OK.
4. Select Initialization.
5. If the "Batch Not Empty Close Batch?" prompt appears:
Select Yes to close the Ernex batch.
OR
Select No to leave the Ernex batch open.
The "Ernex Term ID" prompt appears.
Moneris Vx810 Duet Operating Manual v1.1.01
95
8. The Ernex Programs
6. Press OK to continue.
The terminal completes the initialization and returns to the Setup menu.
7. Press CANC ANNUL to return to the GIFT & LOYALTY transactions menu.
8.7. Ernex Reports
8.7.1. Ernex Transaction List
The Ernex Transaction List displays or prints Moneris gift/loyalty card transactions stored on the terminal
in the current batch WITHOUT closing the batch.
To display a list of Ernex transactions:
1. On the applications menu, select GIFT & LOYALTY.
The message "Activating App..." is displayed then the Ernex transactions menu appears.
2. Press the Reports key (first purple key on the right).
The Ernex Reports menu appears.
3. Select Trans List.
If the "Clerk ID" prompt appears, key in the Clerk ID and press OK.
The "Print by Date or Batch?" prompt appears.
4a. To select transactions by date:
a. Select Date.
The "Date" prompt appears.
b. Key in the date and press OK.
OR
Press OK for all dates.
4b. To select transactions by batch number:
a. Select Batch Number.
The "Batch Num" prompt appears.
b. Key in the batch number (5 numeric digits) and press OK.
OR
Press OK for all batches
5. If the "Print Totals Only" prompt appears:
Select Yes to print just the terminal batch totals.
OR
Select No to print the transaction details as well as the terminal batch totals.
The terminal prints the list of Ernex transactions.
6. Press CANC ANNUL to return to the GIFT & LOYALTY transactions menu.
8.7.2. Ernex Transaction Inquiry
The Ernex Transaction Inquiry displays or prints details of Moneris gift and/or loyalty card transactions
in the current batch WITHOUT closing the batch.
To print a Transaction Inquiry for Ernex transactions:
1. On the applications menu, select GIFT & LOYALTY.
The message "Activating App..." is displayed then the Ernex transactions menu appears.
96
Moneris Vx810 Duet Operating Manual v1.1.01
8. The Ernex Programs
2. Press the Reports key (first purple key on the right).
The Ernex Reports menu appears.
3. Select Trans Inquiry.
If the "Clerk ID" prompt appears, key in the Clerk ID and press OK.
The “All” prompt appears.
4a. To print all transactions for all cards:
a. Select All.
The "Card #:" prompt appears.
b. Press OK for all cards.
4b. To scroll through the list of cards and select a transaction:
a. Scroll through the list:
To scroll forwards, select Next.
To scroll backwards, select Prev.
b. When the correct transaction is displayed, press OK to select it.
4c. To retrieve information about a specific card number.
a. Select Slct.
The "Card #" prompt appears.
b. Key in the gift or loyalty card number and press OK.
4d. To return to the Reports menu, select Exit.
The "Enter Amount:" prompt appears.
5. Key in a dollar amount and press OK.
OR
Press OK for all amounts.
The "Date:" prompt appears.
6. Key in the date and press OK.
OR
Press OK for all dates.
The "Select option" prompt appears.
7a. To view information on the terminal, select View and scroll through the information.
To scroll forwards, select Next.
To scroll backwards, select Prev.
7b. To print the transaction information, select Print.
The terminal prints the report and returns to the Reports menu.
7c. To return to the Reports menu, select Cncl.
8. Press the CANC ANNUL key to return to the GIFT & LOYALTY transactions menu.
8.7.3. Clerk Sub-Totals Report for Ernex Transactions
This report displays or prints the totals of all Moneris gift/loyalty transaction types for one or more Clerk
IDs in the current batch WITHOUT closing the batch.
IMPORTANT: Clerk IDs must be added to your merchant account on the Ernex Host before this
report can be generated.
Moneris Vx810 Duet Operating Manual v1.1.01
97
8. The Ernex Programs
To print the Clerk Sub-Totals report for Ernex transactions:
1. On the applications menu, select GIFT & LOYALTY.
The message "Activating App..." is displayed then the Ernex transactions menu appears.
2. Press the Reports key (first purple key on the right).
The Ernex Reports menu appears.
3. Select Clerk Subtotals.
If the "Clerk ID" prompt appears, key in the Clerk ID and press OK.
The "Zero Clerk totals" prompt appears.
4. To reset clerk totals to zero (0) upon completion of the report, select Yes.
OR
To continue accumulating clerk totals upon completion of the report, select No.
The "Select Clerks" prompt appears.
5a. To print subtotals for one clerk:
a. Select One.
b. Key in the Clerk ID and press OK.
5b. To print subtotals for a group of clerks:
a. Select Grp.
b. Key in the group ID and press OK.
5c. To print subtotals for more than one clerk:
a. Select List.
b. Key in the clerk ID and press OK.
The "Add more?" prompt appears.
c. Select Yes to add more clerks to the list.
OR
Select No to finish the list and print the report.
5d. To print subtotals for all clerks:
a. Select All.
6. The terminal prints the report and returns to the Reports menu.
7. Press CANC ANNUL to return to the GIFT & LOYALTY transactions menu.
8.7.4. Configuration List for Ernex
When you have finished configuring the gift/loyalty program on your terminal, print the Ernex
Configuration List to have a printed record of the terminal’s Ernex parameters.
To print the Ernex Configuration List:
1. On the applications menu, select GIFT & LOYALTY.
The message "Activating App..." is displayed then the Ernex transactions menu appears.
2. Press the Reports key (first purple key on the right).
The Ernex Reports menu appears.
3. Select Config List.
The terminal prints the report and returns to the Reports menu.
4. Press CANC ANNUL to return to the GIFT & LOYALTY transactions menu.
98
Moneris Vx810 Duet Operating Manual v1.1.01
8. The Ernex Programs
8.8. Ernex Configuration
8.8.1. Ernex Printer and Receipt Parameters
Use the Printer selection on the Ernex Setup menu to configure Ernex printer and receipt parameters.
Transactions menu (GIFT & LOYALTY) > Setup menu > Printer
Prmpt Beep Delay
Number of seconds to wait after beeping and displaying the "Tear Receipt; Press OK key" message
before printing the customer receipt.
Key in number of seconds and press OK (120 = default).
Pre-print
Sets the terminal to begin printing the receipt header before the transaction is complete.
Off
On = Default
Enable Printer
Turns the printer on or off.
On = Default
Off (results in the "Printer Disabled" message any time a report should be printed or the "Printer Error"
message any time a financial transaction is attempted)
Number of Copies
Sets the number of receipts printed for each transaction.
0 COPY - no receipts are printed
1 COPY - prints the customer copy
2 COPIES - prints the customer copy and the merchant copy = Default
2 COPIES OPTN - prints the customer copy and prompts for confirmation to print the merchant copy
3 COPIES - prints the customer copy, the merchant copy and a duplicate of the merchant copy
3 COPIES OPTN - prints the customer copy and the merchant copy and prompts for confirmation to
print a duplicate of the merchant copy
8.8.2. Ernex Merchant Parameters
Use the Merchant selection on the Ernex Setup menu to configure Ernex Merchant parameters.
Transactions menu (GIFT & LOYALTY) > Setup menu > Merchant
Merchant ID
Your Moneris Merchant ID.
Key in the numeric Merchant ID assigned to you by Moneris and press OK.
Moneris Vx810 Duet Operating Manual v1.1.01
99
8. The Ernex Programs
Moneris Term ID
Your Moneris Terminal ID.
Key in the numeric Terminal ID assigned to you by Moneris and press OK.
Ernex Term ID
Your Ernex Terminal ID.
Key in the 8-digit Terminal ID assigned to you by Ernex and press OK.
Rct Hdr 1 to 7
The seven lines of text that appear at the top of receipts.
Key in alphanumeric text (max. 40 characters) and press OK.
Footer 1 to 6
The six lines of text that appear at the bottom of receipts.
Key in alphanumeric text (max. 40 characters) and press OK.
Seq #
Not Editable
AutoClos Time
This parameter is updated to match the host each time the GIFT & LOYALTY application is initialized.
HHMMSS (230000 = default)
Auto Close Tries
The number of times the terminal tries to perform a System Batch Close.
Key in a 2-digit numeric value (displayed in seconds, e.g., 60 = 60 seconds) and press OK (3 =
default).
Auto Close Delay
The amount of time the terminal waits between attempts to perform a System Batch Close.
Key in a 2-digit numeric value and press OK (10 = default).
Auto Close Opt
Determines whether the terminal will attempt a System Batch Close each day or whether the batch must
be closed manually (Merchant Close).
No - you must perform a Batch Close manually (default).
Yes - the terminal will automatically attempt to close each day.
Beneft Amt Prmpt
Not Editable
100
Moneris Vx810 Duet Operating Manual v1.1.01
8. The Ernex Programs
Coupon Validation
Enables or disables coupon validation.
No (default)
Yes
Amt Verification
Enables or disables the verification prompt for the amount entered during an Ernex gift and/or loyalty
transaction.
No (default)
Yes
8.8.3. Ernex Communications Parameters
Use the Comm selection on the Ernex Setup menu to configure Ernex communications parameters.
Transactions menu (GIFT & LOYALTY) > Setup menu > Comm
Pri Auth Phone
Do Not Use
Sec Auth Phone
Do Not Use
Baud Rate
Do Not Use
Blind Dial
Do Not Use
Device Type
The Ernex device type.
Key in 7O (capital letter “o”) and press OK.
Dial Type
Do Not Use
Backup Support
Do Not Use
Num Retries
Do Not Use
Reversal Retries
Do Not Use
Moneris Vx810 Duet Operating Manual v1.1.01
101
8. The Ernex Programs
8.8.4. Ernex Terminal Parameters
Use the Terminal selection on the Ernex Setup menu to configure Ernex terminal parameters.
Transactions menu (GIFT & LOYALTY) > Setup menu > Terminal
Clrk/Srvr Mode
Enables or disables the "Clerk ID:" prompt. If Clerk Totals and Clerk ID input are supported, select
Prompt.
None (default)
Prompt
Terminal Beep
Turns the key beep on or off.
Off
On (default)
PABX Code
Do Not Use
Demo Mode
Turns Ernex Demo Mode on or off.
Off (default)
On
Man Inv Prompt
Enables or disables the "Invoice Number" prompt during Ernex gift and/or loyalty transactions. Entry at
the prompt is not required and can be bypassed by pressing OK.
Off (default)
On
Ernex Route Code
The Routing Identifier for the Ernex Host provided to you by Ernex or Moneris.
Key in 67 and press OK.
Language
Sets the terminal display language.
English (default)
French
102
Moneris Vx810 Duet Operating Manual v1.1.01
8. The Ernex Programs
8.8.5. Adding Clerk IDs to the Ernex Gift & Loyalty Application
Follow the procedure below to add Clerk IDs to be used when processing gift and loyalty transactions.
To add an Ernex Clerk ID:
1. On the applications menu, select GIFT & LOYALTY.
The message "Activating App..." is displayed then the transactions menu appears.
2. Select Clerk Admin.
If the "Password:" prompt appears, key in the manager password and press OK.
The CLERK ADMIN menu appears.
3. Select Add Clerk to add a clerk ID.
The "Clerk ID:" prompt appears.
4. Key in the Clerk ID to be added and press OK.
The "Clerk Added" message appears then the "Clerk ID:" prompt re-appears.
To continue adding Clerk IDs, repeat step 3 as needed. You can add a maximum of 20 Clerk IDs at one
time.
Note: When 20 Clerk IDs have been entered for addition, the terminal communicates with the host to add
the Clerk IDs to the Host.
5. When all the Clerk IDs have been entered for addition, press CANC ANNUL.
The "Send to Host?" prompt appears.
6. Select Yes to send the Clerk IDs to the host for addition.
The terminal communicates with the host then displays "APPROVED" and beeps.
7. Press OK to return to the CLERK ADMIN menu.
8. Press CANC ANNUL to return to the GIFT & LOYALTY transactions menu.
8.8.6. Deleting Clerk IDs From the Ernex Gift & Loyalty Application
Use this function to remove Clerk IDs so they can no longer be used when processing gift and loyalty
transactions.
To delete and Ernex Clerk ID:
1. On the applications menu, select GIFT & LOYALTY.
The message "Activating App..." is displayed then the transactions menu appears.
2. Select Clerk Admin.
If the "Password:" prompt appears, key in the manager password and press OK.
The CLERK ADMIN menu appears.
3. Select Delete Clerk to delete a clerk ID.
The "Clerk ID:" prompt appears.
4. Key in the Clerk ID to be removed and press OK.
The "Clerk Deleted" message appears then "Clerk ID:" entry screen re-appears.
To continue deleting Clerk IDs, repeat step 3 as needed.
5. When all the desired Clerk IDs have been deleted, press CANC ANNUL.
The "Send to Host?" prompt appears.
6. Select Yes to send the Clerk IDs to the host for deletion.
The terminal communicates with the host then displays "APPROVED" and beeps.
7. Press OK to return to the CLERK ADMIN menu.
Moneris Vx810 Duet Operating Manual v1.1.01
103
8. The Ernex Programs
8. Press CANC ANNUL to return to the GIFT & LOYALTY transactions menu.
8.9. Ernex Demo Mode
Demo Mode allows you and your employees to practice performing gift and loyalty transactions on your
Moneris terminal WITHOUT affecting your terminal total amounts, your financial accounts or your
customers’ accounts.
Note: Demo Mode is only available if you close your terminal batches on the terminal (Merchant Close).
If your terminal uses System Close, you cannot use Demo Mode.
While the terminal is in Demo Mode:
•
DEMO is printed at the top of each receipt and report.
•
There is no transaction maximum, however, demo transactions for more than $10 produce a decline
message.
•
Transaction amounts equal to or greater than $1.00 produce a "Balance Due" message with an
amount due of $1.00.
•
All gift and loyalty transactions are supported.
8.9.1. Entering Ernex Demo Mode
Note: Demo Mode can only be activated on terminals that have been configured and initialized to the
Ernex host.
IMPORTANT: You must close the current Ernex batch before you can enter Demo Mode. Do
NOT clear the batch.
To enter Ernex Demo Mode:
1. On the applications menu, select GIFT & LOYALTY.
The message "Activating App..." is displayed then the Ernex transactions menu appears.
2. Select Setup.
If the "Password:" prompt appears, key in the manager password and press OK.
The Setup menu appears.
3. Select Demo.
The "Demo Mode" prompt appears.
4. Select On.
The terminal displays "DEMO MODE ON" then the Setup menu re-appears with the DEMO icon
displayed on the left side of the screen.
5. Press CANC ANNUL two times to return to the GIFT & LOYALTY transactions menu.
IMPORTANT: Ensure that you exit Demo Mode before processing actual gift or loyalty
transactions. Transactions processed in Demo Mode will NOT affect your terminal totals, Ernex
accounts or customers’ accounts.
8.9.2. Exiting Ernex Demo Mode
To exit Ernex Demo Mode:
1. On the applications menu, select GIFT & LOYALTY.
The message "Activating App..." is displayed then the Ernex transactions menu appears.
2. Select Setup.
If the "Password:" prompt appears, key in the manager password and press OK.
104
Moneris Vx810 Duet Operating Manual v1.1.01
8. The Ernex Programs
The Setup menu appears.
3. Select Demo.
The "Demo Mode" prompt appears.
4. Select Off.
The "Batch Not Empty Clear Batch" message appears.
5. Select Yes to clear the demo batch so it does not affect totals of real Ernex transactions.
The terminal displays "DEMO MODE OFF" then the Setup menu re-appears. The DEMO icon is
no longer displayed on the screen.
6. Press CANC ANNUL two times to return to the GIFT & LOYALTY transactions menu.
Moneris Vx810 Duet Operating Manual v1.1.01
105
9. End-of-Day Procedure
The end-of-day procedure comprises a number of functions:
•
Batch Close
•
Batch Clear
•
Batch Review
•
Multi-Terminal Batch Close
9.1. Processing a Batch Close
Moneris has two types of settlement:
•
Merchant Close - You are responsible for settlement/Batch Close at the end of each day.
•
System Close - Moneris automatically settles your transactions at the end of the day.
To close multiple terminals at once, see Multi-Terminal Batch Close.
To print the Batch Totals report without closing the batch, see The Batch Totals Report.
9.1.1. Merchant Close
If your merchant account is set up for Merchant Close settlement, you must process a Batch Close
transaction in order to have the funds from your POS transactions deposited to your business account.
Here’s how:
Step 1: Process a Batch Close Transaction
1. On the applications menu, select DEBIT & CREDIT.
The message "Activating App..." is displayed then the transactions menu appears.
2. Scroll down and select Batch Close.
If the "Password:" prompt appears, key in the manager password and press OK.
3. At the "Close Type?" prompt, select Sngl.
The terminal communicates with the Moneris Host then prints the Batch Totals section of the Batch Close
Report.
4. At the "Prt Stored Trans?" prompt, select Yes to print the Stored Transactions Report.
5. At the "Rpt Period:" prompt:
a. To print the transactions for a specific date, select Date, key in the date at the Date
"YYYYMMDD:" prompt then press OK.
OR
b. To print all transactions in the batch, select All.
The terminal prints the Stored Transactions Report and the "Close Batch?" prompt appears.
Step 2: Confirmation
1. When the “Close Batch?” prompt appears, check that the totals on the Batch Totals Report match the
totals on the printed Stored Transactions Report.
If they match, select Yes to close the batch. The terminal finishes printing the Batch Close Report and
returns to the transactions menu.
If they do NOT match, select No to cancel the Batch Close process and call Moneris the next business
day for reconciliation assistance.
Moneris Vx810 Duet Operating Manual v1.1.01
107
9. End-of-Day Procedure
Note: If you don’t make a selection at the “Close Batch?” prompt within two minutes, the terminal will
beep three times then return to the transactions menu without closing the batch
9.1.2. System Close
If your account is set up for System Close settlement, Morris automatically settles your transactions for
you at the end of each day. You must verify transaction totals on a daily basis. Here’s how:
Step 1: Print a Stored Transactions Report.
Step 2: Print a Merchant Sub-Totals Report.
IMPORTANT: The Merchant Sub-Totals Report must be printed before 11:00 p.m. local time.
Step 3: Confirmation
Confirm that the totals on the Merchant Sub-Totals Report match the totals on the Stored Transactions
Report. If they do not match, contact Moneris within 30 days for reconciliation assistance.
9.2. Processing a Batch Clear
This function is primarily used by System Close merchants to clear the batch in the terminal memory. A
system close is initiated by the Moneris Host and clears the batch on the host but not on the terminal. If
the batch on the terminal is never cleared, any totals reports that rely on the terminal batch will continue
to increment each day.
To process a Batch Clear:
1. On the applications menu, select DEBIT & CREDIT.
The message "Activating App..." is displayed then the transactions menu appears.
2. Scroll down and select Batch Clear.
If the "Password:" prompt appears, key in the Manager Password and press OK.
3. At the "Clear Batch?" prompt, select Yes.
The terminal clears the batch and returns to the transactions menu.
Note: If you select No, the terminal returns to the transactions menu without clearing the batch.
9.3. Processing a Batch Review
The Batch Review process retrieves transactions in the current batch by using the following retrieval
methods:
•
Clerk ID (Clrk)
•
Transaction Amount (Amt)
•
Last 4 Digits of the Card Number (Acct)
•
Sequence Number (Seq#)
Once the transaction is retrieved, you can print a Transaction Inquiry, reprint the Merchant Copy of the
receipt, or correct (void) the transaction.
Note: To use the Clerk ID retrieval method, you must enable Clerk ID Prompting. The method is not
available if the Default Clerk ID option is enabled. This function does NOT include Pre-Authorization
transactions. To review these transactions, you must print a Pre-Auth Transactions Report.
To process a Batch Review:
1. On the applications menu, select DEBIT & CREDIT.
The message "Activating App..." is displayed then the transactions menu appears.
108
Moneris Vx810 Duet Operating Manual v1.1.01
9. End-of-Day Procedure
2. Scroll down and select Batch Review.
If the "Password:" prompt appears, key in the manager password and press OK.
3. At the "Retrieve By" prompt, select the method you want to use to retrieve transactions:
Clrk => key in the transaction Clerk ID and press OK.
Amt => key in the transaction amount press OK.
Acct => key in the last 4 digits of the transaction card number and press OK.
Seq# => key in the transaction Sequence Number and press OK. To review the first transaction in the
batch, just press OK.
The terminal displays the following information for the first transaction that matches the criteria:
Seq#:
Card Name
Transaction Type
Card Number
Amount
4a. Select the action you want to perform:
Corr => perform a Correction (Void) on that transaction
Prev => move back to the previous transaction that matches the criteria
Next => move forward to the next transaction that matches the criteria
Prnt => print the details displayed on the screen in the Transaction Inquiry report format
OR
4b. Press the REPRINT key (2nd purple key from the right) to reprint the Merchant Copy of the
displayed transaction's receipt.
5. Press CANC ANNUL twice to return to the applications menu.
9.4. Processing a Multi-Terminal Batch Close
This feature allows you to close batches by Terminal Name (i.e., on one or more terminals) or on all
terminals from another terminal.
This function does NOT compare totals stored in the terminal memory to totals stored on the Moneris
Host. Therefore, you should check that your receipts balance with the Batch Totals printed on the MultiTerminal Batch Close Report. You can also check the balance by printing a Stored Transactions Report
on each terminal included in the Batch Close.
IMPORTANT: A Multi-Terminal Batch Close can be performed only for terminals that are added
to and associated with your Merchant Number on the Moneris Host (see Adding a Terminal
Name).
9.4.1.
By Terminal Name
You can process a Batch Close on one or more terminals by selecting the appropriate Terminal Name(s).
You must therefore know the Terminal Name of the terminal whose batch you want to close.
To process a Batch Close on one or more terminals by Terminal Name:
1. On the applications menu, select DEBIT & CREDIT.
The message "Activating App..." is displayed then the transactions menu appears.
2. Scroll down and select Batch Close.
If the "Password:" prompt appears, key in the manager password and press OK.
Moneris Vx810 Duet Operating Manual v1.1.01
109
9. End-of-Day Procedure
3. At the "Close Type?" prompt, select Mult.
4. At the "Terminal Name:" prompt, key in the name of the terminal and press OK.
The "Add Another Terminal?" prompt appears.
5a. To include more terminals in the Batch Close, select Yes then repeat steps 4 and 5 for each additional
terminal to create the Batch Close process list. After you finish adding terminals, select No.
OR
5b. To include only the terminal selected in step 4, select No.
IMPORTANT: To close the batch for the terminal in use, you must add its Terminal Name to the
Batch Close process list.
Note: You can include up to 20 terminals in a Batch Close. When you enter the 20th Terminal Name, the
terminal automatically processes the Batch Close on them and returns to the "Add Another Terminal?"
prompt. You can then add more terminals as above or select No to complete the Batch Close.
The terminal communicates with the Moneris Host then prints the Batch Totals section of the MultiTerminal Batch Close Report.
6. At the "Batch Close?" prompt, select Yes.
The terminal communicates with the Moneris Host to close the batch, finishes printing the report with the
Batch Close section and returns to the REPORTS menu.
7. Press CANC ANNUL to return to the transactions menu.
9.4.2. For All Terminals
You can process a Batch Close on all terminals associated with your Merchant Number on the Moneris
Host.
To process a Batch Close on all terminals:
1. On the applications menu, select DEBIT & CREDIT.
The message "Activating App..." is displayed then the transactions menu appears.
2. Scroll down and select Batch Close.
If the "Password:" prompt appears, key in the manager password and press OK.
3. At the "Close Type?" prompt, select Mult.
4. At the "Terminal Name:" prompt, press the (*) ASTERISK key and then press OK.
5. At the "Add Another Terminal?" prompt, select No.
6. At the "Batch Close?" prompt, select Yes.
The terminal communicates with the Moneris Host to close the batch, finishes printing the report with the
Batch Close section and returns to the REPORTS menu.
7. Press CANC ANNUL to return to the transactions menu.
110
Moneris Vx810 Duet Operating Manual v1.1.01
10. Troubleshooting
If your terminal is not working properly and an error message appears on the screen, go to the list of Error
Messages and locate the message you see on the terminal. If the problem appears to be with the hardware,
go to the list of Hardware Problems and locate the symptom. Then, review the possible problems and try
the suggested solution.
Note: Please keep any receipts printed during problem transactions. The Merchant Service Centre
representative may require information that appears on the receipts.
If this does not resolve the problem, contact the Moneris Merchant Service Centre for assistance.
10.1. Additional Documentation
Additional documentation for the Vx810 Duet can be accessed in a number of ways:
•
On performing transactions and end-of-day procedures, please refer to the Moneris Vx810 Duet
Using Your Terminal guide shipped with your hardware.
•
On setting up your terminal, please refer to the Moneris Vx810 Duet Setting up Your Terminal guide
also shipped with your hardware.
•
For complete instructions, please refer to the Moneris Vx810 Operating Manual. To download a
printable PDF of this manual, go to moneris.com/duet.
•
To access the Moneris Vx810 Duet Webhelp, go to moneris.com/duet.
•
For a copy of the Moneris Merchant Operating Manual, go to
www.moneris.com/Support/Downloads/MerchantManuals.aspx.
To download other documentation, visit the Support - Downloads pages on our website
www.moneris.com.
10.2. Telephone Assistance
When you need:
•
to order POS stationary supplies including printer rolls
•
to resolve balancing issues
•
to solve problems with your terminal
•
to report a Code 10 situation
•
assistance changing your terminal configuration
•
Credit Voice Authorizations
Please contact:
Moneris Merchant Service Centre
Toll free 1-866-319-7450
24 hours a day, 7 days a week
Moneris Vx810 Duet Operating Manual v1.1.01
111
10. Troubleshooting
10.3. Merchant Direct Secure Message Centre
Log in to Merchant Direct and use the Message Centre to send a secure message directly to the Moneris
Merchant Service Centre.
10.4. Error Messages on the Moneris Vx810 Duet Terminal
A message will appear on the display if an error occurs. In the table below, find the error message that
appears on the terminal and try the solution. If the error message re-appears, contact the Moneris
Merchant Service Centre for assistance.
All error messages are listed in alphabetical order (regardless of their cause).
ERROR MESSAGE
PROBLEM & SOLUTION
CARD NOT SUPPORTED
The type of card swiped on the terminal does not match the card type selected
at the READY screen. For example, a Debit card was swiped during a Credit
Pre-Authorization transaction or an Ernex Gift Card was swiped for an Ernex
Loyalty Card transaction.
Try swiping the card again.
If this message reappears, press CANC ANNUL to cancel the transaction and
retry the transaction.
OR
Your merchant account with Moneris is not set up to accept the card type that
was swiped.
Request another form of payment then contact the Moneris Merchant Service
Centre to discuss how to add that payment type to your merchant account.
CARD SWIPE ERROR
There is a problem with the magnetic stripe on the card that was swiped.
Try swiping the card again, this time more slowly or quickly, or from front of
the terminal to the back.
If the message reappears:
- for credit card with stripe – key in the card number.
- for credit card with chip – swipe the card
- for debit card with stripe or chip – request another form of payment.
CARD REMOVED - 991
The chip card was removed before the end of the transaction.
Retry the transaction.
CHIP CARD
MALFUNCTION
There was an error reading the chip card.
CHIP CARD SWIPED
A chip-enabled card was swiped.
Remove the card and retry the transaction. If the message reappears, swipe the
card.
Insert the card in the chip card reader and resume the transaction.
CommServer Not Responding
to VMAC
The Ethernet cable was connected to the base and the wall jack while you
configured the static IP parameters.
Power off then power on the terminal (leave the Ethernet cable connected to
the base and the wall jack).
COMMSVR ENTRY
PASSWORD
-----------------
The 2 key was pressed when the terminal was at the applications menu (e.g.
attempting to key in a dollar value of $20.00 or another value that includes a
2).
Press CANC ANNUL to return to the applications menu.
112
Moneris Vx810 Duet Operating Manual v1.1.01
10. Troubleshooting
ERROR MESSAGE
PROBLEM & SOLUTION
This symbol appears when the terminal is in Demo Mode.
Exit Demo Mode to remove the symbol from the display.
EMPTY BATCH
If you attempt a Pre Auth Completion but there are no uncompleted PreAuthorizations in the terminal memory, the Empty Batch message appears.
Press OK to return to the Pre Auth menu.
ERR READ CARD NO.
There is a problem with the magnetic stripe on the card that was swiped.
Try swiping the card again, this time more slowly or quickly, or from front of
the terminal to the back.
If the message reappears:
- for credit card with stripe – key in the card number.
- for credit card with chip – swipe the card
- for debit card with stripe or chip – request another form of payment.
EXCEEDS REFUND LIMIT
The total value of refunds performed today is greater than your daily refund
limit.
Call the Moneris Merchant Service Centre for a temporary increase. Please
have the original purchase receipt available for reference.
EXPIRED CARD
The expiry date on the card that was swiped has passed.
Request another form of payment.
HOST LOGON REQUIRED
The terminal has been logged off to protect it from attempts to perform
unauthorized transactions.
Perform a Logon transaction.
INIT REQUIRED
When this message is displayed at the top of the screen (alternating with the
date and time), the Moneris host is requesting a re-initialization of the
terminal.
INVALID DATE
The date entered is not a valid date.
The date must be entered in the MMYY format and must be a valid calendar
date, e.g. 1409 is not a valid date.
Check the date and re-enter it when the prompt re-appears.
INVALID
The password entered does not match the manager's password.
Press CANC ANNUL then re-enter the manager password and press OK.
Inv# is 7 char max
Press OK key
The Private Label card or Purchasing card used for this transaction only
supports invoice numbers with a maximum of 7 characters. The invoice
number keyed in earlier in the transaction was longer than 7 characters.
Press OK. The "Invoice #:" entry screen appears.
Check the invoice number, enter the correct number of characters and press
OK to continue the transaction.
Moneris Vx810 Duet Operating Manual v1.1.01
113
10. Troubleshooting
ERROR MESSAGE
PROBLEM & SOLUTION
INVALID ACCNT NO.
During a swiped credit card transaction, the digits entered as the last four of
the credit card do not match the last four digits of the card number encoded on
the card's magnetic stripe.
Check the card number and re-enter the last four digits when the "Last 4
digits:" prompt re-appears.
If the prompt reappears, contact the Moneris Merchant Service Centre for
assistance.
LINE BUSY
Check if the phone line is shared with another piece of equipment, e.g. a fax
machine.
If it is, disconnect the other piece of equipment to leave the line free for the
terminal and try the transaction again.
OR
Check if a prefix is required to dial out.
If it is, set the PABX code to the required prefix then try the transaction again.
MUST SETTLE SOON
The terminal batch file is nearly full.
Perform a Batch Clear transaction to empty the batch file.
NO ACTIVITY
There are no transactions associated with that clerk ID.
OR
That Clerk ID does not exist.
Check the Clerk ID and try the Clerk Subtotals report again.
NO AIDs
If this message appears when the terminal is powering up, press OK to
continue or wait 45 seconds for the terminal to continue on its own.
No Chip CD On Pre Auth
Please Remove Card
Your terminal is not configured to process Pre Auth transactions using a chip
card and a chip card has been inserted during a Pre Auth transaction.
Remove the chip card, press CANC ANNUL to return to the transaction menu
and perform a Purchase transaction with the chip card.
NO LINE
The terminal cannot detect a dial communications line.
Check that all communications cables are connected to the base and the wall
jack correctly. If they are, check the phone line for dial tone.
Check that the phone line is an analog dial line. The terminal will not work on
a digital phone line or on VoIP.
Try the transaction again. If the message reappears, unplug and replug the
power cable at the power source.
NO MATCH
The information you have used to find a transaction in memory can not be
found.
Check the information and try again.
NO NETWORK
CONNECTION
114
Check the communications cable to ensure it is connected to the terminal and
the wall jack.
Moneris Vx810 Duet Operating Manual v1.1.01
10. Troubleshooting
ERROR MESSAGE
PROBLEM & SOLUTION
OUT OF RANGE
The Cashback amount requested exceeds the maximum Cashback value set on
the terminal.
Ask the cardholder to key in an amount lower than the maximum amount when
the "Cash: " prompt re-appears.
If this error message appears on a regular basis, consider increasing the
cashback limit set on the terminal.
OR
If this message appears while the terminal is in Demo Mode, ensure the
amount of the transaction plus Cashback is $1.00 or less, and the tip is $1.00 or
less.
PAPER OUT
A problem has been detected with the printer.
Open the printer and check that:
- there is paper in the printer
- the paper feed is clear.
- the paper roll is seated correctly.
Close the printer lid and ensure that it is closed completely.
If the problem is fixed:
The printer will finish printing the receipt or report that was in progress and
complete the transaction.
If the problem is not fixed:
Press OK. The terminal will complete the transaction. Fix the problem then
reprint the transaction.
Note: Transactions should not be performed until the printer problem is fixed.
PHONE NUM FLDS EMPTY
The terminal has attempted to dial out but the phone number parameters are
empty. If this message occurs during:
- a financial transaction, call the Moneris Merchant Service Centre for
assistance.
- a Batch Close transaction, perform a Re-initialization then try the transaction
again.
PRINTER ERR
Open the printer, check that there is a paper roll and that the roll is loaded
properly then close the printer.
READ CARD ERR
There is a problem with the magnetic stripe on the card that was swiped.
Try swiping the card again, this time more slowly or quickly, or from front of
the terminal to the back.
If the message reappears:
- for credit card with stripe – key in the card number.
- for credit card with chip – swipe the card
- for debit card with stripe or chip – request another form of payment.
RECORD NOT FOUND
The information you have used to find a transaction in memory can not be
found.
Check the information and try again.
REFUND LIMIT EXCEEDED The total value of refunds performed today is greater than your daily refund
limit.
Call the Moneris Merchant Service Centre for a temporary increase. Please
have the original purchase receipt available for reference.
Moneris Vx810 Duet Operating Manual v1.1.01
115
10. Troubleshooting
ERROR MESSAGE
PROBLEM & SOLUTION
RETRY TRAN?
Select YES to retry the transaction. The terminal will try to send the
transaction to the Moneris Host using the card data already entered.
Select NO to return to the transactions menu.
SETTLE FAILED
The connection with the Moneris host was lost during the batch close function
and the settlement was not completed.
Try the Batch Close again. If the batch totals are $0, print a Deposit Totals
report and a Stored Transactions report then call the Moneris Merchant Service
Centre.
SYSTEM PROBLEM
This message will be followed by one of the three following messages:
- TCP INIT ERR: ####
- TCP RECV ERR: ####
- TCP SEND ERR: ####
A communication error has occurred.
Call the Moneris Merchant Service Centre and give the agent the four-digit
number.
TABLE FULL
You have tried to add too many Clerk IDs or Terminal Names.
You can add a maximum of 255 different Clerk IDs and 100 different
Terminal Names.
TCP INIT ERR: ####
Refer to the SYSTEM PROBLEM error message.
TCP RECV ERR: ####
Refer to the SYSTEM PROBLEM error message.
TCP SEND ERR: ####
Refer to the SYSTEM PROBLEM error message.
TIP ERROR
The cardholder has keyed in a tip amount that is greater that the standard
percentage or a tip percentage that is not defined in the terminal.
TRANS CANCELLED
The CANC ANNUL key was pressed during the transaction.
- If the cardholder pressed the CANC ANNUL key, ask the cardholder to
return the PINPad/terminal.
- Press OK to display the merchant prompts and print the merchant copy of the
cancelled receipt.
- Retry the transaction.
TRANS NOT ALLOWED
You have attempted to perform a transaction that is either not configured on
your terminal or not set up in your merchant account.
If this appears during a Batch Close transaction, your merchant account is set
up to close your batches automatically. Simply print a Merchant Sub-totals
report at the end of each business day.
Call the Moneris Merchant Service Centre for assistance.
USE MAG STRIPE ON
TERMINAL
Your terminal is configured for Visa Debit Opt Out and you have attempted to
perform a Visa Debit transaction. The message appears when you remove the
card from the terminal after you receive a "Card Not Accepted" message and
then press OK at the "Remove Card" prompt.
Press CANC ANNUL and request another form of payment.
VIVO ENTRY PASSWORD
The "8" key was pressed when the terminal was at the applications menu (e.g.
attempting to key in a dollar value of $8.00 or another value that includes an
8).
Press CANC ANNUL to return to the applications menu.
116
Moneris Vx810 Duet Operating Manual v1.1.01
10. Troubleshooting
10.5. Ernex Error Messages on the Vx810 Duet Terminal
A message will appear on the display if an error occurs in the GIFT & LOYALTY application. In the
table below, find the error message that appears on the terminal and try the solution. If the error message
re-appears, contact the Moneris Merchant Service Centre for assistance.
Additional error messages can be found in Error Messages on the Vx810Duet Terminal.
ERROR MESSAGE
PROBLEM & SOLUTION
811 SYSTEM ERROR
PLEASE TRY LATER
The connection with the host was lost during the transaction processing and
the transaction was not completed.
Call the Moneris Merchant Service Centre.
Batch Balance – NO
If this message is printed on the batch summary report during an Ernex Batch
Close, contact the Moneris Merchant Service Centre the next business day for
reconciliation assistance.
CARD NOT IN BIN RANGE
The card type you swiped cannot be used for that transaction type.
OR
Your merchant account is not set up to accept the card type that was swiped.
Request another form of payment.
CARD READ ERROR
There is a problem with the magnetic stripe on the card that was swiped.
Try swiping the card again, this time more slowly or quickly, or from front of
the terminal to the back.
If the message reappears request another form of payment.
ERROR IN PRINTING
Open the printer, check that there is a paper roll and that the roll is loaded
properly then close the printer.
NO MATCH FOUND
The information you have used to find a transaction in memory can not be
found.
Check the information and try again
NOT A LOYALTY CARD
The card swiped (or card number entered) during a Redemption transaction is
not a loyalty card.
Check the card and try again.
10.6. Solving Hardware Problems
If terminal does not display an error message but is not functioning correctly, review this list of hardware
problems to find suggested solutions.
HARDWARE PROBLEM
SOLUTION
Communication problems are
happening intermittently.
Contact the Moneris Merchant Service Centre for assistance.
Chip cards cannot be
processed.
If the card entry prompt is "Swipe Card" and the terminal won’t accept
inserted chip cards (i.e. it beeps and remains at "Swipe Card" when a chip card
is inserted), contact the Moneris Merchant Service Centre for assistance.
Display screen is blank
Ensure that the power cable is firmly connected to the power port on the Duet
base and the wall jack.
If the display is still blank, contact the Moneris Merchant Service Centre for
assistance.
Moneris Vx810 Duet Operating Manual v1.1.01
117
10. Troubleshooting
HARDWARE PROBLEM
SOLUTION
Display lighting is too bright
or too dark
The contrast setting is too high or too low.
Magnetic Stripe Card reader
won't read cards.
Try swiping the card more quickly or more slowly or from the front of the
reader towards the back.
Check the contrast setting and increase or decrease it to work with the lighting
at the terminal location.
Try swiping a different card. If this card can be read, the problem is with the
first card. Request another form of payment.
Use a Head Cleaning Card to clean the card reader (a.k.a. the magnetic stripe
reader or MSR). Contact the Moneris Merchant Service Centre if you need
Head Cleaning Cards.
If the card reader still won't read cards, contact the Moneris Merchant Service
Centre for assistance.
Leftmost LED on the
contactless reader is not lit up.
Check that the contactless reader module is securely connected to the terminal
or to the top of the Vx810 PINPad.
Nothing is possible on the
terminal after initial
communications configuration
is completed: not initialization,
not transactions
Contact the Moneris Merchant Service Centre for assistance.
Printer Jam
Open the printer and check that:
- the paper feed is clear.
- the paper roll is seated correctly.
Close the printer lid and ensure that it is closed completely.
When the problem is fixed, the printer will finish printing the receipt or report
that was in progress. If necessary, reprint the transaction.
Note: Debit transactions cannot be performed until the printer problem is
fixed. Credit transactions can be performed manually if necessary.
118
Moneris Vx810 Duet Operating Manual v1.1.01