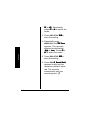
1
www.radioshack.comSM
&4/;4"&KIKVCN
4GEQTFGT
OWNER’S MANUAL —
Please read before using this equipment.
14-1199
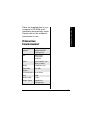
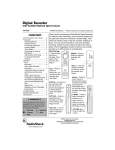
%106'065
Preparation .............................................. 2
Installing Batteries .............................. 2
Using AC or DC Power ....................... 3
Connecting Earphones ....................... 4
Connecting an External Microphone .. 5
Listening Safely .................................. 6
Traffic Safety ...................................... 7
Attaching the Wrist Strap .................... 7
Locking the Recorder’s Controls ........ 8
Installing a Multi-Media Card (MMC) or
Secure Digital (SD) ............................. 9
Operation ................................................ 11
Turning the Recorder On or Off ......... 11
Setting the Clock .............................. 12
Files .................................................. 13
Recording ......................................... 13
Using Voice-Activated Recording ..... 16
Playing Back Messages ................... 17
Changing Playback Speed ............... 18
#
#
"+/2146#06"
If an icon appears at the end of a paragraph, go to the box on that
page with the corresponding icon for pertinent information.
— Warning
. — Caution
± — Note
Rý
© 2002 RadioShack Corporation. All Rights Reserved.
RadioShack and RadioShack.com are trademarks used
by RadioShack Corporation.
Preparation
Fast-Forwarding/
Reversing ............... 18
Forward Skip/Reverse
Skip ......................... 19
Viewing Remaining
Recording Time and
Message Time/Date 19
Repeat Play ............ 20
Repeating a Part of
Message ................. 21
Erasing Messages ........ 22
Erasing a Single
Message ................ 22
Erasing All Messages
in a File ................. 22
Erasing All Messages
in All Files
(Except [M]) ........... 23
Moving a Message to
Another File ........... 24
Using the Recorder
with a PC ..................... 24
Operating
Environment .......... 25
Troubleshooting ............ 26
Care ............................. 27
Service and Repair ....... 27
FCC Declaration of Conformity ............................... 28
Specifications ............... 29
Notes ............................ 31
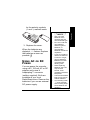
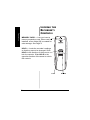
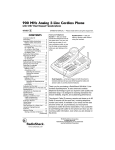
Thank you for purchasing the
RadioShack DR-92 Digital
Recorder. It provides up to
eight hours recording time, and
its light weight and small size
make it easy to slip into a
pocket, briefcase, or purse. Use
it at school, a business
conference, or anywhere on the
go. You can record manually or
set the recorder so sound
activates recording.
24'2#4#6+10
+056#..+0)"$#66'4+'5"
Your recorder requires two AAA
batteries (not supplied) for
power.
1. Slide the battery cover
downward to remove it.
2. Place the batteries in the
compartment as indicated
2
±"016'"±"
•
•
3. Replace the cover.
When the batteries are
depleted, ƒ flashes. Replace
the batteries as soon as
possible.±
±
75+0)"#%"14"&%"
219'4
You can power the recorder
using a 9V, 150 mA AC or DC
adapter and a size H
Adaptaplug connector
(neither supplied). Both are
available at your local
RadioShack store. Remove the
batteries if you use an external
DC power supply.
•
•
•
•
Use only fresh
batteries of the
required size and
recommended type.
Do not mix old and
new batteries,
different types of
batteries, or
rechargeable
batteries of different
capacities.
If you do not plan to
use the recorder for
a month or longer,
remove batteries.
Batteries can leak
chemicals that
destroy parts.
When replacing
batteries, the LCD
may become
blurred. It will
gradually increase in
sharpness.
The stored time/date
lasts for one month
without batteries.
If in recording mode,
ƒ does not flash
and recording stops
when batteries are
depleted.
3
Preparation
by the polarity symbols
(+ and –) marked inside.
You must use a Class
2 power source that
supplies 9V DC and
delivers at least 150 mA. Its
center tip must be set to
positive and its plug must fit the
recorder's DC 9V jack. Using an
adapter that does not meet
these specifications could
damage the recorder or the
adapter.
!
Preparation
Always connect the AC or DC
adapter to the recorder before
you connect it to power. When
you finish, disconnect the
adapter from power before you
disconnect it from the recorder.
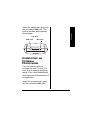
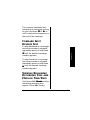
%100'%6+0)"
'#42*10'5
You can use an optional mono
earphone with a 1/8 inch (3.5
mm) mini-plug to listen to your
recordings in private. Your local
RadioShack store carries a
wide selection of earphones.
4
Preparation
Insert the earphone’s plug into
the recorder’s EAR jack. The
built-in speaker automatically
disconnects.
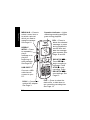
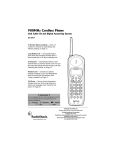
Top View
EAR Jack
MIC Jack
%100'%6+0)"#0"
':6'40#."
/+%412*10'
You can use an optional
microphone with 1/8-inch (3.5
mm) plug to extend recording
range. Your local RadioShack
store carries a wide selection of
microphones.
Insert the microphone’s plug
into the recorder’s MIC jack.
5
The built-in microphone
automatically disconnects.
Preparation
.+56'0+0)"5#('.;
To protect your hearing, follow
these guidelines when you use
earphones.
• Set the volume to the
lowest setting before you
begin listening. After you
begin listening, adjust the
volume to a comfortable
level.
• Do not listen at extremely
high volume levels.
Extended high-volume
listening can lead to
permanent hearing loss.
• Once you set the volume,
do not increase it. Over
time, your ears adapt to
the volume level, so a
volume level that does not
cause discomfort might still
damage your hearing.
6
64#((+%"5#('6;
Preparation
Do not wear earphones while
operating a motor vehicle or
riding a bicycle. This can create
a traffic hazard and could be
illegal in some areas.
Even though some earphones
let you hear some outside
sounds when listening at
normal volume levels, they still
can present a traffic hazard.
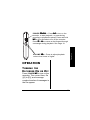
#66#%*+0)"6*'"94+56"
564#2
Thread the strap’s small loop
through the holes on the bottom
of the recorder. Slip the larger
end of the strap through the
smaller loop. Pull the larger
loop to tighten it.
7
Preparation
.1%-+0)"6*'"
4'%14&'4O5"
%10641.5
MEMORY CARD — Lets you insert a
memory expansion card. When card is
installed, a new folder [M] is created for
extra storage. See Page 9.
HOLD — Locks the recorder’s settings
so that they cannot be changed. Slide
HOLD in the direction of the arrow to
lock the controls. Slide HOLD in the
opposite direction of the arrow to unlock
the controls.
Lock
8
Unlock
Preparation
+056#..+0)"#"/7.6+/
/'&+#"%#4&"*//%+"
14"5'%74'"&+)+6#."
*5&+
Open the lid of the MEMORY
CARD compartment and insert
an MMC or SD (not supplied)
until it clicks.
To remove the card, push it in
until it clicks, then springs back.
Remove the card and replace
the lid. Your local RadioShack
store carries MMCs and SDs.
See “Files” on Page 13 to use
this feature. ±
±"016'"±"
When using an
MMC, it takes a few
extra seconds to
begin operation, to
erase or save
messages, change
files, and change
modes.
9
Preparation
MENU A-B — Press to
select a menu item or
to select a point at
which you want to
repeat a message.
See Page 21.
REPEAT
INTRO — Press
to repeatedly
play a
message or to
play the
beginning of
each message.
See Page 20.
USB PORT —
Connect a USB
cable here to
connect to your
PC.
DC 9V — Connect an
optional AC adapter.
See Page 3.
10
Operation Indicator — Lights
red during recording and lights
green during playback.
DEL — Press to
delete the selected
message, or press
during playback to
see the time and
date the message
was recorded. See
Page 19 and 20.
'ý—
REC/STOP ç/'ý
'ý
ç to
Press REC/ç
begin recording a
message. Press
'ýto
STOP/'ý
'ý stop
recording. Press
'ýto
REC/STOP ç/'ý
'ý
store settings. See
Page 13.
FILE — Press to select the
desired file, or hold down to
see remaining recording time.
See Page 13.
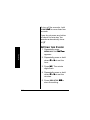
POWER #ýâý,ý— Press â to turn on the
recorder, to start playback, or press during
recording or playback to pause. Press and hold
â for four seconds to turn off the recorder.
Press # or ,ýto reverse or fast-forward through
a message during playback. See Page 18.
Operation
VOLUME IýJý— Press to adjust playback
volume level lower or higher.
12'4#6+10
6740+0)"6*'"
4'%14&'4"10"14"1(("
Press POWER âýýto turn on the
recorder. The current time, file
([A] to [E]), and message
number/number of messages in
the file appear.
11
To turn off the recorder, hold
POWER âýýfor more than four
seconds.
If you do not press any button
for about five minutes, the
recorder automatically turns
off.±
±
5'66+0)"6*'"%.1%Operation
1. Repeatedly press
MENU/A-B until I[jýJ_c[
appears.
2. Repeatedly press or hold
down #ýor , to set the
hour.
3. Press âý. The minute
digits flash.
4. Repeatedly press or hold
down #ýor , to set the
minutes.
5. Press REC/STOP ç/'ýý
'ýýto
'ýý
store the setting.
12
6. Repeatedly press
MENU/A-B until I[jý:Wj[
appears.
7. Repeat Steps 2 and 3 to
set the month, day, and
year.
8. Press REC/STOP ç/'ýý
'ýýto
'ýý
store the setting.
(+.'5
Operation
The recorder has five files ([A]
to [E]) for storing messages.
Each file can store up to 99
messages (495 total). For the
MMC and SD, file [M] is
assigned when a card is
installed. Repeatedly press
FILE to select the desired file.
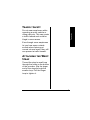
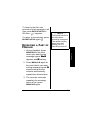
4'%14&+0)
1. Repeatedly press FILE to
select a file.
2. Press MENU/A-B. H;9ýCeZ[
appears. The currently
selected mode flashes (BF,
13
IF, or >G). Repeatedly
press #ýor , to select the
mode.
3. Press REC/STOP ç/'ý
'ýto
'ý
store the setting.
Operation
4. Repeatedly press
MENU/A-B until C?9$ýI[di
appears. The currently
selected mode flashes
(>_]^ or Bem). Press #ýor
, to select the mode.
5. Press REC/STOP ç/'ý
'ýto
'ý
store the setting.
6. Press REC/ç. H[YehZýIjWhjéý
appears briefly and the
operation indicator lights
red. The recorder
automatically sets the
recording level. ±
14
Repeat Icon
Repeat
Mode
Microphone
Sensitivity
Operation
Recording Mode
Current
Time
7. To pause recording, press
âý. Recording time
flashes. The operation
indicator flashes red. To
continue recording, press
âýýagain.
15
±"016'"±"
•
•
•
Operation
•
•
16
The minimum
recording time is two
seconds. If you
'ý
press STOP/'
earlier, H[YehZýIjef
briefly appears and
the message is not
saved.
If the recording time
exceeds the
maximum, C[cehoý
<kbbé appears and
recording stops.
If you try to record
more than 99
messages in a file,
C[cehoý<kbbéý
appears.
Change the mic
sensitivity during
recording by holding
down MENU/A-B for
three seconds.
During recording,
you can use an
earphone to monitor
recording. The
adjustable volume
range is 00 to 05.
Changing the
volume does not
affect the recording
level.
8. To stop recording, press
STOP/'. IWl[$$$$ýFbi$MW_j
appears briefly. ±
75+0)"81+%'/
#%6+8#6'&"
4'%14&+0)
1. Repeatedly press
MENU/A-B until LENýCeZ[
appears. Press #ýor , to
select ED.
2. Press REC/STOP ç/'
' to
store the setting. LEN
appears on the display.
3. Press REC/ç. H[YehZýIjWhjéý
appears briefly. When the
recorder detects voice
input, it automatically starts
recording and the
operation indicator lights
red. When voice input
stops, the recorder
automatically stops
recording and the indicator
flashes red.
4. Press STOP/'ýý
'ýýto
'ýý stop
recording. IWl[$$$Fbi$MW_jý
appears.
2.#;+0)"$#%-"
/'55#)'5
Operation
1. Repeatedly press FILE to
select a file, then
repeatedly press or hold
down #ýor , until the
desired message number
to play back appears.
2. Press âýýto start playback.
3. Repeatedly press VOLUME
Iýýor ýJý to adjust the
volume. The adjustable
range is 00 to 20.
4. To pause playback, press
â. Play time flashes and
the operation indicator
flashes green. To resume
playback, press â.
5. Playback stops at the end
of the message. To stop
17
playback sooner, press
STOP/'
'. FbWoýIJEF
appears.
±"016'"±"
Operation
You can change
playback speed
during playback by
holding down
MENU/A-B. FbWoý<Wij,
FbWoý<Wij
FbWoýDehcWb, or FbWoý
Ibem appears to
indicate that the
playback speed has
been changed to that
setting.
%*#0)+0)"2.#;$#%-"
52''&
Repeatedly press MENU/A-B
until FbWoýIF:ýappears. The
symbol of the currently selected
speed flashes. 22 denotes slow
speed, 00 denotes normal
speed, and 44ýdenotes fast
speed.
Repeatedly press #ýýor , to
select the speed. Press
REC/STOP ç/'
'ýýto store the
setting.±
±
(#56/(149#4&+0)1
4'8'45+0)
To begin fast-forwarding a
message during playback, hold
down ,. To begin reversing a
message during playback, hold
down #.
18
The recorder continues fastforwarding or reversing as long
as you hold down #ýýor ,, or
until it reaches the beginning or
the end of the message.
(149#4&"5-+21
4'8'45'"5-+2
Operation
To skip backward to a message
while the recorder is stopped,
repeatedly press or hold down
#ýýuntil the desired message
number appears.
To skip forward to a message
while the recorder is stopped,
repeatedly press or hold down
, until the desired message
number appears.
8+'9+0)"4'/#+0+0)"
4'%14&+0)"6+/'"#0&"
/'55#)'"6+/'1'"
Hold down FILE. H[cW_d and the
remaining recording time
appear. Press DEL during
19
playback to see the time and
date the message was
recorded. Press DEL during
recording to see the starting
time and date of the recording.
4'2'#6"2.#;
To repeat the current message,
press REPEAT/INTRO during
play. é appears.
Operation
To repeat the messages in the
current file, press REPEAT/
INTRO again. ˆýappears.
To repeat all messages in all
files, press REPEAT/INTRO a
third time. † appears.
To listen to the first nine
seconds of each message in
the current file, press REPEAT/
INTRO a fourth time. ‰
appears.
20
To listen to the first nine
seconds of each message in all
files, press REPEAT/INTRO a
fifth time. ‡ appears.
To return to normal play, press
REPEAT/INTRO again.±
±
4'2'#6+0)"#"2#46"1("
/'55#)'
±"016'"±"
The repeat function is
not reset when
recording is stopped.
The repeat function
stays at the last
setting until it is
manually turned off.
Operation
1. During playback, press
MENU/A-B at the point
where you want to start
message repeat. 7ýjeý8
appears with 8 flashing.
2. Press MENU/A-B again at
the point where you want
to stop message repeat. 8
stops flashing and the
recorder automatically
repeats the selected part.
3. The recorder continues
repeating the message
part until you press
MENU/A-B again.
21
'4#5+0)"
/'55#)'5
'4#5+0)"#"5+0).'"
/'55#)'
1. Repeatedly press FILE,
then #ýýor , to select the
message to erase.
2. Press DEL. ;hWi[ýWýC[iiW][ý
appears.
3. Press DEL again within five
seconds to delete the
message, or press any
other key to cancel
deletion. ;hWi_d]ýFbi$MW_jý
appears and the message
is erased.
Erasing Messages
'4#5+0)"#.."
/'55#)'5"+0"#"(+.'
1. Repeatedly press FILE to
select the file to erase.
2. Hold down DEL until ;hWi[ýWý
<_b[ appears.
22
3. Press DEL again within five
seconds to delete all
messages in the file, or
press any other key to
cancel deletion. ;hWi[&'ý
Fbi$MW_j appears and all the
messages in that file are
erased.
'4#5+0)"#.."
/'55#)'5"+0"#.."(+.'5"
*':%'26"=/?+
1. Hold down DEL until ;hWi[ý
Q7SýjeýQ;Sýappears.
Erasing Messages
2. Press DEL within five
seconds to delete all
messages in all files, or
press any other key to
cancel deletion. ;hWi_d]ý
Fbi$MW_jýandý9h[Wj[ýâ;áý<_b[ý
appears and all messages
are erased.
23
Using the Recorder with a PC
±"016'"±"
You cannot move a
message within the
same file.
/18+0)"#"/'55#)'"
61"#016*'4"(+.'"
1. Press #ýýor , to select a
message.±
±
2. Repeatedly press
MENU/A-B until Cel[ýCI=
appears.
3. Press #ýor , to select the
destination file.
4. Press REC/STOP ç/'
'.
C[iiW][ýCel_d]ýappears,
then C[iiW][ýCel[Zý
appears.
75+0)"6*'"
4'%14&'4"9+6*"
#"2%"
With the supplied software, you
can download recorder files to
your computer. The DR-92
provides management of voice
recordings, file playback, and
text-to-speech conversion.
24
Using the Recorder with a PC
Place the supplied disc in your
computer’s CD-ROM drive.
Installation automatically starts.
Please refer to the software’s
instructions on use.
12'4#6+0)"
'08+410/'06"
Operating
system
Microsoft Windows
98/Me/2000/XP
Professional
PC
IBM PC/ATcompatible
machine
CPU
Intel Pentium 233
MHz or faster
RAM
64 MB or more
Hard-disk
space
300 MB
CD-ROM drive 4x or faster
Port
USB
Sound card
16 bit
Audio output
Speaker or
headphones
25
6417$.'5*116+0)
2TQDNGO
5WIIGUVKQP"
Troubleshooting
Nothing happens when a
button is pressed.
Make sure HOLD is set in the
opposite direction from the
arrow.
Make sure fresh batteries are
correctly installed.
There is no sound.
Make sure the volume is
turned up.
Make sure an earphone is not
connected to the recorder.
The playback speed is too
fast or too slow.
Make sure the unit is not set
to fast playback or slow
playback. See “Changing
Playback Speed” on Page 18.
The recorder will not record. Make sure the number of
recorded messages in the
selected folder is less than
99.
Make sure there is enough
remaining recording time. See
“Viewing Remaining
Recording Time and Message
Time/Date” on Page 19.
26
%#4'
Do not place the recorder on
top of or near electric
appliances. Keep the recorder
dry; if it gets wet, wipe it dry
immediately. Use and store the
recorder only in normal
temperature environments.
Handle the recorder gently and
carefully; do not drop it. Keep
the recorder away from dust
and dirt, and wipe it with a
damp cloth occasionally to
keep it looking new.
5'48+%'"#0&"
4'2#+4
Care
If your recorder is not
performing as it should, take it
to your local RadioShack store
for assistance. Modifying or
tampering with the recorder’s
internal components can cause
a malfunction and might
invalidate its warranty and void
27
FCC Declaration of Conformity
your FCC authorization to
operate it.
(%%"
&'%.#4#6+10"1("
%10(14/+6;
This device complies with Part
15 of the FCC Rules. Operation
is subject to the following two
conditions: (1) this device may
not cause harmful interference,
and (2) this device must accept
any interference received,
including interference that may
cause undesired operation.
Product:
Model:
Responsible Party:
Phone:
28
DR-92 Digital
Recorder
14-1199
RadioShack
100 Throckmorton
Fort Worth, TX
76102
817-415-3200
52'%+(+%#6+105
Recording time:
HQ mode ................................................................. 160 min.
SP mode .................................................................. 220 min.
LP mode .................................................................. 480 min.
Recording medium ................................Built-in flash memory
Dimensions ....................................... 114.50 (H) x 40.5 (W) x
19.5 (D) mm
Power supply ....................................... Two AAA batteries or
Optional Power Adapter with
DC 9V Output
Battery Life ........................ About 8 hours in recording mode
About 7 hours in earphone play
About 6 hours in speaker play
Maximum number of recording messages ..... 495 messages,
5 files x 99 messages
Maximum output power ............................ 50 mW, at 16 ohm
Frequency Bandwidth .................................... 500 to 3000 Hz
Input ..............................................Plug-in power microphone
(mini plug, mono), impedance is
2.2 kohm
Output ....Earphone (mini plug, mono), impedance is 32 ohm
Speaker ........................................... Built-in 26 mm diameter
Microphone ....................................... Built-in omni-directional
29
Specifications
Weight .................................... Approx. 55 g without batteries
condenser microphone (mono)
Operating Temperature .................... 32 to 122°F (0 to 50°C)
Accessories: ....................................... USB cable, wrist strap,
CD-ROM (PC Link & text-to-speech)
Your recorded contents are for your personal use or pleasure
only. It is prohibited to record copyrighted material without
permission of the copyright holders according to copyright
law. Specifications are typical; individual units might vary.
Specifications a subject to change and improvement without
notice.
Specifications
30
Notes
016'5
31
Limited Ninety-Day Warranty
This product is warranted by RadioShack against manufacturing defects in material and workmanship under normal use for ninety (90) days from the date of purchase from RadioShack
company-owned stores and authorized RadioShack franchisees and dealers. EXCEPT AS
PROVIDED HEREIN, RadioShack MAKES NO EXPRESS WARRANTIES AND ANY IMPLIED
WARRANTIES, INCLUDING THOSE OF MERCHANTABILITY AND FITNESS FOR A PARTICULAR PURPOSE, ARE LIMITED IN DURATION TO THE DURATION OF THE WRITTEN
LIMITED WARRANTIES CONTAINED HEREIN. EXCEPT AS PROVIDED HEREIN,
RadioShack SHALL HAVE NO LIABILITY OR RESPONSIBILITY TO CUSTOMER OR ANY
OTHER PERSON OR ENTITY WITH RESPECT TO ANY LIABILITY, LOSS OR DAMAGE
CAUSED DIRECTLY OR INDIRECTLY BY USE OR PERFORMANCE OF THE PRODUCT
OR ARISING OUT OF ANY BREACH OF THIS WARRANTY, INCLUDING, BUT NOT LIMITED TO, ANY DAMAGES RESULTING FROM INCONVENIENCE, LOSS OF TIME, DATA,
PROPERTY, REVENUE, OR PROFIT OR ANY INDIRECT, SPECIAL, INCIDENTAL, OR
CONSEQUENTIAL DAMAGES, EVEN IF RadioShack HAS BEEN ADVISED OF THE POSSIBILITY OF SUCH DAMAGES.
Some states do not allow limitations on how long an implied warranty lasts or the exclusion or
limitation of incidental or consequential damages, so the above limitations or exclusions may
not apply to you.
In the event of a product defect during the warranty period, take the product and the
RadioShack sales receipt as proof of purchase date to any RadioShack store. RadioShack
will, at its option, unless otherwise provided by law: (a) correct the defect by product repair
without charge for parts and labor; (b) replace the product with one of the same or similar design; or (c) refund the purchase price. All replaced parts and products, and products on which
a refund is made, become the property of RadioShack. New or reconditioned parts and products may be used in the performance of warranty service. Repaired or replaced parts and
products are warranted for the remainder of the original warranty period. You will be charged
for repair or replacement of the product made after the expiration of the warranty period.
This warranty does not cover: (a) damage or failure caused by or attributable to acts of God,
abuse, accident, misuse, improper or abnormal usage, failure to follow instructions, improper
installation or maintenance, alteration, lightning or other incidence of excess voltage or
current; (b) any repairs other than those provided by a RadioShack Authorized Service Facility; (c) consumables such as fuses or batteries; (d) cosmetic damage; (e) transportation, shipping or insurance costs; or (f) costs of product removal, installation, set-up service adjustment
or reinstallation.
This warranty gives you specific legal rights, and you may also have other rights which vary
from state to state.
RadioShack Customer Relations, 200 Taylor Street, 6th Floor, Fort Worth, TX 76102
12/99
RadioShack Corporation
Fort Worth, Texas 76102
14-1199
10A02
Printed in Korea