1
LIBERTY
Quick Start Guide
Issue 1.0
Lighting Technologies
ME 1243
1106.01.243
TEXT CONVENTIONS
Panel Keys are under square brackets, e.g. [RECORD] is a panel key.
Keyboard Keys are under brackets, (CTRL).
Software functions in menus are under brackets e.g. {Browse File} is a function in the File
Menu. In this case the access path will be indicated as MENU HATHOR>FILE> (Browse
File).
[-----]&[-----] means hold the first key then push the second key.
SOFTWARE PHILOSOPHY
It can be easier to understand HATHOR if you are familiar with the philosophy of this software.
Channels (INSTRUMENTS)
A Channel (also named instrument) is the control handle used to call anything controlled by
LIBERTY. Regardless if it is a dimmer channel, a moving device, a smoke machine or
something else it will always correspond to a channel number in the Patch.
Attributes and DEVICE LINKS
The control of non-intensity parameters, for example a moving device or a scroller, are
called attributes. These are patched to the controls of LIBERTY when the Template
corresponding to that device is assigned to a control channel in the Patch.
In a sequence all attribute’s values are recorded in a specific area named DEVICE LINK.
Patch (INSTRUMENT SET-UP)
Patch is where outputs are assigned to channels, either directly in the case of dimmers or
using a Template in the case of devices. All settings pertaining to outputs, channels and
devices are also adjusted within the patch.
Groups
Frequently used combinations of channels can be stored in up to 2000 Groups, for quick
recall from the keypad, the touch screen or a remote focusing system.
Presets
This is a specific concept. Frequently used combinations of channels are stored in up to
15000 Presets, for playback in the Main Playback or Virtual Playbacks. The combination of
a Preset and a Device Link in a Sequence Step is the equivalent of a "Cue" in many other
systems. The advantage here is that Presets can be reused in any Sequence, with
different times.
Sequences
Lists of Presets are called Sequences, that can be cross faded or move faded in
consecutive order from a Playback. The system supports up to 1000 Sequences.
Looks
A look is a cue including channels with their intensity levels and their attributes, like a
snapshot, without any time information.
Looks are primarily useful for "live" performances, when you wish to be able to bring up
pre-recorded fixture settings, but in a non-sequential, spontaneous manner, such as for a
musical concert.
Looks can also be useful as building blocks where you can store an idea for future use, but
don't want to record it as a Sequence Step/ Preset (Looks are not usable in Sequence).
www.adblighting.com
Quick Start - page 1
Issue 1.0
TEXT CONVENTIONS ........................................................................................................................1 SOFTWARE PHILOSOPHY................................................................................................................1 1. Installation and Overview ........................................................................................................5 Delivery and Unpacking ................................................................................................................. 5 Installing the Desk .......................................................................................................................... 5 Power Supply ..............................................................................................................................5 Electrical Connection ..................................................................................................................5 Caring for your LIBERTY ............................................................................................................... 5 Connecting your desk to peripherals ............................................................................................. 6 Start with your LIBERTY .............................................................................................................6 1.1 Software ............................................................................................................................ 7 1.2 Front panel Control ........................................................................................................... 7 1.2.1 Introduction ....................................................................................................................7 1.2.2 Overview ........................................................................................................................7 1.2.3 Subfaders section ..........................................................................................................8 1.2.4 Control section ...............................................................................................................8 1.2.5 Access section .............................................................................................................12 2. Setting Up the desk / [SETUP] ...............................................................................................13 Channels ...................................................................................................................................... 13 Attributes ...................................................................................................................................... 14 Playback ....................................................................................................................................... 15 Filestorage ................................................................................................................................... 16 User Interface............................................................................................................................... 17 System ......................................................................................................................................... 18 3. Starting a new show (Play) and patching.............................................................................19 3.1 Starting a new Show : HATHOR menu > File > New / Clear Play.................................. 19 3.2 Patching: [Patch] key or [1] [.] [4] [Screen] to open Instrument Setup ............................ 20 3.2.1 Introduction ..................................................................................................................20 3.2.2 Using the keypad Channels > Dimmers mode only ....................................................20 3.2.3 Using the mouse ..........................................................................................................21 3.2.4 Using the keyboard and the Dimmer Patching Tools ..................................................21 3.2.5 Using the touch screen and the Dimmer Patching Tools ............................................22 3.2.6 Using the wizard ..........................................................................................................22 4. Instruments (Channels)..........................................................................................................26 4.1 Introduction ..................................................................................................................... 26 4.2 The Channel grid ............................................................................................................ 26 4.3 Selecting Instruments and setting values ....................................................................... 27 4.3.1 Using the Keypad ........................................................................................................27 4.3.2 Using the mouse ..........................................................................................................27 4.3.3 Using the Touch screen facilities .................................................................................27 4.3.4 Using the Keypad ........................................................................................................28 4.3.5 Using the mouse ..........................................................................................................28 4.3.6 Using the Touch screen facilities .................................................................................28 4.4 Focus Mode .................................................................................................................... 28 4.5 Instruments with Scroller................................................................................................. 28 4.5.1 Using the Keypad ........................................................................................................28 4.5.2 Using the mouse or the Touch Screen facilities ..........................................................28 5. Groups [Group] , [.] ................................................................................................................30 5.1 Groups - Introduction ...................................................................................................... 30 5.1.1 Group functionality .......................................................................................................30 5.1.2 Groups - Record ..........................................................................................................30 5.1.3 Using the Keypad ........................................................................................................30 5.1.4 Using the mouse: Drag&drop facilities ........................................................................30 5.1.5 Using the Touch screen facilities .................................................................................31 5.2 Working with Groups ....................................................................................................... 31 5.2.1 Using the Keypad ........................................................................................................31 www.adblighting.com
Quick Start - page 2
Issue 1.0
5.2.2 Using the mouse or your finger and the keyboard ......................................................31 5.2.3 Using the mouse or your finger and the keypad..........................................................31 5.3 Groups - Using recorded levels [FETCH] ....................................................................... 32 5.4 Groups Edit Window [EDIT]&[GROUP] .......................................................................... 32 5.5 Editing a Group ............................................................................................................... 32 5.6 Groups and Subfaders .................................................................................................... 32 5.6.1 Loading a group in a subfader .....................................................................................32 5.6.2 Editing a group Loaded in a subfader..........................................................................32 6. PRESETS .................................................................................................................................34 6.1 Introduction ..................................................................................................................... 34 6.2 Record............................................................................................................................. 34 6.2.1 Recording a Preset in the sequence ...........................................................................34 6.2.2 Recording a Preset not included in the sequence .......................................................35 6.3 Update............................................................................................................................. 36 6.4 Edit .................................................................................................................................. 36 6.4.1 Edit a Preset (BLIND mode) ........................................................................................36 6.4.2 Rename a Preset .........................................................................................................36 6.5 Copying levels from a preset to a selection of channels [FETCH] ................................. 36 6.6 Loading a Preset in a Subfader ...................................................................................... 36 7. SEQUENCES ...........................................................................................................................37 7.1 Introduction ..................................................................................................................... 37 7.2 Master Playback.............................................................................................................. 37 7.2.1 Recording a new Preset ..............................................................................................37 7.2.2 Times ...........................................................................................................................37 7.2.3 Insert a Step ................................................................................................................38 7.2.4 Delete a Step ...............................................................................................................38 7.2.5 Replace and Rename Preset ......................................................................................39 8. LOOKS .....................................................................................................................................40 8.1 Introduction ..................................................................................................................... 40 8.2 Record............................................................................................................................. 40 8.2.1 Using the Keypad ........................................................................................................40 8.2.2 Using the mouse ..........................................................................................................41 8.2.3 Using the Touch screen facilities .................................................................................41 8.3 Working with Looks ......................................................................................................... 41 8.3.1 Select Channels...........................................................................................................41 8.3.2 Playback Looks............................................................................................................42 8.3.3 Using recorded values / Fetch .....................................................................................42 8.4 Editing ............................................................................................................................. 43 8.4.1 The Edit window ..........................................................................................................43 8.4.2 Editing a Look ..............................................................................................................43 8.5 Loading To a Subfader ................................................................................................... 43 9. SUBFADERS ...........................................................................................................................44 9.1 Introduction ..................................................................................................................... 44 9.2 Fader Banks .................................................................................................................... 44 9.3 Pages .............................................................................................................................. 44 9.4 Assign Keys .................................................................................................................... 45 9.5 Flash Keys ...................................................................................................................... 45 9.6 Load / Clear..................................................................................................................... 45 9.7 Channel Selection ........................................................................................................... 46 9.8 Editing ............................................................................................................................. 46 9.9 Times .............................................................................................................................. 47 9.10 Settings ........................................................................................................................... 47 9.10.1 Subfader Modes: Normal / Inhibit / Focusing / Disable Stage Recording ...................47 10. CHASERS ................................................................................................................................48 10.1 10.2 Introduction ..................................................................................................................... 48 Recording a chaser ......................................................................................................... 48 www.adblighting.com
Quick Start - page 3
Issue 1.0
10.2.1 Using the keyboard ......................................................................................................48 10.2.2 Changing modes and editing Times and levels in the EDITOR window .....................49 10.3 Loading a Chaser in a Subfader ..................................................................................... 50 10.4 Editing a Chaser ............................................................................................................. 51 10.4.1 BLIND mode ................................................................................................................51 10.4.2 LIVE mode ...................................................................................................................51 10.5 Start a Chaser ................................................................................................................. 51 11. The TRACK WINDOW [TRACK] / Ctrl F4 ..........................................................................52 12. Screen Setup ( MENU HATHOR / Controllers) .....................................................................54 12.1 CONTROLLERS > MENU HATHOR / Controllers ......................................................... 54 12.1.1 FIELD EDITOR ............................................................................................................55 13. Utilities .....................................................................................................................................57 13.1 [SETUP] Preferences (Menu HATHOR / Setup / Preferences) ..................................... 57 13.2 File .................................................................................................................................. 58 13.2.1 Introduction ..................................................................................................................58 13.2.2 Save .............................................................................................................................59 13.2.3 Save as ........................................................................................................................59 13.2.4 Open Library ................................................................................................................59 13.2.5 Import ...........................................................................................................................60 13.2.6 Export ..........................................................................................................................60 13.2.7 New/Clear Play ............................................................................................................60 13.2.8 Browse another............................................................................................................61 13.3 System Restore (KEYBOARD and MOUSE needed)..................................................... 61 www.adblighting.com
Quick Start - page 4
Issue 1.0
1. Installation and Overview
Delivery and Unpacking
As soon as you receive your equipment, open the boxes and inspect the items received. If
you discover any damage, contact the carrier immediately and make any necessary claim
for the problems discovered.
Installing the Desk
The desk and the monitor should be installed on a table or a console.
The surface of your work area should be smooth, level and sturdy.
Make sure that there is enough clearance around the desk to:
•
open the desk
•
access the rear connections
•
allow air circulation around vents to prevent the desk from over-heating
Power Supply
The LIBERTY has a universal power supply that will operate on voltages between 100
volts and 260 volts with a frequency range from 50 to 60 Hz.
Before powering up the desk or any of its peripherals, check that the existing voltages are
within the limits defined.
THIS EQUIPMENT MUST BE EARTHED.
Note: all connections should be made with the power turned off; otherwise functioning
may be affected and can even damage the equipment under certain conditions.
Electrical Connection
TO PREVENT THE RISK OF ELECTRIC SHOCK, DO NOT OPEN THE DESK.
THERE ARE NO USER SERVICEABLE PARTS WITHIN. REFER SERVICING TO
QUALIFIED ENGINEERS ONLY. LETHAL VOLTAGES ARE PRESENT INSIDE!
ALWAYS DISCONNECT FROM THE POWER SUPPLY BEFORE OPENING FOR
INSPECTION.
Note: As all equipment used in computer systems, your system is sensitive to the
characteristics of the network and in particular to variations and voltage peaks.
Consequently, we advise you to use an appropriate line conditioner on this
equipment.
Caring for your LIBERTY
The LIBERTY is manufactured from quality components and will give many years of
service if you take some basic precautions.
•
•
•
Do not allow any liquids or foreign objects to enter the LIBERTY.
Do not apply excessive force to any of the controls. Spare parts and service are
available from your ADB distributor, but prevention is better than cure.
When connecting any devices to the LIBERTY, make sure that all connections are
correct before switching on the power.
www.adblighting.com
Quick Start - page 5
Issue 1.0
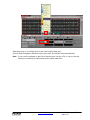
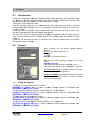
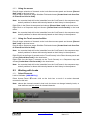
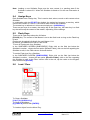
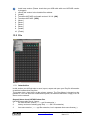
Conn
necting your desk to peripheralls
7
6
5
2
1
3
4
1
Plug the power cable
2
Connectt your mousse and your monitor usb cable in th
he USB porrts
3
Connectt your keybo
oard in the PS2
P
port
4
Connectt your monittor in DVI orr VGA port
5
Connectt your DMX 5 cables
6
Switch On
O the main
n power
7
Start the
e desk
Starrt with you
ur LIBERT
TY
Afterr 1 min, you
ur LIBERTY will displayy the defaultt Layout on your monittor.
You will discovver the cha
annel grid on
o the left side, the Group
G
wind
dow below and the
Sequ
uence windo
ow on the right side.
1
end a chan
nnel on stag
ge, choose a number on
o the keypad, and sim
mply turn the
e wheel,
To se
your channel will
w be seleccted (Red square around the channel box) a
and you willl see its
level in yellow.
To re
ecord your first
f
memoryy: [RECOR
RD] [RECOR
RD].
To sh
hutdown the
e desk: HAT
THOR Men
nu>Shutdow
wn: {YES}.
www
w.adblighting.com
Quicck Start - pa
age 6
Issue
e 1.0
1.1
Software
ADB lighting technologies has a policy of continuous improvement of its products. As the
LIBERTY is a computerized lighting desk, its software is subject to this policy as new
features are added and existing features improved.
The current software version of your LIBERTY is displayed in the HATHOR menu (Upside
Left corner) > About.
The latest version can be downloaded from the ADB website.
Whilst every care is taken in the preparation of this manual, ADB Lighting Technologies
takes no responsibility for any errors or omissions.
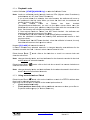
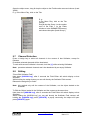
1.2
Front panel Control
1.2.1 Introduction
This section of the manual describes the controls and displays on the front panel of the
LIBERTY desk.
The front panel controls have been divided into the following sections:
• OVERVIEW
• SUBFADERS section
• CONTROL section
• ACCESS section
1.2.2
Overview
SUBFADERS
section
ACCESS section
CONTROL section
www.adblighting.com
Quick Start - page 7
Issue 1.0
1.2.3
Subfaders section
[ASSIGN] keys: upper keys
to load, select or record information or to assign a
time to that Subfader
Note: to clear the content of a Subfader, hold the
[CLEAR] key and use the [ASSIGN] key to select
the Subfader to clear.
[FLASH] keys: lower keys
to bump the content of the SUBFADERS
[LOAD]: to load selected Channels with levels,
Groups, Presets, and Palettes
[RATE]: use these key in combination with the
[ASSIGN] key (see above) of a Subfader with a
running Chaser to adapt the BPM to the current
Tempo.
[CHASER]: to load or record a Chaser directly in
the selected Subfader.
[F/B# CH/SUB]: under development
[PAGE#]: to load a Subfaders Page
[START]: to execute a Subfader automatically
regarding Time settings.
1.2.4
Control section
[SETUP]:
Open the Preferences
window
ATTRIBUTE
GROUP
KEYS:
[FOCUS] for Pan & Tilt
parameters
[COLOR]
for
Color
parameters
[BEAM]
for
Beam
parameters
[PATTERN] for Gobo
and shutters parameters
[EXTRA] for Control
parameters
[OTHER]:
under
development
www.adblighting.com
Quick Start - page 8
Issue 1.0
1.2.4.1 Fader Bank Keys
[F/B -] and [F/B +]:
Use this key to step thru
the 8 banks of 24
submasters.
[A] and [B]:
Pushing the both keys
together switch between
A (stage) and B (Preset)
Note: in combination
with the [TIME] or the
[DELAY] keys, [A] key
corresponds to OUT and
[B] to IN.
e.g.: to input 6 seconds
in-Time,
[6] [TIME] & [B].
1.2.4.2 RECORD and UPDATE Key
[RECORD]: use these
key to record:
Groups: [#] [RECORD] &
[GROUP]
Presets: [#] [RECORD]
Looks: [#] [RECORD] &
[LOOK]
Palettes: [#] [RECORD] &
[COLOR] (e.g.)
Page: [#] [RECORD] &
[PAGE]
[UPDATE]: use these key
to update an existing
Preset on stage
[LOOK]: use these key in
combination
with
the
[RECORD]
key
(see
above) or with the assign
key of a Submaster to
record a Look (levels and
parameters).
[TRACK]: opens a track
sheet for the selected
channels
[S/F]: switch between Stage mode and Field mode in the channel grid (Field Editor)
[BALANCE]: to isolate a selection of channels in the current Field.
www.adblighting.com
Quick Start - page 9
Issue 1.0
1.2.4.3 Master Playback
[TIME]:
to
assign
crossfade times (In/Out)
and special channel or
attribute times.
[DELAY]:
to
assign
crossfade delays (In/Out)
and special channel or
attribute delays.
[WAIT]: to assign wait
times
[A/B]: to switch between
A (Stage) and B (Preset)
in the current Editor
Field.
[ROLLBACK POS]: to
return to the last position
attributes values.
[RECORD POSITION]:
to force the system to
record attribute values
filtered if necessary,
independently of the
history.
[SEQ -], [SEQ +]: to step backwards or forwards in the Sequence without crossfade
times.
[GO BACK]: to go back to the precedent step using default times.
[JUMP/ JUMP TO STEP]: to move inside the sequence directly to a selected Step or
a selected Preset.
[GO] & [PAUSE] : standard crossfade keys
www.adblighting.com
Quick Start - page 10
Issue 1.0
1.2.4.4 Keypad
[CHANNEL]: to select
channels
[FRAME]: to select a
color changer Frame
[INVERT]:
to
switch
between selection of
channels
and
other
channels with level above
zero
(this
channels
become selected).
[ALL]: to select all
channels with level above
zero
[FETCH]:
to
copy
intensity or parameter
values for a selection of
channels from a selected
Preset, to stage.
[GROUP]: to record or
select a selection of
channels with levels.
[+], [THRU] & [-]:
channel selection tools
[+%], [-%]: to increase or
decrease level (absolute
or
proportional)
of
selected channels by a
percentage.
[AT%]: to set a level to
selected channels.
[CLEAR]/[ALT]: to clear
the selection [CLEAR]
[CHANNEL] or to clear
the
current
field
[CLEAR]&[CHANNEL].
www.adblighting.com
Quick Start - page 11
Issue 1.0
1.2.5
Access section
TOUCH SCREEN DISPLAYS:
The first four keys are direct access to specific
screens as labeled.
With the [USER DESKTOP] key, the internal
screen becomes a standard screen, exactly as
external screens.
DIRECT ACCESS:
[SAVE]: to save modifications in the current
play.
[EDIT]: to open objects Edit windows.
[INSERT] & [DELETE]: to use while editing or
browsing.
[SELECT PLAYBACK]: to load a Playback in
the Master Playback which is always the
physical Master Playback.
[HELP]: under development.
[COMPARE]: to compare stage levels with
another Preset.
e.g.: [1] [COMPARE] will open a window
displaying stage levels and levels from Preset 1.
[PATCH]: shortcut to open the Instrument
Setup.
[SCREEN]:
- use directly the [SCREEN] key to identify
connected screens.
- Enter Screen number, and subscreen
number to display directly the subscreen of
your choice in the dedicated screen.
[SCALE]: Sets a proportional level between 0
and 200% for a channel without affecting
recorded presets etc…
Note: this function is very useful to quickly set a
channel to zero%.
MASTER:
[BO]: Blackout Key
NAVIGATION KEYS:
[ESC]: To close any opened window.
[UP] / [DOWN] / [LEFT] / [RIGHT]: navigation
keys.
[ENTER]: To valid any kind of action.
www.adblighting.com
Quick Start - page 12
Issue 1.0
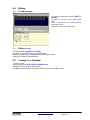
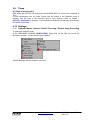
2. Setting Up the desk / [SETUP]
HATHOR menu > Setup > Preferences (or [SETUP])
Channels
1
2
3
4
1
2
3
4
Checked:
[At Level] will bring selected Instruments to the level set here. E.g.: 70%
Note: [At Level] [At Level] will bring selected Instruments to the Full.
[At Level] three times will bring selected Instruments to zero.
Checked:
When [Record] or [Update] are used, all the levels currently coming out of the
system will be recorded.
Unchecked:
[Record] or [Update] will record the levels from the currently active Playback Filed only.
Note: Stage mode in a Field Editor in HATHOR is just a view mode that doesn't
influence what is recorded. This means that you can activate Stage mode and still
use Field mode when recording. If the user only works in the Playback and not with
masters, it's more convenient to leave Record Stage as default unchecked.
Checked:
When [RECORD]&[LOOK] is used, it will automatically record all instruments that
have a level greater than zero.
Note: if "Record Look" is used by dragging channels, this setting is irrelevant, as it
will default to recording the selected instruments.
Sets the percentage that levels will be changed up or down by the [+%] and [-%]
keys.
www.adblighting.com
Quick Start - page 13
Issue 1.0
Attributes
1
2
3
4
5
6
1
Time used with [ROLLBACK POS] key.
2
Attributes Time. These time value will be recorded in Device Links by default for
every parameters.
3
Time used when executing a palette, not when recording a Preset/Device Link
using these palette.
4
Go On Go:
Unchecked: MOVE in DARK active.
Checked: MOVE in DARK unactive.
5
Rubberband:
Unchecked: when the subfader is lowered, only the intensities will restore to their
previous values.
Checked: when the subfader is lowered, the intensity AND attributes will restore to
their previous values.
6
Auto Execute Looks on Faders.
Unchecked: the attributes and Intensity will follow the movement of the fader.
Checked: as soon as the fader moves above zero, the attributes will move to their
positions- they will not fade with the movement of the fader.
www.adblighting.com
Quick Start - page 14
Issue 1.0
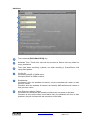
Play
yback
1
2
3
4
1
Cue Onlyy
This function appea
ars in the Record
R
win
ndow when it is appro
opriate. This
s setting
box doess not affect whether or not "Cue only"
o
will app
pear.
Uncheckked: the "C
Cue only" button willl appear disabled.
d
The user can then
manuallyy turn it ON if required.
Checked
d: the "Cue only" butto
on will appe
ear alreadyy activated. The user can
c then
manuallyy turn it OFF
F if required
d.
2
Keep Mixx on Record
d
Uncheckked: the con
ntent of on the newly recorded preset is loa
aded into th
he active
field. In this
t
way Subfaders havve not priority over the active Field
d.
Checked
d: if checke
ed, this prevvents the software
s
fro
om loading the conten
nt on the
newly re
ecorded pre
eset into th
he active fie
eld. In this way one ccan keep on
o using
Subfaders for mixing the outpu
ut for the next Preset.
Tip: Che
ecked Keep
p Mix on Re
ecord if you want to work
w
with ssubfaders as
a single
channelss
3
Uncheckked: links (p
parameters)) only execu
ute when a step is execcuted with [GO].
[
Checked
d: links (parrameters) in
n Sequence
e steps will execute w
when a Play
yback is
manuallly crossfade
ed.
4
A:
[x] [Time
e] (or [Dela
ay]) will set time values
s on the Sequence Ste
ep currently in the A
playbackk (the active
e step on stage).
B:
[x] [Time
e] (or [Dela
ay]) will set time values
s on the Sequence Ste
ep currently in the B
playbackk (the next step
s
to be lo
oaded on sttage).
www
w.adblighting.com
Quicck Start - pa
age 15
Issue
e 1.0
Active:
[x] [Time] (or [Delay]) will set time values on the Sequence Step currently in the A
or the B playback, depending on which Playback is active : [A/B] key switches
between A and B playback.
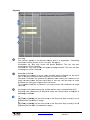
Filestorage
1
1
Autosave time
Time between two automatic « Autosave » File recording.
Note: to use autosave file, go to MENU HATHOR/File/Open Library, open
AutoSave menu, open corresponding play menu then Right Click and choose
option LOAD or BROWSE.
www.adblighting.com
Quick Start - page 16
Issue 1.0
User Interface
1
2
3
4
1
Tick the box to enable the KEYBOARD shortcuts.
2
Tick the box to enable the Double Menu size. Menus: HATHOR and Setup
windows right click menus.
3
Enter the value concerning the size of Browser and Object Edit windows.
4
Unchecked:
Syntax is RPN
Checked:
Syntax is AT MODE
www.adblighting.com
Quick Start - page 17
Issue 1.0
System
6
1
2
3
4
5
1
See chapter 13 for details
2
See chapter 13 for details
3
See chapter 13 for details
4
See chapter 13 for details
5
See chapter 13 for details
6
See chapter 13 for details
www.adblighting.com
Quick Start - page 18
Issue 1.0
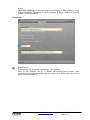
3. Starting a new show (Play) and patching
3.1
Starting a new Show : HATHOR menu > File > New / Clear
Play
1
2
Play name:
Here you can name
the play (the show).
3
4
1
Choose new play to start with an empty play.
2
Choose Clear play to start from your current play and select objects to clear in the
menu.
3
Choose Unpatched to start with a empty Patch or Patched 1:1 to start with a 1:1
patch.
Please note: if you have Instruments with levels in a Play due to Action Lists, when you
create a "new Play" those levels will remain active. If you do not wish to have these levels,
you must turn them off from the initial Play before creating a New Play.
Alternatively you can import these Actions into the new play.
www.adblighting.com
4
Quick Start - page 19
Issue 1.0
3.2
Patching: [Patch] key or [1] [.] [4] [Screen] to open
Instrument Setup
3.2.1
Introduction
Instrument Setup
To open Instrument Setup Open Play menu, RIGHT click on “Instrument Setup” and open
“Edit Instrument Setup“. You can dock the “Instrument Setup“ window in a Subscreen if
you want it always available.
Methods
There are different methods to patch channels:
1. Keypad
2. Mouse
3. Keyboard
4. Touch Screen
5. Wizard
Channels
List
DMX Output Grid
DMX Patching
Tools
3.2.2
Using the keypad Channels > Dimmers mode only
Replace feature: [#] [Ch][->] [->] (to the first Patch Column) [#] [Enter] > Channel #
connected to dimmer # (existing dimmer replaced).
www.adblighting.com
Quick Start - page 20
Issue 1.0
Add feature: [#] [Ch][->] [->] [->] (to the next free Patch Column) [#] [Enter] > Channel
# connected to dimmer # in addition of existing dimmer.
To patch a channel range to a range of dimmers (e.g. Channels 101 thru 124 with
dimmers 1 thru 24).
[101] [Ch] [124] [THRU] [ENTER] a popup will open, confirm with [ENTER].
To unpatch a dimmer: select a dimmer with arrows, then [0] [ENTER].
3.2.3
Using the mouse
Note: to check directly dimmers Live, check the dimmers box in the Live area of Dimmer
Patching Tools.
To connect a dimmer to a channel:
Select a dimmer in the dimmers window (right side of the screen) then drag and drop it to
the channel of your choice.
To move a dimmer from one channel to another:
Select a dimmer in the Channel List (left side of the screen) then drag and drop it to the
target channel.
To unpatch a dimmer:
Select a dimmer in the dimmers window or in the Channel List then Right Click on this
dimmer, choose {UnPatch}.
To Name a Channel:
Go to the Name Column (Channel List), on the correct channel line then DOUBLE Click
on cell, enter the name and [ENTER].
To give a proportional level to a dimmer:
Select a dimmer in the dimmers window or in the Channel List then Right Click on this
dimmer, choose {UnPatch}.
To Rename Channels:
You can change the number used to access your instruments, without altering your Patch.
This is useful when you want to keep your addresses and dimmer assignments as they
are, but you want to change the numbering to fit the numbering of a Plot. Renaming is
done in the Name column of the Channel window.
Go to the Channel # Column (Channel List), on the correct channel line then DOUBLE
Click on cell, enter the name and [ENTER].
To Clear all dimmers:
Go to the Dimmer Patching Tools area, choose Clear Dimmer Patch, a popup will open,
confirm with [ENTER].
3.2.4
Using the keyboard and the Dimmer Patching Tools
Note: please check first that Alpha keys
HATHOR/Preferences/User Interface).
Shortcuts
are
enabled
(MENU
Every times after an action a popup will open, confirm with (ENTER), or cancel with
(ESC).
www.adblighting.com
Quick Start - page 21
Issue 1.0
3.2.4.1 DIMMER TO CHANNEL MODE
To connect a Dimmer to a Channel
(#) (D) (#) (H)
To connect a selection of Dimmers to a Channel
(#) (D) (#) (*) (#) (*) (#) (H)
To connect a range of Dimmers to a Channel
(#) (D) (#) (T) (#) (H)
e.g.: dimmer 1 thru 4 connect to Channel 1:
(D) (4) (T) (1) (H)
e.g.: dimmer 1 thru 4 + 7 and 11 connect to Channel 1:
(D) (4) (T) (7) (*) (11) (*) (1) (H)
e.g.: dimmer 1 thru 7 - 5 connect to Channel 1:
(D) (7) (T) (5) (Shift) (*) (1) (H)
To disconnect (Unpatch) a Dimmer
(#) (D) (O)
To disconnect (Unpatch) a selection of Dimmers
(#) (D) (#) (*) (#) (*) (O)
To disconnect (Unpatch) a range of Dimmers
(#) (D) (#) (T) (O)
3.2.4.2 CHANNEL TO DIMMER MODE
To connect a Channel to a Dimmer
(#) (C) (#) (M)
To connect a Channel to a Dimmer
(#) (D) (#) (T) (#) (H)
To disconnect (Unpatch) a Channel (Unpatch all dimmers connected to this channel)
(#) (C) (E)
To patch a channel range to a range of dimmers (e.g. Channels 101 thru 124 with
dimmers 1 thru 24)
(101) (C) (124) (T) (ENTER)
3.2.5
Using the touch screen and the Dimmer Patching Tools
TIP: first dock the Instrument setup window into the internal Touch screen and check the
dimmers box in the live area of Dimmer Patching Tools.
3.2.5.1 DIMMER TO CHANNEL MODE
Select a Dimmer by touch in the DMX Output Grid
Select a Channel by touch in the Channel List
Choose Connect in the Dimmer Patching Tools area
3.2.5.2 DIMMER TO CHANNEL MODE GOTO NEXT METHOD
Check the Goto Next mode in the Dimmer Patching Tools area
Select a Dimmer by touch in the DMX Output Grid
Select a Channel by touch in the Channel List
Choose Connect in the Dimmer Patching Tools area
The next channel and the next dimmer in the list will be automatically prepared.
3.2.6
Using the wizard
3.2.6.1 PATCHING DIMMER(S)
Go to the Channel # Column (Channel List), RIGHT Click and choose {Instrument wizard}
in the list.
www.adblighting.com
Quick Start - page 22
Issue 1.0
Frrom instrume
ent: to set the first
channel of the ra
ange.
umber of Ins
struments: ho
ow many
Nu
channels do you
u want to patch.
Kind: Dimmer.
MX Universe:: choose the Universe
DM
me
eans select the output (1 orr 2 for the
LIB
BERTY, 1, 2, 3 or 4 for the
FR
REEDOM)
To
o validate, clickk on the check
k box.
3.2.6
6.2 GEL ST
TRINGS
In HA
ATHOR a Scroller
S
is allways linked
d to a GEL STRING.
Before patching
g a Scroller with
w the Wizard you ha
ave to creatte a GEL ST
TRING.
PLAY
Y MENU/Ge
el Strings
PLAY
Y MENU
Gell Strings:
sing
gle click to
ope
en the menu
u.
Right click to
inse
ert a new G
Gel
String
n you will se
ee the Gel String
S
1 in the
t Gel String menu, Right
R
Click o
on Gel Strin
ng 1 and
Then
choo
ose Edit Gell String 1.
www
w.adblighting.com
Quicck Start - pa
age 23
Issue
e 1.0
Go to the Frames column and set the number of colors of the roll, then [ENTER]. The
steps will be automatically created.
To create specific colors and names usable and visible, go to MENU HATHOR/TOOLS/
{Images}.
In the Images window open the Gel Colors menu, choose a manufacturer and drag and
drop the color needed in the Frames column, on the position of your choice (the cell
becomes grey), then choose the option {Copy color and names from ______}
When the Gel string is complete close the window using the mouse or the [ESC] key.
3.2.6.3 PATCHING DIMMER(S) AND SCROLLER(S)
Go to the Channel # Column (Channel List), Right Click and choose {Instrument wizard} in
the list.
Set the first instrument of the range in the from
Instrument box (e.g.: Instrument 11).
Set the number of instruments to create in the
number of instruments box (e.g.: 4).
Set two Parts in the Number of parts box (one
for the dimmer and one for the scroller).
Set Universes for the dimmer and for the
scroller.
In the Kind area, click on Dimmers and choose
Select Templates, then click on the soft key at
the right side of this box.
A popup will open :
Choose the Scroller and click on Select.
www.adblighting.com
Quick Start - page 24
Issue 1.0
Click on the
String ICON.
Gel
In the Select Scroll
window,
click on the Gel String
of your choice then
Select.
The
selected
gel
String will appear in
the Scroll box.
www.adblighting.com
Quick Start - page 25
Issue 1.0
4. Instruments (Channels)
4.1
Introduction
A channel is the "handle" you call upon to control any dimmer or moving device connected
to the system.
Channels are selected in the Editor field (channel Grid), which is the channel functionality
of the programming section. The Channel Control functions are mapped to any section of
the console at any time - for example pressing [A/B] swaps between the A field of the
Main Playback and the B field (Blind field) corresponding to the incoming step in the
sequence.
General Facts
Channels can be selected and set with a Command Syntax from the keypad.
Channels can be selected and set with the mouse or your finger.
Channel levels are set from 0-100%. 0% values are not displayed on the channel screen
and 100% values are displayed as F, standing for "Full".
4.2
The Channel grid
•
At the top of this window are displayed:
the selected Playback and its field (e.g.: Playback 1, field A) with the number and
the name of the Preset loaded, or the Field selected.
- Left side: the display format (Simple click to open a menu).
- Middle: the selected Playback, its field and the Level (normally 100 for A field
and zero from B field) the loaded Preset (number and name).
•
At the bottom of this window the status stage option:
o
Checked: the channel grid displays the Output.
o
Unchecked: the channel grid displays only the content of the selected Field.
-
-
www.adblighting.com
White Number: generic light
Green Number: channel with
DEVICE
Channel box with a red square:
selected channel
In Yellow / Downside Right
corner:
channels
LEVELS
coming from the selected Field
In Yellow / Upside Left Corner:
incoming LEVELS
White triangle: with In/Out
Sequence step time
Blue triangle: with particular
time
In
Orange/Downside
right
corner:
Stage
Channels
LEVELS
Colored Square with number:
FRAME number
Quick Start - page 26
Issue 1.0
4.3
4.3.1
Selecting Instruments and setting values
Using the Keypad
4.3.1.1 Using [Ch] [At%] [+] [-] [Thru] Keys and the intensity wheel
select one channel and use the intensity wheel
[#] + Intensity wheel
select one channel and use the [At%] key
[#] [Ch] [#] [At%]: Channel # at # %
[#] [Ch] [At%]: Channel # at Steplevel (defined in Preferences/Channels/ « Use
Steplevel »)
[#] [Ch] [At%] [At%] > Channel # at Full
select several channels and use the [At%] key
[#] [Ch] [#] [+] [#] [+] [#] [+] [#] [+] [#= level] [At%] (or [At%] or [At%] [At%])
select a range of channels and use the [At%] key
[#] [Ch] [#] [Thru] [#=level] [At%] (or [At%] or [At%] [At%])
select a range of channels except some of them and use the [At%] key
[#] [Ch] [#] [Thru] [#] [-] [#] [-] [#=level] [At%] (or [At%] or [At%] [At%])
select a range of channels and add some others channels and use the [At%] key
[#] [Ch] [#] [Thru] [#] [+] [#] [+] [#=level] [At%] (or [At%] or [At%] [At%])
4.3.1.2 Using [+%] and [-%]
select one channel or several channels ALREADY with intensity upper than zero in the
active Field and use the [+%] and [-%] keys to increase or decrease the level
[#] [Ch] [#] [+] [#] [+] [+%] > Level of selected channels increased of 5% (If 5 is the value
in the +/-% field in Preferences/Channels)
[#] [Ch] [#] [+] [#] [+] [-%] > Level of selected channels decreased of 5% (If 5 is the value
in the +/-% field in Preferences/Channels)
4.3.1.3 Using [All] and [Invert] key
The [All] key is designed to select every channels with an intensity upper than zero in the
active Field.
The [invert] key is designed to select unselected channels with an intensity upper than
zero.
e.g.:
first select some channels and give them some intensity values
[1] [Ch] [3] [+] [5] [+] [60] [At%]
Then select another channels and give them some intensity values
[13] [Ch] [24] [THRU] [At%] [At%]
To select again channels 1, 3 and 5 press [INVERT]
4.3.2
Using the mouse
Same as with the keypad, but instead of using [CH] key, simply select the channel with
ONE click to add it to the selection DOUBLE click to deselect others and keep only this
channel selected. Then use the intensity wheel, [At%], [+%] and [-%] keys to set levels.
You can also Hold the mouse’s Right button and move the mouse to change levels.
4.3.3
Using the Touch screen facilities
Same as with the keypad, but instead of using [CH] key, simply select the channel with
ONE touch to add it to the selection DOUBLE touch to deselect others and keep only this
channel selected. Then use the intensity wheel, [At%], [+%] and [-%] keys to set levels.
www.adblighting.com
Quick Start - page 27
Issue 1.0
Clear Functions
4.3.4
Using the Keypad
To clear all selected channels without reset levels to zero
[C/ALT] [Ch]
To clear all selected channels and reset all levels to zero
[C/ALT]&[Ch]
4.3.5
Using the mouse
To clear all selected channels; DOUBLE LEFT Click in the channel grid (empty space).
4.3.6
Using the Touch screen facilities
To clear all selected channels; DOUBLE Touch in the channel grid (empty space).
4.4
Focus Mode
First set all channels to focus at a preheat level
[1] [Ch] [24] [THRU] [5][At%] which set channels 1 thru 24 at 5%
Then select the start channel for focusing
[1] [Ch] [70] [At%]
and use the [C/ALT] key holded and the [+] key to step to the next channel.
The level used for focusing depends of the Step level defined in the settings (MENU
HATHOR/Setup/Preferences/Channels)
TIP: this method is also useful to check Channels
4.5
Instruments with Scroller
4.5.1
Using the Keypad
4.5.1.1 Using [FRAME] key
[#] [Ch] [#] [FRAME]: load the frame # for the channel #
4.5.1.2 Using [COLOR] key
[#] [Ch] [0] [COLOR]: load the frame 1 (Home Color Frame) for the channel #
4.5.2
Using the mouse or the Touch Screen facilities
First select the DEVICE CONTROL SCREEN
Select Channel(s) with Scroller (e.g. Ch 60).
www.adblighting.com
Quick Start - page 28
Issue 1.0
With the mouse or your finger click on the color in the Frame part.
A list of Gels will appear: choose the color you need. The list will close automatically.
Note: If you need to navigate in the list to check colors, use the « Pin » icon to lock the
window, to confirm your choice click on the check mark icon.
www.adblighting.com
Quick Start - page 29
Issue 1.0
5. Groups [Group] , [.]
Groups are a quick way of recalling a selection of channels.
5.1
Groups - Introduction
You can store channel combinations into groups. The difference between a Group and a
Preset is that a group does not necessarily need levels for the channels involved, by
default, only the channels selected are stored. Groups also do not contain moving light
parameters.
5.1.1
•
•
•
•
•
•
5.1.2
Group functionality
By default only selected channels are stored in a group.
Channels can be recorded in the group with levels.
Each group will "remember" the order in which channels were selected.
Each group can have a text label.
A group can be selected in the same way as a single channel
A group can be loaded to a Subfader.
Groups - Record
Only selected channels are recorded, with or without level.
5.1.3
Using the Keypad
To record a group with the next free number:
[#] [Ch] [#] [+] [#] [+] [#] [+] [#] [+] [#] [At%]
[RECORD]&[GROUP] or [RECORD]&[.] or [.]&[RECORD]
You will get a popup where you confirm recording this group, and can write a text label.
To record a group with a specific number:
[#] [Ch] [#] [+] [#] [+] [#] [+] [#] [+] [#] [At%]
[#] [RECORD]&[GROUP] or [#] [RECORD]&[.] or [#] [.]&[RECORD]
You will get a popup where you confirm recording this group, and can write a text label.
5.1.4
Using the mouse: Drag&drop facilities
First select channels with the mouse,
then drag the selection into the Groups
window, a popup will appear:
Choose {Record new Group}, then
you will get a popup where you can
write a text label and confirm recording
this group.
{Record} to confirm.
www.adblighting.com
Quick Start - page 30
Issue 1.0
5.1.5
Using the Touch screen facilities
First select channels with your finger, then drag the selection into the Groups window, a
popup will appear:
Choose Record new Group, and then you will get a popup where you can write a text
label and confirm recording this group.
{Record} to confirm.
5.2
Working with Groups
You can add and subtract channels that are stored in Groups to/from the current channel
selection.
You can select several consecutive or non consecutive groups at the same time.
5.2.1
Using the Keypad
To select all channels in a Group and deselect others
[#] [GROUP] or [#] [.] [Ch]
To add all channels in a Group to the current channel selection
[#] [.] [+]
To subtract all channels in a Group from the current channel selection
[#] [.] [-]
To select several non consecutive Groups
[#] [.] [Ch] [#] [.] [+] [#] [.] [+]
To select a range of Groups
[#] [.] [Ch] [#] [.] [Thru]
5.2.2
Using the mouse or your finger and the keyboard
Note: Use the [GROUP] key to open the Fly Out window in the internal Touch Screen.
After one click in the window, use the SHIFT key on your keyboard, hold it and use
the mouse wheel to zoom in the window.
To select all channels in a Group and deselect others
Click directly on the Group in the Groups window.
To add all channels in a Group to the current channel selection
If there is some channels selected, hold the Ctrl key then click on another Group
Select several non consecutive Groups
Click directly on the Group in the Groups window, hold the Ctrl key then click on
another Group
Select a range of Groups
Click directly on the Group in the Groups window, hold the SHIFT key then click on
another Group
5.2.3
Using the mouse or your finger and the keypad.
To add all channels in a Group to the current channel selection
If there is some channels selected, hold the [+] key then click on another Group
To subtract all channels in a Group from the current channel selection
If there is some channels selected, hold the [-] key then click on another Group
To select several non consecutive Groups
Click directly on the Group in the Groups window, hold the [+] key then click on
another Group
To select a range of Groups
Click directly on the Group in the Groups window, hold the [THRU] key then click
on another Group
www.adblighting.com
Quick Start - page 31
Issue 1.0
5.3
Groups - Using recorded levels [FETCH]
If Channels were recorded with levels, you can copy these levels from the group to the
matching selection.
You can fetch intensities for all or specific channels from any Group.
To copy levels from Group # for all channels of the Group
[#] [GROUP]&[AT LEVEL]
[#] [.] [Ch] to select all channels of Group #, [#] [FETCH] to set channels to their levels in
Group #.
To copy levels from Group # for a selection of channels existing in the Group select some
channels of Group #, [#] [FETCH] to set those channels to their recorded levels in Group #
5.4
Groups Edit Window [EDIT]&[GROUP]
You can view, edit and create new Groups directly in the Group List: [EDIT] & [GROUP].
To move in the list of Groups: use arrows and Enter keys.
To delete a Group, move to the group in the list: [DELETE] [ENTER], or [ESC] to cancel.
To add a Group: [INSERT], select channels, add levels and [UPDATE] [UPDATE].
To give a name to a Group: Go to the Name column, [ENTER], fill the field [ENTER].
To change the number (ID) of the group: Go to the ID column, [ENTER], enter a new
number then [ENTER].
To close the window: [ESC].
5.5
Editing a Group
To edit a group: [#] [.] [EDIT]
Select channels, change levels, then [UPDATE] [UPDATE].
5.6
Groups and Subfaders
You can load Groups directly to any Playback.
5.6.1
Loading a group in a subfader
Select Group 1 and load it directly to Subfader 13 with the keypad
[1] [.] [LOAD] & [Assign Key 13].
Select Group 1 and load it directly to Subfader 13 with the mouse or your finger
Click directly on the Group in the Groups window, Drag it to the Subfader Field and
choose Load Group #.
5.6.2
Editing a group Loaded in a subfader
5.6.2.1 Using the keys
Hold the assign key of the Subfader, edit channels and levels, then while holding the
assign key, press [UPDATE]. You will get a popup where you confirm recording this
Group, and can write or edit a text label.
Then [UPDATE] [UPDATE].
5.6.2.2 Using the mouse
Right Click on the Subfader Field ( FIELDS Controller), choose Edit Field ## Group ##
www.adblighting.com
Quick Start - page 32
Issue 1.0
Select channels, change levels, then [UPDATE] [UPDATE].
Note: In this way, changing levels in the Edit window of the group will be « LIVE » if the
fader is above zero.
www.adblighting.com
Quick Start - page 33
Issue 1.0
6. PRESETS
6.1
Introduction
General Facts
•
A Sequence is structured in Steps which consists of Presets and Device links.
Instruments levels are stored into Presets, parameters and dynamic Effects are
stored into Device Links.
•
Presets can be arranged in a list called a Sequence, with predefined fade times.
•
Presets can be modified blind or live.
•
Presets can be copied.
•
You can retrieve individual channel levels from recorded Presets with Fetch.
•
When a Preset is recorded in the A playback, it is automatically placed in
numerical order in a step of the Sequence in that playback.
•
When a Preset is recorded in a Field, it is not placed in a step of the Sequence but
recorded in the Preset List directly.
Note:
‐
‐
‐
A Preset is a memory that can be reused in several Sequences or Playbacks at
the same time. To delete it completely you have to go to the source of all
Presets: the Preset List (Menu Play/Presets).
This does NOT mean that the Preset number will disappear from the Sequence
or from Master Pages, but it means that it will be an empty Preset with no
channels or levels stored. It also means that the number of the Preset will be
regarded as an unused Preset in the system.
When deleting a Preset in the Preset List you will get a checkbox option of
deleting all related Sequence Steps.
6.2
Record
6.2.1
Recording a Preset in the sequence
You can choose to record the complete Stage Output or only the A Field content, either by
default in the SETUP (Preferences/Channels), or directly in the Record Preset window
To record a Preset with the next free number:
[RECORD]. You will get a popup where you confirm recording this Preset, and can write a
text label. Then [RECORD] again or [ENTER] or click on. 3 See next page
To record a Preset with a specific number, use the same syntax as above but specify the
number before: [#] [RECORD].
www.adblighting.com
Quick Start - page 34
Issue 1.0
1
2
3
1
Records Levels From:
Choose between Stage or Field
In Field mode you can choose between A field (Live) or B field (Blind).
2
To cancel click on this icon or use [ESC].
6.2.2
Recording a Preset not included in the sequence
6.2.2.1 Working in the A playback
To record a Preset with the next free number:
[RECORD] (You will get a popup where you confirm recording this Preset, and can write a
text label), unchecked « Build Sequence ». 1
Then [RECORD] again or [ENTER] or click on the icon in the down right corner.
To record a Preset with a specific number, use the same syntax as above but specify the
number before:
[#] [RECORD].
1
www.adblighting.com
Quick Start - page 35
Issue 1.0
6.2.2.2 Working in a Subfader Field
Note: to record Preset directly from a field with only the content of this field, « Record
Stage as default » in the SETUP (Preferences/Channels) should be Unchecked. If
« Record Stage as default » is checked the Stage content will be recorded.
To record a Preset:
Hold the assign key of the Subfader, edit channels and levels, then while holding the
assign key, press [#] [RECORD]. You will get a popup where you confirm recording this
Preset, and can write a text label.
Then [RECORD] again or [ENTER] or click on the icon in the down right corner.
Note: the Preset will be automatically loaded in the Subfader.
6.3
Update
6.3.1.1 Working in the A playback
To update a Preset in the playback connected to the Fied Editor selected:
[UPDATE].
You will get a popup where you confirm recording this Preset, and can write or edit a text
label. Then [UPDATE] again or [ENTER] or click on the icon in the down right corner.
6.3.1.2 Working in a Subfader Field
To update a Preset in the Field Editor of a Subfader:
Hold the assign key of the Subfader, edit channels and levels, then while holding the
assign key, press [UPDATE]. You will get a popup where you confirm recording this
Preset, and can write or edit a text label. Then [UPDATE] again or [ENTER] or click on
the icon in the down right corner.
Note: In this way, changing levels in the Field Editor of the Subfader will be « LIVE » if
the fader is above zero.
6.4
Edit
6.4.1
Edit a Preset (BLIND mode)
To Edit a Preset:
[#] [EDIT], select channels and edit levels then [UPDATE]. Use [ESC] to close the edit
window.
6.4.2
Rename a Preset
To Rename a Preset:
[#] [EDIT] and type your text in the field located in the left down corner. Then [ESC] to
close the Edit window.
6.5
Copying levels from a preset to a selection of channels
[FETCH]
To Copy levels from Preset # to selected channels referencing to this preset:
[#] [FETCH].
6.6
Loading a Preset in a Subfader
To load an existing Preset into a Subfader:
[#] [LOAD]&[Assign Key ##].
www.adblighting.com
Quick Start - page 36
Issue 1.0
7. SEQUENCES
7.1
Introduction
General Facts
A sequence is a list of steps that can be played back manually or with fade times. Each
step contains a Preset.
A sequence Step consists of three components:
•
Preset: Channels levels only
•
Device Links: Attributes values, Attribute Times, Go On Go flags
•
Data: Fade Times, Wait Times, Channel Times (Part Fade), Master Link, Page
Links and Action Links
The same Preset can exist in several sequence steps, and several sequences.
In a sequence step, each channel and each parameter can have a particular time.
Sequences can be played back from the Master Playback, or any virtual Playback.
7.2
Master Playback
When you start a new play (HATHOR menu > File > New / Clear Play) there is a default
sequence (Seq 1) in the master Playback.
After selecting some channels with levels, just [RECORD] your first Preset. By default it
will be the first free Preset in the Preset list (Preset 1). Write a text label for this first Preset
in the text field, then [RECORD].
Note: in the Sequence Playback window, you will see this text displayed twice, in the
Text column as Step Text and in the Content column as Preset Text.
7.2.1
Recording a new Preset
To record a Preset with the next free number:
[RECORD].
You will get a popup where you confirm recording this Preset, and can write a text label:
then [RECORD] again or [ENTER] or click on the icon in the down right corner.
To record a Preset with a specific number, use the same syntax as above but specify the
number before:
[#] [RECORD].
7.2.2
Times
Fade times of a Sequence Step are related to that step, not to the Preset linked to the
Step. This makes it possible to use the same Preset with different fade times in other
Steps or in the Subfaders.
7.2.2.1 In & Out Times
First check that in [SETUP] Preferences/Playback the « Set Times mode » is on Active.
Use the [GO] button to execute the Preset on stage, check that you see the content of this
Preset in your field Editor (means you’re working in the A Field). Times used for the
crossfade are default Times.
To set the new same value (#) for In & Out Times:
[#] [TIME].
To set a new value (#) for In Time:
[#] [TIME] & [B].
To set a new value (#) for Out Time:
[#] [TIME] & [A].
www.adblighting.com
Quick Start - page 37
Issue 1.0
Note: to change Times for the incoming Step, swap to B field with the [A/B] key, and use
the same syntax.
7.2.2.2 Delay Times
To set a new value (#) for Delay In Time:
[#] [DELAY] & [B].
To set a new value (#) for Delay Out Time:
[#] [DELAY] & [A].
Note: to change Times for the incoming Step, swap to B field with the [A/B] key, and use
the same syntax.
7.2.2.3 Wait Times
When you want to execute automatically a crossfade between two steps, the wait Time is
always to set on the second step.
The wait Time starts counting down after the END of the first crossfade. That means if you
want the second step to start immediately after the end of the first step, you should set a
value of 0,1 sec.
To set a wait Time:
[#] [WAIT].
Note: to change Times for the incoming Step, swap to B field with the [A/B] key, and use
the same syntax.
7.2.2.4 Channel Time and channel delay
To set a particular Time for one or several channels:
Select Channels
[#] [CH] & [TIME].
To set a particular Delay for one or several channels:
Select Channels
[#] [CH] & [DELAY].
Note: to change Times for the incoming Step, swap to B field with the [A/B] key, and use
the same syntax.
7.2.2.5 Parameter Time and Parameter delay
To set a particular Time for one or several channels and for one attribute Group (e.g.
COLOR):
Select Channels with Scroller
[#] [COLOR] & [TIME].
To set a particular Delay for one or several channels and for one attribute Group (e.g.
COLOR):
Select Channels
[#] [COLOR] & [DELAY].
Note: to change Times for the incoming Step, swap to B field with the [A/B] key, and use
the same syntax.
7.2.3
Insert a Step
Record a Preset with a decimal number :
[#] [.] [#] [RECORD].
7.2.4
Delete a Step
Note: When you delete a Sequence Step the Preset of that step still exist in the Preset
List but all assigned times, links and texts are lost.
www.adblighting.com
Quick Start - page 38
Issue 1.0
With the mouse or your finger, go to the step to delete, in the Sequence Playback window.
Right click or let your finger few seconds on the cell.
In the menu choose {Delete Sequence Step}.
7.2.5
Replace and Rename Preset
With the mouse or your finger, go to the Preset to replace in the Sequence Playback
window.
Double click on the Preset Number, tap the new number then [ENTER].
A popup window will appear with different options:
{Replace Preset} is the default option, confirm with [ENTER].
{Copy Preset to new number}: to copy existing content of selected Preset to another
one without deleting the target selected Preset.
Note: if the new number is corresponding to an existing Preset, check the option
« Replace if new number exists » to replace. If unchecked the existing target
Preset will be not overwrited.
{Rename Preset to new number}: to copy existing content of selected Preset to another
one but with deleting the target selected Preset.
Note: if the new number is corresponding to an existing Preset, check the option
« Replace if new number exists » to replace. If unchecked the existing target
Preset will be not overwrited.
7.2.5.1 Drag & drop a step
To Copy or Move a step to a new location, click on the Step number, drag and drop it to
the step to insert, choose Copy or Move.
www.adblighting.com
Quick Start - page 39
Issue 1.0
8. LOOKS
8.1
Introduction
Lookks are a reccording of ch
hannels inccluding theirr intensity le
evels and th
heir attribute
es. They
are similar
s
to Groups,
G
butt with attribute data allso included
d. Channels that do not
n have
inten
nsity levels can
c be inclu
uded in a Lo
ook, just as with a Grou
up.
Therre is no Time concept in Looks.
Theyy are prima
arily useful for
f "live" pe
erformances
s, when yo
ou wish to b
be able to bring up
pre-rrecorded fixxture setting
gs, but in a non-sequential, spontaneous ma
anner, such as for a
musiical concertt.
Lookks can also be useful as
a building blocks whe
ere you can
n store an idea for future use,
but don't
d
want to
o record it as
a a Sequen
nce Step/ Preset.
P
For "live"
"
use, Looks
L
are usually
u
loaded to subfa
aders, wherre they can be faded in
n or out.
Theyy can be accessed
a
from a Direcct Access Panel, whe
ere there a
are special function
butto
ons.
Lookks can be recorded
r
in
n variety of methods, but a pop-up window
w gives you options
abou
ut what is to
o be recorde
ed.
8.2
Record
When recording, you can ch
hoose betw
ween different
options:
All > 0: Every chann
nel with leve
el > 0:
age
• Sta
• Field
Selecte
ed: only selected channe
els
Note: you
y
can choose working
g by default in one of th
his
mode.
P] (Channels
s)
[SETUP
« Record all with levvel in Looks » checked = All > 0
« Record all with levvel in Looks » unchecke
ed = Selected
d
No Palette References: if sele
ected, attribu
ute values are
recorde
ed instead of Palette references.
Attribute FILTERS
S: simply use
e Attribute Group
G
button
ns
(below the internal Touch Scre
een) to unch
heck Attribute
Groups in the Filter window.
w
8.2.11
Using the
t Keypad
To Record
R
a Look with the next free number:
[REC
CORD] & [LOOK], enter
e
a nam
me if need
ded, chang
ge options if necessa
ary
[REC
CORD] or [E
ENTER] or [LOOK].
To Record
R
a Look with the next free number DIRECTLY in a Subfader:
[LOO
OK] & [Assign Key] enter a name if nee
eded, change options if necessa
ary
[REC
CORD] or [E
ENTER] or [LOOK].
To Record
R
a Look with a sp
pecific number:
[#] [RECORD] & [LOOK]], enter a name
n
if nee
eded, chan
nge optionss if necessa
ary
CORD] or [E
ENTER] or [LOOK].
[REC
To Record
R
a Look with a sp
pecific number DIRECT
TLY in a Su
ubfader:
[#] [LOOK] & [Assign
[
Ke
ey] enter a name if ne
eeded, change optionss if necessa
ary
[REC
CORD] or [E
ENTER] or [LOOK].
www
w.adblighting.com
then
then
then
then
Quicck Start - pa
age 40
Issue
e 1.0
8.2.2
Using the mouse
Drag & drop a selection of channels to the Look direct access panel and choose {Record
New Look} in the local menu.
Drag & drop a Sequence step a Subfader Field and choose {Create New Look from Pos
#: Preset # and load to field}.
Note: the recorded look will be the intensities from the Cue/Preset in the sequence step,
and all positions for those with intensity based on their history in the sequence.
Right Click in the Direct Access panel and choose {Record New Look} in the local menu.
Right Click on a Sequence step and choose {Create New Look from this} in the local
menu.
Note: the recorded look will be the intensities from the Cue/Preset in the sequence step,
and all positions for those with intensity based on their history in the sequence.
8.2.3
Using the Touch screen facilities
Drag & drop a selection of channels to the Look direct access panel and choose {Record
New Look} in the local menu.
Drag & drop a Sequence step a Subfader Field and choose {Create New Look from Pos
#: Preset # and load to field}.
Note: the recorded look will be the intensities from the Cue/Preset in the sequence step,
and all positions for those with intensity based on their history in the sequence.
Right Click (Let the finger 2 seconds on the Touch Screen) in the Direct Access panel and
choose {Record New Look} in the local menu.
Right Click (Let the finger 2 seconds on the Touch Screen) on a Sequence step and
choose {Create New Look from this} in the local menu.
Note: the recorded look will be the intensities from the Cue/Preset in the sequence step,
and all positions for those with intensity based on their history in the sequence.
8.3
Working with Looks
8.3.1
Select Channels
Look in Subfader: [ASSIGN Key].
Direct Access Panel / # mode: click on the Look box or touch it to select channels
recorded in this look.
Note: selects the channels stored in that Look, but does not change Intensity levels, or
load attributes and de-select all selected channels.
www.adblighting.com
Quick Start - page 41
Issue 1.0
8.3.22
Playbac
ck Looks
Lookk in Subfade
er: [START]]&[ASSIGN
N Key] or ra
aise the Sub
bfader Fade
er.
Note
e: Looks on subfaderss handle In
ntensity leve
els as HTP
P (Highest T
Takes Prec
cedence)
and attrib
butes as LT
TP (Last Takes Preced
dence).
If you a Look raised
d on a subffader, then raise anoth
her, the attrributes will move to
the posittions in the
e 2nd Lookk. When you lower the
e 2nd Lookk, the attributes will
restore to those in the first Look.
checked
been
If
"Au
uto
execcute
Loo
oks
on
Faders""
has
(Setup/P
Preferences/Attributes): as soon as the fa
ader movess above ze
ero, the
attributess will move
e to their po
ositions, the
ey will not fa
ade with the movemen
nt of the
fader. Th
he Intensity will follow the
t moveme
ent of the fa
ader.
If "Auto execute Lo
ooks on Fa
aders" has NOT been checked: the attribu
utes and
Intensityy will follow the
t movement of the fa
ader.
If "Rubbe
er band" ha
as been che
ecked (unde
er Setup/Pre
eferences/A
Attributes):
when the subfaderr is lowered
d, the inten
nsity AND attributes w
will restore to their
previouss values.
If "Rubbe
er band" ha
as NOT bee
en checked: ·when the
e subfader iis lowered, the only
intensitie
es will restore to their previous
p
vallues.
Keyp
pad: [#] [LO
OOK] will exxecute the Look
L
#.
It do
oesn’t de-se
elect any selected
s
ch
hannels. It changes In
ntensity and
d attributes
s for the
chan
nnels stored
d in the Lookk · It doesn’t select cha
annel stored
d in Look.
Direcct Access Panel
P
/
clearr the active field.
∑
m
mode:
clickk on the Lo
ook box or touch it to execute Look and
Note
e: changess Intensity le
evels, and load attributtes for the channels
c
re
ecorded in that
t
look
and de-sselect all selected chan
nnels.
Direcct Access Panel
P
/{
clearr the active field.
} mode: click on the Look box or to
ouch it to exxecute Look
k but not
Note
e: changess Intensity le
evels, and lo
oad attributtes for the channels
c
sto
ored in that look but
doesn’t de-select
d
all selected channels.
c
8.3.33
Using recorded
r
v
values
/ Fe
etch
Direcct Access Panel
P
/ ☞ mode:
m
click on the Loo
ok box or to
ouch it to FE
ETCH attrib
bute data
from Look for se
elected channels only.
Right Click on a Look Box, in addition to the norm
mal options there
t
is:
•
{Fetch Levels
L
from
m Look}.
•
{Fetch Positions
P
frrom Look}, with an ad
dditional sub
b-menu to a
allow you to
o filter to
a specific attribute group
g
(i.e. Colour,
C
Bea
am etc.).
www
w.adblighting.com
age 42
Quicck Start - pa
Issue
e 1.0
8.4
Editing
8.4.1
The Edit window
To open the LOOK Edit window: [EDIT] &
[LOOK].
Left click on a Look to open the Channel
Grid.
Open a Position Link to change directly
parameter values.
Change the Label in the label field.
8.4.2
Editing a Look
To Edit a LOOK: [#] [EDIT] & [LOOK].
Left click on a Look to open the Channel Grid.
Open a Position Link to change directly parameter values.
Change the Label in the label field.
8.5
Loading To a Subfader
To load a Look:
Using the keypad: [#] [LOOK] & [ASSIGN Key]
Using the mouse or the Touch screen:
Drag&Drop the Look from the Direct Acess Panel to a Subfader Field.
www.adblighting.com
Quick Start - page 43
Issue 1.0
9. SUBFADERS
9.1
Introduction
Subfaders and Fields are different controllers to the same data.
The Subfader controller includes a Field Editor channel display (hold down 2 seconds the
[ASSIGN] key), so that you can see and edit its content directly.
A Subfader is only a controller (Field), not a content (object).
So the concept is to load content in a controller and to record the main organisation of
every Subfaders in a PAGE.
Note: because Subfaders are controllers, they are linked to the Software and the Desk
and not to the « Play ».
That means every time you will load a Play, the precedent Subfaders will be still
there and that means these Subfaders are not recorded in the Play. To save the
main organisation of the Subfaders in the Play, Record a Page.
9.2
Fader Banks
There are a limitless number of Subfader Fields available, with 192 available at a time.
These 192 Subfaders are organised in 8 Banks of 24 physical Subfaders.
To select a bank: [#] [F/B #].
To move from one bank to another: [F/B -] and [F/B +]
Note: The bank number is displayed in the Internal Touch Screen / up left corner, if
Subfader Screen [Subfader] is selected.
9.3
Pages
The information for each set of 192 Subfaders is stored on a "Page".
To Record a Page with the next free number:
[RECORD] & [PAGE#]
To Record a Page with a specific number:
[#] [RECORD] & [PAGE#]
You can switch between Pages:
To switch to the page 0: [0] [PAGE#] a popup will open « Clear all Fields? », [ENTER] to
confirm if you want to clear all the 192 subfaders, [ESC] to cancel.
To switch to the page #: [#] [PAGE#]
Or press directly [PAGE#] a Flyout window will appear in the Internal Touch Screen,
select the page of your choice.
www.adblighting.com
Quick Start - page 44
Issue 1.0
Note: Loading a new Subfader Page puts the new content in a pending state if the
Subfader is above 0%. When the Subfader is faded to 0% the new information is
loaded.
9.4
Assign Keys
Each Subfader has a assign key. This is used to load, select, record or edit content to that
Subfader.
In combination with the [START] key holded, the assign key becomes a start key, which
execute the content on Time if a Time value does exist for this Subfader.
The master key is referred to in this manual simply as a [ASSIGN key].
There are two keys for a master, the assign key is the upper key, the lower key is a flash
key that will bump the content of the master, depending on the settings.
9.5
Flash Keys
There are 24 Flash keys above the 24 faders.
[FLASH] key: The content of the Master is set to the flash level as long as the Flash key
is held.
Flash mode is toggled individually for each Master 1-24.
By default, all Subfaders are set in Flash mode.
To turn off Flash mode for a Subfader:
In the SUBFADER SCREEN [SUBFADERS], Right click on the field just below the
Subfader’s number , choose the last option {Browse Fields}, click on the line regarding the
Subfader to edit, in the FlMo column uncheck the box.
To set the Flash level for a Subfader:
In the SUBFADER SCREEN [SUBFADERS], Right click on the field just below the
Subfader’s number , choose the last option {Browse Fields}, click on the line regarding
the Subfader to edit, in the FlLev column click in the cell, tap the value on the keypad,
then confirm with [ENTER].
9.6
Load / Clear
To Clear a Subfader
[C/ALT] & [ASSIGN Key].
To Clear all Subfaders
[0] [PAGE #] confirm with [ENTER].
To Load an object from the Menu Play.
www.adblighting.com
Quick Start - page 45
Issue 1.0
Open the object menu, drag & drop the object to the Field/number area and choose (Load
XXXX).
E .g: in the Menu Play, click on the Tab.
E .g.:
in the Menu Play, click on the Tab
Groups.
Drag & drop the Group 1 to the number
area of the Field 1 (in the Fields
window or in the SUBMASTER screen)
and choose the option {Load Group 1}
9.7
Channel Selection
Press a Assign key to select all channels in the content of that Subfader, except for
Palettes.
Precedent selected channels will be deselected.
To work with several Subfader’s channels, hold the [+] while selecting Subfaders.
Note: precedent selected channels won’t be deselected by an empty Subfader.
9.8
Editing
"Direct Edit Subfader Field":
Hold down [ASSIGN key], after 2 seconds the Field Editor will switch display to that
Subfader.
While holding the assign button you can edit directly the Subfader Field content.
Release the assign key to finish.
Note: this method only edit the content of the Subfader, not the object loaded to the
Subfader
To Edit the Object loaded in the Subfader and the content at the same time:
Hold down the [ASSIGN key], after 2 seconds the Field Editor will switch display to that
Subfader.
While holding the [ASSIGN key] you can edit directly the Subfader Field content, still
holding the [ASSIGN key] press [UPDATE]: a popup concerning the object will open
press [UPDATE] again.
www.adblighting.com
Quick Start - page 46
Issue 1.0
9.9
Times
[#] [TIME] & [ASSIGN KEY]
Hold down the [START] key and press the [ASSIGN KEY] to execute the Subfader in
Time.
If some parameters such as Colour Frame exist as content in the Subfader (Look or
Palette), they will jump to the recorded value if Auto Execute Looks on Faders >
[SETUP] / (Attributes) is checked. If unchecked the attributes and Intensity will follow the
movement of the fader.
9.10 Settings
9.10.1 Subfader Modes: Normal / Inhibit / Focusing / Disable Stage Recording
To change a subfader mode:
In the SUBFADER SCREEN [SUBFADERS], Right click on the field just below the
Subfader’s number, choose the last option {Mode},
Choose between the four modes in one click.
www.adblighting.com
Quick Start - page 47
Issue 1.0
10. CHASERS
10.1 Introduction
A Chaser is a specific object, used to Build multi-step effects and always executed while
loaded in a Subfader. A Sequence can’t be set to run as Chaser.
General Facts
•
Chasers have Rate and BPM (BPM can be set with TAP).
•
A Chaser has playback direction’s modes such as Normal, Random, Reverse,
Bounce and Build mode.
•
You can limit any Chaser to a number of loops.
•
You can link any Chaser to a sequence step.
•
You can play back a Chaser from any Subfader and use the next following
Subfader as Speedmaster.
10.2 Recording a chaser
10.2.1 Using the keyboard
10.2.1.1
NO CHANNEL SELECTED
To Record a Chaser with the next free number (for a specific number, just add [#] before):
[CHASER] & [Assign Key] and raise the Subfader at 100%.
•
•
•
•
•
Enter the Name of the Chaser
In the Channels selected area:
just enter the number of Steps needed.
Tick the Set Times box to set times, enter the Stay and
the Fade Times.
The Open Editor on Accept option is checked by
default.
If Unchecked, the editor won’t open automatically.
Click on the checkmark virtual button to validate:
the EDITOR window appears.
www.adblighting.com
Quick Start - page 48
Issue 1.0
1.
2.
3.
Click on the Pause virtual button
Click on the Step 1
Select Channel(s) ant set level(s)
Note: [#] & [LOOK] will load the Look #
directly
4.
5.
6.
7.
8.
9.
10.
11.
Press [UPDATE] to store the Step 1
Go to Step 2 with the [Down] key
Repeat 1 to 4
Go to Step 3 with the [Down] key
Repeat 1 to 4
Go to Step 4 with the [Down] key
Repeat 1 to 4
[ESC] close the Editor window (changes will
be stored automatically). A popup appears,
{YES} will start the Chaser.
Note: to use the next boarding Subfader as Speedmaster: go in the Subfader Screen
[SubFaders], Right click on the number area, select {As Speed master for
chaser in Field #}.
10.2.1.2
CHANNELS SELECTED
E .g. Channels 1 thru 4 are selected with 70% as level
To Record a Chaser with the next free number (for a specific number, just add [#] before):
[CHASER] & [Assign Key] and raise the Subfader at 100%.
•
•
•
Enter the Name of the Chaser
In the Channels selected area: the number of Steps depends on the
number of channels selected. You can change it.
Pr. Step: quantity of channels by Step, by default set in 1.
Note: setting 2 Channels by Step will create 4 Steps, Step 1 with Channel
1 and 2, Step 2 with Channel 3 and 4, Steps 3 and 4 will be exactly
the same as 1 and 2.
•
•
•
•
•
•
•
•
Levels : Full or levels on stage
Tick the Set Times box to set times, enter the Stay and the Fade
Times.
The Open Editor on Accept option is checked by default.
If Unchecked, the editor won’t open automatically.
Click on the checkmark virtual button to validate:
the EDITOR window appears.
Click on the Pause virtual button
Use navigation keys [Up] and [Down] to move from step to step
If the result don’t suit to you, use the above method to Edit Steps.
[ESC] close the Editor window (changes will be stored automatically).
A popup appears, {YES} will start the Chaser
10.2.2 Changing modes and editing Times and levels in the EDITOR window
10.2.2.1
MODES
By default the Chaser is in Hard mode, which means only the Stay Times will be used as
set in the Wizard and if « Set Times » was checked.
www.adblighting.com
Quick Start - page 49
Issue 1.0
To switch to a Crossfade mode, go to the column Mode, double-click on Hard and select
{Soft}, in this mode Fade Time will be used as set in the Wizard and if « Set Times » was
checked.
To switch between different modes:
Normal: go to the column Direction, double-click on XXXX
{Normal}
Bounce: go to the column Direction, double-click on XXXX
{Bounce}
Reverse: go to the column Direction, double-click on XXXX
{Reverse}
Random: go to the column Direction, double-click on XXXX
{Random}
(Current mode) and select
(Current mode) and select
(Current mode) and select
(Current mode) and select
Build mode: go to the column Build, tick the box.
To determine a count: go to the column Loops, click on the cell, [ENTER], tap a number
then [ENTER]. A new column will appear where you can choose the action at the end of
the count, between OFF or ON.
Note: In Hard mode you can set a BPM value: go to the column BPM, click on the cell,
[ENTER], tap a number then [ENTER].
10.2.2.2
TIMES
To Edit Times for one Step:
go to the column In/Out (other choices are In, Out and Stay) with the [DOWN] key then
the other navigation keys, [ENTER], tap a value then [ENTER].
To Edit Times for a range of Steps:
go to the column In/Out (other choices are In, Out and Stay) on the line corresponding to
the first step, with the [DOWN] key, then use the other navigation keys,
hold the shift key on the keyboard, use the [DOWN] key to select the next steps
tap a value then [ENTER].
10.2.2.3
CHANGING INTENSITY LEVELS
To Edit channel level for one Step:
go to the column corresponding to the channel and on the line corresponding to the step
to edit with the [DOWN] key then the other navigation keys
tap new level then [ENTER].
To Edit channel level for a range of Steps:
go to the column corresponding to the channel and on the line corresponding to the first
step to edit with the [DOWN] key then the other navigation keys
hold the shift key on the keyboard, use the [DOWN] key to select the next steps,
tap new level then [ENTER].
10.3 Loading a Chaser in a Subfader
To Load a Chaser in a Subfader:
[#] [CHASER]&[ASSIGN Key]
Note: to use the next boarding Subfader as Speedmaster: go in the Subfader Screen
[SubFaders], Right click on the number area, select {As Speedmaster for
chaser in Field #}.
www.adblighting.com
Quick Start - page 50
Issue 1.0
10.4 Editing a Chaser
10.4.1 BLIND mode
To Edit a Chaser in BLIND mode:
go to the Play Menu, to open the Chasers menu Left click on the Chasers Tab,
Right click on the chaser to edit select {Edit Chaser #}.
Here you can change Modes, Times values, and levels, following exactly the same
method as in paragraph 10.2.2.
10.4.2 LIVE mode
First load the chaser in the Subfader, [#] [CHASER]&[ASSIGN Key]:
[EDIT]] & [ASSIGN Key].
STOP the chaser with the pause virtual button.
Here you can change Modes, Times values, and levels, following exactly the same
method as in paragraph 10.2.2.
10.5 Start a Chaser
Raise the Subfader at 100%: the Chaser will start at Step 1.
You can also use the [START] key: [START] & [ASSIGN Key].
Note: if you set a time to this Subfader, with this method the Chaser will fade in with the
Time set to the Subfader.
When a Chaser is running, you can change the Rate:
Use the next following Subfader as Speedmaster
Use the [RATE] key hold it and TAP the tempo on the [ASSIGN Key]
www.adblighting.com
Quick Start - page 51
Issue 1.0
11. The TRACK WINDOW [TRACK] / Ctrl F4
To open the track window:
[TRACK].
Note: if some channels are selected, those channels will appear in the Track window.
To display a selection of channels
Just select channels with the common selecting tools [Ch] [THRU] [+] [-].
To add or remove channels
[#] [+] / [#] [-].
To Edit level for a channel and one object (Preset, Group, Look).
Use the mouse, your finger or navigation keys, enter the value on the keypad then
[ENTER], [#] [+] / [#] [-].
To Edit level for a channel on a range of objects (Preset, Group, Look).
www.adblighting.com
Quick Start - page 52
Issue 1.0
Use the mouse, your finger or navigation keys, select the first cell (Channel column / First
Object Line), HOLD the Shift key on the Keyboard, select the last cell (Channel column /
Last Object Line), enter the value on the keypad then [ENTER].
To add specific parameter column(s) to Channel Intensity Columns.
Focus a channel column and press Select Parameters.
Choose parameter(s) in the list. This will add columns for ALL channels.
Note: historical parameters are displayed in gray, and cannot be edited.
Actual position recordings can be edited, and dragged:
To change a value: double click on a cell or [ENTER], set the new value and [ENTER] to
confirm.
To change a Frame: double click on a cell or [ENTER], pick the new Frame in the list
using the mouse or navigation keys, and [ENTER] to confirm.
To change a Time value: open the Seq Step (+ box left side of the sequence icon)
Double click on a cell or [ENTER], set the new value and [ENTER] to confirm.
www.adblighting.com
Quick Start - page 53
Issue 1.0
12. Screen Setup ( MENU HATHOR / Controllers)
When you open a new window, such as a Controller or an Editor, it will initially be floating
on the monitor that you opened it from. From there you can work with it as it is. Or you can
dock it. If it is not docked, it will remain in the foreground on that monitor, regardless of
which virtual screen you are using.
To Dock a window:
1.
2.
3.
4.
Right click on the top bar of the window, to the right of its label (i.e. Fields,
Playback etc.), on the local menu that will open click on "Dock able" to check it.
Left click on the top bar and drag the window. If the screen is currently blank the
window will dock and expand to full screen size when it is dragged near the top of
the screen.
If the window already has content you will see an horizontal or vertical bar
indicating where the new window will dock. While that bar is visible drop the
window and it will dock.
The split between the windows can be adjusted by dragging the bar between them.
To Un-dock or remove a window:
Click on the upper border of the window. You will have the option to un-dock or close the
window
12.1 CONTROLLERS > MENU HATHOR / Controllers
Controllers are windows that access the shows data, and provide interfaces to operate the
system.
The system can have multiples of all Controllers, each configured for different uses.
Select a controller and it will open in a non-docked window on the current monitor. It can
then be dragged to whichever monitor you wish, adjusted in size and/or docked
Controllers are typically arranged on the Hathor desktop by docking them on the
Subscreens.
Controllers can also be opened for temporary needs and left floating on the desktop.
Brief description of the different Controllers:
Field Editor: displays a grid of Instruments used for selecting instruments, changing
levels etc.
Fields: displays Subfader Fields in a high density format.
Sequence Playback: displays a Sequence of steps, along with playback controls (i.e,
GO, Stop etc.).
Device Control: displays controls and information for devices such as moving lights etc
that operate in a Last Takes Precedence (LTP) mode.
Device Control Browser: displays information for devices such as moving lights etc that
operate in a Last Takes Precedence (LTP) mode, with zoom functionality, and color
information.
Direct Access: displays buttons used to activate Groups, Looks, Palettes and Pages.
Priority Fields (LTP): displays Information for a special type of Field used for LTP control
(normally only used in architectural systems with external control inputs).
Subfaders: displays information from the same Subfader Fields as shown in "Fields" but
includes a Field Editor grid and virtual faders.
User Panels: displays panels with buttons used to directly activate Action Lists.
www.adblighting.com
Quick Start - page 54
Issue 1.0
12.1..1 FIELD EDITOR
E
Conc
cept:
Selected fixtures have a red highlight box around
d their box.
Chan
nnels are selected
s
so that you can
c
adjust their
t
levels. Specificallly for the following
f
typess of devicess:
Inten
nsity channe
els: you dire
ectly control the intensiity level in the Filed Ed
ditor.
Scrollers: you can
c
change
e their colour frame directly from
m the Field Editor, or from
f
the
Device Controlss.
nnel grid display
d
Zoo
om
Chan
The size of the channel boxxes can be adjusted by
y zooming the
t display area [Ctrl] or
o [Shift]
& Mo
ouse Scroll Wheel.
nnel grid display
d
form
mat
Chan
•
•
•
•
•
•
Num
meric = all ch
hannels
Paccked = chann
nels that are
e: at a level in A Field + going
g
to a le
evel
in B field + selec
cted+ at a levvel
Sele
ected = Sele
ected channe
els
Use
ed = Used in Play ( includ
des at level a
and selected )
Loccked = prevents currenttly displayed
d channels from chang
ging
(i.e.., select Pa
acked, then Locked- displayed cha
annels will not
cha
ange even if criteria
c
for "P
Packed" chan
nges)
Devvice Layouts-- these are user
u
created
Currrent Playba
ack/ Field Id
dentity and
d current le
evel
•
• Shows wh
hat Playback//Field is bein
ng shown in tthe Field Editor
Click on the
t
level ind
dicator to op
pen a windo
ow listing otther Playbaccks &
Fields ava
ailable for editing
Conttent of Currrent Field
•
•
•
•
at is currently loaded intto the curren
nt
displays wha
Playback / Field
F
·
if a Playback is current yyou can sele
ect a differen
nt
Preset·
if Stage/Field mode is set to Stage, doing thiss
loads the Prreset live onsstage ·
if a Submasster / Field is current you can select a
different Pre
eset/Group/P
Palette or Cha
aser
Reco
ord Preset Status
If sho
own, this in
ndicates tha
at the intenssity levels in
i the curre
ent playbackk are differe
ent from
those
e recorded in the curre
ent loaded preset. Typ
pically show
wn when yo
ou have ma
ade level
chan
nges, but ha
ave not re-re
ecorded the
e preset.
www
w.adblighting.com
Quicck Start - pa
age 55
Issue
e 1.0
Anch
hors to Glo
obal Selecttion
This links multip
ple Field Ed
ditors (aka Channel Grids)
G
togeth
her, so thatt they are active
a
at
the same
s
time.
I.e. channels
c
se
elected in Field Editor are
a active in
n all others that
t
have "F
Follow" activ
ve.
Follo
ow mode is active when
n the button
n is depress
sed.
Follo
ow mode is only availab
ble on Field
d Editors tha
at are docke
ed.
The order that Filed
F
Editorss are selectted is not re
elevant.
All Field Editors have to ha
ave "Follow"" activated for
f them to be connected.
Field
ds that are in
i Follow mode
m
will alll be showin
ng the same
e Field Con
ntent (i.e. Playback,
Preset, etc).
Different Fields that are in Follow mod
de can have
e different Display
D
modes.
A useful combin
nation is to have
h
one Field in "Pac
cked" mode with anothe
er in "Selec
cted".
Link
ked Mode
Allow
ws large num
mber of cha
annels to sp
pan across multiple
m
grid
ds.
Linke
ed mode is only availab
ble for Field
d Editors tha
at are in "Fo
ollow" mode
e.
Linke
ed mode is active when
n the button
n is depress
sed.
i.e.: the
t
1s Edittor shows channel
c
1 through 100
0, then the 2nd Editor will show 101 and
highe
er.
The sequence that
t
the Field Editors have
h
"Linke
ed" activated
d determine
es which Ed
ditor has
the lo
owest channel numberrs
Therre may be overlap
o
in th
he channelss displayed
d depending
g on the sizze shape an
nd zoom
of the
e channel grids
g
Scrolling the dissplay in one
e editor will scroll
s
the otther linked editors.
e
Prev
vious / Nextt Mode
The indicators in the top le
eft of each channel
c
sho
ow either where
w
the ch
hannel leve
el was in
the previous
p
step, or wherre it will be going to in the next sttep.
Stag
ge / Field Mode
M
When this box iss checked then
t
you are
e in Stage Mode.
M
S
mode
e, the Fielld Editor shows
s
all current levvels, includ
ding all Pla
aybacks,
In Stage
Subffaders and Priority
P
Fields.
Chan
nnel levels from
f
Action
n Lists or Priority Fields
s will not be recorded.
In Fie
eld mode (b
box not checked ) only channel wiith levels in the active ffield will be shown.
Use [Stage/Fielld] key to to
oggle betwe
een Stage and
a Field modes.
Note
e: If the locck icon is closed,
c
then
n [Stage/Fie
eld] will not change thiis setting. Left
L click
on the lo
ock icon to toggle
t
it bettween locke
ed and unloccked
www
w.adblighting.com
Quicck Start - pa
age 56
Issue
e 1.0
13. Utilities
13.1 [SETUP] Preferences (Menu HATHOR / Setup / Preferences)
1
6
2
3
4
5
1
2
3
4
1.
2.
5
1.
2.
3.
4.
5.
6.
Display Settings Direct access to Windows Screens configuration
Date and Time
Direct access to Windows Date and Time settings
Network
Direct access to Windows Network configuration
Tablet and Touch (Please check that your external monitor is USB wired)
Direct access to Windows Screens configuration to calibrate the external Touch
Screen:
{Configure}, touch the screen with your finger if this screen is the correct one or
[ENTER] to step to the next, again if necessary and touch the correct screen to setup.
{Calibrate} touch the black cross upper left corner, then carry on, and validate
calibration {OK}
eGalaxy Tools
Direct access to Windows Screens configuration to calibrate the internal Touch
Screen:
click on USB controller then {Monitor Mapping}
Touch your Internal Touch screen till OK appears
click on {Tools} then {4 calibration points}
Calibrate (LET YOUR FINGER ON SPOT DURING few seconds)
{OK}
{OK}
www.adblighting.com
Quick Start - page 57
Issue 1.0
6
Install new version (Please check that your USB stick with new HATHOR version
is plugged)
1. choose the version in the Installer files window
2. {Install}
3. Terminate HATHOR and install version X.X.X.X: {OK}
4. Terminate HATHOR: {YES}
5. {Next>}
6. {Next>}
7. {Next>}
8. {Next>}
9. {Install}
10. {Finish}
13.2 File
13.2.1 Introduction
In this section you will find tools to save, import, export and open your Play file information
as well as browse other Play files.
The system has a hard drive as the primary storage. The Play library is located on the
partition E. You can also use a USB memory stick, an external USB drive, Floppy or a File
Server on the network.
General Notes about HATHOR show files
HATHOR saves play files in 3 ways:
1.
the most current version ( -------.ppl file extension )
2.
history versions of existing play files( -------.$0** file extension)
3.
Auto save version ( -------.ppl file extension, but in separate Auto save directory )
www.adblighting.com
Quick Start - page 58
Issue 1.0
Prego will create a "Library" subdirectory in the "HATHOR" directory, in the partition E, as
the default storage location for play files.
This can be changed at Setup/Preferences/File storage.
Each time you do a manual save, the previously saved version saved is saved as a
history file with an extension of $001, in a unique subdirectory created by Prego, for each
play file. The new version is saved with the extension PPL.
On each subsequent save the 001 file becomes 002, 002 becomes 003 etc.
Each of these files has a time and date stamp, so you an "go back" to a previous version if
needed.
Auto save automatically records a backup copy of the show file, in a separate directory, at
a time interval set under Prego menu / Setup / Preferences / File Storage.
Autos aves: ·
•
are recorded in the same manner as History files, with date/time stamps
•
are only executed if show data has changed
•
does not clear the "Changed Data Alert" indicator at the top of the screen
Each Play file has a "Play Name" (Name column), the Play file contains every files
attached to this play (current file and history files). That Play name is separate from the
"File name" (File column).
13.2.2 Save
To saves the current play in current file:
[SAVE]
or
[F2] keyboard key
or
Click on " Changed Data Alert" icon at top of screen (the red disk)
or
HATHOR menu / File / Save
13.2.3 Save as
To save the current play file under a new file name
Note: editor allows you to also change the Play Name
13.2.4 Open Library
Open Library allows you to open or browse:
•
the most current version (* .ppl file extension)
•
history versions of existing play files (*.0** file extension)
•
Auto save version (*.ppl file extension, but in separate Auto save directory)
From Local menu select a play file and you can Load the File, or Browse it.
Browse allows you to access the data from a Play that you do not currently have loaded.
You can move content from the Browsed Play into the loaded play (i.e. import a Device
Template).
See "Browse another" for details on importing data.
www.adblighting.com
Quick Start - page 59
Issue 1.0
13.2.5 Import
Import allows you to select a non-HATHOR format play file, such as Avab Safari (.pla) or
ASCII Light cues (.txt).
Import opens a Windows file browser to facilitate navigating to another drive, or network
location.
13.2.6 Export
Export allows you to save in a non-HATHOR file format, such as Avab Safari (.pla) or
ASCII Light cues (.txt).
Export opens a Windows file browser to facilitate navigating to another drive as a USB
memory stick, or network location.
"Export" is also for storing the play file to somewhere outside the normal library, as on a
USB memory stick.
An "exported" save is independent of normal saves
13.2.7 New/Clear Play
New / Clear play is used to start a new playfile or clear data from an existing play file.
2
1
Play name:
Here you can name the play (the show).
3
4
1
Choose new play to start with an empty play
“New Play” tab offers the choice of creating a new Empty play, or one “Based on
Another” (pull down menu that defaults to “Empty”)
“Based on another” defaults to a play file that is set under Setup/Preferences/ File
storage.
Browse icon at the end of the file name allows you to select any other play from
your library.
www.adblighting.com
Quick Start - page 60
Issue 1.0
2
3
“Based on another” menu allows you to filter what contents you wish to have
imported from the file into your new file. These filter settings are retained.
Choose Clear play to start from your current play and select objects to clear in the
menu (tab menu includes filter for what contents should be cleared).
Choose Unpatched to start with a empty Patch or Patched 1:1 to start with a 1:1
patch
Please note: if you have Instruments with levels in a Play due to Action Lists,
when you create a "new Play" those levels will remain active. If you do not wish to
have these levels, you must turn them off from the initial Play before creating a
New Play.
Alternatively you can import these Actions into the new play. 4
13.2.8 Browse another
Browse allows you to access the data from a Play that you do not currently have loaded.
You can move content from the Browsed Play into the loaded play by dragging the object
from the Browsed Play to the currently loaded play.
The following objects are involved:
•
Dynamic Templates
•
Dynamic Tables
•
Device Templates
•
Sequences
•
Dimmer Curves
•
Device Layouts
•
Action Links
•
Panels
To do this, open the object menu by clicking on the object Tab, in the Play menu, then
drag the object from the Browsed Play on an existing object in the current play. Choose
Copy.
The following elements have a local menu option (Right Click Import) in the browsed play,
to Import to the current Play.
•
Instruments Setup (autocreating missing Devices and Templates).
•
Palettes (autocreating missing Instruments/Devices/Templates).
•
Presets.
•
Groups.
Use this with care, you can mess up your play totally if you try to import into a play
containing a totally different setup.
13.3 System Restore (KEYBOARD and MOUSE needed)
The HATHOR system restore routine allows reinstallation of the software from an internal
DOM SATA device.
All external devices should be removed before starting.
The Desk includes a system restore routine that can restore the original software and
Windows image on the console.
A specific DOM SATA device included stores the files needed to create a clean restore of
the desk software.
The C partition on the hard drive will be completely restored, be sure before anything that
all play files were stored on the D partition: SETUP/PREFERENCES/FILESTORAGE.
In case of your desk is completely crashed:
www.adblighting.com
Quick Start - page 61
Issue 1.0
Shutdown the desk with the keyboard: (Ctrl&Alt&Del)
In the low right corner of the screen you will see a RED icon: click on it to Shutdown
Choose {Forced shutdown} and confirm.
Start the desk normally, but press alternatively F12 while starting till « Boot menu »
appears.
Use the keyboard down arrow to go to Hard Disk then (ENTER) (keyboard).
Use the keyboard down arrow to go to xxxxx SATADOM then (ENTER) (keyboard).
The message « Windows is loading file » appears, wait about ten minutes.
At the end of the process the message « wait Reboot» appears then HATHOR restart.
www.adblighting.com
Quick Start - page 62
Issue 1.0
Personal Notes
www.adblighting.com
Quick Start - page 63
Issue 1.0
Personal Notes
www.adblighting.com
Quick Start - page 64
Issue 1.0
Subject to modifications
N.V. ADB-TTV Technologies S.A.
(Group Headquarters) Leuvensesteenweg 585, B-1930 Zaventem
Tel : +32.2.709.32.11, Fax : +32.2.709.32.80, E-Mail : [email protected]
France
ADB S.A.S.
Sales Office: 92, Avenue Jean Jaurès F-92120 Montrouge
Tel : +33.1.41.17.48.50, Fax : +33.1.42.53.54.76, E-Mail : [email protected]
Factory & Group Logistics Centre: Zone industrielle Rouvroy F-02100 Saint-Quentin
Tel : +33.3.23.06.35.70, Fax : +33.3.23.67.66.56, E-Mail : [email protected]
www.adblighting.com
Lighting Technologies
M-1243-E-01r
ADB - Your Partner for Light
Belgium