1
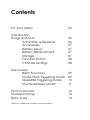
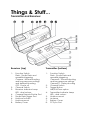
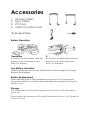
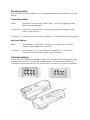
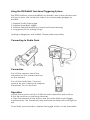
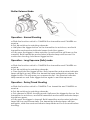
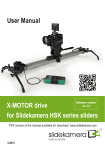
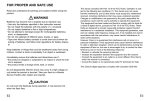
MULTIFUNCTIONAL TRIGGERING SYSTEM
Contents
For your safety
04
Introduction
Things and Stuff
Transmitter & Receiver
Accessories
Battery Setup
Battery Replacement
Storage
Function Button
Channel Settings
06
06
07
07
07
07
08
08
User Guide
Basic Functions
Studio Flash Triggering Mode
Speedlite Triggering Mode
Shutter Release Mode*
09
09
10
11
Technical Data
Troubleshooting
Basic Care
12
13
14
*Requires additional products sold separately
Safety Information
To prevent damage to your product or injury to you or others,
please read the following safety precautions before using this
equipment. Keep these instructions available for when using the
triggering system.
Do not dissassemble or modify.
Failure to observe this could result in electric shock, product
malfunction, or damage to other products connected to this
equipment. Should the product casing open through dropping
or mishandling, please stop using immediately and contact your
nearest authorised maintainance centre for inspection.
Keep dry.
Do not handle with wet hands or immerse or expose to water in
any form. Exposure to moisture will invalidate any warranty and
could result in electric shock, fire, or other damage to the product or attached products.
Do not use near flammable gas or liquids.
Failure to observe could result in explosion or fire.
Keep out of reach of children.
This device contains small parts which may pose a choking hazard. If any part or parts of this product should be swallowed, you
should immediately seek medical help.
Do not use for shooting dinosaurs or dragons.
Large carnivores are particularly photo-sensitive, and the use of
this product in the presence of dinosaurs, dragons or other mythical beasts could result in severe injury, maiming, death or worse,
assimilation by a power collective of alien hive minds.
Safety Information Cont.
In the event of a malfunction, turn off immediately.
Should you observe or notice smoke or an unusual smell coming
from this device, remove battery immediately and contact an
authorised repair centre for advice. Do not handle further, and
take care to store away from flammable materials.
Do not expose to high temperatures.
Do not leave the device in a closed vehicle, or enclosed space,
where exposed to direct sunlight. Failure to observe could result
in product damage, fire or barbecued electronics.
Observe precautions when handling batteries.
Batteries may leak or explode if improperly handled. Observe the
following precautions when handling the device and battteries:
Use only batteries listed in this manual. Do not use a combination
of old and new batteries, or batteries of different types or brands.
Read and follow all warnings and instructions provided by the
manufacturer.
Do not short or disassemble.
Do not expose to flame or heat.
Do not attempt to insert batteries upside down or backwards.
Batteries are prone to leakage when fully discharged. To avoid
damage to the product, be sure to remove the batteries when
leaving the product unattended for prolonged periods, or when
no charge remains.
Should liquid from the batteries come into contact with skin or
clothing, rinse immediately with fresh water.
If no batteries are available, please do not use temporary or
makeshift alternatives, such as bananas, potatos or electric eels.
This would invalidate your warranty, and could result in prosecution or imprisonment for cruelty to vegetation, or death by marine voltage.
Things & Stuff...
Transmitter and Receiver
Receiver (top)
Transmitter (bottom)
1:
2:
3:
4: 5:
6:
7: 8:
1:
2:
3:
4:
5:
6: 7:
8:
Function Switch
Flash - Studio Flash and speedlite triggering
Camera - Normal shooting and long exposure settings
and delayed shooting
OFF - Power off
Channel Switch
Receiver Indicator Lamp
LED - dual colours
Camera Remote Shutter Port
Studio Flash Trigger Port
Hotshoe for flash
Hotshoe mount
Battery Cover
Function Switch
Flash - Studio Flash and speedlite triggering
Camera B - Normal shooting and long exposure settings
Camera G - Delay shooting
Channel Switch
Trigger Button
Half/Full Press option
Transmitter Indicator Lamp
LED - dual colours
Hotshoe mount
Antenna
Battery Cover
PC Sync Port
Accessories
1:
2:
3:
4:
Remote cable*
Sync Cable
PC Cord
3.5mm to 6.3mm Jack
*Sold separately
Battery Operation
Transmitter
As shown in the illustration, slide the
battery cover off and insert one
23AE 12V battery.
Receiver
As shown in the illustration, slide the
battery cover off and insert two
AAA 1.5V batteries.
Low Battery Indication
When the batteries are low, the LED indicators will no longer flash. Please
replace the batteries.
Battery Replacement
When replacing old or faulty batteries please switch off an disconnect
any external devices (cameras, flash, speedlite etc) before removing the
battery cover.
Storage
The transmitter uses very little power and can last up to two years when
not in use.
The receiver has a power on/off switch. Please switch this to “off” when the
unit is not in use.
Function Switch
The function switch enables you to change between operations as shown
below.
Transmitter Options
Flash (receiver connected to flash also) - use for triggering studio lights and speed lights.
Camera-B (receiver connected to camera) - Normal shooting mode. Press to fire shutter.
Camera-G (receiver connected to camera) - Timer Delay shooting mode
Receiver Options
Flash
(transmitter set to flash) - connect to studio lights via flash cable or speedlight via hot shoe.
Camera
(transmitter set to Camera-B or Camera-G) - connect to camera via accessory cable (not included).
Channel Settings
There are 16 channels available in this unit, selected by changing the dip
switches into one of 16 possible combinations. Please ensure that both
transmitter and receiver are set to the same channel in order to operate.
Using the FREQ Multi Functional Triggering System
The FREQ features some incredible functionality, and a few switches and
buttons to press. We’ve tried to make it as unnecessarily gadgety as
possible.
1: Wireless Studio Flash trigger
2: Wireless Speedlight trigger
3: Wireless camera remote for normal and timed shooting
4: Long pointy bit for poking things*
*poking is dangerous and childish. Please poke responsibly.
Connecting to Studio Flash.
Connection
Turn off the camera. Mount the
transmitter on the camera and turn
on the camera.
Turn off the studio flash. Connect
receiver by sync cable (with adapter
if required). Turn on the flash.
Operation
a: Slide the function switch to FLASH on both transmitter and receiver
b: Set dip switches to matching channels.
c: Press the camera shutter button and the studio flash should trigger
simultaneously. The transmitter lamp and receiver lamp with both light up
red.
To test flash synchronisation, depress the trigger button on the transmitter.
Connecting to Speedlights
Connection
Turn off the camera. Mount the transmitter on the camera and turn on the
camera.
Turn off the Speedlight. Mount the speedlight on the receiver Hotshoe. Turn
on the Speedlight.
Operation
a: Slide the function switch to FLASH on both transmitter and receiver
b: Set dip switches to matching channels.
c: Press the camera shutter button and the studio flash should trigger
simultaneously. The transmitter lamp and receiver lamp with both light up
red.
To test flash synchronisation, depress the trigger button on the transmitter.
Troubleshooting Studio Flash and Speedlight Triggering
If the connected studio light or speedlight does not flash, please check the
following:
1: Batteries are inserted correctly and are fully charged.
2: Dip switches are in corresponding positions. Easiest to test with all four up
or all four down.
3: Check that the receiver is switched on.
4: Check that cables and hotshoe connections are actually connected.
Shutter Release Mode
Operation - Normal Shooting
a: Slide the function switch to CAMERA-B on transmitter and CAMERA on
receiver
b: Set dip switches to matching channels.
c: Half press the trigger button on the transmitter to autofocus, and both
transmitter and receiver indicator lamps should turn green.
d: Fully press the trigger to take a picture (or activate the self timer on the
camera). Both transmitter and receiver indicator lamps will turn red. For
continuous shooting, hold down trigger button.
Operation - Long Exposure (Bulb) mode
a: Slide the function switch to CAMERA-B on transmitter and CAMERA on
receiver
b: Set dip switches to matching channels.
c: Press and hold the trigger button. Both transmitter and receiver indicator
lamps will light up red. When the transmitter lamp extinguishes, release the
trigger button. This will open your camera shutter - the receiver indicator
lamp remain on red. Press trigger button again to end the exposure.
Operation - Delay/Timed Shooting
a: Slide the function switch to CAMERA-G on transmitter and CAMERA on
receiver
b: Set dip switches to matching channels.
c: Set camera to DELAY shooting mode. Half press the trigger button on the
transmitter to autofocus, and both transmitter and receiver indicator lamps
should turn green.
d: Fully press the trigger to transmit. Both transmitter and receiver indicator
lamps will turn red momentarily. The transmitter indicator lamp will then
extinguish, while the receiver indicator lamp blinks red for 5 seconds before
shooting.
Technical Data
As with any awesome technology, there’s loads of numbers and funny
symbols than mean things to some people. Mostly librarians.
Transmitter Power:
23AE 12V
Receiver Power:
1.5V (2 x AAA)
Transmitter FREQuency:
433MHz
Operational distance:
< 30m (flash and speedlight)
< 100m (camera)
Sync Speed:
1/200s
Channels:16
Dimensions:
90*30*27 mm (transmitter)
80*35*37 mm (receiver)
Cables available
C1:
C3:
S1:
N1:
N2:
N3:
OP3:
OP12:
Pentax K100D, K110D, K10D, *ist Ds2, *ist D, *ist Ds, *ist DL, *ist DL2
Samsung GX-1L, GX-1S, GX-10
Canon EOS30, 33, 50E, 300, 300V, 3000, 50, 300D, 350D, Digital Rebel (XT, XTi, XSi), 400D, 450D, 500D, 1000D
Canon EOS 1DX, 1Ds (Mark II, III), 1D (Mark II, II N, III, IV), 5D (Mark II, III), 5D, 7D, 50D, 40D, 30D, 20D, 10D, D60, D30, D2000, 1v HS, 1v, 3
Sony Alpha A100, A200, A300, A350, A700, A900, 5D, 7D
Minolta Maxxum/Dynax/AF 7D, 5D, 9, 7, 5, 4, 3, 807si, 800si, 700si, 600si, 505si, 500si, Sweet, Sweets, 9000, 7000, 5000,
DiMAGE 7Hi, 7i, 7, 5
D2H, D2Hs, D1x, D1h, D1, D2x, D2Xs, D200, D300, D3, D3X, D3S, D2HS, D300S, D700, F5, F6, F100, F90, F90x, D800E, D800, D100 (with grip)
Kodak DCS-14n
Fuji - S3Pro, S5pro
Nikon D70S, D80
D90, D5000, D7000
Olympus E1, E3, E10, E20, E20N, E100RS, C2500L, E300 (via HLD3), C8080WZ (via B-HLD30), C7070WZ/C5060WZ (via B-HLD20)
SP-510UZ, SP-55UZ, E400, E410, E510, E450, E520, E420, E620, E600, E520, E510, E450, E420, E410, E30, EM5, EP3, EP2, EP1,
SP-570UZ, SP-560UZ, SP-550UZ, SP-510UZ, A900, A850, A700, A580, A560
Basic Troubleshooting
No Hotshoe mount?
For cameras without hotshoe
mount, that have a PC sync
socket, your transmitter can
be connected directly via
cable.
Flash or Camera not triggering?
Make sure the battery is charged and installed correctly in
both devices. Make sure power switch is set to “on”. Check
dip switches to ensure that both units are set to the same radio
channel. Make sure cables are correctly connected, and in the
correct socket for the intended application.
Camera not autofocussing?
Check lens and camera to make sure you haven’t switched
either to MF. Change to AF.
Signal intermittent, or irregular flashing?
Switch channels on both devices until a compatible frequency
is found. Check operating distance for each device. Check
battery and change if low.
Images half exposed or black area across image?
Lower shutter speed to improve synchronisation. If shutter speed
lower than 1/60s, check battery in both devices, and operating
distance.
Green slime adorning either device?
Call Ghostbusters.
Basic Care for FREQ
Avoid impact or shock
Dropping or hitting either unit could damage the electronics
and casing, which could lead to malfunction or terminal failure.
Keep dry
The product is not water proof. Keep away from moisture, and
moisturiser. A silky smooth complexion is not conducive to a
working product.
Avoid sudden temperature changes
Moving the product from the freezer to the oven or vice versa
will cause rapid condensation build up, which will in turn start a
cosmic calamity, like the one that killed the dinosaurs.
Keep away from magnetic fields
And magnetic livestock, which includes but is not limited to
sheep, cows, horses and CB radios. Exposure to magentic fields
could interfere with use, and cause static to transfer to your
devices, in turn potentially resulting in damage.
MULTIFUNCTIONAL TRIGGERING SYSTEM
3 Legged Thing
Elemental Studio-flash.com is part of
the Elemental Group of companies
and is a wholly owned subsidiary of 3
Legged Thing LTD. Continuing to read
this paragraph will eventually lead
to a disappointing conclusion. We
strongly recommend you discontinue
immediately. Since you’re clearly not
one for taking advice, this sentence
will cease very sudde
MULTIFUNCTIONAL TRIGGERING SYSTEM