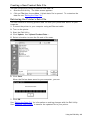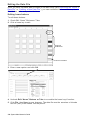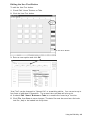
1
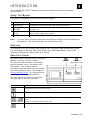
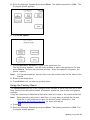
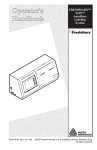
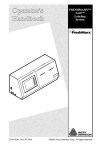
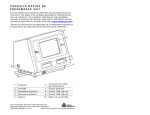
System Administrator's Guide 0 28028 FRESHMARX® 9415™ Labeling System TC9415SA Rev. AJ 8/11 ©2007 Avery Dennison Corp. All rights reserved. Each product and program carries a respective written warranty, the only warranty on which the customer can rely. Avery Dennison reserves the right to make changes in the product, the programs, and their availability at any time and without notice. Although Avery Dennison has made every effort to provide complete and accurate information in this manual, Avery Dennison shall not be liable for any omissions or inaccuracies. Any update will be incorporated in a later edition of this manual. ©2007 Avery Dennison Corporation. All rights reserved. No part of this publication may be reproduced, transmitted, stored in a retrieval system, or translated into any language in any form by any means, without the prior written permission of Avery Dennison. WARNING This equipment has been tested and found to comply with the limits for a Class A digital device, pursuant to Part 15 of the FCC Rules. These limits are designed to provide reasonable protection against harmful interference when the equipment is operated in a commercial environment. This equipment generates, uses, and can radiate radio frequency energy and, if not installed and used in accordance with the instruction manual, may cause harmful interference to radio communications. Operation of this equipment in a residential area is likely to cause harmful interference in which case the user will be required to correct the interference at his own expense. CANADIAN D.O.C. WARNING This digital apparatus does not exceed the Class A limits for radio noise emissions from digital apparatus set out in the Radio Interference Regulations of the Canadian Department of Communications. Le présent appareil numérique n’émet pas de bruits radioélectriques dépassant les limites applicables aux appareils numériques de la classe A prescrites dans le Réglement sur le brouillage radioélectrique édicte par le ministère des Communications du Canada. Trademarks FreshMarx® and 9415 are registered trademarks of Avery Dennison Corporation Avery Dennison 170 Monarch Lane Miamisburg, OH 45342 TABLE OF CONTENTS INTRODUCTION ........................................................................................................................... 1-1 Using This Manual ................................................................................................................... 1-1 Audience ................................................................................................................................ 1-1 About the Printer ..................................................................................................................... 1-1 CHANGING PRINTER SETTINGS ................................................................................................... 2-1 Configuring the Printer ............................................................................................................. 2-2 Setting the Time and Date ........................................................................................................ 2-2 Formatting the Time and Date................................................................................................... 2-3 Assigning a Format (Dual Printer Only) ...................................................................................... 2-4 Assigning a format to a category ........................................................................................... 2-4 Assigning a format to a printer .............................................................................................. 2-5 Selecting a Format (Single Printer Only) .................................................................................... 2-6 Restore Factory Defaults.......................................................................................................... 2-7 Adjusting the Print Settings ...................................................................................................... 2-8 Adjusting the Distance to the Tear Bar ................................................................................... 2-8 Adjusting the Print Position ................................................................................................... 2-9 Adjusting the Display Settings ................................................................................................. 2-10 Changing the Password .......................................................................................................... 2-11 Setting the Manager Options ................................................................................................... 2-12 USING THE EDIT UTILITY ............................................................................................................. 3-1 Installing the Edit Utility ........................................................................................................... 3-2 Selecting a Transfer Mode ....................................................................................................... 3-2 Creating a New Product Data File ............................................................................................. 3-3 Retrieving the Printer’s Data File .............................................................................................. 3-3 Editing the Data File ................................................................................................................ 3-4 Editing home buttons ............................................................................................................ 3-4 Editing the Use First Button .................................................................................................. 3-5 Editing tabs ......................................................................................................................... 3-6 Creating and editing product buttons ...................................................................................... 3-7 UPDATING YOUR PRINTER .......................................................................................................... 4-1 Transferring Files with USB ...................................................................................................... 4-2 Transferring Files with Ethernet ................................................................................................ 4-3 Set the printer’s IP address: .................................................................................................. 4-3 Set the computer’s IP address: .............................................................................................. 4-5 Transfer your product data file to your printer: ........................................................................ 4-5 Updating the Application .......................................................................................................... 4-6 Single Printer & Dual Printer Application Software Description.................................................. 4-6 Updating using a network cable: ............................................................................................ 4-6 Updating using a USB thumb drive: ........................................................................................ 4-6 Using the Factory Reset ........................................................................................................... 4-7 Viewing the Log File ................................................................................................................ 4-8 i LABEL FORMATS ............................................................................................................................ 1 Format 1 .................................................................................................................................... 1 Format 2 .................................................................................................................................... 1 Format 3 .................................................................................................................................... 2 Format 4 .................................................................................................................................... 3 Format 5 .................................................................................................................................... 4 Format 6 .................................................................................................................................... 5 Format 7 .................................................................................................................................... 7 Format 8 .................................................................................................................................... 8 ii System Administrator’s Guide 1 INTRODUCTION The FreshMarx® 9415™ Labeling System prints labels for product freshness and inventory. Using This Manual Following is a summary of the contents of this manual: Chapter Contents 1 Introduction Information you should know before using the printer. 2 Changing Printer Settings Assigning formats, setting time and date, backlight, password, print position, etc. 3 Using the Edit Utility Installing and using the Edit Utility to create and edit product menus, and updating the printer. A Label Formats Format sizes and content fields. Note: You may have a custom application that differs slightly from the examples in this manual. The screens shown are for reference only. Audience This manual is for the System Administrator who configures and updates the printer. For information on printing labels and printer care and maintenance, refer to the Operator’s Handbook included with your printer. About the Printer The printer has a touch screen, five control buttons, and one (or two) printers. The touch screen contains color coded product buttons so you can easily print item labels. The product buttons and home keys are blank until you create and load a product menu. See Chapter 3, “Using the Edit Utility,” for information on creating and editing product menus. Printer 1 Printer 2 (Dual printer onl y) The five control buttons are located on the right side of the touch screen. Button Action Stops/cancels the current print job. Advances supply for the selected printer. or Selects which printer feeds the supply. Printer 1 is located on the left side. Printer 2 is located on the right side. Enters the printer configuration menu. Introduction 1-1 1-2 System Administrator’s Guide CHANGING PRINTER SETTINGS 2 This chapter tells you how to set the time and date. assign formats (dual printer only) or select formats (single printer only). restore the factory defaults. adjust print settings. adjust display settings. change the Manager password. format the time and date. set the Manager options. Note: You may have a custom application that differs slightly from the examples in this manual. The screens and labels shown are for reference only. Changing Printer Settings 2-1 Configuring the Printer Use the Configure screen to set the time and date, assign formats, and change system settings. To configure the printer: 1. Turn on the printer. 2. Enter your Employee ID and press Enter. The ID must be 2-10 alphanumeric characters. Note: The Employee login is optional. See “Setting the Manager Options” for more information. 3. Press . 4. Enter the Manager Password and press Enter. The default password is 1234. The Configure screen appears. Note: This screen appears differently on the single printer version. See the following sections to perform each task you need. Setting the Time and Date The printer contains a real-time clock. After you turn on the printer, make sure the time and date are set correctly. 1. Press . 2. Enter the Manager Password and press Enter. The default password is 1234. The Configure screen appears. Note: This screen appears differently in the single printer version. Time and Date 2-2 System Administrator’s Guide 3. Press Set Time/Date. Use the left and right arrow keys to set the month, day, year, hour and minute fields. The day of the week is automatically set based on the date. Select the button for PM if necessary. Note: Depending on your application, your screen may appear without the hour and minute fields. 4. Press OK. 5. Press Return until you see the product menu. Formatting the Time and Date To specify how the time and date appear on freshness labels: 1. Press . 2. Enter the Manager Password and press Enter. The default password is 1234. The Configure screen appears. 3. Press System Settings. 4. Press Format Time/Date. 5. Select the button for 24 Hour time format if necessary. Using 24 hour time format, 2:00 PM prints as 14:00. 6. Select the date format. Options include mm/dd/yy; dd/mm/yy; yy/mm/dd, and yy/dd/mm. 7. Press OK. The time and date formatting is saved. 8. Press Return until you see the product menu. Changing Printer Settings 2-3 Assigning a Format (Dual Printer Only) These instructions apply to the dual printer version only. See “Selecting a Format” for single printer instructions. Assign one of the preset label formats to each menu category, then assign those formats to a printer to print freshness labels. See Appendix A, “Label Formats,” for the size and content of each format. When you assign a format to a menu category, any labels you print in that category use the selected format. When you assign a format to Printer 1 or Printer 2, that format always prints on the assigned printer. The default assignments are Format 1, Printer 1 for all categories. Note: If you select a format larger than the loaded labels, some information may not print. Assigning a format to a category To assign a format to a menu category: 1. Press . 2. Enter the Manager Password and press Enter. The default password is 1234. The Configure screen appears. 3. Press Assign Format. 4. Press Assign Format To Category. The currently selected format number appears across the top of the screen. Note: The home keys shown are for reference only. 2-4 System Administrator’s Guide 5. Select a format from the Format list, then press the category for that format in the Home Key list. Repeat for each format or category you need. The assignments appear in the Assigned list. 6. When you are finished, press OK. 7. Assign the format to a printer. See “Assigning a format to a printer” for more information. To reset all the format/printer assignments to the default, see “Restore Factory Defaults.” Assigning a format to a printer Assign the formats you need to a category before assigning them to a printer. See “Assigning a format to a category” for more information. 1. From the Configure screen, press Assign Format. 2. Press Assign Format To Printer. 3. Select a format from the Format# list, then press P1 (Printer 1) or P2 (Printer 2) from the Printer# list. Repeat for each format you need. The assignments appear in the Assigned Fmt/Prn list. 4. When you are finished, press OK. The configuration is saved. 5. Press Return until you see the product menu. Your assigned format and printer appears in the status bar. To reset all the format/printer assignments to the default, see “Restore Factory Defaults.” Changing Printer Settings 2-5 Selecting a Format (Single Printer Only) These instructions apply to the single printer version only. See “Assigning a Format” for dual printer instructions. Select one of the preset label formats for your freshness label. See Appendix A, “Label Formats” for the size and content of each format. 1. Press . 2. Enter the Manager Password and press Enter. The default password is 1234. The Configure screen appears. 3. Press Select Format. 4. Press the button of the format you need. The currently selected format number appears across the top of the screen. Note: If you select a format larger than the loaded labels, some information may not print. 5. Press OK. 6. Press Return until you see the product menu. The label format number appears on the status bar at the top of the product menu screen. 2-6 System Administrator’s Guide Restore Factory Defaults You can reset all the format/printer assignments to the default setting (Format 1, Printer 1 for all categories). 1. Press . 2. Enter the Manager Password and press Enter. The default password is 1234. The Configure screen appears. 3. Press Assign Format. 4. Press Restore Factory Defaults. The default values are restored. 5. Press Return until you see the product menu. Changing Printer Settings 2-7 Adjusting the Print Settings You can adjust the label distance to the tear bar and the print position. 1. Press . 2. Enter the Manager Password and press Enter. The default password is 1234. The Configure screen appears. 3. Press System Settings. 4. Press Print Settings. Adjusting the Distance to the Tear Bar You can set the distance the labels feed past the tear bar to remove the labels. Adjustments are in 0.01-inch increments, the default is 0.25. 1. 2. Press < or > to adjust the distance to the tear bar. Use the buttons as follows: Button Function Tear bar > Feeds labels further past the tear bar. Tear bar < Feeds labels closer to the tear bar. Press oron the FMT# button to choose a label format you want to test print. 2-8 System Administrator’s Guide 3. Press Test Printer 1 to print a test label. 4. When you are finished, press OK. 5. Press Return until you see the product menu. Note: Press Factory Defaults to reset the print settings to factory defaults. Adjusting the Print Position You can adjust the horizontal (X) and vertical (Y) position of the text on a label. The adjustments are in dots (0.0049 inch) and the defaults are +10 for horizontal and +5 for vertical. 1. Press < or > to adjust the X and Y print position. Use the buttons as follows: Button Function X Print Position > Moves printed text right. X Print Position < Moves printed text left. Y Print Position > Moves printed text up. Y Print Position < Moves printed text down. Rotate print Toggles printed text upside down or right side up. Default is right side up. 2. Press oron the FMT# button to choose the label format you want to test print. 3. Press Test Printer 1 to print a test label. 4. When you are finished, press OK. 5. Press Return until you see the product menu. Note: Press Factory Defaults to reset the print settings to factory defaults. Changing Printer Settings 2-9 Adjusting the Display Settings To adjust the screen contrast and backlight: 1. Press . 2. Enter the Manager Password and press Enter. The default password is 1234. The Configure screen appears. 3. Press System Settings. 4. Press Display Settings. 5. Use your finger to move the block to the desired adjustment for backlight and contrast. 6. The display changes while you slide the block across the bar. Check the visibility of the colored keys while you change these settings. 7. Press OK. 8. Press Return until you see the product menu. 2-10 System Administrator’s Guide Changing the Password A password is required to make any changes to the printer settings or product screens. To change the Manager Password: 1. Press . 2. Enter the Manager Password and press Enter. The default password is 1234. The Configure screen appears. 3. Press System Settings. 4. Press Change Password. 5. Enter the new password. As you enter the new password, it appears on the screen. 6. Press Enter. You return to the Configure screen. Note: If you forget the Manager Password, enter password 1234 . The configure screen appears. Follow the instructions in this section to reset the password. If password 1234 does not work, call Service. 7. Press Return until you see the product menu. Changing Printer Settings 2-11 Setting the Manager Options Three new Manager options are available: Disable Employee login Does not prompt for employee login, display employee login on the screen, or print employee login on freshness labels. Recreate Label Users may need to reprint a freshness label if a label is torn or missing from a product. The user enters the original Use By time and date. Note: An asterisk (*) prints after the date or time, indicating a reprinted label. “End of Day” expiration mode Prints freshness labels or use-first labels with the words “End of Day” and the date, no time. Use for products that expire at the end of each day or in a set number of days from the first use. End of day expiration mode expires earlier than the normal date/time mode. Enter product expiration values in multiples of 1 day. For example, 1 day expires today; 2 days expires tomorrow, etc. For more information about expiration dates, see the table below. Note: Mode If the expiration time contains any hours and/or minutes, the printer uses normal date/time mode for that product. 1 Day Expiration 2 Day Expiration 3 Day Expiration Normal Date/Time Mode Current date/time: Nov. 16 10 AM 10 AM 11/17/1 10 AM 11/18/11 10 AM 11/19/11 End of Day Expiration Mode Current Date: Nov. 16 End of Day 11/16/11 End of Day 11/17/11 End of Day 11/18/11 To disable employee login, enable recreating a label or use “end of day” expiration mode: 1. Press . 2. Enter the Manager Password and press Enter. The default password is 1234. The Configure screen appears. 2-12 System Administrator’s Guide 3. Press Options. 4. Select the buttons to disable employee login, recreate an old label, or use “end of day” expiration mode. 5. Press OK. 6. Press Return until you see the product menu. Changing Printer Settings 2-13 2-14 System Administrator’s Guide USING THE EDIT UTILITY 3 This chapter tells you how to install the Edit Utility. select a transfer mode. create a new product data file. retrieve the printer’s product data file. edit the printer’s product data file. Using the Edit Utility 3-1 Installing the Edit Utility Install the Edit Utility on a computer with the Microsoft Windows operating system. 1. Download the Edit Utility from our Web site to your computer. 2. Open the downloaded file and follow the on-screen instructions to complete the installation. 3. Start the Edit Utility. The Main screen appears. 4. Decide what you want to do next: To create a new product data file, see “Creating a Data File” for more information. To upload a product data file from the printer to your computer for editing or backup, see “Retrieving the Printer’s Data File” for more information. To edit an existing data file, see “Editing the Data File” for more information. To update the printer’s product data file, see “Updating with USB” or “Updating with Ethernet” for more information. To update the printer’s application, see “Updating with USB” or “Updating with Ethernet” for more information. Selecting a Transfer Mode You can select a transfer mode to transfer files to and from your printer. There are three options; Auto, Standard, and Streamline. The default setting is Standard. Standard Mode uses the handshake on port 55555 before sending/receiving files with TFTP. Streamline mode sends/receives files with TFTP without using the handshake on port 55555. Auto mode checks the printer for a flag file (lean.txt). If the flag file is found, Streamline mode is used; if the flag file is not found, Standard mode is used. To change the Transfer Mode setting: 1. Start the Edit Utility. The Main screen appears. 2. Click on Setup, Network, then use the Transfer Mode drop-down menu to make a selection. 3. Click ick OK. 3-2 System Administrator’s Guide Creating a New Product Data File You can use the Edit Utility to create a new data file. 1. Start the Edit Utility. The Main screen appears. 2. Click on File then choose New. A blank data file is opened. To customize the data file see “Editing the Data File”. Retrieving the Printer’s Data File You can retrieve an existing product data file from your printer and save it to your computer. 1. Connect the printer to your computer using an Ethernet cable. 2. Turn on the printer. 3. Start the Edit Utility. 4. Click Update, then Upload Product Data…. 5. Select a location to save the file and a file name. 6. Click Save. When the file has been saved to your computer, you see: 7. Click OK. See “Editing the Data File” for information on making changes with the Edit Utility. See “Updating Your Printer” to transfer the updated file to your printer. Using the Edit Utility 3-3 Editing the Data File Once you have a product data file open in the Edit Utility (see “Retrieving the Printer’s Data File” or “Creating a New Data File”), you can customize the home buttons, Use First button, tabs, and product buttons. Editing home buttons To edit home buttons: 1. Check Edit “Home” Buttons or Tabs. 2. Click a home key to edit. Home Buttons Use First “ Use First” Button 3. Enter a new caption and click OK. 4. Uncheck Edit “Home” Buttons or Tabs to re-enable the home keys’ function. 5. Click File, then Save to save changes. The data file must be saved as a Unicode text file (.dat) to be loaded into the printer. 3-4 System Administrator’s Guide Editing the Use First Button To edit the Use First button: 1. Check Edit “Home” Buttons or Tabs. 2. Click the Use First button. Use First “ Use First” Button 3. Enter a new caption and click OK. “Use First” can be changed to “Opened On” or something similar. You can enter up to four lines of additional information. The current time and date will also print. 4. Uncheck Edit “Home” Buttons or Tabs to re-enable the home keys’ function. 5. Click File, then Save to save changes. The data file must be saved as a Unicode text file (.dat) to be loaded into the printer. Using the Edit Utility 3-5 Editing tabs Each Home Button category has a series of tabs that hold product buttons. The tabs can be named to match the different categories. To edit the tabs: 1. Check Edit “Home” Buttons or Tabs on the right. Tabs Home Buttons Use First “ Use First” Button 2. Click a home key to edit. 3. Enter a tab name for each of the tabs. 4. Click OK. 5. Uncheck Edit “Home” Buttons to re-enable the home keys’ function. 6. Click File, then Save to save changes. 3-6 System Administrator’s Guide Creating and editing product buttons 1. Click a blank button to add a new product, or click an existing product button to edit. The Edit screen appears. Product Buttons 2. Enter the button caption, description, expiration time, nutrition information, etc. (as needed). See “Setting the Manager Options” for more information about expiration times. If nothing is entered for Description 1, the text entered in Button Caption will be used. The information you include in the item description field depends on your label format. See Appendix A, “Label Formats” for information on each format’s content and maximum number of characters printed. 3. Click the home buttons on the right to edit product buttons in other categories. 4. Click OK when finished. 5. Click File, then Save to save changes. Using the Edit Utility 3-7 U P D AT I N G Y O U R P R I N T E R 4 This chapter tells you how to transfer files via USB transfer files via Ethernet update the application delete data files (perform a factory reset). Updating your printer 4-1 Transferring Files with USB You can use a USB thumb drive, formatted to FAT or FAT32, to transfer files to and from your printer. 1. Save your edited product data file on a thumb drive. 2. Plug the thumb drive into the USB port on the side of the printer. The printer detects the thumb drive automatically. USB Port 3. Press . 4. Enter the Manager Password and press Enter. The default password is 1234. The Configure screen appears. 5. Press USB Update. 4-2 System Administrator’s Guide 6. Press Product Data to update the data files. The file browser appears. 7. Use the scroll buttons to select the data file and press OK. This may take several minutes. The USB Update screen indicates when the update is complete. Press Return. The printer does not restart. 8 . Remove the thumb drive. 9. Press Return until you see the product menu. Transferring Files with Ethernet You can use an Ethernet connection to transfer your data file from the printer to your computer and vise versa. To perform updates using Ethernet, the Edit Utility’s IP address must match the printer’s IP address. Follow these steps to set the IP address on your printer and computer. Set the printer’s IP address: 1. Connect the printer to your computer’s Ethernet port. Note: If you are not connecting through a hub, use a cross-over cable. 2. Press . 3. Enter the Manager Password and press Enter. The default password is 1234. The Configure screen appears. 4. Press System Settings. 5. Press Network Settings. The current network settings are displayed. Updating your printer 4-3 6. Select either Use DHCP to obtain an IP Address automatically or Use a Static IP Address. For DHCP, no other settings are required. We recommend writing down the Printer’s IP Address before pressing OK. Press OK. You return to the System Settings screen. For a static IP address, press Settings. 7. Press the first numeric field and enter the first value for a valid Terminal (printer) IP address. 8. Press Enter. You return to the Static IP Settings screen. 9. Press the next field for the IP address, enter the value, and press Enter. 10. Continue entering field values until all fields are completed for IP address, Subnet Mask, and Default Gateway. 11. Press OK to save the settings. You return to the Network Settings screen. 12. Press OK. A message appears, “Printer will now restart to apply new network settings”. Press OK to restart the printer with the new network settings. 4-4 System Administrator’s Guide Set the computer’s IP address: 1. Start the Edit Utility on the computer. 2. Click Setup, then Network. 3. Enter the IP address of the printer in the IP address field. 4. Click OK. Transfer your product data file to your printer: 1. Connect the printer to your computer using an Ethernet cable. 2. Turn on the printer. 3. Start the Edit Utility. 4. Click Update, Product Data. The File Open dialog box appears. 5. Open the updated product data (.dat) file. The printer enters download mode and “Updating Data Please Wait…” appears on the printer’s touch screen. When the update is complete, the printer beeps and you see: Note: The printer does not restart after updating the data file. Updating your printer 4-5 Updating the Application Single Printer & Dual Printer Application Software Description There are two versions the Application Software; Single Printer and Dual Printer. The Single Printer version (2.7 or higher) can be installed on a dual printer. When this is done, the user presses the appropriate printer button (P1 or P2) to tell the printer which to use. The default is Printer 1. If Printer 2 is chosen, it stays in effect until the user changes the selection or the printer is turned off and back on. Note: The Dual Printer Application Software cannot be installed on a single printer. Updating using a network cable: 1. Download the latest application from our Web site on your computer. Note: Save the file to your computer’s hard drive, not a network drive. 2. Connect the printer to your computer using an Ethernet cable. 3. Turn on the printer. 4. Start the Edit Utility. 5. Click Update, Application Software. 6. Open the freshmarxVxx.bff (“xx” indicates the version number) file you downloaded from the Web site. The printer enters download mode. This may take several minutes. When the update is complete, you see “Update Complete” in the status bar of the Edit Utility. The printer restarts automatically and loads the latest application. Updating using a USB thumb drive: 1. Download the latest application from our Web site. 2. Save it on your thumb drive. 3. Plug the thumb drive into the USB port on the side of the printer. The printer detects the thumb drive automatically. USB Port 4. Press . 4-6 System Administrator’s Guide 5. Enter the Manager Password and press Enter. The default password is 1234. The Configure screen appears. 6. Press USB Update. 7. Press Application Software to update the application file. The file browser appears. Use the scroll buttons to select the application file and press Return. This may take several minutes. When the update is complete, the printer restarts. Note: For firmware updates, contact Service at the number listed on the back of this manual. 8. Remove the thumb drive. 9. Press Return until you see the product menu. Using the Factory Reset The Factory Reset option in the Configure menu deletes all data files from the printer. Data files include the product button information, password, and printer configuration settings. It may be necessary to delete data files when there are errors in the current data files. Note: Before deleting the printer’s data files, you may want to upload the Product Data file to your computer to save the product button information. See “Retrieving the Printer’s Data File” for more information. 1. Press . 2. Enter the Manager Password and press Enter. The default password is 1234. The Configure screen appears. Updating your printer 4-7 3. Press Service. 4. Press Factory Reset. 5. P ress Yes to delete all data files. The printe r deletes all data files and loads the default data files. The printer restarts. Note: All data files are deleted when you press Factory Rese t and they cannot be recovered. You cannot select a specific file to delete. 6. Press Return until you se e the product menu, which is blank. Viewing the Log File You can view your printer’s activity (file transfers, software updates, etc.) in the Log File. To view the file 4. Start the Edit Utility. 5. Click Help, Log, then View. 6. To Close the Log File, repeat Step 2. Note: The Log File only stores information for a single instance of the Utility. Closing the Edit Utility and reopening i t automatically clears the Log File. T o Clear the Log File, click Help, Log, Clear. 4-8 System Administrator’s Guide L A B E L F O R M AT S A This appendix shows a sample of each label format. Note: If an asterisk (*) prints after the time or date, the label was reprinted using the original expiration time or date. See “Setting the Manager Options” for more information. Format 1 Prints 1.2” wide x 1.1” long labels. Enter the following information for each field: Field Description Description 1 Prints up to 17 characters. Description 2 Prints up to 17 characters. Description 3 Prints up to 17 characters. EMPL Employee ID must be 2-10 characters. Must Use By Numbers only. Days 0-365, hours 0-23, minutes 0-59. Format 2 Prints 2.2” wide x 1.1” long labels. Enter the following information for each field: Field Description Description 1 Prints up to 35 characters. Description 2 Prints up to 35 characters. EMPL Employee ID must be 2-10 characters. Must Use By Numbers only. Days 0-365, hours 0-23, minutes 0-59. Label Formats A-1 Format 3 Prints 2.2” wide x 1.5” long labels. Enter the following information for each field: Field Description Description 1 Prints up to 25 characters. Description 2 Prints up to 25 characters. EMPL Employee ID must be 2-10 characters. Expire Date/Time Numbers only. Days 0-365, hours 0-23, minutes 0-59. A-2 System Administrator’s Guide Format 4 Prints 2.2” wide x 2.0” long labels. Note: A box prints around a color-coded block that corresponds to the day-of-week expiration date. Check the box next to “display box with lines” to print lines through the remaining color-coded blocks. Color-Coded Block Optional Lines Enter the following information for each field: Field Description Description 1 Prints up to 15 characters. Description 2 Prints up to 15 characters EMPL Employee ID must be 2-10 characters. Use By Numbers only. Days 0-365, hours 0-23, minutes 0-59. Blue Use by Monday. Yellow Use by Tuesday. Red Use by Wednesday. Brown Use by Thursday. Green Use by Friday. Gold Use by Saturday. Black Use by Sunday. Note: The employee ID number does not print if it was not entered. Label Formats A-3 Format 5 Prints 2.2” wide by 3.0” long labels. Enter the following information for each field: Field Description Description Prints up to 16 characters. Shelf Life Prints up to 13 characters. EMPL Employee ID must be 2-10 characters. Use By Numbers only. Days 0-365, hours 0-23, minutes 0-59. A-4 System Administrator’s Guide Format 6 Prints 2.2” wide x 4.0” long labels. Enter the following information for each field: Field Description Store Name Prints up to 17 characters. Description 1 Prints up to 23 characters. Description 2 Prints up to 23 characters. Description 3 Prints up to 23 characters. Ingredients Prints up to 875 characters. Note: Does not print semicolons or returns. Use By Prints the date in MM/DD/YY format. Net Weight Prints up to 8 characters. Price Prints up to 7 characters: numbers 0-9, period and dollar, cents, Euro, pound, and yen signs only. Label Formats A-5 Format 7 Prints 2.2” wide x 3.0” long labels. Enter the following information for each field: Field Description Serving Size Prints up to 25 characters. Servings Per Container Prints up to 10 characters. Calories Prints up to 6 characters: numbers 0-9 and period only. Fat Calories Prints up to 6 characters: numbers 0-9 and period only. Total Fat (g & %) Prints up to 6 characters: numbers 0-9 and period only. Saturated Fat (g & %) Prints up to 6 characters: numbers 0-9 and period only. Trans Fat Prints up to 6 characters: numbers 0-9 and period only. Cholesterol (mg & %) Prints up to 6 characters: numbers 0-9 and period only. Sodium (mg & %) Prints up to 6 characters: numbers 0-9 and period only. Total Carbs (g & %) Prints up to 6 characters: numbers 0-9 and period only. Dietary Fiber (g & %) Prints up to 6 characters: numbers 0-9 and period only. Sugars (g) Prints up to 6 characters: numbers 0-9 and period only. Protein (g) Prints up to 6 characters: numbers 0-9 and period only. Vitamin A (%) Prints up to 6 characters: numbers 0-9 and period only. Vitamin C (%) Prints up to 6 characters: numbers 0-9 and period only. Iron (%) Prints up to 6 characters: numbers 0-9 and period only. Calcium (%) Prints up to 6 characters: numbers 0-9 and period only. A-8 System Administrator’s Guide Format 8 Prints 1.2” wide x 1.1” long labels. ITEM DESCRIPTION 1 ITEM DESCRIPTION 2 ITEM DESCRIPTION 3 MM/DD/YY PREP HH:MM:PM MUST USE BY: MM/DD/YY HH:MM:PM Day-of-week (English) Note: Day-of-week (Spanish) A box prints around the color-coded block that corresponds to the day-ofweek expiration date. Check the box next to “display box with lines” to print lines through the remaining color-coded blocks. Enter the following information for each field: Field Description Description 1 Prints up to 17 characters. Description 2 Prints up to 17 characters. Description 3 Prints up to 17 characters. EMPL Employee ID must be 2-10 characters. Must Use By Numbers only. Days 0-365, hours 0-23, minutes 0-59. Blue Use by Monday. Yellow Use by Tuesday. Red Use by Wednesday. Brown Use by Thursday. Green Use by Friday. Gold Use by Saturday. Black Use by Sunday. Label Formats A-7 A-8 System Administrator’s Guide 0 28028 Avery Dennison 170 Monarch Lane Miamisburg, OH 45342 1-800-543-6650 (In the U.S.A.) 1-800-387-4740 (In Canada) www.monarch.com For FreshMarx sales: 1-877-774-6829 (In the U.S.A.) www.freshmarx.com