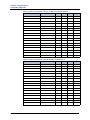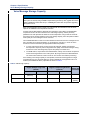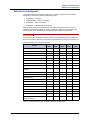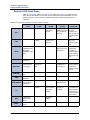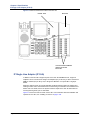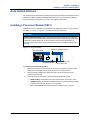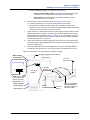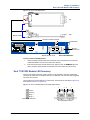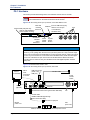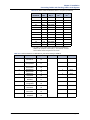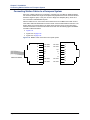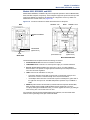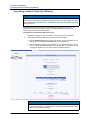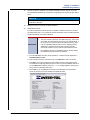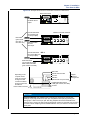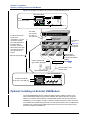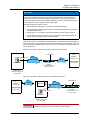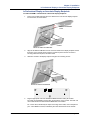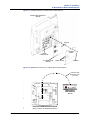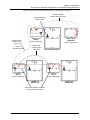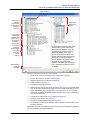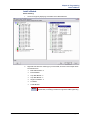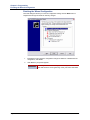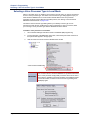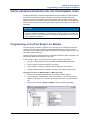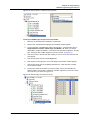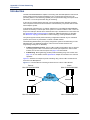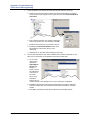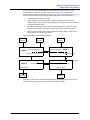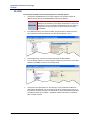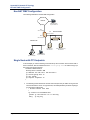
1
MITEL
5000
Installation and Maintenance Manual
Part Number
580.8000
Mitel 5000
Installation and Maintenance Manual
Issue 3.0, October 2008
Notice
This manual is released by Mitel Networks Corporation as a guide for certified service personnel. It provides
information necessary to properly configure, maintain, and operate the product.
The contents of this document reflect current company standards and are subject to revision or change without
notice. Some features or applications mentioned may require a future release and are not available in this
release. Future product features are subject to availability and cost. Some features may require additional
hardware and/or specific software.
The contents of this manual may include technical or other inaccuracies. Mitel reserves the right to make
revisions or changes without prior notice. Software packages released after the publication of this manual will
be documented in addenda to the manual or succeeding issues of the manual.
For additional information and/or technical assistance in North America, certified technicians may contact:
Chandler Technical Support Department
Mitel Networks, Inc.
7300 West Boston Street
Chandler, AZ 85226-3224
1-888-777-EASY (3279)
For information on how to contact Mitel Technical Support outside of North America, please refer to your
Channel Support Agreement.
If you have any questions or comments regarding this manual or other technical documentation, contact the
Technical Publications Department (USA) at:
[email protected]
Mitel ® is a registered trademark of Mitel Networks Corporation.
Inter-Tel ® is a registered trademark of Inter-Tel (Delaware), Incorporated.
All other trademarks mentioned in this document are the property of their respective owners, including Mitel Networks
Corporation and Inter-Tel (Delaware), Incorporated. All rights reserved.
© 2005–2008 Mitel Networks Corporation
Personal use of this material is permitted. However, permission to reprint/republish this material for advertising or
promotional purposes or for creating new collective works for resale or redistribution to servers or lists, or to reuse any
copyrighted component of this work in other works must be obtained from Mitel Networks Corporation.
Portions of this manual and the respective systems and/or methods described therein may be covered under U.S. patent
numbers 4,932,022; 4,977,590; 5,109,519; 5,127,003; 5,341,412; 5,351,276; 5,412,715; 5,461,665; 5,465,286;
5,793,861; 5,815,566; 6,205,206; 6,463,051; 6,754,187; 6,760,427; 6,798,874; 6,829,249; 6,999,431; 7,031,443;
7,031,443; 7,292,685; 7,318,109; D470,830; D476,969; D479,517; D482,342; D483,749; D483,750; D489,049;
D499,724; D529,892; other patents pending.
Product Disposal Instructions
This symbol indicates that the product is classified as electrical or electronic equipment and should
not be disposed of with other commercial or household waste at the end of its working life. For
appropriate disposal and recycling instructions, contact your local recycling authority or Mitel
provider.
The Waste of Electrical and Electronic Equipment (WEEE) Directive (2002/96/EC) was established by the European
Union to minimize negative impact on the environment, control hazardous substances, and curtail landfill expansion by
using the best available recovery and recycling techniques.
Safety Instructions
Safety Instructions
For basic installation guidelines necessary fo rthe proper and safe functining of this equipment,
refer to the Important Safety Instructions (part number 835.3209) packaged with the system,
included on the product software CD, and posted on the Inter-Tel edGE Online Manuals and
Guides (www.inter-tel.com/techpublications) Web site.
NOTE
Read and folow all information contained in the Important Safety Instructions
document before attempting to install or use this product. Only trained, qualified
service personnel shall install or maintain this product.
Regulatory Notices
For regulatory information for U.S., Canada, and Europe, refer to the Regulatory Notices
section in the Important Safety Instructions (part number 835.3209) packaged with the system,
included on the product software CD, and posted on the Inter-Tel edGE Online Manuals and
Guides (www.inter-tel.com/techpublications) Web site.
Limited Warranty
Inter-Tel warrants that its products will, if delivered to the end-user in undamaged condition, be
free from defects in material and workmanship under normal use and service for the period set
forth on the current warranty periods as published in the U.S. Price List from time to time and
substantially in conformance with the documentation (functional and operating specifications)
that Inter-Tel publishes regarding same (end-user reference and operating manuals and guides
relating to the program). Inter-Tel does not, however, warrant that the functions contained in the
software program will satisfy Dealer's particular purpose and/or requirements or that the
operation of the program will be uninterrupted or error free.
Inter-Tel shall incur no liability under this warranty and this warranty is voidable by Inter-Tel (a) if
the product is used other than under normal use, with certified repair and maintenance service
and under proper environmental conditions, (b) if the product is subject to abuse, misuse,
neglect, flooding, lightning, power surges, third-party error or omission, acts of God, damage, or
accident, (c) if the product is modified or altered (unless expressly authorized in writing by InterTel), (d) if the product is installed or used in combination or in assembly with products not
supplied or authorized by Inter-Tel and/or which are not compatible with or are of inferior quality,
design, or performance to Inter-Tel or Inter-Tel supplied products so as to cause a diminution or
degradation in functionality, (e) if there is a failure to follow specific restrictions in operating
instructions or (f) if payment for product has not been timely made.
The sole obligation of Inter-Tel and the exclusive remedy and recourse of Dealer under this
warranty, or any other legal obligation, with respect to product, including hardware, firmware,
and software media, is for Inter-Tel, at its election, to either repair and/or replace the allegedly
defective or missing product(s) or component(s) and return (prepaid) same (if necessary), or
grant a reimbursement credit with respect to the product or component in the amount of the
sales price to the Dealer. With regard to a software program design defect, however, to the
extent it prevents the program from providing functionality and/or operating as intended by InterTel, is service affecting, and prevents beneficial use of the product, Inter-Tel does undertake to
use its best efforts to devise a suitable corrective solution to the problem within a reasonable
period of time; should said action, however, not substantially resolve the problem, then Inter-Tel
reserves the right to substitute a new release (“stream”) of software as soon as it is generally
made available by Inter-Tel. The above, with regard to a software design defect, likewise,
constitutes the sole obligation of Inter-Tel and exclusive remedy of Dealer hereunder.
Mitel ® 5000 Installation Manual – Issue 3.0, October 2008
Page v
Limited Warranty
The responsibility of Inter-Tel to honor the express limited warranty stated above also shall be
predicated on receiving timely written notice of the alleged defect(s) with as much specificity as
is known within thirty (30) calendar days of the malfunction or by the expiration of the warranty
period (plus thirty [30] calendar days), whichever occurs first. Inter-Tel shall further have the
right to inspect and test the product to determine, in its reasonable discretion, if the alleged
malfunction is actually due to defects in material or workmanship. Unless waived by Inter-Tel,
Dealer agrees to return (prepaid) the allegedly defective product or component to Inter-Tel for
inspection and/or testing, and, if appropriate, for repair and/or replacement.
NOTICE
The above express Limited Warranty is in lieu of all other warranties, express or implied, from
Inter-Tel, Inc., or Inter-Tel Integrated Systems, Inc., and there are no other warranties which
extend beyond the face of this warranty. All other warranties whatsoever, including the
implied warranty of merchantability and the implied warranty of fitness for a particular
purpose relating to use or performance of the product, including its parts, are hereby
excluded and disclaimed.
In no event shall Inter-Tel, Inc., under any circumstances, be liable for nor shall a purchaser
(directly or indirectly) be entitled to any special, consequential, incidental, indirect, punitive, or
exemplary damages as a result of the sale or lease of product including but not limited to
failure to timely deliver the product or failure of product to achieve certain functionality, or
arising out of the use or inability to use the product, in whole or in part and including but not
limited to loss of profit, loss of use, damage to business or damage to business relations
even if notified of the possibility of such damages. Inter-Tel shall not be liable for personal
injury or property damage unless caused solely by Inter-Tel’s negligence.
NOTICE
For complete information on returning equipment, refer to the current Inter-Tel Repair and
Return Policy, document part number 835.1065. This document includes specific information
on the following subjects: warranty, procedures to follow when returning equipment,
equipment damaged in shipment, insurance, repair policy, and advance replacement policy.
Page vi
Mitel ® 5000 Installation Manual – Issue 3.0, October 2008
Secure Socket Layer
Secure Socket Layer
Copyright© 1995-1998 Eric Young ([email protected])
All rights reserved.
This package is an SSL implementation written by Eric Young ([email protected]). The
implementation was written so as to conform with Netscapes SSL. This library is free for
commercial and non-commercial use as long as the following conditions are adhered to. The
following conditions apply to all code found in this distribution, be it the RC4, RSA, lhash, DES,
etc., code; not just the SSL code. The SSL documentation included with this distribution is
covered by the same copyright terms except that the holder is Tim Hudson ([email protected]).
Copyright remains Eric Young’s, and as such any Copyright notices in the code are not to be
removed. If this package is used in a product, Eric Young should be given attribution as the
author of the parts of the library used. This can be in the form of a textual message at program
startup or in documentation (online or textual) provided with the package.
Redistribution and use in source and binary forms, with or without modification, are permitted
provided that the following conditions are met:
1.
Redistributions of source code must retain the copyright notice, this list of conditions and
the following disclaimer.
2.
Redistributions in binary form must reproduce the above copyright notice, this list of
conditions and the following disclaimer in the documentation and/or other materials
provided with the distribution.
3.
All advertising materials mentioning features or use of this software must display the
following acknowledgement:
“This product includes cryptographic software written by Eric Young
([email protected])” The word ‘cryptographic’ can be left out if the routines from the
library being used are not cryptographic related.
4.
If you include any Windows specific code (or a derivative thereof) from the apps
directory (application code) you must include an acknowledgement:
“This product includes software written by Tim Hudson ([email protected])”
THIS SOFTWARE IS PROVIDED BY ERIC YOUNG “AS IS” AND ANY EXPRESS OR IMPLIED
WARRANTIES, INCLUDING, BUT NOT LIMITED TO, THE IMPLIED WARRANTIES OF
MERCHANTABILITY AND FITNESS FOR A PARTICULAR PURPOSE ARE DISCLAIMED. IN
NO EVENT SHALL THE AUTHOR OR CONTRIBUTORS BE LIABLE FOR ANY DIRECT,
INDIRECT, INCIDENTAL, SPECIAL, EXEMPLARY, OR CONSEQUENTIAL DAMAGES
(INCLUDING, BUT NOT LIMITED TO, PROCUREMENT OF SUBSTITUTE GOODS OR
SERVICES; LOSS OF USE, DATA, OR PROFITS; OR BUSINESS INTERRUPTION)
HOWEVER CAUSED AND ON ANY THEORY OF LIABILITY, WHETHER IN CONTRACT,
STRICT LIABILITY, OR TORT (INCLUDING NEGLIGENCE OR OTHERWISE) ARISING IN
ANY WAY OUT OF THE USE OF THIS SOFTWARE, EVEN IF ADVISED OF THE
POSSIBILITY OF SUCH DAMAGE.
The licence and distribution terms for any publicly available version or derivative of this code
cannot be changed. i.e. this code cannot simply be copied and put under another distribution
licence [including the GNU Public Licence.]
Mitel ® 5000 Installation Manual – Issue 3.0, October 2008
Page vii
Network Security Statement
Network Security Statement
Although no telecommunications system or data network is entirely secure, as long as
appropriate security measures are put in place and properly maintained by both the customer
and the installing company, this Inter-Tel® Advanced Communications Platform architecture and
its associated server-based applications are substantially secure against unauthorized access
to the customer’s data network via the telecommunications system. Appropriate security
measures include, but are not limited to, the proper implementation of user/administrative
accounts, passwords, firewalls, Network Address Translation (NAT), access control lists, virus
protection, security updates, etc., and the proper maintenance of access points/programs and
their respective accounts/passwords.
Page viii
Mitel ® 5000 Installation Manual – Issue 3.0, October 2008
Contents
Contents
Tables
xv
Figures
xix
Chapter 1: Mitel 5000 v3.0 New Features
1-1
Version 3.0 Content Summary . . . . . . . . . . . . . . . . . . . . . . . . . . . . . . . . . . . . . . . . . . . . . . . . . . . .1-2
Licensing . . . . . . . . . . . . . . . . . . . . . . . . . . . . . . . . . . . . . . . . . . . . . . . . . . . . . . . . . . . . . . . . . . . .1-4
Message Print Messages and Alarms . . . . . . . . . . . . . . . . . . . . . . . . . . . . . . . . . . . . . . . . . . . . . .1-4
Upgrading to v3.0 . . . . . . . . . . . . . . . . . . . . . . . . . . . . . . . . . . . . . . . . . . . . . . . . . . . . . . . . . . . . . .1-5
Programming . . . . . . . . . . . . . . . . . . . . . . . . . . . . . . . . . . . . . . . . . . . . . . . . . . . . . . . . . . . . . . . . .1-5
Administrative Web Session (AWS) Pages . . . . . . . . . . . . . . . . . . . . . . . . . . . . . . . . . . . . . . . . .1-5
Chapter 2: Document Overview
2-1
Introduction . . . . . . . . . . . . . . . . . . . . . . . . . . . . . . . . . . . . . . . . . . . . . . . . . . . . . . . . . . . . . . . . . . .2-2
Document Style Conventions . . . . . . . . . . . . . . . . . . . . . . . . . . . . . . . . . . . . . . . . . . . . . . . . . . . .2-5
Hazard Identification, Notices, and Notes . . . . . . . . . . . . . . . . . . . . . . . . . . . . . . . . . . . . . . . . . .2-6
Chapter 3: Product Description
3-1
Chapter Overview . . . . . . . . . . . . . . . . . . . . . . . . . . . . . . . . . . . . . . . . . . . . . . . . . . . . . . . . . . . . . .3-3
System Configurations . . . . . . . . . . . . . . . . . . . . . . . . . . . . . . . . . . . . . . . . . . . . . . . . . . . . . . . . . .3-5
Inter-Tel CS-5200/5400/5600 Base Server . . . . . . . . . . . . . . . . . . . . . . . . . . . . . . . . . . . . . . . . . . .3-7
Digital Capability . . . . . . . . . . . . . . . . . . . . . . . . . . . . . . . . . . . . . . . . . . . . . . . . . . . . . . . . . . . . . . .3-9
Trunks and Endpoints . . . . . . . . . . . . . . . . . . . . . . . . . . . . . . . . . . . . . . . . . . . . . . . . . . . . . . . . .3-11
System Licensing Requirements . . . . . . . . . . . . . . . . . . . . . . . . . . . . . . . . . . . . . . . . . . . . . . . .3-13
IP Resources . . . . . . . . . . . . . . . . . . . . . . . . . . . . . . . . . . . . . . . . . . . . . . . . . . . . . . . . . . . . . . . . .3-20
Networking . . . . . . . . . . . . . . . . . . . . . . . . . . . . . . . . . . . . . . . . . . . . . . . . . . . . . . . . . . . . . . . . . .3-21
Basic Voice Mail . . . . . . . . . . . . . . . . . . . . . . . . . . . . . . . . . . . . . . . . . . . . . . . . . . . . . . . . . . . . . .3-22
Optional External Messaging Systems . . . . . . . . . . . . . . . . . . . . . . . . . . . . . . . . . . . . . . . . . . . .3-22
Hardware Summary . . . . . . . . . . . . . . . . . . . . . . . . . . . . . . . . . . . . . . . . . . . . . . . . . . . . . . . . . . .3-22
Features . . . . . . . . . . . . . . . . . . . . . . . . . . . . . . . . . . . . . . . . . . . . . . . . . . . . . . . . . . . . . . . . . . . . .3-22
Chapter 4: Specifications
4-1
Chapter Overview . . . . . . . . . . . . . . . . . . . . . . . . . . . . . . . . . . . . . . . . . . . . . . . . . . . . . . . . . . . . . .4-4
Environmental Requirements . . . . . . . . . . . . . . . . . . . . . . . . . . . . . . . . . . . . . . . . . . . . . . . . . . . .4-4
Mitel ® 5000 Installation Manual – Issue 3.0, October 2008
Page ix
Contents
Programming Computer Requirements . . . . . . . . . . . . . . . . . . . . . . . . . . . . . . . . . . . . . . . . . . . .4-5
Software Version Compatibility . . . . . . . . . . . . . . . . . . . . . . . . . . . . . . . . . . . . . . . . . . . . . . . . . . .4-6
System-Wide Specifications . . . . . . . . . . . . . . . . . . . . . . . . . . . . . . . . . . . . . . . . . . . . . . . . . . . . .4-6
Capacities . . . . . . . . . . . . . . . . . . . . . . . . . . . . . . . . . . . . . . . . . . . . . . . . . . . . . . . . . . . . . . . . . . .4-13
Base Server . . . . . . . . . . . . . . . . . . . . . . . . . . . . . . . . . . . . . . . . . . . . . . . . . . . . . . . . . . . . . . . . . .4-20
USB Flash Drives . . . . . . . . . . . . . . . . . . . . . . . . . . . . . . . . . . . . . . . . . . . . . . . . . . . . . . . . . . . . .4-25
Base Server Expansion Modules . . . . . . . . . . . . . . . . . . . . . . . . . . . . . . . . . . . . . . . . . . . . . . . .4-26
Processing Server (PS-1) . . . . . . . . . . . . . . . . . . . . . . . . . . . . . . . . . . . . . . . . . . . . . . . . . . . . . . .4-32
Digital Expansion Interface . . . . . . . . . . . . . . . . . . . . . . . . . . . . . . . . . . . . . . . . . . . . . . . . . . . . .4-34
Basic Voice Mail (BVM) . . . . . . . . . . . . . . . . . . . . . . . . . . . . . . . . . . . . . . . . . . . . . . . . . . . . . . . .4-38
Trunking . . . . . . . . . . . . . . . . . . . . . . . . . . . . . . . . . . . . . . . . . . . . . . . . . . . . . . . . . . . . . . . . . . . .4-40
Endpoints . . . . . . . . . . . . . . . . . . . . . . . . . . . . . . . . . . . . . . . . . . . . . . . . . . . . . . . . . . . . . . . . . . .4-42
Attendant Console . . . . . . . . . . . . . . . . . . . . . . . . . . . . . . . . . . . . . . . . . . . . . . . . . . . . . . . . . . . .4-55
IP Network Requirements . . . . . . . . . . . . . . . . . . . . . . . . . . . . . . . . . . . . . . . . . . . . . . . . . . . . . .4-56
Peripheral Equipment . . . . . . . . . . . . . . . . . . . . . . . . . . . . . . . . . . . . . . . . . . . . . . . . . . . . . . . . . .4-63
Chapter 5: Installation
5-1
Chapter Overview . . . . . . . . . . . . . . . . . . . . . . . . . . . . . . . . . . . . . . . . . . . . . . . . . . . . . . . . . . . . . .5-6
Technical Certification Requirement . . . . . . . . . . . . . . . . . . . . . . . . . . . . . . . . . . . . . . . . . . . . . .5-6
Installation Planning
Network Installation Concerns . . . . . . . . . . . . . . . . . . . . . . . . . . . . . . . . . . . . . . . . . . . . . . . . . . .5-7
Planning Digital and Analog Endpoint Locations . . . . . . . . . . . . . . . . . . . . . . . . . . . . . . . . . . . .5-8
Pre-Installation Checklist . . . . . . . . . . . . . . . . . . . . . . . . . . . . . . . . . . . . . . . . . . . . . . . . . . . . . . . .5-9
Mitel 5000 Base Server Chassis
Gathering Optional Equipment . . . . . . . . . . . . . . . . . . . . . . . . . . . . . . . . . . . . . . . . . . . . . . . . . .5-13
Checking the Unit Pre-Assembly . . . . . . . . . . . . . . . . . . . . . . . . . . . . . . . . . . . . . . . . . . . . . . . .5-14
Unpacking the Equipment . . . . . . . . . . . . . . . . . . . . . . . . . . . . . . . . . . . . . . . . . . . . . . . . . . . . . .5-14
Installing the Mitel CS-5200/5400/5600 Base Server . . . . . . . . . . . . . . . . . . . . . . . . . . . . . . . . .5-15
Wall-Mounting the Base Server . . . . . . . . . . . . . . . . . . . . . . . . . . . . . . . . . . . . . . . . . . . . . . . . . .5-15
Grounding the Inter-Tel 5000 Base Server . . . . . . . . . . . . . . . . . . . . . . . . . . . . . . . . . . . . . . . . .5-16
Installing the USB Security Key and Compact Flash-Type Memory Card . . . . . . . . . . . . . . .5-19
Laying Out Cable Runs . . . . . . . . . . . . . . . . . . . . . . . . . . . . . . . . . . . . . . . . . . . . . . . . . . . . . . . .5-20
Mounting and Cabling the Main Distribution Frame (MDF) . . . . . . . . . . . . . . . . . . . . . . . . . . .5-21
Verifying and Securing Cable Connections . . . . . . . . . . . . . . . . . . . . . . . . . . . . . . . . . . . . . . . .5-33
Completing Installation Tasks . . . . . . . . . . . . . . . . . . . . . . . . . . . . . . . . . . . . . . . . . . . . . . . . . . .5-33
Setting Initial System Configuration . . . . . . . . . . . . . . . . . . . . . . . . . . . . . . . . . . . . . . . . . . . . . .5-34
Page x
Mitel ® 5000 Installation Manual – Issue 3.0, October 2008
Contents
Base Server Modules
Installing a Processor Module (PM-1) . . . . . . . . . . . . . . . . . . . . . . . . . . . . . . . . . . . . . . . . . . . . .5-41
Installing a Processor Expansion Card (PEC-1) . . . . . . . . . . . . . . . . . . . . . . . . . . . . . . . . . . . .5-43
Installing a Two-Port Loop Start Module (LSM-2) . . . . . . . . . . . . . . . . . . . . . . . . . . . . . . . . . . .5-46
Installing a Four-Port Loop Start Module (LSM-4) . . . . . . . . . . . . . . . . . . . . . . . . . . . . . . . . . . .5-47
Installing a Dual T1/E1/PRI Module (T1M-2)
. . . . . . . . . . . . . . . . . . . . . . . . . . . . . . . . . . . . . . .5-48
Installing a Single-Port T1/E1/PRI Module (T1M) . . . . . . . . . . . . . . . . . . . . . . . . . . . . . . . . . . . .5-51
Installing a Basic Rate Module (BRM-S) . . . . . . . . . . . . . . . . . . . . . . . . . . . . . . . . . . . . . . . . . . .5-53
Installing a Four-Port Single Line Module (SLM-4) . . . . . . . . . . . . . . . . . . . . . . . . . . . . . . . . . .5-55
Mitel CS-5600 Processing Server (PS-1)
Processing Server (PS-1) Description . . . . . . . . . . . . . . . . . . . . . . . . . . . . . . . . . . . . . . . . . . . .5-57
Installing the Processing Server (PS-1) . . . . . . . . . . . . . . . . . . . . . . . . . . . . . . . . . . . . . . . . . . .5-59
Digital Expansion Interface (DEI)
Installing a DEI . . . . . . . . . . . . . . . . . . . . . . . . . . . . . . . . . . . . . . . . . . . . . . . . . . . . . . . . . . . . . . .5-60
Unpacking the DEI Equipment . . . . . . . . . . . . . . . . . . . . . . . . . . . . . . . . . . . . . . . . . . . . . . . . . . .5-69
Checking the Unit Pre-Assembly . . . . . . . . . . . . . . . . . . . . . . . . . . . . . . . . . . . . . . . . . . . . . . . .5-69
Installing DEI Hardware . . . . . . . . . . . . . . . . . . . . . . . . . . . . . . . . . . . . . . . . . . . . . . . . . . . . . . . .5-70
Attaching DEI Units and External Voice Mail System . . . . . . . . . . . . . . . . . . . . . . . . . . . . . . . .5-70
Installing Modules in the DEI . . . . . . . . . . . . . . . . . . . . . . . . . . . . . . . . . . . . . . . . . . . . . . . . . . . .5-70
Connecting Station Cables to the MDF . . . . . . . . . . . . . . . . . . . . . . . . . . . . . . . . . . . . . . . . . . . .5-80
Station Loop Resistance Test . . . . . . . . . . . . . . . . . . . . . . . . . . . . . . . . . . . . . . . . . . . . . . . . . . .5-85
Connecting Off-Premises Extensions . . . . . . . . . . . . . . . . . . . . . . . . . . . . . . . . . . . . . . . . . . . . .5-86
Analog Fallback System [Europe Only] . . . . . . . . . . . . . . . . . . . . . . . . . . . . . . . . . . . . . . . . . . .5-87
Maintenance Tasks
Powering Up the System . . . . . . . . . . . . . . . . . . . . . . . . . . . . . . . . . . . . . . . . . . . . . . . . . . . . . . .5-89
Powering Down the System . . . . . . . . . . . . . . . . . . . . . . . . . . . . . . . . . . . . . . . . . . . . . . . . . . . . .5-90
Saving the System and Voice Processor Databases . . . . . . . . . . . . . . . . . . . . . . . . . . . . . . . .5-91
Restoring the Database . . . . . . . . . . . . . . . . . . . . . . . . . . . . . . . . . . . . . . . . . . . . . . . . . . . . . . . .5-94
Backing Up the Database . . . . . . . . . . . . . . . . . . . . . . . . . . . . . . . . . . . . . . . . . . . . . . . . . . . . . . .5-96
Changing the License . . . . . . . . . . . . . . . . . . . . . . . . . . . . . . . . . . . . . . . . . . . . . . . . . . . . . . . . . .5-97
Software License Upload . . . . . . . . . . . . . . . . . . . . . . . . . . . . . . . . . . . . . . . . . . . . . . . . . . . . . . .5-99
Replacing the Power Fuse . . . . . . . . . . . . . . . . . . . . . . . . . . . . . . . . . . . . . . . . . . . . . . . . . . . . .5-102
Replacing the Processor Module Battery . . . . . . . . . . . . . . . . . . . . . . . . . . . . . . . . . . . . . . . . .5-103
Installing the USB-B Port Serial Driver . . . . . . . . . . . . . . . . . . . . . . . . . . . . . . . . . . . . . . . . . . .5-104
Retrieving SMDR or Error Message Output Data . . . . . . . . . . . . . . . . . . . . . . . . . . . . . . . . . . .5-104
Using Terminal Emulation to Retrieve Online Messages . . . . . . . . . . . . . . . . . . . . . . . . . . . .5-105
Mitel ® 5000 Installation Manual – Issue 3.0, October 2008
Page xi
Contents
Endpoints
Installing IP and Multi-Protocol Endpoints . . . . . . . . . . . . . . . . . . . . . . . . . . . . . . . . . . . . . . .5-106
Reading IP Endpoint Status Displays . . . . . . . . . . . . . . . . . . . . . . . . . . . . . . . . . . . . . . . . . . . .5-121
Installation Options for Single Line Endpoints . . . . . . . . . . . . . . . . . . . . . . . . . . . . . . . . . . . .5-127
Installing Digital Endpoints . . . . . . . . . . . . . . . . . . . . . . . . . . . . . . . . . . . . . . . . . . . . . . . . . . . .5-128
System Upgrades
Upgrade Scenarios . . . . . . . . . . . . . . . . . . . . . . . . . . . . . . . . . . . . . . . . . . . . . . . . . . . . . . . . . . .5-142
Upgrading a System . . . . . . . . . . . . . . . . . . . . . . . . . . . . . . . . . . . . . . . . . . . . . . . . . . . . . . . . . .5-142
Upgrading System Software to Version 3.0 . . . . . . . . . . . . . . . . . . . . . . . . . . . . . . . . . . . . . . .5-148
Optional: Installing and Configuring Mitel NuPoint Messenger and the Mitel 5000 . . . . . . .5-163
Optional: Installing DEI Hardware to Expand Digital Capacity . . . . . . . . . . . . . . . . . . . . . . .5-163
Optional: Installing an External USB Modem . . . . . . . . . . . . . . . . . . . . . . . . . . . . . . . . . . . . . .5-172
Firmware . . . . . . . . . . . . . . . . . . . . . . . . . . . . . . . . . . . . . . . . . . . . . . . . . . . . . . . . . . . . . . . . . . .5-181
Optional System Equipment
Installing a CT Gateway . . . . . . . . . . . . . . . . . . . . . . . . . . . . . . . . . . . . . . . . . . . . . . . . . . . . . . .5-191
Installing an External Music Source . . . . . . . . . . . . . . . . . . . . . . . . . . . . . . . . . . . . . . . . . . . . .5-192
Installing External Paging Equipment . . . . . . . . . . . . . . . . . . . . . . . . . . . . . . . . . . . . . . . . . . .5-193
Installing an External Voice Processing System . . . . . . . . . . . . . . . . . . . . . . . . . . . . . . . . . . .5-194
Installing an IP SLA . . . . . . . . . . . . . . . . . . . . . . . . . . . . . . . . . . . . . . . . . . . . . . . . . . . . . . . . . .5-198
Installing SIP Gateways . . . . . . . . . . . . . . . . . . . . . . . . . . . . . . . . . . . . . . . . . . . . . . . . . . . . . . .5-200
Installing a Mini-DSS Unit . . . . . . . . . . . . . . . . . . . . . . . . . . . . . . . . . . . . . . . . . . . . . . . . . . . . .5-203
Installing a Single Line Handset Amplifier . . . . . . . . . . . . . . . . . . . . . . . . . . . . . . . . . . . . . . . .5-205
Installing a DSS/BLF Unit . . . . . . . . . . . . . . . . . . . . . . . . . . . . . . . . . . . . . . . . . . . . . . . . . . . . . .5-205
Chapter Overview . . . . . . . . . . . . . . . . . . . . . . . . . . . . . . . . . . . . . . . . . . . . . . . . . . . . . . . . . . . . . .6-4
Initial DB Programming Tasks
Introduction . . . . . . . . . . . . . . . . . . . . . . . . . . . . . . . . . . . . . . . . . . . . . . . . . . . . . . . . . . . . . . . . . . .6-4
Guidelines . . . . . . . . . . . . . . . . . . . . . . . . . . . . . . . . . . . . . . . . . . . . . . . . . . . . . . . . . . . . . . . . . . . .6-5
System Setup for Programming . . . . . . . . . . . . . . . . . . . . . . . . . . . . . . . . . . . . . . . . . . . . . . . . . .6-8
Database Utilities . . . . . . . . . . . . . . . . . . . . . . . . . . . . . . . . . . . . . . . . . . . . . . . . . . . . . . . . . . . . .6-10
Software License Management . . . . . . . . . . . . . . . . . . . . . . . . . . . . . . . . . . . . . . . . . . . . . . . . . .6-56
Software License Upload . . . . . . . . . . . . . . . . . . . . . . . . . . . . . . . . . . . . . . . . . . . . . . . . . . . . . . .6-60
System Downgrades . . . . . . . . . . . . . . . . . . . . . . . . . . . . . . . . . . . . . . . . . . . . . . . . . . . . . . . . . .6-62
Software License Directory . . . . . . . . . . . . . . . . . . . . . . . . . . . . . . . . . . . . . . . . . . . . . . . . . . . . .6-63
Page xii
Mitel ® 5000 Installation Manual – Issue 3.0, October 2008
Contents
Wizard Interfaces
The Configuration Wizard . . . . . . . . . . . . . . . . . . . . . . . . . . . . . . . . . . . . . . . . . . . . . . . . . . . . . .6-68
The Mitel CS-5600 Connection Wizard . . . . . . . . . . . . . . . . . . . . . . . . . . . . . . . . . . . . . . . . . . . .6-97
Selection Wizards . . . . . . . . . . . . . . . . . . . . . . . . . . . . . . . . . . . . . . . . . . . . . . . . . . . . . . . . . . . .6-105
System Directory Folders and Tasks
Introduction . . . . . . . . . . . . . . . . . . . . . . . . . . . . . . . . . . . . . . . . . . . . . . . . . . . . . . . . . . . . . . . . .6-106
System-Wide Parameters . . . . . . . . . . . . . . . . . . . . . . . . . . . . . . . . . . . . . . . . . . . . . . . . . . . . . .6-108
Communication Server Directory Programming . . . . . . . . . . . . . . . . . . . . . . . . . . . . . . . . . . .6-112
Digital Expansion Interface (DEI) Unit Programming Tasks
Programming a Four-Port Single Line Module . . . . . . . . . . . . . . . . . . . . . . . . . . . . . . . . . . . .6-143
Programming an Eight-Port Single Line Module . . . . . . . . . . . . . . . . . . . . . . . . . . . . . . . . . . .6-146
Attaching an External Voice Processing System to the DEI . . . . . . . . . . . . . . . . . . . . . . . . .6-150
Chapter 7: Reference
7-1
Chapter Overview . . . . . . . . . . . . . . . . . . . . . . . . . . . . . . . . . . . . . . . . . . . . . . . . . . . . . . . . . . . . . .7-2
Technical Support Contact Information . . . . . . . . . . . . . . . . . . . . . . . . . . . . . . . . . . . . . . . . . . . .7-2
Replacement Parts . . . . . . . . . . . . . . . . . . . . . . . . . . . . . . . . . . . . . . . . . . . . . . . . . . . . . . . . . . . . .7-2
Abbreviations and Acronyms . . . . . . . . . . . . . . . . . . . . . . . . . . . . . . . . . . . . . . . . . . . . . . . . . . .7-10
Glossary . . . . . . . . . . . . . . . . . . . . . . . . . . . . . . . . . . . . . . . . . . . . . . . . . . . . . . . . . . . . . . . . . . . .7-14
Appendix A: Private Networking
A-1
Introduction . . . . . . . . . . . . . . . . . . . . . . . . . . . . . . . . . . . . . . . . . . . . . . . . . . . . . . . . . . . . . . . . . A-2
Planning the Network . . . . . . . . . . . . . . . . . . . . . . . . . . . . . . . . . . . . . . . . . . . . . . . . . . . . . . . . . . A-4
T1/PRI or E1/PRI Networking . . . . . . . . . . . . . . . . . . . . . . . . . . . . . . . . . . . . . . . . . . . . . . . . . . . . A-6
T1/PRI and E1/PRI Programming . . . . . . . . . . . . . . . . . . . . . . . . . . . . . . . . . . . . . . . . . . . . . . . . . A-7
IP Networking . . . . . . . . . . . . . . . . . . . . . . . . . . . . . . . . . . . . . . . . . . . . . . . . . . . . . . . . . . . . . . . A-11
Extension Numbers . . . . . . . . . . . . . . . . . . . . . . . . . . . . . . . . . . . . . . . . . . . . . . . . . . . . . . . . . . A-15
Node Programming . . . . . . . . . . . . . . . . . . . . . . . . . . . . . . . . . . . . . . . . . . . . . . . . . . . . . . . . . . . A-17
Network Operation of System Features . . . . . . . . . . . . . . . . . . . . . . . . . . . . . . . . . . . . . . . . . . A-22
Network-Wide Alarms . . . . . . . . . . . . . . . . . . . . . . . . . . . . . . . . . . . . . . . . . . . . . . . . . . . . . . . . . A-28
Mitel ® 5000 Installation Manual – Issue 3.0, October 2008
Page xiii
Contents
Appendix B: Network IP Topology
B-1
Introduction . . . . . . . . . . . . . . . . . . . . . . . . . . . . . . . . . . . . . . . . . . . . . . . . . . . . . . . . . . . . . . . . . . B-2
Terminology . . . . . . . . . . . . . . . . . . . . . . . . . . . . . . . . . . . . . . . . . . . . . . . . . . . . . . . . . . . . . . . . . B-2
Network Address Translation Overview . . . . . . . . . . . . . . . . . . . . . . . . . . . . . . . . . . . . . . . . . . B-4
Communication Types
. . . . . . . . . . . . . . . . . . . . . . . . . . . . . . . . . . . . . . . . . . . . . . . . . . . . . . . . B-5
Topology Requirements . . . . . . . . . . . . . . . . . . . . . . . . . . . . . . . . . . . . . . . . . . . . . . . . . . . . . . . B-6
Private (Trusted) Networks . . . . . . . . . . . . . . . . . . . . . . . . . . . . . . . . . . . . . . . . . . . . . . . . . . . . . B-7
Public (Untrusted) Networks . . . . . . . . . . . . . . . . . . . . . . . . . . . . . . . . . . . . . . . . . . . . . . . . . . . . B-9
Configuring Near-End NAT Traversal for IP Endpoints . . . . . . . . . . . . . . . . . . . . . . . . . . . . . B-13
Configuring Near-End NAT Traversal for IP Gateway Trunks . . . . . . . . . . . . . . . . . . . . . . . . B-17
Firewall Configuration . . . . . . . . . . . . . . . . . . . . . . . . . . . . . . . . . . . . . . . . . . . . . . . . . . . . . . . . B-18
Internal Session Initiation Protocol (SIP) . . . . . . . . . . . . . . . . . . . . . . . . . . . . . . . . . . . . . . . . . B-19
Port Usage and Protocols . . . . . . . . . . . . . . . . . . . . . . . . . . . . . . . . . . . . . . . . . . . . . . . . . . . . . B-20
Knowledge Base Article: Port Information (KB2377) . . . . . . . . . . . . . . . . . . . . . . . . . . . . . . . B-22
Comparison of Mitel Advanced Communications Platforms . . . . . . . . . . . . . . . . . . . . . . . . . B-22
Example Cisco® Configuration Commands . . . . . . . . . . . . . . . . . . . . . . . . . . . . . . . . . . . . . . . B-23
Adtran NetVanta® Switch/Router Example . . . . . . . . . . . . . . . . . . . . . . . . . . . . . . . . . . . . . . . . B-29
Appendix C: Open Source License Agreements
C-1
Introduction . . . . . . . . . . . . . . . . . . . . . . . . . . . . . . . . . . . . . . . . . . . . . . . . . . . . . . . . . . . . . . . . . . C-2
GNU Public License . . . . . . . . . . . . . . . . . . . . . . . . . . . . . . . . . . . . . . . . . . . . . . . . . . . . . . . . . . . C-4
GNU Lesser General Public License . . . . . . . . . . . . . . . . . . . . . . . . . . . . . . . . . . . . . . . . . . . . . . C-8
Lighttpd . . . . . . . . . . . . . . . . . . . . . . . . . . . . . . . . . . . . . . . . . . . . . . . . . . . . . . . . . . . . . . . . . . . . C-15
MD5 . . . . . . . . . . . . . . . . . . . . . . . . . . . . . . . . . . . . . . . . . . . . . . . . . . . . . . . . . . . . . . . . . . . . . . . C-15
Embedded Configurable Operating System . . . . . . . . . . . . . . . . . . . . . . . . . . . . . . . . . . . . . . C-16
SoX . . . . . . . . . . . . . . . . . . . . . . . . . . . . . . . . . . . . . . . . . . . . . . . . . . . . . . . . . . . . . . . . . . . . . . . . C-16
Requests for Source Code . . . . . . . . . . . . . . . . . . . . . . . . . . . . . . . . . . . . . . . . . . . . . . . . . . . . . C-16
Index
Page xiv
I-1
Mitel ® 5000 Installation Manual – Issue 3.0, October 2008
Tables
Tables
Table 1-1
Expanded DEI Capacity. . . . . . . . . . . . . . . . . . . . . . . . . . . . . . . . . . . . . . . . . . . . . . . . . .1-3
Table 3-1
Endpoint License Categories. . . . . . . . . . . . . . . . . . . . . . . . . . . . . . . . . . . . . . . . . . . . .3-17
Table 4-1
Equipment Environmental Requirements . . . . . . . . . . . . . . . . . . . . . . . . . . . . . . . . . . . .4-4
Table 4-2
Windows XP Programming Computer Requirements . . . . . . . . . . . . . . . . . . . . . . . . . . .4-5
Table 4-3
Windows Vista Programming Computer Requirements . . . . . . . . . . . . . . . . . . . . . . . . .4-5
Table 4-4
Loop Limits for Digital and Single Line Endpoints . . . . . . . . . . . . . . . . . . . . . . . . . . . . . .4-6
Table 4-5
Uninterruptable Power Supply Wattage Requirements . . . . . . . . . . . . . . . . . . . . . . . . . .4-8
Table 4-6
USB Hub Compatibility Chart for the Mitel CS-5200/5400 Platform . . . . . . . . . . . . . . .4-10
Table 4-7
USB Hub Compatibility Chart for the Mitel CS-5600 Platform . . . . . . . . . . . . . . . . . . . .4-10
Table 4-8
Main Distribution Frame Materials . . . . . . . . . . . . . . . . . . . . . . . . . . . . . . . . . . . . . . . . .4-11
Table 4-9
Trunk Characteristics. . . . . . . . . . . . . . . . . . . . . . . . . . . . . . . . . . . . . . . . . . . . . . . . . . .4-13
Table 4-10
System Capacities for Systems Running v3.0 and later . . . . . . . . . . . . . . . . . . . . . . . .4-14
Table 4-11
Maximum Licensing Capacities . . . . . . . . . . . . . . . . . . . . . . . . . . . . . . . . . . . . . . . . . . .4-17
Table 5
BVM Storage Capacity . . . . . . . . . . . . . . . . . . . . . . . . . . . . . . . . . . . . . . . . . . . . . . . . .4-18
Table 4-1
Endpoint Capacities of Mitel 5000 Platforms . . . . . . . . . . . . . . . . . . . . . . . . . . . . . . . . .4-19
Table 4-2
Dimensions of Inter-Tel 5000 Base Server . . . . . . . . . . . . . . . . . . . . . . . . . . . . . . . . . .4-20
Table 4-3
Compatible USB Flash Drives . . . . . . . . . . . . . . . . . . . . . . . . . . . . . . . . . . . . . . . . . . . .4-25
Table 4-4
PS-1 Specifications . . . . . . . . . . . . . . . . . . . . . . . . . . . . . . . . . . . . . . . . . . . . . . . . . . . .4-32
Table 4-5
DEI Physical Dimensions. . . . . . . . . . . . . . . . . . . . . . . . . . . . . . . . . . . . . . . . . . . . . . . .4-34
Table 4-6
Resources Available with Chassis and DEM-16s . . . . . . . . . . . . . . . . . . . . . . . . . . . . .4-37
Table 4-7
System Resource Limits by Configuration. . . . . . . . . . . . . . . . . . . . . . . . . . . . . . . . . . .4-37
Table 4-8
BVM Licenses, Time Slot Group Ports, and IP Resources Allocated . . . . . . . . . . . . . .4-38
Table 4-9
Trunking Capacity by Type of Module . . . . . . . . . . . . . . . . . . . . . . . . . . . . . . . . . . . . . .4-41
Table 4-10
Multi-Protocol Endpoint Features . . . . . . . . . . . . . . . . . . . . . . . . . . . . . . . . . . . . . . . . .4-43
Table 4-11
Mitel IP Endpoint Specifications . . . . . . . . . . . . . . . . . . . . . . . . . . . . . . . . . . . . . . . . . .4-44
Table 4-12
Environmental Conditions . . . . . . . . . . . . . . . . . . . . . . . . . . . . . . . . . . . . . . . . . . . . . . .4-45
Table 4-13
EMC and Safety Regulatory Standards. . . . . . . . . . . . . . . . . . . . . . . . . . . . . . . . . . . . .4-45
Table 4-14
Mitel IP Endpoint Feature Buttons . . . . . . . . . . . . . . . . . . . . . . . . . . . . . . . . . . . . . . . . .4-46
Table 4-15
IP and Wireless IP Endpoint Features. . . . . . . . . . . . . . . . . . . . . . . . . . . . . . . . . . . . . .4-47
Table 4-16
Multi-Protocol Endpoint LED Flash Rates, ITP Mode. . . . . . . . . . . . . . . . . . . . . . . . . .4-48
Table 4-17
Multi-Protocol Endpoint LED Flash Rates, SIP Mode . . . . . . . . . . . . . . . . . . . . . . . . . .4-49
Table 4-18
DSS/BLF Dimensions . . . . . . . . . . . . . . . . . . . . . . . . . . . . . . . . . . . . . . . . . . . . . . . . . .4-50
Table 4-19
Model 8416 Mini-DSS Unit Dimensions. . . . . . . . . . . . . . . . . . . . . . . . . . . . . . . . . . . . .4-51
Table 4-20
Mitel IP Endpoint Ports . . . . . . . . . . . . . . . . . . . . . . . . . . . . . . . . . . . . . . . . . . . . . . . . .4-59
Table 4-21
UDP Port Assignments for v1.x and v2.x. . . . . . . . . . . . . . . . . . . . . . . . . . . . . . . . . . . .4-60
Mitel ® 5000 Installation Manual – Issue 3.0, October 2008
Page xv
Tables
Table 4-22
99 Nodes Support Component Compatibility. . . . . . . . . . . . . . . . . . . . . . . . . . . . . . . . .4-62
Table 4-23
PC Specifications for Stand-Alone or Remote Programming . . . . . . . . . . . . . . . . . . . .4-65
Table 5-1
Equipment Environmental Requirements . . . . . . . . . . . . . . . . . . . . . . . . . . . . . . . . . . .5-10
Table 5-2
USB Security Key Port Compatibility . . . . . . . . . . . . . . . . . . . . . . . . . . . . . . . . . . . . . . .5-19
Table 5-3
Dual T1/E1/PRI Module LED Summary — 4-LED Stack. . . . . . . . . . . . . . . . . . . . . . . .5-50
Table 5-4
Dual T1/E1/PRI Module LED Summary — RJ-45 LEDs . . . . . . . . . . . . . . . . . . . . . . . .5-50
Table 5-5
Single T1/E1/PRI Module LED Summary — 3 LEDs. . . . . . . . . . . . . . . . . . . . . . . . . . .5-52
Table 5-6
Single T1/E1/PRI Module LED Summary — RJ-45 LEDs . . . . . . . . . . . . . . . . . . . . . . .5-52
Table 5-7
Loop Limits for Digital and Single Line Endpoints . . . . . . . . . . . . . . . . . . . . . . . . . . . . .5-60
Table 5-8
System Board:Bay:Application Relationship in Message Print . . . . . . . . . . . . . . . . . . .5-67
Table 5-9
Eight-Port Single Line Module (SLM-8) Dimensions . . . . . . . . . . . . . . . . . . . . . . . . . . .5-72
Table 5-10
Station Cable Terminations with a U.S. System . . . . . . . . . . . . . . . . . . . . . . . . . . . . . .5-76
Table 5-11
Cable Terminations on MDF Blocks [Twin Block Cables] for DEM-16 . . . . . . . . . . . . .5-77
Table 5-12
Loop Limits for Digital and Single Line Endpoints and Equipment . . . . . . . . . . . . . . . .5-85
Table 5-13
Invalid License Upload Errors . . . . . . . . . . . . . . . . . . . . . . . . . . . . . . . . . . . . . . . . . . .5-100
Table 5-14
Hardware Revision Identification . . . . . . . . . . . . . . . . . . . . . . . . . . . . . . . . . . . . . . . . .5-107
Table 5-15
Power Supply Kits . . . . . . . . . . . . . . . . . . . . . . . . . . . . . . . . . . . . . . . . . . . . . . . . . . . .5-108
Table 5-16
Firmware Download Progress Displays. . . . . . . . . . . . . . . . . . . . . . . . . . . . . . . . . . . .5-121
Table 5-17
IP PhonePlus and Model 8660 Progress Displays . . . . . . . . . . . . . . . . . . . . . . . . . . .5-122
Table 5-18
Models 8620/8622, 8662, and 8690 Progress Displays . . . . . . . . . . . . . . . . . . . . . . .5-123
Table 5-19
IP PhonePlus and Model 8660/8620/8622/8690 Progress Displays . . . . . . . . . . . . . .5-124
Table 5-20
Image Download Error Message Displays. . . . . . . . . . . . . . . . . . . . . . . . . . . . . . . . . .5-126
Table 5-21
UDP Port Assignments for v3.0 . . . . . . . . . . . . . . . . . . . . . . . . . . . . . . . . . . . . . . . . . .5-148
Table 5-22
IP Endpoint Overview — Mitel and Inter-Tel . . . . . . . . . . . . . . . . . . . . . . . . . . . . . . . .5-150
Table 5-23
Troubleshooting DEIs . . . . . . . . . . . . . . . . . . . . . . . . . . . . . . . . . . . . . . . . . . . . . . . . .5-166
Table 5-24
Time Slots for DEIs . . . . . . . . . . . . . . . . . . . . . . . . . . . . . . . . . . . . . . . . . . . . . . . . . . .5-167
Table 5-25
Troubleshooting Problems and Possible Solutions . . . . . . . . . . . . . . . . . . . . . . . . . . .5-177
Table 5-26
Multi-Protocol Endpoint Firmware Compatibility Matrix . . . . . . . . . . . . . . . . . . . . . . . .5-181
Table 5-27
IP Endpoint Overview — Mitel and Inter-Tel . . . . . . . . . . . . . . . . . . . . . . . . . . . . . . . .5-183
Table 5-28
Possible Upgrade Scenarios for Mitel 5000 v2.0 or Later . . . . . . . . . . . . . . . . . . . . . .5-184
Table 6-1
DB Test and Repair Error Messages for Associated Mailboxes . . . . . . . . . . . . . . . . . .6-12
Table 6-2
DB Test and Repair Error Messages for Modules . . . . . . . . . . . . . . . . . . . . . . . . . . . . .6-13
Table 6-3
DB Test and Repair Error Messages for Devices . . . . . . . . . . . . . . . . . . . . . . . . . . . . .6-14
Table 6-4
DB Test and Repair Error Messages for Dynamic Enumerations . . . . . . . . . . . . . . . . .6-15
Table 6-5
DB Test and Repair Error Messages for Enumerations . . . . . . . . . . . . . . . . . . . . . . . .6-16
Table 6-6
DB Test and Repair Error Messages for Extension Conflicts . . . . . . . . . . . . . . . . . . . .6-16
Page xvi
Mitel ® 5000 Installation Manual – Issue 3.0, October 2008
Tables
Table 6-7
DB Test and Repair Error Messages for Hardware Addresses . . . . . . . . . . . . . . . . . . .6-17
Table 6-8
DB Test and Repair Error Messages for Miscellaneous . . . . . . . . . . . . . . . . . . . . . . . .6-18
Table 6-9
DB Test and Repair Error Messages for Referential Integrity . . . . . . . . . . . . . . . . . . . .6-19
Table 6-10
DB Test and Repair Error Messages for Static Records . . . . . . . . . . . . . . . . . . . . . . . .6-20
Table 6-11
Database Test and Repair Utility Common Errors. . . . . . . . . . . . . . . . . . . . . . . . . . . . .6-21
Table 6-12
Database Conversion Requirements and Considerations. . . . . . . . . . . . . . . . . . . . . . .6-26
Table 6-13
Database Converter Error Messages . . . . . . . . . . . . . . . . . . . . . . . . . . . . . . . . . . . . . .6-27
Table 6-14
DB Converter Supported Cards/Card Conversion. . . . . . . . . . . . . . . . . . . . . . . . . . . . .6-28
Table 6-15
DB Converter Supported Devices/Device Conversion . . . . . . . . . . . . . . . . . . . . . . . . .6-28
Table 6-16
About Window Description. . . . . . . . . . . . . . . . . . . . . . . . . . . . . . . . . . . . . . . . . . . . . . .6-57
Table 6-17
Invalid License Upload Errors . . . . . . . . . . . . . . . . . . . . . . . . . . . . . . . . . . . . . . . . . . . .6-60
Table 6-18
Software License Folder Field Descriptions . . . . . . . . . . . . . . . . . . . . . . . . . . . . . . . . .6-63
Table 6-19
T1M and T1M-2 Module Programming Fields . . . . . . . . . . . . . . . . . . . . . . . . . . . . . . .6-122
Table 6-20
PRI-Equipped Module Timers . . . . . . . . . . . . . . . . . . . . . . . . . . . . . . . . . . . . . . . . . . .6-125
Table 6-21
Busy Out Statuses . . . . . . . . . . . . . . . . . . . . . . . . . . . . . . . . . . . . . . . . . . . . . . . . . . . .6-136
Table 7-1
Contact Information . . . . . . . . . . . . . . . . . . . . . . . . . . . . . . . . . . . . . . . . . . . . . . . . . . . . .7-2
Table 7-2
Version 3.0 Parts and Part Numbers . . . . . . . . . . . . . . . . . . . . . . . . . . . . . . . . . . . . . . . .7-3
Table 7-3
Mitel 5000 System Kits . . . . . . . . . . . . . . . . . . . . . . . . . . . . . . . . . . . . . . . . . . . . . . . . . .7-4
Table 7-4
Compact Flash-Type Memory Cards. . . . . . . . . . . . . . . . . . . . . . . . . . . . . . . . . . . . . . . .7-4
Table 7-5
Replacement Parts . . . . . . . . . . . . . . . . . . . . . . . . . . . . . . . . . . . . . . . . . . . . . . . . . . . . .7-4
Table 7-6
Public Network Trunk Interfaces . . . . . . . . . . . . . . . . . . . . . . . . . . . . . . . . . . . . . . . . . . .7-5
Table 7-7
Mitel 5000 Platform Licenses and Security Key . . . . . . . . . . . . . . . . . . . . . . . . . . . . . . .7-5
Table 7-8
Digital Expansion Components and Licenses . . . . . . . . . . . . . . . . . . . . . . . . . . . . . . . . .7-6
Table 7-9
Mitel 5000 Equipment and Peripheral Cables . . . . . . . . . . . . . . . . . . . . . . . . . . . . . . . . .7-6
Table 7-10
DSS/BLF Units, Data Port Modules, and Transformers . . . . . . . . . . . . . . . . . . . . . . . . .7-7
Table 7-11
Single Line Modules . . . . . . . . . . . . . . . . . . . . . . . . . . . . . . . . . . . . . . . . . . . . . . . . . . . .7-7
Table 7-12
Batteries. . . . . . . . . . . . . . . . . . . . . . . . . . . . . . . . . . . . . . . . . . . . . . . . . . . . . . . . . . . . . .7-7
Table 7-13
Endpoints. . . . . . . . . . . . . . . . . . . . . . . . . . . . . . . . . . . . . . . . . . . . . . . . . . . . . . . . . . . . .7-8
Table 7-14
System Documentation . . . . . . . . . . . . . . . . . . . . . . . . . . . . . . . . . . . . . . . . . . . . . . . . . .7-9
Table 7-15
Endpoint User Guides . . . . . . . . . . . . . . . . . . . . . . . . . . . . . . . . . . . . . . . . . . . . . . . . . . .7-9
Table 7-16
Abbreviations and Acronyms . . . . . . . . . . . . . . . . . . . . . . . . . . . . . . . . . . . . . . . . . . . . .7-10
Table 7-17
Networking Terminology . . . . . . . . . . . . . . . . . . . . . . . . . . . . . . . . . . . . . . . . . . . . . . . .7-14
Table A-1
Programming for Node 1 . . . . . . . . . . . . . . . . . . . . . . . . . . . . . . . . . . . . . . . . . . . . . . . A-11
Table A-2
Sample Network Node Routing Plan . . . . . . . . . . . . . . . . . . . . . . . . . . . . . . . . . . . . . . A-18
Table B-1
Port Assignments. . . . . . . . . . . . . . . . . . . . . . . . . . . . . . . . . . . . . . . . . . . . . . . . . . . . . B-21
Table C-1
Selected Abbreviations . . . . . . . . . . . . . . . . . . . . . . . . . . . . . . . . . . . . . . . . . . . . . . . . . C-3
Mitel ® 5000 Installation Manual – Issue 3.0, October 2008
Page xvii
Figures
Figures
Figure 4-1
Processing Server (PS-1) Chassis, Front View Without Cover . . . . . . . . . . . . . . . . . . .4-33
Figure 4-2
Processing Server (PS-1) Chassis, Back View . . . . . . . . . . . . . . . . . . . . . . . . . . . . . . .4-34
Figure 4-3
Modem Data Port Module . . . . . . . . . . . . . . . . . . . . . . . . . . . . . . . . . . . . . . . . . . . . . . .4-51
Figure 4-4
Model 8416 Mini-Direct Station Selection Unit . . . . . . . . . . . . . . . . . . . . . . . . . . . . . . .4-52
Figure 4-5
IP Single Line Adapter . . . . . . . . . . . . . . . . . . . . . . . . . . . . . . . . . . . . . . . . . . . . . . . . . .4-53
Figure 5-1
Base Server Front and Back Views . . . . . . . . . . . . . . . . . . . . . . . . . . . . . . . . . . . . . . . .5-15
Figure 5-2
Cabling Option 1 for the LSM-2 . . . . . . . . . . . . . . . . . . . . . . . . . . . . . . . . . . . . . . . . . . .5-23
Figure 5-3
Cabling Option 2 for the LSM-2 . . . . . . . . . . . . . . . . . . . . . . . . . . . . . . . . . . . . . . . . . . .5-23
Figure 5-4
Cabling Option 1 – LSM-4 . . . . . . . . . . . . . . . . . . . . . . . . . . . . . . . . . . . . . . . . . . . . . . .5-25
Figure 5-5
Cabling Option 2 – LSM-4 . . . . . . . . . . . . . . . . . . . . . . . . . . . . . . . . . . . . . . . . . . . . . . .5-25
Figure 5-6
Example of Ferrite Bead Installation and Connection Types. . . . . . . . . . . . . . . . . . . . .5-26
Figure 5-7
Built-In Dual Loop Start and Dual Single Line Ports . . . . . . . . . . . . . . . . . . . . . . . . . . .5-27
Figure 5-8
Cabling Option 1 for the Dual LS and Dual SL . . . . . . . . . . . . . . . . . . . . . . . . . . . . . . .5-28
Figure 5-9
Cabling Option 2 for the Dual LS and Dual SL . . . . . . . . . . . . . . . . . . . . . . . . . . . . . . .5-28
Figure 5-10
T1/PRI or E1/PRI Terminations from RJ-48C [RJ45 in Europe] Jacks . . . . . . . . . . . . .5-30
Figure 5-11
Modular Jack [Line Jack Unit] Assembly Wiring for T1/PRI Trunks. . . . . . . . . . . . . . . .5-30
Figure 5-12
T1/PRI or E1/PRI Trunk Terminations from 66-Type Blocks . . . . . . . . . . . . . . . . . . . . .5-31
Figure 5-13
Connecting Two T1M or T1M-2 Modules Together . . . . . . . . . . . . . . . . . . . . . . . . . . . .5-32
Figure 5-14
LCD Panel and Controls . . . . . . . . . . . . . . . . . . . . . . . . . . . . . . . . . . . . . . . . . . . . . . . .5-34
Figure 5-15
LCD Software Application Menus . . . . . . . . . . . . . . . . . . . . . . . . . . . . . . . . . . . . . . . . .5-36
Figure 5-16
System Menu. . . . . . . . . . . . . . . . . . . . . . . . . . . . . . . . . . . . . . . . . . . . . . . . . . . . . . . . .5-37
Figure 5-17
Processor Module . . . . . . . . . . . . . . . . . . . . . . . . . . . . . . . . . . . . . . . . . . . . . . . . . . . . .5-41
Figure 5-18
Components of a Processor Module (PM-1) . . . . . . . . . . . . . . . . . . . . . . . . . . . . . . . . .5-42
Figure 5-19
Expansion Card Upgrade (Mitel CS-5200 to CS-5400) . . . . . . . . . . . . . . . . . . . . . . . .5-45
Figure 5-20
LSM-2 Module . . . . . . . . . . . . . . . . . . . . . . . . . . . . . . . . . . . . . . . . . . . . . . . . . . . . . . . .5-46
Figure 5-21
LSM-4 Module . . . . . . . . . . . . . . . . . . . . . . . . . . . . . . . . . . . . . . . . . . . . . . . . . . . . . . . .5-47
Figure 5-22
Dual T1/E1/PRI Module . . . . . . . . . . . . . . . . . . . . . . . . . . . . . . . . . . . . . . . . . . . . . . . . .5-49
Figure 5-23
Dual T1/E1/PRI Module Faceplate LED Summary . . . . . . . . . . . . . . . . . . . . . . . . . . . .5-49
Figure 5-24
T1M Module. . . . . . . . . . . . . . . . . . . . . . . . . . . . . . . . . . . . . . . . . . . . . . . . . . . . . . . . . .5-51
Figure 5-25
Single T1/E1/PRI Module Faceplate LED Summary . . . . . . . . . . . . . . . . . . . . . . . . . . .5-52
Figure 5-26
BRM-S Module . . . . . . . . . . . . . . . . . . . . . . . . . . . . . . . . . . . . . . . . . . . . . . . . . . . . . . .5-53
Figure 5-27
Parts of the SLM-4, Front and Side Views. . . . . . . . . . . . . . . . . . . . . . . . . . . . . . . . . . .5-55
Figure 5-28
Processing Server (PS-1) Chassis, Front View Without Cover . . . . . . . . . . . . . . . . . . .5-58
Figure 5-29
Processing Server (PS-1) Chassis, Back View . . . . . . . . . . . . . . . . . . . . . . . . . . . . . . .5-58
Mitel ® 5000 Installation Manual – Issue 3.0, October 2008
Page xix
Figures
Figure 5-30
Modular Jack Assembly Wiring Diagrams (U.S. System) . . . . . . . . . . . . . . . . . . . . . . .5-64
Figure 5-31
Line Jack Unit Assembly Wiring [European System]. . . . . . . . . . . . . . . . . . . . . . . . . . .5-64
Figure 5-32
DEM-16 Circuit Mapping Example. . . . . . . . . . . . . . . . . . . . . . . . . . . . . . . . . . . . . . . . .5-66
Figure 5-33
DEM-16 in DEI 1 and DEI 2 Chassis . . . . . . . . . . . . . . . . . . . . . . . . . . . . . . . . . . . . . . .5-71
Figure 5-34
RJ-14 Jack Pinout Diagram . . . . . . . . . . . . . . . . . . . . . . . . . . . . . . . . . . . . . . . . . . . . . .5-72
Figure 5-35
Eight-Port Single Line Module (SLM-8), Front View . . . . . . . . . . . . . . . . . . . . . . . . . . .5-72
Figure 5-36
SLM-8 and DEM-16 Circuit Mapping Example . . . . . . . . . . . . . . . . . . . . . . . . . . . . . . .5-73
Figure 5-37
DEM-16 Pinouts and Cabling . . . . . . . . . . . . . . . . . . . . . . . . . . . . . . . . . . . . . . . . . . . .5-75
Figure 5-38
Cabling Option 1 – Dual LS and Dual SL . . . . . . . . . . . . . . . . . . . . . . . . . . . . . . . . . . .5-79
Figure 5-39
Cabling Option 2 – Dual LS and Dual SL . . . . . . . . . . . . . . . . . . . . . . . . . . . . . . . . . . .5-79
Figure 5-40
DEM-16 Block Cable Terminations for Endpoints on a U.S. System . . . . . . . . . . . . . .5-81
Figure 5-41
BRM-S Cable Connection for European System . . . . . . . . . . . . . . . . . . . . . . . . . . . . .5-82
Figure 5-42
DEM-16 Block Terminations for Endpoints on European System . . . . . . . . . . . . . . . . .5-83
Figure 5-43
SLA Terminations for Single Line Endpoint with a European System . . . . . . . . . . . . . .5-84
Figure 5-44
Off-Premises Connection [Europe Only] . . . . . . . . . . . . . . . . . . . . . . . . . . . . . . . . . . . .5-84
Figure 5-45
Fallback Power and Control . . . . . . . . . . . . . . . . . . . . . . . . . . . . . . . . . . . . . . . . . . . . .5-87
Figure 5-46
Fallback Connections . . . . . . . . . . . . . . . . . . . . . . . . . . . . . . . . . . . . . . . . . . . . . . . . . .5-88
Figure 5-47
Change Software License . . . . . . . . . . . . . . . . . . . . . . . . . . . . . . . . . . . . . . . . . . . . . . .5-97
Figure 5-48
Compare Software License . . . . . . . . . . . . . . . . . . . . . . . . . . . . . . . . . . . . . . . . . . . . .5-101
Figure 5-49
Base Server Chassis Power Fuse . . . . . . . . . . . . . . . . . . . . . . . . . . . . . . . . . . . . . . .5-102
Figure 5-50
Processor Module Battery . . . . . . . . . . . . . . . . . . . . . . . . . . . . . . . . . . . . . . . . . . . . .5-103
Figure 5-51
Connection Interfaces for 8600 Series Multi-Protocol Endpoints . . . . . . . . . . . . . . . .5-111
Figure 5-52
Model 8690 Connection Interfaces . . . . . . . . . . . . . . . . . . . . . . . . . . . . . . . . . . . . . . .5-112
Figure 5-53
Digital Display and Basic Digital Endpoints Self-Test Key Matrix . . . . . . . . . . . . . . . .5-131
Figure 5-54
Model 8500, 8520, and 8560 Endpoints Self-Test Key Matrix. . . . . . . . . . . . . . . . . . .5-132
Figure 5-55
SLA Terminations for DID Trunks (USA Only). . . . . . . . . . . . . . . . . . . . . . . . . . . . . . .5-140
Figure 5-56
SLA Terminations for Single Line Endpoints with a U.S. System . . . . . . . . . . . . . . . .5-140
Figure 5-57
Example TFTP Server Configuration . . . . . . . . . . . . . . . . . . . . . . . . . . . . . . . . . . . . .5-145
Figure 5-58
Example Mitel 5000 DEI Chassis Front and Back View . . . . . . . . . . . . . . . . . . . . . . .5-167
Figure 5-59
Example Base Server Chassis Front and Back Views . . . . . . . . . . . . . . . . . . . . . . . .5-168
Figure 5-60
Example DEI Connection to Mitel 5000 Base Server: 2-DEI . . . . . . . . . . . . . . . . . . . .5-169
Figure 5-61
Example Adding DEIs to the Mitel 5000 Base Server: 4-DEI . . . . . . . . . . . . . . . . . . .5-170
Figure 5-62
Example DEI and External Voice Mail Connection to Base Server . . . . . . . . . . . . . . .5-171
Figure 5-63
Example Voice Mail or DEI Connection to Mitel 5000 Base Server . . . . . . . . . . . . . .5-172
Figure 5-64
Model 5212/5224/5330/5340 IP Endpoint Connections . . . . . . . . . . . . . . . . . . . . . . .5-175
Figure 5-65
Mitel IP Endpoint Wall Mounting . . . . . . . . . . . . . . . . . . . . . . . . . . . . . . . . . . . . . . . . .5-176
Page xx
Mitel ® 5000 Installation Manual – Issue 3.0, October 2008
Figures
Figure 5-66
Music-On-Hold Connection . . . . . . . . . . . . . . . . . . . . . . . . . . . . . . . . . . . . . . . . . . . . .5-192
Figure 5-67
Paging Equipment Connection . . . . . . . . . . . . . . . . . . . . . . . . . . . . . . . . . . . . . . . . . .5-193
Figure 5-68
Example External Voice Mail Connection to Mitel CS-5x00 . . . . . . . . . . . . . . . . . . . .5-197
Figure 5-69
Example of a Remote Site without a SIP Gateway Application . . . . . . . . . . . . . . . . . .5-201
Figure 5-70
Example of a Remote Site with a SIP Gateway Application . . . . . . . . . . . . . . . . . . . .5-201
Figure 5-71
Mini-DSS Installation . . . . . . . . . . . . . . . . . . . . . . . . . . . . . . . . . . . . . . . . . . . . . . . . .5-204
Figure 5-72
Model 8660 with Attached Mini-DSS . . . . . . . . . . . . . . . . . . . . . . . . . . . . . . . . . . . . . .5-204
Figure 5-73
AC Transformer Requirements for PCDPMs. . . . . . . . . . . . . . . . . . . . . . . . . . . . . . . .5-207
Figure 5-74
PCDPM Installation in an Executive or Standard Display Endpoint . . . . . . . . . . . . . .5-211
Figure 5-75
PCDPM Cables on Executive or Standard Display Endpoints . . . . . . . . . . . . . . . . . .5-212
Figure 5-76
PCDPM Cables on Professional or Associate Display Endpoints . . . . . . . . . . . . . . . .5-212
Figure 5-77
PCDPM Installation in a Model 8520 or 8560 Endpoint. . . . . . . . . . . . . . . . . . . . . . . .5-213
Figure 5-78
MDPM Cable Connection in a Model 8520 or 8560 Endpoint . . . . . . . . . . . . . . . . . . .5-213
Figure 5-79
Digital Endpoint Modem Data Port Module (MDPM) Installation . . . . . . . . . . . . . . . . .5-214
Figure 5-80
PCDPM Installation on Executive or Standard Display Endpoints . . . . . . . . . . . . . . .5-216
Figure 5-81
Back of 60-Key, 6-Row Digital DSS/BLF Unit . . . . . . . . . . . . . . . . . . . . . . . . . . . . . . .5-216
Figure 5-82
Executive or Standard Display Endpoint PCDPM Cable Connections . . . . . . . . . . . .5-217
Figure 5-83
PCDPM Cables on Professional or Associate Display Endpoints . . . . . . . . . . . . . . . .5-218
Figure 5-84
Model 8520 or 8560 Endpoint PCDPM Installation . . . . . . . . . . . . . . . . . . . . . . . . . . .5-219
Figure 5-85
Model 8520 or 8560 Endpoint PCDPM Cable Connections . . . . . . . . . . . . . . . . . . . .5-219
Figure 6-1
Inter-Tel Axxess to Mitel 5000 Conversion for Inter-Tel Axxess Cards . . . . . . . . . . . . .6-35
Figure 6-2
Inter-Tel Axxess to Mitel 5000 Connection for Inter-Tel Axxess Devices . . . . . . . . . . .6-38
Figure 6-3
Mitel 5000 Database Converter Utility Drag and Drop Operations . . . . . . . . . . . . . . . .6-40
Figure 6-4
Mitel 5000 T1/E1/PRI Ports Drag and Drop Operations . . . . . . . . . . . . . . . . . . . . . . . .6-41
Figure 6-5
Mitel 5000 Devices Drag and Drop Operations . . . . . . . . . . . . . . . . . . . . . . . . . . . . . . .6-42
Figure 6-6
System Type Selection . . . . . . . . . . . . . . . . . . . . . . . . . . . . . . . . . . . . . . . . . . . . . . . . .6-56
Figure 6-7
Change Software License . . . . . . . . . . . . . . . . . . . . . . . . . . . . . . . . . . . . . . . . . . . . . . .6-58
Figure 6-8
Compare Software License . . . . . . . . . . . . . . . . . . . . . . . . . . . . . . . . . . . . . . . . . . . . . .6-62
Figure 6-9
Software License Directory Display . . . . . . . . . . . . . . . . . . . . . . . . . . . . . . . . . . . . . . . .6-63
Figure 6-10
Compare Software License . . . . . . . . . . . . . . . . . . . . . . . . . . . . . . . . . . . . . . . . . . . . . .6-67
Figure 6-11
Selection Wizard . . . . . . . . . . . . . . . . . . . . . . . . . . . . . . . . . . . . . . . . . . . . . . . . . . . . .6-105
Figure 6-12
System Directory Folders . . . . . . . . . . . . . . . . . . . . . . . . . . . . . . . . . . . . . . . . . . . . . .6-106
Figure 6-13
Backup Database Parameters. . . . . . . . . . . . . . . . . . . . . . . . . . . . . . . . . . . . . . . . . . .6-108
Figure 6-14
Communication Server Directory. . . . . . . . . . . . . . . . . . . . . . . . . . . . . . . . . . . . . . . . .6-112
Figure 6-15
Base Server Module Bays . . . . . . . . . . . . . . . . . . . . . . . . . . . . . . . . . . . . . . . . . . . . . .6-113
Figure 6-16
Busy Out Manager. . . . . . . . . . . . . . . . . . . . . . . . . . . . . . . . . . . . . . . . . . . . . . . . . . . .6-135
Mitel ® 5000 Installation Manual – Issue 3.0, October 2008
Page xxi
Figures
Figure 6-17
Busy Out Manager Programming . . . . . . . . . . . . . . . . . . . . . . . . . . . . . . . . . . . . . . . .6-135
Figure 6-18
Digital Expansion Interface . . . . . . . . . . . . . . . . . . . . . . . . . . . . . . . . . . . . . . . . . . . . .6-138
Figure 6-19
DEI License Requirement . . . . . . . . . . . . . . . . . . . . . . . . . . . . . . . . . . . . . . . . . . . . . .6-138
Figure 6-20
System Configuration . . . . . . . . . . . . . . . . . . . . . . . . . . . . . . . . . . . . . . . . . . . . . . . . .6-139
Figure 6-21
IP Connection . . . . . . . . . . . . . . . . . . . . . . . . . . . . . . . . . . . . . . . . . . . . . . . . . . . . . . .6-140
Figure 6-22
SLM-4 Single Line Ports and Circuits. . . . . . . . . . . . . . . . . . . . . . . . . . . . . . . . . . . . . .6-144
Figure 6-23
Single Line Endpoint Programming Options . . . . . . . . . . . . . . . . . . . . . . . . . . . . . . . .6-145
Figure 6-24
SLM-8 Option in a DEI Bay Drop-Down Box . . . . . . . . . . . . . . . . . . . . . . . . . . . . . . . .6-147
Figure 6-25
SLM-8 Single Line Ports and Circuits . . . . . . . . . . . . . . . . . . . . . . . . . . . . . . . . . . . . .6-147
Figure A-1
A Private Network Combining IP Resources and T1M or T1M-2 Modules . . . . . . . . . . A-2
Figure A-2
Sample T1/PRI Connection . . . . . . . . . . . . . . . . . . . . . . . . . . . . . . . . . . . . . . . . . . . . . . A-6
Figure A-3
Sample Node Programming . . . . . . . . . . . . . . . . . . . . . . . . . . . . . . . . . . . . . . . . . . . . A-18
Figure A-4
Example Call Path Through Nodes . . . . . . . . . . . . . . . . . . . . . . . . . . . . . . . . . . . . . . . A-19
Figure A-5
Network Planning Sheet . . . . . . . . . . . . . . . . . . . . . . . . . . . . . . . . . . . . . . . . . . . . . . . A-29
Figure A-6
Network Numbering Plan Worksheet. . . . . . . . . . . . . . . . . . . . . . . . . . . . . . . . . . . . . . A-30
Figure A-7
IP Networking Planning Worksheet (example) . . . . . . . . . . . . . . . . . . . . . . . . . . . . . . A-31
Figure A-8
IP Networking Planning Worksheet (blank) . . . . . . . . . . . . . . . . . . . . . . . . . . . . . . . . . A-32
Page xxii
Mitel ® 5000 Installation Manual – Issue 3.0, October 2008
Chapter 1: Mitel 5000 v3.0 New Features
Mitel 5000 v3.0 New Features
Chapter 1: Mitel 5000 v3.0 New Features
Version 3.0 Content Summary . . . . . . . . . . . . . . . . . . . . . . . . . . . . . . . . . . . . . . . . . . . . . . . . . . . .1-2
Updated Manual Information . . . . . . . . . . . . . . . . . . . . . . . . . . . . . . . . . . . . . . . . . . . . . . . . . . .1-2
NuPoint Messenger External Voice Mail System . . . . . . . . . . . . . . . . . . . . . . . . . . . . . . . . . . .1-2
Increased DEI Capacity . . . . . . . . . . . . . . . . . . . . . . . . . . . . . . . . . . . . . . . . . . . . . . . . . . . . . .1-3
Mitel Cordless Devices . . . . . . . . . . . . . . . . . . . . . . . . . . . . . . . . . . . . . . . . . . . . . . . . . . . . . . .1-3
Liquid Crystal Display (LCD) Application Enhancements . . . . . . . . . . . . . . . . . . . . . . . . . . . . .1-4
Licensing . . . . . . . . . . . . . . . . . . . . . . . . . . . . . . . . . . . . . . . . . . . . . . . . . . . . . . . . . . . . . . . . . . . . .1-4
Feature Software Licenses . . . . . . . . . . . . . . . . . . . . . . . . . . . . . . . . . . . . . . . . . . . . . . . . . . . .1-4
Mitel 5000 . . . . . . . . . . . . . . . . . . . . . . . . . . . . . . . . . . . . . . . . . . . . . . . . . . . . . . . . . . . . . . . . .1-4
NuPoint Messenger . . . . . . . . . . . . . . . . . . . . . . . . . . . . . . . . . . . . . . . . . . . . . . . . . . . . . . . . .1-4
Mitel Applications Suite . . . . . . . . . . . . . . . . . . . . . . . . . . . . . . . . . . . . . . . . . . . . . . . . . . . . . . .1-4
Message Print Messages and Alarms . . . . . . . . . . . . . . . . . . . . . . . . . . . . . . . . . . . . . . . . . . . . . .1-4
Upgrading to v3.0 . . . . . . . . . . . . . . . . . . . . . . . . . . . . . . . . . . . . . . . . . . . . . . . . . . . . . . . . . . . . . .1-5
Programming . . . . . . . . . . . . . . . . . . . . . . . . . . . . . . . . . . . . . . . . . . . . . . . . . . . . . . . . . . . . . . . . . .1-5
MOH Converter Utility . . . . . . . . . . . . . . . . . . . . . . . . . . . . . . . . . . . . . . . . . . . . . . . . . . . . . . . .1-5
DB Converter Utility . . . . . . . . . . . . . . . . . . . . . . . . . . . . . . . . . . . . . . . . . . . . . . . . . . . . . . . . .1-5
Administrative Web Session (AWS) Pages . . . . . . . . . . . . . . . . . . . . . . . . . . . . . . . . . . . . . . . . . .1-5
Mitel ® 5000 Installation Manual – Issue 3.0, October 2008
Page 1-1
Chapter 1: Mitel 5000 v3.0 New Features
Version 3.0 Content Summary
Version 3.0 Content Summary
This section describes changes made in Mitel 5000 v3.0 to support the following new features
and enhancements, including support for the NuPoint Messenger external messaging system.
NOTICE
The Voice Processing Unit (VPU): The VPU is no longer supported in v3.0. The VPU was
discontinued in May 2007. Mitel recommends that current VPU installations upgrade to
Enterprise® Messaging (EM) or NuPoint Messenger (the new external voice mail system. See
page 1-2). The two EM hardware platforms currently available, Base I and Base II, are
separate system components and must be purchased from your local provider. Instructions for
converting a VPU database to an EM database are included in the Enterprise Messaging
Installation and Maintenance Manual, part number 780.8006. Contact your local provider for
more information.
NOTE
The Mitel 5000 system has been rebranded as the Mitel 5000 system. Over time,
most or all of the supporting materials related to this product line will be rebranded
to reflect this name change.
This list details the new features and enhancements for this release, as they pertain to this
installation manual. For additional v3.0 content summary, refer to the Inter-Tel 5000 Features
and Programming Guide (part number 580.8006).
• “NuPoint Messenger External Voice Mail System” below
• “Increased DEI Capacity” on page 1-3
• “Liquid Crystal Display (LCD) Application Enhancements” on page 1-4
• “Administrative Web Session (AWS) Pages” on page 1-5
Updated Manual Information
Throughout this manual, “change bars” like the one next to this paragraph have been placed in
the margins. This indicates information is new or has been revised since the previous
publication of the Mitel 5000 Installation and Maintenance Manual, Issue 2.4, September 2007.
NuPoint Messenger External Voice Mail System
Prior to v3.0, the Mitel 5000 supports BVM, the internal voice mail option, and EM, an external
voice mail system. Mitel 5000 software version v3.0 introduces the Mitel NuPoint Messenger,
another external voice messaging system. The NuPoint Messenger uses SIP to communicate
with the Mitel 5000. Although you can still equip BVM or EM, you can only assign one mailbox
on one messaging system.
For additional information on NuPoint Messenger, refer to the following documents:
Mitel 5000 Features and Programming Guide, part number 580.8001.
Mitel 5000 and NuPoint Messenger Integration Guide, part number 580.8008.
Page 1-2
Mitel ® 5000 Installation Manual – Issue 3.0, October 2008
Chapter 1: Mitel 5000 v3.0 New Features
Increased DEI Capacity
Increased DEI Capacity
NOTICE
The Mitel 5000 v3.0 release requires a minimum 512MB compact flash-type memory card. If
the system is currently using a 256MB compact flash-type memory card, upgrade the card to
either 512MB (part number 841.0274) or 1024MB (part number 841.0273) before upgrading
the system to v3.0.
This release supports an additional 96 digital endpoints on two DEIs for a total digital endpoint
capacity of 192 (12 DEMs in four DEI chassis). The IP and digital endpoint capacity for the CS5200/5400 remain approximately the same as pre-v3.0 given the trade-off occurred when
increasing digital capacity; IP endpoint capacity will decrease. See Table 1-1 for capacity
information. Hardware requirements for the additional DEIs include:
• The additional third or fourth DEI chassis.
• Additional expansion modules (DEMs or SLM8s) for the new DEIs.
• Additional cabling (for example AIC, power, endpoint cables).
Table 1-1. Expanded DEI Capacity
System
CS-5200
CS-5400
CS-5600
DEIs
Maximum IP
Endpoints
Total
Endpoints
2
75
171
3
25
169
2
175
271
3
125
269
4
75
267
2
250
346
3
250
394
4
250
442
Comments
Current capacity
(maximum 3 DEIs
on 5200)
Current capacity
Current capacity
Mitel Cordless Devices
Version 3.0 supports the Mitel cordless handset and headset for the Mitel Models 5330 and
5340 IP endpoints. Both cordless devices connect to the Mitel IP endpoints through the cordless
module, which attaches to the back of the endpoint. The cordless headset recharges in a
headset cradle that attaches to the side of the endpoint. The cordless handset recharges in the
handset cradle.
NOTE
Installation instructions are included with each device. However, when installing a
cordless device, press and hold the Module Pairing button on the back of the
cordless module for about 5–15 seconds. Then follow the “Hookswitch” instructions
shown on the endpoint display to pair the cordless device with the module. See the
installation instructions included with the device for Module Pairing button and
Hookswitch button locations.
Mitel ® 5000 Installation Manual – Issue 3.0, October 2008
Page 1-3
Chapter 1: Mitel 5000 v3.0 New Features
Liquid Crystal Display (LCD) Application Enhancements
Liquid Crystal Display (LCD) Application Enhancements
The Mitel CS-5200 and CS-5400 servers are equipped with an LCD panel that displays system
information, important messages, and system settings. Version 3.0 includes the following
enhancements to the LCD application:
• The Automatic Diagnostics Delivery (ADD) Freeze option was added to the System menu.
See page 5-38.
• New messages, designed to safeguard flash memory and low-level firmware updates,
have been added. See page 5-39.
Licensing
For systems running Mitel 5000 v2.x software, v3.0 is a chargeable upgrade.
For details and part numbers not listed in this document, refer to the main installation manual.
Licensing is managed through Mitel Application Management Center (AMC). For information on
the AMC, see the AMC Help.
Feature Software Licenses
Refer to the Inter-Tel 5000 Features and Programming Guide (part number 580.8006) for
information on features that require a software license and for changes to the “Help\About InterTel Software License” dialog box.
See page 7-3 for additional parts and part numbers.
Mitel 5000
With v3.0, you license the Mitel 5000 using the AMC. SIP peering for voice mail requires the
new SIP Peer Voice Mail License. The SIP Peer Voice Mail license is used for a connection to
the NuPoint Messenger external voice processing system.
New alarms are associated with this licensing. See “Message Print Messages and Alarms” on
page 1-4.
NuPoint Messenger
NuPoint Messenger requires a license that you obtain through the Application Management
Center (AMC). Refer to the NuPoint Messenger Technical Documentation Help, Release 3.0 on
the Mitel Web site (http://edocs.mitel.com) for details about licensing. Refer to the AMC Help for
details about the Application Management Center.
Mitel Applications Suite
The MAS server requires a license that you obtain through the AMC. Refer to the Mitel
Applications Suite Installation and Maintenance Manual, Release 1.2 on the Mitel Web site
(http://edocs.mitel.com) for details about licensing.
Message Print Messages and Alarms
For additional information about Message Print messages and alarms for the v3.0 release, refer
to the Message Print Diagnostics Manual, part number, 550.8018.
Page 1-4
Mitel ® 5000 Installation Manual – Issue 3.0, October 2008
Chapter 1: Mitel 5000 v3.0 New Features
Upgrading to v3.0
Upgrading to v3.0
NOTICE
This release requires that systems running Basic Voice Mail (BVM) upgrade the
CompactFlash® card to either 512MB (part number 841.0274) or 1024MB (part number
841.0273) before upgrading the system to v3.0.
See “Upgrading to v3.0” on page 5-152 for information on installing Mitel endpoints and
upgrading the system software to v3.0.
Programming
For information on what has changed in programming for v3.0, refer to the Inter-Tel 5000
Features and Programming Guide (part number 580.8006).
For the changes that have been made to the v3.0 Utilities, refer to the Mitel 5000 Features and
Programming Guide (580.8006). Some of the changes are general and are not tied to a specific
v3.0 feature.
MOH Converter Utility
The MOH Converter Utility is new to v3.0. This utility converts audio files to the proper format
(.n64u) for use for the File-Based MOH feature. Use the utility to:
• Convert an audio file
• Change the volume level
• Check the log file
You have the option to install the MOH Converter Utility when you install DB Programming.
NOTE
The power of all signal energy other than live voice cannot exceed -9dBm when
averaged over a 3 second interval. With our default loss plan, worst case, this
means that the File-Based MOH file cannot exceed -12 dBm0 when averaged over
a 3 second interval. If any gain on the system (for example, the transmit gain on a
loop start trunk) is increased, this maximum level must be decreased by the same
amount.
DB Converter Utility
The conversion includes the following updates to v3.0:
• The Echo Canceller setting in the Echo Profiles folder is automatically changed to:
o
The “Advanced” VoIP Echo Canceller Setting (under System) for 5200 database.
o
The “Basic” VoIP Echo Canceller Setting for 5400 and 5600 database.
• The Hybrid Balance Setting is defaulted according to the new default value.
Administrative Web Session (AWS) Pages
The Administrative Web Session (AWS) pages include a variety of changes for Mitel 5000
system software v3.0.
For additional details on changes to AWS, refer to the AWS Help.
Mitel ® 5000 Installation Manual – Issue 3.0, October 2008
Page 1-5
Chapter 2: Document Overview
Document Overview
Chapter 2: Document Overview
Introduction . . . . . . . . . . . . . . . . . . . . . . . . . . . . . . . . . . . . . . . . . . . . . . . . . . . . . . . . . . . . . . . . . . .2-2
New Manual . . . . . . . . . . . . . . . . . . . . . . . . . . . . . . . . . . . . . . . . . . . . . . . . . . . . . . . . . . . . . . .2-2
Intended Audience . . . . . . . . . . . . . . . . . . . . . . . . . . . . . . . . . . . . . . . . . . . . . . . . . . . . . . . . . .2-2
Chapters in This Manual . . . . . . . . . . . . . . . . . . . . . . . . . . . . . . . . . . . . . . . . . . . . . . . . . . . . . .2-3
Mitel Reference Documents . . . . . . . . . . . . . . . . . . . . . . . . . . . . . . . . . . . . . . . . . . . . . . . . . . .2-4
Document Style Conventions . . . . . . . . . . . . . . . . . . . . . . . . . . . . . . . . . . . . . . . . . . . . . . . . . . . . .2-5
British English and American English References . . . . . . . . . . . . . . . . . . . . . . . . . . . . . . . . . .2-5
References to “Endpoints” . . . . . . . . . . . . . . . . . . . . . . . . . . . . . . . . . . . . . . . . . . . . . . . . . . . .2-5
Hazard Identification, Notices, and Notes . . . . . . . . . . . . . . . . . . . . . . . . . . . . . . . . . . . . . . . . . . .2-6
Hazard Identification Methods . . . . . . . . . . . . . . . . . . . . . . . . . . . . . . . . . . . . . . . . . . . . . . . . .2-6
Other Notes . . . . . . . . . . . . . . . . . . . . . . . . . . . . . . . . . . . . . . . . . . . . . . . . . . . . . . . . . . . . . . . .2-6
Mitel ® 5000 Installation Manual – Issue 3.0, October 2008
Page 2-1
Chapter 2: Document Overview
Introduction
Introduction
This manual provides the information needed to plan, install, perform initial programming,
implement, and maintain any of three configurations of the Mitel® 5000 advanced
communications platform—the CS-5200, the CS-5400, and the CS-5600.
To implement the equipment and features described in this manual requires:
• An adequate capacity compact flash-type memory card containing the applicable software
release, applications, and voice mail prompts.
• A Universal Serial Bus (USB) security key to verify licensing. See page 3-13.
New Manual
This Mitel 5000 Installation and Maintenance Manual (part number 835.5000) provides
information for new installations, upgrades, maintenance and troubleshooting relating to
installation for release v2.4. For prior releases, refer to the documentation for that release.
All other information is now in the new Mitel 5000 Features and Programming Guide (part
number 580.8006), and the Mitel 5000 Reference Manual (part number 580.8007). Both new
manuals cover all features, programming, diagnostics and troubleshooting, and any other
information other than installation-related. You can also find all documentation on the Mitel
edGE Online Manuals and Guides (www.inter-tel.com/techpublications) Web site.
Intended Audience
NOTICE
To receive technical assistance from the Mitel Technical Support group, you must have
the following certifications:
• Mitel 5000 Basic Technical Certification.
• Telecommunications Industry Association (TIA) Convergence Technologies Professional
(CTP) certification.
If you do not have these certifications, Mitel Technical Support will provide assistance, but
one Technical Support Incident (TSI) will be charged.
This manual has been developed for Mitel-trained technicians who:
• Possess the knowledge and skill required to set up, maintain, and troubleshoot a
programmable circuit-switched telephone system.
• Use standardized telecommunication practices, procedures, and troubleshooting methods
when performing their work.
• Possess the ability to effectively apply the principles of:
Page 2-2
o
Internet Protocol (IP) telephony/computer telephony (CT).
o
Voice over IP (VoIP), including Quality of Service (QoS).
o
Data networking.
o
Technology convergence.
Mitel ® 5000 Installation Manual – Issue 3.0, October 2008
Chapter 2: Document Overview
Chapters in This Manual
Chapters in This Manual
This manual includes the following chapters:
• Mitel 5000 v3.0 New Features. Provides an overview of the new features and
enhancements in this release.
• Document Overview: This chapter (currently viewing) provides information about the
document’s structure and content, associated documents, and typographical methods
used to call the reader’s attention to important information.
• Product Description: This chapter describes system processes, feature summaries, and
licensing requirements of the Mitel CS-5200, CS-5400, and CS-5600 platforms. Each
platform provides Mitel call processing and business productivity features, messaging
services with Basic Voice Mail and Fax over IP (FoIP), Wide Area Network (WAN) Fail
Survivability, and a Power Fail Bypass relay. Mitel 5000 platforms connect to external
voice mail; to loop start, T1, T1/PRI, E1/PRI, and Basic Rate Interface (BRI)—S
interface—trunks [Europe only]; and to IP, digital, and analog single line endpoints. Inter
Tel 5000 platforms also support Mitel Models 8601 and 8602 Softphone applications.
• Specifications: This chapter defines capacities, dimensions, and parameters of the
hardware and software components of the systems. The chapter also identifies the
environmental conditions required to ensure safe and reliable system operation.
• Installation: This chapter describes the tasks and procedures required to correctly install,
upgrade, and maintain the Mitel CS-5200, CS-5400, and CS-5600 platforms, digital
interface equipment, endpoints, and optional system components.
• Programming: This chapter provides instructions for installing the system Database (DB)
Programming software and for programming the system. The chapter also provides
instructions for backing up the system and voice mail databases, for uploading software
licenses and software upgrades. This chapter also provides instructions for using the
Configuration Wizard.
• Reference: This chapter provides information that applies to the operation and
maintenance of the Mitel 5000 family of products, including:
o
Mitel Technical Support contact information.
o
Abbreviations and acronyms used in the manual.
o
Parts-ordering guidelines.
o
Lists of selected hardware, software, license, and documentation part numbers.
• Appendixes: The manual also provides appendixes that contain detailed information
about related technical topics.
o
Private Networking
o
Network IP Topology
o
Open Source License Agreements
Mitel ® 5000 Installation Manual – Issue 3.0, October 2008
Page 2-3
Chapter 2: Document Overview
Mitel Reference Documents
Mitel Reference Documents
The following documents provide detailed information for installing and using the Mitel CS-5200,
CS-5400, and CS-5600 Communication Servers and peripheral equipment:
Mitel 5000 Documents
• Mitel 5000 Installation and Maintenance Manual, part number 580.8000
• Mitel 5000 Features and Programming Guide, part number 580.8006
• Mitel 5000 Endpoint and Voice Mail Administrator Guide & Administrator Quick Reference
Guide, part number 580.8001
• Mitel 5000 Installation Quick Start Guide, part number 835.2879
• Mitel 5000 Program Planning Sheets (.DOC), part number 835.2882
• Mitel 5000 Memory Card Replacement Instruction, part number 835.3033
• Mitel CS-5200/5400 Expansion Port Cable Replacement Kit, part number 828.1684
Peripheral Equipment Documents
• Anti-Virus Configuration Information, part number 835.2751
• CT Gateway Installation Manual, part number 835.2161
• Enterprise® Messaging Installation Manual, part number 780.8006
• Inter-Tel’s System Equipment Grounding Guidelines, part number 835.2845
• Message Print Diagnostics Manual, part number 550.8018
• Netlink SPV Server and Model 8664/8665/8668 Installation Manual, part number 935.4521
• AudioCodes™ MP-114 SIP Gateway Installation Guide, part number 835.3203
• Quintum® SIP Gateway Installation Manual, part number 835.3123
• SIP Server Installation and Configuration Manual, part number 835.2605
• System Manager Installation and Maintenance Manual, part number 835.2743
• System OAI Toolkit Specifications Manual, part number 835.2615
• Universal RS-232 Kit, part number 828.1282
• Voice Processing Diagnostics Manual, part number 550.8019
• VoIP Data Network Requirements, part number 835.2885
• VoIP Design Considerations, Guidelines, & Practices, part number 835.2976
• Titles of applicable endpoint user guides appear in the Reference chapter, Table 7-15 on
page 7-9.
• For a list of power supplies that Mitel supports, refer to the IP Device Power Supply
Compatibility Matrix, part number 835.2688, which is included on the product CD.
Page 2-4
Mitel ® 5000 Installation Manual – Issue 3.0, October 2008
Chapter 2: Document Overview
Document Style Conventions
Document Style Conventions
This section identifies the style conventions used throughout the manual.
NOTE
An extensive list of abbreviations and acronyms used in this manual appears in
the Reference chapter. See “Abbreviations and Acronyms” on page 7-10.
British English and American English References
This document supports the requirements of technicians in the United States of America (USA)
and in the Mitel European market, which includes the United Kingdom (UK). Because of this
dual support, dual references are made to industry features, standards, and jargon, as
appropriate throughout the document. Terms used in the Mitel European market appear in
brackets [<European equivalent>]. For the purposes of this addendum, British English terms are
assumed to apply to other English-speaking European cultures, as well.
For example, the U.S. telecom industry refers to an audio communication line between a public
switching system and a private switching system as a “central office (CO) trunk.” In the UK, this
same type of line is called a “local exchange trunk.” Applying the dual-reference guideline would
result in the following statements:
• During system installation, the technician connects CO trunks [local exchange trunks] to
the LSM-2 or LSM-4 modules.
• To turn the Diagnostics Mode on or off at an administrator endpoint, the system
administrator enters 9900 [9100 in Europe].
However, this document does not make a similar distinction between American English and
British English spellings of common words. Only American English spellings appear in this
document. For example, the word “analog” is not also spelled “analogue,” inasmuch as the
meaning is clear.
References to “Endpoints”
This document uses the term “endpoint” to describe the devices that the Mitel 5000 family of
products supports over Internet Protocol. In this context, digital and IP phones are endpoints, as
are data modules, fax machines, computer telephony (CT) gateways, Single-Line Adapters
(SLA), IP Single-Line Adapters (IP-SLA), Media Gateway Control Protocol (MGCP)/Session
Initiation Protocol (SIP) gateways, Audio and Web Conferencing (AWC), and answering
machines.
To promote clear communication and understanding, commonly accepted names of endpoints
are used as appropriate. In particular, desktop IP endpoints may also be referred to as IP
phones. Digital endpoints may also referred to as digital phones. Wireless endpoints may also
referred to as wireless phones. And, analog single line endpoints are also referred to as single
line phones or single line sets.
NOTE
In this document and in the Database (DB) Programming application, an endpoint
or phone may also be called a “station” if reference to the endpoint or phone and
its environment are intended. Or, it may be called “device” in the most general
sense.
Mitel ® 5000 Installation Manual – Issue 3.0, October 2008
Page 2-5
Chapter 2: Document Overview
Hazard Identification, Notices, and Notes
Hazard Identification, Notices, and Notes
This manual uses standardized graphic conventions to promote safe practices by technicians
and to prevent damage to equipment and data. Potentially harmful situations are identified
according to the degree of hazard the technician is exposed to. Relevant policies appear in a
boxed format, while important information and notes are set apart from the text with attentiongetting labels. This section explains the conventions used and their meanings.
Hazard Identification Methods
The following hazard identification methods appear in this manual.
• A WARNING
identifies a hazard that, if not heeded, could cause definite personal
injury.
WARNING
Electrical Shock. Disconnect the computer from all power sources before opening the
cover and working inside the chassis. Failure to take this precaution could result in
electrical shock and injury.
• A CAUTION
identifies a hazard that, if not heeded, could cause minor personal injury.
CAUTION
Pinch Hazard. Keep fingers clear of the edges of the faceplate when inserting a trunk
module into the chassis.
• A NOTICE identifies a hazard that, if not heeded, could cause damage to equipment or
corruption of data or databases. Notices also stipulate conditions, requirements, and/or
policies relevant to the topic under discussion.
NOTICE
Equipment Damage Hazard. Only use a single appropriate power adapter. Do not
connect a U.S. power supply and a Universal power supply to the same device. Also,
when using the Universal Power Supply with a barrel connector, no devices (for
example, hubs) should be inserted between the KS/SLA jack on the adapter and the
LAN jack on the endpoint because power is supplied through the cable.
Other Notes
Notes and Important messages provide supplemental information about the topic being
discussed.
• An IMPORTANT message contains information that requires special attention related to
the topic.
IMPORTANT
The chassis must connect firmly to earth ground at the Ground Lug.
• A NOTE conveys supplemental information related to the topic.
NOTE
Page 2-6
Commercially available premoistened towels provide adequate cleaning.
Mitel ® 5000 Installation Manual – Issue 3.0, October 2008
Chapter 3: Product Description
Product Description
Chapter 3: Product Description
Chapter Overview . . . . . . . . . . . . . . . . . . . . . . . . . . . . . . . . . . . . . . . . . . . . . . . . . . . . . . . . . . . . . .3-3
Brief System Descriptions . . . . . . . . . . . . . . . . . . . . . . . . . . . . . . . . . . . . . . . . . . . . . . . . . . . . .3-3
System Evolution . . . . . . . . . . . . . . . . . . . . . . . . . . . . . . . . . . . . . . . . . . . . . . . . . . . . . . . . . . .3-4
System Configurations . . . . . . . . . . . . . . . . . . . . . . . . . . . . . . . . . . . . . . . . . . . . . . . . . . . . . . . . . .3-5
Mitel CS-5200 . . . . . . . . . . . . . . . . . . . . . . . . . . . . . . . . . . . . . . . . . . . . . . . . . . . . . . . . . . . . . .3-5
Mitel CS-5400 . . . . . . . . . . . . . . . . . . . . . . . . . . . . . . . . . . . . . . . . . . . . . . . . . . . . . . . . . . . . . .3-5
Mitel CS-5600 . . . . . . . . . . . . . . . . . . . . . . . . . . . . . . . . . . . . . . . . . . . . . . . . . . . . . . . . . . . . . .3-6
Inter-Tel CS-5200/5400/5600 Base Server . . . . . . . . . . . . . . . . . . . . . . . . . . . . . . . . . . . . . . . . . . .3-7
Base Server Technology . . . . . . . . . . . . . . . . . . . . . . . . . . . . . . . . . . . . . . . . . . . . . . . . . . . . . .3-7
Base Server Interfaces . . . . . . . . . . . . . . . . . . . . . . . . . . . . . . . . . . . . . . . . . . . . . . . . . . . . . . .3-8
Front of the Chassis . . . . . . . . . . . . . . . . . . . . . . . . . . . . . . . . . . . . . . . . . . . . . . . . . . . . . .3-8
Back of the Chassis . . . . . . . . . . . . . . . . . . . . . . . . . . . . . . . . . . . . . . . . . . . . . . . . . . . . . .3-8
Digital Capability . . . . . . . . . . . . . . . . . . . . . . . . . . . . . . . . . . . . . . . . . . . . . . . . . . . . . . . . . . . . . . .3-9
Digital Expansion Interface Unit . . . . . . . . . . . . . . . . . . . . . . . . . . . . . . . . . . . . . . . . . . . . . . . .3-9
Digital Endpoint Module . . . . . . . . . . . . . . . . . . . . . . . . . . . . . . . . . . . . . . . . . . . . . . . . . . . . . .3-9
Single-Line Adapter . . . . . . . . . . . . . . . . . . . . . . . . . . . . . . . . . . . . . . . . . . . . . . . . . . . . . . . .3-10
Data Port Modules . . . . . . . . . . . . . . . . . . . . . . . . . . . . . . . . . . . . . . . . . . . . . . . . . . . . . . . . .3-11
Personal Computer Data Port Module . . . . . . . . . . . . . . . . . . . . . . . . . . . . . . . . . . . . . .3-11
Modem Data Port Module . . . . . . . . . . . . . . . . . . . . . . . . . . . . . . . . . . . . . . . . . . . . . . . .3-11
Administrative Web Session . . . . . . . . . . . . . . . . . . . . . . . . . . . . . . . . . . . . . . . . . . . . . . . . . .3-11
Trunks and Endpoints. . . . . . . . . . . . . . . . . . . . . . . . . . . . . . . . . . . . . . . . . . . . . . . . . . . . . . . . . .3-11
Mitel ® 5000 Installation Manual – Issue 3.0, October 2008
Page 3-1
Chapter 3: Product Description
System Licensing Requirements . . . . . . . . . . . . . . . . . . . . . . . . . . . . . . . . . . . . . . . . . . . . . . . . .3-13
USB Security Key . . . . . . . . . . . . . . . . . . . . . . . . . . . . . . . . . . . . . . . . . . . . . . . . . . . . . . . . . .3-13
Licensing Integrity . . . . . . . . . . . . . . . . . . . . . . . . . . . . . . . . . . . . . . . . . . . . . . . . . . . . . .3-13
USB Security Key for the PS-1 Unit . . . . . . . . . . . . . . . . . . . . . . . . . . . . . . . . . . . . . . . . .3-13
Licensing Options for v3.0 . . . . . . . . . . . . . . . . . . . . . . . . . . . . . . . . . . . . . . . . . . . . . . . .3-14
Upgrading from Mitel CS-5200 to CS-5400 . . . . . . . . . . . . . . . . . . . . . . . . . . . . . . . . . . . . . .3-14
Licensing Scenarios . . . . . . . . . . . . . . . . . . . . . . . . . . . . . . . . . . . . . . . . . . . . . . . . . . . . . . . .3-15
Licensing and Mitel CS-5600 Upgrades . . . . . . . . . . . . . . . . . . . . . . . . . . . . . . . . . . . . . . . . .3-16
Model 8602 IP Softphone . . . . . . . . . . . . . . . . . . . . . . . . . . . . . . . . . . . . . . . . . . . . . . . . . . . .3-16
Basic Voice Mail . . . . . . . . . . . . . . . . . . . . . . . . . . . . . . . . . . . . . . . . . . . . . . . . . . . . . . . . . . .3-16
Endpoint Model-Specific Licensing . . . . . . . . . . . . . . . . . . . . . . . . . . . . . . . . . . . . . . . . . . . . .3-17
IP Gateway Trunk Licensing . . . . . . . . . . . . . . . . . . . . . . . . . . . . . . . . . . . . . . . . . . . . . . . . . .3-18
Software Feature Licensing . . . . . . . . . . . . . . . . . . . . . . . . . . . . . . . . . . . . . . . . . . . . . . . . . .3-18
General . . . . . . . . . . . . . . . . . . . . . . . . . . . . . . . . . . . . . . . . . . . . . . . . . . . . . . . . . . . . . .3-18
Number of Licenses . . . . . . . . . . . . . . . . . . . . . . . . . . . . . . . . . . . . . . . . . . . . . . . . . . . . .3-18
IP Endpoint Licensing . . . . . . . . . . . . . . . . . . . . . . . . . . . . . . . . . . . . . . . . . . . . . . . . . . . . . . .3-18
Endpoint-Specific Licensing . . . . . . . . . . . . . . . . . . . . . . . . . . . . . . . . . . . . . . . . . . . . . . .3-18
Types of IP Endpoints . . . . . . . . . . . . . . . . . . . . . . . . . . . . . . . . . . . . . . . . . . . . . . . . . . .3-19
Endpoint License Activation Process . . . . . . . . . . . . . . . . . . . . . . . . . . . . . . . . . . . . . . . .3-19
Licenses for Mitel 5000 DEI Units . . . . . . . . . . . . . . . . . . . . . . . . . . . . . . . . . . . . . . . . . . . . .3-19
System Alarms for Insufficient Licensing . . . . . . . . . . . . . . . . . . . . . . . . . . . . . . . . . . . . . . . .3-19
IP Resources . . . . . . . . . . . . . . . . . . . . . . . . . . . . . . . . . . . . . . . . . . . . . . . . . . . . . . . . . . . . . . . . .3-20
IP Resources Defined . . . . . . . . . . . . . . . . . . . . . . . . . . . . . . . . . . . . . . . . . . . . . . . . . . . . . . .3-20
Expanded System Capacity . . . . . . . . . . . . . . . . . . . . . . . . . . . . . . . . . . . . . . . . . . . . . . . . . .3-20
Oversubscription . . . . . . . . . . . . . . . . . . . . . . . . . . . . . . . . . . . . . . . . . . . . . . . . . . . . . . . . . . .3-20
IP Device Resource Manager . . . . . . . . . . . . . . . . . . . . . . . . . . . . . . . . . . . . . . . . . . . . . . . . .3-21
Node IP Connection Group . . . . . . . . . . . . . . . . . . . . . . . . . . . . . . . . . . . . . . . . . . . . . . . . . . .3-21
Networking . . . . . . . . . . . . . . . . . . . . . . . . . . . . . . . . . . . . . . . . . . . . . . . . . . . . . . . . . . . . . . . . . . .3-21
Basic Voice Mail. . . . . . . . . . . . . . . . . . . . . . . . . . . . . . . . . . . . . . . . . . . . . . . . . . . . . . . . . . . . . . .3-22
Optional External Messaging Systems . . . . . . . . . . . . . . . . . . . . . . . . . . . . . . . . . . . . . . . . . . . .3-22
Hardware Summary . . . . . . . . . . . . . . . . . . . . . . . . . . . . . . . . . . . . . . . . . . . . . . . . . . . . . . . . . . . .3-22
Features . . . . . . . . . . . . . . . . . . . . . . . . . . . . . . . . . . . . . . . . . . . . . . . . . . . . . . . . . . . . . . . . . . . . .3-22
Page 3-2
Mitel ® 5000 Installation Manual – Issue 3.0, October 2008
Chapter 3: Product Description
Chapter Overview
Chapter Overview
This chapter discusses the Mitel ® 5000 Network Communications Solutions family of products
that provide an enhanced IP solution for small- and medium-sized business environments.
The Mitel 5000 is a family of converged communications platforms that supports Internet
Protocol (IP), digital, and analog single line endpoints. Systems are marketed as the Mitel CS5200, CS-5400, and CS-5600 Communication Servers.
Brief System Descriptions
The Mitel CS-5200 is the basic system. In the default configuration, it comes with 5 IP endpoint
licenses and 3 IP networking resources. With required hardware and licensing, the Mitel CS5200 can support a mix of up to 75 IP endpoints, IP network trunks, and/or IP gateway trunks.
The Mitel CS-5400 is an Mitel CS-5200 with a Processor Expansion Card (PEC-1) and licensing
added to the system. In the default configuration, it comes with 5 IP endpoint licenses and 6 IP
networking resources. With required hardware and licensing, the Mitel CS-5400 can support a
mix of up to 175 IP endpoints, IP network trunks, and/or IP gateway trunks.
The Mitel CS-5600 consists of a Base Server, which is actually an Mitel CS-5400, and a
Processing Server (PS-1) which is a Linux®server that provides call processing power and
communicates with the Base Server across the customer’s local area network (LAN).
With applicable equipment and programming options, trunking, and licensing, the Mitel CS-5200
supports 25–75 IP endpoints and 4, 8, or 16 BVM ports. The CS-5400 supports 110–175 IP
endpoints and 4, 8, or 16 BVM ports. And, the CS-5600 supports 110–250 IP endpoints and 4,
8, 12, or 16 BVM ports.
Optional external voice mail systems such as Enterprise® Messaging (EM) or NuPoint
Messenger can be attached to any of the three systems. In addition, with optional equipment
and programming options, trunking, and licensing the systems support up to 192 digital
endpoints and 54 single line analog endpoints.
Mitel ® 5000 Installation Manual – Issue 3.0, October 2008
Page 3-3
Chapter 3: Product Description
System Evolution
System Evolution
An Inter-Tel 5000 platform running on v2.x provides increased IP endpoint capacity for all its
configurations. This increased capacity is achieved by using a less processing-intensive codec
to allocate IP resources than was used in preceding versions. Starting with v2.0, G.711 became
the default vocoder for Mitel 5000 platforms instead of G.729.
Since the release of v2.0, the Mitel 5000 platforms have supported four single line endpoints
with the Single Line Module (SLM-4), part number 580.2100. Prior to the SLM-4, single line
endpoints were supported on the Mitel 5000 by digital Single-Line Adapters (SLA), IP SLAs, or
the two single line ports built into the Base Server. The built-in single line ports are wired to
connect with two built-in loop start trunk ports, which provides the system with power fail bypass
capability.
In addition, with v2.1 or later, any of the three systems equipped with one or two Digital
Expansion Interface (DEI) chassis can run up to three eight-port Single Line Modules (SLM-8),
part number 580.2101, in each DEI. Applicable licensing is required. Having the same formfactor as the Digital Endpoint Module (DEM-16), the SLM-8 fits in the DEI chassis. For feature
descriptions, installation procedures, and programming instructions, see the appropriate
chapter.
For systems that utilize numerous IP endpoints, IP trunks, and IP networking, v2.0 and later
allows oversubscription of IP resources. With oversubscription, dynamic allocation of IP
resources, and Camp On capability, a system can be programmed with more endpoints than it
has IP resources available to support simultaneously. For oversubscribed systems, the
Resource Reservation Tool allows you to reserve IP resources for essential functions such as
Emergency/911, as well as other customer-specified devices and endpoints.
With v2.1 and later running on the Mitel CS-5600 platform, a separate Processing Server (PS-1)
handles call processing and supports 16-port Basic Voice Mail. The PS-1 controls and
communicates with the Inter-Tel CS-5200/5400/5600 Base Server across the customer’s local
area network (LAN).
NOTE
The Base Server is actually an Mitel CS-5400 that, to avoid confusion hardwarewise, is called a Base Server when it functions as a component of an Mitel
CS-5600 system.
For a list of capacities, see “System Capacities” on page 4-14.
Page 3-4
Mitel ® 5000 Installation Manual – Issue 3.0, October 2008
Chapter 3: Product Description
System Configurations
System Configurations
The Mitel CS-5200, CS-5400, and CS-5600 systems are sold separately as kits that include five
IP endpoint licenses each. Additional IP endpoint licenses are required before more than five IP
endpoints will operate on a system.
Included in the base server, and available to the three systems, are two built-in single line
endpoint circuits, two built-in loop start trunk circuits, and circuitry to support up to 180 trunks
across digital spans. To see a breakout of system trunk capacities by trunk type, see
“Capacities of All-Trunk systems” on page 4-41.
An Inter-Tel 5000 platform running on v2.x provides increased IP endpoint capacity for all its
configurations. This improvement is achieved by using a less processing-intensive codec to
allocate IP resources than was used in previous versions. With v2.0 and later, the system uses
G.711 as the default vocoder instead of G.729. As a result, the Mitel CS-5200, CS-5400, and
CS-5600 systems support up to 75, 175, and 250 IP endpoints, respectively.
Mitel CS-5200
For smaller user environments, the Mitel CS-5200 default configuration includes three IP
networking resources and five IP endpoint licenses. Running v2.x and utilizing the system
oversubscription capability, the Mitel CS-5200 supports a mix of up to 75 IP endpoints, IP
private networking trunks, and/or IP gateway trunks. Required interface hardware and licensing
apply. The CS-5200 provides eight voice channels for Basic Voice Mail and 32 voice channels
for Enterprise Messaging (EM) or NuPoint Messenger.
Mitel CS-5400
Attaching a Processor Expansion Card (PEC-1) to the system’s Processor Module (PM-1) and
adding applicable licensing creates the Mitel CS-5400. The default configuration of the CS-5400
includes six IP networking resources and five IP endpoint licenses. Running v2.x and utilizing
the system oversubscription capability, the Mitel CS-5400 supports a mix of up to 175 IP
endpoints, IP private networking trunks, and/or IP gateway trunks. Required interface hardware
and licensing apply. The CS-5400 provides eight voice channels for Basic Voice Mail and 32
voice channels for Enterprise Messaging (EM) or NuPoint Messenger.
Mitel ® 5000 Installation Manual – Issue 3.0, October 2008
Page 3-5
Chapter 3: Product Description
Mitel CS-5600
Mitel CS-5600
Version 2.0 introduced the Mitel CS-5600 platform, which consists of an Mitel CS-5400
connected to the same local area network (LAN) as a Processing Server (PS-1). For details,
see “Network Environment Requirements” on page 5-148. Running v2.x and utilizing the system
oversubscription capability, the Mitel CS-5600 supports a mix of up to 250 IP endpoints, IP
private networking trunks, and/or IP gateway trunks. Required interface hardware and licensing
apply. The CS-5600 provides 16 voice channels for Basic Voice Mail and 32 voice channels for
Enterprise Messaging (EM) or NuPoint Messenger.
Version 2.1 and later supports the eight-port Single Line Module (SLM-8), part number
580.2101, in addition to the four-port SLM-4 that can be installed in the Inter-Tel CS-5200/5400/
5600 Base Server. Having the same form-factor as the Digital Endpoint Module (DEM-16), the
SLM-8 fits in the Digital Expansion Interface (DEI) chassis. For a feature description, refer to the
Mitel 5000 Features and Programming Guide (580.8006); for the installation procedure see
“Installing an Eight-Port Single Line Module (SLM-8)” on page 5-72; and, for additional
programming instructions, refer to the Mitel 5000 Features and Programming Guide (580.8006).
With v2.1 or later, the CS-5600 Processing Server (PS-1) also supports 16-port Basic Voice
Mail and handles call processing chores for the entire system. It controls and communicates
with the Base Server across the customer’s local area network (LAN). For a feature description,
refer to the basic voice mail information in the Inter-Tel 5000 Features and Programming Guide
(part no. 580.8006).
For systems that utilize numerous IP endpoints, IP trunks, and IP networking, v2.0 and later
allow oversubscription of IP resources. With oversubscription, dynamic allocation of IP
resources, and Camp On capability, a system can be programmed with more endpoints than it
has IP resources available to support simultaneously. For oversubscribed systems, the
Resource Reservation Tool allows you to reserve IP resources for essential functions such as
Emergency/911, as well as other customer-specified devices and endpoints.
With the Mitel CS-5600 platform, a separate Processing Server (PS-1) supports 16 ports of
Basic Voice Mail and handles call processing chores for the entire system. It controls and
communicates with the Base Server across the customer’s local area network (LAN).
NOTE
The Base Server is actually an Mitel CS-5400 that, to avoid confusion hardwarewise, is called a Base Server when it functions as a component of an Mitel
CS-5600 system. For consistency in this document the base server chassis is
called the Inter-Tel CS-5200/5400/5600 Base Server.
For a detailed comparison of system capacities, see “System Capacities” on page 4-14.
Page 3-6
Mitel ® 5000 Installation Manual – Issue 3.0, October 2008
Chapter 3: Product Description
Inter-Tel CS-5200/5400/5600 Base Server
Inter-Tel CS-5200/5400/5600 Base Server
The Inter-Tel CS-5200/5400/5600 Base Server is the foundation of the Mitel 5000 Network
Communications Solutions family of products. This section summarizes the technology of the
base server and identifies system interfaces to network and customer environments.
Base Server Technology
Built on 32-bit architecture and packaged in a 1U chassis, the Inter-Tel CS-5200/5400/5600
Base Server provides a robust IP communication solution. With appropriate licensing, the Mitel
5000 delivers communication assets that include the following services and features:
• Linux® operating system.
• Loop start, T1, T1/Primary Rate Interface (PRI), E1/PRI, Basic Rate Interface [European
market only], and IP gateway (MCGP and SIP) trunk connectivity.
• Messaging, including Basic Voice Mail and Unified Messaging.
• Networking over IP.
• Networking over T1/E1 spans.
• Fax over IP (FoIP)—T.38—Mitel 5000 to Mitel 5000 nodes only.
• Compact flash-type memory card for storing system applications, customer database, and
voice mail messages.
• USB flash drive for backing up voice mail.
• Support for IP, SIP, Multi-Protocol, Wireless IP, Multimedia Touch Screen, Inter-Tel digital,
and analog single line endpoints.
• Programmable Call Processing features for enhanced business productivity.
• Directory Look-Up.
• Hunt Groups.
• Automatic and Uniform Call Distribution.
• Open Architecture Interface (OAI).
• Multilingual Support.
• Music-On-Hold.
• Paging.
• Power Fail Bypass circuitry.
• Wide Area Network (WAN) Fail Survivability.
Basic Voice Mail service is provided with the system, and additional voice mail capacity is
available by installing either the optional Voice Processing Unit or an Enterprise Messaging
system. For details, refer to the Inter-Tel 5000 Features and Programming Guide (part no.
580.8006).
Digital signal processor (DSP) technology enables Conferencing, Dual Tone Multi-Frequency
(DTMF) detection, tone generation, modem operation, and Automatic Number Identification
(ANI), or Caller ID.
Either platform can operate as a stand-alone system or as a node in a network of up to 99 InterTel Axxess or Mitel 5000 nodes. For network connectivity, Inter-Tel Axxess® Converged
Communications Platforms require software v7.0 or later for T1 point-to-point protocol (PPP)
networking. IP networking requires v8.231 or later system software, IP Resources Application
(IPRA) firmware v9.0.0 or later, and applicable licensing.
Mitel ® 5000 Installation Manual – Issue 3.0, October 2008
Page 3-7
Chapter 3: Product Description
Base Server Interfaces
Base Server Interfaces
The Inter-Tel CS-5200/5400/5600 Base Server provides multiple access ports to the features
and functionality of the platform. From the front of the chassis, the technician can set-up the
system and program it if desired, read system alarm messages, backup voice mail messages,
and monitor ongoing system events. From the back of the chassis, the technician can connect
system power, a local area network (LAN), trunks and spans, two single line devices, two loop
start trunks, and an external music source, paging system, and voice mail system.
Front of the Chassis
The front of the Inter-Tel CS-5200/5400/5600 Base Server provides the following interfaces. For
details and illustrations, see “Interfaces on Front of Base Server” on page 4-23.
• One 2-line liquid crystal display (LCD) panel with display message controls and accept/
return button.
• Three Universal Serial Bus (USB) ports, including:
o
Type B port for serial connection to a PC or laptop computer, only for viewing On Line
Monitor output.
o
Type A port that accepts a flash drive for backing up voice mail.
o
Port for USB security key.
• One bay for a Mitel-formatted compact flash-type memory card that stores system
applications, the system database, and voice mail prompts and received messages.
Back of the Chassis
The back of the Inter-Tel CS-5200/5400/5600 Base Server provides the following interfaces. For
details and illustrations, see “Interfaces on Back of Base Server” on page 4-24. For DB
Programming information discussed in this section, refer to the Inter-Tel 5000 Features and
Programming Guide (part no. 580.8006).
• 2 – Loop start trunk circuits in a single port, preprogrammed for connection to the local
telephone company central office (CO) [local exchange] trunks.
• 2 – Single line circuits in a single port, preprogrammed for connecting analog endpoints.
NOTE
Power Fail Bypass: If power to the system is interrupted, an internal
electrical relay automatically connects the two single line circuits with the two
loop start trunks to provide direct connection to CO [local exchange] trunk
dial tone. Under normal operating conditions, the circuits can be programmed
and used the same as any loop start/local exchange trunks or single line
circuits. However, when system power fails, the circuits automatically
connect, regardless of any reprogramming that may have been done.
• 1 – RCA socket for connection of an external paging system.
• 1 – 1/8-inch coaxial stereo socket for connection to a local music source for implementing
Music-On-Hold and/or Background Music.
• 1 – DB-15 socket for connection to an external Voice Processing Unit or Enterprise
Messaging Unit.
• 1 – 100Base-T Ethernet socket on a Processor Module (PM-1).
• 3 – Bays for expansion modules. The expansion module bays can be equipped with any
suitable combination of trunk, span, and single line modules; however, only one SLM-4
can be installed. Connections can be made with loop start [local exchange] trunks or T1,
T1/PRI, or E1/PRI multi-channel spans. Each loop start module (LSM-2 or LSM-4)
provides circuitry for connecting two or four trunks; each T1/E1/PRI module provides
circuitry for connecting one span; and, one SLM-4 module provides circuitry for connecting
four analog single line endpoints. In European market systems, the BRM-S module
provides circuitry for connection of two suitable trunks.
• 1 – Power cord socket.
Page 3-8
Mitel ® 5000 Installation Manual – Issue 3.0, October 2008
Chapter 3: Product Description
Digital Capability
Digital Capability
The addition of the DEI unit to the Mitel 5000 platform allows the installation of digital endpoints.
Customers may install digital or IP endpoints on the Mitel 5000 platform for optimum use of their
communication resources. All call processing functionality on the Mitel 5000 is available to both
digital and IP endpoints.
Digital Expansion Interface Unit
Each Digital Expansion Interface (DEI) unit and its associated hardware and software provides
digital capability. The status of whether a Mitel 5000 platform is Equipped or Not Equipped with
one or two DEIs appears on the Administrative Web Session (AWS).
Digital Endpoint Module
Each Digital Endpoint Module (DEM-16) provides 16 circuits for connecting Executive,
Professional, Standard, and Associate Display endpoints, Axxess and Eclipse Basic Digital
endpoints, Model 8500, 8520, and 8560 endpoints, or Single-Line Adapters (SLA) to the
system.
Each DEM-16 is also equipped with a single Digital Signal Processor (DSP) to provide the
following module and/or system resources:
• Shared speakerphones for Axxess and Eclipse Basic, Standard and Associate Display,
and Models 8500, 8520, and 8560 endpoints. For information about shared
speakerphones, refer to the Inter-Tel 5000 Features and Programming Guide (part no.
580.8006).
• Tone generating circuit for providing system tones (busy, reorder, Do-Not-Disturb, etc.)
to the endpoints connected to the module, if necessary. It is available in case there are no
voice channels available in the system to issue tones.
• Switching matrix to allow access to any available time slot on the module’s PCM highway
(bus). This is provided since the module may need up to 32 simultaneous voice channel
connections.
Mitel ® 5000 Installation Manual – Issue 3.0, October 2008
Page 3-9
Chapter 3: Product Description
Single-Line Adapter
Single-Line Adapter
A Single-Line Adapter (SLA), which can be installed on an available DEM-16 circuit, is used for
connecting two AC-ringing, single line DTMF or pulse-tone sets, playback devices, and/or offpremises extensions.
With a system installed in the United States, an SLA can also be used for connecting two Direct
Inward Dialing (DID) trunks—or, one single line endpoint and one DID trunk. For more
information on using DID trunks, refer to the Inter-Tel 5000 Features and Programming Guide
(part no. 580.8006). SLAs are shipped with both ports set for single line device operation.
Before connecting a DID trunk, be sure to open the unit and set the corresponding port for DID
operation. Also, if necessary, adjust the hybrid balance setting to better accommodate longer
loop lengths. For installation instructions, see the Installation chapter.
AC-ringing off-premises extensions can be connected directly to the SLA circuit. External highvoltage ringing adapter (HVRA) units, power supplies, and ring generators are not needed.
IMPORTANT
SLAs do not support visual Message Waiting applications. If single line sets
with Message Waiting lamps are installed on SLAs, the lamps will not
function. However, single line sets can be configured in DB Programming to
receive audible Message Waiting tones.
Each SLA, whether used for single line sets or DID trunks or both, is powered by its own AC
transformer. Also, SLAs have two self-correcting thermistors. If a short circuit causes a
thermistor to open, it will automatically close when the short is removed.
NOTICE
Possible system degradation. For optimal system performance, do not use SLA circuits for
Voice Mail and Automated Attendant functions. Rather, the Voice Processing PC and
applications software should be used for these purposes.
Page 3-10
Mitel ® 5000 Installation Manual – Issue 3.0, October 2008
Chapter 3: Product Description
Data Port Modules
Data Port Modules
The Personal Computer Data Port Module (PCDPM) and Modem Data Port Module (MDPM)
are connected to appropriate digital endpoints to provide hard-wire paths necessary to connect
Digital Station Select (DSS)/Busy Lamp Field (BLF) units. Contrary to their names, however,
neither device supports serial data.
Personal Computer Data Port Module
The PCDPM can be installed on Standard, Associate, Executive, and Professional Display
endpoints or on Models 8520 or 8560 endpoints to gain Off-Hook Voice Announce (OVHA)
receive capability or to install an optional Modem Data Port Module (MDPM).
The PCDPM supports audio only when used in conjunction with the Mitel 5000
DEI product. In this version of software, the serial port is not functional on the
PCDPM, and it does not transmit data, even though the name of the device
suggests that it does.
NOTE
Modem Data Port Module
The optional Modem Data Port Module (MDPM) can be installed on Standard Display, Executive
Display, Model 8520, or Model 8560 endpoints for attaching a modem-equipped data device or
a single line endpoint. The MDPM requires a PCDPM.
The Model 8416 Mini-DSS connects to Model 8520 or Model 8560 digital endpoints without
PCDPM and MDPM devices. The only programming required for the Mini-DSS is a keymap,
which is explained in detail in the Inter-Tel 5000 Features and Programming Guide (part no.
580.8006).
Administrative Web Session
The Administrative Web Session (AWS) shows whether a Mitel 5000 system is equipped with
DEIs and whether DEM-16 ports are enabled.
Mitel CS-5600 systems provide two AWS interfaces—one for the Base Server and the other for
the Processing Server (PS-1).
Trunks and Endpoints
The Mitel 5000 platform supports the following trunks, spans, gateways, and endpoints:
• Central Office (CO) [Local Exchange] Trunks: Up to 12 loop start [local exchange]
trunks can be installed in increments of four trunks per LSM-4 module. In addition, two
loop start trunks can be installed in the RJ-14 port built in on the Inter-Tel 5000 Base
Server.
• Spans: Up to six T1, T1/PRI, or E1/PRI spans can be installed in the Inter-Tel CS-5200/
5400/5600 Base Server.
o T1: In Database (DB) Programming each of the 24 channels of a channelized T1 span
can be enabled as any of the following types of channels or circuits:
–
–
–
–
–
Loop Start
Ground Start
DID (Direct Inward Dial)/[in Europe, DDI (Direct Dial Inward)]
E&M (Ear and Mouth/2-way)
OPX (Off Premises Extension)
Mitel ® 5000 Installation Manual – Issue 3.0, October 2008
Page 3-11
Chapter 3: Product Description
Trunks and Endpoints
o
T1/PRI: A T1/PRI span provides 23 information-bearing (B) channels and one data (D)
channel for signaling and control.
o
E1/PRI: An E1/PRI span provides 30 B channels and one D channel.
• IP Devices: The Mitel 5000 platform supports IP endpoints, digital endpoints, and IP
Single-Line Adapter (IP-SLA) devices. The Internet Protocol Resource Application (IPRA)
supplies IP functionality for the system and communicates to the endpoints and gateways
across 100Base-T Ethernet. The IPRA supports the Model 8601 Pocket PC SIP
softphone, which is described in the following paragraph, but does not support Inter-Tel
legacy IP SoftPhones. See page 7-8 for specific endpoint models.
• Model 8602 Softphone Application: Model 8602 application software is distributed
separately from the system software. Performance and interoperability is equivalent to
hard IP endpoints. For details, refer to the Model 8602 User Guide, part number 835.3019.
• Pocket PC SoftPhone: Model 8601 is a SIP softphone that runs on selected Pocket PC
2002 (or later) Personal Digital Assistant (PDA) platforms. For information about
installation and programming, refer to the Model 8601 Installation Manual, part number
835.2737.
• IP Gateway Trunks: The Mitel 5000 platform supports Media Gateway Control Protocol
(MGCP) and Session Initiation Protocol (SIP) gateway trunks.
• Multi-Protocol Endpoints: A multi-protocol endpoint operates either in Inter-Tel
Proprietary (ITP) protocol mode or in SIP mode. A SIP server is required for SIP mode
operation. Multi-protocol endpoints include Models 8600, 8620, 8622, 8662, and 8690.
Multi-protocol endpoints require software licenses.
• Mini-DSS: The Mitel 5000 platform supports a Mini-DSS Unit that provides one-button
access to 16 extension numbers and/or feature buttons/resources. For details, see “Model
8416 Mini-Direct Station Select (Mini-DSS) Unit” on page 4-51.
• Direct Station Select (DSS)/Busy Lamp Field (BLF): The Inter-Tel 5000 platform
supports two 60-button DSS/BLF Units and one 50-button model. For details, see “Direct
Station Select/Busy Lamp Field Units” on page 4-50.
• Wireless Endpoints: Models 8664, 8665, and 8668 are wireless, compact IP phones that
operate in the ITP mode. For details, refer to the NetLink SVP Server and Model 8664/
8665/8668 Installation Manual, part number 935.4521, and/or to the Model 8664/8665/
8668 User Guide, part number 935.4522.online
NOTE
Mitel recommends provisioning each system with a display endpoint to allow
an administrator to program selected system data, act as the Attendant for
unsupervised CO recalls, receive system alarm messages, etc.
• Single Line Endpoints: In addition to the two circuits manufactured into the Inter-Tel CS5200/5400/5600 Base Server, single line endpoints can be installed with IP-SLA devices,
Single-Line Adapters, and four-port and eight-port Single Line Modules (SLM-4s and -8s).
Page 3-12
Mitel ® 5000 Installation Manual – Issue 3.0, October 2008
Chapter 3: Product Description
System Licensing Requirements
System Licensing Requirements
Software licensing controls device capacity and feature availability on the Mitel 5000 platform.
Licensing is associated with a system by means of a security key that inserts into a recessed
USB slot located on the front of the unit chassis.
Mitel 5000 platforms are delivered without software licensing. Licenses are generated and
downloaded from the Applications Management Center (AMC). By default, unlicensed Mitel
5000 platforms can be programmed with the capabilities of fully provisioned systems. However,
if the applicable licenses are not provided and authenticated within four hours, the system
invokes a reset.
If the system does not have a software license, Alarm 125 is sent to the LCD panel on the unit
chassis and to the administrator endpoint. This alarm is generated every 5 minutes, and the
system resets every 4 hours until the license issue is resolved. For detailed information about
system alarms, refer to the Message Print Diagnostics Manual, part number 550.8018.
If DB Programming connects to a system with a valid software license, you cannot restore a
database that would invalidate the license. If you need to change the product type, you must
first load a new software license through DB Programming. For details, refer to the Inter-Tel
5000 Features and Programming Guide (part no. 580.8006).
USB Security Key
The USB security key uniquely identifies a system by storing a Mitel Master License. Only the
specific software license that has been digitally signed with the Master License data is allowed
to control the system. The key stores the essential components of the software licensing
scheme.
Licensing Integrity
The security key also ensures licensing integrity. When a system detects removal of its key, the
system disables audio for subsequent calls. When the audio is disabled, the system posts
applicable alarms to the LCD panel on the front of the unit chassis and to the LCD on the
administrator endpoint. Alarm #122 indicates that the key is missing, while Alarm #125 identifies
the number of minutes before the system initiates a reset.
When the key is replaced and the correct serial number is detected by the system, the audio is
enabled and the reset countdown is aborted.
If the system powers up without the USB security key in place, the user must reload the
software license through DB Programming.
USB Security Key for the PS-1 Unit
The Mitel CS-5600 requires that a USB security key reside in the PS-1 unit. However, the Base
Server does not need a USB security key. The administrator must upload the appropriate
software license to the PS-1. For procedural details about uploading a license, refer to the InterTel 5000 Features and Programming Guide (part no. 580.8006).
Mitel ® 5000 Installation Manual – Issue 3.0, October 2008
Page 3-13
Chapter 3: Product Description
Licensing Options for v3.0
Licensing Options for v3.0
NOTES
If you are using Mitel endpoints, you must have a Category D (purchased) license
for each Mitel endpoint that is added to the system.
If you are using Enterprise Messaging, you must have a fax license to detect faxtone and to send, receive, and listen to faxes.
For systems running Mitel 5000 v2.4 software, v3.0 is a chargeable upgrade. However, while no
charge applies to upgrading from v2.x to v2.4, systems running v1.2 must first upgrade to v2.0,
which is a chargeable license.
The Mitel 5000 uses one unique Category D license for each of the Models 5212/5224 and
5330/5340 endpoints, which is a chargeable license. Licensing requirements have not changed
for other supported endpoints.
For details and part numbers, refer to “Parts and Part Numbers” on page 7-3 or contact your
provider for more information.
Upgrading from Mitel CS-5200 to CS-5400
Additional licences and the installation of a Processor Expansion Card (PEC-1) transforms an
Mitel CS-5200 platform into an Mitel CS-5400. To complete the upgrade, the following
applicable licences are required:
• “Upgrade from Mitel CS-5200 to Mitel CS-5400 Base,” part number 840.0240.
• If the Mitel CS-5200 system is already licensed with “CS-5200 IP Networking,” part
number 840.0224, then “CS-5400 IP Networking Upgrade,” part number 840.0223, is also
required.
For complete instructional details, see “Installing a Processor Expansion Card (PEC-1)” on
page 5-43.
Page 3-14
Mitel ® 5000 Installation Manual – Issue 3.0, October 2008
Chapter 3: Product Description
Licensing Scenarios
Licensing Scenarios
The following three scenarios cover hardware and licensing changes associated with upgrading
to a Mitel 5000 system running v2.1 or later:
• Software Upgrade: A customer owns or leases a Mitel CS-5200, CS-5400, or CS-5600
system running on an Mitel 5000 v1.x or v2.0 license. Customers upgrading from v1.x to
v2.1 require a v1.x to v2.0 Upgrade license, part number 840.0623 and a v2.0 to v2.1
Upgrade license, part number 840.0725. In this scenario, the customer also requires a
new v2.1 license for the CS-5200/CS-5400 system, part number 840.0724.
• System Upgrade: A customer owns or leases a Mitel CS-5200, CS-5400, or CS-5600
system and plans on upgrading to a Mitel CS-5600. The customer must purchase the
following items to complete the upgrade:
o
1 – Mitel CS-5600 Processing Server (PS-1) chassis, part number 580.5600.
o
If upgrading from a Mitel CS-5200 system, a Processor Expansion Card (PEC-1), part
number 580.2020, must be installed on the Processor Module (PM-1), part number
580.2200, to create a Mitel CS-5400, or Mitel CS-5600 Base Server. For complete
instructions, see “Upgrading System Software to Version 3.0” on page 5-148.
o
If upgrading from a Mitel CS-5400 system, a new security key is not necessary—
simply move the existing security key from the Mitel CS-5400 system to the PS-1.
o
A v1.x to v2.0 license, part number 840.0623, for the PS-1 and the same Mitel serial
number as the in-place Mitel CS-5400 system.
o A v2.0 Upgrade license, part number 840.0623, for the CS-5600 system type and the
same Mitel serial number as the in-place Mitel CS-5400 system.
o A v2.1 Upgrade license, part number 840.0725, for the CS-5600 system type and the
same Mitel serial number as the in-place Mitel CS-5400 system.
• New Purchase: A customer buys a new Mitel CS-5200, CS-5400 or CS-5600 in a kit that
includes the v2.1 license, part number 840.0724. If buying a new Mitel CS-5600, the
customer receives the Base Server and PS-1 hardware, a single USB security key for the
PS-1, and the Mitel CS-5600 CPU license. For applicable part numbers, see “Parts and
Part Numbers” on page 7-3.
Mitel ® 5000 Installation Manual – Issue 3.0, October 2008
Page 3-15
Chapter 3: Product Description
Licensing and Mitel CS-5600 Upgrades
Licensing and Mitel CS-5600 Upgrades
The existing Mitel 5000 licensing plan does not change with the product going from v1.2 to v2.x.
However, to use v2.x features, customers must purchase a new software license or an upgrade
license.
The following three scenarios cover hardware and licensing changes associated with upgrading
to a Mitel CS-5600 system running v2.0 or later:
• Software Upgrade: A customer owns or leases a Mitel CS-5200 or CS-5400 system,
which implies the system is running on an Mitel 5000 1.x license. Any customers
upgrading to v3.0 must purchase a v2.x to v3.0 license, part number 840.0816. In this
scenario, the customer also needs to purchase a new license for the CS-5200/CS-5400
system, part number 840.6022.
• System Upgrade: A customer owns or leases a Mitel CS-5200 or CS-5400 system and
plans on upgrading to a Mitel CS-5600. The customer must purchase the following items
to complete the upgrade:
o
1 – Mitel CS-5600 Processing Server (PS-1) chassis, part number 580.5600.
o
If upgrading from a Mitel CS-5200 system, a Processor Expansion Card (PEC-1), part
number 580.2020, must be installed on the Processor Module (PM-1), part number
580.2200, to create a Mitel CS-5400, or Mitel CS-5600 Base Server. For complete
instructions, see “Upgrading System Software to Version 3.0” on page 5-148.
o
If upgrading from a Mitel CS-5400 system, a new security key is not necessary—
simply move the existing security key from the Mitel CS-5400 system to the PS-1.
o
A v1.x to v2.0 license, part number 840.0623, for the PS-1 and the same Mitel serial
number as the in-place Mitel CS-5400 system.
o
A v2.x to v3.0 license, part number 840.0816, for the CS-5600 system type and the
same Mitel serial number as the in-place Mitel CS-5400 system.
• New Purchase: A customer purchases a new Mitel CS-5200, CS-5400 or CS-5600. The
customer purchases the v3.0 license, part number 840.0815. If acquiring a Mitel CS-5600,
the customer must purchase the Base Server and PS-1 hardware, a single USB security
key for the PS-1, and the Mitel CS-5600 CPU license. For applicable part numbers, see
Table 7-5 on page 7-4.
Model 8602 IP Softphone
One license is required for each Mitel Model 8602 IP softphone. Each concurrent Model 8602
requires a license.
An Enable IP Endpoint license may be required for some configurations that enable digital
capability. For details, contact your authorized Mitel service provider. For licensing part
numbers, see Table 7-7 on page 7-5.
Basic Voice Mail
Each Basic Voice Mail port is licensed, including the first four. Four BVM port licenses are
included. Additional 4-port licenses must be purchased in order to use additional BVM ports.
Page 3-16
Mitel ® 5000 Installation Manual – Issue 3.0, October 2008
Chapter 3: Product Description
Endpoint Model-Specific Licensing
Endpoint Model-Specific Licensing
All IP endpoints are licensed in accordance with three licensing categories. Table 3-1
summarizes the categories and the endpoints requiring a license in each category.
Table 3-1. Endpoint License Categories
License Category
Category A
Previously licensed as
Advanced IP Endpoints
Endpoints Covered
Multi-protocol endpoints:
• Model 8600, without display, in Inter-Tel Protocol
(ITP) mode
• Model 8622, 2-line display
(and discontinued Model 8620), in ITP mode
• Model 8662, 6-line display, in ITP mode
• Model 8690 in ITP mode
Non-Mitel endpoint:
OAISYS Net Phone, which emulates a Model
8662 in ITP mode
Category B
Model 8602 IP softphone
Category C
Multi-protocol endpoints:
• Model 8600, without display, in SIP mode
• Model 8622, 2-line display
(and discontinued Model 8620), in SIP mode
• Model 8662, 6-line display, in SIP mode
• Model 8690 in SIP mode
NOTE
Endpoints that operate in SIP mode also
require SIP Server licenses.
Endpoints that did not require an individual license in
previous versions:
• Models 8524, 8525, and 8526 wireless digital
endpoints
• Models 8664, 8665, and 8668 wireless IP
endpoints
• Model 8660, 6-line display, ITP mode only
• IP PhonePlus
• IP Single-Line Adapter (IP SLA)
SIP endpoints:
Model 8601 SoftPhone for Pocket PC (Operates
in SIP mode only)
Other:
• Audio and Web Conferencing (AWC) port
• Cisco® 7960 SIP Phone
Category D
Mitel IP Endpoints:
Models 5212, 5224, 5330, 5340
Mitel ® 5000 Installation Manual – Issue 3.0, October 2008
Page 3-17
Chapter 3: Product Description
IP Gateway Trunk Licensing
IP Gateway Trunk Licensing
The Mitel 5000 platform requires “IP Gateway Trunk License,” part number 840.0234, for the
use of the following two types of IP gateway trunks. One license is required for each trunk to be
used.
• Media Gateway Control Protocol (MGCP)
• Session Initiation Protocol (SIP)
Software Feature Licensing
Software features, which customers can purchase to enhance their systems, are controlled by
licensing through the Application Management Center (AMC). This section discusses the
process used for licensing software features and the storage of multiple licenses on a system.
General
Because features are controlled through licensing, the system database cannot be restored with
software features that have not been licensed by Mitel. If an attempt is made to Restore a
database that has more software features than the license reflects, a warning message is
displayed before the Restore command is executed. When this message displays, the Restore
action must be cancelled. For details, refer to the Inter-Tel 5000 Features and Programming
Guide (part no. 580.8006).
Because the software license determines the features that can be enabled, changes cannot be
made directly in DB Programming. The process to add software features involves purchasing
the license, building the licence from the LMC, generating the license, downloading it to the field
PC, and installing it in the system from the PC through DB Programming. For complete
procedural instructions, refer to the Inter-Tel 5000 Features and Programming Guide (part no.
580.8006).
Number of Licenses
The system stores up to five different licenses, each of which is unique based on the system
version. For example, only one v1.0 software license can be stored on the Processor Module. If
a new license that matches the version number of an existing license is loaded, the new license
automatically overwrites the existing license.
In addition, if five licenses are currently stored and a sixth license is saved, the oldest license,
based on the date and time the license was created, is overwritten. If, however, the oldest
license is currently in use, the next oldest license is overwritten. In addition, because each
license is unique, only one license for each version number can be stored at any time.
IP Endpoint Licensing
This section identifies the types of IP endpoints that the Mitel 5000 platform supports and the
process used for activation of licensed endpoints.
Endpoint-Specific Licensing
The Mitel 5000 platform supports a three-tier licensing plan for IP endpoints. Category A
licensing primarily allows use of Mitel Advanced IP endpoints. Category B licensing allows use
of the Mitel Model 8602 IP softphone. Category C licensing primarily allows use of legacy InterTel IP endpoints. Category D licensing allows use of the Mitel 5212, 5224, 5330, and 5340 IP
endpoints. For details, see Table 3-1 on page 3-17.
Page 3-18
Mitel ® 5000 Installation Manual – Issue 3.0, October 2008
Chapter 3: Product Description
Types of IP Endpoints
Types of IP Endpoints
The following list identifies the types of IP endpoints that operate on the Mitel 5000 platform. For
specifications and illustrations of the endpoints, see “Endpoints” on page 4-42.
• Multi-protocol (IP and SIP), including Model 8600 without display and Models 8620/ 8622,
and 8662 with display. Also includes Mitel 5212, 5224, 5330, and 5340
• Multi-protocol with touch-screen display, the Model 8690
• IP mode only, including Model 8660, wireless Models 8664, 8665, and 8668, Axxess IP
PhonePlus, and Eclipse IP PhonePlus
• SIP mode only, Model 8601 Pocket PC SoftPhone
• IP Single-Line Adapter
Endpoint License Activation Process
Only the multi-protocol IP endpoints require a license to operate on the Mitel 5000 platform.
Although you can program IP endpoints into the database without having an adequate number
of licenses, the system allows only the number of endpoints to come online for which licenses
exist. The system assigns licenses to endpoints on a first-come, first-served basis. However,
once the available licenses have been assigned, the system prevents additional IP endpoints
from coming online. As additional IP endpoint licenses are loaded into software, the system
brings programmed but unactivated endpoints online. For detailed information about setting-up
IP endpoints for service, see the Installation chapter, and refer to the Programming chapter in
the Inter-Tel 5000 Features and Programming Guide (part no. 580.8006).
When IP endpoints fail to come online, the Message Print log identifies the excluded endpoint
extensions. At the same time, Alarm #127—Unlicensed IP device failed to come online—
appears on the unit chassis LCD panel and on the administrator endpoint display(s). For details,
refer to the Message Print Diagnostic Manual, part number 550.8018.
Licenses for Mitel 5000 DEI Units
Any of the three Mitel 5000 platforms supports up to four DEI units, and each unit supports up to
48 digital endpoints.
One license is required for each DEI to come online, meaning that two different licenses are
required for operation of a fully expanded Mitel 5000 system.
Because the DEI units are identical, the distinction between them is determined by the cabling
order and selection in DB Programming. The unit that is cabled directly to the Inter-Tel 5000
Base Server is the first unit, and the unit that is cabled to the first DEI unit is the second unit,
and so on.
In some purchase configurations that enable digital capability, an Enable IP Endpoint license
may be required. For details, contact your authorized Mitel vendor. For licensing part numbers,
see Table 7-7 on page 7-5.
System Alarms for Insufficient Licensing
Attempts to activate an unlicensed DEI unit will trigger Alarm 130, and the unit will not come
online. Likewise, attempting to use IP endpoints programmed in DB Programming without
having appropriate IP endpoint licenses will trigger Alarm 127, and the endpoint will not come
online. Mitel recommends purchasing the appropriate IP endpoint license for each IP endpoint
installed on the system. For details, refer to the Inter-Tel 5000 Features and Programming
Guide (part no. 580.8006).
Mitel ® 5000 Installation Manual – Issue 3.0, October 2008
Page 3-19
Chapter 3: Product Description
IP Resources
IP Resources
On an Mitel 5000 platform, IP resources are required for the following communication devices
and services:
• IP endpoints
• IP network connections
• Faxing between Mitel 5000 nodes through Mitel private networking over IP
IP resources are dynamically allocated where needed, which allows oversubscription. However,
resources can be reserved if necessary. For details, see Oversubscription, below.
IP Resources Defined
An Internet Protocol (IP) resource is a quantity of processing power that digital signal
processors (DSPs) on the system use for call processing functions. In terms of processing
power consumed, the “cost” of a DSP function varies, depending on whether the DSP resides
on the Processor Module (PM-1) or on the Processor Expansion Card (PEC-1) in the Base
Server. IP resources are used for DSP processing of speech vocoder and Caller ID functions.
Expanded System Capacity
To achieve greater system capacity, a new installation of v2.0 or later uses G.711 as the default
vocoder instead of G.729, which is used in v1.x software. Upgraded systems retain their
previous configurations.
Mitel recommends that you re-evaluate the use of vocoders in call configurations after
upgrading a customer’s system to v2.0 or later. To improve voice quality and expand capacity,
you should use G.711 for internal IP endpoints and G.729 for external IP endpoints.
Oversubscription
Oversubscription allows you to program more endpoints than there are IP resources available
on the Mitel 5000 platform. This capability is useful for systems that support numerous IP
endpoints and IP trunks and that utilize IP networking. The ability to oversubscribe results from
the following interrelated factors in a Mitel 5000 v2.0 or later platform:
• IP resources are required only for call-related activities, which allows the unreserved
resources to be pooled and shared for general use.
• IP resources are not reserved when an IP endpoint comes online, as was the case with
earlier Mitel 5000 software versions. Dynamic allocation of IP resources is the only
method available for allocation. You can no longer allocate IP resources statically in DB
Programming. However, in oversubscribed systems, you can use the Resource
Reservation tool to dedicate resources for specific IP devices. For details, refer to the
Inter-Tel 5000 Features and Programming Guide (part no. 580.8006).
• The Resource Reservation tool allows you to reserve, or allocate, IP resources for only the
highest priority requirements. By default, IP resources are reserved for Emergency/911
access. However, in some configurations, additional resources may be required to
accommodate IP gateways and/or IP trunks in order to reach an Emergency/911 operator.
Otherwise, a customer may want to reserve a limited number of IP resources for additional
high-priority functions such as IP networking or BVM. In the more effective scenarios,
however, the majority of IP resources would be kept available to be shared as needed. For
programming details, refer to the Inter-Tel 5000 Features and Programming Guide (part
no. 580.8006).
Page 3-20
Mitel ® 5000 Installation Manual – Issue 3.0, October 2008
Chapter 3: Product Description
IP Device Resource Manager
Together, the preceding factors allow you to configure more IP endpoints than the number of IP
resources available in a system. If all IP resources are in use, subsequent demands for IP
resources are placed in a Camp On state until IP resources become available.
Depending on the configuration of reserved IP resources, a few scenarios may produce an
unavailable IP resource condition. When system configuration results in an unavailable
resource, a warning appears on display endpoints, and the user hears a beep every 5 seconds.
To review the scenarios that may generate an unavailable IP resource error, refer to the InterTel 5000 Features and Programming Guide (part no. 580.8006).
NOTE
To effectively oversubscribe an IP-dominant system, the Resource Reservation
feature must be used sparingly to avoid depleting the system pool of available IP
resources. For programming details, refer to the Inter-Tel 5000 Features and
Programming Guide (part no. 580.8006).
IP Device Resource Manager
The IP Device Resource Manager maintains all IP resource requests in the system along with
all allocated IP resources in the system. It provides useful diagnostic data to determine what
types of calls are going on in the system and how long calls have been both camped-on or on
an active call. For details, refer to the Inter-Tel 5000 Features and Programming Guide (part no.
580.8006).
Node IP Connection Group
The Node IP Connection Group corresponds to an IP network connection between a remote
node and the local node.
Networking
Two or more Mitel advanced communication platforms can be connected with T1/E1/PRI
network spans to form a network. To the user, the network appears as one integrated system.
With few exceptions, the user can perform all of the functions across the network that can be
performed within a single system, or node. For networking specifications and details, see
Private Networking.
In a Mitel IP private network environment, IP endpoints can be programmed to traverse, or
bypass, the Network Address Translation (NAT) tables. A Mitel 5000 platform may be placed
behind the firewall using a static NAT assignment.
For details about networking options, see Network IP Topology. For procedural instructions to
implement near-end NAT traversal for IP endpoints, refer to the Inter-Tel 5000 Features and
Programming Guide (part no. 580.8006) and “Configuring Near-End NAT Traversal for IP
Endpoints” on page B-13.
Mitel ® 5000 Installation Manual – Issue 3.0, October 2008
Page 3-21
Chapter 3: Product Description
Basic Voice Mail
Basic Voice Mail
With applicable licensing, Basic Voice Mail (BVM) provides four, eight, or 16 ports of voice
messaging on the Mitel CS-5200 and CS-5400 platforms and up to 16 ports on the CS-5600.
For comprehensive details about BVM, refer to the Inter-Tel 5000 Features and Programming
Guide (part no. 580.8006).
Optional External Messaging Systems
Beginning with the v3.0 release, the Voice Processing Unit (VPU) is not supported on the Mitel
5000 system.
For increased capacity and additional functionality, you can replace BVM with a NuPoint
Messenger or an Enterprise Messaging (EM) system. NuPoint Messenger and EM systems can
be installed on any or all nodes in the network.
EM and NuPoint Messenger are optional, external systems that unify communication and
messaging by providing access to voice mail, fax, and e-mail messages in the user’s mailbox.
In addition, EM provides automatic speech recognition (ASR) capabilities and built-in UM
features. EM runs on the Windows Server® 2003 operating system. For more detailed
information, refer to the Enterprise® Messaging Installation and Maintenance Manual, part
number 780.8006 and the NuPoint Messenger documentation located on the Mitel eDocs Web
site (edocs.mitel.com).
Both the EM and NuPoint Messenger systems allow a caller to leave (on a local system) a
message addressed to a mailbox located on a different system in the network. NuPoint
Messenger and EM each has its own internal message queue, similar to a mailbox message
queue, and stores messages until they can be delivered.
NOTE
The optional Mitel Messaging IP Networking software license is required to use
Voice Processing Nodes. Refer to the Inter-Tel 5000 Features and Programming
Guide (part no. 580.8006).
Hardware Summary
The Specifications chapter identifies preinstallation requirements and environmental parameters
for optimal system performance and defines hardware and software specifications. The scope
of the chapter includes specifications of the chassis, the compact flash-type memory card,
expansion modules, endpoints, and interfaces for peripheral equipment.
Features
Mitel features support the customer’s communication goals with a combination of leading-edge
technology and reliable software performance. In each of its three systems, the Mitel 5000
platform delivers reliable and innovative call processing and communication options. Whether
dialing an intercom number or forwarding a voice mail message to an e-mail address, Mitel
features provide a dependable solution.
The Mitel 5000 provides software wizards to streamline and simplify configuration, networking,
and installation processes. Built on a stable base of system control, trunking, and networking
features, the Mitel 5000 platform maintains performance with a variety of diagnostic features.
Hunt group applications, Attendant and Administrator features, and numerous endpoint features
for the end-user combine to create a satisfying user experience.
For comprehensive descriptions and feature operating instructions, see the Specifications
chapter, and refer to the Inter-Tel 5000 Features and Programming Guide (part no. 580.8006).
Page 3-22
Mitel ® 5000 Installation Manual – Issue 3.0, October 2008
Chapter 4: Specifications
Specifications
Chapter 4: Specifications
Chapter Overview . . . . . . . . . . . . . . . . . . . . . . . . . . . . . . . . . . . . . . . . . . . . . . . . . . . . . . . . . . . . . .4-4
Environmental Requirements . . . . . . . . . . . . . . . . . . . . . . . . . . . . . . . . . . . . . . . . . . . . . . . . . . . . .4-4
Programming Computer Requirements . . . . . . . . . . . . . . . . . . . . . . . . . . . . . . . . . . . . . . . . . . . .4-5
Windows XP . . . . . . . . . . . . . . . . . . . . . . . . . . . . . . . . . . . . . . . . . . . . . . . . . . . . . . . . . . . . . . .4-5
Windows Vista . . . . . . . . . . . . . . . . . . . . . . . . . . . . . . . . . . . . . . . . . . . . . . . . . . . . . . . . . . . . .4-5
Software Version Compatibility . . . . . . . . . . . . . . . . . . . . . . . . . . . . . . . . . . . . . . . . . . . . . . . . . . .4-6
System-Wide Specifications. . . . . . . . . . . . . . . . . . . . . . . . . . . . . . . . . . . . . . . . . . . . . . . . . . . . . .4-6
Loop Limits . . . . . . . . . . . . . . . . . . . . . . . . . . . . . . . . . . . . . . . . . . . . . . . . . . . . . . . . . . . . . . . .4-6
Power Supply . . . . . . . . . . . . . . . . . . . . . . . . . . . . . . . . . . . . . . . . . . . . . . . . . . . . . . . . . . . . . .4-7
Surge/Spike Protection . . . . . . . . . . . . . . . . . . . . . . . . . . . . . . . . . . . . . . . . . . . . . . . . . . . . . . .4-7
Uninterruptible Power Supply (UPS) Connections . . . . . . . . . . . . . . . . . . . . . . . . . . . . . . . . . .4-8
UPS Monitoring . . . . . . . . . . . . . . . . . . . . . . . . . . . . . . . . . . . . . . . . . . . . . . . . . . . . . . . . . . . . .4-9
Compatible UPS Units . . . . . . . . . . . . . . . . . . . . . . . . . . . . . . . . . . . . . . . . . . . . . . . . . . . .4-9
Compatible USB Hubs . . . . . . . . . . . . . . . . . . . . . . . . . . . . . . . . . . . . . . . . . . . . . . . . . . . .4-9
Software Specifications . . . . . . . . . . . . . . . . . . . . . . . . . . . . . . . . . . . . . . . . . . . . . . . . . .4-11
Main Distribution Frame (MDF) and Cabling . . . . . . . . . . . . . . . . . . . . . . . . . . . . . . . . . . . . .4-11
Cabling to Endpoints . . . . . . . . . . . . . . . . . . . . . . . . . . . . . . . . . . . . . . . . . . . . . . . . . . . .4-12
Connections to the Public Network . . . . . . . . . . . . . . . . . . . . . . . . . . . . . . . . . . . . . . . . .4-13
Capacities. . . . . . . . . . . . . . . . . . . . . . . . . . . . . . . . . . . . . . . . . . . . . . . . . . . . . . . . . . . . . . . . . . . .4-13
System Capacities . . . . . . . . . . . . . . . . . . . . . . . . . . . . . . . . . . . . . . . . . . . . . . . . . . . . . . . . .4-14
Licensing Capacities . . . . . . . . . . . . . . . . . . . . . . . . . . . . . . . . . . . . . . . . . . . . . . . . . . . . . . . .4-17
Voice Message Storage Capacity . . . . . . . . . . . . . . . . . . . . . . . . . . . . . . . . . . . . . . . . . . . . . .4-18
System Endpoint Capacities . . . . . . . . . . . . . . . . . . . . . . . . . . . . . . . . . . . . . . . . . . . . . . . . . .4-19
Base Server . . . . . . . . . . . . . . . . . . . . . . . . . . . . . . . . . . . . . . . . . . . . . . . . . . . . . . . . . . . . . . . . . .4-20
Chassis Description . . . . . . . . . . . . . . . . . . . . . . . . . . . . . . . . . . . . . . . . . . . . . . . . . . . . . . . .4-20
Motherboard elements . . . . . . . . . . . . . . . . . . . . . . . . . . . . . . . . . . . . . . . . . . . . . . . . . . . . . .4-21
Processor Module with Processor Expansion Card . . . . . . . . . . . . . . . . . . . . . . . . . . . . . . . .4-22
Interfaces on Front of Base Server . . . . . . . . . . . . . . . . . . . . . . . . . . . . . . . . . . . . . . . . . . . . .4-23
Interfaces on Back of Base Server . . . . . . . . . . . . . . . . . . . . . . . . . . . . . . . . . . . . . . . . . . . . .4-24
USB Flash Drives. . . . . . . . . . . . . . . . . . . . . . . . . . . . . . . . . . . . . . . . . . . . . . . . . . . . . . . . . . . . . .4-25
Base Server Expansion Modules . . . . . . . . . . . . . . . . . . . . . . . . . . . . . . . . . . . . . . . . . . . . . . . . .4-26
Single and Dual T1/E1/PRI Modules . . . . . . . . . . . . . . . . . . . . . . . . . . . . . . . . . . . . . . . . . . .4-26
Special T1/E1 Cabling Requirements . . . . . . . . . . . . . . . . . . . . . . . . . . . . . . . . . . . . . . .4-29
T1M or T1M-2 Modules used for Private Networking . . . . . . . . . . . . . . . . . . . . . . . . . . .4-29
Two-Port Loop Start Module . . . . . . . . . . . . . . . . . . . . . . . . . . . . . . . . . . . . . . . . . . . . . . . . . .4-30
Four-Port Loop Start Module . . . . . . . . . . . . . . . . . . . . . . . . . . . . . . . . . . . . . . . . . . . . . . . . .4-31
Basic Rate Module . . . . . . . . . . . . . . . . . . . . . . . . . . . . . . . . . . . . . . . . . . . . . . . . . . . . . . . . .4-31
Four-Port Single Line Module Characteristics . . . . . . . . . . . . . . . . . . . . . . . . . . . . . . . . . . . .4-31
Mitel ® 5000 Installation Manual – Issue 3.0, October 2008
Page 4-1
Chapter 4: Specifications
Processing Server (PS-1) . . . . . . . . . . . . . . . . . . . . . . . . . . . . . . . . . . . . . . . . . . . . . . . . . . . . . . .4-32
Processing Server Characteristics . . . . . . . . . . . . . . . . . . . . . . . . . . . . . . . . . . . . . . . . . . . . .4-32
PS-1 Licensing . . . . . . . . . . . . . . . . . . . . . . . . . . . . . . . . . . . . . . . . . . . . . . . . . . . . . . . . . . . .4-32
PS-1 BIOS Settings . . . . . . . . . . . . . . . . . . . . . . . . . . . . . . . . . . . . . . . . . . . . . . . . . . . . . . . .4-33
PS-1 Connection Interfaces . . . . . . . . . . . . . . . . . . . . . . . . . . . . . . . . . . . . . . . . . . . . . . . . . .4-33
Digital Expansion Interface. . . . . . . . . . . . . . . . . . . . . . . . . . . . . . . . . . . . . . . . . . . . . . . . . . . . . .4-34
DEI Unit . . . . . . . . . . . . . . . . . . . . . . . . . . . . . . . . . . . . . . . . . . . . . . . . . . . . . . . . . . . . . . . . . .4-34
Digital Endpoint Module . . . . . . . . . . . . . . . . . . . . . . . . . . . . . . . . . . . . . . . . . . . . . . . . . . . . .4-35
Eight-Port Single Line Module Characteristics . . . . . . . . . . . . . . . . . . . . . . . . . . . . . . . . . . . .4-35
Audio Saturation Limit for Single Line Ports . . . . . . . . . . . . . . . . . . . . . . . . . . . . . . . . . . . . . .4-35
Auto NAT Detection and Digital Equipment . . . . . . . . . . . . . . . . . . . . . . . . . . . . . . . . . . . . . .4-36
Software Version Requirements . . . . . . . . . . . . . . . . . . . . . . . . . . . . . . . . . . . . . . . . . . .4-36
Endpoints . . . . . . . . . . . . . . . . . . . . . . . . . . . . . . . . . . . . . . . . . . . . . . . . . . . . . . . . . . . . .4-36
System Resources with DEI . . . . . . . . . . . . . . . . . . . . . . . . . . . . . . . . . . . . . . . . . . . . . . . . . .4-37
Cabling for Digital Capability . . . . . . . . . . . . . . . . . . . . . . . . . . . . . . . . . . . . . . . . . . . . . . . . . .4-37
Digital Endpoints . . . . . . . . . . . . . . . . . . . . . . . . . . . . . . . . . . . . . . . . . . . . . . . . . . . . . . . . . . .4-37
Basic Voice Mail (BVM) . . . . . . . . . . . . . . . . . . . . . . . . . . . . . . . . . . . . . . . . . . . . . . . . . . . . . . . . .4-38
BVM Voice Mail Ports . . . . . . . . . . . . . . . . . . . . . . . . . . . . . . . . . . . . . . . . . . . . . . . . . . . . . . .4-38
BVM Forward to E-Mail Characteristics . . . . . . . . . . . . . . . . . . . . . . . . . . . . . . . . . . . . . . . . .4-39
Initial Recording Handling . . . . . . . . . . . . . . . . . . . . . . . . . . . . . . . . . . . . . . . . . . . . . . . . . . . .4-39
Temporary Files . . . . . . . . . . . . . . . . . . . . . . . . . . . . . . . . . . . . . . . . . . . . . . . . . . . . . . . . . . .4-39
Authentication Supported by BVM . . . . . . . . . . . . . . . . . . . . . . . . . . . . . . . . . . . . . . . . . . . . .4-39
Trunking . . . . . . . . . . . . . . . . . . . . . . . . . . . . . . . . . . . . . . . . . . . . . . . . . . . . . . . . . . . . . . . . . . . . .4-40
Trunking Capacity and Constraints . . . . . . . . . . . . . . . . . . . . . . . . . . . . . . . . . . . . . . . . . . . . .4-40
Hard-Wired (Non-IP Gateway) Trunking . . . . . . . . . . . . . . . . . . . . . . . . . . . . . . . . . . . . . . . . .4-40
Capacities of All-Trunk systems . . . . . . . . . . . . . . . . . . . . . . . . . . . . . . . . . . . . . . . . . . . . . . .4-41
Page 4-2
Mitel ® 5000 Installation Manual – Issue 3.0, October 2008
Chapter 4: Specifications
Endpoints . . . . . . . . . . . . . . . . . . . . . . . . . . . . . . . . . . . . . . . . . . . . . . . . . . . . . . . . . . . . . . . . . . . .4-42
IP Devices . . . . . . . . . . . . . . . . . . . . . . . . . . . . . . . . . . . . . . . . . . . . . . . . . . . . . . . . . . . . . . . .4-42
Multi-Protocol Endpoints . . . . . . . . . . . . . . . . . . . . . . . . . . . . . . . . . . . . . . . . . . . . . . . . . . . . .4-43
IP (Only) Endpoints . . . . . . . . . . . . . . . . . . . . . . . . . . . . . . . . . . . . . . . . . . . . . . . . . . . . . . . . .4-44
Mitel IP Endpoint Specifications . . . . . . . . . . . . . . . . . . . . . . . . . . . . . . . . . . . . . . . . . . . .4-44
Mitel IP Endpoint Environmental Conditions . . . . . . . . . . . . . . . . . . . . . . . . . . . . . . . . . .4-45
Mitel IP Endpoint Regulatory Standards . . . . . . . . . . . . . . . . . . . . . . . . . . . . . . . . . . . . .4-45
Mitel and Inter-Tel IP Endpoint Differences . . . . . . . . . . . . . . . . . . . . . . . . . . . . . . . . . . . . . .4-45
Wireless IP Endpoints . . . . . . . . . . . . . . . . . . . . . . . . . . . . . . . . . . . . . . . . . . . . . . . . . . . . . . .4-47
SIP (Only) Softphones . . . . . . . . . . . . . . . . . . . . . . . . . . . . . . . . . . . . . . . . . . . . . . . . . . . . . .4-47
Model 8602 . . . . . . . . . . . . . . . . . . . . . . . . . . . . . . . . . . . . . . . . . . . . . . . . . . . . . . . . . . .4-47
Model 8601 for Pocket PC . . . . . . . . . . . . . . . . . . . . . . . . . . . . . . . . . . . . . . . . . . . . . . . .4-47
Endpoint LED Flash Rates . . . . . . . . . . . . . . . . . . . . . . . . . . . . . . . . . . . . . . . . . . . . . . . . . . .4-48
Direct Station Select/Busy Lamp Field Units . . . . . . . . . . . . . . . . . . . . . . . . . . . . . . . . . . . . .4-50
Model 8416 Mini-Direct Station Select (Mini-DSS) Unit . . . . . . . . . . . . . . . . . . . . . . . . . . . . .4-51
IP Single Line Adapter (IP SLA) . . . . . . . . . . . . . . . . . . . . . . . . . . . . . . . . . . . . . . . . . . . . . . .4-52
Optional Handset Amplifiers . . . . . . . . . . . . . . . . . . . . . . . . . . . . . . . . . . . . . . . . . . . . . . . . . .4-53
Playback Devices . . . . . . . . . . . . . . . . . . . . . . . . . . . . . . . . . . . . . . . . . . . . . . . . . . . . . . . . . .4-54
Attendant Console. . . . . . . . . . . . . . . . . . . . . . . . . . . . . . . . . . . . . . . . . . . . . . . . . . . . . . . . . . . . .4-55
Personal Computer Application . . . . . . . . . . . . . . . . . . . . . . . . . . . . . . . . . . . . . . . . . . . . . . .4-55
Attendant Service Endpoint . . . . . . . . . . . . . . . . . . . . . . . . . . . . . . . . . . . . . . . . . . . . . . . . . .4-55
IP Network Requirements . . . . . . . . . . . . . . . . . . . . . . . . . . . . . . . . . . . . . . . . . . . . . . . . . . . . . . .4-56
Network Capability Analysis . . . . . . . . . . . . . . . . . . . . . . . . . . . . . . . . . . . . . . . . . . . . . . . . . .4-56
Performance Criteria . . . . . . . . . . . . . . . . . . . . . . . . . . . . . . . . . . . . . . . . . . . . . . . . . . . . . . . .4-56
Automatic NAT Detection . . . . . . . . . . . . . . . . . . . . . . . . . . . . . . . . . . . . . . . . . . . . . . . . . . . .4-58
Protocols and Ports . . . . . . . . . . . . . . . . . . . . . . . . . . . . . . . . . . . . . . . . . . . . . . . . . . . . . . . .4-59
UDP Port Assignments . . . . . . . . . . . . . . . . . . . . . . . . . . . . . . . . . . . . . . . . . . . . . . . . . . . . . .4-60
Tutorial . . . . . . . . . . . . . . . . . . . . . . . . . . . . . . . . . . . . . . . . . . . . . . . . . . . . . . . . . . . . . . .4-60
UDP Port Assignments in v2.x . . . . . . . . . . . . . . . . . . . . . . . . . . . . . . . . . . . . . . . . . . . . .4-60
99 Nodes Support . . . . . . . . . . . . . . . . . . . . . . . . . . . . . . . . . . . . . . . . . . . . . . . . . . . . . . . . . .4-61
Component Compatibility for 99 Nodes Support . . . . . . . . . . . . . . . . . . . . . . . . . . . . . . . . . . .4-62
Peripheral Equipment . . . . . . . . . . . . . . . . . . . . . . . . . . . . . . . . . . . . . . . . . . . . . . . . . . . . . . . . . .4-63
Voice Processor . . . . . . . . . . . . . . . . . . . . . . . . . . . . . . . . . . . . . . . . . . . . . . . . . . . . . . . . . . .4-63
PC for On-Site or Stand-Alone/Remote Programming
. . . . . . . . . . . . . . . . . . . . . . . . . . . . .4-64
Computer Hardware Requirements for Windows XP . . . . . . . . . . . . . . . . . . . . . . . . . . . .4-64
Computer Hardware Requirements for Windows Vista . . . . . . . . . . . . . . . . . . . . . . . . . .4-64
SMDR/Error Message Output . . . . . . . . . . . . . . . . . . . . . . . . . . . . . . . . . . . . . . . . . . . . . . . . .4-65
CT Gateway . . . . . . . . . . . . . . . . . . . . . . . . . . . . . . . . . . . . . . . . . . . . . . . . . . . . . . . . . . . . . .4-65
Additional Information . . . . . . . . . . . . . . . . . . . . . . . . . . . . . . . . . . . . . . . . . . . . . . . . . . . . . . .4-65
Mitel ® 5000 Installation Manual – Issue 3.0, October 2008
Page 4-3
Chapter 4: Specifications
Chapter Overview
Chapter Overview
Correct installation and operation of the Mitel platform depends on a technician’s ability to
access accurate and complete information about the system. The following pages provide a
composite of system’s environmental, physical, and electrical characteristics, as well as its
computing and networking capabilities. Applicable industry, quality, and workmanship standards
have been identified where appropriate.
Information in the chapter flows from general environmental parameters, installation hardware,
and cabling requirements to specific details about component dimensions and characteristics,
networking and power requirements, and power surge and power interruption protection
measures.
Sections summarizing specifications for endpoints and peripheral equipment compose the final
sections of the chapter.
Environmental Requirements
Table 4-1 shows the ranges of environmental conditions for operation and storage of Mitel
platform equipment and endpoints.
NOTICE
Possible Malfunction Due to Overheating. Never exceed the maximum operating
temperature listed in Table 4-1. When installing the chassis and endpoints, allow a sufficient
margin for error in case of air conditioning failure, routine maintenance, plant shutdown, etc.
As a general guideline, if the conditions are suitable for office personnel, they are also
suitable for all equipment and endpoint operation. A properly controlled environment will help
to extend the operating life of the equipment.
Table 4-1. Equipment Environmental Requirements
Requirements
Temperature
Equipment Chassis
Station Instruments
Page 4-4
In Operation
In Storage
32 to 104 °F (0 to 40 °C)
32 to 113 °F (0 to 45 °C)
+40 to 185 °F (–40 to 85 °C)
–40 to 185 °F (–40 to 85 °C)
Relative Humidity
(Non-Condensing)
5–95%
5–95%
Altitude
Up to 10,000 ft (3048 m)
Up to 40,000 ft (12,192 m)
Mitel ® 5000 Installation Manual – Issue 3.0, October 2008
Chapter 4: Specifications
Programming Computer Requirements
Programming Computer Requirements
Microsoft® Windows® 2000 is no longer supported in DB Programming beginning with this
release. This section lists the requirements for Windows XP and Windows Vista® for the
computer running DB Programming.
Windows XP
Table 4-2 lists the minimum and recommended requirements for the computer with the Windows
XP operating system on which you are installing the v3.0 DB Programming software.
Table 4-2. Windows XP Programming Computer Requirements
Minimum Requirements
Recommended Requirements
Intel® Pentium® 850 MHz or faster processor
(or compatible)
Intel Pentium 1 GHz or faster processor (or
compatible)
512 MB of RAM or higher
1 GB of RAM or higher
Hard drive with at least 2.0 GB of available
hard disk space
Hard drive with at least 2.0 GB of available
hard disk space
Super VGA (800 x 600) or higher-resolution
video adapter and monitor
Super VGA (1024 x 768) or higher-resolution
video adapter and monitor
A pointing device (such as a mouse, trackball,
or touch screen)
A pointing device (such as a mouse,
trackball, or touch screen)
Ethernet or Wi-Fi network card with TCP/IP
configured
Ethernet or Wi-Fi network card with TCP/IP
configured
Internet-capable network connection (a
broadband connection of 256 Kbps or faster)
Internet-capable network connection (a
broadband connection of 256 Kbps or faster)
Windows Vista
Table 4-3 lists the minimum and recommended requirements for the computer with the Windows
Vista operating system on which you are installing the v3.0 DB Programming software.
Table 4-3. Windows Vista Programming Computer Requirements
Minimum Requirements
Recommended Requirements
1 GHz 32-bit (x86) or 64-bit (x64) processor
2 GHz 32-bit (x86) or 64-bit (x64) processor
1 GB of RAM
2 GB of RAM
Hard drive with at least 2.0 GB of available
space
Hard drive with at least 2.0 GB of available
space
Super VGA (800 x 600) or higher-resolution
video adapter and monitor
Super VGA (1024 x 768) or higher-resolution
video adapter and monitor
A pointing device (such as a mouse, trackball,
or touch screen)
A pointing device (such as a mouse,
trackball, or touch screen)
Ethernet or Wi-Fi network card with TCP/IP
configured
Ethernet or Wi-Fi network card with TCP/IP
configured
Internet-capable network connection (a
broadband connection of 256 Kbps or faster)
Internet-capable network connection (a
broadband connection of 256 Kbps or faster)
Mitel ® 5000 Installation Manual – Issue 3.0, October 2008
Page 4-5
Chapter 4: Specifications
Software Version Compatibility
Software Version Compatibility
The Mitel 5000 platform requires the Linux operating system version shipped with the software
release to ensure proper operation of version-related features. Failure to use the correct
operating system version may result in system instability. Clicking the Update All button on the
Administrative Web Session page ensures that the correct operating system, call processing
(CP) code, and all drivers and associated software are installed.
System-Wide Specifications
Important system-wide specifications appear in the following subsections.
Loop Limits
Table 4-4 identifies the maximum distances from the Inter-Tel 5000 Base Server to which digital
and single line endpoints can be installed.
Table 4-4. Loop Limits for Digital and Single Line Endpoints
Port
Impedance
Loop Limit
(24 AWG)
600 Ω
2000 ft
(609 m)
REN 3.0
62 Ω
1200 ft
(366 m)
From an MDPM: To a single line endpoint
195 Ω
3800 ft
(1158 m)
From an SLA: To single line endpoints or playback devices.
Supports facility code OL13C.
800 Ω
15,560 ft
(4742 m)
Endpoints
From Base Server chassis:
• To a single line endpoint or playback device connected to
the built-in port
• To a single line endpoint or playback device driven by a
SLM-4 port
From DEI chassis: To a single line endpoint or playback device
driven by a SLM-8
From DEI chassis:
• To digital endpoints
• To a digital endpoint equipped with PCDPM and MDPM and
connected to DSS unit(s) or SLA
Page 4-6
Mitel ® 5000 Installation Manual – Issue 3.0, October 2008
Chapter 4: Specifications
Power Supply
Power Supply
Built into the CS-52xx chassis, the 40 W power supply provides power to the chassis and
modules. The chassis must be connected to an isolated, dedicated, 105–125 VAC, 15 A
(minimum), 57–63 Hz, single-phase commercial power source through an uninterruptible power
supply (UPS). The system power supply provides +5 VDX, 4 A output.
Built into the DEI chassis, a 100 W power supply provides power to the chassis and modules.
For universal operation, each chassis must be connected to an isolated, dedicated, 90–240
VAC, 15 A (minimum), 50/60 Hz, single-phase commercial power source through a (UPS). The
DEI power supply provides +24 VDC, 5.3 A output. For expanded applications, all required
power transformers should be plugged into appropriate power sources. For details, refer to the
equipment manufacturer’s documentation.
NOTICES
Do not use an extension cord.
Do not plug any other equipment into the outlet where the UPS supporting the Base Server
or DEI is plugged-in.
Do not defeat, or leave floating, the ground wire in the AC power cord.
In addition to the system power back-up, a rechargeable battery located on the system
Processor Module backs up the database. In the event of a power failure or brownout condition,
this battery supports the module for up to one day. The battery automatically recharges when
power is restored to the module.
Surge/Spike Protection
To reduce the effects of AC voltage surges and spikes that may cause damage to the electronic
components, Mitel recommends installing a surge/spike protector with the following
specifications:
• Clamp voltage transients at 300 VAC within 5 nsec when exposed to waveforms as
described in the ANSI/IEEE Standard C62.41-1980 (IEEE 587).
• Radio frequency interference (RFI) and electromagnetic interference (EMI) noise reduction
by at least 20 dB at frequencies between 5 kHz and 30 MHz.
The Mitel CommSource® division sells a surge/spike protector that meets the recommended
specifications—part number 900.0500.
Mitel ® 5000 Installation Manual – Issue 3.0, October 2008
Page 4-7
Chapter 4: Specifications
Uninterruptible Power Supply (UPS) Connections
Uninterruptible Power Supply (UPS) Connections
To avoid electrically induced performance problems, all associated Mitel 5000 equipment should
be sourced from the same AC phase and ground reference. To assure that the electrical source
is the same, plug Mitel 5000 equipment into the same UPS unit. A common electrical source is
most critical with Mitel 5000 Base Server and associated Digital Equipment Interface (DEI)
units.
Because the CS-5600 Processing Server (PS-1) is IP networked, a common electrical source is
not as critical. However, if wattage and outlets are available, the CS-5600 should be maintained
on the same UPS. The CS-5600 Processing Server (PS-1) does not require its own UPS unit.
Comply with the following electrical requirements when installing or upgrading Mitel 5000
equipment:
• Plug Mitel 5000 equipment into the same UPS unit, in particular the Base Server and
associated DEI units. If wattage and outlets are available, the CS-5600 Processing Server
(PS-1) should be maintained on the same UPS.
• The UPS unit must be plugged into an isolated, dedicated circuit providing required
voltage, current, and grounding specifications.
• The power rating of the UPS unit must exceed the combined power ratings of all Mitel
5000 units the UPS supports. Table 4-5 provides an example of the wattage ratings in
relation to the server equipment used. This information applies only to Mitel equipment.
Component systems having power supplies include the Mitel CS-5200/5400/5600
Communication Server, Digital Expansion Interface DEI(s), and the external voice processing
systems. The systems plug into the battery back-up unit, which must be plugged-in to an
isolated, dedicated circuit having the power specifications identified in “Power Supply” on
page 4-7.
Table 4-5. Uninterruptable Power Supply Wattage Requirements
Equipment
UPS Wattage
Mitel CS-5200/5400 chassis only
60 W
Mitel PS1 chassis only
200 W
Mitel CS-5200/5400 with EM or VPU
360 W
Mitel CS-5200/5400 with 1 DEI
230 W
Mitel CS-5200/5400 with PS1
260 W
Mitel CS-5200/5400 with 1 DEI and EM or VPU
530 W
Mitel CS-5200/5400 with 2 DEI
400 W
Mitel CS-5200/5400 with 2 DEIs and EM or VPU
700 W
Mitel recommends installing a backup power supply unit having the following characteristics:
• Sine wave output
• Transfer time of less than 20 msec
• Low AC line transfer voltage, or cutoff circuit, of 100 VAC, minimum
The ampere-hour rating of the battery determines the system back-up time. Also, even if the
power supply unit possesses the specifications listed in the preceding paragraph, it cannot be
guaranteed that it will work properly with the Mitel system. Contact the Mitel CommSource
division for a listing of approved UPS/SPS units.
Page 4-8
Mitel ® 5000 Installation Manual – Issue 3.0, October 2008
Chapter 4: Specifications
UPS Monitoring
UPS Monitoring
For correct operation, the UPS Monitoring feature requires compatible hardware and software,
as described in the following sections. An expanded description of the UPS Monitoring feature
and for Flags associated with UPS Monitoring, refer to the Inter-Tel 5000 Features and
Programming Guide, part no. 580.8006. For information about hardware and software
specifications that apply to the UPS Monitoring feature, see page 4-9. For installation
instructions, see “Equipment to Support UPS Monitoring” on page 5-17.
Compatible UPS Units
Three commercial UPS units have passed UPS Monitor-compliance testing for use with the
Mitel 5000 platform.
Monitoring capabilities of the following UPS units were found compatible with the UPS
Monitoring feature:
• APC Smart-UPS® series (Universal Serial Bus [USB] connection)
• MGE Pulsar Evolution series (USB connection)
• ONEAC ON® Series® in advanced interface mode (To connect, you must use the USB
cable provided by the manufacturer.)
Consider the following facts about the compatible UPS units:
• Only monitoring capabilities were tested.
• Only connection across USB is supported.
• Other models/series available from APC, MGE, and ONEAC are not
supported.
NOTE
• The best choice of a UPS for a particular system depends on environmental
factors and a balance between rated load and desired runtime. Consult Mitel
CommSource ® to determine specifications and availability of a UPS suitable
for particular system requirements.
• If a USB hub is needed so that you can use more than one USB port function
at the same time, use only the USB hubs that have been tested and validated
as compatible with the UPS Monitoring feature. For more information about
compatible USB hubs, see page 4-9.
Compatible USB Hubs
Through Mitel product testing and validation, the hubs shown in Table 4-6 and Table 4-7 on
page 4-10 have been identified as compatible with the Mitel 5000 UPS Monitoring feature. The
tables are intended only to identify the USB hubs tested and verified to be compatible with UPS
Monitoring at the time of this publication.
Note that some USB hubs that are compatible with the Mitel CS-5200 and CS-5400 platforms
are not compatible with the CS-5600 platform.
Mitel ® 5000 Installation Manual – Issue 3.0, October 2008
Page 4-9
Chapter 4: Specifications
Compatible USB Hubs
Table 4-6. USB Hub Compatibility Chart for the Mitel CS-5200/5400 Platform
Manufacturer
Model No.
Ports
MGE
APC
ONEAC
APC
19501SG-1V
4
Yes
Yes
Yes
Belkin
F5U007-UNV
4
Yes
Yes
Yes
Belkin
F5U021
4
Yes
Yes
Yes
Belkin
F5U101-MAC
4
Yes
Yes
Yes
Belkin
F5U234 REV3
4
Yes
Yes
Yes
Cables To Go
29560
4
Yes
Yes
Yes
D-Link
DUB-H4
4
No
Yes
Yes
IOGEAR
GUH274
4
Yes
Yes
Yes
Kensington
K33058
4
Yes
Yes
Yes
Linksys
USB2HUB4
4
Yes
Yes
Yes
Linksys
USBHUB4C
4
Yes
Yes
Yes
Offspring
HC2003
3
No
No
Yes
SMC Networks
SMCUSBH7
7
Yes
Yes
Yes
StarTech.com
UH-212
2
No
Yes
Yes
Targus
PAUH216
4
Yes
Yes
Yes
Targus
PA0055U
4
No
Yes
Yes
Tripp-lite
U225-004-R
4
Yes
Yes
Yes
Table 4-7. USB Hub Compatibility Chart for the Mitel CS-5600 Platform
Manufacturer
Page 4-10
Model No.
Ports
MGE
APC
ONEAC
APC
19501SG-1V
4
Yes
Yes
No
Belkin
F5U007-UNV
4
Yes
Yes
Yes
Belkin
F5U021
4
Yes
Yes
Yes
Belkin
F5U101-MAC
4
Yes
Yes
Yes
Belkin
F5U234 REV3
4
Yes
Yes
No
Cables To Go
29560
4
Yes
Yes
No
D-Link
DUB-H4
4
Yes
Yes
Yes
IOGEAR
GUH274
4
Yes
Yes
No
Kensington
K33058
4
Yes
Yes
Yes
Linksys
USB2HUB4
4
Yes
No
No
Linksys
USBHUB4C
4
Yes
Yes
Yes
Offspring
HC2003
3
Yes
Yes
No
SMC Networks
SMCUSBH7
7
Yes
Yes
No
StarTech.com
UH-212
2
No
Yes
Yes
Targus
PAUH216
4
Yes
Yes
Yes
Targus
PA0055U
4
Yes
Yes
Yes
Tripp-lite
U225-004-R
4
Yes
Yes
Yes
Mitel ® 5000 Installation Manual – Issue 3.0, October 2008
Chapter 4: Specifications
Software Specifications
Software Specifications
The UPS Monitoring feature requires the software found in the Mitel 5000 v2.2 or later software
release.
Operating System: The Mitel platform requires the Linux operating system shipped with the
v2.2 or later software release to ensure proper operation of the UPS Monitoring feature. Failure
to use the correct operating system may result in system instability.
IMPORTANT
Do not connect the UPS to the system until after upgrading to the v2.2
software release. The monitoring function begins only when a supported
device is detected.
Software Environment: The UPS Monitoring feature requires all software packages provided
with the v2.2 or later release. Required software includes, but is not limited to, the Linux
operating system, CP, and all UPS drivers and associated software.
Main Distribution Frame (MDF) and Cabling
Connections between the trunks, external equipment, and the trunk circuit modules are made at
the Main Distribution Frame (MDF). The MDF consists of a plywood backboard mounted on a
wall and equipped with adequate interconnection hardware. Typically, the interconnection
hardware includes industry-standard 66M1-50 terminal blocks, or 237A Krone blocks in Europe.
Bridging clips are used on all terminal blocks to complete cross-connections. A patch panel and/
or appropriate modular jacks may be used to connect other types of trunks to the chassis.
Table 4-8 summarizes and describes the materials used to construct an MDF.
The Inter-Tel 5000 Base Server can be placed on a stable, horizontal surface, mounted with
brackets, or rack-mounted. Mitel recommends rack-mounting the equipment. For details, see
“Installing the Mitel CS-5200/5400/5600 Base Server” on page 5-15.
Table 4-8. Main Distribution Frame Materials
Material
Description and Purpose
4 ft x 6 ft x 3/4-inch
backboard, typicala
Mounted securely on a wall, the backboard provides the
vertical surface for mounting terminal blocks, modular jacks,
power strips for AC transformers, or other ancillary
equipment.
In the United States,
66M1-50 Terminal Block
In Europe,
237A Krone Block
May be used to terminate cables from the telephone
company (CO) or Local Exchange to the customer’s
premises. For systems equipped with digital endpoint
capability, the blocks may be used to terminate cables from
the Inter-Tel 5000 Base Server to the MDF for distribution to
end users.
Equipment rack
If using the rack-mount installation method, the rack should
be of standardized dimensions for mounting telephone or
data equipment. The rack should be set up so that the front
of the chassis is at eye-level so the technician can read
messages or commands appearing on the LCD panel. For
further details, see the Installation chapter.
Patch panel
If using the rack-mount installation method, the patch panel
should provide the appropriate number of ports for supporting
the system. Each port shall provide an 8-pin/8-conductor (8P/
8C) interface in a 110-type termination block suitable for 22–
24AWG wire. For further details, see the Installation chapter.
Mitel ® 5000 Installation Manual – Issue 3.0, October 2008
Page 4-11
Chapter 4: Specifications
Cabling to Endpoints
Table 4-8. Main Distribution Frame Materials (Continued)
Material
Description and Purpose
Patch cables
If using the rack-mount installation method, patch cables
terminated with 8P/8C plugs provide rapid, safe, and secure
interconnection of trunk module circuits with telco facilities.
For further details, see the Installation chapter.
6-pin to 8-pin step-up plug
adapters
For connecting cables terminated with 6-pin plugs into 8-pin
patch panel sockets.
6-wire modular jack assembly For prewiring CO lines for Power Fail Bypass circuits.
wired to RJ-11 specifications
6-wire modular jack assembly May be used to terminate cables from the telephone
wired to RJ-14 specifications company (CO) to the customer’s premises. May also be used
for prewiring CO trunks.
8-wire modular jack assembly For prewiring T1, T1/PRI, and E1/PRI trunks.
wired to RJ-48C
specifications, or to RJ-45S
in Europe
Four- or 6-wire modular plug
For terminating cable ends for insertion into jacks.
24 AWG twisted, unshielded
cableb
Appropriate wiring for making network connections to
telephone facilities and, where appropriate, to IP end users.
Bridging clips
To ensure complete electrical contact between crossconnected wires on a 66M1-50 or 237A Krone block.
Miscellaneous hardware,
materials, and tools
Appropriate tools and fasteners to mount the backboard on a
wall and to secure terminal blocks and other system-required
equipment to the backboard.
a. System requirements will determine the size of the MDF backboard and the quantity of each item.
b. Provide sufficient Category 5 (CAT 5) or CAT 5e cabling for connecting the LAN server to the InterTel 5000 Base Server and for connecting IP endpoints to the LAN, as needed.
Cabling to Endpoints
Endpoint cable consists of Category 5e (CAT 5e) or CAT 5 cable connected between the IP
endpoint and the local area network (LAN) at the user’s endpoint location.
Page 4-12
Mitel ® 5000 Installation Manual – Issue 3.0, October 2008
Chapter 4: Specifications
Connections to the Public Network
Connections to the Public Network
In the United States, CO trunks are terminated on telephone company 66-type connecting
blocks, as required by FCC regulations. Cross-connect cable connects the 66-type blocks to the
CO terminal blocks on the MDF. The trunks are then connected to the Loop Start Modules
(LSM) using cable terminated with 8-pin plugs wired to RJ-14 specifications. An alternate
method is to interconnect the lines through a patch panel. In Europe, Local Exchange Trunks
are terminated on 237A Krone blocks.
DID trunks are terminated on telephone company RJ-type modular jacks (or on 66-type blocks
that are then cross-connected to modular jack assemblies), as required by FCC regulations.
Two-pair, nonreversing, mod-to-mod line cord is used to connect each DID trunk to the
appropriate jack on the corresponding SLA.
T1 spans and Primary Rate Interface (PRI) spans are terminated on RJ-48C modular jacks or
on 66-type connecting blocks that are then cross-connected to modular jack assemblies, as
required by FCC regulations. Four-pair, nonreversing, mod-to-mod line cord is used to connect
each T1 and/or PRI span directly to the T1 jack on the corresponding T1M or T1M-2 module.
Mitel recommends installing gas discharge tubes with silicon avalanche suppressors on all nonT1/PRI trunks for lightning protection. For T1, T1/PRI, and E1/PRI spans, the Channel Service
unit (CSU) itself provides the lightning protection. Also, in areas with frequent occurrences of
lightning, it is recommended that the cable between the telephone company termination and the
gas discharge tubes be at least 75 ft (22.5 m) in length. If desired, the cable may be coiled.
Table 4-9. Trunk Characteristics
Characteristic
Specification
Loss from CO to endpoint
0dB (@1 kHz, 0 ft)
Loss from CO to single line set
0dB (@1 kHz, 0 ft)
Loss from CO to CO
0dB (@1 kHz, 0 ft)
Ringer equivalence
0.6B REN
Ringing voltage
40 VRMS minimum
Ring frequency
17–63 Hz
Loop current
18 mA, minimum
Protection, tip-to-ring
400 V transient
Capacities
For general reference purposes, the topics and tables in this section summarize the Mitel 5000
equipment specifications and capacities.
NOTICE
NOTICE
The capacity values published in this addendum have been validated under controlled
laboratory conditions and supported by real-time field trials in a variety of business
operations. However, the actual capacities that an Mitel 5000 platform can support will
depend on the mixture of trunks and types of endpoints installed, among other network and
environmental factors.
While Mitel converged technology platforms provide advanced communications capability, the
nature of that technology imposes certain physical constraints. These physical constraints
include such things as the number of simultaneous voice channels and signal processing
resources available at any time. The maximum capacities listed indicate tested capability
rather than claims that all the values have been realized at the same time.
Mitel ® 5000 Installation Manual – Issue 3.0, October 2008
Page 4-13
Chapter 4: Specifications
System Capacities
System Capacities
Table 4-10 summarizes capacities for Mitel CS-5200, CS-5400, and CS-5600 platforms running
v3.0 and later.
Table 4-10. System Capacities for Systems Running v3.0 and later
Feature
CS-5200
CS-5400
CS-5600
• Patterns per system
50
50
50
• Digits per pattern
48
48
48
• Forced
512
512
512
• Standard
512
512
512
• Digits per code
3–12
3–12
3–12
• Route groups
100
100
100
• Facility groups per route group
100
100
100
• Trunk groups per facility group
208
208
208
Absorbed digits
Account Codes
Automatic Route Selection (ARS)
• Dial Rules (16 digits each)
o
Total
32
32
32
o
Programmable
26
26
26
Basic Voice Mail Ports
8
8
16
Basic Rate Module (BRM-S) per system
(1 span per module) [European market only]
3
3
3
Busy Hour Call Completion (BHCC)
8000
8000
8000
• Requests per system
75
175
250
• Requests per endpoint
1
1
1
• Camp On by an endpoint
1
1
1
• Camp On requests per system
75
175
250
• Endpoints camped on to an endpoint
75
175
250
• Endpoints camped on to a trunk group
75
175
250
16
16
16
• Total per system
20
20
20
• Parties per conference
4
4
4
• Simultaneous 4-party conferences
5
5
5
• Per DEI
3
3
3
• Per system
6
6
6
16
16
16
Callback Queue
Camp On
Class of Service (COS) designations per endpoint
Conference Resources
Digital Endpoint Module (DEM-16) per DEI
Digital Endpoint Module Ports per DEM-16
Page 4-14
Mitel ® 5000 Installation Manual – Issue 3.0, October 2008
Chapter 4: Specifications
System Capacities
Table 4-10. System Capacities for Systems Running v3.0 and later (Continued)
Feature
CS-5200
CS-5400
CS-5600
• DTMF receivers
4
4
4
• Speakerphone
16
16
16
2
2
2
• Per digital endpoint
4
4
4
• Per system, or node
20
20
20
• Message options per endpoint
20
20
20
• Messages per system
75
175
250
• Receivers
6
6
6
• Transmitters
4
4
4
• Per system
100
100
100
• Endpoint or trunk numbers/list
100
100
250
• Endpoints/list used for Hunt Groups
30
60
60
• Endpoints/list used for Paging
30
30
60
6
6
6
• System total
200
200
200
• Paths per endpoint
3
3
3
• Points per path
4
4
4
75
75
300
25
25
25
Digital Endpoint Module Resources
Digital Expansion Interface (DEI) Units
Digital Station Select/Busy Lamp Field (DSS/BLF)
Do-Not-Disturb (DND)
Dual Tone Multi-Frequency (DTMF) Resources
Endpoints
See Table 4-1 on page 4-19.
Extension Lists
Fax over IP (FoIP)—T.38
(Maximum simultaneous faxes
between Mitel 5000 platforms only)
Forwarding Paths
Hunt Groups per system
Keymap Group Assignments
• Endpoint
• DSS/BLF (in Database Programming only)
20
20
20
• User-programmable buttons per endpoint
35
35
35
• Dual (LSM-2)—No longer in production.
3
3
3
• Quad (LSM-4)
3
3
3
1
1
1
Loop Start Module
Music On Hold port per system
Mitel ® 5000 Installation Manual – Issue 3.0, October 2008
Page 4-15
Chapter 4: Specifications
System Capacities
Table 4-10. System Capacities for Systems Running v3.0 and later (Continued)
Feature
CS-5200
CS-5400
CS-5600
• Port per system
1
1
1
• Zones per system
10
10
10
• Endpoints in a paging zone
30
30
60
• Programmable messages
20
20
20
• Message requests per system
75
175
250
• Per Digital Endpoint Module
16
16
16
• Per Digital Expansion Interface
48
48
48
• Per system, or node*
48–96
48–96
48–96
Paging
Reminder Messages
Single-Line Adapter
o
*With 2 single line endpoints per SLA
48
48
48
o
*With 1 single line endpoint per SLA
96
96
96
Single Line Module, 4-port (SLM-4)
(Only in Inter-Tel 5000 Base Server.)
1
1
1
Single Line Module, 8-port (SLM-8)
3
3
3
• Per Digital Expansion Interface
3
3
3
• Per system, or node
6
6
6
• Attendant Consoles
23
23
23
• Desktop Open Architecture Interface (OAI)
10
10
30
• Level 2 OAI
3
3
3
• Message Print
3
3
3
• Station Message Detail Recording (SMDR)
3
3
3
• System Monitor
3
3
3
Station-to-Station messages per system
75
175
250
T1M Single-port T1/E1/PRI Module per system
(1 span per module)
3
3
3
T1M-2 Dual-port T1/E1/PRI Module per system
(2 spans per module)
3
3
3
Socket connections per system
Toll Restriction User Groups
Page 4-16
• Groups per system
8
8
8
• Area Code tables per User Group
1
1
1
• Area Codes per table
800
800
800
• External Area Codes per User Group
6
6
6
• Office codes per table
800
800
800
• Office code tables per external Area Code
2
2
2
Mitel ® 5000 Installation Manual – Issue 3.0, October 2008
Chapter 4: Specifications
Licensing Capacities
Table 4-10. System Capacities for Systems Running v3.0 and later (Continued)
Feature
CS-5200
CS-5400
CS-5600
• Trunk Groups
208
208
208
• Trunks per Trunk Group
120
208
208
• IP gateway trunks
32
32
32
• G.711, maximum
128
250
250
• G.729, maximum
32
120
120
• T.38 (fax over IP) maximum
6
6
6
16
16
16
32
32
32
Trunking
Vocoder Voice Channels
Voice Mail Ports (Voice channels)
• Via Basic Voice Mail
(Requires additional licensing after first 4.)
• Via Enterprise Messaging (EM)
Licensing Capacities
Table 4-11 summarizes IP maximum licensing capacities for the various platforms. Digital
endpoints do not require additional licensing.
Table 4-11. Maximum Licensing Capacities
Type of Endpoint
CS-5200
CS-5400
CS-5600
IP Endpoints
Configured/supported
75
175
250
IP Trunks
Configured/supported concurrently without
IP Networking
32
32
32
• With initial system
3
6
6
• With IP Networking license
IP Networking
75
175
250
Basic Voice Mail (BVM) (4-port increments)
16
16
16
Primary Rate Interface (PRI)
6
6
6
Second T1/E1/PRI Port
3
3
3
Mitel ® 5000 Installation Manual – Issue 3.0, October 2008
Page 4-17
Chapter 4: Specifications
Voice Message Storage Capacity
Voice Message Storage Capacity
NOTICE
The Mitel 5000 v3.0 release requires a minimum 512MB compact flash-type memory card. If
this system is currently using a 256MB compact flash-type memory card, upgrade the card to
either 512MB (part number 841.0274) or 1024MB (part number 841.0273) before upgrading
the system to v3.0.
Basic Voice Mail (BVM) storage capacity has changed with the introduction of the G.726-32
option as an additional voice compression selection.
G.726-32 uses 32 kbps while the default G.729 compression uses 8 kbps. The default BVM
compression is set to G.729 to maximize voice mail storage capacity, and the previously
published voice mail capacities are based on G.729 compression. Using G.726-32 consumes
four times as much storage resulting in 25% of the storage capacity, but it also produces better
audio quality for voice messages in some scenarios.
The CS-5600 BVM does not offer a vocoder selection because it stores voice messages on the
PS-1 hard disk. Since storage is plentiful, no compression is used (G.711). There are some
scenarios in which G.726-32 may be appropriate for BVM compression:
• In some environments where G.729 is used for IP endpoints, multiple compression/
decompression steps may result in degraded voice quality of the stored messages. Using
G.726-32 for voice mail storage may improve the quality of recorded voice.
• The VPIM feature, as specified in the VPIM standard, natively uses G.726-32 compression
for the interchange between voice mail systems. By using G.726-32, the Mitel 5000 does
not need to transcode from G.729 to G.726-32. The result is more efficient processing.
If the resulting voice storage capacity is unacceptable, customers should upgrade to a larger
compact flash-type card. Compact flash-type cards of 256 MB are not supported in this v3.0
release (see the NOTICE above). Capacities are shown in Table 5.
Table 5. BVM Storage Capacity
Mitel Memory Card w/American
English Prompts using G.729
(default)
512 MB
Mitel CS-5200/5400
Mitel CS-5600
Page 4-18
1024 MB
Mitel Memory Card w/American
English Prompts using G.726-32
(optional)
512 MB
1024 MB
5,420 min
(90.33 hr)
N/A
BVM on PS1 Hard Disk
N/A
N/A
N/A
N/A
30,000 min
(500 hr)
Mitel ® 5000 Installation Manual – Issue 3.0, October 2008
Chapter 4: Specifications
System Endpoint Capacities
System Endpoint Capacities
Table 4-1 compares endpoint capacities for the Mitel CS-5200, CS-5400, and CS-5600
platforms when equipped with v1.1/1.2 or v2.x and with either one or two DEI units.
Table 4-1. Endpoint Capacities of Mitel 5000 Platforms
v1.1/v1.2
a
a
IP
IP
v1.0–v1.1 v1.2
Mitel
CS-5200
28
32e
With 1 DEIf
v2.x
b
Digital
Single
Linec
0
2
48
d
Mitel
CS-5200
IP
Digital
Single
Linec
25–75
0
6
With 1 DEI ...and
v2.0 or laterf
48
...or v2.1 or laterf
With 2
DEIsf
96
30
With 2 DEIs ...and
v2.0 or laterf
96
...or v2.1 or laterf
Mitel
CS-5400
116
With 1 DEIf
120e
0
48
2
Mitel
CS-5400
54
110–175
With 1 DEI ...and
v2.0 or laterf
0
96
30
With 2 DEIs ...and
v2.0 or laterf
96
...or v2.1 or laterf
Mitel
CS-5600
N/A
Mitel
CS-5600
6
48
...or v2.1 or laterf
With 2 DEIs f
6
6
54
110–250
0
6
With 1 DEI ...and
v2.0 or laterf
48
...or v2.1 or laterf
48
30
With 2 DEIs ...and
v2.0 or laterf
96
6
...or v2.1 or laterf
96
54
a. Total number of IP resources available without allocation for IP Networking.
b. Capacity assumes the presence of two Digital Expansion Interface units, each equipped with three DEM-16 modules.
c. Includes single line endpoints installed on ports built into the Inter-Tel 5000 Base Server but none that may be attached to
IP-SLA or SLA units.
d. Depending on the vocoder selected, the desired capacity may require oversubscription.
e. Without Basic Voice Mail.
f. Equipped with 3 DEM-16 or 3 SLM-8 in each DEI, as applicable. See the Notice on page 4-13.
Mitel ® 5000 Installation Manual – Issue 3.0, October 2008
Page 4-19
Chapter 4: Specifications
Base Server
Base Server
The Inter-Tel 5000 Base Server houses the system processor module (PM-1) and the
Processor Expansion Card (PEC-1) for a CS-5400, the motherboard, and power supply.
Chassis Description
Table 4-2 summarizes the physical dimensions of Inter-Tel 5000 Base Server chassis.
Table 4-2. Dimensions of Inter-Tel 5000 Base Server
Dimension
Measurement (Metric)
Length
14.50 in. (36.83 cm)
Width
17.00 in. (43.18 cm)
Height
01.75 in. (4.45 cm) (1 U)
Weight
09.00 lb (4.08 kg)
The front of the chassis presents a two-row liquid crystal display (LCD) panel and a five-button
command-and-control interface for interacting with the system. The front of the chassis also
provides two Universal Serial Bus (USB) ports, a USB socket for a software license security
key, a bay that holds a compact flash-type memory card, and a recessed ejection button for
extracting the card.
In addition to the PM-1 bay, the back of the chassis offers three bays that accept slide-in trunk
modules and the following six connection interfaces:
• The system power cord socket
• A 1/8th-inch jack for attaching an audio source to supply system Music-On-Hold and/or
Background Music
• An RCA-type phono jack for attaching an external paging unit
• A 6-pin socket for connecting two loop start trunks
• A 6-pin socket for connecting two single line endpoints.
Together, the loop start and single line circuits also provide the system’s power fail bypass
feature.
• A DB-15 connector for attaching peripheral equipment
• The Inter-Tel 5000 Base Server supports the following trunk circuit modules:
Page 4-20
o
Loop Start Module, 2-port (LSM-2)—Supported but no longer in production.
o
Loop Start Module, 4-port (LSM-4)
o
T1/E1/PRI Module, 1- port (T1M)
o
Dual T1/E1/PRI Module, 2- port (T1M-2)
o
Basic Rate Interface Module, 2-port (BRM-S) [European market only]
Mitel ® 5000 Installation Manual – Issue 3.0, October 2008
Chapter 4: Specifications
Motherboard elements
Motherboard elements
Circuitry and components on the Base Server motherboard provide elements that are essential
to the performance of the Mitel platform, including:
• System/real-time clock: Provides accurate date and time for the system.
• Built-in Network Clock Circuitry (NCC): The network clock circuitry provides the time
division multiplex (TDM) clock for the entire system. This circuitry is necessary specifically
when digital trunks (e.g., T1, T1/PRI, E1/PRI, BRI) are connected to the system. This
circuitry allows the system to synchronize the system TDM clock to the outside world
(telco) and provide a smooth, error-free clock transition when switching clock reference
from one digital trunk to another.
• Conferencing resources: Supports up to 20 circuits in multiple voice conferences. The
system allows up to five simultaneous four-party conferences or up to six simultaneous
three-party conferences at a time. However, conferencing is not amplified.
• DTMF receivers: Provides six resources that convert DTMF signals to digital codes for
use by the system. Used by the system when single line endpoints are dialing, when
features such as DISA and analog voice mail are being used, and to receive Dialed
Number Identification Service (DNIS) and/or Automatic Number Identification (ANI) digits
for incoming T1 Ear-and-Mouth/2-way (E&M) calls. DTMF receivers are in use only while
the dialed number is being processed, not for the duration of the call. If all DTMF receivers
are busy, the user may try again. DISA users are redirected to the primary attendant.
• DTMF transmitters: Provides four resources for generating DTMF tones whenever
needed by the system. For example, when a user manually dials a number while on a call
or when a endpoint user uses one of the system auto-dial features (ARS, Call Forward to
the public network, Station or System Speed Dial, etc.).
• Tone generating circuit: Produces all of the system tones (busy, reorder, Do-Not-Disturb,
etc.) heard by endpoints, DISA, and automated attendant users.
• Internal Modem: Provides a dial-in modem that is accessible through Point-to-Point
Protocol (PPP) and capable of transferring data at speeds up to 33,600 bps. This modem
is always equipped and functions effectively as a system serial port over IP that the user
must “call.” Because the connection is established with a call, each modem application in
a system is assigned an extension. The default extension is 1500. For details about the
modem, refer to the Inter-Tel 5000 Features and Programming Guide, part no. 580.8006.
Mitel ® 5000 Installation Manual – Issue 3.0, October 2008
Page 4-21
Chapter 4: Specifications
Processor Module with Processor Expansion Card
Processor Module with Processor Expansion Card
The Processor Module (PM-1) contains the main controlling microprocessor and associated
control logic and memory circuits. The PM-1 is under the control of the IPR Application, which is
stored in flash memory and activated when the system is powered up. Without a Processor
Expansion Card (PEC-1) attached, the PM-1 drives the Mitel CS-5200 system. The PM-1 with a
PEC attached drives the Mitel CS-5400 system and forms the Base Server of the CS-5600
system. The PEC provides 82 additional IP resources and increases the system processing
capability.
A PM-1 provides the following system resources:
• Database back-up battery: (3.6V, lithium ion, coin cell rechargeable battery) Supports the
database for at least 1 day of continuous system down time. On the PM-1 module, the
LED labeled BAT ALM indicates the charge status of the battery. When the BAT ALM LED
is not lit, the battery is adequately charged. When the LED lights green, the battery is
recharging. For instructions on replacing this battery, see “Replacing the Processor
Module Battery” on page 5-103.
• LED indicators: Shows main processor operation and module removal indicators.
• IP Port (100Base-T): An 8-pin jack provides IP connection directly to the system with
CAT5 or CAT5e cable. In addition, the IP Port can be used to load Call Processing
software or software licenses, or to program the database.
NOTICE
NOTICE
Security is the customer’s responsibility. Mitel is not responsible for network problems
due to security violations involving the IP address exposure of the PM-1. This includes,
but is not limited to, interrupted network service. Mitel recommends that the customer
install the Mitel platform in a private IP network behind a firewall or Network Address
Translation (NAT) unit.
• Software Security and Feature Program: Supports a software license that enables
system functionality. For details about the software security and feature program, refer to
the Inter-Tel 5000 Features and Programming Guide, part no. 580.8006.
• Caller ID receivers: Provides four resources for receiving Caller ID.
The PM-1 supports Call Processing across networks. If the PM-1 is installed on a networked
system (i.e., one with multiple nodes) that includes Inter-Tel Axxess advanced communications
platforms, each Axxess node on the network must be running v7.0 or later for Point-to-Point
Protocol (PPP) networking across T-1s, or version 8.231 or later for VoIP networking. Supports
the United States and European versions of Mitel Advanced Communications Platform software.
Page 4-22
Mitel ® 5000 Installation Manual – Issue 3.0, October 2008
Chapter 4: Specifications
Interfaces on Front of Base Server
Interfaces on Front of Base Server
The front of the Inter-Tel 5000 Base Server is equipped with a two-line LCD panel, an LCD
control consisting of four triangular buttons surrounding a circular button, two USB jacks, a
Security Key socket, a recessed compact flash ejection button, and a compact flash-type card
bay.
LCD Panel: The LCD panel displays system status and command messages on two lines of 14
characters each. provides two basic functions. It displays system status information that the
technician uses to determine the operating condition of the system. As driven by five LCD
control buttons, the panel displays menus and options for programming, changing, or resetting
the system.
LCD Control Buttons: The control buttons allow the technician to scroll through menu items to
set system parameters during system installation and to perform other system routines. The up
and down arrow-shaped buttons control the movement of the menus and menu items displayed
on the LCD panel. The up–down arrows also allow the technician to advance or retreat through
letters or numbers. The right and left arrow buttons control the movement of the cursor from one
character or command to another. Pressing the center, circular button causes the system to
select and accept the chosen letter, number, or command item.
Manual System Reset: Reset is a software-controlled system reconfiguration, and the
technician can manually reset the system using the LCD panel and control buttons. By selecting
the REBOOT command from the SYSTEM MENU on the LCD panel and then pressing the
center button, the technician causes the system to:
• Preserve the battery-backed database information, all calls in progress, outside calls being
dialed, pages in progress, camped-on calls, Callback Queue requests, system and user
programming, messages between endpoints, calls on system and individual hold, DND
messages, and reminder messages.
• Restore DTMF receivers, modem access, and speech channels, and reset the endpoint
clocks to match the system clock. Update button lamp status on mini-DSS units.
• Disconnect calls ringing in and calls in progress.
USB-B Serial Port: The USB (Universal Serial Bus)-B port connects to a personal computer for
local accessing the online Monitoring (OLM) feature.
Security Key: This USB device contains a record of the system’s licenses, allowing only
authorized features to be implemented.
Memory Card Bay and Extractor Button: This bay accepts a compact flash-type card
distributed only by Mitel. The card stores system applications, the system database, and voice
mail prompts and messages, including Record-A-Call recordings. For details, refer to the
backup information in the Inter-Tel 5000 Features and Programming Guide, part no. 580.8006
and to the Voice Processing. Next to the bay is a recessed extractor button that ejects the card
when pushed in. The button is recessed to reduce the risk of the card being unintentionally
removed from the system.
Mitel ® 5000 Installation Manual – Issue 3.0, October 2008
Page 4-23
Chapter 4: Specifications
Interfaces on Back of Base Server
Interfaces on Back of Base Server
The back of the Inter-Tel 5000 Base Server consists of the connection interfaces for expansion
units, the local area network (LAN), external paging, Music On Hold, the PM-1 bay, and bays for
expansion modules.
Music-On-Hold Port: Connects an external music source (such as a radio, tape player, etc.)
that can be heard by callers when they are placed on hold or camped on. It may also be used
for endpoint background music. The port is an 1/8-inch (3mm), two-conductor (stereo), miniphone jack. For installation instructions, see page 5-192. In Database (DB) Programming, music
can be enabled or disabled, and each trunk group (as well as transfer audio) can be assigned
music, silence, or tick-tones. Refer to the Inter-Tel 5000 Features and Programming Guide, part
no. 580.8006 for details. This port supports A-law (European) or mu-law (USA) companding at
the system level, which is flagged in Database (DB) Programming (System\Flags\Companding
Type).
If desired, one external music source may be connected to the system to supply background
music and Music-On-Hold (MOH). The MOH jack is located on the rear of the system chassis.
MOH input circuitry is high-impedance (8.7 Kohm), which allows connection to any audio device
with an output impedance of 4–8.7 ohms. MOH inputs are rated at 1 VRMS. If input power
exceeds this rating, audio may be distorted. Because of this, Mitel recommends limiting the
input power to 1 W.
DB-15 connector: A 15-pin D-subminiature socket connector that provides electrical interface
to the optional, external Voice Processing Unit or Enterprise Messaging system.
Six-pin jacks: Together the jacks provide the system’s Power Fail Bypass feature through an
internal CO cutover relay. One of the jacks supplies two loop start trunk circuit interfaces. The
other jack supplies circuit interfaces for two single line devices.
External Paging Port: An RCA-type phono jack with an output impedance of 600 ohms.
Connects external paging speaker equipment to allow paging to large areas, such as
warehouses or loading docks. For installation instructions, see “Installing External Paging
Equipment” on page 5-193.
IMPORTANT
When connecting external paging equipment to an LSM circuit, use a paging
amplifier that provides talk battery. When connecting external paging
equipment to the chassis, use a paging amplifier that does not provide talk
battery.
NOTICE
Using a paging amplifier with talk battery on an endpoint may damage the endpoint or the
module.
Power Cord Socket: For power supply requirements, see “Power Supply” on page 4-7.
Fuse: System fusing consists of one 250 V, 2 A fuse, located in the power cord connection
socket on the chassis.
Page 4-24
Mitel ® 5000 Installation Manual – Issue 3.0, October 2008
Chapter 4: Specifications
USB Flash Drives
USB Flash Drives
The USB-A serial port located on the front of the Inter-Tel 5000 Base Server receives a USB
flash drive that backs up Basic Voice Mail messages. Although other flash drives may operate
adequately with the system, the flash drives listed in Table 4-3 have passed compatibility testing
and are considered compatible with the Mitel 5000 platform. For details on backing up voice
mail messages, refer to the Inter-Tel 5000 Features and Programming Guide, part no.
580.8006.
Table 4-3. Compatible USB Flash Drives
Capacity
(MB)
Manufacturer
128
Axiom USB Drive
128
Cyclone Flash-Key
128
Fujifilm USB Drive
128
Imation USB Flash Drive
128
Lexar™ JumpDrive®
128
Memorex
128
Memorex TravelDrive™
128
Sony® MicroVault™
256
Viking
256
Viking InterWorks™
512
DiskGo Edge
512
Fujifilm USB Drive
512
Generic USB Flash Drive 2.0
512
Imation Pivot Flash Drive
512
Imation USB Flash Drive
512
Iomega Micro Mini
512
Kingston Data Traveller II
512
Lenovo
512
PNY Technologies
512
Verbatim
512
Viking InterWorks
1024
Kingston Data Traveler®
1024
Lexar JumpDrive
1024
SanDisk® Cruzer™ Mini
1024
Sony MicroVault
2048
SanDisk Cruzer Mini
2048
SanDisk Cruzer Titanium
2048
U.S. Modular Monster Drive
Mitel ® 5000 Installation Manual – Issue 3.0, October 2008
Page 4-25
Chapter 4: Specifications
Base Server Expansion Modules
Base Server Expansion Modules
This section describes the modules that can be installed in any of the three bays at the expand
the capability of the Mitel 5000 platforms. Expansion modules include:
• T1/E1/PRI Module, 1-port – T1, T1/PRI, E1/PRI
(PRI requires additional licensing)
• Dual T1/E1/PRI Module, 2-port – T1, T1/PRI, E1/PRI.
(PRI and second port require additional licensing)
• Loop Start Module, 2-port – LSM-2 (no longer in production)
• Loop Start Module, 4-port – LSM-4.
• Basic Rate Module–S, 2-port – BRM-S.
• Single Line Module, 4-port – SLM-4.
Single and Dual T1/E1/PRI Modules
The T1M and T1M-2 modules support T1, T1/PRI, and E1/PRI spans. T1 refers to a digital
method of transmitting voice and data. It is the 24-channel, time-division multiplex (TDM), 1.544
Mbps pulse code modulation (PCM) method used in the United States [Europe 2.048 Mbps].
The T1 standard, which was developed as a method of reducing cabling and increasing
transmission quality between distant COs, is a subset of a multi-level Digital Signal (DS)
scheme. T1 refers to the DS1 rate as transmitted across any type of media, such as copper
wire, optical fiber, or microwave.
Since each T1 span actually consists of 24 individual circuits (or channels) multiplexed together,
it is often less expensive to purchase a single T1 span than it is to purchase multiple individual
trunks. Each of the 24 T1 channels can be programmed as a Loop Start, Ground Start, DID,
E&M, or OPX (or as unequipped). Any combination is possible.
“Fractional” T1, often called FT1, is a special T1 service where only a portion of the 24 channels
are used and paid for. To implement FT1 equip only those circuits that are provided.
To interface with the public network, each T1M and T1M-2 module is equipped with an on-board
Channel Service Unit (CSU). Since the CSU is on-board, the programmer must select the line
build-out (LBO) attenuation, which is available from the T1 provider.
To use an external CSU instead, the module can be set to DSX mode. However, the module
and the external CSU must be located in the same building, and the cabling between them must
be no longer than 133 ft.
When a T1 span connects the system to the public network or to another telephone system, the
two endpoints must communicate at the same frequency. Since it is practically impossible for
both endpoints to have clocks running at identical frequencies, one endpoint is given master
clock status and the other endpoint is given slave clock status. The slave clock can then extract
and lock-on to the master clock frequency from the incoming T1 data. This master–slave
synchronization is programmed in the database. When connected to the public network, a T1,
T1/PRI or E1/PRI port should be designated as a public network slave.
When voice data is transmitted over a T1 span, a framing bit is added so that the receiving end
can recognize where the information begins and ends, which is effective as long as the clock
circuitry of the two endpoints is synchronized.
The system supports the two major types of framing schemes in use today: D4 Superframe,
which is the most common, and Extended Superframe (ESF), which is required to support
future ISDN and DMI features. For voice transmissions, D4 Superframe is adequate. ESF is
more reliable and efficient for data transmissions.
Page 4-26
Mitel ® 5000 Installation Manual – Issue 3.0, October 2008
Chapter 4: Specifications
Single and Dual T1/E1/PRI Modules
Digital information is transmitted over the T1 span as a series of 1s and 0s (e.g., 1000 0000
0000 0001...). If the stream of digits contains too many consecutive zeroes, the T1 clock
extraction circuitry will not operate correctly. To prevent this situation, T1 carrier equipment limits
the number of consecutive zeros. The Mitel system supports the two major types of zero code
suppression schemes in use today: Alternate Mark Inversion (AMI), also called bit-7 stuffing,
and Bipolar Eight Zero Substitution (B8ZS). Again, for voice transmissions, AMI is adequate.
However, for 64 Kbps clear channel data only transmissions, B8ZS is required.
Like the LBO attenuation, the framing scheme type and zero code suppression scheme type
are also available from the T1 provider. In fact, when ordering a T1 span, always request the
following information from the T1 provider:
• Framing scheme: D4 Superframe or ESF
• Zero code suppression scheme: AMI or B8ZS
• Recommended line build-out attenuation: 0 dB, 7.5 dB, 15 dB, or 22.5 dB
Each T1 port has circuitry to support up to 24 T1 span channels. The channels (or circuits) can
be any combination of loop start trunks, ground start trunks, DID trunks, E&M trunks, or OPX
circuits.
The T1M and T1M-2 modules are equipped with the following resources:
• LED indicators: Show the status of the module and circuits and to show T1 trunk alarms
and module-level error occurrences. For additional information about LEDs, see the
Diagnostics and Troubleshooting chapter in the Inter-Tel 5000 Features and Programming
Guide, part no. 580.8006.
• Digital span jack: (RJ-48C; 8-pin, 8-conductor jack) Connects a T1, T1/PRI, E1/PRI span
to the module. The T1M is equipped with one RJ-48C jack for the span and another RJ48C jack to connect test equipment to monitor the span. The T1M-2 is also equipped with
two RJ-48C jacks; however, both jacks are used for individual spans. The T1M-2 has no
RJ-48C jack for test equipment.
• DTMF transmitters: (T1M and T1M-2 modules only) Generates DTMF tones for traffic on
the T1M and T1M-2 modules. To use these transmitters, the Enable On-Module Dialing
flag must be enabled in DB Programming. Refer to the Inter-Tel 5000 Features and
Programming Guide, part no. 580.8006.
NOTE
The T1M and T1M-2 module DTMF transmitters are not shared resources.
Only the T1M and T1M-2 modules can use these transmitters.
Programming information that is specific to each T1/PRI installed in the system. For details,
refer to the Inter-Tel 5000 Features and Programming Guide, part no. 580.8006:
• Framing type: The type of framing scheme, D4 Superframe or Extended Superframe
(ESF), used by the T1 span connected to each module.
DB Programming will display an error message under the following
circumstances:
• Change the port type of one port if the other port is programmed
(not None).
• Change the Framing Type under a T1 port and the other port is
IMPORTANT
programmed (not None). This field also exists under the T1/PRI
port type, but it is OLM only.
DB Programming displays: WARNING: Changes to this field are only
recommended on an idle system as this may cause a short pause in
audio on the other port of this module (but no dropped calls). Would
you like to continue?
Mitel ® 5000 Installation Manual – Issue 3.0, October 2008
Page 4-27
Chapter 4: Specifications
Single and Dual T1/E1/PRI Modules
• Zero code suppression scheme: The type of zero suppression scheme, AMI (bit-7
stuffing) or Bipolar Eight Zero Substitution (B8ZS), used by the T1 span connected to each
module.
• Line build-out (LBO): The LBO attenuation of the T1 span connected to the module. This
value can be determined automatically by the system, or it can be set according to the T1
provider’s recommendation.
• Loop Length: (Applies only to T1 and T1/PRI modules.) This is displayed with a red “X” if
the Haul Mode is set to Long Haul. It also provides optional loop lengths pertaining to a
Short Haul configuration.
• Haul Mode: This applies only for a T1 or T1/PRI configuration (E1/PRIs do not display this
field).
• Reference clock programming: All T1M, T1M-2, and BRM-S modules and the
motherboard must share the same clock signal so they can be synchronized with all the
digital trunk interfaces (T1/PRI/BRI) connected to the system. This synchronization is
accomplished by allowing one of the digital trunk interfaces to act as the system reference
clock. The programmer must designate whether the digital trunk interface is a private
network master, private network slave, or a public network slave. This clock-type
assignment generates a prioritized list, which forces the public network slave interfaces to
the top of the priority list. You can further prioritize which interface should be higher in the
list, among interfaces of the same type.
If more than one digital trunk interface is installed in the system, the software uses the
Reference Clock list to determine a back up to the system reference clock. Then, if the
module acting as the system reference clock fails or is taken out of service, the next
module on the back-up priority list becomes the reference clock.
• Error diagnostics: If desired, the programmer can generate the current T1 or T1/PRI
error counts, by hour and by day, for the selected T1 port. The error counts are displayed
in tabular format.
• Error thresholds: The programmer can set numerical thresholds for certain T1 port errors
in terms of the number of errors per hour and number of errors per day. When a threshold
is exceeded, an error message is printed on the SMDR record.
The information that is programmed specific to each circuit (i.e., to each of the 24 channels) on
the T1 module includes:
• Circuit type: Each individual circuit can be programmed as a loop start, ground start, DID,
E&M, or OPX circuit.
• DTMF or dial-pulse signaling: When the system is in the default configuration, all trunk
circuits are configured for DTMF signaling. If necessary, some or all of the circuits can be
reprogrammed for dial-pulse signaling.
T1 circuits are assigned hardware address numbers according to the module’s bay in the
chassis and the location of the circuit on the module. For example, T1 circuit 3.1.21 is the 21st
circuit on the T1M or T1M-2 module installed in Bay 3 of the chassis.
Page 4-28
Mitel ® 5000 Installation Manual – Issue 3.0, October 2008
Chapter 4: Specifications
Special T1/E1 Cabling Requirements
Special T1/E1 Cabling Requirements
Mitel recommends that special high-speed data cable with the following characteristics be used
for all T1/E1 installations:
• 22 AWG (0.64 mm)
• Individually shielded two-pair (or with the transmit and receive pairs run in separate cables
or binder groups)
• ABAM or PIC (a level-3 cable designed specifically for the T-carrier transmission rate)
• Maximum capacitance of 15 pF/ft
• Maximum attenuation of 5 dB/1000 ft (300 m) at 772 kHz and 70 °F (21 °C)
NOTE
The programming prompts for LBO attenuation (and DSX mode, if used)
assume that T1/E1 cabling possessing the above characteristics is being
used. When transmitting over shorter distances, it may be possible to use
standard two-pair voice frequency cable instead; however, the programmer
may have to compensate by selecting a smaller LBO setting. Also, no matter
which type of cable is used, the transmit and receive pairs must be shielded
from each other or run in separate cables or binder groups.
T1M or T1M-2 Modules used for Private Networking
When using private networking to connect two nodes, each network span requires two T1M or
T1M-2 modules, one for each end of the span. If using the Telco to connect the private
networking span, order a clear channel, point-to-point T1 span from the service provider, for
each networking span. Do not order premium PRI service, even though PRI will be used.
NOTE
The Mitel system requires T1 channel 24 for the D-channel in any network span.
When a T1M or T1M-2 module is programmed for networking (Private Network switch type), the
system automatically creates a node trunk group. All B channels residing on the same T1M or
T1M-2 module are in the same node trunk group.
Mitel ® 5000 Installation Manual – Issue 3.0, October 2008
Page 4-29
Chapter 4: Specifications
Two-Port Loop Start Module
Two-Port Loop Start Module
Each two-port Loop Start Module (LSM-2) supports one or two analog loop start/CO trunks in
the United States, and each quad Loop Start Module (LSM-4) supports 1–4 of the same type
trunk. LSMs support the same number of local exchange trunks in Europe.
For optimal CO trunk transmission performance, each analog loop start trunk interface should
be “hybrid balanced” in DB programming. Hybrid balancing refers to selecting the balance
network that best matches the trunk’s impedance. To determine an appropriate hybrid balance
setting for analog loop start trunk interfaces, refer to the Inter-Tel 5000 Features and
Programming Guide, part no. 580.8006.
LSM circuits incorporate a self-resetting fuse that should never need replacement. If the fuse
should open momentarily—perhaps as the result of a lightning strike—it should reset within a
few seconds.
NOTICE
LSMs contain no field-replaceable parts. If any insurmountable problem with an LSM should
occur in the field, return the entire module to Mitel for testing and possible repair. Failure to
follow this policy will void the warranty on the module.
Two green LEDs show the status of the LSM-2. The LED labeled ONLINE indicates if any circuit
on the module is busy. The other LED, labeled REMOVE, lights up only when the system has
been powered down and the condition is safe to remove the module from the bay. Also, when
secured in the chassis bay, the metal front panel of the module connects to chassis ground to
suppress electromagnetic interference (EMI).
When the system is in the default configuration, all trunks are configured for DTMF signaling. If
necessary, some or all of the trunks can be reprogrammed for dial-pulse signaling through DB
Programming.
NOTE
Single line endpoints generate their own DTMF tones when dialing. If used on dialpulse trunks, both the DTMF tones generated by the endpoint and the dial-pulse
signals generated by the system are sent to the CO, which may result in a
problem if the CO recognizes both. To avoid this problem, single line sets should
be restricted to ARS-only when using dial-pulse trunks. Then, only the ARSgenerated dial-pulse signals will be sent to the CO.
CO circuits are assigned hardware address numbers according to the module’s bay in the
chassis and the location of the circuit on the module. For example, when using the initial
configuration (see paragraph 3.91), CO circuit 02.02.01 is the second circuit on the LSM-2 or
LSM-4 installed in bay 2. Each trunk module circuit is assigned a six-digit circuit number
XX.YY.ZZ, where XX = the module bay location (01–03), YY = the circuit number on the module
(01 or 02), and ZZ = whether the circuit has more than one purpose (currently, 01 only).
When the system is in the default configuration, the first four buttons on each endpoint are
assigned as CALL buttons for incoming call indication/access. The ANSWER button may also
be used to access incoming calls. No individual trunk buttons or trunk group buttons are
assigned. Button assignments can be designated in DB Programming. For more information,
refer to the Inter-Tel 5000 Features and Programming Guide, part no. 580.8006.
Page 4-30
Mitel ® 5000 Installation Manual – Issue 3.0, October 2008
Chapter 4: Specifications
Four-Port Loop Start Module
Four-Port Loop Start Module
The four-port loop start module (LSM-4) supports four CO [local exchange] trunks. The LSM-4
functions the same as the LSM-2. For complete installation instructions, see “Installing a FourPort Loop Start Module (LSM-4)” on page 5-47. For programming refer to Inter-Tel 5000
Features and Programming Guide, part no. 580.8006.
Basic Rate Module
IMPORTANT
Basic Rate Interface (BRI) capability is supported only in Mitel Europe
installations.
The Basic Rate Module (BRM-S) provides Basic Rate S/T interface ISDN service for
communication and is available only in the European market. Each of the two BRI ports consists
of two bearer (B) channels and one data (D) channel with High-level Data Link Control (HDLC)
support. Each BRM-S module in the chassis supports a total of four BRI trunks.
The ports provide full I.430 ITU S/T ISDN support for trunks (TE mode), but does not support
stations (NT) mode. The BRM-S does not support video conferencing or BRI devices and
endpoints.
Four-Port Single Line Module Characteristics
Only one SLM-4 can be installed in an Inter-Tel 5000 Base Server.
The Single Line (SL) application installs as a part of the Mitel 5000 Version–Release suite of
software packages, along with other application packages that support SLM-4 functionality,
such as DB Programming, Call Processing, etc.
The SLM-4:
• Is hot-swappable.
• Is designed to be inserted into one of the three bays on the back side of the Inter-Tel 5000
Base Server. The form factor used for the SLM-4 is the same as used for the T1M or T1M2, LSM-2, LSM-4, and BRM-S modules.
• Supports two green status LEDs. One shows ONLINE status, and the other shows the
ready to REMOVE status. The SLM-4 provides two RJ-14 jacks, each wired to USOC
T568A specifications. Together, the two jacks support four single line analog endpoints.
• Does not require software feature licensing.
• Does not operate on a v1.x system. If you plug an SLM-4 into a v1.x system, a warning
message appears and Message Print indicates the board will not come online.
• Does not support dial pulse dialing.
• Does not respond to the Auto Equip feature—SLM-4 modules must be programmed
manually in DB Programming. For instructions, refer to the Inter-Tel 5000 Features and
Programming Guide, part no. 580.8006.
Mitel ® 5000 Installation Manual – Issue 3.0, October 2008
Page 4-31
Chapter 4: Specifications
Processing Server (PS-1)
Processing Server (PS-1)
This section describes specifications relevant to the PS-1.
Processing Server Characteristics
Table 4-4 summarizes the physical, electrical, and server computing characteristics of the PS-1.
For a summary of suitable environmental characteristics see “Environmental Requirements” on
page 4-4.
Table 4-4. PS-1 Specifications
Characteristic
Description
Physical dimensions
Length
14.50 in. (36.83 cm)
Width
17.00 in. (43.18 cm)
Height
01.75 in. (04.45 cm)—1 U
Weight
9 lb (4.08 kg), approximately
Electrical
Power requirements
105–125 VAC, 57–63 Hz (USA);
240 VAC, 50 Hz [Europe]
Server computer
Processor
Intel® Pentium 4, 2.8 GHz
Operating System
Linux® Debian v2.6
Hard drive capacity
80 GB
RAM
1 GB
System interfaces
LAN
100 Mbps Ethernet
online Monitor (OLM)
RS-232, DB-9 serial port with null modem cable
Security Key
USB 2.0
PS-1 Licensing
Adding the PS-1 to the Mitel 5000 platform requires the following licensing, at a minimum:
• Mitel 5000 v2.0 software, part number 840.0622
• Mitel CS-5600 License Base, part number 840.0624
IMPORTANT
When installing v2.x software, the license must match the system CPU
type. A Mitel CS-5200 system requires a CS-5200 license; a Mitel CS5400 system requires a CS-5400 license; and, a Mitel CS-5600 system
requires a CS-5600 license.
Additional licensing is required if upgrading a system from an earlier hardware version, if using
IP Networking, and/or adding certain endpoints. For details of required licensing, see “Licensing
and Mitel CS-5600 Upgrades” on page 3-16.
Page 4-32
Mitel ® 5000 Installation Manual – Issue 3.0, October 2008
Chapter 4: Specifications
PS-1 BIOS Settings
PS-1 BIOS Settings
The Basic Input/Output System (BIOS) settings of the PC in the PS-1 chassis have been
customized to control specifically the way Mitel CS-5600 software interacts with system
hardware. Because the default BIOS settings have been modified to allow the system to
operate, the BIOS settings must remain as they came from the factory.
NOTICE
Incorrect or Defaulted BIOS Settings Will Make System Inoperable. If for any reason the
BIOS settings of the PS-1 are defaulted or changed from the way they were shipped from the
factory, contact Mitel Product Support to receive instructions for correctly reprogramming the
BIOS.
PS-1 Connection Interfaces
This section provides line drawings of the front and rear views of the PS-1 chassis.
NOTE
The On/Off switch on the front of the chassis controls power to the system, and it
should remain On at all times.
Figure 4-1. Processing Server (PS-1) Chassis, Front View Without Cover
Compact Disk (CD) drive tray
(Use for initial installation
and for system recovery)
Blue LED
indicates
Power On
USB Port (Use for USB Security Key
ONLY if cover is open
or not attached.
See Rear View.)
Fans
DVD
+
Green LED
Power System
indicates
Active
On/Off Reset
Hard Drive Switch Button
NOTICE
Accidental System Reset. Do not mount the PS-1 in a rack directly above the Base Server. If
you do, pulling down the front cover (not shown) of the PS-1 may cause the edge of the cover to
press the three middle buttons on the LCD panel controls, causing the system to reset. If you
mount the PS-1 in the same rack as the Base Server, make sure the hinged front cover of the
does not open onto the front of the Base Server. Mitel recommends mounting the PS-1 below or
away from the Base Server and Digital Expansion Interface (DEI) units.
Mitel ® 5000 Installation Manual – Issue 3.0, October 2008
Page 4-33
Chapter 4: Specifications
Digital Expansion Interface
Figure 4-2 shows the back of the PS-1 unit.
Figure 4-2. Processing Server (PS-1) Chassis, Back View
Monitor
(not included)
USB Security Key
(Insert in any
USB port.)
RJ-45 to LAN
DB-15
VGA
Connection
to monitor
Power
On/Off
Switch
or
Mouse
(optional)
Keyboard
USB ports
Null modem
with Hardware Flow Control (part number 804.2605)
Fan
RS-232 cable
DB9M to DB9F Straight-through
(part number 813.1683)
Connect to Laptop PC
Monitor
power cord
PS-1
power cord
Isolated, dedicated, single-phase commercial power source
Digital Expansion Interface
This section describes the specifications of the Digital Expansion Interface (DEI) unit and the
modules that it supports—the Digital Endpoint Module (DEM-16) and the eight-port Single Line
Module (SLM-8).
DEI Unit
Physical dimensions of the DEI unit appear in Table 4-5.
Table 4-5. DEI Physical Dimensions
Dimension
Measurement (Metric)
Length
14.50 in. (36.83 cm)
Width
17.00 in. (43.18 cm)
Height
01.75 in. (4.45 cm) (1 U)
Weight
09.00 lb. (4.08 kg)
A green power (PWR) LED on the front of the chassis indicates whether the DEI is plugged-in
to an active electrical circuit. Also, three sets of LEDs show the status of the three module bays.
The active status of each bay is shown by a green online (ON) LED and a yellow BUSY LED.
Three bays at the back of the chassis accept DEM-16 modules, and the following connection
interfaces are provided:
• The system power cord socket with built-in fuse holder (fuse is 250 V, 2 A). Power supply
requirements appear in “Power Supply” on page 4-7.
• Two DB-15 connectors. The 15-pin D-subminiature socket connectors provide electrical
interface to the Inter-Tel 5000 Base Server chassis and to either another DEI or an
optional, external Voice Processing Unit or Enterprise Messaging system.
• An earth ground lug.
Page 4-34
Mitel ® 5000 Installation Manual – Issue 3.0, October 2008
Chapter 4: Specifications
Digital Endpoint Module
Digital Endpoint Module
The Digital Endpoint Module (DEM-16) supports 16 digital endpoints, and three DEM-16s can
be installed in a DEI.
The status for each DEM-16 is shown with LEDs on the faceplate of the module. When lit, a
yellow LED indicates that at least one circuit on the DEM-16 is BUSY, as printed on the module.
When lit, a green LED indicates the module is ONLINE. The online/Off-line status for each
module also appears on the Administrative Web Interface.
DEM-16 ports are programmed in DB Programming. For details, refer to the Inter-Tel 5000
Features and Programming Guide, part no. 580.8006.
Eight-Port Single Line Module Characteristics
Up to three SLM-8 modules can be installed in each Mitel Digital Expansion Interface (DEI) unit
attached to an Inter-Tel 5000 Base Server running the latest software release.
The SLM-8:
• Is hot swappable.
• Is designed to be inserted into one of the three bays of the Mitel 5000 Digital Expansion
Interface (DEI) chassis. The form factor used for the SLM-8 is the same as used for the
Digital Endpoint Module (DEM-16) module.
• Supports two green status LEDs. One shows ONLINE status, and the other shows the
ready to REMOVE status. The SLM-8 provides four RJ-14 jacks, each wired to USOC
T568A specifications. Together, the jacks support eight single line analog endpoints.
• Does not require software feature licensing.
• Does not operate on a v1.x or on the initial release of v2.1 software. If you plug an SLM-8
into a v1.x or an initial release v2.1 system, a warning message displays and Message
Print indicates that the board will not come online.
• Does not support dial pulse dialing.
Audio Saturation Limit for Single Line Ports
If the audio power level feeding into a single line port exceeds the industry standard, distorted
audio may be heard on the conversation. To the listener, the distortion may be an unexpected
burst of noise that repeats.
This unusual event may occur on any single line voice port supported by v2.1 or later. The
endpoint may be connected to a Single Line Module (SLM-4 or -8) or to either of the single line
ports built-in to the Inter-Tel 5000 Base Server. Distortion-related factors include the makes and
models of endpoints being used and the volume level of the speaker. The root cause of the
problem has been traced to the analog single line interfaces between the Mitel 5000 platform
and endpoints that transmit at abnormally high power levels.
NOTICE
Audio Distortion Possible. Distorted audio may occur with various analog single line
endpoints if audio input volume exceeds the industry standard.
For troubleshooting and corrective action suggestions, refer to the Inter-Tel 5000 Features and
Programming Guide, part no. 580.8006.
Mitel ® 5000 Installation Manual – Issue 3.0, October 2008
Page 4-35
Chapter 4: Specifications
Auto NAT Detection and Digital Equipment
Auto NAT Detection and Digital Equipment
Software Version Requirements
For the Auto NAT Detection feature to function, the system must be running Call Processing
v1.2 or later.
Endpoints
Mitel IP endpoints do not support the Automatic Network Address Translation (NAT) address
type. In DB Programming, you must select either Native or NAT for private and public networks.
Refer to the Mitel 5000 Features and Programming Guide, part number 580.8006, to configure
the NAT address type.
With applicable licensing, Auto NAT Detection supports multi-protocol endpoint Models 8600,
8620, 8622, 8662, and 8690; Model 8660, IP PhonePlus, and IP Single-Line Adapter (IP SLA);
and, the Model 8602 IP softphone.
Auto NAT Detection does not support the following endpoints. The NAT setting must be set
manually for:
• Wireless IP endpoint Models 8664, 8665, and 8668.
• IP gateway trunks, neither Station Initiation Protocol (SIP) nor Media Gateway Control
Protocol (MGCP).
• Multi-protocol IP endpoints in SIP mode.
• Non-Mitel SIP endpoints.
• Model 8601 SoftPhone for Pocket PC application.
• SIP Server.
• Audio and Web Conferencing (AWC)
Page 4-36
Mitel ® 5000 Installation Manual – Issue 3.0, October 2008
Chapter 4: Specifications
System Resources with DEI
System Resources with DEI
Installing up to four DEI units to a Mitel platform increases the number of resources available for
each of three DEM-16s. Table 4-6 summarizes the number of resources available with the main
chassis and with each DEM-16.
Table 4-6. Resources Available with Chassis and DEM-16s
Mitel
Base Server
Chassis
Each DEM-16
DTMF Receiver
6
4
Caller ID (CLID) Receiver
4
0
Caller ID (CLID) Transmitter
0
4
Speakerphone
0
16
Type of Resource
Table 4-7 summarizes the resources available for three possible system configurations.
Table 4-7. System Resource Limits by Configuration
DTMF
Receivers
Caller ID
Receivers
Caller ID
Transmitters
Speakerph
ones
Stand-alone
Mitel platform
6
4
0
0
Mitel platform
with one DEI
18
4
12
48
Mitel platform
with two DEIs
30
4
24
96
Configuration
Cabling for Digital Capability
A 15 ft 25-pair cable is available for connecting DEM-16 ports to the main distribution frame
(MDF). The cable, part number 813.1814, is terminated on one end with four 8-pin, 8-conductor
plugs wired to RJ-45 specifications using the 568B standard. The other end of the cable is
terminated with a male Amphenol connector. The cable is designed for quick connection of
digital endpoints that have been terminated on a female Amphenol-type connector at the MDF.
For usage instructions, see “Connecting CO Trunks to a U.S. System” on page 5-26.
Digital Endpoints
The following digital endpoints can be installed on DEI equipment attached to the Mitel platform:
• Models 8500, 8520, and 8560
• Basic, Standard, Executive, and Associate models
• Single-Line Adapter
• Modem Data Port Module (MDPM)
Personal Computer Data Port Module (PCDPM): Audio only. System software does not
support serial communication.
Mitel ® 5000 Installation Manual – Issue 3.0, October 2008
Page 4-37
Chapter 4: Specifications
Basic Voice Mail (BVM)
Basic Voice Mail (BVM)
This section describes the measurable parameters of the Basic Voice Mail feature, including
voice mail storage limits, ports available for licensing on the Communication Servers, voice mail
recording process, and authentication supported.
Mitel CS-5200 and CS-5400 platforms support up to 16 licensed BVM ports. However, the ports
are now allocated dynamically up to the number of valid BVM licenses. As with previous
versions, ports are licensed four at a time and may not be licensed individually. Running on an
Mitel 5600 platform, BVM is hosted on the PS-1. BVM on the PS-1 can be configured with 0, 4,
8, 12, or 16 ports in accordance with feature licensing.
Table 4-8 shows the relationship between the number of valid BVM licenses and the maximum
number of active BVM ports in a system. DBP does not allow dynamic allocation of more BVM
ports than are licensed for the system and that have been manually programmed into the
appropriate Time Slot Group.
Table 4-8. BVM Licenses, Time Slot Group Ports, and IP Resources Allocated
Valid BVM Mail Port
Licenses
Ports Defined in
Time Slot Group
IP Resources
Dynamically Allocated
0
0
0
4
4
0–4
8
(4 + 4)
8
0–8
12
(4 + 4 + 4)
12
0–12
16
(4 + 4 + 4 + 4)
16
0–16
Active BVM Voice
Mail Ports
If all of the IP resources available for BVM are in use, the next caller is camped-on to wait for a
resource to become available. For additional information, refer to the Voice Processing chapter
in the Inter-Tel 5000 Features and Programming Guide, part no. 580.8006.
BVM Voice Mail Ports
Having 16 BVM ports available on the Mitel CS-5200 and CS-5400 platforms provides
increased availability and response time for voice processor applications. Under normal
business conditions, increased ports allow fast response to applications such as voice mail,
Message Notification/Retrieval, Automated Attendant, and Record-A-Call.
The Inter-Tel 5000 platform is equipped with four licensed BVM ports in its default configuration
without an external voice processing PC. Additional four-port licenses may be purchased. An
Mitel CS-5200 or CS-5400 system can be programmed with 0, 4, or 8 ports reserved for voice
mail. The CS-5600 system can be programmed for 0, 4, 8, 12, or 16 ports. The user can
reserve up to the maximum ports supported by the license installed. For programming
instructions, refer to the Inter-Tel 5000 Features and Programming Guide, part no. 580.8006.
The Mitel CS-5600 supports 16 BVM ports on the PS-1. When the PS-1 is installed, the eightport BVM feature is disabled. The CS-5600 initially provides four BVM ports and additional ports
can be licensed and added in four-port increments. For programming instructions, refer to the
Inter-Tel 5000 Features and Programming Guide, part no. 580.8006.
Page 4-38
Mitel ® 5000 Installation Manual – Issue 3.0, October 2008
Chapter 4: Specifications
BVM Forward to E-Mail Characteristics
BVM Forward to E-Mail Characteristics
BVM Forward to E-Mail possesses the following characteristics:
• Forward to e-mail for SMTP–MIME servers only.
• Forward voice mail as .wav file attachments in e-mail messages.
• The .wav encoding format plays on a standard PC running Windows®.
Initial Recording Handling
If Forward and Copy is selected as the e-mail forwarding type in DB Programming, the initial
recording is left at the voice mailbox until deleted using voice mail.
NOTE
If both Remote Messaging and Forward to E-Mail features are enabled, the
Forward and Copy option must be selected. If the Forward Only option is selected,
the user will not receive Remote Messaging notifications.
If Forward is selected at the voice mailbox as the e-mail forwarding type, the initial recording is
deleted. Use this setting with caution because e-mail delivery on the Internet is not guaranteed.
Only one copy is kept on the system of the initial recording.
Temporary Files
Temporary files are used during the conversion from the initial recorded message to the SMTP–
MIME format. The temporary storage required may impact overall BVM storage capacity.
Authentication Supported by BVM
Users do not need to configure anything for authentication beyond setting their username and
password. However, the SMTP mail software package supports three types of authentication
that occur automatically when connecting with the SMTP server. The three types of
authentication are:
• PLAIN
• LOGIN
• CRAM-MD5
This package does not support Microsoft SPA (Secure Password Authentication), also known
as NTLM. If the server supports CRAM-MD5, this is the most secure method supported.
Many SMTP servers validate messages to prevent what is referred to as an “open relay.” These
SMTP servers require that the source and destination addresses are valid e-mail domains.
Improper configuration of the settings within the Mitel 5000 may result in rejected e-mail
messages.
End-users may also use anti-spam software to filter out unwanted e-mail messages. End-users
may need to configure their anti-spam software to allow the forwarded voice mail to reach the
user's in-box.
Mitel ® 5000 Installation Manual – Issue 3.0, October 2008
Page 4-39
Chapter 4: Specifications
Trunking
Trunking
The Mitel platform supports various combinations of trunking across T1, T1/PRI, and E1/PRI
spans, IP gateway trunks, and loop start trunks.
Trunking Capacity and Constraints
The Mitel platform supports up to 104 trunk groups in DB Programming and each trunk group
supports a variable number of CO and IP gateway trunks. Up to 208 trunks can be programmed
per trunk group in DB Programming, but the actual number of trunks that can be connected
depends on the physical constraints of the system. For capacity, see “System Capacities” on
page 4-14. For programming, refer to the Inter-Tel 5000 Features and Programming Guide, part
no. 580.8006.
For hard-wired, non-IP gateway trunking, system capacity is determined by the number of bays
equipped with T1M, T1M-2, or LSM-2 modules. The system provides three bays for multitrunk
modules in addition to two loop start trunk circuits built-in to a single port on the back of the
Base Server.
For software-licensed IP gateway trunking using SIP gateway trunks, actual capacity is
determined by the number of IP resources and the installation of enabling hardware. Without
Basic Voice Mail enabled, the Mitel CS-5200 provides 32 IP resources and the Mitel CS-5400 or
CS-5600 provides 120 IP resources. Based on requirements, the customer provides appropriate
equipment to enable IP gateway trunking. For a detailed description of the hardware and
procedures required for installation of SIP or MGCP IP gateway trunks, see “Installing SIP
Gateways” on page 5-200.
Hard-Wired (Non-IP Gateway) Trunking
In an all-trunk system equipped with required devices and licensing, the Mitel platform could
support from 2 to 182 hard-wired, non-IP gateway trunks. At the low end of the range, the
system could operate on the two loop start trunk circuits that are built-in on the chassis. No
trunk modules would be installed in the bays. At the high end of the range, 182 trunks would be
available in a system equipped with six E1/PRI spans.
Page 4-40
Mitel ® 5000 Installation Manual – Issue 3.0, October 2008
Chapter 4: Specifications
Capacities of All-Trunk systems
Capacities of All-Trunk systems
Table 4-9 summarizes system trunk capacity in terms of the trunk module type and the possible
number of trunks provided in all-trunk systems. A typical installation may include a combination
of hard-wire trunks and IP gateway trunks. See also Table 4-1 on page 4-19 for additional
capacities, including IP.
Table 4-9. Trunking Capacity by Type of Module
Module
Type
Trunk/Span
Type
Modules
Ports or
Channels
per Module
Trunk
Capacity
Built-In
LS Ports
Total
Trunks
T1M
E1/PRI
3
30
90
2
92
T1M-2
E1/PRI
3
30
180
2
182
T1M
T1
3
24
72
2
74
T1M-2
T1
3
24
144
2
146
T1M
T1/PRI
3
23
69
2
71
T1M-2
T1/PRI
3
23
138
2
140
LSM-2a
Loop Start
3
2
6
2
8
LSM-4
Loop Start
3
4
12
2
14
2
34
2
34
NA–CS-5200
IP Gateway
Trunksb
0
N/A
323
NA–CS-5400
or CS-5600
IP Gateway
Trunks2
0
N/A
32 c
a. No longer in production.
b. Requires licensing and installation of enabling hardware.
c. Lab-test to 32 trunks. Actual capacity depends on the availability of IP resources, the vocoder used,
and the system configuration.
Mitel ® 5000 Installation Manual – Issue 3.0, October 2008
Page 4-41
Chapter 4: Specifications
Endpoints
Endpoints
A variety of IP endpoints can be used on the Mitel platform. The combination of endpoints
depends on the number and type of endpoint modules installed. For endpoint illustrations and
endpoint feature description, refer to the Inter-Tel 5000 Features and Programming Guide, part
no. 580.8006.
At least one display endpoint should be installed to allow an administrator the capability of
seeing system alarm messages, program system data, and receive unsupervised CO recalls.
When the system is in the default configuration, extension number 1000 is preassigned as an
administrator and as the primary attendant.
Optional Headsets
NOTE
A headset may be attached to endpoints by unplugging the handset from the
handset jack on the base of the endpoint, plugging the headset into the handset
jack, and entering a feature code to enable the headset. The Speaker button,
which is used to turn the headset on and off, is lit when placing and receiving calls
and unlit when the headset is not in use. The endsets are compatible with industrystandard, 4-conductor, modular headsets that have electret microphones. For
installation instructions, see “Installing IP and Multi-Protocol Endpoints” on page 5106.
The Model 8620/8622, 8660, and 8662 endpoints have dedicated headset jacks on
the rear of the endpoint. This allows the endset to have a headset and handset
plugged in simultaneously. The headset, however, must still be enabled using the
feature code. The Speaker button on the Model 8620/8622 and Model 8660
endsets is used to turn the headset on and off and to indicate when the headset is
not in use. In addition, the hookswitch is enabled even when the headset is turned
on. This allows the user to answer a call with the handset without having to disable
the headset.
IP Devices
The Inter-Tel Protocol (ITP) IP PhonePlus, multi-protocol endpoints, and IP Single Line
Adapters (SLA) provide the functionality that allows the user to make calls through the IP
network to the converged communications platform.
The Model 8690 is a multi-protocol display endpoint that uses Windows CE as the interface.
The IP devices operate the same as their counterparts installed directly on the system, except
that IP devices:
• Cannot use a MDPM.
• Cannot support a full DSS/BLF.
• Do not support Desktop OAI applications.
• Do not need to support the Enhanced Speakerphone Mode feature.
The IP SLA operates like a standard single line endpoint.
Page 4-42
Mitel ® 5000 Installation Manual – Issue 3.0, October 2008
Chapter 4: Specifications
Multi-Protocol Endpoints
Multi-Protocol Endpoints
The following multi-protocol endpoints support the multi-protocol (ITP) mode and restricted
functionality of the Session Initiation Protocol (SIP) mode:
• Model 8600 – No Display
• Model 8620/8622 – With 2-Line Display
• Model 8662 – With 6-Line Display
• Model 8690 – With Multimedia Touchscreen
Multi-functional endpoints operate differently when in SIP mode rather than ITP mode. For
details about the features available and how to program an endpoint to operate in SIP mode,
refer to the SIP Server Installation and Configuration Manual, part number 835.2605.
To operate in SIP mode, SIP Server v1.1 is required.
IMPORTANT
The software license regulates the number of multi-protocol endpoints that can be operated on
the system. Features supported on multi-protocol endpoints appear in Table 4-10 on page 4-43.
Table 4-10. Multi-Protocol Endpoint Features
Feature
Model
8600
2-Line Display
Model
8620
Model
8622
Model
8662
Model
8690
X
X
X
2-Line Display with 2 Ethernet Ports
X
6-Line Display
12-Key Push button Keypad
X
X
X
X
ITP Mode
X
X
X
X
X
SIP Mode
X
X
X
X
X
X
Dedicated Headset Jack
X
X
X
Call and Intercom Buttons
X
X
X
X
Hearing Aid Compatible (HAC)
Handset
X
X
X
X
X
Hold Button
X
X
X
X
X
X
X
Menu Buttons
Message Lamp
X
X
X
X
X
Microphone
X
X
X
X
X
X
X
X
Programmable
Buttons*
Ring and Voice Volume Control
X
X
X
X
X
Speaker
X
X
X
X
X
Speakerphone On/Off Control
X
X
X
X
Special Button
X
X
X
X
X
Stylus
X
Touch Screen Display with
Windows® CE-OS
X
* Can be programmed as a feature, secondary extension, or DSS button.
Mitel ® 5000 Installation Manual – Issue 3.0, October 2008
Page 4-43
Chapter 4: Specifications
IP (Only) Endpoints
IP (Only) Endpoints
The Mitel 5000 platforms support the following IP-only endpoints:
•
•
•
•
•
•
•
Model 8660 – 6-Line Display
Model 8664 – 2-Line Display 802.11b Wireless
Model 8665 – 2-Line Display 802.11b Wireless
Model 8668 – 2-Line Display 802.11b Wireless
Axxess (10Base-T) IP PhonePlus, which operates in multi-protocol (ITP) mode
Eclipse IP PhonePlus, which operates in ITP mode
Mitel Model 5000-series endpoints
Mitel IP Endpoint Specifications
Table 4-11 shows Mitel IP endpoint specifications.
Table 4-11. Mitel IP Endpoint Specificationsa
Specification
Model 5212
Model 5224
Size (L x W x H)
Model 5330
9.5” x 8” x 4.5”
(24 cm x 20.5 cm x 12 cm)
Ports
Power
2
Output: 48VDC
250 mA
Output: 48VDC
250 mA
Output: 48VDC
250 mA
24VDC 1.7A
(reserved for future
use)
802.3af PoE
Input: 100V to 240V
50 to 60 Hz
Input: 100V to 240V
50 to 60 Hz
Input: 100V to 240V 50 to 60 Hz
LAN Power: 802.3af
PoE
LAN Power: 802.3af
PoE
LAN Power: 802.3af PoE
Power
Consumption
3.9 W
Processor Type
Processor Speed
DSPs
N/A
DSP Speed
N/A
Silicon (Processor)
Model 5340
4.8 W
ARM946E-S
MIPS
140 MHz
165 MHz
1
74 MHz
125 MHz
0.18µ CMOS
0.13µ CMOS
N/A
G.722
(currently not supported)
RAM
8 MB
16 MB
ROM
2 MB
8 MB
Codec/Wideband
Voice Traffic
RTP over UDP
Signaling
MiNet over TCP
Ethernet/Voice QoS
IEEE 802.1p/q
Weight
2.8 lbs. (1.3 kg)
Mean Time Before
Failures (MTBF)
Codec/Compression
10 years
G.711, G.729a
a. Not all features are supported across all IP platforms.
Page 4-44
Mitel ® 5000 Installation Manual – Issue 3.0, October 2008
Chapter 4: Specifications
Mitel IP Endpoint Environmental Conditions
Mitel IP Endpoint Environmental Conditions
Table 4-12 shows recommended Mitel IP endpoint environmental conditions.
Table 4-12. Environmental Conditions
Temperature
Humidity
Operational: 40°F to 120°F (4°C to 49°C)
95% (non-condensing)
Storage: –40°F to 150°F (–40°C to 66°C)
15% (non-condensing)
Mitel IP Endpoint Regulatory Standards
Table 4-13 shows Mitel endpoint electromagnetic compatibility (EMC) and safety regulatory
standards.
Table 4-13. EMC and Safety Regulatory Standards
Standard
EMC
Safety
Canada
USA
EU
ICES-003 Issue 3
CFR Title 47 Part 15
(Class B)
RTTE Directive
(1999/5/EC)
EN55024: 1998
EN55022: 1998
CAN/CSA/CSAC22.2 No. 60950-00
UL60950
ANSI/NFPA 70
RTTE Directive
(1999/5/EC)
EN60950: 2000
Mitel and Inter-Tel IP Endpoint Differences
The following are differences in behavior between Mitel IP endpoints Inter-Tel IP endpoints.
• When using a Mitel IP endpoint, you cannot use the handset or speakerphone when the
endpoint is in Headset Mode. Inter-Tel endpoints allow you to use the handset or
speakerphone when the endpoint is in Headset Mode.
• Mitel IP endpoints automatically save volume levels (you do not have to press the center
of the Volume button to save volume levels as with Inter-Tel endpoints). Also, saved
volume levels do not return to the default state after using the feature (Inter-Tel endpoints
return to the default volume levels after use if you do not press the center of the Volume
button to save the volume level).
• The Model 5212 uses half-duplex audio when using the speakerphone (both parties
cannot talk at the same time).
• Mitel IP endpoints register input when buttons are released. Inter-Tel IP endpoints register
input when buttons are pressed.
• Mitel IP endpoints can display 20 characters on each display line—Inter-Tel IP endpoints
display 16 characters.
• Mitel IP endpoints have a different set of ring tones than Inter-Tel endpoints.
• Mitel IP endpoints do not have external speaker activation tones when feature buttons are
pressed (for example, DND, Redial, Outgoing)—Inter-Tel endpoints do.
• Mitel IP endpoints have different feature error alert tones (for example, when an incorrect
feature code is entered). Inter-Tel IP endpoint alert tones resemble a “busy signal.” Mitel
IP endpoints use four short tones for error alerts.
• The feature splash tone on Mitel IP endpoints (the tone heard on the handset when
features are activated) interrupts the voice audio stream. For example, when on a call with
an Inter-Tel IP endpoint, some features notify the user that the feature has been activated
with a tone. When this occurs on an Inter-Tel IP endpoint, the tone and the audio stream
are heard at the same time (the tone is in the “background”). On a Mitel IP endpoint,
feature activation tones supersede (interrupt) the audio stream.
Mitel ® 5000 Installation Manual – Issue 3.0, October 2008
Page 4-45
Chapter 4: Specifications
Mitel and Inter-Tel IP Endpoint Differences
• The DND alert tone generated on a Mitel IP endpoint differs from the DND alert tone
generated on an Inter-Tel IP endpoint.
• Speakerphone (handsfree) volume is generally lower on Mitel IP endpoints when
compared to Inter-Tel IP endpoints. This includes both DTMF and voice audio.
• The Models 5330 and 5340 have Navigation Page buttons located below the LCD to
navigate between the three display pages. If you navigate to the second or third pages,
you must use the Navigation Page buttons to return to the first page. (You are not
automatically returned to the first page after using features or when the endpoint is idle.)
The Home button (
) on the Model 5340 also returns you to the first page.
• The Models 5330 and 5340 have self-labeling buttons (they do not use designation cards).
• Several Mitel IP endpoint feature buttons behave differently than Inter-Tel feature buttons.
Mitel feature buttons descriptions are shown in the Inter-Tel 5000 Features and
Programming Guide, part no. 580.8006.
• Mitel IP endpoints do not support the Automatic Network Address Translation (NAT)
address type. In DB Programming, you must select either Native or NAT for private and
public networks. Refer to the Inter-Tel 5000 Features and Programming Guide, part no.
580.8006 to configure the NAT address type.
• On Mitel 5000 systems, the Mitel Model 5340 endpoint Backlight Timer is set for five
minutes of inactivity (no button presses or audio, including music). After five minutes of
inactivity, the display dims to 20% of the maximum brightness (the display backlight cannot
be turned off). You cannot adjust these default settings. On Mitel 3300 systems, the
Backlight Timer and percentage of maximum brightness settings are adjustable.
See Table 4-14 for a description of the Mitel IP Endpoint feature buttons. Refer to the user
guides for any Mitel or Inter-Tel endpoints for additional information on a specific model type.
Table 4-14. Mitel IP Endpoint Feature Buttons
Button
Action
(Up)
• Provide volume control for the ringer, handset, and speaker.
(Down)
• Scroll through options in some features.
(Speaker)
• Activates Handsfree Mode (speakerphone).
• Activates features.
(Mute)
Temporarily turns off the microphone during a call.
(Applications/ Models 5330 and 5340: Activates the Application menu.
Directory)
Models 5212 and 5224: Activates the Directory.
(Special)
(Redial)
(Hold)
Activates features while on active calls. The
(Special) button does
not cancel features. The Star button (*) cancels features.
Calls the last external number dialed. Does not redial internal numbers.
• Places the current call on hold.
• Left/backspace when entering dialpad characters.
(Transfer)
• Transfers the current call.
• Right/forward when entering dialpad characters.
(Message)
• Connects to the voice mailbox and flashes when messages are
waiting.
• Toggles between Alpha Mode and Numeric Mode when entering
dialpad characters.
Page 4-46
Mitel ® 5000 Installation Manual – Issue 3.0, October 2008
Chapter 4: Specifications
Wireless IP Endpoints
Wireless IP Endpoints
Models 8664, 8665, and 8668 are compact wireless endpoints that operate in ITP mode. To
operate, a NetLink SVP (SpectraLink® Voice check box Priority) server is required. For details,
refer to the SVP Server and Model 8664/8665/8668 Installation Manual, part number 935.4521.
Features supported on IP and wireless endpoints appear in Table 4-15.
Table 4-15. IP and Wireless IP Endpoint Features
Feature
4-Line Display
Model
8664
Model
8665
X
X
Model
8660
6-Line Display
6-Line Display with 2 Ethernet Ports
Axxess
IP PhonePlus
Eclipse
IP PhonePlus
X
X
X
X
X
12-Key Push button Keypad
X
X
Battery Pack and Charger
X
X
X
Dedicated Headset Jack
X
Call & Intercom Buttons
X
X
X
Hearing Aid Compatible (HAC) Handset
X
X
X
X
Xa
X
Hold Button (Red)
ITP Mode
X
X
X
X
X
Menu Buttons
X
X
X
X
X
Message Lamp
X
Microphone
X
X
X
X
X
X
X
X
X
X
X
X
X
Speaker
X
X
X
Speakerphone On/Off Control
X
X
X
Special Button
X
X
X
Programmable
Buttonsb
Push-To-Talk
X
Ring and Voice Volume Control
X
X
a. The Hold button is not red.
b. Can be programmed as a feature, secondary extension, or DSS button.
SIP (Only) Softphones
The Mitel platform supports the Model 8601 SoftPhone for Pocket PC and the Model 8602
softphone application.
Model 8602
Model 8602 application software is distributed separately from the system software.
Performance and interoperability is equivalent to hard IP endpoints. For details, refer to the
Model 8602 User Guide, part number 835.3019.
Model 8601 for Pocket PC
The Model 8601 is a software-based SIP softphone that runs on selected Pocket PC 2002 or
later Personal Digital Assistant (PDA) platforms. For information about installation and
programming, refer to the Model 8601 Installation Manual, part number 835.2736.
Mitel ® 5000 Installation Manual – Issue 3.0, October 2008
Page 4-47
Chapter 4: Specifications
Endpoint LED Flash Rates
Endpoint LED Flash Rates
Table 4-4 on page 4-6, Table 4-5 on page 4-8, and Table 4-6 on page 4-10 describe the LED
flash rates for IP endpoints in ITP and SIP mode in interruptions per minute (IPM). For more
general information, refer to the Inter-Tel 5000 Features and Programming Guide, part no.
580.8006.
Table 4-16. Multi-Protocol Endpoint LED Flash Rates, ITP Mode
Steady
0 IPM
Slow
30 IPM
Call is active
Call is recalling
from hold or
transfer
Conference is in
progress.
Conference is
recalling your
endpoint.
CALL
CNF
DATA2
DND
Auto-dial modem
is dialing and the
data port is
unavailable. (Red
LED)
Fast
240 IPM
Flutter
60/960 IPM
Call or queue
callback is ringing
in or camped on
(waiting)
Call is on hold at
the user’s
endpoint or the
user has entered
a transfer feature
code.1
A conference
party is on
conference wait
hold.
Ring signal is
being sent to the
data device.
Data call is in
progress and
accessible. A
continuous flutter
indicates that the
data device is offhook.
Endpoint is in DoNot-Disturb.
MINI-DSS2
The programmed The programmed
endpoint in busy endpoint is in
or unplugged.
DND.
FEATURE2
The feature is in
use.
FWD
Calls are being
forwarded.
HUNT GROUP
All endpoints in
hunt group are
unavailable.
The programmed Continuous flutter
endpoint has a
indicates that the
call ringing in.
programmed
endpoint was left
off-hook.
Hunt group has a
call camped on.
Intercom call is in Recalling
progress.
intercom call is
camped on
(waiting).
IC
MSG
Endpoint is in
alpha-numeric
mode.
MUTE
Microphone is
muted.
Page 4-48
Medium
120 IPM
Intercom call is
camped on
(waiting).
An intercom call
is on hold at the
user’s endpoint
or the user has
entered a transfer
feature code.1
Message is
waiting.
Mitel ® 5000 Installation Manual – Issue 3.0, October 2008
Chapter 4: Specifications
Endpoint LED Flash Rates
Table 4-16. Multi-Protocol Endpoint LED Flash Rates, ITP Mode (Continued)
Steady
0 IPM
SPEAKER
SPEED DIAL2
TRUNK
Slow
30 IPM
Medium
120 IPM
Fast
240 IPM
Flutter
60/960 IPM
Speakerphone is
on or ready for
use. Or, endpoint
programming is
in progress.
Designated
endpoint is busy
or unplugged.
Designated
endpoint is in
DND.
Designated
endpoint has a
call ringing in.
Trunk is in use at Trunk is in use at
another endpoint, your endpoint.
in a conference
at your endpoint,
or it is unplugged.
Trunk is recalling
from hold or
transfer.
Continuous flutter
indicates that the
designated
endpoint was left
off hook.
Trunk is ringing
Trunk is on hold.
in, camped on
(waiting), or in
busy trunk
callback queue to
your endpoint.
1. For transfers, the IC or CALL button LED goes out when the user hangs up.
2. Requires a programmable button.
Table 4-17. Multi-Protocol Endpoint LED Flash Rates, SIP Mode
Steady
0 IPM
Slow
30 IPM
Medium
120 IPM
Flutter
60/960 IPM
Models
8620 and 8662:
Intercom, recall,
conference,
camped on, or
transferred call is
ringing-in.
ANSWER
The LED flashes
for 2–5 seconds
and then go out
when the
conference is
established.
CNF
DND
Endpoint is in DoNot-Disturb.
FWD
All calls are being
forwarded.
MSG
Endpoint is in
alphanumeric
mode.
MUTE
Microphone is
muted.
SPEAKER
Fast
240 IPM
Speakerphone is
on or ready for
use. Or, endpoint
programming is in
progress.
Mitel ® 5000 Installation Manual – Issue 3.0, October 2008
A conference party
is on conference
wait hold.
Message is
waiting.
Model 8600:
Intercom, recall,
conference,
camped on, or
transferred call is
ringing-in.
Page 4-49
Chapter 4: Specifications
Direct Station Select/Busy Lamp Field Units
Direct Station Select/Busy Lamp Field Units
The Inter-Tel 5000 platform supports two 60-button DSS/BLF Units and one 50-button model.
Although you can use either type of DSS/BLF Unit on any of the endpoints, the type of endpoint
determines which is the more appropriate unit to use.
• With Executive, Standard, Professional, and Associate Display digital endpoints: PC
Data Port Module (PCDPM)-equipped Executive, Professional, Standard, and Associate
display endpoints support up to four 60-button DSS/BLF units each. Up to twenty 60-key
DSS/BLF Units can be installed on a system, or node. Each unit is powered by a 450 mA
AC transformer and connected to the PCDPM installed in the endpoint. The 6-rows-by-10columns model, part number 550.4200, is designed for Executive and Standard Display
endpoints. The 12-rows-by-5-columns model, part number 560.4000, is designed for
Professional and Associate Display endpoints.
• With Models 8520 and 8560 endpoints: PCDPM-equipped Models 8520 and 8560
endpoints support up to four Model 8450 with 50-button DSS/BLF Units, part number
550.8450. Up to 20 of the 5-rows-by-10-columns DSS/BLF Units can be installed on a
system. Each unit is powered by a 450 mA AC transformer and is connected to a PCDPM
installed in the endpoint. For PCDPM installation instructions, see “Installing a PCDPM” on
page 5-206.
DSS/BLF Units always require dedicated AC transformers. For a diagram of AC transformer
requirements, see Figure 5-73 on page 5-207. For DSS/BLF Unit installation instructions see
“Connecting DSS/BLF Units” on page 5-215. DSS/BLF Unit dimensions appear in Table 4-18.
Table 4-18. DSS/BLF Dimensions
60-Button DSS/BLF
50-Button DSS/BLF
Height
3.0 in. (7.6 cm)
2.5 in. (6.4 cm)
Width
7.5 in. (19.1 cm)
6.4 in. (16.3 cm)
Length
9.0 in. (22.9 cm)
8.3 in. (21.2 cm)
Weight
1.7 lb (0.8 kg)
1.2 lb (0.6 kg)
Each DSS/BLF Unit provides one-button access to 50 or 60 extension numbers, trunks,
features, or other resources, and four units provide access to 200 or 240 extensions, features,
and resources. Numbers programmed for the buttons can be endpoint extension numbers, hunt
group numbers, trunk access codes, or feature codes.
The layout of the buttons and the numbers are assigned using one of 20 keymaps in DB
Programming. The intercom number/button assignments of each keymap are programmed in
four lists, pages 1–4. For example, single DSS/BLF Units are assigned page 1 of the desired
keymap, tandem units are assigned two pages of the desired keymap—page 1 for the first unit
and page 2 for the second unit, and so on. For programming instructions, refer to the Inter-Tel
5000 Features and Programming Guide, part no. 580.8006.
Together, the lamps in the buttons create a Busy Lamp Field that indicate the status of each
station, hunt group, or other feature/resource assigned to the buttons. If assigned to a station,
the LED indicator in the button is solidly lit when the associated station is busy or unplugged,
flashes slowly when the station is in Do-Not-Disturb (DND), flashes rapidly when the station has
a call ringing in, or flutters continuously if the station is causing a STATION OFF-HOOK system
alarm.
If assigned to a hunt group, the LED indicator is solidly lit when all stations in the hunt group are
unavailable, either busy, in DND, or removed from the hunt group. The LED indicator flashes
rapidly when a call is camped-on to a hunt group. If assigned to a feature or resource, the LED
indicator is lit to show busy status and unlit to show idle status.
NOTE
Page 4-50
Group Call Pick-Up does not affect DSS lamp status any differently than standard
hunt group calls or individual calls.
Mitel ® 5000 Installation Manual – Issue 3.0, October 2008
Chapter 4: Specifications
Model 8416 Mini-Direct Station Select (Mini-DSS) Unit
Model 8416 Mini-Direct Station Select (Mini-DSS) Unit
The Mitel platform supports a Mini-DSS Unit that provides one-button access to 16 extension
numbers and/or feature buttons/resources. The Mini-DSS attaches to a Model 8660 endpoint.
For reference, the following information matrix shows the approximate dimensions of the MiniDSS Unit.
Table 4-19. Model 8416 Mini-DSS Unit Dimensions
Dimension
Measurement (Metric)
Height
1.5 in. (3.8 cm)
Width
2.6 in. (6.5 cm)
Length
7.7 in. (21.1 cm)
Weight
2.1 lb (0.13 kg)
Figure 4-3. Modem Data Port Module
MODEM DATA PORT MODULE
(TOP COVER REMOVED)
LED
INDICATORS
(stacked)
POWER
OFF HOOK
RINGING
POWER CONNECTOR
TO AC TRANSFORMER
PCDPM CONNECTOR
TO PC DATA PORT MODULE
MODULAR JACK
TO DATA DEVICE
OR SL SET
Mitel ® 5000 Installation Manual – Issue 3.0, October 2008
Page 4-51
Chapter 4: Specifications
IP Single Line Adapter (IP SLA)
Figure 4-4. Model 8416 Mini-Direct Station Selection Unit
MODEL 8660
MINI-DSS
16 EXTENSION NUMBERS
AND/OR FEATURE
BUTTONS
IP Single Line Adapter (IP SLA)
In addition to the two built-in single line ports on the Inter-Tel 5000 Base Server, single line
endpoints can be connected to IP Single Line Adapters (one per IP SLA); to SLAs connected to
DEM-16 modules (two per SLA); and, to Single Line Modules—four per SLM-4 or eight per
SLM-8.
Single line endpoint users can access applicable endpoint features by lifting the handset and
entering a feature code. Other features are accessed using a combination of a hookflash and a
feature code. For details, refer to the System Features chapter in the Inter-Tel 5000 Features
and Programming Guide, part no. 580.8006.
Figure 4-5 shows front and rear views of the IP SLA. For information about the installation and
operation of an IP SLA, see “Installing an IP SLA” on page 5-198.
Page 4-52
Mitel ® 5000 Installation Manual – Issue 3.0, October 2008
Chapter 4: Specifications
Optional Handset Amplifiers
Figure 4-5. IP Single Line Adapter
FRONT OF IP SLA
online
SL STATUS
OFF HOOK/RINGING
IP-SLA
IP STATUS
INTERNET PROTOCOL
SINGLE LINE ADAPTER
VALID IP LINK
BACK OF IP SLA
SL
PHONE
10BASE-T
POWER
24VDC 0.3A
DEFAULT
Default
Button
Optional Handset Amplifiers
The typical handset amplifier is an external device that plugs into the single line endpoint where
the handset is normally connected. The handset is then plugged into the amplifier. Receiver
voice volume is controlled by turning a thumbwheel or similar control located on the amplifier.
Such amplifiers are generally equipped with a transformer that requires a 110 VAC outlet. For
installation instructions, see “Installing a Single Line Handset Amplifier” on page 5-205.
The 800-ohm loop limitation is usually suitable for accessing on-premises endpoints from offpremises endpoints. However, for applications where one off-premises endpoint will be calling
another through the T1 span, the impedance between the two off-premises endpoints (both
circuits added together) must be less than 800 ohms (loop measurement). In this situation, a
Class A or B FIC circuit is preferable.
When an IP SLA circuit is designated for OPX use in DB Programming, its voice volume levels
are increased approximately 3 dB over normal single line endpoint voice volume levels. This
increase in volume level attempts to compensate for any loss in the external OPX circuit. Refer
to the Inter-Tel 5000 Features and Programming Guide, part no. 580.8006
Mitel ® 5000 Installation Manual – Issue 3.0, October 2008
Page 4-53
Chapter 4: Specifications
Playback Devices
However, in certain off-premises applications, the voice volume levels may still be
unacceptable. The degradation in voice volume is due to the natural voice frequency range
limitations of the telephone company or customer-provided circuit. To increase the frequency
range, Mitel recommends installing a two-wire, negative impedance repeater unit. Such units
typically provide from 0–15 dB of voice volume gain and allow regulation of the gain in each
direction when simultaneous voice transmission occurs. The switching sensitivity on the unit
should also be adjustable.
The repeater unit is installed at the MDF between the endpoint block and the cabling to the OPX
endpoint. For OPX installation instructions, see “Connecting CO Trunk Cables to the MDF” on
page 5-22.
When ordering a repeater unit, consult with the supplier for ordering the proper mounting shelf
and power supply for the unit. Typically, the product includes additional information about
operating and adjusting the repeater unit.
NOTE
Each OPX circuit can have extended ring cadence enabled or disabled. For
details, refer to the Inter-Tel 5000 Features and Programming Guide, part no.
580.8006. The extended setting lengthens the duration of the ring signal to meet
the requirements of many OPX and/or repeater applications. The default setting is
disabled.
Playback Devices
AC-ringing playback devices may be connected to the single line port on the chassis or to IP
SLAs. Each IP SLA supports one device. A playback device is an answering machine that
answers the call, plays a message, and then disconnects from the call. Playback devices are
installed like single line endpoints, using one-pair twisted cable and four-conductor modular
jacks. The device must be able to detect ringing, provide ring trip, and automatically disconnect
when the announcement is completed. For IP SLA installation instructions, see “Installing an IP
SLA” on page 5-198. For installing a selected playback device, refer to the manufacturer’s
instructions.
NOTE
For Automated Attendant features and for optimal playback device performance
and functionality, use an optional Voice Processing Unit and applications software
instead of IP SLA circuits.
Playback devices may be used with hunt groups to speed up call processing. Hunt groups can
have three types of special endpoints: announcement stations, overflow stations, and recall
destination stations. These types of endpoints may be equipped with a playback device that
answers the call, then disconnects to transfer it back to the hunt group. For more information,
refer to the Inter-Tel 5000 Features and Programming Guide, part no. 580.8006.
Playback devices are programmed as regular single line endpoints that are assigned an
extension number. If the device is sensitive to Camp On tones and disconnects calls, the
programmer can disable the Camp On for that endpoint circuit. For programming details, refer
to the Inter-Tel 5000 Features and Programming Guide, part no. 580.8006.
Page 4-54
Mitel ® 5000 Installation Manual – Issue 3.0, October 2008
Chapter 4: Specifications
Attendant Console
Attendant Console
With the Mitel platform, the attendant function can be served by a software application operating
on a personal computer (PC) or by a multiline display endpoint and attachment.
Personal Computer Application
The Attendant Console is a special software program and hardware security key that allows
attendants to use a PC to answer and manage incoming call traffic. Although designed for use
with larger communication systems, the Attendant Console provides enhanced functionality
such as electronic text messaging and directory dialing for smaller systems, as well.
The Attendant Console PC, which requires a System Level 2 OAI interface, is connected to the
system through a TCP/IP connection. For details about equipment functions and operation,
refer to the Attendant Console User Guide supplied with the console software.
Attendant Service Endpoint
To achieve Attendant-like capability on the Mitel platform, Mitel recommends using the Model
8660 endpoint with a Model 8416 Mini-DSS Unit attached. The endpoint is equipped with a jack
for plugging in a Mitel handset or headset.
To operate correctly, the Model 8660 must be programmed for headset mode. This can be done
in one of the following ways:
• Enable Headset Mode in Endpoint Programming in the system database.
• At the endpoint, unplug the headset or handset to take the endpoint off-hook and enter the
Headset On/Off feature code (317) to enable headset mode. Then, plug in the headset or
handset.
NOTE
Using the Headset On/Off feature code at the station, the user can disable
the headset mode.
If the user wishes to receive audible signals at the headset, a programmable endpoint flag can
be set to send a single tone to the headset when a call rings in. For details, see the endpoint
programming flags in the Inter-Tel 5000 Features and Programming Guide, part no. 580.8006.
Mitel ® 5000 Installation Manual – Issue 3.0, October 2008
Page 4-55
Chapter 4: Specifications
IP Network Requirements
IP Network Requirements
This section provides a brief technical overview of data network characteristics that will help to
minimize faulty operation of the Mitel platform. For additional technical details and applicable
procedures designed to promote an adequate IP network environment, see Private Networking
and Network IP Topology appendices in this manual.
Network Capability Analysis
Because the Mitel IP devices use IP to connect to other IP devices, the data network must meet
certain specifications that support an adequate VoIP network. This section summarizes
adequate network requirements.
NOTICES
The following notices apply to the network capability:
• Network security is the responsibility of the customer’s network administrator. Mitel is not
responsible for network problems due to security violations involving the IP address of
the Mitel IP devices. This includes, but is not limited to, toll fraud and interrupted network
service.
• Due to the volatility in delay, jitter, and packet loss, sending VoIP traffic over the Internet
may result in intermittent poor voice quality, dropped calls, and equipment resets. No
delivery guarantee can be made for VoIP traffic over the Internet.
Run the Network Qualifier for at least 24 hours to assess the network before purchasing or
installing the hardware required to set up voice over IP. The Network Qualifier application
supports up to eight simulated VoIP connections and is available on the system software CD.
Performance Criteria
The acceptable quality of an IP telephone call depends on the adequacy of the data network
through which it travels. Network adequacy for VoIP transmission includes the speed and
capacity of the network configuration, type of connection, routing scheme, and amount of
network traffic.
Mitel requires that its business-based VoIP products and solutions be used only on data
networks that meet the near toll quality and business communication quality criteria outlined in
this section. Successful VoIP platform deployment requires installation in a correctly
provisioned, configured, and tuned data network.
For both near toll quality and business communication quality levels, the available network
bandwidth/capacity should provide approximately 32 kbps per call using the G.729 vocoder and
approximately 86 kbps using the G.711 vocoder. These capacity values are based on a 30 ms
packetization interval.
Mitel recommends the following network parameters as measurable performance criteria for an
adequate VoIP network:
• Network Packet Loss: The percentage of uniformly distributed data packet loss
(nonburst). For near toll quality service, uniformly distributed data packet loss should not
exceed 1 percent. For business communication quality service, uniformly distributed data
packet loss should not exceed 3 percent.
• Network Delay: The data network delay between two peer-to-peer network devices. For
near toll quality service, one-way delay (UDP–User Datagram Protocol–traffic) should not
exceed 80 ms, assuming all jitter buffers are set to accommodate 40 ms maximum jitter
level. For business communication quality service, one-way delay (UDP traffic) should not
exceed 120 ms, assuming all jitter buffers are set to accommodate 80 ms maximum jitter
level.
Page 4-56
Mitel ® 5000 Installation Manual – Issue 3.0, October 2008
Chapter 4: Specifications
Performance Criteria
• Network Jitter: Variance in delay. For near toll quality service, average jitter should not
exceed 20 ms and maximum jitter should not exceed 40 ms. For business communication
quality service, average jitter should not exceed 40 ms and maximum jitter should not
exceed 80 ms.
• Hops: The number of router points a data packet must pass through during transmission.
Hops should not exceed 15 in order to minimize the number of potential problem points.
• Committed Information Rate (CIR) and Burst Rate (BR): 512 Kbps/each. This criterion
means that 512 Kbps will always be available, and the link may achieve a BR of up to
1024 Kbps for short periods if the bandwidth is available from the WAN provider. Typically,
there is no guarantee of BR availability. Voice traffic should stay below the CIR value.
When voice traffic exceeds the CIR value, packets may begin to queue within the Frame
Relay network and become subject to delay. These packets could eventually be tagged as
Discard Eligible (DE). Packets marked as DE could be discarded before reaching their
destination. The potential queuing delay and packet loss can adversely affect voice quality.
Mitel also recommends the following PSTN performance characteristics:
•
•
•
•
Loop Current: 18–20 mA
Line Voltage: 42.5–56.5 V
Ring Voltage: 55–130 Vrms (Class A)
db Level: Must pass at least +3dBm without distortion into a 600-ohm load
All of the preceding PSTN requirements are consistent with the EIA/TIA-464B specifications.
Use Ethernet switching mechanisms rather than Ethernet hubs. Switches offer inherent
Ethernet advantages over hub (shared) technology. Switches provide advantages such as
segmentation, full-duplex operations, Layer 2 prioritization, etc.
IMPORTANT
Using background music and paging on a hard IP endpoint, such as the IP
PhonePlus, consumes as much bandwidth as a telephone call to the device.
If the site has limited bandwidth, make sure IP endpoint users do not enable
background music and that they limit using the paging feature.
For any router that will have VoIP traffic passing through it, program the router to prioritize the
packets sent by the IP devices. In addition, program the external router to fragment large data
packets into smaller packets. This reduces the possibility that voice packets will have to wait for
a large data packet at the router.
Mitel ® 5000 Installation Manual – Issue 3.0, October 2008
Page 4-57
Chapter 4: Specifications
Automatic NAT Detection
Automatic NAT Detection
Network Address Translation (NAT) is a method for translating internal IP addresses or network
addresses into public Internet addresses.
The Automatic Network Address Translation (NAT) Detection feature allows Mitel IP endpoints
to operate inside or outside a private network NAT or firewall without having to change the IP
Settings\ NAT Address Type field every time the endpoint is relocated. The feature enables
Mitel hard IP endpoints and the Mitel Model 8602 IP softphone to place and receive calls either
from inside or outside a Mitel private network.
Mitel 5000-series IP endpoints do not support the Automatic Network Address Translation (NAT)
address type. In DB Programming, you must select either Native or NAT for private and public
networks. Refer to the Inter-Tel 5000 Features and Programming Guide, part no. 580.8006, to
configure the NAT address type for Mitel 5000-series endpoints.
Automatic NAT Detection automatically determines whether an IP endpoint is inside the firewall
or outside the firewall. In DB Programming, the administrator designates each IP endpoint to
use the Auto type, as well as either Native or NAT types. The default selection is Auto.
Automatic NAT detection is performed each time an IP endpoint comes online and whenever
the feature is set through DB Programming.
This feature does not work with IP Gateways, IP trunks, wireless Models 8664, 8665, and 8668,
any IP endpoints in SIP mode and third-party SIP endpoints. Firmware on these endpoints
cannot run the Auto NAT Detection test. For these endpoints, the installer needs to manually
select the NAT Type setting.
Page 4-58
Mitel ® 5000 Installation Manual – Issue 3.0, October 2008
Chapter 4: Specifications
Protocols and Ports
Protocols and Ports
Table 4-20 describes required connections for IP endpoints. The IP network must allow the
endpoints to establish these connections for proper operation.
Table 4-20. Mitel IP Endpoint Ports
Connection Name
Ports
Description
Dynamic Host
Configuration
Protocol (DHCP)
67 and 68/User
Datagram
Protocol (UDP)
The endpoint uses DHCP to obtain its IP address, subnet mask, default
gateway, TFTP server, and ICP address. This protocol is for use on the
Local Area Network (LAN) only. It is not required to traverse NATs and
firewalls. It is optional if all network information is statically programmed.
TFTP
68 and 69,
20001/UDP
The endpoint uses TFTP to download firmware during the boot process.
The endpoint/source number port number may be random, but the Mitel
5000 destination uses the specified ports. The endpoint ships with the
port setting at 0 (recommended). When left at this setting, the TFTP tries
port 20001 followed by port 69.
MiNet
6800–6802/
Transfer
Connection
Protocol (TCP)
The MiNet protocol is for basic call control. The endpoint/source number
may be random, but the Mitel 5000 destination uses the specified ports.
Switch Application
Communication
(SAC)
3998 and 3999/
TCP
The SAC protocol is for endpoint applications and programmable
buttons. The endpoint/source number may be random, but the Mitel
5000 destination uses the specified ports.
RTP (Inter-Tel IP
Endpoint)
5004–5007/
UDP
RTP (Mitel IP
Endpoint)
50098–50508/
UDP
Real-Time Transfer Protocol (RTP) is for streaming audio. The Mitel
5000 and IP endpoints use the specified ports to send to and receive
from the peer endpoint.
RTP (Processor
Module)
6004–6261/
UDP
RTP (Expansion
Module)
6604–7039/
UDP
Each channel requires two port numbers: The even port number is for
the RTP protocol, and the odd port number is for the Real-time
Transport Control Protocol (RTCP) protocol.
The port number value in DB Programming specifies the endpoint base
RTP port range. The first audio channel uses the base port+2.
Mitel ® 5000 Installation Manual – Issue 3.0, October 2008
Page 4-59
Chapter 4: Specifications
UDP Port Assignments
UDP Port Assignments
Expanded IP endpoint capability with v2.0 and later requires changes in User Datagram
Protocol (UDP) port usage. If the Mitel 5000 v2.x equipment operates inside a firewall and
services external IP endpoints, the firewall configuration needs to be updated to reflect the
changes in the UDP port assignments of system.
NOTICE
No-Audio Condition Possible. Failure to adjust the firewall UDP port settings to the
appropriate range can result in no-audio conditions for external IP endpoints, IP trunks, or IP
networking.
Tutorial
In DB Programming, the Audio Stream Receive Port defines the first of 33 even port numbers
that off-node IP resources use to transmit audio data to this IP resource. You must choose an
even-numbered value. The base audio port number, plus 64 additional port numbers, cannot
conflict with other port numbers on the IP connection.
For example, if the base audio port number is 5000, no other port numbers on the IP connection
can fall in the range from 5000 to 5064. Changing the Audio Stream Receive Port resets the IP
resources. The system broadcasts changes to an IP connection Audio Stream Receive Port to
the other nodes in the private network as a database update. This field corresponds to the offnode IP connection Remote Audio Receive Port. To change the port number, enter the new
number in the text box, then press ENTER or click on another field. The default is 5004, and the
range of values is 1026–65468.
IMPORTANT
Because SIP uses port 5060 (by default) for call control; firewalls, NATs, and
routers often treat this port as a “special case” and may block its use by nonSIP packets. If your network currently uses SIP, Mitel strongly recommends
that you use a different port range (other than 6004–7039) for audio stream
ports; otherwise, you may experience audio problems over the IP network.
UDP Port Assignments in v2.x
To support external IP endpoints, the Mitel CS-5200, CS-5400, or CS-5600 requires that a
range of UDP ports be opened through the firewall. Table 4-21 shows the UDP port range
applicable to v1.x and the UDP ports applicable to v2.x. These port assignments apply to the
Processor Module (PM-1) and the Processor Expansion Card (PEC-1) in the Inter-Tel 5000
Base Server, but not to the Processing Server PS-1.
Table 4-21. UDP Port Assignments for v1.x and v2.x
System
Version
v1.x
UDP Port Range
UDP 6004–6247
[Includes both Real-time Transport Protocol (RTP) and
Real-time Transport Command Protocol (RTCP) ports]
v2.x
UDP 6004–7039 (RTP and RTCP)
• Processor Module (PM-1) base port – 6004
• Processor Expansion Card (PEC-1) base port – 6604
Page 4-60
Mitel ® 5000 Installation Manual – Issue 3.0, October 2008
Chapter 4: Specifications
99 Nodes Support
99 Nodes Support
Version 2.1 or later software allows Mitel Advanced Communications Platforms to expand to 99node networks in the United States and European markets. Each node can transparently
interconnect to 98 other systems using T1/E1/PRI networking and IP networking.
With the 99 Nodes feature the increased network capacity does not affect endpoint user
features. Endpoint users can still dial an extension of a remote user, and the system will
transparently route the call throughout the network. From an administrative perspective, you
must consider the following issues as the node capacity increases:
• Database Management: To program the 99 Nodes feature, you must log-in to individual
systems to configure them. You must plan for supporting a 99-node network by devising a
numbering plan scheme for each node. You should be aware that the creation of new
devices automatically causes the system to export extensions to the network. The use of
export/import may take longer if you attempt to export/import with all 98 remote nodes.
• Numbering Plan: The system supports extensions with a maximum of five digits. It is
important to design a network numbering plan that can support all devices in the network.
• DB Programming Export/Import: Creation of new devices on any node of a network
automatically causes the system to export extensions across the network. Once network
established, you can use DB Programming to adjust node parameters, including the import
or export of devices. Because of the potential complexity of managing a network with
numerous nodes and devices, it is essential that the system administrator devise a
network numbering scheme that accommodates all 99 nodes.
• Networking Resources (IP and PRI): You must be aware of the Primary Rate Interface
(PRI) and Voice over IP (VoIP) resources required to maintain a 99-node network. For
VoIP resources, all nodes must have the appropriate IP bandwidth to support the
maximum IP networking calls.
o
T1/E1/PRI Networking: Networking across T1/E1/PRI remains the same as in previous
versions, except for the increased node capacity. With appropriate licensing, in the T1/
E1/PRI field in DB Programming, you can number network nodes from 1 to 99.
o
IP Networking: IP Networking functionality remains the same as in previous versions,
except for the increased node capacity. If a device does not have an IP resource
reserved, the system dynamically allocates one from the pool of available IP
resources.
• OAI Applications: To support more than 63 nodes, a new version of the CT Gateway
Server is required. Performance degradation may occur on the CT Gateway and individual
nodes depending on the number of OAI applications that connect to the CT Gateway. If
many OAI applications are connected directly to an individual node, slowdowns on those
nodes may occur.
IMPORTANT
The CT Gateway Server must meet Mitel performance requirements when it
is attached to a 99-node network. When configuring a 99-node network, this
could increase the OAI data by 50%. For example, the Attendant Console
application requires a large amount of data at power-up. Multiple Attendant
Console applications, along with fully populated nodes, could increase OAI
data by 50% during the Attendant Console power-up sequence.
For information about programming 99 nodes, refer to the Inter-Tel 5000 Features and
Programming Guide, part no. 580.8006.
Mitel ® 5000 Installation Manual – Issue 3.0, October 2008
Page 4-61
Chapter 4: Specifications
Component Compatibility for 99 Nodes Support
Component Compatibility for 99 Nodes Support
Table 4-22 lists component version numbers that have been validated to support the 99 Nodes
system feature.
NOTE
Because Mitel recommends that you use these versions if you are using the 99
Nodes feature, you should upgrade to the latest non-chargeable upgrade
available.
Table 4-22. 99 Nodes Support Component Compatibility
Mitel 5000 Version
V2.2
V2.3
V2.4
V3.0
4.30x
4.30x
4.30x
4.30x
2.2.1.14
2.3.6.46
2.4.x.x
3.0.x.x
V1.0 and 1.1
V1.0 and 1.1
V1.2
V1.2 and 2.0
2.0.5.8
2.0.6.102
2.0.6.104
2.0.6.104
3.004
3.004
3.1x
3.1x
4.11.0030
4.11.0030
4.11.0030
4.2.1.x
2.006
2.006
2.006
2.006
1.1.1.40
1.1.1.40
1.1.1.40
1.1.1.40
Unified Communicator®
4.0.x.x
4.0.x.x
4.0.x.x
4.0.x.x
Unified Messaging Open
Standards Edition (OSE)
N/A
1.0
2.0
2.0
Unified Messaging v2.2 (VPU)a
2.222
2.222
Not Supported
Not Supported
Unified Messaging v2.3 (EM)a
2.365b
2.365b
Not Supported
Not Supported
8.2.2
8.2.2
8.2.2
8.3.0b
Model 8664/8665/8668
1.0.0.4
1.0.0.4
1.0.0.4
1.0.0.4
Model 8600/8620/8662
2.2.00
2.2.02
2.2.02
2.2.04
Model 8690
1.1.8
1.1.8
1.1.8
1.1.8
IP PhonePlus
8.1.0
8.1.0
8.1.0
8.1.0
IP SLA
8.1.0
8.1.0
8.1.0
8.2.0
Applications
CT Gateway
Database Programming
Enterprise Messaging (EM)
System Manager
Auxiliary Applications
Attendant Console
Contact Center Suite
Network Qualifier
Session Initiation Protocol (SIP)
Server
Devices
Model 8660
a. UM versions 2.2 and 2.3 and VPU have reached end of sale and support.
b. This endpoint firmware version disables RTP Port Redirection (refer to the Inter-Tel 5000 Features and Programming Guide,
part no. 580.8006) to support Peer-to-Peer (P2P) audio with NuPoint Messenger.
Page 4-62
Mitel ® 5000 Installation Manual – Issue 3.0, October 2008
Chapter 4: Specifications
Peripheral Equipment
Peripheral Equipment
The Mitel platform supports peripheral, or external, equipment that provide enhancements to the
IP system’s basic business communication services. The following sections describe equipment
that can be attached to the platform.
Voice Processor
NOTICE
The Voice Processing Unit (VPU): The VPU is no longer supported in v3.0. The VPU was
discontinued in May 2007. Mitel recommends that current VPU installations upgrade to
Enterprise® Messaging (EM) or NuPoint Messenger (the new external voice mail system).
The two EM hardware platforms currently available, Base I and Base II, are separate system
components and must be purchased from your local provider. Instructions for converting a
VPU database to an EM database are included in the Enterprise Messaging Installation and
Maintenance Manual, part number 780.8006. Contact your local provider for more
information.
NuPoint Messenger is voice mail software that resides on the Mitel Applications Suite® (MAS)
server. MAS is a software solution that provides co-residency features for applications that use
the Mitel Standard Linux® (MSL) operating system. Refer to the Mitel Applications Suite
Installation and Maintenance Manual, Release 1.2 for software specifications and detailed
installation information.
The Enterprise Messaging (EM) system runs either Windows 2000 or Windows 2000 Server.
EM is installed on a PC that is connected to the Mitel system to provide integrated voice
processing (voice mail, automated attendant, hunt group announcement and overflow, buffered
SMDR, optional Fax-On-Demand, Record-A-Call, etc.). For installation instructions, see
“Installing an External Voice Processing System” on page 5-194. For operational details refer to
the applicable manual:
• Enterprise® Messaging Installation and Maintenance Manual, part number 780.8006
• Mitel 5000 and NuPoint Messenger Integration Guide, part number 580.8008
Mitel ® 5000 Installation Manual – Issue 3.0, October 2008
Page 4-63
Chapter 4: Specifications
PC for On-Site or Stand-Alone/Remote Programming
PC for On-Site or Stand-Alone/Remote Programming
Windows 2000 is no longer supported in DB Programming. This section lists the requirements
for Windows XP and Windows Vista.
Computer Hardware Requirements for Windows XP
The table below lists the minimum and recommended requirements for the computer with the
Windows XP operating system of which you are installing the Model 8602 software.
Minimum Requirements
Recommended Requirements
Intel® Pentium® 850 MHz or faster processor
(or compatible)
Intel Pentium 1 GHz or faster processor (or
compatible)
512 MB of RAM or higher
1 GB of RAM or higher
Hard drive with at least 2.0 GB of available
hard disk space
Hard drive with at least 2.0 GB of available
hard disk space
Super VGA (800 x 600) or higher-resolution
video adapter and monitor
Super VGA (1024 x 768) or higher-resolution
video adapter and monitor
A pointing device (such as a mouse,
trackball, or touch screen)
A pointing device (such as a mouse,
trackball, or touch screen)
Ethernet or Wi-Fi network card with TCP/IP
configured
Ethernet or Wi-Fi network card with TCP/IP
configured
Internet-capable network connection (a
broadband connection of 256 Kbps or faster)
Internet-capable network connection (a
broadband connection of 256 Kbps or faster)
Headset with microphone that uses the
speaker and microphone ports is required
Headset with microphone that uses the
speaker and microphone ports is required
Computer Hardware Requirements for Windows Vista
The table below lists the minimum and recommended requirements for the computer with the
Windows Vista operating system of which you are installing the Model 8602 software.
Minimum Requirements
Page 4-64
Recommended Requirements
1 GHz 32-bit (x86) or 64-bit (x64) processor
2 GHz 32-bit (x86) or 64-bit (x64) processor
1 GB of RAM
2 GB of RAM
Hard drive with at least 2.0 GB of available
space
Hard drive with at least 2.0 GB of available
space
Super VGA (800 x 600) or higher-resolution
video adapter and monitor
Super VGA (1024 x 768) or higher-resolution
video adapter and monitor
A pointing device (such as a mouse,
trackball, or touch screen)
A pointing device (such as a mouse,
trackball, or touch screen)
Ethernet or Wi-Fi network card with TCP/IP
configured
Ethernet or Wi-Fi network card with TCP/IP
configured
Internet-capable network connection (a
broadband connection of 256 Kbps or faster)
Internet-capable network connection (a
broadband connection of 256 Kbps or faster)
Headset with microphone that uses the
speaker and microphone ports is required
Headset with microphone that uses the
speaker and microphone ports is required
Mitel ® 5000 Installation Manual – Issue 3.0, October 2008
Chapter 4: Specifications
SMDR/Error Message Output
A PC (personal computer) running Windows 2000 or Windows XP is required for on-site or for
stand-alone or remote programming. The PC specifications must meet or exceed the
specifications shown in Table 4-23.
Table 4-23. PC Specifications for Stand-Alone or Remote Programming
Minimum Requirement
Recommended
Pentium II 266 MHz or later
microprocessor
Pentium III 500 MHz or later
microprocessor
32 MB RAM
128 MB RAM or more
100 MB free disk space to install
80–100 MB to run
100 MB free disk space to install
80–100 MB to run
VGA at 640x480 or greater
256-color display at 800x600 or greater
CD-ROM
CD-ROM
Mouse
Mouse
For environmental requirements, see page 4-4.
SMDR/Error Message Output
Output data from SMDR and Error Message Recording features is accessed through an IP
socket defined on the Administrative Web Session. The output may be sent to a PC or to a
printer. For details, refer to the Inter-Tel 5000 Features and Programming Guide, part no.
580.8006.
CT Gateway
System OAI Level 2 applications can be used in conjunction with the CT Gateway. The CT
Gateway provides a TCP/IP System OAI interface that supports a network. As far as the
System OAI streams are concerned, each node in a network functions individually. The user
cannot program a System OAI serial port on Node 1 that will control devices or receive events
for other nodes. If the user needs to control devices on multiple nodes, they must install a CT
Gateway. The CT Gateway receives the OAI streams from multiple nodes and consolidates
them into a single stream for a System OAI application. The CT Gateway sends and receives all
of its data via TCP/IP connections.
For details, refer to the CT Gateway Installation Manual, part number 835.2161. For
environmental requirements, see page 4-4.
Additional Information
If necessary, contact the Mitel CommSource division for additional information about the
following optional equipment:
•
•
•
•
•
•
•
•
•
•
•
Standby Power (system battery back-up)
Uninterruptible Power Supply (UPS)
Lightning and AC Surge Protection
Headsets
Paging Equipment
Single Line Endpoints
Cordless Telephones
Music-On-Hold
OPX Repeaters
Facsimile Machine
Playback Devices
Mitel ® 5000 Installation Manual – Issue 3.0, October 2008
Page 4-65
Chapter 5: Installation
Installation
Chapter 5: Installation
Chapter Overview . . . . . . . . . . . . . . . . . . . . . . . . . . . . . . . . . . . . . . . . . . . . . . . . . . . . . . . . . . . . . .5-6
Technical Certification Requirement . . . . . . . . . . . . . . . . . . . . . . . . . . . . . . . . . . . . . . . . . . . . . . .5-6
Installation Planning
Network Installation Concerns . . . . . . . . . . . . . . . . . . . . . . . . . . . . . . . . . . . . . . . . . . . . . . . . . . .5-7
Planning Digital and Analog Endpoint Locations . . . . . . . . . . . . . . . . . . . . . . . . . . . . . . . . . . . .5-8
Pre-Installation Checklist . . . . . . . . . . . . . . . . . . . . . . . . . . . . . . . . . . . . . . . . . . . . . . . . . . . . . . . .5-9
Establishing Suitable Environmental Conditions for the System . . . . . . . . . . . . . . . . . . . . . . .5-9
Gathering the Necessary Tools and Supplies . . . . . . . . . . . . . . . . . . . . . . . . . . . . . . . . . . . . .5-10
Planning Station Locations . . . . . . . . . . . . . . . . . . . . . . . . . . . . . . . . . . . . . . . . . . . . . . . . . . .5-12
Mitel 5000 Base Server Chassis
Gathering Optional Equipment. . . . . . . . . . . . . . . . . . . . . . . . . . . . . . . . . . . . . . . . . . . . . . . . . . .5-13
Checking the Unit Pre-Assembly . . . . . . . . . . . . . . . . . . . . . . . . . . . . . . . . . . . . . . . . . . . . . . . . .5-14
Unpacking the Equipment . . . . . . . . . . . . . . . . . . . . . . . . . . . . . . . . . . . . . . . . . . . . . . . . . . . . . .5-14
Installing the Mitel CS-5200/5400/5600 Base Server . . . . . . . . . . . . . . . . . . . . . . . . . . . . . . . . .5-15
Wall-Mounting the Base Server . . . . . . . . . . . . . . . . . . . . . . . . . . . . . . . . . . . . . . . . . . . . . . . . . .5-15
Grounding the Inter-Tel 5000 Base Server . . . . . . . . . . . . . . . . . . . . . . . . . . . . . . . . . . . . . . . . .5-16
Equipment to Support UPS Monitoring . . . . . . . . . . . . . . . . . . . . . . . . . . . . . . . . . . . . . . . . . .5-17
Installing UPS Monitoring . . . . . . . . . . . . . . . . . . . . . . . . . . . . . . . . . . . . . . . . . . . . . . . . . . . .5-18
Installing the USB Security Key and Compact Flash-Type Memory Card . . . . . . . . . . . . . . . .5-19
Laying Out Cable Runs . . . . . . . . . . . . . . . . . . . . . . . . . . . . . . . . . . . . . . . . . . . . . . . . . . . . . . . . .5-20
Mounting and Cabling the Main Distribution Frame (MDF) . . . . . . . . . . . . . . . . . . . . . . . . . . . .5-21
Connecting CO Trunk Cables to the MDF . . . . . . . . . . . . . . . . . . . . . . . . . . . . . . . . . . . . . . .5-22
Built-In Ports for WAN Fail Survivability . . . . . . . . . . . . . . . . . . . . . . . . . . . . . . . . . . . . . . . . .5-27
Connecting T1/PRI and E1/PRI Trunks to the MDF . . . . . . . . . . . . . . . . . . . . . . . . . . . . . . . .5-29
Installing Lightning Protection . . . . . . . . . . . . . . . . . . . . . . . . . . . . . . . . . . . . . . . . . . . . . . . . .5-31
Connecting T1M or T1M-2 Modules between Network Nodes . . . . . . . . . . . . . . . . . . . . . . . .5-32
Verifying and Securing Cable Connections . . . . . . . . . . . . . . . . . . . . . . . . . . . . . . . . . . . . . . . .5-33
Completing Installation Tasks . . . . . . . . . . . . . . . . . . . . . . . . . . . . . . . . . . . . . . . . . . . . . . . . . . .5-33
Setting Initial System Configuration . . . . . . . . . . . . . . . . . . . . . . . . . . . . . . . . . . . . . . . . . . . . . .5-34
Mitel ® 5000 Installation Manual – Issue 3.0, October 2008
Page 5-1
Chapter 5: Installation
Base Server Modules
Installing a Processor Module (PM-1) . . . . . . . . . . . . . . . . . . . . . . . . . . . . . . . . . . . . . . . . . . . . .5-41
Installing a Processor Expansion Card (PEC-1) . . . . . . . . . . . . . . . . . . . . . . . . . . . . . . . . . . . . .5-43
Installing a Two-Port Loop Start Module (LSM-2). . . . . . . . . . . . . . . . . . . . . . . . . . . . . . . . . . . .5-46
Installing a Four-Port Loop Start Module (LSM-4) . . . . . . . . . . . . . . . . . . . . . . . . . . . . . . . . . . .5-47
Installing a Dual T1/E1/PRI Module (T1M-2) . . . . . . . . . . . . . . . . . . . . . . . . . . . . . . . . . . . . . . . .5-48
Procedure . . . . . . . . . . . . . . . . . . . . . . . . . . . . . . . . . . . . . . . . . . . . . . . . . . . . . . . . . . . . . . . .5-48
Dual T1/E1/PRI Module LED Summary . . . . . . . . . . . . . . . . . . . . . . . . . . . . . . . . . . . . . . . . .5-49
Installing a Single-Port T1/E1/PRI Module (T1M) . . . . . . . . . . . . . . . . . . . . . . . . . . . . . . . . . . . .5-51
Procedures . . . . . . . . . . . . . . . . . . . . . . . . . . . . . . . . . . . . . . . . . . . . . . . . . . . . . . . . . . . . . . .5-51
Single T1/E1/PRI Module LED Summary . . . . . . . . . . . . . . . . . . . . . . . . . . . . . . . . . . . . . . . .5-52
Installing a Basic Rate Module (BRM-S) . . . . . . . . . . . . . . . . . . . . . . . . . . . . . . . . . . . . . . . . . . .5-53
Procedure . . . . . . . . . . . . . . . . . . . . . . . . . . . . . . . . . . . . . . . . . . . . . . . . . . . . . . . . . . . . . . . .5-53
BRM-S online/Off-line Handling and LED Descriptions . . . . . . . . . . . . . . . . . . . . . . . . . . . . .5-54
Installing a Four-Port Single Line Module (SLM-4). . . . . . . . . . . . . . . . . . . . . . . . . . . . . . . . . . .5-55
Mitel CS-5600 Processing Server (PS-1)
Processing Server (PS-1) Description . . . . . . . . . . . . . . . . . . . . . . . . . . . . . . . . . . . . . . . . . . . . .5-57
Licensing . . . . . . . . . . . . . . . . . . . . . . . . . . . . . . . . . . . . . . . . . . . . . . . . . . . . . . . . . . . . . . . . .5-57
Essential PS-1 BIOS Settings . . . . . . . . . . . . . . . . . . . . . . . . . . . . . . . . . . . . . . . . . . . . . . . . .5-57
PS-1 Hardware . . . . . . . . . . . . . . . . . . . . . . . . . . . . . . . . . . . . . . . . . . . . . . . . . . . . . . . . . . . .5-58
Installing the Processing Server (PS-1). . . . . . . . . . . . . . . . . . . . . . . . . . . . . . . . . . . . . . . . . . . .5-59
Digital Expansion Interface (DEI)
Installing a DEI . . . . . . . . . . . . . . . . . . . . . . . . . . . . . . . . . . . . . . . . . . . . . . . . . . . . . . . . . . . . . . . .5-60
Summary for Installing a New System or for Upgrading . . . . . . . . . . . . . . . . . . . . . . . . . . . . .5-60
Running Cables to Endpoints . . . . . . . . . . . . . . . . . . . . . . . . . . . . . . . . . . . . . . . . . . . . . . . . .5-62
Terminating Cables at Digital Endpoint Locations . . . . . . . . . . . . . . . . . . . . . . . . . . . . . . . . .5-64
Labeling Station Cable and Mapping Circuit Numbers . . . . . . . . . . . . . . . . . . . . . . . . . . . . . .5-65
Assembling and Cabling the Main Distribution Frame . . . . . . . . . . . . . . . . . . . . . . . . . . . . . .5-67
Unpacking the DEI Equipment . . . . . . . . . . . . . . . . . . . . . . . . . . . . . . . . . . . . . . . . . . . . . . . . . . .5-69
Checking the Unit Pre-Assembly . . . . . . . . . . . . . . . . . . . . . . . . . . . . . . . . . . . . . . . . . . . . . . . . .5-69
Installing DEI Hardware. . . . . . . . . . . . . . . . . . . . . . . . . . . . . . . . . . . . . . . . . . . . . . . . . . . . . . . . .5-70
Attaching DEI Units and External Voice Mail System . . . . . . . . . . . . . . . . . . . . . . . . . . . . . . . .5-70
Installing Modules in the DEI . . . . . . . . . . . . . . . . . . . . . . . . . . . . . . . . . . . . . . . . . . . . . . . . . . . .5-70
Installing a Digital Endpoint Module (DEM-16) . . . . . . . . . . . . . . . . . . . . . . . . . . . . . . . . . . . .5-70
Installing an Eight-Port Single Line Module (SLM-8) . . . . . . . . . . . . . . . . . . . . . . . . . . . . . . .5-72
Connecting Cables and Checking Cables to the System . . . . . . . . . . . . . . . . . . . . . . . . . . . .5-74
Page 5-2
Mitel ® 5000 Installation Manual – Issue 3.0, October 2008
Chapter 5: Installation
Connecting Station Cables to the MDF . . . . . . . . . . . . . . . . . . . . . . . . . . . . . . . . . . . . . . . . . . . .5-80
Connecting Station Cables to a U.S. System . . . . . . . . . . . . . . . . . . . . . . . . . . . . . . . . . . . . .5-80
Connecting Station Cables to a European System . . . . . . . . . . . . . . . . . . . . . . . . . . . . . . . . .5-82
Station Loop Resistance Test . . . . . . . . . . . . . . . . . . . . . . . . . . . . . . . . . . . . . . . . . . . . . . . . . . .5-85
Connecting Off-Premises Extensions . . . . . . . . . . . . . . . . . . . . . . . . . . . . . . . . . . . . . . . . . . . . .5-86
Introduction . . . . . . . . . . . . . . . . . . . . . . . . . . . . . . . . . . . . . . . . . . . . . . . . . . . . . . . . . . . . . . .5-86
Installing an OPX Station . . . . . . . . . . . . . . . . . . . . . . . . . . . . . . . . . . . . . . . . . . . . . . . . . . . .5-86
Analog Fallback System [Europe Only]. . . . . . . . . . . . . . . . . . . . . . . . . . . . . . . . . . . . . . . . . . . .5-87
Maintenance Tasks
Powering Up the System. . . . . . . . . . . . . . . . . . . . . . . . . . . . . . . . . . . . . . . . . . . . . . . . . . . . . . . .5-89
Powering Down the System . . . . . . . . . . . . . . . . . . . . . . . . . . . . . . . . . . . . . . . . . . . . . . . . . . . . .5-90
Saving the System and Voice Processor Databases . . . . . . . . . . . . . . . . . . . . . . . . . . . . . . . .5-91
Restoring the Database. . . . . . . . . . . . . . . . . . . . . . . . . . . . . . . . . . . . . . . . . . . . . . . . . . . . . . . . .5-94
Backing Up the Database . . . . . . . . . . . . . . . . . . . . . . . . . . . . . . . . . . . . . . . . . . . . . . . . . . . . . . .5-96
Changing the License . . . . . . . . . . . . . . . . . . . . . . . . . . . . . . . . . . . . . . . . . . . . . . . . . . . . . . . . . .5-97
Software License Upload . . . . . . . . . . . . . . . . . . . . . . . . . . . . . . . . . . . . . . . . . . . . . . . . . . . . . . .5-99
Uploading a License . . . . . . . . . . . . . . . . . . . . . . . . . . . . . . . . . . . . . . . . . . . . . . . . . . . . . . . .5-99
Invalid License Upload . . . . . . . . . . . . . . . . . . . . . . . . . . . . . . . . . . . . . . . . . . . . . . . . . . . . .5-100
Compare Software License Window . . . . . . . . . . . . . . . . . . . . . . . . . . . . . . . . . . . . . . . . . . .5-101
Replacing the Power Fuse . . . . . . . . . . . . . . . . . . . . . . . . . . . . . . . . . . . . . . . . . . . . . . . . . . . . .5-102
Replacing the Processor Module Battery . . . . . . . . . . . . . . . . . . . . . . . . . . . . . . . . . . . . . . . . .5-103
Installing the USB-B Port Serial Driver . . . . . . . . . . . . . . . . . . . . . . . . . . . . . . . . . . . . . . . . . . .5-104
Retrieving SMDR or Error Message Output Data . . . . . . . . . . . . . . . . . . . . . . . . . . . . . . . . . . .5-104
Using Terminal Emulation to Retrieve Online Messages . . . . . . . . . . . . . . . . . . . . . . . . . . . .5-105
Endpoints
Installing IP and Multi-Protocol Endpoints . . . . . . . . . . . . . . . . . . . . . . . . . . . . . . . . . . . . . . . .5-106
Installing IP Endpoints . . . . . . . . . . . . . . . . . . . . . . . . . . . . . . . . . . . . . . . . . . . . . . . . . . . . .5-106
Physical Interfaces . . . . . . . . . . . . . . . . . . . . . . . . . . . . . . . . . . . . . . . . . . . . . . . . . . . . . . . .5-110
Wall-Mounting IP Endpoints . . . . . . . . . . . . . . . . . . . . . . . . . . . . . . . . . . . . . . . . . . . . . . . . .5-115
Changing Protocol Modes: ITP and SIP
. . . . . . . . . . . . . . . . . . . . . . . . . . . . . . . . . . . . . . .5-120
Reading IP Endpoint Status Displays . . . . . . . . . . . . . . . . . . . . . . . . . . . . . . . . . . . . . . . . . . . .5-121
Firmware Download Progress Displays . . . . . . . . . . . . . . . . . . . . . . . . . . . . . . . . . . . . . . . .5-121
Download Error Message Displays . . . . . . . . . . . . . . . . . . . . . . . . . . . . . . . . . . . . . . . . . . . .5-126
Where to Program IP Resources . . . . . . . . . . . . . . . . . . . . . . . . . . . . . . . . . . . . . . . . . . . . .5-126
Mitel ® 5000 Installation Manual – Issue 3.0, October 2008
Page 5-3
Chapter 5: Installation
Installation Options for Single Line Endpoints. . . . . . . . . . . . . . . . . . . . . . . . . . . . . . . . . . . . .5-127
Single Line Modules . . . . . . . . . . . . . . . . . . . . . . . . . . . . . . . . . . . . . . . . . . . . . . . . . . . . . . .5-127
Single-Line Adapter (SLA) . . . . . . . . . . . . . . . . . . . . . . . . . . . . . . . . . . . . . . . . . . . . . . . . . .5-127
IP Single-Line Adapter (IP SLA) . . . . . . . . . . . . . . . . . . . . . . . . . . . . . . . . . . . . . . . . . . . . . .5-127
Modem Data Port Module . . . . . . . . . . . . . . . . . . . . . . . . . . . . . . . . . . . . . . . . . . . . . . . . . . .5-127
Installing Digital Endpoints . . . . . . . . . . . . . . . . . . . . . . . . . . . . . . . . . . . . . . . . . . . . . . . . . . . .5-128
Installing Digital Endpoints . . . . . . . . . . . . . . . . . . . . . . . . . . . . . . . . . . . . . . . . . . . . . . . . . .5-128
Installing Single Line Adapters (SLA) . . . . . . . . . . . . . . . . . . . . . . . . . . . . . . . . . . . . . . . . . .5-138
System Upgrades
Upgrade Scenarios . . . . . . . . . . . . . . . . . . . . . . . . . . . . . . . . . . . . . . . . . . . . . . . . . . . . . . . . . . .5-142
Upgrading a System . . . . . . . . . . . . . . . . . . . . . . . . . . . . . . . . . . . . . . . . . . . . . . . . . . . . . . . . . .5-142
Guidelines for Adding to or Upgrading a System . . . . . . . . . . . . . . . . . . . . . . . . . . . . . . . . .5-142
Removing System Voice Prompts and Inter-Tel Endpoint Firmware . . . . . . . . . . . . . . . . . .5-144
TFTP Server Configuration Example . . . . . . . . . . . . . . . . . . . . . . . . . . . . . . . . . . . . . . . . . .5-145
Upgrading Compact Flash-Type Memory . . . . . . . . . . . . . . . . . . . . . . . . . . . . . . . . . . . . . . .5-146
Upgrading System Software to Version 3.0 . . . . . . . . . . . . . . . . . . . . . . . . . . . . . . . . . . . . . . .5-148
Network Environment Requirements . . . . . . . . . . . . . . . . . . . . . . . . . . . . . . . . . . . . . . . . . .5-148
Upgrade Assumptions . . . . . . . . . . . . . . . . . . . . . . . . . . . . . . . . . . . . . . . . . . . . . . . . . . . . . .5-149
Onboard TFTP Server . . . . . . . . . . . . . . . . . . . . . . . . . . . . . . . . . . . . . . . . . . . . . . . . . . . . .5-149
Software Packaging . . . . . . . . . . . . . . . . . . . . . . . . . . . . . . . . . . . . . . . . . . . . . . . . . . . . . . .5-151
New Installations for v3.0 . . . . . . . . . . . . . . . . . . . . . . . . . . . . . . . . . . . . . . . . . . . . . . . . . . .5-152
Upgrading to v3.0 . . . . . . . . . . . . . . . . . . . . . . . . . . . . . . . . . . . . . . . . . . . . . . . . . . . . . . . . .5-152
Optional: Installing and Configuring Mitel NuPoint Messenger and the Mitel 5000 . . . . . . .5-163
Optional: Installing DEI Hardware to Expand Digital Capacity . . . . . . . . . . . . . . . . . . . . . . . .5-163
Considerations . . . . . . . . . . . . . . . . . . . . . . . . . . . . . . . . . . . . . . . . . . . . . . . . . . . . . . . . . . .5-164
Installing/Upgrading the DEI Chassis . . . . . . . . . . . . . . . . . . . . . . . . . . . . . . . . . . . . . . . . . .5-165
Optional: Installing an External USB Modem . . . . . . . . . . . . . . . . . . . . . . . . . . . . . . . . . . . . . .5-172
Installing Mitel IP Endpoints . . . . . . . . . . . . . . . . . . . . . . . . . . . . . . . . . . . . . . . . . . . . . . . . .5-173
Inter-Tel IP Endpoint Configuration . . . . . . . . . . . . . . . . . . . . . . . . . . . . . . . . . . . . . . . . . . .5-180
MItel 5330/5340 Setup for Teleworking . . . . . . . . . . . . . . . . . . . . . . . . . . . . . . . . . . . . . . . .5-180
Page 5-4
Mitel ® 5000 Installation Manual – Issue 3.0, October 2008
Chapter 5: Installation
Firmware. . . . . . . . . . . . . . . . . . . . . . . . . . . . . . . . . . . . . . . . . . . . . . . . . . . . . . . . . . . . . . . . . . . .5-181
Endpoint Firmware Compatibilities . . . . . . . . . . . . . . . . . . . . . . . . . . . . . . . . . . . . . . . . . . . .5-181
Firmware Update Changes . . . . . . . . . . . . . . . . . . . . . . . . . . . . . . . . . . . . . . . . . . . . . . . . . .5-182
Updating Firmware . . . . . . . . . . . . . . . . . . . . . . . . . . . . . . . . . . . . . . . . . . . . . . . . . . . . . . . .5-182
Upgrade Scenarios . . . . . . . . . . . . . . . . . . . . . . . . . . . . . . . . . . . . . . . . . . . . . . . . . . . . . . . .5-184
Upgrading Only Software . . . . . . . . . . . . . . . . . . . . . . . . . . . . . . . . . . . . . . . . . . . . . . . . . . .5-185
Upgrading from CS-5200 to CS-5400 . . . . . . . . . . . . . . . . . . . . . . . . . . . . . . . . . . . . . . . . . .5-186
Upgrading from CS-5200 to CS-5600 . . . . . . . . . . . . . . . . . . . . . . . . . . . . . . . . . . . . . . . . . .5-187
Upgrading from CS-5400 to CS-5600 . . . . . . . . . . . . . . . . . . . . . . . . . . . . . . . . . . . . . . . . . .5-187
Mitel CS-5600 Licensing with USB Security Key . . . . . . . . . . . . . . . . . . . . . . . . . . . . . . . . .5-191
Optional System Equipment
Installing a CT Gateway . . . . . . . . . . . . . . . . . . . . . . . . . . . . . . . . . . . . . . . . . . . . . . . . . . . . . . .5-191
Installing an External Music Source . . . . . . . . . . . . . . . . . . . . . . . . . . . . . . . . . . . . . . . . . . . . .5-192
Installing External Paging Equipment . . . . . . . . . . . . . . . . . . . . . . . . . . . . . . . . . . . . . . . . . . . .5-193
Installing an External Voice Processing System . . . . . . . . . . . . . . . . . . . . . . . . . . . . . . . . . . .5-194
Introduction . . . . . . . . . . . . . . . . . . . . . . . . . . . . . . . . . . . . . . . . . . . . . . . . . . . . . . . . . . . . . .5-194
Attaching an External Voice Processing System . . . . . . . . . . . . . . . . . . . . . . . . . . . . . . . . .5-195
Review and Update for Enabling a Voice Processor . . . . . . . . . . . . . . . . . . . . . . . . . . . . . .5-196
Installing an IP SLA . . . . . . . . . . . . . . . . . . . . . . . . . . . . . . . . . . . . . . . . . . . . . . . . . . . . . . . . . . .5-198
Defaulting IP SLA Settings . . . . . . . . . . . . . . . . . . . . . . . . . . . . . . . . . . . . . . . . . . . . . . . . . .5-199
Placing the IP SLA in Download Mode . . . . . . . . . . . . . . . . . . . . . . . . . . . . . . . . . . . . . . . . .5-199
Installing SIP Gateways . . . . . . . . . . . . . . . . . . . . . . . . . . . . . . . . . . . . . . . . . . . . . . . . . . . . . . .5-200
Installing a Mini-DSS Unit . . . . . . . . . . . . . . . . . . . . . . . . . . . . . . . . . . . . . . . . . . . . . . . . . . . . . .5-203
Installing a Single Line Handset Amplifier . . . . . . . . . . . . . . . . . . . . . . . . . . . . . . . . . . . . . . . .5-205
Installing a DSS/BLF Unit . . . . . . . . . . . . . . . . . . . . . . . . . . . . . . . . . . . . . . . . . . . . . . . . . . . . . .5-205
Gathering Equipment and Materials . . . . . . . . . . . . . . . . . . . . . . . . . . . . . . . . . . . . . . . . . . .5-205
Installing a PCDPM . . . . . . . . . . . . . . . . . . . . . . . . . . . . . . . . . . . . . . . . . . . . . . . . . . . . . . . .5-206
Installing an MDPM . . . . . . . . . . . . . . . . . . . . . . . . . . . . . . . . . . . . . . . . . . . . . . . . . . . . . . . .5-214
Connecting DSS/BLF Units . . . . . . . . . . . . . . . . . . . . . . . . . . . . . . . . . . . . . . . . . . . . . . . . . .5-215
Mitel ® 5000 Installation Manual – Issue 3.0, October 2008
Page 5-5
Chapter 5: Installation
Chapter Overview
Chapter Overview
This chapter provides information for installing and upgrading Mitel 5000 platforms, the Mitel
Digital Expansion Interface (DEI) unit, expansion modules, IP, digital, and analog single line
endpoints, and optional system components. For system specifications and a description of the
overall system, see the Specifications and Product Description chapters, respectively.
The chapter is organized according to the types of tasks required to install, upgrade, and
maintain the Mitel 5000 platforms. Tasks are grouped into the following categories:
• “Installation Planning” on page 5-7
• “Mitel 5000 Base Server Chassis” on page 5-13
• “Base Server Modules” on page 5-41
• “Mitel CS-5600 Processing Server (PS-1)” on page 5-57
• “Digital Expansion Interface (DEI)” on page 5-60
• “Maintenance Tasks” on page 5-89
• “Endpoints” on page 5-106
• “System Upgrades” on page 5-142
• “Optional System Equipment” on page 5-191
Technical Certification Requirement
As an Inter-Tel 5000-certified technician, you should be familiar with Mitel 5000 platform
architecture and operation. And, you should be able to use the Web-based technical support
features provided by Mitel. For example, the installation and upgrade procedures require you to
navigate the following Web sites:
• Mitel edGe Tech Central (www.inter-tel.com/techcentral)
• Application Management Center (Refer to the Mitel Applications Suite Installation and
Maintenance Manual, Release 1.2 on the Mitel Web site (http://edocs.mitel.com) for details
about licensing.
• Knowledge Base Center (www.inter-tel.com/knowledgebasecenter)
NOTICE
This manual is designed for Mitel certified field technicians. It does not provide detailed
instructions for carrying out tasks typically performed by competent telephone technicians.
For example, the manual does not include premises wiring practices as required by the
National Electrical Code [BS 6701 in Europe]. Excluded from this manual are procedures for
cable layout and installation, AC power installation and appropriate grounding, how to
eliminate or prevent the effects of RFI, EMI, lightning, AC power disturbances or static
discharge, and other telephony practices considered standard within the industry. Cable
installers, electricians, and field technicians are expected to be properly trained and, if
applicable, licensed in their trade practices. Mitel system certification is required of any
person requesting Mitel technical assistance.
Page 5-6
Mitel ® 5000 Installation Manual – Issue 3.0, October 2008
Chapter 5: Installation
Network Installation Concerns
INSTALLATION PLANNING
This section provides procedures for planning the installation of new Mitel CS-5200, CS-5400,
and CS-5600 systems. If upgrading a system, see “System Upgrades” on page 5-142.
Network Installation Concerns
To install a network, you will need to acquire the following components:
• Software License: Software features, including networking, are controlled by a software
license. The license uploaded to the system must have the appropriate networking
feature.
• T1 or E1 Service: For each network span, order a clear channel, point-to-point T1 or E1/
PRI span from the service provider (not PRI service, even though you will be using T1M or
T1M-2 modules set up for T1 or E1/PRI). If you intend to configure the T1/E1 module for
PRI use, you must have the PRI software feature license, part number 840.0227.
• T1M or T1M-2 Modules: For a private network installation, each network span requires
two T1M or T1M-2 modules, part number 580.2700 or part number 580.2702: one for each
end of the span.
• Processor Module (PM-1): The PM-1, part number 580.2000, is the primary circuit board
that holds the system processor and other essential components. It is built-in to the Mitel
CS-5200/5400/5600 Base Server chassis. The Mitel CS-5400 system is made by installing
a Processor Expansion Card (PEC-1), part number 580.2020, on top of the PM-1. See the
procedure, “Installing a Processor Expansion Card (PEC-1)” on page 5-43.
You can create a private network through IP resource programming—Refer to the Mitel 5000
Features and Programming Guide, part number 580.8006. Installation recommendations
include the following:
• Each node must have at least one central office (CO) [local exchange] trunk. Emergency
calls must be programmed to use the local trunk.
• All nodes should have access to the node where an optional external voice processing
system is located, with a minimum number of hops through other nodes. This will have a
significant impact on the network layout. The network does not allow one node to use
resources from another node (for example DSP resources) with the exception of external
page ports.
NOTICE
With regard to IP Addresses, subnet mask, and gateways, the CT Gateway must be on
the same LAN as the Mitel platform IP address and subnet mask, or the system will not
work.
Mitel ® 5000 Installation Manual – Issue 3.0, October 2008
Page 5-7
Chapter 5: Installation
Planning Digital and Analog Endpoint Locations
Planning Digital and Analog Endpoint Locations
Keep the following information in mind when planning digital endpoint locations and types:
• Digital Endpoints: The Mitel DEI unit has the capacity for up to 96 digital endpoints or
SLAs or a combination of both (using two DEI chassis). See “Installing Digital Endpoints”
on page 5-128 for a listing of the available endpoint models. See “System Endpoint
Capacities” on page 4-19 for more information on maximum station capacities.
• Single Line Endpoints: Single line endpoints such as DTMF endpoints or fax machines
can be attached to the Mitel 5000 platform in any of the following ways:
o
Connected to four-port or eight-port Single Line Modules (SLM-4 or SLM-8).
o
Connected to the two-port single line jack (RJ-14) on the back of the Mitel CS-5200/
5400/5600 Base Server. One or two industry-standard, single line DTMF endpoints
can be installed on a system at the back of the base server chassis. For details on this
feature, refer to the Mitel 5000 Features and Programming Guide, part number
580.8006. The dual loop start ports are then cabled to the MDF. This set up allows the
single line endpoints to be used to dial an emergency or other number directly without
going through the system. These lines also provide access outside in the event of a
network or site power outage.
o Connected to IP Single-Line Adapters (IP SLAs). Single line endpoints can be
connected to the dual single line port on the back of the Mitel CS-5200/5400/5600
Base Server chassis.
o Connected to Single-Line Adapters (SLAs).
o Connected to DEM-16s in the DEI. Up to 96 (48 per chassis) industry-standard, single
line DTMF or pulse-tone endpoints can be installed on a system.
• DSS/BLF Units: Up to four DSS/BLF units can be attached to an individual digital
endpoint. Each Mitel system, or network node, supports up to 20 DSS/BLF units.
• Single-Line Adapters: One or two single line endpoints or DID trunks can be attached to
an SLA. Each SLA requires attachment to a DEM-16 port.
• Mini-DSS Units: Models 8520 and 8560 digital endpoints can connect directly to a MiniDSS (Model 8416). The number of Mini-DSS units is not limited by system resources.
• Playback Devices: Playback devices can be used in place of single line endpoints. If an
external voice mail system is not used, playback devices are useful as hunt group
overflow/announcement stations. For details, see the Specifications chapter.
Page 5-8
Mitel ® 5000 Installation Manual – Issue 3.0, October 2008
Chapter 5: Installation
Pre-Installation Checklist
Pre-Installation Checklist
Use the following checklist when preparing to install the system. System specifications,
including capacities are included in the Specifications chapter. System descriptions appear in
the Product Description chapter.
Establishing Suitable Environmental Conditions for the System
Follow these guidelines to establish suitable environmental conditions for the system:
• Locate the chassis within 5 ft (1.5 m) of an isolated, dedicated, 105–125 VAC, 57–63 Hz,
15 A, single-phase commercial power source. Also, use an uninterruptible power supply
(UPS) with the Inter-Tel 5000 Base Server chassis.
WARNING
Electric Shock Hazard. The following list is from UL 1459, a product safety
specification governing telephone equipment:
• Never install telephone wiring during a lightning storm.
• Never install telephone jacks in wet locations unless the jack is specifically
designed for wet locations.
• Never touch uninsulated telephone wires or terminals unless the telephone line has
been disconnected at the network interface.
• Use caution when installing or modifying telephone lines.
Not following these suggestions could result in serious personal injury.
NOTICE
The system must be connected to an isolated, dedicated AC circuit. Power, neutral, and
ground wires must run separately from the outlet to the breaker panel without being
bonded to any other wire or circuit.
• Do not plug any other equipment into this outlet. To maintain the protection
provided by the isolated, dedicated circuit, the AC power cord length limits the
distance between the power supply and the outlet.
• Do not use an extension cord.
Do not defeat (or leave floating) the ground wire in the AC power cord. To protect the
system from AC voltage surges, install a surge/spike protector having the specifications
cited on page 4-7.
• Select the chassis location to minimize cable run length.
• Do not expose the chassis to direct sunlight, high humidity, heat, dust, or strong magnetic
fields (such as those generated by heavy motors and large copy machines).
• The MDF requires a ¾-inch (2 cm) plywood backboard for mounting system equipment,
peripherals, and distribution blocks. Usually, a board measuring 4 ft × 6 ft (1.2 m × 1.8 m)
provides sufficient space. However, a larger backboard may be required for mounting
multiple AC transformers, IP SLAs, or other system-related devices.
• Provide ample air space around the chassis. Do not place or store items on top of the
chassis.
• The SMDR/error message output device must not have cables longer than 50 ft (15 m).
Mitel ® 5000 Installation Manual – Issue 3.0, October 2008
Page 5-9
Chapter 5: Installation
Gathering the Necessary Tools and Supplies
• Install a UPS with the Mitel CS-5200/5400/5600 Base Server.
• Locate the equipment in a climate-controlled room. Mitel recommends that the maximum
operating temperature (as stated below) never be exceeded. Therefore, when installing
the chassis and any other system equipment, allow a sufficient margin for error (for
example, air conditioning failure, routine maintenance, plant shutdown, etc.) As a general
rule, if conditions are suitable for office personnel, they are also suitable for all equipment.
A properly controlled environment will help to extend the equipment operating life.
Table 5-1. Equipment Environmental Requirements
Requirements
Temperature
Equipment Chassis
Station Instruments
In Operation
In Storage
32 to 104 °F (0 to 40 °C)
32 to 113 °F (0 to 45 °C)
+40 to 185 °F (–40 to 85 °C)
–40 to 185 °F (–40 to 85 °C)
Relative Humidity
(Non-Condensing)
5–95%
5–95%
Altitude
Up to 10,000 ft (3048 m)
Up to 40,000 ft (12,192 m)
Gathering the Necessary Tools and Supplies
Keep the following information in mind when gathering the necessary tools and supplies to
install a system:
• Multi-protocol endpoints (IP or SIP): Make sure a LAN connection is in place in the
locations you want to install the endpoints. For multi-protocol endpoints operating in SIP
mode, a v1.1 or later SIP Server is required. For details, refer to the Unified Communicator
and SIP Server Installation and Configuration Manual, part number 835.2871.
• Models 8664/8665/8668 wireless endpoints: A NetLink SVP (SpectraLink® Voice
Priority) server is required. For details, refer to the SVP Server and Model 8664/8665/8668
Installation Manual, part number 935.4521.
• A high-impedance digital multimeter to ensure correct wiring of the modular jack
assemblies [line jack unit]. Multimeter accuracy must be ±0.5% or better.
• With a U.S. system, standard terminal blocks (66-type) and bridging clips for constructing
the MDF. With a European system, Krone blocks for the MDF jumper field.
• With a U.S. system, industry-standard, 2-pair non-stranded cable terminated with modular
plugs for connecting the MDF terminal blocks to single line jacks on the back of the Mitel
CS-5200/5400/5600 Base Server.
• Industry-standard cross-connect, or jumper, wire may be needed for certain applications.
• Gas discharge tubes with silicon avalanche suppressors for lightning protection on the CO
[Local Exchange], DID (USA only), and OPX trunks.
• Grounding terminal and 10AWG [diameter 6mm] wire for grounding the chassis.
• Standard hand tools and the mounting hardware for the MDF backboard, trunk and
termination blocks, modular jack assemblies [line jack unit], etc.
• For on-site or stand-alone/remote system programming, an IBM-compatible personal
computer (PC). For specifications, see page 4-63.
Page 5-10
Mitel ® 5000 Installation Manual – Issue 3.0, October 2008
Chapter 5: Installation
Gathering the Necessary Tools and Supplies
If installing any T1 or E1 and/or Primary Rate Interface (PRI) trunks: Depending on the type
of T1/PRI or E1/PRI termination used by the service provider [network provider] and how close
it is to the MDF, the following tools and supplies are also needed. The T1 or PRI trunk is usually
connected to the standard RJ-48C modular jack provided on the T1M or T1M-2 module. See
page 5-29 for more information.
• For T1/PRI trunks terminated on RJ-48C jacks near the MDF or for E1/PRI trunks
terminated on RJ-45 jacks near the MDF:
o
Four-pair, non-reversing, mod-to-mod line cords (one for each T1/PRI trunk installed).
o
For T1/PRI or E1/PRI trunks terminated on RJ-48C [RJ45 in Europe] jacks away from
the MDF. See Figure 5-10 on page 5-30.
o
Eight-conductor modular jack [line jack unit] assemblies—two for each T1/PRI or E1/
PRI span installed.
o
Four-pair, non-reversing, mod-to-mod line cords—two for each T1/PRI or E1/PRI span
installed.
o
T1 or E1 cable—enough to extend from each telco RJ-48C [RJ45 in Europe] jack to
the MDF. For cable specifications, see page 4-29.
• For T1/PRI or E1/PRI trunks terminated on an 66-type block:
o
Eight-conductor modular jack assemblies [line jack unit]—one for each T1/PRI trunk
installed. See Figure 5-12 on page 5-31.
o
Four-pair, non-reversing, mod-to-mod line cords—one for each T1/PRI trunk installed.
o
T1 or E1 cable—enough to extend from each telco [network provider] termination to
the MDF. For cable specifications, see page 4-29.
Mitel ® 5000 Installation Manual – Issue 3.0, October 2008
Page 5-11
Chapter 5: Installation
Planning Station Locations
Planning Station Locations
Keep the following information in mind when planning station locations and endpoint types:
• Endpoints:
o
IP: Plan where IP endpoints are going to be located and whether a LAN port exists at
that location. One LAN port is required for each endpoint. If a computer or other LAN
device is plugged into this port (for example, a computer network cable), simply plug
the IP endpoint into the LAN port, then plug the computer network cable into the LAN
port on the IP endpoint.
o
Digital: A Mitel 5000 platform equipped with a Digital Expansion Interface (DEI) unit
and Digital Endpoint Module (DEM-16) can support nine digital endpoint models and
the Single-Line Adapter (SLA). The SLA can be used to connect one or two single line
endpoints, an OPX trunk, or—in the USA only—a DID trunk.
o
Analog Single Line: Analog single line endpoints include devices that operate on an
industry-standard tip-ring/AC telephone circuit, such as DTMF endpoints, fax
machines, answering machines, and playback devices. Playback devices are useful as
hunt group overflow/announcement stations. For specifications, see page 4-54.
Using the following interfaces, single line endpoints can be installed on an Mitel 5000
platform:
–
Four-port Single Line Module (SLM-4)—for installation details, see page 5-55.
–
Eight-port Single Line Module (SLM-8)—for installation details, see page 5-72.
–
Single-Line Adapter (SLA)—for installation details, see page 5-64.
–
IP SLA—for installation details, see page 5-198.
–
Modem Data Port Module (MDPM) installed in a digital endpoint—for installation
details, see page 5-214.
–
The dual single line port on the back of the Mitel CS-5200/5400/5600 Base
Server—for installation details, see page 5-27.
NOTE
The RJ-14 jack that supports the two single line (SL) ports is wired
internally through a switch to the RJ-14 next to it that supports two
loop start (LS) trunk ports. In a system outage, the SL ports connect
directly to the LS ports. This wiring design allows the customer to
make one or two single line endpoints available that can be used to
dial out on the LS trunks in the event of total system and/or site
power loss. During normal system operation, the LS and SL ports can
be programmed in DB Programming to function as desired.
• Mini-DSS Units: Model 8660 endpoints can connect directly to a Mini-DSS (Model 8416).
The number of Mini-DSS units is not limited by system resources. For installation details,
see “Installing a Mini-DSS Unit” on page 5-203.
• DSS/BLF Units: Three models of Direct Station Select (DSS)/Busy Lamp Field (BLF) units
can be installed on digital endpoints, depending on the model of endpoint. Each digital
endpoint supports up to four DSS/BLF units, and each Mitel 5000 platform supports a total
of 20 DSS/BLF units. For installation details, see “Installing a DSS/BLF Unit” on page 5205.
Page 5-12
Mitel ® 5000 Installation Manual – Issue 3.0, October 2008
Chapter 5: Installation
Gathering Optional Equipment
MITEL 5000 BASE SERVER CHASSIS
The following sections provide procedures for installing the Mitel CS-5200/5400/5600 Base
Server chassis. The procedures appear in the order they should be performed at a new
installation. Upgrade procedures and procedures for installing the Processing Server (PS-1),
Digital Expansion Interface (DEI), expansion modules, and optional equipment appear in
separate sections.
Gathering Optional Equipment
Keep the following information in mind when gathering optional equipment, in preparation for
installing a system:
• External voice mail systems (Enterprise® Messaging or Voice Processing Unit) and
applications software for integrated Voice Processing (voice mail, Automated Attendant,
Hunt Group Announcement and Hunt Group Overflow, optional Fax-On-Demand, SMDR
storage, etc.).
• CT Gateway for using System OAI applications on a network.
• Headsets (Electret-compatible) for endpoints and handset amplifiers for single line
endpoints.
• External music source.
• External paging speakers and amplifier(s). See the notice on page 5-193.
• Electronic equipment (alarms, lights, etc.) to connect to the night transfer relay.
• External voice mail equipment. See page 4-65.
• Fax machine. See page 4-65.
• Industry-standard, one-pair (two-conductor) twisted cable to run from the MDF to all
station instruments and four-conductor modular jack [line jack unit] assemblies for all
station instruments, including IP and digital endpoints, single line DTMF endpoints, IP
SLAs, SLAs, and playback devices.
• Grounding terminal and 10AWG (diameter 6mm) wire for grounding the chassis, SingleLine Adapters, etc.
• Digital endpoint PCDPMs for using Off-Hook Voice Announce (OHVA) features and for
installing an MDPM. The serial port interface does not support serial data communication.
• Digital endpoint MDPMs for connecting single line endpoints.
• Optional wall-mount kits for the Mitel CS-5x00/DEI chassis. For details, see Table 7-5 on
page 7-4. One wall-mount kit allows you to mount the chassis flat against the MDF and the
other kit from the Mitel CommSource® division provides a rack mount unit that can be wallmounted on the MDF.
Mitel ® 5000 Installation Manual – Issue 3.0, October 2008
Page 5-13
Chapter 5: Installation
Checking the Unit Pre-Assembly
Checking the Unit Pre-Assembly
Please read all sections leading up to the procedures, paying close attention to any cautions
and notes included. For information about system requirements and capacities, see the
Specifications chapter. Figure 5-1 on page 5-15 provides an illustration of the unit chassis.
The unit is shipped fully assembled. There is nothing to install inside the chassis so removing
the cover is not necessary. Modules, security key, and compact flash are provided in separate
packaging and not installed.
Unpacking the Equipment
NOTICE
Electrostatic Discharge (ESD). The modules and components are static-sensitive. Handle
the modules by the edges only and keep them in their protective bags until they are to be
installed. Do not bend or touch the component pins or subject them to a static charge. When
working with the modules, use a properly terminated anti-static wrist strap and cover the
work surface with the bag that protected the module during shipping. Any static charge (no
matter how small) must be discharged from the body before touching the modules or other
components. The warranty for this equipment does not cover damage caused by static or
mishandling. Modules or components damaged in such a manner will not be replaced.
Unpack the equipment and inspect the equipment chassis and all accompanying parts following
these guidelines:
1.
Check the parts against the packing slip and inspect them for damage. If any item is
missing or damaged, contact Technical Support immediately. See “Technical Support
Contact Information” on page 7-2.
2.
Check all circuit module assemblies as follows:
a. Check each module to ensure there is no shipping foam or tape attached.
b. Inspect each module for shorted components.
c. Return all modules to their protective bags until they are ready to be installed in the
chassis.
3.
Page 5-14
Check that the protective covers over the module bays are in place. These covers
protect debris or other foreign matter from entering the system and possibly harming the
internal components. These covers should remain in place until you are ready to install a
module.
Mitel ® 5000 Installation Manual – Issue 3.0, October 2008
Chapter 5: Installation
Installing the Mitel CS-5200/5400/5600 Base Server
Installing the Mitel CS-5200/5400/5600 Base Server
To install the Base Server:
1.
Install the chassis in the rack, then position the chassis and rack near the MDF
backboard. Position the chassis at a height appropriate for reading the LCD panel. Also,
allow room above the chassis for future expansion. For example, a voice processing
system or Digital Expansion Interface (DEI) unit.
The Mitel CS-5200/5400/5600 Base Server can be mounted in a standard rack, on a
table, or on another secure, horizontal surface. Protective “feet” on the bottom of the
chassis allow you to stack units, if not using a rack. There are external voice processing
options available using NuPoint Messenger or Enterprise® Messaging (EM). These
external voice processing systems can either be rack mounted (recommended) or
placed on a horizontal surface in proximity to the Mitel CS-5200/5400/5600 Base Server.
2.
Do not plug in the system AC power cable.
3.
Continue to “Grounding the Inter-Tel 5000 Base Server” on page 5-16.
Figure 5-1. Base Server Front and Back Views
Base Server Front
Memory Card
2-Line LCD Panel
LCD Panel Controls
Eject Button
USB Security Key (recessed)
USB-A (USB hub; UPS cable; or,
Basic Voice Mail backup)
USB-B
Optional External Voice Mail
or Digital Expansion Interface (DEI)
Paging Port
Fuse
Base Server Back
EXP
DUAL LS DUAL SL
PAGE MOH
Music On Processor
Hold Port
Module
Remove
Module
LED
Loop Start T1M or T1M-2
Module
Module
Battery Alarm LED
Ground Lug (Earth ground)
(2) Single Line Ports
(2) Loop Start Ports
Module
Cover*
Power
REF Online
Clock Status
LED LED
* The chassis is shipped without modules installed. The above example is for illustrative
purposes only. Module covers must remain in place if there is not an actual module to occupy
a module bay. The covers help to ensure foreign material does not enter the chassis.
Wall-Mounting the Base Server
Refer to wall-mount kit 828.1692 to wall-mount the base server chassis. Refer to the kit
documentation for wall-mounting instructions.
Mitel ® 5000 Installation Manual – Issue 3.0, October 2008
Page 5-15
Chapter 5: Installation
Grounding the Inter-Tel 5000 Base Server
Grounding the Inter-Tel 5000 Base Server
NOTICE
For proper grounding methods, refer to Inter-Tel’s System Equipment Grounding Guidelines,
part number 835.2845. See page 5-9 for additional AC power requirements.
With a U.S. system, the Inter-Tel 5000 Base Server must be plugged into a UPS and the UPS
plugged into a properly grounded AC power source. Some effective grounding connections
include the steel frame of the building in which the system is installed, a grounding rod that has
been driven a minimum of 8 ft (2.4 m) into the earth, or a copper—not PVC—cold-water pipe.
With a European system, the equipment chassis must be plugged into a properly grounded AC
power source. The Krone field should also be hard-wired to the building earth.
In addition, all optional IP Single-Line Adapters, trunk gas discharge tubes, and UPS battery
compartments that are used must be properly grounded to the chassis AC outlet. The Mitel
CommSource® division or Mitel Europe sells a surge/spike protector that is equipped with a
built-in ground lug just for this purpose.
The grounding wire should be 10AWG [diameter 6mm] or larger. To provide RFI/EMI protection
only, it should not exceed 25 ft (7.5 m). To provide both RFI/EMI and lightning protection it
should not exceed 10 ft (3 m).
For additional and supplementary information, refer to Inter-Tel’s System Equipment Grounding
Guidelines, part number 835.2845.
To ground the system:
1.
Ensure the system AC power source is properly grounded. do not defeat (or leave
floating) the ground wire in the AC power cord.
2.
For a U.S. system only, install an AC surge/spike protector with a built-in ground lug and
connect it to:
a. The ground lug (indicated by the symbol
) on each Single-Line Adapter, if used.
b. The ground lug on the back of the chassis, as shown in Figure 5-1 on page 5-15.
c. Battery compartments, if used.
d. Trunk gas discharge tubes, if used.
3.
Continue to “Base Server Modules” on page 5-41.
If AC power-related problems appear on the system while in operation, one of the following
three methods can be used to test the ground.
• Use a digital multimeter to measure the difference of potential between the equipment
cabinet ground point and the power neutral, and between the cabinet ground point and the
third wire ground. If the voltage measurement exceeds 0.5 V, noise may develop on the
system. If this occurs, call an electrician.
• Use a reliable earth-ground testing device to test the ground point. An earth-ground tester
should be available through the local power company. Look for a reading of 5 ohms or
less.
• For a U.S. system only, unplug the AC power cord from the outlet and insert a ground
isolation plug into the outlet. Plug the AC power cord into the ground isolation plug. If the
problem ceases, call an electrician. When finished, remove the ground isolation plug to
restore ground protection.
Page 5-16
Mitel ® 5000 Installation Manual – Issue 3.0, October 2008
Chapter 5: Installation
Equipment to Support UPS Monitoring
Equipment to Support UPS Monitoring
This section describes the installation of Uninterruptible Power Supply (UPS) units that support
Mitel 5000 Communications Servers. See “Compatible UPS Units” on page 4-9.
The UPS connects directly to an Mitel 5000 USB port, and you should use only the USB cable
provided by the UPS manufacturer. Product validation testing has determined that non-original
equipment manufacturer (non-OEM) cables interfere with UPS Monitoring feature operation.
With an Mitel CS-5200 or CS-5400 system, the UPS is connected to the USB-A port located on
the front of the Base Server. Because only one USB port exists on the Base Server, if the port is
occupied with a flash drive, it must be removed. The use of a USB hub to increase the number
of ports is also supported. See “Compatible USB Hubs” on page 4-9.
With an Mitel CS-5600, the UPS must be connected to an available USB port on the Processing
Server (PS-1). Four USB ports are located on the back of the PS-1.
If upgrading from a CS-5200 or CS-5400 system to a CS-5600 system, the cable from the UPS
must be connected to a USB port on the PS-1 following the upgrade. The UPS must connect to
the server running call processing (CP) software in order for the UPS Monitoring feature to
operate correctly.
To avoid electrically induced performance problems, all associated Mitel 5000 equipment should
be sourced from the same AC phase and ground reference. To assure that the electrical source
is the same, plug Mitel 5000 equipment into the same UPS unit. A common electrical source is
most critical with Mitel 5000 Base Server and associated Digital Equipment Interface (DEI)
units.
Because the CS-5600 Processing Server (PS-1) is IP networked, a common electrical source is
not as critical. However, if wattage and outlets are available, the CS-5600 should be maintained
on the same UPS. The CS-5600 Processing Server (PS-1) does not require its own UPS unit.
Comply with the following electrical requirements when installing or
upgrading Mitel 5000 equipment:
• Plug Mitel 5000 equipment into the same UPS unit, in particular the
IMPORTANT
Base Server and associated Digital Equipment Interface (DEI) units. If
wattage and outlets are available, the CS-5600 Processing Server (PS1) should be maintained on the same UPS. The PS-1 does not require
its own UPS unit.
• The UPS unit must be plugged into an isolated, dedicated circuit
providing required voltage, current, and grounding specifications.
• The power rating of the UPS unit must exceed the combined power
ratings of all Mitel 5000 units the UPS supports.
Mitel ® 5000 Installation Manual – Issue 3.0, October 2008
Page 5-17
Chapter 5: Installation
Installing UPS Monitoring
Installing UPS Monitoring
Use the following procedure to install a UPS and activate UPS Monitoring on systems running
v2.2 or later.
To install a UPS and activate the UPS Monitoring feature:
1.
Upgrade to the latest Mitel 5000 software release. See “Upgrading System Software to
Version 3.0” on page 5-148.
2.
The UPS Monitoring flag, Enable Shutdown on Low Battery, is set to Yes by default.
Clearing this flag prevents a system from shutting down when a low battery event is
received from the UPS unit.
3.
Plug the Mitel 5000 platform into the UPS. In a CS-5600 configuration, both the Base
Server and the PS-1 are assumed to be plugged into the same UPS. If the UPS unit
provides outlets for both Surge Protection and Back Up Battery, use only the outlets for
Back Up Battery.
4.
Plug the UPS monitoring cable into the USB port of the Mitel 5000 platform.
5.
Do either of the following, according to your system type:
•
In an Mitel CS-5200 or CS-5400 system not equipped with a compatible USB hub,
remove the USB flash drive. The flash drive can be swapped with the UPS cable at
a later time for backup purposes, but the UPS cable must be reconnected after
backup for correct functionality of the UPS Monitoring feature.
If the system is equipped with a compatible USB hub, voice mail can be backed up
to a flash drive at the same time the UPS Monitoring feature operates. For a list of
compatible USB hubs, see Table 4-6 on page 4-10.
•
In a CS-5600 system, the UPS monitoring cable is plugged into an available USB
port on the PS-1. The system then detects the device and an entry appears in
Message Print. Even though the Enabling flag is set to Yes in DB Programming,
UPS Monitoring functionality does not begin until a supported device has been
detected.
Consider the following system characteristics:
• Additional USB power events such as On Battery or Low Battery are
also displayed in Message Print. If necessary, the option to shutdown
the system on a low battery event can be disabled in DB
Programming.
NOTES
• Depending on the UPS vendor and model, the UPS itself may have
additional configuration options such as low battery threshold. If
available, the UPS configuration can be modified by loading the
manufacturer's software on a PC, connecting the UPS to the PC, and
configuring it directly. Any configuration of the UPS should be done
prior to connecting the Mitel 5000 platform to it.
Page 5-18
Mitel ® 5000 Installation Manual – Issue 3.0, October 2008
Chapter 5: Installation
Installing the USB Security Key and Compact Flash-Type Memory Card
Installing the USB Security Key and Compact Flash-Type
Memory Card
Locate the security key and compact flash-type memory card that came with the system. The
memory card contains system software files and the applications necessary to operate the
system. There are no application licenses on the security key; the key indicates that the system
is able to download the corresponding license it needs to operate. For additional information
about the USB security key and compact flash-type memory card, see the Specifications and
Product Description chapters.
NOTICE
The Mitel 5000 v3.0 release requires a minimum 512MB compact flash-type memory card. If
this system is currently using a 256MB compact flash-type memory card, upgrade the card to
either 512MB (part number 841.0274) or 1024MB (part number 841.0273) before upgrading
the system to v3.0.
NOTICE
Possible Memory Card Corruption: By adhering to the following precautions you can help
prevent corruption of data on the compact flash-type memory card:
• Do not remove or install the compact flash-type memory card while the system is up and
running or power is otherwise supplied to the Inter-Tel 5000 Base Server chassis, as this
may damage the memory card. Shut down the system using the LCD panel and unplug
the power cord before removing or inserting the memory card.
• Using any compact flash-type memory card other than one provided by Mitel is not
supported.
• Do not place the compact flash-type memory card into any other PC. Doing so may
corrupt the file system and software.
To install the USB security key and compact flash-type memory card:
1.
Using the illustration on the next page as a guide, insert the USB security key in the USB
port labeled “KEY.” Write down the key number (for example, on a sticker you can place
above the key location on the chassis).
The security key has changed. Newer keys (part number: 841.0892) are shorter than the
previous security key (part number: 841.0219). Table 5-2 details the differences and
compatibilities of the keys with the Mitel 5000 chassis.
Table 5-2. USB Security Key Port Compatibility
USB Security Key
New keya
Existing keyd
Chassis
Compatibility
Existing chassisb
Insert new key into a nonrecessed port (USB-A). Do not
insert into port labeled KEY.
Newer chassisc
Insert into any USB port.
Existing chassis
Insert into port labeled KEY.
Newer chassis
Insert into any USB port.
a. Part number: 841.0892
b. Recessed USB port labeled “KEY”
c. No recessed USB ports.
d. Part number: 841.0219
Mitel ® 5000 Installation Manual – Issue 3.0, October 2008
Page 5-19
Chapter 5: Installation
Laying Out Cable Runs
NOTICE
The system constantly verifies that the USB security key is in place. Do not remove
the security key while the system is running. An alarm (122) is issued if the system
detects a missing security key (the key is recessed into the chassis to decrease the
possibility of its being dislodged and losing the connection). If the system detects a
missing security key, it will invalidate the license in 30 minutes and reset the system in
4 hours. If the system is booted without the key in place, you will need to reload the
license file in DB Programming, if it was previously loaded.
Also, If for any reason you need to replace the USB security key, make sure you
upload the latest license file before replacing the key. Attempting to upload a license
file after changing the USB security key results in an error and the system will not
function.
2.
Insert the compact flash-type
memory card into the bay labeled
COMPACT FLASH, as shown in
the following graphic.
3.
Continue to “Verifying and
Securing Cable Connections” on
page 5-33.
Chassis Front
KEY (security)
Compact
Flash
Eject Button
Laying Out Cable Runs
WARNING
Possible Delay in Local Emergency Response to Remote Sites.
IP and SIP endpoint users should be alerted to the following hazardous situations:
• If an Emergency Call phone number is dialed from an IP or SIP endpoint located at a
remote site that is not equipped with a correctly configured gateway, the call will be
placed from the location where the system chassis is installed rather than from the
location where the emergency call is made.
In this situation, emergency responders may be dispatched to the wrong location. To
minimize the risk of remote site users misdirecting emergency responders, Mitel
recommends regular testing of SIP/MGCP gateway trunk(s) for dial tone.
• If uninterruptible power supply (UPS) protection has not been installed as part of the
Mitel 5000 system, IP and SIP endpoints will not operate when electrical power fails
either at remote sites or at the main system location.
To place calls during a power failure in this situation, IP and SIP endpoint users can use
only a single line endpoint connected to one of the circuits built into the system chassis.
If an endpoint connected to one of the built-in ports is not available, users should make
emergency calls from a local endpoint not connected to the system. For details about
the WAN Failover Survivability feature, see page 5-27.
Comply with the following the following guidelines when running cable:
• Develop floor plans to aid in proper IP endpoint cabling in a star (home run) configuration
from the Inter-Tel 5000 Base Server. If necessary, run the necessary network cabling to
where the IP endpoint will be used, or check that a LAN port exits at this location. For
cabling requirements, see “Cabling to Endpoints” on page 4-12.
• If a LAN port is not available to the location you want to place an IP endpoint, make the
required cable runs and install the desired number of LAN ports to this location.
Page 5-20
Mitel ® 5000 Installation Manual – Issue 3.0, October 2008
Chapter 5: Installation
Mounting and Cabling the Main Distribution Frame (MDF)
• If desired, two- or three-pair twisted cable and four- or six-conductor modular jacks [line
jack units] may be used for all endpoint connections. This allows the various types of
endpoints to be easily interchanged as needed.
NOTE
If three-pair cable is used with a U.S. system, extra terminal blocks and the
use of cross-connect wiring techniques are required.
• Install proper type cable for the application according to the National Electrical Code and
local building codes [BS 6701 in Europe].
• Avoid cable runs parallel to fluorescent light fixtures or AC lines not in conduit. If these
obstacles are unavoidable, run the cables across them at right angles.
• Do not run cables inside electrical conduit already occupied by AC power cable. To do so
is a violation of the National Electrical Code, or BS 6701.
• Do not run cables near equipment with electric motors or through strong magnetic fields,
such as those generated by large copy machines, arc welding equipment, heavy motors,
etc.
• Do not place station cables where they can be stepped on or where they can be rolled
over by office furniture.
• Do not exceed the loop limit measurements for the endpoint cable lengths, using 24
gauge (AWG) wire.
For additional information about laying out cable runs for digital expansion installations, see
“Optional System Equipment” on page 5-191.
Mounting and Cabling the Main Distribution Frame (MDF)
The MDF is the point at which the station instruments, trunks, and auxiliary system equipment
are connected to terminal blocks [Krone blocks], or in the case of T1/PRI or E1/PRI trunks,
modular jack [line jack unit] assemblies are used instead. These terminal blocks [Krone blocks]
connect to the circuit modules in the Mitel CS-5200/5400/5600 Base Server chassis.
Connections must be made carefully and securely with solid copper wire. Do not use stranded,
or speaker, wire to connect endpoints to the system.
With a European system each module is normally supplied with 2-meter cable, but 4-meter
cables are available by special order. These cables are supplied with the appropriate number of
Krone blocks for the module type.
To simplify the MDF installation instructions, this manual outlines basic one block-to-one module
installation using bridging clips. However, it is quite acceptable, and in some situations more
functional, to use additional blocks, then cross connect between them.
To assemble the MDF:
1.
Mount a 4 ft x 6 ft (1.2 m x 1.8 m), ¾-inch (2 cm) plywood backboard at the MDF
location. Depending on the number of stations and trunks to be installed, a larger
backboard may be necessary.
2.
With a U.S. system, attach the 66M1-50-type terminal blocks to the plywood backboard.
With a European system, attach the Krone blocks to the plywood backboard. This
includes blocks for connecting CO trunks.
3.
If installing any T1/PRI and/or E1/PRI trunks, attach 8-pin, 8-conductor modular jack
assemblies to the MDF as required. For information on installing T1/PRI or E1/PRI
trunks, see page 5-29.
Mitel ® 5000 Installation Manual – Issue 3.0, October 2008
Page 5-21
Chapter 5: Installation
Connecting CO Trunk Cables to the MDF
Connecting CO Trunk Cables to the MDF
This section provides information on connecting CO trunk cables for the LSM-2 and LSM-4
modules and the built-in dual loop start and dual single line ports. The built-in dual loop start
and dual single line ports provide CO trunk capabilities to the single line endpoints in addition to
providing the power-fail bypass functionality.
Connecting Trunks to LSM-2 Module Ports
For this procedure, see Figure 5-2 and Figure 5-3 on page 5-23 as a guide.
NOTICE
Mitel will continue to support existing LSM-2s in the field, but new modules will not be sold.
For connecting loop start trunks to the Mitel 5000 platform, use the LSM-4 module, part
number 580.2304, or the T1/E1 module, part number 580.2700.
To connect LSM-2 Module CO trunks:
1.
Cable the dual loop start port (CO trunks) using the pinouts shown in Figure 5-2 on page
5-23.
•
Use a patch panel at the rack and adapters between the patch panel and the InterTel 5000 Base Server. Use the fewest modular jacks and adapters possible, and do
not attach any adapters to the back of the chassis; clearance issues prevent them
from attaching securely. If using a 6-pin, 6-conductor patch panel, make the
appropriate adjustments when using the adapters. You can also build your own 6P/
6C to 8P/8C patch cables, if necessary.
•
If using 4- or 6-conductor modular line cord, limit the length to 6 ft maximum. In
general, modular line cords are not twisted pair and could introduce crosstalk
between line 1 and line 2 at longer lengths.
NOTICE
Equipment Damage Hazard. Use adapters when connecting any 6-pin plug to
an 8-pin jack. Although a 6-pin plug will fit into an 8-pin jack, the plastic on the 6pin plug housing will damage pins 1 and 8 on the 8-pin jack. Not using adapters
will increase the likelihood of failure (to pins 1 and 8 in the 8-pin jack) should that
jack need to be used with an 8-pin plug in the future. Various adapter types are
available based on how you choose to connect to the patch panel.
2.
Page 5-22
Create the split to create two loop start port connections:
•
In Figure 5-2 on page 5-23, the split to achieve two loop start ports occurs at the
patch panel. This is the recommended option.
•
In Figure 5-3 on page 5-23, the split to achieve two loop start ports occurs at the
MDF using modular jacks.
Mitel ® 5000 Installation Manual – Issue 3.0, October 2008
Chapter 5: Installation
Connecting Trunks to LSM-2 Module Ports
Figure 5-2. Cabling Option 1 for the LSM-2
8-pin Jack
8-pin Jack
LSM-2 Module
Dual Single Line Port
LS 3
SL 2
R-2 T-1 R-1 T-2
R-2 T-1 R-1 T-2
Adapter
LS 4
6-pin Plug
NO
Chassis Back
6-pin Plug
3
1
4
2
SL 1
LS 1
YES
R-2 T-1 R-1 T-2
LS 2
8P/8C 110 Patch Panel Back
Dual Loop Start Port 25-Pair
cable from
MDF to
patch panel
1 3 5 7
1
2
3
4
5
6
RJ-14
not used
R2
T1
R1
T2
not used
8P/8C 110 Patch
Panel Front
2 4 6 8
17 15 13
11
9
7
5
3
1
18 16 14
12 10
8
6
4
2
8P/8C 110 Patch
Panel Back
66M1-50
Block
RJ-14
4- or 6-conductor
modular line cord
Adapter
6-pin plug
to 8-pin jack
Figure 5-3. Cabling Option 2 for the LSM-2
Chassis Back
For each modular jack assembly
T2
T1
BLK
BLU
GRN
YEL
WHT
RED
GND
R2
R1
RJ-14
1
2
3
4
5
6
not used
R2
T1
R1
T2
not used
Top View
66M1-50
Block
RJ-14
4- or 6-conductor
modular line cord
Mitel ® 5000 Installation Manual – Issue 3.0, October 2008
25-Pair cable
from MDF
to rack
2 modular jack
assemblies at rack
Page 5-23
Chapter 5: Installation
Connecting Trunks to LSM-4 Module Ports
Connecting Trunks to LSM-4 Module Ports
This section provides information on connecting CO trunk cables for the LSM-4 module. For this
procedure, see Figure 5-2 and Figure 5-3 on page 5-23 as a guide.
To connect LSM-4 Module CO trunks:
1.
Cable the four-port loop start module port (CO trunks) using the pinouts shown in Figure
5-2 and Figure 5-3 on page 5-23.
•
Use a patch panel at the rack and adapters between the patch panel and the InterTel 5000 Base Server. Use the fewest modular jacks and adapters as possible, and
do not attach any adapters to the back of the chassis; clearance issues prevent
them from attaching securely. If using a 6-pin, 6-conductor patch panel, make the
appropriate adjustments when using the adapters. You can also build your own 6P/
6C to 8P/8C patch cables, if necessary.
•
If using 4- or 6-conductor modular line cord, limit the length to 6 ft maximum. In
general, modular line cords are not twisted pair and could introduce crosstalk
between line 1 and line 2 at longer lengths.
NOTICE
Equipment Damage: Use adapters when connecting any 6-pin plug to an 8-pin
jack. Although a 6-pin plug will fit into an 8-pin jack, the plastic on the 6-pin plug
housing will damage pins 1 and 8 on the 8-pin jack. Not using adapters will
increase the likelihood of failure (to pins 1 and 8 in the 8-pin jack) should that
jack need to be used with an 8-pin plug in the future. Various adapter types are
available based on how you choose to connect to the patch panel.
2.
Page 5-24
Create the split to create two loop start port connections:
•
In Figure 5-2 on page 5-23, the split to achieve two loop start ports occurs at the
patch panel. This is the recommended option.
•
In Figure 5-3 on page 5-23, the split to achieve two loop start ports occurs at the
MDF using modular jacks.
Mitel ® 5000 Installation Manual – Issue 3.0, October 2008
Chapter 5: Installation
Connecting Trunks to LSM-4 Module Ports
Figure 5-4. Cabling Option 1 – LSM-4
8-pin Jack
8-pin Jack
LSM-2 Module
LS 3
Dual Single Line Port
SL 2
R-2 T-1 R-1 T-2
R-2 T-1 R-1 T-2
Adapter
LS 4
6-pin Plug
6-pin Plug
NO
YES
Back of Mitel CS-5x00 Base Server
4
2
SL 1
LS 1
LS 2
Dual Loop Start Port
8P/8C 110 Patch Panel Back
not used
R2
T1
R1
T2
not used
1
2
3
4
5
6
1
R-2 T-1 R-1 T-2
25-Pair
cable from
MDF to
patch panel
8P/8C 110 Patch
Panel Front
1 3 5 7
RJ-14
3
2 4 6 8
17 15 13
11
9
7
5
3
1
18 16 14
12 10
8
6
4
2
66M1-50
Block
8P/8C 110 Patch
Panel Back
RJ-14
Adapter
6-pin plug
to 8-pin jack
4- or 6-conductor
modular line cord
Figure 5-5. Cabling Option 2 – LSM-4
Back of Mitel CS-5x00 Base Server
For each modular jack assembly
T2
T1
BLK
BLU
GRN
YEL
WHT
RED
RJ-14
R2
1
2
3
4
5
6
not used
R2
T1
R1
T2
not used
R1
Top View
66M1-50
Block
RJ-14
4- or 6-conductor
modular line cord
25-Pair cable
from MDF
to rack
modular jack
assembly at rack
For additional lightning protection, install gas discharge tubes with silicon avalanche
suppressors to ground (grounding rod or copper cold water pipe) on each CO trunk. This must
be done external to the system. Each gas discharge tube is installed directly between the
service provider company RJ-type block and the system CO/DID/OPX input. This protection
should provide energy absorption and filter low-level surge potentials. Also, in areas with
frequent occurrences of lightning, make the cable length between the service provider company
RJ-type blocks and the gas discharge tubes at least 75 ft (22.5 m). The cable may be coiled as
needed.
Mitel ® 5000 Installation Manual – Issue 3.0, October 2008
Page 5-25
Chapter 5: Installation
Connecting CO Trunks to a U.S. System
Connecting CO Trunks to a U.S. System
Connect the CO trunks and other module cables. This procedure describes additional
information for installing digital endpoints. Note that step 2 mentions two installation methods.
Although the first method is more flexible, the second method can be used to minimize the
number of terminal blocks required.
1.
Cross-connect the CO trunks from the telephone company RJ-type blocks to the right
side of the Mitel system blocks at the MDF. To provide additional lightning protection, see
“Installing Lightning Protection” on page 5-31.
2.
Use either of the following methods. To help speed installation, a 15 ft (4.5720 m) cable
with Amphenol connector is available, part number 813.1814.
•
Replacing an Inter-Tel Axxess system: Use the 15 ft Amphenol-terminated cable as
appropriate. One end of the cable is terminated with a male Amphenol-type
connector that will plug into a female Amphenol-type connector used for
terminating Axxess system stations at the MDF. The other end of the cable is
terminated with 4 prewired RJ-45 plugs for quick connection to the DEM-16s in the
DEI chassis. If necessary, using standard electrical tape, attach two ferrite split
beads, part number 808.1195, around each 25-pair cable just below the Amphenoltype connector, as shown in Figure 5-6. Ferrite beads may be necessary to help
reduce EMI and RFI.
Figure 5-6. Example of Ferrite Bead Installation and Connection Types
Amphenol-type
Connectors from existing phone system
Adapter cable to
DEI and DEMs
25-pair cables
to the MDF
Ferrite
beads
•
3.
New Installation: Use enough 25-pair cable to run from the MDF to the modules.
Terminate the other end of each 25-pair cable on the left side of the corresponding cable
termination block, and install bridging clips to complete the connections.
Connecting CO Trunks to a European System
Some trunks are connected using the fallback system. See “Analog Fallback System [Europe
Only]” on page 5-87. The trunk connections are made to the designated Krone blocks.
Lightning Strike Protection Methods
For protecting the system against lightning strikes, attach the two ferrite split beads around each
cable just below the Amphenol-type connector, as shown in Figure 5-6 on page 5-26.
For additional lightning protection, install gas discharge tubes with silicon avalanche
suppressors to ground (grounding rod or copper cold water pipe) on each CO, DID, and OPX
trunk. This must be done external to the system. Each gas discharge tube is installed directly
between the telephone company (network provider) RJ-type block and the system CO/DID/OPX
input. This protection should provide energy absorption and filter low-level surge potentials.
Also, in areas with frequent occurrences of lightning, it is recommended that the cable length
between the telephone company (network provider) RJ-type blocks and the gas discharge tubes
be at least 75 ft (22.5 m). The cable may be coiled up as needed.
Page 5-26
Mitel ® 5000 Installation Manual – Issue 3.0, October 2008
Chapter 5: Installation
Built-In Ports for WAN Fail Survivability
Built-In Ports for WAN Fail Survivability
Two loop start ports and two single line ports are built-in to the Mitel CS-5200/5400/5600 Base
Server to provide Wide Area Network (WAN) Fail Survivability through Power Fail Bypass
circuitry. When not in WAN Fail Survivability mode, the ports support CO loop start trunks and
single line endpoints in the system configuration.
The WAN Fail Survivability feature allows calls to be made from one or two single line endpoints
through the CO [branch exchange] during a network outage. A customer can dial out and
receive calls at any time through these connections. But, the single line endpoints and loop start
trunks connected to the built-in ports continue to operate during a network outage. For more
information about WAN Fail Survivability, see the Product Description chapter.
Two RJ-14 jacks on the back of the Mitel CS-5200/5400/5600 Base Server provide interfaces
for the Dual Loop Start Ports and Dual Single Line Ports that make up the WAN Fail
Survivability feature. See Figure 5-7.
Figure 5-7. Built-In Dual Loop Start and Dual Single Line Ports
Back of Mitel 5000 Base Server
EXP
DUAL LS DUAL SL
Dual Loop Start Port
PAGE
MOH
Dual Single Line Port (to single line endpoints)
For this procedure, see Figures 5-8 and 5-9 on page 5-28 as a guide.
To connect the built-in dual loop start CO trunks and dual single line port:
1.
Run the necessary amount of cable and install the endpoint you want to use (single line
set) should power fail to the system.
2.
Cable the single line and loop start ports.
•
Two 2-pair cables are required: one for the dual single line port and one for the
dual loop start port.
•
Use a patch panel at the rack and adapters between the patch panel and the Mitel
CS-5200/5400/5600 Base Server chassis. Use the fewest modular jacks and
adapters as possible, and do not attach any adapters to the back of the chassis;
clearance issues prevent them from attaching securely. If using a 6-pin, 6conductor patch panel, make the appropriate adjustments when using the
adapters. You can also build your own 6P/6C to 8P/8C patch cables, if necessary.
•
If using 4- or 6-conductor modular line cord, limit the length to 6 ft maximum. In
general, modular line cords are not twisted pair and could introduce crosstalk
between line 1 and line 2 at longer lengths.
NOTICE
Equipment Damage: Use adapters when connecting any 6-pin plug to an 8-pin
jack. Although a 6-pin plug will fit into an 8-pin jack, the plastic on the 6-pin plug
housing will damage pins 1 and 8 on the 8-pin jack. Not using adapters will
increase the likelihood of failure (to pins 1 and 8 in the 8-pin jack) should that
jack need to be used with an 8-pin plug in the future. Various adapter types are
available based on how you choose to connect to the patch panel.
In Figure 5-8 on page 5-28, the split to achieve two loop start and two single line
ports occurs at the patch panel. This is the recommended option. In Figure 5-9 on
page 5-28, the split to achieve two loop start and two single line ports occurs at the
MDF using modular jacks.
Mitel ® 5000 Installation Manual – Issue 3.0, October 2008
Page 5-27
Chapter 5: Installation
Built-In Ports for WAN Fail Survivability
Figure 5-8. Cabling Option 1 for the Dual LS and Dual SL
8-pin Jack
8-pin Jack
Adapter
LSM-2 Module
LS 3
Dual Single Line Port
SL 2
R-2 T-1 R-1 T-2
R-2 T-1 R-1 T-2
EXP
LS 4
6-pin Plug
DUAL LS
DUAL SL
PAGE
MOH
NO
RJ-14
3
1
4
2
SL 1
6-pin Plug
YES
LS 1
R-2 T-1 R-1 T-2
4- or 6-conductor
modular line cord
RJ-14
1
2
3
4
5
6
Adapter
6-pin plug
to 8-pin jack
not used
R2
T1
R1
T2
not used
LS 2
Dual Loop Start Port
8P/8C 110 Patch Panel Back
25-Pair
cable
from MDF
to patch
panel
8P/8C 110 Patch
Panel Front
1 3 5 7
2 4 6 8
RJ-14
17 15 13
11
9
7
5
3
1
18 16 14
12 10
8
6
4
2
66M1-50
Block
8P/8C 110 Patch
Panel Back
4- or 6-conductor
modular line cord
Adapter
6-pin plug
to 8-pin jack
Figure 5-9. Cabling Option 2 for the Dual LS and Dual SL
For each modular jack assembly
T2
T1
BLK
BLU
GRN
YEL
WHT
RED
GND
R2
R1
EXP
DUAL LS DUAL SL
PAGE
MOH
RJ-14
4- or 6-conductor
modular line cord
Top View
1
2
3
4
5
6
not used
R2
T1
R1
T2
not used
25-Pair cable
from MDF
to rack
66M1-50
Block
RJ-14
4 modular jack
assemblies at rack
Page 5-28
Mitel ® 5000 Installation Manual – Issue 3.0, October 2008
Chapter 5: Installation
Connecting T1/PRI and E1/PRI Trunks to the MDF
Connecting T1/PRI and E1/PRI Trunks to the MDF
The installation procedure used to connect T1/PRI and/or E1/PRI spans at the MDF depends on
the type of termination used by the service provider [network provider] and how close it is to the
MDF. T1/PRI or E1/PRI trunks may be terminated on RJ-48C modular jacks [RJ45 line jack
units] or on 66-type terminal blocks.
NOTE Primary Rate Interface for ISDN service requires separate licensing.
Follow one of the termination methods (A, B, or C) outlined below and illustrated beginning on
page 5-31. The T1/PRI trunk is usually connected to the standard RJ-48C jack provided on the
T1M or T1M-2 module.
Method A – T1/PRI Trunks Terminated on RJ-48C Jacks Near the
MDF
To install T1/PRI trunks terminated on RJ-48C jacks near the MDF:
1.
Plug one end of a four-pair, non-reversing [straight through], mod-to-mod line cord into
each service provider RJ-48C jack. The other end of each line cord will later be plugged
into the jack on the corresponding T1M or T1M-2 module.
2.
Make sure the connectors on the ends of each line cord are properly attached. If any of
the wires are cracked or broken, transmission problems can occur.
Method B – T1/PRI Trunks Terminated on RJ-48C Jacks Away from
the MDF
To install T1/PRI trunks terminated on RJ-48C jacks away from the MDF:
1.
Mount one eight-conductor modular jack [line jack unit] assembly next to each service
provider RJ-48C jack. For a diagram of the complete layout, see Figure 5-10 on page 530.
2.
For each modular jack [line jack unit] assembly mounted in step 1, mount a
corresponding four-conductor modular jack [line jack unit] assembly on the MDF
backboard.
3.
Connect the modular jack [line jack unit] assemblies mounted in steps 1 and 2.
a. Run T1 cable between the corresponding modular jack [line jack unit] assemblies.
NOTE
If the service provider termination is more than 2000 ft (600 m) from
the MDF, special T1 cable must be used (see page 4-29 for cable
specifications). For shorter distances, two lengths of standard two-pair
voice-frequency cable (one cable for transmit and one cable for
receive) may be used instead.
b. Wire each end of the cables onto their respective modular jack [line jack unit]
assemblies. See Figure 5-11 on page 5-30 for a diagram of the wiring.
4.
At the service provider termination, plug one end of a four-pair, non-reversing [straight
through], mod-to-mod line cord into each RJ-48C jack and plug the other end into the
corresponding modular jack [line jack unit] assembly next to it.
5.
At the MDF backboard, plug one end of a four-pair, non-reversing [straight through],
mod-to-mod line cord into each modular jack [line jack unit] assembly. The other end of
each line cord will later be plugged into the jack on the corresponding T1M or T1M-2
module. Make sure the connectors on the ends of each line cord are properly attached.
If any of the wires are cracked or broken, transmission problems can occur.
Mitel ® 5000 Installation Manual – Issue 3.0, October 2008
Page 5-29
Chapter 5: Installation
Method B – T1/PRI Trunks Terminated on RJ-48C Jacks Away from the MDF
Figure 5-10. T1/PRI or E1/PRI Terminations from RJ-48C [RJ45 in Europe] Jacks
Four-Pair
Non-Reversing,
Mod-To-Mod
Line Cord
Four-Pair
Non-Reversing,
Mod-To-Mod
Line Cord
T1 Cable
To
Module
in Chassis
To
Telco
RJ-48C
Jack
8-Conductor
Modular Jack [Line Jack Unit] Assemblies
Figure 5-11. Modular Jack [Line Jack Unit] Assembly Wiring for T1/PRI Trunks
OUT = transmit to network
IN = receive from network
TIP
(OUT)
Y
BR
T1 Module
RJ-48C Jack
8
7
6
5
G
Four-Pair
Non-Reversing,
Mod-To-Mod
Line Cord
Modular Jack
[Line Jack Unit]
Assembly
S
1
3
5
7
RING
(OUT)
Page 5-30
2
3
4
R
BK
1
O
BL
TIP 1
(IN)
RING 1
(IN)
2
4
6
8
R1 1
T1 2
3
R 4
T
5
6
7
8
Mitel ® 5000 Installation Manual – Issue 3.0, October 2008
Chapter 5: Installation
Method C – T1/PRI Trunks Terminated on a 66-Type Block
Method C – T1/PRI Trunks Terminated on a 66-Type Block
To install the T1/PRI trunks terminated on an 66-type block:
1.
On the MDF backboard, mount one eight-conductor modular jack [line jack unit]
assembly for each T1/PRI trunk termination on the service provider 66-type block(s).
See Figure 5-12 on page 5-31 for a diagram of the complete layout.
2.
Connect T1 cable between the service provider [network provider] terminations and the
corresponding modular jack [line jack unit] assemblies as follows:
a. Terminate one end of a four-pair cable on each modular jack [line jack unit]
assembly. See Figure 5-11 on page 5-30.
b. Terminate the other end of the four-pair cable on the right side of the T1/PRI 66-type
terminal block.
If the service provider [network provider] termination is more than 2000 ft (600 m) from
the MDF, special T1 cable must be used. For cable specifications, see page 4-29. For
shorter distances, two lengths of standard two-pair voice-frequency cable—one cable for
transmit and one cable for receive—may be used instead.
3.
Plug one end of a four-pair, non-reversing [straight through], mod-to-mod line cord into
each modular jack [line jack unit] assembly, which was mounted in step 1. The other end
of each line cord will later be plugged into the T1 jack on the corresponding T1M or T1M2 module. Make sure the connectors on the ends of each line cord are properly
attached. If any of the wires are cracked or broken, T1/PRI transmission problems can
occur.
Figure 5-12. T1/PRI or E1/PRI Trunk Terminations from 66-Type Blocks
66-Type [Krone]
Connecting Block
T1 Cable
Four-Pair
Non-Reversing,
Mod-To-Mod
Line Cord
To
Module
In Chassis
To
Telco
8-Conductor
Modular Jack [Line Jack Unit] Assembly
Installing Lightning Protection
For additional lightning protection, install gas discharge tubes with silicon avalanche
suppressors to ground (grounding rod or copper, cold water pipe) on each CO, DID, and OPX
trunk. This must be done external to the system. Each gas discharge tube is installed directly
between the service provider [network provider] 66-type block and the system CO/DID/OPX
input. This protection should provide energy absorption and filter low-level surge potentials.
In areas with frequent occurrences of lightning, check that the cable between the service
provider [network provider] 66-type [Krone] blocks and the gas discharge tubes is at least 75 ft
(22.5 m) long. The cable may be coiled as desired.
Mitel ® 5000 Installation Manual – Issue 3.0, October 2008
Page 5-31
Chapter 5: Installation
Connecting T1M or T1M-2 Modules between Network Nodes
Connecting T1M or T1M-2 Modules between Network Nodes
T1M or T1M-2 modules are used for connecting system nodes in a network. Each network span
requires two T1M or T1M-2 modules, one for each end of the span. Point to point, clear channel
T1 spans are used to connect the nodes. For each network span, order a clear channel, point to
point T1 or E1 span from the service provider. Do not order PRI service, even though you will be
connecting to T1M or T1M-2 modules.
T1M or T1M-2 modules can be used to connect two non-networking systems together using
customer-provided cable. The systems may be located in separate buildings and the cabling
between them may be as long as 6000 ft (1800 m), without repeaters.
When connecting two systems together, the line cord (or cabling) between the two T1M or T1M2 modules must be wired so that the receive pair (tip 1 in and ring 1 in) on each module is
connected to the transmit pair (tip out and ring out) on the other module, as shown in Figure 513. For information about programming various types of T1M or T1M-2 installations, refer to the
Mitel 5000 Features and Programming Guide, part number 580.8006.
Figure 5-13. Connecting Two T1M or T1M-2 Modules Together
Modular Jack Assembly
Modular Jack Assembly
TIP
(OUT)
TIP
(OUT)
S
To
T1/E1/PRI
Module
8
BR
7
G
Y
6
5
21
43
65
87
1
2
BL
O
RING 1
(IN)
TIP 1
(IN)
3
BK
4
R
8
7
8
7
6
T 5
R 4
3
T1 2
R1 1
6
5 T
4 R
3
2 T1
1 R1
G
Y
5
6
7
S
8
12
34
56
78
4
R
3
BK
RING
(OUT)
RING
(OUT)
BR
2
To
T1/E1/PRI
Module
1
O
BL
TIP 1
(IN)
RING 1
(IN)
OR
T1/E1/PRI Module
RJ-48C Jack
R1 1
T1 2
3
R 4
T 5
6
7
8
Page 5-32
1
2
3
4
5
6
7
8
R1
T1
R
T
T1/E1/PRI Module
RJ-48C Jack
Mitel ® 5000 Installation Manual – Issue 3.0, October 2008
Chapter 5: Installation
Verifying and Securing Cable Connections
Verifying and Securing Cable Connections
At this point in the installation all cabling to the MDF, patch panel, rack, and endpoints should be
completed, including all cables that terminate at the chassis modules.
To complete cabling:
1.
Plug all applicable cables into their respective modules and chassis ports.
2.
Install the LAN cable from the Processor Module jack to a LAN connection. Plug the
cable into a 100Base-T switch, not a hub.
Completing Installation Tasks
Referring to the following procedures as needed, install optional equipment and/or power up the
system:
• “Installing a Single Line Handset Amplifier” on page 5-205
• “Installing an External Music Source” on page 5-192
• “Installing External Paging Equipment” on page 5-193
• “Powering Up the System” on page 5-89
Mitel ® 5000 Installation Manual – Issue 3.0, October 2008
Page 5-33
Chapter 5: Installation
Setting Initial System Configuration
Setting Initial System Configuration
Upon initial power up, the system uses DHCP to establish a network connection. If the site is
not running a DHCP server, you must provide site-specific IP addresses and other network
information before you can begin programming the system in DB Programming. You can also
program the database offline using the Local Mode option in Session Manager.
Figure 5-14. LCD Panel and Controls
Chassis Front
Push to select menu
option or confirm
selection. Or, push to
power on system if
shut down manually.
2- Line LCD panel
Indicates the selected menu item
LCD Panel Controls. Up, Down,
Right, Left keys move through menus
Indicates a menu selection
either above, below, or both
NOTICE
To avoid system malfunctions observe the following rules when installing an Mitel 5000
platform:
• DHCP is enabled by default to allow the system to become operational upon boot up.
After the system has booted up, replace the DHCP address(es) with static IP addresses.
If using a DHCP server, the IP address may change, dropping any CT Gateway and/or
Voice Processing connections.
• IP Addresses, subnet mask, and gateways, the CT Gateway must be on the same LAN
as the IP address and subnet mask or the system will not operate.
• Mitel CS-5400 systems have two IP addresses—one for the Processor Module (PM-1)
and one for the Processor Expansion Card (PEC-1). Both IP addresses MUST be on the
same subnet mask. This also applies to Mitel CS-5200 systems that have been
upgraded with the PEC-1.
Page 5-34
Mitel ® 5000 Installation Manual – Issue 3.0, October 2008
Chapter 5: Installation
Setting Initial System Configuration
To set the initial system configuration:
1.
Use the LCD panel and display controls to navigate and change network or system
settings. You have 15 seconds to make your selection or the LCD returns to the default
idle display, Mitel 5000. Use Figure 5-15 on page 5-36 as a guide. Obtain any
network information from the site administrator. Although DHCP is enabled by default,
Mitel recommends using static IP addresses. See the notice above.
•
To quickly get to the IP address (from the idle panel display “Mitel 5000”):
Press the center button three times to get to the IP address or subnet mask
settings.
•
To navigate: Press the up, down, or right arrows. Double up and down arrows on
the display indicate menu options exist either above, below, or both. No double
arrows indicate no option is available above or below the current option.
•
To select: Press the center button.
•
To edit:
an IP address or subnet mask:
a.)
Press the left arrow when the cursor is blinking on the left digit (of the address
you want to edit). This deletes the address.
b.)
Use the up and down arrow keys to change the digits.
c.)
Press the center button to confirm selection. Press the center button again to
save the selection.
a menu option:
•
2.
a.)
Press the down arrow key to see any available options.
b.)
Press the center button to confirm selection. Press the center button again to
save the selection.
To go back: Press the left arrow button.
Reboot the system.
a. From the System menu, navigate to the Reboot option using the down arrow button.
b. Press the center button, and when prompted to reboot, use the Up arrow button to
change the selection to Yes. Wait while the system reboots.
3.
Check that the front of the LCD reads: “Mitel 5000,” and then do one of the following:
•
Refer to the Mitel 5000 Features and Programming Guide, part number 580.8006,
for information on adding and configuring other aspects of the system and IP
endpoints. If changes were made in DB Programming, at the same time as using
the LCD panel, DB Programming will need to be restarted.
•
Continue to “Installing IP and Multi-Protocol Endpoints” on page 5-106.
Mitel ® 5000 Installation Manual – Issue 3.0, October 2008
Page 5-35
Chapter 5: Installation
Menus
Menus
You can view and edit the settings displayed on the LCD by navigating a series of menus
provided by the LCD software application (see Figure 5-15). For v3.0, the ADD Freeze option
was added to the System menu.
An ADD freeze collects and delivers diagnostics information to Mitel. ADD settings must be
programmed for the system prior to selecting this menu option. In addition, Call Processing
must be running to complete an ADD Freeze.
Figure 5-15. LCD Software Application Menus
New option for v3.0.
* This menu item is not available unless Call Processing is online.
# The PS menu is not available unless a PS is connected to the CS-5200/5400 server.
Page 5-36
Mitel ® 5000 Installation Manual – Issue 3.0, October 2008
Chapter 5: Installation
Programming
Programming
Several programming options, including the new ADD Freeze option, are available from the
System menu. Figure 5-16 shows all of the System Menu options.
Figure 5-16. System Menu
Mitel ® 5000 Installation Manual – Issue 3.0, October 2008
Page 5-37
Chapter 5: Installation
Troubleshooting
To complete an ADD freeze from the System Menu:
1.
From the idle menu (Mitel 5000), press the down arrow button to navigate to the System
menu, and then the ADD Freeze option.
2.
Press the center button to select the ADD Freeze option. The Are You Sure? prompt
appears.
3.
Press the up arrow button to select Yes, and then press the center button to confirm
your selection. The ADD freeze request is sent to Call Processing and the Please Wait
message is displayed. Once the request has been sent the Success or Error message
is displayed.
•
A Success message indicates that the request was sent successfully.
•
An Error message indicates that ADD has not been configured or enabled in DB
Programming, or that a freeze is already in progress.
After approximately 10 seconds, you are returned to the System menu. The LCD
Application does not wait for the freeze operation to complete.
NOTE
If you select No, the ADD freeze is not completed and the LCD application
returns to the System menu.
Troubleshooting
If an Error message appears on the LCD after you attempt to make a system change, examine
the Resource Command Handler (RCH) log files via the Administrative Web Session (AWS)
pages, to determine the cause of the error. You may need to adjust the level of logging and/or
reproduce the error message to view it in the log files.
The Log Files page is available for Mitel CS-5200/5400/5600 systems, however, the RCH log
file applies to base servers only.
To view the RCH log files:
1.
Open a Web browser and navigate to the Mitel Administrative Web pages. The Enter
Network Password dialog box appears.
2.
Type your User Name and Password in the text boxes and click OK. The Home page
appears.
3.
If you are currently viewing the Web pages for the Processing Server, click Switch to
Base Server.
4.
Click the Logging navigation tab. The Log Files page appears.
RCH Log File
5.
Page 5-38
Click the link to the RCH log file to open it and view the contents. Messages from the
LCD application begin with LCD APP.
Mitel ® 5000 Installation Manual – Issue 3.0, October 2008
Chapter 5: Installation
Flash Memory and Low-Level Firmware Update Messages
Flash Memory and Low-Level Firmware Update Messages
For v3.0, new LCD messages, designed to safeguard low-level firmware updates, have been
added to the LCD application.
This update is required when you:
• perform the initial configuration of the system.
• install a new compact flash-type memory card.
• swap a processor module.
• perform a system upgrade.
During this update, it is critical that the server remain up and running while the updates are
being completed. Do not power off the server during an update. If any of the updates are
missing or become corrupted, the server will not operate and must be returned to Mitel.
CAUTION
Potential system failure. Do not shut down, reboot, or remove power from the server while
the components are being updated. Shutting down, rebooting, or removing power from the
server before the update is complete will render the server inoperable and you will need to
return the server to Mitel.
Flash Memory Updates
The Mitel 5000 server processor modules have 4 MB of flash memory. When you first power up
the server, the system software detects if any flash memory components require an update. If
an update is required, the following message appears on the LCD:
“Upgrade Norflash enter any key.”
Press any button next to the LCD panel to acknowledge the message, and start the update.
NOTE
When you perform a system upgrade using the AWS Web pages, flash memory
updates are completed automatically.
During the update process, the following messages alternately appear on the LCD:
“Upgrading......<NOR flash component>.”
“Do not power off.”
Each component can take several seconds to update. Do not shut down, reboot, or power
down the server during the update process.
After the components are updated, the system automatically reboots.
Mitel ® 5000 Installation Manual – Issue 3.0, October 2008
Page 5-39
Chapter 5: Installation
Flash Memory and Low-Level Firmware Update Messages
Low-level Firmware Updates
The Mitel 5000 motherboard is equipped with low-level firmware that controls electrical signals
to the hardware devices such as compact flash-type memory cards, Universal Serial Bus (USB),
Digital Expansion Interfaces (DEIs), etc.
After flash memory updates, the system software detects if low-level firmware requires an
update. If an update is required, the following message appears on the LCD:
“Upgrade FPGA enter any key.”
Press any button next to the LCD panel to acknowledge the message, and start the update.
NOTE
When you perform a system upgrade using the AWS Web pages, low-level
firmware updates are completed automatically.
During the update process, the following messages are alternately appear on the LCD:
“Upgrading......FPGA.”
“Do not power off.”
The update requires approximately 30 seconds. Do not shut down, reboot, or power down
the server during the update process. After the update is complete, the system automatically
reboots.
When all of the flash memory and low-level firmware components have been updated, the LCD
displays the Mitel 5000 idle screen.
Page 5-40
Mitel ® 5000 Installation Manual – Issue 3.0, October 2008
Chapter 5: Installation
Installing a Processor Module (PM-1)
BASE SERVER MODULES
This section provides procedures for installing and removing the expansion modules that can be
installed in the Mitel CS-5200/CS-5400/CS-5600 Base Server. The procedure for installing a
Processor Expansion Card (PEC-1) on a PM-1 also appears in this section.
Installing a Processor Module (PM-1)
Install the processor module (PM-1) as described in the following procedure. For part numbers
see Table 7-5 on page 7-4. Figure 5-17 provides an illustration of the PM-1.
NOTICE
Equipment Damage Hazard. Use the LCD panel to shut down the system, then unplug all
power sources to the chassis before working with the processor module (PM-1). Replacing or
inserting a processor module with AC power turned on to the chassis will damage the
processor module. A processor module damaged in this manner will not be replaced under
warranty.
Figure 5-17. Processor Module
Base Server Back
Module-to-Chassis Fastener
EXP
DUAL LS DUAL SL
PAGE
MOH
Processor Module
Remove Module LED
Battery Alarm LED
To install the processor module (PM-1):
1.
Make sure the system has been shut down (using the LCD panel) and that the power
cord has been unplugged from the power source. See the NOTICE above.
2.
Using a properly terminated, anti-static wrist strap, remove the module from the
protective anti-static bag.
3.
Check the following components. Use the following illustration as a guide.
•
Module battery: Check that the processor module battery is securely in place.
•
SDRAM memory: Check that the SDRAM memory is correctly seated (the module
is pushed in and the gold “fingers” are not exposed).
•
Pins 1–7 block strap: Check that the strap is installed on pins 1 through 7.
Mitel ® 5000 Installation Manual – Issue 3.0, October 2008
Page 5-41
Chapter 5: Installation
Installing a Processor Module (PM-1)
Figure 5-18. Components of a Processor Module (PM-1)
Processor
Module
Battery
This strap must be in place.
Read the NOTICE below.
Chassis Back
Processor
Module
Top View
Processor
expansion card
mount points
Processor
Module
SDRAM
Module
Processor
Expansion Card
Plastic
standoff (support)
Screw to secure hexagon
metal standoff (support) to
expansion module and
processor module
NOTICE
System Inoperability. A strap covers pin 1 through pin 7 (far right in Figure 5-18).
This strap must be in place, unless using the processor expansion card (page 5-43). If
a system ever needs to function without the processor expansion card (for example,
replacing the expansion card), the strap will need to be put back on the processor
module. The standard processor module (Mitel CS-5200) will not function without the
strap in place.
Page 5-42
4.
Insert the module carefully into the first bay (left side looking at the back of the chassis).
Make sure the module aligns with the rails inside the chassis, then gently slide the
module into the chassis until it stops. Do not use force.
5.
Tighten the fastener at the top of the module, securing it to the chassis. Do not over
tighten this fastener.
6.
If not adding any other modules, continue to “Installing the USB Security Key and
Compact Flash-Type Memory Card” on page 5-19. Otherwise, continue to “Installing a
Two-Port Loop Start Module (LSM-2)” on page 5-46.
Mitel ® 5000 Installation Manual – Issue 3.0, October 2008
Chapter 5: Installation
Installing a Processor Expansion Card (PEC-1)
To remove a processor module (PM-1):
1.
Use the LCD panel on the front of the chassis to shut down the system.
NOTICE
Equipment Damage Hazard. Use the LCD panel to shut down the system, and
unplug all power sources to the chassis before working with the processor module
(PM-1). Replacing or inserting a processor module with AC power turned on to the
chassis will damage the processor module. A processor module damaged in this
manner will not be replaced under warranty.
2.
Unplug the chassis power cord from the power source.
3.
Loosen the fastener at the top of the module (this fastener secures the module to the
chassis).
4.
Using a properly terminated, anti-static wrist strap, remove the module from the chassis
and place it into the anti-static bag that came with the module.
Installing a Processor Expansion Card (PEC-1)
A Processor Expansion Card (PEC-1) provides additional IP resources. By installing a PEC-1
on a PM-1 and adding applicable licensing, you create the Mitel CS-5400 platform. Some
features are provided through software instead of hardware. These module types (both
hardware and software) are discussed in this section. See the Specifications and Product
Description chapters for additional information about modules.
With the exception of the processor module (PM-1), the other modules can be installed in any
bay. However, if a module was programmed while in one bay, it will need to be reprogrammed if
moved to another bay.
NOTICE
Electrostatic Discharge (ESD). The modules and components are static-sensitive. Handle
the modules by the edges only and keep them in their protective bags until they are to be
installed. Do not bend or touch the component pins or subject them to a static discharge.
When working with the modules, use a properly terminated anti-static wrist strap and cover
the work surface with the bag that protected the module during shipping. Any static charge
(no matter how small) must be discharged from the body before touching the modules or
other components. The warranty for this equipment does not cover damage caused by static
or mishandling. Modules or components damaged in such a manner will not be replaced
under warranty.
The optional processor expansion card kit, part number 580.9004, provides additional IP
resources. It is standard equipment in the Mitel CS-5400 chassis. However, you can upgrade
the Mitel CS-5200 chassis to a CS-5400 by installing the processor expansion card. See the
Specifications and Product Description chapters for PEC-1 details. See the Product Description
chapter for further information on any additional licensing you may need to take advantage of
PEC-1 capabilities.
The processor expansion card (PEC-1) includes the necessary hardware to mount it to the
processor module in a Mitel CS-5200 system. There is no software needed for the upgrade; all
necessary software is already included on the existing compact flash-type card. A CD is
provided with the upgrade so that a backup copy of all necessary software is readily available
should it be needed.
Mitel ® 5000 Installation Manual – Issue 3.0, October 2008
Page 5-43
Chapter 5: Installation
Installing a Processor Expansion Card (PEC-1)
To install the processor expansion card:
1.
Perform a Database backup using DB Programming. You can also back up the database
using the LCD panel. For details, refer to the Mitel 5000 Features and Programming
Guide, part number 580.8006.
NOTICE
System Inoperability. The strap covers pins 1 through 7 (Figure 5-19). If using the
expansion card, remove the strap. If the system ever needs to function without the
expansion card (for example, replacing the expansion card), you will need to be put
the strap back on the processor module. The standard processor module (Mitel CS5200) will not function without the strap in place.
2.
Perform a voice mail backup using a USB flash drive attached to the USB-A port on the
front of the Mitel CS-5200/5400/5600 Base Server. Do not back up VM to the compact
flash-type memory card. Refer to the Mitel 5000 Features and Programming Guide, part
number 580.8006, for details on backup up either Basic Voice Mail or external voice
mail.
3.
Shut down the system using the LCD panel. See Figure 5-14 on page 5-34 for an
illustration of the menu locations. Unplug the chassis power cord.
NOTICE
Equipment Damage Hazard. Use the LCD panel to shut down the system, and
unplug all power sources to the chassis before working with the processor module
(PM-1). Replacing or inserting a processor module with AC power turned on to the
chassis will damage the processor module. A processor module damaged in this
manner will not be replaced under warranty.
Electrostatic Discharge (ESD). The modules and components are static-sensitive.
When working with the modules, use a properly terminated anti-static wrist strap. Any
static charge (no matter how small) must be discharged from the body before
touching the modules or other components. The warranty for this equipment does not
cover damage caused by static or mishandling. Modules or components damaged in
such a manner will not be replaced.
4.
Wearing a properly terminated anti-static wrist strap, loosen the fastener at the top of the
processor module. Remove the PM-1 from the chassis and place it on a clean, ESDprotective, surface.
5.
Using Figure 5-19 on page 5-45 as a guide, do the following:
a. On the processor module, remove the strap across the first seven pins on the mount
point closest to the front of the chassis. Do not discard the strap. Please read the
important message below.
IMPORTANT
The pin strap on the front expansion card mount point must be
removed before installing the PEC. Also, if the PEC is removed
and/or the processor module returned, the strap MUST be in
place on the first seven pairs of pins, or the processor module will
not function.
b. Check that the SDRAM memory is correctly seated. Visually inspect to make sure
the module is pushed in and the gold “fingers” are not exposed.
Page 5-44
Mitel ® 5000 Installation Manual – Issue 3.0, October 2008
Chapter 5: Installation
Installing a Processor Expansion Card (PEC-1)
c. Check the standoffs (supports). For guidance, see Figure 5-19.
6.
o
Hexagon-shaped metal standoff: Check that the metal standoff is in place
on the PEC-1. It is located toward the front of the module faceplate.
o
Plastic standoff: Check that the thicker end of the standoff is securely
pressed into the hole on the PEC-1.
Mount the PEC-1 onto the processor module. See Figure 5-19 as a guide.
a. Carefully align the PEC-1 mount points and the stand-off mount points.
b. Gently press the smaller end of the standoff onto the processor module while
aligning the screw mount point over the hexagon-shaped metal standoff and the PEC
mount points. Do not force the card onto the module.
7.
Secure the PEC-1 to the processor module using the supplied screw (located in a small
plastic bag attached to the PEC-1 anti-static bag). This screw attaches to the hexagonshaped metal stand-off installed in step 5c on page 5-45. Do not overtighten this screw.
Insert the processor module into the chassis as described in the procedure “Installing a
Processor Module (PM-1)” on page 5-41.
8.
Check that all cables are connected and plug in the AC power cord. The system boots
and when finished, it displays Mitel 5000 on the LCD panel. This indicates the system is
ready to be programmed.
9.
Refer to the Mitel 5000 Features and Programming Guide, part number 580.8006, for
information to load the license file. You can then program the additional IP resources.
Figure 5-19. Expansion Card Upgrade (Mitel CS-5200 to CS-5400)
Processor module-to-chassis fastener
Metal standoff
mount location
Chassis Back
Processor
Expansion Card
Processor
Processor
Module
Expansion Card
mount points
Remove this
strap before installing
the expansion card.
See the preceding
IMPORTANT note
Plastic standoff
mount location
SDRAM Module
Mitel ® 5000 Installation Manual – Issue 3.0, October 2008
Plastic
standoff (support)
Processor
Module
Screw to secure metal
standoff (support) to
expansion module and
processor module
Page 5-45
Chapter 5: Installation
Installing a Two-Port Loop Start Module (LSM-2)
Installing a Two-Port Loop Start Module (LSM-2)
Install the two-port loop start module (LSM-2) as described below. Part numbers appear in
Table 7-5 on page 7-4. See Figure 5-20 on page 5-46.
IMPORTANT
The loop start module can be removed with power on; however, you must
wait for the REMOVE LED indicator to change to green before removing
the module. Pressing and holding the release lever down until the LED
indicator turns green allows the software to “disconnect” from the module.
Failure to wait until the LED turns green, could result in pending information getting lost or unexpected system behavior.
Other than the processor module, all other modules can reside in any bay.
However, DB Programming will need to change, if you move a module
(that was previously programmed) into a different bay location.
To install the two-port Loop Start module (LSM-2):
1.
Using a properly terminated, anti-static wrist strap, remove the module from the
protective anti-static bag.
2.
Insert the module carefully so that it aligns with the rails inside the chassis, then gently
slide the module into the chassis until it stops and the module release lever clicks into
place (up position). Do not use force.
3.
Tighten the fastener at the top of the module, securing it to the chassis. Do not over
tighten this fastener.
4.
If not adding any other modules, continue to “Installing the USB Security Key and
Compact Flash-Type Memory Card” on page 5-19. Otherwise, continue to “Installing a
Single-Port T1/E1/PRI Module (T1M)” on page 5-51.
Figure 5-20. LSM-2 Module
Module-to-Chassis Fastener
Base Server Back
EXP
DUAL LS DUAL SL
PAGE
MOH
Module
Release
Lever
Processor Module
Remove Module LED
LSM-2
To remove the two-port Loop Start module (LSM-2):
Page 5-46
1.
Using a properly terminated, anti-static wrist strap, loosen the fastener at the top of the
module. This fastener secures the module to the chassis.
2.
Push down and hold the module release lever.
3.
When the REMOVE LED turns green, grasp the module handle and carefully remove the
module from the chassis.
Mitel ® 5000 Installation Manual – Issue 3.0, October 2008
Chapter 5: Installation
Installing a Four-Port Loop Start Module (LSM-4)
Installing a Four-Port Loop Start Module (LSM-4)
The LSM-4 provides four trunk interface ports. For additional technical data about the LSM-4,
see the Specifications chapter. See page 5-23 for information on how this module is cabled to
the MDF.
NOTICE
Electrostatic Discharge (ESD). The modules and components are static-sensitive. When
working with the modules, use a properly terminated anti-static wrist strap. Any static charge
(no matter how small) must be discharged from the body before touching the modules or
other components. The warranty for this equipment does not cover damage caused by static
or mishandling. Modules or components damaged in such a manner will not be replaced.
The LSM-4 can be removed with power on; however, you must wait for the
REMOVE LED indicator to change to green before removing the module.
Pressing and holding the release lever until the LED indicator turns green
allows the software to “disconnect” from the module. Failure to wait until the
LED turns green, could result in pending information getting lost or
unexpected system behavior.
IMPORTANT
LSM-4 modules can reside in any bay. However, DB Programming will need
to change, if you move a module (that was previously programmed) into a
different bay location.
To install an LSM-4:
1.
Using a properly terminated, anti-static wrist strap, remove the module from the
protective anti-static bag. For an example of an LSM-4 module that you can see for the
remaining steps in this procedure, see Figure 5-21.
2.
Insert the module carefully so that it aligns with the rails inside the chassis, then gently
slide the module into the chassis until it stops. Do not use force.
3.
Tighten the fastener at the top of the module, securing the module to the chassis. Do not
over tighten this fastener.
4.
Continue to “Verifying and Securing Cable Connections” on page 5-33.
Figure 5-21. LSM-4 Module
Module-to-Chassis Fastener
Base Server Back
EXP
DUAL LS DUAL SL
PAGE
MOH
Processor Module
Module
Release
Lever
Remove Module LED
LSM-4
To remove an LSM-4:
1.
Using a properly terminated, anti-static wrist strap, loosen the fastener at the top of the
module (this fastener secures the module to the chassis).
2.
Push down and hold the module release lever.
3.
When the REMOVE LED turns green, grasp the module handle and carefully remove the
module from the chassis.
Mitel ® 5000 Installation Manual – Issue 3.0, October 2008
Page 5-47
Chapter 5: Installation
Installing a Dual T1/E1/PRI Module (T1M-2)
Installing a Dual T1/E1/PRI Module (T1M-2)
This procedure assumes the required pre-installation checklist items, regarding T1/E1/PRI, are
in place. If necessary, see “Gathering the Necessary Tools and Supplies” on page 5-10.
The Dual T1/E1/PRI module is installed and configured like the single T1/E1/PRI module with
the following exception: Each port on the dual module can be configured differently from the
other. For example, you can configure one port for T1 and the other for T1/PRI or E1/PRI. The
single T1 module provides two ports as well, but one of the ports is for testing purposes. Unlike
the single T1/E1/PRI module, the dual module does not provide the test port.
See Figure 5-22 on page 5-49 for an illustration of this module.
IMPORTANT
The Dual T1/E1/PRI module can be removed with power on; however, you
must wait for the REMOVE LED indicator to change to green before
removing the module. Pressing and holding the release lever until the LED
indicator turns green allows the software to “disconnect” from the module.
Not waiting until the LED turns green could result in pending information
getting lost or unexpected system behavior.
Other than the processor module, all other modules can reside in any bay.
However, DB Programming will need to change, if you move a module (that
was previously programmed) into a different bay location.
Procedure
NOTICE
Before Installing a Dual T1/E1/PRI Module. If you intend to add or replace a Dual T1/E1/
PRI module, system software must first be upgraded to v2.3 or later. For additional
information, refer to the Mitel Knowledge Base Center (www.inter-tel.com/
knowledgebasecenter) article KB3921.
To install a Dual T1/E1/PRI module:
Page 5-48
1.
Using a properly terminated anti-static wrist strap, remove the module from the
protective anti-static bag.
2.
Insert the module carefully so that it aligns with the rails inside the chassis, and then
gently slide the module into the chassis until it stops and the module release lever clicks
into place (up position). Do not use force.
3.
Tighten the fastener at the top of the module, securing the module to the chassis. Do not
over tighten this fastener.
Mitel ® 5000 Installation Manual – Issue 3.0, October 2008
Chapter 5: Installation
Dual T1/E1/PRI Module LED Summary
Figure 5-22. Dual T1/E1/PRI Module
Top
Side
Module Handle
Module to Chassis Fastener
Chassis Back
EXP
DUAL LS DUAL SL
PAGE
Remove
Module LED
MOH
Module Release Lever
Dual T1/E1/PRI Module
To remove a dual T1/E1/PRI module:
1.
Using a properly terminated anti-static wrist strap, loosen the fastener at the top of the
module (this fastener secures the module to the chassis).
2.
Push down and hold the module release lever, and then when the REMOVE LED turns
green, grasp the module handle and carefully remove the module from the chassis.
Dual T1/E1/PRI Module LED Summary
The Dual T1/E1/PRI module has a total of 8 LEDs on the faceplate to indicate module status.
The LEDs are contained in two separate devices: a 4-LED stack, and 4 bi-color LEDs integrated
into the RJ-45 connector.
The LED stack has 2 green LEDs and 2 yellow LEDs. These LEDs are described in Figure 5-23
and in tables 5-3 and 5-4 on page 5-50.
Figure 5-23. Dual T1/E1/PRI Module Faceplate LED Summary
1
2
Span #1
3
4
Span #2
Online
Remove
Busy 1
Busy 2
4-LED Stack Indicators
RJ–45 Red/Green LEDs
Mitel ® 5000 Installation Manual – Issue 3.0, October 2008
Page 5-49
Chapter 5: Installation
Dual T1/E1/PRI Module LED Summary
Table 5-3. Dual T1/E1/PRI Module LED Summary — 4-LED Stack
LED Name
Online
Color
Indication
Green #1
ON: Board is online and functioning normally.
OFF: Board is not online.
Remove
Green #2
ON: Board is safe to remove.
OFF: Board is not ready to be removed
Busy 1
Yellow #1
ON: One or more channels on the first span are active.
OFF: No channels on the first span are active.
Busy 2
Yellow #2
ON: One or more channels on the second span are active.
OFF: No channels on the second span are active.
Table 5-4. Dual T1/E1/PRI Module LED Summary — RJ-45 LEDs
LED Name
SYNC/ALRM Span 1
LED
Color
1
Green or
Red
(synchronization and
alarm status)
Indication
Solid green: Stable state.
Blinking green: Initial trouble state or clearing trouble state.
Solid red: Stable error state.
Blinking red: Clearing trouble state.
OFF: Span is disabled / not active.
REF_CLK Span 1
(reference clock)
2
SYNC/ALRM Span 2
3
Green ON: Span provides the reference clock for the system.
OFF: Span does not provide the reference clock for the system.
(synchronization and
alarm status)
Solid green: Stable state.
Blinking green: Initial trouble state.
Solid red: Stable error state.
Blinking red: Clearing trouble state.
OFF: Span is disabled / not active.
REF_CLK Span 2
(reference clock)
Page 5-50
4
Green ON: Span provides the reference clock for the system.
OFF: Span does not provide the reference clock for the system.
Mitel ® 5000 Installation Manual – Issue 3.0, October 2008
Chapter 5: Installation
Installing a Single-Port T1/E1/PRI Module (T1M)
Installing a Single-Port T1/E1/PRI Module (T1M)
See Figure 5-24 on page 5-51 for an illustration of this module and for the following procedure.
IMPORTANT
The T1M module can be removed with power on; however, you must wait for
the REMOVE LED indicator to change to green before removing the module.
Pressing and holding the release lever until the LED indicator turns green
allows the software to “disconnect” from the module. Failure to wait until the
LED turns green, could result in pending information getting lost or
unexpected system behavior.
Other than the processor module, all other modules can reside in any bay.
However, DB Programming will need to change, if you move a module (that
was previously programmed) into a different bay location.
Procedures
To install a T1M module:
1.
Using a properly terminated, anti-static wrist strap, remove the module from the
protective anti-static bag.
2.
Insert the module carefully so that it aligns with the rails inside the chassis, then gently
slide the module into the chassis until it stops and the module release lever clicks into
place (up position). Do not use force.
3.
Tighten the fastener at the top of the module, securing the module to the chassis. Do not
over tighten this fastener.
4.
If not adding any other modules, continue to “Installing the USB Security Key and
Compact Flash-Type Memory Card” on page 5-19.
Figure 5-24. T1M Module
Base Server Back
Module-to-Chassis Fastener
EXP
DUAL LS DUAL SL
PAGE
Remove
Module LED
MOH
Processor Module
Module Release Lever
T1M Module
To remove a T1M module:
1.
Using a properly terminated, anti-static wrist strap, loosen the fastener at the top of the
module (this fastener secures the module to the chassis).
2.
Push down and hold the module release lever, then when the REMOVE LED turns
green, grasp the module handle and carefully remove the module from the chassis.
Mitel ® 5000 Installation Manual – Issue 3.0, October 2008
Page 5-51
Chapter 5: Installation
Single T1/E1/PRI Module LED Summary
Single T1/E1/PRI Module LED Summary
The single T1/E1/PRI module has a total of 7 LEDs (two unused) on the faceplate to indicate
module status. The LEDs are contained in two separate locations: 3 LEDs to the right side of
the module faceplate, and 2 green LEDs integrated into each RJ-45 connector.
These LEDs are described in Figure 5-25 and in tables 5-5 and 5-6 below.
Figure 5-25. Single T1/E1/PRI Module Faceplate LED Summary
1
Test Port
2
Span
LED Indicators
RJ–45 Green LEDs
Table 5-5. Single T1/E1/PRI Module LED Summary — 3 LEDs
LED Name
REF CLK
Color
Indication
Green
ON: Span provides the reference clock for the system.
OFF: Span does not provide the reference clock for the system.
REMOVE
ON: Board is safe to remove.
OFF: Board is not ready to be removed
ONLINE
ON: Board is online and functioning normally.
OFF: Board is not online.
Table 5-6. Single T1/E1/PRI Module LED Summary — RJ-45 LEDs
LED Name
LED
Test port LEDs
SYNC
N/A
1
(synchronization and
alarm status)
MSTR (reference
clock)
Color
Green
Indication
Not used
Solid green: Stable state.
Blinking green: Initial trouble state or clearing trouble state.
OFF: Stable error state or span is disabled/not active.
2
Green ON: Follows the span configuration as programmed in the
database. The LED is on if the port/span is programmed for
“Master for Private Network,” as selected in the Reference Clock
List programming.
OFF: Span does not provide the reference clock for the system.
Page 5-52
Mitel ® 5000 Installation Manual – Issue 3.0, October 2008
Chapter 5: Installation
Installing a Basic Rate Module (BRM-S)
Installing a Basic Rate Module (BRM-S)
Each Inter-Tel 5000 Base Server chassis accepts up to three Basic Rate Modules (BRM-S) for
connecting ISDN S-interface trunking. For additional information about modules, see the
Specifications and Product Description chapters.
IMPORTANT
The BRM-S module can be removed with power on; however, you must
wait for the REMOVE LED indicator to change to green before removing
the module. Pressing and holding the release lever until the LED indicator
turns green allows the software to “disconnect” from the module. Failure to
wait until the LED turns green could result in pending information getting
lost or unexpected system behavior.
BRM-S modules can reside in any expansion bay. However, DB Programming will need to be changed if you move a module that was previously
programmed into a different bay location.
Procedure
To install a BRM-S:
1.
Using a properly terminated, anti-static wrist strap, remove the module from the
protective anti-static bag. See Figure 5-26 for an example of the BRM-S module for the
remaining steps in this procedure.
2.
If applicable, remove any protective covers over the module bay where you want to
install the BRM-S. These covers prevent debris or other foreign matter from entering the
system and possibly harming the internal components. These covers should remain in
place until you are ready to install a module.
3.
Insert the BRM-S carefully so that it aligns with the rails inside the chassis, then gently
slide the module into the chassis until it stops. Do not use force.
4.
Tighten the fastener at the top of the module, securing it to the chassis. Do not over
tighten this fastener.
5.
Continue to “Verifying and Securing Cable Connections” on page 5-33.
Figure 5-26. BRM-S Module
Module-to-Chassis Fastener
Reference Clock
Base Server Chassis Back
EXP
DUAL LS DUAL SL
PAGE
Module
Online LED
MOH
Processor
Module
Module Release
Lever
BRM-S
Module
Remove
Module LED
To remove a BRM-S:
1.
Using a properly terminated, anti-static wrist strap, loosen the fastener at the top of the
module (this fastener secures the module to the chassis).
2.
Push down and hold the module release lever, then when the REMOVE LED turns
green, grasp the module handle and carefully remove the module from the chassis.
Mitel ® 5000 Installation Manual – Issue 3.0, October 2008
Page 5-53
Chapter 5: Installation
BRM-S online/Off-line Handling and LED Descriptions
BRM-S online/Off-line Handling and LED Descriptions
The system recognizes the BRM-S as online when inserted into a bay previously programmed
as a Basic Rate Module. The system auto-equips this module even if it has not been previously
programmed in DB Programming, assuming that DB Programming is not in session. However,
you must program the ports/circuits for the ports and circuits to come online. For programming
details, refer to the Mitel 5000 Features and Programming Guide, part number 580.8006.
The system recognizes the BRM-S as off-line when removed from the expansion bay. All the
ports and circuits are recognized as being off-line and all calls dropped, when the module is
removed.
Three LEDs are seen on the BRM-S module:
• ONLINE: (Green) The ONLINE LED is turned ON whenever the module is inserted into
the expansion bay and the module is operational. If the bay in which this module is
installed had been previously programmed with another module type, then this LED will
not light.
• REMOVE: (Green) The REMOVE LED is turned ON whenever the module is safe to be
removed from the expansion bay. See page 5-43 for information on removing the module
from the chassis.
• REF CLK: (Green) The REF CLK LED is turned ON whenever the module has been
selected to provide network clock synchronization to the system.
Page 5-54
Mitel ® 5000 Installation Manual – Issue 3.0, October 2008
Chapter 5: Installation
Installing a Four-Port Single Line Module (SLM-4)
Installing a Four-Port Single Line Module (SLM-4)
This section provides specifications, drawings, and procedures needed for installing an SLM-4,
part number 580.2100.
Installing an SLM-4 consists of inserting the module into an empty bay on the back side of an
Mitel CS-5200/5400/5600 Base Server and assigning the module to the Uninstalled bay through
DB Programming. You can then program up to four single line endpoints on the module ports.
See Figure 5-27. Because the Auto Equip feature does not apply when installing an SLM-4, the
module must be manually programmed in the system before it can be used.
Figure 5-27. Parts of the SLM-4, Front and Side Views
Latch
Lever
PORTS 1-2 PORTS 3-4
ONLINE
Module
Fastening
Screw
REMOVE
Status LEDs
PUSH
TO
REMOVE
SLM 4
Front
Single Line Ports
Side
Backplane
Seating Guides
Module Handle
The pinout design for four-port and eight-port Single Line
Module jacks (SLM-4 and SLM-8) is the same. Each RJ-14
jack represents two single line ports for connecting single line
analog endpoints. The middle four pins in the RJ-14 connector
are wired in accordance with Uniform Service Order Code
(USOC) T568A specifications, as shown in the following
diagram.
To install the SLM-4 module in an Mitel CS-5200/5400/5600
Base Server:
R2
T1 R1
T2
123456
T1–R1 = Port 1 Tip and Ring
T2–R2 = Port 2 Tip and Ring
1.
Put on ESD (electrostatic discharge)-protective gear and ground yourself.
2.
In DB Programming, uninstall any module that may be in the bay where you want to
install the SLM-4.
3.
Remove the physical module in accordance with the applicable procedure—trunk
modules require the REMOVE LED to be lit before the module can be safely removed.
4.
Insert the SLM-4 module into the empty bay. The green LED labeled ONLINE
illuminates, indicating that the new hardware has been detected and the Single Line (SL)
application is running.
Mitel ® 5000 Installation Manual – Issue 3.0, October 2008
Page 5-55
Chapter 5: Installation
Installing a Four-Port Single Line Module (SLM-4)
5.
Using the IP address of the Inter-Tel 5000 Base Server, open a DB Programming
session to the system through the Session Manager.
The programming portion of the SLM-4 installation procedure may be
NOTE performed in a local session of DB Programming and then restored to the
system using the Database Restore utility.
Page 5-56
6.
When DB Studio displays, in the left pane select System and then Communication
Server.
7.
Click the Uninstalled bay and click the down arrow.
8.
Select Single Line Module - 4.
9.
Program the SLM-4 module in the chosen uninstalled bay.
10.
Click the SLM-4 folder and configure the ports.
11.
Program the individual single line endpoints in DB Programming. For programming
details, refer to the Mitel 5000 Features and Programming Guide, part number 580.8006.
12.
Connect and test the endpoints.
Mitel ® 5000 Installation Manual – Issue 3.0, October 2008
Chapter 5: Installation
Processing Server (PS-1) Description
MITEL CS-5600 PROCESSING SERVER (PS-1)
This section identifies the parts, processes, and procedures required for installing the Mitel CS5600 Processing Server (PS-1), part number 580.5600. For processes and procedures required
to upgrade your current system, see “Upgrading System Software to Version 3.0” on page 5148.
Processing Server (PS-1) Description
The PS-1 is a Linux server that connects through a local area network (LAN) to the Mitel CS5600 Base Server and provides call processing power for the expanded-capacity system. For a
functional description, see “Processing Server Characteristics” on page 4-32. For technical
descriptions see the Specifications chapter and “Network Environment Requirements” on
page 5-148.
By providing additional call processing power, the PS-1 allows the Mitel 5000 platform to
support more endpoints than the Mitel CS-5200 or CS-5400 chassis in stand-alone mode. For
capacity details, see “System Endpoint Capacities” on page 4-19.
Licensing
Adding the PS-1 to the Mitel 5000 platform requires, at a minimum, the following licensing:
• Mitel 5000 v2.0, part number 840.0622
• Mitel CS-5600 License Base, part number 840.0624
IMPORTANT
When installing v2.0 software, the license must match the system CPU
type. A Mitel CS-5200 system requires a CS-5200 license; a Mitel CS5400 system requires a CS-5400 license; and, a Mitel CS-5600 system
requires a CS-5600 license.
Additional licensing is required if upgrading a system from an earlier hardware version, if using
IP Networking, and/or adding certain endpoints. For details of required licensing, see “Licensing
and Mitel CS-5600 Upgrades” on page 3-16.
Essential PS-1 BIOS Settings
The Basic Input/Output System (BIOS) settings of the PS-1 have been customized to control
specifically the way Mitel CS-5600 software interacts with system hardware. Because the
default BIOS settings have been modified to allow the system to operate, the BIOS settings
must remain as they came from the factory.
NOTICE
Incorrect or Defaulted BIOS Settings Will Make System Inoperable. If for any reason the
BIOS settings of the PS-1 are defaulted or changed from the way they were shipped from the
factory, contact Mitel Product Support to receive instructions for correctly reprogramming the
BIOS.
Mitel ® 5000 Installation Manual – Issue 3.0, October 2008
Page 5-57
Chapter 5: Installation
PS-1 Hardware
PS-1 Hardware
This section provides line drawings of the front and back views of the PS-1 chassis.
NOTE
The On/Off button switch on the front of the chassis controls power to the system.
The On/Off switch on the back should remain On at all times.
Figure 5-28. Processing Server (PS-1) Chassis, Front View Without Cover
Blue LED
indicates
Compact Disk (CD) drive tray
Power
On
(Use for initial installation
and for system recovery)
USB Port (Use for USB Security Key
ONLY if cover is open
or not attached.
See Back View.)
Fans
DVD
+
Green LED
indicates
Active
Hard Drive
System
Reset
Button
Power
On/Off
Switch
NOTICE
Accidental System Reset Hazard. Do not mount the PS-1 in a rack directly above the Base
Server. If you do, pulling down the front cover (not shown) of the PS-1 may cause the edge
of the cover to press the three middle buttons on the LCD panel controls, causing the system
to reset. If you mount the PS-1 in the same rack as the Base Server, make sure the hinged
front cover of the does not open onto the front of the Base Server. Mitel recommends
mounting the PS-1 below or away from the Base Server and Digital Expansion Interface
(DEI) units.
Figure 5-29 shows the back of PS-1 units.
Figure 5-29. Processing Server (PS-1) Chassis, Back View
Monitor
(not included)
DB-15
VGA
Connection
to monitor
USB Security Key
(Insert in any
USB port.)
RJ-45 to LAN
Power
On/Off
Switch
or
Mouse
(optional)
Keyboard
USB ports
Null modem
with Hardware Flow Control (part number 804.2605)
Fan
RS-232 cable
DB9M to DB9F Straight-through
(part number 813.1683)
Connect to Laptop PC
Monitor
power cord
PS-1
power cord
Isolated, dedicated, single-phase commercial power source
Page 5-58
Mitel ® 5000 Installation Manual – Issue 3.0, October 2008
Chapter 5: Installation
Installing the Processing Server (PS-1)
Installing the Processing Server (PS-1)
To see the location of connectors on the PS-1, see Figure 5-28 on page 5-58 and Figure 5-29.
To install a PS-1:
1.
Rack mount the PS-1 (recommended).
2.
Make sure the power switches on the front and back of the PS-1 are turned off. See
Figures 5-28 and Figure 5-29 on page 5-58.
3.
Connect the PS-1 to an AC power source, but do not turn either of the power switches
on at this time. For electrical requirements, see Table 4-4 on page 4-32.
4.
Using a CAT5 or CAT5e cable terminated on both ends with RJ-45 plugs, connect the
PS-1 to the network through the same 100 Mbps LAN switch as the Base Server.
IMPORTANT
The PS-1 and Base Server must be connected to the network on the
same LAN, VLAN, and subnet. For additional details, see “Network
Environment Requirements” on page 5-148.
5.
Connect a monitor and keyboard to the PS-1. See Figure 5-29. If a monitor and
keyboard are not available, you can use a laptop PC equipped with a DB-9 serial port. In
the alternate mode using a laptop PC, connect the PS-1 to the laptop with a straightthrough RS-232 cable and null modem with hardware flow control, as shown in Figure 529.
6.
Turn power on using the On/Off switch on the back of the chassis. Leave the On/Off
switch on the back of the chassis turned on at all times.
7.
Turn power on using the button switch on the front of the chassis. Use the button switch
to control power to the system. Leave the On/Off switch on the back of the chassis
turned on at all times.
Mitel ® 5000 Installation Manual – Issue 3.0, October 2008
Page 5-59
Chapter 5: Installation
Installing a DEI
DIGITAL EXPANSION INTERFACE (DEI)
The following sections provide processes and procedures required for installing digital interface
equipment.
Installing a DEI
This section describes installing the Mitel Digital Expansion Interface (DEI) unit, the Digital
Endpoint Module (DEM-16), and the eight-port Single Line Module (SLM-8). Other digital
endpoint-related items are also discussed such as Single-Line Adapters (SLA) and supported
digital endpoint installations. Information on installing an external voice processing system is
also discussed.
Summary for Installing a New System or for Upgrading
Follow the new installation summary guidelines with any additions mentioned here. See “PreInstallation Checklist” on page 5-9.
• Run sufficient lengths of cable to any newly installed digital endpoints and to optional
equipment for connection to the MDF. See page 5-20. Allow for adequate strain relief.
Although CAT5e is recommended for new installations, existing CAT5 cabling is
acceptable. CAT5e provides better near-end crosstalk (NEXT) performance.
• Terminate the endpoint cables on modular jack assemblies [line jack units] at the endpoint
locations. See Table 5-7 for loop limits.
Table 5-7. Loop Limits for Digital and Single Line Endpoints
Port
Impedance
Loop Limit
(24 AWG)
600 Ω
2000 ft
(609 m)
REN 3.0
62 Ω
1200 ft
(366 m)
From an MDPM: To a single line endpoint
195 Ω
3800 ft
(1158 m)
From an SLA: To single line endpoints or playback devices.
Supports facility code OL13C.
800 Ω
15,560 ft
(4742 m)
Endpoints
From Base Server chassis:
• To a single line endpoint or playback device connected
to the built-in port
• To a single line endpoint or playback device driven by a
SLM-4 port
From DEI chassis: To a single line endpoint or playback
device driven by a SLM-8
From DEI chassis:
• To digital endpoints
• To a digital endpoint equipped with PCDPM and MDPM
and connected to DSS unit(s) or SLA
Page 5-60
Mitel ® 5000 Installation Manual – Issue 3.0, October 2008
Chapter 5: Installation
Summary for Installing a New System or for Upgrading
• On the MDF backboard, assemble any additional terminal blocks for digital endpoints,
including SLAs. See page 5-21.
o
If any T1/PRI and/or E1/PRI trunks are to be installed, terminate them on eightconductor modular jack [line jack unit] assemblies at the MDF.
o
Connect the trunks, endpoint cables, and module cables to the corresponding terminal
blocks. Connect T1/PRI and E1/PRI trunks to modular jack assemblies [RJ45 sockets].
o
If installing any single line endpoints or non-T1 DID trunks (USA only), you may want
to attach the necessary SLAs and their corresponding modular jack [line jack unit]
assemblies on the MDF.
• Install the DEI chassis near the MDF in a Mitel or other rack. Also, mount the chassis in
the rack at a height appropriate for reading the Status panel. Allow room above and below
the chassis for later expansion. If wall-mounting is desired, contact the Mitel CommSource
Division for information.
See Figure 5-59 on page 5-168, Figure 5-60 on page 5-169, Figure 5-61 on page 5-170,
Figure 5-62 on page 5-171, and Figure 5-63 on page 5-172 for examples.
• Install a patch panel in the rack above the location you will install the Inter-Tel 5000 Base
Server.
A patch panel allows for convenient cable terminations from the MDF, and a patch panel
allows you to use patch cables (for T1M or T1M-2 modules) or modular line cord cables
(built-in dual Loop Start and LSM-2/-4 modules). Run cabling from the MDF 66-block to
the patch panel in the rack.
• Install the DEM-16(s) in the chassis—see page 5-70.
• Install the optional LSM-4 module in the chassis—see page 5-47.
• Install the optional BRM-S module in the chassis—see page 5-53.
• Install an uninterruptible power supply (UPS). For more information, see “Uninterruptible
Power Supply (UPS) Connections” on page 4-8. Plug only the DEI chassis into this UPS.
• Connect the modules to MDF blocks or to a patch panel using appropriate cabling—see
page 5-33. If replacing an Inter-Tel Axxess® system, a 15 ft (4.5720 m) Amphenol-to-DEM16 cable is available, part number 813.1814.
• Ground the chassis—see page 5-16.
• Power up the system—see page 5-89.
• If this is an upgrade, do the following:
o
Perform a database backup.
o
Start an Administrative Web Session and upgrade the system software.
• Install the current DB Programming version. Upload the current license file, as applicable
to your site. Disable Basic Voice Mail before attaching an external voice processing
system. To disable BVM, from the DB Programming menu bar, select Operations – Voice
Processing Operations – Disable Basic Voice Mail.
• Install the optional external voice processing system, if applicable. See page 5-194.
• Install any optional system equipment, external paging network, external music source,
headsets, handset amplifiers, etc. Install an uninterruptible power supply (UPS) with all
units. See “Uninterruptible Power Supply (UPS) Connections” on page 4-8.
• Ensure that all equipment is working properly.
• For additional information, refer to the Mitel 5000 Features and Programming Guide, part
number 580.8006.
Mitel ® 5000 Installation Manual – Issue 3.0, October 2008
Page 5-61
Chapter 5: Installation
Running Cables to Endpoints
Running Cables to Endpoints
Carry out the following guidelines when running cable for digital endpoints:
• Develop floor plans to aid in proper digital endpoint cabling in a star (home run)
configuration from the DEI chassis. If necessary, run the necessary cabling to where the
digital endpoint will be used. See “Cabling to Endpoints” on page 4-12.
• If desired, two- or three-pair twisted cable and four- or six-conductor modular jacks [line
jack units] may be used for all endpoint connections. This allows the various endpoint
types to be easily interchanged, if necessary. (If three-pair cable is used with a U.S.
system, extra terminal blocks and the use of cross-connect wiring techniques are
required.)
• Install proper type cable for the application according to the National Electrical Code and
local building codes [BS 6701 in Europe].
• Avoid cable runs parallel to fluorescent light fixtures or AC lines not in conduit. If these
obstacles are unavoidable, run the cables across them at right angles.
• Do not run cables inside electrical conduit already occupied by AC power cable. (To do so
is a violation of the National Electrical Code or BS 6701.)
• Do not run cables near equipment with electric motors or through strong magnetic fields,
such as those generated by large copy machines, arc welding equipment, heavy motors,
etc.
• Do not place station cables where they can be stepped on or where they can be rolled
over by office furniture.
• If using multi-pair (for example, 25-pair) cable runs to multiple station locations, do not
include AC-ringing single line endpoints, or AC-ringing auxiliary equipment.
• Using 24 AWG solid copper cable, do not exceed the loop limit measurements for the
endpoint cable lengths. The resistance values (in ohms) are loop measurements; the
distance values (in feet or meters) are the maximum one-way measurements from the
equipment chassis. The loop limit for digital endpoints is 62Ω and 1200 ft (366 m). See
Table 5-7 on page 5-60 for additional loop limits for devices connected to the Mitel
platform.
Because the Mitel 5000 platform uses digital voice and data transmission between the digital
endpoints and the chassis, the following cabling requirements apply:
• Do not use shielded cable, and do not use cable smaller than 24 AWG.
• Do not parallel cables (for example, do not “double up on the copper”).
• Do not “bridge” or “Y” off the cable to another location.
• Digital endpoints do not need to be routed in separate multi-pair cable runs. For example,
if using 25-pair cable runs to multiple station locations, it is acceptable to include single
line endpoints, auxiliary equipment, and trunks in a cable being used for endpoints.
Page 5-62
Mitel ® 5000 Installation Manual – Issue 3.0, October 2008
Chapter 5: Installation
Running Cables to Endpoints
WARNING
Possible Delay in Local Emergency Response to Remote Sites. IP and SIP endpoint users
should be alerted to the following hazardous situations:
• If an Emergency Call endpoint number is dialed from an IP or SIP endpoint located at a
remote site that is not equipped with a correctly configured gateway, the call will be
placed from the location where the system chassis is installed rather than from the
location where the emergency call is made.
In this situation, emergency responders may be dispatched to the wrong location. To
minimize the risk of remote site users misdirecting emergency responders, Mitel
recommends regular testing of SIP/MGCP gateway trunk(s) for dial tone.
• If uninterruptible power supply (UPS) protection has not been installed as part of the
Mitel 5000 system, IP and SIP endpoints will not operate when electrical power fails
either at remote sites or at the main system location.
• To place calls during a power failure in this situation, IP and SIP endpoint users can only
use a single line endpoint connected to one of the power failure bypass circuits built into
the system chassis. If a endpoint connected to a power failure bypass circuit is not
available, users should make emergency calls from a local endpoint that is not
connected to the system.
For details about the Power Failure Bypass feature, see “Back of the Chassis” on page 3-8.
For installation instructions, see “Built-In Ports for WAN Fail Survivability” on page 5-27.
Mitel ® 5000 Installation Manual – Issue 3.0, October 2008
Page 5-63
Chapter 5: Installation
Terminating Cables at Digital Endpoint Locations
Terminating Cables at Digital Endpoint Locations
Terminate the digital endpoint, single line endpoint, and playback device station cables on fourconductor modular jack [six-conductor line jack unit in Europe] assemblies at the station
locations.
Do not mount the assemblies on the wall at this time; they will be wall-mounted later when the
station instruments are installed. See Figure 5-30 and Figure 5-31 on page 5-64.
If tip and ring are reversed when installing an endpoint, the endpoint will not
function.
IMPORTANT
Figure 5-30. Modular Jack Assembly Wiring Diagrams (U.S. System)
TIP
RING
G
Y
G
Y
R
BK
R
BK
TIP
RING
For Digital Endpoints and
Single-Line Adapters
For Single Line Endpoints
and Playback Devices
Figure 5-31. Line Jack Unit Assembly Wiring [European System]
For Single Line Endpoints
and Playback Devices
For Digital Endpoints and
Single-Line Adapters
WH./BL
5
3
6
4
1
2
BL/WH
WH./BL
1
2
6
5
3
4
BL/WH
EARTH
Not used
Page 5-64
Mitel ® 5000 Installation Manual – Issue 3.0, October 2008
Chapter 5: Installation
Labeling Station Cable and Mapping Circuit Numbers
Labeling Station Cable and Mapping Circuit Numbers
Label both ends of each cable with the station circuit number (hardware address) and how it
relates to the corresponding location in the DEI chassis. All circuit numbers are preceded with a
two-digit node number. For example, 02.02.16.01 is a port on node 2, module 2, circuit 16.
In some circumstances, a station circuit can have more than one purpose. For example, two
single line devices can be installed on a single DEM-16 circuit. The first device is assigned
circuit number XX.YY.01, and the second device is assigned circuit number XX.YY.02. Similarly,
a PC Data Port Module and Modem Data Port Module can be assigned circuit numbers. In this
case, the endpoint is assigned circuit number XX.YY.01, the first data port is assigned number
XX.YY.02, and the second data port is assigned number XX.YY.03. For detailed information
about programming endpoints, refer to the Mitel 5000 Features and Programming Guide, part
number 580.8006.
The default system assigns extension number 1000 to station circuit 01.01.01, extension
number 1001 to station circuit 01.02.01, and so on to match the initial configuration. Circuit
01.01.01 is equipped as an administrator and as the primary attendant endpoint when the
system is in the default configuration. Through DB Programming, the circuits can be assigned
1–5 digit extension numbers.
Figure 5-32 on page 5-66 illustrates how the Bay numbers in the Mitel CS-5200/5400/5600
Base Server and each DEI correspond to the System Board/Circuit information in Message
Print. This example only shows two DEIs, but you can have up to four DEIs in a system.
Table 5-8 on page 5-67 summarizes the system board/bay/application relationships between an
Mitel 5000 system and Message Print.
Mitel ® 5000 Installation Manual – Issue 3.0, October 2008
Page 5-65
Chapter 5: Installation
Labeling Station Cable and Mapping Circuit Numbers
Figure 5-32. DEM-16 Circuit Mapping Example
Mitel 5000 Base Server
EXP
DUAL LS DUAL SL
PAGE MOH
13 – 16
BAY 3/SYS 3
13 – 16
ONLINE
BAY 2/SYS 5
9 – 12
BUSY
BAY 1/SYS 4
5–8
ONLINE
DEM-16
1–4
BUSY
9 – 12
ONLINE
5 –8
BAY 3
1 –4
BUSY
13 – 16
DEM-16
Male (to DEI)
DEM-16
BAY 3/SYS 6
EXP 2
13 – 16
BAY 1/SYS 12
BAY 2/SYS 13
1–4
5–8
9 – 12
13 – 16
BAY 3
9 – 12
DEM-16
DEM-16
BAY 3/SYS 14
Circuits
BUSY
13 – 16
ONLINE
Circuits
1:12.9.X
to
1:12.12.X
9 – 12
5 –8
DEM-16
Circuits
1:12.13.X
to
1:12.16.X
Circuits
1:12.5.X
to
1:12.8.X
1 –4
ONLINE
13 – 16
BUSY
9 – 12
ONLINE
5–8
BAY 2
1–4
BAY 1
EXP 1
Male
(to EM Voice Mail
part number 813.1806)
BUSY
DEI 2
Female (to DEI)
5–8
9 – 12
BUSY
5–8
EXP 2
BAY 2
1–4
BAY 1
EXP 1
1–4
BAY 2/SYS 2
DEI 1
Female (to DEI)
Circuits
1:12.1.X
to
1:12.4.X
BAY 1/SYS 1
ONLINE
Male
(DEI cable)
Mitel 5000
Base Server
DEI 1
DEI 2
Bay 1
1:01.1.X
through
1:01.2.X
1:04.1.X
through
1:04.16.X
1:12.1.X
through
1:12.16.X
Bay 2
1:02.1.X
through
1:02.30.X
1:05.1.X
through
1:05.16.X
1:13.1.X
through
1:13.16.X
Bay 3
Bay
not
occupied
1:06.1.X
through
1:06.16.X
1:14.1.X
through
1:14.16.X
* These circuits could expand to 30, depending on
the module types in the bay. In this example, the
T1/E1/PRI module is configured for E1/PRI.
DEM-16
LEGEND:
BAY 1/SYS 4 = Bay # in the
chassis is
the same as
equivalent
System # in
Message
Print
Page 5-66
=
DEI Cable
(part number
813.1847
or
813.1847-001)
Mitel ® 5000 Installation Manual – Issue 3.0, October 2008
Chapter 5: Installation
Assembling and Cabling the Main Distribution Frame
Table 5-8. System Board:Bay:Application Relationship in Message Print
System Board (Module) in Message Print . . .
Relates to this bay/application in . . .
Mitel 5000 v1.x System
Mitel 5000 v2.x System
1
Bay 1: LSM-2, T1M or T1M-2
Bay 1: LSM-4, T1M or T1M-2, BRM-S
2
Bay 2: LSM-2, T1M or T1M-2
Bay 2: LSM-4, T1M or T1M-2, BRM-S
3
Bay 3: LSM-2, T1M or T1M-2
Bay 3: LSM-4, T1M or T1M-2, BRM-S
4
On-Board LS-2 Application
DEI-1, BAY1
5
On-Board SL-2 Application
DEI-1, BAY2
6
Not used
DEI-1, BAY3
7
IPRA7 Application (All IP endpoint/networking
call control)
IPRA7 Application (All IP endpoint/networking
call control)
8
Rch (Resource Application)
Rch (Resource Application)
9
IPRA9 Application
IPRA9 Application
10
Not used
On-Board LS-2 Application
11
Not used
On-Board SL-2 Application
12
Not used
DEI-2, BAY1
13
Not used
DEI-2, BAY2
14
Not used
DEI-2, BAY3
15
Not used
Not used
16
Not used
Not used
Assembling and Cabling the Main Distribution Frame
The Main Distribution Frame (MDF) is the location where the Mitel 5000 platform and digital
expansion equipment is connected to station instruments, trunks, and auxiliary system
equipment. Solid copper wire connections are made across industry-standard terminal blocks
[Krone blocks in Europe] and/or modular jack [line jack unit] assemblies. Solid connections
between system elements are made only with an appropriate gauge of solid copper wire—never
stranded speaker wire.
With a European system each module is normally supplied with cables 2 m in length, although 4
m cables are available by special order. These cables are supplied with the appropriate number
of Krone blocks for the module type.
To simplify the MDF installation instructions, this manual outlines basic one block-to-one module
installation using bridging clips. However, it is acceptable, and in some cases more functional,
to use additional blocks, then cross-connect from one block to another.
Mitel ® 5000 Installation Manual – Issue 3.0, October 2008
Page 5-67
Chapter 5: Installation
Assembling and Cabling the Main Distribution Frame
To assemble the MDF:
1.
Mount a 4 ft x 6 ft (1.2 m x 1.8 m), ¾-inch (2 cm) plywood backboard at the MDF
location. Depending on the number of stations and trunks to be installed, a larger
backboard may be necessary. If wall-mounting the Mitel CS-5200/5400/5600 Base
Server or DEI chassis, additional space will be required to allow for sufficient room to
insert/remove modules and wiring space/strain relief. A rack-mount kit is available from
the Mitel CommSource division that will allow the system to be wall-mounted.
2.
With a U.S. system, attach 66M1-50-type terminal blocks to the plywood backboard.
With a European system, attach Krone blocks. Depending on installation requirements,
provision for the following terminal blocks and cabling:
•
Up to 28 blocks for interconnecting trunks and station cables to the system. If more
than 28 blocks are needed, additional backboards may need to be mounted.
•
One 25-pair cable—Quad RF-45 to Amp, part number 813.1814—for each
DEM-16.
•
Sufficient amount of 24-gauge twisted-pair cabling and appropriate terminal plugs
(typically, RJ-11, RJ-14, RJ-45, and/or RJ-48C) to correctly install the job. Consult
with your sales engineering representative.
If you use three-pair cable, extra terminal blocks and cross-connect wiring techniques
are required.
Page 5-68
3.
If installing T1, T1/PRI, E/1, and/or E1/PRI trunks, attach eight-conductor modular jack
[line jack unit] assemblies to the MDF as required.
4.
If installing BRI trunks [European only], attach the necessary connectors to the MDF.
5.
If installing single line endpoints or DID [DDI] trunks, attach the necessary SLAs and
corresponding modular jack [line jack unit] assemblies to the plywood backboard. See
Figure 5-55 on page 5-140 and Figure 5-56 on page 5-140 for complete diagrams of the
SLA setup.
Mitel ® 5000 Installation Manual – Issue 3.0, October 2008
Chapter 5: Installation
Unpacking the DEI Equipment
Unpacking the DEI Equipment
After all digital endpoints and related devices are installed and endpoint/device cabling has
been run or is in place, you are now ready to install the DEI chassis and modules.
NOTICE
Electrostatic Discharge (ESD). Mitel 5000 modules and components are static-sensitive.
Handle the modules by the edges only and keep them in their protective bags until they are
to be installed. Do not bend or touch the component pins or subject them to a static charge.
When working with the modules, use a properly terminated anti-static wrist strap and cover
the work surface with the bag that protected the module during shipping. Any static charge—
no matter how small—must be discharged from the body before touching the modules or
other components. The warranty for this equipment does not cover damage caused by static
or mishandling. Modules or components damaged in such a manner will not be replaced.
To unpack the equipment and inspect the equipment chassis and all accompanying
parts:
1.
Check the parts against the packing slip and inspect them for damage. If any item is
missing or damaged, contact Technical Support immediately. See Table 7-1 on page 7-2.
2.
Check all circuit module assemblies as follows:
a. Check each module to ensure there is no shipping foam or tape attached.
b. Inspect each module for shorted components.
c. Return all modules to their protective bags until they are ready to be installed in the
chassis.
3.
Check that the protective covers over the module bays are in place. These covers
protect debris or other foreign matter from entering the system and possibly harming the
internal components. These covers should remain in place until you are ready to install a
module.
Checking the Unit Pre-Assembly
Please read all sections leading up to the procedures, paying close attention to any cautions
and notes included. For information on requirements or system capacities, see the
Specifications and Product Description chapters. Figure 5-1 on page 5-15 provides an
illustration of the chassis front and back.
The unit is shipped fully assembled. There is nothing to install inside the chassis so removing
the cover is not necessary. Modules, security key, and compact flash-type memory card are
provided in separate packaging and not installed.
NOTICE
Warranty Invalidation. There are no field-replaceable parts inside the Mitel CS-5x00
Network Communications Servers or DEI chassis.
Mitel ® 5000 Installation Manual – Issue 3.0, October 2008
Page 5-69
Chapter 5: Installation
Installing DEI Hardware
Installing DEI Hardware
See page 5-163 for information.
IMPORTANT
Do not plug in any power cords until instructed to do so. Powering up the
system occurs later in the installation.
Attaching DEI Units and External Voice Mail System
See Figure 5-62 on page 5-171 for information.
Installing Modules in the DEI
Each DEI chassis attached to the Mitel CS-5200/5400/5600 Base Server chassis may be
equipped with 16-port Digital Endpoint Modules (DEM-16) and/or eight-port Single Line Modules
(SLM-8). Installation instructions for the DEM-16 and the SLM-8 follow, and an example of
DEM-16 and SLM-8 circuit mapping appears in Figure 5-36 on page 5-73.
Installing a Digital Endpoint Module (DEM-16)
Each DEM-16 supports up to 16 digital endpoints. Digital endpoints include Inter-Tel digital
endpoints and Inter-Tel Single-Line Adapters (SLA). This section provides the procedures you
need to install the DEM-16. Procedures for installing digital endpoints and SLAs appear in the
following section.
Each DEI chassis accepts up to three DEM-16s to provide digital capability on the Mitel 5000
platform. See the Specifications and Product Description chapters for additional module
information.
NOTICE
Electrostatic Discharge (ESD). Mitel 5000 modules and components are static-sensitive.
When working with the modules, use a properly terminated anti-static wrist strap. Any static
charge (no matter how small) must be discharged from the body before touching the
modules or other components. The warranty for this equipment does not cover damage
caused by static or mishandling. Modules or components damaged in such a manner will not
be replaced.
The DEM-16 can be removed with power on; however, any calls on those
circuits will be dropped.
IMPORTANT
DEM-16s can reside in any bay, but DB Programming will need to be
changed if you move a module (that was previously programmed) into a
different bay location.
To install a DEM-16:
Page 5-70
1.
Using a properly terminated, anti-static wrist strap, remove the module from the
protective anti-static bag. See Figure 5-24 on page 5-51 for a DEI chassis and DEM-16
example for the remaining steps in this procedure.
2.
Insert the module carefully so that it aligns with the rails inside the chassis, then gently
slide the module into the chassis until it stops. Do not use force.
3.
Tighten the fastener at the top of the module, securing the module to the chassis. Do
not over-tighten this fastener.
Mitel ® 5000 Installation Manual – Issue 3.0, October 2008
Chapter 5: Installation
Installing a Digital Endpoint Module (DEM-16)
4.
Continue to “Verifying and Securing Cable Connections” on page 5-33.
Figure 5-33. DEM-16 in DEI 1 and DEI 2 Chassis
5–8
13 – 16
DEM-16
EXP 2
To 2nd DEI
or external
Voice Mail*
9 – 12
BAY 1
EXP 1
BUSY
1–4
DEI 1
ONLINE
DEI Chassis Back
To Base Server
only
Module-to-Chassis Fastener
To external
Voice Mail
only*
5–8
9 – 12
BAY 1
EXP 1
DEM-16
EXP 2
*If a DEI chassis exists as part of the configuration, you
must connect the external voice mail PC to the bottom
DB-15 connector on the last DEI chassis in the chain.
PWR
13 – 16
BUSY
1–4
DEI 2
ONLINE
To 1st DEI
only
LEDs:
BUSY (yellow): Indicates
one or more circuits in use
ON (green): Indicates online
Not lit indicates offline
MODULE 1
MODULE 2
MODULE 3
ON BUSY
ON BUSY
ON BUSY
If a Bay is not populated in the system, the
corresponding LEDs will be OFF (not lit).
DEI Chassis Front
PWR
MODULE 1
ON
BUSY
MODULE 2
ON
MODULE 3
BUSY
ON
BUSY
Status Panel
NOTICE
Equipment Damage Risk: Use adapters when connecting any 6-pin plug to an 8-pin jack.
Although a 6-pin plug will fit into an 8-pin jack, the plastic on the 6-pin plug housing will
damage pins 1 and 8 on the 8-pin jack. Not using adapters will increase the likelihood of
failure (to pins 1 and 8 in the 8-pin jack) should that jack need to be used with an 8-pin plug
in the future. Various adapter types are available based on how you choose to connect to the
patch panel.
To remove a DEM-16:
1.
Using a properly terminated, antistatic wrist strap, loosen the fastener at the top of the
module (this fastener secures the module to the chassis).
2.
When the BUSY LED is not lit (not green), grasp the module handle and carefully
remove the DEM-16 from the chassis.
Mitel ® 5000 Installation Manual – Issue 3.0, October 2008
Page 5-71
Chapter 5: Installation
Installing an Eight-Port Single Line Module (SLM-8)
Installing an Eight-Port Single Line Module (SLM-8)
This section provides specifications, drawings, and procedures needed for installing an SLM-8,
part number 580.2101.
Hardware
Table 5-9 summarizes the physical dimensions of the SLM-8 module.
Table 5-9. Eight-Port Single Line Module (SLM-8) Dimensions
USA Customary
Metric
Length
8.375 in.
212.725 mm
Width
3.875 in.
098.425 mm
Height
1.000 in.
025.400 mm
Each SLM-8 is equipped with four RJ-14 jacks, and each jack represents two single line ports,
as shown below in Figure 5-34. For the applicable wiring diagram of SLM-8 ports, see Figure 535 on page 5-72. All SLM-8 ports support Caller ID transmitters.
Single Line Module Pinouts
The pinout design for four-port and eight-port Single Line Module jacks (SLM-4 and SLM-8) is
the same. Each RJ-14 jack represents two single line ports for connecting single line analog
endpoints. The middle four pins in the RJ-14 connector are wired in accordance with Uniform
Service Order Code (USOC) T568A specifications, as shown in Figure 5-34.
Each SLM-8 is equipped with two light-emitting diode
(LED) status lamps, one yellow and labeled BUSY,
and one green, labeled ONLINE. The yellow BUSY
LED indicates that one of the ports programmed on
the module is processing an active call. The green
ONLINE LED indicates that the module is recognized
by the system and ready for use.
Figure 5-34. RJ-14 Jack Pinout Diagram
T1 R1
R2
T2
123456
T1–R1 = Port 1 Tip and Ring
T2–R2 = Port 2 Tip and Ring
All cabling connected to the RJ-14 interfaces should be constructed of
standard 24-gauge twisted pair cable. To ensure reliable operation of single
IMPORTANT
line endpoints connected to the Mitel 5000 platform, do not use flat ribbon
cabling or untwisted pair cabling.
3-4
5-6
7-8
BUSY
1-2
ONLINE
Figure 5-35. Eight-Port Single Line Module (SLM-8), Front View
SLM-8
Page 5-72
Mitel ® 5000 Installation Manual – Issue 3.0, October 2008
Chapter 5: Installation
Single Line Module Pinouts
Figure 5-36. SLM-8 and DEM-16 Circuit Mapping Example
Mitel 5000 Base Server
Male to
Base Server
chassis
EXP
DUAL LS DUAL SL
PAGE MOH
BAY 1/SYS 1
SLM-8
BAY 1/SYS 4
BAY 2/SYS 5
5– 8
9 – 12
13 – 16
ONLINE
DEM-16
1– 4
BUSY
7–8
ONLINE
5 –6
ONLINE
3–4
BUSY
1–2
BAY 3
13 – 16
ONLINE
9 – 12
DEM-16
BAY 3/SYS 6
13 – 16
5–6
7– 8
BAY 1/SYS 12
BAY 2/SYS 13
BAY 3/SYS 14
Circuits
1:14.7
to
1:14.8
3–4
5–6
7–8
BUSY
ONLINE
1–2
DEM-16
ONLINE
Circuits
1:14.5
to
1:14.6
Circuits
1:14.1
and
1:14.2
BUSY
3– 4
SLM-8
Circuits
1:14.3
to
1:14.4
13 – 16
1– 2
DEM-16
Circuits
1:12.9.X
to
1:12.12.X
9 – 12
9 – 12
DEM-16
Circuits
1:12.13.X
to
1:12.16.X
Circuits
1:12.5.X
to
1:12.8.X
5–8
ONLINE
1–4
BUSY
13 – 16
BAY 3
9 – 12
ONLINE
5 –8
BUSY
1– 4
EXP 2
BAY 2
EXP 1
Male to
external Voice Mail
cable part number
813.1806
BAY 1
DEI 2
Female to
DEI 2
5–8
BAY 3/SYS 3
BUSY
EXP 2
(DEI Cable
part number 813.1847
or 813.1847-001)
1–4
5 –8
BUSY
1– 4
BAY 2
EXP 1
Male to DEI 1
BAY 1
Female to
DEI 1
Circuits
1:12.1.X
to
1:12.4.X
BAY 2/SYS 2
DEI 1
SLM-8
Circuits
Mitel 5000
Base Chassis
DEI 1
DEI 2
Bay 1
1:01.1.X
through
1:01.2.X
1:04.1.X
through
1:04.16.X
1:12.1.X
through
1:12.16.X
Bay 2
1:02.1.X
through
1:02.30.X
1:05.1
through
1:05.8
1:13.1.X
through
1:13.16.X
Bay not
occupied
1:06.1.X
through
1:06.16.X
1:14.1 through
1:14.8
LEGEND:
BAY 1/SYS 4 = Bay # in the chassis is the same
as the equivalent System # in
Message Print.
Bay 3
In this example, a T1/E1/PRI module is configured for E1/PRI.
Mitel ® 5000 Installation Manual – Issue 3.0, October 2008
Page 5-73
Chapter 5: Installation
Connecting Cables and Checking Cables to the System
Connecting Cables and Checking Cables to the System
At this point in the installation, all cabling to the MDF, patch panel, rack, and endpoints should
be completed. This includes all cables that terminate at the chassis modules.
To complete cabling:
1.
Plug all applicable cables into their respective modules and chassis ports.
2.
Install the LAN cable from the Processor Module jack to a LAN connection. Plug the
cable into a 100Base-T switch, instead of a hub.
3.
Connect the modules to MDF blocks or a patch panel using appropriate cabling. If
replacing an Inter-Tel Axxess system, a 15 ft (4.5720 m) Amphenol-to-DEM-16 cable is
available, part number 813.1814.
See Figure 5-37 on page 5-75 for a pinout and cabling example. Pinouts must follow the
568B standard.
Page 5-74
4.
If installing optional equipment, see “Optional System Equipment” on page 5-191 and
following.
5.
Continue to “Grounding the Inter-Tel 5000 Base Server” on page 5-16.
Mitel ® 5000 Installation Manual – Issue 3.0, October 2008
Chapter 5: Installation
Connecting Cables and Checking Cables to the System
Figure 5-37. DEM-16 Pinouts and Cabling
Port 1
Signal
Port 3
Signal
Pin-1
Tip 3
Pin 1
Tip 11
Pin-2
Ring 3
Pin 2
Ring 11
Pin-3
Tip 2
Pin-3
Tip 10
Pin-4
Ring 1
Pin-4
Ring 9
Pin-5
Tip 1
Pin-5
Tip 9
Pin-6
Ring 2
Pin-6
Ring 10
Pin-7
Tip 4
Pin-7
Tip 12
Pin-8
Ring 4
Pin-8
Ring 12
Port 2
Signal
Port 4
Signal
Pin-1
Tip 7
Pin-1
Tip 15
Pin-2
Ring7
Pin-2
Ring 15
Pin-3
Tip 6
Pin-3
Tip 14
Pin-4
Ring 5
Pin-4
Ring 13
Pin-5
Tip 5
Pin-5
Tip 13
Pin-6
Ring 6
Pin-6
Ring 14
Pin-7
Tip 8
Pin-7
Tip 16
Pin-8
Ring 8
Pin-8
Ring 16
8
7
6
5
4
3
2
1
Pin Numbers
R4 T4 R2 T1 R1 T2 R3 T3
1
4
2
Port Numbers
3
NOTICE: Pinouts must follow the 568A standard.
25-pair from MDF
To DEI and DEM-16s
Available Cable:
15 ft (4.5720 m) with Amphenol (part number 813.1814)
Mitel ® 5000 Installation Manual – Issue 3.0, October 2008
Page 5-75
Chapter 5: Installation
Connecting Cables and Checking Cables to the System
Table 5-10. Station Cable Terminations with a U.S. System
Page 5-76
AMPHENOL
Position #
Cable
Pair
DEM-16
Bay 1
Circuit
No.a
Extension
No.1
26
W-BL
TIP
01.01.01
1000
1
BL-W
RING
27
W-O
TIP
01.02.01
1001
2
O-W
RING
28
W-G
TIP
01.03.01
1002
3
G-W
RING
29
W-BR
TIP
01.04.01
1003
4
BR-W
RING
30
W-S
TIP
01.05.01
1004
5
S-W
RING
31
R-BL
TIP
01.06.01
1005
6
BL-R
RING
32
R-O
TIP
01.07.01
1006
7
O-R
RING
33
R-G
TIP
01.08.01
1007
8
G-R
RING
34
R-BR
TIP
01.09.01
1008
9
BR-R
RING
35
R-S
TIP
01.10.01
1009
10
S-R
RING
36
BK-BL
TIP
01.11.01
1010
11
BL-BK
RING
37
BK-O
TIP
01.12.01
1011
12
O-BK
RING
38
BK-G
TIP
01.13.01
1012
13
G-BK
RING
39
BK-BR
TIP
01.14.01
1013
14
BR-BK
RING
40
BK-S
TIP
01.15.01
1014
15
S-BK
RING
41
Y-BL
TIP
01.16.01
1015
16
BL-Y
RING
42
Y-O
NOT USED
17
O-Y
NOT USED
43
Y-G
NOT USED
18
G-Y
NOT USED
44
Y-BR
NOT USED
19
BR-Y
NOT USED
Mitel ® 5000 Installation Manual – Issue 3.0, October 2008
Chapter 5: Installation
Connecting Cables and Checking Cables to the System
Table 5-10. Station Cable Terminations with a U.S. System (Continued)
AMPHENOL
Position #
Cable
Pair
DEM-16
Bay 1
45
Y-S
NOT USED
20
S-Y
NOT USED
46
V-BL
NOT USED
21
BL-V
NOT USED
47
V-O
NOT USED
22
O-V
NOT USED
48
V-G
NOT USED
23
G-V
NOT USED
49
V-BR
NOT USED
24
BR-V
NOT USED
50
V-S
NOT USED
25
S-V
NOT USED
Circuit
No.a
Extension
No.1
a. The station circuit numbers shown above are for the first DEM-16 installed in the equipment chassis. (Bay 1). The extension numbers
are the default numbers assigned to those circuits.
Table 5-11. Cable Terminations on MDF Blocks [Twin Block Cables] for DEM-16
Cable Pair
Color
Plug Pin No.
BLOCK NO.
BLOCK PAIR
CIRCUIT
1
White/Blue
Blue/White
1
26
1
1
01.01
2
White/Orange
Orange/White
2
27
2
02.01
3
White/Green
Green/White
3
28
3
03.01
4
White/Brown
Brown/White
4
29
4
04.01
5
White/Gray
Gray/White
5
30
5
05.01
6
Red/Blue
Blue/Red
6
31
6
06.01
7
Red/Orange
Orange/Red
7
32
7
07.01
8
Red/Green
Green/Red
8
33
8
08.01
9
Red/Brown
Brown/Red
9
34
9
09.01
10
Red/Gray
Gray/Red
10
35
10
10.01
Mitel ® 5000 Installation Manual – Issue 3.0, October 2008
Page 5-77
Chapter 5: Installation
Connecting Cables and Checking Cables to the System
Table 5-11. Cable Terminations on MDF Blocks [Twin Block Cables] for DEM-16 (Continued)
Cable Pair
Color
Plug Pin No.
BLOCK NO.
BLOCK PAIR
CIRCUIT
11
Black/Blue
Blue/Black
11
36
2
1
11.01
12
Black/Orange
Orange/Black
12
37
2
12.01
13
Black/Green
Green/Black
13
38
3
13.01
14
Black/Brown
Brown/Black
14
39
4
14.01
15
Black/Gray
Gray/Black
15
40
5
15.01
16
Yellow/Blue
Blue/Yellow
16
41
6
16.01
17
Yellow/Orange
Orange/Yellow
17
42
7
Do not use
18
Yellow/Green
Green/Yellow
18
43
8
19
Yellow/Brown
Brown/Yellow
24
25
9
20
Yellow/Gray
Gray/Yellow
49
50
10
Page 5-78
Mitel ® 5000 Installation Manual – Issue 3.0, October 2008
Chapter 5: Installation
Connecting Cables and Checking Cables to the System
Figure 5-38. Cabling Option 1 – Dual LS and Dual SL
8-pin Jack
8-pin Jack
Adapter
LSM-2 Module
LS 3
Dual Single Line Port
SL 2
R-2 T-1 R-1 T-2
R-2 T-1 R-1 T-2
EXP
LS 4
DUAL LS
DUAL SL
PAGE
6-pin Plug
6-pin Plug
NO
YES
MOH
RJ-45
3
1
4
2
SL 1
LS 1
R-2 T-1 R-1 T-2
LS 2
Dual Loop Start Port
8P/8C 110 Patch Panel Back
25-Pair
cable
from MDF
to patch
panel
RJ-14
1
2
3
4
5
6
Adapter
6-pin plug
to 8-pin jack
not used
R2
T1
R1
T2
not used
1 3 5 7
2 4 6 8
RJ-14
8P/8C 110 Patch
Panel Front
17 15 13
11
9
7
5
3
1
18 16 14
12 10
8
6
4
2
66M1-50
Block
8P/8C 110 Patch
Panel Back
Adapter
6-pin plug
to 8-pin jack
4- or 6-conductor
modular line cord
Figure 5-39. Cabling Option 2 – Dual LS and Dual SL
For each modular jack assembly
T2
T1
BLK
BLU
GRN
YEL
WHT
RED
GND
R2
R1
EXP
DUAL LS
DUAL SL
PAGE
MOH
RJ-14
4- or 6-conductor
modular line cord
Top View
1
2
3
4
5
6
not used
R2
T1
R1
T2
not used
25-Pair cable
from MDF
to rack
RJ-14
66M1-50
Block
RJ-14
4 modular jack
assemblies at rack
4- or 6-conductor
modular line cord
Mitel ® 5000 Installation Manual – Issue 3.0, October 2008
Page 5-79
Chapter 5: Installation
Connecting Station Cables to the MDF
Connecting Station Cables to the MDF
This section describes connecting station cables to the MDF in a USA or European system.
Connecting Station Cables to a U.S. System
Digital endpoints are connected to DEM-16 ports. Single line endpoints are connected to SingleLine Adapters (SLA) which are in turn connected to available DEM-16 circuits.
Besides single line endpoints, playback devices, and off-premises extensions, SLAs can also be
used to install DID trunks. Any combination using the two circuits on the SLA is possible. DID
trunk installation instructions appear in “Installing DID Trunks on an SLA (USA Only)” on
page 5-139.
After the station cables are run, connect them and the 25-pair cables to the DEM-16 blocks on
the MDF as follows:
1.
Ensure that both ends of each station cable are labeled with the circuit number of the
associated station instrument.
2.
Terminate each station cable on the right side of the corresponding station block. See
Figure 5-40 on page 5-81 through Figure 5-44 on page 5-84 for station cable
terminations.
For simplicity, the figures show station instruments being installed using one-pair cable
and four-conductor modular jacks. If three-pair cable and six-conductor modular jacks
are used instead, extra terminal blocks and the use of cross-connect wiring techniques
are required.
Page 5-80
3.
Using enough 25-pair cable to run from each block to each DEM-16 in the equipment
chassis, make the termination cables. Label each connector and cable end with the
appropriate bay number (for example, Bay2). These connectors will be attached to the
DEM-16s after they are installed.
4.
If necessary: Using standard electrical tape, tape two ferrite split beads around each 25pair cable just below the Amphenol-type connector (as shown in Figure 5-6 on page 526).
5.
Ferrite beads may be necessary to help reduce electromagnetic interference (EMI) and
radio frequency interference (RFI). The part number for a single split bead is 808.1195.
6.
Terminate the other end of each 25-pair cable on the left side of the corresponding
station block.
7.
Do not attach bridging clips until the loop resistance tests have been performed, as
described on page 5-85.
Mitel ® 5000 Installation Manual – Issue 3.0, October 2008
Chapter 5: Installation
Connecting Station Cables to a U.S. System
Figure 5-40. DEM-16 Block Cable Terminations for Endpoints on a U.S. System
60M1-50-Type
Block
(Part of MDF)
TIP
1.1.1
1.1.1
1.2.1
1.2.1
RING
TIP
RING
RING
Amphenol
W/BL
BL/W
W/O
O/W
To Digital
Endpoint or
Single-Line
Adapter
G
Y
R
BK
TIP
MODULAR
JACK
ASSEMBLIES
TIP
1.16.1
1.16.1
RING
RING
Y/BL
BL/Y
TIP
To DEI and DEM-16s
G
Y
R
BK
To Digital
Endpoint or
Single-Line
Adapter
Amphenol-Type
Connector
to DEM-16
adapter cable*
For simplicity, this figure shows digital
phones being installed using one-pair cable
and four-conductor modular jacks. If two-pair
cable or three-pair cable is used instead,
extra terminal blocks and the use of crossconnect wiring techniques are required.
Note that tip and ring are connected to the
second pair of terminals (black and yellow)
on the modular jack.
Mitel ® 5000 Installation Manual – Issue 3.0, October 2008
*Available Adapter Cable:
15 ft (4.5720 m) with Amphenol (part number 813.1814)
Page 5-81
Chapter 5: Installation
Connecting Station Cables to a European System
Connecting Station Cables to a European System
Each type of station instrument is connected to a specific port on a DEM-16. Digital endpoints
are connected to DEM-16s. Single line endpoints and playback devices are connected to either
the built-in single line ports, or they can connect to Single-Line Adapters (SLA), which are in
turn connected to available DEM-16 ports
After the cables are run, connect them to the station blocks on the MDF. Ensure both ends of
each station cable are labeled with the circuit number of the associated station instrument. The
station cables are pre-terminated on the upper half of the Krone block. The line plant wiring
extension terminates on the lower half of the Krone block. See the following figures for BRM-S
and station cable terminations:
• Figure 5-41
• Figure 5-42 on page 5-83
• Figure 5-43 on page 5-84
Figure 5-41. BRM-S Cable Connection for European System
Cable from BRM-S
1
not used
not used
1
2
not used
not used
2
3
T1
R1
3
4
R1
T1
4
5
R
T
5
6
T
R
6
7
not used
not used
7
8
not used
not used
8
Socket on NT1
Page 5-82
Mitel ® 5000 Installation Manual – Issue 3.0, October 2008
Chapter 5: Installation
Connecting Station Cables to a European System
Figure 5-42. DEM-16 Block Terminations for Endpoints on European System
Female Amphenol-Type Connectors
1
26
1-16
W/BL-Y/BL
1
2
3
4
5
1
2
3
4
5
WH/BL
5
3
1
6
6
7
8
7
8
9
9
0
0
6
4
2
BL/WH
Use non-conducting
plastic connector covers
To Endpoint or SLA
To DEI and DEM-16s
25-Pair
cable from
MDF
Amphenol-Type
Connector
to DEM
adapter cable*
Mitel ® 5000 Installation Manual – Issue 3.0, October 2008
*Available Adapter Cable:
15 ft (4.5720 m) with Amphenol, part number 813.1814
Page 5-83
Chapter 5: Installation
Connecting Station Cables to a European System
Figure 5-43. SLA Terminations for Single Line Endpoint with a European System
Endpoint LJU
BL/WH
To
DEM-16
Block
SLA
WH/BL
5
3
1
6
4
2
Western Electric
to BT Converters
(C74)
1
2
3
6
5
4
AC Desktop Converter
The SLA is supported with two Western Electric to BT converters (part number C74) for use
when the attached devices are near the SLA. For longer range connections (up to 4.5 Km), an
additional Krone block is required. This is connected to the SLA using a standard line cord—
part number C27—and line jack unit (LJU).
Where exposed OPX cabling is used, also use BT14A/1 of BT21A surge arrestors on the OPX
lines, and ensure the Krone field is earthed. Make the LJU at the far end of the cable a line
master. This entire setup might be part of the main MDF or situated remotely, subject to
chassis-to-SLA cable restrictions.
Figure 5-44. Off-Premises Connection [Europe Only]
OPX LJU
Connection Details
(3)
5
3
1
6
4
2
1
2
3
4
5
6
8
9
0
To OPX
(4)
SL1
RUN BUSY
Page 5-84
7
SL2
BUSY
Mitel ® 5000 Installation Manual – Issue 3.0, October 2008
Chapter 5: Installation
Station Loop Resistance Test
Station Loop Resistance Test
Do not use shielded cable. Achieve longer loop lengths by using heavier gauge cable, such as
22AWG. (For additional station cabling requirements and loop limits, see page 5-20.)
Perform the loop resistance test for each station cable individually.
1.
With a U.S. system only, ensure that bridging clips have not been installed on the station
blocks and that the station instrument is not connected to the modular jack assembly.
2.
With a U.S. system, place a short across the BLACK/YELLOW wires (endpoints) or
RED/GREEN wires (single line endpoints) on the modular jack assembly.
With a European system, place a short across the WHITE/BLUE wires (endpoints) or
BLUE/WHITE wires (single line endpoints) on the line jack unit assembly.
3.
With a U.S. system, at the MDF, measure the resistance across the TIP and RING wires
on the right (station) side of the station block.
With a European system, at the MDF, measure the resistance across the WHITE/BLUE
wires on the lower (station) side of the station block.
The reading should not exceed the limits listed in Table 5-12. The resistance values (in
ohms) indicate loop measurements; the distance values (in feet/meters) indicate the
maximum one-way measurements from the equipment chassis. If necessary, longer loop
lengths can be achieved by using a heavier gauge cable, such as 22 AWG (22 gauge
thickness or larger—smaller number gauge = larger, or thicker, diameter).
IMPORTANT
Excessive and/or improperly made connections increase the
resistance of a cable, which reduces the allowable cable run length.
4.
Remove the short after the test is complete.
5.
Repeat this test for each station cable.
6.
With a U.S. system only, install bridging clips on the station blocks to complete the cable
connections.
Table 5-12. Loop Limits for Digital and Single Line Endpoints and Equipment
Port
Endpoints
Impedance
Loop Limit
(24 AWG)
600 Ω
2000 ft
(609 m)
REN 3.0
62 Ω
1200 ft
(366 m)
From an MDPM: To a single line endpoint
195 Ω
3800 ft
(1158 m)
From an SLA: To single line endpoints or playback devices.
Supports facility code OL13C.
800 Ω
15,560 ft
(4742 m)
From Base Server chassis:
• To a single line endpoint or playback device connected to the
built-in port
• To a single line endpoint or playback device driven by a
SLM-4 port
From DEI chassis: To a single line endpoint or playback device
driven by a SLM-8
From DEI chassis:
• To digital endpoints
• To a digital endpoint equipped with PCDPM and MDPM and
connected to DSS unit(s) or SLA
Mitel ® 5000 Installation Manual – Issue 3.0, October 2008
Page 5-85
Chapter 5: Installation
Connecting Off-Premises Extensions
Connecting Off-Premises Extensions
Off-premises extensions (OPX) are remote single line DTMF stations connected to the Mitel
platform through telephone company [network provider] OPX circuits or customer-provided
circuits. The circuits are connected to Single-Line Adapter (SLA) circuits, which are connected
to available DEM-16 circuits or to T1M or T1M-2 module circuits.
Introduction
SLAs do not support visual message waiting applications. If single line endpoints equipped with
message waiting lamps are installed on SLAs, the lamps will not function. However, single line
endpoints can be configured in DB Programming to receive audible message waiting indication
tones.
OPX devices must be AC ringer-equipped. The SLA onboard high-voltage ringing adapter
(HVRA) provides isolation from the telephone company OPX circuits as required by FCC
regulations.
Each SLA can support one or two OPX stations. SLA circuits support AC-ringing single line
endpoints, fax machines, playback devices, etc.
With some OPX installations, voice volume levels may be degraded due to constraints on the
voice-frequency range inherent in the telco [network provider] or customer-provided circuit. To
increase the voice-frequency range, Mitel recommends installing a two-wire, negative
impedance repeater unit. For details, see the Specifications chapter.
The repeater unit is installed at the MDF between the SLA and the cabling to the OPX station.
For proper installation with the Mitel platform, make the following connections to the appropriate
pins on the repeater unit:
• Battery (–24 to –56 VDC)
• Ground
• System Tip
• System Ring
• OPX Tip
• OPX Ring
For identification of correct pin locations and for information about operating and adjusting the
repeater unit, refer to the manufacturer’s instructions.
Installing an OPX Station
To install the OPX stations:
Page 5-86
1.
At the MDF, terminate each telco [network provider] OPX circuit or customer-provided
circuit on the desired SLA circuit. See Figure 5-56 on page 5-140.
2.
At the OPX location, terminate each telco [network provider] OPX circuit or customerprovided circuit on the appropriate single line endpoint modular jack assembly [line jack
unit].
3.
Program the station and/or trunk as appropriate in DB Programming.
4.
Test for quality.
Mitel ® 5000 Installation Manual – Issue 3.0, October 2008
Chapter 5: Installation
Analog Fallback System [Europe Only]
Analog Fallback System [Europe Only]
The fallback kit, part number PS2728-A, contains the following items:
• 12 volt DC power supply (PS2736)
• Fallback Control Module and Control Lead (J36)
• Fallback Module 3-Circuit (J20)
• Charcoal Line Cord (Standard) (C27)
An additional five fallback modules may also be connected if required.
The Power Supply Unit (PSU) is fitted with a 5-pin DIN plug which is then attached to connector
CH4 of the control module. The control module is supplied with a standard line cord that
connects it to the CPU relay socket. The power to each fallback module is jumpered as shown
in Figure 5-45.
Figure 5-45. Fallback Power and Control
PS2736
PSU
J36
Control Module
+
_
Maximum
of
6 Units
+
_
J20
Fallback
Units
To use dedicated fallback endpoints, the lines to the fallback unit should not be connected to the
LS ports on the chassis. Instead, they should be connected to the PSTN connections. The LS
ports should be jumpered to the COU connections of the module and the dedicated fallback
endpoint connected to the F/B connections. See Figure 5-46 on page 5-88. The dedicated
fallback endpoints must be signaling-compatible with the lines supplied.
To use system endpoints as fallback endpoints, two fallback circuits are required per line. The
lines and endpoints are not directly connected to the LS and SL ports on the chassis but they
are connected as shown in Figure 5-46 on page 5-88. The fallback endpoint must be totally
compatible with the system and the lines. Users should be made aware of any adjustments and
procedures necessary to place calls.
Mitel ® 5000 Installation Manual – Issue 3.0, October 2008
Page 5-87
Chapter 5: Installation
Analog Fallback System [Europe Only]
Figure 5-46. Fallback Connections
Dedicated Connections
To PSTN
To LSM-2/4
To Dedicated
Fallback Endpoint
J20
Connectors
PSTN
COU
F/B
System Connections
To PSTN
To LSM-2/4
J20
Connectors
PSTN
COU
F/B
J20
Connectors
PSTN
COU
To
Endpoint
To SL Ports
in chassis
F/B
Fallback operation can be tested by removing the line cord from the CPU. This will force all
fallback circuits to operate and may disconnect any calls on these circuits.
Page 5-88
Mitel ® 5000 Installation Manual – Issue 3.0, October 2008
Chapter 5: Installation
Powering Up the System
MAINTENANCE TASKS
The following sections provide procedures for performing tasks that are required multiple times
when installing, upgrading, or servicing an Mitel 5000 platform.
Powering Up the System
NOTICES
Do not plug in the UPS power cord unless you are ready to boot the system. There is no
power-on switch on the Base Server chassis. Plugging in the power cord begins the boot
process. Please read the following NOTICE. If power to the system fails (prevented by using
a UPS), then comes back, the system boots automatically. Under normal circumstances, as
long as the power cord is plugged into the chassis, the system is up and running. If the
system is shut down (and plugged in) using the LCD panel, use the center button next to the
LCD panel to power up the system.
Possible Memory Card Corruption: By adhering to the following precautions you can help
prevent corruption of data on the compact flash-type memory card:
• Do not remove or install the memory card while the system is up and running or power
is otherwise supplied to the Inter-Tel 5000 Base Server, as this may damage the
memory card. Shut down the system using the LCD panel and unplug the power cord
before removing or inserting the memory card.
• Using any compact flash-type memory card other than one provided by Mitel is not
supported.
• Do not place the memory card into any other PC. Doing so may corrupt the file system
and software.
To power up the system:
1.
Make sure all chassis modules are installed and fastened to the chassis.
2.
Make sure the chassis is properly grounded and check all connections for loose,
cracked, or broken components.
3.
Make sure all cabling is securely attached to the modules, or any other components, at
the back of the chassis. At times, cables can loosen and drop a connection.
4.
Make sure the compact flash-type memory card and USB security key are installed.
5.
Plug in the chassis power cord into the UPS device. Plug in the UPS power cord. The
system boots and is ready to begin initial configuration and programming.
6.
If this is an upgrade, do the following:
a. Perform a database backup.
b. Start the Administrator Web Session interface and upgrade the system software.
7.
Install the current DB Programming version.
a. Upload the current license file, as applicable to your site.
b. Disable Basic Voice Mail in DB Programming before plugging-in an external voice
processing system. From the DB Studio menu bar, select Operations – Voice
Processing Operations – Disable Basic Voice Mail.
Mitel ® 5000 Installation Manual – Issue 3.0, October 2008
Page 5-89
Chapter 5: Installation
Powering Down the System
8.
Plug in the remaining power cords in this order:
a. Plug in the first DEI chassis.
b. Plug in the second DEI chassis.
c. Plug in the external voice mail system, if equipped. For information on attaching an
external voice processing system, see page 5-195.
9.
If applicable (first-time installation), follow the initial system startup in accordance with
the section titled, “Setting Initial System Configuration” on page 5-34. Otherwise,
continue to the Programming chapter in the Mitel 5000 Features and Programming
Guide, part number 580.8006.
Powering Down the System
To power down the system:
1.
Make sure Database (DB) Programming is not running. If DB Programming is running
when you make programming changes using the LCD panel, the changes will not be
updated until the system is restarted.
2.
From the LCD panel, press the down arrow twice to navigate to the System menu.
3.
Press the center button once to access the System menu, then press the down arrow
until you get to the Shutdown menu.
4.
Press the center button once to access the Shutdown menu.
5.
At the prompt, press the down arrow once to select the Yes option.
6.
Press the center button to execute the Yes option. The system reboots.
NOTE
Page 5-90
If the system does not power down, do not unplug the power cord. If the
system hangs up, you can force the power off by pressing—all at the same
time—the center LCD panel button and the right arrow and left arrow buttons.
Mitel ® 5000 Installation Manual – Issue 3.0, October 2008
Chapter 5: Installation
Saving the System and Voice Processor Databases
Saving the System and Voice Processor Databases
NOTICE
If using an external voice processing system, the EM Unit or Voice Processing Unit must
remain attached when saving and restoring the database. If the unit is not attached,
converted voice mail information, such as non-associated mailboxes and cascade levels, will
not be restored.
After the System and Voice Processor databases have been programmed for the first time,
perform a database save. Store this database in a safe place so it can be used should the
current the database become corrupted and must be re-entered. This saved database can be
used as a starting point for the re-entry. In addition, keep a current copy of the database that
you can update every time you make changes.
IMPORTANT
Performing a Database Save or Database Restore operation will cause the
system to slow down. If at all possible, these operations should not be
performed during normal business hours when the system is being used to
place and receive calls.
To save the system and voice processor databases:
1.
From the DB Studio menu bar, select Operations – Database Operations – Database
Save. The following window displays, allowing you to save the database to disk.
2.
In the Save To: text box, enter the name of the file where the database will be saved. Or,
select Browse to locate the file. This file is saved to the local database PC in the default
directory shown.
Mitel ® 5000 Installation Manual – Issue 3.0, October 2008
Page 5-91
Chapter 5: Installation
Saving the System and Voice Processor Databases
3.
Select the Save voice data to: check box. Then, in the text box, enter the destination
path for the voice processor database.
a. The default destination is U:\ for using a USB flash drive. See Table 4-3 on page 425. If external voice processing is not used, make sure the USB flash drive is
inserted into the Inter-Tel 5000 Base Server before continuing. The option in this
dialog box saves all voice processor information. If you want to save specific voice
processor information, see “Saving the System and Voice Processor Databases” on
page 5-91. Also, refer to the Mitel 5000 Features and Programming Guide, part
number 580.8006, for additional save/restore details.
NOTE
The Save voice data to: check box is available in remote mode only
when a Voice Processing PC is attached or a USB flash drive is attached
to the USB-A port on the front of the chassis.
b. If using a USB flash drive to back up Basic Voice Mail and you want to back up
specific voice data, create subdirectories on the flash drive while it is in the Inter-Tel
5000 Base Server. For example, to back up prompts, create a subdirectory at the
root level of the flash drive such as U:\prompts. Specify this as the Save to
location in the dialog box shown in the figure above. Repeat the Save to process for
each subdirectory you want to save. The system recognizes only those directories
created while the USB flash drive is inserted.
c. If using an external voice processing system, change the Save voice data to: drive
letter to A:\ so that floppies can be used. Or, change it to the drive letter where the
voice data is saved—for example, CD-ROM or external hard drive.
4.
To begin the operation, select Start. If you chose to save to a file that already existed,
you are prompted to overwrite it. When the operation is finished, a message appears
indicating the operation was successful. If using an external voice processing system
during a save operation, you may need to insert a second disk, if choosing to save to
floppy disks. If so, replace the first disk with a blank, formatted floppy disk.
To stop an operation before it is completed:
Select Cancel. A message appears indicating the operation was aborted by the user.
Page 5-92
Mitel ® 5000 Installation Manual – Issue 3.0, October 2008
Chapter 5: Installation
Enable Basic Voice Mail or Disable Basic Voice Mail
Enable Basic Voice Mail or Disable Basic Voice Mail
If installing an external voice mail system, you must disable basic voice mail before installing
and programming the external voice processing system.
After disabling Basic Voice Mail, a System Alarm 203 appears on both the
LCD panel on the Base Server and on the administrator endpoint (normal
functionality). This alarm appears when a system that previously had a voice
mail connected no longer has a voice mail connected.
IMPORTANT
The Disable Basic Voice Mail menu option is not grayed out after disabling
Basic Voice Mail. This allows you to disable Basic Voice Mail if you did not do
so before installing and programming the external voice processing system. If
necessary, use the Administration Web Session to verify that Basic Voice Mail
is off.
To disable basic voice mail:
1.
Open a DB Programming session.
2.
Back up the Voice Mail database. You will need a USB flash drive for this operation. See
“Saving the System and Voice Processor Databases” on page 5-91.
3.
From the DB Studio menu bar, select Operations – Voice Processor Operations –
Disable Basic Voice Mail.
4.
Click OK at the prompt to disable basic voice mail and terminate the session.
5.
Restart the session to configure external voice processing parameters, if needed.
Mitel ® 5000 Installation Manual – Issue 3.0, October 2008
Page 5-93
Chapter 5: Installation
Restoring the Database
Restoring the Database
From the DB Studio menu bar, select Operations – Database Operations – Database Restore
to open the window shown below. It allows you to restore the database to disk during a
programming session.
NOTICES
Consider the following technical consequences when using a modem connection:
• Possible Database Corruption. Poor line quality may cause data transmission
problems when the modem connection exceeds 19200 baud. For this reason, Mitel
recommends not using the modem to restore the database. If you attempt a restore
using the modem, the database may become corrupt.
• Possible Modem Reconfiguration. If the Database Restore feature is used during a
remote programming session, all calls are disconnected except the modem connection.
Before restoring the database, make sure the modem connection will not be
reconfigured during the restoration.
• Restore From: Enter the name of the file where the database was saved on this PC, or,
select Browse to locate the file. The default directory is
C:\InterTel\CS5000\Sessions\Intl5000.intl.
If also restoring voice processor information, check the box Restore Voice Processor
voice data from and provide the drive and path. The default drive and path is U:\, and
the USB flash drive containing the voice data must be attached to the front of the Inter-Tel
5000 Base Server before beginning the restore process. If restoring voice date from an
external voice processing system, provide the path (for example, A:\) and provide the
floppy disks or drive location on which the voice data was saved, when prompted.
• Start: To begin the operation, select Start. When the operation is finished, the
programming session automatically closes. Give the system a few moments after the
programming session ends before restarting another session. This delay before restarting
allows all applications to completely shut down.
Page 5-94
Mitel ® 5000 Installation Manual – Issue 3.0, October 2008
Chapter 5: Installation
Restoring the Database
• Cancel: To stop an operation before it is completed, click Cancel. A message appears,
indicating that the operation was aborted by the user.
NOTICE
Canceling a restore operation causes the system to default the database and terminate
the programming session.
o
If the number of multi-protocol endpoints in the database being restored exceeds the
number indicated in the license, an error message is displayed, and the database is
not restored.
o If the features enabled in the database being restored do not match the features
available in the software license, an error message is displayed, and the system is
inoperative.
o If the database being restored contains Voice Processor information and the system
does not have an operating Voice Processor, you will see a warning message and no
Voice Processor information will be loaded during the restore operation.
o If restoring a database in Local Mode, you may receive an error message that
displays, “Database is incompatible,” due to the differences in system types. Use the
Change Selection method in Session Manager when doing database restores in a
local session. This will load any database over an existing local session database that
was loaded previously without any problems.
When a database is restored, the system checks the following information against the currently
loaded license:
• System type
• Number of devices
• Features
If one or more of these items in the database differ from what is programmed in the license, an
error message is displayed, and the database is not restored. If the license is valid for the
database to be restored, the system checks the current IP settings for the server. If any
differences are detected, a screen similar to the following one displays.
This screen displays the current IP settings (Current Value column) and the settings detected in
the database to be restored (Restore Value). If you click Current Settings, the current settings,
as shown in the Current Value column, are retained. Any other settings will be restored from the
selected database. If you click Restore Settings, the IP settings are automatically changed to
those shown in the Restore Value column, overwriting the current settings.
If, however, you defaulted the database or uploaded new software, the system considers the
static database as “corrupt.” When the system is powered up, a backup database is not
detected, and the IP settings programmed in the restored database are automatically used.
Mitel ® 5000 Installation Manual – Issue 3.0, October 2008
Page 5-95
Chapter 5: Installation
Backing Up the Database
Backing Up the Database
A backup copy of the database is automatically stored on the compact flash-type memory card.
This backup remains available, even if the system experiences a power failure or if the battery
backup loses power. If the system is powered up and a corrupt database file is detected, the
backup file in the memory card is restored.
NOTE
The Voice Processor database is not stored in flash memory.
This backup database is designed to recover in the event of a total power failure—it is not
designed to replace the static database. Changes made to the static database are not reflected
in the backup database until the database is automatically or manually backed up. For example,
if you default the database, the static database is defaulted, not the backup database.
The backup database allows the system to automatically convert databases when the software
is upgraded. For example, if the system is upgraded from v1.01 to v1.02, the v1.01 static
database is detected and considered corrupt. When this occurs, the system restores the backup
database and converts the information to a v1.02 static database. The backup database
version, however, does not change until a backup is performed (it remains a v1.01 database).
The system repeatedly attempted to restore a backup database but was interrupted by powerups. If the static database is corrupted, the system attempts to restore the backup database. If
the system detects problems with the backup database, it may default the static database
instead of restoring the backup database. The database will be defaulted if one of the following
occurs:
• There is no backup database available.
• The system was saving the backup database when the power down occurred.
• The system repeatedly attempted to restore a backup database but was interrupted by
power ups. The system will default the database after it has exceeded the number of
restore attempts, as specified in DB Programming—refer to the Mitel 5000 Features and
Programming Guide, part number 580.8006, for details. If this occurs, the backup
database remains in flash memory for troubleshooting purposes.
If desired, you can force DB Programming to save the backup file immediately, as described
below. To set Backup Database Save parameters, refer to the Mitel 5000 Features and
Programming Guide, part number 580.8006.
To force a backup database save:
Page 5-96
1.
From the DB Studio menu bar, select Operations – Database Operations – Backup
Database Save.
2.
Click Start to create the backup. The backup file is saved and stamped with the new
date/time.
Mitel ® 5000 Installation Manual – Issue 3.0, October 2008
Chapter 5: Installation
Changing the License
Changing the License
If necessary, you can upload a new license that provides a different set of features. If the new
license, however, supports new capacities, you must make sure that you have the appropriate
hardware installed.
To change a license, obtain a new license, as described on page 6-56, then upload the license
as described on page 5-99. The system compares the new license to the existing license and
then displays a screen similar to the one shown below.
Figure 5-47. Change Software License
In this screen, the areas of the license that are changing are selected. The status line indicates
whether the system requires a reset once the license is uploaded.
After you have verified you want to upload the new license, click Finish. The new software
license is loaded, and the old software license is stored on the system. The system may require
a reset.
Mitel ® 5000 Installation Manual – Issue 3.0, October 2008
Page 5-97
Chapter 5: Installation
Changing the License
NOTICE
System Reset and Lost System Functionality.
Mitel strongly recommends against downgrading a software license. Four ways that the
system can downgrade the software license include:
• Uploading a Mitel CS-5400 software license to a Mitel CS-5200 system.
• Uploading a software license where the number of online Advanced IP endpoints is
greater than the new license Advanced IP endpoint license count.
• Uploading a software license where the number of online IP gateway trunks is greater
than the new license IP gateway trunk license count.
• Uploading a software license where the number of online T1/E1/PRI modules is greater
than the new license PRI license count. Before accepting the new software license,
Database (DB) Programming displays where the license field in question is less than the
existing license field. In both of these instances, DB Programming warns that the system
will reset.
In the first scenario (downgrading from a Mitel CS-5400 to a Mitel CS-5200), DB Programming allows the downgrade to occur only if the number of IP endpoints, number of IP networking and number of T.38 Fax calls are valid for a Mitel CS-5200 system.
When uploading a new software license, upload the latest generated .isl license file to
ensure that the software license does not downgrade.
If a system has continuous license key failures, Alarm 132 is posted on all administrator
endpoints. After the system successfully recognizes the license key, upon the next reset,
the system checks for a valid software license.
If the license key is functional but the system does not have a software license, the system
posts alarm 125 every 5 minutes, then resets after 4 hours.
Page 5-98
Mitel ® 5000 Installation Manual – Issue 3.0, October 2008
Chapter 5: Installation
Software License Upload
Software License Upload
After you are in DB Programming, you must upload the software license. If you do not upload
the software license, the system considers the license as “invalid” and issues Alarm 125. For a
complete list of alarm messages, refer to the Message Print Diagnostics Manual, part number
550.8018.
With regard to the USB security key and SSL:
• The serial number is stored on the USB security key. The license must
match the serial number on this key or the upload will fail. If for any
reason you need to replace the USB security key, make sure you upload
the latest license file before replacing the key. Attempting to upload a
license file after changing the USB security key results in an error and
the system will not function.
IMPORTANT
• If the USB security key is not installed when the system reboots, the
software license will need to be uploaded.
Uploading a License
To upload a license:
1.
Start a DB Programming session.
2.
From the DB Studio menu bar, select Operations – Software License Operations –
Upload Software License.
3.
Enter the path and name of the license file or click Browse to search for the file.
4.
Click Start. The system compares the new software license to the existing license. For
details about changing software licenses, see page 5-97. If you click Start before
selecting a license (.isl), a message is displayed, informing you that you have not
identified a file name.
5.
Click Finish. If you click Cancel, the license is not uploaded. The screen below shows
an example of a license loaded onto a Mitel CS-5400.
Mitel ® 5000 Installation Manual – Issue 3.0, October 2008
Page 5-99
Chapter 5: Installation
Invalid License Upload
Invalid License Upload
A software license is created for a specific system type, so if you attempt to load a software
license that does not match the system type, an error message displays. For instance, if you
attempt to load a Mitel CS-5600 license onto a Mitel CS-5400, the following error message
appears. This event may occur when using the Upload Software License feature, which is
accessed from the Session Manager menu bar by selecting Operations and then Software
License Operations.
If the license is invalid, an error message is displayed, indicating why the upload failed. A
license may be considered invalid for a variety of reasons, as described in Table 5-2.
Table 5-13. Invalid License Upload Errors
Error Message
Page 5-100
Possible Cause
Corrective Action
Corrupted Software
License. Unable to load
Software License.
The software license is
corrupted.
Download the file from the
Mitel edGe Software
Downloads Web site
(www.inter-tel.com/software)
again. If this error occurs
again, contact the Inter-Tel
Software Maintenance Center.
The specified Software
License is not valid for this
specific CPU. Unable to
load Software License.
The serial number on the does
not match the number in the
license.
Load a license that has the
correct serial number.
The specified Software
License has expired.
Unable to load Software
License.
The software license is no
longer valid or has expired.
Load (or request) a new
Software License.
Too many devices
equipped. Unable to load
software license.
The current database is
programmed for more devices
than the software license
allows.
Either use local mode to
unequip some devices or
upgrade the capacity limit on
the license.
Software License version is The license you have
not supported. Unable to
attempted to load is for a
load Software License.
different version of system
software.
Either install the correct
version of system software or
upload a software license that
specifies the correct system
version.
Software License is already A valid software license is
loaded. Unable to load
already loaded on the system.
Software License.
If the software license you are
attempting to load is the
correct license, start a new DB
Programming session with a
default database. Then upload
the software license before
restoring the database.
Mitel ® 5000 Installation Manual – Issue 3.0, October 2008
Chapter 5: Installation
Compare Software License Window
Table 5-13. Invalid License Upload Errors (Continued)
Error Message
Possible Cause
Corrective Action
Software License is not
valid for the current CPU
type.
The CPU type identified in the
software license does not
match the CPU type detected
in the system.
Upload a license that identifies
the installed CPU type.
Security key is either
invalid or missing.
The software license serial
number does not match the
serial number on the security
key, or the security key is not
present on the server.
Make sure the security key is
present and properly seated in
the USB port. If the key is
present, make sure the license
reflects the correct serial
number. If necessary, transfer
the license to the correct serial
number (see page 6-58).
The specified Software
The software license product
License is not valid for this version does not match the
software version. Unable to version installed on the system.
load Software License.
Either install the correct
system version or upgrade the
license to reflect the correct
system version.
The specified Software
License encountered an
unknown upload error.
Unable to load Software
License.
Contact the Inter-Tel Software
Maintenance Center.
An unidentified error occurred.
After successfully loading the software license, begin programming the system.
Compare Software License Window
The following illustration shows an example of the Compare Software License dialog box that
appears during the software license upload process.
Figure 5-48. Compare Software License
Mitel ® 5000 Installation Manual – Issue 3.0, October 2008
Page 5-101
Chapter 5: Installation
Replacing the Power Fuse
Replacing the Power Fuse
The Inter-Tel 5000 Base Server has a replaceable power fuse, part number 802.2028. The fuse
is located above the power cord connection on the back of the chassis, as shown in Figure 549.
Figure 5-49. Base Server Chassis Power Fuse
Fuse
AC
Power
Chassis Back
Chassis Front
2- Line LCD Panel LCD Panel
Controls
To replace the power fuse:
Page 5-102
1.
Perform a Database backup—for details, refer to the Mitel 5000 Features and
Programming Guide, part number 580.8006. You can also back up the database using
the LCD panel—see page 5-34.
2.
Perform a voice processing database backup. With the Mitel CS-5200 and CS-5600
running BVM, Mitel recommends using a USB flash drive attached to the USB-A port on
the front of the Mitel CS-5200/5400/5600 Base Server chassis. Do not back up VM to
the compact flash-type memory card. For the backup procedure, refer to the Mitel 5000
Features and Programming Guide, part number 580.8006. For a list of USB flash drives
that have been tested as compatible with the system, see “USB Flash Drives” on
page 4-25.
3.
Shut down the system using the LCD panel. See Figure 5-14 on page 5-34 for an
illustration of the menu locations.
4.
Unplug the power cord.
5.
Remove the fuse from above the power connection at the back of the chassis, then
replace the fuse.
6.
Make sure the fuse is seated correctly, then connect the power cord. The system powers
up and begins the boot process.
Mitel ® 5000 Installation Manual – Issue 3.0, October 2008
Chapter 5: Installation
Replacing the Processor Module Battery
Replacing the Processor Module Battery
Because the processor module battery, part number 815.1026, is located on the module, do not
remove the cover to replace the battery.
NOTICES
Equipment Damage. Danger of explosion if battery is incorrectly replaced. Replace only with
the same or equivalent type recommended by the manufacturer. Dispose of used batteries
according to the manufacturer instructions.
Electrostatic Discharge (ESD). Mitel 5000 modules and components are static-sensitive.
When working with the modules, use a properly terminated anti-static wrist strap and cover
the work surface with the bag that protected the module during shipping, or place the
component on some other anti-static surface. Any static charge, no matter how small, must
be discharged from the body before touching modules or other components. The warranty for
this equipment does not cover damage caused by static or mishandling. Modules or
components damaged in such a manner will not be replaced.
Figure 5-50. Processor Module Battery
Module to Chassis Fastener
Chassis Back
Processor
Module
Battery
EXP
DUAL LS DUAL SL
PAGE
MOH
Processor Module
To replace the processor module battery:
1.
Perform a Database backup using DB Programming. You can also back up the database
the LCD panel. Refer to the Programming chapter in the Mitel 5000 Features and
Programming Guide, part number 580.8006, for details.
2.
Perform a voice mail backup. Use a USB flash drive attached to the USB-A port on the
front of the Inter-Tel 5000 Base Server chassis. Do not back up VM to the compact flashtype memory card. See page 5-91 for backup details. Also, refer to the Mitel 5000
Features and Programming Guide, part number 580.8006, for additional information.
3.
Shut down the system using the LCD panel. See Figure 5-14 on page 5-34 for an
illustration of the menu locations.
4.
Unplug the power cord. Make sure you are wearing a properly terminated, ant-static
wrist strap for the remainder of this procedure.
5.
Loosen the fastener at the top of the module.
6.
Remove the processor module from the chassis and place it onto the anti-static bag that
came with the module, or onto some other anti-static surface.
7.
Locate the battery and carefully remove it from the processor module. Replace the
battery with the new battery.
8.
Insert the module carefully so that it aligns with the rails inside the chassis, then gently
slide the module into the chassis until it stops. Do not use force.
9.
Finger-tighten the fastener at the top of the module, securing it to the chassis. Do not
over-tighten this fastener.
Mitel ® 5000 Installation Manual – Issue 3.0, October 2008
Page 5-103
Chapter 5: Installation
Installing the USB-B Port Serial Driver
Installing the USB-B Port Serial Driver
The USB-B port on the front of the Inter-Tel 5000 Base Server chassis allows you to connect a
laptop and view online messages. However, a driver must be installed on the laptop to allow the
laptop to use this USB-B port. For information on viewing online messages, see “Using Terminal
Emulation to Retrieve Online Messages” on page 5-105.
NOTE
When using the USB-B port, use a cable designed for the USB 2.0 specification.
To install the USB-B serial driver:
1.
Do not connect any cable into the USB-B port until instructed.
2.
Locate the Driver folder on the PC
where you installed DB
Programming. The folder is located
at
C:\InterTel\CS5000\Drivers.
This folder contains the zip file that
contains the driver installation files
and driver components.
3.
Double-click the
CP2101_Drivers.exe file to install
the driver files. Follow the Wizard
screens.
4.
Connect a USB 2.0 cable from a laptop to the USB-B port. The Found New Hardware
Wizard appears.
5.
Point the New Hardware Wizard
to the file type it requests, to
complete the driver installation.
The files the Hardware Wizard
needs are located at
C:\SiLabs\MCU
\CP210x\Windows_2K_XP_S
2K3_Vista. If you selected a
different directory when
unzipping the
CP2101_Drivers.exe file, then
navigate to that location.
NOTE
The Hardware Wizard installs the selected drivers two times.
Retrieving SMDR or Error Message Output Data
SMDR/Error message output is provided over an IP connection. You can retrieve it through an
external voice processing system using a specific IP address and port number. This feature is
not available in Enterprise® Messaging or through Basic Voice Mail. SMDR can be buffered to
System Manager, if enabled or connected.
For information on retrieving SMDR/Error Message information, refer to the Diagnostics and
Troubleshooting chapter in the Mitel 5000 Features and Programming Guide, part number
580.8006, or refer to the Programming chapter in the Mitel 5000 Features and Programming
Guide, part number 580.8006, for details.
Page 5-104
Mitel ® 5000 Installation Manual – Issue 3.0, October 2008
Chapter 5: Installation
Using Terminal Emulation to Retrieve Online Messages
Using Terminal Emulation to Retrieve Online Messages
The USB-B port is provided to allow monitoring information online using a terminal emulation
program such as Windows® HyperTerminal. You will need a USB cable with a standard USB
Type-A connector on one end and a Type-B connector on the other end. This interface is only
supported for terminal emulation use. Do not plug any other device (USB hub, etc.) into the
USB-B connection. Also, to avoid a drop in system performance, do not monitor a live system
for any length of time other than for troubleshooting purposes.
HyperTerminal does not support SSH encryption, which is required for TCP/IP
connections. The PuTTY® application can be used for these types of connections. A
copy of PuTTY is included on system CDs for v1.2 and later.
NOTE
To retrieve online message information:
1.
Pick a time to monitor system information when the system is not in use or at a time
when system traffic is the lowest, if possible.
2.
Make sure you have installed the driver that will allow a PC or laptop to access the USBB port (“Installing the USB-B Port Serial Driver” on page 5-104).
3.
Attach a USB 2.0 cable to the USB-B port on the front of the chassis.
4.
Attach the other end of the cable to a PC or laptop USB port (standard USB connector).
5.
6.
Chassis Front
Start the terminal emulation program
and set any configuration options the
program needs to communicate with
the Mitel 5000 platform. See the
documentation that came with the
terminal emulation program for this
USB-B
information. For the terminal emulation
program you use, set the following options if available:
•
Communications Port: COM3
•
Bits Per Second: 115000
•
Data Bits: 8
•
Parity: None or n.
•
Stop Bits: 1
•
Flow Control: None.
Enter the system username (it5k) and password (itpassw). The “OLM>” prompt
appears on the screen, indicating you have logged in to the Online Monitor (OLM) shell.
To view a list of available commands, type help or ? at the OLM prompt, then press the
ENTER key.
To exit, type EXIT or . (period), then press the ENTER key.
Mitel ® 5000 Installation Manual – Issue 3.0, October 2008
Page 5-105
Chapter 5: Installation
Installing IP and Multi-Protocol Endpoints
ENDPOINTS
This section provides procedures for installing IP, digital, and analog single line endpoints that
operate on the Mitel 5000 platforms.
Installing IP and Multi-Protocol Endpoints
IP or SIP endpoints are connected to a power source and to the network. There is no direct
wiring from either the MDF or the Mitel 5000 platform. All IP endpoints use a LAN connection.
See the Specifications chapter for a list of supported endpoints.
This section covers the following primary topics:
• To begin installing IP endpoints, see page 5-106.
• For information on the physical interfaces for the IP endpoints, see page 5-110.
• For information on wall-mounting IP endpoints, see page 5-115.
For information on power supply compatibilities for the supported IP endpoints and devices, see
the IP Device Power Supply Compatibility Matrix, part number 835.2688.
For programming information, refer to the Mitel 5000 Features and Programming Guide, part
number 580.8006.
Installing IP Endpoints
For hardware revision information, see “Hardware Revision Identification” on page 5-107.
Notices
Please read this section before continuing.
NOTICES
• Possible Functionality Degradation. Mitel strongly recommends using the IP devices on a managed private
network. If connected to the public Internet, IP devices will function, but the quality may suffer due to the
dynamic bandwidth availability. The possible problems could be voice quality degradation, garbled speech,
dropped calls, equipment resets, etc. Also, the VoIP suitability of any Internet connection can change at any
time, with no advance notice. Mitel cannot guarantee any voice quality when connected to the public
Internet. Therefore, Mitel is not responsible for network quality issues that are caused by using the
public Internet. For recommended guidelines on IP network specifications, see page 4-56.
• Possible Network Instability. Do not connect the IP endpoint PC ports to each other, and do not connect
them to a hub. Doing so may cause adverse network conditions. Also, Mitel recommends that you not
connect additional hard IP endpoints to the PC ports. Due to the QoS (Quality of Service) of the hard IP
endpoints, those located downstream will have a lower priority when sending data to the network. Under
heavy network conditions, voice quality may be diminished.
• Equipment Damage Hazard. Only use a single appropriate power adapter with the IP device. Do not connect
a U.S. power supply and a Universal power supply to the same IP device. Also, when using the Universal
Power Supply with a barrel connector, no devices, such as hubs, should be inserted between the KS/SLA jack
on the adapter and the LAN jack on the IP endpoint because power is supplied through the cable. To reduce
the effects of AC voltage surges and spikes that may cause damage to the electronic components, a surge/
spike protector with the following specifications is recommended:
o
Clamp voltage transients at 300 VAC within 5 nsec when exposed to waveforms as described in the ANSI/
IEEE Standard C62.41-1980 (IEEE 587).
o RFI/EMI noise reduction by at least 20 dB at frequencies between 5 kHz and 30 MHz.
The Mitel CommSource division sells a surge/spike protector, part number 900.0500, that possesses all of the
recommended specifications.
Page 5-106
Mitel ® 5000 Installation Manual – Issue 3.0, October 2008
Chapter 5: Installation
Hardware Revision Identification
Hardware Revision Identification
Check the following areas to identify endpoint hardware types:
• Endpoint Web Interface: The hardware type is displayed in the Firmware Information
field under Status – Firmware – Hardware Type.
• LCD (Liquid Crystal Display): The hardware type is displayed on the bottom line of the
LCD on startup.
• Product ID and Revision: The part number and revision are displayed on the labels on
the bottom of the endpoint.
• Message Lamp LED (Light-Emitting Diode) Pattern: The hardware type is identified by
the message lamp LEDs during startup. The user must reset the endpoint first.
• Ethernet Ports: The number of Ethernet interfaces can be used to identify the hardware
type.
Table 5-14 on page 5-107 lists the hardware types and identification methods.
Table 5-14. Hardware Revision Identification
Endpoint
Hardware
Type
LCD
Product ID
(p/n)
LED Pattern
Ethernet
Port
Model 8600 — original
8600
Not
Available
550.8600
The endpoint LEDs
flash in a left-right
alternative blinking
pattern.
1 Port
Model 8620 — original
8620
8620
550.8620
Not Available
1 Ports
Model 8622 — original
8622
8622
550.8622
Not Available
2 Ports
Model 8662 — original
8662
8662
550.8662
Not Available
2 Ports
Model 8662 — enhanced
8662
8662
550.8662E
Not Available
2 Ports
Model 8600 — enhanced,
redesigned
8600v2
Not
Available
550.8600
The endpoint performs
a blinking LED pattern
of the XFER, CNF,
MSG, FWD, and DND
button LEDs.
1 Port
Model 8622 –
enhanced, redesigned
8622v2
8622v2
550.8622
Not Available
2 Ports
Model 8662 –
enhanced, redesigned
8662v2
8662v2
550.8662E
Not Available
2 Ports
Model 8622 — PoE Class 2
8622
8622
550.8622P
Not Available
2 Ports
Model 8662 — PoE Class 2
8662
8662
550.8662P
Not Available
2 Ports
Mitel ® 5000 Installation Manual – Issue 3.0, October 2008
Page 5-107
Chapter 5: Installation
Procedure
Procedure
To install IP endpoints, see the following sections:
• 8600-series endpoints (see below)
• 5000-series endpoints (page 5-173 as part of the upgrade procedure for this release)
To install 8600-series IP phones:
See the following illustrations for connection point examples:
• Model 8660 (page 5-110)
• Models 8600, 8620/8622, and 8662 (page 5-111)
• Model 8690 (page 5-112)
• Axxess IP PhonePlus (page 5-113)
• Eclipse IP PhonePlus (page 5-114)
1.
Make sure the Inter-Tel 5000 system is up and running. Also, read “Notices” on page 5106.
2.
Connect one end of the Ethernet cable to a PC port on the back of the endpoint.
Connect the other end of the cable to the PC, if applicable.
For the Model 8660, use unbooted Ethernet cables. The Model 8660 does not support
booted cables because the plastic “protective” ends on booted Ethernet cables get in the
way when routing the cable away from the endpoint.
3.
Connect the power supply, using one of the following methods. Use CAT5 or better cable
for all LAN jack/plug connections in this procedure.
Depending on the IP devices to be used, there are several power supplies available. For
a list of power supply compatibilities for the supported IP endpoints and devices, see the
IP Device Power Supply Compatibility Matrix, part number 835.2688.
•
USA/European/Universal Power Supply using a LAN Jack:
a.)
Connect the LAN/POWER jack on the baseplate to the KS/SLA jack on the
24 VDC adapter.
b.)
Using another cable, connect the LAN jack on the 24 VDC adapter to the
LAN.
c.)
Connect the 24 VDC adapter to a 110 V wall socket. Mitel currently offers the
following power supply kits.
Table 5-15. Power Supply Kits
Part Number
Contains
828.1642
• U.S. power supply, part number 806.1113
• Network cable, part number 813.1790
828.1660
• Universal power supply, part number 806.1119*
• Network cable part number 813.1790
* Requires a standard IEC (International Electrical Cord) power connector.
Page 5-108
Mitel ® 5000 Installation Manual – Issue 3.0, October 2008
Chapter 5: Installation
Procedure
•
•
4.
Power over Ethernet (PoE) hub (LAN Jack): The Red Hawk PowerSense™
modular, in-line PoE hubs (for multi-port) are available through the Mitel
CommSource® division. The power hub provides power to IP devices without the
use of an external power supply for each device. For details, see the Red Hawk
PowerSense Power over Ethernet Installation Manual, part number 935.0400.
a.)
Pug one end into the LAN/POWER (RJ-45) jack on the IP device.
b.)
Plug the other end of the cable into the POWER/DATA (RJ-45) jack on the
PoE connector.
Universal Power Supply using a Barrel Jack:
a.)
Using CAT5 or better cable, connect the LAN/POWER jack on the baseplate
directly into the network. Do not connect this cable to the PC 1, PC 2, or PC 3
jack.
b.)
Connect the adapter to an AC voltage power source and connect the barrel
plug on the power adapter to the barrel jack on the baseplate (if available).
The center of the barrel jack is positive. The minimum power requirements for
the IP device is 24VDC at 500mA (using a Universal power supply) and
24VDC at 400mA (using a customer-provided power supply).
While the endpoint is connecting to the IP Resource application, the display shows the
following connection-state information:
•
Ethernet address
•
IP address
•
Subnet mask
•
Gateway address
•
Address of the IP resource to which it is connecting.
•
Station identification (extension number and assigned username) for several
seconds.
•
The LCD changes to the appropriate display, depending on its current status. See
the tables beginning on page 5-121 for an explanation of status displays.
NOTE
If the endpoint appears to be stuck in “Waiting For Download” mode,
try to ping the endpoint IP address. If you cannot ping the endpoint,
assign a valid BOOTP IP address from a BOOTP server to the device
Ethernet address. Also, change the default IP address, subnet mask,
and default gateway so that the device receives a better default when
it reconnects to the IPR application after the download. When waiting
for a download, the IP device will attempt BOOTP, even if BOOTP is
disabled in IPR application programming. Power cycle the IP device,
then download the software.
The IP Resource application does not provide a BOOTP server and
requires a static IP address or the use of either a third-party BOOTP
server or a DHCP server for IP address assignment.
Mitel ® 5000 Installation Manual – Issue 3.0, October 2008
Page 5-109
Chapter 5: Installation
Physical Interfaces
Physical Interfaces
See the sections that follow for information on the supported endpoint physical interfaces to the
system. See page 5-106 for the installation procedure. See page 5-115 for information about
wall-mounting the endpoints.
Model 8660
The Model 8660 is supported by both
10Base-T and 100Base-TX interfaces, but
not 100Base-T4, which uses four pairs of
wires. See the illustration at right.
Back
HEADSET Jack
HANDSET Jack
The Model 8660 includes the following
connections:
• LAN/POWER Jack: Connects to a
network hub or a switch and gets
power from pins 7 and 8.
• POWER Jack: Connects to a 24 VDC
external power supply. Use only one
power source to connect the power
supply.
• PC 1-3 Ports: Connect to PCs or any
other Ethernet devices. The speeds
on single uplink and three downlink
ports are independent from each
other and auto-negotiable.
• Handset Jack: Connects to a
24VDC
POWER
PC 3 PC 2 PC 1
LEDs
(Downlink RJ-45)
handset.
Model 8600
• Headset Jack: Connects to a
headset.
• LEDs: There are two indications on each port:
o
Link Status: When the link is valid, the green LED on the left side of the port is lit.
When there is receive or transmit activity on the link, this LED flashes.
o
10/100 Mbps: When the link is connected at a speed of 100 Mbps, the green LED on
the right side of the port is lit. The Mitel 5000 platform operates only on 100Base-T
LANs.
For information about programming a Model 8660, refer to the Programming chapter in the Mitel
5000 Features and Programming Guide, part number 580.8006.
Page 5-110
Mitel ® 5000 Installation Manual – Issue 3.0, October 2008
Chapter 5: Installation
Models 8600, 8620/8622, and 8662
Models 8600, 8620/8622, and 8662
Models 8600, 8620/8622, and 8662 multi-protocol endpoints operate the same as Models 8500,
8520, and 8560 endpoints, respectively. These endpoints support ITP (Inter-Tel Protocol) or SIP
mode using 100Base-TX interfaces. All endpoints are configured to use ITP by default. For
details about ITP and SIP modes, see page 5-120.
Figure 5-51. Connection Interfaces for 8600 Series Multi-Protocol Endpoints
Back
HEADSET Jack
Back
HANDSET Jack
HEADSET/HANDSET
Jack
LEDs
LAN/POWER
(Uplink RJ-45)
PC
(Downlink RJ-45)
LEDs
LAN/POWER
(Uplink RJ-45)
Model 8600
Model 8620/8622/8662
The Model 8600 series endpoints include the following connections:
• Headset/Handset Jack: Connects to a headset or handset.
• LAN/POWER Jack: Connects to an external power supply or a network hub/switch.
• PC Port: (Models 8622 and 8662 only) Connects to a PC or any other 100Base-T
Ethernet device. The speeds on single uplink and downlink port are independent from
each other and auto-negotiable.
• LEDs: There are two indications on each port:
o
Link Status: When the link is valid, the green LED on the left side of the port is lit.
When there is receive or transmit activity on the link, this LED flashes.
o
10/100 Mbps: When the link is connected at a speed of 100 Mbps, the green LED on
the right side of the port is lit. The Mitel 5000 platform operates only on 100Base-T
LANs.
• DRAM: Dynamic Random Access Memory located inside the endpoints. Models 8600,
8620, and 8662 support 8 MB, and Model 8622 supports 16 MB (only one slot is
occupied). Although two DRAM slots exist, you cannot upgrade the memory by adding an
extra memory stick. The second slot is not used.
For information about programming Model 8600 series endpoints, refer to the Mitel 5000
Features and Programming Guide, part number 580.8006.
Mitel ® 5000 Installation Manual – Issue 3.0, October 2008
Page 5-111
Chapter 5: Installation
Model 8690
Model 8690
The Model 8690 multi-protocol endpoint has a touch screen that displays feature, dialpad, and
menu buttons. It supports ITP or SIP mode using 100Base-TX interfaces. The Model 8690 is
configured to use ITP mode by default. For details about ITP and SIP modes, see page 5-120.
Figure 5-52. Model 8690 Connection Interfaces
HEADSET
Jack*
Front
Back
Reset Button
LEDs
HANDSET
Jack*
PCs 1, 2, and 3
(Downlink RJ-45)
*The headset and handset jacks are located on the base.
MIC SPKR
USB
HOST
PCMCIA CF
USB CLIENT LAN/POWER
(Uplink RJ-45)
The Model 8690 includes the following connections points and options:
• LAN/POWER Jack: Connects to an external power supply or a network hub/switch.
• PC Ports 1-3: Connect to PCs or any other 100Base-T Ethernet devices. The speeds on
the single uplink and three downlink ports are independent from each other and autonegotiable.
• Headset/Handset Jack: Connects to a headset or handset.
• SPKR Jack: Connects to a speaker and supports mono for IP endpoint and stereo for
Windows CE playback.
• MIC Jack: Connects to a microphone equipped with a 3.5mm plug.
• Reset Button: Resets the endpoint when pressed and released quickly.
If you press and hold the Reset button until the four LEDs on the front of the
NOTE endpoint (Message Lamp) start blinking, the system defaults the endpoint
configuration (such as the configuration TFTP URL).
• CF Port: Connects to a matchbook-sized compact flash-type memory card that can be
used for copying music, pictures, etc. to the Model 8690. The card also can be used for
additional memory.
• PCMCIA Port: Connects to a credit card-sized memory card manufactured to the
standards of the Personal Computer Memory Card International Association.
• USB HOST Port: Connects to a standard Universal Serial Bus keyboard, mouse, etc. For
details about how to connect a keyboard and/or mouse, see the applicable Model 8690
Endpoint User Guide (ITP Mode or SIP mode), part number 550.8116 or 550.8025,
respectively.
• USB CLIENT Port: Connects to a host computer that runs Microsoft ActiveSync®.
Page 5-112
Mitel ® 5000 Installation Manual – Issue 3.0, October 2008
Chapter 5: Installation
Axxess IP PhonePlus
• LEDs: There are two indications on each port:
o
Link Status: When the link is valid, the green LED on the left side of the port is lit.
When there is receive or transmit activity on the link, this LED flashes.
o
10/100 Mbps: When the link is connected at a speed of 100 Mbps, the green LED on
the right side of the port is lit. The Mitel 5000 platform operates only on 100Base-T
LANs.
• DRAM: Located inside the endpoint. Supports 128 MB (only one slot is occupied).
Although there are two DRAM slots, you cannot upgrade the memory by adding an extra
memory stick. Currently, the second slot is not used.
For information about how to program a Model 8690, refer to the Mitel 5000 Features and
Programming Guide, part number 580.8006.
To use the Model 8690, you must first install the 8690 client application. refer to the Mitel 5000
Features and Programming Guide, part number 580.8006, for details.
Axxess IP PhonePlus
Bottom
LEDs
The Axxess IP PhonePlus operates on either 10BaseT or 100Base-T LANs, while the Mitel 5000 platform
operates only on 100Base-T LANs. The drawing at
right depicts the connection interfaces on the bottom
of the endpoint. The Axxess IP PhonePlus provides
the following connections:
Power
Supply
• LAN/POWER Jack: Connects to an external
power supply and a network hub/switch.
LAN/POWER
To PC
• POWER Jack: Connects to a 24 VDC external
power supply. Use only one power source to connect the power supply.
• OUT TO PC Jack: Connects to a PC.
• LEDs: Two LEDs indicate activity on each port:
o
Link Status: When the link is valid, the green LED on the left side of the port lights.
When receive or transmit activity occurs on the link, the LED flashes.
o
Collision: When both receive and transmit activities occur on the link at the same time,
the yellow LED on the right side of the port lights.
For information about programming an Axxess IP PhonePlus, refer to the Programming chapter
in the Mitel 5000 Features and Programming Guide, part number 580.8006.
Mitel ® 5000 Installation Manual – Issue 3.0, October 2008
Page 5-113
Chapter 5: Installation
Eclipse IP PhonePlus
Eclipse IP PhonePlus
The Eclipse IP PhonePlus operates on either 10Base-T or 100Base-T LANs, while the Mitel
5000 platform operates only on 100Base-T LANs. The following illustration depicts the
connection interfaces on the bottom and back of the endpoint.
Barrel Jack
Back
The center
is positive.
HANDSET Jack
DC
Bottom
LEDs
PORT 3
LAN/
POWER
PORT 1 PORT 2
The Eclipse IP PhonePlus provides the following connection interfaces:
• LAN/POWER Jack: Connects to an external power supply or a network hub/switch.
• Barrel Jack: Connects to an external power supply.
• Ports 1, 2, and 3 (OUT TO PC Jack): Connects up to three other IP devices, such as
PCs, notebooks, and printers.
• LEDs: Two LEDs indicate activity on each port:
o
Link Status: When the link is valid, the green LED on the left side of the port lights.
When receive or transmit activity occurs on the link, the LED flashes.
o
Collision: When both receive and transmit activities occur on the link at the same time,
the yellow LED on the right side of the port lights.
• Handset Jack: Connects to a handset.
For information about programming an Eclipse IP PhonePlus, refer to the Programming chapter
in the Mitel 5000 Features and Programming Guide, part number 580.8006.
Page 5-114
Mitel ® 5000 Installation Manual – Issue 3.0, October 2008
Chapter 5: Installation
Wall-Mounting IP Endpoints
Wall-Mounting IP Endpoints
See the following sections for information about wall-mounting your specific endpoint type.
Model 8600 Series Endpoints
Wall-mounting the Model 8600 series endpoints is not recommended if the user will
be connecting and disconnecting cords (handset, headset, line) and/or cables
NOTE (Ethernet, USB, power supply) frequently. To connect and disconnect these cords
and cables from a wall-mounted endpoint, users will need to remove the endpoint
from the wall.
Because there are two types of bases used on the Model 8600 series endpoints, two sets of
instructions for wall-mounting the endpoints are included here. Determine which type of base
the endpoint has and follow the appropriate instructions.
For best results when wall-mounting the Model 8600 series endpoints, Mitel strongly
recommends that you use the two plastic rivets shipped with the endpoint. Once installed, the
plastic rivets lock the components into place, providing additional stability for wall-mounted
endpoints.
Base
Wall-Mount Knockout
Model 8600 series endpoints are shipped with a plastic adhesive label that covers the
rectangular wall-mount knockout on the base of the endpoint. A portion of the adhesive label
must be removed to use the wall-mount knockout.
To wall-mount the Model 8600 series endpoints, you need an industry-standard wall-mount
bracket (sometimes called a wall jack assembly) and a four-inch line cord. Both of these items
are available through the Mitel CommSource division.
Mitel ® 5000 Installation Manual – Issue 3.0, October 2008
Page 5-115
Chapter 5: Installation
Model 8600 Series Endpoints
To prepare the endpoint for wall-mounting (regardless of base type):
1.
Remove the metal plate from the base of the endpoint by removing the two plastic rivets
to unlock it from the base.
Plastic
Rivets
2.
Slide the cover off. The two plastic rivets are not included on endpoints built prior to May
2005.
3.
Use a sharp blade to cut out the rectangular portion of the adhesive label covering the
wall-mount knockout (see diagram at right).
The following instructions apply to endpoints that have a support mechanism—see the following
illustration—that fits into holes in the base.
Page 5-116
Mitel ® 5000 Installation Manual – Issue 3.0, October 2008
Chapter 5: Installation
Model 8600 Series Endpoints
To wall-mount the Model 8600 series endpoints that have a support mechanism:
1.
Collapse the support mechanism completely and secure it against the bottom housing of
the endpoint, as shown in the following illustration.
Support
Mechanism
Bottom Housing
(Base not shown)
Rivet Holes
Base
Rivet Holes
2.
Close the base completely so that it lies flat against the endpoint. (The two rivet holes on
the base align with the two rivet holes on the bottom housing of the endpoint.)
3.
Plug the four-inch line cord into the jack on the back of the endpoint and thread the line
cord through the wall-mount knockout on the base.
4.
Insert the two plastic rivets through the base and press them firmly into the holes on the
bottom housing of the endpoint. This locks the base to the endpoint.
5.
Test the base to verify that it is securely locked to the endpoint.
6.
Re-attach the metal plate to the endpoint base.
7.
Plug the line cord into the jack on the wall-mount bracket and position the endpoint
securely on the wall-mount bracket.
8.
Flip the handset hanger down to the horizontal position and lock it into place. This will
hold the handset in place.
The following instructions apply to endpoints that have release buttons located on the bottom
housing of the endpoint. To disengage the locking mechanism in the base, push in both buttons.
To lock the base in position, release the buttons.
Mitel ® 5000 Installation Manual – Issue 3.0, October 2008
Page 5-117
Chapter 5: Installation
Model 8600 Series Endpoints
To wall-mount Model 8600 series endpoints with release buttons on the bottom housing:
1.
Close the base completely so that it lies flat against the endpoint. (Rivet hole 1 on the
base aligns with the rivet hole on the bottom housing of the endpoint.)
Bottom Housing
(Base not shown)
Release Buttons
Base
Rivet Hole
Page 5-118
Rivet Hole 2
(Used to lock metal
plate to base)
Rivet Hole 1
(Used to lock base
to bottom housing)
2.
Plug the four-inch line cord into the jack on the back of the endpoint and thread the line
cord through the wall-mount knockout on the base.
3.
Insert one of the plastic rivets in rivet hole 1 on the base (see the illustration above) and
press it into the rivet hole on the endpoint. This locks the base to the endpoint.
4.
Test the base to verify that it is securely locked to the
endpoint.
5.
Reattach the metal plate to the endpoint base.
6.
Insert the remaining plastic rivet through rivet hole 3 (as
shown at right) in the metal plate and press it firmly into rivet
hole 2 in the base. This locks the metal plate to the base.
7.
Plug the line cord into the jack on the wall-mount bracket
and position the endpoint securely on the wall-mount
bracket.
8.
Flip the handset hanger down to the horizontal position and
lock it into place. This holds the handset in place.
Metal Plate
Rivet Hole 3
Mitel ® 5000 Installation Manual – Issue 3.0, October 2008
Chapter 5: Installation
Axxess IP PhonePlus
Axxess IP PhonePlus
To wall-mount the Axxess IP PhonePlus:
1.
Remove the baseplate from the top half of the back of the endpoint.
2.
Carefully unplug the ribbon cable.
3.
On the back of the endpoint, use a pair of
cutting pliers to remove the plastic knockout
covering the lower connector on the endpoint
control board.
Be careful not to let the plastic
knockout fall inside the endpoint. If
NOTE
the knockout falls inside the
endpoint, do not remove it.
Back
Remove the ribbon
cable from this connector.
4.
Plug the free end of the ribbon cable into the
connector on the endpoint control board
(where the plastic knockout was previously
removed).
5.
Use a pencil (eraser end) or other suitable rodlike instrument to press each end of the cable
into the connector. Apply pressure until the
connector clicks securely into place, one end
at a time.
6.
Rotate the baseplate 180º and attach it to the bottom half of the back of the endpoint.
7.
Using a ruler, mark the location of the endpoint mounting holes on the wall. (The centers
of the two perpendicular mounting holes on the back of the endpoint are four inches
apart.)
8.
Drive a screw into the center of each mounting
hole marking. Allow the head of the screw to
protrude approximately ¼ inch.
9.
To hold the handset in place while the endpoint
is wall-mounted, slide the reversible cradle
hook out, rotate it 180º, and reinsert it as
shown on the right.
10.
Position the endpoint mounting holes over the
screws and slide the endpoint into position on
the wall. If necessary, adjust the screws to
ensure the endpoint is held firmly in place.
Mitel ® 5000 Installation Manual – Issue 3.0, October 2008
Remove this knockout to
access the connector on
the control board.
Page 5-119
Chapter 5: Installation
Eclipse IP PhonePlus
Eclipse IP PhonePlus
The Eclipse IP PhonePlus is reserved for a future release.
To wall-mount the Eclipse IP PhonePlus:
1.
Remove the baseplate from the top half of the back of the endpoint.
2.
Rotate the baseplate 180º and attach it to the bottom half of the back of the endpoint.
3.
Using a ruler, mark the location of the endpoint mounting holes on the wall. (The centers
of the two perpendicular mounting holes on the back of the endpoint are four inches
apart.)
4.
Drive a screw into the center of each mounting hole marking. Allow the head of the
screw to protrude approximately ¼ inch.
5.
To hold the handset in place while the
endpoint is wall-mounted, slide the
reversible cradle hook out, rotate it
180º, and reinsert it as shown on the
right.
6.
Position the endpoint mounting holes
over the screws and slide the endpoint
into position on the wall. (If necessary,
adjust the screws to ensure the
endpoint is held firmly in place.)
Changing Protocol Modes: ITP and SIP
The Models 8600, 8620/8622, 8662, and 8690 multi-protocol endpoints support Inter-Tel
Protocol (ITP) or Session Initiation Protocol (SIP) mode. Details about each of the modes are
described in the Specifications chapter. For complete information about supported features,
buttons, and light-emitting diode (LED) indications for multi-protocol endpoints in ITP or SIP
mode, see the Multi-Protocol Endpoints: Supported Features, Buttons, and LED Indications
document, part number 835.2840.
To change the modes on Models 8600, 8620/8622, and 8662:
• Dialpad: To switch to SIP mode, power up the endpoint with
dialpad. To switch back to ITP mode, hold down
up.
IMPORTANT
5
and
6
1 and 2 pressed on the
on the dialpad while powering
The preferred method for changing between SIP and ITP mode is
through an Administrative Web Session—see page 5-572. If the
endpoint has registered with the SIP Server, resetting the endpoint and
pressing 5 and 6 to change from SIP mode to ITP mode will change
the endpoint to ITP mode; however, Call Processing will not allow the
endpoint to register until the SIP Server relinquishes its connection on
behalf of the endpoint. For details discussed in this procedure, refer to
the Mitel 5000 Features and Programming Guide, part number
580.8006.
• Web Interface: Change the operation mode through the Web interface to the endpoint.
• TFTP Server: Change the configuration files using the TFTP server.
To change the modes on the Model 8690:
Change the operation mode through the Web interface.
Page 5-120
Mitel ® 5000 Installation Manual – Issue 3.0, October 2008
Chapter 5: Installation
Reading IP Endpoint Status Displays
Reading IP Endpoint Status Displays
While the boot code is loading, you will see the displays shown in the following table. The top
lines on the display change, as shown in the chart, and the bottom lines always contain the IP
address and the Ethernet address.
Several displays have a “/” character at the end that is a rotating bar to indicate that the device
is working.
Firmware Download Progress Displays
Several changes have been made to the firmware image update process. These changes only
apply when the endpoint is running version 1.2.7 or later firmware (not when upgrading from
1.1.5 to 1.2.7, for example).
• Two copies of the firmware image are kept in case one gets corrupted during a failed
download attempt (this does not apply to the Model 8600 endpoints). This may cause the
firmware update process to take more time than before.
• Additional messages are displayed on the LCD during the firmware download process to
let the user know the status of the firmware download and to discourage the unintentional
interruption of the process—for example, unplugging the endpoint because nothing
appears to be happening. Table 5-16 shows the update progress displays.
.
Table 5-16. Firmware Download Progress Displays
Display
Description
DOWNLOAD IN
PROGRESS
The endpoint is downloading the image from the TFTP server.
ERASING PRIMARY
FLASH
The endpoint is erasing primary flash. The endpoint is preparing to
program the primary flash with the new software image. This
message is usually only shown briefly.
ERASING BACKUP
FLASH
The endpoint is erasing backup flash. The endpoint uses the backup
flash as a place holder when downloading the image or as a backup
storage to restore the image in case the primary flash is corrupted.
This message is usually shown briefly.
WRITING IMAGE TO
PRIMARY FLASH
The endpoint is programming the image to the primary flash.
WRITING IMAGE TO
BACKUP FLASH
The endpoint is programming the image to the backup flash.
FIRMWARE
DOWNLOAD
SUCCESS
The endpoint has successfully updated the firmware. The endpoint
will reset.
If an error occurs during the firmware download process, the endpoint displays an error
message as described in “Download Error Message Displays” on page 5-126.
Mitel ® 5000 Installation Manual – Issue 3.0, October 2008
Page 5-121
Chapter 5: Installation
IP PhonePlus and Model 8660
IP PhonePlus and Model 8660
Table 5-17. IP PhonePlus and Model 8660 Progress Displays
Display
Page 5-122
Status
WAITING FOR DOWNLOAD
Awaiting Download: The boot code is waiting for a code
download.
ERASING FLASH
Programming State - Erasing Flash Memory: The boot
code is receiving object code and programming the flash
memory. The endpoint first erases the flash memory and
then displays this message.
PROGRAMMING CODE
Programming State - Programming Flash Memory:
After erasing the flash, the endpoint programs the flash
memory.
DOWNLOAD COMPLETED
Completed State: The download completed successfully.
HARDWARE FAILURE
FLASH ERASURE
Error State – Flash Erasure: The boot code
encountered an error in erasing the flash chips. If this
occurs, try two or three downloads before returning the
endpoint for repair.
HARDWARE FAILURE
FLASH PROGRAM
Error State – Flash Program: The boot code
encountered an error while programming the flash chips.
If this occurs, try two or three downloads before returning
the endpoint for repair.
HARDWARE FAILURE
MEMORY MAP
Error State – Memory Map: The hardware memory-map
functions are not working properly. After two or three
failed attempts, you should send in the endpoint for
repair.
DOWNLOAD ABORTED
FILE TOO BIG
Error State – File Too Big: This display appears if you
attempt to download a file that is too large for the flash
memory. This error condition might indicate an incorrect
or corrupted file.
DOWNLOAD ABORTED
FILE CORRUPTED
Error State – File Corrupted: This display appears if you
attempt to download a file that is corrupted or that gets
corrupted during the transmission. This error condition
might occur during poor network conditions.
Mitel ® 5000 Installation Manual – Issue 3.0, October 2008
Chapter 5: Installation
Models 8620/8622, 8662, and 8690
Models 8620/8622, 8662, and 8690
The following information does not apply to a non-display endpoint, such as the Model 8600.
Table 5-18. Models 8620/8622, 8662, and 8690 Progress Displays
Display
Status
DOWNLOAD
IN PROGRESS
Download State: The file is being downloaded to the
endpoint.
FIRMWARE
DOWNLOAD SUCCESS
Completed State: The download completed successfully.
The endpoint will reboot momentarily.
ERROR
TFTP FAIL
Error State – TFTP Fail: The endpoint failed to contact
the TFTP server, or the file requested is not available at
the server. It could also indicate that the TFTP server does
not have permission for the endpoint to retrieve the file.
ERROR
TFTP FAIL START
Error State – TFTP Fail Start: The TFTP server failed to
start due to lack of resources. If this occurs, reboot the
endpoint.
ERROR
BAD FLASH
Error State – Bad Flash: The endpoint is unable to
program the new firmware to the flash device. If this
occurs continuously, return the endpoint for repair.
ERROR
TFTP TIMEOUT
Error State – TFTP Timeout: The TFTP protocol timed
out due to network problems, such as bad network traffic.
ERROR
WRONG VERSION
Error State - Wrong Version: The firmware version of the
file being downloaded does not match the version in the
version field in the configuration file (xxxx_image_ver or
8690_dsp_image_ver).
ERROR
WRONG PLATFORM
Error State – Wrong Platform: The file requested does
not match the endpoint type.
ERROR
MISC ERROR
Error State – Miscellaneous Error: A miscellaneous
error, such as file corruption, occurred.
ERROR
NOT GZIP
Error State – Not Gzip: The file requested is not in the
correct format.
ERROR
INVALID FILE ID
Error State – Invalid File ID: The file does not contain the
necessary version information and platform type.
While the application code is executing, you will see the following display as it moves through
several states. After the endpoint is connected to the IP card, the default display appears on the
LCD.
Several displays have a “/” character at the end that is a rotating bar to indicate that the device
is working.
Mitel ® 5000 Installation Manual – Issue 3.0, October 2008
Page 5-123
Chapter 5: Installation
IP PhonePlus and Model 8660/8620/8622/8662/8690
IP PhonePlus and Model 8660/8620/8622/8662/8690
The following information does not apply to a non-display endpoint, such as the Model 8600.
Also, because the Model 8620/8622 has a two-line LCD, this endpoint displays only the first two
status lines.
Table 5-19. IP PhonePlus and Model 8660/8620/8622/8690 Progress Displays
Display
INITIALIZING
TRYING BOOTP...
NO RESPONSE
TRYING DHCP...
SUCCESSFUL /
Status
Initializing: The application code is initializing the IP stack. For the majority of the
initialization time, the IP endpoint is waiting for a BOOTP or DHCP response. For each
enabled option (BOOTP, DHCP, or both), the endpoint screen displays a message
indicating the type of response it is attempting to receive.
• If the IP endpoint receives a BOOTP or DHCP response, it uses the IP address,
subnet mask, and gateway address from the response.
• If the IP endpoint times out, it uses its default IP address, subnet mask, and
gateway address from its internal database.
• If at least one of these options is enabled and the endpoint is not able to receive an
IP address, the endpoint displays NO RESPONSE for five seconds.
• If the endpoint tries BOOTP and fails, but then tries DHCP and succeeds, the
display does not pause for five seconds.
ID: XXXXXXXXXXXX
MY IP ADDRESS:
XXX.XXX.XXX.XXX
FINDING LOCAL
IP CARD ON UDP
PORT XXXXX
/
Finding IP Card (Module) Address: The application code is attempting to find a local
IP resource (Mitel platform) by broadcasting on the LAN.
ID: XXXXXXXXXXXX
MY IP ADDRESS:
XXX.XXX.XXX.XXX
FINDING IP CARD:
XXX.XXX.XXX.XXX
UDP PORT XXXXX /
Finding IP Card (Module): The application code is attempting to find a local IP
resource (Mitel platform) by using the reply from the LAN broadcast. The first line
contains the hexadecimal Ethernet address of the endpoint, while the second and third
lines inform the user of the endpoint IP address. The rest of the LCD panel informs the
user that the endpoint is attempting to find the IP address and its port number.
ID: XXXXXXXXXXXX
MY IP ADDRESS:
XXX.XXX.XXX.XXX
CONNECTING TO:
XXX.XXX.XXX.XXX
TCP PORT XXXXX /
Connecting to IP Card: The application code is attempting to connect to an IP resource
(Mitel platform). The first line contains the hexadecimal Ethernet address of the
endpoint. The second line contains the IP endpoint current IP address. The fourth line
contains the IP address to which the IP endpoint is attempting to connect. The sixth line
indicates the number of unsuccessful connection attempts.
ID:XXXXXXXXXXXX
XXX.XXX.XXX.XXX
CONNECTED TO:
XXX.XXX.XXX.XXX
WAITING FOR
CALL PROCESSING/
Connected to IP Card: The application code has made an IP connection to an IP
resource (Mitel platform). The IP endpoint maintains this display until it receives a
confirmation from call processing. Some possible problems are that call processing is
not running, the module or circuit is not programmed in the call processing database
correctly, or the endpoint is connected to the wrong type of system. The first line
contains the hexadecimal Ethernet address of the endpoint. The second line contains
the IP endpoint current IP address. The fourth line contains the IP address to which the
IP endpoint is connected.
ID: XXXXXXXXXXXX
LOCAL IP CARD
NOT FOUND
IP-Card-Not-Found Error Message: After an attempt to find the local IP resource (Mitel
platform) through broadcast messages, the endpoint would normally attempt to contact
the Remote IP resource (Mitel platform) IP address. However, the endpoint does not
have this field programmed; you can program this field through the Self-Programming
Mode or the Web/Telnet interfaces. The display will show this error message for five
seconds.
REMOTE IP CARD
NOT PROGRAMMED /
Page 5-124
The first line contains the hexadecimal Ethernet address of the endpoint, while the
second and third lines display the endpoint’s IP address. The remainder of the display
endpoint screen indicates that the endpoint is attempting to find an IP address.
Mitel ® 5000 Installation Manual – Issue 3.0, October 2008
Chapter 5: Installation
IP PhonePlus and Model 8660/8620/8622/8662/8690
Table 5-19. IP PhonePlus and Model 8660/8620/8622/8690 Progress Displays (Continued)
Display
Status
ID: XXXXXXXXXXXX
COULD NOT
CONTACT IP CARD
XXX.XXX.XXX.XXX
USING
UDP PORT XXXXX /
UDP-Failed Error Message: If the endpoint did not receive a response via UDP after
attempting to contact the IP resource (Mitel platform), the display will show this error
message for five seconds.
ID: XXXXXXXXXXXX
COUNT NOT
CONTACT IP CARD
XXX.XXX.XXX.XXX
USING
TCP PORT XXXXX /
TCP-Failed Error Message: If the endpoint did not receive a response via TCP after
attempting to connect to the IP card, the display will show this error message for five
seconds.
ID: XXXXXXXXXXXX
XXX.XXX.XXX.XXX
DUPLICATE IP
ADDRESS AT
MAC ADDRESS:
XXXXXXXXXXXX
Duplicate-IP Error Message: If the endpoint determined that some other device is
using the IP address that it is trying to use, the display will show the error message for
thirty seconds. The display shows the IP address the endpoint is trying to use, that the
address is in use by another device, and the MAC address of that device.
DSP FAILURE
DSP Failure: The application code displays the DSP Failure message if there was an
error (bus error) while accessing the DSP. If this occurs, try two or three downloads
before returning the endpoint for repair. After two or three failed attempts, send in the
endpoint for repair.
DSP NOT RUNNING
DSP Not Running: The application code displays the DSP Not Running message if the
endpoint was able to access the DSP but has not received any response from the DSP
(no online interrupt). If this occurs, try two or three downloads before returning the
endpoint for repair. After two or three failed attempts, send in the endpoint for repair.
DSP NOT RUNNING
WAITING FOR
ETHERNET
ADDRESS
Waiting for Ethernet Address: The application code has detected that the endpoint
does not have a valid Ethernet address. If this occurs, try two or three downloads before
returning the endpoint for repair. After two or three failed attempts, send in the endpoint
for repair.
Mitel ® 5000 Installation Manual – Issue 3.0, October 2008
Page 5-125
Chapter 5: Installation
Download Error Message Displays
Download Error Message Displays
The endpoint displays error information concerning the status of the last TFTP application
image update (firmware or boot code) not only on the LCD but also on the Web interface. The
error message is displayed under Status\Image Upgrade\Last Download Error. Table 5-20 lists
the possible error messages.
Table 5-20. Image Download Error Message Displays
Display
ERROR TFTP FAIL
Description
The image download process failed because of one of the following
problems:
• The endpoint cannot contact the TFTP server.
• The TFTP server does not have the software image file.
• The TFTP image URL contains the wrong path.
• The TFTP server does not have the permission to read the
software image file.
ERROR TFTP FAIL
START
The endpoint failed to start TFTP client. This problem could be due to
an insufficient file descriptor for TFTP, etc.
ERROR BAD FLASH
The image download process failed because of a faulty flash memory
device or the flash file system is corrupted. If the user encounters this
error, replace the device.
ERROR TFTP
TIMEOUT
The endpoint failed to communicate with the TFTP server. This error
could be due to bad network connectivity.
ERROR WRONG
VERSION
The image contains an unexpected software version.
ERROR WRONG
PLATFORM
The image contains an unexpected platform identifier.
ERROR MISC
ERROR
Miscellaneous errors include a corrupted file system, unrecognized
error by the TFTP library, etc.
ERROR NOT GZIP
The image is not in GZIP format.
ERROR INVALID
FILE ID
The image does not contain the appropriate file identifier.
ERROR
INCOMPATIBLE HW
The image contains the wrong hardware ID.
ERROR FILE TOO
BIG
The file that the endpoint downloaded for upgrade is too large.
ERROR BOOT
IMAGE CORRUPT
The boot image downloaded is corrupt.
ERROR ALLOCATE
FAILURE
The endpoint was unable to allocate enough memory to download the
image.
ERROR FAILED
VERIFY
The image written to flash does not match the file downloaded. A
write error occurred.
Where to Program IP Resources
Program IP resources in DB Programming. Refer to the Mitel 5000 Features and Programming
Guide, part number 580.8006.
Page 5-126
Mitel ® 5000 Installation Manual – Issue 3.0, October 2008
Chapter 5: Installation
Installation Options for Single Line Endpoints
Installation Options for Single Line Endpoints
AC—or tip/ring-controlled—single line endpoints can be installed using SLM-4 or SLM-8
modules, SLA or IP SLA units, the Data Device port on an MDPM attached to a digital endpoint,
or the two-port single line jack (RJ-14) built-in to the back of the Mitel CS-5200/5400/5600 Base
Server. Program the items discussed in these sections using information discussed in the
Programming chapter of the Mitel 5000 Features and Programming Guide, part number
580.8006.
Single Line Modules
If required, install an SLM-4 in the Mitel CS-5200/5400/5600 Base Server in accordance with
the standardized procedure, “Installing a Four-Port Single Line Module (SLM-4)” on page 5-55.
As applicable, program the endpoint in accordance with the procedure on programming a fourport single line module in the Mitel 5000 Features and Programming Guide, part number
580.8006.
If required, install a SLM-8 module in the Digital Expansion Interface chassis in accordance with
the procedure, “Installing an Eight-Port Single Line Module (SLM-8)” on page 5-72. As
applicable, program the endpoint in accordance with the procedure on programming an eightport single line module in the Mitel 5000 Features and Programming Guide, part number
580.8006.
Single-Line Adapter (SLA)
If required, install an SLA in accordance with the procedure appearing at “Installing Single Line
Adapters (SLA)” on page 5-138.
IP Single-Line Adapter (IP SLA)
If required, install an IP SLA in accordance with the procedure at “Installing an IP SLA” on
page 5-198.
Modem Data Port Module
If required, install a PCDPM in a digital endpoint in accordance with “Installing a PCDPM” on
page 5-206. If required, connect an MDPM to the PCDPM in accordance with “Connecting
PCDPM Cables” on page 5-215.
Mitel ® 5000 Installation Manual – Issue 3.0, October 2008
Page 5-127
Chapter 5: Installation
Installing Digital Endpoints
Installing Digital Endpoints
The following endpoints can be installed through the DEI:
• Digital endpoints
• Single-Line Adapters, connected to DEM-16 ports
Installing Digital Endpoints
Before installing the digital endpoints, unpack each one and check for damage. If items are
damaged or missing, contact Mitel Customer Support. See “Technical Support Contact
Information” on page 7-2.
NOTICE
The proprietary digital endpoints specified in this section are to be installed only on Mitel
Advanced Communications Platforms.
Each digital endpoint from the factory should include the following:
• Baseplate
• One three-pair line cord, 6 ft
• One handset
• One four-conductor coiled handset cord
• Slide-out directory card (not available on Models 8500, 8520, or 8560)
• Extra feature key templates
To install a digital endpoint:
1.
Before mounting the modular jack [line jack unit] assembly and connecting the endpoint,
measure the voltage on the YELLOW terminal of the modular jack [line jack unit]
assembly with respect to the BLACK terminal. (The “common” probe of the voltmeter is
placed on the BLACK terminal.) It must measure +24 VDC (+2.0 VDC). If a negative
voltage is measured, check the cabling for a reversed pair. If tip and ring are reversed,
the endpoint will not function.
2.
Mount the modular jack [line jack unit] assembly on the wall.
3.
Attach the coiled handset cord to the handset and to the handset jack on the bottom of
the endpoint. Place the handset on hook. The bottom of the Model 8500, 8520, and
8560 endpoints have molded channels designed to hold the handset and line cords. For
best results when connecting a handset, uncoil a portion of the handset cord and push
the cord into the channel so that the flat side of the cord is against the endpoint.
4.
Plug one end of the line cord into the wall-mounted modular jack [line jack unit]
assembly. Plug the other end into the line cord jack on the bottom of the endpoint.
To aid in installation and troubleshooting, display endpoints show their station circuit
number, extension number, and assigned user name for several seconds when power is
turned ON and the line cord is first plugged in. This display also appears after a system
reset, and whenever the line cord is removed and replaced while power is ON. The
station identification displays for several seconds, then the endpoint changes to the
appropriate display, depending on its current status.
5.
Page 5-128
Perform the self-test for the specific endpoint model you have.
•
For the Executive, Professional, Standard, and Associate Display models, or the
Axxess or Eclipse Basic digital endpoints, see “Performing the Digital Endpoint
Self-Test,” next.
•
For the Model 8500, 8520, or 8560 endpoint, see paragraph on page 5-130.
Mitel ® 5000 Installation Manual – Issue 3.0, October 2008
Chapter 5: Installation
Performing the Digital Endpoint Self-Test
6.
If necessary, change the endpoint ring tone by performing the steps described in the
Mitel 5000 Features and Programming Guide, part number 580.8006.
7.
If necessary, replace the endpoint paper template with one labeled to match the
programmed feature buttons.
8.
If necessary, adjust the viewing angle. The Model 8000 series digital endpoints allow you
to adjust the viewing angle. If you position the endpoint viewing angle to 60° or greater,
flip the handset hanger to the horizontal position.
Performing the Digital Endpoint Self-Test
Perform the following procedure for the Executive, Professional, Standard, and Associate
Display models, or the Axxess or Eclipse Basic Digital endpoints. For the procedure to perform
the self-test on the Model 8500 series endpoints, see page 5-129.
To perform the digital endpoint self-test:
1.
While pressing the asterisk (*) and pound/hash (#) buttons, unplug and replace the
endpoint line cord.
2.
Release the buttons. The endpoint rings momentarily. Display endpoints show a dark
display—all pixels lit.
3.
Lift and replace the handset. The endpoint rings momentarily. Display endpoints show a
blank display—no pixels lit.
4.
Lift and replace the handset. The endpoint rings momentarily and all LED-equipped
buttons light. Display endpoints show TESTING LED MATRIX. If any of the LEDs do not
light, return the endpoint for repair.
5.
Lift and replace the handset. The endpoint rings momentarily and all of the LEDs go out.
Display endpoints show TESTING KEY MATRIX NN, where NN is a two-digit number.
6.
One at a time, press each of the buttons on the endpoint in any order. If the button is
functioning properly, a key tone (or a DTMF tone for Executive and Professional keypad
buttons) is heard and, on display endpoints, a specific code is shown. The correct code
for each button appears in Figure 5-53 on page 5-131. If the signal is not heard or the
displayed code is incorrect, the button is faulty, and you should return the endpoint for
repair.
7.
Lift and replace the handset. The speaker tones are broadcast over the speakerphone
speaker. Display endpoints show TESTING SPEAKER TONES.
8.
Lift and replace the handset. Tones of various volume levels, from softest to loudest, are
broadcast over the speakerphone speaker. Display endpoints show TESTING
SPEAKER VOLUME.
9.
Lift the handset, and then press and release the hookswitch. The handset tones are
broadcast over the handset receiver. Display endpoints show TESTING HANDSET
TONES.
10.
Place the handset in the cradle. The endpoint rings momentarily and it takes
approximately five seconds for the endpoint to return to normal operation. Display
endpoints show TESTING COMPLETED! for several seconds, then, as described in step
4 on page 5-128, the endpoint identification displays for several seconds.
IMPORTANT
11.
If the endpoint watchdog timer fails, the TESTING COMPLETED!
display is followed by a WATCHDOG ERROR display and eight short
bursts of ring tone. Replace the defective endpoint.
Replace the endpoint if faulty.
Mitel ® 5000 Installation Manual – Issue 3.0, October 2008
Page 5-129
Chapter 5: Installation
Performing the Digital Endpoint Self-Test
Perform the following self-test procedure if installing a Model 8500, 8520, or 8560:
1.
While pressing the asterisk (*) and pound/hash (#) buttons, unplug and replace the
endpoint line cord.
2.
Release the buttons. The endpoint rings momentarily. Display endpoints show a dark
display – all pixels lit. If all pixels are not lit, return the endpoint. The LEDs should not
light. If an LED is lit, the button may be stuck.
3.
Lift and replace the handset. The endpoint sounds an alerting tone. If no tone is heard,
return the endpoint. Display endpoints show a blank display—no pixels lit. If any pixel is
lit, return the endpoint.
4.
Lift and replace the handset. The endpoint rings momentarily. Display endpoints show a
display filled with Os.
5.
Lift and replace the handset. The endpoint rings momentarily. Display endpoints show a
display filled with Ms.
6.
Lift and replace the handset. The endpoint rings momentarily, and all red, LED-equipped
buttons light. Display endpoints show TESTING LED MATRIX. If any of the LEDs do not
light, return the endpoint for repair.
7.
Lift and replace the handset. The endpoint rings momentarily, and all green, LEDequipped buttons light. Display endpoints show TESTING LED MATRIX. If any of the
LEDs do not light, return the endpoint for repair.
8.
Lift and replace the handset. The endpoint rings momentarily. Display endpoints show
TESTING KEY MATRIX.
9.
One at a time, press each of the buttons on the endpoint in any order. If the button is
functioning properly, a key tone is heard, the LED lights red, and a specific code is
shown on the display. The proper code for each button is diagrammed in Figure 5-54 on
page 5-132. If the signal is not heard or the displayed code is incorrect, the button is
faulty; return the endpoint for repair.
10.
Lift and replace the handset. The speaker tones are broadcast over the speakerphone
speaker. Display endpoints show TESTING SPEAKER TONES.
11.
Lift and replace the handset. Tones of various volume levels, from softest to loudest, are
broadcast over the speakerphone speaker. Display endpoints show TESTING
SPEAKER VOLUME.
12.
Lift the handset, then press and release the hookswitch. The handset tones are
broadcast over the handset receiver. Display endpoints show TESTING HANDSET
TONES.
13.
Put on the headset (if one is attached) and place the handset back in its cradle. The
headset tones are broadcast over the headset. Display endpoints show TESTING
HEADSET TONES.
14.
Lift and replace the handset. The endpoint rings momentarily, and it takes approximately
five seconds for the endpoint to return to normal operation. Display endpoints show
TESTNG COMPLETED! for several seconds.
15.
Replace the endpoint if faulty.
IMPORTANT
Page 5-130
If the endpoint watchdog timer fails, the TESTING COMPLETED!
display is followed by a WATCHDOG ERROR display and eight short
bursts of ring tone. Replace the defective endpoint.
Mitel ® 5000 Installation Manual – Issue 3.0, October 2008
Chapter 5: Installation
Performing the Digital Endpoint Self-Test
Figure 5-53. Digital Display and Basic Digital Endpoints Self-Test Key Matrix
BASIC DIGITAL ENDPOINT
20
21
28
29
30
31
38
39
52
23
5A
2B
50
51
5D
24
25
2D
58
59
55
54
33
5C
34
2C
35
3C
3D
44
4C
45
4D
EXECUTIVE OR PROFESSIONAL
DISPLAY ENDPOINT
26
5E
2E
56
36
4E
3E
46
20
28
30
38
40
48
21
29
31
39
41
49
52
23
5A
2B
50
51
58
59
55
54
STANDARD OR ASSOCIATE
DISPLAY ENDPOINT
20
21
28
29
30
31
38
39
40
5C
24
25
2C
2D
34
35
3C
3D
44
4C
45
4D
41
48
49
33
52
23
5A
2B
50
51
58
59
55
54
33
5D
5D
5C
24
25
2C
2D
34
35
3C
3D
44
4C
45
4D
Mitel ® 5000 Installation Manual – Issue 3.0, October 2008
Page 5-131
Chapter 5: Installation
Performing the Digital Endpoint Self-Test
Figure 5-54. Model 8500, 8520, and 8560 Endpoints Self-Test Key Matrix
MODEL 8560
ENDPOINT
LAMP
26
5E
2E
56
36
4E
3E
46
50
77
76
52
MODEL 8500
ENDPOINT
33
51
24
20
28
25
2D
2C
34
35
30
3C
3D
44
4C
45
4D
38
40
58
59
48
21
5F
29
A0
31
5A
39
2B
41
49
5D
23
5C
LAMP
58
59
51
48
21
5F
2B
29
A0
49
31
5A
23
39
5C
50
77
76
33
52
20
24
25
2C
28
2D
34
35
3C
3D
44
4C
45
4D
LAMP
MODEL 8520
ENDPOINT
30
52
50
77
76
33
51
20
28
24
25
2C
2D
34
35
30
3C
3D
44
4C
45
4D
38
40
Page 5-132
58
59
48
21
5F
29
A0
31
5A
39
2B
41
49
5D
23
5C
38
40
Mitel ® 5000 Installation Manual – Issue 3.0, October 2008
Chapter 5: Installation
Adjusting the Baseplate
Adjusting the Baseplate
The Professional, Associate, and Eclipse Basic endpoints have adjustable baseplates that allow
users to set the angle of the endpoint.
To change the baseplate position:
1.
Gently press on one edge of the baseplate and lift it off of the endpoint.
2.
If you have a PCDPM installed, route the cables so that they will be between the
baseplate and the bottom of the endpoint.
3.
Position the baseplate over one of the three sets of holes and snap it into place. The
curved edge should be toward the top of the keyset.
Wall-Mounting Digital Display and Basic Digital Endpoints
To mount the endpoint on a wall, use an industry-standard wall-mount bracket (sometimes
called a wall jack assembly). If a wall-mount bracket is not available, use the two-screw method
outlined below:
1.
Remove the endpoint baseplate from the top half of the back of the endpoint.
2.
Rotate the baseplate 180o and attach it to the bottom half of the back of the endpoint. If
a PCDPM is already installed inside the baseplate, first open the endpoint and reroute
the PCDPM-to-keyset interface cable through the knockout in the bottom half of the
endpoint. See Figure 5-78 on page 5-213.
3.
Using a ruler, mark the location of the endpoint mounting holes on the wall. The centers
of the two perpendicular mounting holes on the back of the endpoint are four inches
apart.
4.
Drive a screw into the center of each mounting hole marking. Allow the head of the
screw to protrude approximately ¼ inch.
5.
To hold the handset in place while the endpoint is wall-mounted, slide the reversible
cradle hook out, rotate it 180o, and reinsert it as shown below.
6.
Position the endpoint mounting holes over the screws and slide the endpoint into
position on the wall. If necessary, adjust the screws to ensure the endpoint is held firmly
in place.
Mitel ® 5000 Installation Manual – Issue 3.0, October 2008
Page 5-133
Chapter 5: Installation
Wall-Mounting Model 8500, 8520, and 8560 Digital Endpoints
Wall-Mounting Model 8500, 8520, and 8560 Digital Endpoints
Because there are two types of bases used on the Model 8000 series digital endpoints, two sets
of instructions for wall-mounting the endpoints are included here. Determine which type of base
the endpoint has and follow the appropriate instructions.
For best results when wall-mounting the Model 8000 Series digital endpoints, Mitel strongly
recommends that you use the two plastic rivets shipped with the endpoint. Once installed, the
plastic rivets lock the components into place, providing additional stability for wall-mounted
endpoints.
Model 8000 series digital endpoints are shipped with a plastic adhesive label that covers the
rectangular wall-mount knockout on the base of the endpoint. A portion of the adhesive label
must be removed to use the wall-mount knockout.
IMPORTANT
Mitel recommends not wall-mounting the Model 8000 Series digital endpoints
if users will be frequently connecting and disconnecting cords (handset,
headset, line) and/or cables (Ethernet, USB, power supply). To connect and
disconnect these cords and cables from a wall-mounted endpoint, users will
need to remove the endpoint from the wall.
To wall-mount the Model 8000 series digital endpoints, use an industry-standard wall-mount
bracket (sometimes called a wall jack assembly) and a four-inch line cord. Both of these items
are available through the Mitel CommSource® division or Mitel Europe.
To prepare the endpoint for wall-mounting (regardless of base type):
1.
Remove the metal plate from the base of
the endpoint by removing the two plastic
rivets to unlock it from the back.
2.
Slide the cover off. The two plastic rivets
are not included on endpoints built prior
to May 2005.
3.
Use a sharp blade to cut out the
rectangular portion of the adhesive label
covering the wall-mount knockout (see
diagram at right).
Base
The following instructions apply to endpoints that
have a support mechanism (see illustration
below) that fits into holes in the base.
Wall-Mount Knockout
Page 5-134
Mitel ® 5000 Installation Manual – Issue 3.0, October 2008
Chapter 5: Installation
Wall-Mounting Model 8500, 8520, and 8560 Digital Endpoints
To wall-mount Model 8000 Series digital endpoints having a support mechanism:
1.
Collapse the support mechanism completely and secure it against the bottom housing of
the endpoint, as shown below.
Support
Mechanism
Bottom Housing
(Base not shown)
Base
Rivet Holes
Rivet Holes
2.
Close the base completely so that it lies flat against the endpoint. Make sure the two
rivet holes on the base align with the two rivet holes on the bottom endpoint housing.
3.
Plug the four-inch line cord into the jack on the back of the endpoint and thread the line
cord through the wall-mount knockout on the base.
4.
Test the base to verify that it is securely locked to the endpoint.
5.
Insert the two plastic rivets through the metal plate and press them firmly into the holes
on the endpoint base. This locks the metal plate to the base.
6.
Re-attach the metal plate to the endpoint base.
7.
Plug the line cord into the jack on the wall-mount bracket and position the endpoint
securely on the wall-mount bracket.
8.
Flip the handset hanger down to the horizontal position and lock it into place. This will
hold the handset in place.
The following instructions apply to endpoints that have release buttons located on the bottom
endpoint housing. To disengage the locking mechanism in the base, push in both buttons. To
lock the base in position, release the buttons.
Mitel ® 5000 Installation Manual – Issue 3.0, October 2008
Page 5-135
Chapter 5: Installation
Wall-Mounting Model 8500, 8520, and 8560 Digital Endpoints
To wall-mount Model 8000 Series endpoints with release buttons on bottom housing:
1.
Close the base completely so that it lies flat against the endpoint. Rivet hole 1 on the
base aligns with the rivet hole on the bottom housing of the endpoint.
Bottom Housing
(Base not shown)
Rivet Hole
Base
Release Buttons
Rivet Hole 2
(Used to lock metal plate to base)
Rivet Hole 1
(Used to lock base to bottom housing)
2.
Plug the four-inch line cord into the jack on the back of the endpoint and thread the line
cord through the wall-mount knockout on the base.
3.
Insert one of the plastic rivets in rivet hole 1 on the base (see illustration above) and
press it into the rivet hole on the endpoint. This locks the base to the endpoint.
4.
Test the base to verify that it is securely locked to the endpoint.
5.
Re-attach the metal plate to the endpoint base.
6.
Insert the remaining plastic rivet through rivet hole 3 (as
shown at right) in the metal plate and press it firmly into
rivet hole 2 in the base. This locks the metal plate to the
base.
7.
Plug the line cord into the jack on the wall-mount bracket
and position the endpoint securely on the wall-mount
bracket.
8.
Flip the handset hanger down to the horizontal position
and lock it into place. This will hold the handset in place.
Metal Plate
Rivet Hole 3
Page 5-136
Mitel ® 5000 Installation Manual – Issue 3.0, October 2008
Chapter 5: Installation
Installing an Optional Headset on a Digital Endpoint
Installing an Optional Headset on a Digital Endpoint
For headset requirements, see “Optional Headsets” on page 4-42.
To attach a headset to an applicable digital endpoint*:
*Includes Executive, Professional, Standard, or Associate Display endpoints; Axxess or
Eclipse Basic digital endpoints; or the Model 8500 endpoint.
1.
Remove the coiled handset cord from the handset jack on the bottom of the endpoint.
Leave the handset in the cradle.
2.
Insert the headset modular plug into the jack. Plug in the headset power source, if used.
3.
If the headset has an ON/OFF switch, turn ON the headset.
4.
On the endpoint, press the Special button and enter the Headset Enable feature code
(default value is 315).
5.
To disable the headset, press the Special button and enter the Headset Disable feature
code (default value is 316). Unplug the headset and reconnect the handset.
To attach a headset to a Model 8520 or 8560 endpoint:
1.
Insert the headset modular plug into the jack located underneath the endpoint. Plug in
the headset power source, if used.
2.
If the headset has an ON/OFF switch, turn ON the headset.
3.
On the endpoint, press
value is 315).
4.
To disable the headset, press ∞
and enter the Headset Disable feature code
(default value is 316). Unplug the headset and reconnect the handset.
Mitel ® 5000 Installation Manual – Issue 3.0, October 2008
∞
and enter the Headset Enable feature code (default
Page 5-137
Chapter 5: Installation
Installing Single Line Adapters (SLA)
Installing Single Line Adapters (SLA)
When installed in a DEM-16 port, each SLA unit can support one DID [DDI] trunk, two single
line endpoints, or one off-premises extension (OPX).
Wall-Mounting an SLA
The SLA can be placed horizontally on a table, or it can be wall-mounted using the two Lshaped brackets that accompany the unit.
To wall-mount an SLA unit:
1.
Remove the two screws on one side of the unit
and use them to attach the two L-shaped wallmounting brackets. See the figure at right.
2.
Position the SLA on the MDF backboard and mark
the location of the mounting screw holes on the
wall. Set the SLA aside.
3.
Drive a screw into the center of each mounting
hole marking, allowing the heads of the screws to
protrude slightly. Use screws of sufficient strength
to support the SLA.
4.
Hang the SLA on the screws. If necessary, adjust
the screws to ensure the SLA is held firmly in
place.
Setting Hybrid Balance Straps for a DID [DDI] Trunk on an SLA
SLAs are shipped with both ports set for single line device operation.
To change the port type if connecting a DID (DDI) trunk:
1.
Remove the cover and set the corresponding port for DID (DDI) operation.
PORT 1 (J3)
SL
2.
PORT 2 (J6)
DID/DDI
SL
If necessary, adjust the hybrid balance setting from short (<.6 mi, or 1km) to long (>.6 mi,
or 1km).
PORT 1 (J2)
LG
3.
Page 5-138
DID/DDI
SHT
PORT 2 (J5)
LG
SHT
Replace the cover.
Mitel ® 5000 Installation Manual – Issue 3.0, October 2008
Chapter 5: Installation
Installing DID Trunks on an SLA (USA Only)
Installing DID Trunks on an SLA (USA Only)
Connect the Direct Inward Dialing (DID) trunks to the Single-Line Adapters as outlined below.
See Figure 5-55 on page 5-140. DID trunks are also supported through T1 circuits. In addition
to DID trunks, SLAs can also be used to install single line endpoints, playback devices, and offpremises extension (OPX) stations. Any combination using the two ports on the SLA is possible.
For a diagram, see Figure 5-56 on page 5-140.
1.
Mount one four-conductor modular jack assembly next to each telephone company RJ
jack.
2.
For each modular jack assembly mounted in step 1, mount a corresponding fourconductor modular jack assembly near the SLA location.
3.
To connect the modular jack assemblies mounted in steps 1 and 2:
a. Run one-pair cable between the corresponding modular jack assemblies.
b. Wire each end of the one-pair cables onto their respective modular jack assemblies.
For a wiring diagram, see Figure 5-55 on page 5-140.
4.
Plug one end of a two-pair, mod-to-mod line cord into each RJ jack and plug the other
end into the corresponding modular jack assembly beside it.
5.
At the MDF backboard, plug one end of a two-pair mod-to-mod line cord into each
modular jack assembly. After programming the DEM-16 port, insert the plug into the
Circuit 1 or Circuit 2 jack on the SLA, as applicable. See “Programming an SLA for Dual
DID Trunks” on page 5-141.
Mitel ® 5000 Installation Manual – Issue 3.0, October 2008
Page 5-139
Chapter 5: Installation
Installing DID Trunks on an SLA (USA Only)
Figure 5-55. SLA Terminations for DID Trunks (USA Only)
Modular
Jack Assemblies
TIP
Endpoint Modular
Jack Assembly
To
DEM
Block
Y
G
G
Y
BK
R
R
BK
SLA
RING
G
Y
RING
R
BK
TIP
TIP
Y
G
G
Y
BK
R
R
BK
To Telco
RJ
To Telco
RJ
RING
AC Transformer
Standard Reversing
Mod-to-Mod Line Cord
If a single line endpoint is located near the SLA, it can be plugged directly into the unit.
Figure 5-56. SLA Terminations for Single Line Endpoints with a U.S. System
Single Line Endpoint Modular
Jack Assemblies
TIP
Endpoint Modular
Jack Assembly
To
DEM-16
Block
Y
G
G
Y
BK
R
R
BK
G
G
Y
BK R
R
BK
SLA
RING
G
Y
RING
R
BK
TIP
TIP
Y
To Single Line
Line Endpoint
Playback
Device
To Single Line
Line Endpoint
Playback
Device
RING
AC Transformer
Standard Reversing
Mod-to-Mod Line Cords
If a single line endpoint is located near the SLA, it can be plugged directly into the unit.
Page 5-140
Mitel ® 5000 Installation Manual – Issue 3.0, October 2008
Chapter 5: Installation
Programming an SLA for Dual DID Trunks
Programming an SLA for Dual DID Trunks
You can use an SLA to install DID trunks on the Mitel 5000 platform. The trunks coming in from
the CO [local exchange] attach to the SLA that has been programmed for Dual DID functionality
on a DEM-16 port.
To program an SLA for dual DID trunks:
1.
Open a session in Session Manager.
2.
From the DB Studio screen, select System – Communication Server – Digital Expansion
Interface # <n> – Bay <n>: that is equipped with a Digital Endpoint Module - 16.
3.
In the right-side pane, click an available Port and from the drop-down menu click Dual
DID. The Create DID Extension window displays (not shown).
4.
In the Create DID Extension window (not shown), select the Starting Extension trunk
number and click OK.
5.
Circuit 1 and Circuit 2 columns appear, containing the selected extension trunk numbers.
6.
Connect a DID trunk into the appropriate jack on an SLA installed in accordance with
“Installing DID Trunks on an SLA (USA Only)” on page 5-139.
Mitel ® 5000 Installation Manual – Issue 3.0, October 2008
Page 5-141
Chapter 5: Installation
Upgrade Scenarios
SYSTEM UPGRADES
This section provides procedures for upgrading Mitel 5000 systems. See page 5-152 for
information on upgrading to version 2.4.
Upgrade Scenarios
An upgrade may involve one of the following scenarios:
• Increase only the system software release, such as going from v2.0 Release 3 to v2.0
Release 4.
• Increase the system software version, such as going from v2.1 to v2.2.
• Install a system with greater capacity, such as going from an Mitel CS-5200 to a CS-5400,
while maintaining the same software version; for example, v2.2.
• Install a system with both greater capacity and later version.
Upgrading a System
The following sections provide information about guidelines and procedures for upgrading Mitel
5000 platforms.
To upgrade to the latest software release, see “Upgrading System Software to Version 3.0” on
page 5-148.
Guidelines for Adding to or Upgrading a System
When adding hardware to or upgrading the version of a system, carry out the following
guidelines. For detailed instructions and figures for each step, see the appropriate sections in
this chapter. The following steps outline the procedures to perform when upgrading or adding to
any Mitel system.
Page 5-142
1.
Advise the customer and plan to do the upgrade when it has the least impact on their
operation.
2.
If the changes affect the Processing Module (PM-1) or Processor Expansion Card (PEC1), the Processing Server (PS-1), or the customer database, perform a complete save of
the customer database. For details, see “Saving the System and Voice Processor
Databases” on page 5-91 and related sections under that title. Also, refer to the
database save and restore information in the Mitel 5000 Features and Programming
Guide, part number 580.8006.
3.
If external voice processing will be affected, save the voice processing database and
prompts. Refer to the Mitel 5000 Features and Programming Guide, part number
580.8006, for information. If using Basic Voice Mail only, back up the voice processing
database to a USB flash drive. For details, For details, see “Saving the System and
Voice Processor Databases” on page 5-91 and related sections under that title. Also,
refer to the voice processor information in the Mitel 5000 Features and Programming
Guide, part number 580.8006. Mitel does not supply the USB flash drive.
4.
If performing an upgrade, follow the instructions provided with the software for saving,
converting, and restoring software. See “Upgrading a System” on page 5-142 for
information.
5.
If adding external voice processing, see the Enterprise® Messaging Installation Manual,
part number 780.8006, or the Voice Processing Unit Installation Manual, part number
835.2890.
Mitel ® 5000 Installation Manual – Issue 3.0, October 2008
Chapter 5: Installation
Guidelines for Adding to or Upgrading a System
6.
Install a system battery back-up, such as an uninterruptable power supply (UPS). For
specifications, see “Uninterruptible Power Supply (UPS) Connections” on page 4-8. Do
not share a UPS with multiple chassis—for example, with both an external voice
processing system and an Inter-Tel 5000 Base Server.
7.
Make sure the software license includes the appropriate features required for the
installation or upgrade. If the license does not match DB Programming, an error
message appears on the LCD panel and administrator endpoint. For additional
information, refer to the software license information in the Mitel 5000 Features and
Programming Guide, part number 580.8006.
8.
If new cabling is required, run cables to the location and run wiring to any optional
equipment. Assemble the new terminal blocks on the MDF, if required. If any T1 or E1
and/or PRI trunks are to be installed, terminate them on eight-conductor modular jack
[line jack unit] assemblies at the MDF.
9.
Connect any new trunks and module cables to the corresponding terminal blocks (or for
T1/E1 and/or PRI, modular jack assemblies or RJ-45 jacks).
10.
Install any new modules in the chassis and connect them to the cables that run from the
MDF blocks or patch panel.
NOTICE
Before Installing a Dual T1/E1/PRI Module. If you intend to add or replace a Dual
T1/E1/PRI module, system software must first be upgraded to v2.3 or later. For
additional information, refer to the Mitel Knowledge Base Center (www.inter-tel.com/
knowledgebasecenter) article KB3921.
11.
If necessary, upload the system software (see “Upgrading to v3.0” on page 5-152). Also
load new voice processing software, if required.
12.
Install any new endpoints and any optional endpoint or system equipment. Ensure all
equipment is working properly.
13.
If adding voice processing (VP) or fax cards to the optional external voice processing
system, install them according to the instructions in either the Enterprise® Messaging
Installation Manual, part number 780.8006, or the Voice Processing Unit Installation
Manual, part number 835.2890. Verify the switch settings, cable connections, and card
options.
14.
Refer to the Programming chapter in the Mitel 5000 Features and Programming Guide,
part number 580.8006, for procedural guidance to restore the database or voice mail
database and configure and program the additions to the system.
15.
Train end users on any new features or options that have been installed. Provide them
contact information for directing questions or issues.
Mitel ® 5000 Installation Manual – Issue 3.0, October 2008
Page 5-143
Chapter 5: Installation
Removing System Voice Prompts and Inter-Tel Endpoint Firmware
Removing System Voice Prompts and Inter-Tel Endpoint Firmware
IMPORTANT
Perform a Backup Database Save after setting the TFTP Pathname and
TFTP IP Address fields. Since the upgrade could restart call processing
(CP), the TFTP address/path change will most likely be lost when CP
restarts. When CP restarts with a new version it does not use the database
stored in persistent memory, instead it uses the backup database and does
any conversions necessary for the new version. By performing a backup
database save, all recent changes including the TFTP address/path will be
preserved.
If an Inter-Tel firmware or voice prompt package is added to the system, and later it is
determined that you need to revert back to a previous version of the same package, the
package will need to be removed and the previous version installed.
NOTICE
Upgrading system software using the Update All option requires a system reboot. Do not use
this option during normal business hours.
IMPORTANT
Before removing any packages, make sure you have the prior version of that
package so that it can be reinstalled, if needed.
Do the following:
Page 5-144
1.
Complete step 2 on page 5-154 through step 8 on page 5-155.
2.
Click the package name you want to remove.
3.
Click Remove to remove the selected package.
4.
Install the previous version of the package you removed.
5.
Reboot the system, if prompted. See step 2 on page 5-35. If you chose the Update All
option, the system will reboot, if needed.
Mitel ® 5000 Installation Manual – Issue 3.0, October 2008
Chapter 5: Installation
TFTP Server Configuration Example
TFTP Server Configuration Example
This example provides information on some configuration settings for the Tftp32d TFTP server
(http://perso.wanadoo.fr/philippe.jounin/tftpd32.html). Depending on the TFTP server you are
using, these settings may be located in other dialog boxes or locations. Mitel does not provide
support for this TFTP server. It is shown here as an example only. For DB Programming
information discussed in this procedure, refer to the Mitel 5000 Features and Programming
Guide, part number 580.8006.
To set TFTP server properties:
1.
Launch the TFTP server application and click the Settings button.
Figure 5-57. Example TFTP Server Configuration
DB Programming
looks in Base Directory
(TFTP root directory)
2.
Configure the following settings. An example is shown on the previous page.
•
Base Directory: To DB programming, this is the TFTP server root directory. DB
Programming will look here for the information configured in the TFTP Pathname
field in DB Programming. In the example above, DB Programming is going to look
for files in C:\TFTP\current.
•
Global Settings: TFTP Server and TFTP Client.
•
DHCP Options: Ping address before assignation and Persistent leases.
•
TFTP Security: Standard
•
TFTP configuration: Leave at default settings.
•
Advanced TFTP Options:
o
o
o
o
3.
Option negotiation
Show Progress Bar: Displays file transfer information.
Translate UNIX file names: Without this checked, the operation will fail.
Allow ‘\’ As virtual root
Click OK, then restart the TFTP server application. The TFTP server must be running
before you attempt to upgrade the Mitel platform.
Mitel ® 5000 Installation Manual – Issue 3.0, October 2008
Page 5-145
Chapter 5: Installation
Upgrading Compact Flash-Type Memory
Upgrading Compact Flash-Type Memory
NOTICE
The Mitel 5000 v3.0 release requires a minimum 512MB compact flash-type memory card. If
this system is currently using a 256MB compact flash-type memory card, upgrade the card to
either 512MB (part number 841.0274) or 1024MB (part number 841.0273) before upgrading
the system to v3.0.
For additional information about Basic Voice Mail storage capacities, see page 4-18. For
database and voice processing data information, refer to the Mitel 5000 Features and
Programming Guide, part number 580.8006.
To upgrade the compact flash-type memory card:
1.
Schedule this upgrade at a time that will have the least impact on the customer.
2.
Access the Administrative Web Session pages and do the following:
a. Click the Advanced View link at the top of the window, and then navigate to the IP
Settings tab. Click the IP Access Control link in the navigation bar.
b. Print the AWS page displaying this information. If any rules are listed here, you will
need to recreate them after installing the new memory card. An example IP Access
Control page appears on the next page. (See the notice that follows.)
NOTICE
System Inoperability. Providing rules in the wrong sequence or constructed of the
wrong content, could deny you access to the system through the Administrative Web
Session or through DB Programming.
Page 5-146
Mitel ® 5000 Installation Manual – Issue 3.0, October 2008
Chapter 5: Installation
Upgrading Compact Flash-Type Memory
3.
Perform a database backup. For details, see page 5-96.
4.
Perform a voice processor backup. For details, see page 5-91.
5.
Power down the system and unplug the power cord. For details, see page 5-89.
6.
Remove the memory card and insert the new memory card into the slot labeled
COMPACT FLASH, as shown in the following example.
Chassis Front
Compact
Flash
Eject Button
7.
Plug in the power cord.
8.
Restore the database. For details see page 5-94.
9.
Restore the voice processor database. See page 5-94 for details. By default, Basic
Voice Mail is enabled. If using an external voice processing system, you will need to
disable BVM after restoring the voice processor database. Use the Administration Web
pages to verify that Basic Voice Mail is disabled.
10.
Check for any software updates and install them, if necessary. Although the larger
compact flash-type card has all the software included, always check for the latest
software updates to the system at the Mitel edGe Software Downloads Web site
(www.inter-tel.com/software). You will be prompted to reboot if a reboot is needed. If
using the Upgrade All option, the system will reboot automatically, if needed.
11.
Reload the license file.
12.
Access the Administrator Web Session pages and do the following:
a. Click the Advanced View link at the top of the window, and then navigate to the IP
Settings tab. Click the IP Access Control link in the navigation bar.
b. Enter any rules that were listed on this page prior to the upgrade.
Mitel ® 5000 Installation Manual – Issue 3.0, October 2008
Page 5-147
Chapter 5: Installation
Upgrading System Software to Version 3.0
Upgrading System Software to Version 3.0
This section describes required network conditions, working assumptions, and the processes
and procedures to follow when upgrading a Mitel 5000 platform.
Network Environment Requirements
For the most efficient network connectivity and system performance, the Mitel 5000 platform
must operate in a suitable network environment. Detailed characteristics appear in VoIP Data
Network Requirements, part number 835.2885.
If upgrading an Mitel CS-5600, the Base Server and the PS-1:
•
•
•
•
•
Must be connected to the same local area network (LAN).
Must be on the same subnet.
Must be on the same Virtual LAN (VLAN).
Must be connected on a 100 Mbps full-duplex switch.
Cannot have a Network Address Translation (NAT) device between them.
If a Base Server—as well as a PS-1—resides behind a firewall and you want to make changes
to the system from a remote location, make sure the system is accessible. To gain access to DB
Programming, IP endpoints, Secure Shell (SSH), Diagnostics Monitor, or Administrative Web
Sessions, the network administrator must open a specific range of User Datagram Protocol
(UDP) ports on the firewall.
Table 5-21 shows the UDP port ranges applicable to v3.0. These port assignments apply to the
Processor Module (PM-1) and the Processor Expansion Card (PEC-1) in the Mitel CS-5200/
5400/5600 Base Server. These port assignments do not apply to the Processing Server (PS-1).
All DB Programming occurs through the Base Server, unless the site is installing a PS-1.
Table 5-21. UDP Port Assignments for v3.0
System
Version
v3.0
UDP Port Range
UDP 6004–7039 (RTP and RTCP)
Processor Module (PM-1) base port – 6004
Processor Expansion Card (PEC-1) base port – 6604
The Mitel 5000 platform does not support IP networking through a Network Address Translation
(NAT) device.
Page 5-148
Mitel ® 5000 Installation Manual – Issue 3.0, October 2008
Chapter 5: Installation
Upgrade Assumptions
Upgrade Assumptions
The processes and applicable procedures detailed in this section assume that:
• You are upgrading a system running v1.2 or later. Systems running v1.2 must first upgrade
to v2.0, which requires a chargeable license. For sites running v.1.1 and earlier, contact
Mitel Technical Support for direction.
• The compact flash-type Mitel 5000 memory card remains the same throughout the
upgrade process. Mitel 5000 memory cards are available with system software in two
capacities: 512 MB and 1024 MB. For ordering details, see “Replacement Parts” on
page 7-2.
NOTICE
The Mitel 5000 v3.0 release requires a minimum 512MB compact flash-type memory
card. If this system is currently using a 256MB compact flash-type memory card,
upgrade the card to either 512MB (part number 841.0274) or 1024MB (part number
841.0273) before upgrading the system to v3.0.
If replacing the Mitel 5000 compact flash-type memory card in addition to upgrading the
software, install the new card in accordance with the Mitel 5000 Memory Card
Replacement Instructions, part number 835.3033.
You must not remove the memory card while the system is up and running or if power
is otherwise supplied to the chassis. Doing so may damage the memory card and the
system data on it.
Onboard TFTP Server
In a Mitel CS-5600 configuration, the TFTP server resides in the Base Server. The onboard
TFTP server is not intended for uses other than TFTP endpoint firmware downloads.
The TFTP server:
• is not used to upgrade any other Mitel 5000 software.
• does not support Mitel endpoint models 5212/5224 at remote locations/teleworker.
• supports local and remote downloads. Port 69 must be open on the corporate firewall for
endpoints at remote locations.
• might have issues with some SOHO routers because some of these routers do not provide
using custom DHCP options.
• uses ports 69 and 20001 for all transfers to save on socket resources. The server
responds on the same port, 69 or 20001, to which the client request is sent. Port 69 must
be open on the corporate firewall for endpoints at remote locations (Mitel models 5212/
5224 are not supported for teleworker/remote location use). If left at 0, the system will try
port 20001 followed by port 69.
See Table 5-22 on page 5-150 for information on TFTP, DHCP and other information relevant to
Mitel and Inter-Tel IP endpoints.
Mitel ® 5000 Installation Manual – Issue 3.0, October 2008
Page 5-149
Chapter 5: Installation
IP Endpoints Supported on the Onboard TFTP Server
Table 5-22. IP Endpoint Overview — Mitel and Inter-Tel
Setting
Mitel IP Endpoints
IP Address, Subnet
Mask, Default
Gateway
DHCP option 43 with the
following character string:
Inter-Tel IP Endpoints
DHCP or through endpoint
keypad
DHCP or through endpoint
keypad
DHCP option 128 or through
endpoint keypad
DHCP option 66 or through
endpoint keypad. Option 67
must be left blank or “/”
DHCP option 129 or through
endpoint keypad
Through UDP discoverya,
.cfg file, or through endpoint
keypad
VLAN ID (optional)
DHCP option 132 or through
endpoint keypad
Through endpoint Web page
or .cfg file
LAN priority
DHCP option 133
n/a
TFTP server IP
address
Call control address
id:ipphone.mitel.com;sw_tftp
=<inter-tel 5000 base server
IP address>;call_srv=<intertel 5000 base server IP
address>;vlan=1;l2p=6;dscp
=46
DHCP validation
(required for
DHCP)
Must equal: MITEL IP
PHONE
If using option 132, you
must use option 133.
a. Because UDP discovery relies on a broadcast, it works only within a Local Area Network (LAN).
IP Endpoints Supported on the Onboard TFTP Server
The following Mitel and Inter-Tel IP endpoints are supported for downloading firmware from the
onboard TFTP server:
• Mitel Models 5212, 5224, 5330, 5340 (subsequent updates can be initiated through the
Admin Web Session pages)
• Inter-Tel Models 8600, 8620, 8622, 8662 (optionally, existing endpoints can be updated
through Admin Web Session pages)
For all other Mitel 5000 supported endpoints, firmware downloads are performed as before v2.4
or as discussed in this document (beginning on page 5-151). Refer to the main installation
manual for information to download firmware beyond what is covered in this document.
Firmware Management
You must do a software downgrade to revert back to an older firmware version for Mitel
endpoints (post v2.4 installation). Multiple firmware versions are not currently supported; only
the latest versions are available for downloading.
Page 5-150
Mitel ® 5000 Installation Manual – Issue 3.0, October 2008
Chapter 5: Installation
Software Packaging
Software Packaging
Endpoint firmware images are maintained on the Mitel 5000 server for each of the supported
Mitel IP and Inter-Tel IP endpoints. The endpoint firmware is maintained in packages to be
upgraded as part of the Mitel 5000 system upgrade. The Inter-Tel images must be explicitly
installed.
Only one release of each firmware is maintained on the Mitel 5000 server.
Package Mechanism
The standard Mitel 5000 packaging procedure is used. There are two packages:
• cs-mitl-ep: Mitel 5000 Mitel endpoints package (automatically installed)
• cs-intl-ep: Mitel 5000 ITP endpoints package (must be selected from the AWS System
Upgrade Web page)
During the Mitel 5000 system upgrade (selected from the AWS System Upgrade Web page),
the installed packages are displayed along with the other system packages that are installed
during the Mitel 5000 system upgrade.
On a system upgrade from an earlier release (for example, Mitel 5000 Release 2.3) not
containing endpoint firmware, the Inter-Tel IP endpoint firmware packages are not automatically
installed, but the Mitel IP endpoint firmware IS automatically installed.
For any Mitel 5000 system software release, the latest endpoint packages will always be
delivered, even if they do not match the version numbers. For example it will not be uncommon
for a v2.4 release to contain v3.0 endpoint packages.
Package Downgrade
System downgrades are supported. For a system downgrade to an earlier release (for example,
Mitel 5000 Release 2.3) not containing endpoint firmware support, the endpoint firmware
packages and contents are removed from the Mitel 5000 system.
Space Management
Before any package upgrade starts, compact flash available space checks are performed on the
Mitel 5000 system as follows:
• A check for available space is performed before package transfer starts.
• A check for available space is performed after all packages are downloaded to the Mitel
5000 system and before the package contents are upgraded.
If the system upgrade determines there is not enough compact flash space available to
complete the system upgrade, the system upgrade displays a message informing you of a lack
of available space, and it will not install any packages. You are then prompted to remove some
voice-mail messages and try again. The system upgrade aborts.
Mitel ® 5000 Installation Manual – Issue 3.0, October 2008
Page 5-151
Chapter 5: Installation
New Installations for v3.0
New Installations for v3.0
This section describes some of the new installation details for v3.0. Also, refer to the main
installation manual for information on installing systems that is not covered here.
Do the following for new installs:
1.
Read the following sections as they apply to this new site installation:
•
“NOTICES: Please Read” below.
•
“Considerations” on page 153.
2.
Install the MAS hardware and software, as detailed in the documentation provided with
those products.
3.
Install the Mitel 5000 v3.0 software as described in “Notices” on page 106. At the end of
this procedure, follow the link to the information that applies to your installation.
4.
Install Mitel 5000 hardware as detailed in the main installation manual. If installing DEI
hardware, see page 5-163.
Upgrading to v3.0
These sections provide detailed information for upgrading to the v3.0 release, including
installing any optional hardware or software provided in this release.
NOTICES: Please Read
Please read the following notices before continuing.
Storage
Systems running Basic Voice Mail (BVM) must upgrade the compact flash-type memory card to
either 512MB (part number 841.0274) or 1024MB (part number 841.0273) before upgrading the
system to v3.0.
Trunk Values
Database Programming will notify you, the first time you connect after an upgrade, that the
gains for all trunks have been defaulted. Because the transmit and receive gains are Online
Monitor-only (OLM) fields, this warning only appears if the previous database version had any
non-default gain values.
System Restarts
Any time after v3.0 software is initially installed or upgraded from a prior release, and the
system restarts or needs to be restarted, you must press any button on the front of the Base
Server chassis to acknowledge an LCD prompt should one appear.
See page 5-39 for information on what prompts will appear according to the type of system
update required.
A prompt also appears after a processor module swap. When upgrading through the Web
interface, the LCD prompt does not appear. Also, Web page connections are not available
during the time the system is performing this operation. Do not interrupt any system operations
during a system restart.
Page 5-152
Mitel ® 5000 Installation Manual – Issue 3.0, October 2008
Chapter 5: Installation
Considerations
Considerations
Upgrading requires the following considerations. Refer to the main installation manual for any
upgrading information not discussed in this document.
• Network Environment Requirements: For details, refer to the main installation manual.
• Upgrade Options: Upgrading to Mitel 5000 v3.0 can involve several combinations of
hardware and software. For detailed discussion of possible scenarios and required
procedures, refer to the main installation manual. In this document, first upgrade to v3.0
before adding additional optional hardware such as DEIs, new voice mail, or other
hardware.
• Upgrade Licensing: A USB security key holds the Mitel 5000 serial number for a system
being upgraded. Licensing is uploaded from DB Programming. The license must match
the serial number on the key or the upload will fail. For details of software license
management, refer to the main installation manual. The upgrade process to v3.0 (page 5106) includes information on upgrading the license.
For Mitel CS-5200 and CS-5400 systems, the security key is inserted in the USB-B port on
the front of the Base Server. Refer to the main installation manual for details and
illustrations. For the Mitel CS-5600, four USB ports on the back of the PS-1 accept the
system security key. Refer to the main installation manual for an illustration. In the CS5600 configuration, the Base Server does not need a security key.
For programming procedures for features introduced with v3.0, see the Features and
Programming Guide (part number 580.8006). Features are described along with any
programming and troubleshooting information.
Install v3.0 Software
This procedure details the upgrade only. Perform the upgrade first before installing and
attempting to bring up the voice mail or DEI hardware.
NOTICE
The Mitel 5000 v3.0 release requires a minimum 512MB compact flash-type memory card. If
this system is currently using a 256MB compact flash-type memory card, upgrade the card to
either 512MB (part number 841.0274) or 1024MB (part number 841.0273) before upgrading
the system to v3.0.
To upgrade the system to version v3.0:
1.
Check that you have done the following:
•
The system is at version 2.x. If not at version 2.x, refer to the main installation
manual for information necessary to get to this version.
Space Limitations:
• If installing voice prompts, keep in mind space limitations on
the compact flash-type memory card. If you no longer want
a particular language prompt package, remove it and install
the desired language prompt package.
IMPORTANT
•
• When downloading the files, the system checks to make
sure there is enough available space on the compact flashtype memory card to upgrade all components. If there is not
enough space to complete the upgrade for all packages, a
dialog box appears warning you there is not enough space
and the upgrade process is stopped. Delete unused voice
mail messages to free up space, and then restart the
system upgrade.
Use only Internet Explorer (IE) v6.x or IE v7.x. This procedure has not been tested
with other browsers.
Mitel ® 5000 Installation Manual – Issue 3.0, October 2008
Page 5-153
Chapter 5: Installation
Install v3.0 Software
2.
Perform a Database backup and a Database save using DB Programming. For details,
“Saving the System and Voice Processor Databases” on page 5-91. Also, back up the
voice mail data, if applicable.
A database backup using DB Programming saves the database to the system. However,
also perform a Database Save to save a copy on your computer or other location you
can access. You can use this copy should the system copy not work or not be available.
If using an EM external voice mail system, refer to the main installation manual for
details.
3.
From an Internet Explorer (IE) window, access the Mitel edGe Software Downloads Web
site (www.inter-tel.com/software). In Europe, download the endpoint firmware software
from the appropriate European FTP server.
4.
Unzip the files and transfer the endpoint firmware to a location accessible by your TFTP
server, so they are available for the upgrade.
The Mitel 5000 system Administrative Web Session application accesses this TFTP
server information to look for the firmware upgrade files.
The Mitel CS-5200, CS-5400, or CS-5600 system Admin Web Session application
accesses this TFTP server IP address and path information to look for upgrade files.
With this information in DB Programming, you will not need to enter it in the Admin Web
Session upgrade page each time you want to access the TFTP server.
Page 5-154
5.
In IE, type the URL to access the Administrative Web Session interface on the Mitel
5000 platform you want to upgrade.
6.
Type the Mitel 5000 platform user name and password to log on. The default user name
is it5k and the default password is itpassw. The main Web page appears.
7.
Click the System Management tab, and then click the System Upgrade link. The
following page appears.
Mitel ® 5000 Installation Manual – Issue 3.0, October 2008
Chapter 5: Installation
Install v3.0 Software
8.
Change the TFTP Address information, if required:
a. In the TFTP Address box, type the IP address of the TFTP server holding the v3.0
upgrade files.
Make sure this IP address points to a separate TFTP server—do not set it to the
internal TFTP server on the Mitel 5000.
b. Clear the third box, as shown in the example above. It is not necessary to specify
where on the Base Server to store the files, unless the files are not in the TFTP
server root directory. If the TFTP files are not in the TFTP server root directory,
specify the path in this third box.
c. Click Change Location.
9.
Click Upgrade All. After the upgrade process is complete, the system reboots
automatically. Wait for the system to reboot before continuing.
NOTICE
Any time after v3.0 software is initially installed or upgraded from a prior release, and
the system restarts or needs to be restarted, you must press any button on the front
of the Base Server chassis to acknowledge an LCD prompt should one appear.
See page 5-39 for information on what prompts will appear according to the type of
system update required.
If installing voice prompts, keep in mind space limitations on the compact flash-type
memory card. If you no longer want a particular language prompt set, remove it and
install the desired language prompt package.
The buttons at the bottom of the page are described as follows:
•
Reset: Clears selected check boxes and clears the TFTP address boxes.
•
Update: Retrieves the current packages information from the TFTP server and
updates what needs to be upgraded and what can be installed.
•
Install: Upgrades only the packages selected.
•
Upgrade All: Upgrades all packages newer than any existing packages.
Diagnostics or log files are also updated for the application, system file, or utility
upgraded. For specific information or messages that appear about the files and
applications upgraded or installed, see the main manual.
10.
Click System Upgrade to navigate back and verify the v3.0 packages that installed.
11.
Restart the browser and start another Admin Web Session for all upgrade changes to
take effect. The Web Session page appears, as shown in the following example.
Mitel ® 5000 Installation Manual – Issue 3.0, October 2008
Page 5-155
Chapter 5: Installation
Install DB Programming
SCR
12.
Run this upgrade procedure on the PS-1 (CS-5600) server, if applicable to this site. This
is required if this site is using a PS-1 server.
13.
Do either of the following:
•
•
14.
If you want to make the Inter-Tel IP endpoint firmware available on the internal
TFTP server, do the following:
a.)
Click the System Management tab, and then click the System Upgrade link.
b.)
Click Update at the bottom of the page.
c.)
Select the check box for the Inter-Tel IP endpoint firmware.
d.)
Click Install at the bottom of the page.
If you want to remove voice prompts you do not need, click the link for the voice
prompt file name, and then click Remove.
Continue to “Install DB Programming” next.
Install DB Programming
NOTICE
Database Programming will notify you, the first time you connect after an upgrade, that the
gains for all trunks have been defaulted. Because the transmit and receive gains are Online
Monitor-only (OLM) fields, this warning only appears if the previous database version had
any non-default gain values.
Do the following:
Page 5-156
1.
Make sure Windows is running, and you have local administrative rights, then insert the
DB Programming CD into the computer CD-ROM drive.
2.
Open the CD folders and click DATABASE_PROGRAMMING.
3.
Click the version folder to be installed. For example, the V20 folder represents Version
2.0 Software. You may copy the DB Programming folder to your DB Programming
computer for emergency recovery.
Mitel ® 5000 Installation Manual – Issue 3.0, October 2008
Chapter 5: Installation
Install DB Programming
4.
Click either SINGLE_FILE_INSTALLATION or FLOPPY_DISK_INSTALLATION. The
Single_File_Installation is used to load the required programming software onto a
desktop or laptop computer with a CD-ROM. The Floppy_Disk_Installation is used to
make the floppy disks for any desktop or laptop computer that does not have a CD-ROM
drive.
5.
Click XXXX_PROD_DB_PROG (where XXXX is the version number), to launch the
executable file.
6.
After reading the license agreement, click I Accept to begin the installation. The
Welcome dialog box appears.
7.
Click Next to continue. The Choose Destination Location dialog box appears, prompting
for the desired destination directory name.
Mitel ® 5000 Installation Manual – Issue 3.0, October 2008
Page 5-157
Chapter 5: Installation
Install DB Programming
8.
Click Next to accept the default directory. Or, click Browse and select the directory
where the DB Programming files will be stored on the selected drive.
Although you can select the directory, it is recommended that you use the default
directory.
The Backup Replaced Files dialog box appears, prompting for the directory location to
store replaced files (for example, backing up files from a previous installation).
9.
Page 5-158
Select Yes (this does not apply to new installations) and accept the default location, or
click Browse and select the directory selected in the previous step. Click Next. The
Select DB Programming dialog box appears, prompting for the country type.
Mitel ® 5000 Installation Manual – Issue 3.0, October 2008
Chapter 5: Installation
Install DB Programming
10.
Select the country type, then click Next. The Select Utilities dialog box appears,
prompting for utility selection.
The Remote Configuration option is reserved for controlled introduction.
11.
Select the utilities to install, then click Next. The Select Program Manager Group dialog
box appears.
12.
Select the program manager group to which you want to install, then click Next. The
Start Installation dialog box appears (next page) listing a summary of the installation
choices.
Mitel ® 5000 Installation Manual – Issue 3.0, October 2008
Page 5-159
Chapter 5: Installation
Install DB Programming
13.
Click Next to start
the installation, or
click Back to
navigate back
through the wizard
and make
changes.
14.
The software
installation starts.
During the
installation, a
window displays
the percentage of
the files that have
been copied.
15.
The last installation
window gives you
the opportunity to
view a “Read Me”
file that explains
the enhancements
that have been
made to the
System. If you
would like to view it
now, click Yes. If
not, click No (you
can still view it later
by selecting
Readme in the
programming
group).
16.
Click Finish, then
click OK to restart
the computer and
complete the
installation. After the restart, the software is loaded and ready to use.
17.
To begin programming, select Start – Programs – Inter-Tel 5000 DB Programming –
Session Manager (or double-click the Session Manager icon on your desktop). Start a
DB Programming session.
NOTICES
Upon DB Programming launch:
• Database: Restore the saved, converted and tested database.
• License: Upload the new license.
• Time Zone: Set the time zone for the location where this system is located.
• Trunk Gains: Database Programming will notify you, the first time you connect
after an upgrade, that the gains for all trunks have been defaulted. Because the
transmit and receive gains are Online Monitor-only (OLM) fields, this warning
only appears if the previous database version had any non-default gain values.
Page 5-160
Mitel ® 5000 Installation Manual – Issue 3.0, October 2008
Chapter 5: Installation
Install DB Programming
18.
Convert and test the database. Use the Mitel 5000 DB Converter utility to convert the
current database (database you saved prior to upgrading), then use the DB Test utility to
test it.
NOTICE
You will lose your email gateway settings if you do not convert and test the database
as indicated in this step.
19.
Restore the saved, converted, and tested database.
20.
Upload the license file.
If you do not upload the software license, the system considers the license as “invalid”
and issues Alarm 125. For a complete list of alarm messages, refer to the Message Print
Diagnostics Manual, part number 550.8018.
With regard to the USB security key and SSL:
• The serial number is stored on the USB security key. The license
must match the serial number on this key or the upload will fail. If
for any reason you need to replace the USB security key, make
sure you upload the latest license file before replacing the key.
Attempting to upload a license file after changing the USB
security key results in an error and the system will not function.
IMPORTANT
• If the USB security key is not installed when the system reboots,
the software license will need to be uploaded.
a. From the DB Studio menu bar, select Operations – Software License Operations –
Upload Software License.
b. Enter the path and name of the license file or click Browse to search for the file.
c. Click Start. The system compares the new software license to the existing license.
For details about changing software licenses, refer to the main installation manual. If
you click Start before selecting a license (.isl), a message appears, informing you
that you have not identified a file name.
d. Click Finish. If you click Cancel, the license is not uploaded. The screen below
shows an example of a license loaded onto a Mitel CS-5200.
Mitel ® 5000 Installation Manual – Issue 3.0, October 2008
Page 5-161
Chapter 5: Installation
Install DB Programming
21.
Make sure the time zone is set correctly for the site where this system is physically
located.
a. From the DB Programming home screen (system-wide parameters), select the
current Time Zone value.
b. Scroll to the desired setting.
c. Click ENTER or select another field to save your change.
22.
Do one of the following:
•
If you did not receive a prompt about the trunk gain changes, continue to step 23.
You will not receive a prompt if you never set trunk gains beyond the default
values.
•
If you did receive a prompt about the trunk gain changes, informing you all gains
for trunks have been defaulted:
a.)
b.)
c.)
•
Page 5-162
Run the Hybrid Balance test. Refer to the Mitel 5000 Features and
Programming Guide, part number 580.8006, for information.
Run the Loop Loss test and measure loop loss. Refer to the Mitel 5000
Features and Programming Guide, part number 580.8006, for information.
You can view results in Message Print. Work with the Central Office (CO) to
get the number to measure the fixed diagnostics tone and for the expected
level (usually 0 dbm). You then need to set the Mitel 5000 system to this level.
If any future Loop Loss tests are outside this level, contact the CO.
Continue to step 23.
If this is a new installation, run the Configuration Wizard and the Networking
Wizard from DB Programming. Refer to the Mitel 5000 Features and Programming
Guide, part number 580.8006, for details on the Networking Wizard. For
information on the Configuration Wizard screens, see page 6-69.
23.
While in DB Programming, add several test users and endpoints, and make several
internal and external calls to verify the system is functional. Test the voice mail system
(BVM or external voice mail as applicable).
24.
Continue to either of the following locations:
•
“Optional: Installing and Configuring Mitel NuPoint Messenger and the Mitel 5000”
on page 5-163
•
“Optional: Installing DEI Hardware to Expand Digital Capacity” on page 5-163
•
“Optional: Installing an External USB Modem” on page 5-172
•
Programming features and enhancements to v3.0. Refer to the Mitel 5000 Features
and Programming Guide, part number 580.8006.
Mitel ® 5000 Installation Manual – Issue 3.0, October 2008
Chapter 5: Installation
Optional: Installing and Configuring Mitel NuPoint Messenger and the Mitel 5000
Optional: Installing and Configuring Mitel NuPoint Messenger
and the Mitel 5000
Refer to the Mitel NuPoint documentation for all hardware and software configuration
procedures not discussed here or in other release-related documentation.
Refer to the Mitel 5000 and NuPoint Messenger Integration Guide, part number 580.8008, for
information on setting up NuPoint Messenger as the voice mail system for the Mitel 5000. The
following Mitel 5000 voice mail applications and features are not supported in v3.0 with NuPoint
Messenger:
• Automatic Speech Recognition (ASR). Refer to the Mitel Speech Auto Attendant (SAA)
product, provided with NuPoint Messenger for similar functionality.
• E-Mail Reader
• Record-A-Call (RAC)
• Soft menu buttons on the endpoints when making internal calls to voice mail
Optional: Installing DEI Hardware to Expand Digital Capacity
This release allows you to expand DEI capacity up to four total chassis. See page 1-3 for
additional information. See page 1-4 for licensing requirements. The following sections are
discussed:
• “Considerations” on page 5-164
• “Installing/Upgrading the DEI Chassis” on page 5-165
• “Troubleshooting” on page 5-166
• “Downgrading DEI Chassis” on page 5-166
• “Time Slots for DEIs” on page 5-167
Mitel ® 5000 Installation Manual – Issue 3.0, October 2008
Page 5-163
Chapter 5: Installation
Considerations
Considerations
In addition to any hardware/software information discussed in the main manual and in the DEI
notice (part number 835.3242) that ships with the DEI unit, please take into consideration the
following, when installing and bringing up DEI units:
• Upgrade the system to v3.0 before installing and upgrading DEIs. A license is required for
each DEI you want to add. Perform a database backup and database save before
installing any DEIs. Be prepared to log on and view the logs.
• Use the Power Calculator to approximate the power usage for the Mitel 5000 chassis and
related peripherals, including the DEI chassis.
• The Power Calculator is available on the software CD-ROM or at the Mitel edGe Axxess
Software Utilities Web page (http://tinyurl.com/5nh6q5). For the purposes of the calculator,
the DEI chassis is classified as a Small App, and the CS-5600 chassis is classified as a
Medium App.
• In addition to the installation guidelines for hardware in the main manual, check for proper
grounding. For example, the ground lug on the chassis must be in parallel with the AC
ground via the power supply. Check with local Building Safety Inspectors on the
installation of the ground wire for the system. Conduit may be required between the
ground bar and earth ground. Refer to Inter-Tel’s System Equipment Grounding
Guidelines, part number 835.2845, for additional information.
• Detach the voice mail system from the last DEI in the chain before adding additional DEI
units. When installing and upgrading new DEIs, leave the system powered on, disconnect
existing DEIs, and connect new DEIs one at a time. If the system has DEIs, disconnect
them, and connect only DEI #1. If no DEIs exist, and you are adding new DEIs, connect
only DEI #1.
• If the attached DEIs do not come online, recycle the power on all DEIs; if they remain
offline, contact Technical Support for further assistance.
The DEI low-level firmware controls how it communicates. For this upgrade, the method of
communication changes. To update the DEI low-level firmware, it must be communicating
in the previous two-DEI configuration. The Mitel 5000 system software automatically loads
the latest DEI software when DEIs are connected and the system is restarted.
• When adding new DEI units, you can connect two DEI cables together to extend the reach
between the Mitel 5000 and the DEI units you want to add. This allows existing DEIs to
remain in place while you upgrade the new DEIs.
• When installing any DEI unit, make sure module bays are empty. DO NOT attach DEIs to
the system with populated module bays. Use the procedures in the main installation
manual for adding modules to the system. The servers are shipped without modules
installed. The examples throughout this document are for illustrative purposes only.
Module covers must remain in place if there is not an actual module to occupy a module
bay. The covers help to ensure foreign material does not enter the chassis.
• In 4-DEI mode, there are 48 voice channels to each DEI; this provides one voice channel
per digital endpoint. Features that require a second voice channel, such as OHVA, MDPM,
and dual-SLA, require special attention. Enable these features using the current methods;
however, these features use a voice channel that could otherwise be used by an endpoint
on the same DEI. DB Programming counts the time slots used by these features and
enforces the maximum timeslot limit for each DEI.
Page 5-164
Mitel ® 5000 Installation Manual – Issue 3.0, October 2008
Chapter 5: Installation
Installing/Upgrading the DEI Chassis
Installing/Upgrading the DEI Chassis
To install the DEI chassis:
1.
Make sure you have upgraded system software to v3.0.
•
If the system has DEIs, disconnect them, and connect only DEI #1. If a voice mail
system was connected to the last DEI, remove the VM—DEI cable from the last
DEI in the chain.
•
If no DEIs exist, and you are adding new DEIs, connect only DEI #1.
See page “Upgrading System Software to Version 3.0” on page 5-148. Also, refer to the
DEI notice, part number 835.3242, that is included in the box with the DEI you want to
install.
2.
Install the chassis in the rack under the Mitel CS-5200/5400/5600 Base Server. Allow
room below the chassis for future expansion (for example, more DEI chassis or an
optional voice processing system such as EM) and proper cooling. See Figure 5-58 on
page 5-167, Figure 5-59 on page 5-168, Figure 5-60 on page 5-169, and Figure 5-61 on
page 5-170 for examples.
3.
When installing one or more DEIs, do the following:
a. Leave the system powered on. Do not power cycle the Base Server or PS-1, if
applicable.
b. Disconnect any existing DEI units.
c. Install the first DEI unit and connect the DEI cable to the system. After the first DEI is
installed and upgraded, power cycle the DEI, and then remove the cable and install
the next DEI. You can connect several DEI cables together as shown in Figure 5-61
on page 5-170 to extend the cable and reach other DEI units.
d. After the last DEI is upgraded, reconnect all DEIs and power up the system. All are
now functional and ready for programming.
To verify functionality and a successful upgrade:
1.
Insert one DEM into each chassis and equip the DEM in DB Programming.
2.
Check the log file in the Admin Web Session pages.
a. Establish an Admin Web session. Log on using the user name it5k. Use the default
password itpassw.
b. Click the Logging tab, then click the Log Files link in the navigation pane.
c. Locate the DEI Logs section and click romd_out_dei.log.
d. Locate the following line. This line indicates a successful DEI update.
"update_dei: Update done size = 65536, Reloading Prom"
An alternative method to check for when a DEI upgrade is complete is to look in
Message Print for the Digital Keyset Board online message. This method assumes
that at least one DEM module is inserted in the DEI and it is equipped in DB
Programming.
3.
Do either of the following:
•
Begin programming the system. Refer to the Mitel 5000 Features and
Programming Guide, part number 580.8006.
•
Continue to installing other optional equipment:
o
NuPoint Messenger: Refer to the Mitel 5000 and NuPoint Messenger
Integration Guide, part number 580.8008
o
External USB modem (page 5-172)
Mitel ® 5000 Installation Manual – Issue 3.0, October 2008
Page 5-165
Chapter 5: Installation
Troubleshooting
Troubleshooting
See Table 5-23 for information on troubleshooting DEIs.
Table 5-23. Troubleshooting DEIs
Scenario
DEI is going offline
Cause
Resolution
Check the Admin Session Web
page log:
romd_out_dei.log.
• Make sure cables are
If you see multiple messages,
such as “MP present,” this is an
indication the DEI link is not
stable.
• Connect one DEI only. Do
firmly attached.
• Try a different DEI cable.
this for all DEIs. This will
help to isolate the faulty
device.
• Make sure the system is
grounded properly.
After upgrading to v3.0, the The DEI low-level firmware was
system cannot
not upgraded correctly.
communicate with one or
more DEI(s).
Upgrade one DEI at a time as
described in the previous
pages. Check the Admin
Session Web page log
romd_out_dei.log for
successful upgrade information.
After upgrading to v3.0, the Incorrect license.
system cannot
communicate with the third
and/or fourth DEI(s).
One or more DEI(s) have over
allocated voice channels.
Obtain a valid v3.0 license with
the appropriate number of
DEIs.
The system is set to 2-DEI
mode.
The system is showing “Out A call on a DEI failed because
of Voice Channels” alarm.
of timeslot/voice channel over
allocation.
Redistribute devices among the
DEIs to avoid voice channel
over allocation. Disable
features such as OHVA, dualSLAs, or MDPMs to reduce the
required voice channels on a
DEI.
Change the DEI Mode setting
in DB Programming to 4-DEI
mode.
Move devices to other DEIs to
eliminate the timeslot over
allocation.
Downgrading DEI Chassis
To downgrade DEI chassis:
To connect a DEI that has v3.0 firmware to a pre-v3.0 Mitel 5000 system, the system
must downgrade the DEI firmware during installation. Do not connect more than one DEI
to the pre-v3.0 Mitel 5000 system at a time. Follow the procedure “Installing/Upgrading
the DEI Chassis” on page 165.
Page 5-166
Mitel ® 5000 Installation Manual – Issue 3.0, October 2008
Chapter 5: Installation
Time Slots for DEIs
Time Slots for DEIs
Table 5-24 summarizes the devices, features, and modules that require time slots.
Table 5-24. Time Slots for DEIs
Device/Feature
Time Slots Used
Digital Endpoints
1
Digital Endpoint/MDPM
2
Dual Single Lines
2
Dual DID
2
Single Line/DID
2
Digital Endpoint with OHVA Receive On
2
Single Line Module - 8
8
Figure 5-58. Example Mitel 5000 DEI Chassis Front and Back View
DEI Chassis Front
PWR
MODULE 1
ON
BUSY
MODULE 2
ON
BUSY
MODULE 3
ON
BUSY
Status Panel
DEM-16
DEM-16
Ground Lug (Earth ground)
5–8
9 – 12
DEM-16
Remove Module
LED
13 – 16
ONLINE
1–4
BUSY
13 – 16
Fuse
BAY 3
EXP 2
9 – 12
ONLINE
5–8
BAY 2
1–4
DEI Chassis Back
BUSY
EXP 1
BAY 1
To Mitel 5000 Base Server
Module Bay
Cover
Power
Battery Alarm LED
To optional External Voice Mail or next DEI in series
Mitel ® 5000 Installation Manual – Issue 3.0, October 2008
Page 5-167
Chapter 5: Installation
Time Slots for DEIs
Figure 5-59. Example Base Server Chassis Front and Back Views
Base Server Front
2-Line LCD Panel
Compact Flash-type
memory card
Eject Button
LCD Panel Controls
KEY (security) recessed
USB-A (USB hub; UPS cable; or,
Basic Voice Mail backup)
USB-B
Optional External Voice Mail or DEI
Paging Port
Base Server Back
Fuse
EXP
DUAL LS DUAL SL
PAGE MOH
Music On Processor
Hold Port
Module
Remove
Module LED
Battery Alarm LED
Ground Lug (Earth ground)
Quad LS
Module
T1/E1/PRI
Module
Module
Cover
Power
REF Online
Clock Status
LED LED
(2) Single Line Ports
(2) Loop Start Ports
Page 5-168
Mitel ® 5000 Installation Manual – Issue 3.0, October 2008
Chapter 5: Installation
Time Slots for DEIs
Figure 5-60. Example DEI Connection to Mitel 5000 Base Server: 2-DEI
Base Server Back
DB-15
(to VM only or DEI)
EXP
DUAL LS DUAL SL
PAGE
MOH
Ethernet to LAN via switch
Mitel 5000 Base Server
If a DEI chassis exists
as part of the
configuration, you must
connect the external
voice mail computer to
the bottom DB-15
connector on the last
DEI chassis in the
chain. Up to four DEI
chassis are supported in
the system.
DEI cable
part number,
813.1847
or
813.1847-001
Ethernet to LAN
through switch
See Table 524 on
page 5-167
for capacity
information.
DEI
DEI
Digital Endpoint
Modules (DEM-16)
or Single Line Modules
(SLM-8)
Optional Component(s)
Cable to external VM
(part number, 813.1806)
SWITCH*
Optional External VM
LAN
Ethernet cable to LAN
through switch
1–4
5–8
To VM only or next DEI only
45-48
41-44
37-40
BAY 3
33-36
29-32
25-28
21-24
BAY 2
17-20
13-16
09-12
05-08
01-04
BAY 1
Mitel ® 5000 Installation Manual – Issue 3.0, October 2008
13 – 16
DEM-16
EXP 2
The endpoint
ports on each DEI
are numbered 116 for a total of 48
ports.
9 – 12
BAY 1
EXP 1
BUSY
To Mitel CS-5x00 only
ONLINE
DEI (1) Chassis Back
Page 5-169
Chapter 5: Installation
Time Slots for DEIs
Figure 5-61. Example Adding DEIs to the Mitel 5000 Base Server: 4-DEI
Base Server Back
EXP
Male termination
into Base Server
output
Male termination
into Base Server
output
DUAL LS DUAL SL
PAGE
MOH
Female termination
into first DEI input
or VM input (EM)
Male termination
into second DEI output
or VM input (EM)
BUSY
ONLINE
9 – 12
13 – 16
BAY 1
5–8
DEM-16
EXP 2
Female termination
into third DEI input
or VM input (EM)
ONLINE
13 – 16
BUSY
Female termination
into fourth DEI input
or VM input (EM)
9 – 12
ONLINE
Male termination
into third DEI output
5–8
BAY 1
1–4
EXP 1
DEM-16
EXP 2
DEI 3
DEI 4
EXP 2
5–8
9 – 12
BAY 1
1–4
EXP 1
Page 5-170
ONLINE
Female termination DEI 2
into second DEI input
or VM input (EM)
1–4
=
BUSY
DEI 1
EXP 1
Female termination
into third DEI input
or VM input (EM)
13 – 16
DEM-16
EXP 2
Male termination
into first
DEI output
9 – 12
BUSY
Connect two cables
to make one longer
cable to reach
third DEI.
5–8
BAY 1
1–4
EXP 1
13 – 16
DEM-16
DEI Cable
(part number,
813.1847 or
813.1847-001)
Mitel ® 5000 Installation Manual – Issue 3.0, October 2008
Chapter 5: Installation
Time Slots for DEIs
Figure 5-62. Example DEI and External Voice Mail Connection to Base Server
Base Server Back
EXP
DUAL LS DUAL SL
PAGE
MOH
Female termination
into first DEI input
or VM input (EM)
Male termination
into first
DEI output
5–8
9 – 12
13 – 16
BUSY
1–4
EXP 1
BAY 1
DEI Cable
(part number,
813.1847 or
813.1847-001)
Module-to-Chassis Fastener
ONLINE
Male termination
into Base Server
output
DEM-16
EXP 2
DEI Chassis Back
DEI 1
Depending on the
computer model
used, the card slot
arrangement and
connector locations
shown at right could
be different.
Power Cable Connector
EXP 2
9 – 12
BAY 1
Male termination
into second DEI output:
Mitel 5x00-to-VM cable
(part number, 813.1806)
5–8
13 – 16
BUSY
1–4
EXP 1
ONLINE
Female termination DEI 2
into second DEI input
or VM input (EM)
DEM-16
Video Card
Network Interface Card
1ST VPC
2ND VPC
Optional FAX card (not in EM)
Sample
Card Slot
Arrangement
To Mitel 5000 Base Server
or DEI (part number, 813.1806)
not used
NOTICE
Equipment Damage: Use adapters when connecting any 6-pin plug to an 8-pin jack.
Although a 6-pin plug will fit into an 8-pin jack, the plastic on the 6-pin plug housing will
damage pins 1 and 8 on the 8-pin jack. Not using adapters will increase the likelihood of
failure (to pins 1 and 8 in the 8-pin jack) should that jack need to be used with an 8-pin plug in
the future. Various adapter types are available based on how you choose to connect to the
patch panel.
Mitel ® 5000 Installation Manual – Issue 3.0, October 2008
Page 5-171
Chapter 5: Installation
Optional: Installing an External USB Modem
Figure 5-63. Example Voice Mail or DEI Connection to Mitel 5000 Base Server
Base Server Back
DB-15
(to VM only or DEI)
EXP
DUAL LS DUAL SL
PAGE
MOH
Ethernet to LAN via switch
If a DEI chassis exists
as part of the
configuration, you must
connect the external
voice mail computer to
the bottom DB-15
connector on the last
DEI chassis in the chain.
Up to four DEI chassis
are supported in the
system.
DEI cable
part number,
813.1847 or
813.1847-001
Mitel 5000 Base Server
Ethernet to LAN
through switch
See Table 524 on
page 5-167
for capacity
information.
DEI
DEI
Digital Endpoint
Modules (DEM-16)
or Single Line Modules
(SLM-8)
Optional Component(s)
Cable to external VM
(part number, 813.1806
SWITCH*
LAN
Ethernet cable to LAN
through switch
Optional External VM
To VM only or next DEI only
.
EXP 2
5–8
9 – 12
BAY 1
1–4
EXP 1
13 – 16
BUSY
To Mitel CS-5x00 only
ONLINE
DEI (1) Chassis Back
DEM-16
Optional: Installing an External USB Modem
The Axxess/5000 Modem Kit (part number 550.3026) has been updated to include a new
Universal Serial Bus (USB) to Asynchronous (ASYNC) cable (part number 813.1873) that
allows you to attach an external modem to the Mitel 5000 system. After all connections are
established, you can configure, manage, or debug the system through this modem connection.
For installation and troubleshooting information for the external modem, refer to the Modem Kit
Installation and Troubleshooting for Mitel 5000 and Inter-Tel Axxess document (part number
835.1621) included in the Modem Kit.
Page 5-172
Mitel ® 5000 Installation Manual – Issue 3.0, October 2008
Chapter 5: Installation
Installing Mitel IP Endpoints
Installing Mitel IP Endpoints
For complete programming procedures for features introduced with v3.0, refer to the
Programming chapter in the Mitel 5000 Features and Programming Guide, part number
580.8006. Refer to other locations in this chapter for information to install or upgrade system
software beyond what is covered in this document.
Connect the cables to your endpoint after you have attached the mounting base unit to it.
Before installing the endpoint, make sure you are familiar with the following powering options:
• An IEEE 802.3af LAN-powered jack provides power to the endpoint using a LAN cable.
The endpoint receives ethernet signals and power through the same cable, also known as
Power over Ethernet (PoE).
• An Ethernet power adapter provides power to the endpoint using a LAN cable. The
Ethernet power adapter is connected to the LAN using a separate LAN cable connected to
a jack. (The endpoint receives ethernet signals and power through the same cable.)
To continue to the installation procedure, see page 5-174.
For specifications, see page 4-44.
Notices
Please read this section before continuing.
NOTICES
• Possible Functionality Degradation. Mitel strongly recommends using the IP devices
on a managed private network. If connected to the public Internet, IP devices will
function, but the quality may suffer due to the dynamic bandwidth availability. The
possible problems could be voice quality degradation, garbled speech, dropped calls,
equipment resets, etc. Also, the VoIP suitability of any Internet connection can change
at any time, with no advance notice. Mitel cannot guarantee any voice quality when
connected to the public Internet. Therefore, Mitel is not responsible for network
quality issues that are caused by using the public Internet. For recommended
guidelines on IP network specifications, refer to the main installation manual.
• Possible Network Instability. Do not connect the IP endpoint PC ports to each other,
and do not connect them to a hub. Doing so may cause adverse network conditions.
Also, Mitel recommends that you not connect additional hard IP endpoints to the PC
ports. Due to the QoS (Quality of Service) of the hard IP endpoints, those located
downstream will have a lower priority when sending data to the network. Under heavy
network conditions, voice quality may be diminished.
• Equipment Damage Hazard. Only use a single appropriate power adapter with the IP
device. Do not connect a U.S. power supply and a Universal power supply to the same
IP device. Also, when using the Universal Power Supply with a barrel connector, no
devices, such as hubs, should be inserted between the KS/SLA jack on the adapter and
the LAN jack on the IP endpoint because power is supplied through the cable.
To reduce the effects of AC voltage surges and spikes that may cause damage to the
electronic components, a surge/spike protector with the following specifications is
recommended:
o
Clamp voltage transients at 300 VAC within 5 nsec when exposed to waveforms as
described in the ANSI/IEEE Standard C62.41-1980 (IEEE 587).
o
RFI/EMI noise reduction by at least 20 dB at frequencies between 5 kHz and 30
MHz.
The Mitel CommSource division sells a surge/spike protector, part number 900.0500,
that possesses all of the recommended specifications.
Mitel ® 5000 Installation Manual – Issue 3.0, October 2008
Page 5-173
Chapter 5: Installation
Special Considerations for Mitel Endpoints
Special Considerations for Mitel Endpoints
Consider the following before installing the Mitel IP endpoints:
• Systems running Basic Voice Mail (BVM) must upgrade the CompactFlash® card to either
512MB or 1024MB before upgrading.
• When upgrading Mitel 5000 software versions, Mitel recommends that you do not use a
wireless network connection because a wired connection is less likely to interrupt the
upgrade.
• The Mitel Models 5212 and 5224 are not supported for remote/teleworker locations.
• When using a Mitel Model 5330 or 5340 from a remote/teleworker location, make sure port
69 is open on the corporate firewall to allow communication to the Mitel 5000 server.
• Mitel IP endpoints use DHCP option 128 for TFTP communication and DHCP option 129
for the call control address. Inter-Tel IP endpoints use DHCP option 66 for TFTP
communication and UDP discovery (broadcast) for the call control address (.cfg file).
• DB Programming provides the option to convert existing Inter-Tel endpoint extensions to
Mitel endpoint extensions.
• Preprinted paper designation cards are available for the Models 5212 and 5224.
Mitel Endpoint Hardware Installation and Cabling Procedure
To install Mitel IP endpoints:
Page 5-174
1.
Plug the handset cord into the handset port and thread it through one of the slots on
either side of the base unit. See Figure 5-64 on page 5-175 for connection point
examples.
2.
Thread the LAN cable plug through the slot on the back of the installed base unit, and
plug it into the LAN port on the back of the endpoint.
3.
Plug the other end of the LAN cable into one of the following:
•
Phone port on Ethernet power adapter (power brick). Then, connect the Ethernet
adapter to the LAN using a separate LAN cable. Plug the power adapter into an AC
power outlet.
•
LAN-powered (PoE) jack. The LAN-powered endpoint can also provide power to
any attached peripheral, such as a conference unit or a DSS/BLF console
(reserved for future use).
4.
(Optional) Plug the headset cord into the headset port on the back of the endpoint.
Thread the headset cord through one of the slots on either side of the base unit, as
shown for the handset cord in Figure 5-64 on page 5-175.
5.
Optional for Model 5224 (reserved for future use): For the LAN-powered 5224 endpoint
equipped with a peripheral (for example, the Model 5310 IP Conference Unit), plug the
DC adapter cord (part number 51005172) into the power input and AC power outlet.
6.
Do either of the following:
•
Continue to “Wall-Mounting Mitel IP Endpoints” on page 5-176.
•
Continue to “Initial Mitel Endpoint – Automatic Configuration (DHCP)” on page 5178.
•
Continue to “Initial Mitel Endpoint – Manual Configuration” on page 5-179.
Mitel ® 5000 Installation Manual – Issue 3.0, October 2008
Chapter 5: Installation
Mitel Endpoint Hardware Installation and Cabling Procedure
Figure 5-64. Model 5212/5224/5330/5340 IP Endpoint Connections
Applicable to 5224 endpoints only (see step 5)
(Optional) To PC (LAN cable)
Endpoint bottom
(Optional) To headset
To handset
Endpoint base unit
LAN-powered jack OR Supplied 48 VDC
power adapter (part number: 50005301)
Mitel ® 5000 Installation Manual – Issue 3.0, October 2008
Page 5-175
Chapter 5: Installation
Wall-Mounting Mitel IP Endpoints
Wall-Mounting Mitel IP Endpoints
The following procedure provides information on mounting the Mitel IP endpoints on a wall or on
a wall plate. Use Figure 5-65 as a guide.
Figure 5-65. Mitel IP Endpoint Wall Mounting
Endpoint hookswitch clip for vertical mounting
Base unit
To wall-mount the Mitel IP endpoints:
1.
Select a location away from electrical cables, pipes or other items that could cause a
hazard when inserting screws in the wall.
CAUTION
Equipment Damage Hazard: Make sure the wall is capable of supporting the weight
of the endpoint. For additional security, mount the endpoint on a plywood backboard.
2.
Turn the base unit so that the hooks on the flat edge of the base unit bend toward the
top edge of the endpoint. Hinge the two upper hooks into the top set of notches and
snap the two lower hooks into the middle set of notches on the back of the endpoint.
3.
Secure the base unit using the two screws provided (found in a separate package with
the endpoint).
4.
Do one of the following:
•
Mounting on a wall:
Insert two mounting screws 3 1/4 inches (8.25 cm) apart. Allow about 3/16 of an
inch (0.5 cm) between the wall and screw heads for mounting the endpoint. Use
#10 screws 1 to 1.5 inches (2.5 to 4 cm) in length for mounting screws and
anchoring devices suitable for the wall.
•
5.
Page 5-176
Mounting on a wall plate:
a.)
Plug the endpoint cord into the wall jack.
b.)
Place the base unit on the wall plate post, and then push down until the unit is
firmly seated.
Using your index finger, lift the clip (from the top) located below the hookswitch, turn the
clip 180 degrees, and then let the clip snap into place to form a hook. The hook keeps
the handset in the cradle when the endpoint is wall mounted.
Mitel ® 5000 Installation Manual – Issue 3.0, October 2008
Chapter 5: Installation
Mitel IP Endpoint Installation Troubleshooting
Mitel IP Endpoint Installation Troubleshooting
Table 5-25 lists general troubleshooting information for problems that could occur while
installing Mitel IP endpoints.
Table 5-25. Troubleshooting Problems and Possible Solutions
Problem
Possible Solution
The UNLICENSED alarm appears
on the endpoint display.
Verify that you have sufficient Category D licenses. To verify, dump the
License Manager or use DB Programming.
The endpoint is not coming online.
Verify that the MAC Address is programmed correctly in DB Programming.
The endpoint is unable to load
firmware.
Verify that the TFTP server is running on the 5000 (use the AWS to check
status). Using OLM, verify that the TFTP server has the correct binary files.
Refer to the diagnostics and troubleshooting information in the Mitel 5000
Features and Programming Guide, part number 580.8006.
The display name is partially cut
off and/or a blinking cursor is
displayed after the firmware is
loaded.
There are two possible reasons for this type of error:
DHCP Discovery
Option 128 Missing appears on
the endpoint display.
Verify that the IP addresses entered in the endpoint for the Mitel 5000 Base
server and TFTP server are correct (they must be the same IP address, if
using the Mitel 5000 as the TFTP server).
The endpoint has been
accidentally configured in “SIP
Mode.” (SIP Mode is enabled by
pressing *7 while the endpoint is
powering on.)
Power cycle the endpoint. While the endpoint is powering on, do one of the
following:
• The system is down.
• An incorrect MAC address is entered in DB Programming for the
endpoint. An endpoint entered into DB Programming with an incorrect
MAC address will still appear to download the initial configuration files;
however, the display error message indicates that the endpoint is not
configured in the system.
• Press and hold *0.
• Press and hold *78.
• Press and hold both Volume buttons.
NOTE
In SIP Mode, an
endpoint display
may also show
several scrolling
Associated Press
news clips.
ENHANCED SEC MODE appears
on the endpoint display after the
endpoint is powered on.
• Press and hold the
button.
After powering on the endpoint, configure as described in “Initial Mitel
Endpoint – Manual Configuration” on page 5-179.
The endpoint must be returned for service. Contact your local provider or Mitel
Technical Support for instructions.
Mitel ® 5000 Installation Manual – Issue 3.0, October 2008
Page 5-177
Chapter 5: Installation
Initial Mitel Endpoint – Automatic Configuration (DHCP)
Initial Mitel Endpoint – Automatic Configuration (DHCP)
You can set up DHCP to provide additional information to avoid having to program each Mitel
endpoint manually.
NOTE
This procedure assumes the Mitel 5000 system is up, configured, and running—
this includes the desired number of Mitel IP endpoints configured in DB
Programming.
To configure the Mitel IP endpoints automatically:
1.
Make sure the Inter-Tel 5000 system is up and running, and then make sure you have
done the following (if applicable):
•
Configured the Mitel IP endpoints in DB Programming (refer to the Mitel 5000
Features and Programming Guide, part number 580.8006, for details). Also, read
“Notices” on page 5-106.
If a Mitel IP endpoint is pointing to the Mitel 5000 and the endpoint has not been
configured in DB Programming, the display appears to be downloading but nothing
is actually happening. You must configure the Mitel IP endpoints in DB
Programming before configuring the endpoint.
•
Check that the following DHCP options have been configured. Keep in mind that
some DHCP servers, typically found in SOHO routers, do not support the ability for
custom options. You can include all parameters within one option or you can
configure several options.
o
Setting a single option: Using the Windows-provide Option 43, type the
following ASCII character string, after clicking once in the ASCII column:
id:ipphone.mitel.com;sw_tftp=<Mitel 5000 base server IP
address>;call_srv=<Mitel 5000 base server IP
address>;vlan=1;l2p=6;dscp=46
o
Setting several options:
–
Options 128 and 129: Option 128 provides the TFTP address, and
Option 129 provides call control information. Both should be set to the
Mitel 5000 IP address of the Base Server.
–
Option 130: Type the text string “MITEL IP PHONE” (case sensitive).
–
Mitel also has two additional Options to consider if putting these endpoints
on a separate VLAN:
Option 132: Type the integer and set to “VLAN for IP Phone.
Option 133: Type the integer and set to “Priority on Vlan.” If using option
132, you must use option 133.
•
Page 5-178
See the troubleshooting section on page 5-177 for any endpoint issues.
2.
(Optional) You can connect a PC to the PC port on the back of the endpoint. If desired,
thread the PC cable through the slot on the back of the installed base unit, as shown for
the LAN cable in Figure 5-64 on page 5-175.
3.
Continue to the Programming chapter in the Mitel 5000 Features and Programming
Guide, part number 580.8006, for information on programming endpoints or other
features in this release.
Mitel ® 5000 Installation Manual – Issue 3.0, October 2008
Chapter 5: Installation
Initial Mitel Endpoint – Manual Configuration
Initial Mitel Endpoint – Manual Configuration
The following manual configuration procedure is required the first time only for each endpoint.
All future updates to the endpoint are automatic. Provided the DB Programming option is set to
enable the onboard TFTP server (refer to the Mitel 5000 Features and Programming Guide, part
number 580.8006, you can provide future endpoint firmware updates by upgrading system
software. The method to do this is through the Admin Session Web pages. To force a manual
upgrade, you must reboot the endpoint using the volume up/down buttons, as described below.
NOTE
This procedure assumes the Mitel 5000 system is up, configured, and running—
this includes the desired number of Mitel IP endpoints configured in DB
Programming.
To configure the Mitel IP endpoints manually:
1.
Make sure the Inter-Tel 5000 system is up and running, and then make sure you have
done the following (if applicable):
•
Configured the Mitel IP endpoints in DB Programming (refer to the Mitel 5000
Features and Programming Guide, part number 580.8006. Also, read “Notices” on
page 5-106.
If a Mitel IP endpoint is pointing to the Mitel 5000 and the endpoint has not been
configured in DB Programming, the display appears to be downloading but nothing
is actually happening. You must configure the Mitel IP endpoints in DB
Programming before configuring the endpoint.
•
See the troubleshooting section on page 5-177 for any endpoint issues.
2.
While the endpoint is powering up, press both volume buttons
of the volume buttons.
and then release one
3.
Using the dialpad buttons, enter cfg (234).
4.
Configure the network information for each endpoint. To backspace, press star (*); to
enter a period, press (#).
=YES at the Network Parameters screen.
*
Keep pressing #=NO until you get to the Modify Static Values screen.
a. Press
b.
*
c. Press =YES at the Modify Static Values screen. The Static Network Parms menu
appears.
d. Press the volume down button to scroll to ICP IP Address, and enter the Mitel 5000
Base Server IP address.
e. Press the volume down button to scroll to TFTP SVR IP Address, and enter the
Mitel 5000 Base Server IP address.
f.
Press the volume down button to scroll to TFTP SVR Port, and enter 69. If left at 0,
the default, the endpoint will first try port 20001 and then it will try port 69.
g. Press the volume down button to scroll to Store Changes.
=YES to store the changes.
*
Press =YES at the Reboot Now display.
*
h. Press
i.
When finished, the display shows the extension information and the date and time.
5.
(Optional) You can connect a PC to the PC port on the back of the endpoint. If desired,
thread the PC cable through the slot on the back of the installed base unit, as shown for
the LAN cable in Figure 5-64 on page 5-175.
6.
Continue to the Programming chapter in the Mitel 5000 Features and Programming
Guide, part number 580.8006, for information on programming endpoints or other
features in this release.
Mitel ® 5000 Installation Manual – Issue 3.0, October 2008
Page 5-179
Chapter 5: Installation
Inter-Tel IP Endpoint Configuration
Inter-Tel IP Endpoint Configuration
If you completed step 13 on page 5-156, as part of the software upgrade, the Inter-Tel firmware
is now available to the Inter-Tel endpoints from the onboard TFTP server. Using the
Administrator Web Session interface, and the step mentioned above, you can avoid the
following procedure.
To configure the Inter-Tel IP endpoints automatically:
1.
2.
Make sure the Inter-Tel 5000 system is up and running, and then make sure you have
done the following (if applicable):
•
Configured Inter-Tel IP endpoints in DB Programming (refer to the Mitel 5000
Features and Programming Guide, part number 580.8006. Also, read “Notices” on
page 5-106.
•
See the troubleshooting section on page 5-177 for any endpoint issues.
Check that DHCP option 66 is configured and pointing to the IP address of the Mitel
5000 base server. This ensures the Inter-Tel IP endpoints retrieve the globalcfg.cfg file
from the Mitel 5000. DHCP option 66 supersedes any TFTP address setting on the
endpoint (also option 67 needs to be blank or “/”). You can set up DHCP to avoid having
to program each Inter-Tel endpoint manually.
IMPORTANT
3.
If a customer has individual MAC-specific .cfg files or a custom
globalcfg.cfg file, you must copy these files to the Mitel 5000 using
the OLM epmgt command (documented in KB entry 3150).
Continue to the Programming chapter in the Mitel 5000 Features and Programming
Guide, part number 580.8006, for information on programming endpoints or other
features in this release.
MItel 5330/5340 Setup for Teleworking
This section details what must be done to configure the Mitel 5330/5340 endpoints for
teleworkers.
To configure the Mitel IP endpoints for teleworkers:
1.
Make sure the Inter-Tel 5000 system is up and running, and then make sure you have
done the following (if applicable):
•
Configured the Mitel IP endpoints in DB Programming (refer to the Mitel 5000
Features and Programming Guide, part number 580.8006. Also, read “Notices” on
page 5-106. Make sure the endpoint is configured to use the NAT option.
If a Mitel IP endpoint is pointing to the Mitel 5000 and the endpoint has not been
configured in DB Programming, the display appears to be downloading but nothing
is actually happening. You must configure the Mitel IP endpoints in DB
Programming before configuring the endpoint.
2.
Page 5-180
•
Check that the main office firewall allows port 69 (TFTP) as well as the other call
control ports mentioned in “Protocols and Ports” on page 4-59.
•
Check that the Mitel 5000 is configured with the NATed address for the Processor
Module and the Processor Expansion Card.
•
Check that the main office firewall has the correct mapping for the appropriate
ports. If needed, see “Network IP Topology” on page B-1.
•
Make sure all teleworker endpoints are not in a call configuration that uses P2P.
•
See the troubleshooting section on page 5-177 for any endpoint issues.
Hold down the volume keys and boot the endpoint to get in programming mode.
Mitel ® 5000 Installation Manual – Issue 3.0, October 2008
Chapter 5: Installation
Firmware
3.
Using the menus, set the ICP and TFTP server address to be the NATed address of the
Mitel 5000 Base Server.
4.
Allow the endpoint to boot using DHCP, download the latest code and come online.
5.
Power down the endpoint and deliver it to the user. The user simply plugs it in for it to
boot up and begin working.
6.
Continue to the Mitel 5000 Features and Programming Guide, part number 580.8006, for
information on programming endpoints or other features in this release.
Firmware
This section provides information on the multi-protocol endpoint firmware, including uploading
firmware and endpoint firmware compatibilities.
Endpoint Firmware Compatibilities
Table 5-26 lists the compatibilities of the multi-protocol endpoint firmware.
Table 5-26. Multi-Protocol Endpoint Firmware Compatibility Matrix
Endpoint
(Hardware Typea)
Firmware
=supported
=not supported
Description
1.01S
Model 8600 (8600)
8 MB RAM, 2 MB flash memory, original
Model 8620 (8620)
8 MB RAM, 4 MB flash memory, original
Model 8622 (8622)
16 MB RAM, 4 MB flash memory, original
Model 8662 (8662)
8 MB RAM, 4 MB flash memory, original
Model 8662 (8662)
1.1.5
2.0.03
or
Later
16 MB RAM, 4 MB flash memory, enhanced
b
16 MB RAM, 4 MB flash memory, enhanced,
redesigned
Model 8662 (8662v2)b
16 MB RAM, 4 MB flash memory, enhanced,
redesigned
Model 8622 (8622v2)
1.0.31/
1.0.33
a. See page 5-107 for details about hardware types.
b. Cannot be downgraded to v1.1.5 or earlier. These endpoints do not function with earlier firmware versions.
Mitel ® 5000 Installation Manual – Issue 3.0, October 2008
Page 5-181
Chapter 5: Installation
Firmware Update Changes
Firmware Update Changes
When upgrading an 8620, 8622, or 8662 endpoint, use the following version strings. For
instructions on how to update firmware, see “Updating Firmware” below.
• From 1.01S to 1.0.31
86xx_image_ver: 1.0.31 (where the 86xx indicates the model type, such as 8622)
86xx_image_url: 192.168.200.202/86xx/86xx_1_0_31.bin
• From 1.01S or 1.0.31 to 1.0.33
86xx_image_ver: 1.0.33
86xx_image_url: 192.168.200.202/86xx/86xx_1_0_33.bin
• From 1.0.33 and earlier to 1.1.5
86xx_image_ver: HWID 1 1.1.5
86xx_image_url: 192.168.200.202/86xx/86xx_1_1_5.bin
If upgrading an 8622 from 1.01S to 1.1.5, use the following image version string:
8620_image_ver: 8620 HWID 1 1.1.5.
• From 1.1.5 and earlier to 2.0.06
86xx_image_ver: HWID 2 2.0.06
86xx_image_url: 192.168.200.202/86xx/86xx_2_0_06.bin
• For future releases (2.0 and later)
itphone_image_ver: v.v.vv (where v.v.vv indicates the firmware version, such as 2.0.06)
itphone_image_url: 192.168.200.202/itphone/itphone_v_v_vv.bin (where v_v_vv.bin
indicates the firmware version, such as 2_0_06)
After an endpoint is updated to v2.0.06 or later firmware, the 86xx_image_ver and _url
strings are no longer necessary. There are only two lines in the configuration files that
need to be modified (itphone_image_ver and itphone_image_url), and one image to be put
on the TFTP server to update all of the multi-protocol endpoints (excluding the Model
8690).
Updating Firmware
Always upgrade all multi-protocol IP endpoints to the latest firmware release. This will minimize
potential conflicts when installing new endpoints at an existing site. The multi-protocol IP
endpoint firmware is available at the Mitel edGe Software Downloads (www.inter-tel.com/
software) Web site. You can update endpoints or other IP devices using any of the following:
• Onboard TFTP Server: The Mitel 5000 now includes a Trivial File Transfer Protocol
(TFTP) server to provide firmware downloads to the Mitel IP endpoints and Models 8600,
8620/22, and 8660/62 IP endpoints. See “Onboard TFTP Server” on page 5-149. The
Administrative Web Session interface is the mechanism used to get the firmware to the
endpoints, using the same method as to upgrade system software. Refer to the
instructions that accompany the endpoint-firmware package download.
• TFTP server. The Model 8690 endpoints use a TFTP server to update firmware, as in
prior releases. The TFTP server allows the endpoints to pull firmware updates from a
TFTP server automatically, rather than push firmware updates to individual endpoints.
• Trivial File Transfer Protocol (TFTP) Download: Included with the IP devices CD-ROM,
or you can download it from the Mitel edGe Software Downloads (www.inter-tel.com/
software) Web site.
• Upload Utility: Included with DB Programming.
Page 5-182
Mitel ® 5000 Installation Manual – Issue 3.0, October 2008
Chapter 5: Installation
Onboard TFTP Server
Onboard TFTP Server
In a Mitel CS-5600 configuration, the TFTP server resides in the Base Server. The onboard
TFTP server is not intended for uses other than TFTP endpoint firmware downloads.
The TFTP server:
• is not used to upgrade any other Mitel 5000 software.
• does not support Mitel endpoint models 5212/5224 at remote locations/teleworker.
• supports local and remote downloads. Port 69 must be open on the corporate firewall for
endpoints at remote locations.
• might have issues with some SOHO routers because some of these routers do not provide
using custom DHCP options.
• uses ports 69 and 20001 for all transfers to save on socket resources. The server
responds on the same port, 69 or 20001, to which the client request is sent. Port 69 must
be open on the corporate firewall for endpoints at remote locations (Mitel models 5212/
5224 are not supported for teleworker/remote location use). If left at 0, the system will try
port 20001 followed by port 69.
See Table 5-22 for information on TFTP, DHCP and other information relevant to Mitel and InterTel IP endpoints.
Table 5-27. IP Endpoint Overview — Mitel and Inter-Tel
Setting
Mitel IP Endpoints
IP Address, Subnet
Mask, Default
Gateway
DHCP option 43 with the
following character string:
Inter-Tel IP Endpoints
DHCP or through endpoint
keypad
DHCP or through endpoint
keypad
DHCP option 128 or through
endpoint keypad
DHCP option 66 or through
endpoint keypad. Option 67
must be left blank or “/”
DHCP option 129 or through
endpoint keypad
Through UDP discoverya,
.cfg file, or through endpoint
keypad
VLAN ID (optional)
DHCP option 132 or through
endpoint keypad
Through endpoint Web page
or .cfg file
LAN priority
DHCP option 133
n/a
TFTP server IP
address
Call control address
id:ipphone.mitel.com;sw_tftp
=<inter-tel 5000 base server
IP address>;call_srv=<intertel 5000 base server IP
address>;vlan=1;l2p=6;dscp
=46
DHCP validation
(required for
DHCP)
Must equal: MITEL IP
PHONE
If using option 132, you
must use option 133.
a. Because UDP discovery relies on a broadcast, it works only within a Local Area Network (LAN).
IP Endpoints Supported on the Onboard TFTP Server
The following Mitel and Inter-Tel IP endpoints are supported for downloading firmware from the
onboard TFTP server:
• Mitel Models 5212, 5224, 5330, 5340 (subsequent updates can be initiated through the
Admin Web Session pages)
• Inter-Tel Models 8600, 8620, 8622, 8660, and 8662 (optionally, existing endpoints can be
updated through Admin Web Session pages)
For all other Mitel 5000 supported endpoints, firmware downloads are performed as before v3.0
or as discussed in this document (beginning on page 5-151). Refer also to the instructions that
accompany any endpoint-firmware-only packages that may be released.
Mitel ® 5000 Installation Manual – Issue 3.0, October 2008
Page 5-183
Chapter 5: Installation
Upgrade Scenarios
Firmware Management
You must do a software downgrade to revert back to an older firmware version for Mitel
endpoints (post v2.4 installation). Multiple firmware versions are not currently supported; only
the latest versions are available for downloading.
Upgrade Scenarios
Table 5-28 summarizes the possible upgrade options and identifies the appropriate process and
applicable procedures to use when upgrading your Mitel 5000 platform.
Table 5-28. Possible Upgrade Scenarios for Mitel 5000 v2.0 or Later
From Existing
To Desired Result
Process and Procedures to Use
System
CS-5200
Version
1.1
System
CS-5200
1.2
CS-5200
CS-5200
1.1
CS-5400
2.x
2.0
2.x
1.1
CS-5600
1.1
CS-5400
1.2
CS-5600
Page 5-184
2.x
1.2
2.0
CS-5400
2.x
1.1
“Upgrading from CS-5200 to CS-5400” on page 5-186
2.x
1. Read “Upgrading from CS-5200 to CS-5600” on page 5-187.
2.x
2. Carry out “Upgrading from CS-5200 to CS-5400” on page 5-186.
2.x
3. Carry out “Upgrading from CS-5400 to CS-5600” on page 5-187.
2.x
“Upgrading Only Software” on page 5-185
2.x
CS-5600
2.x
1.2
2.x
2.0
2.x
2.0
“Upgrading Only Software” on page 5-185
2.x
1.2
CS-5400
Version
CS-5600
2.x
“Upgrading from CS-5200 to CS-5400” on page 5-186
“Upgrading Only Software” on page 5-185
Mitel ® 5000 Installation Manual – Issue 3.0, October 2008
Chapter 5: Installation
Upgrading Only Software
Upgrading Only Software
Before performing the following upgrade process and procedures, read “Network Environment
Requirements” on page 5-148 and “Upgrade Assumptions” on page 5-149.
The following process and applicable procedures apply to upgrading only the software version
running on Mitel CS-5200, CS-5400, or CS-5600 platforms. For other upgrade scenarios, see
Table 5-28.
For some of the tasks in this procedure, refer to the Mitel 5000 Features and Programming
Guide, part number 580.8006, as appropriate.
To upgrade the system version:
1.
Obtain applicable licensing from the Licence Management Center (LMC), as necessary.
IMPORTANT
When installing v2.0 or later software, the license must match the
system CPU type. A Mitel CS-5200 system requires a CS-5200
license; a Mitel CS-5400 system requires a CS-5400 license; and, a
Mitel CS-5600 system requires a CS-5600 license.
2.
Back up system and voice mail databases. Partial Voice Processor saves are not
permitted when upgrading to v2.x.
3.
Run DB Test & Repair.
4.
Use the DB Conversion tool to convert the database to the correct version and system
type. See “Mitel 5000 Database Conversions” on page 6-23.
5.
Configure the system to point to the correct Trivial File Transfer Protocol (TFTP) server
and path, then upgrade the system to the latest release. See “Upgrading to v3.0” on
page 5-152.
NOTICE
Possible Data Corruption. Do not unplug the chassis when the system is in the
process of upgrading because critical system data is migrating at this time.
6.
Install applicable licensing for the upgraded version.
7.
Restore saved databases. See “Restoring the Database” on page 5-94.
8.
Perform a full save of the database and voice processor data after the upgrade is
complete.
9.
Verify results by performing the following or similar tests:
•
Listen and confirm 2-way audio on IP-to-digital endpoint connections and between
digital-to-digital endpoint connections.
•
Test all trunks, incoming and outgoing.
•
Place incoming and outgoing calls.
•
Exercise the company’s dialing plan.
•
Test hunt group functionality, if applicable.
•
Confirm System Manager connections and functionality, if applicable.
•
Confirm functionality of all peripheral systems connected to or dependent on the
Mitel 5000 platform.
•
Confirm that emergency numbers work. However, before conducting the tests, be
sure to coordinate with appropriate local emergency response agencies.
Mitel ® 5000 Installation Manual – Issue 3.0, October 2008
Page 5-185
Chapter 5: Installation
Upgrading from CS-5200 to CS-5400
Upgrading from CS-5200 to CS-5400
Before performing the following upgrade process and procedures, read “Network Environment
Requirements” on page 5-148 and “Upgrade Assumptions” on page 5-149.
Parts and Materials
To perform the following upgrade process and procedures, you will need:
• 1 – Processor Expansion Card, part number 580.2020.
• Applicable licensing.
IMPORTANT
When installing v2.0 or later software, the license must match the
system CPU type. A Mitel CS-5200 system requires a CS-5200 license;
a Mitel CS-5400 system requires a CS-5400 license; and, a Mitel CS5600 system requires a CS-5600 license.
• Personal computer (PC) with Ethernet/Internet connectivity to the Inter-Tel 5000 platform.
• 1 – DB9M to DB9F straight-through cable, part number 813.1683, packed in the Universal
RS-232 Kit, part number 828.1282.
• 1 – DB9F-to-DB9F null modem adapter with hardware (HW) flow control, part number
804.2605, packed in the Universal RS-232 Kit, part number 828.1282.
• Flash drive(s) for backing up the voice mail database, prompts, and received messages.
For lists of tested and validated flash drives, see Table 4-3 on page 4-25.
• PC hard drive or other data storage device for backing up the system database so it can
be restored after upgrading the system.
Processes and Procedures
For some of the tasks in this procedure, refer to the Mitel 5000 Features and Programming
Guide, part number 580.8006.
To upgrade a Mitel CS-5200 system to a CS-5400:
1.
Perform a complete Voice Processor save to one or more thumb drives and a database
save to a PC or other adequate data storage device.
NOTE
Partial Voice Processor saves are not permitted when upgrading to v2.x or
later. In v2.x or later DB Programming, the Voice Processor Save option does
not give the user a choice of items to save.
2.
Run DB Test on the saved database and verify that no problems exist with the database
structure.
3.
Use the DB Conversion tool to convert the database to the correct version and system
type. See “Database Converter Utility” on page 6-22.
4.
Run DB Test on the converted database and verify that the database is intact.
5.
Configure the system to point to the correct TFTP server and path and perform an
UpgradeAll to upgrade the system software. See “Upgrading to v3.0” on page 5-152.
NOTICE
Possible Data Corruption. Do not unplug the chassis when the system is in the
process of upgrading because the Norflash package is migrating at this time.
Page 5-186
Mitel ® 5000 Installation Manual – Issue 3.0, October 2008
Chapter 5: Installation
Upgrading from CS-5200 to CS-5600
6.
Install a Processor Expansion Card (PEC-1), part number 580.2020. See “Installing a
Processor Expansion Card (PEC-1)” on page 5-43.
7.
Load the software license for the version installed. See “Changing the License” on page
5-97.
8.
Restore the full database and voice processor data to the system.
9.
Verify results.
10.
Perform a full save of database and voice processor data after the upgrade is complete.
Upgrading from CS-5200 to CS-5600
Before performing the following upgrade process, read “Network Environment Requirements”
on page 5-148 and “Upgrade Assumptions” on page 5-149.
Because the Mitel CS-5600 Base Server is actually a Mitel CS-5400 system, the first task in
upgrading a Mitel CS-5200 to a CS-5600 is to convert the CS-5200 to a CS-5400 by installing a
Processor Expansion Card (PEC-1) on the Processor Module (PM-1).
For instructions about installing the PEC-1 on the PM-1, see the preceding upgrade process,
“Upgrading from CS-5200 to CS-5400” on page 5-186.
NOTE
Mitel 5000 v2.x software will not prevent the installation of a PS-1 on a Mitel CS5200. However, in this configuration system performance will probably be degraded
because call processing will have significantly fewer IP resources to use.
With the Base Server/Mitel CS-5400 in place, proceed to the following process, “Upgrading
from CS-5200 to CS-5400” next.
Upgrading from CS-5400 to CS-5600
Before performing the following upgrade process and procedures, read “Network Environment
Requirements” on page 5-148 and “Upgrade Assumptions” on page 5-149.
This section describes the parts and materials and the process and applicable procedures
required to upgrade an Mitel CS-5400 system to a CS-5600 system.
Parts and Materials
Upgrading a Mitel CS-5400 system running v1.x, with or without Digital Expansion Interface
(DEI) units, to a Mitel CS-5600 system requires the following items:
• 1 – Processing Server unit, part number 580.5600.
• Applicable licensing.
IMPORTANT
When installing v2.0 or later software, the license must match the
system CPU type. A Mitel CS-5200 system requires a CS-5200 license;
a Mitel CS-5400 system requires a CS-5400 license; and, a Mitel CS5600 system requires a CS-5600 license.
• Personal computer (PC) with Ethernet/Internet connectivity to the Inter-Tel 5000 platform.
Mitel ® 5000 Installation Manual – Issue 3.0, October 2008
Page 5-187
Chapter 5: Installation
Processes and Procedures
• One of the following input-output setups:
o
A monitor, keyboard, and mouse, or
o
A laptop PC, straight-through RS-232 cable terminated with DB-9 connectors, part
number 813.1683, and a null modem with hardware flow control, part number
804.2605. The Universal RS-232 Kit, part number 828.1282. For connection details,
see Figure 5-29 on page 5-58.
• Flash drive(s) for backing up the voice mail database, prompts, and received messages.
For lists of tested and validated flash drives, see Figure 4-3 on page 4-25.
• Hard drive or other data storage device for backing up the system database so it can be
restored after upgrading the system.
Processes and Procedures
With the PS-1 chassis installed in accordance with “Installing the Processing Server (PS-1)” on
page 5-59, you are ready to configure the PS-1 and the Base Server.
NOTE
The Mitel CS-5400 is referred to as the Base Server when it is incorporated into a
Mitel CS-5600 configuration.
To convert a Mitel CS-5400 system to a Mitel CS-5600, you must first upgrade the software,
then configure the system settings. The conversion process requires that you perform the
following procedures.
1.
Prepare the Mitel CS-5400/CS-5600 Base Server for the conversion and upgrade.
2.
Associate the Base Server with the PS-1on the LAN.
3.
Configure the PS-1 on the LAN.
4.
Configure the Base Server in DB Programming.
5.
Reload system and voice mail databases.
6.
Verify that external clients point to the PS-1 rather than the Base Server.
To prepare the Mitel CS-5400 for the conversion and upgrade:
1.
Back up the system and voice mail databases. Refer to the Mitel 5000 Features and
Programming Guide, part number 580.8006, for the detailed procedure.
NOTE
Page 5-188
Partial Voice Processor saves are not permitted when upgrading to v2.0 or
later.
2.
To verify the integrity of the saved database, run the DB Test & Repair Utility. For the
detailed procedure, see the Mitel 5000 Features and Programming Guide, part number
580.8006.
3.
Convert the Mitel CS-5400 database to a CS-5600 database. For the detailed
procedure, see “Mitel 5000 Database Conversions” on page 6-23.
4.
Upgrade the Mitel CS-5400 system software to the latest version. For the detailed
procedure, see “Upgrading System Software to Version 3.0” on page 5-148.
5.
While the system is rebooting as a result of the upgrade, remove the USB security key
from the Mitel CS-5400 chassis and insert it into a USB 2.0 port on the front or back of
the PS-1. See Figure 5-28 on page 5-58 and Figure 5-29 on page 5-58. Connected to
the PS-1, the Mitel CS-5400 platform is called the Mitel CS-5600 Base Server.
Mitel ® 5000 Installation Manual – Issue 3.0, October 2008
Chapter 5: Installation
Processes and Procedures
To associate the Base Server and the PS-1 on the LAN:
1.
Use the LCD panel menu to navigate to Network\Current\<IP Address> to see if the IP
address for the PS-1 has auto-converted to the correct values.
2.
If the correct values do not appear, use the LCD panel menu to navigate to Network –
Configure – IP Address. Enter the Base Server static IP, subnet mask, and gateway IP
addresses and disable DHCP.
3.
Under Main Menu on the LCD panel select System Menu, and then scroll down to
Gateway mode. Toggle the Gateway Mode setting from Disabled, to Enabled. Observe
the message, Waiting for PS-Server Connection on the LCD panel of the Base Server.
4.
Power up the PS-1, if it is not already done. The PS-1 comes with the software preinstalled. After the system has booted up, it performs a self-test. When the self-test
completes, the LCD panel on the Base Server displays Mitel 5000.
To configure the PS-1 on the LAN:
1.
Attach a monitor, keyboard, and mouse or, if using a laptop PC, attach the specified
serial cable and null modem to the PS-1. For details see Figure 5-29 on page 5-58.
2.
If attached with a laptop PC, start a hyperterm session and set the connection baud rate
at 115200. Then start a PuTTY® session. You will find a copy of PuTTY software on the
product CD. Read the Readme file and follow the PuTTY installation and user
instructions.
3.
From the monitor and keyboard or PC attached to the PS-1, log on to the system using
the default username (it5k) and password (itpassw). The Diagnostics Management
Utility screen or window appears.
4.
From the DMU main menu select Configuration. The Configuration screen appears.
NOTE
5.
The PS-1 and Base Server must be connected to the network on the same
LAN, VLAN, and subnet. For additional details, see “Network Environment
Requirements” on page 5-148.
From the Configuration screen:
a. Change Static IP Address for the PS-1
b. Change Static Subnet
c. Change Static IP Gateway
d. Disable DHCP
e. Reboot the system
Mitel ® 5000 Installation Manual – Issue 3.0, October 2008
Page 5-189
Chapter 5: Installation
Processes and Procedures
To configure the Base Server in DB Programming:
1.
From the PS-1 IP address, start a DB Programming session.
•
If a PS-1 is not connected to a Base Server, the Connection Wizard appears.
Follow the instructions in the Connection Wizard to make the Base Server–PS-1
Connection. When you click Finish, the Connection Wizard closes the DB
Programming session.
•
To continue, restart the DB Programming session.
For details about using this wizard, refer to the Mitel 5000 Features and Programming
Guide, part number 580.8006. When you click Finish, the Connection Wizard closes the
DB Programming session.
2.
Upload a Mitel CS-5600 license and any other system-specific licensing. From the DB
Studio menu bar, select Operations – Software License Operations – Upload Software
License. For the detailed procedure, see “Software License Upload” on page 5-99.
IMPORTANT
The license must match the system CPU type. A Mitel CS-5200
system requires a CS-5200 license; a Mitel CS-5400 system requires
a CS-5400 license; and, a Mitel CS-5600 system requires a CS-5600
license.
To reload system and voice mail databases:
For the tasks in this procedure, refer to the Mitel 5000 Features and Programming Guide, part
number 580.8006.
1.
Restore the full database and voice processor data to the system.
2.
Verify results.
3.
Perform a full save of database and voice processor data after the upgrade is complete.
To verify that external clients point to the PS-1: During the installation and system bring-up
process, existing external clients should automatically re-set to point to the PS-1 IP address. To
avoid possible interruption of service, confirm satisfactory operation of all IP-connected clients.
To operate with the Mitel CS-5600, external clients must point to the PS-1 rather than the Base
Server. Clients include, but may not be limited to, OAI CT Gateway, OAI applications, Attendant
Console, System Manager, DB Programming sessions, external voice mail and Diagnostics
Monitor client sessions.
NOTE
Page 5-190
To reduce the amount of programming changes to IP endpoints and remote nodes,
Mitel recommends that the CS-5X00 IP address should not change because IP
networking and IP endpoint configuration values continue to point at this IP address.
Mitel ® 5000 Installation Manual – Issue 3.0, October 2008
Chapter 5: Installation
Mitel CS-5600 Licensing with USB Security Key
Mitel CS-5600 Licensing with USB Security Key
A USB 2.0 port on the front of the PS-1 accepts the Mitel 5600 system security key. See Figure
5-28 on page 5-58. The security key holds the Mitel 5000 master license information. This
master license includes BVM configuration information and, when inserted, disables the BVM
license information on the Base Server. In this configuration, the Base Server does not need a
security key.
You must first connect an Mitel USB security key to the PS-1. The security key has a Mitel serial
number. The customer must then purchase an Mitel CS-5600 software license that corresponds
to the Mitel serial number. Once received, the software license can be uploaded to the PS-1
through DB Programming. For details, refer to the Mitel 5000 Features and Programming
Guide, part number 580.8006.
For details about changes to the software license, see “Licensing and Mitel CS-5600 Upgrades”
on page 3-16. For details about default database values for Mitel platform under each
configuration, refer to the Mitel 5000 Features and Programming Guide, part number 580.8006.
OPTIONAL SYSTEM EQUIPMENT
This section provides procedures for installing optional equipment on Mitel 5000 platforms.
Installing a CT Gateway
System OAI Level 2 applications can be used in conjunction with the CT Gateway. The CT
Gateway provides a TCP/IP System OAI interface that supports a multi-node network. Each
node in a network functions individually, as far as the System OAI streams are concerned; you
cannot program a System OAI serial port on Node 1 that will control devices or receive events
for other nodes. If you need to control devices on multiple nodes, you must install a CT
Gateway. The CT Gateway receives the OAI streams from multiple nodes and consolidates
them into a single stream for a System OAI application. The Gateway sends and receives all of
its data using TCP/IP connections. (At this time, each application requires a separate Gateway.)
NOTE
Mitel recommends that you upgrade the CT Gateway to version 4.x or later.
For more information about the CT Gateway, see the CT Gateway Installation Manual, part
number 835.2161.
Mitel ® 5000 Installation Manual – Issue 3.0, October 2008
Page 5-191
Chapter 5: Installation
Installing an External Music Source
Installing an External Music Source
External music sources may be connected to the system for Music-On-Hold (MOH). The music
jack optional external music sources (radio, tape player, etc.) is on the back of the Inter-Tel 5000
Base Server chassis. The music source can be used for music-on-hold and background music.
Figure 5-66. Music-On-Hold Connection
Back of Mitel 5000 Base Server
EXP
DUAL LS DUAL SL
PAGE
MOH
Music-On-Hold Port
For the music-on-hold feature, music, silence, ringback, or tick-tones can be assigned on a
station-by-station basis. For more information, refer to the Mitel 5000 Features and
Programming Guide, part number 580.8006.
There are often broadcast restrictions associated with copyrighted music. Check
with the music’s original distributor and/or the broadcast source for restrictions and
usage concerning background music and music-on-hold. Mitel is not responsible for
any illegal or improper use of copyrighted music connected to the system. With
European systems, contact PPL (Phonographic Performance Ltd.) for licenses.
NOTE
Using background music and paging on a hard IP endpoint, such as the IP PhonePlus,
consumes as much bandwidth as a call to the device. If the site has limited bandwidth, ensure
that IP endpoint users do not enable background music and that they limit using the paging
functionality.
If using a radio as a music source, place it 5–10 ft (1.5–3 m) away from the chassis to avoid RFI
generated by the chassis. If the radio is placed more than 10 ft (3 m) away from the chassis,
use twisted-pair cable. For better reception, a radio with an external antenna is recommended.
To install the external music source:
Page 5-192
1.
Attach a 1/8-inch, two-conductor (mono), mini-phone plug to one end of a 5–10 ft (1.5–
3.0 m) length of shielded speaker cable, or twisted-pair cable, to run from the external
music source to the Mitel CS-5200/5400/5600 Base Server. A stereo plug will not work
properly in the MOH jack. If the stereo earphone output of an external music source is
used, a stereo-mono adapter should be used between the stereo output jack and the
monaural cable.
2.
Do one of the following:
•
Connect the other end of the cable to the speaker output terminals of the music
source.
•
Attach the necessary connector to the other end of the cable, and plug it into the
earphone jack on the music source (if available). If the earphone jack is “padded”
so that the optimal volume level cannot be reached, connecting to the speaker
output terminals may be more effective.
3.
Plug in the AC power cord for the music source. DO NOT use the same power outlet
used for the Inter-Tel 5000 Base Server. Turn on the AC power to the music source.
Also, Mitel recommends using an UPS.
4.
Insert the 1/8-inch mini-phone plug into the jack labeled MOH on the back of the Mitel
CS-5200/5400/5600 Base Server. See Figure 5-66 on page 5-192.
Mitel ® 5000 Installation Manual – Issue 3.0, October 2008
Chapter 5: Installation
Installing External Paging Equipment
5.
6.
From an endpoint, do one of the following:
•
Select a trunk and dial the number (of one of the other trunks) to call back into the
system. Put the call on hold to hear the music.
•
Place an intercom call to another station. Put the call on hold to hear the music.
•
Dial feature code 313. You should hear background music.
While listening to Music-On-Hold, adjust the volume on the music source to an
acceptable level.
Installing External Paging Equipment
Optional external paging equipment can be connected to the Page port on the back of the Mitel
CS-5200/5400/5600 Base Server. See Figure 5-67 for an example of this port location. Use a
paging amplifier that does not provide talk battery.
NOTICE
Possible Equipment Damage. Using a paging amplifier, with talk battery on an endpoint,
may damage the endpoint or the module.
Using background music and paging on an IP endpoint, such as the IP PhonePlus, consumes
as much bandwidth as a call to the device. If the site has limited bandwidth, ensure that IP
endpoint users do not enable background music and that they limit using the paging
functionality.
Figure 5-67. Paging Equipment Connection
Back of Mitel 5000 Base Server
EXP
DUAL LS DUAL SL
PAGE
MOH
Paging Port
To install external paging equipment:
1.
Cut a length of shielded speaker cable to run from the paging amplifier to the back of the
chassis. Attach an RCA-type phono plug to one end of the cable.
2.
Connect the other end of the cable to the amplifier high-impedance input according to
the manufacturer instructions.
3.
Connect the paging speaker(s) to the amplifier using speaker cable.
4.
Plug in the amplifier AC power cord. do not use the outlet for the Inter-Tel 5000 Base
Server. Also, Mitel recommends using an UPS.
5.
Set the amplifier volume control to the lowest setting and turn on the amplifier.
Mitel ® 5000 Installation Manual – Issue 3.0, October 2008
Page 5-193
Chapter 5: Installation
Installing an External Voice Processing System
6.
Do one of the following:
•
•
If installing the paging equipment on an endpoint speaker or the chassis paging
port:
a.)
From an endpoint location, make a page by lifting the handset, pressing the
PAGE button (or dialing 7—the default Page feature code), and dialing a zone
code that includes the external paging zone or dialing the extension number
of the external paging port. The default is 91000.
b.)
Adjust the amplifier to the desired level while placing the page.
If installing the paging equipment on a LS circuit:
a.)
Ensure that the LS circuit is not toll restricted.
b.)
From an endpoint location, access the LS circuit and adjust the amplifier to
the desired level while placing the page.
Installing an External Voice Processing System
For integrated voice processing (voice mail, automated attendant, hunt group announcement
and overflow, optional Fax-On-Demand, buffered SMDR, Record-A-Call, etc.), an optional
external voice processing PC with special applications software can be attached to the system.
For additional voice processing information, refer to the voice processing information in the
Mitel 5000 Features and Programming Guide, part number 580.8006.
NOTICE
As personal computer (PC) technology evolves, Mitel continually enhances the design of its
voice processing systems. Depending on the actual version of equipment shipped for your
installation, the following instructions may vary. If revised instructions are included with the
equipment, see the most recent information.
Introduction
An external voice processing PC is required for the Unified Messaging feature and to support
increased voice mail capacities. External voice processing is provided using an Enterprise®
Messaging (EM) PC or NuPoint Messenger. For additional information about these external
voice processing systems, including installation, software installation and upgrading, see the
following documentation:
• Enterprise® Messaging Installation Manual, part number 780.8006.
• Mitel 5000 and NuPoint Messenger Integration Guide, part number 580.8008.
WARNING
Possible Electric Shock. Use the LCD panel to shut down the system, then unplug the Mitel
CS-5200/5400/5600 Base Server, power cord before connecting the external voice
processing PC. The Mitel CS-5200/5400/5600 Base Server, power supply unit operates on
110 VAC and retains a charge after it has been turned OFF. Failure to allow the high voltage
to dissipate can cause bodily injury. Like the Mitel platform, the external voice processing PC
must have an isolated, dedicated, properly grounded AC circuit for proper operation and it
should be plugged into an UPS.
IMPORTANT
Page 5-194
As with the Mitel 5000 system, the external voice processing PC must be
connected to an isolated, dedicated, properly grounded AC circuit and UPS
for proper operation. The UPS helps to avoid hard drive corruption in the
event of a power loss.
Mitel ® 5000 Installation Manual – Issue 3.0, October 2008
Chapter 5: Installation
Attaching an External Voice Processing System
Attaching an External Voice Processing System
This section provides information about attaching an external voice processing system to the
Mitel CS-5200/5400/5600 Base Server. For information about installing and setting up the
available external voice processing systems, see the documentation provided with those units.
For an illustration of how an external voice processing PC attaches to an Mitel CS-5200/5400/
5600 Base Server, see Figure 5-68 on page 5-197. For DB Programming tasks in this
procedure, refer to the Mitel 5000 Features and Programming Guide, part number 580.8006.
To attach an external voice processing system:
1.
Back up Basic Voice Mail (BVM).
2.
Disable BVM.
3.
Install the external voice processing PC in the rack under the Mitel CS-5200/5400/5600
Base Server. If the voice processing PC cannot be placed in the rack, place it in the
appropriate proximity to the rack. The distance is limited by the connection cable
provided. As necessary, follow the instructions included with the voice processing PC
you purchased.
4.
Attach the Ethernet cables from both chassis to the LAN, as shown in Figure 5-68 on
page 5-197. Use a switch if necessary; do not use a hub.
5.
Attach the cable, part number 813.1806, from the external voice processing PC to the
Mitel CS-5200/5400/5600 Base Server.
NOTICE
External Voice Mail Inoperability. If you have an existing external voice processing
system (NuPoint Messenger or EM), you cannot use the existing cable to connect the
external voice processing system to the Mitel platform. You must use cable part
number 813.1806.
6.
Program the external voice processing system to connect to the Mitel CS-5200/5400/
5600 Base Server. For details, see the external voice processing system manual.
7.
Use the Administrative Web Session (AWS) pages to verify that Basic Voice Mail (BVM)
is disabled. The AWS default login is it5k, and the default password is itpassw.
Mitel ® 5000 Installation Manual – Issue 3.0, October 2008
Page 5-195
Chapter 5: Installation
Review and Update for Enabling a Voice Processor
Review and Update for Enabling a Voice Processor
Mitel 5000 platforms support any of the following voice processors: Basic Voice Mail (BVM),
Enterprise Messaging (EM), or NuPoint Messenger (NPM). And, for proper configuration, DB
Programming requires that the voice processor type is identified. After the EM is physically
connected, the system senses the voice processing type. Connection with a NP-UM is over IP.
As with previous versions, a voice processor connected to a Mitel 5000 platform auto-enables
when the system boots up. To avoid the risk of overwriting an established database with default
values, Mitel recommends connecting the voice processor first, then connecting with a remote
mode session of DB Programming, and then saving.
To save a voice processor database in remote mode:
1.
Connect the PS-1, EM, or NP-UM equipment to the system in accordance with Mitel
installation instructions. Refer to the applicable installation manual.
2.
In remote mode, launch Session Manager and start a DB Programming session.
3.
Select the voice mail system to use.
Select None if using
NuPoint Messenger
as the voice mail system.
4.
From the DB Studio menu, select Operations – Database Operations – Database Save.
Identify the location where you want to store the system database, then select Save
Voice Data to: box and identify the location where you want to save the voice processor
database.
5.
Click Start. System and voice processor databases are saved to the locations indicated.
Figure 5-68 on page 5-197 shows how an external voice processing system connects to the
Mitel CS-5200/5400/5600 Base Server. An 8.5 ft (2.5 m) cable is available (part number
813.1806). Or, if necessary, contact the Mitel CommSource division for information on
purchasing longer cable lengths.
Page 5-196
Mitel ® 5000 Installation Manual – Issue 3.0, October 2008
Chapter 5: Installation
Review and Update for Enabling a Voice Processor
Figure 5-68. Example External Voice Mail Connection to Mitel CS-5x00
Back of Mitel 5000 Base Server
Connection
to VM only
(not using DEI)
EXP
DUAL LS DUAL SL
PAGE
MOH
Ethernet
to LAN via switch
Mitel 5000
Base Server
Inter-Tel
CS-5200/5400
Ethernet to LAN via switch
SWITCH*
Cable to external VM
(part number 813.1806)
LAN
DB-15
adapter to
DB-15 PCM
(see Figure
4-22)
Optional External-VM
Mitel ® 5000 Installation Manual – Issue 3.0, October 2008
Optional
Components
Ethernet
to LAN via
switch
* Use a switch instead
of a hub. Hubs blindly
transmit traffic from all
ports to all other ports
increasing the
likelihood of LAN
congestion (for
example, Ethernet
collisions). Switches
intelligently segregate
the traffic so that each
port does not need to
compete with other
ports for LAN
bandwidth.
Page 5-197
Chapter 5: Installation
Installing an IP SLA
Installing an IP SLA
The IP SLA provides an interface between a standard single line endpoint and a 10/100Base-T
network. The Mitel 5000 platform operates only on a 100Base-T network. The IP SLA allows
you to make calls through the IP network. The IP SLA operates like a standard SLA. However,
its interface to the system is replaced by the Ethernet IEEE 802.3 10 Mbps UTP interface. The
IP SLA uses flash memory and its software can be updated over the LAN.
IMPORTANT
Fax over IP (FoIP) and modems are not supported through an IP SLA. To
connect a fax machine, attach it to a single line port on one of the single line
interfaces supported by the Mitel 5000 platform. Mitel currently supports T.38
FoIP only.
To install IP SLAs and associated single line endpoints:
1.
Using CAT5e or CAT5 cable, connect the 10BASE-T jack on the IP SLA to the KS/SLA
jack on the 24 VDC adapter. For the correct power brick, see “Replacement Parts” on
page 7-2.
2.
Using another CAT5e or CAT5 cable, connect the LAN jack on the 24 VDC adapter to
the LAN.
3.
Connect the 24 VDC adapter to a 120 V wall socket.
NOTICE
Possible Equipment Damage. Use only the appropriate power adapter with the IP
SLA. Do not attach any device (for example, hubs) between the KS/SLA jack on the
adapter and the 10BASE-T jack on the IP SLA because power is supplied through the
cable.
4.
Connect the single line cord to the SL PHONE jack. Within a few moments, the single
line endpoint will receive dial tone from the system.
5.
Check connection state information while the IP SLA is connecting to the IPR
application. The following LEDs show connection state information, as described below.
•
online: Indicates a connection between the IP SLA and system call processing.
•
SL STATUS: Flashes in time with ringing voltage and is lit when the endpoint is offhook.
•
IP STATUS: Lights when there is a valid Ethernet connection to the device.
Front View
online
SL STATUS
OFF HOOK/RINGING
IP STATUS
VALID IP LINK
IP-SLA
INTERNET PROTOCOL
SINGLE LINE ADAPTER
The DEFAULT button has been added to the IP SLA (revision level -AC or later). This
button allows you to perform the two functions described on the following page.
Back View
SL
PHONE 10 BASE-T
POWER
24V d.c. 0.3A
DEFAULT
Default
Button
Page 5-198
Mitel ® 5000 Installation Manual – Issue 3.0, October 2008
Chapter 5: Installation
Defaulting IP SLA Settings
Defaulting IP SLA Settings
This allows you to change the IP SLA configuration (such as an IP address) to its default
settings.
To default the IP SLA:
1.
Press and hold the DEFAULT button using a pinhole tool (such as a bent paper clip).
The SL STATUS LED flutters for five or six seconds. The default button is not a reset
button.
2.
When the online LED is lit, remove the pinhole tool from the DEFAULT button. The
online LED turns off.
Placing the IP SLA in Download Mode
To place the IP SLA in download mode:
1.
Power down the IP SLA by either removing the cable from the power jack, if present, or
by removing the cable from the 10BASE-T jack.
2.
Press and hold the DEFAULT button using a pinhole tool while reconnecting power to
the IP SLA. The online and SL STATUS LEDs start flashing alternately.
3.
Remove the pinhole tool from the DEFAULT button. The IP SLA is now in the download
mode.
To change the mode using an older IP SLA (revision level earlier than –AC), remove and
reconnect the cable from/into the 10BASE-T jack six times within three seconds. The
online and SL STATUS LEDs start flashing alternately. If the LEDs do not flash
alternately, repeat this procedure until the LEDs start flashing.
Mitel ® 5000 Installation Manual – Issue 3.0, October 2008
Page 5-199
Chapter 5: Installation
Installing SIP Gateways
Installing SIP Gateways
Support is provided in the system for local Public Switched Telephone Network (PSTN)
connectivity using the IP resources in the Mitel CS-5200/5400/5600 Base Server and a thirdparty (Session Initiated Protocol (SIP) gateway. The IP Resource application expands the
support of 25 IP endpoints/Single Port LSAs/SoftPhones to include Loop Start Adapters (Single
Port LSAs). Support for IP-based local loop requires no software feature units.
Up to 25 IP resource ports can be programmed to be loop start adapter ports (SIP/MGCP
gateway trunks). The IP Resource application statically maps IP resources on a one-to-one,
non-blocking basis for each loop start port within the SIP/MGCP device.
The following new SIP gateways are available through the Mitel® CommSource® division:
• Quintum® AFT 400 SIP gateway
• AudioCodes™ MP-114 SIP gateway
For configuration instructions and additional information, see page 5-202.
WARNING
Possible Delay in Local Emergency Response to Remote Sites.
IP and SIP endpoint users should be alerted to the following hazardous situations:
• If an Emergency Call phone number is dialed from an IP or SIP endpoint located at a
remote site that is not equipped with a correctly configured gateway, the call will be
placed from the location where system chassis is installed rather than from the location
where the emergency call is made.
In this situation, emergency responders may be dispatched to the wrong location. To
minimize the risk of remote site users misdirecting emergency responders, Mitel
recommends regular testing of SIP/MGCP gateway trunk(s) for dial tone.
• If uninterruptible power supply (UPS) protection has not been installed as part of the
Mitel 5000 system, IP and SIP endpoints will not operate when electrical power fails
either at remote sites or at the main system location.
To place calls during a power failure in this situation, IP and SIP endpoint users can only use
a single line endpoint connected to one of the power failure bypass circuits built-in to the
system chassis. If an endpoint connected to a power failure bypass circuit is not available,
users should make emergency calls from a local endpoint not connected to the system. For
details about the Power Failure Bypass feature, refer to the Mitel 5000 Features and
Programming Guide, part number 580.8006.
When configured with a SIP gateway, you can program the system so that when an Emergency
Number is dialed from an IP device, the calling name and number associated with the IP
device, not the system, is sent to the emergency call operators.
With regard to the Service Type feature, call processing supports Caller ID on the Single Port
LSA. The Single Port LSA has built-in Caller ID receivers. It does not use shared Caller ID
resources within the system. The resource manager within Call Processing is modified to have
Caller ID receivers as an attribute for this device type and to use the local Caller ID receiver. If
the service type is set to Caller ID, Caller ID messages are passed up through the IP resource
application to Call Processing. By default, it is set to None.
Page 5-200
Mitel ® 5000 Installation Manual – Issue 3.0, October 2008
Chapter 5: Installation
Installing SIP Gateways
NOTICE
It is the responsibility of the organization and person(s) performing the installation and
maintenance of Mitel Advanced Communications Platforms to know and comply with all
regulations required for ensuring Emergency Outgoing Access at the location of both the
main system and any remote communication endpoints. Remote IP and SIP endpoints may
require gateway access to nearby emergency responders.
Emergency Call phone numbers include:
• 911, the default for Mitel systems located in the United States (USA).
• 999, the default for Mitel systems located in the European market and used primarily in
the United Kingdom (UK).
• If applicable, 112, an emergency number used widely in Europe outside of the UK.
• Any emergency number, such as for a police or fire station, that is appropriate for the
location of the main system and/or remote endpoints.
Caller ID receivers are not available on all SIP gateways. Consult the device documentation for
information on Caller ID support. Refer to the Mitel 5000 Features and Programming Guide, part
number 580.8006, for additional details. Figures 5-69 and 5-70 illustrate a remote site without or
with an SIP gateway.
Figure 5-69. Example of a Remote Site without a SIP Gateway Application
IP Resource
911
Operator
Caller dials 911
In Phoenix, AZ
PSTN
IP NETWORK
Caller ID Display:
480-961-9000
Mitel 5000
System
IP Endpoint
Located in Phoenix, AZ
480-961-9000
Remote Site
Located in Orange, CA
714-283-1600
Figure 5-70. Example of a Remote Site with a SIP Gateway Application
911
Operator
IP Resource
PSTN
SIP
Gateway
In Orange, CA
IP NETWORK
(AudioCodes)
Caller ID Display:
714-283-1600
Caller dials 911
Mitel 5000
System
Located in Phoenix, AZ
480-961-9000
IP Endpoint
Remote Site
Located in Orange, CA
714-283-1600
IMPORTANT
The SIP gateway is intended to connect to the PSTN. Connecting the SIP
gateway to single line ports on other systems is not supported.
Mitel ® 5000 Installation Manual – Issue 3.0, October 2008
Page 5-201
Chapter 5: Installation
Installing SIP Gateways
NOTICE
Positive Disconnect. Signaling a call termination from the CO over an analog loop start line
differs from CO to CO. Because the SIP/MGCP gateways detect this call event differently,
you must pay particular attention to how the CO and the SIP/MGCP gateway detect far-end
call termination. If the SIP/MGCP gateway you are installing relies on the CO to detect dial
tone to signal a call termination, then a user could possibly hookflash and place a second call
before the system realizes that a new call is being made. If this occurs, the appropriate toll
restrictions are not applied to the new call. If the CO detects dial tone to indicate a terminated
call, Mitel recommends that the CO line used with the SIP/MGCP gateway be restricted to
local calls.
Also, if the CO caller hangs up before the user, the user may still be connected to the CO
until the user either hangs up or the SIP/MGCP gateway detects dial tone. The user may
eventually hear reorder tone or a message that says, “If you would like to make a call...” until
they hang up.
The system supports SIP (Session Initiated Protocol) trunks to reach the CO. SIP trunks allow
the system to communicate with the CO via SIP-enabled gateways. As the SIP protocol
becomes more and more popular, it is important to be able to communicate to SIP gateways in
the IP-centric world.
The following new SIP gateways are available through the Mitel® CommSource® division:
• Quintum® AFT 400 SIP gateway
• AudioCodes™ MP-114 SIP gateway
These gateways replace the AudioCodes MP-104 SIP/MGCP Gateway that has gone end-oflife in October 2006. Both gateways support analog Foreign eXchange Office (FXO) ports. The
setup procedure is different for each device; the MP-114 gateway uses a Web interface called
the AudioCodes Web administrator, while the AFT 400 gateway uses a Configuration Manager
program and a Command Line Interface (CLI). Existing systems must upgrade to v2.4 or later to
support the gateways. For more information, refer to the Inter-Tel Axxess/5000 Quintum SIP
Gateway Installation Manual (document part number 835.3123) or the Inter-Tel Axxess/5000
AudioCodes MP-114 SIP Gateway Installation Manual (document part number 835.3202).
SIP trunks support the following functionality:
• They are transparent to the system user because SIP trunks act like any other CO trunk in
the system.
• They support transferring trunks, putting trunks on hold, and connecting trunks to
conferences similar to other CO trunks in the system.
• They support making and receiving calls by any endpoint.
• They support peer-to-peer audio by IP endpoints.
• They reside in CO trunk groups like other trunks so that SIP trunk calls can be routed
using Automatic Route Selection (ARS).
• They support Emergency Number calls, such as 911 in the United States or 999 in Europe,
the same as SIP/MGCP trunks.
Page 5-202
Mitel ® 5000 Installation Manual – Issue 3.0, October 2008
Chapter 5: Installation
Installing a Mini-DSS Unit
Installing a Mini-DSS Unit
The Model 8416 Mini-DSS Unit provides 16 additional user-programmable buttons and
connects directly to the Model 8660 IP endpoints. Mini-DSS Units are physically attached to a
special cable pin connector. Because the Mini-DSS Units draw power from the endpoint,
external AC transformers are not required. Mini-DSS Units are optional equipment.
Unpack and inspect the Mini-DSS Unit. Install each Mini-DSS Unit as outlined below. For
diagrams of the installation, see Figure 5-71 on page 5-204 and Figure 5-72 on page 5-204.
To install a Mini-DSS unit:
1.
Lift and remove the original faceplate using the notch on the faceplate edge of the
endpoint. The original faceplate can be returned to Mitel for recycling.
2.
Remove the original endpoint facemats and set them aside for later use.
3.
Turn the endpoint over so that the Mini-DSS access panels located on the bottom of the
endpoint are accessible. The recess beneath the top access panel houses the pin
connector for the Mini-DSS cable.
4.
Remove the screws from the access panels and set them aside for later use.
5.
Remove the access panels from the endpoint. The endpoint access panels can be
returned to Mitel for recycling.
6.
Turn the Mini-DSS over and pull a section of ribbon cable measuring 1¾ in. (4.5 cm)
from the unit.
NOTE
Avoid removing more cable than the recommended 1¾ in. (4.5 cm). The
excess cable may be difficult to return to inside the Mini-DSS unit.
7.
Plug the cable from the Mini-DSS unit into the pin connector on the endpoint.
8.
Guide the “arms” of the Mini-DSS unit into the access panel slots.
9.
Secure the Mini-DSS unit to the endpoint by replacing and tightening the screws
removed from the access panels in step 5.
10.
Turn the endpoint, and attached Mini-DSS, over. Replace the original facemats on the
and place the Mini-DSS facemats on the Mini-DSS unit.
11.
Snap the Mini-DSS faceplate into place covering the facemats.
Mitel ® 5000 Installation Manual – Issue 3.0, October 2008
Page 5-203
Chapter 5: Installation
Installing a Mini-DSS Unit
Figure 5-71. Mini-DSS Installation
Cable
(1¾”)
Top Access Panel
Cable Pin Connector
Bottom Access
Panel
Mini-DSS
(Bottom)
For illustration clarity, the endpoint base is not shown.
8660 Endpoint
(Bottom)
Figure 5-72. Model 8660 with Attached Mini-DSS
Mini-DSS
Faceplate
Mini-DSS
Facemats
Endpoint Facemats
Page 5-204
Mitel ® 5000 Installation Manual – Issue 3.0, October 2008
Chapter 5: Installation
Installing a Single Line Handset Amplifier
Installing a Single Line Handset Amplifier
Single line set users may want to install a handset amplifier. Usually, the amplifier is an external
device placed between a single line endpoint and the handset. For specifications, see page 453.
To install the handset amplifier:
1.
Unplug the coiled handset cord from the single line set.
2.
Plug the coiled handset cord into the amplifier jack labeled HANDSET.
3.
Plug the amplifier line cord (coming from the jack labeled TELEPHONE) into the single
line set handset jack.
4.
Plug the amplifier power supply cord into an available AC power source. Do not plug the
transformer unit into the outlet used for the Inter-Tel 5000 Base Server chassis. Also,
Mitel recommends using a UPS.
5.
Increase or decrease the handset volume, using the thumbwheel located on the
amplifier. Verify that the amplifier is functioning correctly by placing a call and adjusting
the volume from low to high.
Installing a DSS/BLF Unit
Three models of Direct Station Select (DSS)/Busy Lamp Field (BLF) units can be installed on
digital endpoints, depending on the model of endpoint. Each suitable digital endpoint supports
up to four DSS/BLF units, and each Mitel 5000 platform supports a total of 20 DSS/BLF units.
As described in the following sections, to install a DSS/BLF unit on a digital endpoint, carry out
the following process and associated procedures:
1.
Gather installation equipment and materials.
2.
Install Personal Computer Data Port Module (PCDPM) and Modem Data Port Module
(MDPM) devices in digital endpoints, as required.
3.
Connect PCDPM cables.
4.
Install and test DSS/BLF unit(s).
Gathering Equipment and Materials
Keep the following information in mind when gathering equipment and materials for installing
DSS/BLF units.
• PCDPMs are required on digital endpoints in order to use the Off-Hook Voice Announce
(OHVA) feature or to install DSS/BLF units.
IMPORTANT
Serial data communication through the RS-232 serial port interface on
the PCDPM is not supported on the Mitel 5000 platform.
• MDPMs are required on digital endpoints in order to connect single line endpoints.
• Optional wall-mount kits for the Mitel CS-5x00/DEI chassis. One wall-mount kit allows you
to mount the chassis flat against the MDF and the other kit from the Mitel CommSource®
division provides a rack mount unit that can be wall-mounted on the MDF. For detailed
information about wall-mounting the chassis, see “Installing the Mitel CS-5200/5400/5600
Base Server” on page 5-15.
Mitel ® 5000 Installation Manual – Issue 3.0, October 2008
Page 5-205
Chapter 5: Installation
Installing a PCDPM
Installing a PCDPM
The following areas must be addressed to properly install and configure the PC Data Port
Module (PCDPM):
• Hardware Installation (discussed on the pages that follow)
o
Executive Display or Standard Display Endpoint (page 5-208)
o
Professional Display or Associate Display Endpoint (page 5-209)
o
Model 8520 or 8560 Endpoint (page 5-210)
• System DB Programming (refer to the Mitel 5000 Features and Programming Guide, part
number 580.8006)
For Off-Hook Voice Announce (OHVA) receive capability, and to allow a DSS/BLF Unit and/or
Modem Data Port Module to be installed, any Standard, Associate, Executive, or Professional
Display endpoint or Model 8520 or 8560 endpoint may be equipped with a PC Data Port Module
(PCDPM). For the Executive and Standard Display endpoints, PCDPM part number 550.3018
[PB2585 in Europe] or 550.3014 [PB2548-A] is required. For the Professional and Associate
display endpoints, PCDPM part number 550.3018 is required. Models 8520 and 8560 endpoints
require PCDPM part number 550.8400.
The original model PCDPM, part number 550.3014 [PB2548-A in Europe], for the Executive
Display and Standard Display endpoints has been replaced with part number 550.3018
[PB2585]. The new PCDPM, part number 550.3018, and the Model 8520/8560 PCDPM, part
number 550.8400, do not require an external AC transformer. For details, see Figure 5-73 on
page 5-207. Refer to the installation instructions included with the unit. Procedures for installing
PCDPMs begin on page 5-208.
PCDPMs can be used for the following purposes:
• Receive capability for OHVA
• Connect Modem Data Port Module (MDPM)
Page 5-206
Mitel ® 5000 Installation Manual – Issue 3.0, October 2008
Chapter 5: Installation
Installing a PCDPM
Figure 5-73. AC Transformer Requirements for PCDPMs
AC = AC transformer required
PCDPM
For Off-Hook Voice Announce only
ENDPOINT
AC* (450 mA)
PCDPM
AC
(450 mA)
DSS/BLF
AC
DSS/BLF
ENDPOINT
AC*
PCDPM
ENDPOINT
AC (450 mA)
PCDPM
MDPM
Data device or
single line endpoint
ENDPOINT
PCDPM
ENDPOINT
AC
AC
DSS/BLF
DSS/BLF
AC
MDPM
Data device or
single line endpoint
PC/OUTPUT
DEVICE
PCDPM
AC
ENDPOINT
MDPM
Data device or
single line endpoint
AC (1250 mA)
SLA
Single line endpoint
&/or DID trunk
* The AC transformer for the PCDPM is only required if using part number 550.3014 [PB2548-A].
IMPORTANT
DSS/BLF Units, MDPMs, and SLAs always require separate AC transformers. Older PCDPMs, part
number 550.3014 [PB2548-A], require AC transformers when they are connected to DSS/BLF
Units. PCDPMs do not require AC transformers when they are used for OHVA only or have
attached MDPMs.
Mitel ® 5000 Installation Manual – Issue 3.0, October 2008
Page 5-207
Chapter 5: Installation
In Executive Display or Standard Display Endpoints
In Executive Display or Standard Display Endpoints
For installation diagrams, see Figure 5-74 on page 5-211 and Figure 5-75 on page 5-212.
To install the PCDPM for an Executive or Standard Display Endpoint:
1.
Unplug the line cord and the handset from the modular jack on the back of the endpoint.
2.
Remove the endpoint baseplate.
3.
Using a pair of cutting pliers, remove the plastic knockout on the back of the endpoint
that covers the PCDPM connector (J3) on the control board. See Figure 5-74 on page 5211.
IMPORTANT
Be careful not to let the plastic knockout fall inside the endpoint. If the
plastic knockout does get inside the endpoint, do not remove it. If the
endpoint will be wall-mounted, use the knockout in the bottom half of
the endpoint instead. See Figure 5-74 on page 5-211.
Some of the newer-style digital endpoints equipped with both red and green LEDs will
not have a plastic knockout in the upper portion of the back of the endpoint to allow easy
connection to the control board. Instead, you must open the back of the endpoint
(secured by four screws) and route the cable through the plastic knockout in the lower
portion of the back housing, just as you would if you were wall-mounting the endpoint.
4.
Align the PCDPM over the four posts protruding from the inside of the baseplate and
insert the screws (do not over-tighten).
5.
If not already installed, attach one end of the PCDPM-to-keyset interface cable to the
connector on the back of the PCDPM.
On older-style digital endpoints equipped with red LEDs only, use the appropriate
end of the new PCDPM to old keyset interface cable, part number 813.1633. The
connector is keyed so that it can be installed in only one way.
On one of the newer-style digital endpoints equipped with both red and green
LEDs, use the appropriate end of the new PCDPM to new keyset interface cable, part
number 813.1632. Pin 1 of the cable (indicated by the stripe on the edge of the cable)
must correspond to pin 1 on the KEYSET connector (indicated by the silk-screen label
on the PCDPM). The connector is keyed so that it can be installed in only one way.
6.
Plug the free end of the PCDPM-to-keyset interface cable into connector J3 on the
control board—where the plastic knockout was previously removed. Use the eraser end
of a pencil or other suitable rod-like instrument to press each end of the cable connector
into connector J3. Apply pressure, one end at a time, until the connector clicks securely
into place.
IMPORTANT
7.
Pin 1 of the cable (indicated by the arrow on the connector) must
correspond to pin 1 on the RS-232 connector (indicated by the
silkscreen on the PCDPM). Also, the PCDPM-to-DSS interface cable
(part number 813.1595; included with the DSS/BLF Unit) is not used
with the new model PCDPM; use the DSS-to-DSS interface cable
instead.
Plug the appropriate end of the PCDPM-to-MDPM interface cable, part number
813.1566 included with the MDPM, into the MDPM connector (J1) on the PCDPM. The
other end of the cable will be attached to the MDPM after it is installed.
Pin 1 of the cable, indicated by the stripe on the edge of the cable, must correspond to
pin 1 on the MDPM connector, indicated by the silk-screened notch on the PCDPM.
Some older PCDPM-to-MDPM cables may have the stripe on the wrong edge. If the
MDPM doesn't respond properly, try reversing the connector on the PCDPM.
8.
Page 5-208
Carefully thread the cables connected to the PCDPM through the slots on the access
panel. Re-attach the baseplate and reconnect the line cord.
Mitel ® 5000 Installation Manual – Issue 3.0, October 2008
Chapter 5: Installation
In Professional Display or Associate Display Endpoints
In Professional Display or Associate Display Endpoints
To install a PCDPM in a Professional or Associate Display Endpoints:
1.
Press up on the tabs and lift off the cover. Remove the cover and the display endpoint
foot in the back, as shown below.
DISPLAY ENDPOINT
FOOT
COVER
BACK OF DISPLAY ENDPOINT
2.
Align the PC Data Port Module over the connector inside of the display endpoint and the
three pins on the outside. Gently press the module into place until the connector is
securely positioned into place, as shown below.
3.
Attach the module to the display endpoint using the two mounting screws.
PCDPM
BACK OF DISPLAY ENDPOINT
P1
P1
J2
4.
J1
Plug the appropriate end of the PCDPM-to-MDPM interface cable, part number
813.1566, into the MDPM connector (J1), shown above, on the module. The other end
of the cable will later be attached to the MDPM after it is installed.
Pin 1 of the cable, indicated by the stripe on the edge of the cable, must correspond to
pin 1 on the MDPM connector, indicated by the notch silk-screened on the module.
Mitel ® 5000 Installation Manual – Issue 3.0, October 2008
Page 5-209
Chapter 5: Installation
In Model 8520 or Model 8560 Endpoints
5.
Carefully thread the cables connected to the PCDPM through the slots on the access
panel, and re-attach the access panel to the endpoint. Make sure the cables exit through
the slot between the cover and the bottom of the display endpoint, as shown below on
the left.
6.
Place the cables flat against the endpoint and carefully place the foot over the cables, as
shown below on the right. For sample display endpoint PCDPM cable connections, see
Figure 5-76 on page 5-212.
CABLES
CABLES
In Model 8520 or Model 8560 Endpoints
For installation diagrams, see Figure 5-77 on page 5-213 and Figure 5-78 on page 5-213.
To install the PCDPM in a Model 8520 or 8560 endpoint:
1.
Unplug the line cord and headset from the modular jacks on the back of the endpoint.
2.
Open the endpoint base to a fully extended position.
3.
Gently slide the access panel off the endpoint to expose the PCDPM pin connector (J10)
on the endpoint control board.
4.
Align the PCDPM J3 connector with the board J10 connector and plug the PCDPM into
place on the endpoint board (see Figure 5-77 on page 5-213).
If a Modem Data Port Module will be attached to the PC Data Port Module, plug the
appropriate end of the PCDPM-to-MDPM interface cable into the 14-pin (J1) MDPM
connector on the PCDPM. (The other end of the cable will later be attached to the
MDPM after it is installed.)
IMPORTANT
Page 5-210
If the correct end of the cable is not connected into J1, the attached
device will not function properly. Make sure that the notched side of
the cable’s plastic connector faces away from the PCDPM board, and
the smooth side lies flat against it.
5.
Carefully thread the cables connected to the PCDPM through the slots on the access
panel. Re-attach the access panel to the endpoint.
6.
Secure the access panel to the PCDPM and the endpoint using the mounting screw
supplied in the PCDPM kit.
7.
Because a Modem Data Port Module will be attached to the PC Data Port Module, see
the instructions on page 5-213. The only purpose of installing a PCDPM in a digital
endpoint is to provide the copper path between the MDPM and a DSS/BLF unit. There is
no need to install a PCDPM without also installing an MDPM.
Mitel ® 5000 Installation Manual – Issue 3.0, October 2008
Chapter 5: Installation
In Model 8520 or Model 8560 Endpoints
Figure 5-74. PCDPM Installation in an Executive or Standard Display Endpoint
INSIDE OF BASEPLATE
BACK OF DIGITAL ENDPOINT
PCDPM
J1
TO CHASSIS
J2
P1
TO
HANDSET
J3
RS232
CONNECTOR
TO DSS/BLF UNIT OR
PC/OUTPUT DEVICE
MDPM
CONNECTOR
To Modem Data
Port Module
If the endpoint will be wall-mounted, open
the back of the endpoint and reroute the
Module-to-Keyset Interface cable through
this knockout over to connector J3 on the
control board.
Older PCDPMs, part number 550.3014, require AC transformers when they are connected to DSS/BLF units
only. PCDPMs do not require AC transformers when they are used for off-hook voice announce only or have
attached MDPMs. For a diagram of AC transformer requirements, see Figure 5-73 on page 5-207. Also, some
early PCDPM-to-MDPM cables may have the stripe on the wrong edge. If the MDPM does not respond properly, try reversing the connector on the PCDPM.
Mitel ® 5000 Installation Manual – Issue 3.0, October 2008
Page 5-211
Chapter 5: Installation
In Model 8520 or Model 8560 Endpoints
Figure 5-75. PCDPM Cables on Executive or Standard Display Endpoints
RS232
CABLE
PCDPM-to-MDPM
Interface Cable
PCDPM-to-KEYSET
Interface Cable
OR
J1
CE
P1
J1
J2
P1
PC DATA PORT
MODULE
MODEM DATA
PORT MODULE
(Inside of Baseplate)
(Top Cover Removed)
DSS-to-DSS
INTERFACE CABLE
BACK OF DIGITAL
ENDPOINT
Figure 5-76. PCDPM Cables on Professional or Associate Display Endpoints
PCDPM-to-RS232
INTERFACE CABLE
(813.1631)
PCDPM-to-MDPM
Interface Cable
(813.1566)
J2
J2
J1
P1
J1
MODEM DATA
PORT MODULE
(Back of the Unit)
PC OR
OUTPUT DEVICE
BACK OF DISPLAY ENDPOINT WITH PCDPM
Page 5-212
Mitel ® 5000 Installation Manual – Issue 3.0, October 2008
Chapter 5: Installation
In Model 8520 or Model 8560 Endpoints
Figure 5-77. PCDPM Installation in a Model 8520 or 8560 Endpoint
MODEL 8560 ENDPOINT
(BACK)
PCDPM
J2
J1
ACCESS
PANEL
J10 PIN
CONNECTOR
J3 CONNECTOR
(BACK)
CABLE SLOTS
SCREW
2Figure 5-78. MDPM Cable Connection in a Model 8520 or 8560 Endpoint
LE
PCDPM-to-MDP
INTERFACE CAB
(813.1566)
J2
J1
MODEM DATA
PORT MODULE
(BACK)
J2
J1
CE
SS
BLE
BOTTOM OF ENDPOINT WITH PCDPM
(Base not shown for illustrative purposes.)
Mitel ® 5000 Installation Manual – Issue 3.0, October 2008
Page 5-213
Chapter 5: Installation
Installing an MDPM
Installing an MDPM
Digital endpoints equipped with PC Data Port Modules may be equipped with Modem Data Port
Modules, part number 550.3015 [PB2549-A in Europe]. The MDPM contains a four-conductor
modular jack [line jack unit] that can be used to connect a single line endpoint or trunk to the
digital endpoint. Each “equipped” MDPM installed counts as one single line device.
For installation diagrams, see Figure 5-75 on page 5-212 and Figure 5-79 on page 5-214.
To install the MDPM:
1.
Ensure the endpoint line cord is unplugged from its modular jack on the endpoint.
2.
Plug the free end of the PCDPM-to-MDPM interface cable into connector J1 on the
MDPM. The other end of the cable was previously attached to the PCDPM (see page 5217).
3.
Insert the endpoint line cord, which would normally be connected to a CO jack, into the
modular jack (J2) on the MDPM.
4.
Plug the main AC transformer unit into an AC power source. Do not use the same AC
outlet used for the equipment chassis.
5.
Reconnect the endpoint line cord. The MDPM can be placed flat or standing on-end.
Figure 5-79. Digital Endpoint Modem Data Port Module (MDPM) Installation
MODEM DATA PORT MODULE
(TOP COVER REMOVED)
LED
INDICATORS
(stacked)
POWER
OFF HOOK
RINGING
POWER CONNECTOR
To AC Transformer
PCDPM CONNECTOR
To PC Data Port Module
MODULAR JACK
To Single Line
Endpoint
Page 5-214
Mitel ® 5000 Installation Manual – Issue 3.0, October 2008
Chapter 5: Installation
Connecting DSS/BLF Units
Connecting DSS/BLF Units
Up to 20 DSS/BLF Units can be installed on the system. A single endpoint can be equipped with
up to four units.
Before installing DSS/BLF units on digital endpoints, each endpoint must be equipped with a
PCDPM and an MDPM. For detailed installation instructions, see “Installing an MDPM” on
page 5-214 and “Installing a PCDPM” on page 5-206.
Connecting PCDPM Cables
For OHVA receive capability and to allow an optional DSS/BLF Unit and/or an optional MDPM
to be installed, any 2-line or 6-line display endpoint may be equipped with a PCDPM.
• For Executive Display and Standard Display endpoints, use PCDPM part number
550.3018 [PB2585 in Europe]—an external AC transformer is not required.
Or, use part number 550.3014 [PB2548-A]—an external AC transformer is required.
• For Professional Display and Associate Display endpoints, use PCDPM part number
550.3018 An external AC transformer is not required.
• For the Models 8520 and 8560 endpoints, use PCDPM part number 550.8400. An external
AC transformer is not required.
For details, see PCDPM installation instructions included with the unit.
To Executive, Standard, Professional, or Associate Display
Endpoints
To connect the PCDPM cable:
1.
Install the PCDPM for an Executive, Standard, Professional, or Associate Display
endpoint.
For installation diagrams, see Figure 5-80 on page 5-216, Figure 5-82 on page 5-217,
and Figure 5-83 on page 5-218. Also, detailed information is provided in the v1.1
Addendum, part number 580.8002, located on the CD-ROM.
2.
Attach one end of the DSS-to-DSS interface cable, part number 813.1519 which is
included with the DSS/BLF Unit, to J2 on the PCDPM. See Figure 5-80 on page 5-216.
The other end of the cable will be attached to the DSS/BLF Unit after it is installed. If
using an older PCDPM, part number 550.3014, plug the main AC transformer into an
available AC power source. Do not use the outlet for the equipment chassis. Newer
PCDPMs do not require an external AC power source.
Mitel ® 5000 Installation Manual – Issue 3.0, October 2008
Page 5-215
Chapter 5: Installation
To Executive, Standard, Professional, or Associate Display Endpoints
Figure 5-80. PCDPM Installation on Executive or Standard Display Endpoints
Inside of Baseplate
Back of Digital Endpoint
PCDPM
J1
J2
To Chassis
P1
To
Handset
J3
To MDPM
Connector J1
To DSS/BLF
Connector J1
If the endpoint will be wall-mounted,
open the back of the endpoint and
reroute the Module-to-Keyset Interface cable through this knockout
over to connector J3 on the endpoint control board.
Older PCDPMs, part number 550.3014, require AC transformers when they are connected to DSS/BLF units
only or to PC/output devices only. PCDPMs do not require AC transformers when they are used for OHVA only
or have attached MDPMs. For a diagram of AC transformer requirements, see the Specifications chapter.
Also, some early PCDPM-to-MDPM cables may have the stripe on the wrong edge. If the MDPM does not
respond properly, try reversing the connector on the PCDPM.
Figure 5-81. Back of 60-Key, 6-Row Digital DSS/BLF Unit
Connector
To 2nd DSS/BLF
Unit if Installed
Connector
To Endpoint PC Data
Port Module
Back of Digital DSS/BLF Unit
Power Connector
To AC Transformer
J2
J1
J4
J3
Inside of Baseplate
Page 5-216
Mitel ® 5000 Installation Manual – Issue 3.0, October 2008
Chapter 5: Installation
To Executive, Standard, Professional, or Associate Display Endpoints
Figure 5-82. Executive or Standard Display Endpoint PCDPM Cable Connections
PCDPM-to-MDPM
Interface Cable (813.1566)
PCDPM-to-Endpoint
Interface Cable
J2
P1
P1
J1
J1
J2
PC Data Port
Module
(Inside of Baseplate)
PCDPM-to-DSS
Interface Cable
(813.1519*)
DSS-to-DSS
Interface Cable
(813.1519)
*Same as
DSS-DSS Cable
J1
Modem Data
Port Module
(Top Cover Removed)
Back of Digital Endpoint
J1
J2
J4
J1
J2
J4
J3
J1
J3
Connector
Board
(Inside of Baseplate)
Connector
Board
(Inside of Baseplate)
Back of 1st
DSS/BLF Unit
Back of 2nd
DSS/BLF Unit
Same as the PCDPM-to-Endpoint
Interface Cable shown above
Mitel ® 5000 Installation Manual – Issue 3.0, October 2008
Page 5-217
Chapter 5: Installation
To Executive, Standard, Professional, or Associate Display Endpoints
Figure 5-83. PCDPM Cables on Professional or Associate Display Endpoints
PCDPM-to-MDPM
Interface Cable
(813.1566)
J2
J2
J1
P1
J1
Modem Data
Port Module
(Back of Unit)
Back of Display Endpoint with PCDPM
PCDPM-to-DSS
Interface Cable
(Daisy Chain Cable)
(813.1519*)
DSS-to-DSS
Interface Cable
(813.1519)
*Same as
DSS-to-DSS Cable
J1 P4 J2
Connector Board
Back of 1st 12-row DSS/BLF Unit
Page 5-218
J1 P4 J2
Connector Board
Back of 2nd 12-row DSS/BLF Unit
Mitel ® 5000 Installation Manual – Issue 3.0, October 2008
Chapter 5: Installation
To Executive, Standard, Professional, or Associate Display Endpoints
Figure 5-84. Model 8520 or 8560 Endpoint PCDPM Installation
Model 8560 Endpoint
(Back)
J2
PCDPM
J1
J10 Pin
Connector
J3 Connector
(Back)
Cable Slots
Access
Panel
Screw
Figure 5-85. Model 8520 or 8560 Endpoint PCDPM Cable Connections
Mitel ® 5000 Installation Manual – Issue 3.0, October 2008
Page 5-219
Chapter 5: Installation
To Executive, Standard, Professional, or Associate Display Endpoints
PCDPM-to-MDPM
Interface Cable
(813.1566)
J2
J1
Modem Data
Port Module
(Back)
J2
J1
Bottom of Endpoint with PCDPM
(Base not shown for illustrative purposes)
PCDPM-to-DSS
Interface Cable
(813.1519*)
*Same as
DSS-to-DSS Cable
DSS-to-DSS
Interface Cable
(813.1519)
J1
J2
Bottom of 1st DSS Unit
Page 5-220
J1
J2
Bottom of 2nd DSS Unit
Mitel ® 5000 Installation Manual – Issue 3.0, October 2008
Chapter 5: Installation
Connecting to Model 8520 or 8560 Endpoints
Connecting to Model 8520 or 8560 Endpoints
To connect PCDPM cable:
1.
Install the PC Data Port Module for a Model 8520 or 8560 endpoint. For installation
diagrams, see Figure 5-84 on page 5-219 and Figure 5-85 on page 5-219.
2.
Do either of the following:
•
If a DSS/BLF Unit will be attached to the PC Data Port Module, attach one end of a
PCDPM-to-DSS interface cable to the 10-pin (J2) connector on the module, as
shown in Figure 5-84 on page 5-219. The other end of the cable will later be
attached to the DSS/BLF Unit after it is installed.
IMPORTANT
•
If the correct end of the cable is not connected into J2, the
attached device will not function properly. Make sure that the
notched side of the plastic connector on the cable is facing away
from the PCDPM board and the smooth side lies flat against it.
If a Modem Data Port Module will be attached to the PC Data Port Module, plug the
appropriate end of the PCDPM-to-MDPM interface cable into the 14-pin (J1)
MDPM connector on the PCDPM. The other end of the cable will later be attached
to the MDPM after it is installed.
IMPORTANT
If the correct end of the cable is not connected into J1, the
attached device will not function properly. Make sure that the
notched side of the plastic connector on the cable faces away
from the PCDPM board and the smooth side lies flat against it.
3.
Carefully thread the cables connected to the PCDPM through the slots on the access
panel. Re-attach the access panel to the endpoint.
4.
Secure the access panel to the PCDPM and the endpoint using the mounting screw
supplied in the PCDPM kit.
5.
Do either of the following:
•
If a Modem Data Port Module will be attached to the PCDPM, see “Installing an
MDPM” on page 5-214.
•
If a Modem Data Port Module will not be attached to the PCDPM, reconnect the
line cord.
Mitel ® 5000 Installation Manual – Issue 3.0, October 2008
Page 5-221
Chapter 5: Installation
Attaching 6-Row and 50-Key Models
Attaching 6-Row and 50-Key Models
Install the 6-Row or Model 8450 50-Key (50-Button) DSS/BLF Unit as outlined in the following
procedure. For diagrams of the installation, see Figure 5-82 on page 5-217 and Figure 5-81 on
page 5-216.
1.
Remove the baseplate from the back of the DSS/BLF Unit.
2.
On the connector board located in the baseplate, plug the free end of the PCDPM-toDSS interface cable into the main connector (J1). The other end of the cable was
previously attached to the PC Data Port Module (PCDPM) on the corresponding
endpoint.
3.
Plug the AC transformer cable into the power connector (J4) on the baseplate connector
board. The transformer will later be plugged into an AC power source. DSS/BLF Units
always require separate AC transformers. For a diagram of AC transformer
requirements, see Figure 5-73 on page 5-207.
4.
To attach a second DSS/BLF Unit to the first unit:
a. Plug one end of a DSS-to-DSS interface cable into the secondary connector (J2) on
the baseplate connector board in the first unit.
b. Remove the baseplate from the back of the second DSS/BLF Unit.
c. Plug the other end of the DSS-to-DSS interface cable into the main connector (J1)
on the baseplate connector board in the second unit.
d. Plug the AC transformer cable into the power connector (J4) on the baseplate
connector board in the second unit. The transformer will later be plugged into an AC
power source. If more than one DSS/BLF unit is installed on an endpoint, each unit
must be equipped with an AC transformer. In addition, if using PCDPM part number
550.3014 on the corresponding endpoint, the PCDPM also must be equipped with an
AC transformer. PCDPM part number 550.3018 does not require an AC transformer.
For details, see “Connecting PCDPM Cables” on page 5-215.
5.
To attach a third unit to the second unit, follow the same substeps outlined in step 4.
6.
Perform the following DSS/BLF Unit self-test:
a. While holding down the first two buttons in row one (extension numbers 1000 and
1001 in the default database), plug the main AC transformer unit into an available AC
power source. Do not use the outlet for the system chassis. Check that all buttons
light. If an LED does not light, unplug the AC transformer and plug it in while holding
down the first two buttons in row one (ext. 1000 and 1001). If the test fails again,
replace the DSS/BLF Unit.
b. Press each button individually (in any order) to remove the lit status. When finished,
all buttons should not be lit. If an LED does not go out, unplug the AC transformer
and repeat steps a and b. If the test fails again, replace the DSS/BLF Unit. After all of
the buttons have been tested, it takes approximately 5 seconds for the DSS/BLF Unit
to return to normal operation.
c. Replace the baseplate on the back of the DSS/BLF Unit, taking care not to snag any
cables between the baseplate and housing.
Page 5-222
Mitel ® 5000 Installation Manual – Issue 3.0, October 2008
Chapter 5: Installation
Attaching a 12-Row Model
Attaching a 12-Row Model
Install each 12-row DSS/BLF Unit as outlined following procedure. For diagrams of the
installation, see Figure 5-83 on page 5-218. A description of the units appears in “Direct Station
Select/Busy Lamp Field Units” on page 4-50.
1.
Attach one end of a PCDPM-to-DSS interface cable, part number 813.1519, into
connector J2 on the PCDPM.
2.
Remove the baseplate on the back of the DSS/BLF console.
3.
On the connector board located in the baseplate, plug the free end of the PCDPM-toDSS interface cable, part number 813.1519, into the main connector (J1).
4.
Plug the AC transformer cable into the power connector (P1) on the baseplate connector
board. The transformer will later be plugged into an AC power source. DSS/BLF Units
always require their own separate AC transformers. For a diagram of AC transformer
requirements, see Figure 5-73 on page 5-207.
5.
To attach a second 12-row DSS/BLF Unit to the first unit:
a. Plug one end of a DSS-to-DSS interface cable, part number 813.1519, into the
secondary connector (J2) on the baseplate connector board in the first unit.
b. Remove the baseplate from the back of the second DSS/BLF Unit.
c. Plug the other end of the DSS-to-DSS interface cable into the main connector (J1)
on the baseplate connector board in the second unit.
d. Plug the AC transformer cable into the power connector (P1) on the baseplate
connector board in the second unit. The transformer will later be plugged into an AC
power source. If more than one 12-row DSS/BLF Unit is installed on an endpoint,
each unit must be equipped with an AC transformer. In addition, the PCDPM on the
corresponding endpoint must be equipped with an AC transformer.
6.
To attach a third unit to the second unit, follow the same substeps outlined in step 5.
7.
Perform the 12-row DSS/BLF Unit self-test:
a. While holding down the first two buttons in row one (extension numbers 1000 and
1001 in the default database), plug the main AC transformer into an available AC
power source. Do not use the outlet for the system chassis. Check that all of the
buttons light. If an LED does not light, unplug the AC transformer and plug it in while
holding down the first two buttons in row one (ext. 1000 and 1001). If the test fails
again, replace the DSS/BLF Unit.
b. Press each button individually (in any order) to remove the lit status. When finished,
check that all buttons are unlit. If an LED does not go out, unplug the AC transformer
and repeat steps a and b. If the test fails again, replace the DSS/BLF Unit. After all
buttons have been tested, it takes approximately five seconds for the DSS/BLF Unit
to return to normal operation.
c. Replace the baseplate on the back of the DSS/BLF Unit, taking care not to snag any
cables between the baseplate and housing.
Mitel ® 5000 Installation Manual – Issue 3.0, October 2008
Page 5-223
Chapter 6: Programming
Programming
Chapter Overview . . . . . . . . . . . . . . . . . . . . . . . . . . . . . . . . . . . . . . . . . . . . . . . . . . . . . . . . . . . . . .6-4
Initial DB Programming Tasks
Introduction . . . . . . . . . . . . . . . . . . . . . . . . . . . . . . . . . . . . . . . . . . . . . . . . . . . . . . . . . . . . . . . . . . .6-5
Configuration Wizard . . . . . . . . . . . . . . . . . . . . . . . . . . . . . . . . . . . . . . . . . . . . . . . . . . . . . . . .6-5
Networking Wizard . . . . . . . . . . . . . . . . . . . . . . . . . . . . . . . . . . . . . . . . . . . . . . . . . . . . . . . . . .6-5
Guidelines . . . . . . . . . . . . . . . . . . . . . . . . . . . . . . . . . . . . . . . . . . . . . . . . . . . . . . . . . . . . . . . . . . . .6-6
Initial Programming . . . . . . . . . . . . . . . . . . . . . . . . . . . . . . . . . . . . . . . . . . . . . . . . . . . . . . . . . .6-6
Private IP Networking Programming Guidelines . . . . . . . . . . . . . . . . . . . . . . . . . . . . . . . . . . . .6-7
Endpoint IP Resource Programming . . . . . . . . . . . . . . . . . . . . . . . . . . . . . . . . . . . . . . . . . . . .6-8
System Setup for Programming. . . . . . . . . . . . . . . . . . . . . . . . . . . . . . . . . . . . . . . . . . . . . . . . . . .6-9
Determine the System IP Address . . . . . . . . . . . . . . . . . . . . . . . . . . . . . . . . . . . . . . . . . . . . . .6-9
Programming Software . . . . . . . . . . . . . . . . . . . . . . . . . . . . . . . . . . . . . . . . . . . . . . . . . . . . . .6-10
Stand-Alone Local Programming . . . . . . . . . . . . . . . . . . . . . . . . . . . . . . . . . . . . . . . . . . . . . .6-10
Onsite or Remote Programming Over IP . . . . . . . . . . . . . . . . . . . . . . . . . . . . . . . . . . . . . . . .6-10
Remote Programming Using a Modem . . . . . . . . . . . . . . . . . . . . . . . . . . . . . . . . . . . . . . . . . .6-10
Database Utilities. . . . . . . . . . . . . . . . . . . . . . . . . . . . . . . . . . . . . . . . . . . . . . . . . . . . . . . . . . . . . .6-11
Database Test and Repair Utility . . . . . . . . . . . . . . . . . . . . . . . . . . . . . . . . . . . . . . . . . . . . . .6-11
Running a Test . . . . . . . . . . . . . . . . . . . . . . . . . . . . . . . . . . . . . . . . . . . . . . . . . . . . . . . . .6-11
Tests and Error Messages . . . . . . . . . . . . . . . . . . . . . . . . . . . . . . . . . . . . . . . . . . . . . . . .6-12
Database Converter Utility . . . . . . . . . . . . . . . . . . . . . . . . . . . . . . . . . . . . . . . . . . . . . . . . . . .6-23
Notes About Database Version Conversions . . . . . . . . . . . . . . . . . . . . . . . . . . . . . . . . . .6-23
Mitel 5000 Database Conversions . . . . . . . . . . . . . . . . . . . . . . . . . . . . . . . . . . . . . . . . . . . . .6-24
Inter-Tel Axxess to Mitel 5000 Database Conversions . . . . . . . . . . . . . . . . . . . . . . . . . . . . . .6-26
Conversion Requirements and Considerations . . . . . . . . . . . . . . . . . . . . . . . . . . . . . . . .6-26
Database Conversion of a T1/E1 PRI Network . . . . . . . . . . . . . . . . . . . . . . . . . . . . . . . .6-27
DB Converter Error Messages . . . . . . . . . . . . . . . . . . . . . . . . . . . . . . . . . . . . . . . . . . . . .6-27
Database Conversion Supported Cards and Devices . . . . . . . . . . . . . . . . . . . . . . . . . . .6-28
Database Conversion Process. . . . . . . . . . . . . . . . . . . . . . . . . . . . . . . . . . . . . . . . . . . . .6-30
Data Form Drag and Drop Operations . . . . . . . . . . . . . . . . . . . . . . . . . . . . . . . . . . . . . . .6-34
Data Form Drag and Drop Restrictions . . . . . . . . . . . . . . . . . . . . . . . . . . . . . . . . . . . . . .6-34
Drag and Drop Operations: Inter-Tel Axxess Cards. . . . . . . . . . . . . . . . . . . . . . . . . . . . .6-35
Drag and Drop Operations: Inter-Tel Axxess Devices . . . . . . . . . . . . . . . . . . . . . . . . . . .6-38
Drag and Drop Mitel 5000 Module in Mitel 5000 View . . . . . . . . . . . . . . . . . . . . . . . . . . .6-40
Drag/Drop Mitel 5000 T1/E1/PRI Ports . . . . . . . . . . . . . . . . . . . . . . . . . . . . . . . . . . . . . .6-41
Drag and Drop Mitel 5000 Devices . . . . . . . . . . . . . . . . . . . . . . . . . . . . . . . . . . . . . . . . .6-42
Database Conversion Log File . . . . . . . . . . . . . . . . . . . . . . . . . . . . . . . . . . . . . . . . . . . . . . . .6-43
Mitel ® 5000 Installation Manual – Issue 3.0, October 2008
Page 6-1
Chapter 6: Programming
Converting a Database from Inter-Tel Axxess to Mitel 5000 . . . . . . . . . . . . . . . . . . . . . . . . .6-45
Removing All Data Form Changes. . . . . . . . . . . . . . . . . . . . . . . . . . . . . . . . . . . . . . . . . .6-49
Perform Data Form Drag and Drop Operations . . . . . . . . . . . . . . . . . . . . . . . . . . . . . . . .6-49
Remove a Device from a Module . . . . . . . . . . . . . . . . . . . . . . . . . . . . . . . . . . . . . . . . . . .6-50
Install a Module . . . . . . . . . . . . . . . . . . . . . . . . . . . . . . . . . . . . . . . . . . . . . . . . . . . . . . . .6-51
Uninstall a Module . . . . . . . . . . . . . . . . . . . . . . . . . . . . . . . . . . . . . . . . . . . . . . . . . . . . . .6-52
Replace a Used IP Device with an Unused IP Device . . . . . . . . . . . . . . . . . . . . . . . . . . .6-52
Transfer Ground Start Trunks to T1 Module . . . . . . . . . . . . . . . . . . . . . . . . . . . . . . . . . .6-53
Change Module Capacity . . . . . . . . . . . . . . . . . . . . . . . . . . . . . . . . . . . . . . . . . . . . . . . . .6-54
Change IP Endpoint or Softphone Type . . . . . . . . . . . . . . . . . . . . . . . . . . . . . . . . . . . . .6-55
Software License Management . . . . . . . . . . . . . . . . . . . . . . . . . . . . . . . . . . . . . . . . . . . . . . . . . .6-56
Obtaining a Software License . . . . . . . . . . . . . . . . . . . . . . . . . . . . . . . . . . . . . . . . . . . . . . . . .6-56
System Type Selection . . . . . . . . . . . . . . . . . . . . . . . . . . . . . . . . . . . . . . . . . . . . . . . . . . . . . .6-56
Viewing the Current License . . . . . . . . . . . . . . . . . . . . . . . . . . . . . . . . . . . . . . . . . . . . . . . . . .6-57
Transferring Licenses . . . . . . . . . . . . . . . . . . . . . . . . . . . . . . . . . . . . . . . . . . . . . . . . . . . . . . .6-58
Changing the License . . . . . . . . . . . . . . . . . . . . . . . . . . . . . . . . . . . . . . . . . . . . . . . . . . . . . . .6-58
Software License Upload . . . . . . . . . . . . . . . . . . . . . . . . . . . . . . . . . . . . . . . . . . . . . . . . . . . . . . .6-60
Invalid License Upload . . . . . . . . . . . . . . . . . . . . . . . . . . . . . . . . . . . . . . . . . . . . . . . . . . . . . .6-60
Compare Software License Window . . . . . . . . . . . . . . . . . . . . . . . . . . . . . . . . . . . . . . . . . . . .6-62
System Downgrades . . . . . . . . . . . . . . . . . . . . . . . . . . . . . . . . . . . . . . . . . . . . . . . . . . . . . . . . . . .6-62
Software License Directory . . . . . . . . . . . . . . . . . . . . . . . . . . . . . . . . . . . . . . . . . . . . . . . . . . . . .6-63
Software License Operations – Upload Software License . . . . . . . . . . . . . . . . . . . . . . . . . . .6-65
Compare/Upload Software License . . . . . . . . . . . . . . . . . . . . . . . . . . . . . . . . . . . . . . . . . . . .6-66
System Manager CA Certificate Upload . . . . . . . . . . . . . . . . . . . . . . . . . . . . . . . . . . . . . . . . .6-67
Wizard Interfaces
The Configuration Wizard . . . . . . . . . . . . . . . . . . . . . . . . . . . . . . . . . . . . . . . . . . . . . . . . . . . . . . .6-68
Process Summary . . . . . . . . . . . . . . . . . . . . . . . . . . . . . . . . . . . . . . . . . . . . . . . . . . . . . . . . . .6-69
Running the Configuration Wizard . . . . . . . . . . . . . . . . . . . . . . . . . . . . . . . . . . . . . . . . . . . . .6-69
Opening the Configuration Wizard . . . . . . . . . . . . . . . . . . . . . . . . . . . . . . . . . . . . . . . . . .6-70
Programming Date and Time Settings . . . . . . . . . . . . . . . . . . . . . . . . . . . . . . . . . . . . . . .6-71
Programming IP Settings . . . . . . . . . . . . . . . . . . . . . . . . . . . . . . . . . . . . . . . . . . . . . . . . .6-71
Programming General IP Settings . . . . . . . . . . . . . . . . . . . . . . . . . . . . . . . . . . . . . . . . . .6-72
Programming IP Devices . . . . . . . . . . . . . . . . . . . . . . . . . . . . . . . . . . . . . . . . . . . . . . . . .6-73
Editing Existing IP Devices . . . . . . . . . . . . . . . . . . . . . . . . . . . . . . . . . . . . . . . . . . . . . . .6-79
Programming Expansion Modules . . . . . . . . . . . . . . . . . . . . . . . . . . . . . . . . . . . . . . . . . .6-80
Programming Digital Expansion Interface (DEI) Units . . . . . . . . . . . . . . . . . . . . . . . . . . .6-91
Programming DEI Expansion Modules . . . . . . . . . . . . . . . . . . . . . . . . . . . . . . . . . . . . . .6-92
Finishing the Wizard Configuration . . . . . . . . . . . . . . . . . . . . . . . . . . . . . . . . . . . . . . . . .6-96
Page 6-2
Mitel ® 5000 Installation Manual – Issue 3.0, October 2008
Chapter 6: Programming
The Mitel CS-5600 Connection Wizard . . . . . . . . . . . . . . . . . . . . . . . . . . . . . . . . . . . . . . . . . . . .6-97
Connecting the Base Server to the Processing Server . . . . . . . . . . . . . . . . . . . . . . . . . . . . . .6-97
Troubleshooting Tips . . . . . . . . . . . . . . . . . . . . . . . . . . . . . . . . . . . . . . . . . . . . . . . . . . . . . . .6-98
Selection Wizards . . . . . . . . . . . . . . . . . . . . . . . . . . . . . . . . . . . . . . . . . . . . . . . . . . . . . . . . . . . .6-105
System Directory Folders and Tasks
Introduction . . . . . . . . . . . . . . . . . . . . . . . . . . . . . . . . . . . . . . . . . . . . . . . . . . . . . . . . . . . . . . . . .6-107
Planning Sheet Availability . . . . . . . . . . . . . . . . . . . . . . . . . . . . . . . . . . . . . . . . . . . . . . . . . .6-107
Software License Features . . . . . . . . . . . . . . . . . . . . . . . . . . . . . . . . . . . . . . . . . . . . . . . . . .6-107
System-Wide Parameters . . . . . . . . . . . . . . . . . . . . . . . . . . . . . . . . . . . . . . . . . . . . . . . . . . . . . .6-108
Backup Database Parameters . . . . . . . . . . . . . . . . . . . . . . . . . . . . . . . . . . . . . . . . . . . . . . .6-108
Voice Processor Disable/Enable . . . . . . . . . . . . . . . . . . . . . . . . . . . . . . . . . . . . . . . . . . . . . .6-109
Saving a Voice Processor Database in Remote Mode . . . . . . . . . . . . . . . . . . . . . . . . . . . . .6-109
Selecting a Voice Processor Type in Local Mode . . . . . . . . . . . . . . . . . . . . . . . . . . . . . . . . .6-110
Communication Server Directory Programming . . . . . . . . . . . . . . . . . . . . . . . . . . . . . . . . . . .6-112
Base Server Module Bays and Supported Modules . . . . . . . . . . . . . . . . . . . . . . . . . . . . . . .6-113
Moving Modules . . . . . . . . . . . . . . . . . . . . . . . . . . . . . . . . . . . . . . . . . . . . . . . . . . . . . . .6-114
Configuring a Basic Rate Module (BRM-S) . . . . . . . . . . . . . . . . . . . . . . . . . . . . . . . . . .6-114
Configuring a 2-Port/4-Port Loop Start Module (LSM-2/LSM-4) . . . . . . . . . . . . . . . . . .6-119
Configuring a Single-Port/Dual-Port T1/E1/PRI Module (T1M/T1M-2). . . . . . . . . . . . . .6-120
Configuring a Four-Port Single Line Module (SLM-4) . . . . . . . . . . . . . . . . . . . . . . . . . .6-134
Programming the Busy Out Manager. . . . . . . . . . . . . . . . . . . . . . . . . . . . . . . . . . . . . . .6-135
Processor Module . . . . . . . . . . . . . . . . . . . . . . . . . . . . . . . . . . . . . . . . . . . . . . . . . . . . . . . . .6-137
Processor Expansion Card . . . . . . . . . . . . . . . . . . . . . . . . . . . . . . . . . . . . . . . . . . . . . . . . . .6-137
Loop Start Ports and Single Line Ports . . . . . . . . . . . . . . . . . . . . . . . . . . . . . . . . . . . . . . . . .6-137
Digital Expansion Interface . . . . . . . . . . . . . . . . . . . . . . . . . . . . . . . . . . . . . . . . . . . . . . . . . .6-138
DEI License Requirement . . . . . . . . . . . . . . . . . . . . . . . . . . . . . . . . . . . . . . . . . . . . . . .6-138
PCDPM Configuration in DB Programming . . . . . . . . . . . . . . . . . . . . . . . . . . . . . . . . . .6-139
Internet Protocol Resources. . . . . . . . . . . . . . . . . . . . . . . . . . . . . . . . . . . . . . . . . . . . . .6-139
Echo Thresholds . . . . . . . . . . . . . . . . . . . . . . . . . . . . . . . . . . . . . . . . . . . . . . . . . . . . . . . . . .6-142
Digital Expansion Interface (DEI) Unit Programming Tasks
Programming a Four-Port Single Line Module . . . . . . . . . . . . . . . . . . . . . . . . . . . . . . . . . . . . .6-143
Programming an Eight-Port Single Line Module . . . . . . . . . . . . . . . . . . . . . . . . . . . . . . . . . . .6-146
SLM-8 Programming Overview . . . . . . . . . . . . . . . . . . . . . . . . . . . . . . . . . . . . . . . . . . . . . . .6-146
SLM-8 Programming Procedures . . . . . . . . . . . . . . . . . . . . . . . . . . . . . . . . . . . . . . . . . . . . .6-146
Attaching an External Voice Processing System to the DEI . . . . . . . . . . . . . . . . . . . . . . . . . .6-150
Overview . . . . . . . . . . . . . . . . . . . . . . . . . . . . . . . . . . . . . . . . . . . . . . . . . . . . . . . . . . . . . . . .6-150
Procedure . . . . . . . . . . . . . . . . . . . . . . . . . . . . . . . . . . . . . . . . . . . . . . . . . . . . . . . . . . . . . . .6-151
Mitel ® 5000 Installation Manual – Issue 3.0, October 2008
Page 6-3
Chapter 6: Programming
Chapter Overview
Chapter Overview
This chapter contains information about the functions and features of the Mitel ®5000 Database
(DB) Programming application and the tasks for programming the system prior to programming
many of the system features. Topics are grouped into the following categories:
• Initial Database (DB) Programming Tasks: Steps through the initial DB Programming
setup and configuration, focusing on programming areas that are used repeatedly in DB
Programming. In particular, this group of programming tasks includes system-wide
settings, database utilities, the Session Manager interface, system license management,
and system downgrades. Details begin on page 6-4.
• Wizard Interfaces: Covers three structured and software-controlled processes to facilitate
accurate and complete programming of system configuration, private networking, and
troubleshooting the connection of servers for an Mitel CS-5600 system installation. Details
begin on page 6-68.
• System Directory Folders and Tasks: Surveys in detail the folders residing in the
System directory folders of DB Programming. Details begin on page 6-106.
• Digital Expansion Interface (DEI) Unit Programming Tasks: Covers selected
programming tasks related to the DEI unit. Details begin on page 6-143.
INITIAL DB PROGRAMMING TASKS
This section provides information and procedures to support the overall programming of an
Inter-Tel 5000 advanced communications platform. You can also find all documentation on the
Mitel edGe Online Manuals and Guides Web site (www.inter-tel.com/techpublications).
Introduction
This section explains how to program a Mitel 5000 system. The system is functional upon
installation and requires programming only to make changes to meet the customer’s special
needs. This chapter assumes that system hardware has been installed, endpoints are installed,
and all system and endpoint cabling is complete and connected.
NOTE
Programmers must have received Mitel 5000 Basic certification as well as CTP
certification to receive technical support.
Configuration Wizard
The Configuration Wizard is one of several wizards designed to get the system operational
quickly. Mitel recommends running the Configuration Wizard before setting or tweaking other
system parameters or configuring other system features. For programming details, see “The
Configuration Wizard” on page 6-68.
Networking Wizard
The Networking Wizard is one of several wizards designed to get the system operational
quickly. For programming details, refer to the Mitel 5000 Features and Programming Guide, part
number 580.8006.
Page 6-4
Mitel ® 5000 Installation Manual – Issue 3.0, October 2008
Chapter 6: Programming
Guidelines
Guidelines
The following sections provide guidelines about initial programming, IP networking
programming, and endpoint programming.
Initial Programming
Keep in mind the following guidelines when programming the system. Detailed descriptions for
the following steps can be found throughout this chapter or the Mitel 5000 Features and
Programming Guide, part number 580.8006.
1.
Determine the system IP address. See page 6-8. The system is configured to obtain an
IP address automatically, using a DHCP server. However, you need this IP address if
connecting to the system over the network.
2.
Make sure you have installed the driver that will allow you to use the USB-B port when
connecting directly to the system so that you can view online messages. See page 5104.
3.
If you have installed DB Programming on your system, connect to the system through
the network, or you can connect through a modem. Refer to the Mitel 5000 Features and
Programming Guide, part number 580.8006.
4.
Select System, and then click the Communication Server folder. Program the modules
that are installed in the system. See page 6-112.
5.
Disable the Voice Processor port if you will not need it. See page 6-109.
6.
Select Devices and assign extension numbers, as determined by your numbering plan.
Change any feature codes that conflict with extension numbers or that the customer
wants to change. Refer to the Mitel 5000 Features and Programming Guide, part
number 580.8006.
7.
Change the home area codes [not applicable in Europe]. Refer to the Mitel 5000
Features and Programming Guide, part number 580.8006.
8.
Program the Voice Processor. Refer to the Mitel 5000 Features and Programming
Guide, part number 580.8006, for the following tasks:
a. Create a Message Notification/Retrieval application and a Voice Mail Application.
Make sure they have the correct extension numbers.
b. Create a System Administrator mailbox for the endpoint that will serve as the Voice
Mail administrator. You can come back later to program the rest of the mailboxes or
you can do it now.
c. Assign the newly created System Administrator mailbox as the System Administrator.
9.
Perform the remaining programming necessary to meet the customer’s needs. This may
include, but is not limited to, the following items. Refer to the Mitel 5000 Features and
Programming Guide, part number 580.8006, for this information.
•
Voice Processor: Program other Voice Processor applications (including call
routing and Fax-On-Demand—if using an external voice processing system),
extension IDs, group lists, mailboxes, Voice Processor options, timers, custom
recordings, and system information.
•
IP Private Networking: Program node IP connection groups and IP connections.
•
Devices: Program individual hunt groups, page ports, nodes, endpoints, off-node
devices, trunk groups, node trunk groups, and trunks.
•
System-Wide Flags: Program system flags to enable the necessary features. Note
that many installations will want to have the Handsfree Announce On System
Forward Transfer flag disabled; by default it is enabled.
•
ACD Hunt Group Agent IDs: If needed, program the Agent IDs used in ACD hunt
groups.
Mitel ® 5000 Installation Manual – Issue 3.0, October 2008
Page 6-5
Chapter 6: Programming
Private IP Networking Programming Guidelines
10.
•
Maintenance: Program call cost, freeze zones, message print, and SMDR
information, if applicable.
•
Numbering Plan: Program toll restriction area flags, emergency number
information, toll strings, classes of service, and user groups (area flags and user
groups are not applicable to European systems). Also set up ARS route groups,
dial rules, and facility groups.
•
Endpoint-Related Information: Program account codes, attendants, endpoint
flags, button assignments, message centers, Do-Not-Disturb and Reminder
Messages, primary attendants, system forwarding paths, and System Speed Dial.
•
Trunk Call Routing Tables: Program call routing tables.
•
System Timers: Program system timers, as needed.
When you have finished programming, save the database. See page 5-91.
Private IP Networking Programming Guidelines
System software provides a networking wizard to simplify the required programming for private
networking. Refer to the Mitel 5000 Features and Programming Guide, part number 580.8006,
for information on the networking wizard.
The Internet Protocol Resource (IPRA) application relies on a unique numbering plan to make
connections across the network. You must assign each Processor Module (and if applicable, the
Processor Expansion Card) in the network a unique extension that the other Processor Modules
must be able to recognize. For this reason, Mitel strongly suggests that you use the P6XXY
numbering convention, where XX is the node number and Y is the IPRA number. For example,
if the IPRA is the second IPRA on node 1, the extension number would be P6012.
You should also complete the IP Networking Planning Sheet (see “Private Networking” on
page A-1) before you begin programming IP networking. The Private Networking section
includes programming examples. If you do not follow a numbering convention and identify the
extensions before you program the IPRAs, it will be difficult to successfully set up your network.
To program IP private networking:
1.
Program the system for IP (Private Networking). Refer to the Mitel 5000 Features and
Programming Guide, part number 580.8006.
If necessary, choose a “P6XXY” extension where XX is the node number where the IP
resource resides and Y is the IP resource number. A default extension (P6000) is
provided, but it may need to be changed if the same extension already exists. If using
the Processor Expansion Card (PEC), the default extension is P6001.
NOTE
Page 6-6
The extension you assign to each IP resource must reflect the node where
the IP resource resides. If it does not, it will be difficult to establish the IP
connections between IP resources on a multi-node system. This numbering
convention also limits the number of networking IP resources within a
private network to 1000.
2.
Program the IP Connection: The IP resource screen contains a link to the IP resource
IP connection. Whenever the system creates an IP connection, the system broadcasts
the IP information to the other nodes as a database update, and the new IP connection
becomes an off-node device on the other nodes (provided the remote node does not
block the database change such as when a DB Programming session is active on the
remote node). This does not automatically configure the IP resources for use by the
network. You must manually program networking parameters locally as well as on each
remote node.
3.
Program the IP Connection for the remote node: You can also create IP connections
to represent IPRAs on other nodes within the network. To see these off-node IP
connection fields, you must have a node created in System\Devices and Feature
Codes\Nodes.
Mitel ® 5000 Installation Manual – Issue 3.0, October 2008
Chapter 6: Programming
Endpoint IP Resource Programming
4.
Create an off-node IP connection in the IP Connections field.
5.
Enter the “P6XXY” extension of the off-node IP connection. Again, you must assign a
unique extension to each IP connection within the network. When creating off-node
connections and other IP-related extension numbers, use a numbering plan that
associates the extension to the device and the node on which it resides. For example,
the first IP resource on node 2 would be P6021 (P6 followed by the node number, then
the IP resource number). The second IP resource would be P6022, etc.
6.
Program a remote IP address, remote audio receive port, and remote listening port in
the IP Connection screen.
7.
Program the Node IP Connection Group: The off-node IP connection screen also
contains a link to the Node IP Connection Group field to which the IP connection
belongs. The system automatically creates a node IP connection group for each remote
node you program. A node IP connection group corresponds to an IP network
connection between the local node and a remote node. Program the Node IP
Connection Group field. Changes to the Node IP Connection Group parameters do not
take effect until the next call. Changes do not affect existing calls.
Endpoint IP Resource Programming
This section describes how to program IP resources for use with IP devices.
NOTICES
• Do not connect IP Softphones and other IP endpoints to the same IP resource. Loss of
feature or endpoint functionality may result.
• Mitel CS-5400 systems have two IP addresses. One IP address is for the Processor
Module and one IP address is for the Processor Expansion Card. Both IP addresses
MUST be on the same subnet mask. This also applies to Mitel CS-5200 systems that
have been upgraded with the Processor Expansion Card. Also, provide a static IP
address for the processor module. The Processor Expansion Card must have a static IP
address.
To program IP resources:
1.
In DB Programming (System\Communication Server), select Processor Module or
Processor Expansion Card (if you have the Mitel CS-5400). For IP networking, refer to
the Networking Wizard information in the Mitel 5000 Features and Programming Guide,
part number 580.8006.
NOTE
Use a universal numbering plan when programming IP connections. The
convention of P6XXY where XX is the node number and Y is the IP
resource number is recommended. For example, for the second IP
resource on node 3, you would use P6032, and the first IP resource on
node 2 would be P6021.
2.
Program the IP Settings information (System\Communication Server\IP Settings), or if
you have the Mitel CS-5400 or you installed the Processor Expansion Card, program the
IP Connection information (System\Communication Server\IP Connection). Use the
default port settings when possible.
3.
Program voice channels and devices. See “The Configuration Wizard” on page 6-68.
4.
Program the devices to use P2P audio, if desired. Refer to the Mitel 5000 Features and
Programming Guide, part number 580.8006.
Mitel ® 5000 Installation Manual – Issue 3.0, October 2008
Page 6-7
Chapter 6: Programming
System Setup for Programming
System Setup for Programming
Use one of the following methods to program the system.
• On-site programming with an attached PC.
• Programming using a stand-alone PC over an IP connection.
• Remote programming using a modem connection.
Each method is described separately in the following text. Only one programming session
should be in operation at a time.
For on-site, remote, or stand-alone programming, the computer must be an IBM AT-compatible
personal computer (PC). See “Programming Computer Requirements” on page 4-5 for
information.
Determine the System IP Address
IMPORTANT
Use static IP addresses. If using a DHCP server (and not using a static IP
address), the IP address may change, dropping any CT Gateway and/or
Voice Processing connections.
To determine the IP address:
1.
Use the LCD panel on the front of the Mitel CS-5200/5400 chassis to navigate to the
Network menu. Refer to the Installation chapter for more information about the LCD
panel.
2.
Scroll down to IP Address.
By default, the system is programmed to use a DHCP server to obtain an IP address.
When powered up, the system tries to contact the DHCP server to obtain an IP address.
If this fails, you can use the LCD panel and controls to enter a static IP address.
3.
Use the arrow keys to enter a static IP address if a DHCP server does not exist on the
LAN.
4.
Use the arrow keys to navigate to the System menu.
5.
Scroll down to the Reboot menu option, then press the center control button to select,
then press again to acknowledge and reboot the system.
If necessary, you can also change the static IP address in DB Programming (if the
system came up using a DHCP server). You can then use the address you entered as
the IP address for the DB Programming session. Refer to the Mitel 5000 Features and
Programming Guide, part number 580.8006, for details.
Page 6-8
Mitel ® 5000 Installation Manual – Issue 3.0, October 2008
Chapter 6: Programming
Programming Software
Programming Software
All software needed to run the system is pre-installed on the compact flash-type memory card
that came with the system. However, this section is included in the event the software needs to
be installed from the CD-ROM.
The following instructions assume that Windows software is installed on the PC and the user is
familiar with Windows procedures. Also, there should be enough space on the hard drive(s)
where the common files are located, where the files for the specific version will be installed, and
where the operating system is located so the installation program can write temporary files and
install files on the system directory. To install DB Programming, you must have local
administrative rights.
If upgrading from a previous release, see “Upgrading a System” on page 5-142.
To install DB Programming software, see “Install DB Programming” on page 5-156.
Stand-Alone Local Programming
To use a PC for stand-alone programming, the proper version of DB Programming must be
loaded on a PC that has an IP connection to the Mitel CS-5200/5400/5600 Base Server. The
system database can then be saved to the programming PC and/or any storage devices
available on that PC. If saving the voice mail database or Basic Voice Mail, then a USB 2.xcompatible flash drive must be inserted in the USB-A port on the front of the Base Server.
Onsite or Remote Programming Over IP
If you know the system IP address, you can access the system database over the network
through an IP connection. Since the system initially uses DHCP to establish an IP address, you
need to access the LCD panel on the front of the unit to find out what the IP address is, before
you can access the system from a remote location. For more information about finding the IP
address from the LCD panel, refer to the Installation chapter. When you know the system IP
address, you can then provide a static (recommended) IP address in DB Programming. The
system is then available for programming over an IP connection.
Remote Programming Using a Modem
Refer to the Mitel 5000 Features and Programming Guide, part number 580.8006, for
information.
Mitel ® 5000 Installation Manual – Issue 3.0, October 2008
Page 6-9
Chapter 6: Programming
Database Utilities
Database Utilities
The same menu that lists the Session Manager also provides access to database utilities
designed to help maintain database integrity during installation, conversion, and maintenance
processes. These utilities consist of the Database Conversion utility (DB Converter) and the
Database Test and Repair utility (DB Test).
Database Test and Repair Utility
The Database Test and Repair Utility tests databases for corruption. In most cases, it is able to
repair the corruption. You can choose among eight tests to run. Each test can be enabled for
testing only, or it can be enabled for test and repair.
NOTICE
Database Modification. If repairs are enabled, the given database will be modified.
Therefore, you must make a backup copy of your database before running this program. This
will give you a backup copy in case the repairs were undesirable.
DB Test ensures that no more resources are reserved than the system can support. If resources
are reserved beyond the maximum number a system can support, DB Test reports the error and
corrects it by defaulting the excess reserved fields to 0.
The DB Test utility supports the Model 8602 IP softphone and will not report errors because of
this new device type.
With v2.3 or later, the DB Test utility recognizes the T1M-2 and T1M as valid modules for the
Mitel 5000 system (expansion bays 1-3). DB Test also tests the port types of the T1M-2 and
T1M modules and flags any configuration type other than T1, T1/PRI, E1/PRI, or None.
Running a Test
These tests do not find all of the corruptions that are possible. However, they cover a large
number of them. Frequently found corruptions are described in Common Errors. If the Repair
function is enabled and the repair status is Not Repaired, the program was unable to fix the
problem. In that case, contact Mitel for assistance.
Occasionally, a repair can cause another corruption. If this happens and the required test has
not been run, DB Test will notify you that another test needs to be run to repair the new
corruption. If DB Test detects an error but is unable to repair it, contact Mitel Technical Support
for assistance.
When the Database Test and Repair utility makes a repair by deleting records, it is possible for
further corruption to be generated. All of the corruption can be removed by running the proper
test. For example, if endpoint 1000 was deleted because of a major corruption, all references to
endpoint 1000 would still be in the database. The Referential Integrity test would be able to
clean up these references. Therefore, once the repairs are made, the utility may warn you that
other tests/repairs need to be run in order for total clean up to occur. If the proper test
automatically runs after the deletion occurs, then no warning is necessary because the test has
already run. However, you may notice additional error messages as the new corruption is
repaired.
Page 6-10
Mitel ® 5000 Installation Manual – Issue 3.0, October 2008
Chapter 6: Programming
Tests and Error Messages
To run a test:
1.
Enter the path and name of the database (.intl) file in the Database To Test field. (Or,
use the Browse button to locate the file.) Do one of the following:
•
Select the Test to run from the list of tests in the left pane of the window. Then
select Enable or Enable/Repair from the Test drop-down menu.
•
To run all tests, select Enable All or Enable/Repair All from the Test drop-down
menu.
2.
If desired, set the options for the test by selecting Options from the File drop-down
menu.
3.
Select Start Testing from the File drop-down menu. The results of the test are shown in
the right pane of the window.
4.
If you want to save the results to a file, select Save Results from the File drop-down
menu.
Tests and Error Messages
The Database Test and Repair Utility tests include the following:
• “Associated Mailboxes” on page 6-12
• “Boards (Mitel 5000 Modules)” on page 6-13
• “Cleanup” on page 6-13
• “Devices” on page 6-14
• “Dynamic Enumerations” on page 6-15
• “Enumerations” on page 6-16
• “Extension Conflicts” on page 6-16
• “Hardware Addresses” on page 6-17
• “Miscellaneous” on page 6-18
• “Referential Integrity” on page 6-19
• “Static Records” on page 6-20
Mitel ® 5000 Installation Manual – Issue 3.0, October 2008
Page 6-11
Chapter 6: Programming
Tests and Error Messages
Associated Mailboxes
Each mailbox in the database has a flag to indicate if it is associated with another device. This
test searches for two cases. The first case is when the mailbox-associated flag is enabled, but
there is no valid corresponding device with the same extension to be associated. The second
case is when the mailbox-associated flag is disabled, but there is a valid corresponding device
with the same extension to be associated. For a summary of possible error messages, see
Table 6-1.
Table 6-1. DB Test and Repair Error Messages for Associated Mailboxes
Error Message
Page 6-12
Indication
Mailbox x<extension> is not
associated, but has multiple
corresponding devices
In this case, mailbox x1000 has an associated flag
disabled. It has more than one valid corresponding
device with the same extension. This case will not
be repaired. It is not valid for a mailbox to be
associated to more than one device. The Repair
Status will be Not Repaired. To repair this case, run
the Extension Conflicts test. This test will repair the
multiple devices sharing one extension. Then, rerun
the Associated Mailboxes test.
Mailbox x<extension> is not
associated, but has a corresponding
device
In this case, mailbox x1000 has an associated flag
disabled. However, it has a valid corresponding
device with the same extension. This corruption is
repaired by enabling the associated flag. The
Repair Status will be Set Associated Flag to true.
Mailbox x<extension> is associated,
but has no corresponding device
In this case, mailbox x1000 has an associated flag
enabled. However, it does not have a valid
corresponding device with the same extension. This
corruption is repaired by disabling the associated
flag. The Repair Status will be Set Associated Flag
to false.
You have exceeded the maximum
number of mailbox licenses
The database is currently programmed for the
maximum number of licenses allowed. You cannot
add any more mailboxes. For additional licenses,
contact your Mitel service provider.
Mitel ® 5000 Installation Manual – Issue 3.0, October 2008
Chapter 6: Programming
Tests and Error Messages
Boards (Mitel 5000 Modules)
This test checks to make sure that each board, or module, has the proper entries in all
corresponding tables. For a summary of possible error messages, see Table 6-2.
NOTE
In this section the term “board” appearing on the DB Programming graphical user
interface (GUI) refers to Mitel 5000 expansion modules. The term “slot” refers to
one of the bays in the Mitel 5000 Base Server.
Table 6-2. DB Test and Repair Error Messages for Modules
Error Message
Indication
The board in slot <slot number> has no
records in <table name>
In this case, the module/board is required to have
records in its table. However, none exist. This
corruption is repaired by adding default records to
the table. The Repair Status either indicates Record
Added if one record was added or Records Added if
more than one record was added.
The board in slot <slot number> has an
incorrect number of records in <table
name>
In this case, the module/board does not have the
proper number of records in its table. This
corruption is repaired by adding default records to
the table. The Repair Status indicates Records
Added.
The board in slot <slot number> has an
incorrect record sequence in <table
name>
In this case, the module/board has the proper
number of records in the table. However, the
sequence numbers are incorrect. For example, the
records should be numbered 1–10. However, they
are numbered 0–9. This corruption is repaired by
deleting the record that has an out-of-bounds
sequence number and adding a default record for
the each missing sequence number. In the given
example, record 0 would be deleted and record 10
would be added. The Repair Status indicates
Added/Deleted Records, Deleted Records, or
Records Added depending on the action that was
taken.
Cleanup
The Cleanup test detects and removes objects that are not in use, including:
• Hunt Groups
• Facility Groups
• Route Groups
• CO Trunk Groups
• Page Zones
• Standard Account Codes
• Forced Account Codes
• System Speed Dials
Mitel ® 5000 Installation Manual – Issue 3.0, October 2008
Page 6-13
Chapter 6: Programming
Tests and Error Messages
Devices
This test checks to make sure that each device has the proper entries in all corresponding
tables. For a summary of possible error messages, see Table 6-3.
Table 6-3. DB Test and Repair Error Messages for Devices
Error Message
Page 6-14
Indication
Invalid table <table name>
This message is only a warning. It indicates that the
utility was looking for a table, but could not find it in
the database. This discrepancy can happen if a new
table is added in a later version of a major release.
If the test is being run on the earlier version, this
warning appears. For example, if Table A was
added in v1.1, running this test on databases prior
to v1.1 produces a warning that Table A cannot be
found.
Invalid column <table name>:<column
name>
This message is only a warning. It indicates that the
utility was looking for a column, but could not find it
in the database. This discrepancy can happen if a
new column is added in a later version of a major
release. If the test is being run on the earlier
version, this warning appears. For example, if
Column A was added in v1.1, running this test on
databases prior to v1.1 produces a warning that
Column A cannot be found.
Ext <extension number> has no
records in <table name>
This corruption indicates that the given device has
no records in the table indicated. This corruption
can be repaired in more than one way. If the table
that is missing the records is critical, then the device
is non-recoverable and is deleted completely. In this
case, the Repair Status indicates Deleted Device. If
the table that is missing the records is not critical,
the corruption is repaired by adding default records
to the table. The Repair Status either indicates
Record Added if one record was added or Records
Added if more than record was added.
Mitel ® 5000 Installation Manual – Issue 3.0, October 2008
Chapter 6: Programming
Tests and Error Messages
Table 6-3. DB Test and Repair Error Messages for Devices (Continued)
Error Message
Indication
Ext %s has an incorrect number of
records in %s
In this case, the device does not have the proper
number of records in a table. This corruption is
repaired by adding default records to the table. The
Repair Status indicates Records Added.
Ext %s has an incorrect record
sequence in %s
In this case, the device has the proper number of
records in the table. However, the sequence
numbers are incorrect. For example, the records
should be numbered 1–10. However, they are
numbered 0–9. This corruption is repaired by
deleting the record that has an out-of-bounds
sequence number and adding a default record for
each missing sequence number. In the given
example, record 0 is deleted and record 10 is
added. The Repair Status indicates Added/Deleted
Records, Deleted Records, or Records Added
depending on the action that was taken.
Dynamic Enumerations
This test checks to make sure that all dynamic enumeration fields contain valid values. A
dynamic enumeration field is an enumeration field that depends on another field. If the master
field is set to A, the field can contain one set of values. If the master field is set to B, the field
can contain a different set of values. For a summary of possible error messages, see
Table 6-4.
Table 6-4. DB Test and Repair Error Messages for Dynamic Enumerations
Error Message
Indication
Invalid table <table name>
This is only a warning. It indicates that it was
looking for a table, but could not find it in the
database. This can happen if a new table is added
in a later version of a major release. If the test is
being run on the older version, this warning will
appear. For example, if Table A was added in v1.1,
running this test on databases previous to v1.1 will
produce a warning that Table A could not be found.
Invalid column <table name>:<column
name>
This is only a warning. It indicates that it was
looking for a column, but could not find it in the
database. This can happen if a new column is
added in a later version of a major release. If the
test is being run on the older version, this warning
will appear. For example, if Column A was added in
v1.1, running this test on databases previous to v1.1
will produce a warning that Column A could not be
found.
<table name>/<column name> contains The table has an incorrect value in the indicated
an invalid enumeration value [<invalid
column. This corruption is repaired by changing the
value>]
field to a correct value. The Repair Status will be
Value Set to <value> where <value> is the new
contents for the field.
Mitel ® 5000 Installation Manual – Issue 3.0, October 2008
Page 6-15
Chapter 6: Programming
Tests and Error Messages
Enumerations
Each enumeration field has a set of values that are valid. An error is detected if the field has a
value that is out of this range. For a summary of possible error messages, see Table 6-5.
Table 6-5. DB Test and Repair Error Messages for Enumerations
Error Message
Indication
Invalid table <table name>
This is only a warning. It indicates that it was
looking for a table named, but could not find it in the
database. This can happen if a new table is added
in a later version of a major release. If the test is
being run on the older version, this warning will
appear. For example, if Table A was added in v1.1,
running this test on databases previous to v1.1 will
produce a warning that Table A could not be found.
Invalid column <table name>:<column
name>
This is only a warning. It indicates that it was
looking for a column named, but could not find it in
the database. This can happen if a new column is
added in a later version of a major release. If the
test is being run on the older version, this warning
will appear. For example, if Column A was added in
v1.1, running this test on databases previous to v1.1
will produce a warning that Column A could not be
found.
<table name>/<column name> contains The table has an incorrect value in the indicated
an invalid enumeration value [<invalid
column. This corruption is repaired by changing the
value>]
field to a correct value. The Repair Status will be
Value Set to <value> where <value> is the new
contents for the field.
Extension Conflicts
This test checks for extension conflicts. For a summary of possible error messages, see
Table 6-6.
Table 6-6. DB Test and Repair Error Messages for Extension Conflicts
Error Message
Page 6-16
Indication
Found blank extension, device type
<device type>
In this case, a device was found with a blank
extension. The extension is changed to P#XXX
where XXX can be from 000 to 999. The Repair
Status will be Set to Extension <new extension>.
Found conflict with extension
<extension number>, device types
<device type 1>, <device type 2>
Two devices have the same extension number, and
the two device types are not compatible. This
corruption is repaired by changing the extension
number of the second device <device type 2> to
P#XXX where XXX can be from 000 to 999. The
Repair Status will be Set to Extension <new
extension>. Only 1000 extension conflicts can be
resolved at a time because there are only 1000
possible extensions in the P#XXX framework.
Therefore, starting at the 1001 extension, the
Repair Status shows Not Repaired. Once an
extension is set to P#XXX, you can go into DB
Programming and change the extension to a valid
number.
Mitel ® 5000 Installation Manual – Issue 3.0, October 2008
Chapter 6: Programming
Tests and Error Messages
Hardware Addresses
This test checks to make sure that each hardware address is valid. For a summary of possible
error messages, see Table 6-7.
Table 6-7. DB Test and Repair Error Messages for Hardware Addresses
Error Message
Indication
Ext <extension number> refers to an
invalid bay[<bay
number>.<port>.<circuit>
Type:<module type>]
In this case, the device is on a module that is in a
bay that it should not be. Repairs are made by
deleting the device. The Repair Status will be
Deleted Device.
Ext <extension number> refers to an
invalid port [<slot
number>.<port>.<circuit>
Type:<module type>]
In this case, the device has an invalid port number.
Repairs are made by deleting the device. The
Repair Status will be Deleted Device.
Ext <extension number> refers to an
invalid circuit <slot
number>.<port>.<circuit>
Type:<module type>]
In this case, the device has an invalid circuit
number. Repairs are made by deleting the device.
The Repair Status will be Deleted Device.
Ext <extension number> refers to an
unrecognized module [<slot
number>.<port>.<circuit>
Type:<module type>]
In this case, the device is on a module with an
invalid type. Repairs are made by deleting the
device. The Repair Status will be Deleted Device.
Ext <extension number> refers to an
invalid module type [<slot
number>.<port>.<circuit>
Type:<module type>]
In this case, the device is on a module that it should
not be. For example, a loop start device cannot be
on a single line module. Repairs are made by
deleting the device. The Repair Status will be
Deleted Device.
Mitel ® 5000 Installation Manual – Issue 3.0, October 2008
Page 6-17
Chapter 6: Programming
Tests and Error Messages
Miscellaneous
This test checks for miscellaneous business rules. For a summary of possible error messages,
see Table 6-8.
Table 6-8. DB Test and Repair Error Messages for Miscellaneous
Error Message
Indication
Endpoint <extension> is its own
attendant
This error message indicates that the endpoint is
programmed to serve as its own attendant. The DB
Test will set the attendant to none and the Repair
Status will show [Set to None Device]. This test
ensures that all static records are present in the
database.
Invalid Expansion Card Static Subnet
Mask Setting
The Miscellaneous Test recognizes when a
database has static subnet masks or gateways
programmed that are not the same for the
Processor Module, Expansion Card, and Processing
Server (checks fields accordingly based on system
type).
Invalid Expansion Card Static Gateway
Settings
This is reported as an error, and the repair method
Invalid Processing Server Static Subnet is to copy the subnet mask and gateway from the
Processor Module to the Expansion Card (for a
Mark Setting
5400 or 5600 system) and the Processing Server
(for a 5600 system). This allows them to be on the
Invalid Processing Server Static
same subnet/gateway.
Gateway Setting
This test is also performed for the DHCP flag, SSH
port and enable, Web Server listening port and
enable, and listening port fields of the Processing
Invalid Processing Server Web Server
Server. If they do not match the Processor Module's
Port Setting
fields and the system is a 5600, DB Test reports the
error and repairs it, if Repair is enabled. The repair
is to copy the value for each field from the
Processor Module to the Processing Server.
The Default keymap is also validated in the Static
Records test for v2.4. If any entries of the Default
keymap are missing, DB Test reports the error and
repairs it, if Repair is enabled.
Page 6-18
Mitel ® 5000 Installation Manual – Issue 3.0, October 2008
Chapter 6: Programming
Tests and Error Messages
Referential Integrity
This test checks to make sure that the relationships between tables in the database are valid.
For a summary of possible error messages, see Table 6-9.
Table 6-9. DB Test and Repair Error Messages for Referential Integrity
Error Message
Indication
Invalid table <table name> or Invalid
source table <table name>
This is only a warning. It indicates that it was
looking for a table, but could not find it in the
database. This can happen if a new table is added
in a later version of a major release. If the test is
being run on the older version, this warning will
appear. For example, if Table A was added in
version 1.1, running this test on databases previous
to version 1.1 will produce a warning that Table A
could not be found.
Invalid column <table name>:<column
name> or Invalid source column <table
name>:<column name>
This is only a warning. It indicates that it was
looking for a column, but could not find it in the
database. This can happen if a new column is
added in a later version of a major release. If the
test is being run on the older version, this warning
will appear. For example, if Column A was added in
version 1.1, running this test on databases previous
to version 1.1 will produce a warning that Column A
could not be found.
<table name>/<column_name>
contains an invalid reference to
<source table name>/<source column
name> [<invalid reference>]
The indicated value contains an invalid reference to
another table or column.
<table name>/<column name> contains
a reference to a device of the wrong
type [DevID:<device ID>, Type:<device
type>]
The indicated value contains a reference to a device
that is not the proper type. For example, if the
System Administrator Mailbox field contains a
reference to an endpoint it is invalid, because the
System Administrator Mailbox can only be a
mailbox.
<table name>/<column name> contains
a reference to a module of the wrong
type [BoardID:<module ID>,
Type:<module type>]
The indicated value contains a reference to a
module that is not the proper type. For example,
LSM-2 records are connected to a module record
for a SLM-4 module.
Mitel ® 5000 Installation Manual – Issue 3.0, October 2008
Page 6-19
Chapter 6: Programming
Tests and Error Messages
Repairs for Referential Integrity
Repairs for Referential Integrity are different depending on the field that has the corruption. The
possibilities are as follows:
• If a lack of a valid reference makes the record no longer useful, a repair is made by
deleting the record. The Repair Status will be Record Deleted.
• If a reference is referring back to a device or object that is not valid or not present, several
repairs can be made. They are as follows:
o
Set to Extension <extension number> [<device ID>]: In this case, the repair was
made by replacing the bad reference with a device of the same extension, but of the
proper type.
o
Set to None Device: In this case, the repair was made by replacing the bad reference
with None.
o
Set to Current Device: In this case, the repair was made by replacing the bad
reference with the current device.
o
Set to First Available: In this case, the repair was made by replacing the bad
reference with the first device/object found.
• It is possible for the repair to be complicated, and therefore not attempted. In this case, the
Repair Status will be Not Repaired.
Static Records
This test ensures that all static records are present in the database. For a summary of possible
error messages, see Table 6-10.
Table 6-10. DB Test and Repair Error Messages for Static Records
Error Message
Page 6-20
Indication
<Table name> contains an invalid
number of records [<current number>
instead of <desired number>]
The table should have the “desired number” of
records. However, it has the “current number”
records. This corruption is repaired by deleting
unneeded records and adding records that are
missing. The Repair Status will be: Added/Deleted
Records, Added Records, or Deleted Records.
<Table name> is missing <specific
record>
This corruption occurs when a specific record is
missing. Only some of these corruptions will be
repaired. The Repair Status can be: Rebuilt Table,
Created None Device, Created Voice Processing
Local Node, Created Unused Trunk Group, or Not
Repaired.
Mitel ® 5000 Installation Manual – Issue 3.0, October 2008
Chapter 6: Programming
Tests and Error Messages
Common Errors
Table 6-11 lists some of the common errors associated with the Database Test and Repair
Utility.
Table 6-11. Database Test and Repair Utility Common Errors
Test
Hardware
Address
Error
Hardware Address Ext _____ refers to an unrecognized module [0.0.0 Type
262]
A device has a hardware address of 0.0.0. DB Test will remove the device
and cleanup references to it.
Referential
Integrity
[Applications] / [transfer_recall_destination_device_id] contains a reference to
a device of the wrong type [DevID:1, Type 0]
[Endpoints] / [transfer_recall_destination_device_id] contains a reference to a
device of the wrong type [DevID:1, Type 0]
The Transfer Recall Destination field is not pointing to a valid device. DB Test
changes this field to point to the current device.
Boards
(Modules)
The module in bay ____ has an incorrect number of records in [DSPs].
DB Test creates the necessary records.
Static Records <BoardsInformation> contains an invalid number of records [0 instead of 16]
DB Test creates the necessary records.
Referential
Integrity
[Report...] / [report_id] contains an invalid reference to [Reports] /
[report_id][0]
DB Test removes these unneeded records.
Referential
Integrity
[PrimaryRateBoards] / [board_id] contains a reference to a module of the
wrong type [BoardID:<module ID>, Type:253]
DB Test removes this unnecessary record.
Static Records [MessagePrintFreezeOnStrings] contains an invalid number of records [0
instead of 6]
DB Test creates the necessary records.
Devices
Ext ____ has no records in [CallRoutingAnnouncements]
DB Test creates the necessary records.
Boards
(Modules)
The module in bay ____ has no records in T1CallType
Dynamic
Enumerations
[Keysets] / [attached_device_baud_rate_id] contains an invalid enumeration
value [4]
DB Test creates the necessary records.
Mitel ® 5000 Installation Manual – Issue 3.0, October 2008
Page 6-21
Chapter 6: Programming
Database Converter Utility
Database Converter Utility
The DB Converter utility allows you to upgrade database parameters from an existing version to
a later version of software. Downgrading system types is not supported. You can also convert
an Axxess v5.3 or later database to the latest Mitel database.
With v2.4 databases:
• The DB Converter updates the keymap-related programming of databases during
conversion to v2.4. The conversion includes the following updates:
o
The ID numbers of existing keymaps are incremented by 1 (for example, Keymap #3 in
v2.3 becomes Keymap #4 in v2.4). This is because the new Default Keymap becomes
Keymap #1 behind the scenes.
o
Additional programmable keys, 36–45, have been added to all endpoints and keymaps
programmed in the database.
o
The Default keymap has been added to the databases. No existing endpoints
reference this keymap, but any new endpoints programmed for v2.4 are automatically
assigned to the Default Keymap.
• The DB Converter also performs IP Settings checks. If a database has static subnet
masks or gateways programmed that are not the same for the Processor Module,
Expansion Card, and Processing Server (checks fields accordingly based on system
type), the converter copies the subnet mask and gateway from the Processor Module to
the Expansion Card (for a 5400 or 5600 system) and the Processing Server (for a 5600
system). That way, they will all be on the same subnet/gateway. This conversion is also
performed for the SSH port and enable, Web Server listening port and enable, listening
port, and the DHCP flag of the Processing Server. If they do not match the Processor
Module's fields and the system is a 5600 system, the converter copies the value for each
field from the Processor Module to the Processing Server.
With v2.3 databases:
• The T1 module, T1/PRI module, and E1/PRI module are displayed as the T1/E1/PRI
module with a port configured for T1, T1/PRI and E1/PRI, respectively. The DB converter
will make the necessary translation in the database from the individual modules to the one
module with individual port configurations.
• All devices are associated with echo profiles, and the devices in an older database will be
assigned an echo profile according to their type of conversion. Refer to the Mitel 5000
Features and Programming Guide, part number 580.8006, for defaults based on device
type.
• The following list summarizes the changes made to DB Converter for the v2.3 release:
Page 6-22
o
When you right-click Bay 1-3, the list of module types you can create includes Dual T1/
E1/PRI and T1/E1/PRI. This changed from the former options: T1, T1/PRI and E1/PRI
Module respectively.
o
When you move an Axxess T1, T1/PRI, or E1/PRI card onto an unpopulated bay 1-3, it
automatically creates a T1/E1/PRI module and puts the moved card into the port.
o
You can also move an Axxess T1, T1/PRI, or T1/PRI card onto a port of a T1/E1/PRI
or Dual T1/E1/PRI module.
o
You can change a T1/E1/PRI to a Dual T1/E1/PRI at any time, using the right-click
menu.
o
You can change a Dual T1/E1/PRI to T1/E1/PRI using a right-click menu ONLY when
port 2 shows “None.”
o
You can populate a “None” port on these modules using a right-click menu.
o
You can depopulate a port using a right-click menu only when there are no populated
circuits on the port.
Mitel ® 5000 Installation Manual – Issue 3.0, October 2008
Chapter 6: Programming
With v2.0 databases:
o
You can move ports between positions on T1/E1/PRI and Dual T1/E1/PRI modules
(multiple selection is allowed if the ports are on the same module).
o
You can move circuits between the ports and other module types, provided the circuits
are allowed on those ports/modules.
With v2.0 databases:
• The Inter-Tel CS-5600 option appears in the Destination System drop-down list. The
Destination Version drop-down option is dimmed initially until you have entered a source
file and whenever the source file is being changed. The options provided in both the
Destination Version and Destination System will be reset. You must re-select the desired
Destination Version and System if the defaults are not the correct ones.
• The Maximum Simultaneous Fax over IP (FoIP) calls supported is 6, and DB Converter
converts to 6 any FoIP maximums greater than 6.
When converting a database to v1.2:
• The Database Converter program enables Call Logging for all existing digital and IP
endpoints. Also, the meta-values “Off-Node Devices” and “Remote Nodes” will change to
15000 and 98, respectively.
• The Database Converter program checks the voice mail type of the original database. If
the voice mail type is anything other than Basic Voice Mail, the resources allocated to
BVM in the converted database are changed to 0. If the original database indicates the
system used BVM, the default value of 4 allocated resources for BVM remains unchanged
in the converted database.
Mitel 5000 Database Conversions
You can convert Mitel 5000 databases to later versions.
To convert a database from one version to another:
1.
Upgrade the system software to the version you want running on the system after
completing the upgrade process. For more information system upgrades, refer to the
“Installation” chapter in the <Emphasis>Mitel 5000 Installation and Maintenance Manual,
part number 580.8000)
2.
To open the Database Conversion Utility, select Start – All Programs – Inter-Tel 5000 DB
Programming – Inter-Tel 5000 DB Converter. The following dialog box appears.
Mitel ® 5000 Installation Manual – Issue 3.0, October 2008
Page 6-23
Chapter 6: Programming
Mitel 5000 Database Conversions
Page 6-24
3.
Click the ellipsis button at the right of the Source File box.
4.
The database source files available for conversion display. You can browse to a different
folder if necessary.
5.
Select the existing database version that you want to upgrade. The selected file name
appears in the File name box.
6.
Click Open. The Database Converter Utility dialog box appears. The selected and
opened source file appears in the Source File: box, and the Source Version appears
below the Destination File: box. In the following illustration the source version is
2.0.5.142 - USA.
7.
Click the ellipsis button at the right of the Destination File box.
8.
If necessary, browse to search in the appropriate folder, and then select the .intl
database file downloaded in step 5.
9.
Select the target version from the Destination Version list.
10.
Select the target system from the Destination System list.
11.
Click OK. The source database version is converted to the target database version and
system.
Mitel ® 5000 Installation Manual – Issue 3.0, October 2008
Chapter 6: Programming
Inter-Tel Axxess to Mitel 5000 Database Conversions
Inter-Tel Axxess to Mitel 5000 Database Conversions
You can convert any Inter-Tel Axxess v5.3x or later database to a Mitel 5000 v2.2 or later
database. When converting the database, you must convert the Inter-Tel Axxess database to a
Mitel 5000 v2.2 database. You can then convert the database to later Mitel 5000 versions.
For instructions to convert an Inter-Tel Axxess database to a Mitel 5000 database, see
“Converting a Database from Inter-Tel Axxess to Mitel 5000” on page 6-45.
This section discusses the following topics:
• “Conversion Requirements and Considerations” on page 6-26
• “DB Converter Error Messages” on page 6-27
• “Database Conversion Supported Cards and Devices” on page 6-28
• “Data Form Drag and Drop Operations” on page 6-34
Mitel ® 5000 Installation Manual – Issue 3.0, October 2008
Page 6-25
Chapter 6: Programming
Conversion Requirements and Considerations
Conversion Requirements and Considerations
Table 6-12 provides any database conversion requirements and notes to consider before
converting an Inter-Tel Axxess database to a Mitel 5000 database.
Table 6-12. Database Conversion Requirements and Considerations
Requirement or Consideration
Page 6-26
Description
Target platforms
Windows XP, Windows 2000, and Windows
Vista
Inter-Tel Axxess versions prior to v5.3
Not supported
Inter-Tel Axxess to Inter-Tel Axxess
conversions
Not supported
Inter-Tel Axxess to Mitel 5000 versions
Mitel 5000 v2.2 only
Conversions country to country
Only U.S. to U.S. or U.K. to U.K. Other
country types not supported
Downgrading a database
Only conversions from a prior version of the
Mitel 5000 to a subsequent version of the
Mitel 5000 (and/or from a smaller system type
to a larger system type) is supported. This
does not apply for Inter-Tel Axxess to Mitel
5000 conversions because any supported
Inter-Tel Axxess version may be converted to
any supported version of the Mitel 5000, as
specified above.
Inter-Tel Axxess supported cards, devices,
and system types
For the device types not supported, the
conversion utility will allow simple conversion
of the device to a device type supported by
the Mitel 5000. Not all unsupported devices
will be converted. In some cases, the device
must be left behind or replaced by a new,
supported device type.
Conversion of trunk devices from a Digital
Keyset Card to IP
Not supported
Mitel ® 5000 Installation Manual – Issue 3.0, October 2008
Chapter 6: Programming
Database Conversion of a T1/E1 PRI Network
Database Conversion of a T1/E1 PRI Network
When converting an Inter-Tel Axxess database to a Mitel 5000 database, T1/E1 PRI networking
is converted intact, as long as you do the following using the DB Converter:
• Copy over the entire Inter-Tel Axxess T1/E1 card to the appropriate location on the Mitel
5000 side of the Dataform, keeping the B-Channel devices and all. As long as you copy
the card over, everything remains intact.
• Decide where you want the T1/E1 card to reside. For example, in which module (if using a
single T1/E1/PRI module) or port (if using dual T1/E1/PRI module).
For information on converting an Inter-Tel Axxess database to a Mitel 5000 database, see
“Converting a Database from Inter-Tel Axxess to Mitel 5000” on page 6-45.
For information on T1/E1/PRI Networking changes, refer to the Networking Wizard information
in the Mitel 5000 Features and Programming Guide, part number 580.8006.
DB Converter Error Messages
Error messages have been added for attempting to convert nonsupported databases or
conditions, as shown in Table 6-13.
Table 6-13. Database Converter Error Messages
Nonsupported Condition and Error
If an Inter-Tel Axxess database prior to v5.3 is chosen as the source file, the following error message appears:
If an Inter-Tel Axxess database of country type Japan or Mexico is chosen as the source file, the following error
message appears:
If an Inter-Tel Axxess database with a system size greater than 256 is chosen, the following error message
appears:
Mitel ® 5000 Installation Manual – Issue 3.0, October 2008
Page 6-27
Chapter 6: Programming
Database Conversion Supported Cards and Devices
Database Conversion Supported Cards and Devices
The Inter-Tel Axxess cards and devices supported in Database Conversion operations are
shown in Table 6-14 (below) and Table 6-15, “DB Converter Supported Devices/Device
Conversion,” on page 6-28.
IMPORTANT
Embedded Voice Mail (EVMC): If the Inter-Tel Axxess voice mail system is
embedded, the voice mail programming will be carried over and established
as Basic Voice Mail (BVM). The EVMC will be removed from the database
during the conversion. See “Voice Mail” on page 6-33 for details regarding
the conversion of EVMC to BVM.
Table 6-14. DB Converter Supported Cards/Card Conversion
Card 1
Supported Bay
Basic Rate Interface – S/T Card
Converted to...
Bays 1-3
Basic Rate Module – S
DEI Bays
Digital Keyset Module -16
Bays 1-3
Loop Start Module – 4
Basic Rate Interface – U Card
Digital Keyset Card
Digital Keyset Card – 16
Loop Start Card
Loop Start/Daughter Card
After transfer, you can
change this to Loop Start
Module – 2 using a rightclick menu.
LS/GS Card
LS/GS/Daughter Card
DLS/GS Card
DLS/GS/Daughter Card
Single Line Card
Bays 1-3
Single Line Module – 4
Single Line Card – 16
DEI Bays
Single Line Module – 8
E1 Primary Rate Interface Card
Bays 1-3
E1/PRI Module (or Port)
T1 Card
T1 Module (or Port)
T1 Primary Rate Interface Card
T1/PRI Module (or Port)
1. The Options Card is automatically stored in the Unsupported Cards/Devices folder.
Table 6-15. DB Converter Supported Devices/Device Conversion
Device 1
Keyset
Keyset/DPM
Keyset/MDPM
Dual Keysets
Single Line
Page 6-28
Supported Bay
Ports
Converted to...
DKSC - 16
1-16
Digital Endpoint
IP Devices
n/a 2
IP Endpoint 3
DKSC - 16
1-16
Digital Endpoint/MDPM
IP Devices
n/a b
IP Endpoint c, 4
DKSC - 16
1-16
Digital Endpoint/MDPM
IP Devices
n/a b
IP Endpoint c, d
DKSC - 16
1-16
2 Digital Endpoints
IP Devices
n/a b
2 IP Endpoints c
Single Line Ports
1-2
No change
SLM - 4
1-4
No change
SLM - 8
1-8
No change
IP Devices
n/a b
T1 Module
e
n/a
IP Single-Line Adapter
OPX
Mitel ® 5000 Installation Manual – Issue 3.0, October 2008
Chapter 6: Programming
Database Conversion Supported Cards and Devices
Table 6-15. DB Converter Supported Devices/Device Conversion (Continued)
Device 1
Dual Single Lines
Supported Bay
Ports
DKSC - 16
1-16
b
Converted to...
No change
IP Devices
n/a
Dual DID, Single Line/DID
DKSC - 16
1-16
No change
Loop Start (Analog)
Loop Start Ports
1-2
No change
LS - 4
1-4
No change
LS - 2
1–2
No change
T1 Module
n/a 5
Loop Start (Digital)
Loop Start Ports
1-2
Loop Start (Analog)
LS - 4
1-4
Loop Start (Analog)
Loop Start (Digital)
Single-Port LSA
2 IP Single-Line Adapters
LS - 2
1–2
Loop Start (Analog)
T1 Module
n/a e
No change
Loop Start Ports
1-2
Loop Start
LS - 4
1-4
Loop Start (Analog)
LS - 2
1–2
Loop Start (Analog)
T1 Module
n/a e
Loop Start (Digital)
e
Ground Start (Analog)
T1 Module
n/a
Ground Start (Digital)
T1 Module
n/a e
Trunk/Trunk
BRI Module - S
1-2
No change
OPX
T1 Module
n/a e
No change
Single Line Ports
1-2
Single line
SLM - 4
1-4
Single line
SLM - 8
1-8
Single line
T1 Module
n/a e
No change
e
No change
n/a b
No change
DID, E&M
B-Channel
E1/PRI, T1/PRI
IP Endpoint, IP Single-Line Adapter,
IP Devices
IP Softphone, MGCP Gateway &
Endpoint, MGCP Endpoint, SIP Trunk
n/a
Ground Start (Digital)
No change
1. The unsupported System Serial Port and B-Channel Station are automatically removed and stored in the Unsupported Cards/Devices folder.
2. The total number of IP devices in the Mitel 5000 platform is limited to the following, depending on the system
type: CS-5200: 75, CS-5400: 175, CS-5600: 250
3. Any IP Endpoint, after it is stored under IP Devices in the Mitel 5000 platform, can be converted to an IP Softphone and vice versa, using a right-click menu option.
4. When a Keyset/MDPM or Keyset/DPM is converted to an IP Endpoint, the MDPM or DPM is dropped. A message appears and you can choose to not convert that device.
5. For each of these modules or ports, the devices occupy the circuits on the port. The number of circuits per port
is unchanged between the Inter-Tel Axxess and Mitel 5000 platforms.
Mitel ® 5000 Installation Manual – Issue 3.0, October 2008
Page 6-29
Chapter 6: Programming
Database Conversion Process
Database Conversion Process
Messages that may appear are similar to prior versions of the DB Converter utility. The
database conversion process consists of three main parts:
• Inter-Tel Axxess Card and Device Removal
• Mitel 5000 Module and Device Conversion
• Additional Changes
See page 6-45 for the procedure to convert an Inter-Tel Axxess database to a Mitel 5000
database.
Inter-Tel Axxess Card and Devices
Unsupported and unused cards and devices are not moved to the Mitel 5000 database. This
includes only physical devices of the types shown in the Data Migration form. Any logical
devices (Phantoms, Hunt Groups, etc.) are preserved.
For all cards that are not converted to a Mitel 5000 module, all references to the card are
removed from the Mitel 5000 database—as they would be if you uninstalled the card using DB
Programming.
Similarly for all devices that are removed, the device is deleted from the Mitel 5000 database
just as it would be if you deleted it using DB Programming. That is, associated mailboxes are
unassociated, corresponding extension IDs are removed, and the devices are removed from
any Hunt Groups, Extension Lists, DSS BLF keys, etc. in the Mitel 5000 database.
IMPORTANT
Throughout the conversion process, the original Inter-Tel Axxess database is
not changed in any way either before, during, nor after the conversion.
Mitel 5000 Module and Device Conversion
All cards copied from the Inter-Tel Axxess database into Mitel 5000 modules are converted and
any Mitel 5000 modules needed are created. After each module is converted or created, all
ports and devices to be associated with the module are converted.
For devices converted to IP, certain fields are defaulted, and the devices are unassociated from
any physical location in the database.
Regarding devices that can be converted from analog to digital and vice versa (e.g., Loop Start
and Ground Start Trunks), this is transparent in the database. No changes are needed.
Page 6-30
Mitel ® 5000 Installation Manual – Issue 3.0, October 2008
Chapter 6: Programming
Database Conversion Process
Additional Changes
Additional changes, beyond those mentioned above, are needed to convert the database from
Inter-Tel Axxess to Mitel 5000. These are explained in this section. Some changes are always
required; other changes are required only in certain cases, depending on the original Inter-Tel
Axxess database.
Relevant changes are recorded in the log file. Whether the change is recorded in the log file is
explained for each change listed below.
• Extension Lists: The way extension lists are named changed between Inter-Tel Axxess
and the Mitel 5000. Two default extension lists are renamed as follows. These changes
are not recorded in the log file.
o
Auto: All Keysets changed to All IP/Dgtl Endpts
o
Auto: All Stations changed to All Endpoints
o
The P0001 Def DB: All Stations extension list is removed if it is found.
• License: The software license is temporarily set to the default license. This gives you the
ability to program the database in local mode, after the conversion is complete, with
access to all areas of programming. After the database is restored into a Mitel 5000
platform, the actual purchased license will be used. This change is not recorded in the log
file.
• Digital Endpoints - Attached Device: Desktop Interface is not supported, as serial
interfaces are not supported in the Mitel 5000. If encountered, this will be automatically
cleared to None.
For each Endpoint for which Attached Device is set to None, an entry is made in the log
file including the endpoint extension, the old setting, and the new setting.
• Loop Starts - Hybrid Balance ID: The Hybrid Balance ID of a Loop Start device used to
be defaulted to zero. This is no longer the recommended default value. Therefore, for any
loop start device that has this value, the value is changed to the new recommended
default, and it is country dependent: US is 3; UK is 18.
If the Hybrid Balance ID of any Loop Start device is changed, an entry is made to the log
file showing the extension of the Loop Start device, the old value and the new value.
• IP Call Configurations - Echo Suppression Sensitivity Level: The format for storing
Echo Suppression Sensitivity Levels changed between Inter-Tel Axxess and the Mitel
5000. In Inter-Tel Axxess, this value is stored as a percentage, but in the Mitel 5000, this
value is stored as Off, Low, Medium, or High. During the conversion, this value must be
converted for each IP Call Configuration programmed in the database. The change is
made as follows:
Original percentage
Converted to...
0
Off
1 – 49
Low
50 – 69
Medium
70 – 100
High
This change is recorded in the log file for each IP Call Configuration in the database.
• Node IP Connection Groups - DTMF Encoding: For Node IP Connection Groups, the
settings of G.711 Mu-Law, G.711 A-Law and G.729 are no longer supported. These, if
found, are changed to the new default of RFC 2833.
If the DTMF Encoding setting for Node IP Connection Group is changed, an entry is made
to the log file showing the extension of the Node IP Connection Group, the old value and
the new value.
Mitel ® 5000 Installation Manual – Issue 3.0, October 2008
Page 6-31
Chapter 6: Programming
Database Conversion Process
• T1/E1 Ports - Line Build Out: For T1 and E1 cards, under Diagnostics – Status, the Line
Build Out setting of Auto is not supported in the Mitel 5000. Therefore, if any T1/E1 port is
found with this setting, it is changed to the Mitel 5000 default setting, 0 dB (DSX-1).
If the Line Build Out setting for any T1/E1 port is changed, an entry is made to the log file
showing hardware address of the T1/E1 port and stating that the setting was changed
from Auto to 0 dB (DSX-1).
• LSGS Timers: Three LSGS timers are checked and changed accordingly.
o
LS/GS Caller-ID Relay Hold Timer: This timer used to be defaulted to 2500, but it is
now defaulted to 3747.
o
LS/GS Caller-ID Relay Idle Timer: This timer is stored as a number in the Inter-Tel
Axxess database, but is now stored as an enumeration choice in the Mitel 5000
database. This value is changed to the Mitel 5000 default of 128 milliseconds.
o
LS/GS Trunk Ring Detection Timer: This timer is stored as a number in the Inter-Tel
Axxess database, but it is now stored as an enumeration choice in the Mitel 5000
database. This value is changed to the Mitel 5000 default of 384 milliseconds.
All of these changes are recorded in the log file, showing the name of the timer, the old
value, and the new value.
• System Flags: If the All Ring HG Setup Request Priority Threshold is not set at the
appropriate default for the destination system size, it is adjusted. The default for 5200/
5400 systems is 5, and the default for 5600 systems is 30. If this change is made, it is
recorded in the log file, showing the old and new values.
• Modem: If a modem was not included in the Inter-Tel Axxess database, a modem is
created in the converted database. If the default modem extension 1500 is available, this
extension is used. If that extension is not available, you are warned and a temporary
extension is assigned to the modem (P#xxx). In this case, as soon as the database is
opened using DB Programming, you are alerted that an extension needs to be assigned
for the modem.
When the modem is created, Trunk Group 1 is assigned as the outgoing and emergency
trunk group. The creation of a modem is recorded in the log file, including a warning if an
extension needs to be provided.
• IP Settings: The IP settings are defaulted. This includes the settings for the Base
Processor for a CS-5200 or CS-5400 system and the Processing Server for a CS-5600
system.
This change is recorded in the log file, to bring to your attention that these settings will
need to be programmed immediately.
Page 6-32
Mitel ® 5000 Installation Manual – Issue 3.0, October 2008
Chapter 6: Programming
Database Conversion Process
• Voice Mail: If the Voice Mail type was EVMC, it will be translated to BVM. This requires no
database changes. The following checks and changes occur only when the Voice Mail
type was EVMC.
o
If the E-mail system type is anything other than None, it is automatically changed to
None. This is necessary because MAPI and VIM are not supported with BVM, and
SMTP is supported only when a hostname is defined—since the conversion is
defaulting the IP Settings, a hostname will not be defined. These settings are unlikely,
because they are not supported with EVMC. However, since they can be programmed
in the Inter-Tel Axxess database, they will be cleared if detected.
o
The Voice Mail Alternate Tone Detection Flag is checked. If set, it is cleared, as it is not
supported for BVM in the Mitel 5000.
o
All local mailboxes are checked to see if any have Unified Messaging set as the E-mail
Gateway type. If so, this is cleared (set to None) because this is also not supported for
BVM in the Mitel 5000.
If any of the changes just described are made to the database, each is recorded in the log
file, with indication of the old value and the new value. For each local mailbox changed,
the mailbox extension is included on the logged record.
All local mailboxes are set to uninitialized, and a warning is recorded in the log file
indicating that all mailboxes will need to be reinitialized and all custom prompts rerecorded.
• Meta Database: The meta database needs to be adjusted for the destination Mitel 5000
platform. Default values for the destination Mitel 5000 platform are compared to the
current values in the meta database, from the original Inter-Tel Axxess system. If any
value is lower than the default limit, it is set to the default limit. If any value is higher, the
value is not changed, but a warning is added to the log file showing the name of the value,
the current value, and the default limit for the destination system.
NOTICE
Do not change any Meta Database values unless instructed to do so by Mitel Technical
Support. These values should not be changed beyond any necessary changes made by
the conversion utility.
After all meta database values have been examined and updated as needed, and any
default limits were found to be exceeded, a message appears alerting you that one or
more meta database limits are exceeded. Review these numbers and the associated
programming. These warnings are recorded in the log file.
Mitel ® 5000 Installation Manual – Issue 3.0, October 2008
Page 6-33
Chapter 6: Programming
Data Form Drag and Drop Operations
Data Form Drag and Drop Operations
The following drag and drop operations are supported while converting an Inter-Tel Axxess
database to a Mitel 5000 database. See page 6-45 for information on converting an Inter-Tel
Axxess database to a Mitel 5000 database.
• Inter-Tel Axxess cards can be dragged and dropped into the Mitel 5000 view. See page 635 for additional information.
• Inter-Tel Axxess devices can be dragged and dropped into the Mitel 5000 view. See
page 6-38 for additional information.
• Mitel 5000 modules can be dragged and dropped in the Mitel 5000 view. See page 6-40
for additional information.
• Mitel 5000 T1/E1/PRI ports can be dragged and dropped within the Mitel 5000 system.
See page 6-41 for additional information.
• Mitel 5000 devices can be dragged and dropped within the Mitel 5000 platform. See
page 6-42 for additional feature description information.
To select multiple items on the same card or device, use the CTRL and SHIFT keys.
Multiple selection with cards or modules or devices or ports on different cards or modules are
ignored.
To quickly select all devices or ports on a card or module, double-click any device or port.
Data Form Drag and Drop Restrictions
Cards, modules, or devices cannot be dropped anywhere in the Inter-Tel Axxess view.
Configuration changes can be made only by dropping items in the Mitel 5000 view.
The following items cannot be moved:
• Folders that do not represent Inter-Tel Axxess cards or Mitel 5000 modules such as:
o
The system (root) folders
o
Unsupported Cards/Devices
o
Unused IP Devices
o
IP Devices
o
Loop Start Ports
o
Single Line Ports
o
Miscellaneous Devices
• Devices whose position cannot be changed. These include:
o
Miscellaneous devices (page port, modem)
o
IP devices in the Mitel 5000 view (e.g., IP Endpoint, SIP Trunk, etc.)
o
Devices in the Unsupported Card/Devices folder
See also “Conversion Requirements and Considerations” on page 6-26.
Page 6-34
Mitel ® 5000 Installation Manual – Issue 3.0, October 2008
Chapter 6: Programming
Drag and Drop Operations: Inter-Tel Axxess Cards
Drag and Drop Operations: Inter-Tel Axxess Cards
Inter-Tel Axxess cards can be dragged and dropped into the Mitel 5000 view, as shown in the
following example.
Figure 6-1. Inter-Tel Axxess to Mitel 5000 Conversion for Inter-Tel Axxess Cards
Associated devices on those cards are moved as well, provided they meet the criteria
discussed in this section. The following drag and drop locations in the Data Form Mitel 5000
view are supported for Inter-Tel Axxess cards:
• Uninstalled bay or port (below)
• Empty module, port, or folder (page 6-37)
• IP devices (page 6-37)
To an Uninstalled Bay or Port
When an Inter-Tel Axxess card is dropped onto an uninstalled bay (or port) in the Mitel 5000
platform, the following operations take place:
• The card is converted to a Mitel 5000 module (or port) of the appropriate type as
described in Table 6-14, “DB Converter Supported Cards/Card Conversion,” on page 6-28
and Table 6-15, “DB Converter Supported Devices/Device Conversion,” on page 6-28.
In the case of a conversion to Mitel 5000 versions 2.3 or later, if a T1, T1/PRI, or E1/PRI
card is dropped onto an uninstalled bay, a T1/E1/PRI module is automatically created, and
the dropped card is installed in the port on that module. If desired, the module can then be
changed to a Dual T1/E1/PRI module, via right-click operations.
Mitel ® 5000 Installation Manual – Issue 3.0, October 2008
Page 6-35
Chapter 6: Programming
Drag and Drop Operations: Inter-Tel Axxess Cards
• All devices on the card are moved over to the Mitel 5000 module (or port), with the
following exceptions:
o
Devices not supported by that type of module (or port) in the Mitel 5000. See Table 615, “DB Converter Supported Devices/Device Conversion,” on page 6-28.
o
Devices in port positions beyond the capacity of that type of module (or port) in that
bay in the Mitel 5000. See Table 6-15, “DB Converter Supported Devices/Device
Conversion,” on page 6-28.
An exception to this is explained on the next page. (The devices will be shifted up by
the module size and moved over, if all locations on the module would otherwise be
empty.)
• Devices on the card are moved over with the card, usually with no change in port/circuit
position.
o
For example, if the device hardware address (node:slot.port) was 01:01.02 in the InterTel Axxess system and the card is moved to Bay 2 in the Mitel 5000 platform, the
device new hardware address will be 01:02.02, even if port 1 is empty.
o
Port position will be changed when no devices reside on the Inter-Tel Axxess card in
the available ports on the IT5K module. In this case, devices will be shifted up by the
number of ports on the IT5K module. Here are two examples:
–
You copy a fully populated SLC-16 to a DEI bay. An SLM-8 is created and
populated with the first eight single line devices, and the SLC-16 remains in the
Inter-Tel Axxess view with single line devices in ports 9-16. A logical next step
might be to copy the same SLC-16, now with ports 1-8 empty, to the next empty
DEI bay. As you might expect, another SLM-8 is created and populated with the
single line devices from ports 9-16. The devices are shifted up by the size of the
module, and at this point, the SLC-16 card is removed from the Inter-Tel Axxess
view.
–
You first copy the SLC-16 to Bay 1. An SLM-4 is created and populated with the
first four single line devices. You might want to copy the SLC-16 now to Bay 2, but
you are not permitted to do this because the default meta database limits you to a
single SLM-4. So, you copy it now to a DEI bay. This time, an SLM-8 is created,
and the single line devices in ports 5–8 are moved into ports 5–8, leaving ports 1–
4 empty. No shifting was performed because at least one device was found to
transfer into the available ports on the module. The SLC-16 remains in the Inter-Tel
Axxess view with single line devices in ports 9–16. Copying yet again to DEI bay
will create another SLM-8, move over the remaining devices into ports 1-8 and
remove the SLC-16 from the Inter-Tel Axxess view.
• If any devices are not moved over with the card, a copy of the card remains displayed in
the Inter-Tel Axxess view, holding these devices, and a warning message appears.
Review these devices and provide a location for them in another bay in the Mitel 5000
platform.
For example, if a Digital Keyset Card is moved into a DEI bay in the Mitel 5000, and a port
on that card holds a Single-Port LSA, the Single-Port LSA will not be moved with the card.
The user might then drag and drop the Single-Port LSA to any empty location on any Loop
Start Module or in the Loop Start Ports folder in the Mitel 5000 platform. If there are no
available locations for Loop Start devices, and there is an Uninstalled bay available in the
Mitel 5000 platform, the user might create a Loop Start Module in that bay, and then drag
the Single-Port LSA onto that new module.
• If all devices are moved with the card, the card is removed from the Inter-Tel Axxess
system display.
Page 6-36
Mitel ® 5000 Installation Manual – Issue 3.0, October 2008
Chapter 6: Programming
Drag and Drop Operations: Inter-Tel Axxess Cards
To an Empty Module, Port, or Folder
An Inter-Tel Axxess card can be dropped on a populated bay, port, or folder in the Mitel 5000
view if the following conditions are met:
• The card type matches the module, port or folder type.
• All ports/circuits on the module or in the folder in the Mitel 5000 view are empty, e.g., the
view displays “None.” This action is identical to dropping an Inter-Tel Axxess card on an
uninstalled bay (or port). See “To an Uninstalled Bay or Port” on page 6-35.
To IP Devices
Inter-Tel Axxess Digital, Analog, and Executone Keyset cards of any size and Single Line cards
of any size can be dragged and dropped onto the IP Devices folder in the Mitel 5000 platform.
This will cause the devices on the card to be converted to IP Devices, with the following
exceptions:
• Some devices on these cards cannot be converted to IP. If encountered, these devices are
left in the Inter-Tel Axxess view with the card. A message box is presented warning the
user and encouraging them to review these devices. If these devices are needed, they
must be placed on another module in the Mitel 5000 platform. Devices that can reside on
these cards that cannot be converted to IP include the following:
o
Dual DID
o
Single Line/DID
o
Single-Port LSA
• Devices can be converted to IP only if there is room for another IP device in the Mitel 5000
platform.
o
As soon as the IP device limit is reached, further devices on the card being dragged
will not be converted and moved into the Mitel 5000 platform. The remaining devices
will still appear with the card in the Inter-Tel Axxess view. A message box is presented
warning the user and encouraging them to review these devices. If these devices are
needed, they will need to be placed on another module in the Mitel 5000 platform, or
an IP device will need to be deleted to make room for each needed IP device.
o
If there is not room for both devices in a device pair (e.g., Dual Single Lines), neither
device will be moved, i.e., the devices will not be split up.
• When MDPMs or DPMs are encountered, they are removed, and the associated keyset is
converted to an IP Endpoint. This generally makes sense, because you don't need an
MDPM or DPM if you have an IP connection.
When this happens, a message box is presented warning the user. The user can opt not
to convert this particular device. If the user opts not to convert, the device is left in the
Inter-Tel Axxess system with the card, and the user can place the device elsewhere or
leave it behind.
• All Keysets are converted to IP Endpoints. (If an IP Softphone is desired, the user will
need to change the IP Endpoint to an IP Softphone, via right-click.)
• All Single Lines are converted to IP Single-Line Adapters.
Mitel ® 5000 Installation Manual – Issue 3.0, October 2008
Page 6-37
Chapter 6: Programming
Drag and Drop Operations: Inter-Tel Axxess Devices
Drag and Drop Operations: Inter-Tel Axxess Devices
Inter-Tel Axxess devices can be dragged and dropped into the Mitel 5000 view, as shown in the
following example, provided they meet the criteria discussed in this section. When the last
device is moved from the Inter-Tel Axxess view, the Inter-Tel Axxess card is removed from the
Data Form.
The following drag and drop locations in the Data Form Mitel 5000 view are supported for InterTel Axxess devices:
• Empty module, port, or folder (below)
• Empty device location (page 6-39)
• IP devices (page 6-39)
Figure 6-2. Inter-Tel Axxess to Mitel 5000 Connection for Inter-Tel Axxess Devices
To a Mitel 5000 Module, Port, or Folder
Any Inter-Tel Axxess device (or group of devices) displayed under a card in the Inter-Tel Axxess
view can be dragged and dropped onto a module, port or folder in the Mitel 5000 view. There
must be an available empty port/circuit on the module, port or folder in which that type of device
is supported. See Table 6-15, “DB Converter Supported Devices/Device Conversion,” on
page 6-28. If dragging and dropping a group, the operation is permitted if at least one device in
the group can be moved.
When the operation is completed, each dragged device is removed from the Inter-Tel Axxess
view and stored in the Mitel 5000 platform in the first empty location on the module, port or
folder. The view is automatically expanded (if not already) and the device type name is
automatically modified to the Mitel 5000 style (e.g., “Keyset” is changed to “Endpoint”).
If a group of devices is being copied, only those devices that are supported will be moved, and
if there is not room for all of the devices, one or more may be left behind and a message
appears.
Page 6-38
Mitel ® 5000 Installation Manual – Issue 3.0, October 2008
Chapter 6: Programming
Drag and Drop Operations: Inter-Tel Axxess Devices
To an Empty Device Location
Only a single device can be dropped in a specific device location. When a group of devices is
being dragged, the devices must be dropped onto a module, port, or folder.
Any Inter-Tel Axxess device displayed under a card in the Inter-Tel Axxess view can be dragged
and dropped onto a device location in the Mitel 5000 view. However, there must be an empty
location and the device must be supported on the module. See Table 6-15, “DB Converter
Supported Devices/Device Conversion,” on page 6-28.
When the operation is completed, the device is removed from the Inter-Tel Axxess view and
stored in the Mitel 5000 platform in the selected location. The device type name is automatically
modified to the Mitel 5000 style (for example, “Keyset” is changed to “Endpoint”).
To IP Devices in Mitel 5000 View
Any endpoint, pair of endpoints or IP device shown under a card or in the Unused IP Devices
folder in the Inter-Tel Axxess view can be dragged and dropped onto the IP Devices folder in
the Mitel 5000 view. However, you cannot exceed the IP device limit. Multiple selection can be
used, but endpoints must reside under the same card of folder to be selected as a group.
For each dragged IP device, the device is simply transferred over. Other types of endpoints are
converted to IP. When multiple selection is used, only endpoints and IP devices are moved, and
if there is not room for all of the devices, one or more may be left behind, and a message
appears. When an Inter-Tel Axxess device is converted to an IP device, the following rules
apply. See Table 6-15, “DB Converter Supported Devices/Device Conversion,” on page 6-28
regarding converting devices to IP.
• After an endpoint is converted to IP, it cannot be converted back to the original type. IP
devices in the Mitel 5000 view cannot be moved.
• If an endpoint being moved has an associated DSS, the DSS will be left behind. When this
happens, a message appears and you can opt not to convert the endpoint.
• If an endpoint being moved is a keyset/MDPM or keyset/DPM, the MDPM or DPM is
removed, and the associated keyset is converted to an IP endpoint. MDPMs or DPMs are
not required if you have an IP connection. When this happens, a message appears and
you can opt not to convert the endpoint.
• All keysets are converted to IP endpoints. If an IP softphone is desired, you need to
change the IP endpoint to an IP softphone using a right-click operation on the IP endpoint.
• All Single Line devices are converted to IP Single-Line Adapters.
• If an item being moved is a “dual” item (e.g., dual keyset, dual single lines), there must be
room for two more IP devices in the Mitel 5000 platform, or the pair will not be moved. If
there is room, two IP Endpoints or two IP Single-Line Adapters will be created.
• Conversion of trunk devices from a Digital Keyset Card to IP in the Mitel 5000 is not
supported.
Mitel ® 5000 Installation Manual – Issue 3.0, October 2008
Page 6-39
Chapter 6: Programming
Drag and Drop Mitel 5000 Module in Mitel 5000 View
Drag and Drop Mitel 5000 Module in Mitel 5000 View
Mitel 5000 modules can be dragged and dropped within the Mitel 5000 platform, as shown
below. The following drag and drop locations in the Data Form Mitel 5000 view are supported
for Mitel 5000 modules:
• Uninstalled bay
• Installed bay
• IP devices
Figure 6-3. Mitel 5000 Database Converter Utility Drag and Drop Operations
To an Uninstalled Bay
Any installed Mitel 5000 module can be dragged and dropped into an uninstalled bay of the
Mitel 5000 platform, provided that the type of module is supported in that bay.
When a module is dragged/dropped into an uninstalled bay, the module and all associated ports
and devices are moved and the original bay becomes uninstalled.
To an Installed Bay
Any installed Mitel 5000 module can be dragged and dropped into an installed bay of the Mitel
5000 platform, provided that the dragged module is supported in the drop location and the
module in the drop location is also supported in the dragged-from location.
When a module is dragged/dropped into an installed bay, the modules are swapped, along with
all of their associated ports/devices.
To IP Devices
Any installed Mitel 5000 module with an associated device that can be converted to IP can be
dragged and dropped onto IP Devices, provided there is room for at least one device or device
pair to be converted to IP. If the IP device limit would be immediately exceeded, or if there are
no devices on the dragged module that can be converted to IP, the drop onto IP Devices is not
supported.
When an installed Mitel 5000 module is dragged/dropped onto IP Devices, all devices that can
be converted to IP are converted, until the IP device limit is reached. If no devices remain on
the dragged module, the dragged module is not uninstalled. You may manually uninstall the
empty module using the right-click menu, if desired.
Page 6-40
Mitel ® 5000 Installation Manual – Issue 3.0, October 2008
Chapter 6: Programming
Drag/Drop Mitel 5000 T1/E1/PRI Ports
Drag/Drop Mitel 5000 T1/E1/PRI Ports
Mitel 5000 T1/E1/PRI ports can be dragged and dropped within the Mitel 5000 system, as
shown below.
The following drag and drop locations in the Data Form Mitel 5000 view are supported for Mitel
5000 T1/E1/PRI ports:
• Another T1/E1/PRI or dual T1/E1/PRI module (page 6-38)
• Another T1/E1/PRI port location (page 6-38)
Figure 6-4. Mitel 5000 T1/E1/PRI Ports Drag and Drop Operations
To Another T1/E1/PRI or Dual T1/E1/PRI Module
Any installed T1/E1/PRI port can be dragged and dropped onto another T1/E1/PRI or Dual T1/
E1/PRI module, provided that there is any empty port on that module. If two ports are selected
together, the drag will be allowed if at least one port is open on the destination module—but
only the one port will be moved. If two ports are open, both ports will be moved.
The port(s) will be placed in the first open location(s) on the destination module, and all devices
on the ports are moved along with the ports.
To Another T1/E1/PRI Port Location
Any installed T1/E1/PRI port can be dragged and dropped onto another T1/E1/PRI port location,
whether it is empty or not. If not empty, the ports are swapped. If empty, the port is moved. All
devices on the port(s) are moved/swapped with the port(s).
Multiple selection is not allowed for this operation.
Mitel ® 5000 Installation Manual – Issue 3.0, October 2008
Page 6-41
Chapter 6: Programming
Drag and Drop Mitel 5000 Devices
Drag and Drop Mitel 5000 Devices
Mitel 5000 devices can be dragged and dropped within the Mitel 5000 platform, as shown
below.
The following drag and drop locations in the Mitel 5000 view are supported for Mitel 5000
devices:
• Mitel module, port, or folder (below)
• “Empty device location” on page 6-43
• “Populated device location” on page 6-43
• “IP devices” on page 6-43
When the last device is moved from a module, the module is not uninstalled. If desired,
manually uninstall the module using the right-click menu (see page 6-52).
Figure 6-5. Mitel 5000 Devices Drag and Drop Operations
To a Mitel 5000 Module, Port, or Folder
Any installed Mitel 5000 device can be dragged and dropped on a Mitel 5000 module, port, or
folder, provided there is room on the module, port or folder and the device is supported. See
page 6-28 for a table showing which types of devices are supported on which types of modules
in the Mitel 5000 platform. If a group is being dragged, the drag is permitted if at least one
device in the group can be moved.
When a device is dragged and dropped onto another module, port or folder within the Mitel
5000, the device is moved into the first available empty location. The view is automatically
expanded (if not already). If a group of devices is being moved, only those devices that are
supported will be moved, and if there is not room for all of the devices, one or more may be left
behind.
Page 6-42
Mitel ® 5000 Installation Manual – Issue 3.0, October 2008
Chapter 6: Programming
Database Conversion Log File
To Empty Device Location
Any installed Mitel 5000 device can be dragged and dropped into an empty device location in
the Mitel 5000 platform, provided that the type of device is supported in the chosen location.
When a device is dragged and dropped into an empty device location, the device is moved to
the new location and associated with the new module. The original device location is set to
“None.”
Only a single device can be dropped in a specific device location. When a group of devices is
being dragged, the devices must be dropped onto a module, port, or folder.
To Populated Device Location
Any installed Mitel 5000 device can be dragged and dropped onto another installed device in
the Mitel 5000 platform, provided that the dragged device is supported in the drop location and
the device in the drop location is also supported in the dragged-from location.
When a device is dragged/dropped onto another installed device, the devices are swapped.
To IP Devices
Any installed Mitel 5000 endpoint (or pair of endpoints) can be dragged and dropped onto IP
Devices, provided there is room for the endpoint (or pair). If the IP device limit would be
exceeded, the drop onto IP Devices is not permitted. Multiple selection can be used in this
case, but endpoints must reside under the same module or folder to be selected as a group.
For each dragged endpoint, the endpoint is converted to IP and removed from the dragged-from
module. When multiple selection is used, only endpoints (and pairs of endpoints) are moved,
and if there is not room for all of the endpoints, one or more may be left behind.
Database Conversion Log File
As part of the procedure to convert a database (page 6-45), you have the option to save and/or
view the log file. When viewing the log file, it opens in Notepad. After it is saved, the file can be
opened in any text editor. An example is shown on the next page. The only opportunity you
have to save the log file is during the conversion process. Save to the proposed location for the
database conversion.
Mitel ® 5000 Installation Manual – Issue 3.0, October 2008
Page 6-43
Chapter 6: Programming
Database Conversion Log File
The log file lists all cards and devices excluded from
the converted database. These include cards and
devices that:
• Are not supported (in the Unsupported Cards/
Devices folder)
• Were automatically excluded (e.g., IPRCs,
MDPMs)
• Were intentionally deleted (via right-click menu
option)
• Were not used (cards for which all devices
were placed on other modules, cards and
devices left in the Inter-Tel Axxess view)
The log file lists all cards and devices included in the
converted database with their new locations. For
each device, the original Inter-Tel Axxess location is
shown in parentheses after the new Mitel 5000
location.
Any additional changes required to convert the InterTel Axxess database to a Mitel 5000 database, are
listed. Warnings are included as needed.
At the end of the log file, there may be warnings
regarding the meta database limits. If any of the
default limits for the destination Mitel 5000 platform
are exceeded in the database, a warning is included
specifying the current and the default limits. You
need to consider whether to take action on the
warning(s). If any of these warnings are generated
during the conversion, at the end of the conversion,
before the Conversion Complete dialog is
presented, you are presented with a single message
alerting of the warnings and encouraging you to
carefully examine the log file.
If a fatal error occurred during the conversion, the
error message and corrective action will be included
as the last entry in the log file.
Page 6-44
Mitel ® 5000 Installation Manual – Issue 3.0, October 2008
Chapter 6: Programming
Converting a Database from Inter-Tel Axxess to Mitel 5000
Converting a Database from Inter-Tel Axxess to Mitel 5000
For a feature description, see “Inter-Tel Axxess to Mitel 5000 Database Conversions” on page
6-25. This procedure assumes you are currently at release v2.2 on the Mitel 5000. In the
examples shown in this procedure, .intl database files have been stored in a folder named
DB that appears in the Open Window.
Do the following:
1.
From your PC desktop, select Start – All Programs – Inter-Tel 5000 DB Programming –
Inter-Tel 5000 DB Converter.
2.
Click the ellipsis button at the right of the Source File box.
The database source file
folders available for
conversion are listed, as
shown at right. You may
browse to a different folder if
necessary. As shown at
right, the default filter
includes file extensions
.axx and .intl. You can
also select a filter with just
.axx or .intl as the file
extension for the source
database.
3.
Double-click the Inter-Tel
Axxess .axx database file
you want to convert. You can
also navigate to the location,
select the file and click
Open. The second screen at
right appears.
Status appears between the
Help and Convert buttons as
the Source File is examined
to determine if it is valid. The
converter utility then displays
valid options to select.
If any circumstance
regarding what can be
converted is detected, an
error message appears. See
Table 6-13, “Database
Converter Error Messages,”
on page 6-27 for database
incompatibility errors.
Status appears here, if applicable
If the source file is valid, the Destination Version list displays a list of valid versions for
the destination database. For an Inter-Tel Axxess to Mitel 5000 conversion, only Mitel
5000 version 2.2 is supported. For a Mitel 5000 to Mitel 5000 conversion, the DB
Converter will support any installed version subsequent to the source file version.
The .intl file extension is the only valid extension for the destination file. If an invalid
file extension is chosen, an error appears. If the invalid file extension is not changed
before the conversion begins, the .intl extension is automatically added to the
filename.
Mitel ® 5000 Installation Manual – Issue 3.0, October 2008
Page 6-45
Chapter 6: Programming
Converting a Database from Inter-Tel Axxess to Mitel 5000
4.
5.
Do one of the following:
•
Destination Version: Select any v2.2 Mitel 5000 version from the list.
•
Destination System: Select the Mitel CS-5x00 applicable system from the list.
Click Convert. At any time during the progress bar state, you can click Abort to stop the
process.
Conversion status appears between the Help and Convert buttons and progress bars
indicate the conversion state. During this progress bar state (shown below), you can
click Abort to back out of the conversion.
These two
progress bars will
not appear for
Inter-Tel Axxess
versions
9.115 or later.
The Data Form appears, as shown at the top of the next page.
Page 6-46
Mitel ® 5000 Installation Manual – Issue 3.0, October 2008
Chapter 6: Programming
Converting a Database from Inter-Tel Axxess to Mitel 5000
Drag and drop
There are no
right-click
menu options
on the Axxess
side of the
data form
Right-click to
select menu
options
Items in the
Unsupported
Cards/Devices
folder cannot
be moved to
the Mitel
5000 system
Items in the
Unused IP
Devices folder
exceed the
destination
system
capacity
The Miscellaneous Devices folder holds
devices that may have existed in the
Inter-Tel Axxess database. These will
be automatically carried over into the
Mitel 5000 platform. These could
include a Page Port and Modem from
the Inter-Tel Axxess CPC card. If these
devices do not exist in the Inter-Tel
Axxess database, they will be created
automatically in the Mitel 5000
database. This folder is for information
only - these devices cannot be moved
or deleted.
Status appears
here, as
applicable
6.
Analyze the Data Form and do any of the following:
•
Resubmit the conversion and remove any changes. See page 6-49.
•
Perform drag and drop operations. See page 6-49.
•
Remove a device from a module. See page 6-50.
•
Install a module. See page 6-51.
•
Uninstall a module. See page 6-52.
•
Replace used IP devices with unused IP devices. See page 6-52. In the Mitel 5000
view, the IP device system limit is based on the type of Mitel 5000 platform chosen
for the destination in step 4 on page 6-46: 75 for a CS-5200, 175 for a CS-5400
and 250 for a CS-5600. The display updates each time an IP device is added to or
removed from the folder.
•
Transfer Ground Start trunks to a T1 Module. See page 6-53.
•
Change module capacity. See page 6-54.
•
Change IP endpoint/softphone type. See page 6-55.
•
Click Cancel to close the form and return to the Database Conversion utility. Click
Yes when prompted.
Right-click menus are not available from the Inter-Tel Axxess view. Right-click operations
are only permitted from the Mitel 5000 view.
Mitel ® 5000 Installation Manual – Issue 3.0, October 2008
Page 6-47
Chapter 6: Programming
Converting a Database from Inter-Tel Axxess to Mitel 5000
7.
Click Finish. The following prompt appears.
Any cards, ports, and/or devices left showing in the Inter-Tel Axxess view are not
included in the destination Mitel 5000 database.
IMPORTANT
8.
Click Yes to complete the conversion. When the conversion completes, the following
prompt appears.
IMPORTANT
9.
Page 6-48
Throughout the conversion process, the original Inter-Tel Axxess
database is not changed in any way either before, during, or after the
conversion.
Only the log file for the latest Inter-Tel Axxess to Mitel 5000
conversion is accessible from this form. Save the log file for each
conversion for future reference. This is the only opportunity you have
to save the log file.
Click any of the following:
•
Save Log: If a log file was created during the conversion, this button is available;
otherwise, it is dimmed. Use the suggested filename which is created with the
destination database pathname. A log file is always created for an Inter-Tel Axxess
to Mitel 5000 conversion, but for a Mitel 5000 to Mitel 5000 conversion, a log file is
created only if errors occurred. You cannot save the log file in the same location in
which it resides. The prompt above stays open until you click OK. Read the
Important note above.
•
View Log: If a log file was created during the conversion, this button is available;
otherwise, it is dimmed. A log file is always created for an Inter-Tel Axxess to Mitel
5000 conversion, but for a Mitel 5000 to Mitel 5000 conversion, a log is created
only if errors occurred. See page 6-43 for information on the log file. The prompt
above stays open until you click OK. Read the Important note above.
•
OK: You return to the Database Conversion Utility.
Mitel ® 5000 Installation Manual – Issue 3.0, October 2008
Chapter 6: Programming
Removing All Data Form Changes
Removing All Data Form Changes
This procedure will clear all configuration changes you have made to the Inter-Tel Axxess and
Mitel 5000 views on the Data Form page. The Inter-Tel Axxess and Mitel 5000 views will be redisplayed as they were when the form was originally presented in the Data Form page. The
databases are not altered.
Do the following:
1.
Click Clear at the bottom of the Data Form page. The following prompt appears.
2.
Click Yes to clear all configuration changes.
Perform Data Form Drag and Drop Operations
Do the following:
1.
Locate the item you want to move from either the Inter-Tel Axxess side of the form or
from the Mitel 5000 side of the form.
2.
Drag the item to the desired location. You can also drag items to other locations within
the Mitel 5000 form. You cannot drag items from the Mitel 5000 form to the Inter-Tel
Axxess form. See pages 6-28 and 6-28 for a list of supported cards and devices. See
page 6-34 for drag and drop specifics.
Mitel ® 5000 Installation Manual – Issue 3.0, October 2008
Page 6-49
Chapter 6: Programming
Remove a Device from a Module
Remove a Device from a Module
Do the following:
1.
Right-click the device and select Delete, as shown in the following example. You can
delete any device except for devices under the Miscellaneous Devices folder.
A miscellaneous device cannot be deleted, nor can it be moved. An IP device can be
deleted, but it cannot be moved to another location on the Mitel 5000 form. Any device
on the Mitel 5000 form, other than miscellaneous devices, can be deleted. Nothing on
the Inter-Tel Axxess form can be deleted; items can only be left behind.
NOTICE
This operation cannot be undone. You cannot reinstate a device after it has been
deleted. If you mistakenly delete a device, use the Clear button to redo all of your
configuration changes.
2.
Page 6-50
Confirm the delete operation.
Mitel ® 5000 Installation Manual – Issue 3.0, October 2008
Chapter 6: Programming
Install a Module
Install a Module
Do the following:
1.
Locate an empty bay displaying “Uninstalled” in the Mitel 5000 view.
2.
Right-click and select the module type you want install, as shown in the example above.
The selections are:
•
Basic Rate Module - S
•
E1/PRI Module
•
Loop Start Module - 2
•
Loop Start Module - 4
•
Single Line Module - 4
•
T1 Module
•
T1/PRI Module
NOTE
Effective with v2.1, production of the LSM-2 module was
discontinued, but existing modules are supported in DB Programming.
Mitel ® 5000 Installation Manual – Issue 3.0, October 2008
Page 6-51
Chapter 6: Programming
Uninstall a Module
Uninstall a Module
Do the following:
1.
Locate the Module you want to uninstall, from the Mitel 5000 view. All module items must
display “None.” See page 6-50 for information on removing devices from a module.
2.
Right-click the module and select Uninstalled, as shown in the following example.
Uninstalled does not appear as a selection if “None” does not appear for all items within
the module.
Replace a Used IP Device with an Unused IP Device
At the very beginning of a database conversion from Inter-Tel Axxess to Mitel 5000, IP devices
are automatically moved from Inter-Tel Axxess to the Mitel 5000 database. Any Inter-Tel Axxess
IP devices that do not fit into the Mitel 5000 platform are stored in the Unused IP Devices folder
in the Inter-Tel Axxess view. This will only occur if the IP devices limit is reached in the Mitel
5000 view. You can replace a converted Inter-Tel Axxess device with one that did not get
converted, but first you must delete the converted device.
Page 6-52
Mitel ® 5000 Installation Manual – Issue 3.0, October 2008
Chapter 6: Programming
Transfer Ground Start Trunks to T1 Module
Do the following:
1.
Expand the IP Devices folder in
the Mitel 5000 view, and locate the
IP device you want to replace with
an unused IP device from the
Inter-Tel Axxess view.
2.
Right-click the device, in the Mitel
5000 view, and select Delete.
3.
Drag the unused IP device, from
the Inter-Tel Axxess view to the IP
Devices folder in the Mitel 5000
view. See page 6-38 for drag and
drop operations for IP devices.
Indicates IP
Device limit
Transfer Ground Start Trunks to T1 Module
Do the following:
1.
Locate an empty bay on the Mitel 5000 side of the data form.
•
Right-click the bay displaying Uninstalled, and select T1 Module. An example is
shown below.
•
Click the + sign next to the module to expand it.
2.
On the Inter-Tel Axxess side of the data form, locate and expand the card containing the
Ground Start trunks.
3.
Drag and drop the Ground Start trunks to the expanded T1 Module locations. An
example is shown below.
Mitel ® 5000 Installation Manual – Issue 3.0, October 2008
Page 6-53
Chapter 6: Programming
Change Module Capacity
Drag and drop Ground Start trunks to T1 Module
Change Module Capacity
A menu option allows for changing between LS-2 and LS-4 modules and between T1/E1/PRI
and Dual T1/E1/PRI modules. LS-4 modules are always created when Loop Start Cards are
dragged and dropped from the Inter-Tel Axxess view, and T1/E1/PRI modules are always
created when T1/E1/PRI cards are dragged and dropped from the Inter-Tel Axxess system
(versions 2.3 and greater). The destination Mitel 5000 platform may plan to have a Loop Start
Module - 2 or a Dual T1/E1/PRI module in that bay, so this menu option allows you to make this
change in the database without uninstalling the devices or ports. Existing ports on the modules
are preserved.
Right-clicking on a T1/E1/PRI module provides an option to convert to Dual T1/E1/PRI. Also,
right-clicking on an LS-2 module provides an option to convert to Loop Start Module - 4.
Right-clicking on a Dual T1/E1/PRI module when port 2 is empty provides an option to convert
to T1/E1/PRI.
Page 6-54
Mitel ® 5000 Installation Manual – Issue 3.0, October 2008
Chapter 6: Programming
Change IP Endpoint or Softphone Type
Do the following:
1.
2.
Choose the module on which you
want to change capacity:
•
LS–4: Check that ports 3
and 4 are empty on the
module you want to modify.
The menu item does not
appear if ports 3 or 4 are
populated.
•
LS–2
Right-click the module and select
the option to convert. An example
at right shows converting a Loop
Start - 4 to a Loop Start - 2.
NOTE
Effective with v2.1, production of the LSM-2 module was discontinued, but existing
modules are supported in DB Programming.
Change IP Endpoint or Softphone Type
You may decide you want a particular IP Endpoint to be a softphone. See Table 6-14, “DB
Converter Supported Cards/Card Conversion,” on page 6-28 and Table 6-15, “DB Converter
Supported Devices/Device Conversion,” on page 6-28 for additional information on what items
can be converted.
To convert the IP endpoint to a softphone:
Do either of the following:
•
Right-click the IP endpoint you want to change and select Convert to IP
Softphone.
Right-click the IP softphone you want to change and select Convert to IP Endpoint.
Mitel ® 5000 Installation Manual – Issue 3.0, October 2008
Page 6-55
Chapter 6: Programming
Software License Management
Software License Management
This section provides information about obtaining a software license. It also includes additional
software license information such as how to transfer a license and how to troubleshoot license
errors.
Obtaining a Software License
In general, the site should already have a software license available. If necessary, however, you
can “build” a license to meet the customer’s needs. All licensing is handled through the
Application Management Center (AMC). For information on the AMC, refer to the Help or other
documentation available at
For information obtaining software licenses, refer to the AMC Help or the Mitel Web site (http://
edocs.mitel.com).
System Type Selection
The System Type field identifies the platform associated with the license loaded on the system.
For a Mitel CS-5200 license, the field displays “Mitel CS-5200,” and accordingly for the CS5400 and CS-5600 system licenses. This read-only field should match the System Type shown
on the About Inter-Tel Software License dialog. See the example shown in “Viewing the Current
License,” which follows.
Figure 6-6. System Type Selection
Page 6-56
Mitel ® 5000 Installation Manual – Issue 3.0, October 2008
Chapter 6: Programming
Viewing the Current License
Viewing the Current License
To determine the system type and features available with the software license:
1.
Select About Inter-Tel Software License from the Help menu in DB Programming. A
window similar to the following one appears.
The About~ window displays the software license information summarized in Table 6-16, “About
Window Description,” on page 6-57. Up to 1024 licenses may be purchased for IP Networking.
Table 6-16. About Window Description
Feature
Indicates
Inter-Tel Serial Number
The serial number printed on the USB security key.
Product
The product type (Inter-Tel® 5000).
System Type
Mitel CS-5200 or Mitel CS-5400.
License Status
Whether the license is valid or invalid.
License Number
The unique license number assigned by Mitel.
License Agent
The person who created the license.
Creation Date (and Time)
The date and time the software license was created. This is displayed in
the MMM DD, YYYY (HH:MM:SS) format.
IP Endpoints
The number of IP endpoints currently programmed and the maximum
number of physical devices supported. This is in the format XX of YY where
XX is the number of devices currently programmed and YY is the maximum
number of devices supported.
• IP Endpoint Licenses in Use
• IP Gateway Trunk Licenses in
Use
• PRI Licenses in Use
Endpoints that use IP only, such as the Model 8660 and IP PhonePlus, do
not require a license and are not reflected in the IP Endpoint Licenses in
Use field.
• Additional T1/E1/PRI Port
Up to 1024 licenses may be purchased for IP Networking.
• IP Networking Licenses in Use
License in Use
Software License Features
2.
Whether the indicated software license feature is supported (Yes or No).
Click OK when finished to exit this screen.
Mitel ® 5000 Installation Manual – Issue 3.0, October 2008
Page 6-57
Chapter 6: Programming
Transferring Licenses
Transferring Licenses
If problems occur with the security key, you may have to transfer a license. See Table 6-17,
“Invalid License Upload Errors,” on page 6-60 for a list of error messages.
For information on transferring licenses, refer to the AMC Help or the Mitel Web site (http://
edocs.mitel.com).
Changing the License
If necessary, you can upload a new license that provides a different set of features. If the new
license, however, supports new capacities, you must make sure that you have the appropriate
hardware installed.
To change a license, obtain a new license, as described on page 6-56, then upload the license
as described on page 6-60. The system compares the new license to the existing license and
then displays a screen similar to the one shown below.
Figure 6-7. Change Software License
In this screen, the areas of the license that are changing are selected. The status line indicates
whether the system requires a reset once the license is uploaded.
After you have verified you want to upload the new license, click Finish. The new software
license is loaded, and the old software license is stored on the system. The system may require
a reset.
Page 6-58
Mitel ® 5000 Installation Manual – Issue 3.0, October 2008
Chapter 6: Programming
Changing the License
NOTICE
System Reset and Lost System Functionality.
Mitel strongly recommends against downgrading a software license. Four ways that the
system can downgrade the software license include:
• Uploading a Mitel CS-5400 software license to a Mitel CS-5200 system.
• Uploading a software license where the number of online Advanced IP endpoints is
greater than the new license Advanced IP endpoint license count.
• Uploading a software license where the number of online IP gateway trunks is greater
than the new license IP gateway trunk license count.
• Uploading a software license where the number of online T1/E1/PRI modules is greater
than the new license PRI license count. Before accepting the new software license,
Database (DB) Programming displays where the license field in question is less than the
existing license field. In both of these instances, DB Programming warns that the
system will reset.
In the first scenario (downgrading from a Mitel CS-5400 to a Mitel CS-5200), DB
Programming allows the downgrade to occur only if the number of IP endpoints, number of
IP networking and number of T.38 Fax calls are valid for a Mitel CS-5200 system.
When uploading a new software license, upload the latest generated .isl license file to
ensure that the software license does not downgrade.
If a system has continuous license key failures, Alarm 132 is posted on all administrator
endpoints. After the system successfully recognizes the license key, upon the next reset, the
system checks for a valid software license.
If the license key is functional but the system does not have a software license, the system
posts alarm 125 every 5 minutes, then resets after 4 hours.
Mitel ® 5000 Installation Manual – Issue 3.0, October 2008
Page 6-59
Chapter 6: Programming
Software License Upload
Software License Upload
After you are in DB Programming, you must upload the software license. If you do not upload
the software license, the system considers the license as “invalid” and issues Alarm 125.
See “Uploading a License” on page 5-99 for information on software license uploads and
related information.
For a complete list of alarm messages, refer to the Message Print Diagnostics Manual, part no.
550.8018.
With regard to the USB security key and SSL:
• The serial number is stored on the USB security key. The license must
IMPORTANT
match the serial number on this key or the upload will fail. If for any
reason you need to replace the USB security key, make sure you upload
the latest license file before replacing the key. Attempting to upload a
license file after changing the USB security key results in an error and
the system will not function.
• If the USB security key is not installed when the system reboots, the
software license will need to be uploaded.
Invalid License Upload
A software license is created for a specific system type, so if you attempt to load a software
license that does not match the system type, an error message displays. For instance, if you
attempt to load a Mitel CS-5600 license onto a Mitel CS-5400, the following error message
appears. This event may occur when using the Upload Software License feature, which is
accessed from the Session Manager menu bar by selecting Operations and then Software
License Operations.
If the license is invalid, an error message is displayed, indicating why the upload failed. A
license may be considered invalid for a variety of reasons, as described in Table 5-2.
Table 6-17. Invalid License Upload Errors
Error Message
Page 6-60
Possible Cause
Corrective Action
Corrupted Software
License. Unable to load
Software License.
The software license is
corrupted.
Download the file from the
Mitel edGe Software
Downloads Web site
(www.inter-tel.com/software)
again. If this error occurs
again, contact the Inter-Tel
Software Maintenance Center.
The specified Software
License is not valid for this
specific CPU. Unable to
load Software License.
The serial number on the does
not match the number in the
license.
Load a license that has the
correct serial number.
Mitel ® 5000 Installation Manual – Issue 3.0, October 2008
Chapter 6: Programming
Invalid License Upload
Table 6-17. Invalid License Upload Errors (Continued)
Error Message
Possible Cause
Corrective Action
The specified Software
License has expired.
Unable to load Software
License.
The software license is no
longer valid or has expired.
Load (or request) a new
Software License.
Too many devices
equipped. Unable to load
software license.
The current database is
programmed for more devices
than the software license
allows.
Either use local mode to
unequip some devices or
upgrade the capacity limit on
the license.
Software License version is The license you have
not supported. Unable to
attempted to load is for a
load Software License.
different version of system
software.
Either install the correct
version of system software or
upload a software license that
specifies the correct system
version.
Software License is already A valid software license is
loaded. Unable to load
already loaded on the system.
Software License.
If the software license you are
attempting to load is the
correct license, start a new DB
Programming session with a
default database. Then upload
the software license before
restoring the database.
Software License is not
valid for the current CPU
type.
The CPU type identified in the
software license does not
match the CPU type detected
in the system.
Upload a license that identifies
the installed CPU type.
Security key is either
invalid or missing.
The software license serial
number does not match the
serial number on the security
key, or the security key is not
present on the server.
Make sure the security key is
present and properly seated in
the USB port. If the key is
present, make sure the license
reflects the correct serial
number. If necessary, transfer
the license to the correct serial
number (see page 6-58).
The specified Software
The software license product
License is not valid for this version does not match the
software version. Unable to version installed on the system.
load Software License.
Either install the correct
system version or upgrade the
license to reflect the correct
system version.
The specified Software
License encountered an
unknown upload error.
Unable to load Software
License.
Contact the Inter-Tel Software
Maintenance Center.
An unidentified error occurred.
After successfully loading the software license, begin programming the system.
Mitel ® 5000 Installation Manual – Issue 3.0, October 2008
Page 6-61
Chapter 6: Programming
Compare Software License Window
Compare Software License Window
The following illustration shows an example of the Compare Software License dialog box that
appears during the software license upload process.
Figure 6-8. Compare Software License
System Downgrades
You can downgrade a CS-5400 system without reinstalling a CS-5200 license. However, certain
features and capacities may appear to be available (because of the CS-5400 license), but they
are not because the physical hardware is not in place. For example, the last 88 VoIP resources
will not be available although they appear in DB programming, and the database in this state
will still show the processor expansion module (PEC) even though it is not physically there. If
you intend to load a CS-5200 license, please read the following notice before continuing with
the last step in the process.
The following list provides general process for downgrading a system:
NOTE
For more information about removing the PEC or hardware installation issues,
refer to the Installation chapter.
• Power down the system. For more information about system power requirements, refer to
the Installation chapter.
• Remove the processor module, PM-1, from the back of the chassis.
• Remove the processor expansion card, PEC-1, from the processor module.
• Replace the single 7-pair jumper toward the edge of the module just beneath the Ethernet
port. Pins 1–14 will be covered by jumpers, pins 15–20 remain exposed.
• Re-install the processor module.
• Power up the system.
• Start DB Programming and load a valid CS-5200 license—see page 6-56. This action will
default the database.
NOTICE
System Downtime and Database Rebuild. Downgrading a system from a CS5400 to a CS-5200 and installing a CS-5200 license will default the database. If this
is necessary, then schedule to the downgrade at a time that will have the least
amount of impact to the customer. This additional downtime time may be required
to rebuild the database.
Page 6-62
Mitel ® 5000 Installation Manual – Issue 3.0, October 2008
Chapter 6: Programming
Software License Directory
Software License Directory
The Software License directory identifies the type of Mitel 5000 system type and current
licenses. When you click the Software License folder, a list displays in the right pane similar to
<blue>Figure 6-9.
Figure 6-9. Software License Directory Display
The Software License folder displays the licenses currently uploaded to the system. The
features common to all licenses are displayed in this folder along with the value for each feature
according to the current software license. This folder is read-only.
The detailed information about software license features is shown in the table below. The values
shown are for local mode. In remote mode, the values match the software license that is loaded.
If there is no license loaded or the current license on the system is invalid, the fields will display
with a red “X.”
Table 6-18. Software License Folder Field Descriptions
Field
Description
System Type
Displays the system type associated with the license that is loaded to the
system. For a CS-5200 license, the field displays “Inter-Tel CS-5200,” and
accordingly for the CS-5400 and CS-5600 system licenses. This field
should match the system type of the About Inter-Tel Software License dialog.
ACD Hunt Group
Indicates whether or not the ACD Hunt Groups software license is
uploaded to the system.
Additional T1/E1/PRI Ports
Indicates how many additional Dual T1/E1/PRI port licenses are uploaded
to the system.
Agent Help
Indicates whether or not the Agent Help software license is uploaded to
the system.
Analog Voice Mail Hunt Group
Indicates whether or not the Analog Voice Mail Hunt Group software
license is uploaded to the system.
Mitel ® 5000 Installation Manual – Issue 3.0, October 2008
Page 6-63
Chapter 6: Programming
Software License Directory
Table 6-18. Software License Folder Field Descriptions (Continued)
Field
Description
Basic Voice Mail Ports
Indicates how many Basic Voice Mail port licensed are uploaded to the
system.
Category A Endpoints
Indicates how many Category A endpoint licenses are uploaded to the system.
Category B Endpoints
Indicates how many Category B endpoint licenses are uploaded to the system.
Category C Endpoints
Indicates how many Category C endpoint licenses are uploaded to the
system.
Category D Endpoints
Indicates how many Category D endpoint (Mitel Models 5212, 5224, 5330,
and 5340) licenses are uploaded to the system.
Desktop Interface
Indicates whether or not the Desktop Interface software license is
uploaded to the system.
Digital Expansion Interface #1
Indicates whether or not the Digital Expansion Interface # 1 software
license is uploaded to the system.
Digital Expansion Interface #2
Indicates whether or not the Digital Expansion Interface # 2 software
license is uploaded to the system.
Extended Node Capacity
Indicated whether or not the IT-5000 License Enable 99 Nodes software
license is uploaded to the system. For more information about 99 Nodes
requirements, refer to the Specifications chapter.
Inter-Tel Messaging IP Networking
Indicates whether or not the Inter-Tel Messaging IP Networking software
license is uploaded to the system.
IP Endpoints Enabled
Indicates whether or not the IP Endpoints Enabled software license is
uploaded to the system.
IP Gateway Trunks
Indicates how many IP gateway trunk licenses are uploaded to the system.
IP Networking
Indicates how many IP networking trunk licenses are uploaded to the system.
PRI Licenses
Indicates how many PRI licenses are uploaded to the system.
Remote Automatic Call Distribution
Hunt Groups
Indicates whether or not the Remote Automatic Call Distribution Hunt
Groups software license is uploaded to the system.
System OAI Events
Indicates whether or not the System OAI Events software license is
uploaded to the system.
System OAI Third Party Call Control
Indicates whether or not the System OAI Third Party Call Control software
license is uploaded to the system.
Voice Processor AMIS Networking
Indicates whether or not the Voice Processor AMIS Networking software
license is uploaded to the system.
Mitel 5000 systems require a version-specific license. You can install and run DB Programming,
but you are prompted to upload the license file. For information about uploading a software
license and for a list of features that require licenses, see “Software License Operations –
Upload Software License” on page 6-65.
Page 6-64
Mitel ® 5000 Installation Manual – Issue 3.0, October 2008
Chapter 6: Programming
Software License Operations – Upload Software License
Software License Operations – Upload Software License
You must upload a software license to the Mitel 5000 system. If you do not upload a software
license, the system considers the license invalid and issues Alarm 125. For a complete list of
alarm messages, refer to the Message Print Diagnostics Manual, part number 550.8018.
With regard to the USB security key and secure socket layer (SSL), the
serial number is stored on the USB security key. The license must match the
serial number on this key or the upload will fail.
IMPORTANT
If for any reason you need to replace the USB security key, make sure you
upload the latest license file before replacing the key.
Attempting to upload a license file after changing the USB security key
results in an error and the system will not function. If the USB security key is
not installed when the system reboots, the software license will need to be
uploaded.
To upload a software license:
1.
From the DB Studio menu bar, select Operations – Software License Operations –
Upload Software License.
2.
Enter the path and name of the license file (.isl) or click Browse to search for the file.
3.
Click Start. The system compares the new software license to the existing license, if
applicable.
NOTE
4.
If you click Start before selecting a license (.isl), a message displays,
informing you that you have not identified a file name.
Click Finish at the Compare Software License screen. If you click Cancel, the license is
not uploaded.
If you upload a software license that does not support your current programming, you will be
warned accordingly.
Mitel ® 5000 Installation Manual – Issue 3.0, October 2008
Page 6-65
Chapter 6: Programming
Compare/Upload Software License
Additional BVM ports must be licensed for v1.2 or later. If you downgrade a license to support
fewer BVM ports, DB Programming performs a check on the Time Slot Groups. If the Time Slot
Groups currently have a Maximum Channel Allocation greater than the new license will support,
a warning message is displayed, preventing you from uploading the license. You are prompted
as to whether or not you would like to go to the Time Slot Groups folder and change the
Maximum Channel Allocation fields to a value that will be supported in the new license. If you
do not go to the Time Slot Groups or you click Cancel, you are returned to DB Programming
and the new license is not loaded.
Compare/Upload Software License
When you upload a software license, a check is performed on the BVM ports licensed in the
new license and the current resources allocated to BVM. If the current resources allocated
exceed the number of licensed BVM ports, you are prompted to change the resource allocation.
If you click Yes, the view will be changed to the System\Communication Server\IP Settings\IP
Resource Allocation folder so you can change the IP resources allocated to BVM.
If you click No, you return to the folder you were viewing, prior to the software license upload,
and the upload is canceled.
BVM ports, IP Endpoint Categories, and Node Capacity are displayed in the Compare License
dialog, as shown below.
Page 6-66
Mitel ® 5000 Installation Manual – Issue 3.0, October 2008
Chapter 6: Programming
System Manager CA Certificate Upload
Figure 6-10. Compare Software License
The order of the features listed has changed to accommodate the most import features at the
top and the remaining features in alphabetical order.
System Manager CA Certificate Upload
If a node will connect to System Manager, you must upload the Certification Authority (CA)
certificate. The certificate allows the node to use Secure Socket Layer (SSL) for a secure
connection.
IMPORTANT
You cannot upload the CA certificate while in local mode.
To upload the CA certificate:
1.
From the DB Studio menu bar, select Operations and then System Manager CA
Certificate Upload.
2.
When prompted, click Browse and locate the CA certificate (usually at C:\InterTel\System Manager\CA). Certificates have a .cer extension.
3.
Click Start. The CA certificate is uploaded.
For details about using System Manager, refer to the System Manager Installation Manual, part
no. 835.2743.
Mitel ® 5000 Installation Manual – Issue 3.0, October 2008
Page 6-67
Chapter 6: Programming
The Configuration Wizard
WIZARD INTERFACES
Wizard interfaces in DB Programming allow you to quickly program different parts of the system
without having to navigate to separate areas in DB Programming.
For information on the Networking Wizard, refer to the Mitel 5000 Features and Programming
Guide, part number 580.8006.
NOTICES
System Performance. Where appropriate throughout this programming chapter, the following should be performed after hours when system usage is at a minimum (for example,
after normal business hours).
• Imports (with a large database, especially with off-node devices). For example,
performance can also be affected when other nodes export to the local node.
• DB backup saves (with a large database, especially with off-node devices).
• Paging to a large number of endpoints.
• All-ring hunt groups to a large number of endpoints.
• Abusive/intention actions (user runs a “die macro” on their endpoint).
• Change extension logic (DB Programming performs a batch modify/delete extension
(the larger the database, the slower the action).
To receive technical assistance from the Mitel Technical Support group, DB Programming users must have earned the following certifications:
• Mitel® 5000 Basic Technical Certification
• Telecommunications Industry Association (TIA) Convergence Technologies Professional
(CTP) certification
If you do not have these certifications, Mitel Technical Support will assist you, but one
Technical Support Incident (TSI) will be charged.
The Configuration Wizard
The Configuration Wizard allows you to quickly configure a system with enough basic
information to get the system up and running. The Back button on the wizard screens allows
you to return to a previous screen to modify programming.
IMPORTANT
Page 6-68
To complete programming through the Configuration Wizard, you must click
the Finish button on the last screen. Changes and/or additions made in the
wizard do not take effect until you click Finish on the final Wizard screen.
Mitel ® 5000 Installation Manual – Issue 3.0, October 2008
Chapter 6: Programming
Process Summary
Process Summary
Complete the following high-level steps to set up the system with the Configuration Wizard:
1.
Open the Configuration Wizard.
2.
Configure the system’s general IP settings and IP settings for the Mitel CS-5200/5400/
5600 Base Server, Processing Server (PEC-1), and Processor Expansion Card (PEC-1),
as applicable.
3.
Set up or edit parameters for the following IP devices:
4.
•
IP endpoints
•
IP Softphone
•
IP Single Line Adapter
•
MGCP gateway and endpoint
•
MGCP endpoint
•
SIP trunk
Set up and program the following modules, as applicable:
5.
•
Base Server expansion modules
•
DEI expansion modules
•
Dual T1/E1/PRI modules
•
T1/E1/PRI modules
•
Loop Start modules
•
Single Line modules
•
Digital endpoint modules
Finish the Wizard configuration.
Running the Configuration Wizard
For quick reference and access to procedures that involve parent-child windows, the
Configuration Wizard has been grouped into subheadings for documentation purposes. In DB
Programming, the pages appear in sequence without reference to the subheadings.
• “Opening the Configuration Wizard” on page 6-70
• “Programming Date and Time Settings” on page 6-71
• “Programming IP Settings” on page 6-71
• “Programming General IP Settings” on page 6-72
• “Programming IP Devices” on page 6-73
• “Editing Existing IP Devices” on page 6-79
• “Programming Expansion Modules” on page 6-80
o
“BRM-S Module Programming” on page 6-81
o
“Dual T1/E1/PRI (T1M-2) Module Programming” on page 6-83
o
“T1/E1/PRI Module Programming” on page 6-86
o
“LSM-2/LSM-4 Module Programming” on page 6-88
o
“Single Line Module Programming” on page 6-89
• “Programming Digital Expansion Interface (DEI) Units” on page 6-91
• “Programming DEI Expansion Modules” on page 6-92
• “Finishing the Wizard Configuration” on page 6-96
Mitel ® 5000 Installation Manual – Issue 3.0, October 2008
Page 6-69
Chapter 6: Programming
Opening the Configuration Wizard
Opening the Configuration Wizard
To open the Configuration Wizard:
Page 6-70
1.
From the DB Studio menu bar, select Tools and then Configuration Wizard. The
Welcome page appears.
2.
Verify the system type to make sure it matches the system you have. If there is a
difference, either the hardware is incorrect or the license type is incorrect.
3.
Click Next. The System Password Configuration page appears.
4.
Configure user/administrator passwords, and then click Next. The Date and Time
Settings page appears.
5.
Continue to “Programming Date and Time Settings” on page 6-71.
Mitel ® 5000 Installation Manual – Issue 3.0, October 2008
Chapter 6: Programming
Programming Date and Time Settings
Programming Date and Time Settings
To program the Date and Time Settings page:
1.
Program the date, time, enable daylight savings time, and time zone for the system.
2.
If necessary enable Network Time Protocol (NTP), and then program the NTP settings.
3.
Click Next. The IP Settings page appears. Continue to “Programming IP Settings” next.
Programming IP Settings
To program the IP Settings page:
1.
Select DHCP or Static IP Address assignment. A note appears indicating that Mitel
highly recommends using Static. There are five static IP Address fields on this page:
•
Static Processor Module IP Address
•
Static Expansion Card IP Address (unavailable if not a 5400 or 5600 system)
•
Static Processing Server IP Address (unavailable if not a 5600 system)
•
Static Subnet Mask
•
Static Gateway
These fields are editable if you select the “Static” IP Address assignment button.
2.
Configure the Hostnames for the Base and Processing Servers as well as DNS settings.
Mitel ® 5000 Installation Manual – Issue 3.0, October 2008
Page 6-71
Chapter 6: Programming
Programming General IP Settings
3.
Click Next. The General IP Settings page appears. Continue to “Programming General
IP Settings” on page 6-72.
Programming General IP Settings
To program the General IP Settings page:
1.
Page 6-72
Make any changes to the data fields that are common to both the Base Server and
Processing Server on a Mitel CS-5600 system.
Mitel ® 5000 Installation Manual – Issue 3.0, October 2008
Chapter 6: Programming
Programming IP Devices
2.
Program the following common IP fields and the fields required for connecting the CS5600 servers:
•
SSH (Secure SHell) fields
•
Web Server fields
•
PPP (Point-to-Point Protocol) IP Address
•
Listening port
•
Connection Address and Connection Port fields specify the IP address and port
number that are used to connect the CS-5600 Base Server and Processing Server.
The default address is 192.168.200.201 and the default port is 3400.
NOTE
The Connection Address and Connection Port fields apply only to
Mitel CS-5600 systems. The options are dimmed if the system is a
Mitel CS-5200 or CS-5400.
Changes to these fields update both the Base Server and Processing Server settings in
the database. For more information about these fields, see the Configuration Wizard
Help.
3.
Click Next. The IP Device Setup page appears. Continue to “Programming IP Devices”
next.
Programming IP Devices
To program the IP Devices Setup page, perform the following general steps, even though
different IP devices may require different specific details. Specific procedures for each type of IP
device follow the general procedure.
1.
Right-click in the IP Devices pane and then click the Create IP Device button to add IP
devices. The Batch Change Type window appears on top. The IP Devices page of the
Configuration Wizard now allows both Mitel and Inter-Tel IP endpoints configuration.
2.
Create the IP devices required for the system, each with its own unique Medium Access
Control (MAC) address or other required identifier, and then click OK. The IP Device
Setup page reappears.
3.
When finished setting up IP devices, click Next on the IP Device Setup page. The
Expansion Module Installation page appears. See page 6-80. See the pages that follow
to continue programming devices.
Mitel ® 5000 Installation Manual – Issue 3.0, October 2008
Page 6-73
Chapter 6: Programming
Programming IP Devices
To add IP endpoints:
1.
Select Inter-Tel IP Endpoint or Mitel IP Endpoint from the Batch Change Type dialog
box. The Batch Create IP Endpoint dialog box appears.
2.
Select a Starting Extension from the list of available extensions.
3.
Enter the Number of Extensions using the stepper arrows or by selecting and typing a
value. Clicking the down stepper arrow removes extensions from the list. Clicking the up
stepper arrow adds extensions to the list.
4.
Click any endpoint with a red “X” and type a valid MAC address. If desired, click Browse
and import the MAC addresses from a batch file. This batch file can be a simple text file
consisting of a list of MAC addresses. If the program needs 20 only address from the list,
it takes the first 20.
5.
After you have typed the MAC addresses for all the IP endpoints you added, click OK.
6.
Do one of the following:
7.
Page 6-74
•
Add more IP endpoints.
•
Or, click OK.
When finished with setting up IP devices, click Next on the IP Device Setup page. The
Expansion Module Installation page appears. See page 6-80.
Mitel ® 5000 Installation Manual – Issue 3.0, October 2008
Chapter 6: Programming
Programming IP Devices
To add an IP Single Line Adapter:
1.
Select Inter-Tel IP Single Line Adapter, and then click OK to open the Batch Create
Inter-Tel Single Line Adapter dialog box.
2.
Select a Starting Extension from the list of available extensions.
3.
Enter the Number of Extensions using the arrows or by selecting and entering a value.
Clicking the down arrow removes extensions from the list. Clicking the up arrow adds
extensions to the list.
4.
Click any device with a red “X” and enter a valid MAC address. If desired, click Browse
and import the MAC addresses from a batch file. This batch file can be a simple text file
consisting of a list of MAC addresses. If the program only needs 20 address from the list,
it takes the first 20.
5.
After you have typed MAC addresses for all IP single line adapters you added, click OK,
and then do either of the following:
6.
•
Add additional IP single line adapters, or other IP devices (see the following
sections).
•
Or, click OK.
When finished with setting up IP devices, click Next on the IP Device Setup page. The
Expansion Module Installation page appears. See page 6-80.
To add a Model 8602 IP Softphone:
The Model 8602 IP softphone can be added to the IP Device Setup so that a softphone may be
configured through the wizard interface.
1.
Select Inter-Tel IP Softphone, then click OK to open the Batch Create Inter-Tel IP
SoftPhone dialog box.
2.
Enter the Number of Extensions using the stepper arrows or by selecting and typing a
value. Clicking the down stepper arrow removes extensions from the list. Clicking the up
stepper arrow adds extensions to the list.
3.
Click any endpoint with a red “X” and type a valid Device ID for the IP Softphone. For
example, 86.02.36.00.10.01. If desired, click Browse and import the Device IDs from a
batch file. This batch file can be a simple text file consisting of a list of Device IDs. If the
program needs 20 only address from the list, it takes the first 20.
4.
After you have typed the Device IDs for all the IP endpoints you added, click OK.
NOTE
5.
6.
For troubleshooting purposes, use the extension number as the last digits of
the Device ID.
Do one of the following:
•
Add more IP endpoints.
•
Or, click OK.
When finished with setting up IP devices, click Next on the IP Device Setup page. The
Expansion Module Installation page appears. Continue to page 6-80, or continue to the
pages that follow to program other devices.
Mitel ® 5000 Installation Manual – Issue 3.0, October 2008
Page 6-75
Chapter 6: Programming
Programming IP Devices
To add an MGCP gateway and endpoint:
IMPORTANT
1.
From the Batch Change Type dialog box, select MGCP Gateway and Endpoint. The
following dialog box appears.
2.
Use the default starting extension shown or select a different Starting Extension from
the drop-down list.
3.
Enter the Number of Extensions using the stepper arrows or by selecting and entering
a value. Clicking the down stepper arrow removes extensions from the list. Clicking the
up stepper arrow adds extensions to the list.
4.
Type an MGCP gateway name in the Gateway Name box.
5.
Click any device with a red “X” and then type a name. Click OK.
6.
Do one of the following:
7.
Page 6-76
You must create an MGCP Gateway and Endpoint before adding an MGCP
endpoint. See page 6-76.
•
Add additional MGCP gateways and endpoints or other IP devices (see the
following section).
•
Or, click OK.
When finished with setting up IP devices, click Next on the IP Device Setup page. The
Expansion Module Installation page appears. See “Programming Expansion Modules”
on page 6-80, or continue to the pages that follow to program other devices.
Mitel ® 5000 Installation Manual – Issue 3.0, October 2008
Chapter 6: Programming
Programming IP Devices
To add an MGCP endpoint:
1.
Select MGCP Endpoint, then click OK to open the Batch Create MGCP Endpoint dialog
box.
2.
Use the default starting extension shown or select a different Starting Extension from
the drop-down list.
3.
Type the Number of Extensions using the stepper arrows or by selecting and entering
a value. Clicking the down stepper arrow removes extensions from the list. Clicking the
up stepper arrow adds extensions to the list.
4.
Select the associated MGCP gateway for these endpoints, or select another MGCP
gateway from the list.
5.
Click any device with a red “X” and then type a name. Click OK.
6.
Do either of the following:
7.
•
Add additional MGCP endpoints or other IP devices.
•
Or, click OK.
When finished with setting up IP devices, click Next on the IP Device Setup page. The
Expansion Module Installation page appears. See page 6-80, or continue to the pages
that follow to program other devices.
Mitel ® 5000 Installation Manual – Issue 3.0, October 2008
Page 6-77
Chapter 6: Programming
Programming IP Devices
To add a SIP trunk:
1.
Select SIP Trunk from the Batch Change Type dialog box. The Get SIP Trunk Extension
dialog box below appears.
2.
Accept the default Starting Extension or select another extension from the drop-down
list.
3.
Enter the Number of Extensions using the arrows or by selecting and entering a value.
Clicking the down arrow decreases extensions. Clicking the up arrow adds extensions.
4.
Do one of the following:
5.
Page 6-78
•
Add additional SIP trunks or edit IP endpoints (next).
•
Or, click OK.
When finished with setting up IP devices, click Next on the IP Device Setup page. The
Expansion Module Installation page appears. See page 6-80, or continue to “Editing
Existing IP Devices” next.
Mitel ® 5000 Installation Manual – Issue 3.0, October 2008
Chapter 6: Programming
Editing Existing IP Devices
Editing Existing IP Devices
The parameters of IP devices existing on a system can be changed as needed, including the
administrator endpoint (extension 1000) that is accounted for in the system’s default state.
To edit the provided administrator endpoint:
1.
Right-click the administrator endpoint (1000) and select Edit MAC Address.
2.
Enter a unique MAC address, and then click OK.
3.
Click OK, click Next, and then continue to “Programming Expansion Modules” on page
6-80.
To edit existing device types:
1.
Right-click the device type you want to edit. You can also CTRL click or SHIFT click
endpoint types to edit more than one of the same endpoint type at a time.
2.
Select one of the edit options from the list. The options available depend on the device
type selected:
Administrator IP Endpoint
IP Endpoint
IP Single Line Adapter
MGCP Gateway and Endpoint
MGCP Endpoint
SIP Trunk
3.
4.
•
Edit MAC Address. Type the MAC address for the device type selected.
•
Batch Change Type. Change the device type from the list of available device types
listed in the Batch Change Type dialog box.
•
Delete. Delete the selected device type(s). CTRL-click or SHIFT-click to select
more than one device.
•
Create IP Device. Create and configure additional IP devices.
Do one of the following actions:
•
Edit additional devices.
•
Or, click OK.
When finished with editing parameters of IP devices, click Next on the IP Device Setup
page. The Expansion Module Installation page appears. Continue to “Programming
Expansion Modules” on page 6-80.
Mitel ® 5000 Installation Manual – Issue 3.0, October 2008
Page 6-79
Chapter 6: Programming
Programming Expansion Modules
Programming Expansion Modules
The following procedures provide programming instructions for the expansion modules that can
be installed in the Mitel CS-5200/5400/5600 Base Server. From the Expansion Module
Installation page, you can access subordinate pages to program the following modules:
• Dual T1/E1/PRI module
• T1/E1/PRI module
• Two-port/Four-port Loop Start Module
• Basic Rate Module
• Four-port Single Line Module
To set up the Expansion Module Installation page:
1.
Select a module from the Expansion Modules pane and click the Add >> button to place
it in the Expansion Bays pane. One expansion module can be added to any of the three
expansion bays in the Mitel CS-5200/5400/5600 Base Server. To relocate a module to a
particular bay, select the module and click the Move Up or Move Down button.
Consider the following ideas:
• You cannot configure or modify modules that have already been
configured in the system.
NOTES
• If you intend to configure a T1/E1/PRI module for PRI use, you must
have the PRI software license, part no. 840.0227.
• If you intend to configure a Dual T1/E1/PRI module, you must have the
Additional T1/E1/PRI port software license, part no. 580.2702. This
license is not applicable to single-port T1/E1/PRI modules.
2.
Page 6-80
Select one of the expansion modules in the Expansion Bays pane and click Next. The
<Expansion Module Type>: Circuit Configuration page appears. Continue with
configuring the circuits as described in the following sections.
Mitel ® 5000 Installation Manual – Issue 3.0, October 2008
Chapter 6: Programming
Programming Expansion Modules
BRM-S Module Programming
To set up the BRM-S module:
The dialog box at right
shows the Basic Rate
Module - S page.
To a d d t h e B R M - S
module
to
the
configuration:
1.
Select Basic
Rate Module - S,
then click Add >>
to a add it to the
Expansion Bays
panel.
2.
Click Next.
Mitel ® 5000 Installation Manual – Issue 3.0, October 2008
Page 6-81
Chapter 6: Programming
Programming Expansion Modules
To configure BRM-S ports and circuits:
1.
Click the port/circuit
you want to
configure, then click
Change. To select all
circuits, click once to
highlight the first
circuit, then shift-click
the second circuit to
select the range.
2.
From the Batch
Change Type dialog
box, indicate the
circuit type, then click
OK. The Choices
are:
3.
•
None (default)
•
Trunk/Trunk
Select the starting
extension for each
circuit and the
number of
extensions. If you
selected both circuits
in step 1, the Get BChannel Extension
dialog box appears
twice, as shown in
the example at right.
The dialog box at
right appears after
you click OK in the
Get B-Channel
Extension dialog box.
4.
Click Next to get
through the wizard
and to the finish
dialog box. See
page 6-88 for the
LSM-4 module setup.
For information about
manually adding and
configuring the BRMS module, refer to
the DB Programming
online Help.
Page 6-82
Mitel ® 5000 Installation Manual – Issue 3.0, October 2008
Chapter 6: Programming
Programming Expansion Modules
Dual T1/E1/PRI (T1M-2) Module Programming
This section contains the information about configuring a T1M-2 using the Configuration Wizard.
To configure a T1M-2 without using the Wizard, see page 6-119.
To configure a T1M-2 using the Configuration Wizard:
1.
From the DB Programming menu bar, select Tools – Configuration Wizard.
2.
Click Next several times until the Expansion Module Installation page appears.
3.
Select Dual T1/E1/PRI Module, and then click Add>> to move the module to the
Expansion Bays list.
4.
Click Next. The Dual T1/E1/PRI Module: Port and Circuit Configuration page appears.
Mitel ® 5000 Installation Manual – Issue 3.0, October 2008
Page 6-83
Chapter 6: Programming
Programming Expansion Modules
5.
Select a port that has not yet been configured, and then click Configure. The Configure
button is disabled until you select a port. The Batch Change Type dialog box appears.
6.
Select the desired port type, and then click OK. For ports with a type other than “None,”
selecting the port will display that port's circuits in the list view on the right.
DB Programming will display an error message under the following
circumstances:
• Change the port type of one port if the other port is programmed
(not None).
• Change the Framing Type under a T1 port and the other port is
IMPORTANT
programmed (not None). This field also exists under the T1/PRI
port type, but it is OLM only.
DB Programming displays: WARNING: Changes to this field are only
recommended on an idle system as this may cause a short pause in
audio on the other port of this module (but no dropped calls). Would
you like to continue?
Page 6-84
Mitel ® 5000 Installation Manual – Issue 3.0, October 2008
Chapter 6: Programming
Programming Expansion Modules
7.
Select one or more circuits to configure, and then click Configure below the circuit list
view. One of the following dialog boxes appears.
For PRI ports, the following circuit programming choices are available.
For T1 ports, the following circuit programming choices are available.
8.
Program the circuit(s) to the desired configuration, choose extensions, and then the
circuits will be programmed.
Mitel ® 5000 Installation Manual – Issue 3.0, October 2008
Page 6-85
Chapter 6: Programming
Programming Expansion Modules
9.
After the desired ports and circuits have been configured, click Next to continue.
NOTE
10.
Ports and circuits configured prior to running the Configuration Wizard are
displayed, but cannot be changed in the wizard.
In a remote session, click Finish to confirm programming for the T1M-2. The software
license will be checked and you will be warned if the programming being implemented is
not supported by the software license.
T1/E1/PRI Module Programming
To configure circuits on a T1/E1/PRI Module:
1.
From the Circuit Configuration page for the particular module you are setting up, select
the circuits you want to configure, and then click Change. To select all circuits, click
once to highlight the first circuit, and then SHIFT-click the second circuit to select the
range.
First number indicates
bay location (bay 1, 2, or 3).
Second number indicates
circuit type.
T1 PRI Module or E1 PRI Module selection
Depending on the modules installed and the order they reside in the chassis, this screen
could appear differently. This dialog box displays all modules of the same type (for
example, if all T1/E1/PRI modules are used). The first number indicates the bay
location).
Page 6-86
Mitel ® 5000 Installation Manual – Issue 3.0, October 2008
Chapter 6: Programming
Programming Expansion Modules
T1 Module selection
2.
Click the Circuits you want to change, and then click Change. Each time you click Next,
you advance to the next circuit type, if applicable.
3.
From the Batch Change Type dialog, indicate the circuit type, and then click OK. If you
are using the wizard to unequip any configured circuits, click None.
4.
Accept the default starting extension or select a new starting extension from the dropdown list and then click OK.
NOTE
5.
For the Basic Rate Module configuration, if you selected multiple circuits in
step 1, the Get B-Channel Extension dialog appears twice.
Click Next.
Mitel ® 5000 Installation Manual – Issue 3.0, October 2008
Page 6-87
Chapter 6: Programming
Programming Expansion Modules
LSM-2/LSM-4 Module Programming
The dialog box at right
shows the LSM-4 module
you can add to the system.
When the page initially
displays, the Expansion
Bays panel is populated
with any expansion bays
already installed. If the
main chassis contains no
expansion modules, this
window is empty.
To configure the LSM-4
module:
Page 6-88
1.
Select the LSM-4
module, then click
Add >>.
2.
Click Next. The
Circuit Configuration
dialog box appears.
3.
Select the circuits
you want to
configure, then click
Change.
4.
Select Loop Start
from the Batch
Change dialog box,
then click OK. Click
None to unequip
any configured
circuits.
5.
Accept the default
starting extension or
select a new starting
extension from the drop-down list. Click OK.
6.
Click Next to advance to the next wizard dialog
box (discussed on page 6-91). See DB
Programming online Help for information on
manually adding and configuring the LSM-4
module.
Mitel ® 5000 Installation Manual – Issue 3.0, October 2008
Chapter 6: Programming
Programming Expansion Modules
Single Line Module Programming
To add an SLM-4 to a Base Server bay:
1.
Select Single Line Module - 4 from the Expansion Modules list, then click Add >> to
move it to the Expansion Bays list.
2.
Click the Move Up and Move Down buttons as appropriate to identify the bay that
contains the SLM-4 module.
3.
Click Next. When the Single Line Module - 4: Circuit Configuration window appears, you
can configure a single SLM-4 port and circuit or a batch of ports and circuits.
To configure a single SLM-4 port and
circuit:
1.
From the Single Line Module - 4:
Circuit Configuration page, select
the Port you want to configure
from the list appearing in the
Single Line Module - 4 Circuits
pane. The port field changes
color.
2.
Click Change. The Batch
Change Type window appears.
3.
Select the Single Line option and
click OK. The Create Single Line
Extension window appears.
4.
From the Starting Extension list,
select an available extension
number, then click OK. The
selected extension number
appears in the Circuit 1 column to
the right of the port being
configured.
5.
At any time going forward,
program the endpoint in
accordance with customer
requirements from the
System\Devices and Feature
Codes\Endpoints folder. For
guidance, see paragraph on
page 6-144.
Mitel ® 5000 Installation Manual – Issue 3.0, October 2008
Page 6-89
Chapter 6: Programming
Programming Expansion Modules
To configure multiple, or batch, SLM-4 ports and circuits:
1.
From the Single Line Module - 4: Circuit Configuration page, select the first port you
want to configure from the list appearing in the Single Line Module - 4 Circuits pane. The
port-number field changes color.
2.
If the batch of ports you want to program appear in sequence, press Shift + the last port
you want in the batch. The selected port-number fields change color. If the ports you
want do not appear in sequence, hold down Ctrl while you select the desired port
numbers one at a time. The selected port-number fields change color.
3.
Click Change. The Batch Change Type window appears, as shown in the preceding
procedure.
4.
Select the Single Line option and click OK. The Create Single Line Extension window
appears, as shown in the preceding procedure.
5.
Click the drop-down arrow, scroll to and select an available number from the list of
extension numbers appearing in the Starting Extension pane, and click OK. Available
sequential circuit numbers are assigned to the selected ports. They appear in the Circuit
1 column to the right of the SLM-4 ports in the Single Line Module - 4 Circuits pane, as
shown in the preceding procedure.
6.
At any time going forward, you can program the endpoints in accordance with customer
requirements. For guidance, see page 6-144.
To remove a port and circuit:
1.
From the Single Line Module - 4: Circuit Configuration page, as shown in the preceding
procedure, select the port–circuit combination you want to remove from the system.
2.
Click Change. The Batch Change Type window appears, as shown in the preceding
procedure.
3.
Select the None option and click OK. The circuit number disappears from the Circuit
1column in the Single Line Module - 4 Circuits pane.
To change a circuit/extension number associated with a port:
Page 6-90
1.
Perform the procedure titled “To remove a port and circuit:” above.
2.
Perform the procedure titled “To configure a single SLM-4 port and circuit:” on page 689.
Mitel ® 5000 Installation Manual – Issue 3.0, October 2008
Chapter 6: Programming
Programming Digital Expansion Interface (DEI) Units
Programming Digital Expansion Interface (DEI) Units
The dialog boxes below show the DEI Expansion Module Installation for DEI (1) and DEI (2).
Similar to the Expansion Module Setup page for the Communication Server, these pages allow
you to quickly provision the expansion modules in the DEI chassis bays.
DEI bays are displayed in the Expansion Bays panel, as shown in the dialog boxes above. After
adding the number of DEM-16s to the system, a subsequent page allows you to configure those
circuits before moving on to the next DEI chassis (if equipped) in the system.
When the page initially appears, the Expansion Bay panels are populated with any expansion
bays already installed in the DEIs. If the DEIs contain no expansion modules, these dialog
boxes are empty.
Mitel ® 5000 Installation Manual – Issue 3.0, October 2008
Page 6-91
Chapter 6: Programming
Programming DEI Expansion Modules
Programming DEI Expansion Modules
Two system expansion modules can be installed in the DEI, the 16-port Digital Endpoint Module
(DEM-16) and the eight-port Single Line Module (SLM-8). The following procedures provide
instructions for programming these modules for the installation of digital and analog single line
endpoints, respectively. For module and endpoint installation procedures, refer to the Installation
chapter.
To configure a DEM-16 or SLM-8 module:
Page 6-92
1.
From the DB Studio menu bar, select Tools and then Configuration Wizard.
2.
Click Next in all dialog boxes until the Digital Expansion Interface Configuration page
appears.
3.
Select the System DEI Mode: 2-DEI Mode or 4-DEI Mode. The Expansion Module
Installation for DEI # <n> window appears.
4.
Select Single Line Module - 8 from the Expansion Modules list, as shown in the
following illustration.
5.
Click Add >> to add it to the Expansion Bays list. To remove a module from either
bottom panel, select the module to remove, then click << Remove. This dialog box does
not support removal of modules that are already physically installed in the chassis. Only
modules added during the current Configuration Wizard session may be removed.
6.
Click Next.
Mitel ® 5000 Installation Manual – Issue 3.0, October 2008
Chapter 6: Programming
Programming DEI Expansion Modules
To set up DEI expansion modules
1.
From the Expansion Module Installation for DEI #1 (or DEI #2) dialog box, select the
module type you want to add to the system.
2.
Select the module type and click Add>> or click <<Remove, from either list, to move
module types between lists. Currently, two module types exist: Digital Endpoint Model 16 and the SLM-8.
IMPORTANT
3.
You cannot configure or modify modules that have already been
configured in the system. If you intend to configure the a T1/E1
module for PRI use, you must have the PRI software license, part no.
840.0227.
Order the modules, according to the bay in which they are installed, using the Move Up/
Move Down buttons. Click Next.
To configure the SLM-8 module:
NOTE
All configurable ports appear in the Single Line Module-8 Circuits panel. The
ports are represented as node:bay:port for each SLM-8 you added. Eight
ports may be configured with single line endpoints. If a port contains any
endpoints programmed before the current Configuration Wizard session,
these ports cannot be modified. Only ports having circuits labeled as NONE
may be configured.
1.
Click Change to access the dialog.
2.
Select the device type to install in the selected port(s), then click OK.
3.
Select the starting extensions for each device. The screen shows the results of
programming several ports with each of the configuration options.
4.
Click Next. If the second chassis (DEI # 2 panel) was configured with SLM-8 modules,
the next dialog box shows the circuit configuration for that page. Otherwise, the Finish
page displays.
5.
Click Next to get through the wizard and to the finish screen.
Mitel ® 5000 Installation Manual – Issue 3.0, October 2008
Page 6-93
Chapter 6: Programming
Programming DEI Expansion Modules
To configure the DEM-16 module:
1.
Select Tools – Configuration Wizard.
2.
Click Next in all dialog
boxes until you get to
the dialog box shown at
right.
3.
Click Digital Endpoint
Module-16 from the
Expansion Modules
panel to select it.
4.
Click Add >> to add it
to the Expansion Bays
panel.
5.
To remove a module
from the panel, select
the module to remove,
then click << Remove.
This dialog box does
not support removal of
modules that are already physically installed in the chassis. Only modules added during
the current Configuration Wizard session may be removed.
6.
Click Next.
7.
All configurable
ports appear in the
Digital Endpoint
Module-16 Circuits
panel. The ports are
represented as
node:bay:port for
each DEM-16 you
added. Each port
may have up to two
circuits
programmed. If a
port contains any
devices
programmed before
this Configuration
Wizard session,
these ports cannot
be modified. Only
ports labeled as
None may be
configured.
Node:Bay:Port
IMPORTANT
Page 6-94
Although a DEM-16 is physically residing in
DEI Bay 1, 2, or 3, it appears as 04, 05, or 06
in DB Programming to coincide with how
Message Print relates to this hardware in the
system. For more information, refer to the
Installation chapter.
Mitel ® 5000 Installation Manual – Issue 3.0, October 2008
Chapter 6: Programming
Programming DEI Expansion Modules
8.
Configure the DEM-16 ports in the DEI where it is installed. Select the desired ports to
change. Selecting multiple ports enables a batch change selection. When an appropriate
selection is made, the Change button is enabled.
9.
Click Change to access the
first dialog box shown at
right.
10.
Select the device type to
install in the selected
port(s), then click OK.
11.
Select the starting
extensions for each device.
If this is a batch change,
this will be the starting
extension and subsequent extensions will be numbered sequentially after this extension.
The dialog box in
step 6 on page 6-94
shows the results of
programming
several ports with a
few of the
configuration
options.
12.
Click Next. If the
Click to expand and see
second chassis (DEI
the options configured to
# 2) was configured
include modules, ports,
with DEM-16
and endpoints.
modules, the next
dialog box shows
the circuit
configuration for that
page. Repeat step 8
on page 6-95
through step 11 for
the remaining DEIs. Otherwise, the Finish page appears.
The finish page shows all the configuration changes made to the system during the
current Configuration Wizard session. These changes will not be implemented until you
click Finish.
13.
Click Finish to complete the wizard. See the DB Programming online Help for
information on manually adding and configuring the DEIs and DEM-16s through the
Communication Server folder.
Mitel ® 5000 Installation Manual – Issue 3.0, October 2008
Page 6-95
Chapter 6: Programming
Finishing the Wizard Configuration
Finishing the Wizard Configuration
The Finish dialog box allows you to see the configuration settings. Use the Back button to
navigate back through the wizard to make any changes.
1.
Expand the tree and check the configuration changes or additions. If satisfied with the
configuration, click Finish.
2.
Click OK to the prompt that appears.
IMPORTANT
Page 6-96
If IP settings were entered or changed, reset the system. Refer to the
Mitel 5000 Features and Programming Guide, part number 580.8006.
Mitel ® 5000 Installation Manual – Issue 3.0, October 2008
Chapter 6: Programming
The Mitel CS-5600 Connection Wizard
The Mitel CS-5600 Connection Wizard
The CS-5600 Connection Wizard is a troubleshooting tool that helps establish a connection
between the Base Server and Processing Server (PS-1). In Database (DB) Programming, if you
connect to a CS-5600 system with a remote session and the PS-1 and Base Server are not
connected, the following dialog appears.
Connecting the Base Server to the Processing Server
To connect the Base Server to the PS-1:
Click Yes to start the troubleshooting wizard. When the following wizard displays, click
Next.
The first troubleshooting tip page appears. Continue to the next section,
“Troubleshooting Tips” on page 6-98.
Mitel ® 5000 Installation Manual – Issue 3.0, October 2008
Page 6-97
Chapter 6: Programming
Troubleshooting Tips
Troubleshooting Tips
To program the Connection Wizard:
1.
Troubleshooting Tip 1 of 8: Verify that the Base Server IP address in the BS/PS
Connection Address field is correct. Change the address as needed, and click Update
connection Status. If the status shows Disconnected, click Next to proceed.
NOTE
It may take a few minutes to establish the connection. If you clicked the
Update Connection Status button and the status continues to show Disconnected, wait a minute or so and click again before proceeding to the next tip.
At any time during the programming through this wizard, you may click Back to return to
the previous page or click Finish to exit the wizard.
2.
Troubleshooting Tip 2 of 8: If you know how to perform an ICMP (Internet Control
Message Protocol) ping, do it now. If you do not know how to do it, check the LCD panel
of the Base Server and make sure the correct IP address is programmed.
For information about issuing an ICMP ping command, click Details. The following
dialog box appears. Click OK.
Page 6-98
Mitel ® 5000 Installation Manual – Issue 3.0, October 2008
Chapter 6: Programming
Troubleshooting Tips
3.
Click Next to proceed to the next page.
4.
Troubleshooting Tip 3 of 8: Verify that the Base Server is in Gateway mode. Follow the
instructions on this page and check the mode by using either the Base Server LCD
panel or Administrative Web Session.
For information about checking the mode on the Base Server LCD panel, click Details.
The following dialog box appears. Click OK.
5.
Click Update Connection Status to check the connection status. If the status continues
to show Disconnected, click Next.
Mitel ® 5000 Installation Manual – Issue 3.0, October 2008
Page 6-99
Chapter 6: Programming
Troubleshooting Tips
6.
Troubleshooting Tip 4 of 8: Follow the instructions on this page and verify that the
Base Server and PS-1 use the same connection port number using the Diagnostics
Management Utility (DMU).
For information about checking the port using the DMU, click Details. The following
dialog box appears. Click OK.
7.
Page 6-100
Click Update Connection Status to check the connection status. If the status continues
to show Disconnected, click Next.
Mitel ® 5000 Installation Manual – Issue 3.0, October 2008
Chapter 6: Programming
Troubleshooting Tips
8.
Troubleshooting Tip 5 of 8: Verify that the Base Server and PS-1 use the same
connection password. Use either the Base Server LCD panel or Administrative Web
Session to check the password authentication status. For details, follow the instructions.
9.
To change the password, click Change Connection Password. The following dialog
box appears. Enter the new password in the New password and Confirm password text
boxes and click OK.
10.
Click Update Connection Status to check the connection status. If the status continues
to show Disconnected, click Next.
Mitel ® 5000 Installation Manual – Issue 3.0, October 2008
Page 6-101
Chapter 6: Programming
Troubleshooting Tips
11.
Troubleshooting Tip 6 of 8: Follow the instructions on this page and verify that the
Base Server and PS-1 are running the same software versions.
For information about accessing the cp_system_log files, click Details. The following
dialog box appears. Click OK.
12.
Page 6-102
Click Next.
Mitel ® 5000 Installation Manual – Issue 3.0, October 2008
Chapter 6: Programming
Troubleshooting Tips
13.
Troubleshooting Tip 7 of 8: Follow the instructions on this page and verify that the PS1 is using the correct port and IP address to connect with the Base Server. Change the
settings as needed.
For information about accessing the cp_system_log files, click Details. The following
dialog box appears. Click OK.
14.
Click Update Connection Status to check the connection status. If the status continues
to show Disconnected, click Next.
Mitel ® 5000 Installation Manual – Issue 3.0, October 2008
Page 6-103
Chapter 6: Programming
Troubleshooting Tips
15.
Troubleshooting Tip 8 of 8: Follow the instructions on the displayed page and verify
that the Base Server is using the correct port number and that the port is open.
For information about checking the port number using the DMU, click Details. The
following dialog box appears. Click OK.
16.
Click Update Connection Status to check the connection status.
At any point in the wizard, you can click Finish. DB Programming shuts down so that, if the
connection was established, the appropriate folder structure is preserved. When you reconnect,
if the connection was repaired, you will not be prompted for the wizard.
Page 6-104
Mitel ® 5000 Installation Manual – Issue 3.0, October 2008
Chapter 6: Programming
Selection Wizards
Selection Wizards
In DB Programming, there are many operations involving Selection Wizards. Any list in DB
Programming to which you may add or move items through the shortcut menu uses a Selection
Wizard (for example, adding members to a hunt group). The generic Selection Wizard has been
redesigned to simplify the procedure by removing the “Pick Filtering Option” and “Specify Filter”
panels. The revised Selection Wizard also includes Mitel IP endpoints which can be added to
any list that an IP endpoint may be added. Figure 6-11 shows the Selection Wizard page.
Figure 6-11. Selection Wizard
Mitel ® 5000 Installation Manual – Issue 3.0, October 2008
Page 6-105
Chapter 6: Programming
Introduction
SYSTEM DIRECTORY FOLDERS AND TASKS
This section provides information about the DB Programming functions located in the System
directory.
Figure 6-12. System Directory Folders
NOTE
Programmers must have received Mitel 5000 Basic certification and CTP certification
to receive Mitel technical support at no cost.
Introduction
After using Session Manager to start a Database (DB) Programming session, the DB Studio
window appears, consisting of two panes. In the narrow pane on the left, the system IP address
appears along with four top-level directories: Passwords, Software License, System, and Voice
Processor. The larger pane on the right shows also the four top-level directories as well as
settings for the following system-wide parameters: Date, Enable Daylight Saving Time, Enable
Network Time Protocol (NTP), Primary Language, Secondary Language, Time, and Time Zone.
For DB Programming purposes, the right pane is also used for displaying the contents of any
directory selected in the left pane.
For example, when you click the System folder located in the left pane, the following
programming areas display in the right pane. For the items below without links, refer to the Mitel
5000 Features and Programming Guide, part number 580.8006, for information.
• “Communication Server Directory Programming” on page 6-112
• “Devices and Feature Codes
• “Echo Profiles”
• “Endpoint-Related Information”
• “Flags”
• ‘Hunt Group-Related Information”
• “IP-Related Information”
• ‘IP Settings”
Page 6-106
Mitel ® 5000 Installation Manual – Issue 3.0, October 2008
Chapter 6: Programming
Planning Sheet Availability
• “System Maintenance”
• “Numbering Plan”
• “Reference Clock List”
• “Report Programming”
• “Sockets”
• “System Manager”
• “Timers and Limits”
• “Trunk-Related Information”
Also shown are the following system-wide parameters:
• Periodic Backup Database Save Time
• Periodic Backup Database Save Retry Attempts
• Enable Periodic Backup Database Save
• Voice Processor Enable
The major reset parameters are located under System\Maintenance\Major Reset Scheduling.
Each of these programming areas are described individually in the following pages.
Planning Sheet Availability
Programming planning sheets are included on the system CD-ROM in Microsoft® Word and
PDF formats. Planning sheets are also available on the Mitel edGe Online Manuals and Guides
(www.inter-tel.com/techpublications) Web site.
Software License Features
Some system features require a software license. You use DB Programming to enable or
disable these features. For a list of standard features or features that require a software license,
refer to the Mitel 5000 Features and Programming Guide, part number 580.8006.
Mitel ® 5000 Installation Manual – Issue 3.0, October 2008
Page 6-107
Chapter 6: Programming
System-Wide Parameters
System-Wide Parameters
This section provides information on system-wide parameters, such as database backup and
enabling/disabling voice processing.
Backup Database Parameters
A backup copy of the database is automatically stored on the compact flash-type memory card
located on the front of the Mitel CS-5200/5400/5600 Base Server. This backup remains
available, even if the system experiences a power failure or if the battery backup loses power. If
the system is powered up and a corrupt database file is detected, the backup file in flash
memory or on the CF drive is restored. You can program an automatic backup as described
below. Database Backup options are located in the System folder.
Figure 6-13. Backup Database Parameters
Database
Backup
Parameters
Periodic Backup Database Save Time: Select the time of day when a scheduled database
backup will occur. This must be at least 15 minutes after the Scheduled Reset Time; otherwise,
the backup may not occur. If you enter a time that is less than 15 minutes after the Scheduled
Reset Time, a message is displayed, requesting a new value. By default, this is 2:00AM. To
program the time, select the current hours, minutes, or AM/PM value, then scroll to or enter new
setting in the text box. Press ENTER or select another field to save the change.
Periodic Backup Database Save Retry Attempts: Select the number of times that DB
Programming will attempt to save the database. If the database is not saved before the system
retries the number of times specified in this field, the database is not saved until the next day.
The range is 0–10, and the default is 3.
Enable Periodic Backup Database Save: Turn this flag ON to save the database at the time
indicated in Periodic Backup Database Save Time. This flag must be turned ON to backup the
database at the scheduled time. By default, the flag is turned ON.
To turn the Enable Periodic Backup Database Save flag ON and OFF:
1.
Select the current Value, and then select the check [tick] box to place a check [tick] in it.
2.
Press ENTER or select another field to save the change. To remove the check [tick] and
turn the flag OFF, select the box again.
NOTE
Page 6-108
If the system detects that the database has not changed since the last
backup, the save is not performed.
Mitel ® 5000 Installation Manual – Issue 3.0, October 2008
Chapter 6: Programming
Voice Processor Disable/Enable
Voice Processor Disable/Enable
To disable voice processing:
1.
Back up the Voice Mail database. You will need a USB flash drive for this operation if
backing up Basic Voice Mail. See “Saving the System and Voice Processor Databases”
on page 5-91.
2.
Launch Session Manager and start the DB Programming session.
3.
Select the System folder, and then click Voice Processor Enable.
4.
Click the Yes value, and then click in the check box to remove the check mark. Click
outside the area to implement the change. Click OK to the prompt that appears. DB
Programming restarts.
The Voice Processor Enable database field is autoenabled by Call Processing. For example, if
the Voice Processor Enable flag is set to No, and the user successfully connects an external
voice processing system or enables Basic Voice Mail, Call Processing will auto-enable the flag.
However, if DB Programming is currently programming the switch, the auto-enable flag will not
get autoenabled.
In its default state, this flag is turned ON. If you do not have an external voice
processing system connected to the Mitel CS-5200/5400/5600 Base Server,
IMPORTANT
make sure to turn this flag OFF before attempting to import or export
information over the network.
Saving a Voice Processor Database in Remote Mode
Mitel 5000 platforms support any of the following voice processors: Basic Voice Mail (BVM),
Enterprise Messaging (EM), or a Voice Processing Unit (VPU). And, for proper configuration,
DB Programming requires that the voice processor type is identified. Once the voice processor
is physically connected, the system senses which type it is.
As with previous versions, a voice processor connected to an Mitel 5000 platform auto-enables
when the system boots up. To avoid the risk of overwriting an established database with default
values, Mitel recommends connecting the voice processor first, then connecting with a remote
mode session of DB Programming, and then saving.
To save a voice processor database in remote mode:
1.
Connect PS-1, EM, or VPU equipment to the system in accordance with Mitel installation
instructions. Refer to the applicable installation manual.
2.
In remote mode, launch Session Manager and start a DB Programming session.
3.
From the DB Studio menu bar, select Operations – Database Operations – Database
Save. Identify the location where you want to store the system database, then check the
Save Voice Data to: box and identify the location where you want to save the voice
processor database.
4.
Click Start. System and voice processor databases are saved to the locations indicated.
Mitel ® 5000 Installation Manual – Issue 3.0, October 2008
Page 6-109
Chapter 6: Programming
Selecting a Voice Processor Type in Local Mode
Selecting a Voice Processor Type in Local Mode
With v2.1 and later, when you enable a voice processor in local mode, you may be prompted to
choose a voice processor type. The Select a Voice Processor Type dialog appears only if you
have saved the database from a remote session that did not have the voice processor
physically connected. For the Mitel-recommended process, see “Saving a Voice Processor
Database in Remote Mode” on page 6-109.
The Select a Voice Processor Type dialog allows you to identify a known type of voice
processor that has not been enabled in the system configuration. It does not, however, allow
you to change a voice processor type after the database has been created.
To enable a voice processor in local mode:
1.
Launch Session Manager and start a session of Database (DB) Programming.
2.
From the left pane of the DB Studio main screen, select the System folder. Contents of
the System folder appear in the right pane.
3.
Click the value of the Voice Processor Enable feature to Yes.
Voice Processor Enable Flag
IMPORTANT
Page 6-110
The “Select a Voice Processor Type” dialog appears only if you have,
from a remote session, saved the database of a system that does not
have a voice processor unit physically connected. Once the VP unit is
connected, the applicable VP function enabled, and a database saved
in a remote session, the Select a Voice Processor Type dialog does
not display again.
Mitel ® 5000 Installation Manual – Issue 3.0, October 2008
Chapter 6: Programming
Selecting a Voice Processor Type in Local Mode
4.
Select the option button for the voice processor type you know is connected to the
system.
5.
Click OK to continue programming the selected voice processor. If you select Cancel,
the Voice Processor Enable field in the System folder toggles to No. If you select a voice
processor type, or if one already exists in the database, you must restart the system in
order for the changes to take effect. The following message window appears.
6.
Click OK. The voice processor type is updated in DB Programming and the session
closes. Clicking Cancel toggles the Voice Processor Enable value in the System folder
to No, cancels any Select a Voice Processor Type selection made, and displays the DB
Studio window.
7.
Restart a local DB Programming session.
8.
Once enabled, the voice processor can be configured and programmed in accordance
with customer requirements. The following illustration shows a sample of the Voice
Processor folder contents.
Mitel ® 5000 Installation Manual – Issue 3.0, October 2008
Page 6-111
Chapter 6: Programming
Communication Server Directory Programming
Communication Server Directory Programming
The Communication Server programming area allows you to designate the type of interface
module that is installed in each of the module bays of the Mitel CS-5200/5400/5600 Base
Server. In addition, there is information which tells you the number of timeslots required by the
database configuration. This is done so that you are aware of the number of timeslots in use by
the system. Although the basic system configuration is non-blocking, certain configurations can
lead to circumstances wherein more timeslots are assigned than are available, which may result
in blocking if an attempt is made to use all resources at once.
For more about time slot allotment, refer to the Specifications chapter. In addition to the
Processor Module (PM-1), Base Server modules can be installed in any of the three available
bays. The Digital Expansion Interface supports modules that cannot be installed in the Base
Server.
Modules available for installation include the T1/E1/PRI, Dual T1/E1/PRI, the two-port/four-port
Loop Start (LSM-2/LSM-4), four-port Single Line Module (SLM-4), and two-port Basic Rate
Module (BRM-S) [European market only]. Program these fields to identify which type of module
resides in each bay.
Figure 6-14. Communication Server Directory
For more information about system modules, refer to the Specifications and Installation
chapters.
When changing the module type, existing circuits must first be reconfigured. Not redefining the
associated circuits before inserting another module type of a different device type produces an
error message. The fields used in Communication Server programming include the following.
They are described in detail in the following text.
• Module Bays (3)
• Loop Start Ports
• Single Line Ports
• Processor Module
• Processor Expansion Card (optional or included with CS-5400)
• DEI-1, 2, 3, and 4
• Error Thresholds
Page 6-112
Mitel ® 5000 Installation Manual – Issue 3.0, October 2008
Chapter 6: Programming
Base Server Module Bays and Supported Modules
Base Server Module Bays and Supported Modules
Three module bays support the following modules:
• Basic Rate Module - S (BRM-S)
• Dual T1/E1/PRI Module (T1M-2)
• Loop Start Module - 2 ((LSM-2), supported, but no longer in production
• Loop Start Module - 4 (LSM-4)
• Single Line Module - 4 (SLM)
• T1/E1/PRI Module, supported, but no longer in production
Modules can reside in any bay and in any combination. Module bays displaying “Uninstalled”
have not been configured with a module type listed above. If you intend to configure a T1/E1/
PRI module for PRI use, you must have the PRI software license, part no. 840.0227.
To select the module type that will be assigned to a particular bay, click the desired bay labeled
Uninstalled, then select the desired module type in the list box.
Figure 6-15. Base Server Module Bays
When a module is changed, one of the following may occur:
• When a bay is modified to contain a Loop Start Module or T1/E1/PRI module, the new
ports will be included in the “Unused CO” trunk group.
• When a module bay is set to Uninstalled, or where the existing module type is changed to
another module type, all reference to the endpoints or trunks that were on the module in
that bay will be removed from all areas of the Database Manager (unless the module was
first moved to another bay).
• The bay that contains the module with the primary attendant endpoint cannot be changed
to another module type or deleted until the attendant endpoint is changed to another
location on another module. If attempted, a warning message appears.
For more information about equipment chassis capacities, refer to the Specifications chapter. To
program an individual module, double-click it (or right-click and select Explore <module
name>). Follow the programming instructions for that type of module:
• “Configuring a Basic Rate Module (BRM-S)” on page 6-114
• “Configuring a 2-Port/4-Port Loop Start Module (LSM-2/LSM-4)” on page 6-119
• “Configuring a Single-Port/Dual-Port T1/E1/PRI Module (T1M/T1M-2)” on page 6-120
• “Configuring a Four-Port Single Line Module (SLM-4)” on page 6-134
If you change the module type, a window appears prompting you to confirm the change. Select
Yes to continue or No to cancel the change.
Mitel ® 5000 Installation Manual – Issue 3.0, October 2008
Page 6-113
Chapter 6: Programming
Moving Modules
Moving Modules
A module can be moved to any unoccupied location except the left-most bay, which is larger
than the others and reserved for the Processor Module.
To move a module, select the existing module and drag and drop it to the new location. Or,
select the module to move and press CTRL + the up/down arrow to move the module up or
down in the list.
You can also move a module using the Move Board shortcut menu option. This procedure can
only be done while in local programming mode.
1.
Right-click the desired module or press CTRL + M.
2.
Select Move Board. The Move Board (Module) dialog box appears.
3.
Select the destination bay, and then click Move.
Configuring a Basic Rate Module (BRM-S)
The Basic Rate Module (BRM-S) provides the Basic Rate S-Interface ISDN service for
communication. The module fully implements the ISDN S/T interface. Each of the two BRI ports
consists of two bearer (B) channels and one data (D) channel with HDLC support. The ports
provide full I.430 ITU S/T ISDN support for trunks (TE mode). The BRM-S does not support
stations (NT) mode. Each BRM–S provides two circuits for connecting BRI trunks to the system.
To change a specific port, double-click Ports. A Basic Rate Module - S can also be configured
in the Configuration Wizard.
NOTE
Basic Rate Interface (BRI) capability applies only to European market installations for
this release.
To equip several ports at once:
1.
Select the ports you want to equip.
To select a series of items, hold down SHIFT while selecting the first and last item in the
range. To select two or more that are not consecutive, hold down CTRL while selecting
the desired items.
Page 6-114
2.
Right-click and select Batch Change Type. The Batch Change Type dialog box
appears.
3.
Click the port type you want to assign, and then click OK.
Mitel ® 5000 Installation Manual – Issue 3.0, October 2008
Chapter 6: Programming
Configuring a Basic Rate Module (BRM-S)
BRM programming includes the following fields:
• “Call Type” below
• “Overlap Sending” below
• “Port Status” on page 6-116
• “SPID/DN/TEI” on page 6-116
• “Timers” on page 6-117
• “Description” on page 6-117
• “ISDN Switch Type” on page 6-117
• “CO Provides Progress Tones” on page 6-118
• “Connect on Call Proceeding” on page 6-118
• “Process ISDN Data Link Down” on page 6-118
• “Retry ARS Call IF Call Rejected” on page 6-118
• “D-Channel Diagnostics” on page 6-118
Call Type
All Basic Rate ISDN calls have a specific number type and numbering plan field indicated in the
call setup message to the public network peer. In certain cases, front-end equipment interfacing
with the ISDN user (CPE) peer requires a specific number type and/or numbering plan. In the
past System was unable to support this requirement because the number type and numbering
plan options were not programmable. Now the number type and numbering plan are
programmable per call type for each equipped primary rate module. The operation of this
feature is transparent to the user. Once the number type and numbering plan are programmed,
the Primary rate call setup message will include this information for each call.
Overlap Sending
The SPID/DN/TEI option applies only for BRI trunk ports only. Each BRI trunk can have up to 16
SPID/DN/TEI pairs.
• Directory Number (DN): (U.S. Only) Is the number. No DN numbers are assigned by
default.
• Service Profile Identification (SPID): (U.S. Only) Contains the bearer information so that
the CO can associate the number with a set of bearer types, The CO will reject calls to the
directory number based on the bearer types assigned to that number. This also allows the
CO to charge a higher rate for numbers that have more bearer capabilities (for example,
numbers which support data or video as opposed to just speech). No SPIDs are assigned
by default.
• Terminal Endpoint Identifier (TEI): Contains value that Network uses to identify the
terminal. This value can be fixed or automatically assigned by the Central Office. In a
point-to-point setup, there is only one TEI. In a point-to-multipoint setup, there is at least
two. For the US, each SPID/DN pair has an associated TEI. The default is set to
Automatic.
Some Central Offices do not allow 16 SPIDs, and some allow as few as six. Also, SPID/
DN/TEI pairs are only defined for North American ISDN switch types, so they are defined
only for the US Systems. Other countries do not support SPID/DN.
Mitel ® 5000 Installation Manual – Issue 3.0, October 2008
Page 6-115
Chapter 6: Programming
Configuring a Basic Rate Module (BRM-S)
Port Status
The screen displays the status of the following:
• Out of Sync: When this field displays a NO value, it indicates that the port is synchronized
with the terminal connection. If it is a trunk port, this indicates that the connection with the
CO (local exchange) is operational. If it is an endpoint port, it indicates that the signal is
being transmitted to any devices connected to the port. If the value is YES, then the port is
not synchronized with its terminal connection, but may still have signal. Further information
will be provided in the Troubleshooting section of the Installation and Field Maintenance
Manual.
• Loss of Signal (LOS): This field indicates that the port either does (a value of NO) or
does not (a value of YES) recognize the device or CO (local exchange) trunk it is
connected to. When the Loss of Signal field has a value of YES, the Out of Sync value
should also be YES. When the Loss of Signal field has a value of NO, the Out of Sync
field can assume either value and provides additional information about BRI status.
• 2B Loopback: When the 2B Loopback Test is active, data entering the device on the B1/
B2 receive channels is demodulated and remodulated back out on the B1/B2 transmit
channels. Data is received and transmitted on the same B channel, either B1 or B2, and
does not cross channels. This test checks the transmission and reception between the
BRS Module and the public network, verifying the integrity of the BRS chip transceiver and
the physical interface from the module to the public network. BRS endpoint ports cannot
perform loopback tests on the D channel.
SPID/DN/TEI
The SPID/DN/TEI option applies only for BRI trunk ports only. Each BRI trunk can have up to 16
SPID/DN/TEI pairs.
• Directory Number (DN): (US Only) Is the number. No DN numbers are assigned by
default.
• Service Profile Identification (SPID): (US Only) Contains the bearer information so that
the CO can associate the number with a set of bearer types, The CO will reject calls to the
directory number based on the bearer types assigned to that number. This also allows the
CO to charge a higher rate for numbers that have more bearer capabilities (for example,
numbers which support data or video as opposed to just speech). No SPIDs are assigned
by default.
• Terminal Endpoint Identifier (TEI): Contains value that Network uses to identify the
terminal. This value can be fixed or automatically assigned by the Central Office. In a
point-to-point setup, there is only one TEI. In a point-to-multipoint setup, there is at least
two. For the US, each SPID/DN pair has an associated TEI. The default is set to
Automatic.
Some Central Offices do not allow 16 SPIDs, and some allow as few as six. Also, SPID/DN/TEI
pairs are only defined for North American ISDN switch types, so they are defined only for the
US Systems. Other countries do not support SPID/DN.
Page 6-116
Mitel ® 5000 Installation Manual – Issue 3.0, October 2008
Chapter 6: Programming
Configuring a Basic Rate Module (BRM-S)
Timers
To program a timer:
1.
Select its current Value and enter the new value in the text box.
2.
Press ENTER or click on another field to save the change.
The timers are:
• Busy No Answer (T301): Applicable to system for Japan only. If the Call Delivered
response (connect message) is not received before this timer expires, the System
disconnects the call.
• Call Proceeding (T310): See page 6-125.
• Connect Acknowledge (T313): See page 6-125.
• Data Link Disconnect (T309): See page 6-125.
• Disconnect (T305): See page 6-125.
• Idle Link (T203): See page 6-125.
• * Overlap Receiving (T302): See page 6-125.
• * Overlap Sending (T304): See page 6-125.
• Release (T308): See page 6-126.
• Restart Acknowledge (T316): See page 6-126.
• Resume Acknowledge (T318): See page 6-126.
• Retransmit TE1 Request UI Message (T202): Controls the amount of time the ISDN
Data Link layer will wait for a response from the network before it re-transmits a UI frame
during the TEI assignment procedure.
• Re-Transmission (T200): See page 6-126.
• Setup Request Acknowledge (T303): See page 6-126.
• Status Enquiry (T322): See page 6-126.
• Suspend Acknowledge (T319): See page 6-126.
• XID Request (T204): See page 6-126.
* Currently, the overlap sending/receiving protocols are supported with PRI Net 5 and BRI Net 3
switch types, which are prevalent in the Europe and Mexico markets.
Description
To enter a description:
1.
Select the current Value, then enter the description in the text box.
2.
Press ENTER or click another field to save the change.
ISDN Switch Type
Basic Rate Module supports AT&T 5ESS Custom, DMS-100, and National ISDN2 switch types.
To change the ISDN switch type setting:
1.
Select the current Value, and then use the drop-down list box to scroll to the desired
setting.
2.
Press ENTER or click another field to save the change.
Mitel ® 5000 Installation Manual – Issue 3.0, October 2008
Page 6-117
Chapter 6: Programming
Configuring a Basic Rate Module (BRM-S)
CO Provides Progress Tones
See page 6-132.
Connect on Call Proceeding
See page 6-132.
Process ISDN Data Link Down
This field allows a system to determine whether or not the BRI trunk port processes an ISDN
Data Link Down message. When this flag is set to Yes and a BRI trunk port receives an ISDN
Data Link Down message, then a BRI trunk port drops all calls and attempts to bring the ISDN
data link up. When this flag is set to No and a BRI trunk port receives an ISDN data link down
message, then the BRI trunk ignores the ISDN data link down. Some Central Offices (local
exchanges in Europe) will release its TEI after a B-channel trunk has been idle for some time.
This causes an ISDN data link down message to be sent from the CO (local exchange) to the
switch. In this case, if the switch processes the ISDN data link down message, it may drop the
call on the other B-channel trunk on that port. The default value of this field is to ignore the
ISDN data link down message.
Retry ARS Call IF Call Rejected
See page 6-133.
D-Channel Diagnostics
This field turns on/off D-channel diagnostics for BRM. It is set to Off by default. The selections
are: Off, Layer 1, or Layer 2.
To change the setting:
Page 6-118
1.
Select the current Value, and then use the drop-down list box to scroll to the desired
setting.
2.
Press ENTER or click another field to save the change.
Mitel ® 5000 Installation Manual – Issue 3.0, October 2008
Chapter 6: Programming
Configuring a 2-Port/4-Port Loop Start Module (LSM-2/LSM-4)
Configuring a 2-Port/4-Port Loop Start Module (LSM-2/LSM-4)
The system provides two or four loop start ports. The ports provided in these modules are in
addition to the built-in ports of the same type. The primary difference is that the built-in ports
also provide the Power-Fail Bypass functionality.
To equip a single port:
1.
Select the current Port description and use the drop-down list box to scroll to the new
port type.
2.
Press ENTER or click another field to save the change.
To equip several ports at once:
1.
Select the ports you want to equip.
To select a series of items, hold down SHIFT while selecting the first and last item in the
range. To select two or more that are not consecutive, hold down CTRL while selecting
the desired items.
2.
Right-click and select Batch Change Type. The following dialog boxes appear.
3.
Click the port type you want to assign, and then click OK.
Mitel ® 5000 Installation Manual – Issue 3.0, October 2008
Page 6-119
Chapter 6: Programming
Configuring a Single-Port/Dual-Port T1/E1/PRI Module (T1M/T1M-2)
Configuring a Single-Port/Dual-Port T1/E1/PRI Module (T1M/T1M-2)
Depending on the selection, one of the following options can be configured for the T1M module
(or up to two of the options for the T1M-2 module):
• T1
• T1/PRI
• E1/PRI
Auto-Equipping/Upgrading from the Single-Port T1/E1/PRI Module
If the T1M-2 module is installed in an uninstalled expansion bay prior to starting a remote mode
session of DB Programming, the module will auto-equip and be displayed in the appropriate bay
of the Communication Server when the DB Programming session is established.
If a T1M was previously programmed in the bay for the new T1M-2 module, you may change
the module from the T1/E1/PRI module to the new Dual T1/E1/PRI module in DB Programming.
The programming for the T1M port will be automatically copied to the first port of the T1M-2.
Conversely, if a T1M-2 with two configured/programmed ports is changed to a T1M, the
programming for the first port of the T1M-2 will be preserved and configured for the T1M port,
while the programming for the second port of the T1M-2 will be deleted.
DB Programming also permits drag/drop of T1M or T1M-2 ports from one T1M/T1M-2 module to
any “None” port of a T1M/T1M-2. To preserve programming when transitioning from one module
type to another, the ability to “move” a port from one T1M/T1M-2 to another was added.
DB Programming will display an error message under the following
circumstances:
• Change the port type of one port if the other port is programmed (not
None).
• Change the Framing Type under a T1 port and the other port is
IMPORTANT
programmed (not None). This field also exists under the T1/PRI port
type, but it is OLM only.
DB Programming displays: WARNING: Changes to this field are only
recommended on an idle system as this may cause a short pause in audio
on the other port of this module (but no dropped calls). Would you like to
continue?
NOTE
Page 6-120
The move option is available only in a local mode session of DB Programming.
Only T1, T1/PRI or E1/PRI ports may be moved. The None port may not be
moved. Only None ports are valid destinations for a move.
Mitel ® 5000 Installation Manual – Issue 3.0, October 2008
Chapter 6: Programming
Configuring a Single-Port/Dual-Port T1/E1/PRI Module (T1M/T1M-2)
To “move” a T1M/T1M-2 port:
1.
Open the desired database in a local mode session of DB Programming. Make sure the
desired module is explored so the “None” port move location is viewable in the left-hand
tree view.
2.
Browse to the module with the existing port you want to move. Click the port, hold down
the mouse button, and drag it over to the tree view. The None port will become
highlighted when the port to be moved is dragged onto it.
3.
Drop the port by releasing the mouse button over the desired None port. The port will be
“moved” from the original module to the new module and all of its programming (circuits,
networking, etc.) will be retained. The original module will now have “None” listed as the
port type where the moved port used to be.
When changing a module type from T1M to T1M-2 or vice versa or drag/dropping a port
between module types, the echo profiles for devices programmed on any ports undergoing the
module type transition will be changed to their default type. Refer to the Mitel 5000 Features
and Programming Guide, part number 580.8006, for default echo profiles based on module and
device type. Also, when going from a T1M to a T1M-2 (either changing the module type or drag/
dropping a port) the Span Connection Type port-level field of the Dual T1/E1/PRI ports will be
defaulted to the system companding type.
Mitel ® 5000 Installation Manual – Issue 3.0, October 2008
Page 6-121
Chapter 6: Programming
Configuring a Single-Port/Dual-Port T1/E1/PRI Module (T1M/T1M-2)
To program a port on one of the T1M or T1M-2 modules, double-click the module to display the
programming fields. Module Programming includes the following fields.
Table 6-19. T1M and T1M-2 Module Programming Fields
Field
T1
T1/PRI
E1/PRI
Ref.
T1/E1 Circuits
6-123
T1/E1 Diagnostics
6-124
Timers
6-125
Call Type
6-126
(T1M-2 only)
Overlap Sending
6-127
Description
6-128
Enable On-Module Dialing
6-129
(T1M-2 only)
Framing Type
6-129
Zero Code Suppression
6-129
Line Impedance
6-129
CRC Processing
6-130
Haul Mode
6-130
Line Build-Out
6-130
Loop Length
6-131
ISDN Switch Type
6-131
CO Provides Progress Tones
6-132
Connect on Call Proceeding
6-132
Operator System Access
6-133
Retry ARS Call If Call Rejected
6-133
Send International Toll Digits
6-133
D-Channel Diagnostics
6-134
Span Companding Type
6-134
(T1M-2 only)
Page 6-122
(T1M-2 only)
Mitel ® 5000 Installation Manual – Issue 3.0, October 2008
Chapter 6: Programming
Configuring a Single-Port/Dual-Port T1/E1/PRI Module (T1M/T1M-2)
T1/E1 Circuits
To select the port type for a specific circuit:
1.
Select the current Circuit Type description and use the drop-down list box to scroll to the
new port type.
2.
Press ENTER or click another field to save the change.
To equip several circuits at once:
1.
Select the circuits you want to equip. To select a series of items, hold down the SHIFT
key while selecting the first and last item in the range. To select two or more that are not
consecutive, hold down CTRL while selecting the desired items.
2.
Right-click and select Batch Change Type. One of the dialogs below appears.
T1 Options:
T1/PRI or E1/PRI Options:
3.
Select the circuit type you want to assign, and then click OK.
If the new devices require extension numbers, you will be prompted to select the first number in
the batch. The available extension numbers will be assigned sequentially to the newly equipped
circuits. If you attempt to exceed the device limit of the System, an error message appears
informing you the operation cannot be performed.
Mitel ® 5000 Installation Manual – Issue 3.0, October 2008
Page 6-123
Chapter 6: Programming
Configuring a Single-Port/Dual-Port T1/E1/PRI Module (T1M/T1M-2)
T1/E1 Diagnostics
T1 Diagnostics is used for troubleshooting T1 or E1. It shows the status of various conditions for
the selected module.
• Hourly Display: Double-click Hourly to see the number of errors that have occurred in
each hour for the past 24 hours.
• Daily Display: Double-click Daily to see the number of errors that have occurred during
several 24-hour periods.
• Hourly Summary: The hourly summary shows the number of errors that have occurred in
the past hour.
• Daily Summary: The daily summary shows the number of errors that have occurred in the
past 24 hours.
• Last Error Update Hour and Day: These fields show the date and time that the
information was last updated. (Information is automatically updated whenever a new
module is selected.)
• T1/E1 Status: Double-click T1/E1 Status to see the following fields. They show the status
of the T1 or E1 module and allow you to perform diagnostics. To update the information,
right-click anywhere and select Update All Statuses.
o
Make Busy: This option can be used to busy-out all of the circuits. When it is enabled,
the module is busied out, just as it would be if the busy-out switch on the module was
used. To change this option, right-click the current Value and then select Enable Make
Busy. To turn off the Make busy, right-click again and select Disable Make Busy.
NOTE
The T1 or E1 circuits should be busied out before any diagnostics
procedures are performed. If not, the module will go into Red Alarm and
drop all active calls.
If the Make Busy LED is flashing rapidly on the module, someone pressed the Make Busy
switch. If this occurs, you must disable this Make Busy field.
o
Loopback Tests: These options can be used for enabling and disabling the following
T1 loopback diagnostics and alarm. During the tests, LED indications and error
messages can be used to provide troubleshooting information. (The testing options
cannot be used in stand-alone programming mode.) To enable or disable one of the
tests, right-click its current Value, then select Enable. To end the test, right-click again
and select Disable. If the T1 or E1 Loopback timeout timer expires during a loopback
test, the loopback will be terminated automatically. The loopback tests are as follows:
–
Digital Local Loopback: Allows you to check the transmission and reception of
alarm conditions between systems in a private T1 or E1 network. This tests the
framing chip on the module.
–
Digital Remote Loopback: Allows you to check the transmission and reception of
test patterns conditions generated by the T1/E1/PRI module. This tests the framing
chip on the module.
–
Transceiver Local Loopback: Allows you to check the transmission and reception of
alarm conditions generated by the T1/E1/PRI module. This tests the transceiver
chip on the module.
–
Transceiver Remote Loopback: Allows you to check the transmission and reception
of test patterns between the T1/E1/PRI module and the public network. This tests
the transceiver chip on the module.
–
Transmit Blue Alarm: This sends a Blue alarm over the public or private network
interface for testing purposes.
• Line Build-Out: This information is shown here for reference purposes only. To program
Line Build-out for the T1/E1/PRI module, see page 6-130.
Page 6-124
Mitel ® 5000 Installation Manual – Issue 3.0, October 2008
Chapter 6: Programming
Configuring a Single-Port/Dual-Port T1/E1/PRI Module (T1M/T1M-2)
Timers
(Timers are programmed only for PRI-equipped modules). The ISDN timer default values, listed
in Table 5-12, have been carefully selected to ensure proper system operation under most
circumstances. Occasionally, one or more of the timers may need to be adjusted.
To program a timer:
1.
Select the current Value, and then enter the new value in the text box.
2.
Press ENTER or click another field to save the change.
Table 6-20. PRI-Equipped Module Timers
Timer
Default
Range
Purpose
Call Proceeding (T310)
25
1–255
sec
This is used for AT&T 5ESS custom switch type only. If the
appropriate Call Proceeding response (Alerting, Connect, or
Disconnect) is not received before this timer expires, the
requesting system sends a Disconnect.
Connect Ack. (T313)
9
1–255
sec
If the appropriate Call Proceeding response (Alerting, Connect,
or Disconnect) is not received before this timer expires, the
requesting system sends a Disconnect.
Data Link
Disconnect (T309)
90
1–255
seconds
(T1/PRI Only) This timer is initiated when the data link layer is
disconnected. The timer is terminated when the data link is reestablished.
Disconnect (T305)
4
1–255
sec
Idle Link (T203)
100
1–65535
tenths
Overlap Receiving
(T302)*
15
1–255
sec
This timer determines the number of seconds that the system
will wait between messages during the overlap receiving
process. This timer is started whenever the system receives a
setup acknowledge message. It is then restarted every time the
system receives an information message during the overlap
receiving process. Once the last information message is
received, the system has until this timer expires to send a call
progress message (for example, alerting, connected, etc.). If
the system does not send a call progress message or if the
system does not receive an information message before this
timer expires, the call is cleared.
Overlap Sending
(T304)*
20
1–255
sec
This timer determines the number of seconds that the system
will wait between messages during the overlap sending
process. This timer is started when the system receives the
setup acknowledge message from the network provider. It is
then restarted every time the system sends an information
message during the overlap sending process. Once the last
information message is sent, the system waits for a call
progress message (for example, alerting, connected, etc.) from
the network provider. If the system does not receive a call
progress message or if the system does not send an
information message before this timer expires, the call is
cleared.
If the appropriate Disconnect response (Disconnect or Release)
is not received before this timer expires, the requesting system
sends a Release.
This timer controls how long the ISDN Data Link layer will
remain idle before transmitting a Receive Ready (RR)
Supervisory frame or an information frame, once multi-frame
operation has been established.
* Currently, the overlap sending/receiving protocols are supported with PRI Net 5 and BRI Net 3 switch types,
which are prevalent in the Europe and Mexico markets.
Mitel ® 5000 Installation Manual – Issue 3.0, October 2008
Page 6-125
Chapter 6: Programming
Configuring a Single-Port/Dual-Port T1/E1/PRI Module (T1M/T1M-2)
Table 6-20. PRI-Equipped Module Timers (Continued)
Timer
Release (T308)
Restart
Acknowledge (T316)
Resume Acknowledge
(T318)
Re-Transmission
(T200)
Setup Request Ack.
(T303)
Suspend Acknowledge
(T319)
XID Request (T204)
Default
Range
Purpose
4
1–255
sec
If the appropriate Release response (Release Complete) is not
received before this timer expires, the requesting system sends
another Release or releases the B-channel and Call Reference
value.
120
1–255
sec
The system initiates this timer when a Channel Restart
message is sent. The timer is terminated when the Restart
Acknowledge is received from the public network. If the Restart
Acknowledge is not received before this timer expires, the
system sends a second Restart message to the public network.
If the timer expires a second time and a Restart Acknowledge
has not been received from the public network, the system idles
the respective channel.
9
seconds
1–255
sec
(E1/PRI Only) If the appropriate Resume response (Resume
Acknowledge or Resume Reject) is not received before this
timer expires, the requesting system sends a Release Request.
10
1–65535
tenths
This timer controls the amount of time the ISDN Data Link layer
will wait for an acknowledgment from the network before it
transmits a frame again.
4
(9 for
4ESS)
1–255
sec
If the appropriate Setup Request response (Alerting, Connect,
Call Proceeding, Setup Acknowledge, or Release) is not
received before this timer expires, the requesting system sends
another Setup Request or clears the call.
9
sec
1–255
sec
(E1/PRI Only) If the appropriate Suspend response
(Disconnect, Release, Suspend Acknowledge, or Suspend
Reject) is not received before this timer expires, the requesting
system sends a Suspend Reject.
20
tenths
1–65535
tenths
This timer controls how long the ISDN Link Data layer will wait
for an XID response from the network before transmitting the
XID Request again. (XID parameter negotiation is not
supported.)
Call Type
(Applies only to T1/PRI-equipped modules.) All Primary rate ISDN calls have a specific number
type (International, National, Network, or Local/Subscriber) and numbering plan field (ISDN,
Telephony, or Private) indicated in the call setup message to the public network peer. In certain
cases, front end equipment interfacing with the ISDN user (CPE) peer requires a specific
number type and/or numbering plan. The number type and numbering plan are programmable
per call type for each equipped primary rate module. The operation of this feature is transparent
to the user. Once the number type and numbering plan are programmed, the Primary rate call
setup message will include this information for each call.
To set the Primary Rate Call Type for a T1/PRI module:
Page 6-126
1.
Click System, and then click Communication Server.
2.
Double-click the module (or right-click and select Explore Module).
3.
Select Call Type.
Mitel ® 5000 Installation Manual – Issue 3.0, October 2008
Chapter 6: Programming
Configuring a Single-Port/Dual-Port T1/E1/PRI Module (T1M/T1M-2)
Overlap Sending
(Applies only to E1/PRI equipped modules) If using a PRI-equipped module with PRI Net 5, you
can program the system to use the overlap sending and receiving protocols. These protocols
allow you to program the switch to send called number digits either in the setup message or the
information message.
To access the programming options:
1.
Double-click Overlap Sending.
2.
Program either of the following options:
•
Immediate Overlap Sending: Enable this flag to have the system immediately
send the setup message to the network provider. If disabled, all called number
digits are collected before sending the setup message to the network provider. You
should enable this flag if you want the system to seize a B-channel immediately or
if you want the network provider to provide immediate feedback for invalid
numbers. You should disable this flag if the network provider does not support
overlap receiving. By default, this flag is disabled.
NOTE
•
Because Automatic Route Selection (ARS) calls require the system to
collect digits before determining the most cost-effective route, this flag
is ignored for ARS calls.
Maximum Digits in Called Number IE: Select the maximum number of called
number digits that the system will include in the setup and/or information
messages. This field may be required if the network provider only allows calls with
a specified number of maximum digits. The number of digits programmed here and
the Overlap Sending Conditions value determine the number of called number
digits sent in the called number information elements (IE) for setup and information
messages. The valid range is 1–48, and the default is 20.
NOTE
If the Immediate Overlap Sending flag is enabled, this field is ignored.
•
Overlap Receiving: Enable this flag if the network provider does not send digits
“en bloc” to the system. If enabled, the system will not route the call until it has
received a sending complete indication from the network provider or until the
Overlap Receiving Timeout Timer has expired (below). You should enable this flag
if the network provider sends any called number digits in subsequent information
messages. You should disable this flag if the network provider sends all of the
called number digits in the setup message (“en bloc”). By default, this is disabled.
•
Overlap Receiving Timeout Timer: Select the number of seconds that the system
will wait to receive any called number digits from the network provider. You may
need to adjust this value if the network provider does not send a sending complete
indication to signal the end of the called number digits. The valid range is 1–255,
and the default is 30 seconds.
Mitel ® 5000 Installation Manual – Issue 3.0, October 2008
Page 6-127
Chapter 6: Programming
Configuring a Single-Port/Dual-Port T1/E1/PRI Module (T1M/T1M-2)
•
•
Overlap Sending Conditions: Select how the system will send digits if the
Immediate Overlap Sending flag is disabled. Whether or not the overlap sending
protocol is used depends on the value selected here. You have the following
options:
o
Overlap Sending Disabled: Sends all digits “en bloc” as part of the called
number IE in the setup message. This option does not allow overlap sending.
o
Overflow Is Equal Access Only: Sends any overflow digits as equal access
digits in the setup message. This option does not allow overlap sending. This
is the default setting.
o
Overflow Digits Sent In Overlap: Sends any overflow digits in subsequent
information messages. This option allows overlap sending.
o
Overlap And Equal Access Facility: Sends any equal access digits in the
setup message, but sends overflow digits that are not considered equal
access in subsequent information messages. This option allows overlap
sending.
o
Overlap Sending Enabled For All Calls: Sends all digits in subsequent
information messages (that is, none are included in the setup message). The
number of digits sent in each information message is limited by the Maximum
Digits in Called Number IE setting. This option allows overlap sending.
Sending Complete Indication: Select how the system will indicate that it has
finished sending digits to the network provider. If Sending Complete IE is selected,
the system includes a sending complete information element in the setup or
information message. If ‘#’ Digit in Called Number IE is selected, the system inserts
a pound (or hash) digit (#) at the end of the digits in the called number information
element. By default, this is Sending Complete IE.
NOTE
•
This field is ignored if the Transmit Sending Complete Indication flag is
disabled.
Transmit Sending Complete Indication: Enable this flag to have the system send
the complete indication type selected in the Sending Complete Indication field. If
this flag is disabled, the system will not send any indication to the network provider
that no more digits follow. By default, this is disabled.
NOTE
The Transmit Sending Complete Indication and Sending Complete
Indication fields also affect ISDN trunks that use the “en bloc” method
for delivering digits. For example, if the Transmit Sending Complete
Indication flag is enabled and the Sending Complete Indication value is
set to ‘#’ Digit in Called Number IE, the system will insert a pound (or
hash) digit (#) after the collected digits.
Description
To enter a description:
Page 6-128
1.
Select the current Value, then enter the description in the text box.
2.
Press ENTER or click another field to save the change.
Mitel ® 5000 Installation Manual – Issue 3.0, October 2008
Chapter 6: Programming
Configuring a Single-Port/Dual-Port T1/E1/PRI Module (T1M/T1M-2)
Enable On-Module Dialing
In previous versions of the Mitel 5000 there was a system level flag labeled Enable T1/E1/PRI
Dialing. This flag has been removed and replaced with this port level flag for the T1M and T1M2 modules. This flag handles pulse and DTMF dialing for T1M/T1M-2 ports. It is set to Yes by
default.
To change the Enable On-Module Dialing setting:
1.
Select the current Value and then place a check mark in the box by selecting it. To
remove the check, select the box again.
2.
Press ENTER or select another field to save the change.
Framing Type
The type of framing scheme used by the T1/E1 trunks connected to the module can be as
follows:
• T1 Trunks: D4 Superframe or Extended Superframe (ESF)
• E1 Trunks: Common Channel Signaling or Channel Associated Signaling
To set the framing type:
1.
Select the current Value, then use the drop-down list box to scroll to the desired setting.
2.
Press ENTER or click another field to save the change.
DB Programming displays an error message under the following
circumstances:
• Change the port type of one port if the other port is programmed (not
None).
• Change the Framing Type under a T1 port and the other port is
IMPORTANT
programmed (not None). This field also exists under the T1/PRI port
type, but it is OLM only.
DB Programming displays: WARNING: Changes to this field are only
recommended on an idle system as this may cause a short pause in audio
on the other port of this module (but no dropped calls). Would you like to
continue?
Zero Code Suppression
The trunk zero-suppression scheme supports the followings:
• T1/PRI and T1/E1/PRI modules: AMI (Bit 7), Bipolar Eight Zero Substitution (B8ZS), or
None
• E1/PRI modules: HDB3 or None
To change the setting:
1.
Select the current Value, then use the drop-down list box to scroll to the desired setting.
2.
Press ENTER or click another field to save the change.
Line Impedance
(Applies only to E1/PRI-equipped modules.) Set this value to the line impedance the CO is
using for E1/PRI. The value here must match the CO setting. The system supports the following
line impedances:
• 120 ohms (default)
• 75 ohms
Mitel ® 5000 Installation Manual – Issue 3.0, October 2008
Page 6-129
Chapter 6: Programming
Configuring a Single-Port/Dual-Port T1/E1/PRI Module (T1M/T1M-2)
CRC Processing
(Applies only to E1/PRI equipped modules.) The CRC Processing flag is a configuration flag
that can be enabled/disabled for each E1 module. The setting for this flag must match the
setting for the remote-end E1 signal. When CRC Processing is enabled only at one end of an
E1 connection, the E1 signal with the CRC enabled will never reach the CRC Multiframe
synchronization state and will transmit the RAI signal to the remote end until either the CRC
Processing is disabled for that E1 signal or the CRC Processing is enabled for the remote-end
E1 signal.
This flag enables the transmission of a CRC Multiframe pattern and a CRC-4 value computed/
transmitted for every 16 frames of data. At the same time, the CRC Processing flag enables the
E1 module to look for this CRC Multiframe pattern and CRC-4 value on the received E1 signal.
When CRC Processing is enabled on both ends of an E1 connection, both ends will reach the
CRC Multiframe synchronization. In this multiframe synchronized state, both ends will compute
a CRC-4 value and transmit it to the other end along with the E1 data. On the receive ends of
the E1 connection, both receivers will then calculate their own CRC-4 value for the received
data and if the received and the computed CRC-4 values match, the corresponding 16 frames
of E1 data are assumed to be have been received with no bit errors.
Haul Mode
This field applies only for a T1 or T1/PRI configuration (E1/PRIs do not display this field). Shorthaul implies a shorter span and the corresponding loop length field lists lengths for the cable.
Long-haul implies a longer cable with the need for a repeater and the line build out field lists its
associated signal strengths. In previous versions, only Long Haul was available for the T1 or
T1/PRI. It is set to Long Haul by default.
To change the setting:
1.
Select the current Value, then use the drop-down list box to scroll to the desired setting.
2.
Press ENTER or click another field to save the change.
Line Build-Out
(Applies only to T1 and T1/PRI modules.) The LBO attenuation of the T1 trunk connected to the
module value is determined by the distance to the nearest public network T1 repeater. The
selections are shown below.
• 0 dB (DSX-1)
• –7.5 dB (this is the best setting for T1/E1/PRI modules)
• –15 dB
• –22.5 dB
The Auto option should be used during initial installation. The other settings can be used if the
build-out needs to be adjusted later.
To change the setting:
Page 6-130
1.
Select the current Value, and then use the drop-down list box to scroll to the desired
setting.
2.
Press ENTER or click another field to save the change.
Mitel ® 5000 Installation Manual – Issue 3.0, October 2008
Chapter 6: Programming
Configuring a Single-Port/Dual-Port T1/E1/PRI Module (T1M/T1M-2)
Loop Length
(Applies only to T1 and T1/PRI modules.) This is displayed with a red “X” if the Haul Mode is set
to Long Haul. This field provides optional loop lengths pertaining to a Short Haul configuration.
The selections are shown below:
• 0-133 ft. (default)
• 133-266 ft.
• 266-399 ft.
• 399-533 ft.
• 533-655 ft.
To change the setting:
1.
Select the current Value, and then use the drop-down list box to scroll to the desired
setting.
2.
Press ENTER or click another field to save the change.
ISDN Switch Type
(Applies only to PRI-equipped modules.). The system supports Primary Rate B-channels.
• T1/PRI modules support AT&T 4ESS Custom, AT&T 5ESS Custom, DMS-100 or National
ISDN 2, Private Networking, and IP Private Networking.
• E1/PRI module supports Private Networking, PRI NET-5 S-type, and IP Private
Networking.
If the module being programmed will be used to connect two nodes in a network, select Private
Networking.
NOTE
For B-Channel Devices: When changing the switch type field in the port folder of
a T1/PRI or E1/PRI port, any B-Channel devices will be moved to their appropriate
default echo profile based on the switch type value. B-Channels are associated
with different echo profiles based on which module type they are programmed on
and whether they are being used for private networking or as CO trunks. Refer to
the Mitel 5000 Features and Programming Guide, part number 580.8006, for the
default echo profile table.
To change the ISDN switch type setting:
1.
Select the current Value, and then use the drop-down list box to scroll to the desired
setting.
2.
Press ENTER or click another field to save the change. If you selected Private
Networking as the ISDN Switch Type, you will be prompted to select the node that will
contain the trunks on this module. If you want to change the node later, use one of the
following methods:
Method A
a. Select the current Value, then enter the new value in the text box.
b. Press ENTER. A screen appears displaying what is associated with the number.
c. Click OK. The new number appears in the field.
Mitel ® 5000 Installation Manual – Issue 3.0, October 2008
Page 6-131
Chapter 6: Programming
Configuring a Single-Port/Dual-Port T1/E1/PRI Module (T1M/T1M-2)
Method B
a. Right-click the existing Node Number. An option box appears.
b. Select Change Node Number. A window appears prompting for the type of device to
include.
c. Select Local Node or Remote Node, and then click Next. The list of nodes appears.
(You can view a list by selecting List or view details by selecting Details.)
d. Select the node, then click Finish. The selection appears as the Node Number.
IMPORTANT
If you change the ISDN Switch Type to Private Networking, the
system automatically places the trunks in the first available node
trunk group. For more information about node trunk groups, refer
to the Mitel 5000 Features and Programming Guide, part number
580.8006. If you change to any other ISDN Switch Type option, all
of the trunks are moved to the “Unused” trunk group.
CO Provides Progress Tones
(BRI/PRI-equipped modules only) When the System provides local ringback, some central
offices [local exchanges], particularly in Europe, take too long to send the System the connect
message when a call is received. When the CO connects a call too slowly, the user can answer
before the caller is on the line, causing the caller to miss the greeting (such as “Welcome to
Mitel. How may I help you?”). If this flag is enabled, the System does not provide local ringback.
Instead, the System connects the call to the line and the caller hears CO ringback. That way,
when the called party answers, the calling party is already on the line. In the default state, the
flag is disabled.
To change the CO Provides Progress Tones setting:
1.
Select the current Value and then place a check mark in the box by selecting it. To
remove the check, select the box again.
2.
Press ENTER or select another field to save the change.
IMPORTANT
This flag should be enabled for PRI spans that are used for placing
outgoing calls from another node (for example, Node 2 uses ARS
to place outgoing calls using the PRI span on Node 1). If it is not
enabled, some of the calls from Node 2 may not go out to the public network properly. It is recommended that you enable this flag for
all nodes in a system.
Connect On Call Proceeding
(PRI-equipped modules only) This flag affects outgoing Primary Rate ISDN calls. If it is enabled,
the system will connect the B-channel as soon as the Call Proceeding message is received
from the CO interface. Some CO interfaces, especially SS7 interfaces, do not send progress
indicators when they are playing tones or announcements on the B-channel. They play the tone
or announcement prior to sending the progress message, after the call proceeding. In this case,
if the flag is disabled, the user experiences audio clipping. If the flag is enabled, the channel is
opened when the call proceeding message is received and the system does not have to wait for
a progress indicator (indicating alerting, busy, reorder tones or announcements).
Page 6-132
Mitel ® 5000 Installation Manual – Issue 3.0, October 2008
Chapter 6: Programming
Configuring a Single-Port/Dual-Port T1/E1/PRI Module (T1M/T1M-2)
Operator System Access
(T1 PRI set for National ISDN2 only) If National ISDN 2 is selected, there is an option to enable
Operator System Access. Operator System Access (OSA) is required by some central offices. If
this flag is enabled, the user will be allowed to request access to an operator services system.
IMPORTANT
If using ARS with National ISDN 2, and OSA is enabled, you must remove
Dial Rule #2 Echo Toll Field from the Operator and International Operator
Route groups.
Retry ARS Call If Call Rejected
The Retry ARS Call If Call Rejected flag is for ISDN messaging for outgoing calls using ARS. If
set to “Yes,” the system retries the additional channels and trunk groups programmed in ARS if
the call is rejected by the Telco when receiving a specific cause value.
The symptom that will appear because of this flag is when an outgoing call is rejected by Telco,
where it causes the system (via ARS) to cycle through all the ISDN channels before releasing/
disconnecting the call.
This flag must remain enabled or set to “Yes” on T1 or E1 PRI circuits connected to Interprise
3200s. This flag is enabled by default. The flag should be disabled on Public ISDN circuits
connected to Telco. If not using ARS with ISDN services, this flag does not apply.
When this flag is set to “No,” the system does not retry the ARS call, regardless of the reason it
was rejected. If this flag is set to “Yes,” the system retries the ARS call as long as the cause of
the rejection is not one of the following events:
• Unallocated or unassigned number
• User is busy
• No user is responding
• Call rejected
• Number has changed
• Destination is out of order
• Number format is invalid
• There was a temporary failure
• Congestion in the switching equipment
• Requested circuit/channel is not available
• Outgoing calls are barred
• Incoming calls are barred
• Service or option not available, unspecified
• Service or option not implemented, unspecified
• Mandatory information element is missing
• Interworking, unspecified
Send International Toll Digits
If enabled, the system sends international toll digits (for example, 011) in the dial string in
addition to the number type. If disabled, the toll digits are stripped from the dial string for
international calls using ISDN trunks. You should enable this flag if the CO ignores the number
type. By default, this feature is Enabled, set to Yes.
Mitel ® 5000 Installation Manual – Issue 3.0, October 2008
Page 6-133
Chapter 6: Programming
Configuring a Four-Port Single Line Module (SLM-4)
D-Channel Diagnostics
This field turns on/off D-channel diagnostics for T1/PRI or E1/PRI. This is not displayed for T1. It
is set to Off by default. The selections are: Off, Level 1, or Level 2.
To change the setting:
1.
Select the current Value, and then use the drop-down list box to scroll to the desired
setting.
2.
Press ENTER or click another field to save the change.
Span Companding Type
This is the companding type of the remote end connected to the port. Defaults to the System
Level Companding Type (under System\Flags).
To change the setting:
1.
Select the current Value, and then use the drop-down list box to scroll to the desired
setting.
2.
Press ENTER or click another field to save the change.
Configuring a Four-Port Single Line Module (SLM-4)
Four ports in each Single Line Module - 4 (SLM-4) may be configured with single lines
endpoints. The SLM-4 can also be configured using the Configuration Wizard.
When you double-click on a Single Line Module -4, a list of the circuits appears on the right of
the screen. This allows you to configure the SLM-4 ports to support up to four Single Line
devices.
NOTE
If you attempt to configure more than one SLM-4 board, the system refuses the
change and displays an error message.
To equip a single port:
1.
Select the current Port description and use the drop-down list box to scroll to the new
port type.
2.
Press ENTER or click another field to save the change.
To equip several ports at once:
1.
Select the ports you want to equip.
To select a series of items, hold down SHIFT while selecting the first and last item in the
range. To select two or more that are not consecutive, hold down CTRL while selecting
the desired items.
2.
Right-click and select Batch Change Type. The Batch Change Type dialog box
appears.
3.
Click the port type you want to assign, and then click OK.
If the new devices require extension numbers, you will be prompted to select the first number in
the batch. The available extension numbers will be assigned sequentially to the newly equipped
ports. If you attempt to exceed the device limit of the System, an error message appears
informing you the operation cannot be performed.
Page 6-134
Mitel ® 5000 Installation Manual – Issue 3.0, October 2008
Chapter 6: Programming
Programming the Busy Out Manager
Programming the Busy Out Manager
A context menu item appears for Dual T1/E1/PRI, T1/E1/PRI, and Basic Rate modules that
allows you to open the Busy Out Manager. You must be in the Communication Server view in
Remote Mode to access the Busy Out Manager.
Figure 6-16. Busy Out Manager
The Busy Out Manager allows you to select ports or circuits from a list and specify Busy Out
commands for the selected items. The Busy Out Manager displays all ports on the selected
module as well as what type of port is configured (a “None” device will be shown if the port has
not been configured). Selecting a port displays the devices/circuits programmed for that
particular port (devices/circuits that have not been configured will not show up as a None
device).
Figure 6-17. Busy Out Manager Programming
Mitel ® 5000 Installation Manual – Issue 3.0, October 2008
Page 6-135
Chapter 6: Programming
Programming the Busy Out Manager
When you first open the Busy Out Manager for a particular module, the status of the devices/
circuits are unknown (shown as a '-') as they have not been retrieved yet. Anytime you want to
see the “current” status of a particular item, you must select one or more items from either the
ports view or devices/circuits view, and then click the Get Selected Status. If you choose to
retrieve the status at the port level, the command may take a few seconds as it is retrieving
status for every device/circuit programmed for the selected port(s).
You can similarly perform busy out operations on item selections from either the ports view or
the device/circuits view.
To busy out items, do one of the following:
• Select one or more ports.
• Select one or more devices/circuits, and then click Busy Selected.
For example, if you want to busy out the entire board, select all of the ports in the port list, and
then click Busy Selected.
Performing a “Busy Selected” action does not display the current status. The
status for the devices/circuits instead displays “Pending Status Update,” at which
point you must retrieve the status.
NOTE
In the same way that you can perform busy out operations you can perform unbusy operations.
Following the same steps as above, however, instead of clicking Busy Selected you would click
Unbusy Selected.
Busy Out Statuses
There are several different statuses that may be shown in the Busy Out Manager. The display
string and their meaning can be found in the table below.
Table 6-21. Busy Out Statuses
Status
Page 6-136
Meaning
-
The status of the device/circuit is unknown. To get the
status, select the device/circuit, and then click Get Selected
Status.
Not Scheduled For Busy Out
The device is operable. It may be idle or active, but it is not
currently busied out or scheduled for busy out.
Busy
The device/circuit has been set to busy by the Busy Out
Manager.
Pending Busy
The device has been scheduled to be busied out, but is
currently in use.
Pending Status Update
The user has actioned an item for Busy/Unbusy. You need to
retrieve the status.
Mitel ® 5000 Installation Manual – Issue 3.0, October 2008
Chapter 6: Programming
Processor Module
Processor Module
The Processor Module provides IP resource functionality through the IP resource application.
Refer to the Mitel 5000 Features and Programming Guide, part number 580.8006, for
information on programming IP Settings. For more information about IP Resources, refer to the
Specifications and Product Description chapters.
The processor module is equipped with a 100-Base T Ethernet port that allows you to connect
the system to the LAN.
NOTE
The IP Port does not support Simple Network Management Protocol (SNMP).
Before you program the IP port, consult the on-site network administrator for information on any
standard practices that are followed, including the use of special characters in hostnames.
Providing a static IP address and a hostname is generally considered the “best” practice.
To program the port, do one of the following based on the system type you have:
• CS-5200: See “Internet Protocol Resources” on page 6-139.
• CS-5400 and CS-5600: The Processor Expansion Card also uses an IP address to
communicate with the Processor Module. The IP address for the Processor Expansion
Card must be on the same network and subnet mask as the IP address set for the
Processor Module described above. See page 6-140 for information on setting Processor
Expansion Card settings.
NOTICE
Mitel CS-5400 systems have two IP addresses. One IP address is for the Processor
Module and one IP address is for the Processor Expansion Card. Both IP addresses
MUST be on the same subnet mask. This also applies to CS-5200 systems that have
been upgraded with the Processor Expansion Card. Also, provide a static IP address
for the processor module. The Processor Expansion Card must have a static IP
address.
Processor Expansion Card
The Processor Module provides additional IP resources beyond that of a basic system. For
programming information, refer to the Mitel 5000 Features and Programming Guide, part
number 580.8006. For more information about the Processor Module, refer to the Specifications
and Product Description chapters.
Loop Start Ports and Single Line Ports
The system provides two loop start ports and two single line ports (the port addresses are
11.1.1 and 11.2.1). These ports can be configured for the Power Fail Bypass feature. This
feature allows up to two single line endpoints to be able to make calls after a total system
shutdown due to power loss. These ports are also preconfigured in DB Programming but can be
changed. For information about how Loop Start and Single Line Ports are cabled, refer to the
Installation chapter.
Mitel ® 5000 Installation Manual – Issue 3.0, October 2008
Page 6-137
Chapter 6: Programming
Digital Expansion Interface
Digital Expansion Interface
Bay designations appear in the Communication Server folder, displaying which modules are
installed in the specific bay locations for the main chassis and DEI(s).
Figure 6-18. Digital Expansion Interface
Indicates bays
in which modules
are installed
DEI License Requirement
A software license is required for each DEI unit. If a DEI unit is unlicensed, a red X appears
over the DEI unit icon in the Communication Server view, as shown below.
Figure 6-19. DEI License Requirement
You can still program the DEI chassis, even if they are unlicensed, but any attached endpoints
will not come online. For information about uploading a software license see “Software License
Upload” on page 6-60.
Page 6-138
Mitel ® 5000 Installation Manual – Issue 3.0, October 2008
Chapter 6: Programming
PCDPM Configuration in DB Programming
PCDPM Configuration in DB Programming
After the PCDPM hardware is installed, the telephone system database must be programmed
for the PCDPM intended purpose. For PCDPM installation instructions, refer to the Installation
chapter.
To configure DB Programming for PCDPM use:
1.
Start DB Programming, then navigate to the System\Communication Server folder and
select the Digital Expansion Interface where the PCDPM is installed.
2.
Set the following options:
•
System Configuration: In the Digital Endpoint Module - 16 window for the DEI
where this PCDPM will be used, select the Port Type for the port assigned to the
PCDPM.
Figure 6-20. System Configuration
•
Select Keyset if you plan on using the PCDPM as a DSS/BLF Unit connection or
for Off-Hook Voice Announce receive capability.
•
Select Digital Endpoint/MDPM if attaching an MDPM to the PCDPM and you still
want to use the PCDPM for Off-Hook Voice Announce receive capability. The serial
connection on the PCDPM is not functional; therefore, Desktop Interface through
serial connections is not supported. Only the Mini-DSS is supported, and it does
not require a PCDPM.
Internet Protocol Resources
NOTE
DB Converter provides a Help option with instructions for converting a database.
Depending on the system type you have, the Processor Module (CS-5200) appears and
provides IP resource configuration options. Or, if the Processor Expansion card has been
installed or you have a CS-5400 system, the Processor Expansion Card also appears providing
additional IP resources.
Mitel ® 5000 Installation Manual – Issue 3.0, October 2008
Page 6-139
Chapter 6: Programming
Internet Protocol Resources
Figure 6-21. IP Connection
CS-5200
CS-5400
(or CS-5200
with installed
Processor
Expansion
Card)
To equip the Processor Module:
1.
From the DB Studio menu bar, select System – Communication Servers – Processor
Module.
2.
Double-click the P6000 shortcut to connect to the IP Connections folder.
3.
Configure the following IP Connection options:
•
Audio RTP Type of Service and Data Type of Service: The Audio RTP and Data
Types of Service specify the precedence for audio and data packets, respectively.
The system inserts the values of these two fields into the Type of Service (ToS)
field of each audio and data packet. Network devices can then use the value of the
ToS field to establish precedence for IP routing. The default value is 0, meaning the
packets have no precedence. A value of 184 indicates “IP Precedence.” All other
values may be used by a network device using Differentiated Services (Diffserv) to
establish precedence. Use the scroll box to make your selection, then press
ENTER or click another field to save your change.
•
Audio Stream Receive Port: The Audio Stream Receive Port defines the first of
33 even port numbers that off-node IP resources use to transmit audio data to this
IP resource. You must choose an even-numbered value. The base audio port
number, plus 64 additional port numbers, cannot conflict with other port numbers
on the IP connection.
For example, if the base audio port number is 5000, no other port numbers on the
IP connection can fall in the range from 5000 to 5064. Changing the Audio Stream
Receive Port resets the IP resources. The system broadcasts changes to an IP
connection Audio Stream Receive Port to the other nodes in the private network as
a database update. This field corresponds to the off-node IP connection Remote
Audio Receive Port. To change the port number, enter the new number in the text
box, then press ENTER or click another field. The default is 5004, and the range of
values is 1026–65468.
IMPORTANT
Page 6-140
Because SIP uses port 5060 (by default) for call control,
firewalls, NATs, and routers often treat this port as a “special
case” and may block its use by non-SIP packets. If your network
currently uses SIP, Mitel strongly recommends that you use a
different port range (other than 6004–7039) for audio stream
ports; otherwise, you may experience audio problems over the
IP network.
Mitel ® 5000 Installation Manual – Issue 3.0, October 2008
Chapter 6: Programming
Internet Protocol Resources
•
IP Terminal TCP Call Control Port: The IP Terminal TCP Call Control Port defines
the port number the IP resource uses for call control. To change the port number,
enter the new number in the text box, then press ENTER or click another field. The
range is 1024–65535, and the default is 5566.
•
IP Terminal General Purpose UDP Port: The IP Terminal General Purpose UDP
Port defines the port number the IP resource application uses for general purpose
and broadcast messages. To change the port number, enter the new number in the
text box, then press ENTER or click another field. The range is 1024–65535, and
the default is 5567.
•
MGCP Receive Port: The MGCP Receive Port defines the port number the MGCP
gateway and endpoints use for communication. To change the port number, enter
the new number in the text box, then press ENTER or click another field. The range
is 1024–65535, and the default is 2427.
•
TCP Call Control Port: The TCP Call Control Port defines the port number that
off-node IP resources use to connect call control with this IP resource. The TCP
Call Control Port cannot conflict with other port numbers on the IP connection.
Changing the TCP Call Control Port resets the IP resources. The system
broadcasts changes to an IP connection TCP Call Control Port to the other nodes
in the private network as a database update. The IP connection TCP Call Control
Port must be kept in sync throughout the network. This field corresponds to the offnode IP connection Remote Listening Port. To change the port number, enter the
new number in the text box, then press ENTER or click another field. The default is
5570, and the range of values is 1025–65535.
•
Echo Profile: Refer to the Mitel 5000 Features and Programming Guide, part
number 580.8006.
4.
Allocate IP Resources using the Resource Reservations Tool under the Tools menu.
Refer to the Mitel 5000 Features and Programming Guide, part number 580.8006.
5.
Configure the Processor Module IP settings, as described on “Processor Module” on
page 6-137.
6.
Configure the IP Connection settings. Refer to the Mitel 5000 Features and
Programming Guide, part number 580.8006.
7.
Create a universal numbering plan that includes IP connections for forward compatibility.
One such plan is to use the convention of “PSnnc” where P is the pause digit, S is the
number 6 or 7, nn is the node number, and c is a number between 0–9 identifying the
specific IP resource to which the IP connection corresponds.
Mitel ® 5000 Installation Manual – Issue 3.0, October 2008
Page 6-141
Chapter 6: Programming
Echo Thresholds
Echo Thresholds
Specifications include several error thresholds. When an error exceeds one of these thresholds,
an error message is sent to the error message output port. If necessary, you can set the
thresholds for T1/E1/PRI errors in units of the number per hour and number per day. Thresholds
are set to default values that, in most cases, will not need to be changed. Possible errors
include the following:
• BPV (Bipolar Violations): This is a non-zero signal element that has the same polarity as
the previously received non-zero element.
• CRC-6 (Cyclic Redundancy Check): The calculation carried out on a set of transmitted
bits by the transmitter does not match the calculation performed by the system.
• OOF/COFA (Out of Frame/Change of Frame Adjustment): OOF is a state in which the
frame alignment that is received is not consistent with that which is transmitted. COFA
occurs when the system realigns its receiver to the proper frame alignment signal. This
could be caused by an incorrect line build-out (LBO) value.
• CS (Controlled Slips): The system replicated or deleted one 192-bit digital signal (DS1)
frame due to a lack of frequency synchronization. This could be caused by an incorrect
line build-out (LBO) value.
• ES (Errored Seconds): These are seconds in which at least one error occurred.
• SES (Severely Errored Seconds): This is a second during which transmission
performance is degraded below an acceptable level.
• UAS (Unavailable Seconds): This is the time interval during which the T1, T1/PRI, or E1/
PRI span is unavailable for service. This time begins with 10 or more consecutive
Severely Errored Seconds and ends with 10 or more Non-Severely Errored Seconds.
To program a threshold:
Page 6-142
1.
Double-click Error Thresholds to view the list.
2.
To change a specific threshold, click the Value or Daily field, and then enter the new
number.
3.
Press ENTER or click another field to save the change.
Mitel ® 5000 Installation Manual – Issue 3.0, October 2008
Chapter 6: Programming
Programming a Four-Port Single Line Module
DIGITAL EXPANSION INTERFACE (DEI) UNIT PROGRAMMING TASKS
Use DB Programming to configure the Digital Expansion Interface (DEI) unit, digital endpoints,
and optional voice processing system, if equipped. In general, the Configuration Wizard
provides most of the DEI and digital endpoint configuration options needed to quickly get the
options operational. For information about existing dialog boxes and options, see the applicable
sections in this manual. For programming information beyond what is in this section, refer to the
online Help.
NOTICE
System Downtime. Downgrading a System—for example, going from a CS-5400 to a
CS-5200—defaults the database. If downgrading a system is necessary, schedule the
downtime so that it has the least impact on the customer. Downgrading a system requires
you to reprogram the database.
Programming a Four-Port Single Line Module
The option Single Line Module - 4 appears on the drop-down list of module types that can be
inserted into the three bays of an Mitel CS-5200/5400/5600 Base Server. Up to four ports in
each SLM-4 may be configured with single line endpoints. For programming details, refer to the
online Help in DB Programming.
The SLM-4 can also be configured using the Configuration Wizard. For further information, see
“LSM-2/LSM-4 Module Programming” on page 6-88.
To use an SLM-4 module, you must perform the following procedures in sequence:
1.
Program an SLM-4 module to a bay in the Mitel CS-5200/5400/5600 Base Server.
2.
Set up a single line port with telephone circuit number.
3.
Set up multiple, or a batch of, single line ports with telephone circuit numbers.
4.
Program individual single line endpoint in accordance with customer requirements.
To program, or access, an SLM-4 module in a Base Server bay:
1.
Start the Inter-Tel 5000 Session Manager. The DB Studio window appears.
2.
From the left pane of the DB Studio window, select System – Communication Server –
<bay n>. In the right pane, a drop-down arrow appears in the box next to the selected
bay.
3.
Click the arrow and select Single Line Module - 4. see the following illustration.
Mitel ® 5000 Installation Manual – Issue 3.0, October 2008
Page 6-143
Chapter 6: Programming
Programming a Four-Port Single Line Module
To set up or access a single line endpoint on a SLM-4 port:
1.
Start the Inter-Tel 5000 Session Manager. The DB Studio window appears.
2.
From the left pane of the DB Studio window, select System – Communication Server –
<bay n>: <Single Line Module - 4>.
3.
Double-click the desired SLM-4 module.
4.
Select the desired port.
5.
Set up the port as a single line endpoint with associated circuit number or access the
desired port and circuit number. See Figure 6-22.
Figure 6-22. SLM-4 Single Line Ports and Circuits.
To program a single line endpoint:
Page 6-144
1.
Start the Inter-Tel 5000 Session Manager. The DB Studio window appears.
2.
From the left pane of the DB Studio window, select System – Devices and Feature
Codes – Endpoints – <local extension number>.
3.
Program the single line endpoint in accordance with user requirements. For content
guidance and data definition and control, refer to Inter-Tel CS-5200/5400/5600 Program
Planning Sheets (.DOC), part no. 835.2882. Single line endpoint programming options
appear under the Name column in Figure 6-23 ‘‘Single Line Endpoint Programming
Options’’ on page 6-145.
Mitel ® 5000 Installation Manual – Issue 3.0, October 2008
Chapter 6: Programming
Programming a Four-Port Single Line Module
Figure 6-23. Single Line Endpoint Programming Options
If you attempt to configure more than one SLM-4 module in the base chassis, the system
refuses to allow the change and displays the following message window.
Mitel ® 5000 Installation Manual – Issue 3.0, October 2008
Page 6-145
Chapter 6: Programming
Programming an Eight-Port Single Line Module
Programming an Eight-Port Single Line Module
With v2.1 and later, up to three eight-port single line modules (SLM-8) can be installed in a
Digital Expansion Interface (DEI) chassis, and up to eight single line endpoints may be
configured with each SLM-8.
You can program SLM-8 modules with the Configuration Wizard or directly in DB Programming.
Details about the Configuration Wizard process appear on page 6-93, and the direct process
appears in the following sections. For quick-reference to details while programming, refer to the
online Help.
SLM-8 Programming Overview
To activate and manage an SLM-8 module, perform the following procedures as needed.
If you do not use the Configuration Wizard to set up an SLM-8 module, carry out the procedures
in the following process in DB Programming. Step-by-step procedures appear in the “SLM-8
Programming Procedures,” next section.
1.
Program an SLM-8 module in a DEI bay.
2.
Set up one single line port with a system circuit number, as appropriate.
3.
Set up multiple, or batch, single line ports with system circuit numbers, as appropriate.
4.
Program individual endpoints in accordance with customer requirements.
Once an SLM-8 module has been installed and is in operation, the following procedures can be
used to make changes to, or remove, existing assignments. Procedures for the following tasks
also appear in the section titled “SLM-8 Programming Procedures” next:
• Change an endpoint circuit number.
• Remove a single line circuit number.
• Remove an SLM-8 module from system programming.
You can also configure the SLM-8 module with the Configuration Wizard. For further information
about this option, see “To configure the SLM-8 module:” on page 6-93.
SLM-8 Programming Procedures
The following procedures apply to the SLM-8 module.
To add an SLM-8 module to a DEI chassis:
Page 6-146
1.
Start the Inter-Tel 5000 Session Manager. The DB Studio window appears.
2.
From the left pane of the DB Studio window, select System – Communication Server –
Digital Expansion Interface <DEI n>. Status of Bay 1, Bay 2, and Bay 3 appears in the
right pane.
3.
Click an Uninstalled bay. A drop-down arrow appears in the box.
4.
Click the arrow and select Single Line Module - 8 from the drop-down list. See Figure
6-24 ‘‘SLM-8 Option in a DEI Bay Drop-Down Box’’ on page 6-147.
5.
Click anywhere in the right pane. A pop-up window appears asking if you’re sure you
want to make the change.
6.
Click Yes.
Mitel ® 5000 Installation Manual – Issue 3.0, October 2008
Chapter 6: Programming
SLM-8 Programming Procedures
Figure 6-24. SLM-8 Option in a DEI Bay Drop-Down Box
To set up one SLM-8 single line port and circuit number:
1.
Make sure an SLM-8 module is installed in a system DEI.
2.
Start the Inter-Tel 5000 Session Manager. The DB Studio window appears.
3.
From the left pane of the DB Studio window, select System – Communication Server –
Digital Expansion Interface <DEI #: Single Line Module - 8>. When you click the
desired Bay n: Single Line Module - 8, the status of the SLM-8 ports appears in the right
pane. See Figure 6-25 ‘‘SLM-8 Single Line Ports and Circuits’’ on page 6-147.
4.
Click the Port icon to the left of the port number you want to use. A drop-down box and
arrow appear.
5.
Click the drop-down arrow and select Single Line.
6.
Click anywhere in the right pane. The Create Single Line Extension window appears.
7.
Click the drop-down arrow of the Starting Extension box. A drop-down list of system
circuit numbers unfolds.
8.
Scroll to the unused circuit number you want to assign, select it, and click OK. The
selected system circuit number, or telephone extension, appears in the Circuit 1 column
next to the Port you chose. See Figure 6-25.
Figure 6-25. SLM-8 Single Line Ports and Circuits
Mitel ® 5000 Installation Manual – Issue 3.0, October 2008
Page 6-147
Chapter 6: Programming
SLM-8 Programming Procedures
To set up multiple, or batch, SLM-8 single line ports and circuit numbers:
Page 6-148
1.
Make sure an SLM-8 module is programmed in a system DEI.
2.
Start the Inter-Tel 5000 Session Manager. The DB Studio window appears.
3.
From the left pane of the DB Studio window, select System – Communication Server –
Digital Expansion Interface <DEI #: Single Line Module - 8>. When you click the
desired Bay n: Single Line Module - 8, the status of the SLM-8 ports appears in the right
pane. See Figure 6-25 ‘‘SLM-8 Single Line Ports and Circuits’’ on page 6-147.
4.
Click the Port icon to the left of the first port number you want to use. The port number
field changes color and a drop-down box and arrow appear.
5.
If the ports you want to program are in sequence, to select the batch of ports, press Shift
+ the final circuit in the batch you want. The selected port number fields change color. If
the ports are not sequential, hold down Ctrl and then select the desired port numbers
one at a time. The selected port number fields change color.
6.
Right-click the top selected port number. The Batch Change Type... command button
appears, as shown in the following illustration.
7.
Click Batch Change Type.... The Batch Change Type window appears (not shown).
8.
Select the Single Line option button and click OK. The Create Single Line Extension
window appears, as shown in the following illustration.
9.
Click the drop-down arrow, scroll to and select the Starting Extension from the list of
extension numbers, and click OK. Available sequential circuit numbers are assigned to
the selected ports and appear in the Circuit 1 column, where NONE appears prior to
assigning circuit, or extension, numbers. See Figure 6-25 ‘‘SLM-8 Single Line Ports and
Circuits’’ on page 6-147.
Mitel ® 5000 Installation Manual – Issue 3.0, October 2008
Chapter 6: Programming
SLM-8 Programming Procedures
To program single line endpoints:
1.
Start the Inter-Tel 5000 Session Manager. The DB Studio window appears.
2.
From the left pane of the DB Studio window, select System – Devices and Feature
Codes – Endpoints – <local extension number>.
3.
Program the single line endpoint in accordance with user requirements. For content
guidance and data definition and control, refer to Inter-Tel CS-5200/5400/5600 Program
Planning Sheets (.DOC), part no. 835.2882.
To uninstall an SLM-8 module:
1.
Start the Inter-Tel 5000 Session Manager. The DB Studio window appears.
2.
From the left pane of the DB Studio window, select System – Communication Server –
Digital Expansion Interface <DEI n> – Single Line Module - 8. See Figure 6-25 ‘‘SLM-8
Single Line Ports and Circuits’’ on page 6-147.
3.
Click the Bay icon to the left of the module name. The drop-down arrow appears.
4.
Click the drop-down arrow and select Uninstalled.
Mitel ® 5000 Installation Manual – Issue 3.0, October 2008
Page 6-149
Chapter 6: Programming
Attaching an External Voice Processing System to the DEI
Attaching an External Voice Processing System to the DEI
For integrated voice processing (voice mail, automated attendant, hunt group announcement
and overflow, optional Fax-On-Demand, buffered SMDR, Record-A-Call, etc.), an optional
external voice processing PC with special applications software can be attached to the system.
For additional voice processing information, refer to the Mitel 5000 Features and Programming
Guide, part number 580.8006.
NOTICE
Personal computer (PC) technology is continually evolving. As it does, the Mitel voice processing systems will continue to incorporate important design enhancements. Depending
on the actual version of equipment that is shipped, the following installation instructions
could vary somewhat. If revised instructions are included with the equipment, see the new
information instead.
Overview
An external voice processing PC is required for the Unified Messaging feature and to support
increased voice mail capacities. External voice processing is provided using Enterprise®
Messaging (EM) or the Voice Processing Unit (VPU). EM and the VPU run Windows 2000. For
additional information about these external voice processing systems, including installation,
software installation, and upgrading, refer to the following documentation:
• Enterprise® Messaging Installation Manual, part no. 780.8006 (also refer to the Addendum
to the Issue 1.1 Inter-Tel Enterprise Messaging Installation Manual For Version 1.2
Software, part number 780.8007, released in May 2008).
• Voice Processing Unit Installation Manual, part no. 835.2890.
To attach a voice processing PC to the Mitel CS-5200/5400/5600 Base Server, continue to
“Procedure” on page 6-151.
WARNING
Electric Shock Hazard. Use the LCD panel to shut down the system, then unplug the
power cord before connecting the external voice processing PC. The Mitel CS-5200/5400/
5600 Base Server power supply operates on 110 VAC and retains a charge after it has
been turned OFF. Failure to allow the high voltage to dissipate can cause bodily injury.
When used with the Mitel CS-5200/5400/5600 system, the external voice processing
PC either can be plugged into an isolated, dedicated, properly grounded AC circuit
NOTE
(through an UPS) or it can be plugged in to the UPS used for the Mitel CS-5200/
5400/5600 system.
Page 6-150
Mitel ® 5000 Installation Manual – Issue 3.0, October 2008
Chapter 6: Programming
Procedure
Procedure
This procedure provides information on how to attach an external voice processing system to
the Mitel CS-5200/5400/5600 when using the DEI. For information about installing and setting
up the available external voice processing systems, refer to the documentation provided with
those units (see above in Overview).
For sample diagrams of the assembled voice processing computer, refer to the Installation
chapter. An 8.5 ft (2.5 m) cable is available, part no. 813.1806. Or, if necessary, contact the
Mitel CommSource® division for information on purchasing longer cable lengths.
To attach an external voice processing system:
1.
2.
From a DB Programming session, do the following:
•
Perform a database backup.
•
Disable Basic Voice Mail. Select Operations – Voice Processing Operations –
Disable Basic Voice Mail.
If this is a new installation, proceed to step 3.
If this is an existing installation,
•
Back up Basic Voice Mail. See “Saving the System and Voice Processor
Databases” on page 5-91.
•
Disable Basic Voice Mail. See “Enable Basic Voice Mail or Disable Basic Voice
Mail” on page 5-93.
3.
Install the external voice processing PC in the rack under the DEI chassis. If the voice
processing PC cannot be placed in the rack, place it in proximity to the rack (distance is
limited by the connection cable provided). If necessary, follow the instructions included
with the voice processing PC you purchased.
4.
Attach the Ethernet cables from both chassis to the LAN. Use a switch if necessary. Do
not use a hub. For more information, refer to the Installation chapter.
5.
Attach the cable, part no. 813.1806, from the external voice processing PC to the DEI
chassis.
NOTICE
External Voice Mail Inoperability. If you have an existing external voice processing
system (VPU or EM), you cannot use the existing cable to connect the external voice
processing system to the Mitel CS-5200/5400/5600 Base Server. You must use cable
part no. 813.1806.
6.
Plug the UPS into an isolated, dedicated single-phase commercial power source.
7.
Attach and plug in the power cord for the Mitel CS-5200/5400/5600, DEI(s), and voice
processing PC chassis. Check that all systems are powered up.
8.
Program the external voice processing system to connect to the Mitel CS-5200/5400/
5600 system. Refer to the external voice processing system manual for information.
Use the Administration Web Session pages to verify that Basic Voice Mail is disabled. The
Administrative Web Session login/password is it5k/itpassw.
Mitel ® 5000 Installation Manual – Issue 3.0, October 2008
Page 6-151
Chapter 7: Reference
Reference
Chapter 7: Reference
Chapter Overview . . . . . . . . . . . . . . . . . . . . . . . . . . . . . . . . . . . . . . . . . . . . . . . . . . . . . . . . . . . . . .7-2
Technical Support Contact Information . . . . . . . . . . . . . . . . . . . . . . . . . . . . . . . . . . . . . . . . . . . .7-2
Replacement Parts . . . . . . . . . . . . . . . . . . . . . . . . . . . . . . . . . . . . . . . . . . . . . . . . . . . . . . . . . . . . .7-2
Parts Ordering Procedure . . . . . . . . . . . . . . . . . . . . . . . . . . . . . . . . . . . . . . . . . . . . . . . . . . . . .7-2
Rationale for Stocking Spare Parts . . . . . . . . . . . . . . . . . . . . . . . . . . . . . . . . . . . . . . . . . . . . . .7-2
Parts and Part Numbers . . . . . . . . . . . . . . . . . . . . . . . . . . . . . . . . . . . . . . . . . . . . . . . . . . . . . .7-3
Version 3.0 Parts . . . . . . . . . . . . . . . . . . . . . . . . . . . . . . . . . . . . . . . . . . . . . . . . . . . . . . . .7-3
System Kits . . . . . . . . . . . . . . . . . . . . . . . . . . . . . . . . . . . . . . . . . . . . . . . . . . . . . . . . . . . .7-4
Compact Flash-Type Memory Cards . . . . . . . . . . . . . . . . . . . . . . . . . . . . . . . . . . . . . . . . .7-4
Replacement Parts. . . . . . . . . . . . . . . . . . . . . . . . . . . . . . . . . . . . . . . . . . . . . . . . . . . . . . .7-4
Trunk Interfaces/Modules. . . . . . . . . . . . . . . . . . . . . . . . . . . . . . . . . . . . . . . . . . . . . . . . . .7-5
Licenses . . . . . . . . . . . . . . . . . . . . . . . . . . . . . . . . . . . . . . . . . . . . . . . . . . . . . . . . . . . . . . .7-5
Digital Expansion Equipment . . . . . . . . . . . . . . . . . . . . . . . . . . . . . . . . . . . . . . . . . . . . . . .7-6
Cables . . . . . . . . . . . . . . . . . . . . . . . . . . . . . . . . . . . . . . . . . . . . . . . . . . . . . . . . . . . . . . . .7-6
Direct Station Select (DSS)/Busy Lamp Field (BLF) Equipment . . . . . . . . . . . . . . . . . . . .7-7
Analog Single Line Modules. . . . . . . . . . . . . . . . . . . . . . . . . . . . . . . . . . . . . . . . . . . . . . . .7-7
Batteries . . . . . . . . . . . . . . . . . . . . . . . . . . . . . . . . . . . . . . . . . . . . . . . . . . . . . . . . . . . . . . .7-7
Endpoints, Softphones, and Related Endpoints. . . . . . . . . . . . . . . . . . . . . . . . . . . . . . . . .7-8
Documentation . . . . . . . . . . . . . . . . . . . . . . . . . . . . . . . . . . . . . . . . . . . . . . . . . . . . . . . . . .7-9
Abbreviations and Acronyms . . . . . . . . . . . . . . . . . . . . . . . . . . . . . . . . . . . . . . . . . . . . . . . . . . . .7-10
Glossary . . . . . . . . . . . . . . . . . . . . . . . . . . . . . . . . . . . . . . . . . . . . . . . . . . . . . . . . . . . . . . . . . . . . .7-14
Mitel ® 5000 Installation Manual – Issue 3.0, October 2008
Page 7-1
Chapter 7: Reference
Chapter Overview
Chapter Overview
The Reference chapter contains information such as technical support contact information and
replacement parts and part numbers. Endpoint feature codes as well as system-wide feature
codes are listed. Acronyms and glossary terms are also provided.
Technical Support Contact Information
Table 7-1 summarizes important contact information you may need when installing, upgrading,
or servicing a Mitel 5000 platform. For your reference, write in the applicable e-mail address and
phone number.
Table 7-1. Contact Information
Department or Function
E-mail Address
Phone No.
Local Mitel provider (provide at right)
Technical Publications
[email protected]
N/A
Technical Support Department
N/A
1-888-777-3279
Replacement Parts
This section provides information to help the customer order and stock replacement parts for
the Mitel® CS-5200, CS-5400, and CS-5600 Communication Servers.
Parts Ordering Procedure
When ordering equipment for the Mitel platform, provide the following information to the order
processing clerk:
•
•
•
•
•
Company name
Purchase order number
Required date of shipment
Part number(s) of equipment ordered
Quantity required
Rationale for Stocking Spare Parts
Mitel is dedicated to providing and supporting the best possible service for all customers. As a
way of achieving this goal, Mitel recommends that its dealers and branches establish and
maintain an inventory of spare parts to minimize interruption of service to customers’ business
operations.
To minimize the effects of any service outage that a customer may experience, critical parts
should be kept as spares in dealer and branch inventory. However, because each customer’s
installation may be different, coming up with a meaningful list of spare parts that would apply to
all customers is not feasible. Mitel recommends that dealers and branches assess the critical
needs of their installed customer base.
Dealers and branches need to identify the parts that, in the event of system failure, would result
in a significant interruption of the customer’s business operations. Having been identified for
each customer’s needs, these critical parts could be considered a meaningful list of spare parts
to keep in inventory. The spare parts inventory should be adjusted in accordance with changes
that occur to the customer base or to the versions of items being maintained in inventory.
Customers may join or leave the installed base, or existing customers may modify their systems
or purchase new equipment. As well, changes to hardware, firmware, and software may affect
the currency or effectivity of the revision levels being maintained in the dealer or branch spare
parts inventory.
Page 7-2
Mitel ® 5000 Installation Manual – Issue 3.0, October 2008
Chapter 7: Reference
Parts and Part Numbers
Parts and Part Numbers
For reference purposes only, the following tables list selected Mitel CS-5200/5400/5600
platform equipment, bills of material, parts, software, licenses, and documentation. The part
numbers are valid and the descriptions coincide with the names used in the manual. However,
the names shown may differ from the names appearing on the current Mitel Parts List. For
ordering purposes, use the following tables for reference but rely on the current Mitel Price List
for details.
Version 3.0 Parts
The following table lists new parts and part numbers for v3.0.
Table 7-2. Version 3.0 Parts and Part Numbers
Part
Part Number
System Software
Mitel 5000 v3.0 license
840.0815
Mitel 5000 v2.x to v3.0 Upgrade license
840.0816
Mitel 5000 v3.0 CD
841.0986
Mitel 5000 Database (DB) Programming Installation (v3.0)
841.0987
All U.S. Applications (v3.0)
841.0988
All U.K. Applications (v3.0)
841.0989
All Prompts (v3.0)
841.0990
Enterprise Messaging (v1.2)
841.0991
Enterprise Messaging (v2.0)
841.1006
Mitel 5000 U.S. PS-1 Installation Image (v3.0)
841.0993
Mitel 5000 U.K. PS-1 Installation Image (v3.0)
841.0994
Software Feature License
Mitel 5000 DEI #3 License
840.0817
Mitel 5000 DEI #4 License
840.0818
Mitel 5000 File-Based Music Source License
840.0819
Mitel 5000 System Health Report License
840.0820
Mitel 5000 IP Enable Unit License
840.0821
Mitel 5000 SIP Peering Voice mail Port License
840.0825
Mitel Voice Processor Messaging Networking License
840.0232
Documentation (new)
Mitel 5000 Reference Manual
Mitel ® 5000 Installation Manual – Issue 3.0, October 2008
580.8007
Page 7-3
Chapter 7: Reference
System Kits
System Kits
Table 7-3 summarizes the system kits available for the Mitel 5000 Network Communications
Solutions family of products.
Table 7-3. Mitel 5000 System Kits
Part
Number
Description
Mitel CS-5400 Kit
580.9004
Provides materials and licensing to upgrade a base package (580.9000,
580.9001, 580.9002, 580.9003, 580.9044, 580.9045, 580.9046,
580.9047) to a Mitel CS-5400 platform.
Mitel CS-5400 to CS-5600 Upgrade Kit
580.5606
Converts an existing Mitel CS-5400 system to a Mitel CS-5600.
Mitel CS-5600 Kit
580.5605
Provides materials and licensing to upgrade a base package (580.9000,
580.9001, 580.9002, 580.9003, 580.9044, 580.9045, 580.9046,
580.9047) to a Mitel CS-5600 platform.
Compact Flash-Type Memory Cards
Table 7-4 identifies the compact flash-type memory cards available for use in Mitel 5000
platforms.
Table 7-4. Compact Flash-Type Memory Cards
Part Number
[Europe]
Description
Compact Flash-Type Memory Card with Software, 1024 MB
841.0273 [841.0277]
Compact Flash-Type Memory Card with Software, 512 MB
841.0274 [841.0278]
Replacement Parts
Table 7-5 identifies the system equipment and parts available for Mitel 5000 platforms.
Table 7-5. Replacement Parts
Description
Part Number
[Europe]
Processor Module (PM-1)
580.2000
Processor Expansion Card (PEC-1)
580.2020
Digital Expansion Interface (DEI) – See Table 7-8 on page 7-6.
Miscellaneous Equipment
Page 7-4
Modem 5000/Axxess Modem Kit
550.3026
5-Button Keypad, PCBA
580.2600
Mounting Brackets for Mitel 5000 base chassis (pair)
823.1416
Mounting Brackets for Mitel 5000 base chassis (pair)
823.1392
Null Modem with Hardware Flow Control for Processing Server (PS-1)
804.2605
Mitel ® 5000 Installation Manual – Issue 3.0, October 2008
Chapter 7: Reference
Trunk Interfaces/Modules
Trunk Interfaces/Modules
Table 7-6 summarizes the modules and endpoints available and licensing required to connect to
trunks on the public telephone network.
Table 7-6. Public Network Trunk Interfaces
Description
Part Number
AudioCodes MP-114 SIP Gateway
See “The following new SIP gateways are available through the
Mitel® CommSource® division:” on page 5-202 for details.
901.3924
Quintum AFT 400 gateway
See “The following new SIP gateways are available through the
Mitel® CommSource® division:” on page 5-202 for details.
590.5349
IP Gateway Trunk License
Determines the number of IP gateway trunks in the system when
using an external IP gateway. One IP Gateway Trunk License
required per gateway trunk port.
840.0234
IP Single Line Adapter (IP-SLA)
Requires one Category C license.
770.3000
ISDN Basic Rate Module (BRM-S), Two-Port [Sold only in Europe]
580.2240
Loop Start Module, Four-Port (LSM-4)
580.2304
PRI License
Enables PRI on T1 Module. One PRI License required for each
T1M module needing PRI.
840.0227
T1/E1 Module (T1M)
580.2700
Dual T1/E1 Module (T1M-2)
580.2702
Licenses
Table 7-7 summarizes the licenses available for Mitel 5000 platforms.
Table 7-7. Mitel 5000 Platform Licenses and Security Key
Description
Part Number
IP Endpoints
Category A IP Endpoint
840.0226
Category B IP Endpoint
840.0414
Category C IP Endpoint
840.0415
a
Category D License
840.0416
Miscellaneous Licenses
Single Node Connec