1
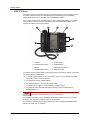
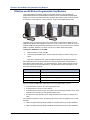
Mitel® 5000 Communications Platform
Phone User Guide Supplement
For Version 3.2 Software
Introduction . . . . . . . . . . . . . . . . . . . . . . . . . . . . . . . . . . . . . . . . . . . . . . . . . . . . . . . . . . . . . . . . . . . . 2
Affected User Guides . . . . . . . . . . . . . . . . . . . . . . . . . . . . . . . . . . . . . . . . . . . . . . . . . . . . . . . . . . . . 2
5000 CP Devices . . . . . . . . . . . . . . . . . . . . . . . . . . . . . . . . . . . . . . . . . . . . . . . . . . . . . . . . . . . . . . . . 3
8528 and 8568 Digital Telephones . . . . . . . . . . . . . . . . . . . . . . . . . . . . . . . . . . . . . . . . . . . . . . . 3
5304 IP Phone . . . . . . . . . . . . . . . . . . . . . . . . . . . . . . . . . . . . . . . . . . . . . . . . . . . . . . . . . . . . . . 5
5320 IP Phone . . . . . . . . . . . . . . . . . . . . . . . . . . . . . . . . . . . . . . . . . . . . . . . . . . . . . . . . . . . . . . 6
5312/5324 IP Phones . . . . . . . . . . . . . . . . . . . . . . . . . . . . . . . . . . . . . . . . . . . . . . . . . . . . . . . . . 7
12-Button and 48-Button Programmable Key Modules . . . . . . . . . . . . . . . . . . . . . . . . . . . . . . . 8
Personal Call Routing . . . . . . . . . . . . . . . . . . . . . . . . . . . . . . . . . . . . . . . . . . . . . . . . . . . . . . . . . . . . 9
Personal Call Routing Feature Codes . . . . . . . . . . . . . . . . . . . . . . . . . . . . . . . . . . . . . . . . . . . . 9
Using Personal Call Routing . . . . . . . . . . . . . . . . . . . . . . . . . . . . . . . . . . . . . . . . . . . . . . . . . . . 10
Enabling and Disabling Personal Call Routing. . . . . . . . . . . . . . . . . . . . . . . . . . . . . . . . . . 10
Answering Routed Calls . . . . . . . . . . . . . . . . . . . . . . . . . . . . . . . . . . . . . . . . . . . . . . . . . . . 10
Using the Handoff Feature . . . . . . . . . . . . . . . . . . . . . . . . . . . . . . . . . . . . . . . . . . . . . . . . . 11
Using Remote Programming . . . . . . . . . . . . . . . . . . . . . . . . . . . . . . . . . . . . . . . . . . . . . . . 11
Troubleshooting . . . . . . . . . . . . . . . . . . . . . . . . . . . . . . . . . . . . . . . . . . . . . . . . . . . . . . . . . . . . 12
5330 and 5340 IP Phone Display Enhancements . . . . . . . . . . . . . . . . . . . . . . . . . . . . . . . . . . . . . 13
Embedded Screen Saver . . . . . . . . . . . . . . . . . . . . . . . . . . . . . . . . . . . . . . . . . . . . . . . . . . . . . 13
Text Size Control . . . . . . . . . . . . . . . . . . . . . . . . . . . . . . . . . . . . . . . . . . . . . . . . . . . . . . . . . . . 16
Support for NuPoint UM Displays and Menu Button Options . . . . . . . . . . . . . . . . . . . . . . . . . . . 17
Document Part Number 835.3262-1
A946/4373A
Page 1
© Mitel Networks Corporation September 2009
Introduction
Introduction
This user guide supplement was created for the Mitel 5000 Communications Platform (CP)
version 3.2 software release. This supplement specifies the affected 5000 CP user guides, and
provides information and instructions for the 5000 CP v3.2 new features and changes. See the
following sections for details:
• “Affected User Guides” below
• “5000 CP Devices” on page 3
• “Personal Call Routing” on page 9
• “5330 and 5340 IP Phone Display Enhancements” on page 13
• “Support for NuPoint UM Displays and Menu Button Options” on page 17
Affected User Guides
This document provides supplemental information and instructions for the following existing
Mitel 5000 phone user guides:
• 8500 User Guide, part number 550.8114
• 8520 User Guide, part number 550.8112
• 8560/8660 User Guide part number 550.8113
• 8600 User Guide, part number 550.8115
• 8620/8622 User Guide, part number 550.8119
• 8662 User Guide, part number 550.8117
• 5212/5224 User Guide, part number 550.8122
• 53201/5330/5340 User Guide, part number 550.8123
• Single Line User Guide, part number 550.8107
• Executive Display/IP Phone Plus User Guide, part number 550.8108
• Standard Display/Basic Digital User Guide, part number 550.8109
• Professional Display Phone User Guide, part number 560.8002
• Associate Display/Basic Digital User Guide, part number 560.8003
The information covered in this document also applies to the following user guides, which are
new for v3.2:
• 8528 User Guide, part number 550.8032
• 8568 User Guide, part number 550.8033
• 5304 User Guide, part number 550.8034
• 5312/5324 User Guide, part number 550.8035
1.
Page 2
The 5320 is a newly supported device for 500 CP v3.2. Because of its similarity to the 5330 and 5340
IP phones, the 5320 is now included in the combined user guide.
Mitel® 5000 CP Phone User Guide Supplement for v3.2, September 2009
5000 CP Devices
5000 CP Devices
5000 CP v3.2 includes support for the following devices:
• “8528 and 8568 Digital Telephones” below
• “5304 IP Phone” on page 5
• “5320 IP Phone” on page 6
• “5312/5324 IP Phones” on page 7
• “12-Button and 48-Button Programmable Key Modules” on page 8
8528 and 8568 Digital Telephones
The new Mitel 8528 and 8568 digital telephones replace the existing 8520 and 8560 digital
telephones, respectively. The 8528 provides a 2-line Liquid Crystal Display (LCD). The 8568
provides a 6-line LCD with menu buttons. Images of both phones appears below.
7
1
2
3
6
4
5
8528 – 2-Line Digital Telephone
8
7
1
2
3
6
4
5
8568 – 6-LIne Digital Telephone
1 – Liquid Crystal Display (LCD)
5 – Programmable buttons
2 – Ring/Message Indicator
6 – External speaker
3 – Feature buttons
7 – Handset
4 – Dialpad buttons
8 – Menu buttons (8568 only)
Mitel® 5000 CP Phone User Guide Supplement for v3.2, September 2009
Page 3
8528 and 8568 Digital Telephones
The new 8528 and 8568 telephones function similar to the 8520 and 8560, but include the
following functional differences:
• The 8528 and 8568 require 5000 CP software v3.2 or later. They are not backwardcompatible with previous 5000 CP software versions and they are not compatible with
Inter-Tel Axxess systems.
• The 8528 and 8568 run on programmable firmware that is downloaded to the telephone
when it first comes online and when updates become available.
• The 8528 and 8568 telephones support the Mitel 12- and 48-Button Programmable Key
Modules (PKMs). They do not support the 8450 50-Button Direct Station Select/Busy
Lamp Field (DSS/BLF) unit or the 8416 Mini-DSS unit.
• The 8528 and 8568 telephones do not support the Personal Computer Data Port Module
(PCDPM) or Modem Data Port Module (MDPM).
• The 8528 and 8568 do not support the Off-Hook Voice Announce (OHVA) feature.
For installation information, refer to the Mitel 8528/8568 Telephone Installation Guide, part
number 835.3259. This document is shipped in the box with the telephone.
For information and instructions for supported features, refer to the following documents:
• Mitel 8528 Telephone User Guide, part no. 550.8032
• Mitel 8568 Telephone User Guide, part no. 550.8033
Page 4
Mitel® 5000 CP Phone User Guide Supplement for v3.2, September 2009
5304 IP Phone
5304 IP Phone
The Mitel 5304 IP phone is a compact, feature-rich phone that provides voice communication
over an IP network. The 5304 has a back-lit liquid crystal display (LCD), display-assisted feature
access, and a Ring/Message Indicator. In addition, for one-touch feature access, the 5304 has
nine programmable buttons. An image of the 5304 IP phone is provided below.
1
3
2
4
8
6
5
7
1 – Liquid Crystal Display (LCD)
5 – Programmable buttons
2 – Ring/Message Indicator
6 – Volume buttons
3 – External speaker
7 – Dialpad buttons
4 – Handset
8 – Hookswitch
The 5304 IP phone functions similar to the 5212 IP phone on the 5000 CP system, but includes
the following functional differences:
• The 5304 IP phone requires 5000 CP software v3.2 or later. It is not backward-compatible
with previous 5000 CP software versions.
• The 5304 IP phone does not have an external microphone and therefore does not support
handsfree operation.
• The 5304 IP phone does not have a dedicated headset jack and therefore does not fully
support headset operation.
• The 5304 IP phone’s dialpad is located under the handset and therefore does not support
on-hook dialing.
In addition the 5304 does not support the following features and peripheral devices:
• OHVA
• Ringer cadence/pitch adjust
• Module operation (Line Interface Module, Mitel 5310 Conference Unit, Programmable Key
Modules)
• Cordless operation (cordless module, cordless handset, cordless headset)
For installation information, refer to the Mitel 5304 IP Phone Installation Guide, part number
57009901. This document is shipped in the box with the phone.
For information and instructions for supported features, refer to the Mitel 5304 IP Phone User
Guide, part no. 550.8034.
Mitel® 5000 CP Phone User Guide Supplement for v3.2, September 2009
Page 5
5320 IP Phone
5320 IP Phone
The 5320 IP phone is a full-feature, dual port phone that provides voice communication over an
IP network. The phone has a 160 x 320 (pixels) liquid crystal display (LED), self-labeling
programmable buttons, on-hook dialing, and a Ring/Message Indicator.
For one-touch feature access, the 5320 IP Phone has11 programmable buttons, and 10 fixed
feature buttons to access commonly used features such as Transfer, Redial, Mute, etc. An
image of the 5320 IP phone is shown below.
1
2
3
4
5
8
6
7
1 – Handset
5 – Feature buttons
2 – Programmable buttons
6 – Dialpad buttons
3 – Display
7 – Navigation page buttons
4 – Ring/Message Indicator
8 – External speaker
The 5320 IP phone functions similar to the 5330 IP phone on the 5000 CP system, but includes
the following functional differences:
• The 5320 requires 5000 CP v3.2 or later system software. It is not backward compatible
with earlier versions of system software.
• The 5320 does not have a backlit display.
• The top three buttons on the 5320 do not have LEDs.
• The 5320 does not support a cordless module or cordless devices.
• The 5320 has fewer programmable keys and does not support multiple pages of
programmable keys.
T
NOTE
The display enhancements for the 5330 and 5340 IP phones are also supported
on the 5320 IP phone. See page 13 for more information.
For installation information, refer to the Mitel 5320 IP Phone Installation Guide, part number
57010765. This document is shipped in the box with the phone.
For information and instructions for supported features, refer to the Mitel 5320/5330/5340 IP
Phone User Guide, part no. 550.8123.
Page 6
Mitel® 5000 CP Phone User Guide Supplement for v3.2, September 2009
5312/5324 IP Phones
5312/5324 IP Phones
The 5312/5324 IP phones function similar to the 5212/5224 IP phones on the 5000 CP system.
Prior to v3.2, the 5312/5324 IP phones were supported by 5000 CP system software, however,
when the phones came online, they simulated the 5212/5224 IP phones. For v3.2 and later, the
5312/5324 IP phones now come online as the appropriate model IP phone.
The 5312/53224 IP phones are full-feature, dual port phones that provide voice communication
over an IP network. Both phones have a back-lit liquid crystal display (LCD), display-assisted
feature access, on-hook dialing, 10 fixed feature buttons, and a Ring/Message Indicator. For
one-touch feature access, the 5312 IP Phone has 12 programmable buttons and the 5324 IP
Phone has 24 programmable buttons. Images of the phones appear below.
1
2
3
4
7
5
6
5312 IP Phone
1
2
3
4
7
5
6
5224 IP Phone
1 – Handset
5 – Dialpad buttons
2 – Display
6 – Programmable buttons
3 – Ring/Message Indicator
7 – External speaker
4 – Feature buttons
For installation information, refer to the Mitel 5312/5324 IP Phone Installation Guide, part
number 57009711. This document is shipped in the box with the phone.
For information and instructions for supported features, refer to the Mitel 5312/5324 IP Phone
User Guide, part no. 550.8035.
Mitel® 5000 CP Phone User Guide Supplement for v3.2, September 2009
Page 7
12-Button and 48-Button Programmable Key Modules
12-Button and 48-Button Programmable Key Modules
The Programmable Key Modules (PKM) are peripheral devices that provide additional
programmable buttons for the Mitel 5224 and 5324 IP phones and the 8528 and 8568 digital
telephones. There is a 12-button PKM and a 48-button PKM, which provide one-button access
to extensions, trunks, features, or other resources. Images of both PKMs appear below.
The PKMs connect to the phones using the modular cable included with the PKMs and an IP
PKM Interface Module (IM) installed in the phones. You can connect one 12 -button or up to two
48-button PKMs (providing 96 additional buttons) to the phone. You cannot connect a 12-button
PKM to a 48-button PKM and you cannot connect two 12-button PKM units together.
To program a PKM button on the PKM:
1.
With the handset on-hook, dial 397.
2.
Press the programmable button, and then enter the number you want to assign to the
button.
Refer to the appropriate user guide for additional details about programming buttons.
Each PKM button has a line status indicator and may be programmed as a feature button, a
Direct Station Select (DSS) button, or a Speed Dial button. The line status indicators work the
same way as those on the associated phones. The table below provides a description of the
status line indicator lamp signals.
Lamp Signals
Description
Continuously lit
The extension is busy or off-hook.
Slowly flashing
The extension is in Do-Not-Disturb (DND).
Quickly flashing
The extension has a call ringing in.
Continuously flashing
The extension is off-hook.
After you program a PKM button, depending on how you programmed it, you can:
• Press the button to place a call to the assigned extension.
• Press the button to access a system feature.
• Press the button and then hang up to transfer a call to the assigned extension. If the call is
transferred to voice mail, you hear repeating double tones.
• Visually monitor the call activity of the assigned extension if the button you assign has a
lamp.
For installation information, refer to the following documents, which are shipped in the box with
the PKM:
• Mitel IP Programmable Key Module (PKM) 12 Installation Guide, part number 56004531.
• Mitel IP Programmable Key Module (PKM) 48 Installation Guide, part number 56004530.
Page 8
Mitel® 5000 CP Phone User Guide Supplement for v3.2, September 2009
Personal Call Routing
Personal Call Routing
When you enable Personal Call Routing on your phone, your incoming calls are automatically
routed to one or more preprogrammed associated destinations according to the routing steps
programmed for you.
Typically, your desk phone is configured as your main extension. You may be programmed for
up to five associated destinations including:
• softphone
• home IP phone
• voice mail
• mobile phone
• home phone
Your desk phone, softphone, home IP phone and voice mail extensions are already
programmed in the system, so your system administrator can easily include them in your routing
steps. To include your mobile and home phone numbers in your routing steps, you will need to
provide these numbers to your system administrator.
Personal Call Routing also includes the Handoff feature, which includes the following functions:
• The Handoff “push” function allows you to move an active call from your main extension to
all of your associated destinations (except voice mail). You can then determine which
device to use to answer the call. The push function is useful if you are leaving your work
area, but want to remain connected to a call. For example, you can push a call from your
desk phone to your mobile phone. While the push is in progress, you can still hear and talk
to the other party from your desk phone. When you answer the call at your mobile phone,
there may be a brief break in the audio, which may be noticeable to the other parties on
the call.
• The Handoff “pull” function allows you to move a call that was previously routed to your
mobile or home phone back to your main extension. The pull function is useful if you
answered a call on your mobile phone, but have since returned to your desk. After you pull
a call back to your desk phone it is connected immediately and you can access system
features such as conference, hold, and transfer.
NOTE
The Handoff feature is only supported on your main extension, typically your desk
phone. However, if you share a desk phone with one or more coworkers and your
main extension is a phantom extension, you cannot use the Handoff feature.
The following call types do not follow Personal Call Routing:
• Hunt group calls
• Hunt group announcement/overflow calls
• Transfer recalls, Hold recalls, Conference recalls, and Attendant recalls
NOTE
A recall occurs when a feature cannot be completed or the feature times out, and
the call returns to the originating extension. For example, a holding call will recall
the extension where it was placed on hold when the hold timer expires.
Personal Call Routing Feature Codes
Personal Call Routing includes the following feature codes:
• Personal Call Routing On: 363
• Personal Call Routing Off: 362
• Personal Call Routing On/Off: 364
• Personal Call Routing – Handoff (push and pull): 388
Mitel® 5000 CP Phone User Guide Supplement for v3.2, September 2009
Page 9
Using Personal Call Routing
Using Personal Call Routing
When you enable Personal Call Routing, your incoming calls are routed as specified by the
routing type programmed for you by your system administrator. The table below provides
descriptions for the default routing types.
Routing Type
Description
Mobile Twinning
Calls simultaneously ring your desk phone and mobile phone, before
going to voice mail.
Delayed Mobile
Twinning
Calls ring your desk phone first, and then ring both your desk phone and
mobile phone, before going to voice mail.
Check with your system administrator to see which routing type has been programmed for you.
Your administrator can modify these routing types by adding or removing routing steps, adding
or removing destinations, and changing the ring timers, if required.
To ensure that calls are routed correctly to your mobile and home phones, inform your system
administrator if either of these phone numbers change.
Enabling and Disabling Personal Call Routing
You can enable and disable Personal Call Routing from you main extension.
To enable Personal Call Routing:
Dial 363 or 364. PERSONAL ROUTING ON appears on the display.
To disable Personal Call Routing:
Dial 362 or 364. PERSONAL ROUTING OFF appears on the display.
Answering Routed Calls
To answer calls routed to your softphone or home IP phone, simply answer the call as you
normally would. See the instructions below to answer calls routed to your mobile and home
phones.
To answer a call routed to your mobile or home phone:
1.
Answer the call when it rings your phone. After you speak, the Personal Call Routing
prompt is played.
2.
Do one of the following:
•
Press # to accept the call.
NOTE
•
You do not need to wait for the prompt to accept the call. You can
accept the call immediately by pressing the # key.
Press * to send the call to the voice mailbox associated with your main extension
(not your mobile phone or home phone voice mailbox). If you do not have a voice
mailbox, the “Press *...” prompt is not played and the call is routed to your main
extension.
If you hang up, the call continues to follow the programmed routing steps.
Page 10
Mitel® 5000 CP Phone User Guide Supplement for v3.2, September 2009
Using the Handoff Feature
Using the Handoff Feature
Personal Call Routing also includes the Handoff feature that allows you to “push” calls from your
main extension to your associated destinations, and “pull” calls from your mobile and home
phones back to your main extensions (see page 9).
To use the Personal Call Routing – Handoff “push” feature:
1.
While on an active call, press the Special button, and then dial 388. HANDOFF IN
PROGRESS appears on the display and the call rings all of your associated destinations
(except voice mail).
2.
Answer the call at one of your associated destinations. For mobile and home phones,
press # to accept the call.
To use the Personal Call Routing – Handoff “pull” feature:
While on an active call on your mobile or home phone, go off hook at your main
extension and dial 388. A confirmation tone is played and the call is pulled back to the
main extension.
To cancel the Personal Call Routing – Handoff feature:
While the handoff is in-progress, do one of the following:
•
Press the Special button, and then dial 388.
•
Press the CANCEL HANDOFF menu button.
HANDOFF CANCELLED appears on the display for your main extension.
Using Remote Programming
You can use Remote Programming (feature code 359) to enable or disable the Personal Call
Routing feature from another system or an external phone. To use Remote Programming from
an external phone, your system administrator must program a Direct Inward System Access
(DISA) number for your main extension.
To use Remote Programming to enable Personal Call Routing:
1.
Do one of the following:
•
Call the DISA number. If necessary, enter the DISA password.
•
Use any phone on the system.
2.
Dial 359.
3.
Enter your main extension number.
4.
Enter your password followed by #.
5.
Dial 363 (Personal Call Routing On).
To use Remote Programming to disable Personal Call Routing:
Follow steps 1 - 4 above, dial 362 (Personal Call Routing Off), and then hang up.
Mitel® 5000 CP Phone User Guide Supplement for v3.2, September 2009
Page 11
Troubleshooting
Troubleshooting
When attempting to use the handoff feature, you may see the NO CALL TO HANDOFF display.
This message indicates that one of the following may have occurred:
• You tried to use the Handoff feature on a call that has not been routed by Personal Call
Routing.
• You tried to use the Handoff feature on a call that the system has not yet recognized as a
valid call.
• You tried to use the Handoff feature on an unsupported extension. The Handoff feature is
supported on the main extension only.
• You tried to use the Handoff feature on a phantom extension. The Handoff feature is not
supported on phantom extensions.
• You entered the Handoff feature code at the exact time the other party on the call
disconnected.
• The call was terminated for some reason.
If you have enabled Personal Call Routing and you think that your calls are not being routed
correctly, or you see the INVALID ROUTING DESTINATION display, contact your system
administrator.
Page 12
Mitel® 5000 CP Phone User Guide Supplement for v3.2, September 2009
5330 and 5340 IP Phone Display Enhancements
5330 and 5340 IP Phone Display Enhancements
For v3.2 and later, the 5000 CP supports two display enhancements for the 5330 and 5340 IP
phones:
• “Embedded Screen Saver” below
• “Text Size Control” on page 16
These features are also supported on the new 5320 IP phone (see page 6).
Embedded Screen Saver
For software version 3.2 and later, the 5330 and 5340 IP phones now include an embedded
screen saver that you can configure for your display.
By default the screen saver image is disabled. When your phone enters screen saver mode,
only the phone’s backlight dims. All 5340 and newer 5330 phones have a backlight.
You can enable the screen saver image and when your phone enters screen saver mode, the
phone’s backlight dims and the embedded screen saver image, similar to the one below,
appears on your display.
NOTE
The screen saver image is the same image you see when you press
(Applications) and select the About 5330/5340 IP Phone menu option.
Mitel® 5000 CP Phone User Guide Supplement for v3.2, September 2009
Page 13
Embedded Screen Saver
Screen saver options include the following:
• Screen saver timeout: Specifies how long your phone is idle before it enters screen saver
mode. Options include 1 minute, 5 minutes, 10 minutes, and 15 minutes. By default, the
timeout period is set to 5 minutes.
• Display Image option: Specifies how your phone’s screen saver mode functions:
o
If you enable the screen saver image, the image appears and your backlight dims
when your phone enters screen saver mode.
o If you disable the screen saver image, only your backlight dims when your phone
enters screen saver mode.
By default, the Display Image option is disabled.
• Brightness options: Specifies the brightness level for your phone display when it is in
screen saver mode. This option only applies to your phone if it has a backlight (all 5340
and newer 5330 phones).
To configure the screen saver on your 5330/5340 IP phone:
1.
Press
(Applications).
2.
Press Screen Saver.
3.
Configure your screen saver options:
a. Select one of the following screen saver timeout options:
Page 14
o
15 minutes
o
10 minutes
o
5 minutes
o
1 minute
Mitel® 5000 CP Phone User Guide Supplement for v3.2, September 2009
Embedded Screen Saver
b. If desired, enable the Display Image option:
o
If you enable the Display Image option, the screen saver image appears and
your backlight dims when your phone enters screen saver mode, as specified
by the screen saver timeout setting.
o
If you disable the Display Image option, only your backlight dims (if your
phone has a backlight) when your phone enters screen saver mode, as
specified by the screen saver timeout setting. This is the default setting.
c. Configure brightness options if your phone has a backlight (all 5340 and newer 5330
phones).
Options include:
o
Brightness+: Increases the brightness of the display when your phone is in
screen saver mode.
o
Brightness-: Decreases the brightness of the display when your phone is in
screen saver mode.
o
Show Brightness: Shows the brightness level of the display when your
phone is in screen saver mode. The display returns to normal after
approximately two seconds.
4.
Press Save.
5.
Press Close to exit the Applications menu.
To wake your phone from screen saver mode:
Lift the handset or press any button to wake the phone.
Mitel® 5000 CP Phone User Guide Supplement for v3.2, September 2009
Page 15
Text Size Control
Text Size Control
For software v3.2 and later, if you are using a 5330 or 5340 IP phone, you can control the size
of the text that appears on the display for programmable buttons. This enhancement does not
apply to the text size that appears on the display for the menu buttons.
Text size options include:
• Large text: Provides one line of basic information for the features and functions
programmed for the button. Large text is enabled by default.
• Small text: Provides a first line of basic information and a second line of supplemental
information for the features and functions programmed for the button.
The table below includes several examples for the large text and small text display options.
Programmable
Button
Large Text
Example
Small Text
Example
Station Speed Dial
Monica S
Monica S
25598
System Speed Dial
Chandler TS
Chandler TS
4809619000
Direct Station
Selection (DSS)
Jessica A
Programmable
Feature
DND
Intercom Call (IC)
Jessica A
28899
IC
480-961-9000
The station speed-dial number
programmed for the button.
The system speed-dial number
programmed for the button.
The extension number programmed
for the user.
(372)
The feature code that corresponds
to the feature programmed for the
button.
IC
The name or number for the other
party on the internal call.
DND
Charlie B
Call Key
Second line provides...
480-961-9000
The caller ID (if available).
Mitel Networks
Page 16
Mitel® 5000 CP Phone User Guide Supplement for v3.2, September 2009
Support for NuPoint UM Displays and Menu Button Options
To change the text size on a 5330 or 5340 display:
1.
Press
(Applications).
2.
Press Text Size.
3.
Select Large Text or Small Text.
4.
Press Save to save the setting.
5.
Press Close to exit the Applications menu.
Support for NuPoint UM Displays and Menu Button Options
5000 CP v3.2 software includes support for the displays and menu button options provided by
the NuPoint Unified Messaging (UM) voice mail product. Display phones include the text
prompts and menu button options when users are connected to NuPoint UM voice mail.
For information about navigating and using NuPoint UM voice mail, refer to the Mitel TUI Quick
Reference Guide for NuPoint Unified Messaging on the Mitel Web site (http://edocs.mitel.com).
Mitel® is a registered trademark of Mitel Networks Corporation.
All other trademarks mentioned in this document are the property of their respective owners, including Mitel
Networks Corporation. All rights reserved.
The contents of this document, which reflect current Mitel standards, may include technical or other inaccuracies. Mitel reserves the right to make revisions or changes without prior notice.
Mitel® 5000 CP Phone User Guide Supplement for v3.2, September 2009
Page 17