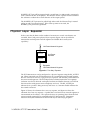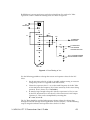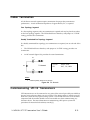
1
L O N W ORKS ®
LPT-10 Link Power
Transceiver
User’s Guide
Version 2.1
@
E C H E L O N®
Corporation
078-0105-01C
Echelon, LON, LONWORKS, LonBuilder, LonTalk, LonManager, 3120, 3150, the Echelon
logo, and Neuron are trademarks of Echelon Corporation registered in the United
States and other countries. LonLink and L ONMARK are trademarks of Echelon
Corporation. Other names may be trademarks of their respective companies.
Other brand and product names are trademarks or registered trademarks of
their respective holders.
Neuron Chips, Link Power Twisted Pair Transceiver Modules, and other OEM
Products were not designed for use in equipment or systems which involve
danger to human health or safety or a risk of property damage and Echelon
assumes no responsibility or liability for use of the Neuron Chips or Link Power
Twisted Pair Transceiver Modules in such applications.
Parts manufactured by vendors other than Echelon and referenced in this
document have been described for illustrative purposes only, and may not
have been tested by Echelon. It is the responsibility of the customer to determine
the suitability of these parts for each application.
ECHELON MAKES AND YOU RECEIVE NO WARRANTIES OR CONDITIONS,
EXPRESS, IMPLIED, STATUTORY OR IN ANY COMMUNICATION WITH YOU, AND
ECHELON SPECIFICALLY DISCLAIMS ANY IMPLIED WARRANTY OF
MERCHANTABILITY OR FITNESS FOR A PARTICULAR PURPOSE.
No part of this publication may be reproduced, stored in a retrieval system, or
transmitted, in any form or by any means, electronic, mechanical,
photocopying, recording, or otherwise, without the prior written permission of
Echelon Corporation.
Printed in the United States of America.
Copyright ©1993 - 1995 by Echelon Corporation.
Echelon Corporation
4015 Miranda Avenue
Palo Alto, CA 94304, USA
Contents
1
Introduction
Applications
Audience
Content
Related Documentation
2
Electrical Interface
LPT-10 Pinout
Network Connection
Reset
Clock Input
Clock Select
Neuron Chip Communications Port (CP) Lines
PC Board Layout Guidelines
Choosing the Inductor and Capacitors for the LPT-10 Switching Power
Supply
Alternative Inductor and Capacitor Selection for Low-Current
Applications
Wake-Up Timer
Physical Layer Repeater
3
Mechanical Considerations
Mechanical Footprint
4
Power Output
Transceiver Output Power
Powering Non-Isolated Devices
5
Network Cabling and System Performance
Network Overview
System Performance and Cable Selection
System Specifications
Transmission Specifications
Power Specification, Simplified Form
Power Specifications for Extended Performance
Cable Termination
Commissioning LPT-10 Transceivers
LONWORKS LPT-10 Transceiver User’s Guide
1-1
1-3
1-7
1-7
1-7
2-1
2-2
2-4
2-4
2-4
2-5
2-5
2-5
2-8
2-10
2-10
2-11
3-1
3-2
4-1
4-2
4-4
5-1
5-2
5-4
5-5
5-6
5-7
5-9
5-13
5-13
iii
6
Design Issues
EMI Design Issues
Designing Systems for EMC (Electromagnetic Compatibility)
ESD Design Issues
Designing Systems for ESD Immunity
Surge Design Issues
Designing Systems for Surge Immunity
Vibration and Mechanical Shock Issues
IEC-801 Testing
7
Programming Considerations
Application Program Development and Export
8
References
Reference Documentation
iv
6-1
6-2
6-2
6-5
6-5
6-6
6-6
6-7
6-7
7-1
7-2
8-1
8-2
Echelon
1
Introduction
The LPT-10 Link Power Twisted Pair Transceiver provides a simple, cost
effective method of adding a network-powered LONW ORKS transceiver
to any Neuron® Chip-based machine controller, process controller, fire
and security device, or general purpose controller. The LPT-10
transceiver consists of a Single In-Line Package (SIP) containing a 78kbps
differential Manchester coded communication transceiver, a switching
power supply that extracts power from the twisted pair network, and
connections for the Neuron Chip Communications Port (CP) lines and
the twisted pair network. The LPT-10 transceiver eliminates the need to
use a local power supply for each node since node power is sent from a
central power supply over the same twisted wire pair that handles
network communications. Up to 128 nodes can be supported on a single
free topology network segment.
The LPT-10 transceiver supports free topology wiring, freeing the
system installer from the need to wire in a multidrop arrangement.
Star, bus, and loop wiring are all supported by this architecture. Free
topology wiring reduces the time and expense of system installation by
allowing the wiring to be installed in the most expeditious manner. It
also simplifies network expansion by alleviating the need for the
installer to follow strict rules about stub lengths. Should it be necessary
to add more nodes or wire in excess of the system limits, then two or
more link power systems can be interconnected with an inexpensive,
physical layer repeater. The LPT-10 contains built-in circuitry to allow
two or more transceivers to be connected back-to-back to make a
repeater.
LONWORKS LPT-10 Transceiver User’s Guide
1-1
The LPT-10 transceiver includes an integral switching power supply
that can furnish +5VDC at up to 100mA. The LPT-10 transceiver
derives its power directly from the switching power supply, providing
up to 100mA of current for a Neuron Chip, application electronics,
sensors, actuators, and displays. The high current capability of the LPT10 transceiver eliminates the need for local power supplies at each
node, resulting in equipment and labor cost savings.
The LPT-10 transceiver includes a comprehensive power management
system to reduce node power consumption. The internal switching
power supply draws power from the twisted pair network and uses a
sophisticated, efficient design that provides only as much current as is
needed at any given time by the node. A transceiver sleep feature
permits the node's Neuron Chip to turn off the transceiver to conserve
power. Finally, an adjustable wake-up timer in the LPT-10 transceiver
can periodically wake-up a Neuron Chip in sleep mode to sample
inputs/outputs and communicate with the network. At all other times
the Neuron Chip can be asleep, dramatically reducing node power
consumption.
The LPT-10 transceiver is compatible with Echelon's FTT-10 Free
Topology Transceiver, and these transceivers can communicate with
each other on a single twisted pair cable. This capability provides an
inexpensive means of interfacing to nodes whose current and/or
voltage requirements would otherwise exceed the capacity of the link
power segment. When equipped with an FTT-10 transceiver, these
nodes can be operated from a local power supply without the need for
additional electrical isolation from the link power network.
Using the LPT-10 transceiver can save literally thousands of hours of
development time compared with a custom-designed transceiver. The
LPT-10 transceiver is designed to comply with FCC, VDE and IEC-801
EMC requirements, minimizing time consuming and expensive
laboratory transceiver testing. As a UL-Recognized component, the LPT10 transceiver can be integrated into a product with minimal additional
safety testing of the LPT-10 transceiver module. The LPT-10 transceiver
also meets LONM ARK™ interoperability standards.
1-2
Applications
A conventional control system using bus topology wiring (such as RS-485) consists of a
network of sensors and control outputs that are interconnected using a shielded twisted
wire pair. In accordance with EIA RS-485 guidelines, all of the devices must be wired
in a bus topology to limit electrical reflections and ensure reliable communications.
There is a high cost associated with installing and maintaining the cable plant that
links together the many elements of an RS-485-based control system. Bus topology
wiring is more time consuming and expensive to install because the installer is unable to
branch or star the wiring where convenient: all devices must be connected directly to the
main bus. The installation of local power supplies for each device is especially
expensive since it usually involves an AC mains connection.
Installing separate data and power wiring also implies that a technician's time will be
spent troubleshooting the wiring harness to isolate and repair cable faults. Moreover,
each time a sensor is added or an actuator is moved, both data and power wiring must be
changed accordingly, often resulting in network down time until the new connections can
be established.
The best solution for reducing installation and maintenance costs and simplifying
system modifications is a free topology communication system that combines power and
data on a common twisted wire pair. Echelon's link power technology offers just such a
solution, and provides an elegant and inexpensive method of interconnecting the
different elements of a distributed control system.
The link power system sends power and data on a common twisted wire pair, and allows
the user to wire the control devices with virtually no topology restrictions. Power is
supplied by a customer-furnished nominal 48VDC power supply, and flows through an
LPI-10 Power Supply Interface onto the twisted pair wire (figure 1.1). The LPI-10
module isolates the power supply from wiring faults on the twisted pair, couples power
to the system wiring, and terminates the twisted pair network.
There are two version of the LPI-10 interface: a simple, low-cost, inductor-based design
intended for customers who are building power supplies, and an electronic LPI-10
interface designed for use with off-the-shelf 48VDC power supplies.
LONWORKS LPT-10 Transceiver User’s Guide
1-3
LPT-10
Node
FTT-10
Node
48VDC
Power
Supply
To
additional
LPT-10
or
FTT-10
nodes
LPI-10
Interface
LPT-10
Node
FTT-10
Node
LPT-10
Node
Figure 1.1
Free Topology Link Power System
LPT-10 Link Power Transceivers located along the twisted wire pair include integral
switching power supplies. These supplies regulate the power on the twisted pair to
+5VDC at currents up to 100mA for use by the Neuron Chip and the various sensors,
actuators, and displays. If a high current or high voltage device must be controlled,
then the +5VDC power can be used to trigger an isolating high current triac, relay, or
contactor.
The integral power supply does away with the need for a local AC-to-DC power
supply, charging circuit, battery, and the related installation and labor expenses. The
savings in money and time that results from eliminating the local power supply can be
up to 20% of the total system cost: the larger the system, the greater the savings.
Moreover, if standby batteries are used, then additional savings will be realized
throughout the life of the system since only one set of batteries will require service.
The link power system uses a single point of ground, at the LPI-10 module, and all of the
LPT-10 transceivers electrically float relative to ground. Differential transmission
minimizes the effects of common mode noise on signal transmission. If grounded sensors
or actuators are used, then either the communication port (CP) or the I/O lines of the
Neuron Chip must be electrically isolated.
Unlike bus wiring designs, the link power system uses a free topology wiring scheme
that supports star, loop, and/or bus wiring (figure 1.2). Free topology wiring has many
advantages. First, the installer is free to select the method of wiring that best suits the
installation, reducing the need for advanced planning and allowing last minute changes
at the installation site. Second, if installers have been trained to use one style of
wiring for all installations, link power technology can be introduced without requiring
retraining. Third, retrofit installations with existing wiring plants can be
1-4
accommodated with minimal, if any, rewiring. This capability ensures that link power
technology can be adapted to both old and new projects, widening the potential market
for link power-based products. Finally, free topology permits link power systems to be
expanded in the future by simply tapping into the existing wiring where it is most
convenient to do so. This reduces the time and expense of system expansion, and from
the customer's perspective, keeps down the life cycle cost of the link power network.
Supply/
Interface
Supply/
Interface
Singly-Terminated Bus Topology
Star Topology
Supply/
Interface
Supply/
Interface
Loop Topology
Mixed Topology
Termination
Supply/
Interface
Doubly-Terminated Bus Topology
Figure 1.2 Typical Wiring Topologies Supported By the Link Power System
LONWORKS LPT-10 Transceiver User’s Guide
1-5
System expansion is simplified in another important way, too. Each link power
transceiver incorporates a repeater function. If a link power system grows beyond the
maximum number of transceivers or total wire distance, then additional link power
systems can be added by interconnecting transceivers using the repeater function (figure
1.3). The repeaters will transfer LonTalk® data between the two systems, doubling the
number of transceivers as well as the length of wire over which they communicate. The
repeater function permits a link power system to grow as system needs expand, without
retrofitting existing controllers or requiring the use of specialized bridges. Note that
systems requiring high levels of network traffic may benefit from the use of
LON WORKS routers which forward packets only when necessary.
LPT-10
Node
LPT-10
Node
48VDC
Power
Supply
LPI-10
Interface
LPT-10
Node
LPT-10
Transceiver
Original System
FTT-10
Transceiver
Expansion
LPT-10
Node
LPT-10
Node
48VDC
Power
Supply
LPI-10
Interface
LPT-10
Node
Figure 1.3 Link Power Repeater for System Expansion
1-6
Link
Power
Repeater
Many link power applications, especially those utilizing battery-backed power
supplies, will require that power consumption be minimized during normal operation.
To accommodate these applications, the link power transceiver incorporates power
management functions to reduce power consumption. Two methods of power management
are provided:
(1) Sleep Mode–the transceiver can be put to sleep and awakened by Neuron Chip I/O
activity;
(2) Neuron Chip Sleep Timer–the transceiver can awaken the Neuron Chip from its
sleep mode on a timed basis by periodically triggering an input line on the Neuron
Chip. This feature allows the Neuron Chip to awaken, sample its I/O lines,
communicate with another controller, and then go to sleep again. This mode of
operation is especially useful for applications where sensors are sampled from timeto-time, but where power consumption must be reduced between samples.
Audience
The L ON W ORKS LPT-10 Link Power Transceiver User’s Guide provides specifications
and user instructions for LPT-10 transceiver customers.
Content
This manual provides detailed technical specifications on the electrical and
mechanical interfaces and operating environment characteristics for the transceiver
module.
This document also provides guidelines for migrating applications from a LonBuilder™
Developer’s Workbench Emulator to a transceiver module-based product design.
Complete references and vendor sources are included to simplify the task of integrating
the transceiver module with application electronics.
This document has a list of references in Chapter 8. Whenever a reference document is
addressed, a superscript number corresponding to the reference has been placed in the
text, e.g., Standler10. Whenever a specific chapter or section within a reference has
been referred to, the reference is enclosed in brackets and the chapter is addressed by
number, e.g., Reference [1], Chapter 8.
Related Documentation
The following Echelon documents are suggested reading:
LonBuilder User's Guide
(078-0001-01)
Neuron C Programmer's Guide (078-0002-01)
LonBuilder Startup and Hardware Guide (078-0003-01)
L O N W ORKS LPI-10 Link Power Interface Module User's Guide (078-0104-01)
LONWORKS LPT-10 Transceiver User’s Guide
1-7
L O N W ORKS FTT-10 Free Topology Transceiver User's Guide (078-0114-01)
L O N W ORKS Product Databook
L O N W ORKS Custom Node Development (005-0024-01)
1-8
2
Electrical Interface
The LPT-10 Link Power Transceiver’s 16 pins provide a polarity
insensitive connection to the twisted pair network, an interface to the
Neuron Chip communications port, a switching power supply, and a
wakeup timer to awaken the Neuron Chip from sleep mode on a
periodic basis.
LONWORKS LPT-10 Transceiver User’s Guide
2-1
LPT-10 Pinout
The pinout of the LPT-10 transceiver is shown in table 2.1. The interconnection between
the LPT-10 and a Neuron Chip is shown in the block diagram in figure 2.1. See figure
3.1 for the physical location of pin 1.
Table 2.1 LPT-10 Transceiver Pinout
Name
NET_A
NET_B
V+
INDUCTOR
Vcc
GND
CLK
CLKSEL0
TXD/CLKSEL1
RXD
TXEN
~RESET
~SLEEP
WAKEUP_CAP
WAKEUP_OUT
RX_ACTIVE
2-2
Pin#
1
2
3
4
5
6
7
8
9
10
11
12
13
14
15
16
Function
Connection to TP network, polarity insensitive
Connection to TP network, polarity insensitive
Power supply input voltage (≈ 35VDC)
Power supply inductor connection
+5VDC power for transceiver operation
Power supply ground
Transceiver clock input from Neuron Chip
Input clock speed select
Neuron Chip CP1 and input clock speed select
Neuron Chip CP0
Neuron Chip CP2
~RESET
Neuron Chip CP3 (powers down the transceiver)
Wake-up timer
Wake-up output to Neuron Chip I/O line
Repeater output
NET_A
TO
NETWORK
NET_B
V+
L1
INDUCTOR
C1
Vcc
GND
CLOCK
CIRCUIT
+5V
C2
C3
GND
CLK
VCS0
VCS1
GROUND GUARD
CLKSEL0
47k
CLK2
CLK1
TXD/CLKSEL1
CP1
RXD
CP0
+5V
TXEN
CP2
100pF
~RESET
~RESET
100pF
~SLEEP
CP3
WAKEUP_CAP
Cwu (optional)
IO0 - IO10
WAKEUP_OUT
RX_ACTIVE
LPT-10
LINK POWER
TRANSCEIVER
+5V
LVI
MC33164
TO
APPLICATION
ELECTRONICS
NEURON 3120
OR 3150 CHIP
Figure 2.1 LPT-10 Transceiver Interconnections
LONWORKS LPT-10 Transceiver User’s Guide
2-3
Reset
Follow the recommendations of the Neuron 3120 Chip and Neuron 3150 Chip Data Book
with regard to reset (references [2] and [3]). An external low voltage indicator (LVI)
suitable for use with a ±10% power supply must be used as shown in figure 2.1. The LVI
must have an open-collector or open-drain drive characteristic to be compatible with
the Neuron Chip's bidirectional ~RESET line. Figure 2.1 also shows two 100pF
capacitors decoupling the ~RESET line of the Neuron Chip. These capacitors improve
ESD immunity for the Neuron Chip, and are required by the LPT-10 for proper reset
timing.
In applications with significant leakage capacitance (>5pF) from the node to external
ground, the reset circuit of figure 2.2 may be used to improve ESD or similiar noise
immunity.
+5V
~RESET
1000pF
100pF
10kΩ
~RESET
~RESET
1000pF
LPT-10
LINK POWER
TRANSCEIVER
100pF
LVI
DS1233Z-10
Figure 2.2 LPT-10 Transceiver -- Alternate Reset Circuit
Network Connection
The network connection (NET_A and NET_B) is polarity insensitive, and therefore
either of the two twisted pair wires can be connected to either of the two NET pins.
Details on network wiring are discussed in Chapter 5.
Transient protection may be required to protect the LPT-10 transceiver against surge
voltages resulting from transient switching and lightning strikes. Details on surge
protection are discussed in Chapter 6.
Clock Input
The LPT-10 transceiver receives its clock input from the Neuron Chip via the CMOS
input CLK pin. This pin is driven by the CLK2 output of the Neuron Chip, whether the
Neuron Chip's oscillator or an external clock oscillator is used. Clock traces should be
kept short (≤ 2cm) to minimize noise coupling.
The LPT-10 transceiver can operate at 10, 5, 2.5, or 1.25MHz. The operating frequency is
selected via the CLKSEL0 and TXD/CLKSEL1 pins.
2-4
Clock Select
The CLKSEL0 and TXD/CLKSEL1 pins are used to indicate the frequency of the input
clock (CLK). CLKSEL0 may be tied directly to Vcc or GND. The TXD/CLKSEL1 must
be tied through a pull-up or pull-down 47kΩ resistor. VCS0 and VCS1 are shown in
figure 2.1. The clock select options are shown in table 2.2.
Table 2.2
Clock Select Options
VCS1
VCS0
CLK Frequency
GND
GND
10MHz
GND
5V
5MHz
5V
GND
2.5MHz
5V
5V
1.25MHz
Neuron Chip Communications Port (CP) Lines
The LPT-10 transceiver transmits and receives LonTalk network packets via the Neuron
Chip's direct, single-ended mode over CP0-3. CP0 is the data input to the Neuron Chip
and is connected to the LPT-10 transceiver's RXD pin. CP1 is the data output from the
Neuron Chip and is connected to the TXD/CLKSEL1 pin; this pin also serves as one of
the input clock select pins. CP2 is the transmit enable output from the Neuron Chip and
is connected to the TXEN pin. CP3 is the ~sleep (~power-down) output from the Neuron
Chip and is connected to the ~SLEEP pin. These connections are summarized in table
2.3.
Table 2.3 Neuron Chip CP Line Connections
Neuron Chip Pin
Neuron Chip Function
LPT-10 Pin
CP0
Data input
RXD
CP1
Data output
TXD/CLKSEL1
CP2
Transmit enable output
TXEN
CP3
~Sleep(~power-down) output
~SLEEP
PC Board Layout Guidelines
The recommended PC board layout for the LPT-10 transceiver and its external
components is shown in figure 2.3.
Variations on this suggested PC board layout are possible as long as the general
principles of grounding, shielding, guarding and spacing are employed. For example,
the LPT-10 transceiver pins can be formed into a right angle before the transceiver is
LONWORKS LPT-10 Transceiver User’s Guide
2-5
soldered onto the PC board. In this case, the layout in figure 2.3 would be modified to
accommodate horizontal (90°) mounting of the transceiver. If the transceiver is bent to
the left in figure 2.3, then C1 should be moved up and to the right, above L1. L1 and C2
can shift down slightly to minimize the trace lengths for L1, C1 and C2 in this
variation on the original layout. Note that the ground plane on the solder side of the
board becomes more important in this variation since the ground pin of C1 is now on the
right-hand side of the transceiver, and a low-impedance path between the ground pins
for C1 and C2 is needed.
NETWORK
CONNECTOR
L1
C1
C2
C3
+5V
GROUND
LPT-10
CLK
NEURON CHIP
AND
APPLICATION ELECTRONICS
Figure 2.3 Recommended PC Board Layout for LPT-10 Transceiver
Figure 2.3 illustrates the connections between the LPT-10 transceiver and its four power
supply-related components on one layer of a two-layer PC board. The other layer
2-6
(generally the solder side of the board) should contain as much ground plane as
possible.
The switching power supply circuit in the LPT-10 transceiver uses the external
components L1, C1 and C2 as part of its switching regulator. Because moderate currents
are switched at approximately 150kHz, it is very important that L1, C1 and C2 are
placed close to the LPT-10 transceiver and oriented as shown in the figure. The inductor
L1 and the capacitors C1 and C2 should be placed with minimum gaps to the body of the
transceiver.
The ground connections between the LPT-10 transceiver and L1, C1 and C2 should be as
similar as possible to those shown in figure 2.3. The wide ground traces and the ground
plane on the other layer of the board serve two functions. First, the wide ground traces
reduce inductance to provide a low-impedance path for the power supply switching
currents. Second, the wide ground areas minimize electric and magnetic field noise
generated by the power supply circuit. The "INDUCTOR" trace from pin 4 of the LPT10 transceiver to the input of L1 carries a 35V, 150kHz switching waveform, and this
can generate moderate levels of electric field noise that can capacitively couple into
any nearby high-impedance circuitry. The ground plane is shown close to the
"INDUCTOR" trace in order to absorb some of the electric field noise generated by the
trace.
Note that L1 is shown in figure 2.3 with a dot marking that is oriented toward the
transceiver. In the Taiyo-Yuden LHL08 series of inductors, the dot identifies which pin
is connected to the inner portion (beginning) of the cylindrical wire winding on the
ferrite slug. Since the input to L1 is a 35V switching waveform and the output is a
smooth +5VDC, it is best to orient the inductor so that the windings with the noisy 35V
switching waveform are in the inner part of the inductor coil. This uses the inductor
coils themselves as part of the electric field shielding. Consult the manufacturer’s
data sheet for the inductor you are using to determine if polarity marking is available,
and whether the marked pin is connected to the inner or outer portion of the coil
winding.
If inductor L1 is an "open slug" type without shielding, it will generate moderate levels
of magnetic field noise during normal power supply operation. Ground guarding and a
ground plane on the other PC board layer will help to contain the magnetic field noise
in a smaller volume near L1. Since the switching frequency of the power supply is near
150kHz, the copper ground plane serves as a fairly effective magnetic field shield.
The electric and magnetic field noise generated by any switching power supply circuit
may interfere with the operation of sensitive circuitry nearby. The magnetic field
noise can be minimized by using a toroidal inductor for L1, or by using a slug inductor
with an integral magnetic shield. Sensitive circuits on a link power node should be laid
out to minimize the loop area of any amplifier inputs or high-impedance lines.
Minimizing these loop areas reduces the amount of voltage that can be induced in the
circuits from the magnetic switching noise that is present. Note that the traces from
the network connector to the LPT-10 transceiver as shown in figure 2.3 are spaced as
closely together as possible in order to minimize their loop area. Circuits that are
sensitive to electric field noise should be kept away from L1 and pin 4 of the
transceiver, and ground guarding should be employed to shield them from the electric
field noise.
LONWORKS LPT-10 Transceiver User’s Guide
2-7
The +5VDC Vcc trace and GROUND trace are shown leading away from the
transceiver into the general board area for the Neuron Chip and application circuit.
The Vcc and GROUND should be routed directly off the C2 capacitor to the node's
circuitry as shown. The ground guarding around the network connector should not be
used as a source of ground for the digital circuitry. C3 is a small 0.1µF decoupling
capacitor that should be placed near C2 to help keep digital switching noise from
returning to the LPT-10 transceiver's Vcc input (pin 5).
The CLK input to the LPT-10 transceiver (pin 7) needs to be guarded by ground traces to
minimize clock noise, and to help keep EMI levels low (see Chapter 6). In general, the
Neuron 3120 or 3150 Chip should be placed close enough to the LPT-10 transceiver and
oriented correctly so that the CLK trace from the Neuron Chip to the transceiver is no
longer than 2cm. At the same time, the Neuron Chip and any other fast digital circuitry
should be kept away from the network connector and NET_A/NET_B pins (pins 1 and 2)
on the transceiver. If noisy digital circuity is located too close to the network connector or
wires, RF noise may couple onto the network cable and cause EMI problems. With these
constraints in mind, it is apparent that the best place to locate the Neuron Chip is in the
lower right corner of figure 2.3, with an orientation that places the Neuron Chip’s CLK2
line closest to the transceiver's CLK input pin. This position and orientation work well
for both the Neuron 3120 and 3150 Chips, since the CP lines are oriented near the lower
portion of the LPT-10 transceiver for the rest of the interconnections.
Choosing the Inductor and Capacitors for the LPT-10
Switching Power Supply
Parts that are chosen for L1, C1 and C2 must meet several key specifications to ensure
that the switching power supply conversion performed by the LPT-10 transceiver stays
within specified limits. As long as these key specifications are met, the designer of a
link power node is free to choose parts that have other specifications that best match
the application. These specifications allow up to 100mA of sustained peak current to be
drawn by the application, including Neuron Chip. Component selection for low-current
applications is discussed in the next section.
Suitable parts for inductor L1 are listed in table 2.4. L1 has the following key
specifications that must be met over the node's operating temperature range: L = 1mH
±10%, Isat ≥ 200mA, DCR ≤ 4Ω where Isat is defined as the current required to decrease
the inductance to 80% of the low-current inductance. For low-current applications,
inductors with saturation currents (Isat) down to 80mA can be used, but the peak
application current should not exceed half of the Isat rating.
2-8
Table 2.4 Example L1 Inductor Selections (1mH)
Manufacturer
(Series)
Part Number
Temperature
Range
Application
Taiyo-Yuden (LHL08)
LHL08-102J
-25°C to +85°C *
General
Stetco (09P)
09P-102J
-25°C to +85°C
General
TDK (TSL)
TSL0807-102KR23
-20°C to +80°C
General
Caddell-Burns (0780)
0780-37
-55°C to +105°C
Wide Temp.
* Note: Echelon has tested the Taiyo-Yuden part from -40°C to +85°C.
Suitable parts for the V+ input capacitor C1 are listed in table 2.5. C1 has the
following key specifications that must be met over the node's operating temperature
range: C = 100µF ±20%, DCWV ≥ 63V, Iripple ≥ 100mArms @ 100kHz. Electrolytic
capacitors come in several grades depending on the total expected life of the product at
its highest operating temperature. For example, the Panasonic SU series capacitor
listed in table 2.5 has a rated life of 2000 hours at 85°C. Electrolytic capacitor life
approximately doubles for every 10°C reduction of the operating temperature, so a 2000
hour part (less than three months at 85°C) should last about 32,000 hours (three and a
half years) if operated at 45°C. Link power nodes that will be operating near the upper
end of the LPT-10 transceiver’s -40°C to +85°C temperature range will need to use
"high-reliability" electrolytic capacitors (like the Panasonic HFZ series) to ensure
adequate product life.
Table 2.5 Example C1 Capacitor Selections (100µF, ≥63V)
Manufacturer
(Series)
Part Number
Temperature
Range
Application
Panasonic (SU)
ECEA1JU101
-40°C to +85°C
General
Panasonic (NHE)
ECEA1JGE101
-55°C to +105°C
8000 hr. @ +85°C
Panasonic (HFZ)
ECA1JFZ101
-55°C to +105°C
20,000 hr. @ +85°C
Sprague (515D)
515D107M063CC6A
-40°C to +85°C
General
Sprague (511D)
511D107M075CG4D
-40°C to +105°C
8000 hr. @ +85°C, 75V
Nichicon (VX)
UVX1J101MPA
-40°C to +85°C
General
Nichicon (VZ)
UVZ1J101MPH
-55°C to +105°C
4000 hr. @ +85°C
Manufacturers for the Vcc output capacitor C2 are listed in table 2.6. C2 has the
following key specifications that must be met over the node's operating temperature
range: C = 22µF ±20%, DCWV ≥ 10V, Iripple ≥ 200mArms @ 100kHz, ESR (equivalent
series resistance) ≤ 1.2Ω @ 100kHz. The lifetime considerations mentioned above for
C1 also apply to the life of C2. In addition, since C2 is the output capacitor for the LPT10 transceiver's switching power supply circuit, it needs to have a low value of ESR to
avoid excessive ripple on Vcc from the 150kHz switching currents. Low ESR capacitors
LONWORKS LPT-10 Transceiver User’s Guide
2-9
are commonly used in switching power supply circuits. ESR generally decreases with
higher DC working voltage rating, so C2 will usually be a 50V or 63V capacitor to
achieve the required ESR specifications even though C2 is connected to Vcc = 5V.
Table 2.6 Example C2 Capacitor Selections (22µF, ≥10V, Low ESR)
Manufacturer
(Series)
Part Number
Temperature
Range
Application
Panasonic (HFZ)
ECA1JFZ220
-55°C to +105°C
20,000 hr. @ +85°C
Nichicon (PL)
UPL1J220MEH
-55°C to +105°C
ESR limits use to ≥ 10°C
Alternative Inductor and Capacitor Selection for LowCurrent Applications
For applications which require no more than 25mA of sustained peak application
current, a set of smaller, surface-mount components for L1, C1 and C2 may be optionally
substituted for those described above. These components are suitable for -40 to +85°C
applications. Molded style capacitors, Sprague type 293, may be also be used for C1 and
C2; they are typically lower-cost but physically larger than those in table 2.7.
Table 2.7 Optional Component Selection for Low-Current Applications (up to 25mA)
Component
Description
Manufacturer
Part Number
L1
1.0mH, 50mA, 25Ω
Murata
LQH4N102K04M00
C1
10µF, 50V tantalum
Sprague
195D106C9050R2
C2
22µF, 10V tantalum
Sprague
195D226X9010Y2
Wake-Up Timer
The LPT-10 transceiver includes a facility for awakening the Neuron Chip
periodically to sample inputs/outputs and communicate with the network. At all other
times the Neuron Chip can remain asleep, dramatically reducing node power
consumption. The wake-up timer triggers an output pulse (open-drain type) from the
WAKEUP_OUT pin to a Neuron Chip input (IO 4 through 7) at a rate that is adjustable
from once per second to once every 100 seconds. The pulse frequency is adjustable via
WAKEUP_CAP. The wake-up pulse is a low-going pulse with a duration from 0.5 to 50
milliseconds. Since the output pin is an open-drain type, multiple devices can be tied
together to wake-up a commonly shared Neuron Chip.
The wake-up frequency is set by a one-pin oscillator that is controlled by an external
capacitor connected to WAKEUP_CAP (Cwu in figure 2.1). The capacitor is connected
between WAKEUP_CAP and GND. With capacitors from 0.001µF to 0.1µF, the
2-10
WAKEUP_OUT pin will be triggered with a period from 1 to 100 seconds, respectively,
with a tolerance of 20% of the period. The tolerance for the capacitor must be added to
this tolerance to obtain the overall tolerance of the output period.
The WAKEUP_OUT pin must be pulled high either with the Neuron Chip’s internal
pullup or with an external resistor. If the wake-up timer is not used, the
WAKEUP_CAP pin must be grounded.
Physical Layer Repeater
In the event that the limits on the number of transceivers or total wire distance are
exceeded, then a link power physical layer repeater (figure 2.4) can be added to
interconnect two link power network segments and double the overall system
capability.
Link Power Network Segment
LPT-10
Transceiver
Link Power
Repeater
FTT-10
Transceiver
Expansion
Link Power Network Segment
Figure 2.4 Two-Way Repeater
The LPT-10 transceiver can be configured as a physical repeater using the RX_ACTIVE
pin. When connected to an FTT-10 transceiver on a second link power network segment,
the two transceivers will act as physical layer repeaters and transmit packets between
the two network segments. The FTT-10 provides isolation between the two segments
(isolation can also be achieved with optical isolators and buffers between two LPT-10
transceivers but with greater circuit complexity and cost). The RX_ACTIVE pin
indicates that a packet is being received, and serves as a transmit enable indicator for
the second transceiver.
Figure 2.5 shows the schematic for a two-way repeater, and figure 2.6 shows the
schematic for a four-way repeater. A packet that is received on any network segment is
retransmitted on the other(s). The repeater derives its operating power from the link
power network segment that is connected to the LPT-10 transceiver. Component
selection and layout information for the FTT-10 may be found in [5], chapter 2.
LONWORKS LPT-10 Transceiver User’s Guide
2-11
Figure 2.5 Two-Way Repeater Schematic
C1
L1
C3
5.0 MHz
Osc
INDUCTOR
GND
VCC
V+
D
Q
F/F
~Q
CLK
RX_ACTIVE
RXD
TXEN
TXD/CLKSEL1
NET_B WAKEUP_OUT
WAKEUP_CAP
CLKSEL0
~RESET
~SLEEP
NC
Rr
NC
LVI
+5V
See Note 1
C15
Rr
C13 C14
GND
CLK
RX_ACTIVE
TXEN
RXD
T2
T1
NET_B
NET_A
TXD/CLKSEL1
CLKSEL0
~RESET
VCC
FTT-10
D14B
D13A D14A
D13B
+5V
D12A D12B
D11B D11A
4. Omit C18, C28, C38, and spark gaps if the node is floating.
3. C11 and C12 are required only for connection to link power networks.
2. Observe polarity shown for C11 and C12.
To/From
Network 2
See Note 4
C18
C12
+
C11
+
See Notes 2 and 3
1. Repeater must operate at 2.5MHz. This can be accomplished by dividing down a 5.0MHz
oscillator with a flip/flop.
Notes:
C2
+5V
To/From
Network 1
NET_A
LPT-10
(spark gaps)
2-12
+5V
RxD0
RxD1
RxD2
RxD3
LPT-10
~SLEEP
See Note 5
NET_A
To/From
Network
Segment 1
Rr
LVI
NC
RxA0
RxA1
RxA2
RxA3
~RESET
WAKEUP_OUT
WAKEUP_CAP
See Note 5
NET_B
CLKSEL0
TXD/CLKSEL1
TxD/CS1
TxEn
+5V
TXEN
RxD0
RxA0
RXD
V+
RX_ACTIVE
VCC
Clk
CLK
See Note 1
INDUCTOR
L1
GND
D
Q
F/F
~Q
C2
C1
NC
+5V
See Notes 2 and 3
FTT-10
C14 C13
VCC
~Reset
5.0 MHz
Osc
C3
NET_A
D11B D11A
C11
+
To/From
Network
Segment 2
Rr
~RESET
C15
NET_B
D12A
CLKSEL0
TxD/CS1
TxEn
RxD1
RxA1
C12
+
TXD/CLKSEL1
D12B
+5V
TXEN
D13B
RXD
D14B
RX_ACTIVE
CLK
TxEn
TxD/CS1
Clk
~Reset
GND
Notes:
(spark gaps)
C18
T1
Clk
T2
D13A
D14A
See Note 4
1.
Repeater must operate at 2.5MHz. This can be accomplished by dividing down a 5.0MHz oscillator
with a flip/flop.
2.
Observe polarity shown for C11, C12, C21, C22, C31, and C32.
3.
C11, C12, C21, C22, C31 and C32 are required only for connection to link power networks.
Figure 2.6a Four-Way Repeater Schematic (page 1 of 2)
LONWORKS LPT-10 Transceiver User’s Guide
2-13
+5V
C24 C23
FTT-10
VCC
See Notes 2 and 3
NET_A
D21B D21A
C21
+
To/From
Network
Segment 3
Rr
~RESET
~Reset
C25
NET_B
D22A
CLKSEL0
TxD/CS1
TxEn
RxD2
RxA2
C22
+
TXD/CLKSEL1
D22B
+5V
TXEN
D23B
RXD
D24B
C28
T1
Clk
CLK
GND
T2
D23A
(spark gaps)
RX_ACTIVE
D24A
See Note 4
+5V
~Reset
C34 C33
See Notes 2 and 3
FTT-10
VCC
NET_A
D31B D31A
C31
+
To/From
Network
Segment 4
Rr
~RESET
C35
D32A
CLKSEL0
TxD/CS1
TxEn
RxD3
RxA3
C32
+
NET_B
TXD/CLKSEL1
D32B
+5V
TXEN
RXD
D33B
D34B
C38
T1
Clk
CLK
Notes (cont.):
TxEn
TxD/CS1
Clk
~Reset
GND
T2
D33A
(spark gaps)
RX_ACTIVE
D34A
See Note 4
4.
Omit C18, C28, C38, and spark gaps if the node is floating.
5.
The delay through the OR and NOR gates must be less than 300ns. The inputs and outputs must be
CMOS compatible.
6.
This method can be extended to build an N-way repeater. The LPT-10 transceiver can power at most a
5-way repeater; above this number, use FTT-10 transceivers and an external power source.
Figure 2.6b Four-Way Repeater Schematic (page 2 of 2)
2-14
3
Mechanical Considerations
This chapter discusses the mechanical footprint and connectors of the
LPT-10 Link Power Transceiver. Details of mounting the transceiver to
an application electronics board containing a Neuron Chip are
provided.
LONWORKS LPT-10 Transceiver User’s Guide
3-1
Mechanical Footprint
The LPT-10 transceiver mechanical dimensions are shown in table 3.1, and the footprint
and connector are shown in figure 3.1. The LPT-10 transceiver is generally mounted to
the application board as a through-hole, soldered component. Decisions about
component placement on the application electronics board must also consider
electromagnetic interference (EMI) and electrostatic discharge (ESD) issues as discussed
in Chapter 6 of this document.
Figure 3.1 shows the maximum height of the LPT-10 transceiver as it is shipped from
the factory. The user has the option of constructing a fixture to bend the connector pins
to reduce the overall height of the printed circuit board assembly on which the
transceiver is mounted.
The LPT-10 transceiver is marked with a black vertical bar oriented toward Pin 1, as
shown in figure 3.1. The sixteen connector pins are fabricated of solder tinned steel
alloy.
Table 3.1 LPT-10 Transceiver Mechanical Dimensions
Dimensions in mm (inches
for reference only)
3-2
Minimum
Nominal
Maximum
Length
31.5
(1.240)
Height
19.8
(0.780)
Width
8.0 (0.315)
Pin Length
6.5 (0.256)
7.0 (0.276)
8.0 (0.315)
Pin Pitch
1.50
(0.059)
1.80
(0.071)
2.10
(0.083)
Pin Thickness
0.27
(0.011)
Pin Width
0.5 (0.020)
Number of Pins
16
31.50mm (1.24") max
8mm (0.315") max
LPT-10
50040-01
®
19.80mm
(0.78") max
7.00mm ±0.5
(0.276" ±0.02)
Pin 1
0.27mm (0.011")
1.8mm ±0.3
(0.071" ±0.012)
Front View
Figure 3.1
0.5mm (0.02") max
Side View
LPT-10 Transceiver Mechanical Footprint
LONWORKS LPT-10 Transceiver User’s Guide
3-3
4
Power Output
This section describes the power supply portion of the LPT-10 Link
Power Transceiver, and provides suggestions for using the 5V output
current.
LONWORKS LPT-10 Transceiver User’s Guide
4-1
Transceiver Output Power
The LPT-10 transceiver power supply circuit performs a number of key functions:
•
draws DC power from the twisted pair network without interfering with
communications with other nodes;
•
regulates the output voltage (Vcc) to +5VDC ±10% with a sustained peak current of
100mA;
•
limits Vcc output current to prevent a node with a Vcc short circuit from reducing the
network voltage;
•
uses an undervoltage shutdown circuit to prevent the transceiver from attempting to
start up when the network voltage is too low.
The upper limit of the twisted pair network voltage is 42.4VDC at the output of the
LPI-10 module. The actual voltage at the input to the LPT-10 transceiver will be a
function of the network wiring topology and the power loading on the network. The
LPT-10 transceiver has a lower input voltage limit of ≈26VDC, and the power supply
includes an undervoltage detection circuit that will prevent the transceiver from
operating at a lower network voltage.
The maximum (sustained peak) output current for the LPT-10 transceiver is 100mA over
the full operating temperature range. For applications that come close to this 100mA
limit, it is important to measure peak application current with a current probe (like the
Tektronix AM503) rather than with a Digital MultiMeter (DMM). DMMs measure the
average current, but they generally cannot follow the rapid current variations
associated with digital circuitry. The LPT-10 transceiver’s power supply circuit will
begin to limit current on any peak application currents that exceed 100mA, and this will
cause a droop in Vcc. Note that the transceiver itself derives power from the switching
power supply directly, and its current consumption does not reduce the available 100mA
limit.
The power supply is designed to operate without damage in the event of a short
between the +5VDC output and GND. However, the power supply output voltage may
overshoot its nominal 5V value when the short condition is cleared. To avoid this
overshoot, a 5.6V zener diode should be installed between the +5VDC output and GND
if there is a possibility that a node's power supply could be put into a short circuit
condition.
Since the LPT-10 transceiver uses a switching power supply to regulate Vcc, the
filtering and decoupling requirements of the other powered devices in the node must be
considered. A power supply output filter may be required to prevent noise generated by
the transceiver's switching power supply from interfering with the operation of these
other devices.
As with all switching power supplies, "resonant" current loads on Vcc should be
avoided. A resonant load is one that presents large changes in current loading at a
continuous repitition rate that is near the switching power supply’s switching frequency
(or its immediate harmonics or sub-harmonics). An example is a circuit that includes an
IR transmitter. The IR LED in a transmitter is typically driven by current pulses ≥
50mA in amplitude, and with a carrier frequency of 39kHz or 42kHz. These frequencies
are close to 1/4 of the LPT-10 transceiver's switching frequency (about 150kHz), so the
4-2
IR LED driver's power supply may need to be isolated from Vcc with an L-C filter.
Typical R-C and L-C filters for isolating loads are shown in figure 4.1
NET_A
TO
NETWORK
NET_B
V+
L1
INDUCTOR
C1
+5V
Vcc
GND
TO GENERAL
CIRCUITRY
C3
C2
Ro
CLK
Co1
TO SENSITIVE
LOW-POWER
ANALOG CIRCUITS
CLKSEL0
Lo
Co2
TO HIGHER-POWER
RESONANT LOADS
LPT-10
Figure 4.1 Post-Filtering of Vcc
Use the following guidelines to design the resistor and capacitor values for the R-C
filter:
1.
Set the resistance value Ro as high as possible without causing an excessive
voltage drop in the Vcc supplied to the filtered load;
2.
Choose the capacitor value Co1 to set the cutoff frequency of the R-C filter
at least 10x below the frequency (fn) of noise sensitivity in the circuit being
powered. That is, choose Co1 ≥ 10/(2πRfn);
3.
Ro must be large enough to keep the "effective capacitance" of Co1 as seen
by the LPT-10 transceiver to less than 5% of the transceiver’s 22µF output
capacitor C2. This can be accomplished by ensuring that
R o ≥ 100Ω(Co1/1µF).
The L-C filter should be used for higher-power isolation (when the voltage drop
through R would be too high for the application circuit to tolerate). Use the following
steps to design the inductor and capacitor values for the L-C filter:
LONWORKS LPT-10 Transceiver User’s Guide
4-3
1.
Choose an LC product that sets the filter cutoff frequency at least a decade
below the frequency of the resonant current demand (fd) in the load. That
is, choose LoCo2 ≥ 100/(4π2fd 2 );
2.
L must be large enough to keep the "effective capacitance" of Co2 as seen by
the LPT-10 transceiver to less than 5% of the transceiver’s 22µF output
capacitor C2. This can be accomplished by ensuring that
Lo ≥ 1mH(Co2/1µF);
3.
The inductor's series resistance must be small enough so that the load
current flowing through it does not generate excessive voltage drop. Choose
an inductor value Lo that has a low enough DC resistance (DCR in the
manufacturer data sheets) for your load current. Generally, smaller
inductors cost less, so you will want to choose the smallest value of Lo that
meets the above criteria;
4.
Once Lo is set, the value of Co2 can be chosen subject to the conditions in
steps 1 and 2 above.
Finally, it is good design practice to decouple each IC's Vcc pin in the node circuit using
0.1µF or 0.01µF radial or surface mount capacitors. This decoupling helps to reduce Vcc
noise that could lead to logic noise problems and radiated EMI problems (see Chapter 6
for more information on design hints to reduce EMI). The combined capacitance of all
the decoupling capacitors should not exceed 1.0µF.
WARNING: THE COMBINED CAPACITANCE OF ALL THE DECOUPLING
CAPACITORS (FROM VCC TO GND) SHOULD NOT EXCEED 1.0µF. TOTAL
DECOUPLING CAPACITANCE IN EXCESS OF 1.0µF CAN CAUSE UNSTABLE
POWER SUPPLY PERFORMANCE.
Powering Non-Isolated Devices
In order to provide reliable common mode rejection, the link power system operates
with one earth ground connection at the LPI-10 module, and all LPT-10 transceivers are
isolated (floating) relative to ground. The LPT-10 transceiver power supply is designed
to power devices that are also ground isolated. If the power supply is connected to a
grounded device, both network communications and power distribution will be
degraded. For nodes where the application electronics must be connected to earth
ground, the FTT-10 transceiver is the best choice, providing both isolation and
communication with LPT-10 nodes on the same twisted pair network segment.
Optionally, optical isolation may be used between the application electronics and
Neuron Chip.
Note that only floating measurement instruments should be used when working with
link power nodes when power is applied. Only isolated Digital Volt Meters (DVMs),
floating differential probes (e.g. Tektronix P6046 or P6135A with A6902B) or batterypowered oscilloscopes (e.g. Tektronix 200 series or T200 series oscilloscopes) should be
used when working with link power nodes. The LPT-10 transceiver may be damaged if
its circuitry is inadvertently shorted to earth while power is applied.
4-4
5
Network Cabling and
System Performance
This chapter provides information about cabling and network
connections for the LPT-10 Link Power Transceiver. This information
includes a discussion of wire characteristics and power distribution
issues.
LONWORKS LPT-10 Transceiver User’s Guide
5-1
Network Overview
The link power system is designed to support free topology wiring, and will
accommodate bus, star, loop, or any combination of these topologies. LPT-10
transceivers can be located at any point along the network wiring, as can the LPI-10
module and its associated power supply. This capability simplifies system
installation and makes it easy to add nodes should the system need to be expanded.
Figures 5.1 through 5.5 present five different network topologies.
Supply/
Interface
Figure 5.1 Singly Terminated Bus Topology
Supply/
Interface
Termination
Figure 5.2 Doubly Terminated Bus Topology
Supply/
Interface
Figure 5.3 Star Topology
5-2
Supply/
Interface
Figure 5.4 Loop Topology
Supply/
Interface
Figure 5.5 Combination Loop/Bus Topology
In the event that the limits on the number of transceivers or total wire distance are
exceeded, then a link power physical layer repeater (figure 5.5) can be added to
interconnect two link power systems and double the overall system capability (see
Chapter 2). Echelon's media routers can also be used to interconnect the link power
system with any other LON W ORKS channel.
LONWORKS LPT-10 Transceiver User’s Guide
5-3
System Performance and Cable Selection
Link power performance has system, transmission, and power specifications which are
outlined on the following pages. Each of the specifications should be met to ensure
proper operation.
The system designer may choose a variety of cables, depending on cost, availability
and performance. Performance as outlined in the transmission and power specifications
varies with cable type. The wire resistance per unit length is a significant factor in the
power specification, since the system is designed to accommodate a substantial drop in
voltage along the wire according to Ohm's Law. The transmission specification
depends on such factors as resistance, mutual capacitance and the velocity of signal
propagation.
Echelon has characterized system performance on several cable types whose typical
electrical parameters are shown in table 5.1.
Table 5.1
Cable Parameters
Cable Type
Wire dia.
/AWG
R loop
Ω/km
C
nF/km
Vprop
% of c
Belden 85102, single twisted pair,
stranded 9/29, unshielded, plenum
1.3mm/16
28
56
62
Belden 8471, single twisted pair,
stranded 9/29, unshielded, nonplenum
1.3mm/16
28
72
55
Level 4/22AWG, twisted pair,
typically solid & unshielded
0.65mm/22
106
49
67
JY (St) Y 2x2x0.8, 4-wire helical twist,
solid, shielded
0.8 mm/20.4
73
98
41
If the cable has a shield, it should be connected to the LPI-10 module ground (at the P1
connector) via a 470kΩ, 1/4 Watt, ≤ 10%, metal film resistor to prevent static charge
build-up.
For more information on Level 4 cable, refer to [12].
Note that the specifications in Transmission Specifications are for one network
segment. Multiple segments may be combined using repeaters as described in chapters 1
and 2 to increase the number of nodes, application current, and distance. For example, a
free topology network containing 512 nodes and total wire length of up to 2000 meters
may be built using four segments interconnected by 3 repeaters, assuming network traffic
requirements are met.
5-4
System Specifications
• Up to 128 LPT-10 transceivers or 64 FTT-10 transceivers are allowed per network
segment.
• Both types of transceivers may be used on a given segment, provided that the
following constraint is met:
(1 x number of LPT-10 transceivers) + (2 x number of FTT-10 transceivers) ≤ 128
• The average temperature of the wire must not exceed +55°C, although individual
segments of wire may be as hot as +85°C.
• The sum of the application current of all the nodes in a segment must not exceed 3.2A
at +5V.
LONWORKS LPT-10 Transceiver User’s Guide
5-5
Transmission Specifications
Table 5.2
Doubly-Terminated Bus Topology Specifications
Maximum bus length
Maximum stub length
Belden 85102
2200
3
Belden 8471
2200
3
Level 4/22AWG
1150
3
JY (St) Y 2x2x0.8
750
3
Table 5.3
Units
meters
Free Topology Specifications
Maximum
node-to-node
distance
Maximum total
wire length
with 10, 5 or
2.5MHz input
clocks
Maximum total
wire length
with 1.25MHz
input clock
Belden 85102
500
500
400
Belden 8471
400
500
400
Level 4/22AWG
400
500
400
JY (St) Y 2x2x0.8
320
500
400
Units
meters
The free topology transmission specification includes two components which must both
be met for proper system operation. The distance from each transceiver to each of the
other transceivers on the network and to the LPI-10 module must not exceed the
maximum node-to-node distance. If multiple paths exist, e.g., a loop topology, then the
longest path should be used for the calculations. The maximum total wire length is the
total amount of wire connected per network segment.
5-6
Power Specifications, Simplified Form
A link power network allows for multiple branches, e.g., a star topology. A branch is
defined as any length of twisted pair cable that extends from the LPI-10 module. Loop
topologies can be formed by joining the ends of branches.
Whereas system and transmission distance specifications involve the entire network,
power specifications apply to individual branches. The closer the nodes on a branch are
to the LPI-10 module, the more nodes that can be on that branch. Similarly, the fewer
the nodes on a branch, the longer that branch can be.
Both nominal and worst case power specifications for the performance of the link power
system, with both lumped and distributed loads, are shown in tables 5.3 through 5.5.
Nominal conditions include: nominal node temperature (+25°C), nominal average wire
temperature (+25°C), nominal manufacturing variations, nominal line-voltage
variations, and nominal LPI-10 module output voltage. The worst case values are
derated for all of these variations.
The following section, “Power Specifications for Extended Performance,” may be used as
an alternative to tables 5.1 through 5.3. It is more complex, but will allow better
performance for certain topologies.
Multiple link power systems may be interconnected via physical layer repeaters or
routers to extend distance, number of nodes, and total available application current.
Table 5.3 Simplified Power Specifications Using Belden 85102 or Belden
8471 (16AWG/1.3mm) Wire
500 meter branch length,
Evenly distributed loading along a bus
application current:
25 mA
50 mA
100 mA
500 meter branch length,
Lumped loading or otherwise distributed
application current:
25 mA
50 mA
100 mA
400 meter branch length,
Lumped loading or otherwise distributed
application current:
25 mA
50 mA
100 mA
LONWORKS LPT-10 Transceiver User’s Guide
Nominal
Worst
Case
Units
128
64
32
128
64
32
nodes
112
56
28
81
40
20
nodes
128
64
32
101
50
25
nodes
5-7
Table 5.4 Simplified Power Specifications Using JY (St) Y 2x2x0.8 Wire
320 meter branch length,
Evenly distributed loading along a bus
application current:
25 mA
50 mA
100 mA
320 meter branch length,
Lumped loading or otherwise distributed
application current:
25 mA
50 mA
100 mA
160 meter branch length,
Lumped loading or otherwise distributed
application current:
25 mA
50 mA
100 mA
Nominal
Worst
Case
Units
128
64
32
96
48
24
nodes
64
32
16
48
24
12
nodes
128
64
32
96
48
24
nodes
Table 5.5 Simplified Power Specifications Using Level 4/22AWG (0.65mm) Wire
400 meter branch length,
Evenly distributed loading along a bus
application current:
25 mA
50 mA
100 mA
400 meter branch length,
Lumped loading or otherwise distributed
application current:
25 mA
50 mA
100 mA
5-8
Nominal
Worst
Case
Units
74
37
18
53
26
13
nodes
37
18
9
26
13
6
nodes
Power Specifications for Extended Performance
Although more complex, this alternative power specification allows for extended
power performance. In addition, it features a separate derating for the average wire
temperature.
I is the average application current of a node. The distance of an LPT-10 transceiver
from the LPI-10 module is the node distance, d. For each branch, the sum of the products
of a node distance and the application current of that node must not exceed a constant:
I1*d1 + I2*d2 + I3*d3 + . . . ≤ K*α*β
where
K is the nominal value, dependent on wire type:
K=1400 Amp*Meters for Belden 85102 and Belden 8471, 16 AWG
K=530 Amp*Meters for JY (St) Y 2x2x0.8
K=370 Amp*Meters for Level 4/ 22AWG
α = 1 + 0.00393
1
, accounting for average wire temperature
(temp
- 25°C)
*
β= 81%, derating for manufacturing and all other variations
At 25°C, α = 1. Note that α is greater than one when average wire temperature is less
than 25°C and is less than one when the temperature is greater than 25°C.
LONWORKS LPT-10 Transceiver User’s Guide
5-9
In the following example, there are only two branches to check. Assume wire type is JY
(St) Y 2x2x0.8 and average wire temperature is 25°C. Thus, α = 1.
2 nodes
100mA
5 nodes
100mA
50m
LPI-10
50m
2 nodes
100mA
50m
20m
80m
5 nodes
100mA
50m
2 nodes
100mA
20m
3 nodes
100mA
2 nodes
100mA
In the upper branch,
(2*0.1A)(50m) + (5*0.1A)(100m) + (2*0.1A)(150m)
= 90 Amp*meters
≤ K*α*β = (530 Amp*meters)(1)(81%) = 430 Amp*meters
In the lower branch,
(5*0.1A)(20m) + (2*0.1A)(100m) + (3*0.1A)(150m) + (2*0.1A)(170m)
= 109 Amp*meters
≤ K*α*β = (530 Amp*meters)(1)(81%) = 430 Amp*meters
This network meets all system, transmission, and power specifications.
In many instances, the lengths of sub-branches can be ignored for this calculation,
reducing the effective d and improving performance.
To determine when the lengths of stubs or sub-branches can be ignored for power
calculation, begin at the ends of the branches and move toward the LPI-10 module.
Upon arriving at a branching point, calculate the sum of products (I1*ds 1 + I2*ds 2
+.
. . ) for every sub-branch where I is the application current of a node and ds is the
distance of that node from the branching point. Then ignore the lengths of all the subbranches except for the sub-branch with the largest sum of products. Repeat this
procedure until the effective network looks like a bus (see Step Three of Example 1).
Note that this simplification may be used only for power considerations. For
transmission specifications, the actual total wire length and maximum distance nodeto-node must be used.
5-10
Example network 1 below illustrates the simplification process in three steps.
Distances are drawn in relative proportion. The numbers represent +5V application
currents, with 5x25 indicating 5 nodes of 25mA each at the same location. Use the
equivalent power network from Step Three when applying the extended power
performance specification.
Example 1. Actual Network:
25
50
5x25
2x100
100
4x100
4x100
LPI-10
25
100
25
50
25
2x25
2x100
25
Simplification Step One:
25
50
125
800
400
800
400
LPI-10
100
75
25
200
Simplification Step Two:
25
50
125
225
LPI-10
100
75
Simplification Step Three and equivalent network for power specifications:
375
225
800
400
LPI-10
LONWORKS LPT-10 Transceiver User’s Guide
5-11
Here is a second example which illustrates the benefits of the extended performance
specification and the importance of the sub-branching simplification procedure.
Without simplifying the network, the sample topology fails to meet the power
specification. However, the equivalent power network, which ignores the lengths of
all but one of the sub-branches, meets the worst case extended performance power
specification and is therefore an allowable topology.
If the simplified form of the power specification is used instead, the actual network
below would not be allowed. Table 5.4 (worst case) allows only a truncated version of
the network, which has 96 nodes and a 160 meter branch length, instead of 128 nodes
and a 240 meter branch length.
All nodes have 25 mA of application current. The wire type is JY (St) Y 2x2x0.8 and
average wire temperature is 25°C.
Example 2. Actual Network, allowed by extended performance power specification:
LPI-10
50m
16 nodes
16 nodes
16 nodes
16 nodes
16 nodes
16 nodes
10m
10m
10m
10m
10m
10m
10m
10m
10m
10m
30m
10m
50m
60m
30m
8 nodes
30m
8 nodes
8 nodes
320m
Truncated version, allowed by table 5.4 (worst case):
16 nodes
16 nodes
16 nodes
10m
10m
10m
LPI-10
50m
10m
10m
10m
30m
16 nodes
8 nodes
160m total
16 nodes
10m
10m
30m
8 nodes
5-12
10m
60m
10m
50m
50m
8 nodes
Cable Termination
A Link Power network segment requires termination for proper data transmission
performance. A total termination impedance of approximately 52Ω is required.
Free Topology Segment
In a free topology segment, only one termination is required and may be placed anywhere
on the free topology segment. The LPI-10 Link Power Interface, with jumper at "1 CPLR"
setting, provides this termination.
Doubly Terminated Bus Topology Segment
In a doubly terminated bus topology, two terminations are required, one at each end of the
bus.
1. The LPI-10 Link Power Interface, with jumper at "2 CPLR" setting, provides one
termination.
2.
An RC network (figure 5.6) provides the second termination.
C1
+
To Network
R1
C1, C2
R1
100µF, ≥50V
105Ω, 1%, 1/8W
C2
+
Notes:
1.
Observe polarity shown for C1 and C2.
Figure 5.6 RC Network
Commissioning LPT-10 Transceivers
LPT-10 transceivers can be connected to any point of the twisted pair cable provided that
the total wire and power limits are not exceeded. This design makes it simple to install
both new systems and to expand existing systems. The LPT-10 transceiver is an electronic
component and the installer should exercise reasonable care when commissioning any
electronic device. For more information on commisioning a link power system and
procedures for network fault isolation, consult [1].
LONWORKS LPT-10 Transceiver User’s Guide
5-13
6
Design Issues
This chapter looks at design issues, and includes discussions of
Electromagnetic Interference (EMI), Electrostatic Discharge (ESD), and
Surge for the LPT-10 Link Power Transceiver.
LONWORKS LPT-10 Transceiver User’s Guide
6-1
EMI Design Issues
The high-speed digital signals associated with microcontroller designs can generate
unintentional Electromagnetic Interference (EMI). High-speed voltage transitions
generate RF currents that can cause radiation from a product if a length of wire or piece
of metal can serve as an antenna.
Products that use the LPT-10 transceivers together with a Neuron Chip will generally
need to demonstrate compliance with EMI limits established by various regulatory
agencies. In the USA, the FCC6 requires that unintentional radiators comply with Part
15 level “A” for industrial products, and level “B” for products that can be used in
residential environments. Similar regulations are imposed in most countries throughout
the world7,8.
Designing Systems for EMC (Electromagnetic Compatibility)
Careful design of application electronics is important to ensure that an LPT-10
transceiver will achieve the desired level of EMC. In a link power network, the nodes
"float" relative to local safety/earth ground because the single point of earth ground in
the network is at the LPI-10 module. Since no explicit connection to earth ground is
allowed at a link power node, the usual EMC techniques involving grounding do not
apply. The techniques for designing RF-quiet link power nodes are very similar to
those used with battery-powered palmtop computers, since palmtops have no explicit
earth ground connection and have cables that connect them to other devices.
Since link power nodes are not allowed to have an explicit earth ground connection, it
becomes very important to minimize the "leakage" capacitance from circuit traces in
the node to any external pieces of metal near the node. Figure 6.1 shows the leakage
capacitances to earth ground from a node's logic ground (Cleak,GND) and from a digital
signal line in the node (Cleak,SIGNAL).
6-2
"FLOATING" NODE ON LINK POWER NETWORK
LPT-10
Vcc
Vcc
Vgate
TWISTED
PAIR
NETWORK
C decouple
NET_A
C load
NET_B
NODE
LOGIC
GROUND
GND
C leak,GND
C leak,SIGNAL
LEAKAGE
CAPACITANCES
TO EARTH
GROUND
Figure 6.1 Parasitic Leakage Capacitances to Earth Ground
The single most important technique for designing an EMI “quiet” floating node is to use
logic ground to guard any fast digital signal lines. Effective guarding of traces with
logic ground reduces Cleak,SIGNAL significantly, which in turn reduces the level of
common-mode RF currents driven onto the network cable.
When a node is mounted near a piece of metal, especially metal that is earth grounded,
any leakage capacitance from fast signal lines to that external metal will provide a
path for RF currents to flow. When Vgate is pulled down to logic ground, the voltage of
logic ground with respect to earth ground will increase slightly. When Vgate pulls up
to Vcc, logic ground will be pushed down slightly with respect to earth ground. As
Cleak,SIGNAL increases, a larger current flows during Vgate transitions, and more
common-mode RF current couples to the network twisted pair. This common-mode RF
current can generate EMI in the 30-300MHz frequency band in excess of “B” levels even
when Cleak,SIGNAL from a clock line to earth ground is less than 1pF, so guarding of
clock lines is essential for meeting Level “B” requirements.
From this discussion, it is apparent that minimizing Cleak,SIGNAL is very important.
By using 0.1µF or 0.01µF decoupling capacitors at each digital IC power pin, Vcc and
logic ground noise can be reduced. Logic ground can then be used as a ground shield for
other noisy digital signals and clock lines.
LONWORKS LPT-10 Transceiver User’s Guide
6-3
For example, in most link power nodes that use the Neuron 3120 Chip, the only fast
digital signal that needs to be routed across the PC board is the CLK2 line from the
Neuron Chip to the LPT-10 transceiver (CLK on transceiver pin 7, see figure 2.1). If a
two-layer PC board is being used, CLK2 can be routed to the transceiver pin with ground
guard traces straddling the clock trace on the component side of the board, and a wide
ground trace (or ground plane) covering the underside of the clock trace on the solder
side of the PC board. If a four-layer PC board is being used, the clock trace can be buried
in an inner layer and guarded on all four sides. The CLK2 trace from the Neuron Chip to
the LPT-10 transceiver should be as short as practical, and in all cases ≤ 2cm.
It may be possible to minimize Cleak,SIGNAL by spacing the node's circuitry away
from any nearby metal using a plastic package or standoffs, and there may be some
mechanical configurations where there will never be earth ground near a link power
node, i.e., motion sensors that hang from ceilings. For most nodes, though, logic ground
guarding of fast digital signals will be required to meet "B" levels of EMC.
Since the Neuron 3150 Chip has an external memory interface bus, there are many more
traces in a Neuron 3150 Chip-based link power node that need to be guarded by logic
ground. In addition, the Vcc noise generated by the memory interface and external
ROM/RAM components requires more Vcc decoupling, and may require a four-layer PC
board to maintain an RF-quiet Vcc and logic ground.
If the link power node's application circuitry uses fast digital signals, the same EMC
design rules apply. Some link power nodes with fast circuitry such as DSP engines and
memory arrays, etc. may require extra RF attenuation between the LPT-10 transceiver
and the twisted pair network in order to meet level "A" or "B". This extra attenuation
can be provided by a common-mode ferrite choke in series with the NET_A and NET_B
lines near the network connector. A common-mode ferrite choke, such as muRata's
PLT1R53C, can provide an additional 10-15dB of attenuation over the 30-300MHz RF
band. Note that a common-mode choke must be used because of the differential DC
current (≤ 50mA) that the LPT-10 transceiver draws from the network to power the
node. Individual ferrite beads on the NET_A and NET_B lines can only be used if they
are large enough not to be saturated by this DC network current flowing into the node.
In summary, the following general trends apply for link power EMC:
6-4
•
the faster the Neuron Chip clock speed (1.25MHz to 10MHz), the higher the level
of EMI;
•
better Vcc decoupling quiets RF noise at the sources (the digital ICs), which lowers
EMI;
•
the Neuron 3120 Chip will generate less EMI than the Neuron 3150 Chip since the
3120 has no external memory interface lines;
•
a four-layer PC board will generate less EMI than a two-layer PC board since the
extra layers facilitate better Vcc decoupling and more effective logic ground
guarding;
•
a two-layer link power node based on a 5MHz Neuron 3120 Chip should be able to
meet FCC/VDE level "B" EMC if good decoupling and ground guarding of the CLK2
line are used;
•
a common-mode ferrite choke can be used to help meet EMC requirements for nodes
that have noisy application circuitry or special circuit requirements.
Note that it may be possible to design a two-layer 10MHz Neuron 3150 Chip-based link
power node that will pass level "B" in some applications, depending on the mechanical
configuration. Early testing of prototype circuits at an outdoor EMI range should be used
to determine the effectiveness of these EMC techniques in a particular application.
ESD Design Issues
Electrostatic Discharge (ESD) is encountered frequently in industrial and commercial
use of electronic systems10. Reliable system designs must consider the effects of ESD and
take steps to protect sensitive components. Static discharges occur frequently in lowhumidity environments when operators touch electronic equipment. The static voltages
generated by humans can exceed 10kV. Keyboards, connectors, and enclosures provide
paths for static discharges to reach ESD sensitive components such as the Neuron Chip.
This section describes techniques to design ESD immunity into LPT-10 transceiver-based
products. For a discussion of ESD issues for the LPI-10 module, see [1].
ESD testing is important to ensure that a link powered node and its network connection
can withstand real-world exposure to static discharges. In addition, the European
Community may adopt legal requirements for ESD testing in product qualifications
similar to the present EMI requirements11.
Designing Systems for ESD Immunity
As with the EMI design issues discussed above, ESD hardening of link power nodes is
different than hardening products that have an explicit earth ground connection. If
Cleak,GND can be kept small (say, ≤ 5pF), and if the link power node is housed inside
a plastic enclosure that offers no access for ESD hits (as in an enclosed IR motion sensor
), then ESD testing is fairly easy to pass. The current from static discharges to the
node's network connector will travel out the network cable, with very little energy
coupled into the node's circuitry.
In nodes that have a larger Cleak,GND (up to about 20pF), more energy travels from
network connector ESD hits through the LPT-10 transceiver’s ESD protection circuitry to
logic ground, and from there to earth ground through Cleak,GND. In this type of node,
it is important to lay out the ground plane and ground guarding so that the LPT-10
transceiver’s ground (pin 6) is connected directly to the largest section of the ground
plane without any sensitive circuitry in the path. When the ESD hit is directed into
logic ground by the LPT-10 transceiver, the transient current can flow out to earth ground
via Cleak,GND without causing disruptive voltage bounces in other node circuitry.
ESD hits should not be allowed to reach a link power node's internal circuitry.
Adequate creepage and clearance distances should be built into each node's enclosure to
prevent discharges to anything other than the network wiring connector. If metal must
be accessible on the outside of a node’s enclosure, then it may be necessary to provide an
earth ground connection to that metal. For example, if metal toggle switches must be
user-accessible, then it may be necessary to mount the switches on a metal plate that is
earth grounded. In this way, ESD hits to the toggle switch handles will be diverted to
the local earth ground. The node's logic ground must still remain isolated from this
earth-grounded "guard" plate, and the leakage capacitance from logic ground to earth
LONWORKS LPT-10 Transceiver User’s Guide
6-5
ground (Cleak,GND) should be held below about 10-20pF to mitigate damage from
network ESD hits.
Surge Design Issues
Surge voltages encountered in industrial and residential environments as a result of
nearby switching transients and lightning can cause disturbances or failures to electronic
communications systems. Transient voltages and currents can couple capacitively or
magnetically to the twisted pair wiring of the link power system. Physical
construction of twisted pair wire allows transients to couple to the cable in a commonmode fashion, i.e., both conductors of the wire pair see the same transient. Since link
power nodes float with respect to earth and communication occurs in a balanced
(symmetric) fashion, common-mode transients have minimal effect on transmission.
The single point of earth reference for a link power network segment is the LPI-10
module. When the LPI-10 module clamps an incident voltage transient, a residual
differential transient voltage may result across the twisted pair conductors. This
residual voltage is seen by the LPT-10 nodes. For small transient voltages found in
benign environments no additional protection for LPT-10 nodes is required. However,
additional protection is required to prevent higher energy transients from damaging
LPT-10 nodes. This section describes the recommended protection scheme necessary to
achieve immunity for link power nodes to various levels of transient voltages defined
by the 1993 IEC 801-5 EMC Surge immunity requirements draft.
Designing Systems for Surge Immunity
Adequate creepage and clearance distances must be built into each node's enclosure to
prevent surge discharges from the local LPT-10 transceiver logic ground to earth.
Unaided, LPT-10 transceivers are immune to 801-5 surge test level 1 (0.5kV). Level 2
(1.0kV) and level 3 (2.0kV) surge immunity can be attained (for revision C03 or later
LPT-10 transceivers) with the addition of a bi-directional transient voltage suppresser
(TVS). The TVS must be placed directly across Net_A and Net_B lines at each LPT-10
(not for use between either of the data lines and earth).
TVS
Differential
Protection
Figure 6.2 TVS Schematic Symbol
6-6
TVS devices used with LPT-10 transceivers must meet the following requirements:
• bi-directional protection;
• rated at 400W minimum peak power (10/1000µs waveform) rating;
• working peak reverse voltage rating Vrwm ≥ 42.4V (-40 to +85°C); Vrwm should be
as low as possible over the temperature range but not less than 42.4V. Typical
reverse breakdown voltage ratings, Vbr, for such devices will be approximately 53V;
• bi-directional capacitance ≤ 275pF @Vr = 26V; bi-directional capacitance in this
application is typically 80% of data book unidirectional rating. Capacitance
increases as voltage across the device decreases.
Table 6.1 lists recommended TVS devices for use with LPT-10 transceivers.
Table 6.1 Recommended TVS Devices
Manufacturer
Motorola
General Instrument
General Instrument
General Instrument
FCI Components
FCI Components
Part Number
SA45CA
P4KE56CA
BZW04-48B
TGL41-56CA
P4KE-56CA
L41-56CA
Peak Power
500W
400W
400W
400W
400W
400W
Package
Axial
Axial
Axial
SMT MELF
Axial
SMB
Vibration and Mechanical Shock Issues
The LPT-10 transceiver is designed to withstand moderate levels of vibration and
mechanical shock while operating. Echelon has tested the LPT-10 transceiver
operating in typical two-layer application boards to verify that the transceiver can
withstand occasional vibration levels up to 1.5g peak-to-peak over the frequency range
of 8Hz to 2kHz (where one "g" = 9.8m/s2), and occasional mechanical shocks up to 100g.
The main horizontal resonance of an LPT-10 transceiver that is soldered onto a multilayer PC board is approximately 300Hz, with a Q ≈ 10.
IEC 801 Testing
Echelon has tested the LPT-10 transceiver operating in typical two-layer application
boards to verify that the transceiver complies with the following IEC 801 test
requirements. As long as a node's PCB is designed following the guidelines in this user's
guide, the LPT-10 transceiver should pass the IEC 801 tests listed in table 6.2.
LONWORKS LPT-10 Transceiver User’s Guide
6-7
Table 6.2 IEC 801 Test Descriptions
IEC 801 Test
801-2
801-3
801-4
801-5
Description
ESD
Radiated Susceptibility
Burst
Surge
Level
Level 4
Level 2
Level 4
Level 1 (0.5kV)
Level 2 (1.0kV)*
Level 3 (2.0kV)*
* Level 2 or 3 surge immunity is only available with revision C03 or later LPT-10
transceiver, and requires external TVS protection.
IEC 801-2 ESD testing is performed on a metal test table using an ESD transient
generator13. Level 4 testing involves injecting up to ±15kV air discharges into the
product under test. Depending on the product design, discharges may be injected at the
network connector, power connector and other user-accessible areas. Normal product
operation should not be interrupted by the discharges, although one packet may be
corrupted on the network by each static discharge to the network connector or cable.
IEC 801-3 RF Susceptibility testing is generally performed in an RF-shielded anechoic
chamber14. The product under test is placed on a non-conducting table in the chamber,
and antennas are used to subject the product to intense radio frequency fields. Normal
product operation should not be interrupted by the RF field, and normal network
communication should continue. Level 2 testing is performed with a field of 3V/m,
which is classified by the test standard as a "Moderate electromagnetic radiation
environment." Level 3 testing is performed with a field of 10V/m, which is classified
by the standard as a "Severe electromagnetic radiation environment."
IEC 801-4 Burst testing is performed on a non-conducting table, with 1 meter of the
network cable clamped in a high-voltage burst generation apparatus15. Normal
product operation should not be interrupted by the bursts, although one packet may be
corrupted on the network by each burst. There are three bursts injected onto the network
cable each second. Level 3 testing is performed with ±1kV bursts, which are classified
by the test standard as representative of a "Typical industrial environment." Level 4
testing is performed with ±2kV bursts, which are representative of a "Severe industrial
environment."
IEC 801-5 Surge testing is performed on a non-conducting table using specialized surge
generation equipment16. The surges are injected directly into the network wiring via a
coupling circuit (see figure 11 of [16]). Normal product operation should not be
interrupted by the surges, although one packet may be corrupted on the network by each
surge. Level 2 testing is performed with up to ±1kV surges, and Level 3 testing is
performed with up to ±2kV surges. For more information on levels and installation
classes, see Annex B.2 of [16]. The applicable surge test levels and coupling mode
specified by IEC 801-5 can be found in table A1 of [16] as follows:
• Symmetrically operated circuits/lines;
• Coupling mode is line-to-ground, either polarity;
• Surge waveform is 1.2/50µs (8/20µs) Combination Wave for Classes 1-4.
6-8
7
Programming Considerations
This section explains how to configure the LonBuilder Developer’s
Workbench to communicate with LPT-10 nodes. It also covers
considerations relating to channel definition.
LONWORKS FTT-10 Transceiver User’s Guide
7-1
Application Program Development and Export
Application programs are initially developed, tested, and debugged using the
LonBuilder Developer’s Workbench. See the LonBuilder User’s Guide for detailed
instructions on developing and testing applications. The LonBuilder SMX Adapter
with attached FTM-10 Modular Transceiver can be used with both the LPT-10 and FTT10 transceivers. The parameters for the FTT/link power channel definition are shown
in table 7.2. These parameters are compatible with both the LPT-10 and FTT-10
transceivers. A standard transceiver definition file is available for LonBuilder that
includes the FT-10 channel definition incorporating the parameters in table 7.2. This
file is available in STDXCVR.ZIP on the LonLink™ bulletin board. Copy the
STDXCVR.TYP file included in STDXCVR.ZIP to the INCLUDE subdirectory of your
LonBuilder system directory, replacing the file of the same name already there. By
default, this directory is C:\LB\INCLUDE.
Application development begins by properly specifying the hardware characteristics of
the system under development. Table 7.1 shows the hardware properties for a typical
Link Power custom node. Assigning these properties to a LonBuilder emulator for
execution will allow the developer to test the application performance at the true clock
rate of the custom node that will eventually host the application. The emulator can also
take on the memory map of the Neuron 3120 Chip by changing the hardware property
Neuron Chip model number to 3120. The backplane network in the LonBuilder
Development Station can also be used to approximate the performance of the twisted pair
media used by the LPT-10 transceivers. Link Power channel emulation is accomplished by
creating a Channel with FT-10 selected as the transceiver type and changing the Comm
Mode type to Differential.
The LPT-10 and FTT-10 transceivers can function as a physical layer signal repeater to
extend the size of the network. The standard channel definition shown in table 7.2
accommodates the delay that occurs as a packet is forwarded by a single physical layer
repeater. If additional repeaters will exist in the path of a packet, the Rcv Start
Delay, and Missed Pream parameters for the channel definition must be modified
according to the notes shown in table 7.2. As the number of physical layer repeaters
increases, the overall channel capacity is reduced because the inter-packet spacing is
increased. In high traffic applications, LON WORKS routers should be used to
selectively forward packets. Systems designed using LON WORKS routers instead of
physical layer repeaters will have a higher overall network packet capacity.
The LonBuilder Developer’s Workbench is initially used to develop and debug
applications on emulators. Once application testing on the emulators is completed, the
LonBuilder software is used to generate custom system images for actual target
hardware (see the LonBuilder User's Guide, Chapter 7, and [4]). A LonBuilder Router
and a LonBuilder SMX Adapter with attached FTM-10 Modular Transceiver is
typically used to interface the LonBuilder hardware to an FT-10 channel. When
changing the LonBuilder hardware configuration to attach a LonBuilder router to an
FT-10 channel, ensure the following steps are completed:
•
7-2
Select a backplane channel for side A and an FT-10 channel for side B in the
LonBuilder Router Target HW definition;
Programming Considerations
•
Ensure that channel A of the router is connected to the backplane channel. For level
1 and 2 routers, a backplane transceiver must be installed in the router P2 channel A
transceiver expansion connector. For level 3 routers, JP1 must be in the "B" position;
•
Mount an FTM-10 Modular Transceiver on a LonBuilder SMX Adapter;
•
Mount the LonBuilder SMX Adapter on the router P3 channel B transceiver
expansion connector. For level 3 routers, JP2 must be in the "A" position;
•
Create a router node specification for the LonBuilder Router;
•
Use LonBuilder to install and load the router.
A heavily loaded FT-10 channel may generate more traffic than can be forwarded
through the LonBuilder Router. This may cause the LonBuilder Protocol Analyzer to
miss some of the packets on the FT-10 channel. To ensure that the protocol analyzer
receives all packets, it may be directly attached to the FT-10 channel. This allows the
protocol analyzer to monitor all channel traffic. When changing the LonBuilder
hardware configuration to attach the protocol analyzer to the FT-10 channel, ensure
that the following steps are completed:
•
Select an FT-10 channel in the protocol analyzer Target HW definition;
•
Mount an FTM-10 Modular Transceiver on a LonBuilder SMX Adapter;
•
Mount the LonBuilder SMX Adapter on the control processor P3 protocol analyzer
transceiver expansion connector. For level 3 control processors, JP1 must be in the
"A" position;
•
Use LonBuilder to install the protocol analyzer.
At this stage, you are ready to use the LonBuilder to install custom nodes attached to
the channel, and to perform other network management functions.
Refer to the custom node section of Chapter 7 of the LonBuilder User's Guide to best
understand the migration of the application from emulators to actual LPT-10 custom
nodes.
Table 7.1 A Typical Hardware Property Record for an FTT Custom Node.
HW Property Name
5MHz_3150
Neuron Chip
3150
Input Clock Rate
5 MHz
ROM Size
128 pages
EEPROM Size
0
RAM Size
0
LONWORKS FTT-10 Transceiver User’s Guide
User's choice
64 for network downloads
7-3
Table 7.2. Standard LPT-10 and FTT-10 Channel Definition for both Bus and Free
Topologies
Variable
FT-10 Standard Transceiver Type
Comm Mode
Single-ended (see note 3)
Comm Rate
78.13kbps
Min Clock Rate
5MHz
Num Priorities
4
Osc Accuracy
200ppm
Osc Wakeup
0µsec
Avg Packet Size
15 bytes
Collision Detect
No
CD terminate after preamble
No
CD through packet end
No
Bit Sync Threshold
4.0 bits
Rcv Start Delay
9.0 bits (see note 1)
Rcv End Delay
0.0 bits
Indeterm Time
24.0 bits
Min Interpacket Time
0.0 bits
Turnaround
0 µsec
Missed Pream
4.0 bits (see note 2)
Use Raw Data?
No
Notes:
1. For N repeaters in a packet path: Rcv Start Delay = 4.5 * (N + 1) bits
2. For N repeaters in a packet path: Missed Pream = 2.0 * (N + 1)) bits
3. Use Differential mode when emulating an FT-10 channel on the LonBuilder backplane
7-4
Programming Considerations
8
References
This section provides a list of the reference material used in the
preparation of this manual.
LONWORKS LPT-10 Transceiver User’s Guide
8-1
Reference Documentation
[1]
L O N W ORKS LPI-10 Link Power Interface Module User's Guide, Echelon Corporation, version
1.1 or later.
[2]
Motorola MC143150 Neuron Chip data book.
[3]
Toshiba TMPN3150 Neuron Chip data book.
[4]
L O N W ORKS Custom Node Development engineering bulletin, Echelon Corporation, 1992.
[5]
L O N W ORKS FTT-10 Free Topology Transceiver User's Guide, Echelon Corporation, version 1.1
or later.
[6]
47CFR15, Subpart B (Unintentional Radiators), U.S. Code of Federal Regulations, (formerly
known as FCC Part 15, Subpart J).
[7]
VDE 0871, Class "B", tested per VFG1046/1984.
[8]
CISPR Publication 22, proposed new EC EMC Standard.
[9]
Not used.
[10]
Protection of Electronic Circuits from Overvoltages, by Ronald B. Standler, John Wiley &
Sons, 1989.
[11]
Electromagnetic Compatibility for Industrial-Process Measurement and Control Equipment,
Part 2: Electrostatic Discharge Requirements, IEC 801-2, 1991-04, draft.
[12]
Junction Box and Wiring Guidelines for Twisted Pair LO N W ORKS Networks,
Echelon Corporation 005-0023-01 Rev D or later.
[13]
IEC 801-2, Electromagnetic compatibility for industrial-process Equipment, Part 2:
Electrostatic discharge requirements, International Standard, Second Edition, 1991-04.
[14]
IEC801-3, Electromagnetic compatibility for industrial-process Equipment, Part 3:
electromagnetic field requirements, International Standard, 1985.
Radiated
[15]
IEC801-4, Electromagnetic compatibility for industrial-process Equipment, Part 4:
fast transient/burst requirements, International Standard, First Edition, 1988.
Electrical
[16] IEC801-5, Electromagnetic compatibility for industrial-process Equipment, Part 5: Surge
immunity requirements, International Standard, January 1993, Draft.
8-2