1
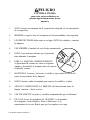
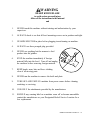
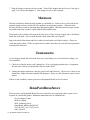
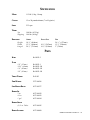
OWNER/OPERATOR
MANUAL
MODEL
E-222
GRINDER
NOTICIA IMPORTANTE
Este manual contiene importantes instrucciones
de seguridad que deben ser seguidas el pie de la
letra cuando utilice esta maquina.
12 • E-222O WNER/OPERATOR MANUAL
IMPORTANT NOTICE
This manual contains Important Safety
Instructions which must be strictly
followed when using this equipment.
BK46705 (February 2002)
BEFORE USING THIS EQUIPMENT
Berkel’s grinders are designed to chop meat and other food products safely
and efficiently. However, unless the operator is properly trained and supervised, there is the possibility of a serious injury. It is the responsibility of
the owner to ensure that this grinder is used properly and safely, strictly
following the instructions contained in this manual and any requirements of
local law.
No one should use or service this grinder without proper training and supervision. All operators should be thoroughly familiar with the procedures
contained in this manual. Even so, Berkel cannot anticipate every circumstance or environment in which its grinders will be used. You, the owner and
operator, must remain alert to the hazards posed by the function of a
grinder—particularly the sharp rotating feedscrew and knife. No one under
18 years of age should operate this equipment. If you are uncertain about a
particular task, ask your supervisor.
This manual contains a number of safe practices in the General Safety Instruction Section. Additional warnings are placed throughout this manual.
WARNINGS RELATED TO YOUR PERSONAL SAFETY ARE INDICATED BY:
WARNING
If any warning label, wall chart or manual becomes misplaced, damaged or
illegible, please contact your nearest distributor or Berkel directly, for a free
replacement.
Remember, however, THIS MANUAL OR THE WARNING LABELS
DO NOT REPLACE THE NEED TO BE ALERT AND TO USE YOUR
COMMON SENSE WHEN USING THIS GRINDER.
E-222 O WNER/OPERATOR MANUAL • 11
TABLE OF CONTENTS
Page
General Safety Instructions .............................................................................................................. 2-3
Equipment Identification ......................................................................................................................4
Installation ............................................................................................................................................5
Operating Instructions ..........................................................................................................................6
Cleaning and Maintenance ...................................................................................................................7
Maintenance .........................................................................................................................................8
Troubleshooting....................................................................................................................................8
Repair Parts/Repair Service ..................................................................................................................8
Specifications .......................................................................................................................................9
Parts ......................................................................................................................................................9
Warranty .............................................................................................................................................10
Berkel Company • World’s Leading Manufacturer of Slicers and Food Processing Equipment
BERKELCOMPANY
4406 Technology Drive · South Bend, Indiana 46628-9700
574/232-8222 · Fax 574/232-8116
(800)348-0251
Form No.Printed
4298R0202
in USA
Printed
in USA
Part No. 3175-00560
Berkel
CompanyBerkel Company
Part No. 3175-00560
E-222 O WNER/OPERATOR MANUAL • 1
PELIGRO
CUCHILLA FILOSA
para evitar serios accidentes a su
persona siga las instrucciones de este
manual y
1.
NUNCA toque esta maquina sin la capacitacion adequada, ni sin autorizaciùn
de su supervisor.
2.
SIEMPRE vea que la base del recipienta este bien atornillada y bien apretada.
3.
LOS PROTECTORES deben estar en su lugar ANTES de enchufar y conectar
la máquina.
4.
USE SIEMPRE el enchufe de tres clavijas suministrado.
5.
NUNCA use nada mas ademas que el prensador
para alimentar la maquina.
6.
PARE LA MAQUINA INMEDIATAMENTE
si algun material extrano cae entre el recipiente.
Apague y desenchufe la maquina antes de remover
el material extrano.
7.
MANTENGA la manos, los brazos, el cabello y ropa suelta LEJOS de las
partes en movimiento de la máquina.
8.
NUNCA heche a andar la maqhina para remover la cuchilla y el plato.
9.
APAGUE Y DESENCHUFE LA MáQUINA del tamacorriente antes de
limpiar, sanitizar, o darle servicio.
10.
USE SOLAMENTE los platos y cuchillas sumministradas por el fabricante.
11.
EN CASO de que los membretes de ‘PELIGRO’ se desprendan
de la máquina o sean illegibles, llame al fabricante o a su
representante de service Berkel para que lo reemplace sin cargo.
2 • E-222 OWNER /OPERATOR MANUAL
WARNING
SHARP KNIFE BLADE
to avoid serious personal injury
follow all the instructions in this manual
and
1.
NEVER touch this machine without training and authorization by your
supervisor.
2.
ALWAYS check to see that all bowl mounting screws are in position and tight.
3.
GUARDS MUST BE in place before plugging in and turning on machine.
4.
ALWAYS use three pronged plug provided.
5.
NEVER use anything but the rammer to feed
product into the grinder.
6.
STOP the machine immediately if foreign
material falls into the bowl. Turn off and unplug
the machine before removing foreign material.
7.
KEEP hands, arms, hair and loose clothing
clear of all moving parts.
8.
NEVER run the machine to remove the knife and plate.
9.
TURN OFF AND UNPLUG machine from power source before cleaning,
sanitizing or servicing.
10.
USE ONLY the attachments provided by the manufacturer.
11.
SHOULD any warning label on a machine come off or become unreadable
contact the manufacturer or your Designated Berkel Service Location for a
free replacement.
E-222 OWNER /OPERATOR MANUAL • 3
EQUIPMENT IDENTIFICATION
Rammer
Tray
On/Off
Switch
Safety
Guard
Hopper
Ring
Plate
Knife
Feedscrew
Thumb
Screw
4 • E-222 OWNER /OPERATOR MANUAL
Thrust
Washer
Fiber
Washer
INSTALLATION
SITESELECTION
Select a solid, level surface to install the E-222 chopper. This area should be well lit and large
enough to allow easy access to all sides of the machine.
ELECTRICAL
Your E-222 chopper is manufactured with a 20-amp power cord and plug. Contact a licensed electrician to install a 20-amp outlet. Do not try to modify a standard outlet to accommodate this plug.
Failure to use a correct outlet will void the warranty. Also, check that the line voltage matches the
motor specifications as shown on the serial plate.
APPROVEDUSES
The Berkel E-222 chopper is suitable to cut and chop the following products:
• Meat
• Poultry
• Fish
NON-APPROVEDUSES:
The Berkel E-222 chopper is not designed to cut and chop the following products:
•
•
•
Non-food products
Dry products
Meat with bones
TESTING PRIORTOOPERATION
1. Make sure the chopper is unplugged and is on a solid, level surface.
2. Check that the line voltage at the outlet matches the machine specifications.
3. Choose a knife and plate to install. (If you have just removed the chopper from its shipping
carton, it is greased and ready to run with a 1/8” plate from the factory.) The standard plate has
1/8” (3.2mm) holes. Optional plates are 3/16” (4.8mm), ¼” (6.3mm), and 3/8” (9.5mm). It is
recommended that a plate and knife should be matched and kept as a pair. They will wear evenly
and provide the best operation of the chopper.
CAUTION
Mixing knives and plates will cause them to
wear unevenly and possibly damage each other.
E-222 OWNER /OPERATOR MANUAL • 5
4. Unscrew the ring from the cylinder. Place the knife, plate surface out, onto the feedscrew,
mating the square hole with the square shaft. Insert the plate over the knife with the flat edge
mating with the pin in the cylinder. Screw the ring onto the body, but do not over tighten. The
fineness of the cut is determined by the size of the holes in the plate, not the tension of the ring.
Over tightening the ring will cause the knife and plate to wear and the motor to overheat. When
the ring is overtightened, the knife and plate can become very hot and discolor the meat.
OPERATINGINSTRUCTIONS
WARNING
To avoid serious personal injury, never attempt to put anything other
than the rammer into the hopper. If the tray guard becomes loose,
damaged or has been removed, do not attempt to operate the chopper.
CAUTION
Never operate the chopper dry. Have meat ready to cut
before turning the chopper on. The natural grease and
oil in the meat will lubricate the moving parts.
1. Cut the meat to a size suitable for easy feeding into the hopper. Trim out the gristle. Gristle has
a tendency to wrap around the knife and will require frequent cleaning. The smaller the size of
the meat, the better the chopper will operate.
2. Place the meat to be chopped onto the tray.
3. Feed a small amount of meat into the hopper and move the toggle switch to ON. Do not force
the meat into the hopper with the rammer. The feed screw is designed to move the meat towards
the knife at the proper speed. Forcing large quantities with the rammer will only cause pressure
to the components. Greater speed is achieved by feeding smaller pieces and allowing the natural
action of the feed screw to do its job.
4. As the chopper is running, continue to keep the hopper well filled, but do not force the meat.
5. Move the toggle switch to OFF as soon as the cylinder is empty.
Note: When using the rammer, only push hard enough to get the meat to the feed screw. Push the
rammer all the way down and remove it slowly so that the suction does not pull meat back up into
the hopper. Dipping the rammer in cold water will stop meat from sticking to it.
When chopping frozen meat, use a course plate for the first grind. A finer plate can be used for each
subsequent grind.
6 • E-222 OWNER /OPERATOR MANUAL
CLEANINGANDSANITIZING
DISASSEMBLY
1. Unplug the chopper and remove the rammer.
2. Loosen the ring but don’t remove it. Loosen the thumbscrew and remove the entire cylinder.
Take the cylinder to the sink. Unscrew the ring and pull off the plate, knife and feedscrew.
Thoroughly clean each of these parts in hot water using a food grade detergent. Rinse and
sanitize each part with an USDA approved sanitizer. Remember to keep the knife and plate
together as a pair. Berkel recommends using approved sanitizer, part number 4975-00400.
3. Wrap a rag around the cleaning rod. Wet the rag and use the rod to clean between the pan and
the housing. You can also use the rag/rod to wipe the inside of the hopper and cylinder.
4. Take a bucket and fill with hot water and good grade detergent. Take an empty bucket and place
below the opening in the tray. Use the hot, soapy water to clean the tray, allowing the dirty
water to drain into the empty bucket.
5. Wipe off the sides with a wet cloth. Rinse with clean water, sanitize and allow to dry.
REASSEMBLY
WARNING
In the next steps, you will be asked to use grease and oil.
To prevent contamination and possible food poisoning, use only
Berkel USDA approved grease (4675-00185) and oil (4675-00182).
1. Place a thin coat of grease on the inside of the cylinder where the feed screw is located.
2. Push the cylinder into place on the chopper aligning the pin to the hole as it is installed. Once
the cylinder is back as far as it will go, tighten the thumbscrew.
3. Place a thin coat of grease on the feedscrew. Insert the feedscrew into the cylinder making sure
the taper shaft mates with the gearbox.
4. Coat the knife with grease and set in place on the feedscrew. The flat side of the knife points
outward.
5. Grease and place the plate on the feedscrew, matching the cutout area of the plate to the pin in
the cylinder.
6. Grease the threads of the ring and screw onto the cylinder. Hand-tighten the ring. Do not use
tools to tighten. Over tightening the ring will only cause the parts to wear faster than normal.
E-222 OWNER /OPERATOR MANUAL • 7
7. Plug the chopper in and run for one second. Turn off the chopper and check to see if the ring is
tight. If it is loose, then tighten it. Your chopper is now ready to operate.
MAINTENANCE
The knives and plates should be kept together as a matched set. Failure to do so will result in mismatched cutting surfaces, which will lower productivity and product quality. When the knife
becomes dull, have it and its matching plate sharpened together. When the plate no longer extends
beyond the end of the cylinder, replace both the knife and the plate.
The threads on the cylinder and ring must be kept clean. If they become clogged, take a stiff bristle
brush and clean them. Also, keep the threads coated with a thin coat of grease.
Inspect the anti-friction thrust and fiber washers located on the end of the feedscrew. If they are
worn, then replace them. Failure to replace these washers when they are worn will cause premature
wearing of the feedscrew.
TROUBLESHOOTING
If your chopper should fail to function, there are several things you can check before calling a service technician.
1. Check to see that the power cord is plugged in. If so, try plugging another piece of equipment
into the same outlet to verify that there is power at the outlet.
2. Unplug the chopper and remove the ring, plate, knife and feedscrew. Check to see if there is any
obstruction. Inspect the knife and plate for sharpness. If they are dull, sharpen or replace immediately.
If there is still a problem, contact your nearest Designated Berkel Service Location.
REPAIRPARTS/REPAIRSERVICE
Please contact your Designated Berkel Service Location for any repair parts and/or repair service
required on your Berkel grinder. Additional information may be obtained from:
Service Support Center
Berkel Company
4406 Technology Drive
South Bend, Indiana 46628-9700
574/232-8222 · Fax 574/232-8116
(800) 348-0251
8 • E-222 OWNER /OPERATOR MANUAL
SPECIFICATIONS
MOTOR
115/60/1, 1hp, 18 amp
CAPACITY
15 to 20 pounds/minute (7 to 9 kg/min.)
SPEED
235 rpm
WEIGHT
Net
Shipping
DIMENSIONS
Height
Width
Length
100 lbs. (45.5 kg)
106 lbs. (48 kg)
OVERALL
18 ¼” (464mm)
15 ¾” (400mm)
28 ½” (724 mm)
FOOTTOFOOT
10 ½” (267mm)
16 ½” (419mm)
TRAY
26 ½ ”, (673mm)
15 ½” (394mm)
3” (76mm)
PARTS
KNIFE
K-04022-2
PLATES
1/8” (3.2mm)
3/16” (4.8mm)
1/4” (6.3mm)
3/8” (9.5mm)
K-04022-1
K-04022-1B
K-04022-1D
K-04022-1H
THRUSTWASHER
E-01993
FIBERWASHER
2275-00566
STIFFBRISTLEBRUSH
4975-09237
BERKELOIL
2 oz.
16 oz.
1 gal.
4675-00182
4675-00183
4675-00184
BERKELGREASE
(3) 3 oz. Tubes
BERKELSANITIZER
4675-00185
4975-00400
E-222 OWNER /OPERATOR MANUAL • 9
WARRANTY
Berkel Company (“Berkel”) warrants to the Buyer of new equipment that said equipment,
when installed in accordance with our instructions and subjected to normal use, is free from
defects in material or workmanship for a period of one (1) year from the date of sale.1
BERKEL SPECIFICALLY DISCLAIMS ANY IMPLIED WARRANTY OF MERCHANTABILITY OR EXPRESS OR IMPLIED WARRANTY OF FITNESS FOR A
PARTICULAR PURPOSE.
Berkel’s obligation and liability under this warranty is expressly limited to repairing or
replacing equipment that proves to be defective in material or workmanship within the applicable warranty period. Berkel or a Designated Berkel Service Location will perform all
repairs pursuant to this warranty. Berkel expressly excludes responsibility for incidental or
consequential damages to buyer or any third party, including, without limitation, damages
arising from personal injuries, lost profits, loss of business opportunity, loss of property,
economic losses, or statutory or exemplary damages, whether in negligence, warranty, strict
liability or otherwise.
This warranty does not apply to: periodic maintenance of equipment including but not limited to lubrication, replacement of worn blades, knives, stones, knobs, accessories, and miscellaneous expendable supply items, and other adjustments required due to installation set-up
or normal wear.
These warranties are given only to the first purchaser from a Berkel Authorized Channel of
Distribution. No warranty is given to subsequent transferees.
The foregoing warranty provisions are a complete and exclusive statement of the warranty
between the buyer and seller. Berkel neither assumes nor authorizes any persons to assume
any other obligation or liability connection with said equipment.
1
Model 180 slicers carry a 90-day warranty.
BK46705 (February 2002)