1
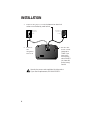
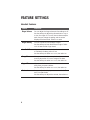
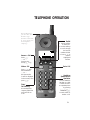
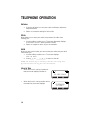
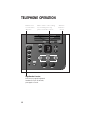
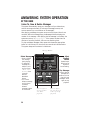
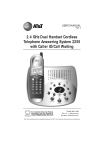
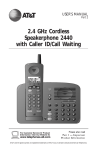
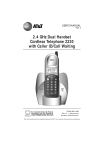
1
USER’S MANUAL
Part 2
2.4 GHz Cordless
Answering System 2455
with Caller ID/Call Waiting
Please also read
Part 1 — Important
Product Information
AT&T and the globe symbol are registered trademarks of AT&T Corp. licensed to Advanced American Telephones.
© 2000 Advanced American Telephones. All rights reserved.
Printed in China. 850004565 Issue 1AT&T 9/00
CONTENTS
BEFORE YOU BEGIN . . . . . . . . . . . . . . 3
CALLER ID OPERATION . . . . . . . 20
Using More Than One Handset ......3
Choosing the Best Location ...........3
About Caller ID with Call Waiting...3
View Calls Log..............................20
Dial Displayed Call Record ..........20
Delete Call Records......................21
Store Call Record in
Telephone Memory ..................22
INSTALLATION . . . . . . . . . . . . . . . . . . . . . . . 4
Belt Clip .........................................6
Headset ..........................................6
FEATURE SETTINGS . . . . . . . . . . . . . . . 7
Handset Softkeys............................7
Telephone Feature Setup ...............7
Handset Features............................8
TELEPHONE OPERATION . . . . . . . 9
Make a Call .....................................9
Answer a Call..................................9
End a Call........................................9
Redial ..............................................9
Flash/Call Waiting ...........................9
Handsfree Speakerphone Operation.9
Volume..........................................10
Mute..............................................10
Hold ..............................................10
Line in Use....................................10
Handset Icons ...............................11
Page/Handset Locator...................12
Operating Range...........................13
TELEPHONE DIRECTORY . . . . . . 14
Store a Number and Name
in Memory ................................14
View a Memory Number..............15
Delete a Memory Number ...........16
Edit a Memory Number ...............17
Dial a Memory Number ...............17
INTERCOM/TRANSFER
OPERATION . . . . . . . . . . . . . . . . . . . . . . . . . 18
Handset to Handset......................18
Handset to All Handsets ...............18
Transfer Calls................................18
ANSWERING SYSTEM
OPERATION
AT THE BASE . . . . . . . . . . . . . . . . . . . . . . . . . . . 23
Audible Indicators........................23
About Mailboxes ..........................23
About Announcements ................23
Record Your Announcement ........24
Answering System
Feature Setup............................25
Feature Summary .........................25
Listen To, Save &
Delete Messages........................26
Call Screening/Intercept ..............27
Record a Memo............................27
Message Window Display.............27
ANSWERING SYSTEM
OPERATION
AT TOUCH TONE PHONE . . . . . . . . . . . . . . 28
Connect with the Answering
System.......................................28
Voice Menu ..................................28
Remote Access Commands ..........29
BATTERIES . . . . . . . . . . . . . . . . . . . . . . . . . . 30
Battery Life...................................30
Charge the Handset
Battery Pack..............................30
Replace the Handset
Battery Pack..............................31
Power Fail Operation ...................32
Spare Battery................................32
IN CASE OF DIFFICULTY . . . . . . 33
1
BEFORE YOU BEGIN
Using More Than One Handset
This system can support up to four handsets. You must “register” additional
handsets (purchased separately) with the base. The handset that came with
the system (Handset 1) will automatically be registered with the base.
Follow the directions that come with an additional handset to register it
with the base.
Choosing the Best Location
Choose a location for the base near an electrical outlet and a telephone
jack. This phone requires a modular telephone jack and a standard
electrical outlet (110v AC) not controlled by a wall switch. For optimum
performance, install the base on the highest floor of your home.
About Caller ID with Call Waiting
This product has a Caller ID with Call Waiting feature that works with
service from your local phone service provider.
Caller ID with Call Waiting lets you see who’s calling before you answer the
phone, even when you’re on another call.
You may need to change your phone service to use this feature. Contact
your phone service provider if:
• You have both Caller ID and Call Waiting, but as separate services
(you may need combined service)
• You have only Caller ID service, or only Call Waiting service
• You don’t subscribe to any Caller ID or Call Waiting services.
You can also use this product with regular Caller ID service, and you can use
this product’s other features without subscribing to either Caller ID or
combined Caller ID with Call Waiting service.
There are fees for Caller ID services, and they may not be available in all
areas.
This phone can provide information only if both you and the caller are in
areas offering Caller ID service and if both telephone companies use
compatible equipment.
3
INSTALLATION
1
Connect the power cord to the base and an electrical
outlet not controlled by a wall switch.
Modular
telephone
jack
2
Connect
the
telephone
line cord.
Standard
electrical
outlet
3 Set the dial
mode switch.
Leave set to
TONE if you
have touch
tone service;
set to PULSE if
you have dial
pulse (rotary)
service.
Use only the power cord supplied with this product.
If you need a replacement, call 1 800 222-3111.
4
INSTALLATION
4
Install the handset battery.
a) Remove battery
compartment cover by
pressing on indentation and
sliding downward.
b) Place the battery pack in the
handset. Align the metal
contacts on the battery with
the contacts in the battery
compartment.
c) Replace cover by sliding it on
its track up over battery case
until it snaps firmly into place.
5
6
Charge the handset battery.
• Place the handset in the base (or a remote charging stand,
purchased separately).
• Charge the battery at least 12 hours. After the first charge, the
battery will quick charge in only eight hours.
Check for dial tone.
• After the batteries are charged, lift the handset and press
P; you should hear a dial tone.
5
INSTALLATION
Belt Clip
Attach belt clip to the cordless handset (optional).
a) Slide down into
grooves to attach.
b) Push up and away
to remove.
Headset
You can use this telephone hands-free when you install a 2.5 mm headset
(purchased separately).
Plug the headset into the jack located on the left side of the handset
(under the small rubber flap). Do not force the connection, but make sure
the plug fits securely.
6
FEATURE SETTINGS
Handset Softkeys
Press the softkey below the operation displayed on the screen to select
that operation. For example, to enter the menu, press the center softkey.
Screen
display of
operations to
be selected
with softkeys.
Softkeys
Telephone Feature Setup
1
2
3
4
5
6
7
8
Make sure the handset is off.
Use the softkey to select MENU.
Use the softkey to highlight HANDSET SETTINGS.
Select OK.
Press the right softkey until the feature you want to set
is highlighted.
Select OK.
Follow the directions for each feature as described in “Handset
Features” on the next page.
The screen returns to the Handset Settings menu.
7
FEATURE SETTINGS
Handset Features
Feature
Directions
Ringer Volume
You can adjust the ringer volume to four settings or off.
Use the softkeys to adjust the volume down or up, or
to turn the ringer off. You will hear a volume sample
each time you change the setting, and the screen
displays the volume level. Select OK to save.
Ringer Melody
You can choose from six different ringers.
Use the softkeys to hear the different ringers. Select
SAVE to save the last ringer heard.
Low Batt Tone
If you turn this feature on, the handset sounds a tone
to indicate the battery power is low.
Use the softkeys to select OFF or ON, then select OK.
Range Tone
When you turn this feature on, the handset sounds a
warning tone when it is out of range of the base.
Use the softkeys to select OFF or ON, then select OK.
Keypad Tone
If you turn this feature on, the handset sounds a tone
every time you press a button.
Use the softkeys to select OFF or ON, then select OK.
Contrast
You can adjust the display screen contrast level. There
are 15 contrast levels.
Use the softkeys to adjust the contrast, then select OK.
8
TELEPHONE OPERATION
On steadily when
you have new voice
mail messages.
(You must subscribe
to service from your
local telephone
company.)
Answer a Call
Press P
— OR —
Press any key
except O or +.
Make a Call
Press P, then
dial the number
— OR —
Dial the number
(it will be displayed
on the screen), then
press P.
Flash/
Call Waiting
Access telephone
company subscriber
services while on
a call.
Redial
1 Use the softkey
to select RDL.
2 Use the softkeys
to scroll through
the last five
numbers dialed.
3 Press P to
call the
highlighted
number.
End a Call
Handsfree
Speakerphone
Operation
You can stand the
handset on a desk
or table and use it
as a speakerphone
by pressing
k
instead of P
to make, redial, or
answer a call.
9
TELEPHONE OPERATION
Volume
1
2
During a call, select VOLUME, then use the softkeys to adjust the
earpiece volume.
Select OK to save the setting for future calls.
Mute
Mute allows you to hear your caller, but prevents the caller from
hearing you.
1 Use the softkey to select MUTE. The screen alternately displays
MICROPHONE MUTED! and the previous screen.
2 Select MUTE again to return to your conversation.
Hold
When you put a call on hold, you cannot hear your caller, and your caller
cannot hear you.
1 Use the softkey to select HOLD. The screen displays
CALL ON HOLD.
2 Press P or k to return to the call.
NOTE: The handset rings to remind you that the call is being held.
If you don’t answer the ring, the call is disconnected.
Line in Use
•
When the line is in use by a handset or
base, the screen display is similar to:
2
02 NEW CALLS
RDL
•
When the line is in use by another set on
the same line, the screen displays:
MEM
EXTENSION
IN USE!!
VOL
10
MENU
MENU
MUTE
TELEPHONE OPERATION
Handset Icons
Icon
Description
Line in Use
On steadily with no number next to it when a parallel set is
in use.
On steadily with one or more numbers next to it to show
which extensions are using the line. For example, 12
indicates that Handset 1 and Handset 2 are on outside calls.
Intercom
On steadily with the extension numbers currently on an
intercom call. For example, 12 indicates that Handset 1 and
Handset 2 are currently on an intercom call.
Battery
Cycles (low, medium, and high) when Handset battery is charging.
Flashes when battery is low.
M
Mute
H
Hold
R
Handset Registration
On steadily when the handset microphone is muted.
On steadily when the line is on hold.
On steadily when a handset is either not registered, or is
searching for a base unit.
11
TELEPHONE OPERATION
Indicates base
is connected to
AC power
Flashes when a call is coming
in; on steadily when any
phone on this line is in use
Page/Handset Locator
Press once to page all registered
handsets for up to 30 seconds;
press again to cancel.
12
Indicates
handset is
in base
TELEPHONE OPERATION
Operating Range
This cordless telephone operates within the maximum power allowed by
the Federal Communications Commission (FCC). Even so, this handset and
base can communicate over only a certain distance — which can vary with
the locations of the base and handset, the weather, and the construction of
your home or office.
If you receive a call while you are out of range, the handset might not
ring — or if it does ring, the call might not connect when you press P.
Move closer to the base, then press P to answer the call.
If you move out of range during a phone conversation, you might
hear noise or interference. To improve reception, move closer to the base.
If you move out of range without pressing O, your phone will be
left “off the hook.” To hang up properly, walk back into range, periodically
pressing O.
13
TELEPHONE DIRECTORY
You can store up to 50 telephone numbers and names in memory.
Store a Number and Name in Memory
1
Start from the “idle” screen.
HANDSET 1
2
3
Begin entering the number you want
to store. Use the PAUSE softkey to
enter a dialing pause if you wish.
Select MEM when finished.
RDL
MENU
PAUSE
MENU
MEM
5551234
MEM
The screen displays:
ENTER NAME
CLR
4
5
SAVE
Use the chart below to enter a name to be stored with this number.
Select to enter a space; select CLR if you make a mistake.
Select SAVE. The number is stored and the “idle” screen is displayed.
Dial Key
1
2
1
2
3
4
5
6
7
8
9
*
0
#
&
A
D
G
J
M
P
T
W
‘
B
E
H
K
N
Q
U
X
Presses
3
,
C
F
I
L
O
R
V
Y
4
5
.
2
3
4
5
6
S
8
Z
1
7
9
*
0
#
NOTE: If the memory is full, the screen displays PHONEBOOK IS
FULL! and exits without saving the entry.
14
TELEPHONE DIRECTORY
View a Memory Number
1
Start from the “idle” screen.
Select MEM.
HANDSET 1
RDL
2
MENU
MEM
The screen displays:
FIND
3
Use the and softkeys to
scroll through memory in
alphabetical order
RALPH
5551234
EDIT
— OR —
Select FIND, then enter the first few
letters of the name and select FIND
again to search.
SEARCH FOR
RAL
CLR
The closest match alphabetically is
displayed.
FIND
RALPH
5551234
EDIT
15
TELEPHONE DIRECTORY
Delete a Memory Number
1
2
Follow Steps 1–3 under
“View a Memory Number.”
Select EDIT.
RALPH
5551234
EDIT
3
Select DEL.
RALPH
5551234
DEL
4
5
16
Select THIS to delete the displayed
entry
— OR —
Select ALL to delete the entire
memory.
If you selected ALL, the screen
displays ARE YOU SURE?.
Select YES to delete the memory
— OR —
Select NO to exit without deleting.
EDIT
RALPH
5551234
THIS
ALL
ARE YOU
SURE?
NO
YES
TELEPHONE DIRECTORY
Edit a Memory Number
1
2
Follow Steps 1–3 under
“View a Memory Number.”
Select EDIT.
MANUEL
5550013
EDIT
3
Select EDIT.
MANUEL
5550013
DEL
4
5
6
7
8
Select to move the cursor to where
you want to begin editing the phone
number.
Select MORE for more editing choices.
Select DEL to delete numbers, then
enter new numbers. Select PAUSE to
enter a dialing pause.
Select BACK. To continue editing, use
the to reposition the cursor and
repeat Steps 5–7.
Select SAVE to exit saving the edits
— OR —
Press O to exit without saving.
EDIT
MANUEL
5550013
SAVE
MORE
MANUEL
55500
DEL
BACK
PAUSE
MANUEL
5550021
SAVE
MORE
Dial a Memory Number
1
2
Follow Steps 1–3 under
“View a Memory Number.”
Press P or K to
dial the call.
CAROL
5551738
EDIT
17
INTERCOM/TRANSFER OPERATION
Handset to Handset
1
2
3
4
Press I on the handset.
Press the number of the handset you
12
are calling (for example, press 2 for
GLOBAL PAGE
Handset 2)
HANDSET 1
— OR —
OK
Use the softkeys to scroll to the
handset you are calling, then select OK.
The responding handset presses I to answer your
signal.
To end the intercom connection, press O on either handset.
Handset to All Handsets
1
2
3
4
Press I on the handset.
Press * on the handset
— OR —
Use the softkey to select OK when GLOBAL PAGE is highlighted.
All registered handsets will ring.
Respond at any handset by pressing I.
To end the intercom connection, press O on the handset.
Transfer Calls
You can transfer calls from handset to handset. A transfer that remains
unanswered for five minutes rings back to the sending handset for
30 seconds, then disconnects.
Blind Transfer
Transfer without advising the other person.
1 Press I.
2 Enter the handset number (1, 2, 3, 4) where you want to
transfer the call
— OR —
Use the softkeys to scroll to the handset where you want to
transfer the call, then select OK.
3 The call is transferred when the responding handset presses
I, P, or k.
18
INTERCOM/TRANSFER OPERATION
Announced Transfer
Advise another person that you are transferring a call.
1 Press H to put the call on hold.
2 Press I.
3 Enter the number of the handset (1, 2, 3, 4) where you are
sending the call
— OR —
Use the softkeys to scroll to the handset where you are sending
the call, then select OK.
4 The responding handset presses I to answer your
signal.
5 Both extensions press O to end the intercom connection.
6 The responding handset presses P or k to
pick up the call.
19
CALLER ID OPERATION
Caller’s
name
Caller’s
telephone
number
Time of call
Date of call
Position of call
in Calls Log
View Calls Log
The handset stores up to 50 Caller Identification records in the Calls Log,
with the most recent records displayed first.
1 Select MENU.
2 Select CALLS LOG. The screen
display is similar to:
SMITH
ANDREW
808-555-1700
11:15A Oct12
#02
CID
3
4
Select or to scroll through the Calls Log.
To exit Calls Log, press O.
Dial Displayed Call Record
1
2
20
Follow the directions to “View Calls Log.”
When the number you want to call is displayed, press P
— OR —
Press k.
CALLER ID OPERATION
Display Dial Options
Display up to four possible dialing strings for the number in Calls Log.
1 Follow the directions to “View Calls Log.”
2 Select CID. The screen display is
similar to:
SMITH
ANDREW
808-555-1700
11:15A Oct12
DEL
3
4
Select OPT#.
Select or to highlight the number
as you want it to be dialed.
OPT#
#02
SAVE
555-1700
1-555-1700
808-555-1700
1-808-555-1700
EDIT
5
To call the selected number, select DIAL
— OR —
Press P
— OR —
Press k.
Delete Call Records
1
2
3
Follow the directions to “View Calls Log.”
Select CID.
Select DEL. The screen display is
similar to:
SMITH
ANDREW
808-555-1700
11:15A Oct12
THIS
4
5
6
#02
ALL
Select THIS to delete the displayed call record
— OR —
Select ALL to delete all records in the Calls Log.
If you select ALL, the screen displays ARE YOU SURE?
Select YES to delete all records and exit
— OR —
Select NO to exit without deleting.
To exit Calls Log, press O.
21
CALLER ID OPERATION
Store Call Record in Telephone Memory
NOTE: Only call records with telephone numbers will be stored in the
telephone memory.
1
2
3
4
22
Follow the directions to “View Calls Log.”
Select CID.
Select SAVE. The number is stored in the memory.
To exit Calls Log, press O.
ANSWERING SYSTEM OPERATION
AT THE BASE
Audible Indicators
This system gives you voice prompts for feature operations and voice
confirmations when you press a button or complete an operation.
About Mailboxes
This answering system has three voice mailboxes. Callers using a touch
tone phone can select the mailbox in which their messages will be
recorded by pressing * 1, * 2, or * 3 after the system answers the call.
All other messages will be recorded in Mailbox 1.
About Announcements
•
•
•
•
•
You can record up to two different announcements — one for normal
answering and one for when you’ve set the system to play the
announcement only.
Use normal answering when you want the system to record callers’
messages. Use Announce Only when you want to give information to
callers without accepting messages.
If you choose not to record an announcement, the system answers with
a pre-recorded announcement.
The normal answering pre-recorded announcement says: “Hello. I’m
unable to answer your call right now. Please leave your name,
number and message after the tone.” The Announce Only
pre-recorded announcement says: “Hello. I’m unable to answer your
call right now. Please call again. Thank you.”
By setting Announce Only to On or Off, you decide which
announcement your callers will hear when the system answers a call
(the system comes set for normal answering, with Announce Only
turned off). See “Set Announce Only” on page 25 to change your
announcement selection.
23
ANSWERING SYSTEM OPERATION
AT THE BASE
Record Your Announcement
NOTE: If you have assigned different mailboxes to different people, be
sure to tell callers in your announcement to press * 1, * 2, or * 3 to
leave a message in the appropriate mailbox.
1
2
3
Press U until you hear “Set outgoing message.”
Press d. After you hear “Now recording” followed by a beep,
speak toward the base to record an announcement up to 90
seconds long. After recording your announcement, wait a few
seconds (so your caller will have time to select a mailbox).
Press any MAILBOX button to stop recording. The system plays
back your recorded message.
To review your announcement at any time:
1 Press U until you hear “Set outgoing message.”
2 Press any MAILBOX button.
To delete your announcement:
Press CLEAR during announcement playback. The system will use the
pre-recorded announcement until you record a new one.
Delete outgoing
announcement
Record outgoing
announcement
Confirm/review
feature setting
Select a
feature setting
Enter Answering
System Feature
Setup and choose
a feature to set
Turn Answering
System on or off
24
ANSWERING SYSTEM OPERATION
AT THE BASE
Answering System Feature Setup
You can set up one feature at a time, or you can set up a feature and then
move on to set up another feature.
1 Make sure the answering system is on.
2 Press and release U until you hear the system announce the
feature you want to set. Refer to the “Feature Summary” below for a
description of the features and your choices.
3 Press S to hear the feature’s settings.
4 Press t to confirm your selection.
Feature Summary
Asterisk (*) indicates default settings.
System announces:
Description/directions:
“Set Outgoing Message”
See “Record Your Announcement” on
page 24.
“Set Security Code”
Set the remote access code you will use
to access features and functions of the
answering system from a touch tone phone.
19 *
“Set Day and Time”
Set the clock: After you set the day, repeat
Steps 2 and 3 in “Answering System
Feature Setup” to set hours and minutes.
“Set Audible Message Alert” When Message Alert is turned on, the base
Off *
On
“Set Announce Only”
Off *
On
“Set Base Ringer”
beeps once every 10 seconds when new
messages have been received.
When you set the system to Announce
Only, callers hear your announcement,
but cannot leave a message.
Turn the base ringer on or off.
On *
Off
“Set Number of Rings”
2
4*
6
Toll Saver
Choose how many times the phone will
ring before the system answers a call.
With Toll Saver active,the system answers
after two rings when you have new
messages and after four rings when you
have no new messages.
NOTE: Exit Feature Setup at any time by pressing a MAILBOX button.
25
ANSWERING SYSTEM OPERATION
AT THE BASE
Listen To, Save & Delete Messages
The system automatically saves your messages until you delete them,
and can store approximately 15 minutes of messages, memos, and
announcements (up to a maximum of 99 messages).
After playing a message, the system announces the day and time it was
received. While the message plays, the Message Window displays the
number of the message. After playing the last message in a mailbox, the
system announces “End of messages.” If the system has less than five
minutes of recording time left, it announces remaining time.
To play and delete messages, either press and release the appropriate
button or hold it down for more than two seconds as indicated below.
The system beeps while a button is held down.
Message Window
Delete Messages
Adjust
Playback
Volume
• Press to delete
the message
that’s playing.
• To delete all
messages in a
mailbox, hold
until you hear
“Please select
mailbox,” then
press the
desired
MAILBOX
button.
• You cannot
delete a message
until it’s been
reviewed;
deleted
messages cannot
be recovered.
26
System beeps
three times at
highest or
lowest setting.
Play Messages
Press to play all
messages in a
mailbox; hold to
play only new
messages. Press
again to stop
playback.
Press to repeat a
message; hold to
slow down
playback
Press to skip to
the next message;
hold to speed up
playback
ANSWERING SYSTEM OPERATION
AT THE BASE
Call Screening/Intercept
1
2
3
Make sure the answering system is on, and set the message playback
volume control above Level 1 so you can hear the caller’s message.
If you decide to take the call, press P on the handset.
If you pick up an extension phone during the announcement and the
announcement does not stop right away, press and release the
telephone switchhook.
Record a Memo
You can record a memo up to four minutes long to store as an incoming message.
1 Press and release d.
2 Press a MAILBOX button to select a mailbox for the memo. After
the beep, speak toward the microphone. The Message Window
displays the length of your memo.
3 To stop recording, press the MAILBOX button again.
Message Window Display
Display:
Indicates:
0
No new messages in any mailbox
1 – 98, flashing
Total number of messages in all mailboxes
0 – 99 ↔ F
Memory is full, or total number of messages is 99
Counting 1 to 99
Duration of Announcement or Memo recording
99, flashing
Length of recording is more than 99 seconds
1 – 99
Current message number during message playback
1 – 8, steady for
one second
Volume level selected when VOLUME + or
VOLUME - is pressed
00 – 99
Current Remote Access Code while setting
A
Announce Only mode
ON or OFF, steady for
A setting has been changed from On or Off
one second
CL ↔ normal display
Clock needs to be set
––
System is answering a call or is in remote operation
– – , flashing
System is in programming mode or initializing
27
ANSWERING SYSTEM OPERATION
AT TOUCH TONE PHONE
Connect with the Answering System
You can access many features of this system remotely from a touch tone
phone.
1
2
3
4
Dial your telephone number.
When the system answers, press #, then enter your
Remote Access Code (preset to 19). The system beeps twice.
Within two seconds, enter a remote command (see “Remote Access
Commands” on page 29).
Press * 0 to exit remote operation.
Voice Menu
The system has voice prompts to help you with remote operation. Press
* 5 to hear the menu while remotely connected to the answering system.
28
ANSWERING SYSTEM OPERATION
AT TOUCH TONE PHONE
Remote Access Commands
Function:
Command:
Play messages in
a mailbox
Press #, then the appropriate mailbox
number (1, 2, or 3). The system plays
new messages. If there are no new
messages, the system plays old messages.
Repeat a message
Press # 4 while message is playing;
each press backs up another message.
Skip a message
Press # 6 while message is playing;
each press advances another message.
Stop
Press # 5.
Save messages
Hang up.
Delete message
Press # 9 while message is playing.
Review announcement
Press # 7; system plays announcement,
then beeps.
Record announcement
Press * 7; after beep, record
announcement, press # 5 to stop.
System plays back announcement.
Record memo
Press * 8; then mailbox number where
you want memo recorded; speak after
beep; press # 5 to exit.
End remote access call
Press * 0.
Turn system off
Press # 0; the system announces,
“The machine is off.” Press # 0 again
to turn the system back on.
Turn system on
When system is off, it answers after 10
rings and announces, “Please enter your
security code.” Press #, then enter your
remote access code.
NOTE: The remote access call will automatically end if 20 seconds go by
with no key being pressed (other than when recording or playing
messages or announcements).
29
HEADLINE LEFT
BATTERIES
HEADLINE L-SUB
Battery Life
Battery life depends on how far the handset is from the base, and other
environmental conditions.
NOTE: For optimum performance, charge your handset on the base
every night.
Charge the Handset Battery Pack
•
•
•
•
•
This battery should remain charged for up to five days. A fully charged
battery provides an average talk time of about six to eight hours.
The battery pack needs charging when:
– The battery icon (
) flashes,
– A warning tone sounds, or
– The screen displays LOW BATTERY when idle.
Place the handset in the base so the CHARGING light goes on. The
battery pack is typically charged in eight hours. For best results, the
initial charge should be twelve hours.
You can keep the battery fully charged by returning the handset to the
base after each use.
If you repeatedly get a Low Battery indicator, even after eight hours of
charging, the battery should be replaced.
CAUTION: To reduce the risk of fire or injury to persons or
damage to the telephone, read and follow these instructions
carefully:
•
•
•
•
•
•
30
Use only Replacement Battery 2401, SKU# 91077.
Do not dispose of the battery in a fire. The cell might explode.
Check with local codes for special disposal instructions.
Do not open or mutilate the battery. Released electrolyte is
corrosive and may cause damage to the eyes or skin. It may be
toxic if swallowed.
Exercise care in handling batteries in order not to short the battery
with conducting materials such as rings, bracelets, and keys. The
battery or conductor may overheat and cause harm.
Charge the battery provided with or identified for use with this
product only in accordance with the instructions and limitations
specified in this manual.
Observe proper polarity orientation between the battery and
battery charger.
BATTERIES
Nickel-Metal Hydride Batteries. Dispose of batteries in a safe manner.
Consult your local waste disposal company for disposal information. Do
not burn or puncture. Like other batteries of this type, if burned it could
explode and if punctured it could release corrosive material which could
injure the skin or eyes and which may be toxic.
Replace the Handset Battery Pack
1
Install the handset battery.
a) Remove battery
compartment cover by
pressing on indentation and
sliding downward.
b) Place the battery pack in the
handset. Align the metal
contacts on the battery with
the contacts in the battery
compartment.
c) Replace cover by sliding it on
its track up over battery case
until it snaps firmly into place.
2
Charge the handset battery.
• Place the handset in the base (or a remote charging stand,
purchased separately)
• Charge the battery at least 12 hours. After the first charge, the
battery will quick charge in only eight hours.
31
BATTERIES
Power Fail Operation
You can use your cordless phone during a power outage when a fully
charged battery is installed in the base unit (see “Spare Battery”). This
battery will provide enough power for you to make and receive calls for up
to five hours.
NOTE: When using the spare battery backup power, audio quality may
be somewhat reduced.
Spare Battery
This phone is equipped with a built-in spare battery charger in the base
unit. The spare battery charger allows you to always have a charged
battery available should the handset battery charge become low.
NOTE: Do not switch the battery while on a call.
1
2
3
4
32
Open the spare battery compartment drawer by sliding the latch
located on the side of the base unit.
Place the battery pack (Replacement Battery 2401, SKU# 91077,
purchased separately) in the drawer, with the charge contacts
facing up and to the left.
Push the drawer closed.
The spare battery takes 24 hours to fully charge.
IN CASE OF DIFFICULTY
If you have difficulty operating this phone, try the suggestions below.
For Customer Service, visit our website at www.telephones.att.com or call
1 800 222–3111. Please retain your receipt as your proof of purchase.
If the phone does not work at all, check these items first:
•
Make sure the power cord is plugged into the base and an electrical
outlet not controlled by a wall switch.
• Make sure the telephone line cord is plugged firmly into the base unit
and the telephone jack.
• Make sure the battery pack is installed correctly.
• If the screen displays LOW BATTERY, place the handset in the base and
charge for at least eight hours.
• If the battery does not charge after eight hours, replace it with
Replacement Battery 2401, SKU# 91077.
If the above suggestions do not solve the problem, try re-initializing the
handset and base (see “To re-initialize the handset and base” below).
If you have no dial tone:
Check all the previous suggestions. If you still do not hear a dial tone,
disconnect the phone and try another phone in the same jack. If there is
no dial tone on that phone either, the problem is probably in your wiring
or local service.
If you hear a two-beep signal when you try to use the handset:
•
•
The handset and base are not communicating properly. You might be
out of range. Move closer to the base and try again.
If moving closer to the base does not help, follow the directions below
to re-initialize the handset and base.
To re-initialize the handset and base:
1
2
3
4
5
6
7
Disconnect the power to the base.
Remove the handset battery pack.
Wait at least 15 seconds.
Insert the handset battery pack.
Connect the power to the base.
Put the handset in the base to re-initialize.
Wait for handset to display FOUND BASE.
33
IN CASE OF DIFFICULTY
If you hear noise or interference when using the phone:
•
•
•
You may be out of range. Move closer to the base.
Household appliances plugged into the same circuit as the base can
sometimes cause interference. Try moving the appliance or the base to
another outlet.
The layout of your home or office may be limiting the operating range.
Try moving the base to another location, preferably on an upper floor.
If the phone does not ring when you receive a call:
•
•
•
•
•
Make sure the Ringer is on.
Make sure the telephone line cord is connected firmly to the base and
the telephone jack.
Make sure the AC adapter is plugged firmly into an electrical outlet not
controlled by a wall switch.
You might be too far from the base; move closer.
You might have too many extension phones on your telephone line to
allow all of them to ring. Try unplugging some of them.
If your telephone misdials:
•
•
If you have dial pulse (rotary) service, you’ll need to set the Dial Mode
switch to PULSE. Follow the instructions in the INSTALLATION section
of this manual.
If you have touch tone service and you hear clicks while you are dialing,
you’ll need to set the Dial Mode to TONE. Follow the instructions in the
INSTALLATION section of this manual.
If the caller’s name or phone number is not displayed:
•
•
•
Make sure you subscribe to a Caller ID service from your local
telephone company.
Make sure the battery is charged.
Caller ID service might not work when the phone is connected to a
Private Branch Exchange (PBX).
If the caller’s name or phone number is not displayed during
Call Waiting:
•
•
•
34
You should call your service provider to confirm that you subscribe to
a combined Caller ID with Call Waiting service.
The Caller ID with Call Waiting feature is inactive during a power
interruption.
Make sure the battery is charged.
Answering System 2455
Remote Commands
To connect with your answering system:
1 Dial your telephone number from a touch tone phone.
2 When the system answers, press #, then enter your
Remote Access Code (preset to 19).
3 Within two seconds, enter a remote command from inside
this card.
Answering System 2455
Remote Commands
To connect with your answering system:
1 Dial your telephone number from a touch tone phone.
2 When the system answers, press #, then enter your
Remote Access Code (preset to 19).
3 Within two seconds, enter a remote command from inside
this card.
PERF.
fold
© 2000 Advanced American Telephones. All rights reserved.
Printed in China. 850004581 9/00
fold
PERF.
© 2000 Advanced American Telephones. All rights reserved.
Printed in China. 850004581 9/00
Turn system on
End remote access call
Turn system off
Record memo
* 8, then mailbox number,
speak after beep, press # 5
to stop
*0
# 0, system announces, “The
machine is off”; press # 0 again
to turn system back on
When off, system answers after
10 rings and announces, “Please
enter your security code”; press
#, then enter your remote access
code
PERF.
Turn system on
End remote access call
Turn system off
Record memo
Repeat message
Skip message
Stop
Save messages
Delete message
Review announcement
Record announcement
Voice Help menu
Play messages
*5
#, then mailbox number
(1, 2, or 3)
#4
#6
#5
Hang up
# 9 while message plays
#7
* 7, speak after beep,
press # 5 to stop
Voice Help menu
Play messages
Repeat message
Skip message
Stop
Save messages
Delete message
Review announcement
Record announcement
Remote Command
Press
Remote Command
* 8, then mailbox number,
speak after beep, press # 5
to stop
*0
# 0, system announces, “The
machine is off”; press # 0 again
to turn system back on
When off, system answers after
10 rings and announces, “Please
enter your security code”; press
#, then enter your remote access
code
*5
#, then mailbox number
(1, 2, or 3)
#4
#6
#5
Hang up
# 9 while message plays
#7
* 7, speak after beep,
press # 5 to stop
Press