1
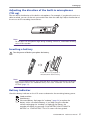
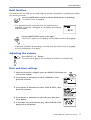
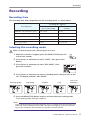
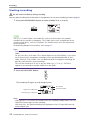
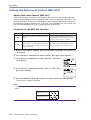
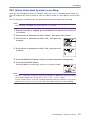
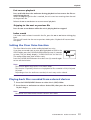
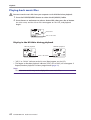
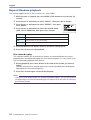
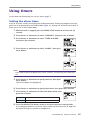
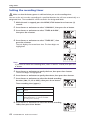
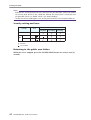
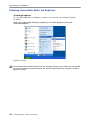
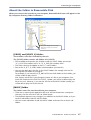
POCKET RECORDER
POCKETRAK 2G
Reference Manual
EN
Table of Contents
Table of Contents
Starting Up ..................................... 4
Playback ........................................18
Controls ............................................................. 4
Inserting a battery ............................................ 5
Stopping playback................................................ 18
Changing playback speed..................................... 18
Fast forward playback........................................... 18
Fast reverse playback ............................................ 19
Skipping to the next or previous file ..................... 19
Index search ......................................................... 19
Battery indicator ............................................... 5
Setting the Clear Voice function..................... 19
Basic Operations ............................. 6
Playing back files recorded from external
devices ............................................................. 19
Selecting a menu item ...................................... 6
Playing back music files................................... 20
Canceling the operation or return to the previous
display ................................................................... 6
Using the headphones ...................................... 6
Display in the M folder during playback ............... 20
Creating and playing back music files from subfolders .................................................................. 21
Using an external stereo microphone .............. 6
Repeat/Random playback ............................... 22
LCD screen ........................................................ 4
Adjusting the direction of the built-in
microphones (Tilt up) ....................................... 5
Turning the power on or off............................. 6
Auto power off function ......................................... 6
Hold function .................................................... 7
Five-second replay ................................................ 22
Deleting .........................................23
Adjusting the volume........................................ 7
Deleting the selected file ................................ 23
Date and time settings...................................... 7
Deleting all files in the selected folder ........... 23
Deleting index marks ...................................... 24
Recording........................................ 9
Recording time.................................................. 9
Selecting the recording mode .......................... 9
Starting recording........................................... 10
Stopping recording .............................................. 11
Pausing recording ................................................ 11
Inserting index marks........................................... 11
Setting the Auto Level Control (MIC ALC)..... 12
About Auto Level Control (MIC ALC).................... 12
Scenarios for the MIC ALC function...................... 12
Selecting the microphone sensitivity ............. 13
With MIC ALC “ON”:........................................... 13
With MIC ALC “OFF”: .......................................... 13
VAS (Voice Activated System) recording ....... 15
Recording from external audio devices.......... 16
Formatting (Deleting all files in all folders) ... 24
Using timers ..................................25
Setting the alarm timer .................................. 25
Setting the recording timer ............................ 26
Security function ...........................28
About the public area and the security area .......... 28
About playback in the security area (S folder) ....... 28
Turning the security lock on and off .............. 28
Turning the security lock on ................................. 28
Turning the security lock off ................................. 29
Playing back a file in the locked S folder........ 29
Security setting and icons ..................................... 30
Returning to the public area folders...................... 30
Auto Divide function ............................................ 17
Setting the menu options .............31
General procedure for setting menu
options ............................................................ 31
VOICE menu options....................................... 32
MUSIC menu options ...................................... 32
COMMON menu options ................................ 33
Switching among different display
indicators......................................................... 34
2
POCKETRAK 2G Reference Manual
Table of Contents
Connecting to a Computer ........... 35
Using the unit as a music player ....43
Computer system requirements ........................... 35
Recording music files ............................................ 43
Connecting the unit to your computer .......... 35
Ripping CDs (transferring music files to your
computer)........................................................ 43
About the USB connection ................................... 35
Precautions when using the USB terminal ............ 36
Selecting the Windows action ........................ 37
Disconnecting the unit from your computer... 38
Recharging the eneloop ................................. 38
Before recharging the eneloop ............................. 38
Recharging the eneloop ....................................... 38
Canceling the recharge operation ........................ 39
Copying data using Explorer .......................... 46
(1) Copying files to the unit.................................. 46
(2) Copying files to your computer....................... 46
Transferring data using Windows Media
Player............................................................... 47
Creating a Playlist ........................................... 48
Selecting the Playlist: ............................................ 48
Viewing removable disks via Explorer ............ 40
Starting Explorer .................................................. 40
Appendix .......................................49
About the folder in Removable Disk............... 41
Troubleshooting.............................................. 49
[VOICE] and [VOICE_S] folders............................. 41
[MUSIC] folder ..................................................... 41
[DATA] and [DATA_S] folders ............................... 42
[Manual] folder .................................................... 42
[ALARM] folder..................................................... 42
[LINE] folder......................................................... 42
FAQ .................................................................. 52
Specifications .................................................. 53
Security setting and removable disk display .. 42
* The illustrations and LCD screens shown in this manual are for instructional purposes only, and may
appear somewhat different from those on your instrument.
* Windows® and Windows Media® player are trademarks or registered trademarks of Microsoft® Corporation in the United States and other countries.
* The company names and product names in this manual are the trademarks or registered trademarks of
their respective owners.
POCKETRAK 2G Reference Manual
3
Starting Up
Starting Up
Controls
1 Built-in microphones (L, R)
2 REC/PEAK LED
3 External stereo microphone/Line
socket ( )
9
4 Skip/Search button (Y)
10
5 Play/Select button (W)
11
6 Skip/Search button (T)
12
7 Volume buttons (VOL +, –)
13
8 Folder/Index button (FOLDER/
INDEX)
9 LCD screen
10 Delete button (DEL)
11 Pause/Record button (PAUSE/REC)
12 Menu/Stop button (MENU/STOP)
13 Speaker
14 Headphones socket ( )
15 Power/Hold switch (POWER/HOLD)
16 Playback speed control switch (PLAY SPEED)
17 Battery compartment lid
18 USB terminal slide switch
19 USB terminal cover (may be rotated)
20 USB terminal
1
2
3
4
5
6
14
7
15
8
16
17
18
20
19
LCD screen
1 Repeat/Random/5-second replay (ONE, ALL, RND,
5SEC)
2 Battery indicator
3 Battery setting (e: eneloop, A: Alkaline)
4 Recording mode (XHQ, HQ, SP, LP, PCM)
5 VAS (Voice activated system)
6 Microphone sensitivity
7 External recording mode (MIC, LINE)
8 Playback Lock/Release
9 Timer/Alarm
10 File number
11 Total file number
12 Information display (Time/Message/Mode etc.)
13 Security setting On/Off (S folder only)
14 Folder (A, B, C, D, S, L, M)
4
POCKETRAK 2G Reference Manual
1 2
14
13
3
4567 8
9
10
11
12
Starting Up
Adjusting the direction of the built-in microphones
(Tilt up)
You can adjust the direction of the built-in microphones. For example, if you place the unit on a
table to record, you can tilt the mic up to avoid noise from the table top. Adjust the direction of
the mic to suit the recording circumstances.
Note:
· Do not adjust the microphone angle during recording. Otherwise, undesirable handling
noise will be recorded.
Inserting a battery
Turn the power off before you replace the battery.
Install one eneloop (supplied) or
AAA/LR03/HP16 alkaline battery.
Note:
· If you use an alkaline battery, press and hold down the MENU/STOP button for at least
two seconds to access the COMMON menu, then select “ALKALINE” for the BATTERY
SETTING (page 33).
Battery indicator
Check the battery indicator on the LCD screen to determine the remaining battery power.
: Good condition
: Weak battery
: Exhausted battery: Recharge the “eneloop” (page 38) or replace the
battery with a new alkaline battery. If you keep using the recorder
without recharging the “eneloop” or replacing the battery, the
recorder will display the message “LOW BATTERY PLEASE CHARGE A
BATTERY” or “LOW BATTERY.” The LCD screen will then go dark.
POCKETRAK 2G Reference Manual
5
Basic Operations
Basic Operations
Selecting a menu item
Press and hold down the MENU/STOP button for at least two seconds.
Press the Y or T button: Moves the cursor highlight up/down.
Press the W button: Selects the menu item.
Canceling the operation or return to the previous display
Press the MENU/STOP button: Returns to the previous display.
Using the headphones
Connect the headphones to the
matically.
socket. The speaker will be disconnected auto-
Using an external stereo microphone
Connect an external stereo microphone (not supplied) to the
The built-in microphones are automatically disconnected.
socket (page 16).
Note:
· If you use an external stereo microphone, press and hold down the MENU/STOP button
for at least two seconds to access the VOICE menu, then select “MIC” for the REC
SELECT.
Turning the power on or off
Set the POWER/HOLD switch to the right.
“HELLO!” appears briefly on the display and the
power turns on, and then the last selected file number appears (Resume function).
Set the POWER/HOLD switch to the left. “SEE
YOU!” appears on the display and the power turns off.
Auto power off function
• If you leave the unit turned on for 15 minutes without using it, the unit will automatically turn off.
• If you leave the unit turned on with a recording paused for more than 15 minutes,
the unit will turn off the power after it creates the recorded file.
6
POCKETRAK 2G Reference Manual
Basic Operations
Hold function
The Hold function can help you to avoid stopping operation (playback or recording) by accidentally pressing a button.
Set the POWER/HOLD switch to the left while the unit is operating.
The Hold function is engaged.
• If an operation button is pressed while the Hold function is
engaged, “HOLD ON” will appear on the display and nothing
else will happen.
Set the POWER/HOLD switch to the right.
“HOLD OFF” appears on the display and the Hold function is disengaged.
• If operation (playback or recording) is finished while the Hold function is engaged,
the unit automatically shuts down.
Adjusting the volume
Press the VOL + or – button.
The volume level appears on the display (VOLUME 0 to VOLUME 20).
Date and time settings
1.
While the recorder is stopped, press the MENU/STOP button for
at least two seconds.
2.
Press the Y or T button to select “COMMON”, then
press the W button.
3.
Press the Y or T button to select “DATE & TIME”, then
press the W button.
4.
Press the Y or T button to select the year, then press
the W button.
5.
In the same way, set the month, day, 24H or AM/PM (12H)
display, hour and minute.
POCKETRAK 2G Reference Manual
7
Basic Operations
6.
Press the MENU/STOP button twice to exit from the menu setting mode.
The date and time settings are complete.
Note:
· Calendar settings may be lost if the battery is removed for longer than 10 minutes. If
so, reset the calendar settings.
· The time display might become slightly inaccurate if the unit is used for an extended
period of time. If this happens, reset the calendar settings.
8
POCKETRAK 2G Reference Manual
Recording
Recording
Recording time
The recording time differs depending on the recording mode, as shown below.
Recording time (approx.)
Recording mode
PUBLIC AREA
(A, B, C and D folder)
SECURITY AREA
(S folder)
PCM: Pulse Code Modulation (stereo)
2hr. 50 min.
10 min.
XHQ: Extra high-quality (stereo)
25 hr. 20 min.
2 hr. 15 min.
HQ: High-quality (stereo)
63 hr. 20 min.
4 hr. 35 min.
SP: Standard (stereo)
126 hr.
9 hr. 15 min.
LP: Long (monaural)
253 hr.
18 hr. 30 min.
Selecting the recording mode
Make sure that the battery has sufficient power to record.
1.
While the recorder is stopped, press the MENU/STOP button for
at least two seconds.
2.
Press the Y or T button to select “VOICE”, then press the W
button.
3.
Press the Y or T button to select “REC MODE”, then
press the W button.
4.
Press the Y or T button to select a recording mode, then press the W button. The display indicates “REC MODE”.
Extra high-quality
5.
High-quality
Standard
Long
Pulse Code
Modulation
Press the MENU/STOP button twice to exit from the menu setting mode.
The recording mode setting is complete.
Note:
· If you record and delete files quite frequently, there is a chance that the unit may eventually skip while recording in PCM mode. To avoid such skipping, save desired recordings to your computer, then reformat the recorder’s internal memory.
POCKETRAK 2G Reference Manual
9
Recording
Starting recording
Do not remove the battery during recording.
You can adjust the direction of the built-in microphones to suit your recording situation (page 5).
1.
Press the FOLDER/INDEX button to select a folder (A, B, C, D or S).
Hint:
The A, B, C, D and S folders store audio files (such as a conversation, for example)
recorded via the recorder’s microphones. The L folder stores music recorded from a connected external device, such as a CD player. The M folder stores music files transferred
from a computer.
For detailed explanation of the folders, refer to page 41.
Note:
· Press and hold down the FOLDER/INDEX button for at least two seconds to select the S
folder.
· Do not select the L or M folder. The L and M folders are not VOICE folders. If you select
one of them, built-in microphone recordings will be recorded automatically to the A
folder. However, if the A folder is full, no additional built-in microphone recordings are
possible (until you delete some recordings).
· The unit can record up to 99 files in any one folder (A, B, C, D or S). “FILE FULL”
appears if you attempt to record a 100th file in any folder.
2.
Press the PAUSE/REC button.
The recording LED lights up and recording starts.
Elapsed recording time
File number
Total file number
Remaining recording time
Note:
· When MIC ALC is set to OFF, the recorder enters the recording standby mode. Press the
PAUSE/REC button again to start recording.
· With some files, the elapsed recording time displayed on the LCD may differ from the
actual elapsed time.
10
POCKETRAK 2G Reference Manual
Recording
Hint:
The recording LED can be turned off (page 33).
You can monitor audio that is currently being recorded by listening through headphones
(supplied) that you connect to the unit. Use the VOL + or – button to adjust the monitoring level.
Stopping recording
Press the MENU/STOP button.
Pausing recording
Press the PAUSE/REC button.
Press it again to resume recording.
Inserting index marks
You can insert index marks only in the files in the VOICE folder.
To insert an index mark, press the FOLDER/INDEX button during recording.
“INDEX SETTING 1/32” appears briefly and recording continues.
Note:
· You can insert up to 32 index marks in each file. If you try to enter additional index
marks, “INDEX FULL” appears briefly on the display. You can delete all index marks as
a group, but you cannot delete individual index marks.
Hint:
You can insert index marks also during playback. To insert an index mark, press the
FOLDER/INDEX button during playback. “INDEX SETTING 1/32” appears briefly and
playback continues.
POCKETRAK 2G Reference Manual
11
Recording
Setting the Auto Level Control (MIC ALC)
About Auto Level Control (MIC ALC)
Auto Level Control is a function that automatically maintains the recording volume
close to a specified level during recording under various recording environments. The
function maintains a consistent recording level by recording loud sounds at lower levels and quiet sounds at higher levels. As a result, files recorded with this function will
play at a comfortable level, with no clipping noise or distortion.
Scenarios for the MIC ALC function
MIC ALC
Scenarios
ON
Recording meetings, conversations, interviews
You can make recordings that are less
dynamic but maintain consistent sound
levels for various voices or sources.
Recording music practices; recording
sound sources so that playback retains relative source levels as heard in the recording environment
You can adjust and optimize the recording level to make recordings that accurately represent to the original sound.
OFF
Features
1.
While the recorder is stopped, press the MENU/STOP button for at least two
(2) seconds.
2.
3.
Press the Y or T button to select “VOICE”, then press the W button.
Press the Y or T button to select “MIC ALC”, then press
the W button.
4.
Press the Y or T button to select “ON” or “OFF”, then
press the W button.
5.
Press the MENU/STOP button twice to exit from the menu setting mode.
The MIC ALC setting is complete.
Note:
· If you change the MIC ALC setting, the icon displayed in the LCD screen changes as
below.
With MIC ALC on:
With MIC ALC off:
12
POCKETRAK 2G Reference Manual
Recording
Selecting the microphone sensitivity
With MIC ALC “ON”:
1.
While the recorder is stopped, press the MENU/STOP button for at least two
(2) seconds.
2.
3.
Press the Y or T button to select “VOICE”, then press the W button.
4.
Press the Y or T button to select “HIGH”, “MIDDLE” or
“LOW”, then press the W button.
HIGH: High sensitivity
MIDDLE: Middle sensitivity
LOW: Low sensitivity
5.
Press the MENU/STOP button twice to exit from the menu setting mode.
The setting of the microphone sensitivity is complete.
6.
Press the PAUSE/REC button to start recording.
Press the Y or T button to select “MIC SENS.”, then
press the W button.
With MIC ALC “OFF”:
1.
Press the PAUSE/REC button to enter the recording
standby mode.
Adjust the angle of the built-in microphones toward the
sound to be recorded.
2.
Press the Y or T button to adjust the microphone sensitivity while checking the level meter.
The microphone sensitivity can be adjusted to 31 levels (Level
0 to level 30).
3.
Press the PAUSE/REC button to start recording.
SP 20 MIC
SP 15 MIC
Note:
· The LCD screen changes while you adjust the microphone sensitivity as shown below.
SP 20 MIC
SP 15 MIC
· The recorder will remember the specified microphone sensitivity for the next recording
session.
· Adjusting the microphone sensitivity during recording may cause unwanted noise to be
recorded. Adjust the sensitivity only when the recorder is in recording standby mode.
POCKETRAK 2G Reference Manual
13
Recording
Adjusting the microphone sensitivity
The level meter moves to left or right as the volume level of the sound source
changes.
If the sensitivity level is low:
If the level meter moves only very slightly, raise the microphone sensitivity by pressing the Y button so that the
level meter will move moderatley to the right.
If the sensitivity level is high:
If the level meter frequently moves all the way to the right
and the REC/PEAK LED lights up, recorded sounds may be
distorted. Press the T button to lower the microphone
sensitivity.
If the sensitivity level is optimum:
The microphone sensitivity is optimum when the meter indicates
a “-6” level consistently, without deflecting all the way to the
right at loud sounds.
SP 15 MIC
SP 23 MIC
SP 23 MIC
Note:
· You cannot change the microphone sensitivity setting while the recorder is stopped.
· At a level of zero (0), the recording will be silent.
· Turn on the MIC ALC function when you record any sound source other than music.
14
POCKETRAK 2G Reference Manual
Recording
VAS (Voice Activated System) recording
When the VAS recording function is turned on, and if the unit is in recording pause mode, the
unit will automatically start to record as soon as it detects audio at a level above a certain threshold.
The unit will pause recording when the detected audio level falls below the threshold.
Note:
· VAS recording is available only when MIC ALC is set to ON.
1.
While the recorder is stopped, press the MENU/STOP button for at least two
(2) seconds.
2.
3.
Press the Y or T button to select “VOICE”, then press the W button.
4.
Press the Y or T button to select “ON”, then press the
W button.
5.
6.
Press the MENU/STOP button twice to exit from the menu setting mode.
Press the Y or T button to select “VAS”, then press the
W button.
Press the PAUSE/REC button.
Recording begins automatically when the unit detects audio.
Note:
· You can set the voice sensing level by pressing the Y or T button during recording.
The recorder displays the sensing level (“VAS” 1: Low – “VAS” 5: High).
· Set this function to OFF if you are recording important material. Otherwise, if the source
audio level is too low, the unit will not detect the audio and will not start recording.
POCKETRAK 2G Reference Manual
15
Recording
Recording from external audio devices
1.
Use an audio cable to connect the stereo microphone socket (
the headphones socket on the external autio device.
To stereo microphone
socket
socket) to
Audio device
To audio output
headphones socket
or
To LINE OUT (Recording)
socket
Note:
· For audio cable, use a 3.5mm stereo mini plug without resistance.
2.
While the recorder is stopped, press the MENU/STOP button for at least 2
seconds.
3.
4.
Press the Y or T button to select “VOICE”, then press the W button.
5.
Press the Y or T button to select “LINE”, then press the
W button.
Press the Y or T button to select “REC SELECT”, then
press the W button.
Note:
· If you record audio with an external stereo microphone, select “MIC” (page 6). For
external microphones, Yamaha recommends that you use an electret condenser microphone with the capabilities of plug-in power operation, 2k Ω impedance, performance
guaranteed with a 1.3V power supply, and a 3.5mm stereo mini plug.
16
6.
7.
Press the MENU/STOP button twice to quit the menu setting mode.
8.
Start playback on the external device, then press the
PAUSE/REC button on the recorder to start recording.
Press the FOLDER/INDEX button to select the L (Line)
folder.
Even if one of the other folders is selected, audio data will be
recorded in the L folder.
POCKETRAK 2G Reference Manual
Recording
Note:
· Audio is automatically recorded in XHQ mode.
· The unit can record up to 199 files in the L (Line) folder. If you attempt to record the
200th file, the recorder will indicate “FILE FULL”.
· When you record to the L folder, MIC ALC is automatically set to OFF.
Auto Divide function
When the Auto Divide function is turned on, the unit automatically detects the
silence between songs and records each song as an individual file. This function is
useful when you are recording songs from a CD player.
1.
While the recorder is stopped, press the MENU/STOP button for at least 2
seconds.
2.
3.
Press the Y or T button to select “VOICE”, then press the W button.
4.
Press the Y or T button to select “ON”, then press the
W button.
5.
Press the MENU/STOP button twice to quit the menu setting mode.
Press the Y or T button to select “AUTO DIVIDE”, then
press the W button.
Note:
· The function does not work if the recorder does not recognize a silent pause of at least
two seconds between songs, especially when it is recording audio from a cassette tape,
radio, and so on.
· If the unit detects a silent pause for 15 seconds or more, recording stops automatically.
POCKETRAK 2G Reference Manual
17
Playback
Playback
1.
2.
Press the FOLDER/INDEX button to select a folder (A, B, C, D, L or M).
3.
Press the W button.
Playback begins.
Press the Y or T button to select a file.
File number
Total file number
Elapsed playing time
Total playing time
Stopping playback
Press the MENU/STOP button.
Press the W button to resume playback.
Note:
· A few seconds may be required to start playback of a file or an extremely large number
of files.
· Depending on the MP3/WMA file, the displayed playing time may vary from the actual
playing time.
· You may be unable to play certain MP3/WMA files on this unit.
Changing playback speed
Use the Playback speed control switch to change
the playback speed.
• SLOW (Slow speed playback)
• NORMAL (Normal speed playback)
• FAST (Fast speed playback)
Note:
· This function may not work with the files recorded in PCM mode.
Fast forward playback
Press and hold down the Y button during playback to fast forward the file currently being played.
When the end of the file is reached, the unit starts fast forwarding the next file.
18
POCKETRAK 2G Reference Manual
Playback
Fast reverse playback
Press and hold down the T button during playback to fast reverse the file currently being played.
When the beginning of the file is reached, the unit starts fast reversing from the end
of the previous file.
Release the Y or T button to resume normal playback.
Skipping to the next or previous file
Press the Y or T button while the unit is playing back or stopped.
Index search
If an index mark has been inserted in the file, press the Y or T button during playback.
The unit will search for the next or previous index point. Playback will resume from
that point.
Setting the Clear Voice function
The Clear Voice function makes audio playback less noisy.
If you hear unwanted static or noise during playback of a file in the
VOICE folder, press the FOLDER/INDEX button for two (2) seconds
or more. The unit briefly displays “CLEAR VOICE ON” on the LCD.
The audio will be more clear and less noisy.
Press the FOLDER/INDEX button for at least two (2) seconds again
to turn off the function.
Note:
· This function applies only to files in the VOICE folder.
· This function is especially effective on the playback of files recorded in PCM, XHQ and
HQ mode.
· Depending on how the audio was recorded, the noise may not be reduced.
Playing back files recorded from external devices
1.
2.
Press the FOLDER/INDEX button to select the L (LINE) folder.
Press the Y or T button to select a desired file, then press the W button.
Playback begins.
Note:
· You cannot insert Index marks into files stored in the L folder.
POCKETRAK 2G Reference Manual
19
Playback
Playing back music files
You must transfer music files from your computer to the M folder before playback.
1.
2.
Press the FOLDER/INDEX button to select the M (MUSIC) folder.
Press the Y or T button to select a desired file, then press the W button.
An artist name, and the title or file name appear on the LCD, and playback
begins.
Artist name
Title or file name
Display in the M folder during playback
MP3 file playback
WMA file playback
Title or file name
• “MP3” or “WMA” indicator and a bit rate (kbps) appear on the LCD.
• The Repeat or Random playback indicator (ONE, ALL or RND) will also appear if
Repeat/Random playback has been programmed (page 22).
Note:
· The artist name or title may not be displayed for some music files.
20
POCKETRAK 2G Reference Manual
Playback
Creating and playing back music files from sub-folders
When transferring files to the unit, you can create multiple sub-folders in the MUSIC
folder into which you can copy files. Folders are created directly inside the MUSIC
folder (page 41). Follow the steps below to select and play back a file in one of the
sub-folders.
1.
2.
Press the FOLDER/INDEX button to select the M (music) folder.
Press the Y or T button to select the desired folder. Then press the W button.
Hint:
Press the FOLDER/INDEX button to move from the second to the first level of the MUSIC
hierarchy (see “Folder hierarchy example” below).
3.
Press the W button again to start playback of the music files in the selected
folder.
The unit displays “
” on the LCD screen.
Note:
· While the unit is stopped, press the FOLDER/INDEX button to exit from M (music)
folder.
· You can play files located at the first or second level of the MUSIC folder hierarchy.
Hint:
Folder hierarchy example:
First level of
hierarchy
Second level
of hierarchy
Music file
Music file
Playlist
Folder
Folder
Music file
Music file
Folder
Music file
Music file
Folder
Music file
Music file
POCKETRAK 2G Reference Manual
21
Playback
Repeat/Random playback
This function applies to files in the M (music) or L (line) folder.
1.
While the unit is stopped, press the MENU/STOP button for at least two (2)
seconds.
2.
3.
Press the Y or T button to select “MUSIC”, then press the W button.
4.
Press the Y or T button to select the desired mode
(ONE, ALL or RANDOM), then press the W button.
5.
6.
Press the Y or T button to select “REPEAT”, then press
the W button.
OFF:
No repeats
ONE:
Repeats only the current file.
ALL:
Repeats all files in the current folder.
RANDOM:
Repeats all files in the current folder in random sequence.
Press the MENU/STOP button twice to exit menu setting mode.
Press the W button to start playback.
Five-second replay
This function enables you to rewind to a location five seconds before the current
playback point and repeatedly replay this five-second segment. It is very useful if you
wish to repeatedly playback short phrases.
1.
During playback, press the W button at the end of the section you want to
replay.
The unit rewinds to five seconds prior to the current playback point and repeatedly replays the five-second segment.
2.
Press the W button again to cancel the playback.
Note:
· If you press the W button before five seconds of playback elapses, the unit will return to
the beginning of the file and repeatedly play the segment up to the point at which you
pressed the W button.
22
POCKETRAK 2G Reference Manual
Deleting
Deleting
The deleted file is not recoverable.
Deleting the selected file
1.
2.
Press the FOLDER/INDEX button to select a folder.
3.
4.
Press the Y or T button to select “FILE”, then press the W button.
5.
Press the DEL button.
Press the Y or T button to select the file to be deleted,
then press the W button.
Press the Y or T button to select “YES”, then press the
W button.
The selected file is deleted.
Note:
· After you delete a file, the subsequent files will be renumbered automatically. (For
example, if you delete File 2 from a set of Files 1, 2, and 3, then File 3 will be renumbered as File 2.)
· Only MP3/WMA files that can be played on this unit can be deleted. You cannot delete
files in any other formats.
Deleting all files in the selected folder
1.
2.
3.
Press the DEL button.
4.
Press the Y or T button to select “YES”, then press the
W button.
All files in the selected folder are deleted.
Press the Y or T button to select “FOLDER”, then press the W button.
Press the Y or T button to select the folder to be
deleted, then press the W button.
POCKETRAK 2G Reference Manual
23
Deleting
Note:
· Deleting a VOICE (A, B, C, D or S) folder is not permitted if the folder contains file(s)
that were not recorded in the VOICE folder.
· You cannot delete any MP3/WMA files that are not stored in the playable folders.
Deleting index marks
1.
2.
3.
4.
Press the FOLDER/INDEX button to select a folder.
5.
Press the Y or T button to select “YES”, then press the W button.
All index marks in the selected file are deleted.
Press the DEL button.
Press the Y or T button to select “INDEX”, then press the W button.
Press the Y or T button to select a file containing the index marks to be
deleted, then press the W button.
If you wish to abort the delete operation, press the MENU/STOP button once or
twice.
Formatting (Deleting all files in all folders)
Back up to your computer all data on the unit that you wish to keep. Files deleted from the
unit cannot be recovered.
If you select the format function from the menu, the memory will be initialized and all files will be
deleted. Be careful not to use this function unless you are certain that you want to delete all data.
1.
While the unit is stopped, press the MENU/STOP button for at least two (2)
seconds.
2.
3.
4.
Press the Y or T button to select “COMMON”, then press the W button.
5.
Press the Y or T button to select “FORMAT”, then press the W button.
Press the Y or T button to select “PUBLIC AREA” or
“SECURITY AREA”, then press the W button.
The unit displays “FORMATTING”, then “COMPLETE”. All files
are deleted. The unit then displays “FORMAT”.
PUBLIC AREA:
All data other than the data in the S folder is deleted.
SECURITY AREA:
All data in the S folder is deleted.
Press the MENU/STOP button twice to exit from the menu setting mode.
Note:
· If you format the security area, the security setting is canceled and the custom-set passcode is reset to “0000” (factory default).
24
POCKETRAK 2G Reference Manual
Using timers
Using timers
Set the date and time before you set any timers (page 7).
Setting the alarm timer
A file (or an alarm sound) can be played at a designated time. Before you program the timer,
place the file to be played in the ALARM folder (page 42). A beep will sound for 10 seconds if
there are no files in the ALARM folder.
1.
While the unit is stopped, press the MENU/STOP button for at least two (2)
seconds.
2.
3.
Press the Y or T button to select “COMMON”, then press the W button.
4.
Press the Y or T button to select “ALARM”, then press
the W button.
Press the Y or T button to select “TIMER & ALARM”,
then press the W button.
Note:
· If you want to cancel the alarm timer, select “CANCEL” instead, then press the W button.
5.
Press the Y or T button to specify the hour, then press
the W button.
The minute digits are highlighted.
6.
7.
Press the Y or T button to specify the minute, then press the W button.
8.
Press the Y or T button to select the alarm sound, then
press the W button.
BEEP:
Beep sound
MUSIC:
Plays the audio file in the ALARM folder.
Press the MENU/STOP button twice to exit from the menu setting mode.
At the programmed time, the alarm timer will be activated and a file or beep will
be played through the speaker or headphones.
POCKETRAK 2G Reference Manual
25
Using timers
Setting the recording timer
Make sure that the battery power is sufficient before you set the recording timer.
You can set the unit to make a recording of a specified duration that will start automatically at a
designated time. The recorded file will be created in the designated folder.
1.
While the unit is stopped, press the MENU/STOP button for at least two (2)
seconds.
2.
3.
Press the Y or T button to select “COMMON”, then press the W button.
4.
Press the Y or T button to select “TIMER REC”, then
press the W button.
The unit displays the record start time. The hour digits are
highlighted.
Press the Y or T button to select “TIMER & ALARM”,
then press the W button.
Note:
· If you want to cancel the recording timer, select “CANCEL” instead, then press the
W button.
5.
Press the Y or T button to specify the hour, then press the W button.
The minute digits are highlighted.
6.
7.
Press the Y or T button to specify the minute, then press the W button.
Press the Y or T button to select the desired recording
duration (30m, 1h, 2h or MAX), then press the W button.
Timer recording time (approx.):
8.
26
30m:
30 min
1h:
60 min.
2h:
120 min.
MAX:
Recording will continue until you press the
MENU/STOP button or until the available
recording time is used up.
Press the Y or T button to select the desired recording
folder, then press the W button.
POCKETRAK 2G Reference Manual
Using timers
9.
Press the MENU/STOP button twice to exit menu setting mode.
10.Turn the power off if required.
Recording will start at the designated time.
If timer recording does not start for one of the following reasons, a crossed
timer indicator appears on the LCD as shown below.
•
•
•
•
•
No available recording time left.
The recording folder is full.
The unit is currently playing back.
The unit is currently recording.
The unit is in menu setting mode.
Note:
· You cannot set the alarm timer and the recording timer to the same time.
· Once the alarm timer or the recording timer is executed, the corresponding timer setting will be cleared.
POCKETRAK 2G Reference Manual
27
Security function
Security function
Be sure to write down your passcode and keep it in a safe place. If you forget the passcode,
you will be unable to play or access any files in the security folder. Yamaha will be unable
to decrypt or reset the passcode for you.
Note:
· The security function of the unit restricts playback from the S folder, but does not
encrypt files.
· The capacity of the security area is 128 MB.
· You can record files in and delete files from the security area (the S folder) even if the
security function is turned on.
About the public area and the security area
The unit features the public area and security area. Each area contains the following
folders:
• Public area — A, B, C, D, L and M folders: For normal recording and playback
• Security area — S folder: Playback from this folder can be locked via passcode.
About playback in the security area (S folder)
When security lock is on: You must enter the passcode to release the security lock to
play back files.
When security lock is off: You can play back files in this folder in the same way as in
the public area.
Turning the security lock on and off
Turning the security lock on
28
1.
While the unit is stopped, press the MENU/STOP button for at least two (2)
seconds.
2.
3.
Press the Y or T button to select “COMMON”, then press the W button.
4.
Press the Y or T button to select a number for the first
digit, then step to the next digit by pressing the W button.
You can set any four-digit number from 0000 to 9999 as the
passcode. (The factory-set passcode is 0000.)
5.
Enter a number for digits 2 to 4 in the same way.
Press the Y or T button to select “SECURITY ON”, then
press the W button.
POCKETRAK 2G Reference Manual
Security function
6.
Make sure that “SET” is highlighted, then press the W button.
7.
Write down your passcode, then press the W button.
Keep your passcode in a safe place.
Turning the security lock off
1.
While the unit is stopped, press the MENU/STOP button for at least two (2)
seconds.
2.
3.
Press the Y or T button to select “COMMON”, then press the W button.
4.
Press the Y or T button to select a number for the first digit of your passcode, then step to the next digit by pressing the W button.
5.
6.
Enter a number for digits 2 to 4 of your passcode in the same way.
Press the Y or T button to select “SECURITY OFF”.
Make sure that “RESET” is highlighted, then press the W button.
After you turn off the security lock, the passcode returns to “0000”, which is the
factory default.
Playing back a file in the locked S folder
1.
While the unit is stopped, press the FOLDER/INDEX button
for at least two (2) seconds to select the S folder, then
press the W button.
2.
Press the Y or T button to select a number for the first
digit of your passcode.
3.
4.
Enter a number for digits 2 to 4 of your passcode in the same way.
Make sure that “OK” is highlighted, then press the W button.
Playback begins.
POCKETRAK 2G Reference Manual
29
Security function
Note:
· Reformat the security area of the unit if you have lost your passcode. (When you format
the security area, all files in the S folder are deleted, the security lock is turned off, and
the passcode returns to “0000” which is the factory default.)
· To lock the security folder again, turn off the power and then turn the power back on.
Security setting and icons
S folder
Security
Icon
Playback
Off
Recording
Deleting
–
Locked
On
Unlocked
–
: Available
: Not available
Returning to the public area folders
While the unit is stopped, press the FOLDER/INDEX button for at least two (2)
seconds.
30
POCKETRAK 2G Reference Manual
Setting the menu options
Setting the menu options
General procedure for setting menu options
1.
While the unit is stopped, press the MENU/STOP button for at least two (2)
seconds.
The first level of the menu option hierarchy appears.
2.
Press the Y or T button to select the desired option.
VOICE:
Settings for audio recording
MUSIC:
Settings for music playback
COMMON:
Common (global) settings
3.
Press the W button.
The second level of the menu option hierarchy appears.
4.
Press the Y or T button to select the desired option.
VOICE menu:
“DIVIDE” ↔ “REC MODE” ↔ “MIC ALC” ↔ “MIC SENS.” ↔ “VAS” ↔ “STEREO
WIDE” ↔ “REC SELECT” ↔ “AUTO DIVIDE” ↔ “DIVIDE” ↔ ...
Note:
· “DIVIDE” cannot be selected if the MUSIC folder has been selected.
· “MIC SENS.” cannot be selected if “MIC ALC” has been turned off.
· “VAS” cannot be selected if “MIC ALC” has been turned off.
MUSIC menu:
“SOUND EQ” ↔ “BASS” ↔ “REPEAT” ↔ “SOUND EQ” ↔ ...
COMMON menu:
“BEEP SOUND” ↔ “DATE & TIME” ↔ “BATTERY SETTING” ↔ “TIMER & ALARM”
↔ “FORMAT” ↔ “REC LED” ↔ “BACKLIGHT” ↔ “AUTO POWER OFF” ↔ “MENU
MODE” ↔ “CONTRAST” ↔ “SECURITY ON” ↔ “USB SETTING” ↔ “VERSION”
↔ “BEEP SOUND” ↔ ...
5.
6.
Press the W button.
To edit the setting of the selected menu option, press the Y or T button,
then press the W button.
The second level of the menu option hierarchy is displayed again.
Note:
· To return to the second level of the menu option hierarchy without changing the setting, press the MENU/STOP button once during the menu setting procedure. The setting is cancelled and the menu options are displayed.
7.
Press the MENU/STOP button twice to exit menu setting mode.
POCKETRAK 2G Reference Manual
31
Setting the menu options
VOICE menu options
DIVIDE: Divides a file.
You can use the Divide function to get rid of unnecessary parts and keep only those
you desire. To divide a file, you must first locate the desired position (time) by playing
back the file up to that position.
NO: Returns to menu setting mode.
YES: Divides the file at the current stop position.
Note:
· Once a file is divided, it cannot be joined together again.
· Short files or files in the M (music) folder cannot be divided.
· A few seconds at the division point of each of the divided parts will overlap.
· If a file that includes index marks is divided, all index marks will be deleted.
REC MODE: Selects the recording mode (page 9).
MIC ALC: Enables the microphone’s Auto Level Control function (page 12).
MIC SENS.: Selects the microphone’s sensitivity (effective only for microphone
recording when the MIC ALC function is turned on) (page 13).
VAS: Enables VAS recording (effective only for microphone recording when the MIC
ALC function is turned on) (page 15).
STEREO WIDE: Selects Stereo wide (effective only for microphone recording).
OFF: Stereo wide off
ON: Stereo wide on
Note:
· This function does not work while “recording mode” is set to “LP”.
REC SELECT: Selects the external recording mode (page 6 for the “MIC” setting,
and page 16 for the “LINE” setting).
AUTO DIVIDE: Automatically divides a file (effective only for the line-in setting)
(page 17).
MUSIC menu options
SOUND EQ: Selects the equalizer function (effective only for playback through
headphones).
OFF: Equalizer is off.
POP: Emphasizes the high range.
ROCK: Emphasizes high and low ends.
JAZZ: Emphasizes the mid range.
32
POCKETRAK 2G Reference Manual
Setting the menu options
BASS: Emphasizes the bass sound (effective only for playback through headphones).
OFF: Bass function is off.
ON: Bass function is on.
REPEAT: Selects the repeat/random mode (page 22).
COMMON menu options
BEEP SOUND: Selects the beep sound.
OFF: Beep sound is off.
ON: Beep sound is on.
DATE & TIME: Sets the date and time (page 7).
BATTERY SETTING: Selects the battery type (page 5).
eneloop: Rechargeable Ni-MH battery (supplied).
ALKALINE : AAA/LR03/HP16 alkaline battery.
TIMER & ALARM: Sets timers (page 25).
FORMAT: Formats the internal memory (deletes all files in all folders) (page 24).
REC LED: Selects the LED function for recording.
OFF: LED is off.
REC: LED operates as recording indicator.
PEAK: LED operates as peak indicator.
Note:
· PEAK can be selected only when you set MIC ALC to OFF. If you select PEAK with MIC
ALC “ON”, REC LED will remain OFF.
BACKLIGHT: Turns on the backlight.
OFF: Backlight is off.
ON: Backlight is on.
POCKETRAK 2G Reference Manual
33
Setting the menu options
AUTO POWER OFF: Enables the Auto Power Off function (page 6).
OFF: The function is off.
ON: The function is on.
MENU MODE: Selects the menu mode.
SIMPLE: Displays only the basic menu options (REC MODE,
SOUND EQ, BASS, BEEP SOUND, DATE & TIME, BATTERY SETTING, VERSION and MENU MODE).
EXPERT: Displays all menu options.
CONTRAST: Adjusts the contrast of the LCD display.
L (1) ⇔ (10) H
SECURITY ON: Turns on the Security function (page 28).
USB SETTING: Selects the USB connection mode (page 35).
USB2.0: Standard USB connection
for WMA DRM10: Connection mode for WMA DRM10.
VERSION: Displays the unit’s version number.
Switching among different display indicators
While the unit is stopped, press the MENU/STOP button repeatedly. The display
changes in the following sequence:
In the VOICE (A, B, C, D, S) and L (Line) folder:
Remaining recording time → Current date/time → Total playing time (if there is a file)
→ Recorded date/time (if there is a file) → Remaining recording time → …
In the M (Music) folder:
Artist/Title name (if there is a file) → Current date/time → Total playing time (if there
is a file) → Artist/Title name → ….
Note:
· Artist name and title may not be displayed for some music files.
34
POCKETRAK 2G Reference Manual
Connecting to a Computer
Connecting to a Computer
Computer system requirements
Windows
Computer
Windows-based computer with built-in USB interface
OS
Windows Vista, XP
Others
Speakers or headphones
Sound playback function
Macintosh
Computer
Macintosh computer with built-in USB interface
OS
Mac OS X 10.4, 10.5
Others
Speakers or headphones
Sound playback function
Note:
· For latest information about the minimum system requirements, check the web site
below.
<http://www.yamahasynth.com/>
Connecting the unit to your computer
You can connect the USB terminal on the recorder directly to a USB connector on your computer.
Open the USB terminal cover on the recorder, use the USB terminal slide switch to extend the
USB terminal, then insert the extended USB terminal in the correct orientation into a USB connector on your computer.
Do not apply force to the terminal. Otherwise, it may break. If necessary, use the supplied
USB cable.
Take note of the orientation
of the terminal.
About the USB connection
In the menu settings, you can select either “USB2.0” or “for WMA DRM10” as an USB
connection mode (page 34).
USB2.0: Select this mode in most cases, and specifically to transfer files to a computer
or to use the unit as a USB flash memory.
for WMA DRM10: Select this mode to transfer DRM10 content WMA files to the
unit.
POCKETRAK 2G Reference Manual
35
Connecting to a Computer
Note:
· To transfer non-DRM10 content files, select “USB2.0” mode.
· To use the “for WMA DRM10” connection, you must have Windows Media Player 10 or
later for Windows XP SP2, or Windows Media Player 11 or later for Windows Vista
installed on your computer.
Hint:
DRM (Digital Rights Management) 10 is a copy-protection format designed to protect
intellectual property (for example, music) from illegal copying and distribution.
In order to play WMA files protected by this format, you must first set the unit to “for
WMA DRM10,” then connect the unit to the computer and transfer the WMA files.
Precautions when using the USB terminal
When connecting the USB terminal to the computer, make sure to observe the following points. Failing to do so risks freezing the computer and corrupting or losing
the data. If the computer or the unit freezes, restart the application software or OS, or
turn the power to the unit off then on again.
• Before connecting the USB terminal to the computer, exit from any power-saving
mode of the computer (such as suspended, sleep, standby).
• Execute the following before turning the power to the unit on/off or plugging/
unplugging the USB terminal.
· Make sure that no read or write operations are in progress.
· Safely remove the unit from the computer after closing all windows that accessed
the unit.
• While the unit is connected to the computer, you should wait for six seconds or more
between these operations: (1) when turning the power of the unit off then on again,
or (2) when alternately plugging/unplugging the USB terminal.
Note:
· When you connect the recorder to the computer for the first time, some computers may
not immediately recognize the unit as a Removable Disk. In this case, disconnect the
unit and reconnect it again.
· While the unit is connected to the computer, the unit will operate without consuming
battery power.
36
POCKETRAK 2G Reference Manual
Connecting to a Computer
Selecting the Windows action
When you connect the unit to a computer, the system displays the following window:
Note:
· The following description applies to the “USB2.0” mode (normal USB connection).
· The screens, the menu items and buttons displayed on your computer may not exactly
match those shown in this manual, depending on the OS version or manufacturer of
your computer. (The screens shown in this manual are of Windows XP.)
1) Select
3) Click
2) Check
Select an option that would suit your computer’s environment.
In this example, [Take no action] is selected, [Always do the selected action] is
checked, and [OK] is clicked. This completes the connection to the computer.
When connected to the computer, the unit will display the following indicators, and
all buttons will be disabled.
Connected to PC
Transmitting to/from PC
Before disconnecting the unit from the computer, be sure to follow the steps on the next
page. Do not disconnect the unit from the computer during data transfer.
POCKETRAK 2G Reference Manual
37
Connecting to a Computer
Disconnecting the unit from your computer
Before disconnecting the unit from your computer, make sure that no data is being transferred.
Follow the steps below to disconnect.
1.
Right-click the device icon on the taskbar at the bottom right of the Windows screen to pop up the menu option [Safely Remove Hardware].
If the icon is not displayed, refer to Windows Help.
2.
Click [Safely Remove Hardware].
3.
4.
Select [USB Mass Storage Device] and click [Stop].
5.
Disconnect the unit from your computer.
Make sure that [Yamaha Pocketrak USB Device] is in the list, then select [USB
Mass Storage Device] and click [OK].
Recharging the eneloop
• Be sure to insert and recharge the eneloop. Do not attempt to recharge alkaline batteries. Otherwise, the battery liquid may leak and damage the unit.
• Recharge the eneloop at an ambient temperature between 5 and 35 degrees Celsius
(41 and 95 degrees Fahrenheit).
Before recharging the eneloop
• Make sure that the BATTERY SETTING is set to “eneloop.” (page 33)
• Be sure to close the battery cover before you start recharging.
Recharging the eneloop
1.
2.
Connect the unit to your computer. (page 35)
While the LCD screen on the recorder indicates that
the unit is connected to the computer, press the Y
button for at least two seconds.
The REC/PEAK LED lights up and recharging starts. When
the battery is recharging, the battery indicator on the LCD
screen changes in the following sequence:
When recharging is complete, the REC/PEAK LED turns off.
38
POCKETRAK 2G Reference Manual
Connecting to a Computer
Note:
· Recharging takes approximately 90 minutes.
· The recharging time is an approximate value based on a full recharge of a fully drained
eneloop battery. The recharging time will vary depending on the power left in the battery and the ambient temperature.
· You can recharge the eneloop during data transfer. However, depending on how you
use the unit, the battery may be exhausted more quickly.
• The battery may become warm during recharge, but this is normal.
• The battery life has come to an end if the battery is exhausted relatively quickly even
after being fully recharged.
The recharging operation may not start for one of the following reasons. In such
cases, a crossed-out battery icon will appear.
• A non-eneloop battery has been loaded.
• There is no battery in the unit.
• The unit is overheated.
3.
Disconnect the unit from your computer. (page 38)
Canceling the recharge operation
To cancel the recharge operation, press the Y button for at least two seconds while
recharging.
POCKETRAK 2G Reference Manual
39
Connecting to a Computer
Viewing removable disks via Explorer
Starting Explorer
To view removable disks via Explorer as shown in this manual, start Windows Explorer
as follows:
Click [start], then right-click [My Computer], and select [Explorer] from the
menu that appears.
Explorer will start.
Do not format the internal memory from the computer. Doing so may render the unit unable
to record. If you have already formatted the internal memory from the computer, format it
again on the unit.
40
POCKETRAK 2G Reference Manual
Connecting to a Computer
About the folder in Removable Disk
When you connect the recorder to your computer, Removable Disk icons will appear in the
My Computer directory folder in Windows.
The system displays two removable
disks if the security lock has been
canceled.
[VOICE] and [VOICE_S] folders
These folders store files recorded by the unit.
The [VOICE] folder contains sub-folders A-D (VOICE).
• Files recorded and stored in the A folder inside the VOICE folder are named
“IC_A_XXX (file number).MP3” or “IC_A_XXX (file number).WAV”.
• The same naming rule applies to the B, C, and D folders.
• Each of the A, B, C, D, and S folders accommodates up to 99 files.
• You can play back only the files (in the VOICE folder) that comply with the file
naming rules for folders A through D.
For example, if you move file IC_B_001.MP3 from the B folder to the A folder, you
will be unable to play the file.
Also, keep in mind that if you change the name of a file on the computer, then
move the file back to the VOICE or VOICE_S folder, you will be unable to play the
file on the unit. However, if you transfer the file to the MUSIC folder instead, you
will be able to play the file on the unit.
[MUSIC] folder
This folder stores files transferred from your computer.
• There are no naming rules applied to files that are transferred from a computer.
However, the files must be in MP3 or WMA format.
• The playback sequence may change if you add files to the MUSIC folder, or if you
create a sub-folder inside the MUSIC folder.
• You can create sub-folders inside the MUSIC folder and move files to those subfolders.
POCKETRAK 2G Reference Manual
41
Connecting to a Computer
[DATA] and [DATA_S] folders
These folders store data files (Excel, Word, etc.) as a Removable Disk.
The system displays the DATA_S folder if the security lock has been canceled.
[Manual] folder
This folder stores the PDF manual files in each of the language folders (English/
German/French/Spanish/Italian/Russian).
• Each of the language folders contains the owner’s manual (supplied) and the reference manual (PDF only).
• In order to view the PDF files, Adobe Reader must be installed in your computer.
Note:
· If you format the unit, the Manual folder will be deleted. You can download the latest
PDF manual files from the following Yamaha website.
http://www.yamaha.co.jp/manual/
[ALARM] folder
This folder stores MP3/WMA files (excluding DRM contents) that can be played
as an alarm.
• If the ALARM folder is empty, a beep will be used as the alarm.
• Only one file can be used as an alarm at a time.
[LINE] folder
This folder stores files recorded from external devices.
• Files recorded and stored in the LINE folder are named “IC_L_XXX (file number).MP3”.
• The LINE folder accommodates up to 199 files.
• You can play only those files (in the LINE folder) that comply with the file naming
rules.
Security setting and removable disk display
The following table shows the relationship between the security setting status and the removable
disk display when the unit is turned on and connected to the computer:
Security
PUBLIC AREA
SECURITY AREA
(DATA_S, VOICE_S)
Off
Playback locked
On
Playback unlocked
*
: Displayed
: Hidden
* Since the playback function is automatically locked when the unit is turned off, the unit’s
removable disk icon will not be displayed if you connect the unit while its power is turned
off.
42
POCKETRAK 2G Reference Manual
Using the unit as a music player
Using the unit as a music player
You can use the unit as a music player to enjoy listening to music. To do so, you must first
record music files on your computer, then transfer them to the unit.
Recording music files
There are the two methods that will enable you to use the unit as a music player:
• Ripping CDs (see below on this page) on the computer → Copying data to the unit
using Explorer (page 46)
• Using a music distribution service through the Internet → Transferring data using
Windows Media Player (page 47)
If you have installed Microsoft Windows Media Player on your computer, you can
transfer WMA/MP3 files to the unit. See Windows Media Player online help for details
on how to transfer files.
Microsoft Windows Media Player can be downloaded from the following website:
http://www.microsoft.com/windows/windowsmedia/
Note:
· The unit can play back music files only if they are in WMA or MP3 format.
· Copying, distributing or posting on the Internet commercially-available music files or
data is strictly prohibited, except in cases limited to your personal use.
· Yamaha makes no representations or warranties with regard to the content of files, and
cannot be held responsible for the failure of transfers or downloads, or for damage or
erasure of music files due to malfunction of the unit or your computer.
· The screens, the menu items and buttons displayed on your computer may not exactly
match those shown in this manual, depending on the OS version or manufacturer of
your computer. (The screens shown in this manual are of Windows XP / Windows
Media Player 10.)
Ripping CDs (transferring music files to your computer)
This section explains how to rip music files (MP3 or WMA) from CDs to your computer using
Microsoft Windows Media Player. For detailed information about this operation, see the Windows
Media Player online help.
1.
Select [Start] menu → [All programs] → [Windows Media Player] to start
Windows Media Player.
Alternatively, select [Start] menu → [All programs] → [Accessories] → [Entertainment] → [Windows Media Player].
2.
Click [Rip] tab.
Click
POCKETRAK 2G Reference Manual
43
Using the unit as a music player
3.
Insert a CD into the CD-R/RW drive.
Note:
· If your computer has access to the Internet, the system will automatically obtain and
display music information related to the CD.
4.
Click [G] → [Tools] → [Options].
Click
5.
6.
44
Select the [Rip Music] tab.
Make sure that [Copy protect music] is NOT checked, then click [OK].
POCKETRAK 2G Reference Manual
Using the unit as a music player
7.
Check the box of the songs that you wish to rip to your computer, then click
[Rip Music].
Click
Check
The system starts ripping the CD.
Note:
· Some MP3/WMA files may not play on the unit.
· Copying, reproducing or distributing MP3 or WMA files, except in cases limited strictly
to your personal use, is prohibited without the permission of the copyright holders as
stipulated by intellectual copyright laws.
POCKETRAK 2G Reference Manual
45
Using the unit as a music player
Copying data using Explorer
This section explains how to transfer MP3/WMA files to the unit using Windows Explorer.
1.
2.
3.
Connect the unit to the USB terminal on the computer.
Start Explorer on the computer (page 40).
Open the “MUSIC” folder in the Removable Disk drive and the “My Music”
folder in “My Document” on the computer.
(1) Copying files to the unit
Select the MP3/WMA files (other than DRM content) that you wish to copy, then
“drag and drop” them to the MUSIC folder in the Removable Disk drive.
(2) Copying files to your computer
Select the MP3/WMA files you wish to copy in the MUSIC folder on the Removable
Disk, then “drag and drop” them into a folder of your choice on your computer.
Note:
· If you want to transfer to the unit WMA files purchased via a music distribution service,
use Windows Media Player (page 47).
1 2
46
POCKETRAK 2G Reference Manual
Using the unit as a music player
Transferring data using Windows Media Player
This section explains how to transfer MP3/WMA files to the unit using Windows Media Player.
Select [Start] menu → [All programs] → [Windows Media Player] to start the program.
6) Click
1) Click
4) Select
3) Select
5) Check
1.
Click [Sync] tab.
When you transfer DRM10 content WMA files to the unit, set USB SETTING to
“for WMA DRM10” (page 35).
2.
Connect the unit to the computer.
Note:
· If the system displays "Device Setup" window, select “Manual”, then click [Finish].
3.
Select [Removable Disk] (if “USB2.0” has been selected) or [Digital Voice
Recorder] (if “for WMA DRM10” has been selected) from the pull-down
menu on the right side to display the files.
4.
5.
6.
Select [All Music] from the “Sync List” pull-down menu.
Check the box for the songs that you wish to transfer to the unit.
Click [Start Sync].
The system starts synchronizing to the device.
Never disconnect the unit from your computer during file transfer.
POCKETRAK 2G Reference Manual
47
Using the unit as a music player
Creating a Playlist
You can create a Playlist to play back tracks in the MUSIC folder in the desired sequence. This section explains how to create a Playlist on your computer and transfer it to the unit.
1.
Select the [Start] menu → [All programs] → [Accessories], then open [Notepad].
Playlist example:
Folder name
File name
Drive letter
2.
Enter the file names included in the MUSIC folder into the Playlist in the
desired sequence.
Note:
· File names must be 200 characters or shorter.
· You can specify the playback sequence of the files included in the MUSIC folder. However, you cannot specify the sequence of the files in the VOICE folders.
· It may not be possible to specify a playback order for files in certain formats.
3.
4.
5.
Save the Playlist file with a name “XXX (file name).m3u.”
Transfer the Playlist file to the MUSIC folder on the unit using Explorer.
Disconnect the unit from the computer.
Selecting the Playlist:
1.
2.
3.
Press the FOLDER/INDEX button to select the M (MUSIC) folder.
Press the Y or T button to select the desired Playlist, then press the W button.
Press the W button again to start playback of the Playlist.
“PL” appears on the display.
Note:
· To cancel the Playlist playback, press the FOLDER/INDEX button while the unit is
stopped.
48
POCKETRAK 2G Reference Manual
Appendix
Appendix
Troubleshooting
The unit does not operate.
Possible cause
Battery is not inserted properly or is dead.
Corrective action
Reinsert the battery correctly.
Recharge the eneloop or replace with a new alkaline battery.
Possible cause
Internal memory error.
Corrective action
Format (initialize) the internal memory and then try recording again.
Buttons do not work.
Possible cause
The Hold function is set.
Corrective action
Turn off the function.
Possible cause
The USB terminal is still connected to the computer.
Corrective action
Disconnect the unit from the computer.
No sound.
Possible cause
The volume is turned down too low.
Corrective action
Adjust the volume.
Files in the VOICE (A, B, C, D, S) or L (line) folder cannot be played.
Possible cause
The file name is wrong.
Corrective action
If you modify the file name using your computer, the file may become unplayable. Correct the
file name to “IC_X(folder name)_XXX (file number).MP3” or “IC_X_XXX.WAV”.
Files in the M (music) folder cannot be played (correctly or at all).
Possible cause
The file is not in a playable format.
Corrective action
Use MP3/WMA-format files.
Possible cause
Files on the PC were not transferred to the MUSIC folder.
Corrective action
Transfer the files to the MUSIC folder on the Removable Disk.
Possible cause
You attempted to play a data file, which cannot be played on the unit.
Corrective action
Create a file using different encoder (MP3/WMA conversion) software.
Cannot play back files in the Playlist folder, and the unit displays “- M - - S”.
Possible cause
Music files you have erased remain in Playlist.m3u.
Corrective action
Delete music files you have erased from Playlist.m3u (page 48).
POCKETRAK 2G Reference Manual
49
Appendix
The Removable Disk is not displayed when the unit is connected to the PC.
Possible cause
The unit is not connected to the PC correctly.
Corrective action
Make sure the connection is correct.
Disconnect the unit from the PC and reconnect it again.
Possible cause
Sufficient power is not being supplied from the PC to the unit.
Corrective action
If a USB hub is being used, reconnect the unit directly to the USB terminal on the PC. If the PC
is equipped with several USB terminals, try another terminal.
Possible cause
A network drive has been assigned.
Corrective action
If a network drive has been assigned, the drive letter (the letters used as drive names) is
already taken, so the Removable Disk cannot be created. Change the network drive assignments and reconnect the unit. Talk to your network administrator about reassigning network
drives.
Possible cause
Playback is locked with the security setting turned on.
Corrective action
Cancel the playback lock and connect the unit to the PC with the unit’s power turned on.
Cannot recharge the eneloop.
Possible cause
The BATTERY SETTING is set to “ALKALINE.”
Corrective action
Set the BATTERY SETTING to “eneloop” (page 33).
Possible cause
Connecting the unit to the PC does not cause the battery to be recharged.
Corrective action
Press the Y button for at least two (2) seconds (page 38).
A file can’t be erased.
Possible cause
The attribute of the file is set to “read only.”
Corrective action
Connect the unit to the PC and change the file attribute or erase the file from the PC. Alternatively, format (initialize) the built-in memory.
[ERROR FILE SYSTEM] is displayed and nothing else happens.
Possible cause
FAT administration system error.
Corrective action
Format (initialize) the built-in memory.
Cannot select the S folder.
Corrective action
Icon “
Press and hold down the FOLDER/INDEX button while the unit is stopped. See “Playing back a
file in the locked S folder” on page 29.
” appeared when you attempted to recharge the battery.
Possible cause
You attempted to recharge a battery other than the eneloop.
You attempted to recharge the battery, but the battery had not been inserted.
Corrective action
Insert the eneloop battery into the unit.
Possible cause
The unit is overheated.
Corrective action
Disconnect the unit from the PC, let the unit cool down for a while, then try to recharge
again.
50
POCKETRAK 2G Reference Manual
Appendix
Cannot divide a file.
Possible cause
There may be insufficient free memory.
Corrective action
Erase unnecessary files. See “Deleting the selected file” on page 23.
Possible cause
The file is too short to divide.
Corrective action
You can divide only files that exceed a specific minimum recording time.
PCM... about one sec or longer
XHQ... about four sec or longer
HQ ..... about eight sec or longer
SP ...... about 16 sec or longer
LP....... about 32 sec or longer
The file transfer speed (from PC to unit) is slow.
Possible cause
The unit is connected to the USB1.1 terminal.
Corrective action
Connect the unit to a USB2.0 High Speed terminal.
Recordings include unwanted noise.
Possible cause
Recording mode or microphone sensitivity may not be appropriately set.
Corrective action
Change the recording mode or microphone sensitivity and try to record again. Determine the
optimum setting for your recording environment.
See “Selecting the recording mode” on page 9 and “Selecting the microphone sensitivity” on
page 13.
Format (initialize) the internal memory. See “Formatting (Deleting all files in all folders)” on
page 24.
“Connection” icon does not appear when the unit is connected to the PC.
Corrective action
Some computers may not cause the icon to be displayed on the unit, or may not recognize
the unit. Disconnect the unit from the PC, then reconnect it.
The calendar does not show the correct date and time.
Corrective action
Set the date and time again. See “Date and time settings” on page 7.
The playback is missing a small portion at the beginning of the file.
Possible cause
In order to minimize noise, 0.1 seconds from the beginning of the file is faded-in for playback
(the volume will gradually increase).
Corrective action
If you’re using this device to play back a file that was created using DAW software such as
Cubase AI, insert a blank space of at least 0.1 seconds at the beginning of the file when creating it.
POCKETRAK 2G Reference Manual
51
Appendix
FAQ
Q: May I use a manganese battery?
A: Do not use a manganese battery or NiCad battery. You may use an oxyride battery, but the
battery life would be about the same as that of alkaline batteries.
Q: Why do I hear a rustling noise in the recordings?
A: A rustling noise may be recorded if you move the unit during recording, or even if you move
your fingers while holding the unit when recording. If possible, try not to move the unit
during recording.
Q: How can I store the recordings onto tapes or MDs?
A: Use a standard audio cable (with 3.5mm mini plugs) to connect the unit to your tape
recorder or MD recorder, then dub the recordings to a tape or MD.
Stereo headphone
socket
Microphone
jack
Standard audio cable
Compatible audio cable
Jack on the external recorder
Audio cable
Microphone input
3.5-inch mini plug, with resistance
Line input
3.5-inch mini plug, without resistance
• Use a stereo audio cable.
• Before dubbing the recordings, try a test dubbing and adjust the dubbing level
on the unit.
• You can also dub the recordings from your tape or MD player to the unit
(page 16).
Q: Does the available recording time specified in the the manual apply to each file?
A: No. The available recording time in each recording mode refers to the total time available for
recording without changing the recording mode, and assuming that no recording files exist
in the memory. For example, if you record one file until the memory is full, you cannot record
further even if you change the file or folder.
Q: Are there any tips to making a good recording?
A: Try a test recording to set the optimum recording mode and sensitivity, since the recording
condition varies with the location and circumstance.
Q: I cannot play back a recorded file that was stored on the PC and transferred
back to the unit.
A: You may have changed the file name on the PC. If you change the file name, the file will not
play, even if it is transferred back into the VOICE folder. However, you will be able to play the
file if you transfer it into the MUSIC folder.
52
POCKETRAK 2G Reference Manual
Appendix
Specifications
Internal Memory:
2GB
Recording Time (total time of A, B, C,
D and S folder):
Approx. 3hr.5min. (PCM)
Approx. 27hr.40min. (XHQ)
Approx. 68hr. (HQ)
Approx. 136hr. (SP)
Approx. 272hr. (LP)
Frequency Response (overall):
40 Hz - 20 kHz (Built-in microphones, PCM)
40 Hz - 15 kHz (Built-in microphones, XHQ)
40 Hz - 7.5 kHz (Built-in microphones, HQ)
40 Hz - 3.5 kHz (Built-in microphones, SP)
40 Hz - 3.5 kHz (Built-in microphones, LP)
Recording Format:
MP3, PCM
Playback Format:
MP3 (MPEG-1 LAYER-3, MPEG-2 LAYER-3, MPEG-2.5 LAYER-3), WMA,
PCM (only files recorded on this device)
Frequency Response (playback):
20 Hz - 20 kHz
Sampling Frequency:
44.1 kHz (PCM, XHQ)
22.05 kHz (HQ)
11.025 kHz (SP)
16 kHz (LP)
Bit Rate (recording):
1411 kbps, 16 bit (PCM)
160 kbps, 128 kbps (S folder) (XHQ)
64 kbps (HQ)
32 kbps (SP)
16 kbps (LP)
Bit Rate (playback):
MP3 (16 - 320 kbps)
WMA (32 - 192 kbps)
(Some files may not be playable on this device.)
Connectors:
USB,
Operating Temperature:
+5°C – +35 °C (+41°F – +95°F)
Output Power (headphones):
10mW + 10mW (at 16Ω load)
Power Supply:
DC 1.5V (“eneloop” or “AAA/LR03/HP16” alkaline battery x 1)
Battery Life:
Continuous Recording
SP:
Approx. 25 hr. (alkaline)
Approx. 19 hr. (eneloop)
PCM: Approx. 9 hr. (alkaline)
Approx. 8 hr. 30 min. (eneloop)
(when the recording LED and backlight are OFF and without headphone monitoring)
(Headphones),
(Microphone)
Continuous Playback (headphones)
MP3: Approx. 22 hr. (alkaline)
Approx. 17 hr (eneloop)
PCM: Approx. 9 hr. 30 min. (alkaline, eneloop)
(when the backlight is OFF)
Continuous Playback (speaker)
MP3: Approx. 14 hr. (alkaline)
Approx. 11 hr. (eneloop)
PCM: Approx. 6 hr. (alkaline, eneloop)
(when the backlight is OFF)
Dimensions (W x H x D):
Approx. 34.2 x 119.5 x 13 mm
Weight:
Approx. 49 g (including “eneloop,” excluding soft case)
Included Accessories:
Owner’s Manual, earphones, USB connection cable, “eneloop”
(Rechargeable Ni-MH battery), DVD-ROM, soft case, microphone stand
adapter
POCKETRAK 2G Reference Manual
53
Appendix
* Consecutive recording/playback time varies depending on the type and manufacturer of battery, storage condition, usage, ambient temperature, etc. The time value
listed above is an estimate and is not guaranteed. Yamaha will not guarantee operation if you use any battery other than an alkaline battery or a rechargeable battery
specified by Yamaha (eneloop).
* The actual available capacity of the internal memory will be smaller than the one
mentioned in the manual because the internal memory contains software necessary
for the operation of the unit.
* Due to the characteristics of the internal memory, the recording time can be shortened.
* Specifications and descriptions in this manual are for information purposes only.
Yamaha Corporation reserves the right to change or modify products or specifications at any time without prior notice. Since specifications, equipment or options
may not be the same in every locale, please check with your Yamaha dealer.
54
POCKETRAK 2G Reference Manual
U.R.G., Pro Audio & Digital Musical Instrument Division, Yamaha Corporation
© 2008 Yamaha Corporation
807IP-B0