1
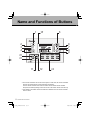
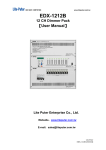
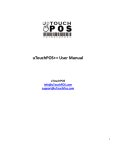
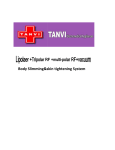
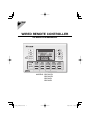
WIRED REMOTE CONTROLLER
OPERATION MANUAL
MODELS : BRC230Z4
BRC230Z8
BRC24Z4
BRC24Z8
01_EN_3P209820-1.indd 1
2007/11/06 12:04:58
01_EN_3P209820-1.indd 2
2007/11/06 12:05:14
CONTENTS
READ BEFORE OPERATION
Name and Functions of Buttons ······························ 2
Preparation before Operation ·································· 4
OPERATION
FAN · DRY · AUTO · COOL · HEAT Operation ········ 6
TIMER Operation ···················································· 8
SIMPLE 7 DAY TIMER Operation ························· 10
MULTI 7 DAY TIMER Operation ···························· 14
Explanation of the 7 DAY TIMER operation ·········· 16
ZONE Control ························································ 17
TEMPERATURE SENSOR Switching (Option) ····· 18
Name registration ·················································· 19
CARE
Cleaning ································································ 21
1
01_EN_3P209820-1.indd Sec1:3
2007/11/06 12:05:15
Name and Functions of Buttons
1
15
5
2
3
4
6
7
8
9
10
12
11
13
14
● Two remote controllers can connect to the system. In that case, the remote controllers
will work as master and sub remote controllers respectively.
The sub remote controller is the same in function as the master remote controller
except for time and day settings, which can be set in the master remote controller only.
● The settings in the master remote controller are reflected in the sub remote controller
and vice versa.
2
READ BEFORE OPERATION
01_EN_3P209820-1.indd Sec1:4
2007/11/06 12:05:15
1. ON/OFF button
Press this button to turn the air
conditioner ON and OFF.
2. MODE selector button
Press this button to select the AUTO/
COOL/HEAT/DRY/FAN mode.
3. FAN setting button
Press this button to select the airflow
rate.
4. TEMPERATURE adjustment
button
Press this button to make temperature
adjustment and other settings.
5. 7 DAY TIME CLOCK button
Press this button to go to the setting
display for the “
” and
“
”.
6. ON/OFF TIMER button
Press this button to set the ON TIMER
and OFF TIMER.
7. SHIFT button
9. CLEAR button
Press this button to cancel settings.
10.TEST/EXIT button
Press this button to exit programs.
11. DAY/TIME button
Press this button to go to the clock and
day setting.
12.SELECT SENSOR button
Press this button for sensor selection.
13.FIXING SENSOR button
Press this button to enter the sensor
selection that has been made.
14.ZONE button
Press this button to make zone settings.
15.DISPLAY
The present settings are displayed on
the LCD.
(In this illustration, each section is shown
with all its displays ON for the purpose of
explanation.)
Press this button to change the display at
the time of making settings.
8. ENTER button
Press this button to accept the settings
that have been made.
READ BEFORE OPERATION
01_EN_3P209820-1.indd Sec1:5
3
2007/11/06 12:05:15
Preparation before Operation
■ Turn the breaker ON
Turn the breaker ON if nothing is displayed on the LCD of the remote controller.
■ Time and Day Settings
* If two remote controllers are connected, time and day settings can be made in the master remote
controller only.
1
● “Mo”, “
”, “SET” : blinks
● The above appears if no time and day settings have been made yet.
To change the current time and day settings, begin with STEP 2.
2
Press “
3
Press “
4
Press “
,
select the day.
button”.
● The normal display will appear after a while if you do
not press a button.
In this case press the “
button” once again.
button”.
●“
” is displayed on the LCD.
“Mo” blinks.
● Go to the day setting section.
button” and
● Days are displayed on the LCD.
Mo
Tu
We
Th
Fr
Sa
5
Press “
6
Press “
,
button” to
adjust the present time.
Su
button”.
●“
” : blinks
● Go to the time setting section.
● Keep pressing the button to advance the displayed
time quickly.
4
READ BEFORE OPERATION
01_EN_3P209820-1.indd Sec1:6
2007/11/06 12:05:15
7
Press “
settings.
button” to enter the
● The set time and day will be displayed.
■ To cancel Time and Day Settings
1
Press “
2
Press “
4 seconds.
button”.
● The time and day setting screen will appear.
button” for at least
● The time and day settings are cancelled.
● Set the time and date again. (page 4.)
“Mo” and “SET” : blinks
NOTE
■ Tips for saving energy.
● Be careful not to cool the room too much.
Keeping the temperature setting at a moderate level helps save energy.
● Cover windows with a blind or a curtain.
Blocking sunlight and air from outdoors increases the cooling effect.
■ Please note.
● The air conditioner always consumes a small amount of electricity even while it is not operating.
● If you are not going to use the air conditioner for a long period, for example in spring or autumn,
turn the breaker OFF. When air conditioning is required ensure the breaker is switched on 6 hours
before operating the air conditioning system.
READ BEFORE OPERATION
01_EN_3P209820-1.indd Sec1:7
5
2007/11/06 12:05:17
FAN · DRY · AUTO · COOL · HEAT Operation
The air conditioner operates with the operation mode of your choice.
From the next time on, the air conditioner will operate with the same operation mode.
■ To start operation
1
Press “
button” and select an
operation mode.
FAN
2
Press “
DRY
AUTO
COOL
HEAT
button”.
● The air conditioner starts operating in the selected
mode.
■ To stop operation
3
Press “
button” again.
● The air conditioner comes to a stop.
■ To change the temperature setting
4
Press “
,
button”.
DRY or FAN mode:
The temperature setting is not available.
AUTO or COOL or HEAT mode:
Press “
button” to raise the temperature and
press “
button” to lower the temperature.
Set to the temperature you like.
The temperature can be selected from a range of
16°C to 32°C.
6
OPERATION
01_EN_3P209820-1.indd Sec1:8
2007/11/06 12:05:18
■ To change the airflow setting
5
Press “
button” and select an
airflow rate.
● The volume of air is selectable from two levels while
the air conditioner is in either normal mode or AUTO
fan mode.
■ Note on HEAT operation
● Since this air conditioner heats the room by absorbing the heat from outdoor air and releasing
the heat to the indoors, the heating capacity drops in lower outdoor temperatures.
● The heat pump system heats the room by circulating hot air around all parts of the room.
After the start of heating operation, it takes some time before the room sufficiently warms.
● In heating operation, frost may occur on the outdoor unit and lower the heating capacity. In that
case, the system switches into defrosting operation to melt away the frost.
● During defrosting operation, warm air will not flow out of the indoor unit.
■ Note on COOL operation
● This air conditioner cools the room by absorbing the heat from the air within the room and
releases it outside, so if the outside temperature is high, performance drops.
■ Note on DRY operation
● The computer chip works to rid the room of humidity while maintaining the temperature as much
as possible. It automatically controls temperature and fan strength, so manual adjustment of
these functions is unavailable.
■ Note on AUTO COOL/HEAT operation
● In AUTO operation, the system selects an appropriate operation mode (COOL or HEAT) based
on the room temperature at the start of the operation.
LCD while in cooling operation
LCD while in heating operation
● The system automatically reselects setting at a regular interval to bring the room temperature to
user-setting level.
■ Note on airflow rate setting
● The fan may stop while the air conditioner is in operation. In that case, if AUTO fan speed has been
selected, the fan will stop for 6 minutes continuously and then operate for 30 seconds or more (depends
on model). This function will occur every 6 minutes only when the room temperature is within the
selected temperature range. The AUTO fan function may not behave in the manner mentioned, in that
case your installer may have selected other fan settings during the commissioning of the controller.
● AUTO fan settings will only operate when the “
” is selected. When “
” has
not been selected the AUTO fan function will operate the same as standard low and high speed setting.
● The fan will operate for a period of 30 seconds to allow the temperature controller located in the
indoor unit to sample the room air temperature.
OPERATION
01_EN_3P209820-1.indd Sec1:9
7
2007/11/06 12:05:19
TIMER Operation
Timer functions are useful for automatically switching the airconditioner on or off at night or in the morning.
You can also use ON TIMER and OFF TIMER in combination.
■ To use ON TIMER and OFF TIMER operation
● Make sure the day of the week and time are set.
If not, set the day of the week and time. (page 4.)
1
Press “
button” to select
ON TIMER or OFF TIMER.
ON
OFF
Normal display
●“
”, “ON” and “
● Setting other them “
been previously set.
2
Press “
3
Press “
,
select time.
” are displayed on the LCD.
” may appear if timer has
button”.
●“
” is displayed on the LCD.
” blinks.
“
● Go to the time setting section.
button” and
● The time is selectable in 1 hour increments from
1 to 12 hours.
4
Press “
button”.
● The timer setting is complete.
● The normal display appears again and “ON” or “OFF”
is displayed.
● When the set time has passed, preset operation will
start or stop.
8
OPERATION
01_EN_3P209820-1.indd Sec1:10
2007/11/06 12:05:20
■ To cancel ON TIMER and OFF TIMER operation
1
Press “
button” to select
ON TIMER or OFF TIMER.
● The timer setting is displayed.
2
Press “
4 seconds.
button” for at least
● The setting that has been made is cleared.
● When the timer is set next time, the previous setting remains.
“ON” : blinks.
■ To combine ON TIMER and OFF TIMER
● A sample setting for combining the two timers is shown below.
Example
ON TIMER for action after 1 hour
OFF TIMER for action after 3 hours
OFF TIMER is set.
ON TIMER is set.
Normal display
Timer Operation
Timer set to switch unit on
in 1hour & Off in 3hours
Unit switches ON
Unit switches OFF
ON
0h
1h
2h
3h
4h
Timer Operation when 2 controllers are connected
● If two remote controllers are connected:
The air conditioner will operate in the following sequence if timer settings are made in both master and sub remote controllers.
Example
Settings in master remote controller (for living room): ON TIMER 1h/OFF TIMER 4h
Settings in sub remote controller (for bedroom): ON TIMER 2h/OFF TIMER 3h
Set timer
Unit not in operation
Unit switches ON
(Settings enabled)
Unit in operation
(Settings disabled)
Unit switches OFF
(Settings enabled)
Unit not in operation
(Settings disabled)
ON
0h
1h
2h
3h
4h
* Timer settings are possible in the master and sub remote controllers respectively.
The air conditioner will operate according to the above sequence if the master and sub remote controllers are set to
different timer settings. Therefore, it is recommended to make timer settings in either one of the remote controller.
OPERATION
01_EN_3P209820-1.indd Sec1:11
9
2007/11/06 12:05:21
SIMPLE 7 DAY TIMER Operation
■ To use SIMPLE 7 DAY TIMER operation
● Make sure the day of the week and time are set.
If not, set the day of the week and time. (page 4.)
1
Press “
button”.
● Each time the button is pressed, the day and
program number will shift.
●“
” and “
” are displayed on the
LCD.
“ ” blinks.
● If required press the button for a minimum of
4 seconds to go to the MULTI 7 DAY TIMER setting
section. (page 14.)
Mo /
Mo /
Tu /
Tu /
We /
We /
Normal
display
Th /
Su /
2
Press “
Sa /
Sa /
Fr /
Fr /
Th /
button”.
● Go to the time setting section.
●“
“
3
Su /
” is displayed on the LCD.
” blinks.
Press “
,
select time.
button” and
● Set the ON TIMER.
● The time is selectable in 10 minute increments
between 00:00 and 23:50.
“
” blinks.
4
Press “
button”.
● The OFF TIMER setting section is selected.
10 OPERATION
01_EN_3P209820-1.indd Sec1:12
2007/11/06 12:05:22
5
Press “
,
select time.
button” and
● Set the OFF TIMER.
● The time is selectable in 10 minute increments
between 00:00 and 23:50.
“
” blinks.
6
Press “
7
Press “
,
select MODE.
button”.
● The MODE setting section is selected.
“FAN” blinks.
button” and
● During this function the mode button is disabled.
● Select the operation mode from the following items.
“FAN” blinks.
FAN
8
DRY
Press “
AUTO
COOL
HEAT
button”.
● The temperature setting section is selected.
“
” blinks.
● If you have selected FAN·DRY in mode setting,
the display will not shift to the temperature setting.
Proceed to step 10 to complete the setting.
9
Press “
,
button” and
select temperature.
● Set the temperature.
10
Press “
button”.
● “ ” : blinks.
OPERATION
01_EN_3P209820-1.indd Sec1:13
11
2007/11/06 12:05:24
SIMPLE 7 DAY TIMER Operation
11
Press “
button”.
● To complete the timer setting, press “
button”.
The normal display appears again and “PROG”
is displayed. Press “
button” twice to enter
program 2 (If required).
● To set the timer for another day of the week, repeat the
procedure from step 1 (page10.) or refer to page 13
“copy mode” if you want to copy settings to another day.
■ To cancel SIMPLE 7 DAY TIMER operation
1
Press “
button”.
● To cancel all timer settings, proceed to step 2.
● To cancel timer setting individually, press “
button”,
select the setting to cancel, and proceed to step 3.
2
Press “
4 seconds.
button” for at least
● All the timer settings are canceled.
●“
” and “
” are displayed on the
LCD.
“ ” blinks.
● Press “
button” or wait for a while, until the
normal display appears again.
● If you have set MULTI 7 DAY TIMER, this setting is
also cancelled.
3
Press “
●“
“
4
button”.
” is displayed on the LCD.
” blinks.
Press “
4 seconds.
button” for at least
● The selected setting is cancelled.
● Press “
button” or wait for a while, until the
normal display appears again.
12 OPERATION
01_EN_3P209820-1.indd Sec1:14
2007/11/06 12:05:25
■ Setting SIMPLE & MULTI 7 DAY TIMER using copy mode
● A setting can be copied to the setting for the next day.
1
Press “
2
Press “
3
Press “
4 seconds.
button”.
● Press the button and select the program number of
the desired day of the week to copy.
“ ” : blinks.
●“
button”.
” is displayed on the LCD.
button” for at least
● The timer setting is copied to the setting for the next day.
● Repeat using the enter button if you want to copy to
other days of the week.
4
Press “
5
Press “
button”.
● “ ” : blinks.
button”.
● Once you have completed the copy mode settings
button” to return to normal
press the “
operation mode.
NOTE
● All S. 7 DAY TIMER settings also apply to M. 7 DAY TIMER.
● For the timer setting, up to two items per day and up to 14 items per week can be set.
● Ensure to set both the on and off timer for correct time clock operation.
● Incomplete settings will be entered if the “
button” is pressed before all the settings are done.
button”.
To abort the settings without entering them, press the “
● Turning the breaker off, power outages, and other similar events may render operation of the indoor
unit’s internal clock inaccurate. Reset the clock. (page 4.)
● If an incorrect setting is made or you accidentally skip a setting item, use the “
button” to scroll
through the setting items until the required setting item is displayed.
OPERATION
01_EN_3P209820-1.indd Sec1:15
13
2007/11/06 12:05:27
MULTI 7 DAY TIMER Operation
You can set SIMPLE 7 DAY TIMER, zone control, and thermistor switching.
■ To use MULTI 7 DAY TIMER operation
1
Press “
4 seconds.
button” for at least of
● Each time the button is pressed, the day and
program number will shift.
●“
LCD.
“ ” blinks.
Mo /
” and “
Mo /
” are displayed on the
Tu /
Tu /
We /
We /
Normal
display
Th /
Su /
Su /
Sa /
Sa /
Fr /
Fr /
Th /
procedure for setting ON TIMER, OFF TIMER, mode
2 The
selection, and temperature is the same as for SIMPLE 7 DAY
TIMER. Refer to steps 2 to 9 of SIMPLE 7 DAY TIMER. (page 10.)
3
Press “
button”.
●“
“
” is displayed on the LCD.
” blinks.
4
Press “
5
Press “
button”.
●“
” is displayed on the LCD.
button”.
● Select the desired zones by using any of the 8 zone
buttons.
● The LEDs of selected zones on the remote
controller light up green.
14 OPERATION
01_EN_3P209820-1.indd Sec1:16
2007/11/06 12:05:29
6
Press “
button”.
● Switch the thermistor sensor.
● Switching of thermistor sensor is available only if an
optional product is installed, with the exception of
master and indoor sensors.
7
Press “
● The thermistor sensor position is fixed.
“
8
button”.
” blinks.
Press “
● Press “
button”.
button” to enter program 2, if required.
● “ ” : blinks.
9
Press “
button”.
● The timer setting is completed.
● To set the timer for another day of the week, repeat the
procedure from step 1 (page14.) or refer to page 13
“copy mode” if you want to copy settings to another day.
To complete the timer setting, press “
button”.
The normal display appears again and “PROG” is
displayed.
OPERATION
01_EN_3P209820-1.indd Sec1:17
15
2007/11/06 12:05:30
Explanation of the 7 DAY TIMER operation
For 7 DAY TIMER operation, two types are provided: simple and multi. Use the desired type according
to your lifestyle and situation. You can use this operation as follows.
Case 1
The SIMPLE 7 DAY TIMER can be programmed to start & stop the air conditioning
unit twice a day, 7 day a week. Individual modes & temperatures can also be set
within each time frame.
ON
OFF
ON
OFF
AUTO, 23°C
6:00
COOL, 22°C
8:30
15:00
21:00
Program 1
ON
Program 2
OFF
ON
Set unit to switch on at 6:00 and off at 8:30
Chosen mode : Auto/Set temperature : 23°C
Case 2
OFF
Set unit to switch on at 15:00 and off at 21:00
Chosen mode : Cool/Set temperature : 22°C
The MULTI 7 DAY TIMER can be programmed to start & stop the air conditioning
unit twice a day, 7 day a week. Individual modes, temperatures, zones & sensor
position can also be set within each time frame.
ON
OFF
Living room,
Dining room
AUTO, 23°C
Children’s
room
AUTO, 23°C
ON
OFF
COOL, 22°C
Main
bedroom
COOL, 22°C
17:00
Program 1
21:30
21:40
Program 2
23:30
Temperature
sensor
Temperature
sensor
Set unit to switch on at 17:00 and off at 21:30
Chosen mode : Auto/Set temperature : 23°C
Chosen zone : Living, Dinning, Children room
Chosen temperature sensor : Living room
Set unit to switch on at 21:40 and off at 23:30
Chosen mode : Cool/Set temperature : 22°C
Chosen zone :Main bedroom, Children room
Chosen temperature sensor : Main bedroom
16 OPERATION
01_EN_3P209820-1.indd Sec1:18
2007/11/06 12:05:31
ZONE Control
For ZONE control, select the rooms you wish to heat or cool.
■ To select ZONE
1
Press “
2
Press “
button”.
● Select the desired ZONE number you wish to
switch on.
●“
” is displayed on the LCD.
button” again.
● The selected zone is fixed.
● The LED on the remote controller lights up green.
● When operation is started, air is blown to the
selected zone.
● For other zones, use the same procedure for setting.
■ To cancel ZONE selection
1
Press “
2
Press “
button”.
● Select the ZONE number for which you wish to
switch off.
●“
” is displayed on the LCD.
button” again.
● The selection is canceled.
● The green LED on the remote controller goes out.
● For other zones, use the same procedure for setting.
NOTE
● Not all the buttons are available, depending on the number of zones installed. If a zone button not
corresponding to any zone is pressed, the green LED will not be lit. Zones that are not required
must be set up during the commissioning of the controller.
● You can register a name for each zone. For the method of registering, refer to the section of name
registration. (page 19.)
OPERATION
01_EN_3P209820-1.indd Sec1:19
17
2007/11/06 12:05:31
TEMPERATURE SENSOR Switching (Option)
You can add up to 2 optional temperature sensors. (For example in the living room, bedroom, and so on.)
By switching the detection position of the mounted temperature sensors, you can control the temperature
according to the temperature of the selected room.
■ To switch the temperature sensor
1
Press “
button”.
● Each time the button is pressed, the sensor
detection position will shift.
●“
” is displayed on the LCD.
● Each time the button is pressed, the sensor
detection position will shift.
In the case of 2 sensors
In the case of 3 sensors
2
Press “
button”.
● The selected temperature sensor detection position is fixed.
● To change the temperature sensor detection
position, use the same procedure.
● The displayed contents of each temperature sensor vary with the setting item. Check with the
following table for the characters.
Temperature sensor position
LCD shown during temperature
sensor setting
LCD during 7 DAY TIMER
setting
Indoor Unit
Optional sensor 1
Optional sensor 2
Master remote controller
Optional sub remote controller
NOTE
● This function is available only if an optional sensor or sub controller is mounted, with the exception
of “
” and “
” sensor.
● The initial setting is “
”.
● The temperature sensor setting can be checked by pressing “
button”.
● The name of each sensor can be registered. For the method of registration, refer to the section of
name registration. (page 19.)
18 OPERATION
01_EN_3P209820-1.indd Sec1:20
2007/11/06 12:05:32
Name registration
You can register a name for each zone and temperature sensor.
When you switch the zone or temperature sensor, the registered name will be displayed.
■ To register the name
1
Press “
4 seconds.
button” for at least
●“
” is displayed on the LCD.
● Each time the “
button” is pressed, the display
will shift to the next zone.
“ ” blinks.
2
Press “
,
a character.
to
3
Press “
to
button” to enter
to
blank
button”.
● The cursor moves to the next digit.
● Repeat step 2 and step 3 to set the name.
4
Press “
button”.
● The setting is fixed and the display shifts to the next
zone.
● Each time the “
button” is pressed, the display
will shift to the next zone.
● To complete the name change, press “
“ ” blinks.
button”.
OPERATION
01_EN_3P209820-1.indd Sec1:21
19
2007/11/06 12:05:34
Name registration
■ To initialize registered names
1
Press “
4 seconds.
button” for at least
● The display shifts to name setting.
2
Press “
4 seconds.
button” for at least
● The display returns to the initial state.
20 OPERATION
01_EN_3P209820-1.indd Sec1:22
2007/11/06 12:05:35
Cleaning
■ Filter Cleaning Notice Reset
When the filter becomes dirty with dust, or the system has operated for a predetermined period of
time the remote controller will notify you that filter cleaning is required. (Check the filter and see if
cleaning is required.)
1
2
● The remote controller will display “
” in
that case, check the filter to determine if the filter
requires cleaning. Return the filter after cleaning.
Press “
4 seconds.
button” for at least
● The normal display will appear.
CARE
01_EN_3P209820-1.indd Sec1:23
21
2007/11/06 12:05:36
MEMO
22
01_EN_3P209820-1.indd Sec1:24
2007/11/06 12:05:36
23
01_EN_3P209820-1.indd Sec1:25
2007/11/06 12:05:36
MEMO
24
01_EN_3P209820-1.indd Sec1:26
2007/11/06 12:05:36
01_EN_3P209820-1.indd Sec1:27
2007/11/06 12:05:36
Two-dimensional bar code is a code
for manufacturing.
3P209820-1 M07B043 (0709)
01_EN_3P209820-1.indd Sec1:28
HT
2007/11/06 12:05:36