1
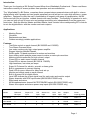
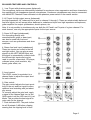
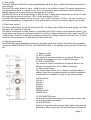
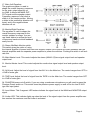
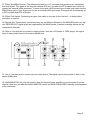
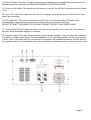
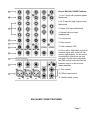
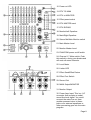
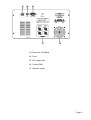
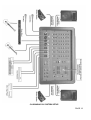
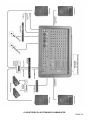
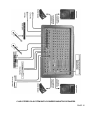
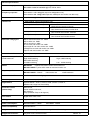
BX SERIES MIXER INSTRUCTION MANUAL:
BX1060SD
BX1360SD
BX1780SD
WARNING: DUE TO THE RISK OF FIRE OR
ELECTRIC SHOCK, DO NOT EXPOSE THIS
UNIT TO RAIN OR MOISTURE.
Wharfedale Professional Limited Warranty: The BX Series of Powered Mixers are warranted to be clear of
manufacturing or materials defects for a period of one year from the original date of purchase. In the event of malfunction, contact your authorised Wharfedale Professional dealer of distributor. Be aware that warranty details differ from country to country.
Unpacking: All Wharfedale Pro Products are fully checked before leaving the factory. After unpacking please
inspect the units for any physical damage. Please retain the shipping carton if possible and internal packing material in case the unit needs to be returned. Please check as soon as possible that the unit is functioning. In the
event of any damage please contact your dealer immediately so that a written claim for damages may be made.
!Warning – read all operating and service instructions that accompany this appliance! !Varning – läs alla användar- och serviceinstruktioner som medföljer enheten! !Atenção - leia todas as instruções de manutenção e de operação que acompanham este aparelho! !AVVERTENZA – Leggere attentamente le istruzioni per il funzionamento e la manutenzione fornite con
l'unità! !Aviso: Lea todas las instrucciones de funcionamiento y de mantenimiento que se adjuntan a este aparato!Vaara – lue
kaikki laitteen mukana toimitetut käyttö- ja huolto-ohjeet! !Advarsel – læs alle betjenings- og serviceanvisninger, der følger
med produktet! !Waarschuwing – lees alle bedienings- en onderhoudsinstructies die bij dit apparaat horen! !Vorsicht Lesen Sie diese Bedienungsanleitung sorgfältig durch! !Attention: Lisez attentivement les instructions avant d’utiliser ce produit!
FORSIKTIGHET: För att minska risken för elstötar bör man inte ta bort enhetens ytterhölje (eller det bakre skyddshöljet).
Reparationer får bara genomföras av kvalificerade servicetekniker.
AVISO: Para reduzir o risco de choque eléctrico, não remova a tampa (ou a cobertura traseira). O usuário não deve efectuar
a manutenção. Deve pedir aos técnicos qualificados em manutenção.
ATTENZIONE: Per ridurre il rischio di scosse elettriche, non rimuovere la copertura (o il pannello posteriore). Le operazioni di
manutenzione devono essere eseguite esclusivamente da personale qualificato.
PRECAUCION: Con el fin de reducir el riesgo de sacudidas eléctricas, no desmonte la tapa (o la tapa posterior). El mantenimiento no deberá ser realizado por el usuario, sino por el personal de mantenimiento cualificado.
WARNING: To reduce the risk of electric shock, do not remove cover (or back). No user servicing - qualified service personnel only.
VAROITUS: Tulipalo- ja sähköiskuvaaran vähentämiseksi älä irrota suojusta (tai takapaneelia). Älä huolla laitetta itse,anna
huoltotyöt ammattitaitoisen huoltohenkilökunnan tehtäväksi.
FORSIGTIG: For at mindske risikoen for elektrisk stød må du ikke fjerne beklædningen (eller bagbeklædningen). Reparationer
må kun udføres af kvalificeret servicepersonale.
PAS OP: Om de kans op elektrische schokken te minimaliseren, dient u de afdekklep (of achterkant) niet te verwijderen.
Onderhoud dient alleen te worden uitgevoerd door gekwalificeerd personeel.
VORSICHT: Um diee Gefahr eines elektrischen Schlages zu vermeiden darf die Abdeckung nicht entfernt werden. Die
Wartung des Gerätes sollte qualifiziertem Fachpersonal vorbehalten bleiben.
CAUTION: Pour réduire les risques d’électrocution, ne pas démonter le capot. La manipulation doit être effectuée par un personnel agréé.
CONTENTS:
Page
Page
Page
Page
Page
Page
Page
Page
Page
Page
1
2
7
10
12
13
14
15
16
17
Introduction
BX1060SD Features and Controls
BX1360SD/1780SD Features
General Operating Instructions
Club Mono PA System Setup
Club Stereo PA System
Club Stereo PA System with Subwoofer
Club Stereo PA System with Powered Monitors
General Specifications
Input and Output Specifications
Introduction:
Thank you for choosing a BX Series Powered Mixer from Wharfedale Professional. Please read these
instructions carefully to ensure problem free operation and user satisfaction.
The Wharfedale Pro BX Series comprises three compact stereo powered mixers with built in stereo
digital effects with 8 presets and two graphic equalisers as well as two low noise high efficiency power
amplifiers. Designed to offer the user a combination of longevity with ease of transportation the BX
Series are built into an injection molded chassis with carry handles. The flexibility of operation is such ,
you can run both a front of house mix and onstage monitoring mix independently from the same powered mixer. Both the Monitor Master and Main Master Level controls have corresponding EFX controls
to mix the digital effects with the monitor and main outputs.
Applications:
•
•
•
•
Meeting Rooms
Churches
Restaurants and bars
Outdoor meeting/ portable applications
Features:
•
Trim/Gain control on each channel (BX1060SD and 1360SD)
•
True Stereo Powered Mixer
•
Low noise continuously high output power amplifier
•
Rugged Injection Molded Chassis
•
Studio grade 7/9 band equalisers for mains and monitors
•
Amp routing switch assigns power amps to mains or mains plus monitors
•
Massive toroid transformer for high current output
•
3 band EQ on each mono & stereo channel
•
2 band EQ on stereo channel (BX1360 & 1780SD)
•
High headroom, low noise pre-amps
•
Super Hi-Z channel for electric, acoustic or bass guitar
•
Built in compressor to prevent clipping
•
Peak LED on mono channel for easy level set up
•
Monitor and effects send on each channel
•
Built in 8 preset 24 bit digital effects
•
Level LED indicate the output signal level for each main and monitor output
•
Stereo channels with RCA input socket (BX1360SD/1780SD only)
•
Effect send and return
•
All Microphone/mono channel MUTE/STANDBY switch (BX1360/1780SD only)
•
Stereo line outputs and stereo power amp inputs (BX1360/1780SD only)
Model
Balanced
Mic Input
Super Hi Z
Input
Hi Z
Input
Stereo Line
Input
RCA
Input
Aux
Input
Graphic
EQ
Power
output @ 4Ohm
BX1060SD
7
1
3
3
1
1
7 band
300w x 2
BX1360SD
7
2
5
3
2
N
9 band
300w x 2
BX1780SD
7
2
5
5
2
N
9 band
400w x 2
Page 1
BX1060SD FEATURES AND CONTROLS:
1. Low Z input with phantom power (balanced):
The microphone inputs are electronically balanced for maximum noise suppression and have characteristics matching all low impedance dynamic microphones. Condenser microphones may also be connected
with 48Volt DC Phantom Power activated via the phantom power switch in the master section.
2. Hi Z input for high output source (balanced):
the high-impedance 1/4” balanced line in jack on channel 1 through 3. These are electronically balanced
line-level inputs, but will accept either balanced or unbalanced input from high impedance microphones,
guitar amplifier line output synthesizers, electric pianos, etc.
Note: It is not possible to simultaneously use both the Hi-Z and Low-Z inputs of a given channel. For
each channel, use only the appropriate inputs for the input source.
3. Super Hi-Z input (unbalanced):
For connecting directly with
acoustic/electric guitar or bass input,
can also be used with line-level
sources, such as synthesizers and drum
machines.
4. Stereo line level input (unbalanced)
These two inputs are routed to the left
and right output. You can plug a mono
signal into the LEFT/MONO input and
the signal is automatically routed to both
the left and right inputs and may be
used to connect a tape deck, CD player,
outboard mixer, drum machine, keyboard, guitar effect, etc.
5. Level control:
The LEVEL control is equivalent to a
channel fader to adjust the output level
for each channel.
6. Gain control:
The gain control adjusts the input sensitivity of the mic and line inputs to allow
optimum level matching with just about
any source.
To correctly adjust the gain level, apply
a signal to the channel and turn up the
GAIN control until the LED next to it just
blinks. This provides the best signal-tonoise ratio for the channel.
7. Peak indicator LED: The peak indicator will illuminate 3 dB before clipping,
warning that the clipping level is near.
Page 2
8. Tone control:
The LOW, MID and HIGH EQ controls independently adjust the bass, middle and treble frequencies for
each channel.
The LOW EQ control allows for up to +15dB of boost or cut at 80Hz or below. The center detented position indicates that there is no boost or cut. The Low Frequency control should be used to enhance or
deplete frequencies found in items such as bass guitar or drum.
The MID EQ control is for the Mid Range of EQ, the area in which most frequencies are found. The Mid
EQ control allows boost or cut from -15 to +15dB, shelving at 2.5 KHz.
The HIGH EQ control allows boost or cut from -15 to +15dB, shelving at 12 KHz. You can use this control to add transparency to keyboards or vocal and to hide any ‘hiss’ from external signal such as tape.
9. Effect send control:
The effects send signal is post-EQ and post-LEVEL, so these controls affect the signal going to the effect
processor, be it internal or external.
The effects send signal for each channel is controlled by the EFX control for that particular channel. The
overall effects send level is controlled by the EFX controls for Main and Monitors, both range from OFF to
+10dB of gain. The EFX to Main control adjusts the amount of effects returned to the main mix. The EFX
to monitor control allows you to add effects to the monitor mix.
10. Monitor send control:
The MONITOR control determines the level of the input signal that is fed to the monitor bus and subsequently the MONITOR OUPTUT jack. The MONITOR control is not affected by the channel’s LEVEL control.
11. Power on LED
12. EFX TO MAIN:
This control is used to add internal or external effect to the
Main Mix and ranges from off to +10dB of extra gain.
13. EFX to MONITOR:
This control is used to add internal or external effect to the
Monitor and ranges from off to +10dB of extra gain.
14. Effect preset select:
The Preset Select allows you to change one preset effect to
another, these are not programmable and allow reverberation
or ambiance to be added to vocals or instrumental sound.
VOCAL DELAY
VOCAL 1
VOCAL 2
VOCAL 3
ROOM 1
ROOM 2
MEDIUM HALL
LARGE HALL
15. EFX MASTER send:
Controls the overall effect signal of all channels to either internal or external effect processor.
16. EFX BYPASS:
Pushing in this button will mute the effect signal to the internal
processors. When muted the LED indicator light will illuminate.
Page 3
17. Main /Left Equalizer:
The graphic equalizer is used to
shape the overall frequency response
for the main output signal by up
to+12dB. It affects the MAIN OUTPUT signal and the speaker output.
Frequency response is flat when a
slider is in the center position. Moving
a slider in the positive/up direction will
boost, and in the negative/down
direction will cut.
18. Monitor/Right Equalizer:
The equalizer is used to shape the
overall frequency response for the
monitor speaker on stage. You can
use these sliders to reduce the level
of frequency bands at which feedback
easily occurs.
19. Stereo Mix/Main Monitor switch:
This switch gives the option of using
the internal amplifier to power both main and monitor outputs OR to power two main speakers with the
internal amplifiers and use separate power amplifier to power the monitors. Pushing the switch in will activate this.
20. Main Master Level: This control adjusts the stereo (MAIN L,R) bus signal output level and speaker
output level.
21. Monitor Master Level: This control adjusts the monitor bus signal output level and speaker output
level.
22. AUX level: Adjust the level of signal from the AUX in to the Main bus. The control ranges from OFF to
+15dB of extra gain.
23. TAPE level: Adjust the level of signal from the TAPE in to the Main bus. The control ranges from OFF
to +15dB of extra gain.
24. PHANTOM power on/off switch: If you are using a condenser microphone you will need to press the
Phantom Power switch on. This switch turns the phantom power supply on and off for the Low-Z/ XLR
type Mic input jacket.
25. Level Meter: This 5-segment LED meters indicate the signal level at the MAIN and MONITOR output
signal.
26. Limiter LED: This indicator lights up when the level of the signal output from the power amplifier section reaches the maximum and the limiter is activated.
Page 4
27. Effect Send/Effect Return: The effects send jack is a 1/4” connector that produces an unbalanced
line-level signal. This signal is fed from the internal EFX bus, just after the EFX master level control to
connect an external effect processor. To return the signal use the same type of cable and insert into the
Effect Return jack. If you choose not to use an external effect processor, the signal will automatically go
to EFX to Main and EFX to Monitor.
28. Effect Foot Switch: Connecting an open foot switch to the jack to turn the built - in digital effect
processor on and off.
29. Record Out: These phono connectors carry the pre-EQ(not affected by the MAIN EQ) main mix signal. RECORD OUT signal levels are regulated by the MAIN master. A stereo recording device can be
connected to this jack.
30. Tape In: Use this jack to connect a stereo device, such as a CD player or TAPE player, the signal
input to these jacks is sent to the stereo (MAIN) bus.
31. Aux In: Use this jack to connect any line-level device. The signal input to these jacks is sent to the
stereo (MAIN) bus.
32. MAIN/MONITOR Out: Can be used to drive an external power amplifier or sound system from the
internal mixer bus, just after the MAIN MASTER control and MAIN EQUALIZER, allowing more speakers
to be connected.
Page 5
33. Monitor Output: This jack is used to connect to an external monitor amplifier and speakers from the
internal monitor bus, just after the MONITOR MASTER and PRE EQUALIZER.
34. Power on /off Switch: This switch turns the power on and off, the LED will illuminate when the Power
is On.
35. Fuse: This is the main safety fuse for the AC line voltage. Only replace the fuse with one the exact
same type and rating.
36. A/C power Inlet: This is the receptacle for an IEC line cord, which provides AC power to the
mixer/amplifier. Connect the line cord to this connector to provide power to the unit.
DO NOT ATTEMPT TO BYPASS THE GROUND CONNECTION OF THIS POWER CABLE
37. Cooling FAN: DO NOT obstruct the flow of air around the heat sink fins on the rear of the mixer as
this may cause the power amplifier to overheat.
38. Speaker output: The output connectors are used to connect speakers. They are internally connected
in parallel and output same signal. The total impedance of the connected speaker system must between
4 and 8 ohms. This means that you can connect one speaker with impedance between 4 and 8 ohms to
one speaker socket, or two speakers each with an impedance of between 8 and 16 ohms to each socket.
Page 6
Key to BX1360/1780SD Features:
1. Low Z input with phantom power
(balanced)
2. Hi Z input for high output source
(balanced)
3. Super Hi-Z input (balanced)
4. Stereo line level input
(unbalanced)
5. Level control
6. Gain control
7. Peak indicator LED
8. Pan control: Adjust the amount of
channel signal sent to the left versus the right outputs. On the mono
channels the controls act as true
pan pots. On the stereo channels,
the PAN control knob acts like the
balance control on the a home
stereo amplifier.
9. Tone control
10. Effect send control
11. Monitor send control
BX1360SD/1780SD FEATURES
Page 7
12. Power on LED
13. EFX TO MAIN
14. EFX to MONITOR
15. Effect preset select
16. EFX MASTER send
17. EFX BYPASS
18. Monitor/Left Equalizer
19. Main/Right Equalizer
20. Stereo Mix/Main Monitor switch
21. Main Master Level
22. Monitor Master Level
23. PHANTOM power on/off switch
24. Channel 1-7 Mute switch: Push
this switch in during your breaks and
will mute all mono channels.
25. Level Meter
26. Limiter LED
27. Effect Send/Effect Return
28. Effect Foot Switch
29. Record Out
30. MAIN Output/MONITOR
31. Monitor Output:
32. Power Amp Input: This is a 1/4”
connector that accepts an unbalanced line-level signal. You could
connect the mixer line out from
another powered mixer to these
jacks or an external equalizers or
other processing gear into the main
program.
Page 8
33. Power on /off Switch
34. Fuse
35. A/C power Inlet
36. Cooling FAN
37. Speaker output
Page 9
General Operating Instructions:
1. Ensure the Power Switch is set to “OFF” before connecting setup.
2. Select either ‘Stereo Mix’ or ‘Main Monitor’ by pressing the routing button.
3. Connect your external components. You can connect a low-impedance microphone to the 3-pin
XLR type MIC inputs on the front panel on channel 1-7 or connect a high impedance unbalanced
microphone to the Hi-Z jack on channel 1-4, or to the super Hi-Z jack. Line level Signal should be
connected to the LINE jack.
If you are using a condenser microphone you will need to activate ‘PHANTOM POWER’ in order to
supply phantom power to the Low-Z inputs.
4. Make sure that all channels are turned down as well as the MASTER and MONITOR control
knob. Make sure that all EQ sliders are at center position.
5. If you are using a separate power amplifier for the monitor speakers, run a shielded patch cable
from the monitor LINE OUT JACK TO THE INPUT OF THE MONITOR POWER AMPLIFIER. If
you are using a separate graphic EQ for the monitors , run a shielded patch cable to the input of
EQ . then , another one from the EQ’s output to the input of the monitor power amplifier.
6. Position your main speakers at the front of the stage, pointing directly out at the audience.
Position your monitor speakers on the stage floor, in front of the mic stand, pointing up at the
backs of the mics.
7. Connect the AC power cord to a 120/240Volt AC grounded outlet.
8. Turn on the POWER switch on the rear of the unit –the LED on the front panel should show red
now.
9. Using one of the inputs, for example a CD or the microphone, test the unit is working.
10. Set the channel LOW, MID, and HIGH EQ at center. Set the channel GAIN/TRIM, MON, and
EFX control at 0.
11. Set the MAIN MASTER and MONITOR MASTER control to approximately 3 o’clock position.
The EFX to MAIN and EFX to MONITOR control to around 1 o’clock position, and EFX MASTER
set up to around 12 o’clock position.
12. While speaking into the microphone (or whilst playing the instrument), adjust the TRIM/GAIN
control so that the channel PEAK indicator occasionally illuminates (blinks) at the maximum volume.
13. Turn up the channel LEVEL controls slowly until each channel can be heard at the desired volume level through the main PA speakers.
14. Turn up the channel MON controls until the performers can hear themselves at adequate volume levels without feedback.
15. Turn up the EFX controls on those channels requiring effect. Usually this would be the lead
Page 10
and harmony vocal channels.
16. Make sure you increase the input channel volume level on this input to what will be during normal
use.
17. Use the MAIN/MONITOR EQ in the master section to adjust the overall tone balance.
18. Feedback during a performance is usually caused by one of the monitors. The main PA speaker is
less likely to feedback because the mics are further away from the main PA speakers.
Therefore, if you are using monitors and feedback occurs, try the following procedures:
1. Turn the MONITOR master down until feedback stops.
2. Put down one or two of the MONITOR EQ sliders in the frequency range around 3 to 6 dB where the
sound seems to be occurring.
3. Now turn the MONITOR master back up. If feedback recurs, push the EQ slider back up to center
position and try pulling down one or two others.
4. In the rare case of main system feedback, following the above MONITOR type pf procedure, but using
the MAIN master and EQ.
IMPORTANT THINGS:
• The Low-Z and Hi-Z input of each channel can not be used simultaneously.
• Never plug amplifier outputs into anything except speakers.
• Before making connections to an external amp or reconfiguring an amp’s routing, turn the amp’s
level/gain controls down, and turn the power off.
• When you turn off the BX powered mixer, turn off any external amplifiers first.
Page 11
CLUB MONO PA SYSTEM SETUP
PAGE 12
CLUB STEREO PA SYSTEM SETUP
PAGE 13
CLUB STEREO PA SYSTEM WITH SUBWOOFER
PAGE 14
CLUB STEREO PA SYSTEM WITH POWERED MONITOR SPEAKERS
PAGE 15
General specifications:
Maximum output power:
BX1060/1360SD: 300W/4Ω 200W/8Ω @0.4% THD at 1KHz
BX1780SD: 400W/4Ω 300W/8Ω @0.4% THD at 1KHz
Frequency response:
20Hz-20KHz +1dB -3dB@1W output into 8Ω(speakers out)
20Hz-30KHz+1dB -3dB@+4dB output into 10KΩ(main out monitor out effect out)
Total harmonic distortion:
Less than 0.3%@20Hz-30KHz main out monitor out effect out)
Hum&noise:
-58dB residual output noise(speakers out)
-88dB residual output noise(main out, monitor out)
-76dB (main out monitor out)
Master level Control: nominal level
Channel level Controls: minimum
-75dB (main out monitor out)
Master level Control: nominal level
One channel level control: nominal level
-78dB (effect out)
EFX Master Level Control: nominal
One Channel level Control: minimum
-74dB (effect out)
EFX master level Control: nominal
One Channel level Control:nominal
Maximum voltage gain:
Mic to main and monitor out: 66dB
Mic to effect out: 65dB
Mic to record out: 50dB
Hi-z to main and monitor out: 40dB
Input super hi-z to main monitor out: 40dB
Left/right line to main and monitor out: 20dB
Tape to main and monitor out: 20dB
Crosstalk at 1KHz:
70dB adjacent input
Input channel equalisation:
±15dB maximum:
3 Band EQ
High 12kHz shelving
Mid 2.5kHz shelving
Low 80Hz shelving
2 Band EQ:
High: 10kHz shelving
Low: 100Hz shelving
Meters
BX1060SD:
5 points LED meter at main and monitor out
BX1360/1780SD: 7 points LED meter at main and monitor out
Graphic equalizer:
BX1060SD: 7 bands
main/monitor out
±12dB maximum
BX1360/1780SD: 9 bands
main/monitor out
±15dB maximum
Channel Peak LED:
Illuminate at 3dB before clipping
Phantom power:
+48V(balanced input)
Digital Effect:
8 preset effects: Vocal 1, Vocal 2, Vocal 3, Room 1, Room 2,
Medium Hall, Large Hall, Vocal Delay
Protection circuit
(Power Amp):
Short circuit,
Power switch on/off mute,
DC detection,
Temp (Heatsink Temp ≥ 90 degrees)
Foot switch:
Digital effect mute on/off
EFX bypass:
Digital effect on/off
Power consumption:
BX1060/1360SD: 1000W
Dimensions(WxHxD):
600*390*400mm
Weight:
BX1060SD: 17.8kg BX1360SD: 18.2kg BX1780SD: 19.2kg
Supplied accessories:
AC power cord & owners manual
BX1780SD: 1300W
PAGE 16
INPUT SPECIFICATIONS:
Input
Connector
Type
Input Level
Max Before Clipping
Gain/Trim
Actual load
Nominal level
max
3KΩ
-58dB(1mv)
-40dB(8mV)
min
3KΩ
-15dB(130mV)
+4dB(1.2V)
max
470KΩ
-36dB(12mV)
-7dB(170mV)
min
470KΩ
+8dB(2V)
NA
max
10KΩ
-36dB (12mV)
-9dB (280mV)
min
10KΩ
+8dB (2V)
NA
no
3KΩ
-41dB(7mv)
-12dB(200mV)
Phone jack
Unbalanced
no
30KΩ
-12dB(195mV)
+14dB(3.8V)
1360/1780SD
RCA
no
35KΩ
-12dB(195mv)
NA
Effect Return
Phone jack
unbalanced
no
10KΩ
-12dB(195mV)
NA
RCA
no
30KΩ
-12dB(195mV)
NA
Phone jack
Unbalanced
no
30KΩ
-12dB(195mV)
NA
Mono Channel
(MIC)
XLR
Balanced
Mono Channel
(SUPER Hi-Z) Phone jack
Unbalanced
Mono Channel
(Hi-Z)
Phone jack
Balanced
Channel without
Trim control
1060SD only
XLR
(MIC)
Balanced
Stereo
Channel
Line Input
Stereo RCA input
TAPE Input
BX1060SD
AUX Input
BX1060SD
OUTPUT SPECIFICATIONS:
Output
Connector type
Speakers out
Main out(L/R)
Monitor out
Effect out
REC out
(L/R)
Actual source
Impedance
Nominal impedance
Output level
Nominal
Max
Before Clipping
Phone jack or
Speakon type
0.1Ω
4/8Ω speaker
NA
BX1060/1360: 300W/4Ω
BX1780SD: 400W/4Ω
Unbalanced
Phone jack
600Ω
10KΩ lines
+4dB (1.23V)
+20dB (7.75V)
Unbalanced
Phone jack
600Ω
10KΩ lines
+4dB (1.23V)
+20dB (7.75V)
Unbalanced
Phone jack
600Ω
10KΩ lines
+4dB (1.23V)
+20dB (7.75V)
RCA jack
600Ω
10KΩ lines
0dB (775mV)
+20dB (7.75V)
PAGE 17
911.393
WHARFEDALE PROFESSIONAL
IAG HOUSE, SOVEREIGN COURT, ERMINE BUSINESS PARK
HUNTINGDON, PE29 6XU, UNITED KINGDOM
Email: [email protected]
www.wharfedalepro.com