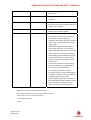
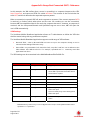
1
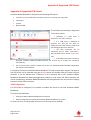
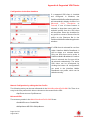
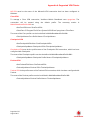
 Enterprise Install Guide:
Vodafone Mobile Broadband
Contents
Introduction .......................................................................................................................... 3 Corporate Setup Package ................................................................................................ 4 Prerequisites for Vodafone Mobile Broadband .......................................................................5 Customisation Files ............................................................................................................ 5 Customisation Examples ................................................................................................. 9 Start/exit settings ................................................................................................................................................9 Turn off Updates ................................................................................................................................................ 11 Not installing feature SMS or feature Optimiser .............................................................. 12 How to disable features? ........................................................................................................................... 13 How to automatically start a VPN? ................................................................................................. 14 How to disable the optimiser? ............................................................................................................. 15 Using Locks .............................................................................................................................................................. 15 Feature Application Conflicts ................................................................................................................. 16 Appendix A: Supported VPN Clients .........................................................................18 Appendix B: Always Best Connected (ABC) - Reference ..................................21 Appendix C: Using Transforms for Customisation ...............................................29 Further Information .........................................................................................................35 Page 2 of 35
August 2011 Introduction
Introduction
This document covers the installation of the Vodafone Mobile Broadband 10.2 application on
Microsoft® Windows® operating systems in corporate environments. It covers scenarios for IT
administrators, customisation, and the rollout of the application using transform files.
For an introduction to corporate rollouts of the Vodafone Mobile Broadband application, please
refer to the Standard Install Guide.
Comparison of the guides covering installing the Vodafone Mobile Broadband application:
Vodafone Mobile
Broadband Standard Install
Guide
Overview of available application
variants
9 Silent installation command line
parameters for msiexec.exe
9
Silent installation command line
parameters for setup_vmc.exe
9
Installing the Vodafone Mobile
Broadband application manually
9
Frequently Asked Questions
(FAQ) about installation
9
Vodafone Mobile
Broadband Enterprise
Install Guide
(this document):
Corporate Setup Package
9
Customisation Files
9
Customisation Examples
9
Supported VPN Clients
9
ABC (Always Best Connected)
settings for automatic connection
management
9
Using Transforms for
customisation
9
Page 3 of 35
August 2011 Corporate Setup Package
Corporate Setup Package
The Corporate Setup Package is provided as a compressed release, where all program files are
stored into a single cabinet file, it comprises the following files in folder DISK1.
Vodafone Mobile Broadband.msi
File
Description
Installer database file
Setup_vmb.exe InstallShield’s setup launcher application
Setup.ini
Configuration file for InstallShield’s setup launcher
application setup_vmb.exe
Data1.cab
Compressed file containing all program files
Autorun.inf
Aurorun/Autoplay configuration file
Nnnn.mst
Language Transform files for all supported languages, eg
2057.mst for English (UK)
0xnnnn.ini
Configuration files for InstallShield’s setup launcher
application setup_vmb.exe containing language
resources for all supported languages, eg 0x0809.ini for
English (UK)
There are several differences compared to the standard Full cabinet release of Vodafone Mobile
Broadband, please see following list.
Items
Cabinet release
Setup prerequisites (Microsoft’s hotfix KB918997 for
Windows XP SP2 and MSXML 6.0 only)
yes
Corporate
cabinet release
no
.Net Framework 2.0
yes
no
MSI Installer 3.1
yes
no
Visual C++ 2005 SP1 run-time assemblies
yes
no
Drivers
all¹
all¹
Languages
all¹
all¹
Opcos
all¹
all¹
Features
all¹
all¹, except
Update feature
¹ For a list of supported drivers, languages, and Opcos, please check the ReadMe file.
Page 4 of 35
August 2011 Prerequisites for Vodafone Mobile Broadband
Setup prerequisites are Wireless LAN API hotfix, Installer 3.1, .Net Framework 2.0, and Visual C++
2005 SP1.
Wireless LAN API (for Windows XP SP2 only)
Microsoft’s hotfix Wireless LAN API (KB918997), this hotfix is contained in Service Pack 3 of
Windows XP.
http://www.microsoft.com/downloads/details.aspx?FamilyId=52A43BAB-DC4E-413F-AC71158EFD1ADA50&displaylang=en
However, this hotfix requires Microsoft Core XML Services (MSXML), this application is
contained in Service Pack 3 of Windows XP.
http://www.microsoft.com/downloads/details.aspx?FamilyID=993c0bcf-3bcf-4009-be2127e85e1857b1&displaylang=en
MSI Installer 3.1 (for Windows XP SP2 only)
The required MS Installer version for VMB is 3.1, this application is contained in Service Pack 3 of
Windows XP.
http://www.microsoft.com/downloads/details.aspx?displaylang=en&FamilyID=889482fc-5f564a38-b838-de776fd4138c
.Net Framework 2.0 (for Windows XP only)
The VMB Software is a .Net application, thus .Net Framework 2.0 is required. Microsoft’s .Net
Framework 2.0 is part of Windows Vista and Windows 7, but not for Windows XP.
http://www.microsoft.com/downloads/details.aspx?displaylang=en&FamilyID=0856eacb-43624b0d-8edd-aab15c5e04f5
Microsoft Visual C++ 2005 SP1 Redistributable Package
The VMB Software is using version 8.0.50727.762 of this package, it is required for all Windows
operating systems.
http://www.microsoft.com/downloads/en/details.aspx?FamilyID=200b2fd9-ae1a-4a14-984d389c36f85647&displaylang=en
Customisation Files
Vodafone Mobile Broadband works with a user profile file named MobileBroadbandProfile.xml.
This file is generated for each user during run-time. The setup package includes only a template
user profile file which contains certain common settings in the folder
<installdirectory>\templates. However this template user profile file is used as a starting point
when creating an actual user profile file.
If certain settings for all users are required, then the standard template user profile file can be
replaced by a different one during the setup process by using Microsoft’s Transform mechanism.
Page 5 of 35
August 2011 Customisation Files
In addition of the user profile file MobileBroadbandProfile.exe, there are two other profile files,
one for VMB’s SMS application named SmsProfile.xml, and one for VMB’s Dial-Up feature named
VodafoneMobileBroadband.pbk.
At least all Operator specific XML customisation files, like 23415.xml, Opco-23415.xml, for
example for Vodafone UK can be replaced by modified ones.
These customisation files and of course all other files can be replaced during the setup process
using Transform files.
Customisation using a modified User Profile file
When the Vodafone Mobile Broadband application is started for the very first time after
installation, a user profile XML file MobileBroadbandProfile.xml is generated for the current user.
This happens automatically without any user interaction or input. Such a XML user profile eg.
created during a test installation of VMB can then be used as a template for customised
installations: it can be edited and then replaced in the MSI database using Transforms, overwriting
the standard template file.
Modifications to this file are made using a Transform file. Please refer to the Using Transforms for
Customisation chapter for more details.
Creating and Authoring a customised User Profile
1. Install Vodafone Mobile Broadband 10 on a test computer.
Install the Vodafone Mobile Broadband application as described in the Standard Install Guide.
2. Perform first-time device installation.
See above for details on adding one or more devices. The device details created will be stored in
the MobileBroadbandProfile.xml file.
Note
First-time device installation overwrites any existing user profile XML files.
3. Save the MobileBroadbandProfile.xml file to be used as a template for further customised installations.
Save the MobileBroadbandProfile.xml file created by the Vodafone Mobile Broadband application
and located in the folder
Windows XP
<drive>:\Documents and Settings\<username>\Application Data\Vodafone\Vodafone Mobile
Broadband\UserData
Windows Vista and Windows 7
<drive>:\Users\<username>\AppData\Roaming\Vodafone\Vodafone Mobile
Broadband\UserData
Use this file as a template for your customised installations with Transforms.
4. Edit the MobileBroadbandProfile.xml file.
Page 6 of 35
August 2011 Customisation Files
Optional: Modify XML elements as you require.
5. Create a Transform file.
Refer to the Using Transforms for Customisation chapter.
6. Apply your Transform file to the Vodafone Mobile Broadband 10 setup procedure.
Refer to the Using Transforms for Customisation chapter.
Customisation using a modified Dial-Up Phonebook file
If the ‘Dial-Up’ feature is set to ‘true’ in the OpCo XML file, a default dial-up phonebook called
VodafoneMobileBroadband.pbk is generated during installation of the Vodafone Mobile
Broadband application, in order to manage fixed-line dial-up connections. If there is an Operator
specific phonebook (eg. 20810.pbk in the case of France), all entries in this phonebook are
transferred to the default dial-up phonebook. The default dial-up phonebook can be edited and
then replaced in the MSI database.
Modifications to this file are made using a Transform file. Please refer to the section Using
Transforms for Customisation for more details.
Creating and authoring a customised dial-up phonebook
1. Install Vodafone Mobile Broadband 10 on a test computer.
Install the Vodafone Mobile Broadband application as described in the Standard Install Guide.
2. Create new entries in the phonebook VodafoneMobileBroadband.pbk
•
Start the Vodafone Mobile Broadband application, switch to Advanced View.
•
Then select either the Status or the Priorities tab.
•
Open the Connection Settings window either by selecting the default connection in the
Status view or by clicking the Add Settings button for Dial-up connections in the Priorities
view.
•
Select New to create a new phonebook entry.
•
Select OK to save the new phonebook entry.
•
The button Dial Settings can be used to enter the system properties of the dial-up connection
for additional settings.
•
Click the default connection in the Status view, or the Add Settings button for Dial-up
connections in the Priorities view, to perform one of the following tasks:
•
Delete existing phonebook entries
•
Modify existing phonebook entries
•
Set Auto-VPN for an existing phonebook entry (If Auto-VPN is set, the default VPN client is started
automatically once a connection has been opened).
3. Protect phonebook entries from modification by the user
The VodafoneMobileBroadband.pbk file is located in the folder
Page 7 of 35
August 2011 Customisation Files
Windows XP
<drive>:\Documents and Settings\<username>\Application Data\Vodafone\Vodafone Mobile
Broadband\UserData
Windows Vista and Windows 7
<drive>:\Users\<username>\AppData\Roaming\Vodafone\Vodafone Mobile
Broadband\UserData
The Vodafone Mobile Broadband application uses some entry attributes which are not supported
by the operating system. These attributes are therefore saved in the ‘comment’ value of a
phonebook entry:
•
OPCO=1 or OPCO=0 If 1, this entry was transferred from the Operator specific phonebook.
•
Auto-Vpn =1 or AutoVpn=0 If 1, the default VPN client is started automatically once the
connection is open.
•
Default=1 or Default=0 If 1, this is the default dial-up entry.
•
Locked=1 or Locked=0 If 1, only the dial prefix, the credentials and the device can be modified by
the user.
If an attribute is missing, its value is set to ‘0’. Attributes are separated by ‘|’.
To set the Locked attribute, open the VodafoneMobileBroadband.pbk file in a text editor, and
modify the comment of the entry to ‘locked’. The first line of an entry is [entry name]
Examples:
[My Company1]
...
UseDialingRules=0
Comment=Default=1|Locked=1
LastSelectedPhone=0
...
[My Company2]
...
UseDialingRules=0
Comment=Locked=1
LastSelectedPhone=0
...
4. Create a Transform file.
Refer to the Using Transforms for Customisation chapter.
5. Apply your Transform file to the Vodafone Mobile Broadband 10 setup procedure.
Refer to the Using Transforms for Customisation chapter.
Page 8 of 35
August 2011 Customisation Examples
Customisation Examples
A good starting point for finding the correct xml element to be set for a certain task is to install
VMB on a test machine and then to set the required setting from within the GUI. After exiting VMB,
the modifications can then be viewed in the file MobileBroadbandProfile.xml, when compared to
a saved file MobileBroadbandProfile.xml.
Start/exit settings
In order to check the default settings for the Start and Close options, start VMB and switch to
Advanced View, then click the Application Button to open the drop down menu. Then click on
Options to open the Vodafone Mobile Broadband Options windows. Click on option Start and
Close in the left hand navigation area to display the current settings.
The default settings may be Start this
application in the background for start
option and Close the window, but run this
application as normal for close option.
The default settings should be changed to
Do not start this application for start
option and Exit this application for close
option.
Page 9 of 35
August 2011 Customisation Examples
Which File to modify?
If these changes should be applied for all OPCPs, then we must modify the template file
MobileBroadbandProfile.xml, otherwise we have to change the OPCO file for one or more OPCOs,
the OPCO file for Vodafone UK for instance is Opco-23415.xml.
What xml element to modify
The default xml elements in the file MobileBroadbandProfile.xml for the Start and Close options
are:
<Gui Start="InBackground" Exit="None">
...
</Gui>
The default xml elements for the Start and Close options in the OPCO file are:
<Misc Start="InBackground" Exit="None">
...
</Misc>
The start value InBackground means Start this application in the background because of user
logged on, whereas the exit value None means Close the window, but run this application as
normal.
Default settings:
Xml element/attribute
Gui/Start
Misc/Start Gui/Exit
Misc/Exit Value
InBackground
Description
None
Close the window, but run this
application as normal
Start this application in the
background
The start value DoNotStart means Do not start this application, whereas the exit value
DoNotStartNewInstance means Exit this application.
Required settings:
Xml element/attribute
Page 10 of 35
August 2011 Value
Description
Customisation Examples
Gui/Start
Misc/Start DoNotStart
Do not start this application
Gui/Exit
Misc/Exit DoNotStartNewInstance
Exit this application
So, to change for instance the Start and Close options for Vodafone UK, please do the following:
1. Open file Opco-23415.xml and add or change the xml element Gui to
<Misc Start="DoNotStart" Exit="DoNotStartNewInstance">
...
</Misc>
2. Perform the steps described in chapter Using Transforms for Customisation of this document.
Turn off Updates
If it is required to hide and to disable the VMB-GUI controls for the Updates functionality in VMB’s
application menu Options, then please set the following two installer properties either via
command line or Transform modifying the property table of the msi database:
LOCKUPDATING=true
UPDATEINTERVAL=never
Note If you are using the corporate cabinet release, then Updates are already disabled and
hidden.
Command Line Example:
setup_vmb.exe /s /b"%LOCALAPPDATA%\Vodafone" /v"LOCKUPDATING=true
UPDATEINTERVAL=never /qb /norestart"
Or
msiexec.exe /I “Vodafone Mobile Broadband.msi” TRANSFORMS=2057.mst LOCKUPDATING=true
UPDATEINTERVAL=never /qb /norestart
Vodafone Mobile Broadband.msi
Parameter
Description
Installer database file
Setup_vmb.exe InstallShield’s setup launcher application
/s
Performs a silent mode of application setup_vmb.exe
/b
Cache installation locally on the target machine. To
specify where to cache the contents of a compressed
Page 11 of 35
August 2011 Customisation Examples
package on the local system. With the /b option, one can
specify the directory in which to cache the installation
files, as in /b"%LOCALAPPDATA%\Vodafone". A local
cache of the installation files is necessary when installing
VMB, the recommended local folder would be
%LOCALAPPDATA%\Vodafone, but can be changed if
required. The environment variable %LOCALAPPDATA%
is defined in Windows Vista and in Windows 7, for
Windows XP the environment variable %APPDATA% can
be used as well. The cache location is important for
installing missing features during run time. In that case
the installer needs access to the msi database of
Vodafone Mobile Broadband. Please use always the subfolder name “Vodafone” for the cache location.
/v
The /v option is used to pass command line options and
values of public installation properties through to
Microsoft’s installation process msiexec.exe. The
recommended command line options are option /qb,
which displays a basic UI, i.e. progress bar dialog during
the installation process and option /norestart, which
forces the installer never restarts the computer after the
installation.
Not installing feature SMS or feature Optimiser
The features SMS or ByteMobile can be excluded from the installation by using the installer
property REMOVE. The feature being removed must be listed in the Feature table of the msi
database. The value of this property is list of features delimited by commas. Installer property
ADDLOCAL is a list of features that are delimited by commas, and are to be installed locally.
Command Line Example:
setup_vmb.exe /s /b"%LOCALAPPDATA%\Vodafone" /v"ADDLOCAL=ALL REMOVE=SMS /qb
/norestart"
setup_vmb.exe /s /b"%LOCALAPPDATA%\Vodafone" /v"ADDLOCAL=ALL REMOVE=ByteMobile
/qb /norestart"
or
msiexec.exe /I “Vodafone Mobile Broadband.msi TRANSFORMS=2057.mst ADDLOCAL=ALL
REMOVE=SMS /qb /norestart
msiexec.exe /I “Vodafone Mobile Broadband.msi TRANSFORMS=2057.mst ADDLOCAL=ALL
REMOVE=ByteMobile /qb /norestart
Page 12 of 35
August 2011 Customisation Examples
How to disable features?
Certain features can be set in the opco file using xml node element <Features>.
Xml element with default value
Description
Should Always Best Connected be enabled in VMB
software? If 'Yes' the software will display the ABC
function in the main view. ABC provides best
connectivity at any time.
<ABC>false</ABC>
<DialUp>false</DialUp> Dial-Up allowed? Tell VMB how to deal with the
corresponding Dial-Up service module. If true,
establishing Dial-up connections is allowed.
<DiasbleCA>false</DisableCA>
Should management of conflicting applications be
disabled in VMB software? If not VMB will inform the user
about other application(s) using the same device.
<LAN>true</LAN>
Should LAN be enabled in VMB software? Tell VMB how
to deal with the corresponding LAN service module. And
even if this switch is off, you can use LAN. Eg. the LAN
service module only provides an indication whether a
LAN connection is established or not. "Should LAN be
enabled in VMB software? If set to 'true' this will provide
a VMB software interface to check LAN connectivity.
<MyLocationfalse></Mylocation>
Location based service capability called my location.
<NetworkSearchTimeout>360</
NetworkSearchTimeout >
If the user performs a manual network search and the
software is not being able to register onto the previously
selected network a message will ask for automatic
network search. This message will be displayed after the
amount of time defined here.
NetworkSearchTimeout is triggered only by manual
network searches. The dialog shall be presented after 6
minutes (360 seconds) of not being able to register onto
the previously-selected network.
<NetworkSearchTimeoutAuto>360</
NetworkSearchTimeoutAuto>
If the device is searching in automatic mode: to trigger a
Manual search and select to avoid the user having to
remove the SIM.
<PowerOn>true</PowerOn>
Should the device be switched on automatically? If set
to ‘true’, devices which have an initial radio state of OFF
will automatically be switched on.
For those devices which have an initial radio state of OFF
or software disabled status it will be possible for the user
Page 13 of 35
August 2011 Customisation Examples
to enable a setting in the start-up settings panel which
allows VMB to switch the radio of the device on.
The default setting for this value will be true. Where the
user has made a custom action to disable the radio via
the enable/disable mobile device option then VMB
must NOT attempt to power on the device until the user
has re-enabled the device.
<SavePIN>true</SavePIN>
If SavePIN is ‘true’ the PIN will be saved in the software
and used automatically when the SIM is used.
<SMS>true</SMS>
Should SMS module be enabled in VMB software? If set
to ‘true’, the VMB software will provide a SMS client.
<VoiceClient>false</VoiceClient>
Should the Voice Call Manager be enabled in VMB
software? If set to ‘true’, the Voice Call Manager will be
installed.
The Voice Capability is provided by the Huawei E169 and
Vodafone K3520 devices (Vodafone Call Manager).
There are two _rerequisites:
1) the Operator must enable voice (VoiceClient = true).
2) a voice enabled data card has to be inserted.
<VPN>true</VPN>
Should VPN indication be enabled in VMB software? If
set to ‘true’, this will provide a VMB software interface to
the preferred VPN client (subject to VPN client support).
<WLAN>true</WLAN>
Should management of Wi- Fi be enabled in VMB
software? If set to ‘true’, this will provide a VMB software
interface to native Windows Wi-Fi features, subject to OS
support. And even if this switch is off, you can use WLAN.
How to automatically start a VPN?
The setting <AutoVPN>true</AutoVPN> is attached to each APN xml element in Opco files
(these are nnnnn.xml and Opco-nnnnn.xml), listed in the <APNs> area. The default value for xml
element <AutoVPN> is false and VPN itself has to be enabled as a feature of VMB within the
<Features> xml element.
File Opcp-nnnnn.xml:
<Features>
<VPN>true</VPN>
Page 14 of 35
August 2011 Customisation Examples
</Features>
File nnnnn.xml:
<APNs SwitchMarketSegment="true">
<APN Account="Unknown" Apn="" HomeOP="" Name="" Pass="" DNS="" DNS2="" I="0"
User="">
<AutoVPN>false</AutoVPN>
...
</APN>
</APNs>
How to disable the optimiser?
The optimiser, i.e. ByteMobile can be disabled using the following xml settings in the opco file.
<OptimisationClient Use="None">
<IP />
<Port>0</Port>
</OptimisationClient>
Using Locks
There are two things to do, first add or amend xml element <Locks> in template file
MobileBroadbandProfile.xml, and second set installer property LOCKINGCODE either via
command line or per Transform modifying the property table of the msi database.
Example: Three items should be locked: Usage, Updates, and ManageDevices
File: MobileBroadbandProfile.XML
<Locks>
<Locks>Usage Updates ManageDevices</Locks>
</Locks>
See below for a list of available locks.
Page 15 of 35
August 2011 Customisation Examples
Set command line installer property LOCKINGCODE or modify Property Table via Transform.
After installation of VMB the locking code is stored without encryption in registry hive
HKLM\SOFTWARE\Vodafone\VMB:LockingCode.
Command line example:
msiexec.exe /i "Vodafone Mobile Broadband.msi" LOCKINGCODE=500503 TRANSFORMS=....
Locks available
Member Name
None
Description
No locks
Startup Startup: (Broadband Options / Start and Close)
Standby
Standby: (Broadband Options / Standby or Hibernate)
Notification
Notification: (Broadband Options / Notifications)
Updates
Updates: (Broadband Options / Updates)
Language
Language: (Broadband Options / Language)
ConnectionDisplay
ConnectionDisplay
Usage
Usage: (Usage Ribbon)
AccountType
AccountType: (Account Type)
VPNsettings
VPNsettings: (Main Ribbon, switching group)
ManageConnections
ManageConnections: (Connections Ribbon)
ManageDevices
ManageDevices: (Devices Ribbon)
Optimisation
Optimisation: (Broadband Options, Optimisation)
CustomProgram
CustomProgram: (Program Ribbon)
ApplicationConflicts
Application Conflicts: (Broadband Options)
All
All settings
Feature Application Conflicts
This feature cannot be hidden from the GUI, it is only possible to lock it using the following lines. Page 16 of 35
August 2011 Customisation Examples
<Locks>
<Locks>ApplicationConflicts</Locks>
</Locks>
Page 17 of 35
August 2011 Appendix A: Supported VPN Clients
Appendix A: Supported VPN Clients
Vodafone Mobile Broadband 10 supports the following VPN clients:
•
Cisco (the new Cisco VPN Client called ‘Any Connect’ is currently not supported)
•
Checkpoint
•
Fortinet
•
Microsoft VPN.
The following functionality is supported
for all these clients:
• Detecting if a VPN client is
installed on the user’s computer
• If a VPN client is detected as
installed, the VPN tab will show an
additional button that allows a profile from
the VPN application to be selected
• The VPN connection will be
monitored and its status (connected /
disconnected) will be shown in the Status
view
• If the VPN connection is broken or
disrupted, Vodafone Mobile Broadband detects this and will try to re-open the connection
automatically
•
If the user manually closes the mobile connection, the Vodafone Mobile Broadband application
will disconnect the VPN first.
For all other VPN clients, Vodafone Mobile Broadband 10 only includes basic support. The path to
the VPN client can be selected using the Browse button and window. After the client has been
selected, it can be started from a Shortcut on the Shortcuts Bar in the Vodafone Mobile
Broadband Standard and Advanced application windows. In such cases, the VPN connection will
not be monitored by Vodafone Mobile Broadband, and the application will not monitor or display
the status of the VPN connection.
VPN Configuration
If a VPN client is configured, it is possible to enable this client for use with Vodafone Mobile
Broadband.
There are two possibilities:
•
Using the Vodafone Mobile Broadband user interface
•
Manual configuration by editing the Vodafone Mobile Broadband user profile.
For both use‐cases, a working VPN connection must already exist in Windows. Page 18 of 35
August 2011 Appendix A: Supported VPN Clients
Configuration via the User Interface
If a supported VPN client is installed
and configured in Windows, the
Vodafone Mobile Broadband application
will automatically display a button for it
(Microsoft, Cisco, Checkpoint or
Fortinet). If one of these buttons is
selected, a drop-down menu with the
available profiles from the VPN client
will be shown. Select the checkbox for
any profile to create a Shortcut for this
profile on the Shortcuts Bar in the
Vodafone Mobile Broadband application
windows. If a VPN client is activated for use from
within Vodafone Mobile Broadband, it
will be shown as a selected button.
Only one VPN client can be active in
Vodafone Mobile Broadband; if another
client is selected, the first one will be
de-selected automatically. The active
VPN client can be de-selected by
clicking the button. All configurations
are saved in the Vodafone Mobile
Broadband user profile, which can be
edited manually.
Manual Configuration by editing the User Profile
The following entries can be seen afterwards in the MobileBroadbandProfile.XML file. There is an
entry in the user profile which allows a shortcut to be created for the VPN:
<VpnShortcut>true</VpnShortcut>
Microsoft VPN
The necessary entries in the MobileBroadbandProfile.XML file are:
<UseMsVPN>true</UseMsVPN>
<MsVpnName>MS VPN</MsVpnName>
Page 19 of 35
August 2011 Appendix A: Supported VPN Clients
MS VPN must be the name of the Microsoft VPN connection that has been configured in
Windows.
Cisco VPN
To manage a Cisco VPN connection, Vodafone Mobile Broadband uses vpngui.exe. The
connection will be created using the default profile. The necessary entries in
MobileBroadbandProfile.XML are:
<UseCiscoVPN>true</UseCiscoVPN>
<CiscoExec>C:\Program Files\Cisco Systems\VPN Client\vpngui.exe</CiscoExec>
The name of the Cisco profile can also be defined in MobileBroadbandProfile.XML:
<CiscoVpnName>Cisco Profile Name</CiscoVpnName>
Checkpoint VPN
<UseCheckpointVPN>false</UseCheckpointVPN>
<CheckpointVpnName>Checkpoint VPN</CheckpointVpnName>
Checkpoint VPN must be the profile name of the Checkpoint VPN connection, which has been
configured with Checkpoint.
The name of the Checkpoint profile can also be defined in MobileBroadbandProfile.XML:
<CheckpointVpnName>Checkpoint Profile Name</CheckpointVpnName>
Fortinet VPN
<UseFortinetVPN>false</UseFortinetVPN>
<FortinetVpnName>Fortinet VPN</FortinetVpnName>
Fortinet VPN is the profile name of the Fortinet VPN connection, which has been configured with
Fortinet.
The name of the Fortinet profile can also be defined in MobileBroadbandProfile.XML:
<FortinetVpnName>Fortinet Profile Name</FortinetVpnName>
Page 20 of 35
August 2011 Appendix B: Always Best Connected (ABC) - Reference
Appendix B: Always Best Connected (ABC) - Reference
Always Best Connected enhances the Vodafone Mobile Connect application, allowing it to
manage all available types of connection, as opposed to only being able to manage mobile
connections:
•
LAN (Ethernet)
•
Mobile Networks (eg. GPRS, 3G, HSPA)
•
Wi-Fi (e.g. public hotspots, Wi-Fi routers, or corporate Wi-Fi networks).
Always Best Connected has been built on core Windows services, including the .NET Framework
and the Windows WLAN API.
To use ABC the following items must be installed:
•
Windows XP Service Pack 3 or higher (or Windows Vista or Windows 7)
•
If you are using Windows XP Service Pack 2, you will need to ensure that the following patches are
installed:
•
o
.NET Framework 2.0 (this is installed with the Vodafone Mobile Broadband application)
o
WLAN API Hotfix (KB918997) – language-dependent (EN, FR and DE are included in the
VMB installer)
o
MSXML 6.0 (KB933579) – language-dependent (EN, FR and DE are included in the VMB
installer)
ABC does not support Windows 2000, as the required Windows services are not available on this
platform.
In addition, the Microsoft Windows Wi-Fi manager built into the operating system must be used
for Wi-Fi management, and not a 3rd party Wi-Fi manager. We also recommend that any Wi-Fi
profiles required for corporate Wi-Fi networks are pre-loaded: Always Best Connected will detect
and use existing Windows Wi-Fi profiles automatically.
The changes described in the following chapters must be made in the OpCo.XML file to define the
service settings. The OpCo.XML file can be found at the following location:
%ProgramFiles%\Vodafone\Vodafone Mobile Broadband\Opco\
Example for Vodafone UK:
%ProgramFiles%\Vodafone\Vodafone Mobile Broadband\Opco\23415 United Kingdom\23415.XML
To localise the installation to your environment, additional changes are required to the
MobileBroadbandProfile.XML in the templates section:
%ProgramFiles%\Vodafone\Vodafone Mobile Broadband\Templates\MobileBroadbandProfile.XML
Enable or Disable ABC
Although Wi-Fi itself is not de-selectable, two other features offered by an OpCo (mobile network
operator) can be de-selected by the user:
•
Optimisation software
•
SMS.
Page 21 of 35
August 2011 Appendix B: Always Best Connected (ABC) - Reference
In this element, additional features can be defined by the OpCo, e.g. VPN, SavePIN, PowerOn, and
so on.
Xml element
ABC
Value
boolean
Comment
Feature can be disabled by the user.
DisplayName
string
DisplayName, e.g. Always best connected.
DisableSetting
boolean
Feature can be disabled by the user.
<Features>
<ABC>true</ABC>
<LAN>true</LAN>
<WLAN>true</WLAN>
<SMS>true</SMS>
<VPN>true</VPN>
<SavePIN>true</SavePIN>
<PowerOn>true</PowerOn>
<DisableSIMdetection>false</DisableSIMdetection>
<NetworkSearchTimeout>360</NetworkSearchTimeout>
<DisableCA>false</DisableCA>
<VoiceClient>false</VoiceClient>
<UltraCard>true</UltraCard>
</Features>
<AlwaysBestConnected DisplayName="ABCd">
<DisableSetting>true</DisableSetting>
Switching Behaviour
The SwitchingBehaviour tag specifies how the Vodafone Mobile Broadband application should
react to changes in connections or the availability of connection types. This section applies to
three situations:
•
Connect
•
Disconnect
•
Switch situation (disconnect followed by connect).
The tags PreventWhenVpn, PreventWhenBusy, and PreventWhenNew apply only to the
disconnect and switch situations. They allow the OpCo to define that an automatic switch to a
higher-prioritised connection will be prevented if there a connection is already open, which
•
has a VPN connection running over it
•
is busy transferring data
Page 22 of 35
August 2011 Appendix B: Always Best Connected (ABC) - Reference
•
or has only been open for a short time - the default is 0 minutes.
The PreventWhenVpn and PreventWhenBusy tags are Boolean. The PreventWhenNew tag is
numeric and defines the number of minutes for which a connection will be considered ‘new’.
Xml element
PreventWhenVpn
Value
boolean
Comment
Prevent when a VPN is open.
PreventWhenNew
number
Prevent when a connection is new.
SwitchingMode
Auto
This tag allows the OpCo to define
whether a switch to the highest prioritised
connection should be made
automatically, or whether the user will be
prompted, or if the user has to connect
and disconnect manually. The possible
values for these tags are Auto, Prompt,
and Manual.
Prompt
Manual
HasSpecialModeChange
boolean
When the SwitchingMode is changed from
Off to Auto or Prompt, the LAN and Wi-Fi
connection types will be selected as well.
When the SwitchingMode is changed from
Auto or Prompt to Manual, the LAN and
WLAN connection types will be deselected as well.
PromptWhenRoaming
boolean
Prompt when roaming.
PromptWhenVpn
boolean
Prompt when VPN.
ShowNotifications
boolean
This tag defines whether the user will be
notified about a better connection by a
notification above the Vodafone Mobile
Broadband Notification area (‘system tray’)
icon when the switching mode is set to
Auto or Manual.
When in Manual mode, the notification
can be clicked to switch.
No notification will be shown when the
switching mode is Prompt, because a
separate prompt window will appear
anyway.
When the global switching mode is Auto, a
notification might still be desirable in
certain situations:
- A roaming scenario (for all three
situations: connect, disconnect, and
switch),
- When a connection is open and a VPN
connection is running through it, and this
Page 23 of 35
August 2011 Appendix B: Always Best Connected (ABC) - Reference
connection needs to be closed in order to
switch to a higher-prioritised connection.
<SwitchingBehaviour>
<PreventWhenVpn>false</PreventWhenVpn>
<PreventWhenNew>0</PreventWhenNew>
<SwitchingMode>Manual</SwitchingMode>
<HasSpecialModeChange>true</HasSpecialModeChange>
<PromptWhenRoaming>true</PromptWhenRoaming>
<PromptWhenVpn>true</PromptWhenVpn>
<ShowNotifications>true</ShowNotifications>
</SwitchingBehaviour>
Auto VPN
You can use the AutoVpn section to define VPN settings for connection profiles. These settings
only apply when a corporate anchor point has not been defined.
VpnGlobal is only used when a corporate anchor point has been defined. It is the default value for
the global setting, which can be used to set up the software for corporate or for private use.
The other sub-tags of this element define the default value for starting a VPN per connection
profile (for the respective bearer types). These values are only used when a corporate anchor
point has not been defined. Possible values are True and False; the default is False. The setting is
independent of the specific VPN client: it applies to all VPN clients.
Xml element
VpnGlobal
Value
boolean
Comment
Global VPN Flag
LAN
boolean
LAN
WWAN
boolean
WWAN
WebSessions
boolean
WebSessions
PreferredWlan
boolean
Preferred WLAN
OtherWlan
boolean
Other WLAN
<AutoVpn>
<VpnGlobal>false</VpnGlobal>
<LAN>false</LAN>
<WWAN>false</WWAN>
<WebSessions>false</WebSessions>
<PreferredWlan>false</PreferredWlan>
<OtherWlan>false</OtherWlan>
Page 24 of 35
August 2011 Appendix B: Always Best Connected (ABC) - Reference
</AutoVpn>
National and International
The AlwaysBestConnected element contains two objects that prioritise the connection types:
•
The sub-tag in the International tag sets the priority of this connection type when the user is in a
roaming situation
•
The sub-tag in the National tag sets the connection’s priority in non-roaming situations, ie. when
the user is located in coverage of their home network.
The National and International elements describe the prioritisation order of connection types,
and which of them should be enabled by default. The sections also configure the Open Internet
Anchor Points. Each BearerPrio object contains a new DisconnectionBehaviour tag, both for
National and International, which defines whether and how Vodafone Mobile Broadband should
disconnect a Mobile or WebSessions connection when a higher priority LAN or Wi-Fi connection is
opened. The possible values for these tags are Auto, Prompt and Manual.
Xml element
National
Value
string
Comment
The object National will be applied, when
the user is in a non-roaming situation.
International
string
The object International will be applied,
when the user is in a roaming situation.
Title
string
Module title string.
Bearer
string
Bearer type string.
Enabled
boolean
Module status.
Index
number
Index of the ServiceModule.
<National>
<AnchorPoint1 Latency="10" ResponsePattern="">
<Server />
</AnchorPoint1>
<AnchorPoint2 Latency="10" ResponsePattern="">
<Server />
</AnchorPoint2>
<Modules Title="At home">
<Module Bearer="LAN" Enabled="false" Index="0" />
<Module Bearer="WWAN" Enabled="true" Index="1" />
<Module Bearer="PreferredWLAN" Enabled="false" Index="2" />
<Module Bearer="OtherWLAN" Enabled="false" Index="3" />
<Module Bearer="WebSessions" Enabled="false" Index="4" />
</Modules>
Page 25 of 35
August 2011 Appendix B: Always Best Connected (ABC) - Reference
</National>
<International>
<AnchorPoint1 Latency="10" ResponsePattern="">
<Server />
</AnchorPoint1>
<AnchorPoint2 Latency="10" ResponsePattern="Vodafone Group Plc">
<Server>http://www.vodafone.com</Server>
</AnchorPoint2>
<Modules Title="Abroad">
<Module Bearer="LAN" Enabled="true" Index="0" />
<Module Bearer="PreferredWLAN" Enabled="true" Index="1" />
<Module Bearer="WWAN" Enabled="true" Index="2" />
<Module Bearer="WebSessions" Enabled="false" Index="3" />
<Module Bearer="OtherWLAN" Enabled="true" Index="4" />
</Modules>
</International>
Anchor Points
Even when a connection has been selected and opened by the Vodafone Mobile Broadband
application with ABC, the connection may still not be useful to the user, either because it does
not offer access to the internet, or because the user cannot reach their corporate network via
VPN. ABC can therefore be set up to make HTTP requests to specific servers to check for both
internet and intranet access. These servers are called ‘anchor points’. Their URLs must be defined
and they must fulfil certain conditions:
•
The sub-tag in the ‘International’ tag sets the priority of this connection type when the user is in a
roaming situation
•
High server availability
•
Fast response
•
Low data traffic.
Open Internet Anchor Points vs. Corporate Anchor Point
Open Internet Anchor Points can be defined by the OpCo in the OpCo.XML file – see the
introduction to this chapter for the location. These Open Internet Anchor Points are used to
check that the internet can actually be reached, for instance when using a public Wi-Fi hotspot.
A Corporate Anchor Point can be defined by an IT administrator in the
MobileBroadbandProfile.XML file. This anchor point will then be used to check that the corporate
intranet can be reached via VPN – see the Auto VPN section above.
Xml element
Page 26 of 35
August 2011 Value
Comment
Appendix B: Always Best Connected (ABC) - Reference
AnchorPoint1 url
URL of server acting as the corporate
anchor point.
AnchorPoint2 url
URL to be used if AnchorPoint1 is not
available.
Latency
number
To accept the connection as usable, the
anchor point must be reachable within this
latency time (seconds).
ResponsePattern
string
The server must send back a response
matching this response pattern.
Server
url
The name of the anchor point. The Open
Internet Anchor Point is used to check
whether the internet in general is
reachable, and whether the user’s standard
web browser should be opened to show a
landing page.
Whenever the highest-prioritised open
connection changes, or a connection is
opened manually, ABC issues an HTTP GET
request over the connection to the Open
Internet Anchor Point. If ABC does not get
the expected response, it will also open
the user’s browser at the Open Internet
Anchor Point.
The browser's HTTP GET request might
then be re-directed to a landing page. If
the connection is a WebSessions
connection, the user will be able to
purchase a session on the landing page. If
it is a Wi-Fi connection, the user might get
a landing page for authorisation.
When no Open Internet Anchor Point has
been defined by the OpCo, ABC will always
assume that the internet is reachable
when a connection has been opened.
<ABC Subscribed="true" InCorporateSenario="true">
<CorporateAnchorPoint Latency="10" ResponsePattern="ACK">
<Server>http://myserver/ACK.html</Server>
</CorporateAnchorPoint>
</ABC>
Page 27 of 35
August 2011 Appendix B: Always Best Connected (ABC) - Reference
In this example, the XML defines that a server is accessible in a corporate intranet at the URL
http://myserver, and serves an HTML file called ACK.html. The content of the file includes the
word ACK, and this is defined as the expected response pattern.
When a connection is opened, ABC will send a request to myserver. If the correct response (ACK)
is received, no further action takes place and the user can continue to use the connection,
because ABC has established that it can reach the corporate intranet. If, however, no response is
received, and the InCorporateScenario and VpnGlobal tags are set to true, ABC will open the
user’s VPN automatically.
VPN Settings
The Vodafone Mobile Broadband application allows an IT administrator to define the VPN that
shall be started, along with any parameters required.
The Vodafone Mobile Broadband application supports a wide range of VPN software:
•
Microsoft VPNs – when a Microsoft VPN has been set up on the computer already, it can be
selected via the Settings/VPN menu entry
•
Other VPNs – any executable (.exe), batch file (.bat), script file (.cmd) etc. can be defined as the
VPN software that VMB should use. For example, ‘ipsecdialer.exe’ is commonly-used VPN
application from Cisco.
The VPN settings can be customised in the MobileBroadbandProfile.XML file.
Location Xml element
Value
string
Comment
Program path / location of the VPN client
ManualProxy
string
Automatically use a manual proxy server
when VPN is opened and a mobile device
connection is in place.
UseMsVpn
boolean
Use Microsoft VPN client?
MsVpnName
string
Microsoft VPN name
UseOtherVpn
boolean
Use other VPN client?
OtherVpnName
string
Other VPN name
NoProxyWhenNoVPN
string
Inherit original proxy server settings when
VPN is not open.
Use no manual proxy server setting when
VPN is not open.
VpnParam
string
Additional start parameter for the VPN
client
<VPN ManualProxy="false" Proxy="" Port="0" Bypass="false" Script="" NoProxyWhenNoVPN="false">
<VpnParam>/c</VpnParam>
Page 28 of 35
August 2011 Appendix C: Using Transforms for Customisation
<Location>% ProgramFiles%\Cisco Systems\VPN Client\ipsecdialer.exe</Location>
<UseMsVPN>false</UseMsVPN>
<UseOtherVPN>true</UseOtherVPN>
<MsVpnName />
<OtherVpnName>Cisco VPN</OtherVpnName>
</VPN>
Here the location of an existing VPN client is defined in the LOCATION tag, and the start
parameter /c is defined in the VpnParam to connect automatically when the client is started.
Appendix C: Using Transforms for Customisation
A Windows Installer Transform is a database that contains the differences between two MSI
databases. A Transform can only be applied to an MSI database which will be installed, not to a
product that is already installed on a target computer. Transforms are useful for system
administrators to provide variations of a single product without having to modify the original
product installer database. Multi-language installations are also performed by a default language
contained in the MSI database, together with several Transform files, one for the localised strings
of each language.
Creating Transforms
The following instructions describe basic steps using Orca from Microsoft to create Transforms.
All tasks can actually be put into one single Transform – there is no need to put each step or
customisation into a separate Transform.
Task: Replace a File - the file 23415.xml should be replaced by a modified file.
Original file
<working folder>\program files\Vodafone\Vodafone Mobile Broadband\Opco\23415
United Kingdom\23415.xml
Modified file
23415.xml
For the modified file size, open Windows Explorer, navigate to the modified file, right-click it to
display its properties, and then note the file size, e.g. Size: 4.64 KB (4.756 bytes). Keep this
number in mind when creating the Transform later.
1.
Start Orca.
2.
From the File Menu, select Open.
3.
Browse to the folder that contains your working copy of the Vodafone Mobile
Broadband application.
4.
Select Vodafone Mobile Broadband.msi.
5.
Click Open.
Page 29 of 35
August 2011 Appendix C: Using Transforms for Customisation
6.
From the Transform menu, select New Transform.
7.
In the left pane, select the File table.
8.
In the right pane, select the row which displays the filename 23415.xml in the third
column.
9.
Select the column FileSize and enter the file size of your modified file 23415.xml
10.
From the Transform menu, select Generate Transform.
11.
Enter a Transform filename and save the Transform.
12.
From the Transform menu, select Close Transform.
13.
Exit Orca.
These are the basic steps to replace a file using a Transform. For all OpCo files, including
23415.xml, an additional step is necessary to replace this file correctly:
9.1. In the left pane, select the ISSetupFile table.
9.2. In the right pane, select the row which displays the filename 23415.xml in the second
column.
9.3. Read the binary stream for file 23415.xml by clicking on to the Stream column
9.4. Select the modified file 23415.xml with the browse button
After generating the Transform, it must be applied to the installation setup package:
1.
Open the file setup.ini in an editor, e.g. notepad.exe.
2.
Find the [Startup] section and complete the CmdLine= key with the name of your
Transform file, e.g. CmdLine=TRANSFORMS=MyTransform.mst
3.
Copy the modified file 23415.xml to the location of the uncompressed setup where
the original file was stored.
4.
Copy the Transform file to the root directory of the uncompressed setup where the
files Vodafone Mobile Broadband.msi and setup.ini are located.
5.
Start the setup, e.g. by double-clicking setup_vmb.exe.
Task: Change a property - a specific property should be modified:
1.
Start Orca.
2.
From the File Menu, select Open.
3.
Browse to the folder that contains your working copy of the Vodafone Mobile
Broadband application.
4.
Select Vodafone Mobile Broadband.msi.
Page 30 of 35
August 2011 Appendix C: Using Transforms for Customisation
5.
Click Open.
6.
From the Transform menu, select New Transform.
7.
In the left pane, select the Property table.
8.
In the right pane, select the row which displays the file you want to modify.
9.
In the right pane, select the column Value and enter a new value for the property.
10.
From the Transform menu, select Generate Transform.
11.
Enter a Transform filename and save the Transform.
12.
From the Transform menu, select Close Transform.
13.
Exit Orca.
Task: Modify a registry key - a specific registry key should be modified:
1.
Start Orca.
2.
From the File Menu, select Open.
3.
Browse to the folder that contains your working copy of the Vodafone Mobile
Broadband application.
4.
Select Vodafone Mobile Broadband.msi.
5.
Click Open.
6.
From the Transform menu, select New Transform.
7.
In the left pane, select the Registry table.
8.
In the right pane, select the row which displays in the column Name the name of the
registry key to be modified.
9.
In the right pane, select the column Value and enter a new value for the registry key.
10.
From the Transform menu, select Generate Transform.
11.
Enter a Transform filename and save the Transform.
12.
From the Transform menu, select Close Transform.
13.
Exit Orca.
Authoring Transform files
The following example shows how to create a Transform file with Orca from Microsoft to replace
the sample file MobileBroadbandProfile.xml and the Opco file 23415.xml from the MSI database.
1. Install Orca.
Orca can be downloaded from the following Microsoft webpage:
http://support.microsoft.com/kb/255905/EN-US
2. Make a backup copy of the Vodafone Mobile Broadband.msi file.
Page 31 of 35
August 2011 Appendix C: Using Transforms for Customisation
3. Open Orca.exe.
4. From the File menu, select Open and browse to the file Vodafone Mobile Broadband.msi.
5. From the Transform menu, select New Transform.
6. In the left pane, select the File table.
7. In the right pane, select the MobileBroadbandProfile.xml row.
8. Select the column FileSize and enter the file size of the new MobileBroadbandProfile.xml file.
9. In the right pane, select the row which displays filename 23415.xml in the third column.
10. Select the column FileSize and enter the file size of the new 23415.xml file.
11. In the left pane, select the ISSetupFile table.
12. In the right pane, select the row which displays the filename 23415.xml in the second
column.
13. Read the binary stream for file 23415.xml by clicking on to the Stream column. Select the
modified file with the Browse button.
14. Generate a Transform file by selecting Generate Transform… from the Transform menu.
15. Save your modifications.
16. Close the Transform file MyTransform.mst.
17. Exit Orca.exe.
Applying Transform files with setup_vmb.exe
The following steps explain how to apply a Transform file along with an installer database
package.
1. Apply the Transform file.
Apply the Transform file by editing the
setup.ini file. Open the setup.ini file in an
editor - e.g. notepad.exe. Find the [Startup]
section and complete the CmdLine key with
the name of your Transform file, e.g.
MyTransform.mst in the following example.
Note: Any Transform file can also be applied by setting the command line parameter
TRANSFORMS, either with setup_vmb.exe or with the msiexec.exe installer.
Page 32 of 35
August 2011 Appendix C: Using Transforms for Customisation
2. Provide the modified MobileBroadbandProfile.xml file for setup_vmc.exe launcher.
Copy the new MobileBroadbandProfile.xml
file that should replace the existing file into
the related folder of the source media. For
example, navigate to the folder
DISK1\program files\Vodafone\Vodafone
Mobile Broadband\Templates, and replace
the existing MobileBroadbandProfile.xml
file.
3. Provide the modified file 23415.xml for setup_vmc.exe launcher.
Copy the modified 23415.xml file that
should replace the existing file to the
related folder of the source media. For
example, navigate to the folder
DISK1\program files\Vodafone\Vodafone
Mobile Broadband\Opco\23415 United
Kingdom and replace the existing
23415.xml file.
4. Run Setup_vmb.exe.
Execute setup_vmb.exe, e.g. by doubleclicking it in Windows Explorer.
5. Conclusion
Page 33 of 35
August 2011 Appendix C: Using Transforms for Customisation
The installation process should now use the modified MobileBroadbandProfile.xml and
23415.xml files.
Page 34 of 35
August 2011 Further Information
Further Information
The Vodafone support website contains software and documentation for all Vodafone data
products.
•
Vodafone Mobile Broadband application downloads
•
VPN documentation
•
FAQs
•
How-to documents
•
Etc…
http://support.vodafone.com
© Vodafone Group 2011. Vodafone, the Vodafone logos and Vodafone Mobile Broadband are trade marks of the Vodafone Group. Other product
and company names mentioned herein may be the trade marks of their respective owners. The Vodafone Mobile Connect data card is the subject
of a European Community Design Application No. 000093539. Microsoft, Windows and Windows NT are either registered trade marks or trade
marks of Microsoft Corporation in the United States and/or other countries. Mac and PowerBook are trade marks of Apple Inc., registered in the US
and other countries.
Page 35 of 35
August 2011