1
Manual – TrueView People Counter™, embedded for
Axis IP Cameras
Copyright © Cognimatics AB, 2007-2010
Table of Contents
Overview.......................................................................................................................................................1
Mounting the camera..................................................................................................................................2
Installing the software.................................................................................................................................5
Configuring TrueView People Counter™...................................................................................................8
Live view.....................................................................................................................................................11
Statistics.....................................................................................................................................................12
Cognimatics POS data format....................................................................................................................15
Axis Camera Station integration...............................................................................................................16
HTTP API...................................................................................................................................................17
Events........................................................................................................................................................25
Maintenance..............................................................................................................................................26
Troubleshooting.........................................................................................................................................27
Appendix...................................................................................................................................................28
Overview
TrueView People Counter™ is a fully embedded software module for Axis IP cameras, intended for
shops and other environments where you need to count people. TrueView People Counter™ offers an
unbeaten solution for people counting with features such as
1) Embedded people counter – fully embedded into Axis IP camera. TrueView People
Counter™ is a powerful stand-alone people counter directly in your Axis camera. Requiring no
dedicated computer, all counting is done automatically in the camera.
2) IP technology –Using IP technology it offers a cost efficient, infinitely scalable, easy-toinstall and flexible system for automatic people counting, with a superior accuracy.
3) Maintenance – Maintain your people counter remotely over IP, set and check parameters,
and stream video.
4) Web reporting – automatically export counting data to TrueView Web Report™ or directly
to an SQL database through the TrueView Report Daemon™.
5) Bi-directional counting – the module simultaneously differentiates and counts people
moving upwards and downwards in the camera’s field of view.
6) Statistics – Built in graphs in the camera web interface.
Easy to set up, with this software you can instantly monitor your customer traffic. Integrated with your
network, it supports your staff planning and entrance management. With the TrueView People
Counter™ you may collect data such as customer flows, trend analysis, evaluation of advertising and
promotions and enhance your strategic marketing decisions through effective monitoring of customer
traffic. Improve your network video surveillance system with new cost-efficient analytics.
There are several ways to use the data from the People Counter:
• View real-time counting data and compare it with sales statistics directly on the camera
through a web browser.
• View graphs of historical data directly on the camera.
• Download data through an open API.
• Use TrueView Report™, which is a powerful statistical software package that lets you manage
and monitor historical data conveniently.
Historical data is available on the camera up to one month and is updated every 15 minutes. The data
is stored in 15 minutes bins representing the in and out counts for the 15 minutes periods.
1 of 28
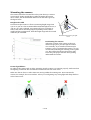
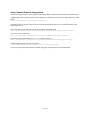
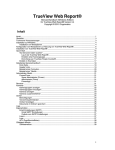
Mounting the camera
The camera should be mounted above the point where you want to
count people, facing straight down. When mounting the camera
above a door, the recommended distance from the wall is given by
the figure below.
Height and width
TrueView People Counter™ allows a mounting height range from
250 cm to 500 cm. The recommended minimum height, however, is
300 cm. As a rule-of-thumb, one counter will cover a passage as
wide as the camera mounting height. Depending on the camera
model and lens configuration, both the height range and the covered
width may be extended.
Mount the camera facing straight
down
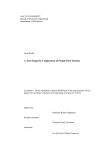
Positioning the camera
Adjust the position of the camera so that it is
natural for people to pass through the camera
view vertically. If you install TrueView People
Counter™ prior to mounting the camera, you can
use the lines indicating the counting zone to guide
you. The red line should run from left to right,
across the path people will take when passing
underneath the camera.
Recommended minimum distance from wall
General guidelines
In order for the camera and, in effect, TrueView People Counter™ to function properly, make sure that
the lighting is sufficient. We recommend a minimum of 80 lux in the scene.
Make sure that no doors or other items are moving within the counting area. Do not mount the
camera, for example, above an escalator. Also try to avoid getting very strong light and sharp shadows
in the camera view.
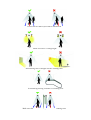
Place the camera straight over the area where people are going.
2 of 28
Do not tilt the camera forwards or backwards.
Make sure there is enough light.
Avoid having direct sunlight into the counting zone.
Avoid having moving escalator in counting area.
28
Make sure that doors are not3 of
opened
into the counting zone.
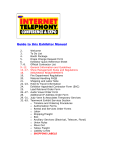
Tuning and validation
When the cameras are installed and counting it is highly recommended to validate the accuracy and
fine tune the system. This is likely to increase the accuracy or identify counters with problems.
Begin with an overview of the traffic numbers. Look
at the numbers for all cameras a couple of days back.
If there is no difference (<5-10%) between in and out
this is a good first indication that the counting
system if configured correctly.
To validate each camera:
1) Go to the Live View page of the camera.
2) Note the numbers in the dominant walking
direction.
3) Manually count 100 or more passages.
4) Compare the numbers between your manual
count and the counting systems number.
Use the live view to guide you
The difference between the counting system
and the manual count should be less than
10%.
5) If the difference is sufficiently small you can move on to the the next camera.
6) If the difference is >10% the counter needs to be manually tuned.
7) Make sure the camera is mounted according to the guidelines in this document.
8) Adjust the height settings. The changes will adjust the internal parameters inside the camera.
a) If the counter is counting too much compared to truth, decrease the height with around
10cm.
b) If the counter is counting too little compared to truth, increase the height with around
10cm.
9) Go back to step 3 to validate the counter. Please note that the counter will need a couple of
minutes after saving parameters before counting accurately.
4 of 28
Installing the software
If TrueView People Counter™ software module is not already installed from your vendor it must be
installed manually in your Axis camera.
1) Make sure you have one of the supported AXIS IP cameras and that you have the correct
corresponding software module of TrueView People Counter™. The supported cameras and
the corresponding software modules are listed in Appendix A.
2) Install the camera on your network, start it up and point your web browser to it. Supported
web browsers are Firefox 3, Internet Explorer 7 & 8 and Safari 3 & 4.
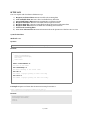
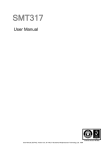
3) Upload the TrueView People Counter™ firmware by clicking Setup -> System Options ->
Maintenance. Under the section Upgrade Server, specify the path to the TrueView People
Counter™ firmware file or use the Browse button. Click on the Upgrade button. After
installation the camera will restart.
Note that the user name and password will be reset to their respective default
values: 'root' and 'pass'.
Axis 212PTZ maintenance page
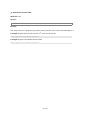
4) Reload the camera in the web browser.
5) Click the Finish button to complete the installation and reset all parameters to the original
factory settings. After this, the camera will restart again.
5 of 28
Reset page
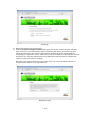
6) Reload the camera in the web browser.
7) Click the TrueView People Counter link to get to the People Counter interface. The first
time you do this, you will be asked to enter your license code. Enter your license code and
follow the instructions. The software will attempt to activate the license automatically by
connecting to a registration server. If the server cannot be reached you will be asked to activate
the license on a computer with internet access. When the license activation is complete the
camera is ready to be used for counting.
Note that your software license is for one camera only. You can not install the software to
another camera without a new registration key.
Registration page
6 of 28
8) When the registration is done you'll be redirected to a Quick start page where you can manage
the essential settings for the counter to work. You can find these settings in the Settings page
as well so if you are used to work with TrueView People Counter™ you can safely skip this
step.
9) When you update any setting it will take a while for the counter to calibrate, sometimes up to
ten minutes. You can see if the counter is working by navigate to the Live view page and walk
in the Counting zone.
Quick start page
7 of 28
Configuring TrueView People Counter™
Note: To ensure accurate counting of persons passing the camera, the TrueView People Counter™
must be calibrated before use. This is done using the Visual height setting.
The people counter settings are divided into three categories: Basic/counting, Data/reporting and
Connectivity. There are also direct links to some basic Axis camera settings for convenience.
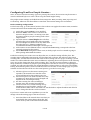
Basic counting configuration
For the basic setup, go to the General section. This is where one toggles the counter status, name the
counter and set the most fundamental parameters.
1) Verify that Counter status is set to Enabled.
2) Enter the name of the camera or location the
TrueView People Counter™ is viewing. Note that
all cameras used for people counting need to have
unique names.
3) Input the camera’s visual height above the floor
and select the proper height unit. This is normally
the actual height over the floor but may differ from
this value due to e.g. lighting conditions. It is
recommended that the visual height is at least 300 cm.
4) If the camera can use different lenses, verify that the lens setting corresponds to the lens
currently mounted on the camera.
5) Set the direction through the camera view, in which people are to be counted as going in
when passing underneath the camera.
Under the Counting zone section one can adjust the area, in which counting will take place. The
counting zone is indicated in the image by two blue lines and a red area. The red area is the virtual
counting “line” and the blue lines show the extent of the counting zone. For proper counting, a person
needs to be visible within the entire zone. In addition to adjusting the size and position of the counting
zone, one can also change the shape of the counting “line”. Use the curvature settings to change its
shape such that it is natural for people to pass through the count line at as close to a straight angle as
possible. You will notice that there are certain limitations on these values as well as the visual height
setting. Note that the position of the red and blue lines over the video on the settings page are just an
estimate of where the line will be. For the actual position, go to the live view page.
1) The Line offset moves the entire counting zone
upwards or downwards. How much it can be
moved will depend on the counting zone size.
2) The Counting zone size slider sets the size of the
counting area. How much it can be changed will
depend on the visual height setting.
3) Use the Counting line interval setting to
shorten/move the counting lines sidewise.
4) Let the counter use a curved counting area by
checking the Curved checkbox. Doing so will
enable another slider with an icon next to it. Use the slider to adjust the radius and click the
icon to change the direction of the curvature.
If you have a camera with zoom capabilities you can also
change it from the settings page in the Zoom section.
1) Move the slider to the wanted value. Note that you
must disable the counter before doing this, this
can be done by click on the link above the slider.
8 of 28
Note! Do not forget to press the Submit button when
changes in settings are made, otherwise the settings won't
be saved.
Under the Counting schedule section start and stop times
for the counter can be set individually for each day of the
week. By unchecking the Per day schedule box, changing
the times for one day will affect all days. Unchecking a box
by the sliders will disable counting for that particular day.
Data and reporting configuration
The format of the strings used when exporting data to CSV
files can be customized in the Data export section. The
CSV files are constructed using either the time drive or the
type drive strategy. Time drive gives one line per time interval and may include values of several data
types. Type drive gives one line per count type and time interval and may include a type description.
Possible patterns are
%i
in
%o
out
%c
type-code
%d
type description
%r
short type description
%n
counter name
%s
camera serial number
%v
value
%t
timestamp
%u
Unix timestamp
%S
separator character
Patterns associated with the two different strategies mentioned above are conflicting and may not be
used in conjunction. The patterns %i and %o are used with time drive and patterns %c, %d, %r and %v
are used with type drive.
The default pattern is %t%S%s%S%n%S%i%S%o.
Apart from showing statistics in the camera interface and
serving CSV/XML data, the people counter software can
also push count data to the TrueView Web Report™
system. The settings for this are found in the Web Report
section.
1) Check the Enable checkbox to enable pushing data
to TrueView Web Report.
2) Select the correct version of TrueView Web
Report™ that will be accessed.
3) Enter the Web Report server address and your
account credentials.
4) If the camera resides behind a proxy server, enter
the proxy server address and credentials.
In the Events section you can enable if the counter should generate events for each passage. Please
read more about this functionality in the Events section in the manual.
9 of 28
Connectivity configuration
If there are several counters on your network you can
enter them in the Additional counters section, on this
form: http://<user>:<password>@<address>. This
makes it possible to see statistics from all counters on the
statistics page of one counter. Up to nine additional
counters can be added.
To display sales statistics from the POS system, go to the
POS data tab. The connection to the POS system is
described later on in this manual.
1) Enter the POS data address.
2) Select your currency.
Axis settings
You can set the standard parameters of the AXIS camera
by selecting one of Users, TCP/IP or Date & Time in
the Axis settings section. See your AXIS camera manual
for how to set the parameters. To assure the best counting
performance, avoid using any camera built-in functionality
that may affect the counting accuracy. Do not set any other
parameters than:
a. Local time
b. IP address
c. Users
10 of 28
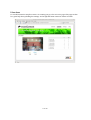
Live view
To see when TrueView People Counter™ is counting you go to the Live view page. This page can also
be a great help when polishing the settings. To the right the latest counts are shown in a table.
11 of 28
Statistics
You can configure your TrueView People Counter™ in different ways to generate the statistics you
require and also link in data from point of sales. This includes important measurements like
conversion rate and average basket, which helps you optimize the performance of your shop. You
can obtain statistics from your counters in four different ways.
1) Real time data with graphs – Real time people counter data linked with Point of Sales
(POS). This data is updated in real time every five seconds. Using Cognimatics API you can
link in point of sales data to generate important key figures like conversion rate and
average basket size. Click on Statistics at the top left hand side of the page to see data
updated in real time.
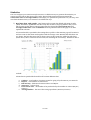
If no POS data file is specified in the settings the top table on the statistics page will contain in
and out count for the latest week together with the average count. Beneath the table there are
two charts. The left chart (Day chart) shows counts of the current day while the right chart
(Week chart) shows values for the last week (not including the current day). When new data is
available the day chart will automatically be updated.
If POS data is specified the data table will contain different data:
a.
b.
c.
d.
e.
f.
Visitors – total number of visitors counted as going in by the units in your network
Buyers – total number of transactions
Did not buy – difference between Visitors and Buyers
Turnover – sales in shop
Conversion rate – the number of buyers divided by the number of visitors (Buyers/
Visitors)
Average basket – the size of the average purchases (Turnover/Visitors)
12 of 28
Data files can be downloaded in cnt, xml or csvformat by selecting the format and click day you
want the data for. For csv and xml different time
resolutions can be chosen as well. If you want to
download all files for a certain format just press
the All files link.
If additional counters are specified you will see a
link in the upper right corner with the text “Multiple counters”. By clicking this link you can
see data from all counters that your counter can connect to. By clicking on a counter name you
will see the day and week charts for that counter.
13 of 28
2) TrueView Report™ – Installing TrueView Report™ on your windows PC or TrueView Web
Report™ on a web server lets you manage and view historical data conveniently. For more
information about these statistical software packages we refer to their respective manuals.
3)
4)
At the bottom of the statistics page you can find data from TrueView People Counter in both
.cnt and .xml format.
HTTP API – Download data in text format using the HTTP API described below.
Events – Let the counter generate events for each passage, with 1 second resolution.
14 of 28
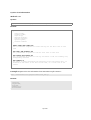
Cognimatics POS data format
The POS data file specified in the settings must be on the Cognimatics POS data format for the
counter to be able to interpret the data. The data format can handle up to eight days including the
current day.
An example of the POS data format is the following:
{"data": [
{"timestamp":1236084604,"buyers":5,"turnover":61},
{"timestamp":1236171004,"buyers":15,"turnover":198},
{"timestamp":1236257404,"buyers":31,"turnover":530},
{"timestamp":1236343804,"buyers":46,"turnover":647},
{"timestamp":1236430204,"buyers":0,"turnover":3},
{"timestamp":1236516604,"buyers":0,"turnover":3},
{"timestamp":1236603004,"buyers":6,"turnover":123},
{"timestamp":1236689404,"buyers":12,"turnover":87}
]}
The data should be a JSON1 array with the key “data”. Each row in the array should have the keys
●
●
●
timestamp: a UNIX timestamp in the day
buyers: number of persons who bought something that day
turnover: the turnover that day
Note that if the current days' data is updated the People Counter will also show the changes in the
interface.
An example of an POS-data file is available in the counter. Put
http://<user>:<pass>@127.0.0.1/local/people-counter/random-pos.cgi as POS data address
on the Settings page for using this.
1 For more information about the JSON format, see http://www.json.org.
15 of 28
Axis Camera Station integration
TrueView People Counter™ have pages suited customized for the Axis Camera Station software (ACS).
A lightweight version of the People Counter interface, suitable for use in ACS, be opened from the URL
below:
http://<servername>/local/people-counter/acs/
The default view is the Day chart. You can select the Week chart and Live view from the menu in the
right lower corner.
The week chart can be choosen directly by giving the following URL:
http://<servername>/local/people-counter/acs/index.shtml?type=chart&time=week
Live view can be accessed by
http://<servername>/local/people-counter/acs/index.shtml?type=liveview
If the menu should be hidden pass clean as an URL option, i.e.
http://<servername>/local/people-counter/acs/index.shtml?clean&type=liveview
A lightweight settings page can be found at
http://<servername>/local/people-counter/acs/settings.shtml
For more precise instructions how to embed web pages in ACS please see the ACS manual.
16 of 28
HTTP API
You can request and clear data in different ways.
1)
2)
3)
4)
5)
6)
7)
8)
Request real time data: Returns text file with counting data
List available data: Returns a list of available binary data files
Download binary data: Returns Cognimatics proprietary format
Request CSV data: Returns a file with comma-separated values
Request DTD file: Returns a DTD file describing the format of the XML data
Request XML data: Returns an XML file containing historical data
Clear local counting data
Live view information: Returns information about the placement of the lines in Live view
1) Real time data
Method: GET
Syntax:
http://<servername>/local/people-counter/live_sum.js
Return:
{
}
"name":"<cameraName>",
"timestamp":<timestamp>,
"in":<in>,
"out":<out>
where <cameraName> is
the name of the camera
and <timestamp> is
the UNIX timestamp of the latest count
and <in> is
the number of people passing in until now today
and <out> is
the number of people passing out until now today.
Example: Request real time data from TrueView People Counter™.
http://myserver/local/people-counter/live_sum.js
Return:
{
"name":"Entrance south",
"timestamp":1236769334,
"in":3,
"out":2
}
17 of 28
2) List all available .cnt data files.
Method: GET
Syntax:
http://<servername>/local/lscnt.cgi?plain
Return:
{
"timestamp":"1237294947",
"files":["xx.cnt", [..] "xx.cnt"]}
}
where <timestamp> is
the time set in the camera
and <files> is
an array of available .cnt files sort in write date descending order.
Example: List all data files available in TrueView People Counter™.
http://myserver/local/lscnt.cgi?plain
Return:
{"timestamp":"1237294947","files":["17.cnt","16.cnt"]}
18 of 28
3) Download .cnt data files
Method: GET
Syntax:
http://<servername>/local/getcnt.cgi?[day=<day>|all]
Return:
This script returns a Cognimatics proprietary binary data file, to be used in TrueView Report™.
Example: Request historical data for the 12th of the current month.
http://myserver/local/getcnt.cgi?day=12
Example: Request all available historical data.
http://myserver/local/getcnt.cgi?day=all
19 of 28
4) Request CSV data
Method: GET
Syntax:
http://<servername>/local/getdata.cgi?
format=csv &
[day=<day>|all] | [days=<day1>,<day2>,..] &
[res=15m|hour|day]
Return:
This script returns data in plain text, comma-separated values. The format for each line can be defined
on the settings page, described above.
Example: Request historical data for the 3rd, 12th and 19th of the current month with 15 minute
resolution.
http://myserver/local/getdata.cgi?format=csv&days=3,12,19
Example: Request historical data for all available days, with 24 hour resolution.
http://myserver/local/getdata.cgi?format=csv&day=all&res=day
20 of 28
5) DTD file
Method: GET
Syntax:
http://<servername>/local/people-counter/appdata.dtd
Return:
<?xml version="1.0"?>
<!-<!-<!-<!-<!-<!-<!-<!-<!-<!-<!-<!-<!-<!-<!-<!--
A countdata element contains at least one typedesc element and a
number of cntset elements. A typedesc element contains a number of
type elements, each having a unique id attribute and a string
value describing the data type. A cntset element has three
attributes for the name of the counter, the data set start time
and the save interval delta. The starttime is given in seconds
since the epoch, delta is given in seconds. A cntset contains a
number of cntgroup elements, each in turn containing a number of
cnt elements carrying data for one save interval. A cnt element
has one attribute describing the data type id and a value that
gives the actual count.
-->
-->
-->
-->
-->
-->
-->
-->
-->
-->
-->
-->
This specification can be used for event driven data collection as -->
well as time driven. In that case, each cntgroup should be given a -->
timestemp. With timestamps in the cntgroup elements, the cntset
-->
starttime and delta may be ignored (but must still be included).
-->
<!ELEMENT countdata (typedesc+) (cntset*)>
<!ATTLIST countdata
version CDATA #IMPLIED>
<!ELEMENT typedesc (type?)>
<!ELEMENT type (CDATA)>
<!ATTLIST type
typeid ID #REQUIRED>
<!ELEMENT cntset (cntgroup*)>
<!ATTLIST cntset
name
CDATA #REQUIRED
starttime CDATA #REQUIRED
delta
CDATA #REQUIRED>
<!ELEMENT cntgroup (cnt*)>
<!ATTLIST cntgroup
timestamp CDATA #IMPLIED>
<!ELEMENT cnt (CDATA)>
<!ATTLIST cnt
typeid IDREF #REQUIRED>
21 of 28
6) XML file
6-1) Predefined XML
Method: GET
Syntax:
http://<servername>/local/people-counter/appdata.xml
Note! There may be multiple sets in the file.
6-2) Custom XML
Method: GET
Syntax:
http://<servername>/local/getxml.cgi?[day=<day>|all]
http://<servername>/local/getdata.cgi?
format=xml &
[day=<day>|all] | [days=<day1>,<day2>,..] &
[res=15m|hour|day]
Return:
If day=all or no arguments are given to getxml.cgi, all available data files are converted to XML
and returned. Otherwise, the data for each day specified in the argument list is converted to XML and
returned.
Using the script getdata.cgi, the time resolution can be selected to either 15 minutes, 1 hour och 24
hours.
Example: Request the historical data for the 6th of the current month.
http://<servername>/local/getxml.cgi?day=06
Example: Request historical data for all available days, with 1 hour resolution.
http://<servername>/local/getdata.cgi?format=xml&day=all&res=hour
22 of 28
7) Clear local counting data.
Method: GET
Syntax:
http://<servername>/local/people-counter/rmcnt.cgi
23 of 28
8) Live view information
Method: GET
Syntax:
http://<servername>/local/people-counter/lvinfo.js
Return:
{
}
"left":<left>,
"right":<right>,
"top":<top>,
"bottom":<bottom>,
"yfirst":<yfirst>,
"ylast":<ylast>,
"radius":<radius>
where <left> and <right> are
the x coordinates in pixels for start and stop for the blue lines in Live
view
and <top> and <bottom> are
the y coordinates in pixels for the two blue lines in Live view
and <yfirst> and <ylast> are
the y coordinates in pixels for the top and bottom of the red counting area,
disregarding curvature
and <radius> is
the radius in pixels describing the curvature of the red counting area, as
measured in the center of the area on both axes, or 0 if the area is not
curved.
Example: Request Live view information form TrueView People Counter™.
http://<servername>/local/people-counter/live_sum.js
Return:
{
}
"left":56,
"right":296,
"top":88,
"middle":136,
"bottom":224
24 of 28
Events
The counter can generate events for each passage, with 1 second time resolution. The daemon that
handles the event system can act either as a server or as a client. When running as a server, one or
more clients may connect to the counter to start receiving events. When running as a client, the
daemon itself connects to a provided listener that collects the events and handles the information.
TrueView Web Report v2 comes with an event handler. Example code is available for those who want
to write their own event handler.
25 of 28
Maintenance
On the Maintenance page (found under Help > Maintenance) there are several actions that can be
taken.
1) Restart
If you find the counting inaccurate or the web interface unusually slow, you may try restarting the
running services or restart the camera.
2) Logs
If you have any trouble with your camera you can send counter logs to Cognimatics. These can be
generated by pressing the “Generate logs” button. After a while you'll be prompted with a file you can
save to your computer and send to [email protected].
3) Record video
You can use this feature to record video from your camera, locally to your computer. Just select the
desired duration of the video and press Record.
4) Patch software
When minor modifications to the counter software is made they are usually released as patches that'll
be provided by Cognimatics. When you have such patch file you can use it by selecting the file in the
form and press “Upload and patch”.
26 of 28
Troubleshooting
The video does not show in Live view
Make sure no one else is watching the video and click reload in your web browser. In the Axis 207W
only one viewer is allowed while Axis 209FD and 212PTZ support a few more viewers at the same time.
If you are using Internet Explorer an additional ActiveX plugin must be installed, the browser will
prompt you with a notification if it is not.
The software asks for registration code every time
Reset to factory default after installation and restart the camera.
The software prompts me with a warning saying that the frame rate is too low
•
If the scene is too dark, the Axis camera does not deliver enough frames per second for the
People Counter to work. The scene must have a lightning with at least 80 lux.
•
When streaming video from the camera make sure to open only one stream at a time and to
stream in 320x240 MJPEG format.
The setting page does not show the parameter values
Reset to factory default after installation and restart the camera.
The software does not upload to TrueView Web Report
Go to to http://<servername>/local/people-counter/showlogs.cgi in your web browser and
look at wrupload.log to see if the error can help you. Note that some times it can take up to half an
hour for the software to upload data to TrueView Web Report.
The software does not count
Make sure you reset to factory default after installation and restart the camera. Make sure the scene is
well lit. People Counter only works when the scene has at least 80 lux.
The software does not count after changing parameters
After changing the parameters the software may need to run up to 10 minutes before the counting
accuracy is at optimum.
The software does not count correctly
•
Make sure people are passing the entire counting zone crossing both blue lines – not passing
out to the left or to the right.
•
If the software counts too many – lower the visual height.
•
If the software counts too few – increase the visual height.
I still can't get the software to count
If you've followed all of the advices above and still can't get the software to work please contact the
Cognimatics support team at [email protected]. Don't forget to send the archive with logs
and other generated from the page http://<servername>/local/people-counter/genlogs.cgi.
27 of 28
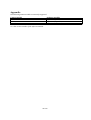
Appendix
The following camera models are currently supported
Camera model
Axis 212PTZ
Axis 207W
Axis 209FD-R
Software module
tvpcAxis212_xx.bin
tvpcAxis207W_xx.bin
tvpcAxis209FD-R_xx.bin
xx is the version number of the software module.
28 of 28