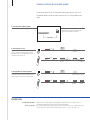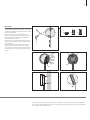
1
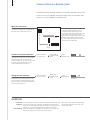
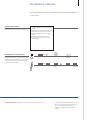
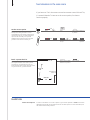
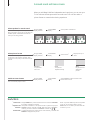
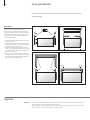
BeoSystem 3 Guide Cautions – Make sure that the product is set up, placed and connected in accordance with the instructions in this Guide. – Place your product on a firm and stable surface. To prevent injury, use Bang & Olufsen approved stands and wall brackets only! – Do not place any items on top of your product. – Do not subject the product to high humidity, rain or sources of heat. – The product is developed for indoor use in dry, domestic environments only. Use within a temperature range of 10–35°C (50–95°F), and at an altitude of no more than 1500 m (5000 ft). – Do not place the TV in direct sunlight, as this may reduce the sensitivity of the remote control receiver. – Leave enough space around the product for adequate ventilation. – Do not connect any of the products in your system to the mains, until you have connected all the cables. – Do not attempt to open the product. Leave such operations to qualified service personnel. – The product can only be switched off completely by disconnecting it from the wall socket. Dear Customer Contents This Guide contains information about the daily use of your Bang & Olufsen product and about connecting and operating external equipment. We expect your retailer to deliver, install and set up your product. 4 Watch television 6 Teletext On the Bang & Olufsen website, www.bang-olufsen.com, you can find further information and relevant FAQs about your product. 9 BeoLink 19 Advanced use 33 Installation – setup The needs of the user are considered carefully when designing and developing Bang & Olufsen products. Therefore, please take the time to tell us about your experience with your product. To contact us, visit our website on … www.bang-olufsen.com or write to: Bang & Olufsen a/s BeoCare Peter Bangs Vej 15 DK–7600 Struer or fax: Bang & Olufsen BeoCare +45 9785 3911 (fax) Technical specifications, features and the use thereof are subject to change without notice. 3500242 0903 How to use your remote control Beo5 operation You can operate your television with Beo5 or Beo4. The instructions in this Guide are mainly based on Beo5. TV + DTV N.MUSIC PC DVD O The Beo4 display shows you the activated source or function Back up through Beo5 displays TV Switch on the TV* Bring up digits to select channel or recording Press again to return RADIO N.RADIO STOP Back up through menus or press once to pause playback and twice to stop PLAY Start playback BACK Exit menus completely CD TV LIGHT RADIO DTV DVD CD V MEM RECORD A MEM 7 8 9 4 5 6 1 2 3 TEXT 0 MENU V MEM GO Switch on a connected video recorder 0–9 Select channels and enter information in on-screen menus MENU Bring up the main menu of the active source TEXT Switch on teletext Turn to adjust volume To mute, turn quickly counter-clockwise LIST Accept and store settings and start playback GO Select colour specific functions* Press volume wheel next to the colour Step through channels or move in menus Hold for continuous step EXIT STOP Select colour specific functions BA CK GO 3 Search backwards or forwards or move in menus 2 AY ST TV PL P V.MEM 1 Soft button, touch screen to select* Switch on a source or select a function Bring up SCENE buttons, such as Zones or Speaker Press again to return Living Room TV Beo4 operation Press centre button to accept and store settings Adjust volume To mute, press the middle of the button Step through screen menus Search backwards or forwards Recordings Step through channels or recordings Hold for continuous step LIST Display extra ‘buttons’ on the Beo4 Press repeatedly to change ‘buttons’ STOP Back up through menus or press once to pause playback and twice to stop EXIT Exit menus Standby Standby Useful hints 1 *About buttons Light grey buttons indicate that you have to press a text in the display. Dark grey buttons indicate that you have to press a hard button. 2 *Coloured buttons Press the wheel next to the colour to activate a coloured button. Actual zone Indicates the actual zone as it was named during the setup process. Soft buttons Depending on the activated source, different soft buttons appear on the screen. Touch the screen to activate the function. 3 *Marked buttons can be reconfigured during the setup process. See p. 37. My reconfiguration: TV DTV NOTE! For general information about remote control operation, see the Guide enclosed with your remote control. Introduction 3 … Information about the selected source is shown at the top of the screen. On-screen menus allow you to adjust settings. Menu name Select TV’s zone TV Menu Switch on TV Show menu TV SETUP Watch television • Teletext Display and menus Easy use Watch movies and listen to different sources, such as a connected set-top box or a music centre. TUNING Menu options PLAY TIMER OPTIONS STAND POSITIONS Information field select + Navigate in menus When a menu is on the screen, you can move between menu options, reveal settings or enter data. Select option/ setting Enter data 0–9 BACK GO Bring up submenu/store setting Select option 4 Exit menus* Important – for more information: www.bang-olufsen.com Remote control The instructions in this Guide are mainly based on the Beo5 remote control, but you can also operate the TV with Beo4. On the fold-out page in this Guide, you will find an overview of the buttons on Beo5 and Beo4. For general information about remote control operation, see the Guide enclosed with your remote control. 4 *NOTE! Press STOP to back up through menus. Watch television 4 Choose a TV channel by its number or switch to another channel or source. Adjust the sound volume and change the sound type or language. Activate the TV source to use these functions Beo5 operation Switch on the TV Select a TV channel Channel name Channel number Bring up a channel list TV CHANNEL LIST CNN 1 … DISCOVER CWNBC BBCWORLD … … … SUPER CH … CRIME TV CINEMA … MOVIE NW … … … … more 2 3 4 5 6 7 8 9 10 11 12 13 14 15 16 17 18 select Adjust the volume Record here and now on a recorder While recording on a connected recorder you can also watch another recording, source, or TV channel. See second source Indicates more channels Divide the screen to watch two sources at the same time. Switch off the TV Automatic colour calibration may start automatically. Useful hints Automatic Colour Management Automatic Colour Management automatically compensates for colour changes on the screen for every 100 hours of use approximately. Do not switch off the system or disconnect it from the mains during the calibration. 5 Beo4 operation TV TV Press Press + or Select Activate numbers 0–9 Select previous channel + or Record STOP P-and-P Press Stop recording DVD Select source Swap Swap pictures Press STOP 0 Select channel Previous channel Hold to activate Select page or channel and accept Adjust volume To mute, press in the middle of the button or Accept Bring back the sound by turning the wheel either way. Record Start recording 0–9 Select 0–9 Hold for Select page Select channel channel list Adjust volume. To mute, turn quickly counter-clockwise or Previous Select channel RECORD STOP Press twice to start LIST Select P-AND-P DVD Press twice to stop 0 Select source Swap pictures Press Second source You can bring up two video sources. With Swap you can make the left and right pictures switch places. With BACK you leave the function and go to the source on the left. You can also just select the source you wish to go to. See also p. 40 for information about HDMI sources. Teletext 6 Operate teletext through the menu bar at the top of the teletext page or the arrow buttons on your Beo5. Beo5 operation Start teletext Activate teletext to use these functions Access the start page of teletext. Move to pages Access teletext pages you wish to see. Actual page Change broadcaster 1 Change teletext service* Access teletext pages of other broadcasters. PAGE CHANNEL P100 BBC LARGE HALT REC S100 Wed 13 Oct SETUP 12:39:34 Stop subpages from turning Reveal hidden messages … and the like. Create MEMO pages Nine MEMO pages are available for each channel’s 2 teletext service.* View a MEMO page Stop subpage turning The arrow indicates that more options are available. Reveal hidden text on ‘REVEAL’ and make settings on ‘SETUP’ ‘MEMO’ is only available if you have stored MEMO pages. Delete a MEMO page Exit teletext Leave the teletext function. Glossary Beo5 teletext point With the inner arrow buttons on Beo5 you can navigate in page references in a teletext page. Go to a page referred to by pressing the centre button and back again by pressing BACK. 1 *Teletext service Each channel provides its own teletext service. Change easily between teletext pages of different channels. MEMO pages Store a teletext page as a MEMO page to be able to access it quickly. Large teletext To enlarge the size of the teletext page, bring up teletext, move to ‘LARGE’ in the menu bar and press the centre button repeatedly to switch between the upper and lower half of the page and normal page size. 7 Beo4 operation Text TEXT Press repeatedly to change screen mode Press or 0–9 Select page 0–9 Move to ‘PAGE’ Select page Go to index pages (100, 200, 300 …) Move to ‘CHANNEL’ or Bring up Select ‘MEMO’ then ‘CHANNEL’ channel list channel STOP or Accept or Stop turning Move to ‘HALT’ Press Move to ‘REVEAL’ Accept or STOP Restart turning Index pages 0–9 0–9 Stop turning Select subpage and restart turning Move to ‘REVEAL’ Accept 0–9 Select page Move to ‘SETUP’ Accept Move to ‘CHANNEL’ or ‘MEMO’ Select MEMO page Move to ‘SETUP’ Select MEMO page Accept Store current page Press Move to ‘BACK’ Accept Select page Move to ‘SETUP’ Move to ‘CHANNEL’ or ‘MEMO’ Delete BACK Press 2 Move to ‘PAGE’ and select Move to ‘CHANNEL’ or Press, select ‘MEMO’ then channel and ‘CHANNEL’ accept 0–9 Select subpage or Select page *Teletext subtitles If you would like available teletext subtitles to appear automatically for a particular channel, store the teletext subtitles page as MEMO page 9. Dual screen When teletext is activated, pressing Text swaps between dual screen and full screen mode. Move to ‘SETUP’ Press Select page Accept then store Select MEMO page Press twice EXIT Press NOTE! If your TV is linked via a Master Link cable to another TV, stored MEMO pages are not shared among these TVs. MEMO pages must be stored manually on each linked TV. 8 BeoLink system 12 Connect and set up an audio system 14 Connect and set up a BeoLink system 15 Your television in a link room 16 Two televisions in the same room BeoLink 10 9 BeoLink system • Connect and set up an audio system • Connect and set up a BeoLink system … Contents – BeoLink BeoLink system 10 If you have a BeoLink system, you can operate all connected sources from both the main room and link rooms. Beo5 operation TV sound on the audio speakers Activate main or link room sources Listen to sound from a TV source on your audio system speakers. Audio sound on the TV speakers Link room Listen to audio sound on the speakers connected to the TV. Use a source present in one room Activate a main or link room source from a link room. The source type is only present in one room. Use a link room source Activate a link room source in a link room. The source type is present in both rooms. Use a main room source Main room Activate a main room source from a link room. The source type is present in both rooms. Stereo sound in a link room If stereo sound is selected in the link room, you cannot distribute other main room sources to the link room 1 system.* Useful hints Options Main room source Link room source Audio system To use all functions properly, the products must be set to the correct options. See p. 12. This is the central source from which you can distribute sound and pictures to link room sources. This source is placed in the link room and through the source you can receive sound and pictures from connected main room sources. Only Bang & Olufsen audio systems with Master Link support integration with the TV. 11 Beo4 operation … TV Select audio speaker zone … LIST Select video source CD Select TV speaker zone TV 2 Select video source 2 Select audio source Select AV* LIST CD Select audio source Select AV* Operate source as usual Select source Operate source as usual Operate source as usual Select source Operate source as usual RADIO RADIO Select source TV TV Select source Link TV Press Select source TV AV Switch on TV 1 Press LIST Operate source as usual Select 2 LINK* DTV Select main room source *Sound Usually sound distributed from a main room video source, such as a set-top box, to the link room is transmitted in mono. However, you can select stereo sound. Changes in link If you move your link room products to other rooms, remember to get room setup your Beo5 remote control reconfigured by your Bang & Olufsen retailer. TV TV Select source Operate source as usual LIST DTV 2 Switch on TV Select AV* 2 Select main room source *NOTE! In order to display AV and LINK on Beo4, you must first add it to the Beo4 list of functions. See the Guide enclosed with your Beo4. Connect and set up an audio system 12 To obtain the benefits of an integrated audio/video system, connect a compatible Bang & Olufsen audio system to the TV using a Master Link cable. 1. Connect the audio system Connect the available sockets marked MASTER LINK on the TV and the audio system using a Master Link cable. MASTER LINK 2. Set option for TV Option pgm and If your TV has been set up in an audio/video system, set it to the correct option. Switch the entire system to standby first and place yourself in front of the TV. Hold Press and Hold 3. Set option for audio system Set the audio system to the correct option. Switch the entire system to standby first and place yourself in front of the audio system. LIST Press Press and Hold LIST Select OPTION? and accept Option pgm and Hold Press LIST Press Press LIST Select OPTION? and accept … Select zone in which TV is placed LIST 0–9 Select V.OPT Select Option … Select zone in which audio system is placed LIST Select A.OPT 0–9 Select Option Useful hints TV and audio speakers Choice of options Play a CD on your audio system using speakers connected to the TV, or switch on a TV programme and send the sound to your audio system speakers. If you have a Beo4 remote control, options for the TV can be 1, 2, or 4 in a main room and 5 or 6 in a link room. Options for the audio system can be 0, 1, 2, 5, 6. See also p. 15. 13 Your audio/video system can be placed together in one room, or in two rooms with the TV in one and the audio system with a set of speakers in another. Select options To set the correct options with the Beo5 remote control, you must select the zone in which your product is placed, see p. 12. To set the correct options with the Beo4 remote control, you can get an overview of options on this page. Option 2 Option 0 Option 1 Option 1 Option 2 Option 2 Options For information about Option 4, 5 and 6, see pp. 15–16. The TV and audio system are set up in one room with all speakers connected to the TV. Set the TV to Option 2 and the audio system to Option 0. The TV with or without additional speakers and an audio system with a connected set of speakers are set up in one room. Set the TV to Option 1 and the audio system to Option 1. The audio system is set up in one room and the TV with or without additional speakers in another. Set the TV to Option 2 and the audio system to Option 2. NOTE! Not all Bang & Olufsen audio systems support integration with the TV. Connect and set up a BeoLink system 14 Connect and set up a BeoLink system to see pictures and hear sound in link rooms. You can, for example, connect the living room TV to another video system or to a set of speakers in another room. Make link connections To distribute video signals to link rooms, it is necessary to connect an RF Link Amplifier to 1 the main room TV and a link room TV.* TV LINK TV MASTER LINK Connect the Master Link cable to the available socket marked MASTER LINK on the TV. To distribute video signals to link rooms, connect an ordinary aerial cable to the socket marked LINK TV on the main connection panel. Then run the aerial cable to the RF Link Amplifier and the Master Link cable to the link room. Follow the instructions enclosed with the link room equipment. RF Link Amplifier Switch on the system modulator If you have an audio setup, such as a BeoLink Active/Passive, and you set up a non-linkable TV in the same room, you must set the system modulator to ‘ON’. The factory setting is ‘AUTO’, which must be used if you are using a linkable Bang & Olufsen TV. Change the link frequency If, e.g., a TV channel in your area is broadcasted on the same frequency as the factory setting for the BeoLink system; 599 MHz, you must tune the system modulator to 2 an unoccupied frequency.* Select ‘OPTIONS’ in ‘TV SETUP’ menu Select ‘LINK’ in ‘CONNECTIONS‘ menu Select ‘MODULATOR’ Select ‘OPTIONS’ in ‘TV SETUP’ menu Select ‘LINK’ in ‘CONNECTIONS‘ menu Select ‘FREQUENCY’ Reveal ‘ON’ Accept Find unused Accept frequency Useful hints 1 *Connected If an audio system is already connected to the MASTER LINK socket and equipment you wish to connect more equipment, the Master Link cable must be split in two and joined with the cable from the link room using a special junction box. Contact your Bang & Olufsen retailer for assistance. 2 *Link frequency When you change the link frequency in the main room TV, make sure that the link frequency in the link room corresponds to it. NOTE! Only sources with an analogue signal can be distributed from a main room TV to the link room system. Your television in a link room 15 If you have a BeoLink system, operate all connected systems through the TV in a link room. Connect link room TV Follow the procedure described here when you connect your TV for use in a link room. 1 Connect the link room TV to the mains supply. 2 Using your remote control, programme the link room TV to the correct option. 3 Disconnect the link room TV from the mains. 4 Make the necessary connections. 5 Reconnect the link room TV to the mains supply. For your entire system to function properly, it is essential that the TV in the link room is set to the correct option before you connect it to the system in the main room. Place yourself in front of the link room TV. Option pgm and Set option for a link room TV Hold Press and Hold Timer programming Programme a Play Timer on the TV in the main room. LIST Press Press LIST Select OPTION? and accept 3 … Select zone in which TV is placed LIST 6 Select V.OPT Select 3 Option 6* *NOTE! If you have a Beo4 and you connect the TV for use in a link room where other link systems are already connected, such as speakers, you must set the TV to Option 5 instead. Two televisions in the same room 16 If you have two TVs in the same room and one remote control for both TVs, it is essential that the TVs are set to the correct options, for them to function properly. Set the correct option Hold If you place your TV in a room where you already have a Bang & Olufsen TV and commands from your remote control can be received by both TVs, you must change the option of the secondary TV to prevent simultaneous activation of both TVs. Place yourself in front of the secondary TV. Press and Hold Beo5 – operate the TVs Normally you can activate a source simply by pressing the relevant source button, but if you have two TVs in the same room, you must remember first to select the zone of the TV you wish to use, if you have a Beo5. Option pgm and LIST Press BeoVision 9 Zone ‘A’ Press LIST Select OPTION? and accept … Select zone in which desired TV is placed … Select zone in which TV 1 is placed* LIST 4 Select V.OPT Select Option 4 TV Select source Zone ‘A’ TV BeoVision 9 Zone ‘B’ Zone ‘B’ TV Useful hints Teletext with Option 4 In order to use teletext on a TV set to Option 4, you must set up Beo4 to VIDEO 3. This limits the Beo4 functions that can be used with TVs set to other options. For more information, see the Guide enclosed with your Beo4. 17 Beo4 – operate TV in option 4 Normally you can activate a source simply by pressing the relevant source button, but if your TV is set to Option 4, you must do the following to activate a source, if you have a Beo4. However, if you wish to dedicate a remote control to your secondary TV, contact your Bang & Olufsen retailer. BeoVision 9 Option 4 LIST Select LINK TV Select source LIST LINK TV TV LINK on Beo4 In order to display LINK on Beo4, you must first add it to the Beo4 list of functions. See the Guide enclosed with your Beo4 for more information. 1 *NOTE! For information about choice of zone, contact your Bang & Olufsen retailer. 18 Surround sound and Home cinema 21 Sound type 22 Wake-up Timer 23 Play Timer 24 Edit and add TV channels 25 Adjust picture and sound settings 26 Calibrate colour accuracy of the screen 27 The pincode system 28 Tuner setup 30 Operate other equipment with Beo5 or Beo4 Advanced use 20 19 Surround sound and Home cinema • Sound type • Wake-up Timer • Play Timer • Edit and add TV channels … Contents – Advanced use Surround sound and Home cinema 20 When you add Bang & Olufsen loudspeakers and a projector, you can turn your TV into a Home cinema system with surround sound. You can also select a picture format to customise the viewing experience. Select speakers for movie sound The TV automatically selects the optimal sound, when you select a source, but you can select an available speaker combination that suits the source you are using yourself. Bring up Scene 1 display on Beo5* Mode 1 Select picture format The TV automatically adapts the picture to fill out as much of the screen as possible, when you select a source, but you can select a format yourself. Bring up Scene 1 display on Beo5* Standard For panoramic view or 4:3 Switch to Home cinema Move the picture from a connected TV screen onto a connected projector screen. Bring up Scene 1 display on Beo5* Select Speaker display Mode 2 2 Select speaker combination* Mode 3 Select Picture display Mode 4 2 Select format* Zoom The picture is adjusted vertically Select Cinema display Mode 5 Adjust picture up or down Wide For genuine 16:9 widescreen pictures Select Cinema to switch between Home cinema and TV mode Useful hints 1 *Scene menu Display FORMAT for picture formats and Home cinema and SPEAKER for speaker combinations on Beo4. 2 *Optimise and The speaker combination or the picture format is optimised if you press Variation Optimise on Beo5. On Beo4 press GO. With each press on Variation on Beo5, you select a variation of Standard. On Beo4 use or . Switch mode To switch between Home cinema and TV mode on Beo4, press LIST until FORMAT is displayed then press 0. NOTE! If you have added only two front speakers to the TV, you will only be able to choose Mode 1–3. You can add up to two BeoLab sub woofers to your TV. Sound type 21 While you watch TV, switch between available sound types. Change sound type or language Switch between available sound types and languages. Sound type or language Sound Bring up sound type Sound Press repeatedly to select Store your favourite sound type when tuning in TV channels. See p. 24. Wake-up Timer 22 You can make the TV switch on automatically via the Wake-up Timer. A Wake-up Timer is a once only Timer which lasts for one hour and is disabled once it has been executed. Enter a Wake-up Timer Choose the source, channel number and start time. Check or delete a Wake-up Timer Check or delete the settings of a Wake-up Timer. Bring up ‘TV SETUP’ menu Select ‘PLAY TIMER’ menu Select ‘WAKE-UP TIMER’ menu Enter and accept settings Bring up ‘TV SETUP’ menu Select ‘PLAY TIMER’ menu Select ‘WAKE-UP TIMER’ menu Change and accept settings PLAY TIMER WAKE UP TIMER SOURCE TV CHANNEL START TIME ON / OFF TIMER ON / OFF OFF PLAY TIMER INDEX CHANNEL GROUP 21 BBC 07:00 PLAY TIMER PROGRAMMING WAKE UP TIMER 07:00 ON store store Useful hints Wake-up Timer A Wake-up Timer applies only to the TV it has been programmed on. Make sure that the clock is set to the correct time for the Wake-up Timer to be executed correctly. NOTE! The TV cannot be part of an ordinary Play Timer or standby Timer until the Wake-up Timer has been carried out or disabled. Play Timer 23 You can make your TV switch on and off automatically by setting a Play Timer or a standby Timer in your main room system. Timed play and timed standby Preset your TV to start and stop automatically at the same time and day every week. Bring up ‘TV SETUP’ menu and select ‘PLAY TIMER’ menu Select ‘PLAY TIMER PROGRAMMING’ menu The source names corresponds to what the sources are registered as in the ‘CONNECTIONS’ menu Switch on the Play Timer To include the TV in the Play Timer, set the Timer to ‘ON’. View, edit or delete a Timer View, edit or delete a Timer from the list of settings you have entered. Select source Enter and accept settings TV DTV DTV2 (V.AUX) V.MEM DVD/DVD2 V.AUX2 CD N.MUSIC N.RADIO A.MEM RADIO DTV RADIO STANDBY Bring up ‘TV SETUP’ menu Select ‘PLAY TIMER’ menu Select ‘TIMER ON/ OFF’ menu Select ‘ON’ and accept Bring up ‘TV SETUP’ menu Select ‘PLAY TIMER INDEX‘ in ‘PLAY TIMER’ menu Select Timer Edit settings or delete Timer Play Timer Enter up to six Play Timers. Make sure that the clock is set to the correct time for the Timers to be executed correctly, see p. 48. The TV cannot be part of an ordinary Play Timer or standby Timer until the Wake-up Timer has been carried out or disabled. NOTE! Link room systems can perform the timed play or timed standby functions as well. However, you must programme Timers on your main room system and activate them on your link room system. Edit and add TV channels 24 Rearrange the order in which the channels appear and provide them with a name of your own choice. You can also delete a channel or add new channels, if available. Preset up to 99 TV channels on channel numbers of their own. Move a channel You can move TV channels to the desired channel numbers. Name a channel Name the TV channels for easy recognition. Delete a channel Delete channels you do not want. Adjust tuned channels Fine tune channel reception, indicate the presence of coded channels and choose sound types, etc. Re-tune via automatic tuning Re-tune all TV channels automatically. Note that all channel settings you have made will disappear. Add new channels Add channels which, e.g. have been moved by the broadcaster. Tune in channels via the ‘ADD CHANNELS’ menu, to leave previously tuned channels unchanged and keep channel names, order, and settings stored for those channels. Bring up ‘TV SETUP’ menu Select ‘EDIT CHANNELS‘ in ‘TUNING’ menu Select channel Bring up ‘TV SETUP’ menu Select ‘EDIT CHANNELS‘ in ‘TUNING’ menu Select channel Bring up ‘TV SETUP’ menu Select ‘EDIT CHANNELS‘ in ‘TUNING’ menu Select channel Bring up ‘TV SETUP’ menu Select ‘MANUAL TUNING‘ in ‘TUNING’ menu Select item Follow on-screen instructions Bring up ‘TV SETUP’ menu Select ‘TUNING’ menu Select ‘AUTO TUNING’ menu Start auto tuning Bring up ‘TV SETUP’ menu Select ‘TUNING’ menu Select ‘ADD CHANNELS’ menu Start adding channels Press Follow on-screen instructions Enter and accept settings Move Press twice to delete Useful hints ‘MANUAL TUNING’ The ‘EXTRA’ menu in the ‘MANUAL TUNING’ menu gives you access to the menu items ‘FINE TUNE’, ‘(DECODER)’, ‘(TV SYSTEM)’ and ‘SOUND’. ‘TV SYSTEM’ If the item ‘TV SYSTEM’ appears, make sure that the correct broadcast system is displayed before you begin tuning; ‘B/G’ (PAL/SECAM BG), ‘I’ (PAL I), ‘L’ (SECAM L), ‘M’ (NTSC M) and ‘D/K’ (PAL/SECAM D/K). For more information, contact your retailer. NOTE! If channels are broadcasted with two languages and you want both languages, you can store the channel twice, once with each language. Adjust picture and sound settings 25 Picture and sound settings are preset from the factory to neutral values which suit most viewing and listening situations. However, if you wish, you can adjust these settings to your liking. Adjust picture Adjust brightness, colour and contrast. For information on picture format, see p. 20. Adjustments made to the ‘TINT’ setting only apply to the current channel. Mute the picture Remove the picture from the screen temporarily. Adjust sound Preset volume, bass, treble or loudness, up to two connected BeoLab subwoofers and two default loudspeaker combinations. The contents of the ‘SOUND’ menu varies according to what you have connected to the TV. See also p. 20 about speaker combinations. Bring up ‘TV SETUP’ menu Select ‘OPTIONS’ menu Bring up Scene display on Beo5 Select Picture Bring up ‘TV SETUP’ menu Select ‘SOUND’ in ‘OPTIONS’ menu Select ‘PICTURE’ menu Enter and accept settings Select PictureMute to mute/restore Select ‘ADJUSTMENT’ menu Enter and accept settings PICTURE SOUND ADJUSTMENT VOLUME ............... BRIGHTNESS ............... BASS ............... CONTRAST ............... TREBLE ............... COLOUR ............... SUBWOOFER ............... TINT ............... ON SIZE ............... ............... LOUDNESS DEFAULT VIDEO SPEAKER3 HOR. SIZE DEFAULT AUDIO SPEAKER2 VERT. SIZE ............... HOR. POSITION ............... VERT. POSITION ............... store Temporary settings To only store picture and sound settings until you switch off the TV, press and hold BACK instead of the centre button when you accept the settings. ‘DEFAULT VIDEO’ The speaker combination chosen in the ‘DEFAULT VIDEO’ submenu is activated automatically when you switch on a video source in the TV. ‘DEFAULT AUDIO‘ The speaker combination chosen in the ‘DEFAULT AUDIO’ submenu is activated automatically when you switch on an audio source in the TV. NTSC signal only 1080p/i or 720p signal only VGA signal only select NOTE! Do not allow still pictures, such as logos, video games, computer images, and images displayed in 4:3 format, to be displayed on the screen for an extended period of time. This can cause a permanent after-image to remain on the screen. 26 Calibrate colour accuracy of the screen Automatic Colour Management ensures perfect colours on the screen continuosly. During calibration, a sensor arm swings down from the TV frame and an on-screen bar changes between various greyscale colours. Automatic calibration Approximately for every 100 hours of use, the TV will initiate a calibration automatically, when you press the standby button. Manual calibration The TV must be switched on for more than two minutes and be in TV mode for the ‘AUTO COLOUR MANAGEMENT’ menu to be available. After manual calibration We recommend that you let the TV perform calibration automatically, instead of manually. Bring up ‘TV SETUP’ menu Select ‘OPTIONS’ menu Sensor arm retracts and TV returns to last chosen source Activate ‘AUTO COLOUR MANAGEMENT‘ Calibration process 1 begins* ‘CALIBRATION COMPLETE’ shortly appears on screen Useful hints 1 *Manual calibration All text is removed from the screen, the sensor arm swings down and the calibration starts. Calibration failed If the sensor arm does not swing down fully, the calibration is not performed and the arm is retracted if needed. If the calibration was initiated automatically, the TV will attempt to execute the calibration the next time it is switched off. NOTE! Never switch off your system or disconnect it from the mains during calibration. The pincode system 27 The pincode system prevents people who do not know the pincode from using the TV. When the pincode system is activated and the TV has been disconnected from the mains for 15–30 minutes, the system goes into effect. Activate the pincode system Enter a four digit pincode to activate the system. Change the pincode 1 Change the pincode you have chosen.* Delete the pincode Delete the pincode you have chosen. Enter the pincode If you cannot switch on the TV after disconnection from the mains, wait 30 seconds and try again. Bring up ‘TV SETUP’ menu Bring up ‘TV SETUP’ menu Bring up ‘TV SETUP’ menu Enter pincode If you forget the pincode Contact your Bang & Olufsen retailer to receive a five digit mastercode. 1 Hold when prompted for pincode2 to display five fields* STOP Press twice Press Press twice Press Press twice Press STOP STOP Enter a four digit code and accept Re-enter the code and accept Enter pincode, accept and select ‘NEW PINCODE‘ Enter new code, accept, re-enter code and accept Enter pincode and accept Select ‘DELETE PINCODE’ and accept Accept Enter five digit mastercode *Change of pincode If you change your pincode more than five times within a three-hour period, the ‘PINCODE’ menu becomes inaccessible for three hours, assuming that the TV is not disconnected from the mains. Incorrect pincode Five incorrect entries will cause the TV to shut down for three hours, during which operation is not possible. Disconnecting the TV resets the three-hour period. Accept to delete pincode, you can now activate pincode system again NOTE! If you are prompted for a pincode the first time you switch on your TV, contact your Bang & Olufsen retailer. To cancel a pincode entry and clear the input fields, press BACK. On Beo4, press STOP. 2 *On Beo4 hold to bring up the five fields. Tuner setup 28 Disable the TV or DVB tuner, if your TV or DVB source is a peripheral unit, such as a set-top box. Disable the internal tuner If you disable the TV tuner, you can activate a connected peripheral unit with the TV button. If you disable the DVB tuner, you can activate a connected peripheral unit with the DTV button. Bring up ‘TV SETUP’ menu Select ‘TUNER SETUP‘ in ‘OPTIONS’ menu Disable/enable ‘TV TUNER’ Disable/enable ‘DVB‘ and accept Useful hints Disable TV/DVB If you disable both the TV tuner and the DVB tuner, you can activate a tuner peripheral unit acting as tuner with either the TV button or the DTV button. ‘TUNING’ menu The ‘TUNING’ menu is only available if the TV tuner is enabled. See p. 50. NOTE! If you have connected a Bang & Olufsen hard disc recorder to your TV, it is recommended not to disable the TV tuner. 29 Operate other equipment with Beo5 or Beo4 30 The built-in Peripheral Unit Controller acts as an interpreter between connected video equipment, such as a set-top box, recorder or DVD player, and your Bang & Olufsen remote control. Beo5 operation The main functions of your equipment can be operated with the Bang & Olufsen remote control. Not all functions may be supported. 1 Show menu overlay* If you have a Beo4, the menu overlay gives you quick access to selected functions. Direct Beo4 operation Activate a function without the menu overlay. The connected equipment must be switched on. Select source Select function Select connected equipment Bring up menu overlay Press coloured button to activate function Select channel Menu or Select function or Hold for Programme Guide PROGRAM GUIDE RADIO/TV MODE MENU INFORMATION PROGRAM GROUPS 1 SUBTITLE LANGUAGE 2 AUDIO LANGUAGE 3 SETUP 4 PROGRAM LIST 5 Useful hints 1 *Menu overlay The menu overlay shows the options you have with a selected source. You can only bring up the menu overlay on the TV screen with a Beo4. With a Beo5 you have access to the corresponding functions via the Beo5 display. You cannot bring up the overlay in link rooms. Instead, press a desired coloured button or GO followed by a number. NOTE! Which source button activates your peripheral unit depends on the tuner setup and settings in the ‘CONNECTIONS’ menu. See pp. 28 and 37. 31 Use the Bang & Olufsen remote control to gain access to the functions offered by your non-Bang & Olufsen equipment. Use equipment menus Operate a connected equipment’s own menu via the remote control. On Beo4 you may have to press EXIT instead of STOP to return to a previous menu. Video recorder/DVD player Switch on equipment, start and stop playback, and search back and forth. Record here and now Make an immediate recording of a programme from any source/channel. Watch what you are recording, select another source, or switch the TV to standby – the recording continues. To ensure a successful recording, make sure that the video recorder is set to the correct input. If you attempt to switch to another TV source while recording, ‘RECORD’ appears on the screen. Record from video recorder tuner Channels you wish to record must be stored in the video recorder tuner, as well as in the TV’s tuner. The recording is controlled by the video recorder. To ensure that recording takes place, remember to set the input selector correctly on the video recorder. For more information about recording, see the video recorder’s own guide. 2 Bring up equipment menu Switch on equipment Record Press twice Select video recorder + or Navigate in Select function menus STOP Backwards/ forwards Record Press twice *Beo4 On Beo4 you have to press GO before the arrow buttons. Switch on or off On some connected equipment you have to press GO then 0 to switch the equipment on and off if you have a Beo4. Record on a second To make a recording on a second video recorder connected to the AV2 recorder socket area, press Record2 on Beo5. To stop the recording, press Record2 then STOP twice. 0–9 Enter information PLAY Once to pause Twice to stop Select source Step in pages/2 channel lists* Resume playback Select video recorder You can switch to standby/ return to recording STOP Press twice to stop recording STOP Press twice to stop recording NOTE! See also the guide enclosed with the connected equipment. For further information about supported equipment, contact your Bang & Olufsen retailer. 32 Set up your television 36 Expand your setup 38 Set up additional equipment 40 Connection panels 42 Sockets for temporary connections 4 4 First-time setup of your television 46 Loudspeaker setup 48 Additional settings 50 On-screen menus 50 Cleaning Installation – Setup 34 33 Set up your television • Expand your setup • Set up additional equipment • Connection panels • Sockets for temporary connections … Contents – Installation Set up your television 34 Follow the guidelines for placement and connection described on this and the following pages. Run cables When you connect external equipment to the system, we recommend that you connect equipment to the sockets at the far ends of the socket panel first, and work your way in towards the middle of the socket panel. This allows you access to the necessary sockets throughout the connection procedure. 1 Mount the left and right cable bracket on the system as shown. 2 Open the cable brackets, make the necessary connections, run the cables down through the brackets, and close the brackets. 3 When connections are complete, attach the cable cover by sliding the cable cover down over the cable brackets. The tabs (A) should fit the gaps in the cable cover. 4 Press the cable cover down lightly until it clicks into place. To remove the cable cover, press the tabs (A) inward with your thumbs while lifting the cable cover with your fingers. 1 2 3 4 click A click A Important Ventilation To ensure proper ventilation, allow for at least 5 cm (2") of space on each side of the TV and 10 cm (4") above it. Do not cover the ventilation holes on the rear. At overheating a warning will appear on the screen, switch the TV to standby, not off, in order for the TV to cool down. You cannot operate the TV during this time. 35 IR-receiver The IR-receiver receives signals from your remote control and sends them to the system, which then sends control signals to the plasma screen or other connected equipment. Place the IR-receiver on the same wall as the screen. If the IR-receiver is placed incorrectly, the light emitted by the screen can impede remote control operation of your TV. When you have mounted the IR-receiver as shown on this page, connect it to the 9-pin IR IN socket on your system. If you have both a plasma screen and a projector, and the projector screen covers the IR-receiver when in use, you must mount a second IR-receiver and connect it to the second IR-IN socket on your system. B White Blue Green Yellow Black Brown Grey Red C B D B B A D D C C NOTE! Do not allow still pictures, such as logos, video games, computer images, and images displayed in 4:3 format, to be displayed on the screen for an extended period of time. This can cause a permanent after-image to remain on the screen. Expand your setup 36 Your TV supports a wide range of additional equipment. You can even connect a projector or a home automation system to control room lights and curtains. Connect video recorders only to AV1 or AV2. Disconnect from the mains While expanding your setup, the TV must be disconnected from the mains. Connect additional equipment To operate non-Bang & Olufsen products with Beo5, attach a Bang & Olufsen IR-transmitter to each product. See also pp. 38-39. Switch on the TV Always attach covers before you connect the TV to the mains. Switch off TV Disconnect TV from mains Select corresponding socket marked CTRL Make the connections Attach all covers Connect TV to mains supply Switch on TV Information ‘AUTO SELECTION’ ‘TIMER RECORDER’ Automatic selection of connected sources, when the TV is on and detects a signal. Activate the Timer recording option for a connected recorder. Only available in the ‘AV1’ and ‘AV2’ menus, and can only be activated in one of these menus at any time. ‘HDMI’ Equipment connected via an HDMI IN socket. If you have set the ‘HDMI EXPANDER’ in the ‘CONNECTIONS’ menu to ‘YES’, the ‘HDMI-C’ option in the ‘AV’ menus is replaced with ‘HDMI-C1’, ‘HDMI-C2’, ‘HDMI-C3’, and ‘HDMI-C4’. 37 Register additional equipment Register the equipment you have connected to the TV, if it is not detected automatically by the TV. Repeat the procedure for each socket group. Bring up ‘TV SETUP’ menu Contents of the ‘CONNECTIONS’ menu Select ‘CONNECTIONS’ in ‘OPTIONS’ menu AV1–AV6 DISPLAY 1–2 HDMI EXPANDER LINK Source options in the ‘AV1–AV6’ menus NONE V.MEM DVD/DVD2 DTV2 (V.AUX) DTV V.AUX2 TV PC CENTRE Select sockets in a socket group and register Select ‘STANDBY OPTIONS’ menu Follow on-screen instructions Register connected equipment Register a connected screen and/or projector Enable or disable an HDMI Expander connected to the HDMI C socket Set a link frequency and enable the system modulator Nothing connected Connected video recorder Connected DVD player or recorder Equipment, such as a set-top box Equipment, such as a set-top box Equipment, such as a video game console Connected TV tuner Connected PC For connection of a source centre, which may contain up to six built-in sources (only in either the ’AV1’ or ‘AV2’ menu) The above are only examples of registrations, you can register available equipment to any source option. You may also have to register additional equipment in the Master Link system. ‘(VGA)’ ‘(Y – Pb – Pr)’ ‘STANDBY OPTIONS’ Equipment connected via VGA socket (AV5 or AV6). Equipment connected via Y – Pb – Pr socket (AV2 or AV3). Set the set-top box to switch off when you switch source or when you switch off the TV. You can also choose that the set-top box should always be switched on or that it should be switched on and off manually by means of the remote control. Set up additional equipment 38 Set up the TV with video sources and loudspeakers. Video signals IR IN (9-pin) MONITOR DISPLAY 1 Connect your video signals, such as a cable, antenna, or satellite to the sockets shown on the diagram to the right. Loudspeakers POWER LINK Use Bang & Olufsen Power Link speakers. Use the cables enclosed with the speakers. Longer cables are available from your Bang & Olufsen retailer. CENTRE 1 ANT 1 BEOSYSTEM 3 DVB-T/C POWER LINK 1 SUB ANT 3 POWER LINK 2–6 Additional video equipment Video Recorder [V MEM] AV 1 ANT 3 Digital TV [DTV] AV 2 DVD [DVD] AV 3 BeoMaster [PC] VGA MASTER LINK AV 5 Camera [CAMERA] AV 6 BEOSYSTEM 3 Connect many different types of video equipment at the same time. Here you can also see examples of source names you can select for the equipment in the ‘CONNECTIONS’ menu. IR-transmitters: To operate non-Bang & Olufsen products with a Bang & Olufsen remote control, attach a Bang & Olufsen IR-transmitter to each of the products. Connect each transmitter to the corresponding socket marked CTRL on the connection panel. Mount the transmitters on the products. If you would like to use the remote control delivered with the product, do not cover the product’s own IR-receiver completely. Useful hints Equipment with HDMI output Equipment with HDMI output can be connected to any available HDMI sockets, regardless of the particular AV socket group to which you have connected the equipment. For more information about how to set up connected equipment for use, see p. 37. 39 Expand your setup, for example in a home cinema system with a projector and a home automation system. Home cinema setup Use a plasma screen and/or a projector or connect a home automation system to the TV, so you can control room lights and curtains. If you only connect a screen or a projector, connect it to the DISPLAY 1 socket, otherwise connect the screen to the DISPLAY 1 socket and the projector to the DISPLAY 2 socket. You cannot connect two screens or two projectors at the same time. IR IN (9-pin) MONITOR DISPLAY 1 IR-IN IR 1+2 DISPLAY 2 Home Automation system BEOSYSTEM 3 Mains cord and plug CINEMA The supplied mains cord and plug are specially designed for the TV. If you change the plug or in any way damage the mains cord, it can affect the TV performance. Connect the ~ socket on the connection panel of your TV to the wall outlet. The IR-receiver lights up in red and the TV is in standby mode and ready to be used. Connection panels 40 Any equipment you connect to the main connection panel must be registered in the ‘CONNECTIONS’ menu. See p. 37. VIDEO IN L IN R IN SPDIF CTRL S VIDEO VIDEO IN L IN AV 5 CTRL SPDIF CTRL SPDIF Y R IN SPDIF PCMCIA CTRL AV 6 Pb Pr CTRL SPDIF Y SMARTCARD VGA Pb Pr VIDEO IN L IN SPDIF CTRL R IN CONTROL S VIDEO AV 1 AV 3 AV 2 DISPLAY 2 DISPLAY 1 A B LINK TV 1 AV 4 C D MASTER LINK HDMI IN ANT PCMCIA SMARTCARD IR IN 2 3 DVI-D OUT TTL DTV DATA CENTRE 1 1(SUB) MONITOR 2 CINEMA 3 POWER LINK IR IN RS232 IR 1+2 4 5 6 The CA module has one protruding edge on one side and two on the other side. The side with two edges should face right. When you insert a card, the gold chip should face upwards. Useful hints HDMI source You can watch two HDMI sources at the same time if one of the sources is connected to the HDMI A or HDMI B socket, and the other source is connected to the HDMI C or HDMI D socket. 41 “Greyed out” sockets on the illustration of the main connection panel may be occupied by internal connections. Do not disconnect the cables from these sockets! AV1 Socket group for AV connection of a primary video recorder, a set-top box, or other types of additional video equipment. AV2 Socket group for AV connection of a secondary video recorder or additional video equipment. AV3 Socket group for AV connection of additional video equipment. The TV keeps a signal path open between a recorder connected to the AV1 socket area and a recordable source connected to the AV3 socket area. This allows you to set the source on AV3 to switch on automatically, as well as set a recorder on AV1 for timed recording of the source on AV3, provided your connected equipment supports these functions. Y – Pb – Pr (AV2–AV3) For video signals from an external source, e.g. HDTV source. You can use the socket in conjunction with an AV socket or a digital audio socket. SPDIF (AV1–AV6) Digital audio input socket, e.g. DVD player. S VIDEO (AV4, AV6) For S-VHS or Hi-8 Camcorders. DISPLAY 1 – 2 (DVI-D OUT) Connect a plasma screen and/or a projector. If you only connect a screen or a projector, connect it to DISPLAY 1, otherwise connect the screen to DISPLAY 1 and the projector to DISPLAY 2. You cannot connect two screens or two projectors at the same time. AV4 Socket group for AV connection of additional video equipment. HDMI IN (A–D) For High Definition Multimedia Interface video source or PC. The sources can be registered to any of the AV socket groups. Connect an HDMI Expander to the HDMI C socket. AV5 Use this socket group for equipment which you do not wish to have permanently connected, e.g. a camera or a camcorder. You can also connect a BeoMaster to AV5. ANT (1–3) Aerial input socket DVB T/C (1) from external aerial/cable TV network, DVB-S (2) from satellite dish, external aerial/cable TV network (3) from external aerial/analogue cable TV network. AV6 Use this socket group for equipment which you do not wish to have permanently connected, e.g. a camera or a camcorder. LINK TV Aerial output for distribution of video signals to other rooms. CTRL (AV1–AV6) For IR control signals to external equipment connected to an AV socket. L-IN, R-IN (AV4–AV6) Right and left line input. CENTRE 1 For a centre speaker, such as BeoLab 7. See also the Guide enclosed with the speaker. IR IN (9-pin) For a BeoLink IR-receiver enabling remote control operation. MONITOR For a plasma screen. CINEMA For a Home Automation System. TTL/RS232 Only for use in Hotel setups. IR IN For a BeoLink IR-receiver enabling remote control operation. IR 1+2 For an external IR-transmitter used with Home cinema setups. ~ – Mains supply Connection to the mains supply. PCMCIA/SMARTCARD For a card/module for access to digital satellite channels. USB For service use only. DTV DATA For future use. MASTER LINK For a compatible Bang & Olufsen audio system. The socket is also used for BeoLink distribution of sound/picture throughout the house or for connection of a BeoMaster. VIDEO IN (AV4) For video signal. POWER LINK 1 (SUB) Use a cable splitter to connect two Bang & Olufsen subwoofers. POWER LINK 1–6 For external speakers in a surround sound setup. See also pp. 46–47. NOTE! Video recorders can only be connected to the AV1 and AV2 socket groups, as these are the only sockets groups for video output. Connect the primary recorder to AV1 and the secondary recorder to AV2. Sockets for temporary connections 42 Connect headphones and listen to a TV programme, connect a camera or PC and see the pictures on the screen, or connect a Camcorder and watch or record your home movies. Make temporary connections To always activate these sockets, register the connected equipment in the ‘CONNECTIONS’ menu. VIDEO IN L IN R IN SPDIF CTRL S VIDEO VIDEO IN L IN AV 5 CTRL SPDIF CTRL SPDIF Y Pb Pr CTRL SPDIF Y AV 3 AV 2 DISPLAY 1 SPDIF PCMC CTRL DISPLAY 2 A B DVI-D OUT SMARTCAR VGA Pb B AV 1 R IN AV 6 Pr VIDEO IN L IN R IN L – R VIDEO 1 S VIDEO LINK TV DTV DATA For a camera or camcorder. For audio connection SPDIF sound CTRL – left and right channel – and a video signal. AV 4 C D MASTER LINK S-VIDEO For S-VHS or Hi-8 Camcorders. HDMI IN 2 3 ANT CENTRE 1 SPDIF Digital audio input socket. For access to the sockets for temporary connections, press the button (B) on the right side of the system and the door opens automatically. You can close the door manually. CTRL For IR control signals to external equipment. VGA For a High Definition video source or a PC. You can also use the socket for connection of a BeoMaster. Connect stereo headphones. Useful hints Headphones To mute speakers turn the volume wheel quickly counter-clockwise. Turn the volume wheel either way to adjust volume in headphones. To restore sound in speakers, turn the volume wheel quickly counterclockwise. IR IN 1(SUB) 43 Connect a computer to the TV Connect the cable to the VGA/HDMI socket on the TV. To hear sound in connected speakers connect the sound output on the computer to the R-L sockets on the TV. Disconnect the TV, the computer and all equipment connected to the computer from the mains. Make the connections and reconnect to the mains. VGA R–L Bring up computer picture Press the source button for the computer to bring up a picture on the TV. NOTE! A computer connected to the VGA socket must be registered to the AV5 or AV6 socket in the ‘CONNECTIONS’ menu. A computer connected to the HDMI socket can be registered to any of the AV sockets or socket groups. First-time setup of your television 44 This first-time setup procedure is activated when the TV is connected to the mains and switched on for the first time. If you want to change your setup at a later date, you can access the same menus and update your settings. Switch on the TV TV It takes the TV approx. 20 seconds to start up and become ready for use. Switch on Make settings You are led through the following settings only 1 when you switch on the TV for the first time.* Select setting MENU LANGUAGE TUNER SETUP CONNECTIONS AUTO TUNING Accept and go to next menu item Set the on-screen menu language Disable or enable internal TV tuner or DVB Register connected equipment, see p. 37 Tune in TV channels automatically, see also p. 24. Available only if the TV tuner is enabled, see p. 28 Information Menu language TV tuner Connections Auto tuning Select the language for on-screen menus. The ‘TUNING’ menu is only available if the TV tuner is enabled, see pp. 28 and 50. Select the type of equipment connected to each socket, the sockets used, the product name, and the source name. A menu for channel tuning automatically appears on the screen. 45 When first-time setup is complete, you can then set up your loudspeakers for Home cinema use. Calibrate the speakers Set up the speakers to optimise sound from your listening position. SPEAKER TYPES SPEAKER ROLES SPEAKER DISTANCE SPEAKER LEVEL First-time setup of loudspeakers applies only to speakers for TV viewing. After first-time setup, you can set up speakers for Home cinema viewing. See also ‘Loudspeaker setup’ on pp. 46–47 and ‘Surround sound and Home cinema’ on p. 20. SOUND ADJUSTMENT Adjust volume, bass, treble and loudness and preset two default speaker combinations. Select a different speaker combination at any time. See p. 25. Projector If you have connected a projector and not a screen, you must switch off the system after first-time setup and then switch it on again for your settings to take effect. 1 * NOTE! When you have made the preferred settings in a menu, you may have to press the green button to continue to the next menu in the first-time setup procedure. Follow on-screen instructions. 46 Loudspeaker setup Add Power Link speakers and up to two BeoLab subwoofers to your TV and you have a surround sound system. Select speaker setup Switch on the TV in TV or Home cinema mode before you adjust speaker settings for either mode. Set speaker type Register the type of each speaker in the menu. Each Bang & Olufsen speaker makes a sound and is highlighted on the screen. Set speaker role Select the function for each connected loudspeaker, such as front, back or surround. A speaker can have more than one role – one for TV viewing and one for Home cinema viewing. In TV mode the role ‘CENTRE1’ cannot be adjusted. Switch on TV and bring up ‘TV SETUP’ menu Select ‘SOUND’ in ‘OPTIONS’ menu Select menu Select ‘SPEAKER TYPES’ menu Select speaker1 and reveal speaker type* Accept Select ‘SPEAKER ROLES’ menu Reveal speaker role for each speaker Accept B A 1 C G 2 A: B: C: D: E: F: G: TV (1) Right front Left front Off Off Left back Right back Off Home cinema (2) Left front Left surround Left back Right back Right surround Right front Centre D E F Set speaker role. Information Sound during setup During the setup process, a sound is sometimes produced by a speaker. Check if the highlighted speaker matches the name of the speaker making the sound. Speaker roles You must select the surround speakers before you can select the back speakers. 1 *‘CONFIG’ Select a ‘CENTRE’ configuration as a single speaker or a pair. Depending on the selected centre speaker or speakers, ‘CONFIG’ may be inaccesible. NOTE! To make a Home cinema setup, you must first switch to Home cinema mode. For information about Home cinema, see p. 20. 47 If your setup includes two different viewing positions, a Home cinema setup and a regular TV viewing setup, you must make two different loudspeaker settings. Set speaker distance Enter the straight-line distances in metres between your favourite viewing position and the individual speakers. Calibrate the sound level A calibration sound is produced alternately in each speaker. Adjust the speakers to match the centre speaker’s sound level. See active sound system See the name of the active sound system for a source or programme on the screen. Select ‘SPEAKER DISTANCE’ menu Select speaker and select distance Select ‘SPEAKER LEVEL’ menu Select ‘AUTOMATIC’ or ‘MANUAL’ in ‘SEQUENCE’ If ‘MANUAL’ is selected, select speaker and adjust level Bring up ‘TV SETUP’ menu Select ‘SOUND’ in ‘OPTIONS’ menu Select ‘SOUND SYSTEM’ menu LEFT FRONT CENTRE LEFT SURROUND LEFT BACK Accept Accept RIGHT FRONT RIGHT SURROUND 1 2 RIGHT BACK Set speaker distance. Speaker level Calibrate each speaker in reference to the centre speaker to ensure an optimal surround sound. Calibrate sound level from two different viewing positions. NOTE! Once you have performed the speaker calibration, you will only need to re-calibrate the speaker sound if you make changes to the setup. 48 Additional settings You have the possibility to make additional settings, such as to set the correct time and date and to select a menu language. Time and date Set the time and date. Press Clock on Beo5 to bring up the clock on the display. It disappears again after 10 seconds. Menu language Select a language for on-screen menus. Bring up ‘TV SETUP‘ menu and select ‘OPTIONS’ menu Select ‘CLOCK’ menu Set time and date Bring up ‘TV SETUP‘ menu and select ‘OPTIONS’ menu Select ‘MENU LANGUAGE’ menu Set language Accept Accept CLOCK TIME 20:00 DATE MONTH YEAR SYNCHRONISE 23 APR 2009 NO store Information NOTE! The simplest way to set the clock is to synchronise it with the teletext service offered by the current TV channel via the ‘CLOCK’ menu. If a teletext service is not available, you can set the clock manually. 49 On-screen menus 50 General settings: Select your Zone, TV and Menu. 1. 2. 1 TUNING* 3. Make settings EDIT CHANNELS ADD CHANNELS AUTO TUNING MANUAL TUNING p.24 p.24 p.24 PLAY TIMER TIMER ON/OFF PLAY TIMER INDEX PLAY TIMER PROGRAMMING WAKE-UP TIMER p.23 p.23 p.23 p.22 OPTIONS MANUAL TUNING (EXTRA) p.24 CONNECTIONS AV1–AV6 DISPLAY 1–2 HDMI EXPANDER LINK p.37 p.37 p.37 p.37 TUNER SETUP TV TUNER* DVB 1 p.28 p.28 SOUND SOUND ADJUSTMENT SPEAKER TYPES SPEAKER ROLES SPEAKER DISTANCE SPEAKER LEVEL SOUND SYSTEM p.25 p.46 p.46 p.46 p.47 p.47 PICTURE CLOCK MENU LANGUAGE p.25 p.48 p.48 Cleaning Maintenance Regular maintenance, such as cleaning, is the responsibility of the user. Screen Use a soft, dry cloth to wipe dust off the screen. Do not use liquid cleaners or aerosol cleaners. Cabinet and Wipe dust off the surfaces using a dry, soft cloth. To remove stains or dirt, use controls a soft, damp cloth and a solution of water and mild detergent, such as washing-up liquid. Never alcohol Never use alcohol or other solvents to clean any parts of the TV. 1 *NOTE! The ‘TUNING’ menu is only available if the TV tuner is enabled in the ‘TUNER SETUP’ menu. 51 Waste Electrical and Electronic Equipment (WEEE) – Environmental protection Electrical and electronic equipment, parts and batteries marked with this symbol must not be disposed of with normal household wastage; all electrical and electronic equipment, parts and batteries must be collected and disposed of separately. When disposing of electrical and electronic equipment and batteries by use of the collection systems available in your country, you protect the environment, human health and contribute to the prudent and rational use of natural resources. Collecting electrical and electronic equipment, batteries and waste prevents the potential This product is in conformity with the provisions of the Directives 2004/108/ EC and 2006/95/EC. This product incorporates copyright protection technology that is protected by U.S. patents and other intellectual property rights. Use of this copyright protection technology must be authorized by Macrovision, and is intended for home and other limited viewing uses only unless otherwise authorized by Macrovision. Reverse engineering or disassembly is prohibited. HDMI, the HDMI logo and High-Definition Multi media Interface are trademarks or registered trademarks of HDMI Licensing LLC. contamination of nature with the hazardous substances which may be present in electrical and electronic products and equipment. Your Bang & Olufsen retailer will advise you of the correct way of disposal in your country. If a product is too small to be marked with the symbol, it will appear in the User Guide, on the Guarantee certificate, or on the packaging. Manufactured under license from Dolby Laboratories. Dolby, Pro Logic, and the double-D symbol are registered trademarks of Dolby Laboratories. Confidential unpublished works. Copyright 1992–2003 Dolby Laboratories. All rights reserved. Manufactured under license under U.S. Patent #’s: 5,451,942; 5,956,674; 5,974,380; 5,978,762; 6,487,535; 7,003,467; 7,212,872 & other U.S. and worldwide patents issued & pending. DTS, DTS Digital Surround, ES, and Neo:6 are registered trademarks and the DTS logos, and Symbol are trademarks of DTS, Inc. © 1996-2008 DTS, Inc. All Rights Reserved. 52