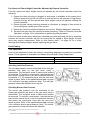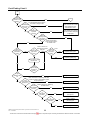
1
SERVICE INSTRUCTIONS
Gas Fireplace & Gas Log Fire
TM036
Revision: A
Published: January 08
LHEC30
RFSDV34
This document is stored and maintained electronically by
Service. All printed copies not bearing this statement in RED are deemed “uncontrolled”
Contents
Safety Warning .................................................................................................................... 3
Introduction .......................................................................................................................... 3
Model Identification .............................................................................................................. 3
Specifications....................................................................................................................... 4
Fluing ................................................................................................................................... 5
Wiring Diagrams .................................................................................................................. 6
Components and Their Function .......................................................................................... 7
Gas Valve Features ............................................................................................................. 8
Operation ............................................................................................................................. 9
Lighting Instructions ........................................................................................................... 12
Remote Controller Operation ............................................................................................. 12
Recognition Signal ......................................................................................................... 12
On (Manual) Mode ......................................................................................................... 13
Auto Mode ...................................................................................................................... 13
Off Mode ........................................................................................................................ 14
Other Functions .............................................................................................................. 14
Preventative Maintenance ................................................................................................. 15
Common Faults ................................................................................................................. 16
Fault Finding ...................................................................................................................... 17
Checking Inlet Gas Pressure .......................................................................................... 17
Checking Burner Gas Pressure ...................................................................................... 17
Adjusting the Pilot Flame................................................................................................ 18
Adjusting the Ignition Plug Gap ...................................................................................... 18
Gas Valve Safety Shutdown Test ................................................................................... 18
Fault Indication ............................................................................................................... 18
Error Code 3 ............................................................................................................... 19
Error Code 8 ............................................................................................................... 19
Fault Diagnosis Sequence (General Fault Finding Chart) .............................................. 20
Fault Finding Chart 1 ...................................................................................................... 21
Fault Finding Chart 2 ...................................................................................................... 22
Fault Finding Chart 2.1 & 2.2 ......................................................................................... 23
Fault Finding Chart 3 ...................................................................................................... 24
Fault Finding Chart 4 ...................................................................................................... 26
Fault Finding Chart 5 ...................................................................................................... 27
Fault Finding Chart 5.1 & 5.2 ......................................................................................... 28
Fault Finding Chart 6 ...................................................................................................... 29
Fault Finding Chart 6.1 & 6.2 ......................................................................................... 32
Fault Finding Chart 6.3 ................................................................................................... 33
Electrical Insulation Testing ............................................................................................ 33
Fault Finding Chart 7 ...................................................................................................... 34
Fault Finding Chart 8 ...................................................................................................... 35
Component Replacement Procedures – LHEC30 ............................................................. 35
Component Replacement Procedures – RFSDV34 ........................................................... 41
Exploded View 1 – LHEC30............................................................................................... 47
Exploded View 2 – RFSDV34 ............................................................................................ 49
Gas Type Conversions ...................................................................................................... 51
Warranty ............................................................................................................................ 52
Document Revision History................................................................................................ 53
TM036 Vermont Gas Fireplace & Gas Log Fire Service Instructions REV: A
D.O.I: 17/01/2008
This document is stored and maintained electronically by
2
Service. All printed copies not bearing this statement in RED are deemed “uncontrolled”
Safety Warning
The purpose of this service manual is to provide sufficient information to allow a person
with the skills as required by the Regulatory Authorities to carry out effective repairs to a
Vermont Gas Fireplace or Gas Log Fire in the minimum of time.
Safety precautions or areas where extra care should be observed when conducting tests
outlined in this service manual are indicated by print in bold italics and/or a warning
symbol. Take care to observe the recommended procedure.
Certain diagnostic procedures outlined in these Service Instructions require
“live” testing to be conducted. Personal Protective Clothing (PPE) shall be
worn and an RCD shall be installed between the power point and 3-pin cord
of the log fire to reduce the risk of electric shock.
If the supply cord is damaged, it must be replaced by the manufacturer or its
service agent or a similarly qualified person in order to avoid a hazard.
Introduction
The information provided in these instructions is based on the Gas Fireplace or Gas Log
Fire being installed in accordance with the Installation Instructions provided with each log
fire.
Should you require further technical advice on a Rheem Vermont Gas Fireplace or Gas
Log Fire, contact your nearest Rheem Service Department where genuine replacement
parts are also available.
Model Identification
The identification numbers are located on the log fire rating plate. LHEC30 rating plate is
located on slide out tray behind front lower access louvre. RFSDV32 rating plate is located
on inside face of right hand side panel.
Each log fire is supplied with a remote controller as standard.
NG
Propane
LHEC30RFN
LHEC30RFP
3 piece stainless steel surround, black top
& black bottom louvres
LHEC30RFN-3PSS
LHEC30RFP-3PSS
4 piece stainless steel surround, black top
& black bottom louvres
LHEC30RFN-4PSS
LHEC30RFP-4PSS
NG
Propane
RSFDV34RFN
RSFDV34RFP
LHEC30 Inbuilt Gas Fireplace
Black surround, top & bottom louvres
RFSDV34 Freestanding Gas Log Fire*
Black surround, top & bottom louvres
* Includes a draught diverter with integral „blocked flue safety switch‟ which must be
installed and wired by a licensed technician. Refer to „Wiring Diagrams‟ on page 6 for more
information.
TM036 Vermont Gas Fireplace & Gas Log Fire Service Instructions REV: A
D.O.I: 17/01/2008
This document is stored and maintained electronically by
3
Service. All printed copies not bearing this statement in RED are deemed “uncontrolled”
Specifications
Specification
Power supply
Electrical connection
Gas input – NG
Gas input – P
Output
Heating Capacity (cool climate)
Colour
Heating type
Circuit resistance (overall A - N)
Fan resistance
Gas valve gas connection
Gas valve resistance (A – N)
Transformer resistances
Transformer voltages
Thermopile 1 voltage (generated)
Thermopile 2 voltage (generated)
Pilot flame adjustment level
Ignition plug gap
Heater external dimensions (mm)
Weight
Minimum flue length
Maximum flue length
Blocked flue switch cut out temp
Installation method
Remote controller
LHEC30
RFSDV34
240 VAC 50Hz
10A 3 pin plug
32 MJ/hr
32 MJ/hr
6.3 kW
69m²
Charcoal grey
Convection/Radiant
27.1 ohms
12 ohms
3/8”NPT
13 Mega-ohms (using multimeter – do not megger)
Primary 27 ohms / Secondary 13.3 ohms
Primary 240 VAC / Secondary 115 VAC
500mVDC
280mVDC
10 – 13mm vertically high
3mm
H 555 W 760 D 430
H 810 W 660 D 495
44kg
77kg
3.7m
3m
10.7m
12m
132ºC
218ºC
Inbuilt
Freestanding
Included as standard
Gas Pressures
Min gas inlet pressure - NG
Min gas inlet pressure - Propane
Max gas inlet pressure - NG
Max gas inlet pressure - Propane
Burner gas pressure - NG
Burner gas pressure - Propane
Minimum Clearances (mm)
Back
Sides
Floor
Top
Corner
Mantle height
Mantle maximum depth
TM036 Vermont Gas Fireplace & Gas Log Fire Service Instructions REV: A
D.O.I: 17/01/2008
This document is stored and maintained electronically by
LHEC30
RFSDV34
1.1 kPa
2.75 kPa
3.5 kPa
3.5 kPa
0.87 kPa
2.5 kPa
LHEC30
N/A
N/A
N/A
N/A
N/A
610 above upper louvre
200
RFSDV34
0
305
0
915
0
N/A
N/A
4
Service. All printed copies not bearing this statement in RED are deemed “uncontrolled”
Fluing
To comply with the requirements of AS5601 the LHEC30 gas fireplace and RFSDV34 gas
log fire must be flued.
The LHEC30 is certified for a minimum flue length of 3.7 m and a maximum flue length of
10.7m whilst the RFSDV34 is certified for a minimum flue length of 3m and a maximum
flue length of 12m.
The LHEC30 may be installed in and vented through any solid fuel fireplace that has a
minimum opening of 730x535x395mm and has been constructed and installed in
accordance with state or local building codes and is constructed of non-combustible
materials, however any flue damper or blockage must be removed from the chimney prior
to installation of the log fire.
AS5601 clause 5.13.5 states that a flue shall not be located in, or through, lift wells,
clothes chutes, rubbish chutes, air ducts or ventilating ducts.
AS5601 clause 5.13.5.5 states that the clearance between a flue and any electrical wiring
or fitting, telephone cable or communication wiring shall not be less than 75mm where the
flue or log fire includes a draught diverter.
AS5601 clause 5.13.5.7 states that the clearance between a certified twin wall (twin skin)
metal flue and a combustible surface shall be at least 10mm.
AS5601 clause 5.13.5.8 states that the clearance between a single wall metal flue and a
combustible surface shall be at least 25mm (For these log fires this pertains to the single
skin section of flue that extends through the roof space).
AS5601 clause 5.13.6.1 states that the termination point of a flue shall be located in
relation to neighbouring structures that wind from any direction will not be likely to create
downdraught in the flue or chimney.
AS5601 clause 5.13.6.2 states
that where a flue is to terminate
above:
(a) a roof, the end of the flue shall
be at least 500mm from the
nearest part of the roof;
(b) a trafficable roof designed for
personal or public use, the end of
the flue shall be at least 2m above
the roof level. This dimension is to
be increased where necessary so
that a minimum distance of
500mm is maintained above any
surrounding parapet; or
(c) a chimney, the end of the flue
shall be at least 200mm from the
nearest part of the chimney.
TM036 Vermont Gas Fireplace & Gas Log Fire Service Instructions REV: A
D.O.I: 17/01/2008
This document is stored and maintained electronically by
5
Service. All printed copies not bearing this statement in RED are deemed “uncontrolled”
Wiring Diagrams
Wiring Diagram – LHEC30 & RFSDV34
When installing the RFSDV34 the draught hood adapter (draught diverter)
supplied with the log fire MUST be installed. The draught diverter has an
inbuilt „blocked flue safety switch‟ which MUST be wired in series with
thermopile circuit 1 by the installing technician. The log fire must not be
operated unless the draught diverter is installed and the blocked flue switch
wired as per the installation instructions & wiring diagram shown below.
RFSDV34 wiring diagram after draught
diverter installation & wiring (blocked flue
switch and flue switch wiring shown in red).
RFSDV34 wiring diagram as supplied and
before draught diverter installation.
TM036 Vermont Gas Fireplace & Gas Log Fire Service Instructions REV: A
D.O.I: 17/01/2008
This document is stored and maintained electronically by
6
Service. All printed copies not bearing this statement in RED are deemed “uncontrolled”
Components and Their Function
Transformer
The transformer converts the incoming supply voltage from 240 VAC to 115VAC.
Fan
The fan moves air from outside the log fire through the back of the heater and out through
the front louvre via an air flow chamber. The air flow chamber is separated from the
combustion chamber and is heated by conduction. The heated air is then circulated by the
fan (convection heating). Fan speed may be controlled by the remote controller via the gas
valve which varies the voltage supply to the fan motor thus controlling the fan speed.
Secondary Flue
The secondary flue draws combustion gasses from the combustion chamber and vents
these gasses to atmosphere. Flue draw is created by an increase in temperature within the
flue due to the hot combustion gasses rising up the flue which simultaneously draws clean
air into the combustion chamber via the air intake louvres.
Blocked flue switch
A blocked flue switch is located in the flue section of each log fire. The blocked flue switch
is temperature sensitive and provides a safety shutdown function in the event of a blocked
flue by open circuiting the thermopile circuit and shutting down the gas valve. The blocked
flue switch comes pre-wired on the LHEC30 but is supplied separately for the RFSDV34
and must be installed and wired at time of installation (refer to wiring diagrams on page 6).
The blocked flue switch on the LHEC340 will automatically reset (close) when sufficiently
cool (<132ºC) however the blocked flue switch on the RFSDV34 is a manual reset type
and has a pin which is pushed to reset the switch. The reset switch can only be reset if the
switch temperature is less than 218ºC.
Pilot assembly
The pilot assembly is comprised of the pilot, ignition (spark) plug and two thermopiles.
Each component of the pilot assembly is detailed under its own separate heading.
Pilot
The pilot delivers gas from the gas valve which is then ignited by a spark from the ignition
plug. The burner is ignited by cross lighting from the pilot. The pilot is a „permanent pilot‟
type. This means that the pilot is manually lit and remains on regardless of the burner
operation. The pilot can only be extinguished under normal operating conditions when the
log fire is manually turned off (pilotstat knob manually rotated to the „off‟ position).
Ignition Plug
The ignition plug ignites the pilot gas by supplying a spark (high voltage) which arcs from
the ignition plug to the hood of the pilot (earth potential). The high voltage is generated by
the piezo igniter.
Thermopile
A thermopile is a group of thermocouples encased in a metal housing. The thermocouple
generates a voltage when heat is applied and the sum of the generated voltage is utilised
to electromagnetically hold open the pilot and burner gas valves; thus providing a safety
shut off in case of pilot flame failure. Each log fire has two thermopiles.
Burner Manifold
TM036 Vermont Gas Fireplace & Gas Log Fire Service Instructions REV: A
D.O.I: 17/01/2008
This document is stored and maintained electronically by
7
Service. All printed copies not bearing this statement in RED are deemed “uncontrolled”
The burner manifold directs gas from the gas valve to the front and rear burner injectors.
The burner manifold has an aeration shutter which controls the air gas ratio for delivery to
the injectors. The aeration shutter is preset and the position remains the same for both gas
types.
Injectors
Both log fires have three injectors (pilot, burner front and burner rear). The pilot injector
delivers gas to the pilot whilst the burner injectors deliver gas from the burner manifold to
the burner for combustion. Injector size is dependent upon gas type (refer to „Gas Type
Conversion Procedure‟ on page 51 for more information).
Burner
The burner is where combustion occurs. The gas valve supplies gas to the burner manifold
which in turn supplies gas to the burner via a front and rear injector. The gas is then
injected into the burner and ignited by cross lighting from the pilot flame.
Gas valve
A Honeywell RV8310D gas valve is utilised for burner control and provides manual piezo
ignition, flame modulation, flame monitoring and LED indication. It also allows for remote
control of temperature, fan and flame appearance via a hand held remote control unit. The
gas valve is available in NG or Propane and is gas type convertible (refer to „Gas Type
Conversion Procedure‟ on page 51 for more information).
Gas Valve Features
1. Pilotstat knob: The pilotstat knob is used to light and turn the log fire on and off (refer
to „Lighting Instructions‟ on page 12 for more information).
2. Modulating motor: The modulating motor
drives the gas valve open or closed in
seven stages ranging from 0 – 6, with 0
being fully closed and 6 being fully open.
3. Piezo Igniter: When pushed, the piezo
igniter creates a high voltage which is sent
to the ignition plug. The high voltage is
created when a spring loaded striker is
manually activated striking an internal
crystal. The high voltage jumps (arcs)
across the ignition plug gap trying to find a
path to earth and ignites the gas flowing
through the pilot injector.
4. Local/Remote switch: This switch is set on „Local‟ when lighting the log fire. After
lighting the log fire and turning the pilotstat knob to „on‟ it may be left on „Local‟ or
switched to „Remote‟. If left on „Local‟ the gas valve will operate on full flame (gas valve
fully open) and full fan speed with only the fan speed able to be adjusted by the remote
controller. If set on „Remote‟ the remote controller can be used to adjust the flame
height (gas valve modulation) and fan speed.
5. LED: The LED will flash to indicate gas valve and/or remote control operation and will
also indicate a thermopile or gas valve fault.
TM036 Vermont Gas Fireplace & Gas Log Fire Service Instructions REV: A
D.O.I: 17/01/2008
This document is stored and maintained electronically by
8
Service. All printed copies not bearing this statement in RED are deemed “uncontrolled”
6. Antenna: The antenna receives transmissions from the remote control. The antenna
should hang in free air away from grounded (earthed) metal.
7. Gas type plug: There are two gas type plugs available, one for NG and one for
Propane. This plug determines the gas type the gas valve operates on (refer to „Gas
Type Conversion Procedure‟ on page 51 for more information).
8. Pilot adjustment screw: This screw is utilised to adjust the pilot flame height by
altering the gas pressure to the pilot. Remove the outer screw cap and turn the internal
screw clockwise to decrease the pilot flame and anti-clockwise to increase the pilot
flame. It should be noted that the pilot gas pressure is the only gas pressure that can be
adjusted at the log fire.
9. Inlet gas test point: The inlet gas pressure can be measured at this point using a
manometer. The test point screw is captive and cannot be removed. To connect a
manometer, unscrew the test point screw several turns in an anti-clockwise direction
and attach a ¼” ID manometer hose with the screw in place. Note: The inlet gas
pressure cannot be adjusted at the log fire.
10. Burner gas test point: The burner gas pressure can be measured at this point using
a manometer. This test point screw is also captive and should be connected to with a
manometer as per the inlet gas test point. (This test point is located behind the
modulating motor and cannot be seen in the diagram on page 8). Note: The burner gas
pressure is fixed and cannot be adjusted.
Operation
The LHEC30 and RFSDV34 utilise the same gas valve, pilot assembly, fan assembly,
igniter, transformer and remote control to provide radiant/convection heating. Although
aesthetically the log fires are quite different, operation is identical.
Sequence of Operation
Refer to „Sequence of Operation Component Diagram‟ on page 10 to view components
shown in brackets e.g. (1).
1. The incoming 240VAV power supply is converted by the transformer (1) to 115VAC.
2. The gas valve (2) LOCAL/REMOTE selector switch (3) is manually set on „LOCAL‟ and
the pilotstat knob (4) is manually turned to the „PILOT‟ position and depressed; allowing
gas entry via an internal pilot valve to the pilot (5).
3. Ignition is provided by a spark which is generated at the ignition (spark) plug (6) by
manually pressing the piezo igniter (7).
4. The gas passing through the pilot (5) is ignited by the ignition spark and the resulting
flame impinges on thermopile 1 (8) and thermopile 2 (9) which both generate a voltage
after a period of several seconds (hot start) to one minute (cold start).
5. If the blocked flue switch (10) is closed, the resulting voltage generated by thermopile 1
(8) and thermopile 2 (9) will create an electromagnetic field in the gas valves (2) internal
pilot valve solenoid which holds the internal pilot valve open after the pilotstat knob (4)
is released.
TM036 Vermont Gas Fireplace & Gas Log Fire Service Instructions REV: A
D.O.I: 17/01/2008
This document is stored and maintained electronically by
9
Service. All printed copies not bearing this statement in RED are deemed “uncontrolled”
6. After successful ignition the pilotstat knob (4) is then manually turned to the „ON‟
position allowing gas entry via the gas valves (2) internal main valve to the burner (11).
The burner (11) and fan (12) will now operate on full flame and full speed and both the
internal pilot valve solenoid and internal main valve solenoid are held open by the
voltage generated by thermopile 1 (8) and thermopile 2 (9), provided the blocked flue
switch (10) remains closed.
7. After successful ignition and operation in „LOCAL‟ mode, the LOCAL/REMOTE selector
switch (3) may be set on „REMOTE‟ allowing burner flame and fan speed to be adjusted
manually or automatically by the remote controller (13). The gas valve (2) has an
antenna (14) which receives the remote controller‟s (13) signals.
8. The gas valve (2) modulating motor (15) responds to the remote controller (13) signal
by opening or closing in seven stages of modulation (0 = off & 6 = full flame) regulating
the gas supply to the burner (11). Likewise the gas valve (2) will vary the voltage output
to the fan motor (12) controlling the fan speed in response to the remote controller (13)
signal. Refer to „Remote Controller Operation‟ on page 12 for information on operating
the remote controller.
9. The pilot and burner will turn off if any of the following circumstances occur:
The pilotstat knob (3) is manually rotated to the „OFF‟ position.
Thermopile 1 (8) generates less than 500mVDC.
Thermopile 2 (9) generates less than 280mVDC.
The blocked flue switch (10) open circuits. This will occur at a temperature of 132ºC
for the LHEC30 and 218ºC for the RFSDV34.
Sequence of operation Component Diagram
1
2
3
4
5
6
7
8
9
10
11
12
13
14
15
TM036 Vermont Gas Fireplace & Gas Log Fire Service Instructions REV: A
D.O.I: 17/01/2008
This document is stored and maintained electronically by
Transformer
Gas Valve
Local/Remote Selector
Switch
Pilotstat Knob
Pilot Light
Ignition Plug
Piezo Igniter
Thermopile 1
Thermopile 2
Blocked Flue Switch
Burner
Fan
Remote Controller
Antenna
Modulating Motor
10
Service. All printed copies not bearing this statement in RED are deemed “uncontrolled”
Operational Flow Chart
On Operation
Manual Off Operation
Plug In
Power On
E
A
Fault rectified
Isolate Power
Gas valve fault
(1)
Initial
check
normal?
NO
Thermopile fault
YES
Local/Remote selector
switch manually set to
„Local‟ (if on „Remote)
Wait until LED
stops indicating
1 flash
NO
Remote
controller reset to
auto or on?
Pilot gas valve open
Pilotstat knob manually
depressed & held in
Piezo igniter manually
pushed generating
spark at igniter
Pilot gas valve
closed
B
C
Fan on previous remote
control setting
No remote controller
operation preformed
Burner (gas valve) on
previous remote control setting
Remote controller fan
speed selected from 0 - 6
Thermopile 1 >
500mV
Thermopile 2 >
280mV
3 seconds
later (hot start)
to 1 min later
(cold start)
Fan override can
be activated by
pressing the fan &
then up or down
arrow buttons
YES
LED 1 flash
Pilotstat knob released
NO
Does
thermopile 1
generate > 500
mV?
Gas control valve
modulates burner gas
valve to new setting
Remote
Controller
Mode?
On
(Manual)
Remote controller fan
speed selected from 0 - 6
Gas control valve
alters fan motor
voltage to new setting
Auto
YES
No remote controller
operation preformed
Gas control valve
alters fan motor
voltage to new setting
Room
temp > set
temp?
Burner gas valve
closed
YES
Fan off
Burner gas valve
closed
Burner gas valve
open (level 1 – 6)
Burner gas valve
closed
Fan off
Fan on (level 1 – 6)
Burner gas valve
open (level 1 – 6)
Burner gas valve
fully open
D
NO
Room
temp > set
temp?
Pilotstat knob manually
turned to „on‟
Fan on full
Remote controller flame
height selected from 0 - 6
Fan override
activated?
NO
Did
pilot go
out?
Gas control valve
alters fan motor
voltage to new setting
Count
down timer
on?
Count down timer
reaches „0‟
YES
YES
Remote controller operation
– Gas valve Selector switch
on „Local‟
YES
NO
NO
Remote controller operation
– Gas valve Selector switch
on „Remote‟
Pilotstat knob manually
turned to „Pilot‟ then
depressed & held in
Did
Pilot
ignite?
Fan off
Fan off
LED 3 Flash
YES
Burner gas valve
closed
Burner gas valve
closed
E
Is
LED indicating
1 flash?
Remote controller
set to „off‟
Pilot gas valve
closed
(1) Note:
Initial check
is performed
whilst ever
log fire is
operating
LED 8 Flash
Remote Controller
Off Operation
Pilotstat knob manually
turned to „off‟
Remote
controller reset to
Auto or on?
NO
YES
NO
YES
Does
thermopile 2
generate > 280
mV?
NO
YES
NO
D
YES
NO
Is
blocked
flue switch
closed?
YES
Gas valve
local/remote selector
switch manually set to
„Remote‟?
NO
NO
YES
Pilot gas valve
closed
Burner gas valve
closed (if open)
TM036 Vermont Gas Fireplace & Gas Log Fire Service Instructions REV: A
D.O.I: 17/01/2008
This document is stored and maintained electronically by
C
Fan off (if on)
Pilotstat knob manually
turned to „off‟
Blocked flue fault rectified
(if applicable)
B
A
11
Service. All printed copies not bearing this statement in RED are deemed “uncontrolled”
Lighting Instructions
1. Ensure the LOCAL/REMOTE selector switch on the gas valve is set on LOCAL.
2. Remove the log fire glass door.
3. Turn the pilotstat knob to the PILOT position, push the pilotstat knob down and hold it in
the depressed position. The pilot valve is now open and will allow gas to flow to the
pilot.
4. Push and release the piezo igniter until the pilot flame is established. When lit, continue
to hold the pilotstat knob in the depressed position until the gas valve LED flashes (this
will take from several seconds (hot start) to one minute (cold start). When the LED is
flashing the thermopile is generating sufficient voltage to hold the gas valve open and
the pilotstat knob can then be released. If the pilot goes out repeat steps 3 to 4 until lit.
5. Replace the glass door.
6. Turn the pilotstat knob to the ON position. The burner will now light on full flame and the
fan will operate on full speed.
7. For remote control operation turn the LOCAL/REMOTE selector switch to the REMOTE
position.
8. To turn the log fire OFF push in the pilotstat knob slightly and rotate to the OFF position.
It should be noted that the pilotstat knob cannot be turned from the OFF to PILOT position
whilst the gas valve LED is flashing. This is a safety device which may occur if the log fire
has been switched off after or during operation and is due to the thermopiles generating a
voltage from residual heat. When the thermopiles cool (approx 30 seconds) the pilotstat
knob may be operated as normal.
Remote Controller Operation
Both log fires are supplied with
and can be operated by a remote
controller which is powered by
three AAA batteries.
Remote controller
operational buttons
The remote controller will not
turn the pilot or gas valve ON or
OFF however it can control the
burner flame height and fan
speed manually or automatically.
Recognition Signal
Upon initial use of the remote controller a recognition signal operation is required to be
performed between the gas valve and the remote controller.
To perform this procedure switch the LOCAL/REMOTE selector switch on the gas valve to
the REMOTE position and press the fan or flame button on the remote controller within 30
seconds. The LED on the gas valve will flash once indicating the signal has been received.
The gas valve has now been programmed to the remote controller frequency and may be
operated manually (ON mode) or automatically (AUTO mode) by the remote controller.
Note: The LOCAL/REMOTE selector switch on the gas valve must be in the REMOTE
position for the remote controller to operate the log fire (except fan speed).
TM036 Vermont Gas Fireplace & Gas Log Fire Service Instructions REV: A
D.O.I: 17/01/2008
This document is stored and maintained electronically by
12
Service. All printed copies not bearing this statement in RED are deemed “uncontrolled”
On (Manual) Mode
Press and release the „Mode‟
button until „On‟ is displayed on
the controller.
After a two second delay the
burner and fan will turn on and
operate on the previously used
settings. The information shown
on the diagram opposite will be
displayed
on
the
remote
controller display.
To adjust the main burner flame level press and release the flame button. The flame icon
will be displayed along with the current flame level setting. The flame level setting can then
be adjusted from 0 to 6 in increments of 1 by pressing and releasing the up or down arrow
buttons. If the flame level is set on „0‟ the burner will turn off however the pilot will remain
lit.
After a two second delay from the operation of any button the controller will accept the new
setting and revert to the previous display. The flame level will then change to the new
setting.
Likewise, to adjust the fan speed press and release the fan button. The fan icon will be
displayed along with the current fan speed setting. The fan speed setting can then be
adjusted from 0 to 6 in increments of 1 by pressing and releasing the up or down arrow
buttons. If the fan level is set on „0‟ the fan will turn off.
After a two second delay from the operation of any button the controller will accept the new
setting and revert to the previous display. The fan level will then change to the new setting.
Auto Mode
Press and release the „mode‟
button until „Auto‟ is displayed.
After a two second delay the
information
shown
on
the
diagram
opposite
will
be
displayed
on
the
remote
controller display.
If the room temperature is higher
than the set point temperature the burner and fan will not turn on (or will turn off if already
on). The flame and fan levels will both indicate „0‟ (off) and will not operate however the
gas valve and pilot will remain on.
To adjust the set point temperature press and release an up or down arrow button. The set
point temperature will then be displayed.
The set point temperature can then be adjusted in increments of 0.5 degrees by pressing
and releasing the up or down arrow buttons.
After a two second delay from the operation of any button the controller will accept the new
setting and revert to the previous display.
TM036 Vermont Gas Fireplace & Gas Log Fire Service Instructions REV: A
D.O.I: 17/01/2008
This document is stored and maintained electronically by
13
Service. All printed copies not bearing this statement in RED are deemed “uncontrolled”
If the set point temperature is now higher than the room temperature the optimum flame
and fan levels will automatically be selected to reach or maintain the set point temperature.
These levels (of modulation) will depend upon the differential between the set point
temperature and the room temperature i.e. larger differential = higher flame and fan levels.
For example: If there is a differential of 2.5 degrees the controller may automatically
determined that a flame height of 6 and a fan speed of 6 is required. When the room
temperature has reached the set point temperature the controller may then automatically
determine that a flame height of 1 and fan speed of 1 is required to maintain this
temperature.
Fan Override: It should be noted that when in auto mode the fan speed will be the same
as, and will automatically rise and fall with the flame speed. If a lower or higher fan speed
is desired, the fan speed can be overridden by pressing and releasing the fan button and
then adjusting the fan speed manually using the up or down arrow buttons as previously
explained.
If the fan speed has been overridden in this manner „Auto‟ will be displayed next to the
flame icon and „Manual‟ will be displayed next to the fan icon.
To revert to the auto fan setting, cycle through to „Auto‟ by pressing and releasing the
mode button until „Auto‟ appears for the second time („Auto‟ will first appear when the
mode button is pressed and released however you must cycle past this until „Auto‟
appears again).
Off Mode
Press and release the „mode‟ button until „OFF‟ is displayed. After a two second delay from
the operation of any button the burner and fan will turn off and room temperature and
„OFF‟ will be displayed on the controller.
Other Functions
Temperature Unit of Measurement: The temperature unit of measurement can be
changed from ºC to ºF and vice versa. To do this press and hold down the up and down
arrow buttons simultaneously until the display value changes (approximately three
seconds). This function may be performed whist the remote controller is in any mode.
Countdown Timer: A countdown timer is available and can be activated when the remote
control is in the „ON‟ (Manual) or „AUTO‟ mode. The countdown timer can be set from 10
minutes to 2 hours and will turn the burner and fan off when it reaches zero.
To activate the countdown timer first ensure the remote is in „ON‟ or „AUTO‟ mode then
press and release the timer button.
The timer time can then be adjusted up or down in ten minute increments by pushing and
releasing the up or down arrow buttons. After a 2 second delay the time will be accepted.
The display will then revert to the relevant setting (ON or AUTO) and the timer time will be
displayed along with the usual information.
When the countdown timer reaches zero the burner and fan will turn off and the remote
control will revert from „ON‟ or „AUTO‟ mode to „OFF” mode.
The countdown timer can be cancelled at any time after activation by pressing and
releasing the countdown timer button until -:-- is shown on the display. After a two second
delay the display will revert to the previously used setting and the delay timer will be
cancelled.
TM036 Vermont Gas Fireplace & Gas Log Fire Service Instructions REV: A
D.O.I: 17/01/2008
This document is stored and maintained electronically by
14
Service. All printed copies not bearing this statement in RED are deemed “uncontrolled”
Preventative Maintenance
It is suggested for peak performance that the log fire be serviced annually.
Servicing is to be performed by qualified persons.
1. Remove log set and larva rocks.
2. Clean the glass panel(s) with a non-ammonia based household cleaner and warm
water (gas fireplace glass cleaner is recommended for use as a cleaning agent). Check
the glass and gasket for cracks or damage and replace the glass frame assembly
and/or gasket if necessary.
Only glass and gaskets approved by Raypak Australia may be used for
replacement. The use of substitute glass and/or gaskets will void all
warranties.
Under no circumstances is the log fire to be operated without the front glass
or with a broken glass panel or gasket. Replacement of the glass including
the gasket is to be performed by a licensed and qualified person.
3. Isolate power and check all electrical connections for signs of overheating due to poor
connection.
4. Check the 3 pin plug and lead for damage and replace if necessary.
5. Clean the fan by blowing out with compressed air, vacuuming or by brushing with a soft
bristled brush.
6. Check the burner and clean if necessary by blowing out with compressed air,
vacuuming or by brushing with a soft bristled brush. Replace the burner if any cracks
are evident in the burner ceramic tiles.
7. Check the ignition plug gap and reset to 3mm if required (refer to „Adjusting the Ignition
Plug Gap‟ on page 18).
8. Check the inlet gas pressure at the log fire and advise the customer if not within
specification (refer to „Checking Inlet Gas Pressure‟ on page 17).
9. Check the burner gas pressure (refer to „Checking Burner Gas Pressure‟ on page 17).
Note: The burner gas pressure is preset and cannot be adjusted. If the inlet gas
pressure is correct and the burner gas pressure is not within specification the gas valve
will require replacement.
10.Check the pilot flame and adjust if necessary (refer to „Adjusting the Pilot Flame‟ on
page 18).
11.Check the pilot and burner flames to ensure flame is not lifting off and/or spluttering.
Clean pilot injector and burner front and rear injectors if required. Flame lift off can also
be indicative of a cracked burner ceramic tile(s).
12.Check flue for blockage or build-up of foreign material and clean if necessary.
13.Check air passages for blockage or build up of foreign material and clean if necessary.
14.Reposition log set and larva rocks. Replace any logs if broken.
15.Replace remote controller batteries and check remote controller operation.
16.Perform a gas valve safety shut down test (refer to page 18).
TM036 Vermont Gas Fireplace & Gas Log Fire Service Instructions REV: A
D.O.I: 17/01/2008
This document is stored and maintained electronically by
15
Service. All printed copies not bearing this statement in RED are deemed “uncontrolled”
Common Faults
When a complaint is lodged about the performance of a gas fireplace or gas log fire there
are a number of causes that should be checked and eliminated. In an attempt to pinpoint
the most likely cause it is important to discuss with the customer their reasons for the
complaint, the duration of the problem, any change in circumstances or usage and recent
weather conditions. This information in conjunction with the following listed common
complaints will assist you in locating the most likely cause.
Condensate Forms on the Glass Panel
Condensate forming on the inside of the glass panel during start up is normal.
Condensation is caused by the air inside the combustion chamber heating to the dew point
of the moisture in the air causing it condensate and collect on the glass surface. The
condensate will evaporate from the glass as the temperature inside the combustion
chamber increases past the dew point temperature.
Creaking and/or Cracking Noises
It is normal for heating appliances fabricated from steel to give off some expansion and/or
contraction noises during the start-up or cool down cycle.
Log Fire Produces an Odour
It is not unusual for a Raypak Vermont gas fireplace or gas log fire to produce some odour
the first time it is operated. This is due to the burn-off off residual oils utilised during the
manufacturing process. These odours should disappear after approximately 10 hours of
operating time.
For this reason it is recommended that when the log fire is operated for the first time it is
operated for at least 10 hours on high with the fan in the OFF position. Ensure all windows
are open during this initial firing period to provide adequate ventilation.
Odours could also be caused by the following:
1. A partially blocked flue. Check the flue and clear or clean if necessary.
2. A build up of lint or dust. This may be especially obvious if the log fire has not been
operated for some time. Clean the log fire if necessary.
3. Foreign material being placed in the log fire. The log fire is suitable only for the
approved gas type as indicated on the rating label. No other combustible material
such as wood, paper or coal is to be used, nor is any other gas type to be used.
Note: This does not preclude the use of a different gas type provided a gas
conversion has been performed by a suitably qualified person in conjunction with
the gas type conversion procedure shown on page 51.
Fan does not operate
If the three pin plug is not plugged in or there is no power available at the power point the
log fire can still be lit and the burner will operate on high flame, however the fan will not
operate. If the fan is not operating, check to ensure that the 3 pin plug is plugged in, the
power point is switched on and that there is power available at the power point.
TM036 Vermont Gas Fireplace & Gas Log Fire Service Instructions REV: A
D.O.I: 17/01/2008
This document is stored and maintained electronically by
16
Service. All printed copies not bearing this statement in RED are deemed “uncontrolled”
Fan Speed or Flame Height Cannot be Adjusted by Remote Controller
If the fan speed and flame height cannot be adjusted by the remote controller check the
following:
1. Ensure the three pin plug is plugged in and power is available at the power point.
Without power the log fire can still be lit and the burner will operate on high flame,
however the fan will not operate and flame height cannot be adjusted utilising the
remote controller.
2. Ensure the gas valves receiving antenna is connected, is hanging in free air and is
not touching any metallic part of the log fire.
3. Ensure the remote controller‟s batteries are not low. Replace batteries if necessary.
4. Re-teach the gas valve the remote controller frequency. Refer to „Remote Controller
Operation‟ on page 12 for information on performing this procedure.
If the four items shown above have been checked and eliminated and the fan is operating
however the remote controller will still not control the fan speed or flame height, the gas
valve may require replacement. Refer to fault finding chart 7 on page 34 for a more
thorough fault finding analysis before replacing the gas valve.
Fault Finding
Test Equipment
A list of test equipment which will assist in conducting diagnostic procedures is provided
below. This equipment is available from Rheem Service Spare Parts Department.
Description
Fine probe adapter kit
Probe to alligator clip kit
Part Number
WH0020082
WH0020084
Checking Inlet Gas Pressure
The inlet gas pressure can be measured at the inlet gas
pressure test point on the gas valve using a
manometer. The test point screw is captive and cannot
be removed. To connect a manometer, unscrew the test
point screw several turns in an anti-clockwise direction
and attach a ¼” ID manometer hose with the test point
screw in place. Refer to the specifications table on page
4 for indicative inlet gas pressures. Note: The inlet gas
pressure cannot be adjusted at the log fire.
Checking Burner Gas Pressure
The burner gas pressure can be measured at the
burner gas pressure test point on the gas valve using a
manometer. The test point screw is captive and cannot
be removed. To connect a manometer, unscrew the test
point screw several turns in an anti-clockwise direction
and attach the manometer hose with the test point
screw in place. Refer to the specifications table on page
4 for indicative burner gas pressures. Note: The burner
gas pressure is fixed and cannot be adjusted.
TM036 Vermont Gas Fireplace & Gas Log Fire Service Instructions REV: A
D.O.I: 17/01/2008
This document is stored and maintained electronically by
17
Service. All printed copies not bearing this statement in RED are deemed “uncontrolled”
Adjusting the Pilot Flame
When lit, the pilot should produce a flame 10 – 13mm
vertically high that impinges evenly across both
thermopiles.
The pilot flame can be adjusted by rotating the pilot
adjustment screw on the gas valve which will alter the
gas pressure to the pilot. Unscrew and remove the
outer cap and turn the internal screw clockwise to
decrease the pilot flame or anti-clockwise to increase
the pilot flame.
If the pilot flame cannot be adjusted, is uneven or
splutters, the gas supply and pressure should be
checked as should the pilot injector to ensure it is clean
and not blocked with foreign matter.
Adjusting the Ignition Plug Gap
The ignition plug gap should be set at 3mm. This gap is
measured between the ignition plug probe and the
closest point on the hood of the pilot. The ignition plug
gap can be adjusted by gently bending the ignition plug
probe the required direction with a pair of long nose
pliers. Be careful not to crack or break the ceramic body
of the ignition plug whilst adjusting.
Gas Valve Safety Shutdown Test
The gas valve safety shutdown test should be performed whenever the gas valve is
replaced, adjusted or gas type converted.
To perform the gas valve safety shut down test follow the procedure outlined below.
1. Light the log fire by following steps 1 – 6 of the lighting instructions on page 12.
2. Rotate pilotstat knob to the pilot position. The main burner should extinguish
however the pilot should remain lit.
3. Extinguish pilot flame by isolating the gas supply to the log fire.
4. When the pilot flame extinguishes, immediately restore the gas supply to the log
fire. Gas flow to the pilot should cease within 30 seconds from pilot outage (gas
valve safety shut off activated).
5. Relight log fire and operate through one complete cycle to ensure all controls
operate correctly including remote controller operations.
Fault Indication
Both log fires utilise a simple form of fault indication which is provided by the gas valve
LED. As mentioned previously the gas valve will blink when lighting the pilot and once after
every command from the remote control, these are not fault indications.
It should be noted that failure codes may occur anytime after the pilot has been lit and in
the event of multiple failure codes the first failure code will be followed by a three second
delay then the second failure code will be displayed.
TM036 Vermont Gas Fireplace & Gas Log Fire Service Instructions REV: A
D.O.I: 17/01/2008
This document is stored and maintained electronically by
18
Service. All printed copies not bearing this statement in RED are deemed “uncontrolled”
Error Code 3
Error code 3 is a thermopile related fault and is indicated by three 0.5 second flashes
separated by a 30 second off period between each series of flashes. If this fault occurs
check the following:
1. Disconnect power and ensure all thermopile spade connectors are pushed on firmly
and are making contact. Check blocked flue switch to ensure it is not open circuit.
Restore power. If error code 3 is still displayed move on to step 2.
2. Disconnect power and switch the front two thermopile wires with the back two
thermopile wires ensuring that the white leads are connected to the spade terminal
with the „white dot‟ next to it (refer to wiring diagram on page 6). Restore power; if
error code 3 is still displayed replace both thermopiles.
Note: This procedure can be performed by following fault finding chart 2.1 on page
23.
Error Code 8
Error code 8 is a gas valve related fault and is indicated by eight 0.5 second flashes
separated by a 30 second off period between each series of flashes. If this fault occurs
check the following:
1. Ensure the gas valve receiving antenna is firmly connected, hanging in free air and
is not touching any metal (earth).
2. Confirm that the gas valve is not in REMOTE mode. If the gas valve is in remote
mode and is indicating error code 8 the gas valve is defective and will need to be
replaced. If the gas valve is in LOCAL mode and is indicating error code 8 go to
step 3.
3. Switch the gas valve local/remote switch to REMOTE and re-teach the valve the
remote control signal (refer to „Recognition Signal‟ on page 12). The error code
should clear itself after approximately 1 ½ minutes and then return to normal
operation; if error code 8 is still displayed replace the gas valve.
Note: This procedure can be performed by following fault finding chart 2.1 on page
23.
TM036 Vermont Gas Fireplace & Gas Log Fire Service Instructions REV: A
D.O.I: 17/01/2008
This document is stored and maintained electronically by
19
Service. All printed copies not bearing this statement in RED are deemed “uncontrolled”
Fault Diagnosis Sequence (General Fault Finding Chart)
General Fault Finding Chart
Fault
Pilotstat
knob cannot be
operated
YES
1
YES
2
YES
3
YES
4
NO
Pilot
will not
ignite
NO
Pilot
will not
stay lit
NO
Burner
will not
ignite
NO
Burner
ignites but goes
out
5
NO
Fan
does not
operate
YES
6
YES
7
Noisy Log fire
8
NO
Remote
controller does
not operate
log fire
NO
TM036 Vermont Gas Fireplace & Gas Log Fire Service Instructions REV: A
D.O.I: 17/01/2008
This document is stored and maintained electronically by
20
Service. All printed copies not bearing this statement in RED are deemed “uncontrolled”
Fault Finding Chart 1
1
Does
gas valve LED
indicate 3 or 8
flashes?
2.1
YES
NO
Does
gas valve LED
indicate 1
flash?
YES
NO
Wait until the gas
valve LED stops
flashing
Replace the gas valve
Can
the pilotstat knob
be operated?
NO
YES
Replace the gas valve
Thermocouples were still hot
from previous operation.
Normal operation
Fault Finding Test 1
Test 1
Warning - Ensure power is isolated before conducting this test.
1. Cut ignition plug wire 100mm before electrical joining connector and strip end to
expose conductor.
2. Hold tip of exposed conductor 2 – 3mm away from any unpainted metal part of
log fire frame (earth).
3. Push and release piezo igniter. A spark should be generated between tip of
exposed conductor and metal frame every time the piezo igniter push button is
operated.
4. Rejoin wire with an insulated electrical connector when testing is complete.
TM036 Vermont Gas Fireplace & Gas Log Fire Service Instructions REV: A
D.O.I: 17/01/2008
This document is stored and maintained electronically by
21
Service. All printed copies not bearing this statement in RED are deemed “uncontrolled”
Fault Finding Chart 2
2
Does
gas valve LED
indicate 3 or 8
flashes?
NO
2.1
YES
The local/remote selector switch
Is
is located on the gas valve
local/remote
NO
switch set on
„Local‟?
Is
Pilotstat knob
operated
correctly?
YES
YES
NO
Rotate pilotstat knob to the
„Pilot‟ position then depress
and hold in whilst attempting
to light pilot.
NO
Does
piezo ignitor
push button
operate?
YES
Does
ignition plug
generate a
spark?
The local/remote selector
switch must be set on „local‟
when lighting the pilot.
Set switch to „Local‟.
NO
When pushed piezo
ignitor should produce
an audible „click‟
Refer to section on
„adjusting the ignition
Test 1
Is
Does
plug gap‟
ignition plug
piezo wire
YES
NO
gap set at
generate a
3mm?
spark?
NO
YES
Replace piezo ignitor.
Replace ignition plug.
Adjust ignition plug
gap to 3mm.
NO
YES
Does
ignition plug
generate a
spark?
YES
Is gas
isolation valve
on?
YES
NO
Turn gas isolation valve on.
Refer to section on „Checking Inlet Gas
Pressure‟. Refer to Specification Table
Is gas
for gas pressures.
inlet pressure
NO
within spec?
YES
Advise customer.
Refer to section on „Adjusting
Is pilot
the Pilot Flame‟.
flame adjusted
NO
correctly?
YES
Is
pilot injector
blocked?
Adjust pilot flame.
Is
pilot feed pipe
blocked?
NO
YES
NO
TM036 Vermont Gas Fireplace & Gas Log Fire Service Instructions REV: A
D.O.I: 17/01/2008
This document is stored and maintained electronically by
Clean or replace
pilot injector.
YES
Clean or replace
pilot feed pipe.
Replace gas valve.
22
Service. All printed copies not bearing this statement in RED are deemed “uncontrolled”
Fault Finding Chart 2.1 & 2.2
2.1
Is the
gas valve LED
indicating 3
flashes?
YES
Are
all thermopile
spade terminals
pushed on
firmly?
Reconnect thermopile spade
terminal(s) firmly.
NO
2.2
No: Error code
8 is indicated
(8 flashes)
Notes
(1) RFSDV34 blocked flue switch
can be manually reset < 218ºC.
LHEC30 auto resets < 132ºC.
YES
Test 2A for
LHEC30
or
Test 2B for
RFSDV34
Is
blocked
flue switch
open?
Is
flue blocked
or partially
blocked?
YES
NO
NO
Rectify flue and/or
flue cowl fault.
Refer to section
on „Fluing‟ Is flue
Disconnect
power
(1)
NO
length and/or
cowl location
correct?
YES
Swap thermopile 1 wires with
thermopile 2 wires at gas valve.
Ensure white wires are connected
to terminals with white dots next
to them (refer to wiring diagram).
Unblock &
clean flue.
YES
For RSFDV34 reset
blocked flue switch by
pressing reset button on
rear of switch. LHEC30
is auto reset.
Test 2A for LHEC30
or Test 2B for
RFSDV34
Is
blocked
flue switch
open?
YES
NO
Flue blockage cleared.
Blocked flue switch reset.
Replace blocked flue switch
Is the
gas valve LED
indicating 3
flashes?
Restore power
The local/remote selector switch
is located on the gas valve
Is
local/remote
switch set on
„Local‟?
YES
YES
NO
Replace both thermopiles
Fault rectified.
NO
Replace the gas valve.
Remote controller antenna must be
firmly connected, hanging in free air
Is antenna and not touching any metal (earth)
correctly
NO
installed?
Reconnect antenna.
Move antenna away from
any metal (earth).
YES
Switch the local/remote
selector switch to remote.
Re-teach the gas valve the
remote controller frequency.
Wait 2 minutes.
Is the
gas valve LED
indicating 8
flashes?
YES
Replace the gas valve.
Refer to „Recognition Signal‟ in
the section on „Remote Controller‟
NO
TM036 Vermont Gas Fireplace & Gas Log Fire Service Instructions REV: A
D.O.I: 17/01/2008
This document is stored and maintained electronically by
Fault rectified.
23
Service. All printed copies not bearing this statement in RED are deemed “uncontrolled”
Fault Finding Chart 3
3
Does
gas valve LED
indicate 3 or 8
flashes?
NO
2.1
YES
Does
pilot
ignite?
YES
2
NO
Is
Pilotstat knob
operated
correctly?
YES
Pilotstat knob must be held
in the depressed position
and not released until after
the gas valve LED provides
1 flash indication.
NO
Did
gas valve LED
indicate 1
flash?
YES
Retry lighting 3 times ensuring
that the Pilotstat knob is not
released until 5 seconds after the
LED gives 1 flash indication.
NO
Does
pilot
ignite?
YES
2
NO
Does
pilot Stay
lit?
NO
YES
Did
gas valve LED
indicate 1
flash?
Appliance operational.
YES
Replace gas valve.
NO
Refer to section on „Checking Inlet Gas
Pressure‟. Refer to Specification Table
for gas pressures.
Is gas
inlet pressure
NO
within spec?
YES
Advise customer.
Refer to section on „Adjusting
the Pilot Flame‟.
Is pilot
flame adjusted
correctly?
YES
Is
blocked
flue switch
open?
NO
Adjust pilot flame.
Test 2A for LHEC30
or Test 2B for RFSDV34
YES
2.2
Tests 3 & 4
NO
Are
thermopiles
working?
NO
YES
TM036 Vermont Gas Fireplace & Gas Log Fire Service Instructions REV: A
D.O.I: 17/01/2008
This document is stored and maintained electronically by
Replace faulty thermopile(s).
Replace gas valve.
24
Service. All printed copies not bearing this statement in RED are deemed “uncontrolled”
Fault Finding Tests 2A – 4
Test 2A – LHEC30
Test 2B – RFSDV34
Warning – Log fire may be hot.
Ensure log fire has sufficiently
cooled before conducting this
test.
Warning – Log fire and flue may
be hot. Ensure log fire has
sufficiently
cooled
before
conducting this test.
Disconnect wiring from blocked flue switch.
Using a multimeter on the ohms scale,
measure between the two terminals of the
blocked flue switch.
Disconnect wiring from blocked flue switch.
Using a multimeter on the ohms scale,
measure between the two terminals of the
blocked flue switch.
The reading should be approximately 0 The reading should be approximately 0
ohms.
ohms.
Test 3
Test 4
Warning – „Live‟ equipment wear
Personal Protective Equipment
when conducting this test.
Using a multimeter on the DC millivolt (mV)
scale, measure between the first and
second thermocouple wires at the gas
valve (looking from the front of gas valve).
Normal voltage is approx 500 millivolts DC.
Warning – „Live‟ equipment wear
Personal Protective Equipment
when conducting this test.
Using a multimeter on the DC millivolt (mV)
scale, measure between the third and
fourth thermocouple wires at the gas valve
(looking from the front of gas valve).
Normal voltage is approx 280 millivolts DC.
TM036 Vermont Gas Fireplace & Gas Log Fire Service Instructions REV: A
D.O.I: 17/01/2008
This document is stored and maintained electronically by
25
Service. All printed copies not bearing this statement in RED are deemed “uncontrolled”
Fault Finding Chart 4
4
Does
gas valve LED
indicate 3 or 8
flashes?
Does
pilot
ignite?
NO
2.1
YES
Does
pilot stay
lit?
YES
2
NO
YES
3
NO
Is
pilotstat knob
operated
correctly?
NO
After successful ignition of
the pilot the pilotstat knob
must be rotated to
the „On‟ position.
YES
Refer to section on „Checking Gas Inlet
Pressure‟. Refer to Specification Table
Is
for gas pressures.
gas inlet
NO
pressure within
spec?
Advise customer.
YES
Refer to section on „Checking Burner
Gas Pressure‟. Refer to Specification
Table for gas pressures.
Is
burner gas
pressure within
spec?
NO
Replace gas valve.
YES
Clean or replace
burner injectors.
YES
Clean or replace burner
manifold feed pipe.
YES
Remove blockage from
burner manifold.
YES
Are burner
injectors
blocked?
NO
Is
burner feed pipe
blocked?
NO
Is
burner manifold
blocked?
NO
TM036 Vermont Gas Fireplace & Gas Log Fire Service Instructions REV: A
D.O.I: 17/01/2008
This document is stored and maintained electronically by
Replace gas valve.
26
Service. All printed copies not bearing this statement in RED are deemed “uncontrolled”
Fault Finding Chart 5
5
Does
gas valve LED
indicate 3 or 8
flashes?
NO
2.1
YES
Refer to section on „Checking Gas Inlet
Pressure‟. Refer to Specification Table
Is gas
for gas pressures.
NO
inlet pressure
within spec?
Refer to section on „Checking Burner
Gas Pressure‟. Refer to Specification
Is
Table for gas pressures.
burner gas
NO
YES
pressure within
spec?
Advise customer.
Replace gas valve.
YES
The local/remote selector
switch is located on the
Does
gas valve
burner go out
only when local/remote
YES
switch is set to
„remote‟?
ON (manual)
Remote
controller
setting
5.1
The remote controller must
be set to „On‟ or „Auto‟ mode
for the burner to operate.
OFF
AUTO
5.2
NO
Refer to section on
„Adjusting the Pilot Flame‟.
Is pilot
flame adjusted
correctly?
NO
Adjust pilot flame.
YES
Is
blocked
flue switch
open?
Test 2A for LHEC30
or Test 2B for RFSDV34
2.2
YES
NO
Tests 3 & 4
Are
thermopiles
working?
NO
Replace faulty thermopile(s).
YES
Clean or replace
burner injectors.
YES
Are burner
injectors
blocked?
NO
Is
burner feed pipe
blocked?
NO
Is
burner manifold
blocked?
YES
NO
TM036 Vermont Gas Fireplace & Gas Log Fire Service Instructions REV: A
D.O.I: 17/01/2008
This document is stored and maintained electronically by
Clean or replace burner
manifold feed pipe.
YES
Remove blockage from
burner manifold.
Replace gas valve.
27
Service. All printed copies not bearing this statement in RED are deemed “uncontrolled”
Fault Finding Chart 5.1 & 5.2
5.1
5.2
Note: RC = Remote
Controller
(1)
Is
RC flame level
„0‟?
YES
(1)
Is RC
room temp > or
= set temp?
Room temp must be > or =
to set temp for burner to
operate.
NO
NO
YES
Notes
(1) When room temp = set temp
burner may be on or off.
(1)
Is RC
room temp =
set temp?
YES
Increase RC set
temp to 1º > room temp &
wait for 1 minute.
YES
Replace remote controller
NO
Is RC
flame level set
on „0‟?
Is
RC flame level
„0‟?
NO
NO
YES
(1)
Did
the burner come
on?
Increase RC flame
level to 6.
YES
Room temp was = set temp
& remote controller turned
burner off. Normal operation.
NO
Did
the burner come
on?
7
NO
Remote controller flame
level was set on 0. It must be
set on 1 – 6 for burner to
operate.
YES
TM036 Vermont Gas Fireplace & Gas Log Fire Service Instructions REV: A
D.O.I: 17/01/2008
This document is stored and maintained electronically by
28
Service. All printed copies not bearing this statement in RED are deemed “uncontrolled”
Fault Finding Chart 6
6
(1)
(1)
Is
Log fire plugged
into power point &
switched on?
Plug Log fire into power
point and switch on.
NO
Notes
(1) Log fire will light and burner will operate on
high flame without 240V power supply however
fan and some remote controller functions will not
operate.
YES
6.1
ON (manual)
The local/remote selector switch
is located on the gas valve
Does
fan not work
only when local/remote
switch is set to
„remote‟?
Remote
controller
setting
YES
The remote controller must
be set to „On‟ or „Auto‟ mode
for the fan to operate.
OFF
6.2
AUTO
NO
Test 5
Is
240V AC present
at the power
point?
NO
Has
the power
circuit fuse
blown?
No power supply. Advise
customer to have electrician
check household power
circuit.
NO
YES
Did
the power
circuit fuse
blow?
Replace fuse or reset
circuit breaker.
YES
YES
NO
Is 240V AC
present at the
transformer?
6.3
Blown fuse replaced.
Possible overloading of
power circuit. Check log
fire operation and advise
customer.
Test 7A for LHEC30
or Test 7B for RFSDV34
NO
Replace cord set.
NO
Replace transformer.
NO
Replace fan assembly.
YES
Is 115V AC
present at the
transformer?
Test 8A for LHEC30
or Test 8B for RFSDV34
YES
Is the
fans winding
resistance
correct?
Test 6
YES
TM036 Vermont Gas Fireplace & Gas Log Fire Service Instructions REV: A
D.O.I: 17/01/2008
This document is stored and maintained electronically by
Replace gas valve.
29
Service. All printed copies not bearing this statement in RED are deemed “uncontrolled”
Fault Finding Tests 5 – 6
Test 5
Test 6
Warning – „Live‟ equipment wear
Personal Protective Equipment
when conducting this test.
Warning - Ensure power is
isolated before conducting this
test.
Ensure power point is switched on and
using a multimeter on the AC voltage
scale, measure between the 3 pin sockets
on the power point. The following results
should be obtained:
Mark and disconnect wiring from the fan
and using a multimeter on the ohms scale,
measure between the two fan terminals.
Active to Neutral – 240 Volts AC.
Active to Earth – 240 Volts AC.
Neutral to Earth – 0 Volts.
TM036 Vermont Gas Fireplace & Gas Log Fire Service Instructions REV: A
D.O.I: 17/01/2008
This document is stored and maintained electronically by
The reading should be approximately 12
ohms
30
Service. All printed copies not bearing this statement in RED are deemed “uncontrolled”
Fault Finding Tests 7A – 8B
Test 7A – LHEC30
Test 7B – RFSDV34
Warning - Ensure power is
isolated before conducting this
test.
Mark and disconnect wiring from the
transformer and using a multimeter on the
ohms scale, measure between terminals 1
and 5 of the transformer (transformers
primary winding).
Warning - Ensure power is
isolated before conducting this
test.
Mark and disconnect wiring from the
transformer and using a multimeter on the
ohms scale, measure between terminals 1
and 5 of the transformer (transformers
primary winding).
The reading should be approximately 27 The reading should be approximately 27
ohms.
ohms.
Test 8A – LHEC30
Test 8B – RFSDV34
Warning - Ensure power is
isolated before conducting this
test.
Mark and disconnect wiring from the
transformer and using a multimeter on the
ohms scale, measure between terminals 2
and 4 of the transformer (transformers
secondary winding).
Warning - Ensure power is
isolated before conducting this
test.
Mark and disconnect wiring from the
transformer and using a multimeter on the
ohms scale, measure between terminals 2
and 4 of the transformer (transformers
secondary winding).
The reading should be approximately 13 The reading should be approximately 13
ohms.
ohms.
TM036 Vermont Gas Fireplace & Gas Log Fire Service Instructions REV: A
D.O.I: 17/01/2008
This document is stored and maintained electronically by
31
Service. All printed copies not bearing this statement in RED are deemed “uncontrolled”
Fault Finding Chart 6.1 & 6.2
6.1
6.2
Note: RC = Remote
Controller
Notes
(1) This refers to the wording next to the
fan icon (remote controller on auto
but fan manually overridden)
(2) When room temp = set temp fan may
be on or off.
(1)
Is
RC fan setting
on manual?
YES
NO
(2)
Is
RC fan level
„0‟?
YES
(2)
Is RC
room temp > or
= set temp?
NO
Room temp must be > or =
to set temp for fan to
operate.
YES
Increase RC set
temp to 1º > room temp &
wait for 1 minute.
YES
Replace remote controller
YES
NO
(2)
Is RC
room temp =
set temp?
NO
Is RC
fan level set on
„0‟?
Is
RC fan level
„0‟?
NO
NO
YES
(1)
Did
the fan come
on?
Increase RC fan
level to 6.
YES
Room temp was = set temp
& remote controller turned
fan off. Normal operation.
NO
Did
the fan come
on?
7
NO
Remote controller fan level
was set on 0. It must be set
on 1 – 6 for fan to operate.
YES
TM036 Vermont Gas Fireplace & Gas Log Fire Service Instructions REV: A
D.O.I: 17/01/2008
This document is stored and maintained electronically by
32
Service. All printed copies not bearing this statement in RED are deemed “uncontrolled”
Fault Finding Chart 6.3
Electrical Insulation Test
6.3
megger between the log fire 3
pin plug active pin and earth.
Then megger between the 3
pin plug neutral pin and earth.
Is either
reading below 1
mega-ohm?
NO
Faulty power circuit. Advise
customer to have
electrician check household
power circuit.
Is the
reading below 1
mega-ohm?
YES
Replace transformer.
Is the
reading below 1
mega-ohm?
YES
Replace fan assembly.
Is the
reading below 1
mega-ohm?
YES
Replace gas valve.
YES
Disconnect the wiring from the
transformer and megger
between each terminal on the
transformer and earth.
NO
Disconnect the wiring from the
fan and megger between each
terminal on the fan and earth.
NO
Disconnect the power supply
wiring from the gas valve and
megger between each power
supply terminal on the gas
valve and earth.
NO
Check for pinched or
damaged wiring touching
the Log fire chassis.
Electrical Insulation Testing
There are three basic test procedures that should be carried out when the operation and
function of a Vermont gas fireplace or gas log fires electrical system is in doubt.
Procedure 1: Insulation resistance of the water heater Neutral Circuit. (Reading not
to be below 1 Mega ohm).
1. Isolate power to the log fire by switching off power point and unplugging the 3
pin plug from the power point.
2. Connect megger leads to the Neutral and Earth pins of the log fire 3 pin plug.
3. Operate megger. A reading above 1 Mega ohm should be obtained.
4. If a reading below 1 Mega ohm is indicated, all component parts will need to be
individually tested to locate the fault. Refer to Fault Finding Chart 6.3 above.
Procedure 2: Insulation resistance of the log fire Active Circuit (reading not to be
below 1 mega-ohm).
5. Connect megger leads to the Active and Earth pins of the log fire 3 pin plug.
6. Operate megger. A reading above 1 Mega ohm should be obtained.
7. If a reading below 1 Mega ohm is indicated, all component parts will need to be
individually tested to locate the fault. Refer to Fault Finding Chart 6.3 above.
Procedure 3: To check “Continuity” of the log fire electrical circuit.
8. Set megger to resistance scale or multimeter to x1 resistance scale.
9. Measure between the Active and Neutral pins of the log fire 3 pin plug. The resistance
should be approximately 27.1 ohms. If a reading outside this resistance value is
obtained all electrical component parts will need to be individually tested to locate the
fault. Refer to Specifications table on page 4 for indicative resistance values of
components.
10.Reinsert 3 pin plug into power point and switch power point on. Note: If continuing
with any diagnostic procedures do not perform this step.
TM036 Vermont Gas Fireplace & Gas Log Fire Service Instructions REV: A
D.O.I: 17/01/2008
This document is stored and maintained electronically by
33
Service. All printed copies not bearing this statement in RED are deemed “uncontrolled”
Fault Finding Chart 7
7
Does
gas valve LED
indicate 3 or 8
flashes?
Notes
(1) Log fire will light and burner will operate on high
flame without 240V power supply however fan and
some remote controller functions will not operate.
(1)
YES
Is the
log fire plugged
into power point &
switched on?
(1)
YES
Is
local/remote
NO
switch set on
The local/remote selector
„Local‟?
switch is located on the
gas valve
Are
remote
controllers
batteries
flat?
The local/remote selector
switch must be set on
„remote‟ for the remote
controller to operate the log
fire. Set switch to „remote‟.
Plug log fire into power
point and switch on.
Replace remote controller
batteries.
YES
Is antenna
correctly
installed?
NO
NO
Reconnect antenna.
Move antenna away from
any metal (earth).
Remote controller antenna
must be firmly connected,
hanging in free air and not
touching any metal (earth)
YES
NO
NO
(1)
NO
Does
the fan work
when local/remote
YES
switch is set to
„local‟?
The local/remote
selector switch is
located on the gas
valve
2.1
YES
Switch the local/remote
selector switch to „remote‟.
Test 5
Is
240V AC present
at the power
point?
Does
remote
controller
work?
Re-teach the gas valve the
remote controller frequency.
NO
Has
the power
circuit fuse
blown?
Refer to „Recognition
Signal‟ in the section on
„Remote Controller‟.
YES
YES
NO
Did
the power
circuit fuse
blow?
Replace fuse
or reset circuit
breaker.
Replace gas valve.
NO
YES
YES
YES
Test 7A for LHEC30
or Test 7B for RFSDV34
NO
Is 115V AC
present at the
transformer?
YES
Blown fuse replaced.
Possible overloading of
power circuit. Check Log
fire operation and advise
customer.
6.3
No power supply. Advise
customer to have electrician
check household power
circuit.
NO
Is 240V AC
present at the
transformer?
Fault rectified.
Replace cord set.
Test 8A for LHEC30
or Test 8B for RFSDV34
NO
Test 6
Is the
fans winding
resistance
correct?
NO
YES
TM036 Vermont Gas Fireplace & Gas Log Fire Service Instructions REV: A
D.O.I: 17/01/2008
This document is stored and maintained electronically by
Replace transformer.
Replace fan assembly.
Replace gas valve.
34
Service. All printed copies not bearing this statement in RED are deemed “uncontrolled”
Fault Finding Chart 8
8
Is the
noise a creaking
and/or cracking
noise?
YES
It is normal for heating
appliances fabricated from
steel to give off some
expansion and/or contraction
noises during the start-up or
cool down cycle.
YES
Remove fan obstruction.
YES
Replace fan assembly.
NO
Is
the fan
obstructed?
NO
Is the
fan or fan motor
motor noisy?
Check for vibration noise
caused by loose component.
NO
Component Replacement Procedures – LHEC30
Removing the Glass Frame Assembly – LHCE30 (Procedure 1)
Only glass and gaskets approved by Raypak Australia may be used for
replacement. The use of substitute glass and/or gaskets will void all
warranties.
Under no circumstances is the log fire to be operated without the glass frame
assembly or with a broken glass panel or gasket. Replacement of the glass
including the gasket is to be performed by a licensed and qualified person.
If the log fire has been recently operated the glass frame assembly will be
extremely hot. A serious and significant burn hazard exists. Ensure the log
fire has sufficiently cooled before attempting to remove the front glass frame
assembly.
1. Turn pilotstat knob to the „OFF‟ position.
2. Open the hinged front lower louvre located below glass frame then lift up and remove
lower louvre.
3. Remove two glass frame retaining screws located on bottom corners of glass frame
assembly then lift bottom of glass frame assembly out slightly and up to remove.
4. Complete reassembly in reverse order of above.
TM036 Vermont Gas Fireplace & Gas Log Fire Service Instructions REV: A
D.O.I: 17/01/2008
This document is stored and maintained electronically by
35
Service. All printed copies not bearing this statement in RED are deemed “uncontrolled”
Log Assembly – LHEC30 (Procedure 2)
1. Remove front glass assembly (refer to procedure 1).
2. Remove logs and larva rock from burner.
Reassemble as follows:
3. Place rear centre log KR24 on rear log bracket. Locate the two holes in bottom of log
over the centre two bracket studs.
4. Place left log KR22 on rear log bracket. Locate the two holes in bottom of log over the
left two bracket studs.
5. Place right log KR23 on rear log bracket. Locate the two holes in bottom of log over the
right two bracket studs.
6. Place left front log KR25. Position notch in lower right hand side of log against second
grate from left. The top left hand edge of log KR25 rests in notch on log KR22.
7. Place right front log KR26. Position notch in centre of Y part of log against third grate
from right. The top edge of log KR26 rests in notch on log KR23.
8. Place larva rock on top of burner in the two vacant spaces between logs.
Sheet Metal Base Assembly– LHEC30 (Procedure 3)
Wear Personal Protective Equipment when conducting step 3 of this
procedure to reduce the risk of electric shock. Refer to Rheem Safety
Procedure on electrical testing.
1. Isolate power and gas supplies to the log fire and open front lower access louvre.
2. Remove two nuts retaining transformer cover and lift out transformer cover.
3. Confirm with a multi-meter between Active and Neutral, then Active and Earth,
then Neutral and Earth terminals of the transformer that voltage is not present.
4. Remove glass frame assembly (refer to procedure 1).
5. Remove log assembly and larva rock from burner (reverse procedure 2).
6. Remove screw retaining front right hand ember rack bracket to sheet metal base and
remove ember rack by withdrawing from left hand bracket.
7. Remove three screws retaining gas valve access cover to sheet metal base and
remove gas valve access cover.
8. Disconnect gas supply line at gas valve.
9. Remove four screws retaining burner sheet metal base assembly to side brackets. Two
screws are located on each side of sheet metal base assembly.
10.Lift up and remove burner sheet metal base assembly. The burner, pilot assembly and
gas valve will come away with the sheet metal base assembly. The power supply,
blocked flue switch wiring and fan wiring will need to be disconnected at the gas valve
to enable the sheet metal base assembly to be completely removed.
11.Complete reassembly in reverse order of above. Use thread tape when reconnecting
gas supply line to the gas valve.
12.Test for gas leaks at all unions using soapy water solution.
TM036 Vermont Gas Fireplace & Gas Log Fire Service Instructions REV: A
D.O.I: 17/01/2008
This document is stored and maintained electronically by
36
Service. All printed copies not bearing this statement in RED are deemed “uncontrolled”
Pilot Assembly – LHEC30 (Procedure 4)
1. Remove sheet metal base assembly (refer to procedure 3).
2. Mark and disconnect thermopile wiring at gas valve. Note: Mark wiring to ensure
thermopiles are reconnected in their original location.
3. Disconnect ignition plug wiring by unplugging at electrical joining connector.
4. Unscrew pilot feed pipe nut at gas valve and remove pilot feed pipe from gas valve.
5. Remove screw retaining pilot heat shield to bracket and remove pilot heat shield.
6. Complete reassembly in reverse order of above.
7. Test for gas leaks at all unions using soapy water solution.
Ignition Plug – LHEC30 (Procedure 5)
1. Remove pilot assembly (refer to procedure 4).
2. Remove screw retaining ignition plug to pilot assembly and remove ignition plug from
pilot assembly.
3. Complete reassembly in reverse order of above.
4. Set ignition plug gap at 3mm (refer to „Adjusting the Ignition Plug Gap‟ on page 18.
5. Test for gas leaks at all unions using soapy water solution.
Thermopile – LHEC30 (Procedure 6)
1. Remove pilot assembly (refer to procedure 4).
2. Unscrew nut from beneath thermopile ensuring thermopile wiring does not turn with nut
and withdraw thermopile from pilot assembly.
3. Complete reassembly in reverse order of above.
4. Test for gas leaks at all unions using soapy water solution.
Pilot Injector – LHEC30 (Procedure 7)
1.
2.
3.
4.
Isolate power and gas supplies to the log fire.
Remove front glass assembly (refer to procedure 1).
Remove log assembly and larva rock from burner (reverse procedure 2).
Unscrew and remove top section of pilot light (section above bracket) from pilot
assembly.
5. Remove injector from top section of pilot light.
6. Complete reassembly in reverse order of above.
7. Test for gas leaks at all unions using soapy water solution.
Pilot Feed Pipe – LHEC30 (Procedure 8)
1.
2.
3.
4.
Remove pilot assembly (refer to procedure 4).
Unscrew pilot feed pipe nut at pilot light and remove pilot feed pipe from gas valve.
Complete reassembly in reverse order of above.
Test for gas leaks at all unions using soapy water solution.
TM036 Vermont Gas Fireplace & Gas Log Fire Service Instructions REV: A
D.O.I: 17/01/2008
This document is stored and maintained electronically by
37
Service. All printed copies not bearing this statement in RED are deemed “uncontrolled”
Burner – LHEC30 (Procedure 9)
1.
2.
3.
4.
5.
6.
7.
Isolate power and gas supplies to the log fire.
Remove front glass assembly (refer to procedure 1).
Remove log assembly and larva rock from burner (reverse procedure 2).
Remove two screws retaining log bracket to log fire rear and remove log bracket.
Remove screw retaining burner manifold cover and remove burner manifold cover.
Remove two screws retaining burner hold down brackets to burner base.
Remove screw retaining pilot heat shield to pilot assembly and remove pilot heat
shield.
8. Withdraw burner by lifting burner up at right hand side to clear pilot assembly and then
sliding towards pilot assembly. Note: burner injectors may catch on burner hindering
withdrawal and necessitating some jiggling of burner to remove.
9. Complete reassembly in reverse order of above.
10. Test for gas leaks at all unions using soapy water solution.
Burner Injectors – LHEC30 (Procedure 10)
1. Remove burner (refer to procedure 9).
2. Unscrew and remove front and/or rear burner injector(s).
3. Complete reassembly in reverse order of above using gas sealing paste on burner
injector threads.
Burner Feed Pipe – LHEC30 (Procedure 11)
1. Remove the sheet metal base (refer to procedure 3).
2. Unscrew burner feed pipe nut at gas valve and remove burner feed pipe from gas
valve.
3. Unscrew burner feed pipe nut at burner manifold and remove burner feed pipe from
burner manifold.
4. Complete reassembly in reverse order of above.
5. Test for gas leaks at all unions using soapy water solution.
Burner Manifold – LHEC30 (Procedure 12)
1. Remove burner (refer to procedure 3).
2. Remove screw retaining burner manifold bracket to log fire base.
3. Unscrew nut retaining burner feed pipe to burner manifold and remove burner
manifold.
4. Unscrew and remove front and/or rear burner injector(s).
5. Unscrew and remove burner manifold to burner feed pipe adapter.
6. Complete reassembly in reverse order of above using gas sealing paste on burner
injector threads and burner manifold to burner feed pipe adapter.
TM036 Vermont Gas Fireplace & Gas Log Fire Service Instructions REV: A
D.O.I: 17/01/2008
This document is stored and maintained electronically by
38
Service. All printed copies not bearing this statement in RED are deemed “uncontrolled”
Gas Valve – LHEC30 (Procedure 13)
1. Remove the sheet metal base (refer to procedure 3).
2. Mark and disconnect all gas valve wiring. Note: Mark wiring to ensure thermopiles
and components are reconnected in their original location.
3. Disconnect ignition plug wiring by unplugging at electrical joining connector.
4. Unscrew pilot feed pipe nut at gas valve and remove pilot feed pipe from gas valve.
5. Unscrew burner feed pipe nut at gas valve elbow and remove burner feed pipe from
gas valve.
6. Remove four screws retaining gas valve to gas valve supporting bracket and remove
gas valve.
7. Unscrew and remove burner feed pipe elbow from gas valve.
8. Complete reassembly in reverse order of above using thread tape on gas valve elbow
and check for gas leaks using soapy water solution.
9. Operate log fire and perform the gas valve safety shutdown test procedure (refer to
page 18).
10. Operate log fire and perform remote controller recognition procedure (refer to
„Recognition Signal‟ on page 12).
Gas Valve Receiving Antenna – LHEC30 (Procedure 14)
Wear Personal Protective Equipment when conducting step 3 of this
procedure to reduce the risk of electric shock. Refer to Rheem Safety
Procedure on electrical testing.
1. Isolate power and gas supplies to the log fire and open front lower access louvre.
2. Remove two nuts retaining transformer cover and lift out transformer cover.
3. Confirm with a multi-meter between Active and Neutral, then Active and Earth,
then Neutral and Earth terminals of the transformer that voltage is not present.
4. Disconnect antenna spade terminal from gas valve and remove antenna.
5. Complete reassembly in reverse order of above.
6. Operate log fire and check remote controller operation. If remote controller does not
operate perform the remote controller recognition procedure (refer to „Recognition
Signal‟ on page 12).
Transformer – LHEC30 (Procedure 15)
Wear Personal Protective Equipment when conducting step 3 of this
procedure to reduce the risk of electric shock. Refer to Rheem Safety
Procedure on electrical testing.
1. Isolate power and gas supplies to the log fire and open front lower access louvre.
2. Remove two nuts retaining transformer cover and lift out transformer cover.
3. Confirm with a multi-meter between Active and Neutral, then Active and Earth,
then Neutral and Earth terminals of the transformer that voltage is not present.
4. Mark and disconnect wiring from transformer.
5. Remove four screws retaining transformer to transformer supporting bracket and
withdraw transformer through front of log fire louvre opening.
6. Complete reassembly in reverse order of above.
TM036 Vermont Gas Fireplace & Gas Log Fire Service Instructions REV: A
D.O.I: 17/01/2008
This document is stored and maintained electronically by
39
Service. All printed copies not bearing this statement in RED are deemed “uncontrolled”
Fan Assembly – LHEC30 (Procedure 16)
Wear Personal Protective Equipment when conducting step 3 of this
procedure to reduce the risk of electric shock. Refer to Rheem Safety
Procedure on electrical testing.
1. Isolate power and gas supplies to the log fire and open front lower access louvre.
2. Remove two nuts retaining transformer cover and lift out transformer cover.
3. Confirm with a multi-meter between Active and Neutral, then Active and Earth,
then Neutral and Earth terminals of the transformer that voltage is not present.
4. Remove glass frame assembly (refer to procedure 1).
5. Remove log assembly and larva rock from burner (reverse procedure 2).
6. Remove two screws retaining log bracket to log fire rear and remove log bracket.
7. Remove four screws retaining fan cover to rear of log fire and remove fan cover.
8. Disconnect fan wiring from fan motor.
9. Remove two nuts retaining fan assembly to rear of log fire. Note: Nuts are on studs
welded to rear of log fire.
10.Remove earth wire from left hand stud and lift out fan assembly.
11.Complete reassembly in reverse order of above.
Blocked Flue Switch – LHEC30 (Procedure 17)
1. Remove front glass assembly (refer to procedure 1).
2. Remove five screws retaining flue baffle to inside top of fireplace and remove baffle.
3. Remove four screws retaining blocked flue switch access cover and remove cover and
gasket.
4. Remove screw retaining blocked flue switch bracket and withdraw bracket and blocked
flue switch through opening.
5. Disconnect the wiring from the blocked flue switch and remove blocked flue switch.
Note: If the blocked flue switch bracket retaining screw is dropped inside the log fire,
the fan motor cover will need to be removed and the screw recovered. Do not leave
this screw inside the log fire as it may get caught in the fan causing fan seizure
and subsequent fan motor burn out. Also ensure the blocked flue switch wiring does
not fall inside the access hole or the fan motor cover will have to be removed to
recover the wiring.
Cord Set – LHEC30 (Procedure 18)
1.
2.
3.
4.
5.
Remove transformer (refer to procedure 15).
Mark and disconnect cord set wiring to the transformer.
Remove earth stud nut and remove cord set earth wire from earth stud.
Cut and remove cable tie retaining cord set compression gland.
Withdraw compression gland and cord set wiring through aperture in transformer
supporting bracket.
6. Remove compression gland from cord set wiring.
7. Complete reassembly in reverse order of above replacing cut cable tie.
TM036 Vermont Gas Fireplace & Gas Log Fire Service Instructions REV: A
D.O.I: 17/01/2008
This document is stored and maintained electronically by
40
Service. All printed copies not bearing this statement in RED are deemed “uncontrolled”
Component Replacement Procedures – RFSDV34
Removing the Glass Frame Assembly – RFSDV34 (Procedure 19)
Only glass and gaskets approved by Raypak Australia may be used for
replacement. The use of substitute glass and/or gaskets will void all
warranties.
Under no circumstances is the log fire to be operated without the glass frame
assembly or with a broken glass panel or gasket. Replacement of the glass
including the gasket is to be performed by a licensed and qualified person.
If the log fire has been recently operated the glass frame assembly will be
extremely hot. A serious and significant burn hazard exists. Ensure the log
fire has sufficiently cooled before attempting to remove the front glass frame
assembly.
1. Turn pilotstat knob to the „OFF‟ position.
2. Open left and right hand side panels of the log fire.
3. Unclip two retaining clamps located behind each side panel and lift clear of slots in
glass frame assembly.
4. Lift glass frame assembly forward to remove. Glass panels, glass frame and air louvre
will come out as one piece. Note: Seals may cause glass frame to stick slightly.
5. Complete reassembly in reverse order of above.
Log Assembly – RFSDV34 (Procedure 20)
1. Remove front glass assembly (refer to procedure 19).
2. Remove logs and larva rock from burner.
Reassemble as follows:
3. Place rear log KR10 firmly on rear log bracket behind bracket tabs ensuring log is
horizontal and centred.
4. Place front log KR7 behind the front serrated deflector ensuring log is horizontal and
centred.
5. Place centre left log KR8 on top of burner left side. Locate the two holes on bottom of
log onto the two studs located on burner ensuring log tapers towards centre of burner.
6. Place centre right log KR9 on top of burner right side. Locate the two holes on bottom
of log onto the two studs located on burner ensuring log tapers towards centre of
burner.
7. Place larva rock on top of burner in the vacant space between the front log and two
centre logs.
8. Place top left log KR11 on to locator studs on centre left and rear logs so as log KR11
lies across centre left and rear logs from front to back.
9. Place top right log KR12 on to locator studs on centre right and rear logs so as log
KR12 lies across centre right and rear logs from front to back.
Front Lower Access Panel – RFSDV34 (Procedure 21)
1.
2.
3.
4.
Open lower front access cover by pulling forward from top.
Remove two retaining screws holding lower access panel in place.
Pull top of lower access panel forward to clear gas valve knobs then lift out.
Complete reassembly in reverse order of above.
TM036 Vermont Gas Fireplace & Gas Log Fire Service Instructions REV: A
D.O.I: 17/01/2008
This document is stored and maintained electronically by
41
Service. All printed copies not bearing this statement in RED are deemed “uncontrolled”
Pilot Assembly – RFSDV34 (Procedure 22)
Wear Personal Protective Equipment when conducting step 2 of this
procedure to reduce the risk of electric shock. Refer to Rheem Safety
Procedure on electrical testing.
1. Isolate power and gas supplies to the log fire and remove front lower access panel
(refer to procedure 21).
2. Confirm with a multi-meter between Active and Neutral, then Active and Earth,
then Neutral and Earth terminals of the transformer that voltage is not present.
3. Remove glass frame assembly (refer to procedure 19).
4. Remove log assembly and larva rock from burner (reverse procedure 20).
5. Mark and disconnect thermopile wiring at gas valve. Note: Mark wiring to ensure
thermopiles are reconnected in their original location.
6. Disconnect ignition plug wiring by unplugging at electrical joining connector.
7. Unscrew pilot feed pipe nut at gas valve and remove pilot feed pipe from gas valve.
8. Remove heat resistant sealing compound from underneath pilot assembly.
9. Remove screw retaining pilot heat shield to bracket and remove pilot heat shield.
10. Remove screw retaining lower sheet metal pilot aperture cover to log fire base and
remove lower sheet metal pilot aperture cover (the screw is located under the log fire
base below the pilot assembly).
11. Withdraw pilot assembly, pilot feed pipe and pilot wiring out through aperture in log fire
base being careful not to damage pilot feedpipe or wiring.
12. Complete reassembly in reverse order of above ensuring pilot assembly aperture in log
fire base is sealed with heat resistant sealing compound (part number 890591).
13. Test for gas leaks at all unions using soapy water solution.
Ignition Plug – RFSDV34 (Procedure 23)
1. Remove pilot assembly (refer to procedure 22).
2. Remove screw retaining ignition plug to pilot assembly and remove ignition plug from
pilot assembly.
3. Complete reassembly in reverse order of above.
4. Set ignition plug gap at 3mm (refer to „Adjusting the Ignition Plug Gap‟ on page 18.
5. Test for gas leaks at all unions using soapy water solution.
Thermopile – RFSDV34 (Procedure 24)
1. Remove pilot assembly (refer to procedure 22).
2. Unscrew nut from beneath thermopile ensuring thermopile wiring does not turn with nut
and withdraw thermopile from pilot assembly.
3. Complete reassembly in reverse order of above.
4. Test for gas leaks at all unions using soapy water solution.
TM036 Vermont Gas Fireplace & Gas Log Fire Service Instructions REV: A
D.O.I: 17/01/2008
This document is stored and maintained electronically by
42
Service. All printed copies not bearing this statement in RED are deemed “uncontrolled”
Pilot Injector – RFSDV34 (Procedure 25)
1.
2.
3.
4.
Isolate power and gas supplies to the log fire.
Remove glass frame assembly (refer to procedure 19).
Remove log assembly and larva rock from burner (reverse procedure 20).
Unscrew and remove top section of pilot light (section above bracket) from pilot
assembly.
5. Remove injector from top section of pilot light.
6. Complete reassembly in reverse order of above.
7. Test for gas leaks at all unions using soapy water solution.
Pilot Feed Pipe – RFSDV34 (Procedure 26)
1. Remove pilot assembly (refer to procedure 22).
2. Unscrew pilot feed pipe nut at pilot light and remove pilot feed pipe from gas valve.
3. Complete reassembly in reverse order of above.
Burner – RFSDV34 (Procedure 27)
1.
2.
3.
4.
5.
6.
7.
8.
9.
Isolate power and gas supplies to the log fire.
Remove glass frame assembly (refer to procedure 19).
Remove log assembly and larva rock from burner (reverse procedure 20).
Remove two screws retaining log ember grill to log fire base and remove log ember
grill.
Remove two screws retaining burner hold down brackets to burner base brackets.
Remove screw retaining pilot heat shield to pilot assembly and remove pilot heat
shield.
Withdraw burner by lifting burner up at right hand side to clear pilot assembly and then
sliding towards pilot assembly. Note: burner injectors may catch on burner hindering
withdrawal and necessitating some jiggling of burner to remove.
Complete reassembly in reverse order of above.
Test for gas leaks at all unions using soapy water solution.
Burner Injectors – RFSDV34 (Procedure 28)
1. Remove burner (refer to procedure 27).
2. Unscrew and remove front and/or rear burner injector(s).
3. Complete reassembly in reverse order of above using gas sealing paste on burner
injector threads.
TM036 Vermont Gas Fireplace & Gas Log Fire Service Instructions REV: A
D.O.I: 17/01/2008
This document is stored and maintained electronically by
43
Service. All printed copies not bearing this statement in RED are deemed “uncontrolled”
Burner Feed Pipe – RFSDV34 (Procedure 29)
1. Remove the burner (refer to procedure 27).
2. Unscrew burner feed pipe nut at gas valve and remove burner feed pipe from gas
valve.
3. Remove heat resistant sealing compound from burner feed pipe aperture in log fire
base.
4. Remove retaining screw holding burner manifold bracket to log fire base and withdraw
burner manifold and burner feed pipe through aperture in log fire base.
5. Unscrew burner feed pipe nut at burner manifold and remove burner feed pipe from
burner manifold.
6. Complete reassembly in reverse order of above ensuring burner feed pipe aperture in
log fire base is sealed with heat resistant sealing compound (part number 890591).
7. Test for gas leaks at all unions using soapy water solution.
Burner Manifold – RFSDV34 (Procedure 30)
1.
2.
3.
4.
Remove burner feed pipe (refer to procedure 29).
Unscrew and remove front and/or rear burner injector(s).
Unscrew and remove burner manifold to burner feed pipe adapter.
Complete reassembly in reverse order of above using gas sealing paste on burner
injector threads and burner manifold to burner feed pipe adapter.
5. Test for gas leaks at all unions using soapy water solution.
Gas Valve – RFSDV34 (Procedure 31)
Wear Personal Protective Equipment when conducting step 2 of this
procedure to reduce the risk of electric shock. Refer to Rheem Safety
Procedure on electrical testing.
1. Isolate power and gas supplies to the log fire and remove front lower access panel
(refer to procedure 21).
2. Confirm with a multi-meter between Active and Neutral, then Active and Earth,
then Neutral and Earth terminals of the transformer that voltage is not present.
3. Remove glass frame assembly (refer to procedure 1).
4. Remove log assembly and larva rock from burner (reverse procedure 20).
5. Mark and disconnect all gas valve wiring. Note: Mark wiring to ensure thermopiles
and components are reconnected in their original location.
6. Disconnect ignition plug wiring by unplugging at electrical joining connector.
7. Unscrew pilot feed pipe nut at gas valve and remove pilot feed pipe from gas valve.
8. Unscrew burner feed pipe nut at gas valve and remove burner feed pipe from gas
valve.
9. Remove two screws retaining gas valve supporting bracket to log fire base and remove
gas valve.
10. Remove four screws retaining gas valve supporting bracket to gas valve.
11. Complete reassembly in reverse order of above.
12. Test for gas leaks at all unions using soapy water solution.
13. Operate log fire and perform the gas valve safety shutdown test procedure (refer to
page 18).
14. Operate log fire and perform remote controller recognition procedure (refer to
„Recognition Signal‟ on page 12).
TM036 Vermont Gas Fireplace & Gas Log Fire Service Instructions REV: A
D.O.I: 17/01/2008
This document is stored and maintained electronically by
44
Service. All printed copies not bearing this statement in RED are deemed “uncontrolled”
Gas Valve Receiving Antenna – RFSDV34 (Procedure 32)
Wear Personal Protective Equipment when conducting step 2 of this
procedure to reduce the risk of electric shock. Refer to Rheem Safety
Procedure on electrical testing.
1. Isolate power and gas supplies to the log fire and remove front lower access panel
(refer to procedure 21).
2. Confirm with a multi-meter between Active and Neutral, then Active and Earth,
then Neutral and Earth terminals of the transformer that voltage is not present.
3. Disconnect antenna spade terminal from gas valve and remove antenna.
4. Complete reassembly in reverse order of above.
5. Operate log fire and check remote controller operation. If remote controller does not
operate perform the remote controller recognition procedure (refer to „Recognition
Signal‟ on page 12).
Transformer – RFSDV34 (Procedure 33)
Wear Personal Protective Equipment when conducting step 2 of this
procedure to reduce the risk of electric shock. Refer to Rheem Safety
Procedure on electrical testing.
1. Isolate power and gas supplies to log fire and remove front lower access panel
(refer to procedure 21).
2. Confirm with a multi-meter between Active and Neutral, then Active and Earth,
then Neutral and Earth terminals of the transformer that voltage is not present.
3. Remove two screws retaining transformer supporting bracket to log fire base and
withdraw transformer and supporting bracket through front or rear of log fire.
4. Mark and disconnect wiring from transformer.
5. Remove four screws retaining transformer to transformer supporting bracket and
remove transformer from supporting bracket.
6. Complete reassembly in reverse order of above.
Fan Assembly – RFSDV34 (Procedure 34)
Wear Personal Protective Equipment when conducting step 2 of this
procedure to reduce the risk of electric shock. Refer to Rheem Safety
Procedure on electrical testing.
1. Isolate power and gas supplies to the log fire and remove front lower access panel
(refer to procedure 21).
2. Confirm with a multi-meter between Active and Neutral, then Active and Earth,
then Neutral and Earth terminals of the transformer that voltage is not present.
3. Remove two nuts retaining fan assembly to rear of log fire. Note: Nuts are on studs
welded to rear of log fire.
4. Remove earth wire from left hand stud and lift fan assembly clear of studs. Fan
assembly may be withdrawn through front or rear of log fire.
5. Disconnect fan wiring from fan motor.
6. Complete reassembly in reverse order of above.
TM036 Vermont Gas Fireplace & Gas Log Fire Service Instructions REV: A
D.O.I: 17/01/2008
This document is stored and maintained electronically by
45
Service. All printed copies not bearing this statement in RED are deemed “uncontrolled”
Blocked Flue Switch – RFSDV34 (Procedure 35)
If the log fire has been recently operated the flue will be extremely hot. A
serious and significant burn hazard exists. Ensure the log fire is not
operating and that the flue has sufficiently cooled before attempting to
remove the blocked flue switch.
1. Remove two screws retaining blocked flue switch cover to draught diverter and
withdraw blocked flue switch cover and blocked flue switch from draught diverter.
2. Disconnect wiring to the blocked flue switch.
3. Complete reassembly in reverse order of above.
Cord Set – RFSDV34 (Procedure 36)
1.
2.
3.
4.
5.
Remove transformer (refer to procedure 33).
Mark and disconnect cord set wiring to the transformer.
Remove earth stud nut and remove cord set earth wire from earth stud.
Cut and remove cable tie retaining cord set compression gland.
Withdraw compression gland and cord set wiring through aperture in transformer
supporting bracket.
6. Remove compression gland from cord set wiring.
7. Complete reassembly in reverse order of above replacing cut cable tie.
TM036 Vermont Gas Fireplace & Gas Log Fire Service Instructions REV: A
D.O.I: 17/01/2008
This document is stored and maintained electronically by
46
Service. All printed copies not bearing this statement in RED are deemed “uncontrolled”
Exploded View 1 – LHEC30
TM036 Vermont Gas Fireplace & Gas Log Fire Service Instructions REV: A
D.O.I: 17/01/2008
This document is stored and maintained electronically by
47
Service. All printed copies not bearing this statement in RED are deemed “uncontrolled”
Replacement Parts List – LHEC30 (Exploded View 1)
Item
1
1a
1b
1c
1d
1e
2
3
4
5
6
7
12
13
15
21
24
25
26
27
28
30
34
35
36
40
41
42
43
44
45
46
47
49
50
52
Not
Shown
Description
Log Set Complete
Log Rear Left
Log Rear Right
Log Rear Centre
Log Front Left
Log Front Right
Larva Rock Burner Package A
Larva Rock Burner Package B
Burner Assembly (includes ceramic tiles)
Ceramic Tile - Burner (single)
Injector Burner Front - NG
Injector Burner Front - Propane
Injector Burner Rear - NG
Injector Burner Rear - Propane
Pilot Assembly - NG
Pilot Assembly - Propane
Injector Pilot - NG
Injector Pilot - Propane
Manifold Tubing - Burner (includes fittings, requires bending)
Piezo Igniter (includes cable)
Gas Valve Honeywell RV8310D - NG
Gas Valve Honeywell RV8310D - Propane
Antenna – Gas Valve
Remote Controller
Thermopile
Cord Set
Fan Assembly (includes fan, fan motor & bracket)
Window Glass (includes gasket)
Window Gasket
Window Glass Frame
Bracket - Blocked Flue Switch
Flexible Connector – Gas Inlet
Bracket - Rear Log Assembly
Bracket - Log Support Assembly
Access Cover & Gasket - Blocked Flue Switch
Bracket - Grate
Hinges - Front Lower Louvre (1 pair)
Pilot Heat Shield
Grate Assembly
Blocked Flue Switch
Wiring Harness - Blocked Flue Switch
Transformer 240V/115V
Gas Conversion Kit - NG to Propane
Gas Conversion Kit - Propane to NG
Zero Clearance Kit (for new installations)
Surround with Mantle (raw ready to paint)
LHEC30
10004866
KR22
KR23
KR24
KR25
KR26
57697
10001454
10004972
57803
57672
54831
50998
54833
20002266
20002268
20000908
20000907
57318
20000062
20003719
20003720
20003561
20002047
20002400
20002541
54103
10004989
57317
10004873
10004980
10005098
10005489
10004885
10005007
10003479
52356
10000248
10004967
51866
10005073
10008760
10005890
10005891
HEZC
*MAJ700
* For Sheraton brown finish order MAJ7014SB or for faded mahogany order MAJ7014FM.
TM036 Vermont Gas Fireplace & Gas Log Fire Service Instructions REV: A
D.O.I: 17/01/2008
This document is stored and maintained electronically by
48
Service. All printed copies not bearing this statement in RED are deemed “uncontrolled”
Exploded View 2 – RFSDV34
TM036 Vermont Gas Fireplace & Gas Log Fire Service Instructions REV: A
D.O.I: 17/01/2008
This document is stored and maintained electronically by
49
Service. All printed copies not bearing this statement in RED are deemed “uncontrolled”
Replacement Parts List – RFSDV34 (Exploded View 2)
Item
1
1a
1b
1c
1d
1e
1f
2
3
4
5
6
7
8
11
12
13
14
15
18
19
20
24
27
28
29
30
31
32
34
40
Not
Shown
Description
Log Set Complete
Log Ember Bed
Log Front Left
Log Front Right
Log Rear
Log Top Left
Log Top Right
Larva Rock Burner Package A
Burner Assembly (includes ceramic tiles)
Ceramic Tile - Burner (single)
Injector Burner Rear - NG
Injector Burner Rear - Propane
Injector Burner Front - NG
Injector Burner Front - Propane
Injector Pilot - NG
Injector Pilot - Propane
Pilot Assembly - NG
Pilot Assembly - Propane
Pilot Tube With Fittings
Manifold Tubing - Burner (includes fittings, requires bending)
Thermopile
Piezo Igniter (includes cable)
Remote Controller
Gas Valve Honeywell RV8310D - NG
Gas Valve Honeywell RV8310D - Propane
Cord Set
Fan Assembly (includes fan, fan motor & bracket)
Window Frame Assembly (includes glass)
Front Louvre Assembly
Cabinet Side Door (left or right)
Control Door Assembly
Clamp – Control Door Assembly
Antenna – Gas Valve
Top Grill Panel
Mesh Screen
Burner Tray Relief Plate (includes gasket)
Transformer 240V/115V
Manifold Assembly
Relief Plate (includes gasket)
Window Glass (includes gasket)
Window Glass Gasket
Draught Diverter
Blocked Flue Switch – Draught Diverter
Heat resistant sealing compound
TM036 Vermont Gas Fireplace & Gas Log Fire Service Instructions REV: A
D.O.I: 17/01/2008
This document is stored and maintained electronically by
RFSDV34
100001763
KR7
KR8
KR9
KR10
KR11
KR12
57897
10001272
57803
50998
54833
57672
54831
20000908
20000907
20002266
20002268
10003297
57318
20002400
20000062
20002047
20003719
20003720
20002541
54103
10001917
10001370
10001792
10001790
10000949
20003561
10001791
10001749
10004192
10008760
10000824
10002862
10001916
10001983
N/A
51866
890591
50
Service. All printed copies not bearing this statement in RED are deemed “uncontrolled”
Gas Type Conversions
Both the LHEC30 and RFSDV34 are gas type convertible between Natural and Propane
gas. The gas type conversion procedure is identical for both log fires as are the gas type
conversion kits.
Gas Type Conversion Kits
Convert to gas type
Gas conversion kit part number
Kit components
NG
Propane
10005891
10005890
Gas valve conversion kit
Pilot injector
Front burner injector
Rear burner injector
Instruction sheet
To convert the gas type of a log fire the gas valve needs to be converted and all three
injectors replaced (pilot injector and burner front and rear injectors). An adhesive gas type
label is to be filled out by the technician performing the gas conversion and attached to the
log fire rating plate.
Gas Type Conversion Procedure
Converting the Gas Valve
Both gas valve conversion kits are comprised of a fuel conversion plug and a gas type
label. The gas valve can be converted in position and is converted as follows:
1. Isolate the power and gas supply to the log fire. The
power supply can be isolated by switching off the power
point and removing the log fire 3 pin plug from the power
point.
2. Open the hinged front lower louvre (LHEC30) or remove the
front lower access panel (RFSDV34 – refer to component
replacement procedure 21 on page 41). This will provide
access to the gas valve.
3. Remove the modulating motor cover (3) by unscrewing in an anti-clockwise direction.
This will expose the gas type selector switch.
4. Using as flat bladed screwdriver rotate the gas type selector switch (4) until the arrows
point to the desired selection. Red screw for Propane and blue screw for NG.
5. Remove the existing fuel plug (5) and replace it with the new fuel plug. Red plug for
Propane and blue plug for NG.
6. Fill out the gas conversion label and adhere it to the log fire rating plate.
Injectors
To complete the gas type conversion the pilot injector will need to be replaced, as will the
burner front and rear injectors.
7. Remove and replace the front and rear burner injectors with injectors suitable for the
new gas type (for LHEC30 refer to procedure 10 on page 38 and for RFSDV34 refer to
procedure 28 on page 43).
8. Remove and replace the pilot injector with an injector suitable for the new gas type (for
LHEC30 refer to procedure 7 on page 37 and for RFSDV34 refer to procedure 25 on
page 43).
9. Restore power and gas supplies.
10. Test for gas leaks at all unions using soapy water solution.
11. Perform the gas valve safety shut down test procedure (refer to page 18).
TM036 Vermont Gas Fireplace & Gas Log Fire Service Instructions REV: A
D.O.I: 17/01/2008
This document is stored and maintained electronically by
51
Service. All printed copies not bearing this statement in RED are deemed “uncontrolled”
Warranty
Raypak Majestic LHEC30 Gas Fireplace & RFSDV34 Gas Log Fire Warranty
(Australia only)
*Rheem Australia will:
a) Repair or, if necessary replace any Raypak LHEC30 Gas Fireplace or RFSDV34 Gas Log Fire, or
b) Replace any component (or, if necessary, arrange the installation of a LHEC30 Raypak Gas Fireplace or RFSDV34
Gas Log Fire, which falls within the Warranty Periods specified in the installation and operating instructions, in
accordance with the subject table, conditions and exclusions.
Installation
Models
Gas Fireplace Insert
LHEC30RFN
LHEC30RFP
Freestanding Gas Log Fire
RFSDV34RFN
RFSDV34RFP
Gas Fireplace Insert
LHEC30RFN
LHEC30RFP
Freestanding Gas Log Fire
RFSDV34RFN
RFSDV34RFP
Gas Fireplace Insert
LHEC30RFN
LHEC30RFP
Freestanding Gas Log Fire
RFSDV34RFN
RFSDV34RFP
Period
Component
Year 1
All components
including Labour.
Year 2
All components
excluding labour
Years 3-10 (pro-rata)
From year 4 reducing
15% per year
Fire Box
excluding labour
WARRANTY CONDITIONS
1. This warranty is applicable only to the LHEC30RFN and LHEC30RFP Gas Log Fireplaces and RFSDV34RFN and
RFSDV34RFP Gas Log Fires manufactured from August 2005.
2. The gas fireplace or gas log fire must be installed in accordance with the Raypak installation instructions supplied
with the log fire and in accordance with all relevant statutory and local requirements of the state in which the log fire is
installed.
3. The Gas Fireplace or Gas Log Fire must be correctly commissioned by a licensed and authorised person and the
installation certified by the relevant Gas Authority of the State in which the log fire is installed.
4. Where a failed component or log fire is replaced under warranty, the balance of the original warranty period will
remain effective. The replaced part or log fire does not carry a new warranty.
5. Where the gas fireplace or gas log fire is installed outside the boundaries of the metropolitan area as defined by
Rheem or further than 25km from a regional Rheem branch office, or an accredited service agent, the cost of
transport, insurance and travelling costs between the nearest Rheem accredited Service Agent‟s premises and the
installed site shall be the owners responsibility.
6. The warranty only applies to the gas fireplace or gas log fire and original or genuine (company) component
replacement parts and therefore does not cover any plumbing or electrical parts supplied by the installer and not an
integral part of the log fire.
Notes:
* Rheem Australia Pty Ltd provides warranty service and spare parts on behalf of Raypak.
Rheem reserves the right to transfer fully functional components from the defective gas fireplace or gas log fire to the
replacement log fire if required.
In addition to this warranty, the Trade Practices Act 1974 and similar laws in each state and territory provide the owner
under certain circumstances with certain minimum statutory rights in relation to your Raypak gas fireplace or gas log fire.
This warranty must be read subject to that legislation and nothing in this warranty has the effect of excluding, restricting
those rights.
NOTE: Every care has been taken to ensure accuracy in preparation of this publication. No liability can be accepted for
any consequences which may arise as a result of its application.
Rheem Australia Pty Ltd
TM036 Vermont Gas Fireplace & Gas Log Fire Service Instructions REV: A
D.O.I: 17/01/2008
This document is stored and maintained electronically by
ABN 21 098 823 511
52
Service. All printed copies not bearing this statement in RED are deemed “uncontrolled”
Document Revision History
Title:
Vermont Log Fire Service Instructions
Revision
A
Document Nº: TM036
Details of change
Service Manual Issued for Gas Fireplace & Gas Log Fire
TM036 Vermont Gas Fireplace & Gas Log Fire Service Instructions REV: A
D.O.I: 17/01/2008
This document is stored and maintained electronically by
D.O.I.
01/08
53
Service. All printed copies not bearing this statement in RED are deemed “uncontrolled”