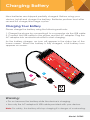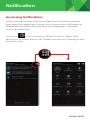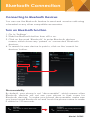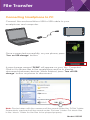
1
Quick Start Guide
D554P
U.S Service Hotline : 1-888-863-0138
More support at www.d2pad.info
Overview
1
2
6
7
3
4
5
1
Volume Keys
2
Front Camera
3
Menu Key
4
Home Key
5
Back Key
6
Flash and Rear Camera
7
Power Button
Model: D554P
SIM Card Installation
A SIM card contains your phone number and other necessary data. Your
device has dual SIM slots that both support 3G (WCDMA) SIM cards.
To Install the SIM Card
Make sure the device is turned off and the front facing down. Hold
the device firmly and use the notch at the bottom corner to loosen
the cover. Use material with a hard, thin edge such as your fingernail
or a credit card to carefully run along the seam to loosen. Then lift
the cover until it detaches completely.
2. Remove the battery first if it is in. Locate the SIM card slot and
insert the SIM card with gold contacts facing down and cut-off
corner facing out.
Slot 1
Slot 2
Note: The phone can support dual SIM
cards. While both card slots support 3G SIM
card (WCDMA), only one SIM card may
connect to a 3G network at a time. If you
need to use 3G operation, insert a 3G card
into slot 1 (Default is SIM1 card. To
enable/disable a 3G network go to Settings
> More… > Mobile networks > 3G service).
Some SIM cards may not have 3G function,
nor be compatible with your device. Please
consult your service provider for a
replacement SIM card (fees may occur).
3. To turn on/off a SIM card go to Settings > SIM management and
slide the SIM card sliders. To turn on/off a SIM card’s data connection,
go to Settings > SIM management and click on ‘Data connection’
option and select a SIM card that has 3G capability.
Model: D554P
Charging Battery
New batteries are shipped partially charged. Before using your
device, install and charge the battery. Batteries perform best after
several full charge/discharge cycles.
Charging Your Battery
Please charge the battery using the following methods:
1. Charge the phone by connecting it to a computer via the USB cable.
2. Connect the USB cable to the phone and the AC adapter. Plug the
AC adapter into an electrical outlet to start charging.
As the battery charges, an icon will appear in the status bar of the
home screen. When the battery is fully charged, a full battery icon
appears on screen.
1
2
Warning:
• Do not remove the battery while the device is charging.
• Use only the AC adapter & USB cable provided with your device.
Note: For safety, the battery will stop charging if in danger of overheating.
Model: D554P
Audio/Sleep/Screen Lock
Audio Profile
From the home screen, touch ‘App Menu’ & select ‘Settings’. Go to
‘Audio profiles’ and change the audio settings by clicking on the
‘Settings’ icon located next to the ‘General’ option. For your
convenience, you may also select Silent, Meeting, or Outdoor
preset options.
App Menu
Sleep Mode
Turn on sleep mode to save your battery power.
1. On the home screen, touch ‘App Menu’ & select ‘Settings’.
2. Select ‘Display’.
3. Select ‘Sleep’ and choose a time interval from the list.
Automatic On/Off
1. On the home screen, touch the ‘App Menu’ & select ‘Settings’.
2. Select ‘Schedule power on & off’.
3. Set the time/days for your phone to turn on & off automatically.
Screen Lock
1. On the home screen, touch the ‘App Menu’ & select ‘Settings’.
2. Select ‘Security’ then select ‘Screen lock’.
3. Select the desired type of lock & follow the prompts to set up.
Model: D554P
Phone Features
To Make Phone Calls
1. Touch the phone icon.
2. Select SIM1 card or SIM2 card.
3. Click on a contact from your contact list to
make a call.
(012) 345-6789
New York
Dial
Click on the phone icon to bring
up the phone dial.
(987) 654-3210
Call Logs
Click on the time icon to see the
most recent phone calls,
received calls, and missed calls.
Contacts List
Select a contact then select
the phone number to call. To
end a call, touch the red ‘END’
button.
PHONE CONTACT
Friends
100 people
Family
4 people
Co-Workers
50 people
Groups
You may customize and group
your contacts into different
categories.
Favorite Contacts
You may create, customize,
and save a list of your favorite
contacts here.
Note: If you inserted two SIM cards, the dial screen is default for
dual call. (Defined in the menu Settings > SIM management > Voice call)
Model: D554P
Texting
Composing text messages
1. Touch the text icon on home screen.
2. Add recipients by typing a name, number, or
email address in the ‘To’ field. Matching contact
results will appear.
3. To add an attachment, touch ‘Attach’ & select from existing
files or make a new attachment. To remove, select the
attachment’s ‘Remove’.
4. Type your message.
5. Click the mail icon to send your text.
Note: One text message has a limit of approximately 160 characters. If you
continue to type after the limit is reached, your message will be delivered
in multiples.
Model: D554P
Connecting to E-Mails
Log into your e-mail accounts.
You may log-in to your e-mail accounts from the phone to
access your e-mails.
From the Home screen select ‘Email’.
Enter your email address, password and tap ‘Next’.
Select which type of email account you
are setting up and complete settings.
(POP3 / IMAP / Microsoft Exchange
Account)
You will need to enter your user name,
password, and server information
depending on the type of email
account or your can change the settings
by tapping ‘Manual setup’ at the top
right corner screen. Tap ‘Next’ and
select ‘OK’ to accept the activation
notification.
Compose new:
1. Press MENU & select ‘Compose’.
2. Add recipients by typing a name or
email address in the ‘To’ field.
Matching contacts will appear. Select
a recipient or continue typing in the
email address to send to multiple
contacts.
3. Once finished typing the mail, select
‘Send’, ‘Save as draft’, or ‘Discard’.
4. The reply tab contains ‘Reply’,
‘Reply ll’ and ‘Forward’ options.
Delete message:
1. Go to Inbox to display messages.
2. Touch & hold the message you want
to delete.
3. Select ‘Delete’.
Model: D554P
Notification
Accessing Notifications
Touch the status bar & slide your finger down the home screen,
then press the upper right corner icon to open the notification list.
Notification list reports the arrival of new messages, calendar
events, & alarms etc.
Touch the
icon to bring up ‘Quick Function’ menu that
allows you to simply turn on/off certain functions by clicking on the
function’s icon.
Model: D554P
Bluetooth Connection
Connecting to Bluetooth Devices
You can use the Bluetooth feature to send and receive calls using
a headset or any other compatible accessories.
Turn on Bluetooth function.
1. Go to ‘Settings’.
2. Slide the Bluetooth button from off to on.
3. Click on the word ‘Bluetooth’ to enter Bluetooth devices
screen, which shows any ‘paired’ or ‘connected’ Bluetooth
devices.
4. To search for new device to pair to, click on the ‘search for
devices’ button.
D554P
Discoverability
By default, your phone is not “discoverable”, which means other
Bluetooth devices will not see your phone in their scans for
Bluetooth devices. To make your phone discoverable, make sure
you have turned Bluetooth on and touch the phone name to make
it visible for 120 seconds.
D554P
Not visible to other Bluetooth
devices
D554P
Visible to all nearby Bluetooth
devices (2:00)
Model: D554P
Wi-Fi / Camera
Turn on Wi-Fi
On/off: Slide bar to turn on or off.
Settings: Touch the word ‘Wi-Fi’ to open the Wi-Fi settings screen.
Select a network from the network list and provide a username
and/or password if required.
Home Wi-Fi
Public Wi-Fi
Camera
Capture images or record videos and share with family and
friends!
Turning on/off flash
Switch to front/rear camera
Settings
Video Take
Mode Picture
Model: D554P
Wallpapers / Screen Captures
Changing Wallpapers
Press and hold on a blank spot on the home screen and the Home
Screen option will pop up. Select ‘Home Screen’ and you may
choose a wallpaper from your Gallery, Live Wallpaper, Video
Wallpaper, and regular wallpaper.
Screen Capture
Pressing Volume(-) and power button at the same time to capture
‘screenshot’. All captured screenshot will be saved under gallery.
Model: D554P
File Transfer
Connecting Smartphone to PC
Connect the enclosed Micro USB to USB cable to your
smartphone and computer.
Once connected successfully, on your phone, press
‘Turn on USB storage’ button.
A new storage named ‘D554P’ will appear on your ‘My Computer’.
Click in it to review files in the smartphone and/or to transfer
documents between devices. When finished, press ‘Turn off USB
storage’ button on phone to disconnect.
D554P
Note: Photos taken with the camera will be saved under the ‘DCIM’ folder.
Screenshots captured will be saved under ‘Pictures’ folder. Put Music files
in the ‘Music’ folder for the files to be played properly.
Model: D554P
PRECAUTIONS
Avoid drop or strong collision of the product or heavy vibration of the
IPS screen, as it may cause damage or abnormal display of the IPS
screen.
Some storage capacity may not be available for data storage.This
product cannot be used with any unauthorized chargers, otherwise it
may burn the product, which is not covered by warranty.
For any additional orginal charger, please contact customer service.
To avoid any accidents, please do not use the product when driving
or walking on the street.
Digital2® shall not be held liable for any loss of data caused by
damage or repair of the product or any other reason. Please operate
the product properly following the guidelines.
Note: Pictures in this Quick Start Guide are for references only and
may differ from actual product.
©2014 All rights reserved. Digital2® and its Digital2® logo are registered
trademarks of Digital2®. All other trademarks or registered trademarks are the
property of their respective owners.