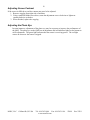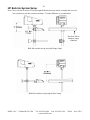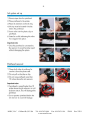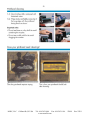
1
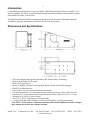
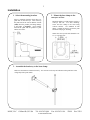
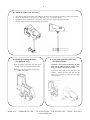
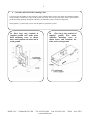
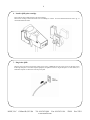
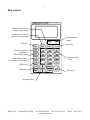
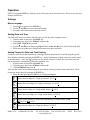
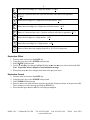
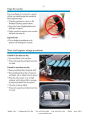
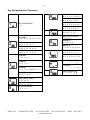
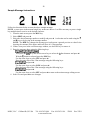
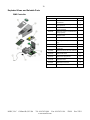
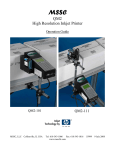
MSSC
QM2
High Resolution Inkjet Printer
Operation Guide
QM2-101
QM2-111
(Print head bracketry sold separately)
MSSC, LLC Collinsville, IL USA
Tel: 618-343-1006 Fax: 618-343-1016
www.msscllc.com
55899
Rev 22211
1
Table of Contents
Introduction..................................................................................................................................................2
Dimensions and Specifications ....................................................................................................................2
Installation....................................................................................................................................................3
Key Layout...................................................................................................................................................7
Quick Startup ...............................................................................................................................................8
Operation....................................................................................................................................................10
Settings.................................................................................................................................................. 10
Menu Language ................................................................................................................................ 10
Setting Date and Time ...................................................................................................................... 10
Setting Format for Date and Time Printing ...................................................................................... 10
Expiration Offset............................................................................................................................... 11
Expiration Format ............................................................................................................................. 11
Setup Menu ........................................................................................................................................... 12
Ink ..................................................................................................................................................... 12
Parameter .......................................................................................................................................... 12
DT Tune ............................................................................................................................................ 13
Total Count ....................................................................................................................................... 13
Init Data ............................................................................................................................................ 13
Extend ............................................................................................................................................... 13
Serial Numbers/Consecutive Numbering ............................................................................................. 14
Editing and Selecting Messages............................................................................................................ 15
Editing/Creating Messages ............................................................................................................... 15
Inputting Special Message Functions ............................................................................................... 15
Inputting Chinese Characters (Available in English menus only).................................................... 16
Two Ways of Printing Two Line Message with the QM2................................................................ 16
Maintenance...............................................................................................................................................18
Installing Ink Cartridges ....................................................................................................................... 18
Cleaning the Print Head ........................................................................................................................ 18
Adjusting Screen Contrast .................................................................................................................... 19
Adjusting the Photo Eye ....................................................................................................................... 19
HP Bulk Ink System Setup ........................................................................................................................20
Troubleshooting .........................................................................................................................................25
Appendix....................................................................................................................................................26
Feet/min. to meters/min Conversion Table....................................................................................... 26
Date and Hour Code Table ............................................................................................................... 26
Key Assignments for Characters ...................................................................................................... 27
Sample Message Instructions............................................................................................................ 28
Accessories and Parts........................................................................................................................ 29
Exploded Views and Saleable Parts.................................................................................................. 30
Creating Logos for the QM2............................................................................................................. 33
MSSC, LLC Collinsville, IL USA
Tel: 618-343-1006 Fax: 618-343-1016
www.msscllc.com
55899
Rev 22211
2
Introduction
Congratulations on the purchase of your new MSSC QM2 Industrial Inkjet Printer from MSSC, LLC.
We are confident you will be very pleased with the operation and performance of this durable, quality
built machine for many years to come.
The QM2 Industrial Inkjet Printer operating manual provides the necessary information about the
installation, operation, maintenance, and repair of your new inkjet printer.
Dimensions and Specifications
•
•
•
•
•
•
•
•
•
•
•
All in one compact inkjet printer powered by HP Thermal Inkjet Technology
Back-lit monochrome LCD screen
Phone like keypad layout
Menus in English, German, French, Spanish, Italian, Finnish, and Arabic languages
READY/ALARM indicator
Prints at max. conveyor speed of 200 ft/min (60 m/min)
100 message memory w/ 30 full height characters max per message. More with 2 line text.
Optimum 1/8” (3 mm) distance between print head and surface, not to exceed 1/4” (7 mm)
Operates on 85-240V AC power source
40-105°F (5-40°C) Temperature, 10-80% Humidity
1.5 Meter long data cable on QM2-111 offers more flexibility in print head mounting.
CAUTION: Never connect or disconnect the data cable with the QM2 powered on. Doing so
may damage the printer and void the warranty.
MSSC, LLC Collinsville, IL USA
Tel: 618-343-1006 Fax: 618-343-1016
www.msscllc.com
55899
Rev 22211
3
Installation
1. Select the mounting location.
Select a mounting location where there are
guide bars on the conveyor. This will keep
the print head at the correct distance of 1/8”
(3mm) from the product preventing damage
to the QM2. CAUTION: Avoid contact
between the QM2 and the product as print
quality may suffer.
2. Mount the base clamp to the
conveyor or floor.
Mount the QM2 to a solid structure such as a
conveyor side rail. For floor mounting,
secure the base clamp to the floor using
concrete anchors. Use standard 18 mm
tubing. Support the unit to prevent the print
head from swaying or vibrating.
NOTE: the conveyor side rails should be 1/8”
x 2.5” or greater steel.
3. Assemble the bracketry to the base clamp.
Make sure the bracket is mounted securely. You want to avoid sway and vibration in the print head. This
will greatly affect print quality.
MSSC, LLC Collinsville, IL USA
Tel: 618-343-1006 Fax: 618-343-1016
www.msscllc.com
55899
Rev 22211
4
4a. Mount the QM2 to the bracketry.
•
•
•
•
Place the base clamp on the bottom of the QM2 over the end of the vertical tubing and tighten to secure the print head.
Adjust the print head by loosening the cross clamp with a 5/32” or 4 mm allen wrench.
The QM2 should be perpendicular to the product. If the print head is angled print quality will suffer.
Once the QM2 is in position tighten all screws on the clamps
4b. Mount the remote print head.
(For QM2-111 only)
Mount the Remote print head using M5 screws
extending into the print head no more than 6 mm.
Note: Print head bracketry kit is sold separately.
(MSSC P/N 55325)
MSSC, LLC Collinsville, IL USA
4c. Connect the print head data cable.
(For QM2-111 only)
CAUTION: Never connect or disconnect the data
cable with the QM2 powered on. Doing so may
damage the printer and void the warranty.
Connect the data cable to the print head and
controller. Tighten the screw locks and route the
cable in such a way as to avoid items that might
cause damage to it.
Tel: 618-343-1006 Fax: 618-343-1016
www.msscllc.com
55899
Rev 22211
5
5. Controller and Print Head Grounding Cable.
To help prevent the buildup of static electricity on the controller and/or remote print head, the included grounding
wire(s) should be attached to a proper earth ground, bare metal. This wire gives the static charge a direct path to
ground preventing discharge through the controller’s or printhead’s sensitive electrical components.
For the QM2-111, perform steps 1 and 2. For the QM2-101, perform step 2 only.
5a. Place large ring terminal of
supplied ground wire under print
head mounting screw as shown
below and terminate the other end to
earth ground.
MSSC, LLC Collinsville, IL USA
5b.
Place large ring terminal of
supplied ground wire under
controller mounting screw as
shown below and terminate the
other end to earth ground.
Tel: 618-343-1006 Fax: 618-343-1016
www.msscllc.com
55899
Rev 22211
6
6. Install a QM2 print cartridge.
Power must be off to install and remove the print cartridge.
Please insert cartridge in horizontal direction to avoid damage to contacts. For more detailed instructions refer to pg. 15
of the QM2 Operation Guide.
7. Plug in the QM2.
Plug the power cord into an appropriate voltage power source. NOTE: Be sure the power source for the QM2 is free
from surges and spikes. Like other computer equipment, the QM2 is sensitive to surges and spikes. For best results, use a
dedicated receptacle on a direct line from the power panel.
MSSC, LLC Collinsville, IL USA
Tel: 618-343-1006 Fax: 618-343-1016
www.msscllc.com
55899
Rev 22211
7
Key Layout
Special Information and
Display Type Change
Language Selection and
Special Character Menu
Run Key
Status Indicator
Lights
Escape Key
Message Selection
and Editing
Date Printing Setup
Message Entry
Keys
Serial Number Setup
or Consecutive Numbering
QM2 setup
Alarm Reset
Enter Key
Navigation Keys
MSSC, LLC Collinsville, IL USA
Tel: 618-343-1006 Fax: 618-343-1016
www.msscllc.com
55899
Rev 22211
8
Quick Startup
QM2 Start Up Procedure
When starting up the QM2, the internal fan will start running and then the software initializes
and the unit will boot up. The startup cycle will take 10-15 seconds.
Please note, the photocell CANNOT be blocked/activated during this startup cycle. If the
photocell is blocked, the unit will experience an ERR, display ERR on the screen and the
QM2 will not function. The operator must clear the path to make the photocell not activate,
press RUN key on the QM2 and press the RUN key a second time cycling from STOP to
RUN on the display.
1. Install your QM2 and QM2 ink cartridge according to the installation instructions
a. CAUTION: Power must be off when installing or replacing a QM2 Ink Cartridge.
b. CAUTION: The QM2 will only function with QM2 Ink Cartridges.
c. CAUTION: Never connect or disconnect the data cable with the QM2 powered on.
Doing so may damage the printer and void the warranty.
2. Plug QM2 into proper power receptacle and turn the QM2 on using the on/off switch.
3. The QM2 can display screen prompts in English, French, Spanish, German, Finnish and Arabic
languages. The unit is shipped with English as the default language. To switch the language
press the FONT key on the keypad, then using the arrow keys on the keypad select the desired
language and then press the enter key. You can only change the language at the main menu
screen. The QM2 will always restart in the last language selected.
4. Set the date and time using the DATE key on the keypad. Likewise, you will need to set the date
and time format in order to print date and time. The format is set using the DATE key.
5. Enter your message(s) using the MSG key on the keypad and then using the arrow keys highlight
EDIT and press enter key. You can load 100 messages, 00 – 99, and the maximum is 30 full
height characters per message. To create a message or edit a message use the mobile phone like
keypad layout.
6. To print the desired message, press MSG, then SELECT and press the enter key. Using the
arrow keys, highlight the desired message and press the enter key. Press the enter key again
indicating yes I want to print the message.
7. Last step before printing, you must setup the QM2. This is done using the STUP key on the
keypad. There are many functions performed at this point.
MSSC, LLC Collinsville, IL USA
Tel: 618-343-1006 Fax: 618-343-1016
www.msscllc.com
55899
Rev 22211
a.
b.
c.
d.
e.
f.
9
INK allows you to set the start ink volume (new cartridge 42 ml), indicates ink volume
status and you set the point where the low ink alarm LED lights.
PARAMETER, the most commonly used key, you set the print delay in millimeters
(000 – 999), character width in millimeters (02-26), character height in millimeters
(05-13), dot density (1-8), Font (2 to choose from), print direction as viewed from
behind the printer, and the line speed in meters/minute must be entered by user. The
width, density and speed are interrelated. If the settings are not acceptable the QM2 will
not allow you to leave this window. The QM2 indicates which of these three values are
to high or low using arrows to the left of the variable. Use the arrow keys to maneuver
and change the values and the enter key to store changes.
DT TUNE, contains additional date formatting options.
TOTAL CNT, allows you to reset the total count (photocell trips)
INIT DATA, clears the memory of the entire unit.
CAUTION: If you do this you will lose all messages programmed and print
parameter settings.
EXTEND, contains advanced setup functions for repeat print, printer setup, and spacing
between lines for two line printing using the 2 function.
S
MSSC, LLC Collinsville, IL USA
Tel: 618-343-1006 Fax: 618-343-1016
www.msscllc.com
55899
Rev 22211
10
Operation
NOTE: Pressing the RUN key from any menu will return you to the main screen. However any unsaved
changes will be lost.
Settings
Menu Language
1. From main screen press the FONT key.
2. Use the ↑ and ↓ keys to select desired language.
3. Press ↵ to select and return to the main screen.
Setting Date and Time
The QM2 will retain current date and time once set, like any other computer device.
1. From the main screen press the DATE key.
2. Using the arrow keys select TODAY and press ↵.
3. Select SET CLOCK and press ↵.
4. Use the ↑ and ↓ keys to change highlighted field, use ← and → keys to select the desired field.
5. When done press ↵ to save changes and return to the previous menu.
Setting Format for Date and Time Printing
In order to print current date and time in a message, the date format must be entered using the special
date characters found by pressing the FONT key. A brief explanation of these characters can be found
in the table below. Once the date and time are set and the format is created, the current date and time
can be printed by selecting the character explained later.
1. From the main screen press the DATE key.
2. Using the arrow keys select TODAY and press ↵.
3. Select FORMAT and press ↵.
Enter the date in the desired format using the special date characters shown in the table below. These
characters can be found by pressing the FONT key.
4. When finished press ↵ select YES to save and press ↵ again.
D
T
Y
1
Inserts the first digit of a 2 digit year format. 07-20-07
Y
2
Inserts the second digit of a 2 digit year format. 07-20-07
M
1
Inserts the first digit of a 2 digit month format. 07-20-07
M
2
Inserts the second digit of a 2 digit month format. 07-20-07
M
X
Inserts month number or abbreviation depending on settings in DT TUNE.
07-20-07 or JUL-20-07
D
1
Inserts the first digit of a 2 digit day format. 07-20-07
MSSC, LLC Collinsville, IL USA
Tel: 618-343-1006 Fax: 618-343-1016
www.msscllc.com
55899
Rev 22211
11
D
2
Inserts the second digit of a 2 digit day format. 07-20-07
D
X
Inserts a 1 character date code. (See date and hour code table in the appendix)
07-K-07
H
1
Inserts the first digit of a 2 digit hour in 24 hour format. 14:53
H
2
Inserts the second digit of a 2 digit hour in 24 hour format. 14:53
H
X
Inserts a 1 character hour code. (See date and hour code table in appendix) E:53
m
1
Inserts the first digit of a 2 digit minute. 14:53
m
2
Inserts the second digit of a 2 digit minute. 14:53
J
D
Inserts a Julian date code ranging from 001 to 365 (366 for leap year)
Expiration Offset
1.
2.
3.
4.
From the main screen press the DATE key.
Using the arrow keys select EXPIRE and press ↵.
Select OFFSET and press ↵.
Use the ↑ and ↓ keys to change highlighted field, use ← and → keys to select the desired field.
Note: Expiration offset is unique to each individual message.
5. When done press ↵ to save changes and return to the previous menu.
Expiration Format
1.
2.
3.
4.
From the main screen press the DATE key.
Using the arrow keys select EXPIRE and press ↵.
Select FORMAT and press ↵.
Enter the date in the desired format using the special date characters shown in the previous table.
These characters can be found by pressing the FONT key.
5. When finished press ↵ select YES to save and press ↵ again.
MSSC, LLC Collinsville, IL USA
Tel: 618-343-1006 Fax: 618-343-1016
www.msscllc.com
55899
Rev 22211
12
Setup Menu
To access the setup menu press the STUP key.
Ink
This sub menu allows the user to specify the ink cartridge volume as well as when the QM2 generates a
low ink alarm.
To set the ink volume:
1. Press STUP key
2. Select INK and press ↵.
3. Use the ↑ and ↓ keys to change highlighted field.
4. Type in the desired value, 42 ml for a new cartridge or 370 ml for the bulk ink system.
5. Then set ink low at desired setting to generate low ink alarm. Press 02 for 2ml alarm trigger, for
example.
6. When done press ↵ to save the changes and return to the previous menu.
Parameter
The PARAMETER sub menu is used to setup how the QM2 prints the selected message. The settings
in this menu can be unique to each message or set up as common parameters.
Note: When a parameter is changed from the common settings; an asterisk (*) will appear next to the
message number. To revert back to the common settings return to the parameter submenu and press the
asterisk (*) key. This will restore all parameters for the selected message to the settings under
COMMON.
•
•
•
•
•
•
•
•
MSG: Select the message number to alter. If COMMON is selected, the settings will apply to
all messages that do not have a custom setting.
DELAY: Sets the distance between when the photo eye is tripped and the start of printing. This
value can be set from 0 to 999mm (0 to 39.3in). NOTE: 25mm = 1in.
WIDTH: Sets the width of the characters printed. This value can be set from 2 to 26mm (0.08 to
1.02in). The range of acceptable values is dependent on the SPEED and DENSITY settings.
HEIGHT: Sets the height of the characters printed. This value can be set from 5 to 13 mm (0.2 to
0.51in).
DENSITY: Controls the amount of ink deposited. A lower value means less ink and a lighter
print. A higher value means more ink and a darker mark. The range of acceptable values is 1 to 8
dependent on the SPEED and WIDTH settings.
FONT: Sets the font used in the message. There are two different fonts shown below.
DIRECT: Sets the direction of conveyor travel as well as mark orientation.
SPEED: Sets the QM2 for the speed the conveyor runs at. This value can be set from 1 to
60m/min (3 to 200ft/min).
MSSC, LLC Collinsville, IL USA
Tel: 618-343-1006 Fax: 618-343-1016
www.msscllc.com
55899
Rev 22211
13
Common Parameters set at Factory
MSG
DELAY
WIDTH
HEIGHT
DENSITY
FONT
DIRECT
SPEED
=
=
=
=
=
=
=
=
COMMON
000 mm
08 mm
13 mm
4
FONT 2
←ABC
30.5 m/min
DT Tune
The DT Tune sub menu is where adjustments to date code formatting are made. The settings in this
menu apply to all messages printing dates.
•
•
MX SIZE: Sets the number of characters in month code. For a value of 2, a two digit number
corresponding to the month is printed. For a value of 3, the three letter abbreviation for the
month is printed
DT TRIM: Sets how month and day characters with leading zeros are printed. There are three
options
o 2007.01.01: Prints leading zeros in day and month.
o 2007. 1. 1: Replaces leading zeros with spaces as place holders.
o 2007.1.1: Prints month and day with no leading zero or space.
DT TRIM is not available when MX SIZE is set to 3.
Total Count
Total count shows how many times the photo eye has triggered printing since the last time the count was
reset. The count can be reset here by selecting YES and pressing ↵.
Init Data
The INIT DATA function ERASES ALL DATA except TOTAL COUNT and S/N. Once this is done
any lost data cannot be recovered.
To initialize all data:
1. Press STUP key
2. Select INIT DATA and press ↵.
3. Select Yes and press ↵.
Extend
The EXTEND sub menu contains advanced printing and setup functions that change the way the QM2
prints.
•
RPEAT JET:
o REPEAT: Sets the number of times the message is repeated. “CONTINUE” repeats the
message while the photo eye is activated.
o INTERVAL: Sets the spacing between prints.
o S/N COUNT: “COUNT” changes the serial number each time the message is printed.
“HOLD” changes the serial number with each activation of the photo eye.
MSSC, LLC Collinsville, IL USA Tel: 618-343-1006 Fax: 618-343-1016 55899 Rev 22211
www.msscllc.com
•
•
•
•
•
•
14
CNT DOTS: Displays the number of dots in a message and the volume of ink needed for each
printing.
SEL NOZZL: This setting controls what channels are used to print.
o AUTO: (Recommended) the QM2 selects the best nozzle configuration based on
operating conditions. (300 DPI)
o EVEN: Prints using the even channels. (300 DPI)
o ODD: Prints using the odd channels. (300 DPI)
o BOTH: Prints using both channels. (600 DPI)
RS485: This submenu configures the QM2 communications. Parameters in this menu should
only be adjusted under the advice of MSSC, LLC.
DRV PULSE: This menu controls the print head operating parameters.
SENSR DELAY: This setting allows for an overall offset for printing. This setting offsets all
messages in addition to the DELAY setting in the Parameter menu.
GAP 2L: This setting changes the gap between lines on the special message function. The
value can be set from 0 to 90%. This is how the print height 6mm-1mm is achieved. See page 13
for description of S2 .
2
S
Serial Numbers/Consecutive Numbering
The serial number setup menu can be accessed from the main screen by pressing the S/N key. This
menu allows for the adjustment of how serial numbers are printed.
•
NEXT S/N: Sets the next serial number to be printed. To change, enter the new number using
the keypad.
•
RESET: Resets the NEXT S/N value to the value in INITIAL. To use, press ← or → key to
select yes and press ↵.
•
LENGTH: Sets the desired number of digits in the serial number. The maximum number of
digits is 8.
•
INCREMENT: Sets the amount the serial number increases by at each sequential change.
•
INITIAL: sets the value that NEXT S/N is set to when RESET is used.
•
COUNT UP: Sets the number of times a serial number is printed before advancing to the next
number.
•
COUNTING: Keeps track of how many times a repeated serial number has been printed. This
value can be set to reflect the number actually printed.
NOTE: COUNTING is decreased by 1 when the serial number setup menu is accessed.
MSSC, LLC Collinsville, IL USA
Tel: 618-343-1006 Fax: 618-343-1016
www.msscllc.com
55899
Rev 22211
15
Editing and Selecting Messages
The QM2 has space for 100 different messages. To access the message menu press the MSG key.
Editing/Creating Messages
To create or edit a message:
1. From the main screen press the MSG key.
2. Select EDIT and press ↵.
3. Select the desired message number to create or modify and press ↵. A selection can be made
using the ↑ and ↓ keys or by keying in the message number.
NOTE: The DISP key changes the message preview between a general preview to a detail view
showing the contents of the upper and lower lines of a 2 line message.
4. Enter the desired message using the keypad. When finished press ↵.
5. Select Yes and press ↵ to save changes.
Inputting Special Message Functions
During message creation or editing pressing the FONT key accesses the library of special text strings.
Use the arrow keys to select the desired function and press ↵ to select and insert into the message.
D
T
Inserts the current date as formatted in date setup
E
X
Inserts the expiration date as formatted in expiration date setup
2
L
Inserts 2 lines of text with NO adjustable line spacing
N
Inserts a serial number as formatted
G
Inserts a preloaded graphic
2
S
Inserts 2 lines of text with adjustable line spacing between the 2 lines
SP
4
Inserts the equivalent of 4 spaces
SP
5
Inserts the equivalent of 5 spaces
SP
10
Inserts the equivalent of 10 spaces
SP
15
Inserts the equivalent of 15 spaces
MSSC, LLC Collinsville, IL USA
Tel: 618-343-1006 Fax: 618-343-1016
www.msscllc.com
55899
Rev 22211
16
Inputting Chinese Characters (Available in English menus only)
During message creation pressing the FONT key twice accesses the library of 30 simplified Chinese
characters for insertion into a message. Use the arrow keys to select the desired character press ↵ to
select and insert into the message.
30 simplified Chinese characters available for use in messages
Two Ways of Printing Two Line Message with the QM2
2
L
or
2
S
However, you cannot use both functions within the same message.
Creating or Editing 2 Line Text using
2
L
2
L
1. If the character is not already inserted in the message being edited, press the FONT key
and select the character and press ↵.
2. Select icon in edit window and press MSG.
3. Select the line to edit and press ↵ to edit the upper and lower lines.
4. Enter desired message content.
5. After editing press ↵ to return to the SELECT LINE menu.
6. If done editing the 2 lines select SET and press ↵ to return to main edit window. Select
message to print, select yes, and press ↵.
2
L
2
L
2
Example of 2 Line Text using the L
MSSC, LLC Collinsville, IL USA
function and varying character height within parameter settings (5-13
respectively)
Tel: 618-343-1006 Fax: 618-343-1016
www.msscllc.com
55899
Rev 22211
17
Creating or Editing 2 Line Text with Adjustable Spacing using
2
S
2
S
1. If the character is not already inserted in the message being edited, press the FONT key
and select the character and press ↵.
2. Select icon in edit window and press MSG.
3. Select the line to edit and press ↵ to edit the upper and lower lines.
4. Enter desired text.
5. After editing press ↵ to return to the SELECT LINE menu.
6. If done editing the 2 lines select SET and press ↵ to return to main edit window. Select
message to print, select yes, and press ↵.
7. To adjust the spacing between the 2 lines and reduce the size of the printed text, press the
STUP key.
8. Select the Extend option.
9. Select the GAP 2L option to enter your gap percentage.
10. Select a value of 0-90% using the → and ← keys to create the gap between the text lines.
The higher the percentage, the smaller the text size will be.
2
S
2
S
NOTE: The DISP key changes the message preview between a general preview to a detail view
showing the contents of the upper and lower lines of a 2 line message.
Example of 2 Line Text using the
MSSC, LLC Collinsville, IL USA
2
S
function with changing GAP 2L percentage (0-90% respectively).
Tel: 618-343-1006 Fax: 618-343-1016
www.msscllc.com
55899
Rev 22211
18
Maintenance
The QM2 was designed to be easy to maintain for the user. However there are a few precautions:
1. Always turn off the QM2 before installing or removing an ink cartridge.
2. Never connect or disconnect the print head data cable with the power on. Doing so may damage
the printer and void the warranty
3. Never disassemble the QM2. There are no user serviceable parts inside.
4. Never drop or spray the QM2 with water or any other liquid.
Installing Ink Cartridges
1.
2.
3.
4.
5.
Power off the QM2.
Flip the blue locking lever down.
Remove old ink cartridge
Remove the tape on the front of the nozzle by pulling on the loose end on the bottom.
With blue locking lever in the downward position, insert the ink cartridge as horizontal as
possible to avoid damaging the contacts inside the cartridge stall.
6. With the cartridge all the way in the stall, flip the blue locking lever up.
7. The unit may now be powered on.
7. After Startup press the STUP key
8. Select INK and press ↵.
9. Use the ↑ and ↓ keys if necessary to select the prompt for Current Ink Volume.
10. Type in the volume of the ink cartridge (42 ml for standard cartridges, 370 ml for the bulk ink
system).
8. When done press ↵ to save the changes and return to the previous menu.
Cleaning the Print Head
If streaks missing dots or other print quality issues occur the print head cartridge may need to be cleaned
as follows:
1. Power off the QM2.
2. Remove the ink cartridge from the cartridge stall.
3. Moisten a Tex Wipe or similar lint free cloth with de-ionized water. Paper towels are not
recommended due to their abrasiveness. The scratches caused by paper towels will cause print
quality to suffer.
4. With the nozzle pointed down, wipe the nozzle with the moistened wipe in the direction shown
in the figure below. Holding the cartridge in any other orientation could cause air to enter the
nozzle, causing streaks in printing.
Wipe
5. When finished wiping the nozzle, reinstall the print cartridge and test.
MSSC, LLC Collinsville, IL USA
Tel: 618-343-1006 Fax: 618-343-1016
www.msscllc.com
55899
Rev 22211
19
Adjusting Screen Contrast
If the screen is difficult to read the contrast may need to be adjusted.
1. Remove cap plug from right side of machine.
2. Using a small flat blade screwdriver, rotate the adjustment screw clockwise to lighten or
counterclockwise to darken.
3. When finished, replace the cap plug.
Adjusting the Photo Eye
In some instances, adjustment of the photo eye may be necessary to improve the performance of
the QM2. The photo eye on the QM2 has an adjustment dial and indicator lights on the bottom to
aid in adjustment. The green light indicates that the sensor is receiving power. The red light
comes on whenever the sensor is tripped.
MSSC, LLC Collinsville, IL USA
Tel: 618-343-1006 Fax: 618-343-1016
www.msscllc.com
55899
Rev 22211
20
HP Bulk Ink System Setup
Note: Never exceed 10 inches (254 mm) height difference between printer cartridge and reservoir.
Never hold reservoir above printer cartridge. 2” height difference is recommended.
Not level, fall to
fitting to empty
container
Bulk Ink restraint set-up using the flange clamp
Bulk Ink restraint set-up using the base clamp
MSSC, LLC Collinsville, IL USA
Tel: 618-343-1006 Fax: 618-343-1016
www.msscllc.com
55899
Rev 22211
21
MSSC, LLC Collinsville, IL USA
Tel: 618-343-1006 Fax: 618-343-1016
www.msscllc.com
55899
Rev 22211
22
MSSC, LLC Collinsville, IL USA
Tel: 618-343-1006 Fax: 618-343-1016
www.msscllc.com
55899
Rev 22211
23
MSSC, LLC Collinsville, IL USA
Tel: 618-343-1006 Fax: 618-343-1016
www.msscllc.com
55899
Rev 22211
24
MSSC, LLC Collinsville, IL USA
Tel: 618-343-1006 Fax: 618-343-1016
www.msscllc.com
55899
Rev 22211
25
Troubleshooting
The following are common alarm errors for the QM2.
Low Ink Alarm – Indicated by visible red LED and audible alarm. This is customer set low ink level
and the customer must reset ink volume when cartridge is changed.
No Print – FIRE on display but no print. Hot Plug Issue, customer connects or disconnects data cable of
the 111-style printer with power on. Generally the driver board must be replaced at a minimum.
Parameter Settings Are Not Valid – Software will not allow the user to exit the parameter screen until
the settings are corrected. The incorrect parameter settings are indicated by an arrow in the left margin.
No Print with a 101 – FIRE was in the display, but no print. This can be remedied by reinitializing the
system. To reinitialize, go to STUP, INIT DATA, and select YES. All messages are erased. The unit
should function as normal.
Data Not Changing at Prescribed Time – For example, date to change at 12:00 am (midnight) in their
printed message. The customer programmed date and time incorrectly in the DATE function. Instead of
selecting minute, m1 and m2, they selected M1 and M2, which is the month. No error message occurred.
Instead, the printed message was incorrect and they contacted MSSC via technical call.
Serial Number Error – Indicated by a serial number xxxxx displayed on the screen, along with an
audible beep. To clear the alarms follow the following steps. First, turn on the controller. Press the S/N
button on the left side of the controller. At the top of this screen will be the serial number. Enter any
value in this field from 1 to 09999999. Note: battery failure may result in this alarm error as well.
Startup Error - When starting up the QM2, the internal fan will start running and then the software
initializes and the unit will boot up. The startup cycle will take 10-15 seconds. Please note, the photocell
CANNOT be blocked/activated during this startup cycle. If the photocell is blocked, the unit will
experience an ERR, display ERR on the screen and the QM2 will not function. The operator must clear
the path to make the photocell not activate, press RUN key on the QM2 and press the RUN key a second
time cycling from STOP to RUN on the display.
MSSC, LLC Collinsville, IL USA
Tel: 618-343-1006 Fax: 618-343-1016
www.msscllc.com
55899
Rev 22211
26
Appendix
Feet/min. to meters/min Conversion Table
ft/min
5
10
15
20
25
30
35
40
45
50
55
60
65
70
75
80
85
90
95
100
m/min
1.5
3.0
4.6
6.1
7.6
9.1
10.7
12.2
13.7
15.2
16.8
18.3
19.8
21.3
22.9
24.4
25.9
27.4
29.0
30.5
ft/min
105
110
115
120
125
130
135
140
145
150
155
160
165
170
175
180
185
190
195
200
m/min
32.0
33.5
35.1
36.6
38.1
39.6
41.1
42.7
44.2
45.7
47.2
48.8
50.3
51.8
53.3
54.9
56.4
57.9
59.4
61.0
Code
1
2
3
4
5
6
7
8
9
A
B
C
D
E
F
G
Date
17
18
19
20
21
22
23
24
25
26
27
28
29
30
31
Code
H
I
J
K
L
M
N
O
P
Q
R
S
T
U
V
Date and Hour Code Table
Date
1
2
3
4
5
6
7
8
9
10
11
12
13
14
15
16
Distance conversion: 1 inch = 25.4 mm
MSSC, LLC Collinsville, IL USA
Tel: 618-343-1006 Fax: 618-343-1016
www.msscllc.com
55899
Rev 22211
27
Key Assignments for Characters
ALL LANGUAGES
1 @
ALL LANGUAGES
M N O 6 m n oÖØöø
FRENCH
M N O 6 m n oÔô
SPANISH
M N Ñ O Ó 6 m n ñ o
FINNISH
M N O Ö 6 m n oö
ALL LANGUAGES
P Q R S 7p q r s
ENGLISH
A B C 2 a b cÄ Â Æ ä å æ
TUV8tuv
GERMAN
A B C 2 a b cÄ ä
FRENCH
A B C 2 a b c À â à
FINNISH
A B C 2 a b cÅ Ä å ä
ENGLISH
D E F 3 d e f
GERMAN
TUV8tuvÜü
FRENCH
TUV8tuvÜÛÙüûù
ALL LANGUAGES
W X Y Z 9 w x y z
FRENCH
W X Y Z 9 w x y zŸ
ÿ
ALL LANGUAGES
GERMAN
D E F 3 d e f
* . , - / + = : ’ ( ) #
FRENCH
D E F 3 d e f ÉÊÈË é ê è ë
SPANISH
D E É F 3 d e f
ALL LANGUAGES
SPANISH
* . , - / + = : ’ ( ) #¿
ALL LANGUAGES
0 ! $ % & [ ] □ ■
ALL LANGUAGES
G H I 4 g h i
FRENCH
G H I 4 g h iÎÏîï
ALL LANGUAGES
J K L 5 j k l
MSSC, LLC Collinsville, IL USA
Tel: 618-343-1006 Fax: 618-343-1016
www.msscllc.com
55899
Rev 22211
28
Sample Message Instructions
Follow the directions below to enter the above sample message.
NOTE: to save space in the manual single key strokes are shown. It will be necessary to press a single
key multiple times to arrive at the desired character.
1. From the main screen press the MSG key.
2. Select EDIT and press ↵.
3. Select the desired message number to modify and press ↵. A selection can be made using the ↑
and ↓ keys or by keying in the message number.
NOTE: The DISP key changes the message preview between a general preview to a detail view
showing the contents of the upper and lower lines of a 2 line message.
4. If there is any text in the current message window, use the DEL key to remove it.
5. Enter the message above using the following keys:
Then press the
Key and use the arrow keys to select the font character and press ↵.
With the character selected press the MSG key.
Use the arrow keys to select UPP and press ↵.
Enter the upper line of the 2 line message using the following keys:
and press ↵.
Use the arrow keys to select LOW and press ↵.
Enter the lower line of the 2 line message using the following keys:
and press ↵.
Use the arrow keys to select SET and press ↵ to return to the main message editing screen.
6. Select Yes and press ↵ to save changes.
2
L
2
L
MSSC, LLC Collinsville, IL USA
Tel: 618-343-1006 Fax: 618-343-1016
www.msscllc.com
55899
Rev 22211
29
Accessories and Parts
Mounting Hardware
55325
55335
55345
55355
Remote Print Head Mounting Kit
Heavy Duty Mounting Clamps
Heavy Duty Flange Clamp
Heavy Duty Joint Clamp
Bulk Ink System
55955
55950
55960B-NS
55960C-NS
Bulk Ink Restraint for 55950
Bulk Ink System (370 cc); Standard Black
Bulk Ink, Black 400mL w/ Quick Disconnect Fitting
Bulk Ink, Black Cartridge w/ Quick fitting, for use
with 55960B-NS
Ink Cartridges
55900
55901
55902
55903
55904
55975
55350
Ink Cartridge (42 cc); Standard Black
Ink Cartridge (42 cc); Red
Ink Cartridge (42 cc); Green
Ink Cartridge (42 cc); Blue
Ink Cartridge (42 cc); Yellow
Ink Cartridge (42 cc); VB Premium Black
Texwipe Lint-Free Cotton Cloths (25 per pack)
Other
55500
55132
QM2 Download Kit, used for loading logos
QM2 Remote Mount Photocell Kit w/ 2 meter cable
MSSC, LLC Collinsville, IL USA
Tel: 618-343-1006 Fax: 618-343-1016
www.msscllc.com
55899
Rev 22211
30
Exploded Views and Saleable Parts
QM2 Controller
PARTS LIST
PART NUMBER
MSSC, LLC Collinsville, IL USA
DESCRIPTION
ITEM
RP55420
QM2 Driver Board with Software
DB Standoff
1
2
RP55110
QM2 Display Board & Keypad Board
3mm Spacer x4
10
9
RP55120
QM2 Photo Sensor, 0-10CM Sensing
Range (standard)
6
RP55122
QM2 Photo Sensor, 0-30CM Sensing
Range (special)
RP55132
QM2 Remote Mount Photosensor
with Data Sheet
RP55135
QM2 Power Cord with Ferrite Core
4
RP55155
QM2 Keypad Overlay with MSSC
logo
5
RP55180
QM2 Fan
8
RP55485
QM2-111 Controller Interface Board
(Universal)
3
RP55820
QM2 Driver Board, NS, with Software
RP55130
QM2 On/Off Switch
11
RP55115
QM2 Power Supply Board
12
RP55125
QM2 Noise Filter
13
RP55001
QM2 Bottom Enclosure
14
RP55002
QM2 Top Enclosure
15
Tel: 618-343-1006 Fax: 618-343-1016
www.msscllc.com
55899
Rev 22211
31
QM2 101 Printhead
PARTS LIST
MSSC, LLC Collinsville, IL USA
PART NUMBER
DESCRIPTION
ITEM
RP55470
QM2 Pen Driver Board Universal
1
RP55165
QM2 HP Pen Stall with Latch
2
RP55160
QM2 Printhead Guard with
Hardware
3
RP55003
QM2-101 Printhead Enclosure
4
RP55440
QM2 Flate Cable, 14 pin
5
Tel: 618-343-1006 Fax: 618-343-1016
www.msscllc.com
55899
Rev 22211
32
QM2 111 Printhead
PARTS LIST
MSSC, LLC Collinsville, IL USA
PART NUMBER
DESCRIPTION
ITEM
RP55160
QM2 Printhead Guard with Hardware
1
RP55165
QM2 HP Pen Stall with latch
2
RP55495
QM2 Datacable, 1.5 meter with
Ferrite Core
3
RP55470
QM2 Pen Driver Board
w/ Flat Cable
4
RP55004
QM2-111 Printhead
Enclosure
5
6
RP55120
QM2 Photo Sensor
7
Ink Cartridge
[55900=Black, 55901=Red,
55902=Green, 55903=Blue,
55904=Yellow]
8
RP55301
QM2 Flange Clamp, Lightweight
9
RP55488
QM2-111 Printhead Complete
Tel: 618-343-1006 Fax: 618-343-1016
www.msscllc.com
55899
Rev 22211
33
Creating Logos for the QM2
For logos to work with the QM2, they must:
1. be a monochrome Bitmap (.bmp) file.
2. have a height of 32 pixels.
3. be saved as grimgX.bmp, X being the logo number (0-9).
4. be transferred using the QM2 Download Kit (MSSC P/N 55500).
MSSC, LLC Collinsville, IL USA
Tel: 618-343-1006 Fax: 618-343-1016
www.msscllc.com
55899
Rev 22211
MSSC, LLC Collinsville, IL USA
Tel: 618-343-1006 Fax: 618-343-1016
www.msscllc.com
55899
Rev 22211