1
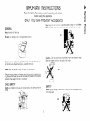
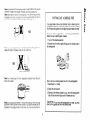
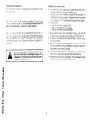
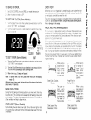
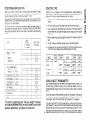
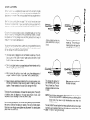
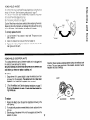
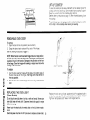
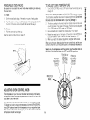
DROP-IN
ELECTRIC RANGE
USE AND CARE MANUAL
/ Copy Your Model and Serial Numbers\
IN THE BOX BELOW
Model and Serial numbers are on a
plate, behind the oven door, on the
front frame. If you call for service, or
with a question, have this information
ready.
Keep this book, your installation guide,
your warranty
and the sales slip
together.
Model No.:
I
Serial No.: ___
Purchase
Date:
Part No. 336126
SAFETY RULES
HOW TO USE YOUR RANGE
Cooktop Controls
Energy Saving Tips
:
Cooktop Setting Gurde
Baking and Broiling
New Oven Odor
Oven Light
:” ::
Clock a;d Timer ........................
Oven Vent ................................
Rack and Pan Arrangement .................
.2-4
.6
.
6
CLEANING AND CARE
TO-13
l
Oven Cleaning
10
l
Cleaning Chart
11
l
RemovableKnobs
::..::::::...::.
12
l
Removable Cooktop Unrts
.12
l
Lift-Up Cooktop
.13
l
Removable Oven Door
13
l
ReplacingtheOvenLight
. . . . . . . . . . . ...113
l
Removable Oven Racks
14
ADJUSTING
PREVENTING
COOKING HINTS
l
Preheating
l
Using FOII
l
Brorlrng TIPS
: :: :
l
Posrtronrng Broiler Pan
l
Roasting TIPS
l
Using A Meat Thermometer
l
Choosing Cookware
l
Common Baking Problems
and Causes
7-9
7
7
9
OVEN CONTROL
SERVICE
KNOB ..........
CALLS
..
..
.14
....
FIND PROBLEMS DURING THE WARRANTY
PERIOD”
Warranties are based on time, not usage. You should
try each feature and control on your new range soon
after installation.
.14
E
IMPORTANT INSTRU~IONS
Read the Safety Rules below and all operating
before using this appliance
instructions
ONLY YOU CAN PREVENT ACCIDENTS
Never lea/e chi d-en alone 0’ unwatched where a range IS In use Never
leave the over (:oor ‘Jpen when you are not watching the range
GENERAL
Keep this book lor later use
Be sure your range IS put In and grounded
NO’
properly
Caution - Do not store things that chlldren might want above a range
Never let children climb on any part of the range
Never try to fox or replace any part of the range unless this book tells you
to Ail other work should be done by a skllled technIcIan
Never block free aIrflow through the oven vent see page 6
NO!
Only some kinds of glass and ceramic pans can be used for cooktop cookIng Be sure thar the pan you use WIIInot break when heated on the cooktop
elements See page 9 for tips on cookware
CHILD SAFETY
SAFETY
Teach your children not to play with range knobs or any other part 01 the
range
A
,
Never use vour ranae to heat a room Donna so can be dangerous
hurl range harts
r
NO’
2
and
Never wear loose clothlqg whmQ IJsing your range Such CW’es could ca’cf‘,‘C
Always use care when !ouchlng cookfop elements areas near cooklop
elemen!s ‘:ver ‘leatlnq e;emenls or Inslae the oven Healing elements could
be hst erlougt- .o bJ;:i 1’0~ even II they are dark n ~010~ The oven dent
Ul~ct (see page 6) and ‘he oben door may also become hot during range
IJSie
NO!
Never heal unopened load c~~nta~ners Presx~r
tanner bursl and cause Injury
Choose 11,)‘s;i:V pa “5 4h llat botto~~s laqe enougi- lo cover the enlfre
‘Iok!r;o +merU 1 iii’ &III cbt down !t:e IIS~ of setbng pot holders or clothing
“I lLrc w/t’) ar jnccdereo element and waste less energy
GREASE FIRES
bd IO-JII rr,ay TaKe cc;7
Never lel pol handles stick 0~11over the lro~nt of Ihe range Turf- handles
in. over the cooktop. so that ‘hey can not be bumped ~nlo Be sure not
to turn handles over anolher element They may gel ho1 and burn you
Never leave jars or cans of fat or drippIngs on or near the range Never
le! grease hulld up on your range You can keep grease fires from starting
0 yolk clean up grease and spills after each range use
NO!
NO!
Always use care when opening oven door Let hot air or steam out before
moving food
Never Iry lo move a pan of hot (al. especially
the fat has cooled
a deep lat fryer Wall until
Always move oven racks wh le oven IS cool
Always use dry pal holders when removing pans from the oven or cooktop
MOISI or damp pol holders can cause steam burns Do nol use a towel
or other bulky cloth II may catch fire on the element
Always keep the range area clear and free from lhlngs that WIII burn,
gasoline and other flammable vapors and liquids Never store lhlngs In
an oven or near cookfop elements These things may catch fire and plasllc
Items may melt and burn
Y
NO!
NO!
3
Never use aluminum lo11to line drip bowls or oven bottoms Only use folf
as shown on page 7 of this book, Improper use of foil can start a fire
Never leave jars or cans of fat or drtpplngs on or near the range Never
let grease build up on your range You can keep grease fires from starting
If you clean up grease and splllovers after each range use
PUTTING
OUT A GREASE FIRE
II is a good idea to have a dry chemical, foam or Halon type fire
extinguisher where you can easily reach it in case of a cooking
fire. A Halon extinquisher will not spoil food and makes no mess.
NO!
Never use water on a grease fire - it will only spread the flames
Never pick up a flaming pan. Instead:
1. Turn off the heating element.
2. Smother the fire with a tightly filling pan lid, bakrng soda or
an extinguisher.
Never leave cooktop elements unwatched al high heat settings Boilovers
cause smoking and greasy splllovers may catch fire
NO
Never try to move a pan of hot fat especially a deep fat fryer Walt until
the fal has cooled
I 1
How to put out a liquid grease fire with a fire extinguisher:
1. Stand back 5 or 6 feel.
2. Open the extingursher
3. Starting al the flames closest to you, move the extinguisher
side to side and work back until all flames are out.
CAUTION: lf you bring the extinguisher IOO close, you may
blow burning grease all over the cooking area.
When brolllng always remember to remove the broiler pan lrom the range
and clean it when you are finished cooking If you leave a broiler pan full
of grease in the range and later use the oven. you may have a broiler fire
4
COOKTOP
CONTROLS
‘4 >y7 lo rredr the ~os<cp
14r
I
y
,+a:,
ENERGY SAVING TIPS
cc trol knobs shows whrch element IS turned
inob
fr e c oir~f, controls zar oe jet anywhere between LO and HI for an
JWI ~3 rumSer of hea\ settln;s To turn Ihe control knobs from the OFF
postron. push the knobs rn, then turn rn eilher direction.
.
‘St4r. i 1~’ :ooklng dl a r lgher <enrng to speed element heat up then lurn
‘he :c~?tro~ ‘o a lower seqrng ‘o frnrsh cooklng Remember that cooklng
~1111.cri!rrn~,eafter the \1n1tIS lurned off Tram yourself to turn controls down
‘or od before cookrng IS f~rirshe~l See the chart below for suggested cons
701 iettlrqs
.
.
.
.
Never line reflector bowls with aluminum foil. Foil can
block normal heat flow, and damage the range. This
is especially true if foil blocks the oven vent lube under
the right rear cooktop element.
.
5
Check the Chocs~ng Cookware chart on page 9 to see whrch type of
cookware 15 bes! for each type fo cookrng you do
Pans must cover lhe en:lre element to absorb the full heat output An
~nders~red par ‘~111expose part of the element and the uncovered
oar WI:’ glow red This shows heat and energy are berng wasted
‘JSP oa7s Ihal
;i Have flal bottoms and strarght sides
B Have lrghl handles that do not trlt pans
C Are aboul the same sze as Ihe element
‘When possrble, thaw frozen foods before cookrng cook wrth the
ri1nmum amount of water and use a pan wrth a trghtfy frtrng lid.
Put pans on ‘he cooktop elements before the heat IS turned on, so you
will
not wasre heat
Be sure to watch foods when heatrng them qurckly on HI As soon as
the food reaches the cookrng temperature, reduce the heat to the
lowest settrng that wrll keep II cooking
Turn the element off fust before cookrng IS done, to use the remarnrng
heat to frnlsh cookrng and keep food warm before servrng
Never leave an empty pan on a hot element Thuscan damage the range
cooktop, reflector bowl and pan, and the element.
TO BAKE OR BROIL
OVEN VENT
1
Set OVEN CONTROL
2
When fInIshed turn knob to OFF
knob to BROIL or needed temperature
TO SET THE CLOCK (Some Models)
1
2
Turn the ClockJTlmer knob In the counterclockwise directIon until the
words SET TIME are displayed
Turn the Clock~T~mer knon In either dIrection to set the time 01 day
CLOCK
TO SET TIMER (Some Models)
TIMER
SET
1.
Turn the Clock/Timer knob in the clockwise direction until the words
SET TIMER’ are dlsplayed
2
Turn the Clock/Timer knob in any direction to set amount of time
The timer will automatically start counting down.
3
When time is up, 3 beeps will sound
When the oven IS on, heated air IS vented through a vent under the right
rear cooktcp element On the cooktop. thls hot air make pot handles hot
or met plastic l!ems left too near the vent
The vent IS netessary for proper air circulation In the oven and good bake
Ing results Do not block this vent. Doing so may cause cooking failure,
fire or damage to the range.
RACKAND
=, When using a
large flat pan
that covers
most of the
rack, center
on one rack
Sheet Cake, Cookies,
Blscults
/
NEW OVEN ODOR
During the first
te some odor
and insulation.
ether ventllatlon
baking and brolllng cycles in your new oven, there may
This IS normal and IS caused by the heating of new parts
The odor WIII go away wlthln a short time A vent fan or
WIII help to clear the air,
OVEN LIGHT (Some Models)
Some models have an Interior oven Ilght. To turn the oven light on and
of‘. push the Oven Light switch on the control panel See page 13 for more
I ilormation
~~-~~~
~-
The pan or
pans
using
” the least rack
area should
be placed on
the fower of
the two racks
Cake Layers, Pies.
Casseroles, 3 Pans
6
2
c
ii
PAN ARRANGEMENT
Pu’ o\‘F:n 1;~~s) 17 place before turning on the oven Rack posItIons are
numbsred 1 to 4 starting at the bottom with number 1 In general when
using onl;i ore rack position No 2 shoula be used When using two racks
pos IIons h!o 2 and 4 work best
WIlen ,,SIYJ cc,ckie sheets place them with the long side of the cookie sheet
to;riar’ri tbe IrCn! of the oven and centered on the rack When using two
CO~KII?sheets al the same time use rack posItIons No 2 and 4 The cookies
cr, 19~:lower r,ick may be done 1~2 minutes before the ones on the higher
rack iou may want to switch rack positions when baking IS halfway finished
Pans too close to each other to oven walls, or to the oven bottom block
the free movement of air Improper air movement causes uneven browni:ig and cooklng
Note: To cancel timer, turn the Clock/Timer knob until the display
reads 90.
While the timer is being used, the time of day will be shown in the display
about every 10 seconds.
s
i
When bakinGI
on one rack 111
the
lowest
posItIon
Angel Food or
Sponge Cake
When using
two racks ant
so no pan is
dlrectfv above
another
Cake Layers, Pies,
4 Pans (staggered)
s
ii
2
%
CRt=4!=ATl~r,
- nreneatrng lets lhe oven rleat evenly before the food IS put in Allow IO
mrnutes at temperatures less than 3500 F and 15 minutes at 3500 F or more
Nith recipes tnat call for an oven preheated to a certain temperature. it
IS very important that you follow those rnstructrons It IS not lrkely that you
rv~~lge: good bakrng results every trme wrthout preheatrng to the needed
temperature unless the recrpe says to start in a cold oven
Alter the oven IS preheated and you are ready to put the food In. try to
have everythrng handy so that you will not have to leave the oven door
open lor an extended period of time.
Opening the door to often to check the food during bakrng makes It rmpossble for the oven to stay at the same temperature you have selected
Try to t/me your baking and check only when close to being finished
CAUTION
Do not cover the broiler grid with foil. Hot fat on the
foil may cause a broiler fire. If a fire starts, close the
oven door and turn controls off. If fire does not go
out throw baking soda on the fire. Do not put water
on the fire.
NOTE: When using cookware made of ovenproof glass or pottery,
Teflon ‘B coated cookware and dull or darkened pans in the oven, be
sure lo reduce recipe temperature by 25OF (see Choosing Cookware,
page 9).
BROILING TIPS
. ‘four oven door should be open to the stop posrtron whrle brorltng (see
page 13) If the door IS closed the food will roast and not broil
USING FOIL
. Use only the brorler pan and grid that came wrth your range for brorl-
For Baking
To catch sprllovers, cut a piece of for1 slrghtly larger than the pan and turn
up the edges Use two oven racks and put the foil on the lower oven rack
below the pan. Do not use aluminum foil directly under a pan on the same
oven rack The for1 will reflect heat away from the pan
.
.
.
Do not cover the bottom of an entire oven rack with
.
Ing failures, and damage the oven interior.
.
.
.
For Roasting
0
For slow brownrng, place a fort “tent” loosely over the meat Thus ISes ecrally good on a large turkey Do not seal the forI Sealing the foil WIPI tend
to steam the meat
7.
tng They are made for proper drarnage 01 lat and llqutds and help prevent spatter. smoke, or fire.
Do not preheat when brorlrng For even brorlrng on both srdes. start
the food on a cold pan. Allow slightly more than half the cookrng time
for the first srde then turn the food usrng tongs. If you pierce the meat
with a fork, the furces WIII escape.
When brorlrng frozen meat, use on rack posrtron lower than shown In
the chart and up to 1% times the brotlrng time
Tram the outer layer of fat from steaks and chops. Slit fatty edges to
keep the meat from curling
Always put the food berng brolled on the proper rack (see chart at nght)
Food placed too close to the brotler may spatter, smoke or catch fire
For maxrmum furceness, salt the frrst srde just before turnrng the meat
Salt the second srde just before servrng
Brush chicken and fish with butter several trmes as they brorl. When
brorlrng fish. grease the gnd to prevent sttcklng
Never leave a sorled broiler pan In the range Grease In the pan may
smoke or burn the next time the oven IS used See page 11 for trps
on cleaning the brorler pan and grad
Be sure you know how to put out a grease ftre See page 4
POSITIONING
BROILER
PAN
ROASTING
Broiling IS cooklng by drrect heat from the upper oven element. Tender
cuts of mear or marlnated meat should be selected for brorlrng. For best
results steaks and chops should be at least W’ thrck.
After placrng food on the brorler pan, put the pan on an oven rack In the
proper posrtlon. The recommended rack positron and cookrng time can
be found in the chart below.
The closer the food IS to the brorl element the faster the meat browns on
the outsrde. yet stays red to punk In the center. Movrng the meat farther
away irom the element lets the meat cook to the center whrle browning
outside
i
-ood
St~~;e
Rack
Posrtron
4 = Hrghest
1 = Lowest
TIPS
Roastrng time WIII depend on the oven temperature, meat temperature,
size, shape and type of the meat, the proportron of bone and fat, and the
degree of doner.ess (internal temperature) you desire.
Add extra trme (15 to 20 minutes per pound) when roasting frozen
meats
For even cookrng. put the meat in the pan with the fat side up
Use a roastrng pan that fits the size of the roast. Too small a pan will
let the melted fat drip over the edge and too large a pan will cause
spattering.
Reduce spattenng by putting lightly crushed foil In the pan under the
food.
Total Trmes
(Mrnutes)
To best measure doneness,
always use a meat thermometer.
For easier carving, let the roast stand 10 to 20 minutes after removing
it from the oven. Always carve across the grain of meat.
1” Thrck
I
Medium
Well Done
TEMP
L
TEMP
TEMP
tare
Ground Beef Panres
Medium
1” Thrck
Medtum ‘1~’ Thick
Lamb Chops
1” Thrck
Pork Chops
1” Thick
Pork Chow
‘12” Thick
MEAT
medium
well
3
3
3
18 21
27 29
16 18
USING A MEAT THERMOMETER
Stick the thermometer into the center of the largest muscle of meat, or In
the inner thigh, or breast of poultry. For an accurate readrng, the top of
the thermometer should not touch the bone or grrstle or rest in a pocket
of fat.
As the meat cooks, the thermometer may slip from its posrtron. If the readrng
on the thermometer seems unusually hrgh for the length of time the met
has cooked, check the thermometer and reposition It if necessary.
This chart is a general guide. The size, weight, thickness
and starting temperature of the food, as well as your own
personal preference, will affect the cook time.
If you let a roast stand 10 to 20 minutes after you remove rt from the oven,
it WIIIbe easier to carve and the internal temperature WIII raise as it stands
Remove the roast from the oven when the thermometer reads 5oF to 1OOF
less than the internal temperature you desire. If ou do not plan to let the
8 roast stand, leave the meat In the oven until the fuYI temperature is reached
r
;;.
s
I
5
G
CHOOSING
COOKWARE
COOKTOP
-T-
COOKWARE
COOKING
Spreads heal quickly and evenly
I---
Slow lo change temperature
CiS’ IrO”
C’zppper
T~~~~~~~
r INned
+--.----.---Glass Cerarn c
C-Pert e1a.r E ‘,.im~,
cam
:;l,lll’le5i
braising and pot roasts
ano holds heal Good for browning
frying and slewlng
’ Qufck to change temperalure
Great for gourmet cookIng Wine sauces and egg cookery TInlInIng ~111wear thin with
use and musl be rellnned 10 aiioia a poisonous reacl~o~l between Ihe copper the heal and Ihe rood
Slow IO chanqe lemperature
------t
3?1~l
_~~
.~~~ .~ ~~~~~~_~
OVEN COOKWARE
-~~
Aluminum
----~Ovenproof
Pottery
Besl lor trying
NOTES
Best for long low heal cooklng with a llq4ld
Porcelafr enamel bver steel IS ong last,nq slain aid scralch resIstant How well II heals depends upon the lyoe 01
‘,‘eel used Besl Ior cooping souos aqd other ‘lqulds
--t-~ clsually comb neclui,‘h other me!ais sy,bil as alurn~~um copper or caroon sleel These olher metals make the
Besl for ‘rv~rlg sauces souns
ooktiare Q~al more (111’ck I ir ” IP rhp “d8nles5 SIP?’ makes 1 s:ro?q ard long lx3nq
Jegelnbles ,irld egp:oo“g
Absorbs heal raster than glass or steel and conducls
reduces spattering of roasls Besl lot cakes, muffins.
~~
Glass/
-c
--I-.
heat well Produces delicate browning,
quick breads, cookies and roasllng
tender Crusts. and
Because lhls cookware absorbs heal quickly and holds II well, you should lower your oven lemperalure
Gives food a deep, crusty brown top Besl for casseroles
Absorbs heal quicker lhan shfnny cookware
Teflon, Dull or
pies and other foods baked I” paslry shells
Darkened Cookware
z
Can I use special cookmg equlpment. like an orlental wok,
on my cooklop elemenls’
Lower your oven lemperalute
A.
25OF (excepl
for paslry)
25OF
Good for
Yes. If YOU use a support ring that IS vented with holes, Solid (unvented)
SuPPOfl rws should not be used because they trap the heat under
the element and mav damage the cooktop.
COMMON
BAKING
PROBLEMS
AND
CAKE RISES UNEVENLY
l
Range or oven rack not level
l
Pan warped
l
Batter spread unevenly I” pan
l
Pans loo close lo oven wall or rack loo crowded
CAKE HIGH IN MIDDLE
l
Too much llour
l
Oven lemperalure loo high
CAKE NOT DONE IN CENTER
l
Wrong size pan
l
Oven loo hol
l
Pan nol cenlered I” oven
CAKE FALLS
l
Too much shorlenlng llquld or sugar
l
Temperature loo low
l
Pan 100 small
l
oven door opened loo ollen
l
Too much leavenin or slale leavening
l
OvermIxing after a 8 ding flour
CAUSES
9
’
BOTTOM PIE CRUST SOGGY
l
Fllllng too ,uicy
l
Fallen allowed lo stand in pie shell belore baking
- Use 3 shiny pans
- Temperalure loo low al slari 01 bakin
l
Crusl and/or IlllIng nol allowed to coo 9 belore Iilllng crl~sl
BURNING AROUND EDGES OF PIE CRUST
l
Oven lemperalures loo high
l
Edges of crusl loo Ihin or loo high
l
Oven loo full or pans loo close logelher
COOKIES AND BISCUITS BURN ON BOmOM
l
Oven preheat llme too short
l
Pan too deep or loo large
l
Used dark pans
l
Used ~ncorrecl rack positron
FOOD NOT DONE AT END OF COOKING TIME
l
Oven temperature set 100 low
l
Oven loo crowded
l
Oven door opened loo onen
l
&lumlnum lo11 blocking air movemenl
OVEN CLEANING
Some rlcml el? t ;i~e a standard porcelain oven flnlsh and some models
have a co’ !I~UO~JS clean flnlsh on the oven top, back and sidewalls Standard :)orcF ~11115%mootP The continuous clean flnlsh has a rougher texture
See t.le r.l.>an I g :nstrJctlons on page 11 to find out how to best clear
the Sar u,:.c! nocelar fNl1sh If vour oven has the continuous clean flrish.
read 7~1~i ‘1~ I~IS special porcelain enamel works and how to care for It
Or a S~WC1’1s:maard porcelain surlace a fat spatter beads up, then chars
and tuns 3lack On the rougher comnuous-cleamng
surface, a fat spata larger area and then gradually burns away at
ter spreads o~lt ‘ormlng
medium tc, h’gh baking temperatures
You do not have to wipe up heavy ipatters, but It may speed the cleaning
actlon If you wish to wipe up heavy spatters, follow the tips below so you
do not damage the continuous-cleaning
flnlsh.
wNTlNUOUS
CLEANING
FIN
A heavy spatter has illled the
pores and formed a mound
of
SOII
wHTINuOuS
CLEANING
FIN
The heavy spatter has been
wiped up. The contlnuouscleaning action WIIIbegln the
next time the oven IS used
Use clear water or detergents such as Fantastlk, Lrquld Ajax, Top Job,
Llquld Lysol, or Mr Clean, mlxed In water, and a soft cloth or nylon
brush to clean any heavy spatters
Do nol use paper towels or sponges because these materials will rub
off and clog the pores of the finish
After cleaning the surface, rinse It well, using three tablespoons of
vrnegar, mixed with a quart of cold water. Blot up excess liquid.
Never scrape or use abrasive materials such as scouring powders, commercial oven cleaners or steel scounng pads for cleanrng up heavy
spatters. These materials will scratch and damage the finish.
The hrgher the oven temperature, the faster the cleaning action. The length
of cleaning time will depend on the type and amount of soil, oven
temperature and the length of time the oven IS used
Soil WIII slowly go away with normal oven use. Cleanrng occurs whenever
the oven IS turned on for baking or roastrng. The oven WIII look presentably clean, even though some spatters may be present. No cleaning takes
place when the oven IS off
CONTINUOUS
CLEANING
FIN,
WNTlNUWS
CLEANING
FIN
BASE
This shows the amount of
soil remaining after a few
hours of oven use. The soiled area is smaller and lighter
in color.
After more oven use, the
has been removed.
so11
NOTE: If any stubborn stains remaln after normal oven use, you may run
the oven empty at 4OoOF for additional continuous-cleaning action.
Some foods may leave a light discoloration even when the
surface is clean
You can protect the oven bottom from heavy spillovers and cut your cleaning time by using a piece of aluminum forI under your cooking utensil See
10 page 7 for tips on usrng forI correctly.
r-
I
PART
Control Panel
1 and Knobs
i-
Cooktop
Reflector
Bowls
( Burner Box
(under cooktop)
Ou;;ic$
Finishes:
Glass
(some oven
doors)
Porcelain
(cooktop)
Paint
(some oven doors)
Oven Finishes:
Porcelain
Continuous
Cleaning
Oven Racks
Broil Pan
and Grid
CLEANING
I
INSTRUCTIONS
Pull knobs off and wash at srnk In soap and water. Wash
control panel wfth soap and water, rinse wrth vineoar and
water and dry wrth a paper towel. Important:
correct reolacement of knobs.
See page 12 for InstructIons on removing cooktop elements
Do not put cooktop elements into water to clean. They
clean themselves when heated during use. Wash cooktop
reflector bowls wfth soap and waler after each spfllover Soak
stubborn stafns wfth anammonia soaked oaoer towel then
Rafse cooktop as shown on page 12. Wash wrth soap and
waler. then drv
rub gently with a scouring pad. Excessfve rubbing may scratch
the ffnish If spills go below reflector bowls, Mt the cooktop to
clean below (see Burner Box. below)
See page 12 for
Wash wfth soap and water. For heavy solI, cover wllh a damp
cloth and let soak 30 mfnutes. A chrome cleaner may be
used To remove ffnger prints on brushed chrome, apply
a small amount of baby 011or cookfng 011with a cloth or paper
Wash with a soapy damp cloth. Remove stubborn so11wfth
a paste of baking soda and water or ammonia and water.
Do not use abrasive materials. Before using an all-purpose
cleaner, check the label to be sure it is recommended
towel Rub In the same dfrection as the brush marks on the
chrome. Chrome will stain of acfdic foods (such as vinegar) are
not cleaned up qufckly.
Porcelain enamel can crack or chip wfth misuse. It can stain
if acid spfllovers are not cleaned up qufckly. Wash with soap
and water. For heavy soil, cover wtth a damp cloth and let
soak 30 mfnutes or use a scouring pad. Rinse then dry wrth
with a paper towel.
If you are not sure if a surface is paint or porcelain,
instructions in the paint section of this chart
Wash wfth soap and water, rinse then dry wfth a paper towel,
Avoid cleaning
powders
or abrasrves
which may
scratch the surface.
Wash with soap, water and a scouring pad. Soak stubborn
starns wtth an ammonia soaked paper towel, or set a dash
of ammonia water In the oven overnfght to loosen soil, then
rub with a scouring pad. Rinse wfth vinegar and waler. When
using oven cleaners, follow package directions and be sure
that no trace of the oven cleaner remains in the oven,
Follow special Instructions for continuous cleanfng ovens on
page 10. Never use oven cleaners or abrasfve cleaners.
Remove from oven (see rnstructions on page 14) and wash
at sink with soap, waler and a scouring pad.
Do not leave in range to cool. If you clean immediately, the
so11WIIIsteam loose while you are eating. Remove pan from
oven and remove fat and drippings. Spnnkle pan wrth
Traces of the cleaner could put starns on the oven finish when
heated. To make sure thus does not happen give a final rfnse
of vinegar and water. Caution: Do not coat heating element and
thermostat bulb (wfre in upper part of oven). Never use oven
cleaner on outside oven surfaces, aluminum, chrome or baked
enamel.
11
for glass-some
will permanently damage glass, To help prevent a brown residue from forming on the oven wtndow the next
time the oven is heated, rinse the inside window with vinegar
and waler, then dry.
follow the
scratch the surface.
at
1:tnen cover wrtn a wet clotn or paper towel ana let soak
L%:gew”ash In soap and water usfng a scouring pad as
necessary. Both the pan and grid are dfshwasher safe
1
REMOVABLE
KNOBS
Al control knobs may be removed for easy cleaning by pulling the knob
straight off !he sierl See the cleaning InstructIons on page 11
HIit Slip a thin cloth (such as a handkerchlefl or a piece of string under
arc1 around the knob edge and pull up
SEE. the cleaning InstructIons on page 11
Caution: Read lhese instructions carefully before replacmg the knobs.
Replacing the knobs improperly will damage the knobs and the spring
clip on Ihe stems. if this happens, the knobs will fit loosely.
To correctly replace the knob:
1 Look at the stem It has a groove in each side The groove IS clear
(see illustratron)
2 Check the InsIde of the knob and find the molded rrb
3 Replace the knob by frttrng the molded nb rnsrde the knob Into the
clear groove on the slem
REMOVABLE
The cooktop
the reflector
Be sure all
cool before
COOKTOP
UNITS
elements of open co11element models can be unplugged and
bowls removed for cleanrng
cooktop unit control knobs are turned off and elements are
you remove or replace a cooktop unit.
To remove:
1, Grasp element trlt 11upward slrghtly to clear the refleclor bowl, then
pull away from the receptacle The element will not sit level when
replaced if it is forced too far upward when removed.
2.
Lift out the reflector bowl. See the cleaning instructions on page 11.
DO not put the element into water, It cleans itself when heated during normal use
To replace:
1 Replace the reflector bowl Be sure the receptacle IS showmg In the
bowl opening
2. For models with porcelain enameled reflector bowls, replace chrome
tnm ring.
3 Slide the plug of the element firmly rnto lhe receptacle and lower the
element Into place.
Important: Never operate a cooktop element without the reflector bowl
in place This can cause scorching of the cooktop. burning of wirmg
Insulation and loss of energy.
LIFT-UP COOKTOP
To raise the cooktop so the area underneath can be cleaned. grasp the
cooktop at the front and lift up Some models have a cooktop support
Raise the support to hold the cooktop while cleaning.
See the cleaning Instructions on page 11 When flnlshed cleaning. Igwer
the cooktop
To avoid chipping or damaging porcelain coated cooktop, be careful
not to drop or force cooktop when raising or lowering.
REMOVABLE
OVEN DOOR
To remove1 Open the door to the stop posltlon (see Illustration)
2. Grasp the door at each side and I~fi up and off the hinges
See the cleaning InstructIons on page I 1
NOTE: When the door is removed and hinge arms are at stop position,
do not bump or try to move the hinge arms. The hinges could snap back
causing an injury to the hands or damage to the porcelain on the front
of the range. Cover the hinges with toweling or empty towel rolls while
working in the oven area.
To replace:
1 Hold the
the door
the stop
2 Slide the
door
s
m
.Ic
s
S
0
door over the hinges with the slots at the bottom edge of
lined up with the hinges The hinge arms must still be in
position.
door down onto the hinges as far as It WIII go and close the
REPLACING THE OVEN LIGHT
ome Models)
(s
Do not touch oven bulb when it is hot or with wet hands. Never wipe
oven lighl area with wet cloth. Disconnect
before removmg.
Never touch the electrically
ing it.
Electrical
electrical
Replace the bulb with a 40 watt appliance bulb An appliance bulb IS
smaller than a standard 40 watt household bulb and IS made to withstand
high oven temperatures and have a much longer bulb life
supply lo range
live melal collar on Ihe bulb when replac-
power musf be shut off if you have to replace a broken bulb.
13
SEMOVABLE
OVEN RACKS
TO ADJUST OVEN TEMPERATURE
Be careful not to scratch the oven finish when installing
the oven rack.
or removing
1
Turn OVEN CONTROL knob to OFF and remove the knob by pulling
strarght otf
IMPORTANT Before you replace the OVEN CONTROL knob, turn to page
12 and carelully read the InstructIons for replacIng the knob Do not force
the knob onto the thermostat stem or you may damage it.
To nstall:
1 Set the raised back edge of the rack on a pair of rack guides
2 Push the rack In until you reach the bump In the rack gurde, then lift
the iront of the rack a bit and push the rack all the way In
2
The factory settng for the knob lines the lndlcator mark on the knob
up with the mark In the center of the scale The knob can be adjusted
up to 5OFo hotter or 5OFo cooler, in 10FO steps
3 Use a screwdrlver to loosen the screws about 1 turn each
4 Rotate the metal part of the back of the knob In the HOTTER or
COOLER directron Each mark on the scale represents lOOF
5 When you reach the desired adfustment. retlghten both screws
When ustng the oven, after adfustfng the oven control knob, set the oven
control so that the tip of the pointer pornts to the selected temperature
To Remove:
1 Pull the oven rack out, then up.
See the cleanrng rnstruct~ons on page 11
Select only the temperature with the pointer. Use the wihite mark on
the front of the knob to select the OFF and BROIL positions.
POINTER AT
POINTER
ORIGINAL
POINTER
ADJUSTED
FACTORY
ADJUSTED
TOWARD
yy)w;y,
sETi’NG
INDICATOR
MARK
ADJUSTING
OVEN CONTROL
KNOB
The temperature in your new oven has been set correctly at the factory,
so be sure to follow the rectpe temperatures and times the frrst few trmes
you bake in your new oven.
If you thank the oven should be hotter or cooler, you can adjust tt yourself
To dectde how much to change the temperature, set the OVEN CONTROL
knob 25oF hrgher or lower than the temperature in your recipe then bake.
The results of this “test” should give you an Idea of how much the
terrperature should be changed
14
SCREW
IF YOU HAVE A PROBLEM
OVEN/BROILER
Save time and money - check this list before you call for servlce.
--o ellmlnate unnecessary service calls, first read all the Instructions tn thls
manual carefully. Then, If you have a problem, always check this list of
common problems and possible solutions belore you call for service.
If you do have a problem you can not fix yourself, call your authorized
Roper Dealer for help
CLOCK/TIMER
l
l
l
PI)
=
z
2
L
l
Check for a blown fuse or tripped circuit breaker.
Bulb loose or burned out Use a 40 Watt appliance
l
Power outage
F
‘E
l
l
F
l
2!
IL
lights.
9
Oven Temperature
l
Using wrong rack position, See chart on page 8.
not set to stop within the Broil area of the knob.
SMOKING
Aluminum foil not used properly and grease can not drain correctly.
See page 7.
Did you broil with the oven door open to the stop posltion? See page 7
or using wrong rack posltion. See pages 6 and
Using improper cookware.
PROBLEMS
.
Broiler pan full of grease left tn range from the last time you brolled
food. Dirt broiler pan must not be left In the range or smoking and
a broiler YIre can result the next time the oven is used.
Check to be sure the range and oven rack are level. See your Installatlon Guide for leveling instructlons.
Oven control knob not set correctly.
Instructions.
See the sectlon on new oven odor on page 6.
OVEN/BROILER
Are you using a tested recipe from a reliable source? Are you follow1ng all instructlons in the recipe. such as pan size, preheating, using
all lngredlents called for7
Oven too crowded,
9 for tips
The oven thermostat on your new range may be more accurate than
the one on your old range See page 14 for information on adjusting
the Oven Control.
9 Aluminum foil not used properly and grease can not drawn correctly.
See page 7.
bulb to replace.
COOKING RESULTS ARE NOT WHAT YOU EXPECTED
l
Check the section on baking problems and causes on page 9
BROILING
OVEN LIGHT WILL NOT WORK
;
l
l
Unplug the element and plug one of the other elements, of the same
size, In its place. See page 12. If the second element heats, the first
element should be replaced If the second element does not heat, call
for service.
l
SEEMS WRONG
OVEN GIVES OFF AN ODOR
Check to be sure the element IS plugged In firmly. See page 12.
check by trying household
Is the Oven Control knob turned on?
9
l
DOES NOT WORK
DOES NOT WORK
Is proper airflow blocked by aluminum foil? See page 7 for tips on correct use of foil
Is the oven vent blocked? See page 6
l
KNOBS WILL NOT TURN
ELEMENT
ELEMENT
Check to be sure the range cord IS plugged into the outlet completely
Check for a blown fuse or tripped ctrcult breaker Check for power
outage
OVEN TEMPERATURE
DOES NOT WORK
To turn from OFF posItIon. push knob in and then turn.
COOKTOP
l
l
Check to be sure the range cord IS plugged into the outlet completely
Check for a blown fuse or tripped circuit breaker Check for power
outage
Check step by step operating ~nstructlons on page 6
COOKTOP
l
l
CONTINUOUS-CLEANING
OVEN FINISH
LOOKS SOILED
See page 6 for step by step
l
See tips on page 9.
15
The continuous-cleaning
finish will gradually reduce sot1 during normal baking temperatures. It will not keep your oven spotless
only
presentably clean