1
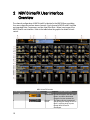
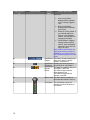
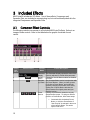
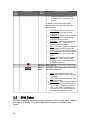
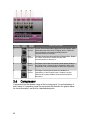
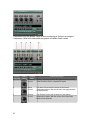
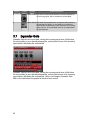
NRV10 InterFX User Guide
Version 1.0
1
1 Getting Started .................................... 4
1.1
Check for the Latest Update ...................................................................4
1.2
A Tutorial on Working with the NRV10 interFX Software:.......................4
Preparing the NRV10 Mixer for Use with NRV10 interFX: .............................4
Processing Signals with NRV10 interFX: .......................................................5
1.2.1.1
Applying the Expander-Gate: ...................................................5
1.2.1.2
Applying the Compressor: ........................................................6
1.2.1.3
Working with Custom Effects:...................................................7
1.2.1.4
Setting Optimal Output Gain: ...................................................7
1.2.1.5
Processing Additional Channels:..............................................8
Storing a Program:.........................................................................................8
Loading a Program: .......................................................................................8
Adjusting the Latency of the NRV10 Mixer: ...................................................8
Using NRV10 interFX with other Applications:...............................................9
2 NRV10 interFX User Interface
Overview ................................................10
3 Included Effects ..................................15
3.1
3.2
3.3
3.4
3.5
3.6
3.7
Common Effect Controls.......................................................................15
BPM Delay............................................................................................16
Chorus ..................................................................................................17
Distortion ..............................................................................................18
Flanger .................................................................................................19
Compressor ..........................................................................................20
Expander-Gate .....................................................................................22
4 Options Menu ...................................24
5 Preferences Dialog ...........................24
5.1
5.2
5.3
General Tab..........................................................................................24
The Audio Tab ......................................................................................25
The Interface Tab .................................................................................25
6 Mac OS X Menu Bar.........................26
6.1
6.2
6.3
6.4
6.5
2
NRV10 interFX .....................................................................................26
File........................................................................................................26
Program................................................................................................26
Window.................................................................................................26
Help ......................................................................................................27
7 Adjusting the Latency of the NRV10
Mixer......................................................28
8 NRV10 Mixer-NRV10 interFX Signal
Flow Diagram .......................................29
9 Keyboard Shortcuts ..........................30
10 Troubleshooting................................32
10.1 Loud Feedback Heard After Launching NRV10 interFX .......................32
10.2 Noticeable Delay Between Input to the NRV10 Mixer, and Output from
NRV10 interFX: ...............................................................................................32
10.3 Crackles, Clicks, or Pops:.....................................................................32
10.4 Installed VST Plug-ins Are Not Available in NRV10 interFX: ................32
10.5 The Volume Fader and Pan Knobs of the NRV10 Mixer Do Not affect
NRV10 interFX: ...............................................................................................33
10.6 NRV10 interFX Crashes on Startup:.....................................................33
10.7 The Mixer Window of NRV10 interFX Disappears When NRV interFX is
Not the Active Application: ..............................................................................33
Contacting Technical Support..............33
11 Credits................................................34
3
1
Getting Started
Welcome to the NRV10 interFX User Guide. The NRV10 interFX software is an audio
processing application designed specifically for the NRV10 Mixer, greatly expanding its
audio processing capabilities. Typically, you will use NRV10 interFX in a live situation,
when you want to add more effect processing to microphones and/or other audio
sources plugged into the NRV10 Mixer. The channel configuration of NRV10 interFX is
identical to the NRV10 Mixer, providing four mono channels and two stereo channels.
Due to this configuration, there is no need to configure the inputs and outputs of NRV10
interFX. After launching the software, simply use the per-channel Expander-Gate and
Compressor, and choose up to two user-definable VST effects per channel.
1.1
Check for the Latest Update
To ensure that you have the most recent version of NRV10 interFX, choose “Check for
Updates” from the NRV10 interFX menu of the OS X Menu Bar. This action opens the
NRV10 interFX update page of the Audiffex website. Before downloading and installing
the update, choose “About” from the NRV10 interFX menu of the OS X Menu Bar.
Compare the version number reported by the About Dialog with the version number
listed on the Audiffex website. If the version numbers match, you do not need to
update NRV10 interFX.
1.2
A Tutorial on Working with the NRV10 interFX
Software:
Below is a tutorial that describes the typical workflow of NRV10 interFX. This tutorial
assumes that the driver of the NRV10 Mixer is installed, and that the NRV10 Mixer is
connected to your computer:
Preparing the NRV10 Mixer for Use with NRV10 interFX:
To use the NRV10 Mixer with NRV10 interFX, ensure that the Pre EQ/Post EQ
button of the NRV10 Mixer is pushed out/up before launching NRV10 interFX. If this
button is pushed in/down when using NRV10 interFX, you will experience feedback. In
addition, ensure that the CH/FW buttons at the top of each channel of the NRV10 Mixer
are pushed in/down. This sends the signal from each channel of the NRV10 Mixer to
4
the associated channel of the NRV10 interFX software. NRV10 interFX then outputs the
processed signals to the related channels of the NRV10 Mixer. In this way, NRV10
interFX acts as an effect processing insert point for each channel of the NRV10 Mixer,
before all channels are summed to the stereo output of the NRV10 Mixer.
Processing Signals with NRV10 interFX:
As mentioned above, NRV10 interFX matches the channel configuration of the NRV10
Mixer, eliminating the need to configure the inputs and outputs of NRV10 interFX. For
example, if you have a microphone plugged into channel 1 of the NRV10 Mixer,
channel 1 of NRV10 interFX processes that microphone. NRV10 interFX offers an
Expander-Gate, followed by a Compressor, and then two custom effect slots on each
channel. Signals are processed in that order, and these "processors" are ordered from
top to bottom graphically, where the Expander-Gate is at the top of each channel, and
the second custom effect slot at the bottom. The User Guide of the NRV10 Mixer details
various signal connections, such as microphone and line inputs. Assuming that you've
followed the User Guide of the NRV10 Mixer, and have a microphone plugged into
channel 1 of the NRV10 Mixer, follow the directions below to process the signal of the
microphone:
1.2.1.1 Applying the Expander-Gate:
Note: While following this tutorial, if you perceive latency or a delay in the processed
signal, see Adjusting the Latency of the NRV10 Mixer.
An Expander-Gate is often used to reduce background noise, or "bleed" from other
instruments/sources. For example, if you apply the Expander-Gate to channel 1 (where
your microphone is attached), you can ensure that the channel outputs audio only
when you sing into the microphone, reducing the possibility of feedback, and
producing a cleaner signal. Once you have set a suitable level for the microphone
(directly on the NRV10 Mixer), follow these steps to apply the Expander-Gate of the
NRV10 interFX software's first channel to the microphone. The Expander-Gate is
located at the top of each NRV10 interFX channel:
1. By default, NRV10 interFX disables all Expander-Gates. To enable the Expander-Gate
on channel 1, click the Expander-Gate Bypass Button of channel 1. When the ExpanderGate is not bypassed, the Expander-Gate Bypass Button does not display a red LED.
2. Move the Expander-Gate Ratio Control of channel 1 fully clockwise.
3. Move the Expander-Gate Threshold Control of channel 1 fully counterclockwise.
4. As you sing or play an instrument into the microphone, slowly move the ExpanderGate Threshold Control of channel 1 clockwise. At some position (depending on how
loudly you are singing or playing), this movement causes your microphone signal to
5
"mute." Whenever the microphone signal falls below the threshold setting of the
Expander-Gate, the Expander-Gate mutes the signal.
5. If you wish to reduce the volume of the signal, rather than mute it when the
microphone signal falls below the threshold setting, move the Expander-Gate Ratio
Control of channel 1 counterclockwise, until you achieve the desired result. This
process is commonly referred to as "downward expansion."
6. By adjusting the Expander-Gate Attack Control, you can adjust how fast the signal
reduces to the setting of the Expander-Gate Ratio Control, after the signal falls below
the threshold setting of the Expander-Gate. The fully counterclockwise position yields
the fastest "attack," and the fully clockwise position yields the slowest "attack."
7. By adjusting the Expander-Gate Release Control, you can adjust how fast the signal
"un-mutes," or increases from the setting of the Expander-Gate Ratio Control, after the
signal exceeds the threshold setting of the Expander-Gate. The fully counterclockwise
position yields the fastest "release," and the fully clockwise position yields the slowest
"release."
1.2.1.2 Applying the Compressor:
A Compressor reduces the dynamic range of an audio signal (the difference between
the loudest and softest sound produced). For example, a song might include relatively
quiet vocals in the verse, with significantly louder vocals in the chorus. The Compressor
can help compensate for the difference in loudness between the two song sections.
Once you have set a proper input level for the microphone (directly on the NRV10
Mixer), follow these steps to apply the Compressor of the NRV10 interFX software's first
channel to the microphone signal. The Compressor is located below the ExpanderGate of each NRV10 interFX channel, and is labeled "Comp":
1. By default, NRV10 interFX disables all Compressors. To enable the Compressor on
channel 1, click the Compressor Bypass Button of channel 1. When the Compressor is
not bypassed, the Compressor Bypass Button does not display a red LED.
2. Move the Compressor Ratio Control of channel 1 to approximately 9 o'clock.
3. Move the Compressor Threshold Control of channel 1 fully clockwise.
4. As you sing or play an instrument into the microphone, slowly move the Compressor
Threshold Control of channel 1 counterclockwise. At some position (depending on how
loudly you are singing or playing), this movement causes your microphone signal to
reduce in volume. Whenever the microphone signal exceeds the threshold setting of
the Compressor, the Compressor reduces the volume of the signal.
5. The Compressor Ratio Control determines exactly how much the Compressor
reduces the signal, once the signal exceeds the threshold setting of the Compressor.
6
The fully counterclockwise position yields minimum compression, while the fully
clockwise position yields maximum compression, or "limiting."
6. By adjusting the Compressor Attack Control, you can adjust how fast the signal
compresses (reduces to the setting of the Compressor Ratio Control) after the signal
exceeds the threshold setting of the Compressor. The fully counterclockwise position
yields the fastest "attack," and the fully clockwise position yields the slowest "attack."
7. By adjusting the Compressor Release Control, you can adjust how fast the signal
increases from the setting of the Compressor Ratio Control, after the signal falls below
the threshold setting of the Compressor. The fully counterclockwise position yields the
fastest "release," and the fully clockwise position yields the slowest "release."
1.2.1.3 Working with Custom Effects:
Each channel of NRV10 interFX allows you to load up to two custom, or user-defined,
VST effects. The User Effect Slots are located beneath the Compressor of each channel.
Both User Effect Slots function in the same manner, so we'll cover only the first
User Effect Slot in this tutorial. To load a VST effect to User Effect 1, follow these steps:
1. Click the User Effect 1 Plug-in Chooser of channel 1, and select the desired plug-in.
2. To open the editor window of the effect, click the User Effect 1 Edit Button.
3. To bypass User Effect 1, click the User Effect 1 Bypass Button.
4. To remove the effect, click the User Effect 1 Plug-in Chooser, and select "Remove
Plug-in" from the resultant menu.
Note: If NRV10 interFX does not show plug-ins that you known are installed on your
system, refer to the Troubleshooting section of this guide.
1.2.1.4 Setting Optimal Output Gain:
Located at the bottom of each NRV10 interFX channel, you'll find a Gain Control and a
Level Meter. The Gain Control raises or lowers the output of the NRV10 interFX channel
to the NRV10 Mixer, where the 12 o'clock position equals no gain change. Depending
on the Expander-Gate, Compressor, and custom effect settings of a channel, you may
need to alter the Gain Control. While adjusting the Gain Control, observe the
Level Meter. If the uppermost LED lights up (the red LED), move the Gain Control
counterclockwise to reduce the signal's loudness, and thus prevent distortion. It is also
good practice to "boost" the signal as much as possible, without creating distortion. To
increase or "boost" the loudness of the signal, move the Gain Control clockwise.
7
1.2.1.5 Processing Additional Channels:
The instructions above apply to all channels of NRV10 interFX. When selecting your
input sources (microphones, turn-tables, etc) for the NRV10 Mixer, keep in mind that
channels 1 through 4 are mono channels, and channels 5/6 and 7/8 are stereo
channels .
Storing a Program:
A Program contains all channel settings of NRV10 interFX. Using Programs, you can
quickly store and recall NRV10 interFX settings. For example, in a live setting, you can
create Programs tailored to specific songs and instruments. To save all channel
settings of NRV10 interFX to a Program, follow these steps:
1. Click the Store Button, located at the top of the NRV10 interFX user interface.
2. After clicking the store button, additional controls appear at the top of the NRV10
interFX user interface, as pictured in the graphic below:
.
3. Use the up/down arrows to select the desired Program Number. There are 128
Program Numbers available.
4. Type the desired Program name into the name field.
5. Click the OK Button.
6. If a Program exists in the chosen Program Number, clicking the OK Button will
overwrite that Program.
If you wish to cancel the store operation, click the Cancel Button.
Loading a Program:
To load a Program, follow these steps:
1. Press the Select Button, located at the top of the NRV10 interFX user interface.
2. Click the desired Program from the resultant list.
Adjusting the Latency of the NRV10 Mixer:
As NRV10 interFX was designed primarily for live settings, it is vitally important to use
the lowest possible latency setting allowed by your computer. Latency is a measure of
the delay between the time that sound enters the NRV10 Mixer, travels through NRV10
interFX, and feeds back to the NRV10 Mixer. Depending on the processing power of
your computer, you may hear clicks or pops if the latency setting of the NRV10 Mixer is
8
too low. If you hear clicks or pops, raise the latency setting incrementally until you
achieve "glitch-free" audio playback.
To adjust the latency setting of the NRV10 Mixer, do the following:
1.
2.
3.
4.
5.
Click the Options Button of NRV10 interFX.
From the resultant menu, choose "Preferences."
In the Preferences Dialog, click the Audio Tab.
Using the Buffer Size Selector, select the desired buffer size.
Click the Close Button of the Preferences Dialog.
Using NRV10 interFX with other Applications:
On Mac OS X, multiple applications can share the same driver, so you can run other
applications through the NRV10 Mixer alongside NRV10 interFX. On Windows XP, when
using ASIO (which is the driver that provides the best latency times, and the only driver
supported by NRV10 interFX), only one application may access the driver at a time. If
you wish to use ReWire client applications, such as Torq or Live with the NRV10 Mixer
and NRV10 interFX, you can upgrade to NRV10 interFX Pro. When you exit NRV10
interFX, a dialog provides upgrade instructions. NRV10 interFX Pro includes the
following enhancements:
•
•
•
•
•
•
•
9
ReWire Player: Host ReWire applications such as Torq and Live directly in NRV10 interFX
Pro, with complete control over the output channel.
Track Player: Play back playlists of audio files (Wav, MP3, AIF) through NRV10 interFX
Pro, with complete control over the output channel.
6 User Effect Slots.
Additional VST Plug-ins.
Recorder: Record the master output of the NRV10 Mixer.
Advanced MIDI Mapping of effect parameters, NRV10 interFX Pro channels, and Program
changes.
Support for VST Instruments: Add VST Instruments to NRV10 interFX channels, and mix
them with the incoming audio signal.
2 NRV10 interFX User Interface
Overview
The channel configuration of NRV10 interFX is identical to the NRV10 Mixer, providing
four mono channels and two stereo channels. Each channel of NRV10 interFX includes
an integrated Gate, Compressor, and two User Effect Slots. Below is an image of the
NRV10 interFX user interface. Refer to the table below the graphic for details of each
control.
Control Call-out
#
1
2
10
NRV10 interFX Controls
Control Picture
Control
Control Description
Name
Select ButtonTo load a Program, click the Select
Button, and select the desired
Program from the resultant list.
Bypass
The Bypass Button bypasses all
Button
effects and gain settings of NRV10
interFX, allowing audio to pass
through NRV10 interFX
unchanged.
Control Call-out
#
3
4
5
6
Control Picture
Control
Name
Program
Display
Control Description
The Program Display displays the
name and Program Number of the
currently loaded Program.
Additionally, it reports the value of
the currently selected control. For
example, when you click the
Compressor Ratio Control, the
Program Display
reports the current value of that
control.
Store Button To save all channel settings of
NRV10 interFX to a Program, click
the Store Button, and follow these
steps: After clicking the Store
Button, additional controls appear
at the top of the NRV10 interFX
user interface:
Options
Button
Power
Switch
Use the up/down buttons to select
the desired Program Number.
There are 128 Program Numbers
available. Type the desired
Program name into the name field.
Click the OK Button. If a Program
exists in the chosen Program
Number, clicking the
OK Button will overwrite that
Program. If you wish to cancel the
store operation, click the Cancel
Button.
The Options Button opens the
Options Menu.
The Power Switch turns the audio
engine of NRV10 interFX on or
off. The default setting is "on". If
you wish to change this setting, do
the following:
1. Click the Options Button.
2. Select "Preferences" from
the resultant menu.
3. Click the General Tab of
the
Preferences Dialog.
4. Un-check "Start
Processing (Power On)."
5. Click the Close Button of
the
Preferences Dialog.
11
Control Call-out
#
Control Picture
Control
Name
Control Description
6. The next time you launch
7
8
9
10
11
12
13
14
15
16
12
NRV10 interFX, the Power
Switch will be set to "off."
Expander- Once the incoming signal’s volume
Gate
falls below the setting of the
Threshold
Expander-Gate Threshold Control,
Control
gating begins.
Expander- The Expander-Gate Ratio Control
Gate Ratio sets the amount of volume
Control
reduction for the incoming signal,
after it falls below the set
threshold.
Expander- The Expander-Gate Attack Control
Gate Attack sets the amount of time before
Control
gating begins, after the signal’s
volume falls below the set
threshold.
Expander- The Expander-Gate Release
Gate
Control sets the amount of time
Release
before gating ceases, after the
Control
signal’s volume exceeds the set
threshold.
Expander- To bypass or enable the Gate,
Gate Bypass press the Expander-Gate Bypass
Button
Button. When bypassed, the
Expander-Gate Bypass Button
displays a red LED. By default,
NRV10 interFX bypasses the gate
of each channel.
Compressor Once the incoming signal’s volume
Threshold
exceeds the setting of the
Control
Compressor Threshold Control,
compression begins.
Compressor The Compressor Ratio Control
Ratio Control sets the amount of volume
reduction for the incoming signal,
after it exceeds the set threshold.
Compressor The Compressor Attack Control
Attack
sets the amount of time before
Control
compression begins, after the
signal’s volume exceeds the set
threshold.
Compressor The Compressor Release Control
Release
sets the amount of time before
Control
compression ceases, after the
signal’s volume falls below the set
threshold.
Compressor To bypass or enable the
Bypass
compressor, press the
Button
Compressor Bypass Button.
When bypassed, the
Compressor Bypass Button
displays a red LED. By default,
NRV10 interFX bypasses the
Control Call-out
#
17
Control Picture
Control
Name
Control Description
compressor of each channel.
User Effect 1 Pressing this control opens a
Plug-in
menu with available VST plug-ins.
Chooser
To load a plug-in, follow these
instructions:
After clicking User Effect 1 Plug-in
Chooser, NRV10 interFX displays
a menu with several sub-menus.
Below is a description of these
submenus:
•
18
19
20
21
User Library Effects:
Displays effects available
for the currently logged-in
user.
• Root Library Effects:
Displays effects available
for all users.
• Effects in Custom Folder: If
you manually added an
effect to a non-standard
location, use this option to
navigate to the effect.
• Private Effects: Displays
effects private to NRV10
interFX. Click the desired
effect from one of the submenus to load it.
Note: If NRV10 interFX does not
show plug-ins that you know are
installed on your system, refer to
the Troubleshooting section of this
guide.
User Effect 1 User Effect 1 Display displays the
Display
name of the plug-in currently
loaded in User Effect 1.
User Effect 1 Pressing this button opens the
Edit Button plug-in editor for User Effect 1.
User Effect 1 To bypass or enable the plug-in in
Bypass
User Effect 1, press the
Button
User Effect 1 Bypass Button.
When bypassed, the
User Effect 1 Bypass Button
displays a red LED.
User Effect 2 Pressing this control opens a
Plug-in
menu with available VST plug-ins.
Chooser
To load a plug-in, follow these
instructions:
After clicking User Effect 2 Plug-in
Chooser, NRV10 interFX displays
a menu with several sub-menus.
Below is a description of these
13
Control Call-out
#
Control Picture
Control
Name
Control Description
submenus:
•
22
23
24
25
26
14
User Library Effects:
Displays effects available
for the currently logged-in
user.
• Root Library Effects:
Displays effects available
for all users.
• Effects in Custom Folder: If
you manually added an
effect to a non-standard
location, use this option to
navigate to the effect.
• Private Effects: Displays
effects private to NRV10
interFX. Click the desired
effect from one of the submenus to load it.
Note: If NRV10 interFX does not
show plug-ins that you know are
installed on your system, refer to
the Troubleshooting section of this
guide.
User Effect 2 User Effect 2 Display displays the
Display
name of the plug-in currently
loaded in User Effect 2.
User Effect 2 Pressing this button opens the
Edit Button plug-in editor for User Effect 2.
User Effect 2 To bypass or enable the plug-in in
Bypass
User Effect 2, press the
Button
User Effect 2 Bypass Button.
When bypassed, the
User Effect 2 Bypass Button
displays a red LED.
Gain Control The Gain Control increases or
decreases the channel’s volume.
Level Meter The Level Meter reports the
moment-to-moment loudness of
the channel.
3 Included Effects
NRV10 interFX includes six VST effects. Two of these effects, Compressor and
Expander-Gate, are included as separate plug-ins, but are functionally identical to the
integrated Compressor and Expander-Gate.
3.1
Common Effect Controls
The following controls are common to all included NRV10 interFX effects. Below is an
image of these controls. Refer to the table below the graphic for details of each
control.
Control
Callout #
1
2
3
4
Control Picture
Control
Name
Parameter
Display
On-Off
Button
Compare
(C) Button
Preset
Buttons
Control Description
The Parameter Display reports the value of the
currently adjusted or clicked effect parameter.
Clicking the On-Off Button enables or disables
the effect.
The Compare Button works in conjunction with
the Preset Buttons. When you load a preset
by clicking a Preset Button, and modify the
preset by changing the controls of the effect,
clicking the Compare Button switches the
effect between the original preset and your
modified version.
Clicking a Preset Button loads the currently
assigned effect preset. To assign a different
preset to a Preset Button, follow these steps:
1. Command-click the desired Preset
Button, or click the Preset Button if
"Auto Pop-Up" is selected in the menu
of the Options Button. This action
opens a sub-menu.
15
Control
Callout #
Control Picture
Control
Name
Control Description
2. Select the desired preset from the
"Load Built-In" or "Load User" submenus.
In addition to the preset assign options
described above, the sub-menu offers the
following items:
•
Preset Name: At the top of the submenu is the name of the currently
loaded preset.
• Load Built-In: Opens a sub-menu listing
all factory presets. Click the desired
preset from the list to load it.
• Load User: Opens a sub-menu listing
all user presets. Click the desired
preset from the list to load it.
• Save: This item is grayed out (disabled)
when a factory preset is loaded, and
enabled when a User preset is loaded.
• Save Copy: If you alter a factory preset,
and wish to save a copy, choose this
option.
• Delete: Deletes the currently loaded
user preset. If the currently loaded
preset is a factory preset, this option is
grayed-out (disabled).
On-Off
When the effect is on, the On-Off Status LED
Status LED looks bright red.
Options
Clicking the Options Button opens a sub-menu
Button
with the following items:
5
6
•
•
•
3.2
About: Opens the About Box of the
effect, which displays version and credit
information.
Help: Opens a window with basic effect
usage information.
Auto Pop-Up: Select this option to show
the associated pop-up menus of the P1,
P2, P3, and P4 Buttons when clicking
them. If this option is deselected, Altclick the P1, P2, P3, and P4 buttons to
show the associated pop-up menu.
BPM Delay
BPM Delay is an effect that creates delayed repetitions of the incoming signal. Below is
an image of BPM Delay. Refer to the table below the graphic for details of each
control.
16
Control Control Control
Control Description
Call-out # Picture
Name
1
Level
The Level Control sets the balance between the processed and
Control
unprocessed signal, where the 12 o'clock position outputs
equal amounts of processed and unprocessed signal levels.
Rotate this control clockwise to increase the amount of the
unprocessed signal, and rotate it counterclockwise to increase
the amount of the processed signal in the output of the effect.
2
Tempo
The Tempo Control sets the tempo, or rate of repetition, for the
Control
delayed repetitions of the incoming signal. Alternatively, you
can set the tempo of BPM Delay with the Tap Button.
3
Decay
Control
The Decay Control sets the "decay time" of the delayed signal
repetitions, or the amount of time it takes the delayed signal
repetitions to fade from full to inaudible volume. Rotate this
control clockwise to increase "decay time," and rotate it
counterclockwise to decrease the "decay time."
Stereo
The Stereo Control contracts or expands the stereo image of
Control
the effect. Rotating the control clockwise increases the stereo
width, and rotating it counterclockwise decreases the stereo
width. If you are using BPM Delay on a mono channel of
NRV10 interFX (channels 1-4), it is recommended to set this
control fully counterclockwise.
Tap Button Click the Tap Button, and then click the On-Off Button two
times, at the desired tempo, to set the tempo of BPM delay.
Alternatively, you can set the tempo of BPM delay with the
Tempo Control.
4
5
3.3
Chorus
Chorus creates the classic "chorusing" effect, where the incoming signal appears to be
doubled. Below is an image of Chorus. Refer to the table below the graphic for details
of each control.
17
Control
Call-out
Number #
1
Control
Picture
Control
Name
Mix
Control
2
Rate
Control
3
Depth
Control
4
Stereo
Control
3.4
Control Description
The Mix Control sets the balance between the processed and
unprocessed signal, where the 12 o'clock position outputs
equal amounts of processed and unprocessed signal levels.
Rotate this control clockwise to increase the amount of the
unprocessed signal, and rotate it counterclockwise to increase
the amount of the processed signal in the output of the effect.
The Rate Control sets the speed of the Chorus effect. Faster
Rate settings produce special effect sounds, while slower Rate
settings produce more natural "chorusing" effects. Rotate the
control clockwise to increase the Rate, and counterclockwise
to decrease it.
The Depth Control sets the frequency width (sweep width) of
the Chorus effect. Rotate the knob clockwise to affect more
frequencies, and counterclockwise to affect less frequencies.
The Stereo Control contracts or expands the stereo image of
the effect. Rotating the control clockwise increases the stereo
width, and rotating it counterclockwise decreases the stereo
width. If you are using Chorus on a mono channel of NRV10
interFX (channels 1-4), it is recommended to set this control fully
counterclockwise.
Distortion
Distortion creates the classic sound of guitar amplifier distortion, and is useful on many
sound sources. Below is an image of Distortion. Refer to the table below the graphic
for details of each control.
18
Control Control Control
Control Description
Call-out # Picture
Name
1
Level
The Level Control sets the output level of the distortion effect.
Control
Rotate the control clockwise to increase the output level, and
counterclockwise to decrease it.
2
Color
Control
The Color Control alters the sound of the Distortion effect.
Rotate the control counterclockwise to achieve a softer tone,
and clockwise to achieve a brittle, or more aggressive, tone.
3
Distort
Control
The Distort Control sets the amount of distortion of the
Distortion effect. Rotate the control clockwise to increase the
amount of distortion, and counterclockwise to decrease the
amount of distortion.
3.5
Flanger
Flanger creates the classic "flange" sound. Below is an image of Flanger. Refer to the
table below the graphic for details of each control.
19
Control Control Control
Control Description
Call-out # Picture
Name
1
FX Tune The FX Tune Control sets the delay time of the Flanger, which
Control
greatly alters the sound of the "Flanging" effect. Rotate the
control clockwise to decrease the delay time and
counterclockwise to increase it.
2
Rate
The Rate Control sets the speed of the Flanger effect. Rotate
Control
the control clockwise to increase the Rate, and
counterclockwise to decrease it.
3
Depth
Control
The Depth Control sets the frequency width (sweep width) of
the Flanger effect. Rotate the knob clockwise to affect more
frequencies, and counterclockwise to affect less frequencies.
4
Regen.
Control
The Regen. Control sets the amount of feedback, or
regeneration, of the "flanged" signal. Rotate the control
clockwise to increase feedback, and counterclockwise to
decrease it.
3.6
Compressor
Compressor limits the dynamic range of the incoming signal. For an explanation of
each control or Compressor, hover the mouse over the controls in the graphic below
for a brief description, and click for a detailed description.
20
Compressor limits the dynamic range of the incoming signal. Below is an image of
Compressor. Refer to the table below the graphic for details of each control.
Control Control
Control
Call-out # Picture
Name
1
Threshold
Control
Control Description
Once the incoming volume of the signal exceeds the setting
of theThreshold Control, compression begins.
2
Attack
Control
The Attack Control sets the amount of time before
compression begins, after the volume of the signal exceeds
the set threshold.
3
Release
Control
The Release Control sets the amount of time before
compression ceases, after the volume of the signal falls
below the set threshold.
21
Control Control
Control
Control Description
Call-out # Picture
Name
Ratio ControlThe Ratio Control sets the amount of volume reduction for
4
the incoming signal, after it exceeds the set threshold.
5
3.7
Mode Switch The Mode Switch switches the Compressor effect between
Normal and Auto Mode. In Auto Mode, the Compressor
automatically compensates for gain reduction by increasing
output volume. In Normal Mode, there is no compensation
for gain reduction.
Expander-Gate
Expander-Gate acts as a noise gate, muting the incoming signal when it falls below
the set threshold, or as a downward expander, reducing the volume of the incoming
signal when it falls below the set threshold.
Expander-Gate acts as a noise gate, muting the incoming signal when it falls below
the set threshold, or as a downward expander, reducing the volume of the incoming
signal when it falls below the set threshold. Below is an image of Expander-Gate.
Refer to the table below the graphic for details of each control.
22
Control Control
Control
Call-out # Picture
Name
1
Threshold
Control
Control Description
Once the incoming volume of the signal falls below the setting of
theThreshold Control, gating or expansion begins.
2
Attack
Control
The Attack Control sets the amount of time before gating or
expansion begins, after the volume of the signal falls below
the set threshold.
3
Release
Control
The Release Control sets the amount of time before gating or
expansion ceases, after the volume of the signal exceeds the
set threshold.
4
Ratio ControlThe Ratio Control sets the amount of volume reduction for
the incoming signal, after it falls below the set threshold.
23
4 Options Menu
The Options Menu includes a single item, labeled "Preferences." Choose this item to
open the Preferences Dialog.
5 Preferences Dialog
To open the Preferences Dialog, choose "Preferences" from the Options Menu. The
Preferences Dialog includes four tabs. The features available in each tab are outlined
below:
5.1
•
•
•
•
24
General Tab
Show Splash Screen: When this preference is checked, NRV10 interFX displays a splash screen
on start-up.
Start Processing (Power On): When this preference is checked, NRV10 interFX starts processing on
start-up.
Reload Last Program: When this preference is checked, NVR10 interFX loads the last loaded
Program on start-up.
Effect Appearance: This section of the General Tab includes two drop-down controls. The upper
control is available at all times, and the lower control is available depending on the selection of
the upper control. Options in the upper control include:
• Preserve Windows Arrangement: On Program load, this option recalls the arrangement
of Effect Editors saved with the Program. With this option selected, the lower control is not
available.
• Override Saved Windows Arrangement: On Program load, this option ignores the
arrangement of Effect Editors saved with the Program. With this option selected, the lower
control offers the follow options:
• Hide All Windows: Hides all Effect Editors on Program load.
• Tile Windows Horizontally: Opens all Effect Editors, and tiles them from left to right,
on Program load.
• Tile Windows Vertically: Opens all Effect Editors, and tiles them from top to bottom,
on Program load.
• Put Effects to Dock: Opens all Effect Editors, but minimizes them to the Mac OS X
dock.
• According to Channel Position: Opens all Effect Editors, and tiles them into one of
six columns, according to channel position.
• Always Force Windows Arrangement: Forces the arrangement of windows whenever
they are opened, according to the options available in the lower control:
• Tile Windows Horizontally: Opens all Effect Editors, and tiles them from left to right,
on Program load.
• Tile Windows Vertically: Opens all Effect Editors, and tiles them from top to bottom,
on Program load.
• Put Effects to Dock: Opens all Effect Editors, but minimizes them to the Mac OS X
dock.
• According to Channel Position: Opens all Effect Editors, and tiles them into one of
six columns, according to channel position.
5.2
•
•
5.3
•
•
25
The Audio Tab
Buffer Size Selector: Select the desired buffer size from this control, to alter the latency of the
NRV10 Mixer.
Rescan Button: Click this button to rescan the NRV10 Mixer, to re-compute available buffer sizes.
The Interface Tab
Sensitivity Slider: This control sets the sensitivity, or the amount of motion required, to move the
graphical knobs of NRV10 interFX.
Vertical/Circular Switch: This control sets the mouse gesture (vertical or circular) used to adjust
the knobs of the NRV10 interFX user interface.
6 Mac OS X Menu Bar
The Mac OS X Menu Bar includes the following menus and menu items:
6.1
•
•
•
•
•
•
•
•
6.2
•
•
•
•
•
6.3
•
•
•
6.4
•
26
NRV10 interFX
About: Opens the About Dialog of NRV10 interFX, which includes credits and version
information.
Check for Updates: Choose this option to navigate to the Audiffex website and download
the latest NRV10 interFX update. Choose “About” from the menu bar of NRV10 interFX to
compare the installed version number of NRV10 interFX with the latest version number
listed on the Audiffex website. If the version numbers match, you do not need to update
NRV10 interFX.
Preferences: Opens the Preferences Dialog.
Services: The "Services" item is a standard interoperability feature of Mac OS X.
Hide NRV10 interFX: Hides NRV10 interFX, but does not close it.
Hide Others: Hides all open applications, except for NRV10 interFX.
Show All: This item is only available after choosing "Hide Others." Choosing "Show All"
shows all hidden applications.
Quit NRV10 interFX: Closes NRV10 interFX.
File
Open User VST Folder: Opens the top-level VST plug-ins folder available to the current
User account.
Open System VST Folder: Opens the top-level VST plug-ins folder available to all Users.
Open Custom VST Folder: Opens the top-level custom VST plug-ins folder selected using
the "Select Custom VST Folder" option of the File Menu.
Select Custom VST Folder: Choose this option to select the custom VST plug-ins folder of
NRV10 interFX, if desired.
Rescan Plug-In Folders: Rescans all plug-in folders. Choose this option if you've added
new plug-ins while NRV10 interFX is running, or if you cannot access plug-ins that you
know are installed on the computer.
Program
Load Program: This item includes a sub-menu that lists all available Program. Click the
desired Program to load it.
Store Program: Unlike pressing the Store Button, choosing "Store Program" from the
Program Menu stores all channel settings of the NRV10 interFX software under the current
Program name and Program Number. If you wish to save a Program under a different
name and Program Number, use the Store Button.
Delete Program: Deletes the currently loaded Program from disk, but retains the currently
loaded program in memory.
Window
Hide Effects: Choosing this item hides all Effect Editors.
•
•
•
•
•
•
6.5
•
•
•
•
•
•
•
•
27
Show Effects: Choosing this item opens all Effect Editors.
Hide Effect Toolbars: NRV10 interFX displays toolbars containing buttons for effect
bypass and preset load at the bottom of each effect window. Choose this item to hide
these toolbars.
Show Effect Toolbars: NRV10 interFX displays toolbars containing buttons for effect
bypass and preset load at the bottom of each Effect Editor Window. Choose this item to
show these toolbars.
Tile Effects Horizontally: Tiles Effect Editor Windows from left to right.
Tile Effects Vertically: Tiles Effect Editor Windows from top to bottom.
Tile Effects by Channel: Tiles Effect Editor Windows into one of six columns, according to
channel position.
Help
NRV10 interFX Help: Opens this User Guide in the Macintosh Help Viewer application.
Open Help in your Default Browser: Opens this User Guide in your default Web Browser.
Buy the NRV10 interFX Pro Version On-Line: Opens the NRV10 interFX upgrade page in
your default browser.
Visit M-Audio.com: Opens the M-Audio Website in your default browser.
Open the ReadMe file: Opens the ReadMe file for this version of NRV10 interFX.
Release Notes: Opens the release notes for this version of NRV10 interFX.
Solving Problems - FAQ: Opens the Frequently Asked Questions document.
Send mail to DSound Support: Creates a new e-mail message to Audiffex support.
7 Adjusting the Latency of the NRV10
Mixer
As NRV10 interFX was designed primarily for live settings, it is vitally important to use
the lowest possible latency setting allowed by your computer. Latency is a measure of
the delay between the time that sound enters the NRV10 Mixer, travels through NRV10
interFX, and feeds back to the NRV10 Mixer. Depending on the processing power of
your computer, you may hear clicks or pops if the latency setting of the NRV10 Mixer is
too low. If you hear clicks or pops, raise the latency setting incrementally until you
achieve glitch-free audio playback.
To adjust the latency setting of the NRV10 Mixer, do the following:
1.
2.
3.
4.
5.
28
Click the Options Button of NRV10 interFX.
From the resultant menu, choose "Preferences."
In the Preferences Dialog, click the Audio Tab.
Using the Buffer Size Selector, select the desired buffer size.
Click the Close Button of the Preferences Dialog.
8 NRV10 Mixer-NRV10 interFX Signal
Flow Diagram
The block diagram below illustrates the basic signal flow of an NRV10 Mixer channel,
and the point at which audio sends to and returns from the NRV10 interFX software.
For a complete signal flow diagram of the NRV10 Mixer, refer to the printed getting
started guide.
29
9 Keyboard Shortcuts
To aid in learning the NRV10 interFX software, the application displays tool-tips. When
hovering the mouse over a control, NRV10 interFX displays tool-tips that provide the
name of the control. By holding the Command key and mousing over a control, NRV10
interFX displays a detailed description of the control.
To increase your efficiency with NRV10 interFX, you may call the various items of the
Mac OS X Menu Bar using the following keyboard shortcuts:
Open the Preferences Dialog: Command+,
Hide NRV10 interFX: Command+H
Quit NRV10 interFX: Command+Q
Open User VST Folder: Shift+Command+O
Open System VST Folder: Option+Command+O
Open Custom VST Folder: Control Command+O
Select Custom VST Folder: Control+Command+U
Rescan Plug-in Folders: Option+R
Store Program: Command+S. Note: This shortcut stores the current settings of NRV10
interFX to the current Program name and Program Number.
Delete Program: Command+D. Note: This shortcut deletes the Program currently
displayed in the Program Display.
Hide Effects: Option+Command+H
Show Effects: Option+Command+S
Hide Effect Toolbars: Shift+Command+L
Show Effect Toolbars: Shift+Command+K
Tile Effects Horizontally: Shift+Command+H
Tile Effects Vertically: Shift+Command+V
Tile Effects by Channel: Shift+Command+C
30
NRV10 interFX Help: Command+?
NRV10 interFX lists keyboard shortcuts directly to the right of each menu bar item, using
symbols for Command, Option, and Shift. The table below lists each symbol and its
English name:
Symbol
31
Name
Command
Option
Shift
10 Troubleshooting
10.1
Loud Feedback Heard After Launching NRV10
interFX
Ensure that the Pre EQ/Post EQ button of the NRV10 Mixer is pushed out/up before
launching NRV10 interFX. If this button is pushed in/down when using NRV10 interFX,
you will experience feedback.
10.2 Noticeable Delay Between Input to the NRV10
Mixer, and Output from NRV10 interFX:
The cause of this issue is a high latency setting, and the remedy is to lower this setting.
For details on adjusting latency, see Adjusting the Latency of the NRV10 Mixer.
10.3 Crackles, Clicks, or Pops:
If at any time the audio output of NRV10 interFX produces crackles, clicks, pops, or other
artifacts, try the following:
•
•
•
Make sure no channels are clipping on the input of the NRV10 Mixer.
If the output of a channel in NRV10 interFX is clipping (signal reaches the top of a Level
Meter ), rotate the Gain Control of the channel counter-clockwise.
Crackles, clicks, pops, or other artifacts also occur when your computer cannot keep up
with the current task. To solve this problem, adjust the latency setting of the NRV10
interFX Mixer. See Adjusting the Latency of the NRV10 Mixer for more information.
10.4 Installed VST Plug-ins Are Not Available in
NRV10 interFX:
If you install new plug-ins while NRV10 interFX is running, choose "Rescan Plug-in
Folders" from the File Menu. Otherwise, the new plug-ins will be available on the next
NRV10 interFX startup. If your VST plug-ins are still not available in NRV10 interFX, follow
these steps:
1.
2.
3.
4.
32
Click the File Menu in the Menu Bar.
Click "Select Custom VST Folder."
From the resultant dialog, select the folder where your VST plug-ins reside.
When you click User Effect 1 Plug-in Chooser or User Effect 2 Plug-in Chooser, your VST
plug-ins should be available in the resultant Effects in Custom Folder sub-menu.
10.5 The Volume Fader and Pan Knobs of the
NRV10 Mixer Do Not affect NRV10 interFX:
This behavior is normal. The signal of an NRV10 Mixer Channel flows to NRV10 interFX,
and back to the NRV10 Mixer, before it travels through the Volume Fader and Pan Knob
of an NRV10 Mixer Channel. See NRV10 Mixer-NRV10 interFX Signal Flow Diagram for
more details.
10.6 NRV10 interFX Crashes on Startup:
On startup, NRV interFX can bypass corrupted Programs and settings caused by, for
example, a computer power failure. To perform this operation, hold the SHIFT key
during application startup.
10.7 The Mixer Window of NRV10 interFX
Disappears When NRV interFX is Not the
Active Application:
This is the normal behavior of floating windows on OS X.
Contacting Technical Support
For additional help, technical support is available on our web site at http://www.maudio.com/tech, where you can fill out our technical support form.
•
Alternatively, you can contact us by phone at: (626) 633-9055
•
Technical support is available by telephone from 7am - 7pm PST.
•
For technical support regarding NRV10 interFX, you may also contact Audiffex support:
[email protected].
33
11 Credits
Software Development by Audiffex:
•
•
•
Vitezslav Kot (PC Development)
David Oboril (PC Development)
Lubor Prikryl (Mac Development, graphics)
Functional Specification:
•
•
•
•
Chad Carrier
Petr Krkavec
Jason McClinsey
Lubor Prikryl
Program Management:
•
•
Anna Sitko
Trevor Zylstra
Quality Assurance:
•
•
Kuba Marek (Audiffex)
George Radai (M-Audio)
Manual:
•
Jason McClinsey
Legal Notice:
•
•
VST PlugIn Interface Technology by Steinberg Media Technologies GmbH
VST is a trademark of Steinberg Media Technologies GmbH
©2006 Avid Technology, Inc. All rights reserved. Product features, specifications, system requirements
and availability are subject to change without notice. Use of the enclosed software is subject to a related
license agreement. Avid, M-Audio, NRV 10 interFX and Torq are trademarks or registered trademarks of
Avid Technology, Inc. in the U.S. and other countries. All other trademarks contained herein are the
property of their respective owners.
34