1
MHDD Documentation
Very Low Level Hard Disk Diagnostic Tool
Dennis German
About the MHDD Project
MHDD is the small and powerful freeware tool to work with hard drives at the lowest possible level.
The first version was released in 2000 by Dmitry Postrigan whose main objective was to develop wellknown and trusted HDD diagnostic tool. It was able to make surface scan of an IDE drive in CHS
(Cylindar, Head,Sector) mode.
MHDD now includes features to access raw sectors, view S.M.A.R.T. (SMART) and other drive
parameters such as acoustic management, security, Host Protected Area. You can issue a sequence
of commands using simple scripting.
How it Works
When DOS needs to read a sector from a drive , it asks the BIOS to do it. The BIOS looks into its
tables to find where that drive is attached, checks ranges and then starts sending commands to the
drive. After everything is done BIOS returns result to DOS.
This diagram shows how a DOS program talks to the drive:
program
<--->
MSDOS
<--->
BIOS
<--->
IDE/SATA controller
<---> Hard disk
This is how MHDD works:
MHDD
<-------------------------------->
IDE/SATA controller
<---> Hard disk
The main difference: MHDD does not use DOS or BIOS functions or interrupts and works even if the
BIOS does not detect the drive. You can turn on your drive after DOS boots (A small risk of drive
damage exists if you are not careful).
MHDD works directly with IDE or Serial ATA controller so it does not know about partitions, file
systems, BIOS (motherboard) limitations, etc.
For SCSI drives MHDD uses DOS ASPI driver (incuded).
If the drive under test is on the Primary IDE interface use /ENABLEPRIMARY switch. (this is included
in the CD image).
Platform and Supported Hardware
Platform:
DR-DOS , MSDOS version 6.22 included on CD image
Hardware:
Intel Pentium or higher CPU
boot device (USB, CDROM, FDD, HDD)
IDE/SATA Controllers:
Any integrated into motherboard north bridge (addresses: 0x1Fx for primary channel, 0x17x for
secondary channel)
PCI UDMA boards (detected automatically): HPT, Silicon Image, Promise, ITE, ATI and so on. Some
RAID boards are supported. In this case MHDD works with each physical drive separately.
Revised January 10, 2009
Page 1 of 20
MHDD Documentation
Very Low Level Hard Disk Diagnostic Tool
Dennis German
UDMA/RAID controllers integrated into motherboard as additional chip
Hard Disk Drives:
IDE or Serial-ATA drive with size bigger than 600Mbytes, i.e. LBA mode is supported in full. removed
CHS code since version 2.9
IDE or Serial-ATA drive with size smaller than 8,388,607 TBytes, i.e. LBA48 mode is supported.
SCSI drive with sector size 512—528 bytes
Other Devices:
Any SCSI removable media such as tape, CDROM. Maximum sector size for such devices is 4096
bytes
Getting MHDD
Please use HDDguru.com website.
MHDD is available as CD image, as self-extracting floppy image or as an archive.
MHDD is included in the sysresccd free download at SysRescCD.org
Preparing the Package
Write a bootable CD from the ISO image with any CD burning software.
Floppy image can be written under Windows 2000/XP.
Take the executables and build your own system.
MHDD Package Contents
mhdd.exe Main executable
mhdd.hlp used by MAN to describe commands
batch/sample.mba Sample batch script to run tests without intervention
scripts/test Sample script for sending commands
cfg/mhdd.cfg configuration
AUTOEXEC.BAT
@ECHO OFF
set EXPAND=YES
SET DIRCMD=/O:N
set LglDrv=27 * 26 Z 25 Y 24 X 23 W 22 V 21 U 20 T 19 S 18 R 17 Q 16 P 15
set LglDrv=%LglDrv% O 14 N 13 M 12 L 11 K 10 J 9 I 8 H 7 G 6 F 5 E 4 D 3 C
call setramd.bat %LglDrv%
path=%RAMD%:\
copy command.com %RAMD%:\ > NUL
set comspec=%RAMD%:\command.com
echo.
%RAMD%:
MD MHDD
cd \MHDD
copy A:\mhdd\mhdd.zip . > nul
copy a:\pkunzip.exe . > nul
pkunzip -d mhdd.zip > nul
del mhdd.zip
del pkunzip.exe
echo.
Revised January 10, 2009
Page 2 of 20
MHDD Documentation
Very Low Level Hard Disk Diagnostic Tool
Dennis German
echo The MHDD was successfully unpacked to
echo.
%RAMD%:\MHDD
set CDROM=
set LglDrv=
mhdd /enableprimary
CONFIG.SYS
[menu]
menuitem=SCSI, Start computer with ADAPTEC SCSI adapter support
menuitem=NOSCSI, Start computer without SCSI support.
menudefault=NOSCSI,30
menucolor=7,0
[SCSI]
device=himem.sys /testmem:off
device=aspi2dos.sys
device=aspi8dos.sys
device=aspi4dos.sys
device=aspi8u2.sys
[NOSCSI]
device=himem.sys /testmem:off
[COMMON]
files=10
buffers=10
dos=high,umb
stacks=9,256
devicehigh=ramdrive.sys /E 2048
lastdrive=z
SETRAMD.BAT
@echo off
set RAMD=
set CDROM=
@rem
@rem
sweeps all possible drive letters to find ramdrive
returns i errorlevel for drive (C:=3)
findramd
if errorlevel 255 goto no_ramdrive
if not errorlevel 3 goto no_ramdrive
goto do_shift
:loop
if errorlevel %1 goto no_shift
:do_shift
set cdrom=%2
shift
shift
if not %1*==* goto loop
Revised January 10, 2009
Page 3 of 20
MHDD Documentation
Very Low Level Hard Disk Diagnostic Tool
Dennis German
goto no_ramdrive
:no_shift
set ramd=%2
goto success
:no_ramdrive
echo MHDD startup disk could not create a temporary drive for itself.
echo This happen because this computer has less than 4 Mbytes of memory.
echo.
:success
The bootable CD image creates a:
RAM drive (2MB) as D:,
the CD becomes A: and the
floppy is B:.
The CD is removable and you can insert a different CD having an editor or other programs.
First Run
Some important information
MHDD is very easy to use.
Knowing what to have MHDD do is not easy!
If you don't have in depth knowledge of how disk drives work, read the ATA/ATAPI standard: ATA8ACS PDF.
If you already have in depth knowledge of how disk drives work, read the ATA/ATAPI standard: ATA8ACS PDF.
It is very important to understand that you have to spend several hours (minimum) before you will start
using MHDD.
I strongly recommend trying a couple of good SPARE drives, with MHDD before you start working
with bad drives.
Before you Start
IDE drive to be tested MUST be configured as master (i.e. set the jumpers on the drive), no other
devices should be attached.
MHDD uses cfg/mhdd.cfg for program configuration information.
Primary IDE channel is disabled. To enable it, first read read this warning message:
WARNING: Do not run MHDD from the hard drive that is on the same physical
IDE channel (cable) you are going to use to diagnose drives! DOS
(SMARTDRV.EXE, for example) may access any drive at the same moment as
MHDD. This will cause data loss on both devices on that channel! There is
no way to block or trace MSDOS or BIOS read/write attempts. That is why, by
Revised January 10, 2009
Page 4 of 20
MHDD Documentation
Very Low Level Hard Disk Diagnostic Tool
Dennis German
default, MHDD does not work with Primary IDE as it usually used to boot DOS
and run MHDD.
then edit MHDD.CFG and include:
#PRIMARY=TRUE
If you booted from the CD, MHDD runs from a RAM drive, so this is not problem and UTOEXEC.BAT
starts MHDD with the /enableprimary command line option.
Have a DOS formatted floppy ready for saving logs, screenshots and config files. Adding a tiny editor
like vi.exe and pkzip would also be a good idea. Remember floppy is B: if you booted from the CD.
MHHD logs all activity in log/mhdd.log.
Example:
31.07.2007
31.07.2007
31.07.2007
31.07.2007
31.07.2007
31.07.2007
31.07.2007
31.07.2007
17:22:14
17:22:14
17:22:14
17:22:30
17:22:30
17:22:32
17:22:32
17:22:32
| MHDD 4.6 (c) Dmitry Postrigan | FREEWARE
Changing mode to: IDE
Changing mode to: IDE
Device selected: 3
MHDD<QUIT
MHDD: Exit
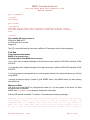
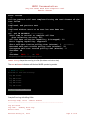
After starting MHDD you will see drive selection menu. This can be displayed later by pressing
SHIFT+F3.
Drive parameters - PRESS F2 to DETECT
Current position
Created directory: "CFG"
Autodetect disabled. To Enable see MMHDD.CFG
PORT 1F0h (Primary controller)
1. [
PORT 170h (Secondary controller)
3. [
PORT 100h (PC-3000 board)
5. [
PCI controllers)
6. [
8. [
----------------------------------------------------------------------------Warning: SLAVE DEVICES NOT SUPPORTED
Enter HDD Number [3]:
| MHDD 4.6 (c) Dimitry Postrigan | FREEWARE
Revised January 10, 2009
|
hh:mm:ss
Page 5 of 20
MHDD Documentation
Very Low Level Hard Disk Diagnostic Tool
Dennis German
Be extremely careful when running MHDD the first time.
[F1] displays the commands.
MAN EN command or MAN RU command describes what the command does.
Some have shortcuts, for example F4 for SCAN.
SCREENSHOT or [F10] will do a print screen to file LOG\SCRSHOT.LOG.
Using MHDD
Device identify commands
Retrieve information from the drive.
ID and EID display detailed information about the drive.
ID or shift[F2]
Maxtor 5T030H3 LBA: 60,030,432 BIOS: 80H
SN: T3D3N8WC FW: TAH71DP0 CACHE:512KN Size = 8063MB
EID adds
Supports: HPA DLMC LBA MS16 DMA (UDMA2,MWDMA2) EID
SMART: Enabled EID
Size=8063MB
PORT or shift[F3] detects disks and presents the drive selection menu.
CX seek read test measures access times:
Init drive: Done
Seel&Read test
Press <>ESC> to finish...
Start: hh:mm:ss
Average Access Time:
16.87
This is continueously averaged and updated until you press [ESC].
Maximun: 35.03
Done: hh:mm:ss
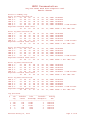
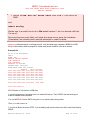
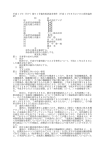
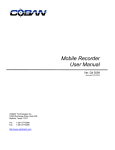
SMART Attributes
SMART ATT or [F8].
Different manufactures and different models provide different information.
Revised January 10, 2009
Page 6 of 20
MHDD Documentation
Very Low Level Hard Disk Diagnostic Tool
Dennis German
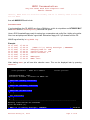
#5 Reallocated Sectors Count attribute is the most important item. This reports the number of
remaps on the drive. This should be ZERO . If it is more than 50 — you have a problem. That
means you have bad power supply, vibration, or overheating.
#194 Temperature best values are between 20 and 40 degrees centigrade.
#199 CRC error rate attribute means how many errors have happened during transferring data
through the IDE/SATA cable and should be zero . If not change the cable! Overclocking may result
in increased error rate. For more information about SMART ATT display smart attributes to screen
and smart.log
Each drive model may present different attributes
HDD: Maxtor 5T030H3; FW: TAH71DP0; SN: T3D3N8WC
Name
Val Worst
Att #
1 : Read error rate
: 253 252
Att #
3 : Spin up time
: 210 208
Att #
4 : Number of spin-up times
: 240 240
Att #
5 : Reallocated sectors count : 253 253
Att #
6 : Read channel margin
: 253 253
Att #
7 : Seek error rate
: 253 252
Att #
8 : Seek time performance
: 252 245
Att #
9 : Power-on time
: 216 216
Att # 10 : Spin-up retries
: 253 252
Att # 11 : Calibration retries
: 253 252
Att # 12 : Start/stop count
: 252 252
Att # 187 : Unknown
: 35
46
Att # 189 : Unknown
: 35
46
Att # 190 : Unknown
: 35
46
Att # 194 : HDA Temperature
: 35
46
Att # 196 : Reallocate event count
: 253 253
Att # 197 : Current pending sectors
: 253 253
Att # 198 : Offline scan UNC sectors : 253 253
Att # 199 : Ultra ATA CRC Error Rate : 199 199
Att # 200 : Write error rate
: 253 252
Att # 201 : Unknown
: 253 172
Att # 202 : Unknown
: 100 253
Raw
94
16970
27451
0
0
0
53387
64096
0
0
432
35
35
35
35
0
0
0
0
0
794
0
SMART Commands
SMART off | on
SMART AAS enable | disable attribute autosave
SMART DATA read data
If this does not display in about 50 seconds the drive may not be responding.
No error is displayed by MHHD if the command timesout.
off-line data collection statue:
CODE:130
Self-test execution status: nn%*, and was aborted by the HOST
-orRevised January 10, 2009
Page 7 of 20
MHDD Documentation
Very Low Level Hard Disk Diagnostic Tool
Dennis German
Never started
-orand the previous self-test completed having the read element of the
test failed.
-orCompleted, and previous test
-orCompleted without error or no test has ever been run.
-ornn%, and IN PROGRESS ( percent remaining)
Total time in seconds to complete off-line
data collection activity: 430
Off-line data collection capability (bit-mapped): 91
Error logging capability: supported
Short self-test routine polling time (minutes): 1 (don't believe it)
Extended self-test routine polling time (minutes): 54
Conveyance self-test routine polling time (minutes): 2
CheckSum: OK
-orCheckSum: FAIL, 1
-or- 109
subsequent queries return increasing values up to 255
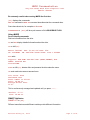
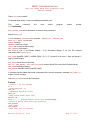
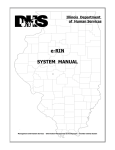
SMART ErLog dumps the error log to a file (this takes a minute or two)
The ERR and ABRT indicators will blink as MHDD queries log entries.
* Smart -> ERLOG
Filename to save the ErrorLog:
Log
…
Log
Log
Log
…
Log
#01 found.
#EE found.
#EF found.
#F0 found.
#FF found.
Log saved to file: "xxxxx"
Sucessful
Sample Error Log with failing LBAs:
ErrorLogs dump. Drive : Maxtor 6Y060L0
-------------------------------------------------------------Log #01 found.
Log name : "Summary Error Log"
Errors Count
: 2152
Revised January 10, 2009
Page 8 of 20
MHDD Documentation
Very Low Level Hard Disk Diagnostic Tool
Dennis German
Errors in summary log:
Error log data structure #1:
CMD # 1 :
00
FF
88
1C
57
CMD # 2 :
00
FF
87
1D
57
CMD # 3 :
00
FF
86
1E
57
CMD # 4 :
00
FF
85
1F
57
CMD # 5 :
00
FF
84
20
57
Registers contains after error :
40
F7
84
32
87
Error log data structure #2:
CMD # 1 :
00
FF
7C
28
57
CMD # 2 :
00
FF
7B
29
57
CMD # 3 :
00
FF
7A
2A
57
CMD # 4 :
00
FF
79
2B
57
CMD # 5 :
00
FF
78
2C
57
Registers contains after error :
40
31
78
44
87
Error log data structure #3:
CMD # 1 :
00
FF
7B
29
57
CMD # 2 :
00
FF
7A
2A
57
CMD # 3 :
00
FF
79
2B
57
CMD # 4 :
00
FF
78
2C
57
CMD # 5 :
00
FF
77
2D
57
Registers contains after error :
40
FD
77
45
87
Error log data structure #4:
CMD # 1 :
00
FF
7A
2A
57
CMD # 2 :
00
FF
79
2B
57
CMD # 3 :
00
FF
78
2C
57
CMD # 4 :
00
FF
77
2D
57
CMD # 5 :
00
FF
76
2E
57
Registers contains after error :
40
FF
76
46
87
Error log data structure #5:
CMD # 1 :
00
FF
79
2B
57
CMD # 2 :
00
FF
78
2C
57
CMD # 3 :
00
FF
77
2D
57
CMD # 4 :
00
FF
76
2E
57
CMD # 5 :
00
FF
75
2F
57
Registers contains after error :
40
FB
75
47
87
E0
E0
E0
E0
E0
42,
42,
42,
42,
42,
TIME:
TIME:
TIME:
TIME:
TIME:
E0
51, TIME: 26432 -> Err. REG: UNC
E0
E0
E0
E0
E0
42,
42,
42,
42,
42,
E0
51, TIME: 26432 -> Err. REG: UNC
E0
E0
E0
E0
E0
42,
42,
42,
42,
42,
E0
51, TIME: 26432 -> Err. REG: UNC
E0
E0
E0
E0
E0
42,
42,
42,
42,
42,
E0
51, TIME: 26432 -> Err. REG: UNC
E0
E0
E0
E0
E0
42,
42,
42,
42,
42,
E0
51, TIME: 26432 -> Err. REG: UNC
TIME:
TIME:
TIME:
TIME:
TIME:
TIME:
TIME:
TIME:
TIME:
TIME:
TIME:
TIME:
TIME:
TIME:
TIME:
TIME:
TIME:
TIME:
TIME:
TIME:
147462080
147463104
147464176
147465200
147466208 -> LBA:5709956
147467088
147467088
147467104
147467104
147467104 -> LBA:5713016
147467088
147467104
147467104
147467104
147468144 -> LBA:5713271
147467104
147467104
147467104
147468144
147469200 -> LBA:5713526
147467104
147467104
147468144
147469200
147470224 -> LBA:5713781
Log #06 found.
---------------------------------------------------#
1x3
selftest
life
selftest
failing
reg
status
timestamp checkpoint
LBA
---------------------------------------------------1 129
118
24787
3
72817737
2 129
118
24787
3
72817737
3 130
35
24787
0
72817737
4
1
118
6875
3
72817737
5
2
114
6878
5
72817737
Revised January 10, 2009
Page 9 of 20
MHDD Documentation
Very Low Level Hard Disk Diagnostic Tool
Dennis German
6
1
118
6894
3
72817737
7
1
118
6897
3
72817737
8
2
114
6901
5
72817737
9
1
118
6914
3
72817737
10
1
118
6937
3
72817737
11
1
118
6941
3
72817737
12
1
118
12301
3
72817737
13
2
20
12301
0
72817737
14
1
118
12301
3
72817737
15
2
118
24786
0
0
16
2
118
24786
0
0
17
2
118
24786
0
0
18 129
118
24786
3
72817737
19 129
118
24786
3
72817737
20 130
114
24787
5
72817737
21
0
0
0
0
0
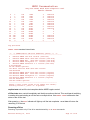
---------------------------------------------------Log #09 found.
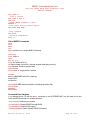
SMART TEST executes internal tests
-=- -=- SMART Execut OFF-Line immediate (tests) -=- -=-----------------------------------------------------------0
Execute SMART off-line routine (off-line)
1
Execute SMART Short self-test routine (off-line)
2
Execute SMART Ext. self-test routine (off-line)
3
Execute SMART Conveyance s.t. routine (off-line)
4
Execute SMART Selective s.t. routine (off-line)
5-63 Reserved
64-126 Vendor specific
127 Abort off-line mode self-test routine
128 Reserved
129 Execute SMART Short self-test routine (captive)
130 Execute SMART Ext. self-test routine (captive)
131 Execute SMART Conveyance s.t. routine (captive)
132 Execute SMART Selective s.t. routine (captive)
133-191 Reserved
192-255 vendor specific
-----------------------------------------------------Select a test (0-255, blank or any symbol for cancel):
Starting routine n, press "Y" to process:
captive tests wait until the test completes before MHDD regains control
off-line tests return control immediately and the drive continues the test. This would permit switching
to another drive and starting an off-line test on multiple drives. Use SMART DATA to determine that
status of the off-line test.
After pressing Y, the BUSY indicator will light up until the test completes . smart data will return the
remaining % of the test
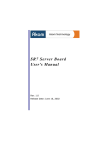
Scanning a Drive
Scanning is possible only if the drive was detected by ID or EID commands.
Revised January 10, 2009
Page 10 of 20
MHDD Documentation
Very Low Level Hard Disk Diagnostic Tool
Dennis German
MAKELOG scans the surface of the drive and creates a detailed log file.
If you booted from the CD there will, most likely, be insufficient space for the log file on the RAM drive.
If the target drive is less than 10GB the log will fit on a floppy.
To create the log on a hard drive:
(this means there must be one with a FAT partition which you are willing and able to write to).
(Here's a use for those old < GB drives you have laying around.)
mkdir C:\MHDD or on another partition
COPY MHDD\*.* C:\MHDD to copy files from the RAM drive (or CD) to the hard drive
C:
CD C:\MHDD to that directory and start MHDD
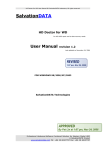
or use SCAN or [F4] and forget the logfile.
You will see menu where you can adjust Start and End LBA,
set to Remap bad spots (warning) Remapping with MHDD is safe to data if there are less then 100
bad blocks.
change the Timeout limit, Spindown after scan, loop test/repair and Erase Delays (danger
data will be lost).
Scan Parameters: SPACE or ENTER to change
Start LBA:
0
End LBA :
12656477
Remap :
OFF
Timeout (sec) :
240
Spindown after scan :
OFF
Loop test/repair :
OFF
Erase Delays *DESTRUCTIVE* :
OFF
[A,D,S,W]-move; [CTRL+ENTER,F4]-finish
Defaults are shown. I suggest you change the Timeout to 5 DGG
Press [F4] again to start the scan .
One block is 255 sectors (130,560 bytes).
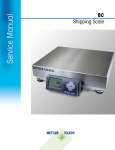
How Scan Works
1.
2.
3.
4.
5.
MHDD issues a VERIFY SECTORS command with LBA number and number of sectors to verify
drive raises BUSY flag
MHDD starts timer
After drive executes VERIFY, it drops BUSY
MHDD measures the time and puts the corresponding block on the screen
Revised January 10, 2009
Page 11 of 20
MHDD Documentation
Very Low Level Hard Disk Diagnostic Tool
Dennis German
D0 ERR INDX CORR DREQ DRSC WRFT DRDY BUSY
UNCR BBK 00
[drive mfg model
] [
nnn,nnn,nnn] [
nn,nnn,nnn]
xx x x x x
x xxx x x x x x
x
x x x
x x
AMMF TONF
ABRT INDF
[ EST:
mm:ss ]
AVG [ nnnnn
kb/s]
ACT [ nnnnn
kb/s]
. <3ms
:
nnnnnnn
x <10ms :
nnnnn
X <50ms : nnn
* <150ms : n
* <500ms :
* >500ms :
? TIME :
x UNC :
! ABRT :
S IDNF :
A AMNF :
0 TONF :
* BBK :
[ nn.n% ] [
nn.n%]
ssssss
sssssss
x x x
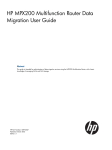
6. Drive registers are displayed at the top of the screen.
50 ERR INDX CORR DREQ DRSC WRFT DRDY
BBK 00
BUSY
AMMF TONF
ABRT INDF UNCR
7. Any IDE/SATA drive should report DRIVE READY and DRIVE SEEK COMPLETE, so you will see
DRDY and DRSC flags colored in blue.
BUSY appears when drive is executing (read or write command, for example).
DATA REQUEST (DREQ) flag is on when drive wants to receive or send some data from/to the
PC.
Some flags such as WRITE FAULT and TRACK 0 NOT FOUND are obsolete, they never should
appear.
INDEX flag is obsolete too, but sometimes blinks.
8. When you see ERROR flag (ERR) you can look at the error register where you can see what kind
of error happened. ATA/ATAPI standard has more information about registers and commands.
Revised January 10, 2009
Page 12 of 20
MHDD Documentation
Very Low Level Hard Disk Diagnostic Tool
Dennis German
9. The brightness of the blocks reflect the length of time it to to read the sectors. This is most likely
do to the firmware performing a retry. It is normal for a checker board like pattern to scroll across
the screen.
10. A table on the right shows the number of blocks in each time range. If an error occurs a letter
describing the type is shown
? TIME
x UNC
! ABRT
*
VERIFY command did NOT complete
data is uncorrectable.
command was aborted
BBK
within the timeout
Bad
Block
S IDNF
A AMNF
0 TONF
sector ID cannot be read or not as
expected
Data Address Mark Not
Found
Track 0 was not found
during drive
recalibration
A blue block indicates remapping in progress.
The AVG (average) transfer rate in kilobytes per second is displayed, as well as the percentge
complete.
During the scan pressing,
Left arrow backs up 10,000 sectors
down arrow advances 10,000 sectors
up arrow backs up 250,000 sectors
Right arrow advance 250,000 sectors
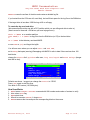
The log of scan is log/mhdd.log which is nice to save like to a floppy ( or maybe c:\driveSN.LOG.
Now that the scan showed some
Save the scan log! Check
UNC errors, what to do?
smart att
Of special interest are:
•
#5 Reallocated sectors count: 144 139 1109 this should be
zero!
•
•
#194 HDA Temperature perhaps there's an answer here!
#195 Hardware ECC recovered 253 252 731 Watch for
astronomical number
•
•
#196 Reallocate event count 1 1 982 This looks bad!
#197 Current pending sectors 144 139 1109 Not good
either!
•
#198 Offline scan UNC Sectors 1 1 11090 Looks like offline
selftesting found errors too (same ones??)
Revised January 10, 2009
Page 13 of 20
MHDD Documentation
Very Low Level Hard Disk Diagnostic Tool
Dennis German
•
#199 Ultra ATA CRC error rate 199.198 1 THis has to be
BAD!
and
smart errlog
Maybe now is a good time to do a file based backup! ( but you already did that
I'm sure!)
Reruning the scan most likely will show the same errors since the hardware
(firemware) has already done multiple attempts to read the data.
MAKELOG creates advlog.bin to a floppy as well, it will be rather large (example: 800KB for a 6GB
drive), to be used by another program to further analyze the condition of the drive surface.
Example file:
9A 00 00 00 hex header
VER:2
MODE: IDE
DEVICE: Maxtor 90648D3
F/W: GAS54112
S/N: A30V0VFC
SECTORS: 12,656,448
SECTOR SIZE: 512 bytes
SCAN BLOCK SIZE: 255 sectors
address
milli seconds
0000 0000 0000 0000 0000 0000 0000 302a
0000 0000 0000 ff00 0000 0000 0000 694c
0000 0000 0000 fe01 0000 0000 0000 5a1f
0000 0000 0000 fd02 0000 0000 0000 2b1f
0000 0000 0000 fc03 0000 0000 0000 6122
0000 0000 0000 fb04 0000 0000 0000 8c1c
...
0000 0000 0000 1f1f c100 0000 0000 c80b
0000 0000 0000 0a
49,633 blocks of 16 bytes for a 6GB drive
If your drive has errors, first thing to do is to make full back up. Then VERIFY that the backup you
made is readable and complete!!
You can WIPE OUT all the DATA using the ERASE which erases every sector
Then SCAN with REMAP on.
If you see all blocks as errors STOP. You are dealing with service-area error which cannot be fixed by
MHDD .
Revised January 10, 2009
Page 14 of 20
MHDD Documentation
Very Low Level Hard Disk Diagnostic Tool
Dennis German
The best option contact the manufacturer for a Return Materials Authorztion, or discard the drive.
Writing Sectors to a File
TOF writes sectors To a File.
You can write several sectors or the whole drive to a file or to set of files.
ATOF (automatic file splitting) command will get more than 1 GB and to create several files.
MHDD skips bad sectors
Writing Sectors from file to the Drive
FF to write sectors From a File to the drive. input the LBA of the first sector to write and how many
sectors to write.
Acoustic Management
AAM adjusts the Acoustic Management parameter. Note: decreasing the sound level is done by
increasing the seek time!
Device Configuration
CONFIG views or set the maximum UDMA mode, Security , SMART , LBA48 mode , AAM and HPA
support, etc. You can also cut or uncut the drive by using this command. Some manufacturers are
using Device Configuration to artifically reduce the size of a disk.
Display all PCI Devices
PCISCAN Scan PCI and save map to MHDD_PCI.log Example:
MHDD PCI SCAN LOG
NAME-----------------------CLASS--SUBCLASS--VENDOR--DEVICE--IO PORTS--------------------Intel
06
00
8086
7190
0008 0000 0000 0000 0000 0000
Intel
06
04
8086
7191
0000 0000 0100 D0D0 FCA0 F480
Intel
06
01
8086
7110
0000 0000 0000 0000 0000 0000
Intel PIIX4 EIDE Controller 01
01
8086
7111
0000 0000 0000 0000 FFA1 0000
Intel
0C
03
8086
7112
0000 0000 0000 0000 EF81 0000
Intel
06
80
8086
7113
0000 0000 0000 0000 0000 0000
04
01
12EB
0001
0000 EFA1 EF69 0000 0000 0000
VIA
0C
00
1106
3044
F800 EC01 0000 0000 0000 0000
0C
03
1045
C861
E000 0000 0000 0000 0000 0000
PROMISE FastTrak100
01
80
105A
4D30
EFF1 EFE5 EFA9 EFE1 EE81 0000
02
00
10EC
8139
E801 F700 0000 0000 0000 0000
ATI
03
00
1002
4C42
0000 D801 F000 0000 0000 0000
Erasing Sectors or Whole Drive
ERASE
If your drive is recognized by the BIOS, MHDD will use BIOS functions to erase the contents of the
drive. Use /DISABLEBIOS command line switch to prohibit this.
First MHDD shows the disk ID, then invokes Fast Disk Eraser
Fast
Type
Type
tart
Disk Eraser v4.4 (LBA28/48/BIOS/ASPI)
start sector to write [0]:
end sector [16514063]:
: 1785
Revised January 10, 2009
Page 15 of 20
MHDD Documentation
Very Low Level Hard Disk Diagnostic Tool
Dennis German
End :1786
[] Continue? (y/N)
Start: 23:40:02
Sectors done: 2, 0Mbytes completed
End :23:40:02
HDDerase from cmrr.ucsd.edu/people/Hughes/SecureErase.shtml or on the Ultimate Boot CD, will
ERASE the contents of the entire drive at once using the internal SECURE ERASE command. This is
the fastest erase and cannot be stopped.
If the drive is powered off after accepting the SECURE ERASE command, on power up it will be
locked.
In this state the drive will continue the erase unless it is unlocked (after being partially erased) if the
internal password is known.
Cutting the Drive (size change)
RHPA display factory size
HPA limits the size of a drive. Enter the new MaxLBA number, in sectors.
NHPA returns to factory size
Power cycle the drive before using NHPA.
According to ATA/ATAPI standard, you can use HPA functions only once per drive's power cycle.
Security Commands
Before using Security passwords, look in the BIOS setup for options to provide the password. If there
is no way to provide a password at boot time, the only way to access the drive once setting the
password, is to use MHDD to disable the password.
PWD command locks a drive with defined user password. According to ATA/ATAPI standard , Power
cycle the drive to make password setting active.
There are two commands to unlock drives: UNLOCK and DISPWD.
UNLOCK unlocks a drive until the next power cycle.
To disable password, UNLOCK the drive, then use DISPWD command.
You must know the password to use UNLOCK or disable password commands.
UNLOCK and DISPWD can change the master or user passwords. For example, PWD command sets
USER password.
Master password is set by manufacturer and can be used to unlock a drive.
Batches
An example is in the BATCH directory.
Revised January 10, 2009
Page 16 of 20
MHDD Documentation
Very Low Level Hard Disk Diagnostic Tool
Dennis German
Press [F5] to run a batch.
Comments begin with a ; but are not displayed as batch runs.
First
(non
comment)
V1.1 Commands:
line
must
match
program
version
number
ASK_ON/ASK_OFF ask for permission to execute every command
default is ASK_OFF
SOUND frequency, NOSOUND, BEEP seconds, ENDSND_ON / ENDSND_OFF
HALT_ON / HALT_OFF on error
PAUSE seconds
REPEAT n next line n times.
[ESC] can be used to stop looping.
DEV_SELECT (from menu),
DRV-PORT p (use 1 for Primary Master... 3 for Secondary Master, 6 for first PCI channel
(see output from SHIFT+[F3]),
DRV_SCAN {startLBA | MIN } { endLBA | MAX } {0 | 1 | 2 } (where 0 is for scan, 1 scan and remap, 2
scan + Erase Delays)
DRV_WAIT wiat for drive to be ready
DRV_ID, DRV_RESET, DRV_STOP, DRV_NHPA recover Native Drive size (Host Protected Area)
DRV_SEEK seconds of testing
DRV_ERASE {startLBA | MIN } {endLBA | MAX }
A comment can be added after some commands with a numeric argument, example DRV_SEEK 10 ;
expect 13.9 ms average
Use MAN EN BATCH to see the commands
Example:
;version - do not change
V1.1
;confirmations: on
ASK_ON
;terminate batch on error
HALT_ON
;make sound after each line
ENDSND_ON
beep 1 ;;;;; Please select drive with SN=Y2VSJQHE
;select a drive from the displayed list
DRV_SELECT
;ATA reset
DRV_RESET
;Seek Test for 10 seconds
Revised January 10, 2009
Page 17 of 20
MHDD Documentation
Very Low Level Hard Disk Diagnostic Tool
Dennis German
DRV_SEEK 10
; scan a little
DRV_SCAN 0 200 0
ASK_OFF
;repeat NEXT command 2 times
REPEAT 2
;scan whole drive without repair
DRV_SCAN MIN MAX 0
;stop spindle
DRV_STOP
;announce completion
beep 10
Other MHDD Commands
EXIT
QUIT
HELP
CLS
WAIT until drive is no longer BUSY then beep
SCSIINFO
PORT shift+F3
INIT
RST or [F3]
STOP the spindle shift+F4
RX Receive data from buffer ( internal porgram debuging use only)
RPM Calculate Rotation speed of disk
SETCDSPEED
SWITCHMBR i.e. toggle active | inactive
CLRMBR
save to LBA0.MBR and LBA 1 (backup)
erase LBA 0
set inactive
FDISK Write MBR with one partition containing the entire disk.
SCSIFORMAT
MAKEBAD
RANDOMBAD
Command Line Switches
If you booted from a CD with the MHDD command in the AUTOEXEC.BAT you will need to exit and
issue the MHDD command to include switches.:
/NOPINGPONG Disable some sounds
/DISABLEBIOS Disable ERASE through BIOS
/DISABLESCSI Disable SCSI engine
/ENABLEPRIMARY Enable Pimary IDE/SATA channel
Revised January 10, 2009
Page 18 of 20
MHDD Documentation
Very Low Level Hard Disk Diagnostic Tool
Dennis German
/RO (disable logging and temp files creation)
Environment Variables
CDROM
LglDrv
RAMD drive letter of RAM drive
CONFIG
CFG/mhhd.cfg File
as observed
N.B. # is NOT a comment but is included in every(?) line.
#AUTODETECT_ENABLED=FALSE
#DEVICE=3
#SCAN_ERASEWAITSDELAY=350
#SCAN_STARTLBA=0
#SCAN_ENDLBA=12656447
#SCAN_TIMEOUT=240
#SCAN_MENUX=20
#SCAN_MENUY=5
#SCAN_SLEEP=0
#PRIMARY_ENABLED=FALSE
Frequently Asked Questions
FAQ is available here: forum.hddguru.com/viewtopic.php?t=5
original Editor: Maya Postrigan
revised by Dennis German
Copyright and Disclaimer
This manual cannot be sold or published anywhere. As I am trying to make it useful, it is much better
to give a link to this page instead of copying something from here.
You may distribute MHDD without any limitations while you preserve copyrights. You can disassemble
(reverse-engineer) MHDD for educational purposes. You cannot sell MHDD program or any its parts.
© 2005 Dmitry Postrigan
DISCLAIMER: Use this software as is. MHDD is powerful, but very dangerous program and nobody is
responsible for any damage or data loss made by MHDD.
Revised January 10, 2009
Page 19 of 20