1
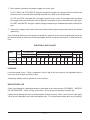
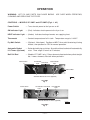
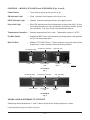
INSTALLATION &
OPERATION MANUAL
VF SERIES ELECTRIC FRYERS
MODEL
VF1
VMF1
VF2
VMF2
VF90
VFD90
VF1D
VMF1D
VF2D
VMF2D
ML-52913
ML-52914
ML-52915
ML-52916
ML-52917
ML-52532
ML-52538
ML-52539
ML-52542
ML-52543
VF1
VULCAN-HART
COMPANY,
P.O.
BOX
FORM 30916 (1-95) (Formerly F-114555 & F-114556)
696,
LOUISVILLE,
KY
40201-0696,
TEL. (502) 7 7 8 - 2 7 9 1
Installation, Operation and Care of
MODELS VF1, VMF1, VF2, VMF2, VF1D,
VMF1D, VF2D & VMF2D
ELECTRIC FRYERS
SAVE THESE INSTRUCTIONS FOR FUTURE USE
GENERAL
Standard features include stainless steel fry tank and front, a high limit device, twin baskets, and a liftout fry tank (20" wide models only) which is easily removed for cleaning.
VF1, VF2, VF1D and VF2D floor model fryers are equipped with 6" adjustable legs. They may be
ordered without legs for installation on a masonry base. The fryers also can be supplied with a 4" toe
base in place of legs as an optional extra.
Optional features include extra fry tanks, a large single basket supplied in place of twin baskets, syphon
and strainer bags, casters (floor models only), stainless steel fry tank cover, and extra sets of twin
baskets or single baskets. Stainless steel side(s) and back are also available optionally.
MODEL
VF1
WIDTH / STYLE
20" Floor model
CONTROLS
Mechanical
AUTOMATIC
BASKET
LIFT
Opt.
VMF1
VF2
20" Countertop
24" Floor model
Mechanical
Mechanical
Opt.
Opt.
Opt.
Opt.
VMF2
VF1D
24" Countertop
20" Floor model
Mechanical
Solid State
Opt.
Opt.
Opt.
Std.
VMF1D
VF2D
20" Countertop
24" Floor model
Solid State
Solid State
Opt.
Opt.
Std.
Std.
VMF2D
VF90/VFD90
24" Countertop
20" Frymate
Solid State
N/A
Opt.
N/A
Std.
N/A
MELT
CYCLE
Opt.
The VF90 and VFD90 Frymate Work Stations may be installed next to any of the VF Series Fryers.
The top draining section has a lift-out screen and center drain into a 3-quart, slide-out drain pan. The
interior of the cabinet has storage space for 4 standard #200 pans in drawer-type, non-tilt pan slides.
Pans are not supplied with the Frymate.
The Frymate is equipped with 6" adjustable legs. It may be ordered without legs for installation on a
masonry base, or with a 4" toe base in place of legs as an optional extra.
—2—
INSTALLATION
Before installing the fryer, verify that the electrical supply agrees with the specifications on the fryer
data plate which is located on the inside of the door panel on floor model fryers and on the lower front
cover on countertop models.
UNPACKING
Immediately after unpacking the fryer, check it for possible shipping damage. If the fryer is found to
be damaged, save the packaging material and contact the carrier within 15 days of delivery.
Do not use the door or its handle to lift or move the fryer.
LOCATION
The fryer may be installed at 0" clearance from the back or side walls. The fryer must be installed at
least 16" away from any open top flame appliance. Position the fryer for easy accessibility for service.
INSTALLATION CODES AND STANDARDS
Vulcan fryers must be installed in accordance with:
In the United States
1. State and local codes.
2. National Electrical Code ANSI/NFPA No. 70 (latest edition). Copies may be obtained from The
National Fire Protection Association, Batterymarch Park, Quincy, MA 02269.
3. NFPA Standard #96.
ELECTRICAL CONNECTIONS
WARNING: ELECTRICAL AND GROUNDING CONNECTIONS MUST COMPLY WITH THE
APPLICABLE PORTIONS OF THE NATIONAL ELECTRICAL CODE AND/OR OTHER LOCAL
ELECTRICAL CODES.
WARNING: DISCONNECT ELECTRICAL POWER SUPPLY AND PLACE A TAG AT THE
DISCONNECT SWITCH TO INDICATE THAT YOU ARE WORKING ON THE CIRCUIT.
Position the fryer in its final location. Select the size and type of wire in accordance with National
Electrical Code suitable for carrying the fryer's rated amps and voltage. Use wires suitable for 75°C
on fryers carrying more than 80 amps.
—3—
1. Bring conduit containing the proper supply wire to the fryer.
On VF1/VMF1 and VF1D/VMF1D, bring the conduit in through the clearance hole in the back and
terminate on the terminal block housing mounted in the back of the breaker box.
On VF2 and VF2D, terminate the field supply conduit on the corner of the bottom floor and bring
the supply leads into the breaker box through the removable channel mounted to the right side.
On VMF2 and VMF2D, bring the conduit through the opening in the bottom toward the front of the
fryer.
2. Connect the supply leads to the field terminal block and the green grounding lead to the labeled
ground lug.
Fryers wired for 3-phase service may be changed to 1-phase or vice versa by relocating two wires on
the terminal block as shown on the wiring diagram and the schematic decal which is attached to the
fryer.
ELECTRICAL DATA CHART
MODEL
TOTAL
K.W.
CONN.
VF1/VMF1,
12
VF1D/VMF1D
VF2/VMF2,
21.0
VF2D/VMF2D
3-PHASE LOADING
KW PER PHASE
208, 240 & 480 V.
X-Y
Y-Z
X-Z
X
208 V.
Y
Z
NOMINAL AMPS PER LINE WIRE
3 PHASE
240 V.
480 V.
X
Y
Z
X
Y
Z
3.8
3.8
4.2
34
33
34
29
28
29
15
14
15
58
50
25
5.25
10.5
5.25
44
66
66
38
57
57
20
30
30
101
88
44
1 PHASE
208 240 480
V.
V.
V.
LEVELING
Level floor model fryers. Place a carpenter's level on top of the fryer and turn the adjustable legs to
level fryer front-to-back and side-to-side.
Countertop models must be placed on a level surface.
BEFORE FIRST USE
Clean fryer thoroughly, following procedures described in this manual under CLEANING — WEEKLY
OR AS REQUIRED. Clean all fryer accessories. Rinse all parts thoroughly and wipe dry.
Lightly season backsplash area to avoid possible surface corrosion. With a soft, lint-free cloth, apply
a thin layer of cooking oil over entire backsplash area. This should also be done after every cleaning.
—4—
OPERATION
WARNING: HOT OIL AND PARTS CAN CAUSE BURNS.
CLEANING AND SERVICING THE FRYER.
USE CARE WHEN OPERATING,
CONTROLS — MODELS VF1/VMF1 and VF2/VMF2 (Fig's. 1 & 2)
Power Switch
— Turns electric power to the fryer on or off.
ON Indicator Light
— (Red) Indicates electric power to the fryer is on.
HEAT Indicator Light — (Amber) Indicates heating elements are supplying heat.
Thermostat
— Controls temperature of oil in tank. Temperature range is 0-400°F.
Fry/Melt Switch
— (Optional - Not shown.) Position on MELT when solid shortening is being
melted; then position on FRY for normal operation.
Automatic Basket
— Set to desired frying cycle time. At end of set time, baskets will automatically
Lift Timers (Optional)
raise. Timer range is from 0 to 15 minutes.
Ball Pull Rod
— (Models VF1/VMF1 only.) Raises elements from tank when pulled straight
out. Lowers elements into tank when pushed in.
Power Switch
On Indicator
Thermostat
Light
Heat Indicator
Light
Ball Pull Rod
Automatic Basket Lift Timers (optional)
PL-40539-1
VF1/VMF1
Fig. 1
Power Switch
On Indicator Thermostat
Light
Heat Indicator
Light
Automatic Basket Lift Timers (optional)
PL-40540-1
VF2/VMF2
Fig. 2
—5—
CONTROLS — MODELS VF1D/VMF1D and VF2D/VMF2D (Fig's. 3 and 4)
Power Switch
— Turns electric power to the fryer on or off.
ON Indicator Light
— (Red) Indicates electric power to the fryer is on.
HEAT Indicator Light
— (Amber) Indicates heating elements are supplying heat.
High Limit Light
— When ON, indicates that the oil temperature is higher than 400°F, or that
the heating elements are not covered with shortening, and the system
has shut down. Call your Vulcan-Hart authorized servicer.
Temperature Controller — Controls temperature of oil in tank. Temperature range is 0-375°F.
Fry/Melt Switch
— Position on MELT when solid shortening is being melted; then position
on FRY for normal operation.
Ball Pull Rod
— (Models VF1D/VMF1D only.) Raises elements from tank when pulled
straight out. Lowers elements into tank when pushed in.
On Indicator Light
Temperature Controller
High Limit Light
Power Switch
Heat Indicator
Light
Fry/Melt
Switch
Ball Pull Rod
PL-40537-1
VF1D/VMF1D
Fig. 3
On Indicator Light
Temperature Controller
Power Switch
Heat Indicator
Light
High Limit Light
Fry/Melt
Switch
PL-40538-1
VF2D/VMF2D
Fig. 4
ADDING LIQUID SHORTENING TO THE FRYER
Shortening should be between 1" and 2" above the top of the heating elements' surface.
Liquid shortening may be used in all fryers.
—6—
1. Push power switch to OFF and allow fryer to cool.
2. Remove the fryer basket(s) and support rack (support rack in VF2/VMF2 and VF2D/VMF2D only).
3. Leave the heating elements in the tank (VF1/VMF1 and VF1D/VMF1D).
4. VF1/VMF1 / VF1D/VMF1D: Pour 30-35 pounds of shortening into the fryer tank.
VF2/VMF2 / VF2D/VMF2D: Pour 78-82 pounds of shortening into the fryer tank.
5. Replace the rack support (VF2/VMF2 and VF2D/VMF2D only) and fryer basket(s) inside the tank.
6. Push power switch to ON and turn temperature controller or thermostat to desired frying
temperature.
ADDING SOLID SHORTENING TO THE FRYER
Only fryers equipped with the MELT cycle may use solid shortening. Melting solid shortening without
using the MELT cycle will damage the fry tank and scorch the shortening. Tank warranty may be voided
by improper operation.
Models VF1/VMF1 and VF1D/VMF1D
1. Push power switch to OFF and allow fryer to cool.
2. Remove fryer baskets.
3. Leave the heating elements in the tank.
4. Place 30-35 pounds of solid block shortening in the fryer tank on top of the heating elements.
5. Follow melt cycle operation.
Models VF2/VMF2 and VF2D/VMF2D
1. Remove fry basket and rack support.
2. Place 78-82 pounds of solid block shortening in the fryer tank and pack around the heating
elements.
3. Place basket rack support on top of shortening.
4. Follow melt cycle operation.
Melt Cycle Operation
1. Set the temperature controller knob to frying temperature.
2. Push power switch to ON.
3. Push Fry/Melt Switch to MELT. The elements will cycle on for 2 seconds and off for 28 seconds
until the shortening melts and reaches a temperature of 135°F. The temperature controller will
bring the shortening to the frying temperature.
4. Place Fry/Melt Switch in the FRY position when ready to fry.
—7—
FRYING
Place the ON-OFF switch to the ON position. The red ON indicator light will come on.
Turn thermostat or temperature controller to desired temperature. The amber HEAT indicator light will
come on.
When the shortening temperature reaches the set temperature, the amber HEAT light will go off. The
heating elements (and the amber HEAT light) will cycle on and off to maintain the set temperature.
Pieces of product to be fried should be about the same size to ensure uniform doneness.
Drain or wipe dry raw or wet foods to minimize splatter when lowering into the hot oil.
Fill frying baskets half full. Do not overfill baskets.
Carefully lower baskets into oil.
When cooking French fries or onion rings, shake basket several times in a way that does not splatter
the shortening.
Batter-covered foods should be dropped carefully, one by one, into shortening or basket. If you use
the basket, first dip basket into the shortening to reduce batter build-up on basket surfaces.
When frying is completed, remove baskets or product. Hang baskets to drain on rear basket hangers.
Remove food and season it. Do not salt food over the shortening because salt will cause a chemical
change in the oil.
Add fresh shortening as needed. Shortening should be between 1 and 2 inches above the heating
elements.
TURNING THE FRYER OFF
To turn the fryer OFF, place the ON-OFF switch to the OFF position.
Extended Shutdown
Place ON-OFF switch to OFF. Turn thermostat knob to OFF. Apply a thin film of cooking oil to tank
interior and tank back to inhibit rust.
HIGH LIMIT CONTROL
If the shortening becomes overheated, or if the heating elements are not covered with shortening, the
high limit control will shut down the entire control system and the fryer will be inoperable.
If the heating elements are not covered with shortening, add shortening until the level is 1 or 2 inches
above the top of the heating elements. When the temperature of the shortening returns to normal
(300°F), manually reset the circuit breakers (located behind the fryer door on floor model fryers and
behind the lower panel on countertop models.
If the high limit control continues to shut the fryer down, contact your authorized Vulcan servicer.
—8—
DAILY FILTERING
Shortening life will be extended by filtering at least once a day, or more often if conditions warrant.
Models VF2/VMF2 and VF2D/VMF2D are equipped with a 1/4 turn ball type drain valve. Models VF1/
VMF1 and VF1D/VMF1D have a removable fry tank that can be lifted out by raising the heating
elements out of the tank, or the shortening can be syphoned out as follows:
Models VF1/VF1D
Turn the fryer off and allow shortening to cool. Place the syphon assembly (Fig. 5) so that the short
tube rests on the bottom of the tank and the long tube projects down through the hole in the grease
trough. Tie the filter bag to the end of the long tube. Provide a metal container of sufficient capacity
at the end of the long tube inside the storage compartment.
To start the syphoning action, push the stopper in the bowl closed. Fill the bowl with clean liquid
shortening. Pull the stopper to allow shortening to start draining. Push the stopper closed before all
the shortening is drained from the bowl. To stop draining, pull the stopper and empty the bowl
completely.
PL-40541
Fig. 5
Models VMF1/VMF1D
Turn the fryer off and allow shortening to cool. Place the syphon assembly (see Fig. 5) so that the short
end rests on the bottom of the tank and the long tube projects down in front of the fryer. Tie the filter
bag to the end of the long tube. Provide a metal container of sufficient capacity at the end of the long
tube.
To start the syphoning action, push the stopper in the bowl closed. Fill bowl with clean liquid
shortening. Pull stopper to allow shortening to start draining. Push stopper closed before all the
shortening is drained from the bowl. To stop draining, pull stopper and empty the bowl completely.
—9—
Models VF2/VMF2 and VF2D/VMF2D
1. Turn the fryer off and allow shortening to cool.
2. Slowly remove the baskets to prevent splashing.
3. Open the fryer door and place a metal container of sufficient capacity below the drain pipe.
4. If a filter bag is used, tie it securely to the drain pipe. If other filter medium is used, place it in the
metal container.
5. Open the drain valve carefully so the oil stream is directed through the filter.
6. With a small amount of warm shortening, flush out scraps and sediment in the fry tank. Drain the
tank thoroughly and wipe clean.
7. If it is necessary to clean the tank more thoroughly, follow the procedures shown in CLEANING —
WEEKLY OR AS REQUIRED in this manual.
8. Close the drain valve.
9. Return strained shortening to the fry tank.
10. Add shortening until the level is between 1 and 2 inches above the heating elements.
CLEANING
Daily
Clean the exterior of your fryer regularly with a damp cloth and polish with a soft dry cloth. If regular
cleaning is neglected, grease will be burned on and discolorations may form. These may be removed
by washing with any detergent or soap and water. A self-soaping scouring pad may be used for
particularly stubborn discolorations. Always rub with the "GRAIN" in a horizontal direction.
Keeping the fryer exterior clean and free of accumulated grease will prevent stubborn stains from
forming. Wash all exterior surfaces at least once daily. Use a cloth with warm water and a mild soap
or detergent. Follow with a clear rinse, then dry.
Fingerprints are sometimes a problem on highly polished surfaces of stainless steel. They can be
minimized by applying a cleaner that will leave a thin, oily or waxy film. To use these cleaners, simply
wipe on and remove excess with a soft dry cloth. After using, subsequent fingerprints will usually
disappear when wiped lightly with a soft dry cloth or with a cloth containing a little of the cleaner.
If the surface is heavily soiled to start with, wash first with soap or detergent and water.
Weekly or as Required
1. Once the shortening has been drained, flush out scraps and sediment with a small amount of warm
shortening. Allow the tank to drain thoroughly.
— 10 —
2. Close the drain valve (Models VF2/VMF2 and VF2D/VMF2D only).
3. Fill the tank with a non-corrosive, grease-dissolving commercial cleaner, following the manufacturer's
instructions.
4. Turn the fryer on and set the thermostat or temperature controller at a temperature recommended
by the manufacturer of the commercial cleaner. Boil the solution for 15 to 20 minutes. If cleaner
is a water based chemical, temperature may be 190-212°F. Set the temperature as low as possible;
monitor boiling to prevent overflow.
5. Drain (Models VF2/VMF2 and VF2D/VMF2D) or syphon (Models VF1/VMF1 and VF1D/VMF1D)
cleaning solution from the tank.
6. Close the drain valve (Models VF2/VMF2 and VF2D/VMF2D only).
7. Refill the fry tank with water. Add 1 cup of vinegar to neutralize alkaline left by the cleaner. Bring
solution to a boil and allow it to stand for a few minutes.
8. Drain (Models VF2/VMF2 and VF2D/VMF2D) or syphon (Models VF1/VMF1 and VF1D/VMF1D)
solution from the tank and rinse thoroughly with clear, hot water. All traces of cleaner must be
removed. Dry the tank thoroughly.
9. Close the drain valve (Models VF2/VMF2 and VF2D/VMF2D only).
10. Add shortening until the level is between 1 and 2 inches above the heating elements.
The fryer is now ready for use.
Heat Tint
In and around equipment where temperatures reach 500°F or more, straw-colored or slightly darkened
areas may appear on stainless steel. This "Heat tint" is caused by a slight oxidation of the stainless
steel and is not harmful. To contol this condition, never use more heat than is absolutely necessary.
Heat tint can be removed by scouring vigorously with stainless steel wool and a paste made of a
scouring powder. Remember to rub in the direction of the polish lines.
Burned-On Foods and Grease
Soaking with hot soapy water will help greatly to remove burned-on foods and grease. Stubborn
deposits can be removed with scouring powder mixed into a paste and applied with stainless steel wool
or sponges. Never use ordinary steel wool; particles of the steel wool can become embedded in, or
lodge on, the surface of the stainless steel and eventually rust, causing unsightly spots and stains.
Likewise, when scraping off heavy deposits of grease or oil from stainless steel equipment, never use
ordinary steel scrapers and knives. Where it is necessary to scrape, use stainless steel, wood, plastic
or rubber tools.
— 11 —
MAINTENANCE
WARNING: HOT OIL AND PARTS CAN CAUSE BURNS.
CLEANING AND SERVICING THE FRYER.
USE CARE WHEN OPERATING,
WARNING: SPILLING HOT FRYING COMPOUND CAN CAUSE SEVERE BURNS. DO NOT MOVE
FRYER WITHOUT DRAINING ALL FRYING COMPOUND FROM THE TANK.
LUBRICATION
The motors in all fryers are permanently lubricated and no lubrication is required.
SERVICE AND PARTS INFORMATION
To obtain service and parts information concerning these fryers, contact the Vulcan-Hart Service
Depot in your area (refer to listing supplied with the fryer), or Vulcan-Hart Company Service
Department at the address or phone number shown on the front cover of this manual.
FORM 30916 (1-95) (Formerly F-114555 & F-114556)
— 12 —