1
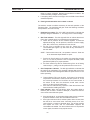
POWERCUT-1500 Instruction Manual (GB) 0558003745 102002 BE SURE THIS INFORMATION REACHES THE OPERATOR. YOU CAN GET EXTRA COPIES THROUGH YOUR SUPPLIER. These INSTRUCTIONS are for experienced operators. If you are not fully familiar with the principles of operation and safe practices for arc welding and cutting equipment, we urge you to read our booklet, "Precautions and Safe Practices for Arc Welding, Cutting, and Gouging," Form 52-529. Do NOT permit untrained persons to install, operate, or maintain this equipment. Do NOT attempt to install or operate this equipment until you have read and fully understand these instructions. If you do not fully understand these instructions, contact your supplier for further information. Be sure to read the Safety Precautions before installing or operating this equipment. USER RESPONSIBILITY This equipment will perform in conformity with the description thereof contained in this manual and accompanying labels and/or inserts when installed, operated, maintained and repaired in accordance with the instructions provided. This equipment must be checked periodically. Malfunctioning or poorly maintained equipment should not be used. Parts that are broken, missing, worn, distorted or contaminated should be replaced immediately. Should such repair or replacement become necessary, the manufacturer recommends that a telephone or written request for service advice be made to the Authorized Distributor from whom it was purchased. This equipment or any of its parts should not be altered without the prior written approval of the manufacturer. The user of this equipment shall have the sole responsibility for any malfunction which results from improper use, faulty maintenance, damage, improper repair or alteration by anyone other than the manufacturer or a service facility designated by the manufacturer. SAFETY Full responsibility for safety of personnel working on or near system rests on user of ESAB Welding Equipment. Wrong operation can lead to abnormal situation, injure operator and damage equipment. All personnel working with welding equipment must be fully familiar with - handling of equipment - location of emergency stops - functions of equipment - applicable safety regulations - cutting Operator must make sure - no one stays inside work area while machine starts - no one is unprotected while arc is being struck Work area must be - free of machine parts, tools and other objects that can obstruct operator moving within area - so arranged, that emergency stop buttons are easily accessible - free from draughts Personal safety equipment - always use proper safety equipment such as goggles, non flammable clothing, protective gloves - never wear loose clothing, belts, bracelets, rings etc., which may catch on equipment or cause burns Miscellaneous - only authorised personnel may operate electrical equipment - check whether return cables are properly fitted and earthen - requisite fire fighting equipment should be easily available in specially and clearly marked areas - lubrication and maintenance of welding equipment must not be proceeded during operation. SAFETY ! WARNING ! ARC WELDING AND CUTTING CAN BE INJURIOUS TO YOURSELF AND OTHERS. TAKE PRECAUTIONS WHEN WELDING OR CUTTING. ASK YOUR EMPLOYER FOR SAFETY PRACTICES THAT SHOULD BE BASED ON MANUFACTURER’S HAZARD DATA. ELECTRIC SHOCK - Can kill - Install and earth welding equipment in accordance with obligatory standards. - Do not touch live electrical parts or electrodes with bare skin, wet gloves or wet clothes. - Insulate yourself from earth and workpiece. - Ensure your work position is safe. FUMES AND GASES - Can be dangerous to your health - Keep your head away from fumes. - Use ventilation and/or extraction to keep fumes and gases away from your breathing zone and surroundings. ARC RAYS - Can injure eyes and burn skin - Protect your eyes and skin. Use correct welding screens, filter lens and wear protective clothes. - Protect bystanders with suitable screens or curtains. FIRE HAZARD - Sparks (spatter) can cause fire. Make therefore sure there are no inflammable materials nearby. NOISE - Excessive noise can damage your hearing. - Protect your ears. Use ear defenders or other hearing protection. - Warn bystanders of the risk. MALFUNCTION - Call expert assistance in event of malfunction. READ AND UNDERSTAND THE INSTRUCTION MANUAL BEFORE INSTALLING OR OPERATING UNIT PROTECT YOURSELF AND OTHERS ! TABLE OF CONTENTS SECTION PARAGRAPH TITLE PAGE SECTION 1 1.1 1.2 1.3 1.4 DESCRIPTION ................................................................................................. General ............................................................................................................. Scope ................................................................................................................ Packages Available .......................................................................................... Specifications .................................................................................................... 85 85 85 85 86 SECTION 2 2.1 2.2 2.3 2.4 2.5 2.6 INSTALLATION ................................................................................................ General ............................................................................................................. Equipment Required ......................................................................................... Location ............................................................................................................ Inspection ......................................................................................................... Primary Electrical Input Connections ................................................................ Secondary Output Connections ........................................................................ 89 89 89 89 89 89 91 SECTION 3 3.1 3.2 3.3 3.4 OPERATION .................................................................................................... Operation .......................................................................................................... PowerCut-1500 Controls .................................................................................. Cutting with the PT-32EH ................................................................................. Possible Cutting Issues .................................................................................... 93 93 93 95 98 SECTION 4 4,1 4.2 4.3 4.4 MAINTENANCE ............................................................................................... General ............................................................................................................. Inspection and Cleaning ................................................................................... PT-32EH Torch Consumable Parts .................................................................. IGBT Handling & Replacement ......................................................................... 161 161 161 161 162 SECTION 5 5.1 5.2 TROUBLESHOOTING ..................................................................................... 163 Troubleshooting ................................................................................................ 163 Troubleshooting Guide ..................................................................................... 164 SECTION 6 REPLACEMENT PARTS ................................................................................. 173 83 84 SECTION 1 DESCRIPTION 1.1 GENERAL Use only The ESAB PT-32EH Plasmarc torch with this console. Use of torches not designed for use with this console could create an ELECTRIC SHOCK HAZARD. The Powercut-1500 is a compact, completely self-contained plasma cutting system. As shipped, the system is fully assembled and ready to cut after being connected to input power and a source of compressed air at 6.2-10.3 bar (90-150 psig). The Powercut-1500 package uses the heavy-duty PT32EH torch to deliver cutting power for severing materials up to 38.1mm (1.50") thick. Refer to the following paragraphs for descriptions of the Powercut1500 packages available as well as performance specifications. 1.2 SCOPE The purpose of this manual is to provide the operator with all the information required to install and operate the Powercut-1500 plasma arc cutting package. Technical reference material is also provided to assist in troubleshooting the cutting package. 1.3 PACKAGES AVAILABLE 1.3.1 Manual Cutting Packages Powercut-1500 packages listed on the front cover and below, includes the following components: Powercut 1500 Manual Cutting Packages: PowerCut-1500 400 V, "CE" 7.6 m (25 ft.) PT-32EH ............ P/N 0558001945 PowerCut-1500 400 V, "CE" 15.2 m (50 ft.) PT-32EH .......... P/N 0558001946 The components that are included in the Powercut-1500 packages may be purchased separately by using the appropriate P/N when placing orders. Individual part numbers are listed below: Console: PowerCut-1500 400 V, 3-ph, 50/60Hz, 24A .......................... P/N 0558001947 PT-32EH Torches: PT-32EH Torch, 90o, 7.6 m (25 ft.) ........................................ P/N 0558003548 PT-32EH Torch, 90o, 15.2 m (50 ft.) ...................................... P/N 0558003549 PT-32EH Spare Parts Kit (see table below) .......................... P/N 0558003557 Table 1-1 PT-32EH 90Amp Spare Parts Kit, P/N 0558003557, Contents Description Part Number 90 Amp Nozzle 40 Amp Nozzle Electrode Heat Shield Valve Pin Stand Off Guide Wrench Lubricant Fuse 2Amp 600VAC 0558002837 0558002908 0558001969 0558003110 0558001959 0558002393 0558000808 0558000443 0558003075 85 Quantity 4 1 3 2 1 1 1 1 1 SECTION 1 DESCRIPTION 1.4 SPECIFICATIONS Table 1-2 PowerCut-1500 Specifications Rated Inputs Phases Volts Three Amps 400 24 18 Power * Duty Factor Cycle 86% 81% 60% 100% Rated Outputs Open Output Circuit Amps Voltage 90A @ 127Vdc 75A @ 120Vdc 278 Vdc 278 Vdc Length w/handles Height Efficiency 88% 87% 648 mm (25.50") 813 mm (32.00") 416 mm (16.38") Dimensions of Console Width w/o opt. storage w/ opt. torch storage Weight of PowerCut-1500 System Shipping Weight 333 mm (13.10") 409 mm (16.10") 42.7 kg (94 lbs) 49.5 kg (109 lbs) * Duty cycle is based on a 10-minute period: therefore, a 60% duty cycle means the power source may operate for 6 minutes with a cool down period of 4 minutes. 100% duty cycle means the power source may operate continuously. 86 SECTION 1 DESCRIPTION Table 1-3 PT-32EH Torch Specifications Current Capacity (100% Duty) 90 A DCSP 165 l/min @ 5.5 bar Air Requirements (350 cfh @ 80 psig) 7.6 m (25ft.) or 15.2 m (50ft.) Length of Service Lines Weight 2.4 kg (5.2 lbs) 7.6 m (25ft.) 4.4 kg (9.6 lbs) 15.2 m (50ft.) Figure 1-1 PT-32EH Dimensions PT-32EH CUT SPEED - CARBON STEEL Cut Speed, mm/m 4000 3000 90 Amps 70 Amps 2000 60 Am ps 1000 0 6.4mm 12.7mm 19.1mm 25.4mm 31.8mm 38.1mm M aterial Thickness PT-32EH DRAG MODE CUTTING SPEEDS AIR @ 5.5 BAR (80 PSIG) and OUTPUT CURRENT 40 AMPS Thickness mm (in.) Cutting Speed mm/m (ipm) Carbon Steel 1.6 (1/16) 3.2 (1/8) 6.4 (1/4) 9.5 (3/8) 12.7 (1/2) 5,080 (200) 2,489 (98) 914 (36) 457 (18) 279 (11) Stainless Steel 1.6 (1/16) 3.2 (1/8) 6.4 (1/4) 9.5 (3/8) 12.7 (1/2) 3,505 (138) 1,473 (58) 457 (18) 254 (10) 152 (6) Aluminum 1.6 (1/16) 3.2 (1/8) 6.4 (1/4) 9.5 (3/8) 12.7 (1/2) 5,080 (200) 2,794 (110) 1,219 (48) 432 (17) 356 (14) Material Figure 1-2 PT-32EH / POWERCUT-1500 Cutting Performance 87 88 SECTION 2 INSTALLATION 2.1 GENERAL Proper installation is important for satisfactory and trouble-free operation of the PowerCut 1500 cutting package. It is suggested that each step in this section be studied carefully and followed closely. 2.2 EQUIPMENT REQUIRED A source of clean, dry air that supplies 165 l/m (350 cfh) at 5.5 bar (80 psig) is required for the cutting operation. The air supply should not exceed 10.3 bar (150 psig) (the maximum inlet pressure rating of the air filter-regulator supplied with the package). 2.3 LOCATION Adequate ventilation is necessary to provide proper cooling of the PowerCut 1500. The amount of dirt, dust, and excessive heat to which the equipment is exposed, should be minimized. There should be at least one foot of clearance between the PowerCut 1500 power source and wall or any other obstruction to allow freedom of air movement through the power source. 2.4 INSPECTION Installing or placing any type of filtering device will restrict the volume of intake air, thereby subjecting the power source internal components to overheating. The warranty is void if any type of filter device is used. ELECTRIC SHOCK CAN KILL! Precautionary measures should be taken to provide maximum protection against electrical shock. Be sure that all power is off by opening the line (wall) disconnect switch and by unplugging the power cord to the unit when connections are made inside of the power source. A. Remove the shipping container and all packing material and inspect for evidence of concealed damage which may not have been apparent upon receipt of the PowerCut 1500. Notify the carrier of any defects or damage at once. B. Check container for any loose parts prior to disposing of shipping materials. C. Check air louvers and any other openings to ensure that any obstruction is removed. 2.5 PRIMARY ELECTRICAL INPUT CONNECTIONS The PowerCut 1500 consoles are equipped with approximately 3.1m (10 ft.) of 4-conductor input power cable for 3-phase connection. 89 SECTION 2 INSTALLATION 2.5.1 INPUT VOLTAGE CHANGEOVER ELECTRIC SHOCK CAN KILL! Before making electrical input connections to the power source, "Machinery Lockout Procedures" should be employed. If the connections are to be made from a line disconnect switch, place the switch in the off position and padlock it to prevent inadvertent tripping. If the connection is made from a fusebox, remove the corresponding fuses and padlock the box cover. If it is not possible to use padlocks, attach a red tag to the line disconnect switch (or fuse box) warning others that the circuit is being worked on. A line (wall) disconnect switch with fuses or circuit breakers should be provided at the main power panel (see table below for fuse sizes). The input power cable of the console may be connected directly to the disconnect switch or you may purchase a proper plug and receptacle from a local electrical supplier. If using plug/receptacle combination, see table below for recommended input conductors for connecting receptacle to line disconnect switch. Table 2-1 Recommended Sizes For Input Conductors and Line Fuses Input Requirements Volts 400 The chassis must be connected to an approved electrical ground. Failure to do so may result in electrical shock, severe burns or death. Before making any connections to the power source output terminals, make sure that all primary input power to the power source is de-energized (off) at the main disconnect switch and that the input power cable is unplugged. 90 Phase 3 Amps 24 Input & Gnd Fuse Conductor Size CU Amps 6 mm2 (10 AWG) 30 SECTION 2 INSTALLATION 2.6 SECONDARY (OUTPUT) CONNECTION (REFER TO FIGURE BELOW) The torch comes factory installed. Connect your air supply to the inlet connection of the filter-regulator. Prefiltered DRY AIR SUPPLY (Customer Supplied) 6.2 to 10.3 bar (90 to 150 psig max) PRIMARY INPUT POWER CABLE FUSED DISCONNECT BOX Clamp the work cable to the workpiece. Be sure the workpiece is connected to an approved earth ground with a properly sized ground cable. WORK SAFETY GROUND Figure 2-1 PowerCut 1500 Interconnection Diagram 91 92 SECTION 3 OPERATION A B C D Figure 3-1A PowerCut 1500 Controls 3.1 OPERATION 3.2 PowerCut 1500 CONTROLS (see figure above) A. Power Switch. When placed in ON position, the green pilot light will glow indicating control circuit is energized. B. Air Test Switch. When placed in Test position, air filter-regulator can be adjusted to desired pressure 5.5 bar (80 psig) before cutting operations. Allow air to flow for a few minutes. This should remove any condensation that may have accumulated during shutdown period. Be sure to place switch in OPERATE position before starting cutting operations. C. Trigger Lock Switch. When placed in LOCK position, this permits releasing torch switch button after cutting arc has been initiated. To extinguish arc at end of cut, press and release torch switch button again or pull torch away from work. When placed in UNLOCK position, torch switch must be held closed by the operator during the entire cutting operation and then released at the end of cut. D. Output Current Control. Adjustable from 20 to 90 amperes. 93 SECTION 3 OPERATION G E F H I Figure 3-1B PowerCut 1500 Controls 3.2 PowerCut 1500 Indicator Lights (see figure above) E. Power "ON" Indicator: Illuminates whenever the front panel power switch is in the ON position. F. AC Line Indicator or High/Low Line Voltage Indicator: This fault light will blink to indicate that the input voltage is outside the “+ or -” 15% range of the input rating. G. Gas Flow Indicator: This fault light will blink to indicate that the air flow supply is low or has no back pressure. H. Fault Indicator: When this light blinks, either the system failed to initiate a pilot arc after a number of attempts, or there has been an over-current event within the system. If the light blinks for 10 seconds and then stops, then the problem is pilot arc initiation. Check the consumables in the torch. If the light continues to blink, and the system does not reset, then the fault is an over-current event. One likely source of an over-current fault is a nozzle to electrode short. Turn off the machine and inspect the torch and its consumables. Replace the consumables as needed. Turn the machine back on. If the problem occurs again, the machine may require service. I. Over Temperature Indicator: This fault light will blink to indicate that the duty cycle has been exceeded. Allow the power source to cool down before returning to operation. All fault signals will remain on for a minimum of 10 seconds. If fault clears, all will reset automatically except for over-current. To clear over-current, the power must be shut off for 5 seconds and then turned back on. 94 SECTION 3 OPERATION 3.3 CUTTING WITH THE POWERCUT-1500 ELECTRIC SHOCK can kill. ž Do NOT operate the unit with the cover removed. ž Do NOT apply power to the unit while holding or c a r r y ing the unit. ž Do NOT touch any torch parts forward of the torch handle (nozzle, heat shield, electrode, etc.) with power switch on. Use the following procedures to cut with the PT-32EH torch (see exploded view of PT-32EH torch). A. B. C. E. F. ARC RAYS can burn eyes and skin; NOISE can damage hearing. ž Wear welding helmet with No. 6 or 7 lens shade. ž Wear eye, ear, and body protection. Make sure that the wall disconnect switch is on. Turn on the front panel power switch. Set pressure regulator to 5.5 bar (80 psig). Hold the torch nozzle approximately 3.2 to 4.8 mm (1/8 to 3/16 inch) above the work and tilted at about 15 - 30°. This reduces the chance of spatter entering the nozzle. If the PT-32EH's standoff guide is being used, the distance between electrode and work piece will be approx. 4.8 mm (3/16 inch). Depress the torch switch. Air should flow from the torch nozzle. Two seconds after depressing the torch switch, the pilot arc should start. The main arc should immediately follow, allowing the cut to begin. (If using the trigger LOCK mode, torch switch may be released after establishing the cutting arc.) After starting the cut, the torch should be maintained at a 5-15° forward angle (see figure below). This angle is especially useful in helping to create a "drop" cut. When not using the standoff guide, the nozzle should be held approximately 6.4 mm (1/4 inch) from the work. Standoff vs. Power Output IMPORTANT!!! Maintain Proper Stand-Off Distance 4.8 to 6.4 mm (3/16" to 1/4") Position the PowerCut 1500 at least 3 meters (10 feet) from the cutting area. Sparks and hot slag from the cutting operation can damage the unit. Power Output increases with Stand Off Distance! CUT DIRECTION Figure 3-2 Recommended Stand-off and Torch Angle 95 SECTION 3 OPERATION G. H. When ending a cut, the torch switch should be released (press and release if using trigger LOCK mode) and the torch lifted off the workpiece just before the end of the cut. This is to prevent the high frequency from reigniting after cutting arc extinguishes and causing damage to the nozzle (double arcing). For rapid re-starts, such as grate or heavy mesh cutting, do not release the torch switch. In the postflow mode, the arc can be re-started immediately by depressing the torch switch. This avoids the 2-second preflow portion of the cutting cycle. HEAT SHIELD 0558003110 ELECTRODE 0558001969 VALVE PIN 00558001959 NOZZLE 40A 0558002908 90A 0558002837 Fig 3.3 Exploded View of PT-32EH Torch 96 O-RING SUPPLIED WITH HEAD 0558003694 SECTION 3 OPERATION ADJUST GUIDE BY TURNING IN A CLOCKWISE DIRECTION ONLY. THIS WILL PREVENT ACCIDENTAL LOOSENING OF SHIELD. STEEL GUARD STAND OFF GUIDE P/N 0558002393 IF GUIDE IS TOO TIGHT ON SHIELD, OPEN SLOT WITH SCREWDRIVER. GUIDE AGAINST STRAIGHT EDGE OR FREE-HAND CUT THIN GAUGE MATERIALS CAN BE CUT WITH 1.6 mm (1/16") TORCH-TO-WORK DISTANCE ADJUST TO 4.8 mm (3/16") FOR MATERIALS OVER 6.4 mm (1/4") THICK 1.6 mm (1/16") TO 6.4 mm (1/4") TORCH-TO-WORK IF TOO LOOSE, CLOSE SLOT WITH VISE OR LARGE PLIERS. Figure 3-4 Installation and Operation of Steel Heat Shield Guards 97 SECTION 3 OPERATION 2 1 WHEN THE ARC BREAKS THROUGH THE WORK, BRING THE TORCH TO AN UPRIGHT POSITION AND PROCEED TO CUT. TO START A PIERCE, TILT THE TORCH TO PREVENT MOLTEN MATERIAL FROM COMING BACK AGAINST AND DAMAGING THE TORCH. Figure 3-5 Piercing Technique using the PT-32EH 3.4 POSSIBLE CUTTING ISSUES Replace when eroded beyond .06"(1.6mm) depth NEW REPLACE ELECTRODE BEFORE PITTING BECOMES DEEPER THAN 1.6 MM (0.06 INCH) WORN Figure 3-6. Electrode Wear Limit NOTE: When replacing the nozzle, always inspect the electrode for wear. If more than 1.6 mm (.06") of electrode Hafnium has eroded, replace the electrode. If the electrode is used beyond this recommended wear limit, damage to the torch and power source may occur. Nozzle life is also greatly reduced when using the electrode below the recommended limit. Refer to exploded view of PT-32EH torch. 3.3.1. Drag Cutting with PT-32EH torch / PowerCut 1500 package. Drag cutting, even with lower current levels may significantly reduce the life of torch consumables. Attempting to Drag Cut with higher currents (40 amps) may cause immediate catastrophic consumable damage. LOW CURRENT AUTO-DRAG FEATURE If drag cutting is desired for thin material under 9.5 mm (3/8") thick, remove the standard 90 amp nozzle from the PT-32EH torch and install ESAB's 40 amp nozzle. Lower the current level setting to be within the AUTODRAG range of 20 to 40 amps (see Auto Drag Scale on front panel). Then follow steps in "Cutting with the PowerCut-1500" section. Also refer to PT-32EH Instruction Manual No. F15-440. HIGH CURRENT DRAG CUTTING If drag cutting is desired on materials above 9.5 mm (3/8”) thick, be sure that the 90 amp nozzle is installed in the PT-32EH torch. Attach ESAB's standoff guide and operate per heat shield guard installation and operation figure. 98 SECTION 3 OPERATION Listed below are common cutting problems followed by the probable cause of each. If problems are determined to be caused by the PowerCut 1500, refer to the maintenance section of this manual. If the problem is not corrected after referring to the maintenance section, contact your ESAB distributor. A. Insufficient Penetration. 1. 2. 3. 4. 5. Current too low. Cutting speed too fast. Damaged cutting nozzle. Improper air pressure. Low air flow rate. B. Main Arc Extinguishes. 1. Cutting speed too slow. 2. Worn electrode. C. Dross Formation. (In some materials and thicknesses, it may be impossible to get dross-free cuts.) 1. 2. 3. 4. 5. Current too low. Cutting speed too fast or too slow. Improper air pressure. Faulty nozzle or electrode. Low air flow rate. D. Double Arcing. (Damaged Nozzle Orifice.) 1. 2. 3. 4. Low air pressure. Damaged cutting nozzle. Loose cutting nozzle. Heavy spatter accumulation on nozzle. E. Uneven Arc. 1. Damaged cutting nozzle or worn electrode. F. Unstable Cutting Conditions. 1. Incorrect cutting speed. 2. Loose cable or hose connections. 3. Electrode and/or cutting nozzle in poor condition. G. Main Arc Does Not Strike. 1. Worn electrode. 2. Loose connections. 3. Work cable not attached. H. Poor Consumable Life. 1. Improper gas pressure. 2. Contaminated air supply. 3. Low air flow rate. 99 100 SECTION 4 MAINTENANCE 4.1 GENERAL If this equipment does not operate properly, stop work immediately and investigate the cause of the malfunction. Maintenance work must be performed by an experienced person, and electrical work by a trained electrician. Do not permit untrained persons to inspect, clean, or repair this equipment. Use only recommended replacement parts. Be sure that the wall disconnect switch or wall circuit breaker is open before attempting any inspection or work inside of the Powercut-1500. 4.2 INSPECTION AND CLEANING Frequent inspection and cleaning of the Powercut-1500 is recommended for safety and proper operation. Some suggestions for inspecting and cleaning are as follows: A. B. C. D. E. F. G. Check work cable for secured connection to workpiece. Check safety earth ground at workpiece and at power source chassis. Check heat shield on torch. It should be replaced if damaged. Check the torch electrode and cutting nozzle for wear on a daily basis. Remove spatter or replace if necessary. Make sure cable and hoses are not damaged or kinked. Make sure all plugs, fittings, and ground connections are tight. With all input power disconnected, and wearing proper eye and face protection, blow out the inside of the Powercut-1500 using lowpressure dry compressed air. Water or oil occasionally accumulates in compressed air lines. Be sure to direct the first blast of air away from the equipment to avoid damage to the Powercut-1500. H. Occasionally, bleed all water from the filter beneath the air filterregulator. 4.3 PT-32EH TORCH CONSUMABLE PARTS Make sure power switch on POWERCUT-1500 is in OFF position before working on the torch. The PT-32EH torch head contains a gas flow check valve that acts in conjunction with the flow switch and circuitry within the power source. This system prevents the torch from being energized with high voltage if the torch switch is accidentally closed when the shield is removed. Always replace torch with the proper torch manufactured by ESAB since it alone contains ESAB¹s patented safety interlock. To assemble the consumable parts, refer to Figure 3.3 . 161 SECTION 4 MAINTENANCE 4.4 IGBT Handling & Replacement Since IGBT gates are insulated from any other conducting region, care should be taken to prevent static build up, which could possibly damage gate oxides. All IGBT modules are shipped from the factory with conductive foam contacting the gate and emitter sense pins. Always ground parts touching gate pins during installation. In general, standard ESD precautions application to FETs should be followed. Other handling precautions that should also be observed are as follows: • • • • Use grounded work station with grounded floors and grounded wrist straps when handling devices. Use a 100Ω resistor in series with the gate when performing curve tracer tests. Never install devices into systems with power connected to the system. Use soldering irons with grounded tips when soldering to gate terminals. When mounting IGBT modules on a heatsink, certain precautions should be taken to prevent any damage against a sudden torque. If a sudden torque (“one-sided tightening”) is applied at only one mounting terminal the ceramic insulation plate or silicon chip inside the module may get damaged. The mounting screws are to be fastened in the order shown in Figure 4-2. Also, care must be taken to achieve maximum contact (i.e. minimum contact thermal resistance) for the best heat dissipation. Application of a thermal pad on the contact surface improves its thermal conductivity. See Replacement Parts section for the required pad. A torque wrench should be used. Tighten mounting screws to 28 in-lbs; wire connecting screws to 19 in-lbs. If torque is too heavy, the device can damage like the above “one-sided tightening”. Two-Point Mounting Type Temporary tightening cÎd Final tightening dÎc c Four-Point Mounting Type Temporary tightening cÎdÎeÎf Final tightening fÎeÎdÎc d c e f d Figure 4-2. Screw Fastening Order 162 SECTION 5 TROUBLESHOOTING 5.1 TROUBLESHOOTING ELECTRIC SHOCK CAN KILL! Be sure that all primary power to the machine has been externally disconnected. Open the line (wall) disconnect switch or circuit breaker before attempting inspection or work inside of the power source. Check the problem against the symptoms in the following troubleshooting guide. The remedy may be quite simple. If the cause cannot be quickly located, shut off the input power, open up the unit, and perform a simple visual inspection of all the components and wiring. Check for secure terminal connections, loose or burned wiring or components, bulged or leaking capacitors, or any other sign of damage or discoloration. The cause of control malfunctions can be found by referring to the sequence of operations and electrical schematic diagram (Figure 5-1) and checking the various components. A volt-ohmmeter will be necessary for some of these checks. Voltages in plasma cutting equipment are high enough to cause serious injury or possibly death. Be particularly careful around equipment when the covers are removed. NOTE Before checking voltages in the circuit, disconnect the power from the high frequency PC Board (PCB-2, Connector J2) to avoid damaging your voltmeter. 163 SECTION 5 TROUBLESHOOTING 5.2 TROUBLESHOOTING GUIDE A. Power Light does not come on. 1. Visually inspect the machine for any damage. 2. Check following: a. Check if the machine power cord is plugged into the input power receptacle. b. Measure the input power at the receptacle. If not present, then check the wall disconnect switch and it’s fuses. c. Check Fuse (F1). 3. If above items check OK , the problem is internal. Send unit to an Authorized Repair Station for repair. a. Ensure that ribbon cable is connected to main PCB-1 and front panel PCB-3 b. Measure voltage between pins P7-5 and P7-6 of the control board. If there is no voltage, then replace Control Transformer (T6). c. If the voltage is present, then the pilot light may be burnt out. B. No Air Flow 1. Check air inlet supply. Unit requires 350 cfh at 80psig. 2. Check air hose and connections. Tighten if leaking. 3. Does air flow when “air test” switch is in test position? a. If not, check torch consumables, replace if necessary. b. If above items check OK , the problem is internal. Take unit to an Authorized Repair Station for repair. C. The Power light is on, but nothing happens when the torch switch is depressed. Fault light does not activate. NOTE: Unplug high frequency connection before attempting to work on this problem. 1. With the machine power on, depress the torch switch. On the control board the LED 1 should be lit as long as the switch is depressed. If not then check: a. Turn power off to the machine. Unplug Control board. Put an ohmmeter across J3-3 and J3-4 to take resistance reading. Depress torch switch. Meter should read a short. If not, then one of the following is not working properly: b. Torch switch or the leads. Unplug the torch switch leads at the machine. Put a meter across the two plug pins. Should read a short when the torch switch is depressed. If not, then either broken switch leads or malfunctioning switch. 2. Check transformer secondary voltages at the output diode modules. 164 SECTION 5 TROUBLESHOOTING Refer to system schematic. Replace the transformer module if the correct secondary voltages are not present. 3. If everything above checks out all right, then the PCB1 Control Board should be replaced. D. Fault light activates when torch switch is closed. The machine monitor conditions necessary for the safe operation of the Powercut-1500. The fault lights will glow under the following conditions and operations will come to a stop. 1. High/Low line voltage. The "AC LINE" light will blink to indicate that the input voltage is outside the +/- 15% range of the nominal voltage. 2. Gas Flow indicator - The fault light will blink to indicate that the air flow is low or that the torch is not providing any back pressure. a. Check the air pressure at the machine regulator. It should be adjusted to 80 psig. If no air pressure, check the air at the supply point. Also, check for any obstructions in the air hose. b. Air flow may be blocked at the torch tip. Check the torch consumables (see Figure 3.3). Also check for any obstructions in the torch leads. NOTE: If above items check OK , the problem is internal. Send unit to an Authorized Repair Station for repair. c. Put the ‘Air Check’ switch to On position. Air should flow through torch. If not, and air pressure is set at required 80 PSIG, check gas Solenoid (SOL1) for proper operation. d. Air Check switch may also be malfunctioning if the air is flowing continuously or putting in the On position does not turn air on. 3. Over Temperature indicator . The fault light will blink to indicate that the machine is overheated. This generally indicates that the air flow has been blocked. Clear blockage and allow the power source to cool before operating. a. Thermal Switch (TS1) may be open. It will open if the heat sink temperature reaches 80°C. With the machine power off, check the continuity between P6-7 and P6-8 of the control board. If the switch is OK, then the ohmmeter should read a direct short. If not then it should read open. b. If the switch is malfunctioning, replace it. Clean the surface of the heat sink before installing the switch. 4. Fault Indicator. When this light blinks, either the system failed to initiate a pilot arc after a number of attempts, or there has been an over-current event within the system. a. If the light blinks for 10 seconds and then stops, then the problem is pilot arc initiation. Check the consumables in the torch. b. If the light continues to blink, and the system does not reset, then the fault is an over-current event. One likely source of an overcurrent fault is a nozzle to electrode short. Turn off the machine and inspect the torch and its consumables. Replace the consumables as needed. Turn the machine back on. If the problem occurs again, the machine may require service. 165 SECTION 5 TROUBLESHOOTING c. b. To check if the output is shorted, measure the resistance by putting the ohmmeter leads across the output. Put the black lead to the "work" terminal and the red lead to the torch electrode terminal. The reading should be about 2K OHMs. If the resistance reading is different than above, check the torch, the output bridge and Start-up Board (PCB-6). E. Air is On but nothing happens when torch switch is operated. 1. Check the torch. Make sure that the valve pin is installed and the heat shield is very tight. 2. Check to assure high frequency is present at the torch. Disconnect HI FREQUENCY leads. Check for 575 volt supply to the high frequency unit between P2A-1 & P2A-3 of the High Frequency Board (PCB2) with torch switch closed. 3. With HI FREQUENCY leads disconnected, measure open circuit voltage. It should be 320 VDC between “Work” and “Torch” terminals. If it is not present then any one of the following may not be working properly: a. Check the operation of the Thermal Switch (TS1). See D.3.a. above. b. Check Air Check switch operation. It might be stuck in On position. Pilot arc will not initiate if this switch is in the ON position. (safety reasons) c. Check air flow switch. There may be internal short. See D.2.c above. d. Measure voltage across C5 or C6 capacitor. It should be as follows: approx. 325 VDC with 230 V supplied to the 230/460 volt unit. approx. 294 VDC with 208 V supplied to the 230/460 volt unit approx. 325 VDC with 460 V supplied to the 230/460 volt unit approx. 400 VDC with 575 V supplied to the 575 volt unit If not, one of following could be malfunctioning: 1). Check the capacitors C5 and C6 for any damage. 2.) Check input bridge/SCR Module (BR1) This can be checked without taking it out of the circuit using an volt/ ohmeter. Replace it if found malfunctioning. Follow bridge installation instructions. 3.) Check Inrush current resistor (R1), located on the Input Bridge Heatsink and SCR (Q1). Replace if malfunctioning. e. IGBTs may be damaged. See IGBT installation procedure. Before replacing IGBTs, make sure to check the zener diodes and pico fuses on the IGBT driver boards. 166 SECTION 5 TROUBLESHOOTING F. High Frequency and Pilot Arc are on but Main Arc does not transfer. 1. Make sure work clamp is connected to work material. 2. Check the torch. Replace consumables if necessary. G. Poor Cutting Performance. 1. Check air supply regulator . It should be adjusted to 80 psig. 2. The air supplied to the torch should be free of oil and water. 3. Make sure the consumables in the torch are acceptable. 4. Check open circuit voltage. See E.3 above. 5. Check the output. Use a calibrated current probe capable of measuring 100 amps in the presence of high frequency. H. Air does not shut off. 1. Check air test, the gas solenoid valve is energized when the switch is in the “on” position. 2. Does air flow stop when the torch switch is unplugged? If yes, check and repair the torch. If not, send unit to an Authorized Repair Station for repair. a. Check voltage to solenoid coil, if present when torch switch is unplugged, replace PCB1. If voltage is “0”, replace solenoid valve. I. Main arc is difficult to start. 1. The most common reason is worn or missing consumables. Check and replace if necessary. 2. Input air must be clean and dry. 3. Input air pressure must be 80 psig. 4. Torch connections must be tight. 5. Work cable and clamp must be in good condition and must make a good electrical connection to the material to be cut. 6. If above items check OK , the problem is internal. Send unit to an Authorized Repair Station for repair. a. Missing or weak pilot arc. Check pilot arc fuse, open circuit voltage and pilot arc wiring. b. Inoperative Start-up Board (PCB-6). 167 SECTION 5 TROUBLESHOOTING 5.3 REFERENCE VOLTAGE CHECKS A. Control Board Assembly (PCB1) 1. LED’s LED- (D9)LED- (D4)LED- (D1)- 2. Torch Switch Pilot Arc Relay Gas Solenoid Valve Voltage Test Points Tests are made with power on - no arc. Disable High Frequency by disconnecting blue wire with black sleeve TP-1 TP-4 TP-5 TP-7 TP-8 TP-9 TP-10 - Torch trigger signal IGBT’s driving signal - switching frequency = 18.5 KHz IGBT’s driving signal - switching frequency = 18.5 KHz +5 vdc +15 vdc -15 vdc Ground 54 µs 13vdc 0 13vdc Figure 5.1 IGBT Gating Signal 168 SECTION 5 TROUBLESHOOTING 5.4 SEQUENCE OF OPERATION A. TRIGGER LOCK “UNLOCK” position TORCH SWITCH PUSH RELEASE OPEN CLOSE GAS SOLENOID VALVE PREFLOW 2 SEC. 20 SEC Postflow FLOW SWITCH OPEN CLOSE FAULT OVERLOAD LIGHT HF CIRCUIT ENERGIZE PILOT ARC INVERTER CUTTING ARC (CURRENT) NOTES: 1. When the torch switch is pushed during postflow period, the postflow and preflow times are canceled, and the HF is energized immediately. 2. When the amber fault light comes on, cutting operation should be stopped. The postflow time starts from the moment the torch switch is released. 169 SECTION 5 B. TROUBLESHOOTING TRIGGER LOCK "LOCK" position PUSH RELEASE PUSH RELEASE TORCH SWITCH OPEN CLOSE GAS SOLENOID VALVE PREFLOW 2 SEC. 20 SEC POSTFLOW CLOSE Postflow OPEN FLOW SWITCH FAULT LIGHT ENERGIZE HF CIRCUIT PILOT ARC INVERTER CUTTING ARC (CURRENT) NOTES: 1. When the torch switch is pushed during postflow period, the postflow time is reset, the preflow time is canceled, and the HF is energized immediately. 2. When the red fault light comes on, cutting operation should be stopped. The postflow time starts from the moment the torch switch is released. 3. FAULT light is on during second "turn-off" trigger only. This does not affect performance in any way. 170 171 0558003513 Powercut-1500 Schematic Diagram 172 SECTION 6 REPLACEMENT PARTS A. REPLACEMENT PARTS Replacement Parts are illustrated on the following figures. When ordering replacement parts, order by part number and part name, as illustrated on the figure. Always provide the series or serial number of the unit on which the parts will be used. The serial number is stamped on the unit nameplate. B. ORDERING To assure proper operation, it is recommended that only genuine ESAB parts and products be used with this equipment. The use of non-ESAB parts may void your warranty. Replacement parts may be ordered from your ESAB distributor or from: ESAB Welding & Cutting Products Attn: Customer Service Dept. P.O. Box 100545, 411 S. Ebenezer Road Florence, SC 29501-0545 Be sure to indicate any special shipping instructions when ordering replacement parts. To order parts by phone, contact ESAB at 1-843-664-5540. Orders may also be faxed to 1-800-634-7548. Be sure to indicate any special shipping instructions when ordering replacement parts. Refer to the Communication Guide located on the last page of this manual for a list of customer service phone numbers. 173 SECTION 6 REPLACEMENT PARTS 3 2 4 1 9 8 11 10 6 5 7 Front View - Powercut-1500 Item No. Qty. 1 2 3 4 5 6 7 8 9 10 11 1 2 1 1 1 1 2 1 2 1 1 Part No. Description 0558003359 0558000596 0558001818 0558003770 0558003001 0558003771 0558002780 0558002581 0558001916 0558002464M 0558003548 0558003549 Switch, Power Switch Seal, Black Knob Panel Front Silkscreen Work Cable Assembly Work Cable Receptacle Foot, Plasma Tube Strain Relief Input NPT End Cover, Handle Cover, Torch Connection PT-32EH Torch Assembly x 25' (7.6 m) PT-32EH Torch Assembly x 50' (15.2 m) 174 Symbol S1 SECTION 6 REPLACEMENT PARTS 3 2 4 1 5 6 7 8 Rear View - Powercut-1500 Item No. Qty. 1 2 3 4 5 6 7 8 1 1 1 1 1 1 1 1 Part No. Description 0558000675 0558000594 0558003362M 0558003075 0558003774 0558003554 0558000388 0558002994 Regulator, Air Line Gauge, 160 PSI Panel, Rear Fuse, 2A, 600VAC Connector Cable Grip Cable, Input Power x 10 ft. Fan Finger Guard 175 Symbol F1 M1 SECTION 6 REPLACEMENT PARTS 2 3 3 4 9 8 1 6 7 5 Internal View - Powercut-1500 Lower Left Side Item No. Qty. 1 2 3 4 5 6 7 8 9 1 4 2 2 1 1 1 1 1 Part No. Description 0558003377 0558000404 0558000401 0558003367 0558002576 0558002455 0558002189 0558002482 0558003105 Transformer, Main Module RES WWFAHT 25W 1% 20 OHMS Diode Module FDS 100A 600V Transducer Current 100A Relay, SPST 24V w/MAG Inductor Output Switch Pressure, .25 GPN Solenoid Assembly Switch, Pressure, High 176 Symbol T2, T4 R12-15 D7, D8 T5, T7 K2 L2 PS1 SOL1 FS1 SECTION 6 REPLACEMENT PARTS 3 1 6 8 (Behind 6) 9 5 2 (Behind Bar) 7 (Behind Power PCB) 4 10 (Behind Bar) Internal View - Powercut-1500 Right Side Item No. Qty. 1 2 3 4 5 6 7 8 9 10 1 2 2 4 1 1 2 1 1 1 Part No. Description Symbol 0558000643 0558003182 0558003779 0558000469 0558003781 0558003782 0558002435 0558003783 0558002449 0558003784 3PH BR Rect. w/out Thyristor Module Dual IGBT 200A 600V RES WW AHNI 50W 3%K 10 OHM CAPC Metpoly *20.0***UF 400VDC PCB Power PCB HI Freq Capacitor, 3200 mfd - 450vdc Line Reactor Transformer, High Frequency PCB IGBT Driver BR1 Q2, Q3 R6, R7 C11-C14 PCB5 PCB2 C5, C6 L1 T8 PCB7 177 SECTION 6 REPLACEMENT PARTS 2 1 6 5 3 8 4 7 Internal View - Powercut-1500 Item No. Qty. 1 2 3 4 5 6 7 8 1 1 1 1 1 1 1 1 Part No. Description 0558003785 0558003786 0558003787 0558003788 0558003789 0558003790 0455803880 0558003389 PCB Start-up Network PCB Display PCB Control Solid State Relay PCB In Rush Control Switch Thermal 131°F PCB EMI Filter Transformer, Control 178 Symbol PCB6 PCB3 PCB1 Q4 PCB4 TS2 PCB8 T6 Instruction Manual Changes ORIGINAL RELEASE 179 ESAB subsidiaries and representative offices Europe AUSTRIA ESAB Ges.m.b.H Vienna--Liesing Tel: +43 1 888 25 11 Fax: +43 1 888 25 11 85 BELGIUM S.A. ESAB N.V. Brussels Tel: +32 2 745 11 00 Fax: +32 2 726 80 05 THE CZECH REPUBLIC ESAB VAMBERK s.r.o. Prague Tel: +420 2 819 40 885 Fax: +420 2 819 40 120 DENMARK Aktieselskabet ESAB Copenhagen--Valby Tel: +45 36 30 01 11 Fax: +45 36 30 40 03 FINLAND ESAB Oy Helsinki Tel: +358 9 547 761 Fax: +358 9 547 77 71 FRANCE ESAB France S.A. Cergy Pontoise Tel: +33 1 30 75 55 00 Fax: +33 1 30 75 55 24 GERMANY ESAB GmbH Solingen Tel: +49 212 298 0 Fax: +49 212 298 204 GREAT BRITAIN ESAB Group (UK) Ltd Waltham Cross Tel: +44 1992 76 85 15 Fax: +44 1992 71 58 03 ESAB Automation Ltd Andover Tel: +44 1264 33 22 33 Fax: +44 1264 33 20 74 HUNGARY ESAB Kft Budapest Tel: +36 1 20 44 182 Fax: +36 1 20 44 186 ITALY ESAB Saldatura S.p.A. Mesero (Mi) Tel: +39 02 97 96 81 Fax: +39 02 97 28 91 81 THE NETHERLANDS ESAB Nederland B.V. Utrecht Tel: +31 30 248 59 22 Fax: +31 30 248 52 60 NORWAY AS ESAB Larvik Tel: +47 33 12 10 00 Fax: +47 33 11 52 03 POLAND ESAB Sp.z.o.o Warszaw Tel: +48 22 813 99 63 Fax: +48 22 813 98 81 PORTUGAL ESAB Lda Lisbon Tel: +351 1 837 1527 Fax: +351 1 859 1277 SLOVAKIA ESAB Slovakia s.r.o. Bratislava Tel: +421 7 44 88 24 26 Fax: +421 7 44 88 87 41 SPAIN ESAB Ibérica S.A. Alcobendas (Madrid) Tel: +34 91 623 11 00 Fax: +34 91 661 51 83 SWEDEN ESAB Sverige AB Gothenburg Tel: +46 31 50 95 00 Fax: +46 31 50 92 22 ESAB International AB Gothenburg Tel: +46 31 50 90 00 Fax: +46 31 50 93 60 SWITZERLAND ESAB AG Dietikon Tel: +41 1 741 25 25 Fax: +41 1 740 30 55 North and South America ARGENTINA CONARCO Buenos Aires Tel: +54 11 4 753 4039 Fax: +54 11 4 753 6313 Asia/Pacific Representative offices AUSTRALIA ESAB Australia Pty Ltd Ermington Tel: +61 2 9647 1232 Fax: +61 2 9748 1685 BULGARIA ESAB Representative Office Sofia Tel/Fax: +359 2 974 42 88 CHINA Shanghai ESAB A/P Shanghai Tel: +86 21 6539 7124 Fax: +86 21 6543 6622 INDIA ESAB India Ltd Calcutta Tel: +91 33 478 45 17 Fax: +91 33 468 18 80 INDONESIA P.T. Esabindo Pratama Jakarta Tel: +62 21 460 01 88 Fax: +62 21 461 29 29 MALAYSIA ESAB (Malaysia) Snd Bhd Selangor Tel: +60 3 703 36 15 Fax: +60 3 703 35 52 SINGAPORE ESAB Singapore Pte Ltd Singapore Tel: +65 861 43 22 Fax: +65 861 31 95 EGYPT ESAB Egypt Dokki--Cairo Tel: +20 2 390 96 69 Fax: +20 2 393 32 13 ROMANIA ESAB Representative Office Bucharest Tel/Fax: +40 1 322 36 74 RUSSIA-- CIS ESAB Representative Office Moscow Tel: +7 095 937 98 20 Fax: +7 095 937 95 80 ESAB Representative Office St Petersburg Tel: +7 812 325 43 62 Fax: +7 812 325 66 85 Distributors For addresses and phone numbers to our distributors in other countries, please visit our home page www.esab.com ESAB Asia/Pacific Pte Ltd Singapore Tel: +65 861 74 42 Fax: +65 863 08 39 SOUTH KOREA ESAB SeAH Corporation Kyung--Nam Tel: +82 551 289 81 11 Fax: +82 551 289 88 63 UNITED ARAB EMIRATES ESAB Middle East Dubai Tel: +971 4 338 88 29 Fax: +971 4 338 87 29 BRAZIL ESAB S.A. Contagem--MG Tel: +55 31 333 43 33 Fax: +55 31 361 31 51 CANADA ESAB Group Canada Inc. Missisauga, Ontario Tel: +1 905 670 02 20 Fax: +1 905 670 48 79 MEXICO ESAB Mexico S.A. Monterrey Tel: +52 8 350 5959 Fax: +52 8 350 7554 USA ESAB Welding & Cutting Products Florence, SC Tel: +1 843 669 44 11 Fax: +1 843 664 44 58 ESAB AB SE-- 695 81 LAXÅ SWEDEN Phone +46 584 81 000 Fax +46 584 123 08 www.esab.com 0558003745 01/03 020314