1
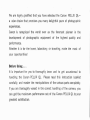
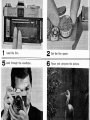
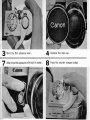
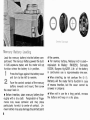
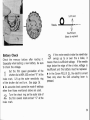
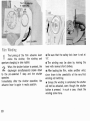
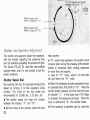
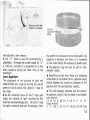
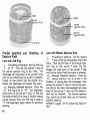
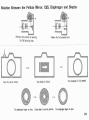
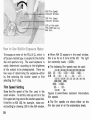
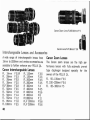
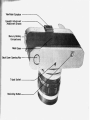
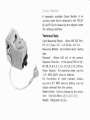
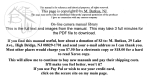
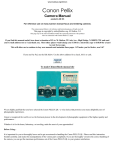
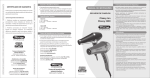
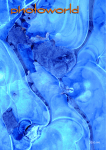
INSTRUCTIONS
Enalish Edition
We are highly gratified that you have selected the Canon PELLIX QLa wise choice that promises you many delightful years of photographic
experiences.
Canon is recognized the world over as the foremost pioneer in the
development of photographic equipment of the highest quality and
performance.
Whether it is for the home, laboratory, or traveling, make the most of
your opportunities!
..
Before Using.
I t is important for you t o thoroughly know and to get accustomed to
handling the Canon PELLIX QL. Please read this instruction booklet
carefully, and master the manipulations of the various parts completely.
If you are thoroughly versed in the correct handling of the camera, you
can get the maximum performance out of the Canon PELLIX QLto your
greatest satisfaction.
\
ASA
Film Speed Indicator Window
Technical Data
Type: 35mm single.lens reflex camera.
Viewfinder: Eye.ievel system using pentagonal
Waist.Level Viewer 2 can be
prism.
attached.
Focusing Glass: Highly efficient in resolving
power, using Fresnel lens and built.in
prism screen rangefinder.
Mirror: The Canon Peliicie Mirror, a half trans.
Oarent
- mirror.
Standard Lens: FL 50mm F1.8. FL 50mm
F 1.4, FL 55mm F 1.2, FLP 38mm F2.8.
Aperture: Fully automatic pre.set aperture built.
in. Pre-set release possible.
Shutter: 1/1000-1 sec. and BIT) X single pivot
dial focal plane shutter.
Exposure Meter: Built-in. Zeromethod CdS cell
coupled to shutter dial and aperture
setting. TTLM system. EV0.5(with ASA 1 0 0
film, F 1.2 at 1set.)-EV 18(F 16 at 1/1000
sec.) one stage system. ASA25-2000.
Powered by one 1.3V M 2 0 (#625) mercury
battery.
Photometry: Exposure meter functions with the
CdS actuating lever. Continuous photo.
metry is possible with the CdS actuating
lock lever. Battery checker built in.
7 -
Measuring of Ultra-Low Illumination: EV 1.5 112
sec.- EV-4.5 3 0 sec. at F 1.2 can be
measured with theattachment of the Canon
Booster [auxiliary meter for extremely dim
lighting).
Flash Synchronization: Synchronizing possible
for FP and X contacts and FP class, M class.
MF class and speedlight.
Self.timer: Built.in.
Film Rewinding: Done by button and crank.
Film Advance Lever: Single operation 174'
winding lever, possible to wind with several
short strokes.
Film Loading: Back cover opening and closing,
using only cartridge. The Canon-developed
QL mechanism makes possible simple and
quick loading of film.
interchangeable Lenses:
Automatic pre.set
aperture type FL series lens system.
Film Counter: Self.resetting type.
~
Size: 1 4 4 x 9 1 x 4 3 m m ( 5 % ' ' ~3 % " 1%").
Weight: 755 grams11 lb. l O % o z . b b o d y only.
Subject to alterations.
Contents
Mercury Battery Loading ....................................................... 8
10
Film Winding ...........................................................................
Shutter and Aperture Adjustment ............................................. 12
How to Use Built-in Exposure Meter ............................
16
Exposure Setting 1-Shutter Speed Priority Method .................. 1 8
19
Exposure Setting 2-F Stop Priority Method .........................
Coupling Range of Built-in Exposure Meter ..............................2 0
Focusing .................................................................................2 1
Holding the Camera
........................................2 3
Film Loading ...........................................................................25
Film Rewinding ............................
28
......
......................
.
......
.............................
...............
Photography Using Self-timer and Eyepiece Shutter
29
Flash Synchronization
30
31
Uses of Lenses ..............................
36
Double Exposure .....................................................................
Filters
.........................................................
37
Proper Care of the Canon PELLlX QL
38
Interchangeable Lenses and Accessories ................................. 4 0
Canon Booster
43
..............................................................
.
.
.....................................
.....................
..................
.
.
...............
........................................................................
1
Load the fllm
5 Look through the viewfinder.
2 Set the fllm speed
6 FOCUSand compose the picture.
3 Wind the film advance lever.
7
Determine the exposure with built-in meter.
4 Remove the lens
cap.
Press the shutter release button.
Load the mercury battery into the battery com.
partment. The mercury battery powers the built.
in CdS exposure meter, and the meter will not
function unless the battery is in position.
1
2
Press the finger against the batterycover
and turn t o the left to remove.
Face the central contact of the mercury
battery inwards and insert, then screw
the cover back in.
I) Before insertion, clean mercury battery thoroughly with a dry cloth. Perspiration or finger
marks may cause corrosion and may prove
particularly harmful t o center of contact. Un.
clean battery may also damage the contact point
8
o f the camera.
I) For mercury battery, National H-D is usedequivalent to Mallory RM.625R. Eveready
E625N, Burgess Hg.625R. Life of the battery
in continuous use is approximately one year.
*
When inserting, do not confuse the @ 0.
Not only will the meter fail to function in case
of reverse insertion, but the cover cannot be
screwed in properly.
I) When not in use for a long period, remove
the battery and keep in a dry place.
Sufficient
Naedle
4
Insufficient
(Need to replace)
.
Battnrv Check
- Check the mercury battery after loading it.
Especially when loading a new battery, be sure
to check the voltage.
Set the film speed graduation of the
shutter dial at ASA 100 and set "X" at the
index mark. Lift up the outer sensitivity ring
of the shutter dial and turn. See page 16.
I) An accurate check cannot be made if settings
other than those mentioned above are used.
Turn the check ring on the outer side of
the film rewind knob and set "C" at the
index mark.
1
2
I f the meter needle inside the viewfinder
swings up t o or over the o index, it
means there is sufficient voltage. If the needle
stays below the edge of the o index, voltage is
insufficient and the battery must be replaced.
I) In the Canon PELLIX QL, the electric current
flows only when the CdS actuating lever is
a
------A
"leD>LiU.
-
The fllm co
I s advanced
Film Wit~ding
The turning of the film advance lever
cocks the shutter, fiim winding and
aperture charging in one motion.
When the shutter button is pressed, the
diaphragm simultaneously closes down
to the preselected F stop and the shutter
operates.
Immediately after the shutter operation, the
advance iever is again in ready position.
1
2
I) Be sure that the safety lock lever is set at
"A".
The winding may be done by moving the
iever with several short strokes.
I) After loading the fiim, make another wind.
since there is the possibility of the very first
winding not catching.
Unless the winding is completed, the shutter
will not be actuated, even though the shutter
button is pressed. In such a case, check the
winding once more.
*
*
film counter
I.
Film Counter
Attaching the Cable Release
Each winding of film will advance the number of
the film counter, indicating the number of
pictures taken. When the back cover is opened,
the indicator automatically returns to starting
position " S
A cable release can be attached to the shutter
button. Even if the safety lock lever is a t
" L" position, the shutter will operate by using
the release.
When using the cable release, be sure to close
the eyepiece shutter before shooting. Refer to
instructions on page 29.
".
Safety Device for Shutter
When the safety lock lever around
button is turned t o "L" position,
is locked and will not move. This
be used when the camera is carried
condition.
the shutter
the shutter
device may
in a wound
11
Make reverse turn
when i t stops a t " X " .
-
Make reverse turn
.
when it stops at " B ".
Shutter and Aperture Adjustment
The shutter and aperture adjust the exposure.
with the shutter adjusting the exposure time
and the aperture adjusting the amount of light.
The Canon PELLIX QL uses the zeromethod
coupled meter, and it is very simple to get the
proper exposure.
Shutter Speed Dial
By revolving the dial, it is possible t o adjust the
speed by turning it to the necessary index
number. The index on the dial shows the
denominators of l/lOOO sec., 1115 sec., etc.
The shutter speed dial does not revolve
between the indexes " X " and " 6".
Set the index at the position where the click
*
*
12
stop catches.
$ "8" means bulb exposure. The shutter, which
remains open during the pressing oftheshutter
button, is employed when making exposures
of more than one second.
In case of " B " index, adjust it to the white
dot just below the " B " index.
I) When it is necessary t o make an exposure over
an extended time, first set it a t " B ". Keep the
shutter button pressed, turn the time lock lever
to indicator " L". In this case, even if the finger
is removed, the exposure continues. When the
lever is returned to "A", the shutter closes.
Time exposure is possible also by using the
*
R ~ Y O I VwBttile the
button is pressed.
Pre-set
Aperture-
-
Inde*
Ring
lock.attached cable release.
The " X " index is used for synchronizing a
speedlight. Although the shutter speed at " X "
is 1/60 sec.. actually it is equivalent to a very
short exposure during the flash time of the
speediight.
*
Lens Aperture
The adjustment of the quantity of light and
depth.of-field are made by turning the pre.set
aperture ring to adjust the desired F stop to
the index.
As the numerical value of the F stop gets
larger, the amount of light reaching the film
becomes correspondingly less. For each F stop
the light is reduced one-half. Accordingly, when
*
the aperture is increased by one index point, the
exposure is doubled, and when it is increased
by two index points the exposure is quadrupled.
The aperture ring can also be set to inter.
mediate values.
*
*
Depending on the lens, there are instances
where there Is no relation to the lightness being
halved between the maximum diameter of the
aperture and the next aperture reading.
The ratio between aperture and the amount
of exposure, using F 2 as the basis, is as follows:
Lens Aperture
1.2 1.4 1.8 2 2.8 3.5 4 5.6 8 11 16 22
EXDOSUTBRatio
3
2
1.25 1 112 113 114 118 1116 1132 1164 11128
13
--Index
-
Index
pre.*et
A~evtureRins
-',6"%$e
Rins
Manual
Aperture Rlng
A - M Ring
Pre-Set Aperture and
Depth-of-Field
Checking
of
ens w i t h A-M R i n ~
Pre.Setting of Aperture: Set the A.M ring
at "A". Then set the desired F stop on
the pre.set aperture ring t o the index. 'The
diaphragm will close down t o the pre-set F stop
onlv for the instant that the shutter is released.
~ x i e p tfor the instant that the shutter is re.
leased, the diaphragm will remain fully open.
r? Manually Operated Aperture : When the
K
A-M ring is set at "Mu the diaphragm
closes down t o the pre.set F stop. I n this way
the deoth-of-field at the time of shutter release
can be'checked. When the A.M ring is reset at
A" the diaphragm again returns t o maximum
opening.
.
Lana w l t h M a n u a l Aperture R i n g
a
Pre.settin~of aperture : Set the desired
fi
F stop o n t h e pie-set aperture ring t o the
index. Then set the index of the manual aperture r i m t o this ore.set F stoo. The dia.
phragm will~ciosed o k n to t h e p i e - s e t F stop
only for the instant that the shutter is released.
Manually Operated Aperture: When the
manual aperture ring is turned in the
direction of closing down the diaphragm, after
setting the desired-F stop on the pre-set aper.
ture ring t o the index, the diaphragm will close
o t h e- ars.set F stoo -~
and- the deoth-of.
down t~field can be checked.
he manual adekure
ring cannot be turned when set at maximum
aperture opening.
q Refer t o pages 34-35 concerning depth.of.
field.
2
~~
~~~
Relation Between the Pellicle Mirror. CdS. Diaphragm and Shutter
=-
'3,
Deteimlne the axporurc by prers~ng
the CdS actuating laver.
Press the shutter button.
The diaphragm begin% to clore.
The shutter is clicked.
Closed down to pre-set position.
The diaphragm is fully o p n r d .
The diaphrrzm b p i n r l a open,
AS4 Film Speed
- DIN Fllm Wnndow
Speed
.--L--lndtcator
lndlcator Window
Llft UP the outer
fllm speed set ring
and turn.
How to Use Built.in Exposure Meter
The exposure meter of the PELLiX QL, which is
of thezero method type, is coupled to the shutter
dial and aperture ring. The exact exposure is
easily determined according to the brightness
of the subject to be photographed. There are
two ways of determining the exposure--either
by first selecting the shutter speed or first
selecting the F stop.
Fllm Speed Setting
Show the fiim speed of the film used in the
small window. To do this, hold up and turn the
fiim speed set ring around the shutter speed dial.
If the fiim is ASA 100, for example, make correct setting by showing 100 in the ASA window.
*
When ASA 25 appears in the small window,
this is as far as it turns to the left. The right
(20001.
turn extremity reads
The following film speeds may be used:
.
. 100.
.ZOO. .400. .
2 1 . . 2 4 . . 27..
(32) (40) (64) (80) (125) (160)(2501 (320) (533)(MO)
ASA 2 5 . . 5 0 .
DIN 1 5 . - 1 8 . .
(16)(17) c19)cm) tm (231 (251 (261 12s) (29)
(lom)(lZso) ( 2 W
. . 1600 .
. 33.
800
30.
(31) (32)
(30
Figures in parentheses represent intermediate
film speeds.
The film speeds are shown either on the
film box cover or on the explanatory sheet.
CdS Actuating Lever
The exposure meter can be set into measuring
condition by turning the CdS actuating lever
towards the lens.
The CdS actuating lever can be fixed by turning
it towards the lens after setting the lock lever
at " L " position. If the iock lever is returned
to its original position ( . index) the CdS actuat.
ing lever will also return to its original position.
The shutter cannot be released while the CdS
actuating lever is being turned or when it is
locked with the iock lever.
*
How to Measure the Average Brightness
The exposure meter on the Canon PELLIX QL
is of the spot reading type which accurately
measures any special spot of the subject. Therefore, when measuring a subject with greatly
differing dark and bright parts, take two
measurements, one each of the dark and bright
parts. Then obtain the average value and set
the F stop or shutter speed accordingly.
Exposure Setting 1-Shutter
4
Speed Priority Method
Set the shutter at a desired speed.
I
Face the camera towards the photo.
graphic subject, look into the viewfinder,
and press the CdS actuating lever fully.
2
Either keep pressing the lever or lock
the lever and turn the aperture ring.
Set the meter needle at the o index
within theviewfinder for correct exposure.
Canon's TTLM system has been adopted in
the PELLIX QL which provides the most accu.
rate photometry. Under this system, the CdS
photocell of the built.in meter is placed in the
closest position to the film on the back side
3
*4
of the pellicle mirror.
The rectangular frame on the outside of the
prism screen withintheviewfinder is thesamesize
as the light receiving area of the CdS photocell.
Place the center of the photographic subject
within this frame and measure the intensity of
light. In this way the photographer can decide
the best exposure for his photographic needs.
The TTLM system makes possible the measuring
of exposures in counter-light conditions.
I) Measurement a t " B " and " X " indexes of
the shutter dial is not possible with theexposure
meter because " 0 " is used for long exposures
over one second and " X " is used for speedlight.
*
I
E x p o c ~ ~S~~rt t i n e2
-F
Stop Priority Method
Set the lens aperture a t the deslred F
stop.
Face the camera towards the photographic subject. look into the viewfinder,
and press the CdS actuating lever.
While pressing or locking the CdS actuating lever, turn the shutter dial.
Set the meter needle at the o index
within the viewfinder for
correct
exposure.
Intermediate positions on the shutter speed
dial scale cannot be used, but since any aperture may be utilized, the shutter speed should
first be determined when strictly considering the
q]
3
4
*
exposure. It is most practical t o adjust the
aperture according t o this.
iDuring the use of the meter, there are
instances Of the movement of the needle becoming slack, owing to changes in the degree
of light, but this is due to the characteristics
of tKe C ~ S .
When taking pictures against light, always
use a lens hood.
When the subject is too bright or too dark
and is outside the coupling range of the built-in
exposure meter, the meter needle will point to
the top of the viewfinder and will indicate that
proper exposure cannot be obtained. Refer to
"Coupling Range of Built-in Exposure Meter"
on the following page.
*
*
Coupling Range o f Built-in
Exposure Meter
The built-in exposure meter couples t o the fol.
sure meter couples fully within the range of
lowing range of F stops and shutter speeds with
F 1.2 at 1 sec. IEV 0.51 and F 16 at l/lOOO sec.
respective film speeds. When using the F 1.2
(EV 18).
Lens and ASA 100 film. for examole. the exoo.
Film Speed
ASA
DIN
1
Shutter Speed
...... 1
. . 1 112
25
15
112
-
ASA
50
18
DIN
-
tsi
I:
1 112 114
--
1/30
1/15
1/60
118
/114
--
114
118
118
1/15
11125
11250
-
-----1/15
1/30
1/60
11125
11250
11500
1/30
1/60
11125
1/250
1/500
1/1000
-------
.. .
ASA
400
. ...
11125 11250 11500 1/1000
1/60
114 118 1/15 1/30
DIN
27
--------ASA
800
. . . ...
11125 11250 11500 1/1000 . . .
118 1/15 1/30 1/60
01,
30
----- ----.. ... .. - .. .
1/1000
5; l6Z: 1/15 1/30 1/60 11125 11250 11500 -ASA 2000
.
.
.
.
.
.
... - ..
1130 1/60 11125 11250 11500 1/1000
DIN
34
ASA
DIN
200
24
112
114
118
1/15
1/30
1/60
11125
11250
11500
1/1000
---a
-
-
-
p
p
p
-
f/Stops
20
1
(22
1-22
-22 f/l-22
f/l-22
f/l-221 fI1-22
f/l-22
f/l-22
f/l-22
f/l-16
'
l
. ..
~
~
A
FocusingRing
I
Fociising
While looking through the viewfinder, rotate
the focusing ring.
it is out of focus when the image within the
circle in the center of the viewfinder is unclear.
I t is in focus when the images coincide and
the unclear images become clear.
The center of the viewfinder (circular section,
is the prism screen type rangefinder for focusing
made up of microscopic prisms.
*
Eyesight adjustment lenses are available as
optional attachment. When an eyesight adjustment lens is attached t o the eyepiece, those
who are far.sighted or near.sighted can take
pictures without glasses. Four different diopters
of +1.5. 0, -2.5, and -4 are available.
C O ~ P O Sand
~ ~Viewfinder
~ O ~
The exact picture image to be photographed on
the film can be seen on the ground glass without
any parallax. I t is possible to determine the
composition exactly according to the viewfinder.
Waist.Level Viewer 2 can be attached to the
eyepiece for copying, enlarging and microphotog.
raphy. In this case, the image is reversed left
and right.
..:
.
Holding the camera firmly is very important
in order to take a clearly focused picture.
Hold the camera in either vertical or horizontal
position, as shown in the photographs. Look
through the viewfinder and adjust the focus
while determining the composition. Then, gently
press the shutter button. At this time, it is
important t o consider the following points:
Hold the camera with both hands as
firmly as possible.
Stabilize the camera by pressing it
against the cheek or forehead.
2
When the camera is in a horizontal
3 position, both elbows should be firmly
pressed against the body, and at least one elbow
should be resting against the body when in a
vertical position.
Rough pressing of the shutter button is a
cause of blur.
I) it is advisable to use the tripod and cable
release. Particularly recommended when using
a slow shutter speed below 1130 sec.
*
QL Shaft
Fllm Set Mark
Sprocket
Cartridge Compartment
Direction in which film is placed
lsmulsified surface facing the back of the lens1
Film Loading
Canon PELLIX QL accepts any standard 35mm
film in cartridge for daylight loading.
When loading a new film, avoid direct sunlight.
e When repacking a long-wound film for
darkroom loading into the ordinary cartridge,
trim the end of the leader part in between the
perforations.
Open the back cover.
Raise the back cover lock, make a half
turn to the left, and the cover will rise.
Open the back cover fully. When the back
cover is opened, the QL cover also opens simultaneously and is ready for loading the film.
e The QL cover automatically opens and closes
together with the opening and closing of the
1
back cover.
2
Do not touch the QL cover.
Insert cartridge.
Raise the rewinding knob ail the way.
When the cartridge has been inserted, push the
knob back to its former position again. Push
the fork into the axis of the cartridge. I n case
the knob does not fully return, it can be easily
put into proper position by turning it slightly to
the left or right.
--q
Set film tip to the red mark.
Face the cartridge as shown in the
picture and hold the film down with the left
hand so that it does not rise.
25
A
When t h e b a c k cover Is half-closed.
the QL cover presses down on the film.
Check through the sprocket window whether the
film has been engaged correctly onto the gear.
Close t h e b a c k cover.
Press down to prevent the cover from
rising, then turn the back cover lock clockwise
t o close.
Fold down the rewinding crank.
I f the film is sagging, the cartridge will rise
and the back cover will not close.
M a k e t h r e e b l a n k shots.
Leave the lens cap on and advance the
film three times, each time releasing the shutter.
The film counter will advance from the " S "
mark to "0". With one more advance, the
camera will be ready for the first shot.
Setting the Fllm Speed
Checking Correct Fllm Loading
When loading the film, be sure to set the film
speed in the window of the shutter dial. Refer
to page 16 for setting the film speed.
The film is properly loaded and transported if
the rewind knob rotates when the film advance
lever is wound. If the rewind knob does not
rotate, it means the film was not loaded properly.
If such is the case, take out the film, as illustrated on page 28. and reload the film.
Fii. . ~ ~ ~ ~ v ~ i i r i i i i ~
Since no further winding is possible when the
film has reached the end, rewind the film
immediately into the cartridge. As the exposed
film is naked within the camera, the entire roll
will be exposed and ruined if the cover is
opened before rewinding.
1
Press I n t h e r e w i n d i n g button.
Rewind w i t h crank.
Raise the rewind knob, turn the crank in
the direction of the arrow, and return the film
into the cartridge. When the rewinding button
stops revolving and rewinding resistance be.
comes light, immediately stop rewinding.
2
3
Open t h e b a c k cover.
Remove t h e cartridge.
knob completely and
4 Raise the rewind
remove the cartridge.
) Once the rewinding button has been pressed.
the finger may be removed. The button will
return automatically when the lever is wound.
) if winding is continued after the film is at its
end, the film will come loose from the cartridge
spool or tear and rewinding will become impossible. If this happens, open the back cover
in a completely dark room.
Photography Using Self-timer and Eyepiece Shu:teiWind the shutter and close the eyepiece shutter.
Turn the self.timer lever in the direction of the
arrow and press the shutter button. The shut.
ter will be actuated approximately 10 seconds
later.
I) Be sure to wind the Self.timer completely.
Be sure to wind the shutter. If this is
neglected and only the self.timer is wound and
the shutter button pressed, the self.timer will
act but the shutter will not be actuated.
The self-timer lever can be used as a CdS
actuating lever as soon as it returns to its
original position. When taking shots with the
.
eye off the eyepiece, such as when using the
self.timer or cable release, always be sure to
close the eyepiece shutter.
Eyeplece Shutter
Since the Canon PELLIX QL incorporates
mirror, the light rays may cause ghosts
the film plane if the viewfinder eyepiece
ceives strong light.
I$ For closing the eyepiece shutter, turn
eyepiece shutter ring t o the left and set
index mark t o m.
the
on
re.
the
the
By connecting the cord of the fiash unit or
speedlight to the flash socket, it is possible to
synchronize the following shutter speeds.
When taking pictures with fiash, light volume
adjustment is required because the Canon
PELLiX QL uses a stationary mirror. Obtain
F stop by guide number and further open
aperture by one.half.
A lens hood is necessary when taking flash
pictures.
*
SYnchronired
Shutter Speeds1
FP class
1116, Press 261
Fiash
M class
IM3. 15. Press 2 5 )
MF class IAG-1. AG-
3. M2. Flashcube)
/
Speedlite
1160 or faster
1115 or slower
'/I5
Or 'lower
Or
"x" Setting
fesuiv. to 1160sec.l
'F
.
. ,
.
'.,~% f
Coincide
"P
,
and remove.
its:
-"?
~:
colnclde the red dot and guide Pln.
Uses of Lenses
Changing Lenses
In removing the lens from the camera, after
turning the bayonet ring of the lens to the left,
take out the lens.
In mounting the lens'match the red dot Of the
lens to the red dot on the camera mount. Turn
the bayonet ring to the right and fasten.
When mounting, turn the bayonet ring of
the lens sufficiently to the left and coincide the
red dot and guide pin of the lens.
e Do not change your lens in a strong light.
When changing your lenses have the replacement lens a t hand. Then quickly change the
lenses in the shade.. or use your shadow as
a shield from direct light.
.
Prri.
,
."*,
* T h e r e is a pre-set aperture lever at the
back end of the lens which opens and closes
the aperture. when the lensis removed, be
sure to always put on the dust cap so a s to
protect the aperture lever.
If interchangeable lenses are changed while
the CdS actuating
is in locked position,
the preset aperture lever cannot be connected
t o the coupling part on the camera body and
the pre.set aperture will not function. Be sure
to unlock the CdS actuating lever when changing interchangeable lenses.
Do not touch the pellicle mirror or the coupling section of the aperture. When not in Use
for a long time, protect the pellicle mirror by
putting on the flange cap.
*
31
-
Distance Scale
-
Indicator
(central
orange line)
Infrared Index "R"
Distance Scale
The distance scale indicates the distance between the focused subject and the film plane.
The scale is necessary for checking the depth.
of.field, for infrared photography and flash
photography.
,
~h~ correct position of the scale, where the
distance is a one.digit figure, is in the middle
of the figure; if it is a two-digit figure, it is
between the two figures ; and if it is a three.
digit figure, it i s in the middle of the central
figure.
32
i
Infrared Index
"R"
For infrared photography, correction of the
distance scale is necessary because the focal
position deviates a little from ordinary photog.
raphy.
Make ordinary focusing first, then
adjust that distance scale to the infrared mark
'' R". For instance, if the distance reads 10m
'"
after focusing, merely shift the 1 0 scale to
"
position.
*The position of " R " is scaled according to the
use of the standard of a film with the highest
sensitivity of a wave length of about 800mp
and infrared filter (for example. KODAK IR 135
Film Plane Mark
The lens distance index is scaled by measuring
the distance from the film position. Thus, in
case the focusing is done by actual measurement, measure from the film plane mark and
transfer this distance t o the lens distance index.
I ) Traces of water bubbles cannot be entirely
removed from glass used for high quality lenses
because of the manufacturing process. Lens
bubbles will not a t all affect the sharpness of
the oicture.
Depth-of-field Scale
The depth-of-field scale indicates the range of
subjects which will be in sharp focus on the
film. This range will vary with the following
factors: The depth-of-field will be deeper the
smaller the lens aperture, the further the
distance of the subject, andlor the shorter the
lens focal length. The depth.of.field will be
shallower the larger the lens aperture, the nearer
the distance of the subject, and/or the longer
the lens focal length.
Daoth-of-field 2.3
3m
F a 50rnm Focused at
m ,*3m
w
For example, if the lens is 50mm and the subject
has been focused at a distance of 3m, with an
F 8 aperture, the depth.of-field would be from
approximately 2.3m to 4.3m a s indicated on
both sides of the distance index.
Lens Mount
1
(FL and R
Series Lenses)
Similarly, if the aperture is F16, the picture
will be sharp from about 1.9m to 7.6m.
This range will vary with the F stop selected.
As the iens mount for the Canon PELLlX QL is
the same as for Canon PELLIX, FT QL. FX, and
FP, it is possible to use all FLseries lenses except
the 19mm F 3.5 lens. The 19mm F 3.5 iens
cannot be attached because the PELLIX QL uses
stationary type pellicle mirror. Use FL 19mm
F3.5R for exclusive use with the Canon PELLIX
QL instead.
FL series of the Canon lenses have a feature
which lets you see the actual sharpness through
the viewfinder by turning the manual aperture
ring.
It is possible b attach and use all the R
series lenses for CANONFLEX use. However, as
the automatic aperture mechanism differs, pictures must be taken with the manual aperture.
F16
*
mm
Depth.oF.field 1.g m.7.6 m
Focused a t 3 m
*
35
Double Exposure
Under ordinary usage, there is no danger of
double exposure. However, double exposure
can be made by the following steps:
1
When the first exposure has been made.
press the rewinding button.
Rewind the film with the rewinding crank
by watching the mark on the rewinding
button carefully.
2
Stop rewinding when the mark has made
270.. Be sure not to
exceed one turn of the rewinding button.
3 3/4 turning, i. e.,
Next, wind the film advance lever while
lightly holding the rewinding crank. When
resistance is felt on the rewinding crank, stop
the winding.
4
Wind the film advance lever once more.
By repeating the above process, it is
possible to make any number of exposures
on the same film plane. The film counter
will, however, continue to advance with each
exposure.
5
I
Var.ous rypes of 5 8 m m
FL 5 0 m m F3.5.
for FL
for
5 0 m m . F1.4. 5 5 m m F 1.2
a n d 48mm
50mm F 1.8) screw-in t y p e f i l t e r s a r e available f o r
special effects in b o t h color a n d b l a c k a n d w h i t e
photography.
1
/
The
exposure m e t e r
Canon PELLIX QL i s o f t h e
for
the
TTLM s y s t e m a n d
so there i s a b s o h t e l y n o necessity f o r c o m p e n s a .
tion of exposure factor.
Fitters
UV
tor color and black and whfte
,
R1
for black and white
G1
~
0
N"
R
4
}.
for color and
o ack and white
Skylight
CCB4
CCB8
CCB (12 wulv.)
,
.Absorbs only ultra-violet rays.
Especially effective a t ssaride, high
mountains where there Is much ultra-violet rays. Recommended for use
in color Photography.
Increases contrast of black and white film. Enhancsr clouds, darkening
the blue sky. Brightens red and yellow.
D a r k e n s blue, increases yellow and red volume perceptibly. Good for
contrasts in distant landscaper.
Makes strong contrasts. Renders day almost into night May also be
l..d- - - with
, ,. . in+r.r0rl
..... . film
. ...
Prevents re. from t ~ r n l n gradically Into whits. Lightens sky and lace
apT)lOPrlate.y, ano reflects the ilghtnsrs of fresh greenery.
h D 4 reduces light valuer by 1 4 ND8 by 1 8. No effects on the r e ~ r o .
. s t i o n ot coiors of co or t m.
.Acts to harmonize the blue sky and shade.
F o r use with daylight type f i l m under thecloud:
F o r use with universal type (color negative) ftlm under the cloud or
tungsten type film under the morning sun or sunset.
F o r use with tungsten type f i l m under sunlight,
FOT U S 8 with daylight type f i l m under the morning sun or sunset.
F o r use with daylight type f i l m and clear flash bulb.
F O T use with dayl~ghttype f i l m under tungsten light.
_ __
.
37
Proper Care of the Canon PELLlX QL
Storage of Camera
Moisture and dust are harmful t o your camera.
It should be taken out into the fresh air from
time to time.
If your camera is to be stored for a long time.
it should be removed from its case. Silica gel
or another drying agent should be placed along.
side it.
Cleaning of the Camera
When you use your camera on a rainy day, or
at the beach, moisture and salt air adhere t o
it, which can result in stains, rust, and corro-
38
sion. Use a soft brush to rid the dust and a
soft dry cloth for wiping.
Cleaning the Lens
Use a blower with a rubber ball to blow away
dust on the lens or brush lightly with a brush.
Do not touch the lens. If you should inadvertently get a fingerprint on your lens, follow this
procedure: use a little pure alcohol, or ether.
if available on special lens cleaning tissue. Then
wrap the tissue around a wooden matchstick
and wipe the lens in a circular motion.. .lightly
and systematically.
*
Never touch the peliicle mirror. if dust should
accumulate on It, blow it away with a blower.
in extremely cold areas, expose the camera
to the outer air only when in use. Put it back
into Its case immediately after use. When
using in cold climates, expose the camera
gradually to the outer air to prevent the lens
from clouding.
*
In hot climates, do not leave the camera
inside closed automobiles during the daytime
or in direct sunlight. it is not good for the
CdS cell.
Canon Zoom Lens FL 85-30Drnm F 5
Canon Lens FLP38mm F 2.8
4
lnterchangeable Lenses and Accessot.ies
Canon Zoom Lenses
A wide range of interchangeable lenses from
19mm to lOOOmm and various accessories are
available to further enhance your PELLlX QL.
Canon Interchangeable Lenses
FL 19mm
FL 28mm
FL 35mm
FL 35mm
FLP 38mm
FL 50mm
FL 50mm
FL 5omm
FL 55mm
FL 85mm
FL lOOmm
F3.5R
F3.5
F3.5
F2.5
F2.8
F3.5
F1.8
~ 1 . 4
F1.2
F 1.8
F3.5
FL
FL
FL
FL
135mm
135mm
200mm
200mm
R 300mm
R 400mm
R 600mm
R aoomm
R 1OOOmm
FL.F 300mm
FL.F 500mm
The Canon zoom lenses are the high per.
formance lenses with fully automatic pre.set
type diaphragm designed specially for the
owners of the PELLlX QL.
Accessories
. Filters (48 and
. Lens Hood
. Flash
58mm screw.in type1
. Canon Quint
Speedlite 102. 2 0 0
- Flash V-3
. Bellows R
. Canon
Release
. Waist-Level Viewer 2
. Bellows FL
. Photomicro Unit F
.. Canon
Booster
Copy Stand 3F
. Handy Stand F
.. 58
m m Close-uo Lens
camera ~ o l d e r R4-2
'
I
Vlawflnder Eyepleca
!
Eyesight Adjustment
Attach,ment Qroova
I
Mercury Battery
Compartment
1
-:
1
Back Covar
i
I
I
1
Back Cover Opening Kay
II
\
I
Trlpod Socket
~
i
i
i
,
.
Rawlndlng Bunon
.
' - ,~
-.nn.,
A separately available Canon Booster is an
auxiliary meter that is attached t o the PELLlX
QL and FT QL for measuring the subjects under
dim lighting conditions.
Technical Data
Light Measuring Range : Using ASA 1 0 0 film :
EV 1.5 1/2sec.-EV -4.5 30sec. at F 1.2.
Measuring Method : Zero-method direct reading
type.
Photocell: Utilizes CdS cell of the camera.
Exposure Time Dial: In the case of PELLlX QL;
60,30,15,8,4,2,1,112,1/4,1/8,1/15,1/30sec.
Power Sources: For operating meter, use two
1.3V M 2 0 (#625) mercury batteries.
For illumination of meter indicator window,
use one 1.3V M20 mercury battery (use the
battery removed from the camera].
Battery Check: Can be checked by the switch.
~ % " 1%").
~
Size : 6 5 x 5 4 x 39mm ( 2 % " 2
Weight: 1 8 0 grams i6?4 oz.!.
CANON INC.
9.9. Ginza Cchome. Chuo-ku. Tokyo 104. Japan
CANON U.S.A., INC.
64-10 Queens Blvd., Woodside, N.Y. 11377, U.S.A.
CANON AMSTERDAM N.V.
Gebouw 70. Schlphol 0 0 s t . Holland
CANON LATIN AMERICA. INC.
Apartado 7022. Panama 5. Panama
PUB. NO. 51(17V
1009113.8
PRlNTED I N J&PAN