1
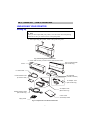
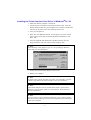
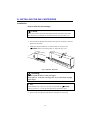
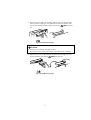
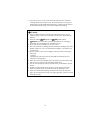
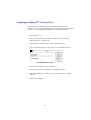
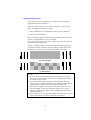
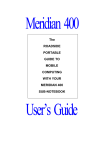
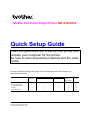
Mobile Full Color Inkjet Printer MP-21C/CDX Quick Setup Guide Read this guidebook first to set up your printer and prepare your computer for the printer. Be sure to save all packing materials and the outer carton. The steps required for setting up the printer varies by model. Follow the order of setting up as shown in the chart below. MP-21C A: Printer Interface Card B: PC Card Cable C: Parallel Cable D: Ink E: Printer Driver MP-21CDX Printer Interface Card Parallel Cable 1 2 1 2 3 4 3 4 1 2 3 Optional PA-21MP 1 2 3 Page 4 7 8 10 13 The product names in this guidebook are trademarks or registered trademarks of each manufacturer. The specifications are subject to change without notice. ©1998 Brother Industries Ltd. UJ5394001 A Printed in Japan SETTING UP THE PRINTER UNPACKING YOUR PRINTER Setting Up ✒ Note After you have unpacked your printer, save the carton box and packing materials in case you want to move or ship the printer. 1. After unpacking the printer, remove the protective parts. Fig. 1 Removing the Protective Parts 2. Check and see that you have all the items shown below. Auto Cut Sheet Feeder (MP-21CDX only) Printer PC Card Cable Ink Cartridges (LC03BC, LC03MY) Printer Interface Card (CI-100-PC Card) AC adapter -100V (MP-21CDX only) AC adapter -200V (MP-21CDX only) Parallel Interface Cable (MP-21CDX only) User’s Guide Quick Setup Guide Floppy Disks Fig. 2 Components in the Printer Carton Box 1 ✒ Note You may have some additional parts not listed above depending on which country you live in. Parts supplied with your printer Model MP-21 C × (Option) × (Option) × (Option) Printer Ink Cartridges Printer Interface Card PC Card Cable Auto Cut Sheet Feeder AC Adapter Parallel Interface Cable ! MP-21CDX Caution Be sure to follow the steps below in the correct order to ensure correct printer operation. The steps required for setting up the printer varies by model. Follow the order of setting up as shown in the chart below. MP-21C A: Printer Interface Card B: PC Card Cable C: Parallel Cable D: Ink E: Printer Driver MP-21CDX Printer Interface Card Parallel Cable 1 2 1 2 3 4 3 4 1 2 3 Optional PA-21MP 1 2 3 Computer Requirements The following are the minimum computer requirements to setup and operate the printer. CPU: RAM: Hard Disk Drive: OS: i486DX4 66MHz or higher 8MB or more (16MB recommended) 40Mbyte free space available Windows 3.1x/95/98 2 Page 4 7 8 10 13 ABOUT YOUR PRINTER Printer Overview Top Cover PC Card Cable Printer Interface Card (CI-100) Fig. 3 Front View AC Adapter Connector Straight Paper Path Slot Auto Cut Sheet Feeder -1 Paper Feeding Slot Guide Parallel Interface Cable -2 Printer Stand AC Adapter- 2 Fig. 4 Rear View Print Head Release Lever Ink Cartridges (LC03BC, LC03MY) Fig. 5 Inside the Printer 1) MP-21CDX or optional SF-21MP users only 2) MP-21CDX or optional PA-21MP users only 3 A: INSTALLING THE PRINTER INTERFACE CARD If you are not going to use the printer through the Printer Interface Card, skip sections ‘A’and ‘B’ and go straight to section ‘C’. However, we recommend that you install the Printer Interface Card Driver at this point whether or not you intend to use the printer through the Printer Interface Card. ! Caution DO NOT remove the Printer Interface Card and the PC Card Cable when LEDs are on or blinking. Before you remove them, press the (On/Off) button and wait until all the LEDs are off. ✒ Note • Before installing the Printer Interface Card Driver, check that your computer is connected to a live power source or your computer has enough battery power left. • If you remove the printer cable or turn the printer off while you are inserting the Printer Interface Card into the PC Card slot, and the printer does not work correctly after that, remove the Printer Interface Card from the slot and insert the card again and re-start the Printer Interface Card Driver installation. • Before you install the PC Card Driver, be sure to set the Power Save mode of your computer off. For details, see your computer's manual. Installing the Printer Interface Card Driver in Windows 3.1 1. Make sure that the computer is turned off. 2. Connect the PC Card Cable to the Printer Interface Card. Insert the Printer Interface Card into the PC Card slot of your computer with the label side face up. Be sure to insert the card fully into the slot. Fig. 6 Inserting the Printer Interface Card 3. Turn your computer on and start Windows 3.1. 4 4. Insert the supplied disk (Printer/PC Card Driver disk1) into your floppy disk drive A (or drive B). 5. Choose Run from the File menu in the Program Manager. 6. Type A:\CARDINST (or B:\CARDINST for drive B) in the Command Line box. 7. Choose the OK button or press the Enter key. 8. Follow the installation instructions that appear on the display monitor. 9. When the installation is complete, remove the disk from your floppy disk drive. 10. Restart your computer. 11. Turn off your computer. ✒ Note The ‘Config.sys’ file and ‘Autoexec.bat’ file in your system have been changed. The originals are saved as ‘Config.up1’ and ‘Autoexec.up1’. 5 Installing the Printer Interface Card Driver in Windows 95 / 98 1. Make sure that the computer is turned off. 2. Connect the PC Card Cable to the Printer Interface Card. Insert the Printer Interface Card into your computer’s PC Card slot with the label side face up. Be sure to insert the card fully into the slot. 3. Turn your computer on. 4. When the ‘New Hardware Found’ screen appears, select the second option “Driver from disk provided by hardware manufacture” and press ‘OK’. 5. Insert the supplied disk (Printer/PC Card Driver disk1) into your floppy disk drive: (drive A in most cases) and press ‘OK’. ✒ Note If the following screen appears, type "A:" (Or your floppy disk drive name) and press the 'OK' button. 6. Follow the instructions that appear on the screen. 7. Restart your computer. ✒ Note If you have only one PC card slot in your PC, you will need to copy the contents of the Printer Interface Card Driver onto your hard disk. ✒ Note If the Printer Interface Card is not detected by the PC, open "Device Manager" in the "System" folder in "Control Panel". Find "Unknown Device" and delete it. ✒ Note If you are using a type of computer that allows you to connect a Floppy Disk Drive to the printer port, remove the Floppy Disk Drive before you restart your computer. 6 B: CONNECTING THE CABLES - PC Card Cable Connect Your Printer To Your Computer You can connect the printer through the Printer Interface Card or through the Parallel Interface cable (MP-21CDX or PA-21MP users only). How to connect the PC card cable to your computer and printer 1. Connect the PC Card Cable to the printer. Fig. 7 Connecting the PC Card Cable 7 C: CONNECTING THE CABLES - Parallel Interface Cable How to connect the AC Adapter and Parallel Interface Cable to your computer and printer (MP-21CDX or optional PA-21MP users only) ✒ Note Only the MP-21CDX model is shipped with an AC Adapter and Parallel Interface Cable. If you would like to purchase them as an option, the order number is PA-21MP. 1. Connect the AC Adapter to your printer and plug it into the mains. Fig. 8 Connecting the AC Adapter 2. Connect the Parallel Interface Cable to the printer. Fig. 9 Connecting the Parallel Interface Cable 8 3. Connect the Parallel Interface Cable to your computer. Fig. 10 Connecting the Parallel Interface Cable ✒ Note You need to use the AC adapter when you connect using the parallel interface cable. ✒ Note This printer does not support ECP mode. If the printer port is set as an ECP port, change it to be a bi-directional port. See your PC’s manual for how to change the printer port. 1. Click 'Start' and select 'Printer' from the 'Setting' tab. 2. Click the right mouse button on the 'MP-21C' icon and click 'Properties'. 3. Click the 'Details' tab and select 'LPT1' from the 'Print to the following port' drop down list. 9 D: INSTALLING THE INK CARTRIDGES Installation How to install the ink cartridges ! Caution When you connect the printer through the Printer Interface Card, make sure that the PC Card Cable is connected securely and your PC is on. 1. Turn the Printer Stand at the bottom of the printer outwards so that the printer will be stable. 2. Make sure that the LEDs are on. If the LEDs are off, press the (On/Off) button to turn the printer on. Open the top cover. Fig. 11 Open the Top Cover Warning DO NOT push the shutter with your fingers. Sharp pins are in the Ink Cartridge Slot. If you touch them, it might cause injury. ✒ Note If the LEDs do not come on, even after you pressed the (On/Off) button, go back to ‘A’ and ‘B’ and repeat these operations again. 3. Open an ink cartridge bag and take the cartridge out of the bag. 10 4. Insert the new LC03BC ink cartridge, making sure it is inserted in the correct position referring to the indications on the label. Push it fully into the slot using both hands. Make sure that the (BC)LED turns off. Fig. 12 Install BC Ink Cartridge ! Caution • Be sure to insert the ink cartridge securely. • Do not push down on the printer when you install the ink cartridges. 5. Repeat actions 3 to 4 and install the LC03MY ink cartridge into your printer and make sure that the (MY)LED goes off. Fig. 13 Install MY Ink Cartridge 11 6. Close the top cover. Your printer will automatically carry out head cleaning and become ready to print. When the printer is carrying out head cleaning, all the LEDs blink alternately. It takes about 8 minutes to finish the head cleaning, wait until the LEDs stop blinking. ! Caution • Once you have installed a cartridge, DO NOT take it out until you need to replace it with a new one, otherwise the print quality may be reduced. (BC)LED and (MY)LED) and the • If the Ink LEDs ( (Alarm) LED are on after you have installed the ink cartridges, check that the ink cartridges are installed correctly. • If you take an ink cartridge out, do not re-use it. • The print head may be damaged if you install ink cartridges other than Brother original or if you use refilled ink cartridges. You might void your warranty. • Do not insert or remove ink cartridges while the printer is doing the following; *printing *cleaning the print head (when all the LEDs are blinking in turn.) *feeding or ejecting paper • When you insert ink cartridges, place the printer on a flat surface and take care not to insert the ink cartridges upside down. • Use the ink cartridge up within 6 months after you installed it into the printer. • It takes several minutes for the printer to clean its print head. DO NOT turn off the printer when all the LEDs are blinking in turn. • After carried out head cleaning, sometimes ink stains the first print page. We recommend you print a test page right after you have carried out head cleaning. 12 E: INSTALLING THE PRINTER DRIVER Installing the Windows 95/98 Printer Driver You need to configure Windows 95/98 for the printer by installing the printer driver from the supplied disks into Windows 95/98. 1. Make sure that your computer is on. 2. Make sure that your printer is on. ✒ Note If the "New Hardware Found" screen appears, press the 'Cancel' button. 3. Click the Start button and choose Run. 4. Insert the supplied disk for Windows 95/98 (Printer/PC Card Driver disk 1) into your floppy disk drive: (drive A in most cases). 13 5. Type A:\SETUP and choose the OK button or press the Enter key. ✒ Note If you use a drive other than drive A, type the drive name in the “Copy manufacturers files from” box on the screen. 6. Follow the instructions that appear on the screen. 7. When installation is complete, remove the disk from the drive. 8. Restart your computer. 14 Installing the Windows 3.1 Printer Driver You need to set up this printer by installing the printer driver into Windows 3.1. Since the supplied printer driver is compressed on the disks, be sure to use the supplied Setup program to install them as follows : 1. Start Windows 3.1. 2. Insert the supplied disk (Printer/PC Card Driver disk 1) into your floppy disk drive A (or drive B). 3. Choose Run from the File menu in the Program Manager. 4. Type A:\SETUP (drive A in most cases ) in the Command Line box. Fig. 14 Windows 3.1 screen 5. Choose the OK button or press the Enter key. 6. Follow the instructions that appear on the display monitor. 7. When the installation is complete, remove the disk from your floppy disk drive. 8. Restart your computer. 15 After Installing the Printer Drivers Monitor Calibration procedure The printer driver needs to know the color settings of your monitor in order to be able to correctly reproduce colors that you see on your monitor screen. 1. Run the Monitor Calibration program. 2. Select the Advanced button. 3. Carry out the adjustment for the color level and balance for all three colors following the instructions on the screen. 4. Click OK to save the settings. After you have installed the printer drivers, try the ‘Test Print’ from the printer driver as follows. ✒ Note When the color level and balance does not match exactly, select the ones that are the closest. Test Print 1. Select ‘Maintenance’ from the MP-21C series group in Windows. 2. Click ‘Test Print’. ✒ Note • When you do the Test Print, insert A4 or Letter size plain paper into the printer. • After you have printed out a test page and if you find white lines in the printout, press the Clean button to clean the print head or do so from the maintenance tool of the printer driver. 16 Adjusting Vertical Lines If the vertical lines are not straight, carry out the Vertical Alignment adjustment from the printer driver. When you do this, load A4 or Letter size plain paper. For how to load paper, see Chapter 2 in the User’s Guide. 1. Select ‘Maintenance’ from the MP-21C series group in Windows. 2. Click 'Vertical Alignment.'. If you are using the printer through the Printer Interface Card, the printer will carry out adjustment for slow speed mode. If you are using the printer with the AC adapter, the printer will carry out adjustment for fast speed mode. See Fig. 15 and Fig. 16 below. From the adjustment pattern page which the machine has just printed out, select the pattern number which looks most like Fig. 15 for both slow speed mode and fast speed mode. Fig. 15 Good Sample Fig.16 Bad Sample ✒ Note • If you are not sure which number pattern is the right one, select the one where the short and long vertical lines on the adjustment pattern are matched or the closest. • If you can find more than one pattern in which the short and long vertical lines are matched, compare the gray shaded part and select the number pattern in which all the check patterns look the same. • When the AC Adapter is not connected, the printer carries out only slow speed mode vertical lines adjustment. When you use the AC Adapter, connect the AC Adapter and try adjusting the vertical lines again from the driver. • If you cannot correct the vertical alignment at the first setting, you can repeat the alignment procedure through the printer driver. 17