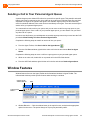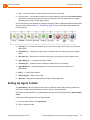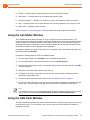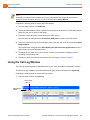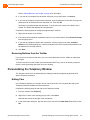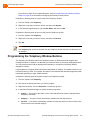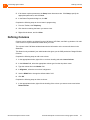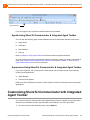
1
ShoreTel Enterprise Contact Center 8 Using Agent Toolbar November 2012 Legal Notices Document and Software Copyrights Copyright © 1998-2012 by ShoreTel Inc., Sunnyvale, California, USA. All rights reserved. Printed in the United States of America. Contents of this publication may not be reproduced or transmitted in any form or by any means, electronic or mechanical, for any purpose, without prior written authorization of ShoreTel, Inc. ShoreTel, Inc. reserves the right to make changes without notice to the specifications and materials contained herein and shall not be responsible for any damage (including consequential) caused by reliance on the materials presented, including, but not limited to typographical, arithmetic or listing errors Trademarks ShoreTel, ShoreTel (and logo), ControlPoint, Brilliantly Simple, Brilliantly Simple Communication, ShoreCare, ShoreGear, ShorePhone, and ShoreWare are registered trademarks of ShoreTel, Inc. in the United States and/or other countries. The ShoreTel logo is a trademark of ShoreTel, Inc. in the United States and/or other countries.. All other copyrights and trademarks herein are the property of their respective owners. Patents ShoreTel Enterprise Contact Center is covered by patents as listed at http://www.shoretel.com/about/patents.html. Version Information Using Agent Toolbar Part Number: 800-1713-01 Release: Contact Center 8 Version:8 Date: 10/22/12 Company Information ShoreTel, Inc. 960 Stewart Drive Sunnyvale, California 94085 USA +1.408.331.3300 +1.408.331.3333 (fax) www.shoretel.com ShoreTel Enterprise Contact Center ShoreTel Enterprise Contact Center 8 Using Agent Toolbar 2 Table of Contents About This Book . . . . . . . . . . . . . . . . . . . . . . . . . . . . . . . . . . . . . . . . . . . . . . . . . . . . . . . . . . . . . 5 Organization . . . . . . . . . . . . . . . . . . . . . . . . . . . . . . . . . . . . . . . . . . . . . . . . . . . . . . . . . . . . 5 Conventions . . . . . . . . . . . . . . . . . . . . . . . . . . . . . . . . . . . . . . . . . . . . . . . . . . . . . . . . . . . . 5 Chapter 1 Overview . . . . . . . . . . . . . . . . . . . . . . . . . . . . . . . . . . . . . . . . . . . . . . . . . . . . . .7 Starting Agent Toolbar . . . . . . . . . . . . . . . . . . . . . . . . . . . . . . . . . . . . . . . . . . . . . . . . . . . . . . . . 8 Standard Logon . . . . . . . . . . . . . . . . . . . . . . . . . . . . . . . . . . . . . . . . . . . . . . . . . . . . . . . . . . 8 Logging on in the Hotdesk or Citrix Environments . . . . . . . . . . . . . . . . . . . . . . . . . . . . . . . 9 Chapter 2 Using Agent Toolbar. . . . . . . . . . . . . . . . . . . . . . . . . . . . . . . . . . . . . . . . . . . . 10 Status Bar . . . . . . . . . . . . . . . . . . . . . . . . . . . . . . . . . . . . . . . . . . . . . . . . . . . . . . . . . . . . . . . . Telephony Features . . . . . . . . . . . . . . . . . . . . . . . . . . . . . . . . . . . . . . . . . . . . . . . . . . . . . . . . . Making Calls . . . . . . . . . . . . . . . . . . . . . . . . . . . . . . . . . . . . . . . . . . . . . . . . . . . . . . . . . . . Answering Incoming Calls . . . . . . . . . . . . . . . . . . . . . . . . . . . . . . . . . . . . . . . . . . . . . . . . . Answering Incoming Email . . . . . . . . . . . . . . . . . . . . . . . . . . . . . . . . . . . . . . . . . . . . . . . . Ending Email Calls . . . . . . . . . . . . . . . . . . . . . . . . . . . . . . . . . . . . . . . . . . . . . . . . . . . . . . Using Wrap-Up Codes . . . . . . . . . . . . . . . . . . . . . . . . . . . . . . . . . . . . . . . . . . . . . . . . . . . Answering a Chat Contact . . . . . . . . . . . . . . . . . . . . . . . . . . . . . . . . . . . . . . . . . . . . . . . . . Transferring Calls . . . . . . . . . . . . . . . . . . . . . . . . . . . . . . . . . . . . . . . . . . . . . . . . . . . . . . . Conferencing . . . . . . . . . . . . . . . . . . . . . . . . . . . . . . . . . . . . . . . . . . . . . . . . . . . . . . . . . . . Diverting Calls . . . . . . . . . . . . . . . . . . . . . . . . . . . . . . . . . . . . . . . . . . . . . . . . . . . . . . . . . . Working with Callbacks . . . . . . . . . . . . . . . . . . . . . . . . . . . . . . . . . . . . . . . . . . . . . . . . . . . Callback Scenarios . . . . . . . . . . . . . . . . . . . . . . . . . . . . . . . . . . . . . . . . . . . . . . . . . . . ACD Features . . . . . . . . . . . . . . . . . . . . . . . . . . . . . . . . . . . . . . . . . . . . . . . . . . . . . . . . . . . . . Logging Into and Out of ACD Groups and Agent Queue . . . . . . . . . . . . . . . . . . . . . . . . . Managing Your Groups . . . . . . . . . . . . . . . . . . . . . . . . . . . . . . . . . . . . . . . . . . . . . . . . . . . Assigning Wrap-Up Codes . . . . . . . . . . . . . . . . . . . . . . . . . . . . . . . . . . . . . . . . . . . . . . . . Not Entering a Wrap-Up Code . . . . . . . . . . . . . . . . . . . . . . . . . . . . . . . . . . . . . . . . . . Assigning a Release Code . . . . . . . . . . . . . . . . . . . . . . . . . . . . . . . . . . . . . . . . . . . . . . . . Sending a Call to Your Personal Agent Queue . . . . . . . . . . . . . . . . . . . . . . . . . . . . . . . . . Window Features . . . . . . . . . . . . . . . . . . . . . . . . . . . . . . . . . . . . . . . . . . . . . . . . . . . . . . . . . . . Setting Up Agent Toolbar . . . . . . . . . . . . . . . . . . . . . . . . . . . . . . . . . . . . . . . . . . . . . . . . . Using the Call Status Window . . . . . . . . . . . . . . . . . . . . . . . . . . . . . . . . . . . . . . . . . . . . . . Using the ACD Calls Window . . . . . . . . . . . . . . . . . . . . . . . . . . . . . . . . . . . . . . . . . . . . . . Using the Call Log Window . . . . . . . . . . . . . . . . . . . . . . . . . . . . . . . . . . . . . . . . . . . . . . . . Using the Telephony Window . . . . . . . . . . . . . . . . . . . . . . . . . . . . . . . . . . . . . . . . . . . . . . Viewing Messages in the Agent Board . . . . . . . . . . . . . . . . . . . . . . . . . . . . . . . . . . . . . . . ShoreTel Enterprise Contact Center ShoreTel Enterprise Contact Center 8 Using Agent Toolbar 10 11 13 13 14 14 14 15 15 16 17 17 17 18 20 21 22 22 22 23 23 24 25 25 26 27 27 3 Table of Contents Other Operations . . . . . . . . . . . . . . . . . . . . . . . . . . . . . . . . . . . . . . . . . . . . . . . . . . . . . . . . . . . Running an External Application . . . . . . . . . . . . . . . . . . . . . . . . . . . . . . . . . . . . . . . . . . . . Separating Buttons on the Agent Toolbar . . . . . . . . . . . . . . . . . . . . . . . . . . . . . . . . . . . . . Understanding Call Flow . . . . . . . . . . . . . . . . . . . . . . . . . . . . . . . . . . . . . . . . . . . . . . . . . . . . . Email Call Flow . . . . . . . . . . . . . . . . . . . . . . . . . . . . . . . . . . . . . . . . . . . . . . . . . . . . . . . . . Chat Call Flow . . . . . . . . . . . . . . . . . . . . . . . . . . . . . . . . . . . . . . . . . . . . . . . . . . . . . . . . . . Dial List Call Flow . . . . . . . . . . . . . . . . . . . . . . . . . . . . . . . . . . . . . . . . . . . . . . . . . . . . . . . Chapter 3 Customizing Agent Toolbar . . . . . . . . . . . . . . . . . . . . . . . . . . . . . . . . . . . . . . 30 Specifying Toolbar Display and Behavior . . . . . . . . . . . . . . . . . . . . . . . . . . . . . . . . . . . . . . . . Selecting View Options . . . . . . . . . . . . . . . . . . . . . . . . . . . . . . . . . . . . . . . . . . . . . . . . . . . Defining Agent Toolbar Behavior . . . . . . . . . . . . . . . . . . . . . . . . . . . . . . . . . . . . . . . . . . . Changing Your Contact Information . . . . . . . . . . . . . . . . . . . . . . . . . . . . . . . . . . . . . . . . . Setting Ring Options . . . . . . . . . . . . . . . . . . . . . . . . . . . . . . . . . . . . . . . . . . . . . . . . . . Setting Queue Alert Options . . . . . . . . . . . . . . . . . . . . . . . . . . . . . . . . . . . . . . . . . . . . Selecting Toolbar Features . . . . . . . . . . . . . . . . . . . . . . . . . . . . . . . . . . . . . . . . . . . . . . . . Adding Buttons to the Toolbar . . . . . . . . . . . . . . . . . . . . . . . . . . . . . . . . . . . . . . . . . . Programming Buttons . . . . . . . . . . . . . . . . . . . . . . . . . . . . . . . . . . . . . . . . . . . . . . . . . . . . Removing Buttons from the Toolbar . . . . . . . . . . . . . . . . . . . . . . . . . . . . . . . . . . . . . . Personalizing the Telephony Window . . . . . . . . . . . . . . . . . . . . . . . . . . . . . . . . . . . . . . . . Editing Tabs . . . . . . . . . . . . . . . . . . . . . . . . . . . . . . . . . . . . . . . . . . . . . . . . . . . . . . . . Programming the Telephony Window Buttons . . . . . . . . . . . . . . . . . . . . . . . . . . . . . . . . . Defining Columns . . . . . . . . . . . . . . . . . . . . . . . . . . . . . . . . . . . . . . . . . . . . . . . . . . . . . . . Chapter 4 28 28 28 29 29 29 29 30 30 31 32 32 33 34 34 34 35 35 35 36 37 Using ShoreTel Communicator with Integrated Agent Toolbar . . . . . . . . . 38 Starting ShoreTel Communicator with Integrated Agent Toolbar . . . . . . . . . . . . . . . . . . . . . . Working with ShoreTel Communicator & Integrated Agent Toolbar . . . . . . . . . . . . . . . . . Agents Using ShoreTel Communicator & Integrated Agent Toolbar . . . . . . . . . . . . . Supervisors Using ShoreTel Communicator & Integrated Agent Toolbar . . . . . . . . . . Customizing ShoreTel Communicator with Integrated Agent Toolbar . . . . . . . . . . . . . . . . . . . Limitations . . . . . . . . . . . . . . . . . . . . . . . . . . . . . . . . . . . . . . . . . . . . . . . . . . . . . . . . . . . . . Information from Status Bar Not Available . . . . . . . . . . . . . . . . . . . . . . . . . . . . . . . . . ShoreTel Enterprise Contact Center ShoreTel Enterprise Contact Center 8 Using Agent Toolbar 38 39 40 40 40 41 41 4 Before You Start The following sections provide an overview of the book. About This Book.......................................................................................................... 5 About This Book This guide provides information about customizing and using ShoreWare Agent Toolbar for ShoreTel Enterprise Contact Center. This guide is intended for Enterprise Contact Center supervisors and agents. Organization The document is divided into the following chapters: Chapter 1, Overview Chapter 2, Using Agent Toolbar Chapter 3, Customizing Agent Toolbar Chapter 4, Using ShoreTel Communicator with Integrated Agent Toolbar Conventions The following typographical marking conventions are used in this document. Marking Meaning Bold Names of interface objects, such as buttons and menus. Courier Code examples. ShoreTel Enterprise Contact Center ShoreTel Enterprise Contact Center 8 Using Agent Toolbar 5 4 Before You Start Conventions Marking Meaning Courier Italic Variables in code examples. Blue Cross references with hyperlinks. Click the blue text to go to the indicated section. All chapters have a list of section links on the first page. Note: Table of Contents entries are also links, but they are not shown in blue. ShoreTel Enterprise Contact Center ShoreTel Enterprise Contact Center 8 Using Agent Toolbar 6 CHAPTER 1. Overview ShoreWare Agent Toolbar is a powerful, easy-to-use software application that provides agents with access to telephony and ACD capabilities. Telephony capabilities include features such as answer, call, hold, transfer, and conference. ACD capabilities include features for going into release, resume, and wrap-up modes, and viewing calls in a queue. Agent Toolbar works with ShoreTel Enterprise Contact Center to enable you to maximize performance in your call center environment. In addition, if you have the correct license and permissions, you can use Agent Toolbar integrated with ShoreTel Communicator. Agent Toolbar has the following features: Customizable Toolbar — Buttons can be programmed, enabling quick access to Agent Toolbar features and frequently performed telephony operations. Telephony window — Perform call handling from your desktop by assigning keypad buttons to specific telephony functions. ACD Calls window — Provides a view of the status of all calls in a queue. The call list updates dynamically to show the current queue situation. If a call requires immediate attention, you can pick up a call directly from the queue. You can also use this window to place calls into your personal agent queue. Call Status — Displays the status of your connected calls. You can also place calls into your personal agent queue using this window. Call Log — Available for all calls ringing or answered by an agent. Agent Board — Real-time statistical information about your group. Chat — Provides a chat browser for handling chat contacts. ShoreTel Enterprise Contact Center ShoreTel Enterprise Contact Center 8 Using Agent Toolbar 7 1 Overview Starting Agent Toolbar Agent Toolbar also provides a library of services enabling integration with your company’s existing services and database using the Windows DDE/ActiveX interface. Information can be shared between systems during ACD call handling. Refer to the following section for more information about Agent Toolbar: Starting Agent Toolbar................................................................................................. 8 Starting Agent Toolbar There are two methods for starting Agent Toolbar depending on your environment. If you are using the Hotdesk or Citrix environment, you may want Agent Toolbar to dynamically associate with any available number. This is done through a different logon process, for details refer to Logging on in the Hotdesk or Citrix Environments section on page 9. You also can start Agent applications, such as Agent Toolbar, by right clicking the login console icon in your Windows task bar and selecting the agent application you want to open. Note You can only log onto Agent Toolbar from your PC. Attempting to log on using your telephone results in the application shutting down. Standard Logon 1. From the Windows desktop, click Start > Programs > ShoreTel > ShoreWare Contact Center Agent > ShoreWare Agent Toolbar. If the Agent Toolbar icon is on your desktop or in the Windows Start menu, you can click this icon to start Agent Toolbar. 2. In the ShoreTel Contact Center Logon window, specify User, Password, Extension, Server, and Email Address, and then click Login. Email Address is available only if System Parameters > Chat and Email > Email > Email Address Set by Agent (Client Side) is selected in Contact Center Director. Tip If not all of the fields listed in this step are visible, click More to expand the Contact Center Login Console window. 3. Select Remember my password to configure the application to allow you to launch the application by clicking the Login button without entering any other information. ShoreTel Enterprise Contact Center ShoreTel Enterprise Contact Center 8 Using Agent Toolbar 8 1 Overview Logging on in the Hotdesk or Citrix Environments 4. Select Sign me in automatically to launch ShoreWare Agent Toolbar automatically and without entering any login information. If you select this option, Remember my password is also selected. Once connected to the server, ShoreWare Agent Toolbar opens. The features available of Agent Toolbar have been determined by your administrator. Depending on the permissions granted by your administrator, you can customize Agent Toolbar with the features and functionality you need to do your job. Refer to Chapter 3, Customizing Agent Toolbar for details. Logging on in the Hotdesk or Citrix Environments If you are working in the Hotdesk or Citrix environment, you may want to dynamically associate Agent Toolbar with any available phone in your call center. This allows you to handle and manage calls with Agent Toolbar, in conjunction with the ShoreTel AnyPhone feature, just as if you were assigned the extension being used. 1. In the Windows Taskbar, click Start > Run. 2. In the Open field, enter the installation location for Contact Center. For example, you might enter C:\Program Files (x86)\Shoretel\ContactCenter\Agent\Bin\Cac.exe ETAS if you took the default installation location for a 64-bit version of Contact Center. 3. Click OK. Note ShoreWareAgent.exe is no longer supported. 4. In the resulting dialog box, specify User, Password, Extension, and Server, and then click Login. Tip If not all of the fields listed in this step are visible, click More to expand the Contact Center Login Console window. 5. Select Remember my password and Sign me in automatically to log in automatically the next time you launch ShoreWare Agent Toolbar. If you do not select these options, you must enter your Password the next time you launch ShoreWare Agent Toolbar. Once connected to the server, ShoreWare Agent Toolbar opens. ShoreTel Enterprise Contact Center ShoreTel Enterprise Contact Center 8 Using Agent Toolbar 9 CHAPTER 2. Using Agent Toolbar The ShoreTel Agent Toolbar provides quick access to frequently used operations. It enables you to perform Telephony and automatic call distribution (ACD) operations from your desktop with the click of a single button. And you can handle a combination of calls such as calls on hold, ringing calls, a connected call, and an ACD call. Agent Toolbar also includes special features, like a log of your calls. Refer to the following sections for more information about using Agent Toolbar: Status Bar.................................................................................................................. 10 Telephony Features................................................................................................... 11 ACD Features ........................................................................................................... 18 Window Features ...................................................................................................... 23 Other Operations....................................................................................................... 28 Understanding Call Flow ........................................................................................... 29 Status Bar The Status bar provides a Toggle button, and displays information on your current activity and on the state of your extension. This includes an indication if the current call is from your personal agent queue. The information shown on the Status bar has been determined by your administrator. Complete the following steps to use the Status bar: ShoreTel Enterprise Contact Center ShoreTel Enterprise Contact Center 8 Using Agent Toolbar 10 2 Using Agent Toolbar Telephony Features 1. Move between active calls by clicking the Toggle button ( information about the currently connected call. ). The Status bar changes to reflect 2. Determine the state of you extension by the color of the Status bar: Yellow — A call is ringing. Green — You are connect to the call. Light Blue — You are on reserve for outbound calls. Magenta — The call is on hold. Blue — The action has been initiated. Red — The action has failed. 3. Identify the type of call you are currently on by the icon(s) displayed in the Status bar: Callback (1) — Callback call, scheduled by the customer. Web Callback (2) — Web callback call. A web callback is a callback call requested from the Web. Dial List (3) — Dial list or campaign call. Callback-Abandoned Call (4) — Callback call to an abandoned caller. ACD (5) — Incoming ACD call. Chat (6) — Chat contact. Email (7) — Email contact. Voice (8) — Voice call. Telephony Features Agent Toolbar’s telephony features enable you to handle calls with a single click. To increase your efficiency and productivity, configure the Agent Toolbar to display the most useful telephony buttons. Refer to Selecting Toolbar Features on page 34 for information about adding and removing buttons. ShoreTel Enterprise Contact Center ShoreTel Enterprise Contact Center 8 Using Agent Toolbar 11 2 Using Agent Toolbar Telephony Features Swap Calls (1) — Swaps the call on hold with the connected call. Answer (2) / Connected Call (3) — Answers an incoming call or email. If the incoming call is a chat, clicking Answer launches the chat browser. Disconnect (4) — Disconnects the current call. Start Transfer (5) — Starts the transfer procedure for the current call. Start Conference (6) — Starts the conference procedure. Divert Call (7) — Diverts the incoming call to another number. Hold (8) — Places the current call on hold. Call (9) — Calls the selected telephone number. Retrieve (10) — Retrieves the call on hold. Complete Conference (11) — Completes the conference procedure. Single Step Transfer (12) — Performs a single step transfer. Complete Transfer (13) — Completes the transfer procedure. Reconnect (14) — Disconnects the current call and reconnects to the call placed on hold. Set Callback – Reinsert Busy (15) — Reinserts a callback call in the queue. This feature is only available when an actual call is connected; if the callback extension is invalid you will not be able to use callback. You may not need this feature if your system automatically identifies a busy destination and does not transfer callbacks to an agent. Set Callback – Reinsert No Answer (16) — Reinserts an unanswered callback call in the queue. This enables the system to again dial the outbound call. This feature is only available when an actual call is connected; if the callback extension is invalid you will not be able to use callback. ShoreTel Enterprise Contact Center ShoreTel Enterprise Contact Center 8 Using Agent Toolbar 12 2 Using Agent Toolbar Making Calls You may not need this feature if your system automatically identifies a destination that does not answer and does not transfer callbacks to an agent. Set Callback – Reinsert Terminate (17) — Removes the callback call from the system. This feature is only available when an actual call is connected; if the callback extension is invalid you will not be able to use callback. Silent Monitor (18) — Allows you to monitor agent conversations. Note Agent Toolbar does not support silent coaching. Implementing such a feature can result in unexpected information in the Status bar. Barge In (19) — Enables you to barge in on agent conversations. Making Calls You use the Call button on the Agent Toolbar to make a call. Complete the following steps to make a call: 1. From the Agent Toolbar, click Call. If the Call button is programmed with the number to call, the system automatically dials the number. 2. If the button is not programmed with the number to call, the Call dialog box appears. Use the Call dialog box to enter the number to dial; recently dialed numbers can be selected from the dropdown list. Click OK. For information about changing the programmed number being prompted for a number each time you click the Call button, refer to Programming Buttons on page 34. Answering Incoming Calls When a call comes in, the system routes the call to an agent. If you have an incoming call, the Status bar turns yellow, indicating that your extension is ringing. Complete the following steps to answer an incoming call: 1. From the Agent Toolbar, click Answer. The Status bar indicates that you are now connected, and the Answer button changes to Connected. The current active call is displayed on the Status bar. The Connected button reverts back to the Answer button after you complete the call. Use the Toggle button to move between calls. ShoreTel Enterprise Contact Center ShoreTel Enterprise Contact Center 8 Using Agent Toolbar 13 2 Using Agent Toolbar Answering Incoming Email In your call center, you may be required to provide a wrap-up code before answering the next incoming call, even if you are logged out of a group. In this case, Agent Toolbar displays the Enter Wrap-Up Code icon on the Status bar. Click the icon to enter the wrap-up code, as explained in Assigning Wrap-Up Codes on page 22. Answering Incoming Email When an email comes in, the system routes the email to an agent. If you have an incoming email, the Status bar turns yellow, indicating that an email is available. Complete the following steps to answer an incoming email: 1. From the Agent Toolbar, click Answer. The current active call is displayed on the Status bar. The Connected button reverts back to the Answer button after you complete the call. Use the Toggle button to move between calls. Ending Email Calls An email call ends when an agent answers an email or clicks the Disconnect button. When an agent clicks the Disconnect button to end an email call, the following scenarios may be applicable depending on the status of the Allow Late Email Replies feature: If Allow Late Email Replies is not selected and an agent replies to an email after the email call is disconnected, the reply is sent to a dead letter account, if one is configured. If Allow Late Email Replies is selected and an agent replies to an email before the Allow Reply for period expires, the email is sent to the customer. If Allow Late Email Replies is selected and an agent does not reply to the email before the Allow Reply for period expires, the email is routed to another available agent. If Allow Late Email Replies is selected and an agent replies to email after the Allow Reply for period expires, the reply is sent to three different places: a dead letter account, if one is configured; the customer; and to an available agent. Refer to Setting Agent Preferences on page 151 in the ShoreTel Contact Center 8 Administrator Guide for information about configuring the Allow Late Email Replies and Allow Reply for settings. Using Wrap-Up Codes In your call center, you may be required to provide a wrap-up code before answering the next incoming call, even if you are logged out of a group. In this case, Agent Toolbar displays the Enter Wrap-Up Code icon on the Status bar. Click the icon to enter the wrap-up code as explained in Assigning Wrap-Up Codes on page 22. Wrap-up codes are applicable to all call types: voice, email, and chat. ShoreTel Enterprise Contact Center ShoreTel Enterprise Contact Center 8 Using Agent Toolbar 14 2 Using Agent Toolbar Answering a Chat Contact Answering a Chat Contact Chat sessions are initiated through requests coming from a chat web browser. The customer clicks a Chat button on your web site to open a chat window while waiting for an agent to respond. A chat browser window opens at your end, allowing you to start the chat session. Contact Center supports the following chat services: Chat conversation — You can be engaged in a chat conversation at any time. Web callback — Customers can leave telephony callback information. The system uses this information to initiate a telephone call with an available agent. You are put on reserve to receive an outbound call and automatically connected once the customer is contacted to receive the call. When a chat contact is routed to you, the Status bar indicates that the incoming contact is a chat request. Complete the following steps to answer a chat contact: 1. From the Agent Toolbar, click Answer. 2. To end the chat, from the Agent Toolbar click Disconnect, or close the browser. Transferring Calls Transferring puts the current call on hold while the system dials a specified destination number. This allows you to determine the availability of a transfer destination, and introduce the caller to the transfer destination. You can also cancel a transfer call, and connect a caller directly to the destination number in a single step. You can transfer calls to agents in another group. However, since these calls are treated as non-ACD, Agent Toolbar’s wrap-up code features are not available on these type of calls. If you are working in ACD mode, use the Transfer to Agent button to transfer the call to an agent within your group. Refer to ACD Features on page 18 for details. Complete the following steps to transfer a call: 1. From the Agent Toolbar, click Start Transfer. If the Start Transfer button is programmed with the number to call, the system automatically dials the number and puts the active call on hold. 2. If the button is not programmed with the number to call, the Start Transfer dialog box appears. Use the dialog box to specify the number for the transfer destination. Click the drop-down list to select from recently-called numbers. 3. Click OK. The system dials the number and places the active call on hold. 4. Click Complete Transfer. ShoreTel Enterprise Contact Center ShoreTel Enterprise Contact Center 8 Using Agent Toolbar 15 2 Using Agent Toolbar Conferencing For information about changing the programmed number or being prompted for a number each time you click the Start Transfer button, refer to Programming Buttons on page 34. To cancel a transfer call, click Reconnect before the transfer is completed. The system returns you to the original caller. Complete the following steps to connect a caller directly to the destination number in a single step: 1. From the Agent Toolbar, click Single Step Transfer. If the Single Step Transfer button is programmed with the number to call, the system automatically connects the active call to the destination. 2. If the button is not programmed with the number to call, the Single Step Transfer dialog box appears. Use the dialog box to specify the number for the transfer destination. Click the drop-down list to select from recently-called numbers. 3. Click OK. The system dials the number and disconnects you from the call. For information on changing the programmed number, or to instead be prompted for a number each time you click the Single Setup Transfer button, refer to Programming Buttons on page 34. Conferencing The Conference feature allows two additional people to converse simultaneously in a call. When engaged in a conference call, you cannot make another call using Agent Toolbar; however, you can do so using your telephone. You can also cancel a conference call. Complete the following steps to initiate a conference call: 1. From the Agent Toolbar, click Start Conference. If the Start Conference button is programmed with a specific number, the system puts the current active call on hold and dials the number for the conference. 2. If the button is not programmed with a number, the Start Conference dialog box appears. Use the dialog box to specify the number for the conference call. Click the drop-down list to select from recently-called numbers. 3. Click OK. 4. Click Complete Conference. For information about changing the programmed number or being prompted for a number when you click the Conference button, refer to Programming Buttons on page 34. To cancel a conference call, click Reconnect before the conference call is completed. The system returns you to the original caller. ShoreTel Enterprise Contact Center ShoreTel Enterprise Contact Center 8 Using Agent Toolbar 16 2 Using Agent Toolbar Diverting Calls Diverting Calls Agent Toolbar makes it possible to divert an incoming call to another number while the call is ringing. Complete the following steps to divert a call: 1. From the Agent Toolbar, click Divert Call. 2. In the Divert Call dialog box, enter the destination number, or select the number from the dropdown list of recently called numbers. 3. Click OK. The system diverts the call to the specified number. Working with Callbacks Callback is an option for returning calls automatically when customers supply a callback number or calls are abandoned by customers. The Callback feature offers customers an alternative to waiting in queue when agents are busy. There are two types of callbacks: Abandoned — The caller hangs up after some time. Scheduled — The caller schedules a number and time to be called back. If your Contact Center implementation includes callback, you are placed on reserve for outbound calls. If the Contact Center Director option, Routing > Services > Scheduled Callbacks > Require Agent Confirmation, is selected, the Outbound Callback Confirmation dialog box opens when an outbound call is made. The dialog box displays the following call details to help you decide whether to accept or reject the call: Destination Number — The number the system will dial. Customer Number — The customer’s phone number. Customer Name — The customer’s name. Response countdown — The remaining time (in seconds) for you to respond to the callback request. If you reject the call, or if you do not respond to accept the call, you are automatically placed in a Release mode. Complete the following steps to work with callbacks: 1. Click Yes in the Outbound Callback Confirmation dialog box to accept the callback. 2. Click the appropriate callback button, as explained in Callback Scenarios on page 17. 3. End the call by hanging up. Callback Scenarios The following table lists common scenarios while working with callbacks, the actions you should take, and the result. ShoreTel Enterprise Contact Center ShoreTel Enterprise Contact Center 8 Using Agent Toolbar 17 2 Using Agent Toolbar ACD Features Table 1: Callback Actions and Results Scenario Action Result When the call is connected, you hear a busy signal. 1. Click the Set Callback – Reinsert Busy button. The number will be called back again once the time specified in the Retry on Busy option (in Contact Center Director) has expired. 2. End the call by hanging up. You are connected to voicemail. 1. Click the Set Callback – Reinsert No Answer button. 2. End the call by hanging up. You are connected to a fax machine. 1. Click the Set Callback – Reinsert Terminate button. The number will be called back again once the time specified in the Retry on No Answer option (in Contact Center Director) has expired. The number will not be called back and is removed from the callback list. 2. End the call by hanging up. You want the callback to be made using a different telephone number of the customer. 1. Click any of the callback buttons. The customer is called back using another telephone number, as listed in the system. 2. End the call by hanging up. This callback may be sent to a different agent. 1. End the call by hanging up. No other callbacks are dialed for the customer. For example, if after connecting with the customer, you are asked to call back using a different phone number. You speak with the customer and the call is successful. ACD Features Agent Toolbar ACD features allows you to manage calls within ACD mode. To increase your efficiency and productivity, display the appropriate ACD buttons on the Agent Toolbar. Refer to Chapter 3. Customizing Agent Toolbar for information about adding and removing buttons. Some ACD buttons can be programmed for specific purposes. Refer to Selecting Toolbar Features on page 34 for details. ShoreTel Enterprise Contact Center ShoreTel Enterprise Contact Center 8 Using Agent Toolbar 18 2 Using Agent Toolbar ACD Features Login Primary ACD Groups (1) / Logout Primary ACD Groups (2) — Allows you to log in to or log out from your personal agent queue and all of your primary groups with a single click. The button changes to indicate your current state: A green check mark shows that you are logged into your personal agent queue and primary groups. A red check mark means you are logged out from your personal agent queue and primary groups. Note The appearance and functionality of the Agent Toolbar is determined by your administrator. Your personal agent queue and primary groups are also defined and allocated by the administrator during configuration. An agent can add or remove buttons from the Agent Toolbar only if the administrator configured the agent’s COS permission to do so. The administrator sets this permission by enabling Agent Toolbar Setup in Agent > Class of Service > Agent Toolbar Setup in Contact Center Director. Login to ACD Group (3) / Logout from Group (4) — Enables you to toggle between login to or logout from your personal agent queue or a specific group to which you belong. The button changes to indicate your current state: A green check mark shows that you are logged into your personal agent queue or your group. A red check mark means you are logged out from your personal agent queue or group. Groups Manager (5) — Makes it possible to manage your personal agent queue and groups by specifying the login or logout state of each. Release (6) / Resume (7) — Enables you to toggle between setting your station to a Release state and the normal ACD mode. This feature is useful when taking a break from your call center activities. The Release state blocks ACD calls without having to log out. You can also receive internal or private calls. When in release mode, the button turns red; in resume mode the button is green. You can not add or remove this button. If Agent Toolbar displays this button, it has been included by your administrator during configuration. ShoreTel Enterprise Contact Center ShoreTel Enterprise Contact Center 8 Using Agent Toolbar 19 2 Using Agent Toolbar Logging Into and Out of ACD Groups and Agent Queue Note If the Contact Center Director > System Parameters > Agent Preferences > When TAPI connect is Lost > Agents go in release then auto-resume upon reconnect option is selected, you are automatically placed in Release if a TAPI outage occurs while using a device affected by the outage. Once TAPI recovers, you are automatically returned to the state you were in before the outage. Wrap-Up Code (8) — Associates wrap-up code with a call. In a wrap-up state, ACD calls are not routed to you. The time associated with a wrap-up state is typically used by agents to finish paperwork or tie-up loose ends regarding the just ended call. Wrap-Up Manual Control (9) — Controls the wrap-up state. Extends the wrap-up time if the automatic wrap-up time is not sufficient. The Ready button will flash during controlled wrap-up reminding you to press the button to enable you to receive incoming calls. Manual Wrap-Up Ready (10) — Manually ends the wrap-up/controlled wrap-up state, making you ready and available for ACD calls. Transfer to Agent (11) — Transfers a call to another available agent in your group. The system treats a transfer to another agent, in the same ACD group, as an ACD transfer and reports it as an ACD call. Supervisor Help (12) — Notifies a supervisor if you require help. Release with Code (13) — Allows you to choose a release code, indicating the reason for going into the Release state. Send a Call to the Agent Queue (14) — Sends a call in your personal agent queue. Logging Into and Out of ACD Groups and Agent Queue Agent Toolbar provides two toggle buttons that allow you to log into or out from ACD groups and your personal agent queue. These features are only available if your administration has given you the COS permissions Initiate Specific Login/Logout and Automatically Log into Agent Queue. If you log out with calls in your personal agent queue, a message is displayed informing you that calls are still pending. If you decide to continue with the logout process, the calls in your queue are sent to the No Agent destination. Otherwise, you will be logged out of all groups except your queue. ShoreTel Enterprise Contact Center ShoreTel Enterprise Contact Center 8 Using Agent Toolbar 20 2 Using Agent Toolbar Managing Your Groups Note This feature is not part of releases prior to ShoreWare 16.4 integrated with Agent Toolbar. To log into or out of all your ACD groups and personal agent queue, click Login/Logout Primary ACD Group on the Agent Toolbar. You are automatically logged in to or out of all your ACD groups and personal agent queue. The login state persists even when you exit Agent Toolbar, meaning that you do not have to log in or out of your ACD groups or personal agent queue each time you start up. Complete the following steps to log in to or out of a specific ACD group or personal agent queue: 1. From the Agent Toolbar, click Login/Logout ACD Group. If the Login ACD Group button is programmed with a specific group or your personal agent queue, the system automatically logs you into that group or your queue. 2. If the Login ACD Group button is not programmed with a specific group or your personal agent queue, the Login Group dialog box appears. Use the dialog box to select the group or your queue from the drop-down list. 3. Click OK. For information about changing the programmed group or being prompted for a group each time you click the Login ACD Group button, refer to Programming Buttons on page 34. Managing Your Groups The Groups Manager enables you to manage your personal agent queue and groups by specifying the login or logout state of your queue and each group. Assigning a state to your queue or a group makes it possible to logout from one and automatically login to another using the Login/Logout ACD Group button. Complete the following steps to use the Groups Manager: 1. From the Agent Toolbar, click Groups Manager. The Logged Groups pane on the left shows your groups that are in the login state. The Available Groups pane on the right displays the list of groups that you can log into. 2. To put a group into the login state, select the group(s) from the Available Groups pane and click Login. The group is moved to the Logged Groups pane. 3. To put a group into the logout state, select the group(s) from the Logged Groups pane and click Logout. The group is moved to the Available Groups pane. 4. When you are satisfied with the status of your groups, click Close. ShoreTel Enterprise Contact Center ShoreTel Enterprise Contact Center 8 Using Agent Toolbar 21 2 Using Agent Toolbar Assigning Wrap-Up Codes Assigning Wrap-Up Codes Wrap-up code is a description of the outcome of a call in wrap-up state. By assigning a wrap-up code, you specify the outcome of the just completed call. Complete the following steps to assign wrap-up code: 1. From the Agent Toolbar, click Wrap-Up Code. If the Wrap-Up Code button is programmed with a specific code, the code is assigned to the call. 2. If the Wrap-Up Code button is not programmed with a specific code, the Wrap-Up Code dialog box appears. Use the dialog box to select the code from the drop-down list. 3. Click OK. For information about changing the programmed code or being prompted for a code each time you click the Wrap-Up Code button, refer to Programming Buttons on page 34. Not Entering a Wrap-Up Code In your call center, you may be required to provide a wrap-up code before answering the next incoming call, even if you are logged out of a group. However, there may be instances in which you need to move onto the next call without entering a wrap-up code. For example, when the caller hangs up immediately after you answer the call. In this instance, you can avoid entering wrap-up code for a call by either exiting Agent Toolbar, or by logging out of your primary ACD group or the ACD group that routed the call. Assigning a Release Code Release code is a description of the reasons for being in the Release state. By assigning a release code, you identify the reason you are currently in the Release state. Complete the following steps to assign a release code: 1. From the Agent Toolbar, click Release with Code. If the Release with Code button is programmed with a specific code, the code is assigned to the call. 2. If the Release with Code button is not programmed with a specific code, the Release with Code dialog box appears. Use the dialog box to select the code from the drop-down list. 3. Click OK. For information about changing the programmed code or being prompted for a code each time you click the Release with Code button, refer to Programming Buttons on page 34. ShoreTel Enterprise Contact Center ShoreTel Enterprise Contact Center 8 Using Agent Toolbar 22 2 Using Agent Toolbar Sending a Call to Your Personal Agent Queue Sending a Call to Your Personal Agent Queue A personal agent queue allows ACD calls to be queued for a specific agent. This powerful and useful feature can improve customer service, since calls can be routed to an individual agent first, and then expanded to a larger set of agents if that agent is not available. Agent queues are also extremely useful for schedule callbacks, since calls can be routed directly to an agent. There are several ways to send a call to your personal agent queue. You can transfer an active call to your queue, and you can move a call from a group queue to your personal agent queue. Once a call is in your personal agent queue, you can answer it as you would any other call in a queue. In order to use this feature, your administrator must enable agent queues and you must have the COS permission Allow Routing of Calls to Personal Agent Queue. Complete the following steps to transfer an active call into your queue: From the Agent Toolbar, click Send a Call to the Agent Queue . From the Call Status window, right-click the active call in the list and choose Send to Agent Queue. Complete the following steps to move a call from a group queue to your personal agent queue: While on an active call, double-click on a queued call in the ACD Calls window. From the ACD Calls window, right-click the call in the list and choose Send to Agent Queue. Window Features Window features focus on the Agent Toolbar and informational windows in Agent Toolbar. The informational windows provide specific features when working in a window. Click to specify window behavior Help Call Properties Button Window Behavior — Click the window button in the top-left corner, and select the appropriate option from the menu. The option Always on Top may be particularly useful. ShoreTel Enterprise Contact Center ShoreTel Enterprise Contact Center 8 Using Agent Toolbar 23 2 Using Agent Toolbar Setting Up Agent Toolbar Help — Click the Help icon to get context-sensitive help on the window. Call Properties — If the window contains a list of calls, selecting a call and clicking Call Properties provides an area where the agent can enter notes about the call. This information is no longer available when the agent closes Agent Toolbar. To increase efficiency and productivity, configure the Agent Toolbar to display the Window buttons that are most useful. Refer to Chapter 3., Customizing Agent Toolbar for information about adding and removing buttons. Call Log (1) — Lists the calls handled by you in the current logon session and in your personal agent queue. Call Status (2) — Displays the status of your connected calls and calls in your personal agent queue. ACD Calls (3) — Shows the current calls in the group queue and your personal agent queue. Agent Setup (4) — Customizes the Agent Toolbar. Telephony (5) — Enables access to telephone operations from your desktop. Agent Board (6) — (Optional) Displays real-time information from your supervisor or administrator. Exit (7) — Closes Agent Toolbar. Online Help (8) — Opens online Help. About (9) —Displays information about the Agent Toolbar application. Setting Up Agent Toolbar The Agent Setup button provides access to tabs to customize Agent Toolbar, specify preferences, define your extension and email address, select a ring tone, and create alerts. This feature is only available if your administration has given you the COS permission Agent Toolbar Setup. Complete the following steps to set up Agent Toolbar: 1. From the Agent Toolbar, click Agent Setup. 2. Click on appropriate tab: ShoreTel Enterprise Contact Center ShoreTel Enterprise Contact Center 8 Using Agent Toolbar 24 2 Using Agent Toolbar Using the Call Status Window Toolbar — Provides options for the display and contents of the Agent Toolbar. Preferences — Includes options for personalizing the Agent Toolbar. Contact Information — Identifies your extension number, email address, and server address. Ring — Includes options for ring alerts and tones for incoming contacts by voice, email, or chat. Queue Alert — Displays options for alerts. Refer to Chapter 3. Customizing Agent Toolbar for information about using these tab options. Using the Call Status Window The Call Status window shows the status of all your currently connected calls and calls in your personal agent queue. Because the Status bar displays details only for the current call, the Call Status window is useful for viewing information on other calls. You also can use the Call Status window to simultaneously handle a combination of calls, transfer an active call into your personal agent queue, and define how data on a call is displayed on the Status Bar. Information is displayed in columns.This feature is only available if your administration has given you the COS permission Call Status. Complete the following steps to use the Call Status window: 1. From the Agent Toolbar, click Call Status. The Call Status window opens. 2. To view call properties, select the call from the list and click Call Properties. 3. The Call Properties dialog box opens. Use the Notes field to add a note about the call. Click OK to close the dialog box 4. Information in the Notes field is saved to the Call Log. 5. To change the sort order of the calls in the list, click the column header to display the calls in ascending or descending order. 6. To add to or delete columns from this window, refer to Defining Columns on page 37. 7. To work with a call, right-click on the call in the list, and select the appropriate command from the pop-up menu. These commands are Add, Drop, Hold, Retrieve, and Send to Agent Queue. Note You can send a call to your personal agent queue only if the connected call is an ACD voice call and you have the COS permission Allow Routing of Calls to Personal Agent Queue. Using the ACD Calls Window The ACD Calls window provides information about calls that are currently in group queues and in your personal agent queue. You can answer a call in a queue directly from this window. Information is displayed in columns. ShoreTel Enterprise Contact Center ShoreTel Enterprise Contact Center 8 Using Agent Toolbar 25 2 Using Agent Toolbar Using the Call Log Window Note Information on queued calls is available only if your administrator has configured the system to broadcast queue information and you have the COS permission Queue Monitor. Complete the following steps to use the ACD Calls window: 1. From the Agent Toolbar, click ACD Calls. 2. To filter the calls displayed, select a group from the top part of the window. The ACD Calls window shows only the calls in queue for that group. 3. To answer a call in the queue, double-click on the call in the list. You must have the COS permission Pickup from ACD Calls to answer a call in the queue. 4. To move a queued call to your personal agent queue, right-click the call in the list and select Sent to Agent Queue. You must have the COS permission Allow Routing of Calls to Personal Agent Queue to move a queued call to your personal agent queue. 5. To change the sort order of the calls in the list, click the column header to display the calls in ascending or descending order. 6. To add to or delete columns from this window, refer to Defining Columns on page 37. Using the Call Log Window The Call Log window displays log data about each of your calls. Information is displayed in columns. This feature is only available if your administration has given you the COS permission Agent Log. Complete the following steps to use the Call Log window: 1. From the Agent Toolbar, click Call Log. Click to Clear Call Log Delete Record Button ShoreTel Enterprise Contact Center ShoreTel Enterprise Contact Center 8 Using Agent Toolbar 26 2 Using Agent Toolbar Using the Telephony Window 2. To view the log properties for a call, select the call from the list and click Call Properties. You can also add a note about the call. Click OK to close the dialog box. Information in the Notes field is saved to the Call Log. 3. To delete a call from the log, select the call and click Delete Record. 4. To clear information about all the calls in the log, click Clear. 5. To change the sort order of the calls in the list, click the column header to display the calls in ascending or descending order. 6. To add to or delete columns from this window, refer to Defining Columns on page 37. Using the Telephony Window The Telephony window functions like a telephone keypad, allowing you to perform call handling operations from your desktop. This feature is only available if your administration has given you the class of service (COS) permission Telephone Manager. Complete the following steps to use the Telephony window: 1. From the Agent Toolbar, click Telephony. The Telephony window appears, with the Telephony tab displayed by default. 2. Click on appropriate tab: Telephony — Displays the dial pad and nine buttons that can be customized with specific functions. The Telephony tab can be renamed but it cannot be deleted. Windows — Contains 20 buttons that can be assigned with specific functions. 3. To make a call, from the Telephony tab, click the dial pad buttons for the number and click Call. 4. To execute a function, click on the appropriate button. 5. Close the Telephony window. Additional tabs can be added to the Telephony window, and buttons can be programmed with specific functions. Refer to Personalizing the Telephony Window on page 35 for details. Viewing Messages in the Agent Board The Agent Board is used by supervisors to send you information instantly or as needed. You must be in a logged in state to use the Agent Board. ShoreTel Enterprise Contact Center ShoreTel Enterprise Contact Center 8 Using Agent Toolbar 27 2 Using Agent Toolbar Other Operations To view messages in the Agent Board, click Agent Board on the Agent Toolbar. Other Operations Agent Toolbar’s other features allow you to setup and run external applications from within Contact Center and to create a visual separation between buttons on the Agent Toolbar. To increase your efficiency and productivity, display the appropriate Other buttons on the Agent Toolbar. Refer to Chapter 3. Customizing Agent Toolbar for information about adding and removing buttons. Execute App (1) — Launches an external application in Contact Center. Separator (2) — Creates a visual separation between buttons on the Agent Toolbar. Running an External Application Information on an external application is not saved in the system when Agent Toolbar closes. The following procedure must be repeated each time you want to run an external application from within Contact Center. Complete the following steps to run an external application: 1. From the Agent Toolbar, click Run. 2. In the Program field, click the ellipsis (…). 3. Locate and select the application you want to run. 4. If required by the selected application, specify the Working Directory. You can click the ellipsis (…) to locate and select the directory. 5. If required by the selected application, enter command-line parameters in the Parameters field. 6. Click OK. Separating Buttons on the Agent Toolbar The Separator button creates a visual separation between buttons on the Agent Toolbar. Complete the following steps to separate buttons on the Agent Toolbar: 1. From the Agent Toolbar, click Agent Setup. 2. In the Category area, select Other. 3. Drag and drop the Separator button to the appropriate position on the Agent Toolbar. ShoreTel Enterprise Contact Center ShoreTel Enterprise Contact Center 8 Using Agent Toolbar 28 2 Using Agent Toolbar Understanding Call Flow Understanding Call Flow Email Call Flow The process of receiving and addressing an email call is as follows: 1. To answer the email, the agent clicks the Answer icon, and the status bar in the integrated call manager changes to show the call as connected. Refer to Telephony Features on page 11 for an illustration of Agent Toolbar icons. 2. An email call is ended when the agent clicks the Disconnect button or replies to the email. Chat Call Flow The process of receiving and addressing a chat call is as follows: 1. When a chat call is routed to an agent, the agent receives a prompt in the integrated call manager. stating that there’s an incoming chat request and indicates how long the chat interaction has been active. 2. To answer the chat request, the agent clicks the Answer icon, and then the ECC displays a chat window. Refer to Telephony Features on page 11 for an illustration of Agent Toolbar icons. 3. In the chat window, the agent converses with the customer using the Send button to send responses to the customer. 4. When the chat interaction is complete, the agent clicks Disconnect to end the chat call. Dial List Call Flow The process of handling outbound dial list calls is as follows: 1. When agent is assigned an outbound call from a dial list, the integrated call manager displays a notification for an incoming call. If Dial List > Dial List > General > Require Agent Confirmation is selected in Contact Center Director, the agent clicks Yes to accept the call. 2. The integrated manager displays the amount of time the call has been in process. 3. The agent clicks the Disconnect icon to end the call. Refer to Telephony Features on page 11 for an illustration of Agent Toolbar icons. ShoreTel Enterprise Contact Center ShoreTel Enterprise Contact Center 8 Using Agent Toolbar 29 CHAPTER 3. Customizing Agent Toolbar Agents can personalize and customize the ShoreTel Agent Toolbar for the way they work. This includes determining the look and feel of the Toolbar, selecting the features you want on the Toolbar for easy access, and programming buttons to enable single-click functionality. Refer to the following section for more information about customizing Agent Toolbar: Specifying Toolbar Display and Behavior .................................................................. 30 Specifying Toolbar Display and Behavior Agents can specify how Agent Toolbar looks on your desktop, how Agent Toolbar behaves, the contact information, and the type of rings and alerts they want. Selecting View Options By default, certain view options are selected during installation. You can change how the Agent Toolbar is displayed on your desktop by using the View options. This feature is only available if your administration has given you the COS permission “Change Toolbar Layout.” Complete the following steps to select a View option: 1. From the Toolbar, click Agent Setup. The Setup window opens with the Toolbar tab selected by default. 2. Select the options you want by clicking on the checkbox: ShoreTel Enterprise Contact Center ShoreTel Enterprise Contact Center 8 Using Agent Toolbar 30 3 Customizing Agent Toolbar Defining Agent Toolbar Behavior Always on Top — Keeps the Toolbar on top of other running applications. Two lines — Arranges the buttons on the Toolbar into two rows (saving space). Large Buttons — Displays the button on the Toolbar in a large format. Auto Resize — If this option is not selected, the width of the Toolbar can be resized by dragging the window horizontally. Status Bar — Adds the Status bar to the Toolbar. 3. Click the Close button. Defining Agent Toolbar Behavior You can define how Agent Toolbar opens and closes. Complete the following steps to define Agent Toolbar behavior: 1. From the Toolbar, click Agent Setup 2. Click the Preferences tab. 3. Select the options you want by clicking on the checkbox: Start minimized — Start the Toolbar minimized. This option is useful in environments in which all agent functionality is embedded in a CRM application, so there is no need to show the Toolbar. Enable closing via the system menu “x” button — Enables closing Agent Toolbar by clicking the window Close button. You can leave this option unselected to prevent accidentally closing the application. Open Toolbar on “Forced Release” state — Allows the minimized toolbar to pop-up in forced release state, alerting you of any incoming calls. Selecting this option ensures that you are aware of incoming calls when Agent Toolbar is minimized. Allow to minimize the Toolbar in “Release” state — Enables you to minimize the Toolbar when in Release state. Open Toolbar on Ring — Enables the minimized toolbar to pop-up when a call arrives. Selecting this option ensures that your are aware of incoming calls when the application is minimized. Minimize on Answer — Allows you to minimize the Toolbar when answering a call. Open Toolbar on Queued Call — Enables the minimized toolbar to pop-up when a called is added to the queue. Selecting this option ensures that your are aware of new calls in queue when the application is minimized. ShoreTel Enterprise Contact Center ShoreTel Enterprise Contact Center 8 Using Agent Toolbar 31 3 Customizing Agent Toolbar Changing Your Contact Information Require wrap-up codes — Requires a wrap-up code to be assigned to a call. Refer to Defining Wrap-Up Codes on page 152 of the ShoreTel Contact Center Administrator Guide for information about wrap-up codes. 4. Click the Close button. Changing Your Contact Information Your extension, server address, and email username are used in Agent Toolbar. If your contact information changes, you can update the information in Agent Toolbar. You must restart Agent Toolbar for these changes to take affect. Complete the following steps to change your contact information: 1. From the Toolbar, click Agent Setup. 2. Click the Contact Information tab. Your default values are displayed. 3. Click Set New Values, and set the following values: Extension — Displays the current telephone extension assigned to you. Voice call are routed to this extension. If your extension includes a dash, type your extension without the dash. For example, if your extension is 555-6778, type it as 5556778. Email Account Username — The email username used by the system to route email contacts to you. Note ECC uses the email account username only if Email Address Set by Agent (Client Side) is selected in the System Parameters > Chat and Email > Email settings of Contact Center Director. Refer to Configuring Parameters for Email on page 158 of the ShoreTel Contact Center 8 Administrator Guide for information about this setting. Server IP Address — The IP address of the Contact Center server. Note The Set New Values options are available only if you are using ECC with ShoreTel Communicator for Windows. If you are not using ECC with ShoreTel Communicator for Windows, you can configure these settings in the Contact Center Login Console. 4. Click the Close button. Setting Ring Options Ring options are available for voice, chat, and email calls. ShoreTel Enterprise Contact Center ShoreTel Enterprise Contact Center 8 Using Agent Toolbar 32 3 Customizing Agent Toolbar Changing Your Contact Information Complete the following steps to set ring options: 1. From the Toolbar, click Agent Setup. 2. Click the Ring tab. 3. Select the appropriate ring options: ACD Voice Calls — Ring tone is played for ACD voice calls. Email Calls — Ring tone is played for an email contact. Chat Calls — Ring tone is played for a chat contact. Outbound Call Confirmation Window — Ring tone is heard when the Outbound Confirmation Call Confirmation window is opened. Non ACD Voice Calls — Ring tone is played for non-ACD voice calls. In the Ring Alert area, these options are Ring Once — The ring tone is heard only once for a ringing call. Continuous Ring — The ring tone is heard until the call is answered. In the Ring Tone area, these options are Default — Your computer’s internal speaker generates the ring tone. File — The ring tone comes from a WAV file. This option requires a computer with a sound card. Specify the WAV file in the field, or click the ellipsis (…) to locate and select the file. 4. Click Save. 5. Click the Close button. Setting Queue Alert Options Alert options are available for calls in the queue. Complete the following steps to set queue alert options: 1. From the Toolbar, click Agent Setup. 2. Click the Queue Alert tab. 3. Select the appropriate queue alert options: Speaker Beep — Your computer’s internal speaker generates the alert. File — The alert tone comes from a WAV file. This option requires a computer with sound card. Specify the WAV file in the field, or click the ellipsis (…) to locate and select the file. ShoreTel Enterprise Contact Center ShoreTel Enterprise Contact Center 8 Using Agent Toolbar 33 3 Customizing Agent Toolbar Selecting Toolbar Features 4. You can change the interval between alerts by entering the interval, in seconds, in the Alert Every field. The alert is sounded only if you have calls in the queue, and you are not on an ACD call. 5. Click Save. 6. Click the Close button. Selecting Toolbar Features By default, the Toolbar contains buttons for the features selected by your administrator. You can add additional buttons, program buttons for one-click use, and remove buttons. Adding Buttons to the Toolbar You can add buttons to the Toolbar for easy access to the features you most commonly use. Complete the following steps to add a button to the Toolbar: 1. From the Toolbar, click Agent Setup. 2. In the Category area, select the appropriate button category to display buttons associated with the category. 3. For a description of a button, select it and view the details in the Description area. If a button can not be added to the Toolbar, the button description includes a notation. 4. Click the button you want to add, and drag-and-drop it to the appropriate position on the Toolbar. If the button requires parameters, the associated dialog box appears. Use the dialog box the define the button’s parameters. Refer to Programming Buttons on page 34 for specifics. 5. Click the Close button. Programming Buttons You can program both the buttons that require destination numbers, and the buttons that require other types of parameters. Programming a button allows you to use the feature with just one click. These buttons can also be programmed to instead prompt you for a parameter each time you use the feature. You can also change the default programming of a button. Note that if you program the Transfer to Agent button with the extension of an agent in another group, the system treats the transfer as a non ACD call. As a result, you are unable to use Agent Toolbar’s ACD features, like Wrap-Up, with the call. Instead, program the Start Transfer button with the agent’s extension. Complete the following steps to program a button: 1. Add the button to the Toolbar. ShoreTel Enterprise Contact Center ShoreTel Enterprise Contact Center 8 Using Agent Toolbar 34 3 Customizing Agent Toolbar Personalizing the Telephony Window Refer to Adding Buttons to the Toolbar on page 34 for information. 2. If you want to be prompted for a parameter each time you use the feature, click Cancel. 3. If you want to program the button with a parameter, enter the parameter in the field; recently used parameters can be selected from the drop-down list. Then click OK. The button is programmed with the parameter. To verify, point your mouse to the button on the Toolbar. The button label displays the new parameter. Complete the following steps to change the programming of a button: 1. Right-click the button on the Toolbar. 2. If you want to be prompted for a parameter each time you use the feature, select Reset to Prompt from the popup menu. 3. If you want to program the button with a parameter, from the popup menu select Configure Default. In the resulting dialog box, enter the parameter in the field; recently used parameters can be selected from the drop-down list. 4. Click Save. Removing Buttons from the Toolbar If you do not use a feature all that often, you can remove the button from the Toolbar to make better use of space. To remove a button from the Toolbar, press and hold the SHIFT key, click on the button you want to remove, and drag-and-drop the button onto your desktop. Personalizing the Telephony Window The Telephony window can be personalized by editing the tabs and programming the buttons for specific telephony operations. Editing Tabs In the Telephony window, you can add, rename, and remove tabs. You may want add a tab to the Telephony window for additional Toolbar operations. Complete the following steps to add a tab to the Telephony window: 1. From the Toolbar, click Telephony. 2. Right-click on a tab. In the resulting pop-up menu, click Insert. New tabs are inserted to the right of the selected tab. 3. In the Insert Page dialog box, type the name of the new tab in the New Name field, and then click OK. ShoreTel Enterprise Contact Center ShoreTel Enterprise Contact Center 8 Using Agent Toolbar 35 3 Customizing Agent Toolbar Programming the Telephony Window Buttons The new tab contains 20 non-captioned buttons. Refer to Programming the Telephony Window Buttons on page 36 for information on assigning functionality to these buttons. Complete the following steps to rename a tab in the Telephony window: 1. From the Toolbar, click Telephony. 2. Right-click on the tab you want to rename, and then click Rename. 3. In the Rename Page dialog box, type the New Name, and then click OK. Complete the following steps to remove a tab from the Telephony window: 1. From the Toolbar, click Telephony. 2. Right-click on the tab you want to remove, and then click Remove. 3. Click OK. Note The Telephony tab cannot be removed from the Telephony window; however, the tab name can be changed. Programming the Telephony Window Buttons The Telephony and Windows tabs in the Telephony window, by default have both assigned and unassigned buttons. In addition, new tabs that you create are made up of entirely unassigned buttons. You can program buttons with the appropriate functionality, or change the functionality already assigned to a button. It is good practice to program buttons with functionality based on category. This makes it easier for you to find the button you need. For example, the buttons in the Windows tab should be programmed with functionality pertaining to Agent Toolbar windows. Complete the following steps to program a button in the Telephony window: 1. From the Toolbar, click Telephony. 2. Click the tab containing the button you want to program. 3. Right-click the button, and click Properties from the pop-up menu. 4. In the Button Properties dialog box, specify the button properties: Caption — The name for the button. Use a name that reflects the function and parameters assigned to the button. Category — The type of button functionality, available from the drop-down list. Function — The button’s functionality, available from the drop-down list. The functions in the list are based on the selected category. ShoreTel Enterprise Contact Center ShoreTel Enterprise Contact Center 8 Using Agent Toolbar 36 3 Customizing Agent Toolbar Defining Columns 5. If the button requires parameters, the Setup button becomes active. Click Setup, specify the appropriate parameters, and click Save. 6. In the Button Properties dialog box, click OK. Complete the following steps to clear a button’s programming: 1. From the Toolbar, click Telephony. 2. Click the tab containing the button you want to clear. 3. Right-click the button, and click Clear. Defining Columns Columns can be added to or deleted from the Call Status, ACD Calls, and Call Log windows. You add a new column to capture additional details about your calls. The columns in the Call Status window determine the information on the current call shown in the Status Bar. This feature is only available if your administration has given you the COS permission Change Window Columns. Complete the following steps to add a new column: 1. In the appropriate window, right-click on a column heading and select Insert Column. 2. In the Column field, select the appropriate column type from the drop-down menu. 3. Type the column title in the Header field. 4. In Alignment, select the new column’s alignment. 5. Use the Width field to change the default width of 100. 6. Click OK. Complete the following steps to delete a column: 1. In the appropriate window, right-click the heading of the column you want to remove and select Delete Column. ShoreTel Enterprise Contact Center ShoreTel Enterprise Contact Center 8 Using Agent Toolbar 37 CHAPTER 4. Using ShoreTel Communicator with Integrated Agent Toolbar If you have the correct license and permissions, as configured by a system administrator, you can use ShoreTel Communicator with integrated Agent Toolbar. Note that ShoreTel Workgroups is a separate call center application for small, informal Automatic Call Distribution (ACD) groups using the ShoreTel system. ShoreTel Workgroups support basic call routing, agent management, reporting, and agent activity functions. Workgroup features cannot be used to perform Contact Center functions and Contact Center features cannot be used to perform Workgroups functions. For information on ShoreTel Workgroups, refer to the ShoreTel Communicator for Windows User Guide. Agents can access ShoreTel Communicator with integrated Agent Toolbar only on PCs upon which both ShoreTel Communicator and Agent Toolbar are installed. Supervisors also need the Contact Center Supervisor Suite applications installed; and need to be configured as a Contact Center agent. Starting ShoreTel Communicator with Integrated Agent Toolbar 1. From the Windows desktop, click Start > Programs > ShoreTel > ShoreTel Communicator. You can also click the ShoreTel Communicator icon on your desktop or in the Windows Start menu to start ShoreTel Communicator. 2. If this is your first time starting ShoreTel Communicator with integrated Agent Toolbar, the Agent Toolbar setup dialog box is displayed. Use this dialog box to specify your information: ShoreTel Enterprise Contact Center ShoreTel Enterprise Contact Center 8 Using Agent Toolbar 38 4 Using ShoreTel Communicator with Integrated Agent Toolbar Working with ShoreTel Communicator & Integrated Agent Toolbar Agent ID — Agent Password — Server IP Address — The IP address of the Contact Center server. If the agent belongs to an email group and ECC is configured to assign email addresses to agents using Contact Center Director, the user must use Agent Toolbar Setup button > Contact Information tab > Set New Values to specify the Email Account Username. ShoreTel administrators configure ECC to assign email address to agents in System Parameters > Chat and Email > Email > Email Address Assigned to Agent using Director in Contact Center Director. 3. Click OK. 4. To login into your groups, select Contact Center > Log into All Groups. 5. Verify that you have successfully logged into a Contact Center group by viewing the Login icon in the Communicator Assignment bar. If you are not logged into at least one Contact Center group, the icon displays Logged Out. If a problem occurs while logging into a Contact Center group, the Communicator Status bar displays “System Unavailable”. Working with ShoreTel Communicator & Integrated Agent Toolbar with integrated Agent Toolbar, basic Agent Toolbar functions, such as Log Into All Groups, Logout of All Groups, Release, Resume, and opening Call Status/ Call Log /Queue Monitor / Agent Board windows are available from the Communicator Contact Center menu. You can use ShoreWare Director to create a Communicator Toolbar for Contact Center buttons for functions such as End Wrap-Up, Wrap-Up Code, and Release with Code. Refer to the ShoreWare Administrator Guide for more information. ShoreTel Enterprise Contact Center ShoreTel Enterprise Contact Center 8 Using Agent Toolbar 39 4 Using ShoreTel Communicator with Integrated Agent Toolbar Customizing ShoreTel Communicator with Integrated Agent Tool- Agent Toolbar bar If you are logged in as a supervisor, additional features are available. Agents Using ShoreTel Communicator & Integrated Agent Toolbar You can open the following Agent Toolbar windows from the Communicator Contact Center menu: Agent Board Call Status Queue Monitor Call Log Refer to Chapter 2. Using Agent Toolbar for information about using these windows. You can modify the ShoreTel Communicator toolbar to include the options you need to use with ECC. Refer to the Contact Center Integration with Communicator section in Chapter 11 of the ShoreTel System Administrator Guide for more information. Supervisors Using ShoreTel Communicator & Integrated Agent Toolbar If you are a supervisor, the Communicator Contact Center menu provides access to the following Contact Center applications: Agent Manager Contact Center Reports Refer to the ShoreTel Enterprise Contact Center Supervisor Guide for information about using these applications. Customizing ShoreTel Communicator with Integrated Agent Toolbar You customize ShoreTel Communicator with integrated Agent Toolbar to identify your groups, and to determine the information shown in the Call Status, Queue Monitor, and Call Log windows. 1. From the Communicator ShoreTel button, choose Options. ShoreTel Enterprise Contact Center ShoreTel Enterprise Contact Center 8 Using Agent Toolbar 40 4 Using ShoreTel Communicator with Integrated Agent Toolbar Limitations 2. Click Contact Center. 3. Click Configure Contact Center. 4. To select the Contact Center groups you want to log in and out of, click Configure Groups in the Contact Center Options window. Use the Group Manager window to select the Contact Center groups you want to log in and out of, as explained in the Managing Your Groups on page 21. 5. If you want to specify the information show in the Call Status, Queue Monitor, or Call Log windows, from the Contact Center Options window, click the appropriate Configure button. Use the resulting Configure window to select a field that you want displayed in the window, and then click << or >> to move the field into the appropriate pane. You can use the Up and Down buttons to change the order the fields will be displayed in the window. 6. Click OK. 7. To change your contact information, from the Contact Center Options window, click Setup. 8. Use the resulting window to specify a new extension, server, or email account, as explained in Changing Your Contact Information on page 32. 9. If you want to display the standalone version of Agent Toolbar, from the Contact Center Options panel select Show Agent Toolbar. 10. From the Contact Center Options panel, click OK. Limitations This section describes the limitations and unsupported features of ShoreTel Communicator with integrated Agent Toolbar. Information from Status Bar Not Available The ShoreTel Communicator with integrated Agent Toolbar Status bar does not provide information on Agent Toolbar. This means that the following caller and call status information is not available: Call profile information collected from the IVR or configured in Contact Center. However, the Call Status window can display this information in the Call Profile field. An indication that you are scheduled for an outbound call, as programmed by Contact Center dial lists, abandoned callbacks, and scheduled callbacks. However, if your administration has enabled the Contact Center Agent Notification Preview option, ShoreTel Communicator receives notification of programmed calls before they are placed. ShoreTel Enterprise Contact Center ShoreTel Enterprise Contact Center 8 Using Agent Toolbar 41 4 Using ShoreTel Communicator with Integrated Agent Toolbar ShoreTel Enterprise Contact Center Limitations ShoreTel Enterprise Contact Center 8 Using Agent Toolbar 42