1
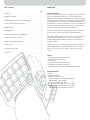
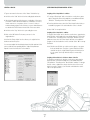
Page
a
User Guide
F8GFPC100
Table of Contents
INTRODUCTION
Page
Introduction
Installing the Software . . . . . . . . . . . . . . . . . . . . . . . . . . . . . . . . . . . . . . . .1
Assigning Profiles to Games in Loadout Manager . . . . . . . . . . . . . . . . . .1
Nostromo Array Programming Software . . . . . . . . . . . . . . . . . . . . . . . . . .2
Making a Profile . . . . . . . . . . . . . . . . . . . . . . . . . . . . . . . . . . . . . . . . . . . . .3
Creating a Macro . . . . . . . . . . . . . . . . . . . . . . . . . . . . . . . . . . . . . . . . . . .5
Welcome and Thanks
Thank you for purchasing the Nostromo SpeedPad n52 (the n52). Built to
give you the winning edge in any game, the n52 captures all the
advantages of its critically acclaimed predecessor, the n50, and adds
advanced options that make sure you dominate your game in virtually
any application. It puts keyboard and gamepad functionality into one
small and easy-to-use device, delivering more tools for customizing your
game than ever. Check out the rest of the Nostromo gaming arsenal,
as well as our wide array of PC accessories, at belkin.com.
The Nostromo SpeedPad n52 is a simple Plug-and-Play controller that
sets up easily with (or without) the Array Programming Software.
Other Remapping/Reprogramming Options . . . . . . . . . . . . . . . . . . . . . .5
“Signing” and Sharing your Profile . . . . . . . . . . . . . . . . . . . . . . . . . . . . . .6
Using the Profile Loadout Manager . . . . . . . . . . . . . . . . . . . . . . . . . . . . .7
Troubleshooting . . . . . . . . . . . . . . . . . . . . . . . . . . . . . . . . . . . . . . . . . . . . .8
®
User Guide for Mac Users . . . . . . . . . . . . . . . . . . . . . . . . . . . . . . . . . . . . .9
Although the n52 will function right out of the box as a Human Interface
Device (HID) keyboard with a mouse scroll wheel, for advanced
programmability and functionality, we highly recommended that you
install the n52 driver.
Installation of the Nostromo Array Programming Software will give you
added flexibility and up to 104 programmable functions. You will be
able to customize your Nostromo game controller for each game
you play.
Information . . . . . . . . . . . . . . . . . . . . . . . . . . . . . . . . . . . . . . . . . . . . . . . .13
Features
• 14 programmable keyboard-style buttons
• 2 programmable thumb buttons
• Mouse wheel
• A programmable, 8-way directional pad
• An adjustable, removable, left-hand rest
• Stable base with internal metal weight and rubber footpad
System Requirements
• USB port
• CD-ROM or DVD drive
• Windows® 98, 2000, Me, or XP
- Pentium® 233MHz or compatible with 32MB RAM
- 30MB available on the hard drive
- DirectX® compatible video card
• Mac OS® 9.04 or later or Mac OS X v10.1.2 or later
- 102MB available on the hard drive for Mac OS X
- 10MB available on the hard drive for Mac OS 9
INSTALLING THE SOFTWARE
ASSIGNING PROFILES TO GAMES IN LOADOUT MANAGER
Important Notes:
If you choose to install the n52 driver, you must install it prior to
connecting the SpeedPad to your computer. If you choose not to install
the n52 driver, please proceed to the “Using the SpeedPad as a default
HID Device” at the end of this user guide.
The Nostromo Array Programming Software comes with premade
profiles. Additional profiles are available for download at
www.belkin.com/nostromo. To submit your own profiles, e-mail
them as an attachment to [email protected]. Please note
that pre-built profiles are created by other gamers, which means you
may not feel comfortable with the key layout for them. It is always
recommended to create your own profiles so that the n52 is customized
to your needs, according to the ways you play. To create your own
profile, please check out the “Making a Profile” section in this User
Guide before following the next steps.
If you have previously installed a driver for any Nostromo game
controller, you must uninstall the old driver before proceeding with this
installation procedure.
1. Insert your Nostromo Array Programming Software into your CD/DVD
drive on your computer.
1. Be sure you have the n52 connected to your computer
before continuing.
2. The software should start automatically. If it does not, click the “Start”
button and choose “Run”. Click “Browse” and choose your CD drive.
Select “setup.exe” and click “OK”.
2. Open the Loadout Manager by clicking on the Nostromo icon in the
taskbar, your desktop, or in the Start menu under Program Files. Click
on the bar (on the left) that shows your attached controller. Select
“Load Profile” and then select the profile you want to use. The
default location of pre-built profiles and website downloaded profiles
are in the “pre-built” folder under “C:\Program Files\Belkin\
Nostromo\Profiles”. If you created one, the default location is right
under “Profiles”.
3. Follow the on-screen instructions to continue with the
software installation.
4. After the installation is done, select “Finish”. Connect the n52 to an
available USB port on your computer.
5. Once installation is completed, please check to see if the installation
was successful by proceeding to “Verifying Proper Installation”.
3. Then click “Browse” (on the right) and find the game executable
(.exe) file you would like to use. You can select the game’s shortcut
from your desktop as an easier way of finding the path. If you don’t
have a link on your desktop, you can select the file by looking in the
directory where you installed the game.
Verifying Proper Installation
1. You will need to confirm that the installation was successful through
the device manager.
4. For more detailed information, please see the following “Nostromo
Array Programming Software” section.
2. To get to Device Manager, right-click on “My Computer” and leftclick on ”Properties”. Then left-click on “Hardware” and then on the
“Device Manager” button.
3. Check to make sure that the Device Manager list includes
a) two new entries under Human Interface Devices, “Nostromo n52
HID SpeedPad 2.0” and “Nostromo n52 HID SpeedPad 2.0
Mouse Wheel”.
b) a new entry under Keyboards, “HID Keyboard Device”.
c) a new entry under Mice and Other Pointing Devices,
“HID-Compliant Mouse”.
4. Once you have confirmed that the installation was successful, you
can either proceed to “Assign a Profile to a Game in the Loadout
Manager” or “Making a Profile”.
Page
1
NOSTROMO ARRAY PROGRAMMING SOFTWARE
Utilize 3 Shift States
Red, green, blue, and normal shift states quadruple the number of
functions that can be programmed into the other buttons. There are
different ways to set this.
• With the cycle shift option, one button or one direction of the scroll
wheel will cycle through all the shift states.
• You can set the keys to work separately for red, green, and blue. You
can create a toggle switch (which keeps the game in that shift state
until pressed again), or momentary (stays in the shift state only as long
as you hold down the key).
Introduction
The Nostromo Array Programming Software is a suite of tools that
enhances your gaming experience when using the Nostromo
SpeedPad n52.
The Nostromo Array Programming Software increases your play
functionality and customization options. It allows you to remap
your controller however you like, depending on which games you
are playing.
Note: When shift state is not active, the game returns to its normal state.
There are two major components to the Nostromo Array
Programming Software:
• The Profile Editor, which is used to create and change profiles. A
profile is a set of mapped keyboard, mouse, and/or controller
functions that can be saved and assigned to specific games.
• The Loadout Manager sets the profile to a certain program that can
launch automatically or manually with the program. The Loadout
Manager also gives you the ability to set a default profile that would
launch with any program that does not have a profile assigned to it.
With this Software, you can:
• Create and save your customized profiles;
• Download/upload profiles via the Internet;
• Assign profiles to your favorite programs for use each time you start
that program; and
• Set default profiles that would be active for everything on your
computer that does not have a profile already set to it.
Remap or Reprogram Buttons and Scroll Wheel 5 Ways
• Remap n52 buttons or scroll wheel to correspond to the
keyboard keys.
• Reprogram buttons or scroll wheel to different controller ID buttons.
(For games that identify controllers and have a certain key mapping
for the game.)
• Remap buttons or scroll wheel with macros.
• Reprogram any of the buttons or wheel as a mouse click (left-,
center-, right-click).
• Reprogram any of the buttons or scroll wheel to change
shift states.
Page
2
MAKING A PROFILE
Menu Bar & Tool Bar
Mode Bar—This allows you to select between normal, red, green, and
blue shift state modes.
Profile Editor
The Profile Editor is the tool used to create and customize profiles. A
profile is a set of remapped button functions that can be saved.
Controller Selection Corner—This allows owners of multiple Nostromo
devices to easily switch back and forth between controllers when
programming.
Some examples of the types of actions you can program are:
Function Assignment Hardpoints—These are the buttons or axis
identifiers, such as button “01”, that you click to open your
programming windows.
Single Key—Make a button on the controller work like a keyboard key.
Macros—Record a sequence of keyboard keystrokes, mouse-button
presses, and/or joystick commands (such as axis controls, d-pad
controls, and joystick button commands) to be played back when a
button is pushed.
Make a Profile
This section will explain how to create a profile using the Profile Editor. In
general, creating a profile consists of the following functions:
remapping single-key assignments, creating macros, setting mousecontrol functions, programming control (direct input) function, and
setting shift states.
Remap Direct Input Buttons, Axis Controls—Remap the buttons on the
game controller to the Direct Input commands that are used within the
game.
Note: You would use this when playing a game that supports game
controllers and you want to use its preset configuration.
To begin, click on “Start”, then “Programs”, then “Nostromo”, then
“Profile Editor”. This will display the main screen of the “Profile Editor”.
Four Shift Modes—Utilize one of three shift buttons for each game
controller and quadruple the number of functions you can program.
Remapping Single-Key Assignments
1. Left-click on the hardpoint next to button “01” (labeled “Tab”
by default).
Mouse—Program the game controller to function as a mouse click or
scroll wheel.
Main Screen of the Profile Editor
This figure shows the Profile Editor for the Nostromo SpeedPad n52.
2. Select “Single Key” from the pop-up menu. This will bring up the
“Single Key Assignment” screen. This screen is used to select a single
key to assign to one of the buttons on a Nostromo game controller.
When a single key is assigned to a button, pushing the button is the
same as pressing that key on the keyboard.
If this is the first time you have assigned a single key to one of the
hardpoints, the screen will look like this:
3. At this point, press a key on the keyboard or the space bar. The
screen will display the name of the key you pressed.
4. Notice that in addition to displaying the key you pressed, the edit
window in the middle displays and highlights the same key name.
You can elect to keep the default name, or type your own, such as
“Fire Guns”.
The main screen consists of:
View of the Device—This makes clear which keys you are programming.
Page
3
5. Now you can click “OK” if you are happy with the current setup, or
you can click “Cancel” to abort the key assignment. You can also
click “Record Key” to record a different key on the keyboard.
There are three settings to choose from under “when macro key
is pressed”:
1. Play macro only one time.
This is set by default and means that when you push or hold down
the button assigned to it, it will run the macro only once. To
reactivate it, you will have to push it again.
2. Repeat macro while key is down.
This runs the same macro over and over when you hold the button
down, until you release it.
3. Repeat macro until key is pressed again.
This makes the macro command act like a toggle switch. If you push
it once and let go, it will repeat the commands until you push it
again to release the macro.
Note: If you record a new key, any name you type in the edit box will
be erased.
Macro Editor
To make a macro for a specific button, select another hardpoint, and
select “New Macro”. A macro is a combination of buttons that enacts
a special function. Additionally, in many games you can make a macro
to send messages (“cover me” or “attack”, for example) with one
button press.
Repeat Delay Adjust—This control allows you to adjust the repeat rate.
This next group of buttons is for modifying recorded macros.
Insert: This feature enables you to add commands that were missed
during the recording or were not available during the recording.
1. Delay: Here you can add delays to your macro. By default they are
set to 0.05 when added.
2. Keyboard: Here you can add a single key to your profile.
3. Mouse Button: Here you can set a left, right, or center mouse click to
your macro.
The next six features are standard controls for game controllers and only
work with games that support game controllers, and have a place for
these commands.
1. Axis Up
2. Axis Centered
3. Axis Down
4. D-pad
5. Joystick
6. Throttle
This screen is used to create macros. You can also use it to adjust
properties of macros after they are recorded.
Event Field—As you record a macro, the keyboard commands that you
type along with the actual delays between the events will start listing
while you are typing in the “Event” panel on the left.
Delete: Removes something in the macro that is not needed. Left-click
what you want to remove and then left-click on “Delete”.
Move Up: If you want to move up a command in the event list, select
the one you want to move with your mouse and left-click on “Move
up” until it is in the desired position.
Note: You cannot record joystick or mouse click commands during the
recording phase. You can add them after you have completed
the recording of all the single keys.
Move Down: If you want to move down a command in the event list,
select the one you want to move with your mouse and left-click on
“Move down” until it is in the desired position.
Start—Starts the recording of a new macro.
Stop—As you probably guessed, this stops macro recording.
Select All: Highlights everything on the event list.
Delay Adjust—This control allows you to adjust the duration of a delay in
the event list. Simply click on the delay in the event list that you want to
adjust and then use the up and down arrow keys or number keys to
change it.
Select All Delays: This feature selects only the recorded delays in the
event list. This is helpful if you want to make all the delays the same.
Record Delays Between Events—This switch turns recording of delays on
or off. A macro without recorded delays replays the events at the
maximum possible rate, which is about 10 milliseconds between events.
By default, this feature is on.
Page
4
CREATING A MACRO
OTHER REMAPPING/REPROGRAMMING OPTIONS
1. Type a new name for the macro in the “Name” field at the top.
Assigning a Direct Input Button to a Button
2. Left-click on the “Start” button to start recording keyboard events.
1. To assign a “Direct Input” button to a button on a Nostromo game
device, simply left-click on the hardpoint you would like and select
“DI Button”. This will open the “Direct Input” window.
3. Using the keyboard, type in the key-press combination of the macro
you want to create. This will normally be a combination of moves to
create a new move, or a phrase, such as “cover me”, that you
would use during a game. Notice the keys you press and release are
recorded in the “Event” field on the left side of the macro editor.
2. From the pull-down menu, select the “Direct Input” button that you
would like to program to the selected button on the controller.
3. Select “OK” to remap the button.
4. Left-click on the “Stop” button to stop recording the macro.
Assigning a Direct Input Axis to a Button
To assign a “Direct Input” axis to a button on a Nostromo game device,
simply left-click on the hardpoint you would like and select “DI Axis Up”
or “DI Axis Down”. This will open the “Direct Input” window. From the
pull-down menu, select the “Direct Input” axis that you would like to
program to the selected button on the controller. Select “OK” to remap
the button.
5. Click on the “OK” button. That saves your macro to the
assigned button.
Note that the “Delay Adjust” function allows you to adjust the time
between each button press.
You can even adjust the time delay between the finish and start of the
macros while they are repeating with the “Adjust Delay Between
Repeats” function at the bottom of the window.
Note: DI buttons and DI Axis can only be used for games or programs
that can identify them. The types of games that this would be
used with are sports or flight simulation games. Most first-person
shooter games don’t map with direct input commands by
default.
Assigning a Mouse Button to a Nostromo Game Controller
To assign a mouse button to a button on a Nostromo game device,
simply left-click on the button hardpoint you would like and select
“Mouse Button”. This will open the “Mouse Button” window. To reassign
the left, center, or right button, simply select the circle of the mouse
button you want to assign to your selected controller button. Select
“OK” to remap the button.
Page
5
Shift States
The Nostromo Array Programming Software allows you to program three
shift states: red, green, and blue. A shift state allows you to add another
layer of programming to each button. You can either set different keys
for each of the shift states, or set one to cycle through all the different
states. This cycle shift gives you the capability to have two extra buttons
for each state. Basically, it frees up six buttons.
“SIGNING” AND SHARING YOUR PROFILE
In the “Profile Editor” toolbar, the icon between the question mark and
the “Loadout Manager” icon is the “Contact Info” window. Click on
that to get a window similar to this:
• To program shift states, you must choose one button for a cycle shift
command or individual buttons for each of the shift states. In any shift
state, that button will remain a shift button and cannot be remapped
with a function.
• To program a key as a shift button, left-click on the button you would
like to program and select red, green, or blue shift key or “Cycle
Shift”. For the red, green, and blue, you can select “Momentary”
or “Toggle”.
• If you select “Momentary”, the shift function will only be in effect while
you hold the button down. If you select “Toggle”, pressing the shift
button will start the programmed shift state and the controller will
remain in that shift state until the shift button is pressed again.
• Once the button is assigned as a shift key, you must go to the
corresponding shift window to assign the functions in that shift state.
By filling in this window, you get something similar to a name tag for
your profile. You can have the profile identified as yours, including your
comments, e-mail address, etc. for the Nostromo community.
• You can view different shift-state windows by clicking on the red,
green, or blue arrows in the toolbar at the top. You can return to the
original window by clicking on the “SpeedPad” icon.
Once your profile is saved and identified, you can submit it to the
Belkin Nostromo team by e-mailing the profile in an e-mail attachment
to [email protected] for inclusion on the Belkin website.
This way, you can have your unique profile and/or loadout file made
available to other users of Nostromo game devices throughout
the world.
• Once you are in the different shift-state windows, you can remap
keys, create macros, and reprogram axes just as you did in the
original shift state.
• Through use of these shift states, you can quadruple the
programmability of each Nostromo game device. This will also
allow you quick access to many functions during games while
giving you the flexibility of assigning shift keys to any position on
your Nostromo controller.
When you are finished creating or editing your profiles, left-click on the
“File” menu on the toolbar and select “Save” or “Save As”. The default
name is “Untitled”. Give it an easily identifiable name (for the next time
you retrieve it), and click “OK”.
• Save your work.
Your profile is saved in C:\Program Files\Belkin\Nostromo\Profiles. If you
installed to a directory other than C:\ProgramFiles\Belkin\Nostromo,
then the profile is saved in YourInstallDirectory\Profiles.
Note: It is always a good idea to get into the habit of saving your
profiles by going to “File” and “Save As”. This ensures that when
you modify a profile that is used in a different game for another
purpose, you won’t simply overwrite it. This lets you keep your
different profiles intact.
Uploading and Downloading Profiles
Please submit any profiles you create for addition to the profile list at
belkin.com. To submit a profile, please send it as an e-mail attachment
to [email protected].
To download profiles, go to belkin.com/nostromo and click
on “Downloads”.
Page
6
USING THE PROFILE LOADOUT MANAGER
If the Loadout Manager is currently running, there will be an icon
in the system tray on the right side of the taskbar at the bottom of
the desktop:
The Loadout Manager is responsible for “programming” the game
controllers with profiles. The Loadout Manager can be used in two
modes: manual and automatic.
If the Loadout Manager is not running, you can start it from the “Start”
menu: “Start>Programs>Nostromo->Loadout Manager”.
A loadout is a set of profiles that are assigned to the Nostromo game
controllers on your system (one profile for each controller), and an
associated game (or really any application). Loading that game
causes the Loadout Manager to automatically load the profiles you’ve
set up. This conveniently enables you to create profiles that will be
associated with each game you play. The system will automatically
load those profiles for you as you start up each game.
• Find the controller you want to load the profile for in the list shown. If
you have more than one of a type of controller, and it’s not obvious
which entry on the screen represents which controller, simply press a
couple of buttons on the controller and the image representing that
particular one will light up.
• Click on the profile button for that controller. Select “Load Profile…”
from the menu. This will bring up the typical file selection window.
Loadouts are built with the Loadout Manager. You assign a profile for
each controller, and select a game to associate with the set of profiles.
• Find the profile you want, select it, and click “OK”.
Manual Mode—Manual Mode is the simplest way to use the Loadout
Manager. In this Mode, you directly select profiles for controllers. You
simply open the activator window and select a profile for each
controller it shows.
• On the right half of the Loadout Manager, click “Browse” to select the
executable (.exe) file of the game you want to play. You can do this
by selecting the shortcut for the game on your desktop if you have
one there. If you do not, you can find the file in the directory where
you installed your game.
Automatic Mode—In Automatic Mode, you set up a loadout for each
game. The Loadout Manager then waits for that game to start. When
it does, the Loadout Manager loads all the profiles associated with
that loadout.
• Once you have the Programs.exe (or executable) selected, you can
either left-click on “Launch Game” or go to “File” and “Save as” and
name it. Save the loadout to use in Automatic Mode later.
Automatic Mode has a complex initial setup, but once that is done,
you never need to think about it again. Simply launch the game you
want to play and the Loadout Manager makes sure the controllers are
configured the way you want them to be.
• If you choose to use it in Automatic Mode, then you will need to
switch to Automatic from Manual by going to “Option” at the top left
corner of the editor.
Under “Options” there are a few different features that you can
also use.
Load the Profile you Just Made
After making a profile, you will need to activate it with a game in the
Loadout Manager. To do this, you simply select the controller, the
profile, and the game executable file. Then you can easily launch the
game from within the Loadout Manager.
• Automatic Mode: Allows the profile to launch automatically when the
program is activated.
• Manual Mode: If you select this, you will need to manually launch the
profile through the loadout manager each time you use it.
Open the Loadout Manager.
• Set as default loadout: You can set a profile to launch with every
application that does not have a profile set to it already.
• Clear default loadout: This will remove any default loadout that is
active on the system.
• Run on system start: If you uncheck this, the Loadout Manager will
NOT load at system startup.
Page
7
TROUBLESHOOTING
The n52 is not in the Windows Control Panel.
When I start the game with the Loadout Manager, there is no response
or control from my SpeedPad n52.
• Unplug your n52, and uninstall the software and drivers. Then reboot,
reinstall the software, and plug in the unit. If you are using Windows
2000, be sure to plug in the n52 before rebooting.
• Check the status in the “Game Controller” icon in the Control Panel
(click “Start”, “Control Panel”, “Game Controllers”). Make sure the
controller is listed in the “Game Controller” panel and the status is
listed as “OK”.
If you are still having problems, contact Belkin Tech Support at the
numbers listed on the back cover. First make sure that the problem you
are having is related to the Nostromo game controllers and the
Nostromo Array Programming Software, and is not an issue with the
game you are playing. If you are having problems with the game,
please contact the game publisher directly.
• In your game, make sure the keyboard is selected as the
default controller.
• Make sure your controller cable is connected properly.
Using the SpeedPad as a Default HID Device
• In the Windows “Control Panel/Game Controllers” window, make sure
the window shows the name of your Nostromo controller and “OK”. If
you don’t see this line, or if it says “not connected”, unplug the
controller and uninstall the software and drivers. Then reboot, reinstall
the software, and plug in the controller.
If you choose not to install the software or don’t set a profile to a game,
then by default, your n52 will map like this:
1.
2.
3.
4.
5.
6.
7.
8.
9.
10.
11.
12.
13.
14.
15.
• Check to be sure you know which button assignments you have
set up
After using the Loadout Manager, Windows is acting erratically, as if a
keyboard button was constantly pressed.
The button functions are not what they should be in the profile
I am using:
• Check to see if the original keyboard assignments within the game
options have been changed. If the original keyboard key assignments
in the game have changed, it will affect your profile because your
profile functions are based on keyboard functions.
In Windows 2000, the Nostromo drivers did not load and the controller is
only being recognized as an HID device.
Tab
D-pad are the keyboard’s arrow keys
Q
Thumb pad is the “Space” key
W
Thumb button is the “ALT” key
E
R
CAPS
A
S
D
F
SHIFT
Z
X
C
By default, the scroll wheel acts like a standard mouse scroll wheel
with a third mouse click.
This configuration works well with the default keyboard setup of most
first-person shooter games.
• Unplug the controller.
• Uninstall any Nostromo software, including device drivers.
• Restart the computer.
• Plug in the Nostromo game device you want to use. Allow the device
to install without the Nostromo Software Interface CD.
• While the controller is still plugged in, install the software interface
and drivers on the CD.
The game freezes.
• Restart your computer.
Page
8
USER GUIDE FOR MAC® USERS
Select an Application
The “Target” pop-up menu determines which profile applies to which
application.
1. Select “New Settings…” from the “Target” pop-up; a dialog will
appear asking what to use as the base setting.
2. Select “Create Empty Settings” to start with a blank slate.
CHOOSING AN APPLICATION
The software loads a profile based on the settings and the currently
running application. If no profile exists for the current application, the
software uses the “Global Settings” profile. The Global Settings profile
applies to all applications that do not have a profile specifically
assigned to them.
Profiles
A profile is a mapped set of button-presses on the controller that
accomplishes various actions. Some examples of the types of actions
you can program are:
• Single Key—make a button on the controller work like a
keyboard key.
• Macros—record a sequence of keyboard keys to be played back
when a button is pressed.
• Three shift modes—the controller can have three shift buttons that
quadruple the number of functions that can be programmed into the
other buttons.
• Mouse—the game controller can be programmed to insert
mouse clicks.
The Nostromo Array Panel will bring up a standard file chooser. In Mac
OS X, find and select “TextEdit” in your Applications folder. In Mac OS 9,
find and select “SimpleText”.
Assign a Single Key Event
1. Click on the Button 01 hardpoint or press button 01 on the controller.
This will change the “Trigger” pop-up to “Button 01”. The “Trigger”
pop-up indicates which button on the controller we are assigning the
action to.
2. The “Action” pop-up is set to “Type Keystroke” by default. This
indicates that we want the controller to simulate a keyboard
key-press when we hit the control listed in “Trigger”. This is correct.
3. Click in the “Keystroke” area. The Control Panel will highlight this box
and wait for you to press a key. Press “a”.
4. The “Frequency” pop-up determines how that key acts. The default is
“Hold Down”. Hold Down indicates that the key will be held as long
as you hold the button on the controller. This is correct.
See the “Tutorial” section for a walk-through creating a profile. See the
“Interface Reference” section for a description of the interface and its
functionality.
TUTORIAL
Building a Simple Profile
We will walk through a simple example of how to use the tool to create
profiles using Nostromo Array Programming Software (NAPS).
Assign a Macro
A macro is a series of keystrokes that get played back when the
triggering controller button is pressed.
1. Click on the Button 02 hardpoint or press button 02 on the controller.
This will change the “Trigger” pop-up to “Button 02”.
2. Change the “Action” pop-up to “Run Macro”.
3. In the “Macro” pop-up, select “New Macro…”. This will bring up the
“Edit Macro” dialog.
4. Enter “My Macro” as the name for this macro.
5. Tab to the first “Keystroke” edit control.
6. Type “hi there”. These keys will be filled in the various keystroke boxes.
If you make a mistake, hit the “Clear” button and try again.
Note: This example does not cover every feature of the software. You
can find more information in the “Main Interface” section.
Note: All screen shots are from the Mac OS X version of the software.
The interface is the same in Mac OS 9 and the controls are in the
same places.
Start the Nostromo Array Programming Software Application
On Mac OS X, this is installed into your applications directory; in Mac OS
9, this is in your Control Panels menu. This will display the Main Screen
of NAPS.
Page
9
7. All the other controls default to values that we want; select “OK” to
accept this macro.
Test Global Profile
Open any application other than the application you have a specific
profile for. Use button 01 and button 02. The settings from your global
profile are used. Open the application you have a specific profile for;
this is SimpleText in Mac OS 9 and TextEdit in Mac OS X. Now try button
01 and button 02. The settings from your application-specific profile
are used.
INTERFACE REFERENCE
Main Interface
The Nostromo Array control panel is used to create a profile for a
Nostromo game controller and to associate those profiles with
applications.
The top of the window has a view of the controller and hardpoints for
each of the assignable controls. The bottom of the window contains
the mapping controls.
Test your Profile
Notice that the hardpoints that you have assigned actions to now have
text that describes what that button will do. You have assigned the “a”
key to game controller button 01 and the “My Macro” macro to game
controller button 02.
Start the application that is associated with this profile. This is TextEdit in
Mac OS X or SimpleText in Mac OS 9.
Press button 01 on the n52 and notice that an “a” appears in the editor.
Press and hold button 01 and notice that it repeats, just like holding a
key on the keyboard.
Press button 02 on the n52 and notice that the “hi there” you assigned
as the macro gets typed into the window.
Make a Global Profile
When you run an application, and you have not created a profile for it,
it uses the “Global Settings” profile. This tutorial describes creating a
Global Profile. The Global Profile tutorial is written under the assumption
that you have read and followed the “Building a Simple Profile” tutorial.
Hardpoint
“Hardpoint” is our name for each assignable control on the n52. There is
one hardpoint for each button, one for each d-pad direction, one for
scroll up, one for scroll down, one for the scroll wheel button, and one
for both thumb buttons. Each hardpoint has text that describes the
action that will happen when that control is hit. Clicking on a hardpoint
selects that control as the control to be edited in the trigger pop-up.
Select Global Settings
Switch the “Target” pop-up to “Global Settings”.
Set Controls
Use the methods you learned earlier to set button 01 to report as “b”.
Use the methods you learned earlier to set button 02 to report as a
macro that produces “hello”.
Page
10
No Device Found
This indicator is shown when the software does not detect an n52
plugged into your Mac computer. You can still create profiles if there is
no n52 plugged into the computer. If the controller is plugged in and
the software does not detect it, try unplugging the controller, and then
plugging it in again.
7. Profiles by name: The last part of the menu is a list of the existing
profiles listed by profile name. When you select a profile name in the
“Target” pop-up, the profile is loaded for editing.
Shift State
The shift state can be changed with the “Shift State” pop-up or by
clicking on LED images on the interface. When you program controls in
a shift state, those controls are only active in that shift state. The “Shift
State” pop-up displays the current shift state. Lit LEDs on the controller
and the interface also indicate the shift state.
Device Selection Box
In the upper right corner of the interface is the device selection box.
Press the arrow to edit settings for other controller.
Mapping Controls
The mapping controls section of the window allows the user to edit
controls and associate the profile with an application.
Trigger
The “Trigger” pop-up displays the control you are currently editing. You
can change which control you are editing by selecting it in the
“Trigger” pop-up, by clicking on the hardpoint for the control in the
interface, or by pressing that button on the controller.
Target
The “Target” pop-up lists the application whose profile is currently
displayed.
1. Buttons: The buttons 1-15 and the circle button activate the set
action when pressed.
2. Mouse Wheel: The mouse wheel can be assigned three actions: one
action is triggered when the wheel is rotated up, another when the
wheel is rotated down, and the third when the wheel is pressed.
Pressing the wheel acts just like pressing any other button on the
controller. Rotating the wheel acts as if you quickly pressed and
released the button.
3. D-pad: Each direction of the d-pad can be treated like a separate
button. In the case where a diagonal is pressed but there is no action
programmed, the software acts as if both adjacent directions are
pressed. This lets you program the cardinal directions as the arrow
keys, press a diagonal, and get both appropriate arrow keys.
Action
The effect the software produces when a trigger is pressed.
1. Do Nothing: This control has no effect.
2. Type Keystroke: Pressing the associated control reports the given
keys as pressed.
3. Press Modifier Keys: This action allows you to map one or more
modifier keys to your n52.
Note: You cannot combine modifier keys with other keys on your
keyboard; however, you can do so with the keystroke action.
4. Open File or Folder: This allows you to set up a control to open a file
or a folder or an application.
5. Run Macro: This allows you to choose a macro to run when the
triggering control is pressed.
6. Mouse Click: This action causes the software to report a mouse click
at the current mouse location.
7. Double-Click: Same as single-click except that this reports a
double-click.
8. Triple-Click: Same as single-click except that this reports a triple-click.
9. Click Lock: This toggles the state of the mouse press.
Note: On current versions of Mac OS X, the click is released as soon
as the mouse cursor is moved by another device (typically
the mouse).
10. Shift State: Choosing one of the shift states as the action causes the
controller to enter that shift state when the triggering control is held
down.
In addition, the “Target” pop-up contains the controls for selecting
which application to associate a profile with, and exporting and
importing profiles.
1. Global Settings: This is a special profile that is in effect when the
running application does not have a specific profile associated. The
Global Settings profile does not have an associated application, all
other profiles do.
2. New Settings…: The New Settings entry creates a new profile
associated with a new application. It asks if you want to start from an
empty profile, copy the Global Settings, or copy the profile you are
looking at when you select “new”. It also asks you to pick an
application to associate this profile with.
3. Import Settings…: Import Settings loads a profile saved with
Export Settings.
4. Export Settings…: Export Settings saves the current profile as a file. This
file can be sent to other people using NAPS so that they can use,
edit, and view your settings.
5. Rename Settings…: Rename Settings lets you change the name of
a profile.
6. Remove Settings…: Remove Settings deletes the current profile.
Page
11
11. Hold Shift State: This action causes pressing the triggering control to
enter the appropriate shift state. The controller remains in that shift
state until the triggering control is pressed a second time.
12. Scroll Direction: This scrolls in the selected direction.
2. New Macro…: This brings up the Edit Macro dialog empty, so that
you can enter a new macro.
3. Edit Macro…: This brings up the Edit Macro dialog with the current
macro so that you can edit it.
4. Delete Macro…: This deletes the current macro.
5. Macros by Name: The pop-up lists the existing macros by name.
Selecting one sets it as the macro for this action.
Action - Type Keystroke
When “Type Keystroke” is selected as the action, you have
two additional options.
Action - Mouse Click
When one of the “Mouse Click” actions is selected, you have the
additional option of selecting which modifier keys to report at the same
time. Select the modifier keys you want pressed by clicking on the
appropriate button.
Keystroke
The “Keystroke” box is where you enter the key to report for the Type
Keystroke action. Select this box and press the key you want. You can
also add modifier keys here by holding the modifier key you want as
you press the key.
Action - Scroll Direction
When one of the “Scroll” actions is selected as the action, you have
two additional options.
Frequency
The “Frequency” pop-up details how the key is reported to the system.
1. Once: This indicates the system will act as if the key is pressed and
released once. The keystroke will not be reported again until the
control is released and re-pressed.
2. Hold Down: This indicates the software will report the key held down
as long as the triggering control is held down.
3. N times/sec: The software will report the key being pressed and
released very quickly.
4. Every N seconds: The software reports the key being pressed and
released as listed, once every N seconds.
Scroll Speed
The “Scroll Speed” pop-up lets you select how far to scroll when this
action is activated.
Action - Press Modifier Keys
When “Press Modifier Keys” is selected as the action, you have the
additional option of selecting which modifier keys to press. Select the
modifier keys you want pressed by clicking on the appropriate button.
Edit Macro Dialog
The Edit Macro dialog is where you edit the macros you want
to use.
Frequency
The “Frequency” pop-up details how often the key is reported to the
system. This behaves just like the frequency selection of the “Type
Keystroke” action.
1. Macro Name: Macros need names to distinguish them from each
other; enter the name here.
2. Key Speed: The Key Speed is the time between reported key presses.
If the macro repeats, this is also the time between the last key press
and the first.
3. Clear: This erases the keystrokes recorded for this macro.
4. Keystroke List: This is the list of keystrokes that the software will report
while this macro is running. You can select any box and type a key to
replace the key in that position. You can have the macro report
modifier keys by pressing them with the key to report.
5. Repeat until released: When this box is checked, this macro will
restart from the beginning if the triggering control is still pressed. If this
box is not checked, the macro will stop when it reaches the end of
the keystroke list, even if the triggering control is still pressed.
Action - Open File or Folder
When “Open File” or “Folder” is selected as the action, you have the
additional option of selecting what to open. Click the “Item to Open”
control to bring up a standard file chooser, then choose the item you
want opened when the triggering control is pressed.
Action - Run Macro
When “Run Macro” is selected as the action, you have the additional
options of creating or choosing which macro to run.
Macro Pop-Up
The macro pop-up is how you manage macros.
1. No Macro Selected: This is the default. No macro has been selected
yet. You cannot choose this option; it exists to indicate that you need
to select a macro.
Page
12
GLOSSARY
INFORMATION
FCC Statement
Action
The effect the software produces when a trigger is pressed.
DECLARATION OF CONFORMITY WITH FCC RULES FOR
ELECTROMAGNETIC COMPATIBILITY
We, Belkin Corporation, of 501 West Walnut Street, Compton, CA 90220, declare
under our sole responsibility that the product,
F8GFPC100
to which this declaration relates,
Complies with Part 15 of the FCC Rules. Operation is subject to the following two
conditions: (1) this device may not cause harmful interference, and (2) this
device must accept any interference received, including interference that may
cause undesired operation.
Hardpoint
A hardpoint is a button on the software interface that represents a
single physical control on the n52. Click on a hardpoint to select it
for programming.
Macro
A macro is a set of keystrokes that are played in sequence when
triggered.
CE Declaration of Conformity
We, Belkin, declare under our sole responsibility that the F8GFPC100, to which this
declaration relates, is in conformity with Generic Emissions Standard EN55022 1998
and with Generic Immunity Standard EN55024 1998, and with low voltage
directive.
Profile
A profile is a collection of mappings between triggers and actions. Most
profiles are associated with a specific application. Global Settings is a
special profile that applies when no other profile is associated with the
current application.
Note: If during the use of this product the host computer becomes unresponsive,
it may be due to electrostatic discharge. Please follow the procedures
below to correct the problem:
- Disconnect the USB cable from the computer;
- Close the software application in the computer (or reboot the computer
if necessary); and
- Reconnect the USB cable to the computer.
Shift State
A shift state is a way of putting more than one function on a single
button of the n52. There are four shift states available:
Normal, Red, Green, and Blue. If no LEDs light up, then Normal mode is
indicated. An LED of the appropriate color indicates the other modes.
Any control on the n52 can activate a shift state. These can either be
active while that control is held, or toggled on and off by using that
control. Controls can have different functions in each shift state. For
example, in Normal mode, button 01 might act like the letter “a” on the
keyboard; while in Blue mode, button 01 runs a macro.
Belkin Corporation Limited Lifetime Warranty
Belkin Corporation warrants this product against defects in materials and
workmanship for its lifetime. If a defect is discovered, Belkin will, at its option,
repair or replace the product at no charge provided it is returned during the
warranty period, with transportation charges prepaid, to the authorized Belkin
dealer from whom you purchased the product. Proof of purchase may be
required.
This warranty does not apply if the product has been damaged by accident,
abuse, misuse, or misapplication; if the product has been modified without the
written permission of Belkin; or if any Belkin serial number has been removed
or defaced.
THE WARRANTY AND REMEDIES SET FORTH ABOVE ARE EXCLUSIVE IN LIEU OF ALL
OTHERS, WHETHER ORAL OR WRITTEN, EXPRESSED OR IMPLIED. BELKIN SPECIFICALLY
DISCLAIMS ANY AND ALL IMPLIED WARRANTIES, INCLUDING, WITHOUT LIMITATION,
WARRANTIES OF MERCHANTABILITY AND FITNESS FOR A PARTICULAR PURPOSE.
No Belkin dealer, agent, or employee is authorized to make any modification,
extension, or addition to this warranty.
BELKIN IS NOT RESPONSIBLE FOR SPECIAL, INCIDENTAL, OR CONSEQUENTIAL
DAMAGES RESULTING FROM ANY BREACH OF WARRANTY, OR UNDER ANY OTHER
LEGAL THEORY, INCLUDING BUT NOT LIMITED TO, LOST PROFITS, DOWNTIME,
GOODWILL, DAMAGE TO OR REPROGRAMMING OR REPRODUCING ANY
PROGRAM OR DATA STORED IN OR USED WITH BELKIN PRODUCTS.
Some states do not allow the exclusion or limitation of incidental or consequential
damages or exclusions of implied warranties, so the above limitations of
exclusions may not apply to you. This warranty gives you specific legal rights, and
you may also have other rights that vary from state to state.
Trigger
A trigger is any control on the n52 that triggers an action.
Page
13
Belkin Corporation
310.898.1100
Compton • CA • USA
Belkin Components, Ltd.
+44 (0) 1933 35 2000
Rushden • United Kingdom
Belkin, Ltd.
+61 (0) 2 4372 8600
West Gosford • Australia
Belkin Tech Support
US:
310.898.1100 ext. 2263
800.223.5546 ext. 2263
Europe:
00 800 223 55 460
Australia:
1800 666 040
© 2003 Belkin Corporation. All rights reserved. All trade names are registered trademarks of respective manufacturers listed.
Mac OS and Mac are trademarks of Apple Computer, Inc., registered in the U.S. and other countries.
P74289-B