1
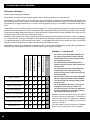
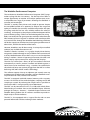
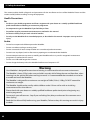
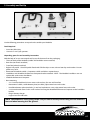
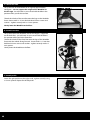
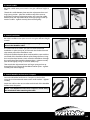
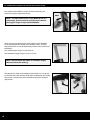
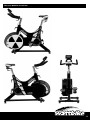
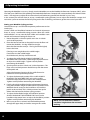
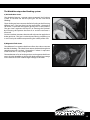
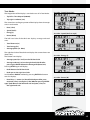
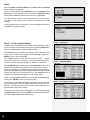
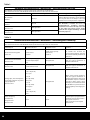
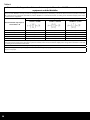
Table of Contents About this Manual 1. Introduction to the Wattbike - Welcome to the Wattbike - Wattbike – Cycling for all - The Wattbike Performance Computer 2. Safety Instructions 3. Assembly and Setup - Tools Required - Unpacking, parts list and assembly instructions - Saddle and handlebar horizontal and vertical setup 4. Operating Instructions - Setting your Wattbike cycling position - The Wattbike dual braking system - Air Brake Gear Lever - Magnetic Climb Lever - The Wattbike Performance Computer - Just ride • TEXT MODE • GRAPH MODE - Select Workout - Recall - Setup - HR Monitor Interface - Peak Power Test - Logcard - Battery - Sockets 5. Preventative Maintenance and Troubleshooting 6. Wattbike Expert Software and Wattbike Racing 7. Regulatory Information - FCC and Other Domestic Regulations - European Regulations 02 About This Manual This manual is divided into a number of sections as follows: 1. Introduction to the Wattbike Introduction to the exciting world of the Wattbike. 2. Safety Instructions Provides guidelines for safely operating the Wattbike. 3. Assembly and Set Up To get you started immediately, this section provides instructions for unpacking, assembling and rider adjustment of the Wattbike. 4. Operating Instructions Provides step by step instructions to set up your cycling position, the Wattbike dual braking system and for operating the Wattbike Performance Computer. 5. Preventative Maintenance and Troubleshooting Describes the preventative maintenance measures required to keep your Wattbike in good condition and likely causes and solutions to any problems you may encounter. 6. Wattbike Expert Software and Wattbike Racing Provides a description of the sports performance and race analysis software. 7. Regulatory Information Provides regulatory information for the Wattbike. 03 1. Introduction to the Wattbike Welcome to Wattbike Thank you for choosing the Wattbike. The Wattbike accurately measures power output - Watts. No other product of its type does this. The Wattbike is an indoor bike, it is an exercise bike, group cycling bike, testing bike, competition bike and rehabilitation bike all wrapped up in one. It offers an unlimited range of resistance provided by a unique air braked flywheel, and a supplementary magnetic climb lever; and can be used by people of all ages and abilities irrespective of their fitness level. The Wattbike is the first indoor bike to be endorsed by British Cycling, the governing body with a global reputation for innovation and achievement. It has been designed to offer a cycling experience as close to riding on the road as possible. The ground-breaking Wattbike Performance Computer delivers immediate high-quality feedback that, until now, only the world’s best cyclists have been privileged to receive. Wattbike is a new sport for all, which will engage everyone, experienced and inexperienced cyclists, adults and children. It is suitable for riders of all ages, and abilities. It reproduces the challenges of the open road. You can cycle along lightly at a comfortable pace or push yourself to your limits. The Wattbike will measure every pedal turn from start to finish and offer scope to compete in an indoor arena with the bikes linked for racing. The Wattbikes impact spans performance monitoring, fitness testing, talent identification, group cycling, competitions, education and preventative healthcare. It can be used in a gym, school or at home. ✓ ✓ ✓ ✓ ✓ Feels Like Cycling on the Road ✗ ✓ ✓ ✓ ✓ Suitable for Group Cycling ✗ ✓ ✓ ✓ ✓ Suitable for Competition ✗ ✗ ✗ ✓ ✓ Suitable for Talent Identification ✗ ✗ ✗ ✗ ✓ Provides Accurate Feedback ✗ ✗ ✗ ✗ ✓ In-Depth Scientific Analysis ✗ ✗ ✗ ✗ ✓ ✓ ✗ ✓ ✗ ✗ Wattbike Road Bike (fitted withSRM crank) Road Bike Road Bike (on TurboTrainer) Suitable for Training Suitable for Use 24/7 04 Traditional Group Cycling Traditional Exercise Bike Wattbike – Cycling for all ✓ ✓ ✓ ✓ ✓ ✓ ✓ ✓ • • • • • For the non-cyclist, the Wattbike combines all the values and enjoyment of cycling with the health benefits of an activity that can provide the foundation for fitness. For school children, the Wattbike provides a gateway to physical activity, and the promise of year-round fun. For the recreational cyclist, the Wattbike offers everything from low intensity fat-burning exercise to group cycling, right through to high intensity sprinting. For the top level cyclist and coach, the Wattbike delivers a degree of reliable scientific feedback that will revolutionize training, testing and the search for talent. For all, the Wattbike introduces a new sport of competitive indoor cycling. Amateurs can genuinely ride against and measure themselves against the professionals, and riders of all ages can track their performance for life. Wattbike is versatile and value for money. Just compare its features with existing alternatives. The freedom of cycling outside remains irresistible but the Wattbike possesses qualities that are difficult or expensive to acquire on a real bike. The table opposite compares the features of Wattbike with a variety of cycling options that are available: The Wattbike Performance Computer The revolutionary Wattbike Performance Computer (WPC) brings indoor cycling into the 21st century. For the first time it offers a unique opportunity to monitor and analyze performance across a comprehensive range of parameters knowing that feedback is accurate and meaningful. The WPC is entirely menu-driven and simple to operate despite the incredible breadth of its potential. It eclipses the range and quality of scientific data currently available and provides the sport of cycling with the first low cost, reliable medium for talent ID screening. It also opens up the prospect of the development of the sport of indoor cycling, as bikes can be linked together for racing. Riders can recall and race against previous workouts either from the WPC memory or from a Logcard. In addition it will soon be possible to share data files through the Wattbike World Ranking and there will be the capacity to download and race against performances of other riders, all from the comfort of the home. However, Wattbike is not all about racing. A variety of pre-installed workouts are available for exercise users. The WPC is fitted as standard. It is a graphic display driven device; navigation is intuitive through an easy to follow menu structure and 4 clearly labelled buttons that make it easy to use and manipulate during a workout. Section 4 Operating Instructions describes and details step by step instructions for setting the WPC displays. The rider can select from a library of pre-set workouts that load automatically or recall a previous workout and ReRide against it. Heart Rate can be monitored using, a standard un-coded Polar chest belt and heart rate receiver plugged into the WPC or a chest belt using ANT/ANT+SPORT wireless technology This software captures data up to 100 times per second, stores up to 700 minutes of information and offers real-time feedback across 39 parameters for riders, coaches and scientists. The WPC is equipped with 2Mb internal memory with a capacity to store 175 minutes of data with the highest sampling rate of 100 samples per second. By reducing the sample rate it is possible to increase the WPC’s storage capacity up to 700 minutes. The WPC can be connected to a PC via a USB cable which allows downloading of workout data to the Wattbike Expert Software package for analysis. Section 6 – Wattbike Expert Software and Wattbike Racing outlines the PC software available to provide indepth analysis of rider workouts. The WPC is also equipped with a Logcard for the rider to store personal information and data relating to their workouts. 05 2. Safety Instructions This section includes health safeguards and precautions for the installation and use of the Wattbike. Please read this section carefully before installing or using the equipment. Health Precautions Do - Do discuss your health programme and fitness regimen with your doctor or a suitably qualified healthcare professional before embarking on an exercise programme. - Do stop exercising on the Wattbike if you feel dizzy or faint. - Do perform regular preventative maintenance as outlined in this manual. - Do exercise slowly until you reach a level of comfort. - Do only use the Wattbike for its intended purpose, as described in this manual. Improper use may result in injury. Do Not - Do not let unsupervised children operate the Wattbike. - Do not use without cycling or training shoes. - Do not use outside in wet or damp weather or in an enclosed pool environment. - Do not insert any object, hands or feet into any opening on or underneath the Wattbike. - Do not attempt to remove any covers or modify your Wattbike unless it is part of a recognized maintenance programme as outlined in this manual. - Do not use a USB cable longer than 3 metres - Do not charge the battery unless the Wattbike Performance Computer is OFF Warning Your Wattbike is designed for exercise and training in a commercial and consumer environment. The Wattbike is heavy (55kg) make sure you hold it securely whilst fitting the rear and front foot, when lowering it to the ground and when moving it around. It is recommended that two adults are used to assemble and move the Wattbike. The Wattbike is designed for a maximum user weight of 330lb (23.6st) /150kg. DO NOT exceed the maximum user weight. The Wattbike should not be used by adults/children under 150 cms tall or with an inside leg measurement of less than 60 cms. Please check with your doctor or suitably qualified healthcare professional prior to beginning any exercise programme. Do not push yourself to excess. Stop if you are feeling faint, dizzy or exhausted. Use common sense when cycling. Read the User Manual fully before using your Wattbike, Failure to obey this warning can result in injury or death. 06 3. Assembly and Set Up Use the following procedures to unpack and assemble your Wattbike. Tools Required - 5mm Hex (Allen) Key - 15mm & 17 mm Cycle spanners Unpacking, parts list and assembly instructions With the help of an assistant unpack and lay out all the items from the packaging. • The main body of the Wattbike (saddle and handlebar stems attached) • Rear foot (no wheels attached) • Front foot (wheels attached) • Right & Left pedals - Standard pedals fitted with SDP foot clips on one side and toe clips on the other. Custom pedals easy to fit. • Recreational Wattbike saddle. Competitor saddle available as optional extra • Handlebars with Wattbike Performance Computer bracket attached– NOTE - The Wattbike handlebars are not replaceable with custom handlebars • Wattbike Performance Computer • Box containing - 4 x 17 mm hex bolt head 25 mm screws with washers, for rear and front feet - Recreational saddle, saddle bottom plate (one hole), adjustment lever and washer - Handlebar bottom plate (two holes), 5 mm hex head 40 mm screw, adjustment lever and washer - 2 x 25 mm thumb screws and 2 small washers for fixing the Wattbike Performance Computer to the handlebar bracket - Plug-in battery charger - Logcard and 3m USB cable NOTE - the Wattbike is heavy (55kg) make sure you hold it securely whilst fitting the rear and front foot and when lowering it to the ground. 07 A - Attach rear foot Lift up the rear of the Wattbike to an angle of approximately 30 degrees – do not support the weight of the Wattbike on the fan cage. You will need an assistant to hold the bike in this position whilst you fit the rear foot. Thread the 2 holes of the rear foot onto the lugs on the Wattbike frame. Secure with 2 x 17 mm hex bolt head 25 mm screws and washers - tighten securely with a 17 mm spanner. Gently lower the Wattbike to the floor. B - Attach front foot Lift up the front of the Wattbike so that the weight is supported on the back foot – you will need an assistant to hold the bike in this position whilst you fit the front foot. Thread the 2 holes of the front foot onto the lugs of the Wattbike frame with the wheels facing forward. Secure with 2 x 17 mm hex bolt head 25 mm screws and washers - tighten securely with a 17 mm spanner. Gently lower the Wattbike to the floor. C - Attach pedals Screw the right pedal onto the right crank - tighten securely using a 15 mm spanner. Repeat for the left pedal. 08 D - Attach saddle Raise the saddle stem post to mark 12 to give sufficient height to work Thread the saddle bottom plate onto the adjustment lever and large spring washer - place the saddle on top of the stem to the furthest backward adjustment point, and screw the saddle bottom plate and adjustment lever and large spring washer up into the saddle – tighten securely (but not too tightly). E - Attach handlebars Raise the handlebar stem post to mark 14 to give sufficient height to work NOTE - Be careful when adjusting the stem height not to disturb the Wattbike cable. It is easier with an assistant. Ask your assistant to hold the handlebars in place on top of, and towards the furthest forward adjustment point of the handlebar stem. Place the handlebar bottom plate underneath the stem with the small hole of the handlebar bottom plate facing the front. Using the 5 mm hex head 40 mm screw secure the handlebars through the small hole of the handlebar bottom plate – tighten securely (but not too tightly) using a 5 mm hex (Allen) key. Then attach the adjustment lever and large spring washer up through the large hole on the handlebar bottom plate – tighten securely (but not too tightly). F - Attach Wattbike Performance Computer Secure the Wattbike Performance Computer to the bracket using the 2 x 25mm thumb screws and 2 small washers – tighten securely. Attach the cable to the sensor socket on the back of the Wattbike Performance Computer. NOTE - The Wattbike Performance Computer should always be switched off when attaching the cable. 09 G - Saddle and handlebar horizontal and vertical set up The saddle and handlebars can be moved horizontally and vertically using the adjustment levers. PULL NOTE – The adjustment levers on the Wattbike are of a ratchet type, to move the lever pull the lever outwards placing your fingers away from the Wattbike. There are two adjustment levers on the frame of the Wattbike to set the height of the saddle and handlebar stems, and two adjustment levers to set the horizontal position of the saddle and handlebars. The saddle height range is 59 cm to 84 cm. The handlebar height range is 55 cm to 74 cm. NOTE – Do not extend the saddle or handlebar height above the minimum marking. The horizontal saddle and handlebar adjustment has a range of 6 cm for both. Measure from the back of the saddle block for saddle adjustment, and the front of the handlebar block for handlebar adjustment. 10 How your Wattbike should look. 11 4. Operating Instructions Operating the Wattbike is very easy. Simply sit on the Wattbike, turn on the Wattbike Performance Computer (WPC), select ‘Just Ride’, press ENTER and start pedaling. The Wattbike Performance Computer will start immediately and show the ‘Main menu’. Learning how to adjust the resistance levels and familiarizing yourself with the WPC is just as easy. In this section you will learn how to set-up a comfortable cycling position, how to adjust the Wattbike’s unique dual resistance system to recreate the feel of cycling on the flat or climbing; and how to get the most out of your WPCr. Setting your Wattbike Cycling position Correct bike set-up is crucial both to optimize performance and to avoid injury. Use the saddle and handlebar horizontal and vertical adjustment levers to set up a comfortable riding position. When the saddle and handlebars are set, note the final saddle and handlebar stem vertical and horizontal settings for future use. 1. Rotate the pedals so that the pedals are in the 12 o’clock and 6 o’clock positions. 2. Place the heel of one foot on the pedal nearest the floor and mount the Wattbike – the leg should be straight. Move the feet into the toe clips - The leg should be slightly bent at the knee. If the leg is too straight lower the saddle height. If too bent raise the saddle height. Pedal backwards, the hips should not rock. 3. To adjust the saddle height ALWAYS DISMOUNT THE WATTBIKE FIRST and use the saddle height adjustment lever to adjust the saddle height. Tighten securely before remounting the Wattbike. 4. Spin the pedals to the 9 o’clock and 3 o’clock positions. The knee at the 9 o’clock position should line up with the centre of the pedal axle. Adjust the horizontal position of the saddle forward or backwards to line up the knee position. 5. To adjust the horizontal position of the saddle ALWAYS DISMOUNT THE WATTBIKE FIRST and use the saddle horizontal adjustment lever to adjust the saddle position. Tighten securely before remounting the Wattbike. 6. Finally adjust the handlebar height and horizontal positions using the handlebar height and horizontal adjustment levers. With both hands resting on the handlebars and with the pedals at the 9 o’clock and 3 o’clock positions line up the elbow with the knee for the best cycling position. 7. To adjust the handlebar height and horizontal position ALWAYS DISMOUNT THE WATTBIKE FIRST and use the handlebar adjustment levers to adjust the handlebar position. Tighten securely before remounting the Wattbike. 8. Make sure you have a relaxed and comfortable position through the upper body and whilst sitting on the saddle. 12 NOTE – Do not extend the saddle or handlebar height above the minimum marking. The Wattbike unique dual braking system a) Air Brake Gear Lever The Wattbike features a unique patent protected dual braking system to recreate the feel of cycling on the flat and whilst climbing. The air brake gear lever recreates the feel of cycling on the flat using different gears. The ‘gear lever’ can be moved from ‘1 through to 10’ where ‘1’ represents the lightest gearing and ‘10’ the heaviest. The gear lever regulates the flow of air entering the flywheel. By increasing the aperture the flow of air and the resistance is increased. For most workout situations the rider will only need to apply the air brake gear lever. The ‘gear’ can be adjusted during a workout, just as on a road cycle without compromising the validity of the data. b) Magnetic Climb Lever The addition of a magnetic climb lever allows the rider to recreate the feel of climbing. The ‘climb’ lever rotates clockwise through one complete turn and is marked ‘1’ through to ‘7’ where ‘1’ represents a level road and ‘7’ a very steep gradient. The combination of an air brake gear lever and magnetic climb lever means that the Wattbike can be used for high cadence low wattage at one extreme and low cadence high wattage at the other. 13 The Wattbike Performance Computer (WPC) Features: • Accurate tracking of performance data – Time (h:m:s), 1km Pace (m:s), Speed (km/h), Energy (Joules) and Power (Watts) • Four Text modes – Speed (/1km), Speed (km/h), Energy (J), Power (Watt). • Three Graph modes – Polar-Graph (Force Curve), Signal- Graph (Force Curve [N]) and Bar-Graph (Speed [km/h], Power [W] and Energy [J]) • Logcard – removable Logcard stores workout data and personal preferences. One Logcard included with each Wattbike Performance Computer • Heart Rate Monitoring – integrated heart rate display for Polar ANT/ANT+SPORT wireless technology • Power generation – this draws power from the cycling to extend the battery life • USB Interface – transfer of data to PC Automatic Operation – Turn the WPC on, select ‘Just ride’, press ENTER and start pedaling and the WPC will give immediate feedback. The WPC turns off after 4 minutes if inactive. There are seven basic screens, 4 Text Modes and 3 Graph Modes Just ride During a workout the measured and calculated parameters can be shown in 4 different Text Modes. You can scroll round the Text Modes using the up/down keys on the WPC. 14 Text Modes Just ride – Speed (Pace/1km) The top portion of the display is standard across all 4 Text Modes. • Top left is Time elapsed (0:00:00) • Top right is cadence (r/m) The second row and largest portion of the display shows the major units in each mode. • Pace (/1km) • Speed (km/h) • Energy (J) Just ride – Speed (Km/h or mph) • Power (Watt) The left hand side of the third row displays average and total units. • Total distance (m) • Total energy (kJ) • Average power (av. Watt) The right hand side of the third row displays the current heart rate (beats/min). The bottom row displays Just ride – Energy (J) • Average speed (av. km/h) on the left hand side • Average cadence (r/m) on the right hand side OR after pressing the ENTER button the Average HR (beats/min) Pressing ENTER again will display • Peak Watt on the left hand side • Peak rpm on the right hand side In a Custom or ReRide workout by pressing ENTER the bottom row also displays Just ride – Power (W) • Pace bike, +/- metres (m) ahead/behind pace bike, pace required (/1km), actual pace )/1km) OR after pressing ENTER again peak Watt on the left hand side and pace (/1km) on the right hand side 15 Graph Modes Just ride – Polar-Graph You can also show the parameters in Graph Mode. As with the top of the 4 standard Text Modes the top portion of the display is standard across all 3 Graph Modes. • Top left is Time elapsed (0:00:00) • Top right is cadence (r/m) On the left hand side of each graphic display are graphs in Polar (Force Curve – left leg/right leg %), Signal (Force Curve [N]) and Bar form. The right hand side of the second row displays the major units in each mode. NOTE – The Polar graph shows: Left hand side – 0° to 180° is the left leg drive Right hand side - 0° to 180° is the right leg drive • Pace (/1km) • Power (Watt) • Energy (J) • Speed (km/h) Just ride - Signal The major units loop within each graphic display by pressing the ENTER button and then within the graphs by pressing the up/ down keys. The third row displays the average and total units. • Total Distance (m) with Pace (/1km) and Speed (km/h) display • Average Power (av. Watt) with Watts display • Total Energy (total kJ) with Energy (J) display These fields also loop within each graphic display by pressing the ENTER button. The bottom right hand field displays the current Heart Rate (beats/ min). 16 Just ride – Bar-Graph Workout Press ENTER - The Workout feature offers a variety of workout options. Use the up/down keys on the WPC to scroll through the displays and ENTER to select an option • Last workout – this repeats the last workout completed • Standard – offers a choice of six pre programmed workouts - 1,000 m - 3,000 m - 4,000 m - 10,000 m - 30 minutes - 60 minutes • ReRide – enables you to race against a previous workout. In ReRide the pace bike will be displayed at the bottom of the screen and will show +/- metres (m) ahead/behind the pace bike, actual pace and pace required (/1km). • Custom – allows you to select from 6 of your own workouts, which can be created in New workout and allows you to recall any workout previously stored on the Logcard • New workout – enables you to create your own custom workout. In New Workout mode you can set the pace (/1km) required and set a workout by distance (m) or time (h:m:s). The Custom workout display will hold the pace bike at the custom pace and show +/- metres (m) ahead/behind the pace bike, actual pace and custom pace. During a Custom workout press ENTER and the custom pace (/1km) will be shown in the bottom right of the display. 17 Recall After a Just Ride, Standard, ReRide or Custom workout the Recall of the workout is automatic. To see a saved workout press ENTER after accessing Recall in the Main menu - Each workout can be reviewed in Graphical or Text mode and pre-defined split intervals can be set in Set split. The split intervals can be set in increments of 1 minute within a range of 1-60 minutes with a total recall memory of 1400 minutes. Use the up/down keys on the WPC to scroll through the displays and ENTER to select an option Recall - Text & Graphical Modes Recall – Text Mode In Text mode, on the left hand side of the screen the defined splits of your workout can be viewed and by pressing the up/down keys you can scroll through the splits for the workout. The Summary of the workout will remain on the right hand side of the screen. There are two pages of the Summary, simply press ENTER to access the second page. The Summary pages show (for the whole session) – Length (of session), Power av., Power pk., L%/R% (left and right leg %), Cadence, Cad. Pk., Distance, Energy (kJ), Speed av., and HR av. Recall – Graphical Mode Pressing ENTER again will bring you to the Graphical mode, on the left hand side of the screen you can view your workout splits as a bar chart for Power, HR, Cadence, Energy, Distance and Speed as well as the split Maximum and Average for the parameter, to scroll though the splits press the up/down keys. The Summary of the workout will remain on the right hand side of the screen. Again as with the Text mode there are two pages of the Summary, simply press ENTER to access the second page. If you have set a Custom workout as an interval session the WPC will automatically switch to Recall Text mode during the rest interval – you will see the interval rest time counting down in the top left hand corner of the screen. During the rest interval you will be able to switch between Text and Graphical mode by pressing ENTER and use the up/down keys to scroll through defined split information. 18 Recall – During Rest Interval Setup Press ENTER - In Setup you can go into the Memory and Delete all or Delete last session and also change the Sample rate per second to OFF (session will not be saved), 25 samples, 50 samples or 100 samples. Use the up/down keys on the WPC to scroll through the displays and ENTER to select an option. The WPC is equipped with 2Mb internal memory which has the capacity to store 175 minutes of data with a resolution of 100 samples per second. It is possible to increase the WPC’s storage capacity by reducing the sample rate to 50 or 25 samples per second. 100 samples per second 175’ 50 samples per second 350’ 25 samples per second 700’ For general exercise the 25 sample setting is appropriate. For cycling enthusiasts, professional cyclists, coaches and sports scientists, particularly if using Wattbike Expert Software, a higher sampling rate may be necessary. The Wattbike Performance Computer only stores 40 sessions, irrespective of the length of the sessions and when full deletes the latest session first. It is recommended that the data is backed up regularly, either to the logcard or direct to Wattbike Expert Software, and the memory cleared regularly. Setting the Zero State of the Monitor Whilst the Wattbike is factory calibrated there is a function to Set zero from the Wattbike Performance Computer. This can be used to ensure that the Wattbike has been returned to zero prior to testing. Select Setup from the Main menu, then Memory and simultaneously press all four buttons. Rotate the pedals backwards for a few revolutions to unload the Wattbike. The cranks should be unladened and in a horizontal position Press ENTER – the monitor will automatically Set Zero. 19 Heartrate Connection to a HR Monitor device is by a Heart Rate Interface receiver or ANT/ANT+SPORT wireless technology In Set up select HR, press ENTER this takes you into the HR set up screen - select the HR Monitor device you are using (not forgetting to connect the HR Interface cable if one is required) and follow the instructions on screen. When connected press ESC until the screen returns to the Main menu – Your HR will now appear on all the Just ride screens. Peak Power Test The Wattbike has a built in peak power test. In the Just ride mode press ENTER until you see ‘peak Watt’ in the bottom left of the screen and ‘peak rpm’ in the bottom right of the screen. You can set the other display units using the up/down keys on the WPC. This is a very short test and should take only a few seconds or pedal revolutions. Set the Air-brake gear lever at your personal level and warm up for 10 minutes. You are now ready to do the peak power test. From a static starting position pedal as fast and as hard as you can, after a few pedal revolutions ‘peak Watts’ and ’peak rpm’ will stop rising – the figures shown are your peak power in watts and peak rpm. Record your peak power and peak rpm to compare against future re-tests. Do not undertake this test if feeling unwell or if you are injured. If in doubt consult your Doctor before undertaking the peak power test. 20 Logcard The WPC Logcard (CCL) is a smart card. When loaded into the WPC, through the slot on the right hand side it captures all the data from a workout – the workouts can be recalled to ReRide against on another occasion. It is recommended that data is transferred directly from the WPC to the PC using a USB cable (see the Wattbike Expert Software User Manual). The Logcard memory is sufficient to store six individual Custom workouts and 58.5 hours (3,510 minutes) of data. This gives a greater memory capacity than the WPC itself. Battery The Wattbike is fitted with a generator that recharges the battery when cycling at a cadence over 50 r/m. This means that close to 98% of the working time will be covered with current from the generator. The batteries should be recharged every month using the external battery charger supplied with Wattbike. The WPC can only operate with the original factory supplied accu-batteries – please contact your Wattbike distributor if you experience any battery problems. See Section 5. Preventative Maintenance and Troubleshooting on page 22 for further battery charging instructions. Sockets There are four sockets on the back of the Wattbike Performance Computer • SENSOR – to connect the WPC to the Wattbike • CHARGE – to connect the 12V battery charge adapter • HEART RATE – to connect to a Polar heart rate receiver • USB – to connect the Wattbike to a PC (do not use a USB cable of more than 3m in length) • RESET button – see Section 5. Preventative Maintenance and Troubleshooting Where the ‘no hands’ symbol is displayed do not touch the connectors on the back of the Wattbike Performance Computer with your hands unless your body has been discharged of static electricity. 21 5. Preventative Maintenance and Troubleshooting The Wattbike is constructed from high performance components and is designed to be almost maintenance free and should withstand heavy usage. Any unusual symptoms, such as loud noises or grinding during operation should be reported to your local Wattbike distributor. For a normal service all that is required is 4 mm, 5 mm Hex (Allen) Keys, 15 mm and 17 mm spanners. Daily Maintenance To ensure your Wattbike stays in first class condition remove all sweat, dust, dirt or other substances by using a clean, soft cloth and a non-abrasive liquid cleaner. Wipe down the exterior covers and frame, saddle, handlebar and Wattbike Performance Computer. Weekly maintenance Vacuum the floor under and around the Wattbike. Inspect the feet screws, saddle and handlebar sliders and Wattbike Performance Computer bracket for looseness. Tighten as necessary. Inspect the saddle and handlebar stem adjustments. Tighten as necessary. Check that the pedals are secure. Tighten as necessary. Monthly Maintenance Check for smooth and quite operation of all moving parts. Battery The Wattbike Performance Computer is fitted with a rechargeable battery and does not require an external power supply. When cycling at a cadence of 50 r/m and above the battery is recharged with the help of an integrated generator. It can also be recharged using an external plug-in battery charger although the need for external recharging is almost eliminated by the addition of the generator. ALWAYS charge the battery with the Wattbike Performance Computer switched off and only use the battery charger supplied with your Wattbike, failure to do so may damage the rechargeable batteries. General The Wattbike has been designed in accordance with current safety standards and any features which may cause injury have been avoided or made as safe as possible. Incorrect repairs and any structural modifications may endanger the safety of the user. Multiple Wattbikes should not be stacked together. A reasonable distance should be maintained between each Wattbike. During use the recommended minimum distance between Wattbikes is 1 metre. The Wattbike should be regularly examined for any damage or wear. Broken, damaged or worn components may endanger safety or reduce the lifetime of the Wattbike and should be replaced immediately. There is a RESET button on the back of the Wattbike Performance Computer – this should only be used if the Wattbike Performance Computer displays stops working or shows inconsistent data. NOTE – you will not lose any data saved in the Memory if you activate the RESET button. If in doubt contact your local Wattbike distributor. If you have a problem or require a service you should contact your local Wattbike distributor. Details can be found at www.wattbike.com. 22 6. Wattbike Expert Software and Wattbike Racing The Wattbike Expert Software is ground-breaking. It goes far beyond any other sports software package. It offers the user an extraordinary range and depth of performance data for analysis and visualization. Its intuitive approach makes it suitable for everyone from recreational riders to sport scientists. Wattbike Expert Software is free and can be downloaded from www.wattbike.com. Delivered through the Wattbike Performance Computer, the software captures data 100 times per second and offers recall feedback across 39 different parameters. The range of data capture is unrivalled but the full power of the software is realized when the WPC is linked directly to a PC and the Wattbike Expert Software via its USB port. Now everyone can monitor their performance knowing that the data is accurate, meaningful and comparable. This means that the recreational rider can compare their performance against their friends or even with Olympic champions and know that the comparison is valid. There is the ability to explore every facet of performance down to every pedal turn if that is what is required. The beginner may want to simply track heart rate against power output to ensure training is in the correct zone but they will also be able to track other parameters such as percentage power in each leg to ensure leg symmetry. For the professional rider, coach and sports scientist the Wattbike Expert Software represents a whole new world of scientific analysis and revolutionizes the concept of cycling performance measurement. It explores bio-mechanical parameters never before seen and offers in-depth analysis of every pedal turn. Wattbike Racing Using the Wattbike Expert Software, Wattbikes can be linked together to stage races in real-time. On each individual WPC the rider is able to track their own performance in relation to the race leader and also to see the progress of all the competitors displayed on a large Race Screen. The main portion of the screen displays the race lanes and graduated distances along with the competitor’s name and a bike icon. As the race unfolds the bike icon moves from left to right across the screen. Different parameters can be displayed such as distance travelled (metres), average power (Watts) and average cadence (r/m). However the race parameters are not restricted to just these three, using the Wattbike Expert Software it is possible to display a range of other parameters for example; heart rate (beats/min), average speed (km/h) and Pace (/ km) etc. The Race Screen also displays and constantly updates and ranks the position of each competitor, the distance covered and the distance each competitor is behind the race leader. Minimum system requirements • Processor – Pentium (Intel, AMD) >500MHz • Memory – 128MB (minimum), 512MB+ (Optimum) • Storage media – 40Mb Hard disc • Resolution – 1024x768 • USB port • OS – Microsoft Windows 2000 or Windows XP or Windows Vista 23 The 39 Parameters Measured by Wattbike Expert Software Name Description Elapsed time Elap. Time [s] Elapsed time per revolution Elapsed time Elp.time tot [s] Elapsed time in the session Turns number Turns.Nr. [Nr] Ordinal number of turns in the session Cadence [1/min] Total number of turns per minute Cadence peak/rev [1/min] Peak revolutions 1/min Circ. pedal velocity Vpedal [m/s] Circumferential pedal velocity Velocity [km/h] Estimated road bike velocity Velocity average Vel avr [km/h] Estimated average road bike velocity Distance total Dis.tot. [km] Estimated road bike distance in given time Heart rate HR [1/min] Heart rate Force per revolution F rev [N] Average force in single turn Force peak Fpeak [N] Peak force Force peak/rev F peak/rev [N] Peak force within one turn Force average F avr [N] Average force for the whole session Torque per revolution TQ rev [Nm] Torque per pedal revolution Torque average TQ avr [Nm] Torque average for the whole session Pace/1000m [sec] Pace per 1km Pace/1000m avr [sec] Average pace per 1km Efficiency per revolution [%] Efficiency per revolution Efficiency average [%] Average Efficiency for the whole session Power per revolution P rev [W] Power average per pedal revolution Power peak P peak/rev [W] Power peak for the whole session Power average P avr [W] Average Power for the whole session Power/kg per revolution P/K rev [W/Kg] Power/Kg average per pedal revolution Power/Kg average P/Kg avr [W/Kg] Power/Kg average for the whole session Work per revolution A rev [J] Work in J (Force x distance in single turn) Work total A total [KJ] 24 Total work obtained by summing up work at the end of each turn Left leg percent LL% [%] Left vs. right leg force in % Total left leg percent Total LL% [%] Total average left vs. right leg force in % Right leg percent RL% [%] Right vs. left leg force in % Total right leg percent Total RL% [%} Total average right vs. left leg force in % Left time to force peak L time to F peak [mm:ss:00] Time to reach left leg force peak Total left time to force peak Total L time to F peak [mm:ss:00] Total average time to reach left leg force peak Right time to force peak R time to F peak [mm:ss:00] Time to reach right leg force peak Total right time to force peak Total R time to F peak [mm:ss:00] Total average time to reach right leg force peak Left angle to force peak L angle to F peak [°] Left leg peak force pedal position in degrees (°) Total left angle to force peak L angle to F peak [°] Total average left leg peak force pedal position Total in degrees (°) Right angle to force peak R angle to F peak [°] Right leg peak force pedal position in degrees (°) Total right angle to force peak Total R angle to F peak [°] Total average left right peak force pedal position in degrees (°) 7. Regulatory Information This section provides regulatory and safety information pertaining to the Wattbike and the Wattbike Performance Computer. FCC AND OTHER DOMESTIC REGULATIONS The Wattbike has been tested and found to comply with the limits for a Class B digital device, pursuant to Part 15 of FCC rules. Under FCC guidelines, operation is subject to the following: 1) This device does not cause harmful interference 2) This device must accept any interference received including interference that may cause undesired operation The Wattbike generates and uses radio frequency energy. If the product is not installed and used in accordance with the instructions provided in the User manual interference with radio communications may occur. In addition if unapproved accessories are installed interference with radio communications may occur. No modifications or accessories should be made or installed without the express approval of Wattbike Ltd. The intent of the Class A limit is to provide reasonable protection against harmful interference in a residential installation. However, there is no guarantee that interference will not occur in a specific installation. In the event that interference is experienced turn off the unit to verify that it is the source. If the interference clears with the unit off try each of the following measures or a combination thereof: • Re-orientate or relocate the Wattbike • Re-orientate or relocate the receiving antenna for your television, radio or VCR • Contact Wattbike or your authorized dealer or a qualified radio/television technician for help EUROPEAN APPLICATIONS This product has been tested to the following standards: • FCC Part 15 (October 1st 2008 Edition) • EN 60601-1-2:201 + A1:2006 EMC of Medical Electrical Equipment • EN 61000-3-2:2006 EMC Generic standards • EN 61000-3-3:1995 + A1:2001+A2:2005 EMC Generic standards • EN 61000-6-1:2007 EMC Generic standards • EN 61000-6-3:2007 EMC Generic standards • The Wattbike Performance Computer complies with EN60601-1-2 electromagnetic compatibility but may be affected by mobile telephones and by electromagnetic interference higher than the IEC 60601 test level. The CE mark is used to mark conformity of the Wattbike Performance Computer with the European Union EMC directives. 25 Table 1: Guidance and manufacturer’s declaration – electromagnetic emission The Wattbike is intended for use in the electromagnetic environment specified below. The customer or the user of the Wattbike should assure that it is used in such an environment. Emission test Compliance RF emissions The Wattbike uses RF energy only for its internal function. Therefore, its RF emissions are very low and are not likely to cause any interference in nearby electronic equipment. Group 1 CISPR 11 RF emissions Class B CISPR 11 Harmonic emissions The Wattbike is suitable for use in all establishments, including domestic establishments and those directly connected to the public low-voltage power supply network that supplies buildings used for domestic purposes. Not applicable IEC 61000-3-2 Voltage fluctuations/flicker emissions IEC 61000-3-3 Electromagnetic environment - guidance Not applicable Table 2: Guidance and manufacturer’s declaration – electromagnetic immunity The Wattbike is intended for use in the electromagnetic environment specified below. The customer or the user of the Wattbike should assure that it is used in such an environment. Immunity test IEC 60601 test level Compliance level Electrostatic discharge IEC ± 6 kV contact 61000-4-2 ± 8 kV air ± 6 kV contact (except connectors) Electrical fast transient/burst IEC 61000-4-4 ± 8 kV air ± 2 kV for power supply lines ± 1 kV for input/output ± 1 kV differential mode IEC 61000-4-5 ± 2 kV common mode Floors should be wood, concrete or ceramic tile. If floors are covered with synthetic material, the relative humidity should be at least 30 %. Not applicable Mains power quality should be that of a typical commercial or hospital environment. Not applicable Mains power quality should be that of a typical commercial or hospital environment. Not applicable Mains power quality should be that of a typical commercial or hospital environment. If the use of the Wattbike requires continued operation during power mains interrupts, it is recommended that the Wattbike be powered from an uninterruptible power supply or a battery. 3 A/m Power frequency magnetic fields should be at levels characteristic of a typical location in a typical commercial or hospital environment. lines Surge Electromagnetic environment guidance < 5 % UT (> 95 % dip in UT) for ½ cycle 40 % UT Voltage dips, short interruptions and voltage variations on power supply input lines IEC 61000-4-11 (60 % dip in UT) for 5 cycles 70 % UT (30 % dip in UT) for 25 cycles < 5 % UT (> 95 % dip in UT) for 5 s Power frequency (50 Hz/60 Hz) magnetic field 3 A/m IEC 61000-4-8 NOTE 00 26 UT is the a.c. mains voltage prior to application of the test level. Table 4: Guidance and manufacturer’s declaration – electromagnetic immunity The Wattbike is intended for use in the electromagnetic environment specified below. The customer or the user of the Wattbike should assure that it is used in such an environment. Immunity test IEC 60601 test level Compliance level Electromagnetic environment guidance Portable and mobile RF communications equipment should be used no closer to any part of the Wattbike , including cables, than the recommended separation distance calculated from the equation applicable to the frequency of the transmitter: Recommended distance Conducted RF 3 Veff IEC 61000-4-6 150 kHz to 80 MHz Radiated RF IEC 61000-4-3 3 V/m 80 MHz to 2,5 GHz separation 3V 3 V/m 80 MHz to 800 MHz 800 MHz to 2,5 GHz Where P is the maximum output power rating of the transmitter in watts (W) according to the transmitter manufacturer and d is the recommended separation distance in metres (m).b Field strengths from fixed RF transmitters, as determined by an electromagnetic site survey, a should be less than the compliance level in each frequency range.b Interference may occur in the vicinity of equipment marked with the following symbol: NOTE 1: At 80 MHz and 800 MHz, the higher frequency range applies. NOTE 2: These guidelines may not apply in all situations. Electromagnetic propagation is affected by absorption and reflection from structures, objects and people. Field strengths from fixed transmitters, such as base stations for radio (cellular /cordless) telephones and land mobile radios, amateur radio, AM and FM radio broadcast and TV broadcast cannot be predicted theoretically with accuracy. To assess the electromagnetic environment due to fixed RF transmitters, an electromagnetic site survey should be considered. a If the measured field strength in the location in which the Wattbike is used exceeds the applicable RF compliance level above, the Wattbike should be observed to verify normal operation. If abnormal performance is observed, additional measures may be necessary, such as reorienting or relocation the Wattbike. Over the frequency range 150 kHz to 80 MHz, field strengths should be less than [V1] V/m. b 27 00 Table 6: Recommended separation distances between portable and mobile RF communications equipment and the Wattbike The Wattbike is intended for use in an electromagnetic environment in which radiated RF disturbances are controlled. The customer or the user of the Wattbike can help prevent electromagnetic interference by maintaining a minimum distance between portable and mobile RF communications equipment (transmitters) and the Wattbike as recommended below, according to the maximum output power of the communications equipment. Separation distance according to frequency of transmitter - m 150 kHz to 80 MHz 80 MHz to 800 MHz 800 MHz to 2,5 GHz 0,01 0,35 0,35 0,70 0,1 1,11 1,11 2,21 Rated maximum output power of transmitter - W 1 3,50 3,50 7,00 10 11,07 11,07 22,14 100 35,00 35,00 70,00 For transmitters rated at a maximum output power not listed above, the recommended separation distance d in metres (m) can be determined using the equation applicable to the frequency of the transmitter, where P is the maximum output power rating of the transmitter in watts (W) according to the transmitter manufacturer. NOTE 1: At 80 MHz and 800 MHz, the higher frequency range applies. NOTE 2: These guidelines may not apply in all situations. Electromagnetic propagation is affected by absorption and reflection from structures, objects and people. 00 28 Wattbike Limited | 2-Year Parts Warranty Limited Guarantee This Wattbike Product (the “Product”) is guaranteed for 2 years for non-wear items and 1 year for wear items from the date of purchase (in either case the “Guarantee Period”) against defects materials or workmanship which effect the operation of the Product on the terms set out below. During this period of Limited Guarantee Wattbike Ltd will at its discretion repair or have parts replaced provided that: 1. the Product or any defective part is returned (but only if requested) to Wattbike Ltd (or its authorised representative) with evidence of purchase date in accordance with the claims procedure outlined below; 2. if a repair or replacement is not reasonably possible a refund may be offered instead; 3. the Product has been purchased by the user and not used for hire purposes; 4. the Product has been purchased either directly from Wattbike Ltd or one of its authorised retailers; 5. the Product has not been modified, misused, abused, neglected or handled carelessly or used on a voltage supply other than that specified on the Product; 6. the Product has been used and maintained in accordance with its manual and / or any further instructions that Wattbike Ltd may issue from time to time including those posted on the website - www.wattbike.com; 7. the user has only used the Product in conjunction with any parts or accessories recommended by Wattbike Ltd; 8. any claim under this guarantee must be made by an end-user consumer of the Product and not an intermediary or reseller of the product or any person using the product in the course of their business. 9. the Product has not been sold to a user in a country not covered by this Limited Guarantee; and 10.repairs of the Product have not been made or attempted other than by our service staff or authorised dealers. Further Terms of Limited Guarantee For the purpose of this Limited Guarantee “wear” items means consumable items or items that require periodic replacement during the normal course of the Product’s operation such as the pedals, the foot straps for the pedals, the saddle, the grip(s) on the handle bars, the handle bars, the key pad on the Wattbike Performance Computer (WPC) and the WPC, adjustment levers for the saddle stem and the handle bars stem, the air resistance gear lever and the magnetic resistance knob. Non-wear items are any items or parts of this Product which are not wear items. If anyone (other than Wattbike Ltd or its authorised representatives) disassembles or attempts to disassemble the Product or any part of the Product this Limited Guarantee will immediately be rendered void. This Limited Guarantee shall be invalid if any serial numbers or other identifying marks attached to the Product has been altered, deleted, removed, or made illegible. This Limited Guarantee is not transferable. This Limited Guarantee does not extend to cover damage to the finish of the Product or cosmetic or superficial damage or other similar issues which do not effect the normal operation of the Product. Wattbike Ltd is not liable for: • any transport carriage deliver transit or insurance costs; • labour costs for the installation of any parts; • import duties tariffs or taxes; or • any charges from telephones faxes or other electronic communication devices arising as a result of a failure in the Product All exchanged parts and/or products replaced under this warranty will become the property of Wattbike Ltd. 29 00 Any repair or replacement made under the Limited Guarantee shall extend the Guarantee Period as if the repaired or replaced items had been purchased on the date of repair or replacement provided always that this extension of the Guarantee Period shall apply only in respect of the repairs made or the item or items replaced and shall not in any way extend the period of this Limited Guarantee in respect of any other component, part or assembly of the Product. Claims Procedure Any claim made under this Limited Guarantee should be made directly to the manufacturer. The claim itself should be made in a letter setting out: • the purchaser’s full name, address and contact details; • the date and place of purchase; and • a brief explanation of the problem which has led to the claim. This letter should then be sent, together with the defective part and proof of the purchase date (preferably a receipt), to the following address: WATTBIKE LIMITED Vermont House Unit 5 Nottingham South & Wilford Industrial Estate Ruddington Lane Nottingham NG11 7HQ PLEASE NOTE: that it is essential that the letter of claim reaches the above address on the last day of the Guarantee Period at the latest. The Guarantee Period shall be calculated from the date of purchase by the original end-user customer of the Product. Late claims will not be considered. This Limited Guarantee applies to all goods purchased from an authorised retailer of Wattbike Ltd within the United Kingdom of Great Britain and Northern Ireland. Additional written copies of this Limited Guarantee can be obtained by writing to the above address (given under the heading ‘Claims Procedure’). Please include a stamped and self addressed envelope for each copy of the Limited Guarantee requested. Disclaimer Except for this express Limited Guarantee and to the maximum extent permitted by law, Wattbike Ltd does not issue any warranty or guarantee for the Product. Wattbike Ltd expressly includes any other liability, whether expressed (in writing or orally) or implied, to the fullest extent permitted by the law. In particular, but without limiting the generality of this exclusion, any implied terms as to merchantability, satisfactory quality, fitness for particular purpose and/or non infringement of third party rights are excluded whether in contract or tort. Any implied warranties that may be imposed by law are limited in duration to the term of the express limited guarantee set out above to the extent permitted by applicable law. To the maximum extent permitted by the applicable law, in no event shall Wattbike Ltd be liable for any damages whatsoever (including direct or indirect damages, loss of business profits, loss of savings or other special, incidental, exemplary or consequential damages whether for breach of warranty, contract/liability, tort or otherwise) arising out of or resulting from the use or inability to use the Product. Any liability of Wattbike Ltd which is not excluded shall be limited to the purchase price of the Product. This Guarantee is offered as an extra benefit to the purchaser and nothing in the terms set out above shall operate to affect your statutory rights as a consumer. 30 31