1
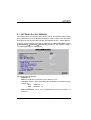
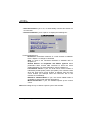
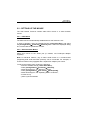
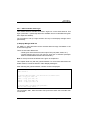
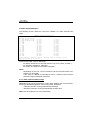
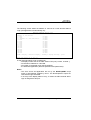
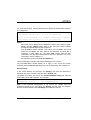
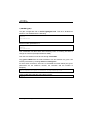
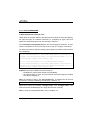
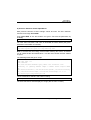
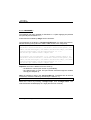
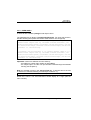
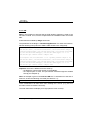
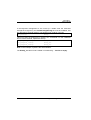
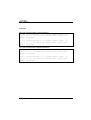
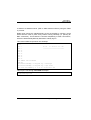
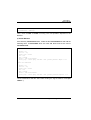
AXEL TCP/IP Terminal
AX3000 models 65 and 65E
Installing and Using the
Axel-VNCviewer
May 2002 - Ref.: AXVNCE-13
The reproduction of this material, in part or whole, is strictly prohibited. For
additional information, please contact:
14 Avenue du Québec
Bât. K2 - BP 728
91962 Courtabœuf cedex - FRANCE
Tel.: 33 1.69.28.27.27
Fax: 33 1.69.28.82.04
Email: [email protected]
The information in this document is subject to change without notice. AXEL
assumes no responsibility for any errors that may appear in this document.
All trademarks and registered trademarks are the property of their respective
holders.
© - 2000-2002 - AXEL - All Rights Reserved.
NOTES
The Axel-VNCviewer is the AX3000 TCP/IP Platine Terminal model 65 or 65E
equipped with VNC firmware. In this document we assume that the AX3000 has
been fitted with this firmware.
This documentation deals only with features specific to the Axel-VNCviewer. We
assume that the reader is already familiar with the AX3000 set up procedures.
For more information, please read the AX3000 TCP/IP - User's Manual.
TABLE OF CONTENTS
1 - INTRODUCTION............................................................................................ 1
2 - SETTING UP THE PLATINE ......................................................................... 3
2.1 - SETTING UP A VNC SESSION .............................................................. 4
2.2 - SETTING UP THE MOUSE..................................................................... 6
2.2.1 - PS/2 Mouse....................................................................................... 6
2.2.2 - Serial 2-button Mouse ....................................................................... 6
3 - CONFIGURING VNC ON THE UNIX/LINUX SERVER ................................. 7
3.1 - PREREQUISITS ...................................................................................... 8
3.2 - THE CONFIGURATION UTILITY: AXVNC ............................................. 8
3.2.1 - VNC Terminals with Login............................................................... 10
3.2.2 - VNC Terminal without Login............................................................ 11
3.3 - MANUALLY CONFIGURING THE UNIX/LINUX SERVER.................... 13
3.3.1 - LINUX.............................................................................................. 14
3.3.2 - SCO OPENSERVER ...................................................................... 19
3.3.3 - UNIXWARE 7.................................................................................. 21
3.3.4 - OPEN UNIX 8 ................................................................................. 22
3.3.5 - AIX................................................................................................... 23
3.3.6 - SUN OS 5.6 .................................................................................... 25
3.3.8 - HP-UX 11 ........................................................................................ 26
4 - USING THE AX3000 .................................................................................... 27
4.1 - OPENING A SESSION .......................................................................... 28
4.2 - DISCONNECTING................................................................................. 28
4.2.1 - Log out ............................................................................................ 28
4.2.2 - Voluntary Disconnection ................................................................. 28
4.2.3 - Forced Disconnection ..................................................................... 29
5 - TECHNICAL INFORMATION ...................................................................... 30
5.1 - VNC SESSION ...................................................................................... 31
5.2 - TEXT-BASED SESSION ....................................................................... 31
6 - GOING FURTHER WITH VNC .....................................................................33
6.1 - VNC AUTHENTICATION .......................................................................34
6.2 - SHARABLE VNC SESSION ...................................................................36
6.3 - XVNC DAEMON .....................................................................................37
6.4 - USING A DIFFERENT RESOLUTION ...................................................38
6.4.1 - Checking Available Resolutions.......................................................38
6.4.2 - Setting-Up the AX3000 ....................................................................38
6.4.3 - Setting-Up Xvnc ...............................................................................38
6.5 - RUNNING SOFTWARE WITHOUT DISPLAY MANAGER OR
DESKTOP.......................................................................................................39
6.5.1 - The RunScriptVNC Script ................................................................40
6.5.2 - Internet Terminal: Automatically Running Netscape ........................41
6.5.3 - Windows Terminal: Automatically Running Rdesktop .....................41
6.6 - USING (X)INETD WITH KDE 2.2...........................................................43
6.6.1 - Updating the inetd or xinetd Environment ........................................43
6.6.2 - Checking Access Rights ..................................................................45
6.6.3 - Enabling XDMCP .............................................................................45
6.7 - COLOUR CLASS....................................................................................46
7 - TROUBLESHOOTING..................................................................................47
7.1 - THE AX3000 DISPLAY IS BLACK OR DISTORTED .............................48
7.2 - AX3000 FONTS ARE NOT AS EXCEPTED ..........................................49
7.3 - LINUX: 'WHO' COMMAND DOESN'T LIST VNC USERS .....................50
7.4 - RED HAT: DPMS ERROR MESSAGE...................................................51
7.5 - SCO: KEYBOARD DIFFICULTIES WITH SCOTERM ...........................51
7.6 - XVNC: ERROR MESSAGE "HOST UNWILLING" .................................51
7.7 - XVNC: ERROR MESSAGE "FONT FIXED"...........................................52
-1INTRODUCTION
Installing and Using the Axel-VNCviewer
1
The VNC protocol enables a remote graphical display on the Axel-VNCviewer.
The image is constructed, maintained and updated within the Unix server’s
frame buffer, and transmitted across the TCP/IP network.
Note: this protocol is public and the associated software is free. For more
information please see http://www.uk.research.att.com/vnc.
VNC protocol information:
- Server side: the VNC server daemon (Xvnc) is required. This software is
an X server with embedded VNC.
- Client side (called VNC viewer): the AX3000 must support VNC.
- VNC protocol key points: display update requests are sent by the
viewer. An update request can be incremental (the part of the display that
changed is transmitted) or total (the complete display is updated).
2
Installing and Using the Axel-VNCviewer
-2SETTING UP THE PLATINE
Installing and Using the Axel-VNCviewer
3
2.1 - SETTING UP A VNC SESSION
This chapter deals only with the VNC session set-up. We assume that the other
set-up parameters (such as AX3000 IP address, hosts, routers, etc.) have been
already set. For more information please read AX3000 TCP/IP - User's Manual.
To set-up a VNC session, enter the AX3000 Set-Up (<Ctrl><Alt><Esc>) select
[Configuration]→[Terminal]→[Session X] (where X is the session number).
The following dialog box is displayed:
Set the following parameters:
- Protocol: vnc
- Host: the hostname on which the Xvnc daemon is run
- TCP Port: numeric value associated with the DISPLAY environment (see
Chapter 3):
5901 : DISPLAY = 1
5902 : DISPLAY = 2
….
- Auto Connection: yes or no, to automatically connect this session on
power up.
4
Installing and Using the Axel-VNCviewer
- Auto Reconnection: yes or no, to automatically connect this session on
re-connection.
- General Parameters: press <Space> to display the following box:
These parameters are:
- Resolution: the default resolution of a VNC session is 800x600.
Press <Space> to change to 1024x768.
Note: to check if the 1024x768 resolution is available refer to
Chapter 6.4.
- Shared Session and Keyboard and Mouse Ignored: these
parameters allow several VNC terminals to share the same
graphical display. For more information, refer to Chapter 6.2.
- Local Mouse Cursor: if 'yes', the local mouse cursor location is
indicated by a little square pointer (2x2 pixels). This could be useful
when the local mouse cursor location is different from the VNC
cursor location (for example when the Unix/Linux box or the
network are overloaded).
- Emulate a 3-button Mouse: if 'yes', the mouse middle button is
emulated by clicking both left and right buttons.
- Mouse Accelerator: if 'yes', the AX3000 speeds up the mouse
cursor.
Note: after exiting set-up, we advise a power-cycle of the AX3000.
Installing and Using the Axel-VNCviewer
5
2.2 - SETTING UP THE MOUSE
The VNC Platine Terminal controls either PS/2 mouse or a serial 2-button
mouse.
2.2.1 - PS/2 Mouse
The PS/2 mouse is automatically enabled when a VNC session is set.
In event of problem, enter the AX3000 Set-Up (<Ctrl><Alt><Esc>) and select
the [Configuration]→[Terminal]→[General] menu. Within the displayed dialog
box, set the "Mouse" parameter to "PS2".
2.2.2 - Serial 2-button Mouse
Attach this mouse to the AUX2 port (if needed, use RJ45-9pts adaptor
supplied).
Note: for electrical reasons, only a native serial mouse or a combo-mouse
(supporting both serial and PS/2 protocol) can be connected. For example, a
exclusive PS/2 mouse (equipped with a "9pts-PS/2" adaptor) won’t work.
To set-up the serial mouse, perform the following:
- enter the AX3000 Set-Up (<Ctrl><Alt><Esc>),
- select [Configuration]→[Terminal]→[ General],
- within this dialog box, set "Mouse" to "AUX2",
- select [Configuration]→[Aux. Ports]→[AUX2 (RJ45)],
- within this dialog box, set "Operating Mode" to "Mouse",
- exit the set-up,
- power-cycle the AX3000.
6
Installing and Using the Axel-VNCviewer
-3CONFIGURING VNC ON THE
UNIX/LINUX SERVER
Installing and Using the Axel-VNCviewer
7
3.1 - PREREQUISITS
Warning: it is assumed that the X11 environment is already installed (utilities,
directories and files) on the Unix/Linux server.
Mount the Axel CD-ROM and copy the following files onto the hard disk:
- Xvnc (VNC server, on CD supplied, under /bin). Copy and rename as
‘Xvnc’ the appropriate binary (Xvnc.SCO, Xvnc.LINUX, Xvnc.UW7,
Xvnc.AIX) to a local directory (ie /usr/local/bin). Set execute permission by
invoking chmod +x Xvnc.
- vncpasswd (VNC authentication, on CD supplied, under /bin). Copy and
rename as 'vncpasswd' the appropriate binary (vncpasswd.SCO,
vncpasswd.LINUX, vncpasswd.UW7, vncpasswd.AIX) to a local directory
(i.e. /usr/local/bin). Set execute permission by invoking chmod +x
vncpasswd.
- axvnc (VNC configuration utility, on CD supplied, under /bin). Copy axvnc
to /etc. Set execute permission by invoking chmod +x axvnc.
- other files: copy files located in /misc to /tmp:
- xservers.SCO (for SCO OpenServer 5.0.5),
- govnc.SCO (for previous SCO versions),
- govnc.LINUX (for Linux with gdm),
- govnc.KDE22 (for Linux with KDE 2.2),
- xservers.LINUX (for Linux),
- xservers.UW7 (for UnixWare 7),
- xservers.OU8 (for Open Unix 8),
- xservers.AIX (for AIX),
- xservers.SUN (for SUN),
- xservers.HPUX (for HP-UX),
- runNS (autorun script for Netscape),
- runRDP (autorun script for rdesktop).
3.2 - THE CONFIGURATION UTILITY: AXVNC
The axvnc configuration utility can be used to easily set up the Unix/Linux
server. This script has been certified for Linux, SCO OpenServer and
8
Installing and Using the Axel-VNCviewer
UnixWare 7, Sun OS and HP-UX environments. For other environments manual
configuration is required.
The axvnc utility must be run from the graphical Unix/Linux console by invoking
/etc/axvnc.
The first operation performed by axvnc is to check the system has the
necessary components for correct VNC operation:
AXEL VNC UTILITY (V1.2-0)
------------------------Checking system configuration:
- Operating System:
--> Linux (runlevel 5)
- VNC server (Xvnc):
--> OK
- Misc Utilities:
--> OK
- X11 font:
--> unix/:-1
Press <CR>
Note: if the default font paths given by the O.S are not needed, use the '-nofp'
option when axvnc is run.
The second screen gives two choices:
- The user being presented with a standard Unix/Linux desktop following a
graphical login.
- The ability to run a program or script without running the X display
manager. (For example ‘rdesktop’ or ‘netscape’ can be run without an
underlying display manager reducing memory and CPU requirements).
AXEL VNC UTILITY (V1.2-0)
-------------------------
This utility allows you to set-up Unix/Linux to run automatically at boot time
Xvnc servers. For each display, a different resolution and a different
number of colors can be chosen.
An Xvnc daemon can be used:
- either to get a graphical login and to access a desktop (KDE, GNOME, etc.)
- or to run automatically an X software (netscape, rdesktop, etc.)
Select the method (<L>ogin or <A>ny software):
Installing and Using the Axel-VNCviewer
9
3.2.1 - VNC Terminals with Login
This method offers a standard Linux/Unix "login box" on the VNC terminal. This
logon (username + password) allows the AX3000 user to be identified and given
their respective desktop
The procedure to set up a login session can vary on the display manager used.
(See below).
a) Display Manager KDE 2.2
For KDE 2.2, VNC terminals can be declared either through /etc/inittab or the
environment (x)inetd.
There are two main differences:
- inittab gives each terminal its own unique TCP port (5901, 5902, etc.).
- (x)inetd requires only one TCP port for each type of terminal (example:
5950 for all 800x600 and 256-colour terminals).
Note: a more precise list of differences is given in Chapter 6.6.
This chapter deals only with the (x)inetd method. For more information about the
inittab method, consult the Section 'Other Display Managers'.
After selecting the (x)inetd method, a similar screen is displayed:
(x)inetd and /usr/share/config/kdm/kdmrc will be modified.
Please confirm: Y
*** Checking INET environment (/etc/services and /etc/xinetd.d/vnc)
800x600 - 8 bpp (port 5950): OK
800x600 - 16 bpp (port 5951): OK
1024x768 - 8 bpp (port 5952): OK
1024x768 - 16 bpp (port 5953): OK
*** Checking XDMCP (/usr/share/config/kdm/kdmrc)
xdmcp has been already enabled !
The four 5950, 5951, 5952 and 5953 TCP ports have been set to handle VNC
connections.
10
Installing and Using the Axel-VNCviewer
b) Other Display Managers
The following screen allows the removal or addition of a VNC terminal with
Login:
MANAGING GRAPHICAL DISPLAY FILE
Contents of /etc/inittab:
:1 Xvnc 800x600 - 8 bpp
:2 Xvnc 1024x768- 8 bpp
:3 busy
:4 free
:5 free
:6 free
:7 free
:8 free
:9 free
:10 free
:11 free
:12 free
:13 free
:14 free
:15 free
:16
:17
:18
:19
:20
:21
:22
:23
:24
:25
:26
:27
:28
:29
:30
free
free
free
free
free
free
free
free
free
free
free
free
free
free
free
:31
:32
:33
:34
:35
:36
:37
:38
:39
:40
:41
:42
:43
:44
:45
free
free
free
free
free
free
free
free
free
free
free
free
free
free
free
<A>dd a display / <D>elete a display / <M>odify a display settings / <Q>uit
Enter your choice (A, D, M or Q):
A VNC terminal with Login is defined by:
- its display number: this is the VNC session TCP port (1=5901, 2=5902...),
- its resolution: 800x600 or 1024x768,
- its number of supported colour bits: 8 bits/pixel.
Notes:
- Depending on the O.S., the Xvnc daemon will be launched either from
Xservers or /etc/inittab.
- If the entry of a display is described as 'busy' it means a VNC terminal
WITHOUT login is assigned to that port.
3.2.2 - VNC Terminal without Login
Depending of the use of the terminal, a login and a desktop may not be needed.
Running a dedicated application can be very useful. Examples:
- "Intranet Terminal": running automatically Netscape,
- "Windows Terminal": running automatically an RDP client.
Note: refer to Chapter 6.5 for more information.
Installing and Using the Axel-VNCviewer
11
The following screen allows the addition or removal of a VNC terminal without
Login (the application is automatically run):
MANAGING GRAPHICAL DISPLAY FILE
Contents of /etc/inittab:
:1 busy
:2 busy
:3 (800x600 - 8) /usr/local/bin/a...
:4 free
:5 free
:6 free
:7 free
:8 free
:9 free
:10 free
:11 free
:12 free
:13 free
:14 free
:15 free
:16
:17
:18
:19
:20
:21
:22
:23
:24
:25
:26
:27
:28
:29
:30
free
free
free
free
free
free
free
free
free
free
free
free
free
free
free
<A>dd a display / <D>elete a display / <M>odify a display settings / <Q>uit
Enter your choice (A, D, M or Q):
A VNC terminal without Login is defined by:
- its display number: this is the VNC session TCP port (1=5901, 2=5902...),
- its resolution: 800x600 or 1024x768,
- its number of supported colour bits: 8 bits/pixel,
- the dedicated application (absolute pathname and parameters).
Notes:
- The Xvnc server and application are run by the RunScriptVNC script
which is automatically created by axvnc. The RunScriptVNC scripts are
launched through /etc/inittab.
- If an entry in the display table is 'busy', it means the VNC terminal WITH
login is assigned to this port.
12
Installing and Using the Axel-VNCviewer
3.3 - MANUALLY CONFIGURING THE UNIX/LINUX SERVER
A new and separate VNC daemon (Xvnc) must be run for each Platine VNC
session. Every Xvnc daemon controls a DISPLAY number (i.e. a VNC
connection to 5901, 5902, etc).
There are different procedures for running the Xvnc daemon in the following
environments:
- Linux (Red Hat, Mandrake, SuSE, Caldera and Corel),
- Unix SCO OpenServer,
- UnixWare 7,
- Open Unix 8,
- AIX 4.x,
- SunOS 5.6,
- HP-UX 11.
Note: the following examples describe how to set-up the Xvnc server for a
800x600 resolution. To handle other resolutions refer to Chapter 6.4.
Installing and Using the Axel-VNCviewer
13
3.3.1 - LINUX
Under Linux, X terminal devicess (including VNC terminals) are managed by a
Display Manager. A Display Manager provides services similar to those provided
by init, getty and login on character terminals: i.e. prompting for login name and
password, authenticating the user and running a "session".
The most common Display Managers (and their associated daemons) are:
- KDE 2.2: kdm daemon,
- KDE: kdm daemon,
- GNOME: gdm daemon.
To find out which Display Manager is being used by your system invoke the
following command:
# ps -ef | grep dm
Note: if kdm is used, check if the Display Manager is KDE or KDE 2.2.
If no gdm or kdm daemon is running: you MUST use a runlevel which
handles graphical displays. This runlevel is operating system dependent.
Generally this is runlevel 5.
The following describes the VNC configuration with KDE 2.2, KDE and GNOME.
a) KDE 2.2 (kdm)
First, XDMCP must be enabled. This is done through the file kdmrc. The
location of kdmrc depends on the operating system. Possible locations are
/etc/kde/kdm, /usr/share/config/kdm or /opt/kde2/share/config/kdm.
This file is divided into sections. In the xdmcp section, set the 'Enable'
parameter to 'true':
[xdmcp]
Enable=true
This modification will take effect after rebooting Linux, or invoking init twice to
change the runlevel (invoke init 3 then init 5).
Then the Xvnc daemon must be run through /etc/inittab.
14
Installing and Using the Axel-VNCviewer
Copy govnc.KDE22 from Axel supplied CD-ROM to /etc and rename to govnc.
Set execute permission by invoking chmod +x /etc/govnc.
For each VNC connection, add a line in /etc/inittab as shown below (the govnc
parameters are the DISPLAY number, the resolution and the number of
bits/pixel):
axv1:5:respawn:/etc/govnc 1 800x600 8 1>/tmp/axvnclog1 2>&1
axv2:5:respawn:/etc/govnc 2 800x600 8 1>/tmp/axvnclog2 2>&1
These modifications will take effect after invoking:
# init q
The following shows the govnc script:
DISPLAY=":"$1
PORT=`expr 5900 + $1`
GEOMETRY=$2
if [ "$3" = "8" ]; then
BPP="-depth 8 -cc 3"
else
BPP="-depth 16"
fi
/usr/local/bin/Xvnc $DISPLAY -ac -query localhost -once -geometry
$GEOMETRY $BPP -rfbwait 120000 -rfbport $PORT
These modifications will take effect after rebooting the Linux server.
The Axel-VNCviewer should display an X login. If not, check the access
restriction listed in Xaccess (generally any host is authorised). See Chapter 7.6.
b) KDE (kdm)
With KDE, X terminals are controlled through the Xservers file. The possible
locations are operating system dependent:
- /etc/xdm/X11: Red Hat, SuSE and Mandrake
- /etc/kdm/X11: Open Linux Caldera
- /usr/X11R6/config/kdm: Corel Linux
Installing and Using the Axel-VNCviewer
15
For each VNC session, add the following lines (below two Platine VNC sessions
are configured):
:1 local /usr/local/bin/Xvnc :1 -ac -geometry 800x600 -depth 8 -rfbwait
120000 -rfbport 5901 -fp unix/:-1 -cc 3 -co /usr/lib/X11/rgb
:2 local /usr/local/bin/Xvnc :2 -ac -geometry 800x600 -depth 8 -rfbwait
120000 -rfbport 5902 -fp unix/:-1 -cc 3 -co /usr/lib/X11/rgb
Notes:
- Each VNC line is different by the DISPLAY number (this number is given
twice), and the -rfbport option which is the TCP port number entered
through the AX3000 Set-Up (see Chapter 2).
- The -fp unix/:-1 option requires a font server to be available. If the font
server is not enabled, the Xvnc daemon will terminate. To check the X
resources, invoke 'xset -q'. The font path section lists the font
information. Use the same information for the Xvnc -fp option. For more
information, refer to Chapter 7.2.
- An example is given in the xservers.LINUX file.
These modifications will take effect after resetting the Linux server.
The Axel-VNCviewer should display an X login. If not, check the access
restriction listed in Xaccess (generally any host is authorised). See Chapter 7.6.
Going Further:
In the same directory as Xservers, the Xsetup_0 file sets the DISPLAY 0
behaviour (the main console). Copy this file to Xsetup_vnc.
The DISPLAY profiles are run by the /etc/X11/xdm/xdm-config file. Add the
lines relating to the VNC displays. For example:
DisplayManager._1.setup:
DisplayManager._2.setup:
/etc/X11/xdm/Xsetup_vnc
/etc/X11/xdm/Xsetup_vnc
Note: if the keyboard management is not correct (i.e. unable enter the
username through the X login box), the Xsetup_vnc file must be modified.
Remove all lines related to the xmodmap command from this file.
16
Installing and Using the Axel-VNCviewer
c) GNOME (gdm)
The gdm configuration file is /etc/X11/gdm/gdm.conf. This file is divided into
sections. The XDMCP lists the following:
[xdmcp]
Enable=0
HonorIndirect=0
...
Set the 'Enable' parameter to 1.
[xdmcp]
Enable=1
HonorIndirect=0
This modification will take effect after rebooting Linux, or invoking init twice to
change the runlevel (example init 3 then init 5).
Then the Xvnc daemon must be run through /etc/inittab.
Copy govnc.LINUX from the Axel CD-ROM to /etc and rename it to govnc. Set
execute permission by invoking chmod +x /etcx/govnc.
For each VNC connection, add a line in /etc/inittab as shown below (the govnc
parameters are the DISPLAY number, the resolution and the number of
bits/pixel):
axv1:5:respawn:/etc/govnc 1 800x600 8 1>/tmp/axvnclog1 2>&1
axv2:5:respawn:/etc/govnc 2 800x600 8 1>/tmp/axvnclog2 2>&1
These modifications will take effect after invoking:
# init q
Installing and Using the Axel-VNCviewer
17
The following shows the govnc script:
DISPLAY=":"$1
PORT=`expr 5900 + $1`
GEOMETRY=$2
if [ "$3" = "8" ]; then
BPP="-depth 8 -cc 3"
else
BPP="-depth 16"
fi
HOST=`hostname`
/usr/local/bin/Xvnc $DISPLAY -ac -query $HOST -once -terminate -geometry
800x600 -depth 8 -rfbwait 120000 -rfbport $PORT -fp unix/:-1 -cc 3 -co
/usr/lib/X11/rgb
IMPORTANT: The -fp unix/:-1 option requires a font server to be available. If
the font server is not enabled, the Xvnc daemon will terminate. To check the X
resources, invoke 'xset -q'. The font path section lists the font information. Use
the same information for the Xvnc -fp option. For more information, refer to
Chapter 7.2.
Note for SuSE: if the keyboard management is not correct (i.e. unable enter the
username through the X login box), the /etc/X11/xdm/Xsetup file must be
modified. For the TCP/IP connections, remove all lines related to the xmodmap
command from this file:
if test -x $xmodmap ; then
if test -z "${DISPLAY%:*}" ; then
# local connection
test -r $sysmodmap && $xmodmap $sysmodmap
else
# TCP/IP connection (remote or local)
### NOT NEEDED FOR VNC
###
test -r $defmodmap && $xmodmap $defmodmap
###
test -r $hostmodmap && $xmodmap $hostmodmap
fi
fi
18
Installing and Using the Axel-VNCviewer
3.3.2 - SCO OPENSERVER
a) SCO OpenServer 5.0.6 and 5.0.5
Under SCO the scologin daemon provides services similar to those provided by
init, getty and login on character terminals: i.e. prompting for login name and
password, authenticating the user and running a "session".
The /usr/lib/X11/scologin/Xservers file lists all managed X terminals. A VNC
session is treated as a local connection by Linux (not as a 'foreign' connection).
For each VNC session, add the following lines (below two Platine VNC sessions
are configured):
:1 local /usr/local/bin/Xvnc :1 -ac -geometry 800x600 -depth 8
-fp /usr/lib/X11/fonts/misc/,/usr/lib/X11/fonts/Speedo/,/usr/lib/X11/fo
nts/Type1/,/usr/lib/X11/fonts/75dpi/,/usr/lib/X11/fonts/100dpi/ -cc 3 -co
/usr/lib/X11/rgb -rfbwait 120000 -rfbport 5901
:2 local /usr/local/bin/Xvnc :2 -ac -geometry 800x600 -depth 8
-fp /usr/lib/X11/fonts/misc/,/usr/lib/X11/fonts/Speedo/,/usr/lib/X11/fo
nts/Type1/,/usr/lib/X11/fonts/75dpi/,/usr/lib/X11/fonts/100dpi/ -cc 3 -co
/usr/lib/X11/rgb -rfbwait 120000 -rfbport 5902
Important: each line is different from the other by:
- the DISPLAY number (this number is given twice),
- the -rfbport option. It is the TCP port number entered through the AX3000
Set-Up (see Chapter 2).
Note: an example is given in the xservers.SCO file. To add this line to the end
of Xservers, invoke the following command (be careful to >>):
# cat /tmp/xservers.SCO >> /usr/lib/X11/scologin/Xservers
Reset the X server by invoking '"scologin stop", then "scologin start". The
Axel-VNCviewer should display an X login (like the main console).
Note: in event of keyboard difficulties, refer to Chapter 7.5.
Installing and Using the Axel-VNCviewer
19
b) Previous Versions of SCO OpenServer
With previous versions of SCO scologin cannot be used. The Xvnc daemon
must be run through /etc/inittab.
Copy govnc.SCO to /etc and rename it to govnc. Set execute permission by
invoking:
# chmod +x /etc/govnc
For each VNC connection, add a line in /etc/inittab as shown below (the govnc
parameter is the DISPLAY number):
axv1:2345:respawn:/etc/govnc 1 1>/tmp/axvnclog1 2>&1
axv2:2345:respawn:/etc/govnc 2 1>/tmp/axvnclog2 2>&1
Note: to avoid these lines being removed after relinking the kernel, we advise
you to create the file /etc/conf/init.d/vnc. This file must contain the lines related
to govnc.
The following shows the govnc script:
DISPLAY=":"$1
PORT=`expr 5900 + $1`
HOST=`hostname`
/usr/local/bin/Xvnc $DISPLAY -query $HOST -once -terminate -auth
.Xauthority -ac -geometry 800x600 -depth 8 -rfbwait 120000 -rfbport $PORT
-fp
/usr/lib/X11/fonts/misc/,/usr/lib/X11/fonts/Speedo/,/usr/lib/X11/fonts/Ty
pe1/,/usr/lib/X11/fonts/75dpi/,/usr/lib/X11/fonts/100dpi/ -cc 3 -co
/usr/lib/X11/rgb 1>/tmp/axvnclog$1 2>&1
These modifications will take effect after invoking:
# init q
The Axel-VNCviewer should display an X login (like the main console).
20
Installing and Using the Axel-VNCviewer
3.3.3 - UNIXWARE 7
The following has been qualified for UnixWare 7.1.0 (after applying the ptf7408
and ptf7446) and UnixWare 7.1.1.
X terminals are handled by dtlogin under UnixWare.
The parameter file of dtlogin is /usr/dt/config/Xservers. For each VNC session,
add the following lines (below two Platine VNC sessions are configured):
:1 local@none /usr/local/bin/Xvnc :1 -ac -geometry 800x600 -depth 8 -fp
/usr/X11R6.1/lib/X11/fonts/misc/,/usr/X11R6.1/lib/X11/fonts/Speedo/,/usr/
X11R6.1/lib/X11/fonts/Type1/,/usr/X11R6.1/lib/X11/fonts/75dpi/,/usr/X11R6
.1/lib/X11/fonts/100dpi/,/usr/dt/config/xfonts/C -cc 3 -co
/usr/lib/X11/rgb -rfbwait 120000 -rfbport 5901
:2 local@none /usr/local/bin/Xvnc :2 -ac -geometry 800x600 -depth 8 -fp
/usr/X11R6.1/lib/X11/fonts/misc/,/usr/X11R6.1/lib/X11/fonts/Speedo/,/usr/
X11R6.1/lib/X11/fonts/Type1/,/usr/X11R6.1/lib/X11/fonts/75dpi/,/usr/X11R6
.1/lib/X11/fonts/100dpi/,/usr/dt/config/xfonts/C -cc 3 -co
/usr/lib/X11/rgb -rfbwait 120000 -rfbport 5902
Important: each line is different from the other by:
- the DISPLAY number (this number is given twice),
- the -rfbport option. It is the TCP port number entered through the AX3000
Set-Up (see Chapter 2).
Note: an example is given in the xservers.UW7 file. To add this line to the end
of Xservers, invoke the following command (be careful to >>):
# cat /tmp/xservers.UW7 >> /usr/dt/config/Xservers
Reset the X server by invoking '"scologin stop", then "scologin start". The
Axel-VNCviewer should display an X login (like the main console).
Installing and Using the Axel-VNCviewer
21
3.3.4 - OPEN UNIX 8
X terminals are handled by dtlogin under Open Unix 8
The parameter file of dtlogin is /usr/dt/config/Xservers. For each VNC session,
add the following lines (below two Platine VNC sessions are configured):
:1 local@none /usr/local/bin/Xvnc :1 -ac -geometry 800x600 -depth 8 -cc 3
-rfbwait 120000 -rfbport 5901 -fp /usr/X11R6.1/lib/X11/fonts/misc/,/usr
/X11R6.1/lib/X11/fonts/Speedo/,/usr/X11R6.1/lib/X11/fonts/Type1/,/usr/X11
R6.1/lib/X11/fonts/75dpi/,/usr/X11R6.1/lib/X11/fonts/100dpi/,/usr/dt/conf
ig/xfonts/C -co /usr/lib/X11/rgb
:2 local@none /usr/local/bin/Xvnc :2 -ac -geometry 800x600 -depth 8 -cc 3
-rfbwait 120000 -rfbport 5902 -fp /usr/X11R6.1/lib/X11/fonts/misc/,/usr
/X11R6.1/lib/X11/fonts/Speedo/,/usr/X11R6.1/lib/X11/fonts/Type1/,/usr/X11
R6.1/lib/X11/fonts/75dpi/,/usr/X11R6.1/lib/X11/fonts/100dpi/,/usr/dt/conf
ig/xfonts/C -co /usr/lib/X11/rgb
Important: each line is different from the other by:
- the DISPLAY number (this number is given twice),
- the -rfbport option. It is the TCP port number entered through the AX3000
Set-Up (see Chapter 2).
Note: an example is given in the xservers.OU8 file. To add this line to the end
of Xservers, invoke the following command (be careful to >>):
# cat /tmp/xservers.OU8 >> /usr/dt/config/Xservers
Reset the X server. The Axel-VNCviewer should display an X login (like the
main console).
22
Installing and Using the Axel-VNCviewer
3.3.5 - AIX
Note: in this chapter we assume that the CDE windows manager is used by the
AIX main console. If not, see the chapter about the installation under Linux with
kdm.
X terminals are handled by dtlogin under AIX.
The parameter file of dtlogin is /usr/dt/config/Xservers. For each VNC session,
add the following lines (below two Platine VNC sessions are configured):
:1 local@none /usr/local/bin/Xvnc :1 -ac -geometry 800x600 -depth 8 -fp
/usr/lib/X11/fonts/,/usr/lib/X11/fonts/misc/,/usr/lib/X11/fonts/75dpi/,/u
sr/lib/X11/fonts/100dpi/,/usr/lib/X11/fonts/i18n/,/usr/lib/X11/fonts/ibm8
50/,/usr/lib/X11/fonts/TrueType/,/usr/lib/X11/fonts/Type1/ -cc 3 -co
/usr/lib/X11/rgb -rfbwait 120000 -rfbport 5901
:2 local@none /usr/local/bin/Xvnc :2 -ac -geometry 800x600 -depth 8 -fp
/usr/lib/X11/fonts/,/usr/lib/X11/fonts/misc/,/usr/lib/X11/fonts/75dpi/,/u
sr/lib/X11/fonts/100dpi/,/usr/lib/X11/fonts/i18n/,/usr/lib/X11/fonts/ibm8
50/,/usr/lib/X11/fonts/TrueType/,/usr/lib/X11/fonts/Type1/ -cc 3 -co
/usr/lib/X11/rgb -rfbwait 120000 -rfbport 5902
Important: each line is different from the other by:
- the DISPLAY number (this number is given twice),
- the -rfbport option. It is the TCP port number entered through the AX3000
Set-Up (see Chapter 2).
Note: an example is given in the xservers.AIX file. To add this line to the end of
Xservers, invoke the following command (be careful to >>):
# cat /tmp/xservers.AIX >> /usr/dt/config/Xservers
These modifications will take effect after resetting the X server. (Log out from
the main console to reset the X server).
The Axel-VNCviewer will display an X login (like the main console).
Installing and Using the Axel-VNCviewer
23
If the keyboard management is not correct (i.e. unable enter the username
through the X login box), the /usr/dt/config/Xconfig file must be modified. This
file describes X terminal settings. The following line could be in the file:
Dtlogin*setup:
Xsetup
This line means the Xsetup file is used by ALL X terminals. To use a different
file for each X terminal, replace this line by:
Dtlogin*myhost_0*setup:
Dtlogin*myhost_1*setup:
Dtlogin*myhost_2*setup:
Xsetup
Xsetup_vnc
Xsetup_vnc
Note: in this example, myhost is the AIX hostname.
The Xsetup_vnc file must be created in /usr/dt/config… This file is empty.
24
Installing and Using the Axel-VNCviewer
3.3.6 - SUN OS 5.6
X terminals are handled by dtlogin under Sun OS.
The parameter file of dtlogin is /usr/dt/config/Xservers. For each VNC session,
add the following lines (below two Platine VNC sessions are configured):
:1 local@none /usr/local/vnc/Xvnc :1 -ac -geometry 800x600 -depth 8 rfbwait 120000 -rfbport 5901 -cc 3 -co /usr/openwin/lib/X11/rgb -fp
/usr/openwin/lib/X11/fonts/misc/,/usr/openwin/lib/X11/fonts/75dpi/,
/usr/openwin/lib/X11/fonts/100dpi
:2 local@none /usr/local/vnc/Xvnc :2 -ac -geometry 800x600 -depth 8 rfbwait 120000 -rfbport 5902 -cc 3 -co /usr/openwin/lib/X11/rgb -fp
/usr/openwin/lib/X11/fonts/misc/,/usr/openwin/lib/X11/fonts/75dpi/,
/usr/openwin/lib/X11/fonts/100dpi
Important: each line is different from the other by:
- the DISPLAY number (this number is given twice),
- the -rfbport option. It is the TCP port number entered through the AX3000
Set-Up (see Chapter 2).
Note: an example is given in the xservers.SUN file. To add this line to the end
of Xservers, invoke the following command (be careful to >>):
# cat /tmp/xservers.SUN >> /usr/dt/config/Xservers
These modifications will take effect after resetting the X server.
The Axel-VNCviewer will display an X login (like the main console).
Installing and Using the Axel-VNCviewer
25
3.3.8 - HP-UX 11
X terminals are handled by dtlogin under HP-UX.
The parameter file of dtlogin is /etc/dt/config/Xservers. For each VNC session,
add the following lines (below two Platine VNC sessions are configured):
:1 local@none /usr/local/bin/Xvnc :1 -ac -geometry 800x600 -depth 8 -cc 3
-rfbwait 120000 -rfbport 5901 -co /usr/lib/X11/rgb -fp /usr/lib/X11/fonts
/misc/,/usr/lib/X11/fonts/hp_roman8/75dpi/,/usr/dt/config/xfonts/C,/usr/l
ib/X11/fonts/iso_8859.15/75dpi
:2 local@none /usr/local/bin/Xvnc :2 -ac -geometry 800x600 -depth 8 -cc 3
-rfbwait 120000 -rfbport 5902 -co /usr/lib/X11/rgb -fp /usr/lib/X11/fonts
/misc/,/usr/lib/X11/fonts/hp_roman8/75dpi/,/usr/dt/config/xfonts/C,/usr/l
ib/X11/fonts/iso_8859.15/75dpi
Important: each line is different from the other by:
- the DISPLAY number (this number is given twice),
- the -rfbport option. It is the TCP port number entered through the AX3000
Set-Up (see Chapter 2).
Note: an example is given in the xservers.HPUX file. To add this line to the end
of Xservers, invoke the following command (be careful to >>):
# cat /tmp/xservers.HPUX >> /etc/dt/config/Xservers
These modifications will take effect after resetting the X server.
The Axel-VNCviewer will display an X login (like the main console).
26
Installing and Using the Axel-VNCviewer
-4USING THE AX3000
Installing and Using the Axel-VNCviewer
27
4.1 - OPENING A SESSION
The default keystroke used to open a session is <Alt><Fx> (where <Fx> is a
function key from <F1> to <F4>).
When the VNC authentication is enabled (see Chapter 6.1) the VNC password
must be entered. If the VNC authentication fails the VNC session is
disconnected.
On successful authentication, the Axel-VNCviewer displays a graphical login
screen or a previously opened session depending which type of disconnection
was previously performed
4.2 - DISCONNECTING
Three cases of disconnection can be distinguished:
4.2.1 - Log out
Note: only for SCO, UNIXWARE 7 and Linux with gdm.
When the user selects ‘Exit session’ from the X desktop menu, the VNC
connection is automatically closed. To get a new login screen, the user must
open again a VNC connection (pressing <Alt><Fx>).
: if you need a new login screen to be displayed automatically, set 'auto
reconnection' to 'yes' in the AX3000 Set-Up.
4.2.2 - Voluntary Disconnection
The user closes the VNC session at the AX3000 level by pressing
<Ctrl><Alt><Shift><D>. At Unix level, the VNC session is not closed, the next
time the Platine connects, the existing/current X screen will be displayed.
28
Installing and Using the Axel-VNCviewer
4.2.3 - Forced Disconnection
Another VNC viewer has opened a VNC session with the same TCP port as the
AX3000. In this case, the VNC server closes the AX3000 connection before
accepting the second connection.
Notes:
- To prevent a VNC terminal being disconnected by a second VNC
terminal, use the '-dontdisconnect' Xvnc option. Then second VNC
terminal connection will be refused.
- If a sharable VNC session is needed (i.e. several VNC viewers share the
same graphical screen), refer to Chapter 6.2.
Installing and Using the Axel-VNCviewer
29
-5TECHNICAL INFORMATION
30
Installing and Using the Axel-VNCviewer
The AX3000 offers 4 independent and concurrent sessions. Each session can
be used as:
- a vnc session,
- a text-based session (telnet or tty protocols).
5.1 - VNC SESSION
No specific setting is needed for a VNC session (no emulation or function key
set up).
Technical information:
- resolutions: 800x600 and 1024x768 (according to the AX3000 hardware ;
see Chapter 6.4),
- colours: 256,
- default VGA frequency: 72 Hertz,
- mouse: a serial 2-button mouse.
For best performance the X desktop should be set to:
- background aspect: select a one-colour background (no colour-scale
background or picture)
- moving and resizing windows: set for these operations to be performed
without displaying the window’s contents. (i.e. move the frame only)
5.2 - TEXT-BASED SESSION
There are two techniques used for text-based emulations:
- Standard Text Mode – identical to the Ax3000 Models 55 and 55E
- Alpha-GUI Mode (Revamping) which allows the display of GIF files and
various shading and shadow effects for characters and semi-graphics
characters
Note: AX3000 are equipped with the real-text mode firmware. The alpha-GUI
mode is an optional firmware. (This option is called AGA, AGV or AGW in the
firmware revision)
Installing and Using the Axel-VNCviewer
31
The alpha-GUI mode has the following specifications:
- only 80-column mode supported,
- currently only supports ANSI, VT and WYSE emulations,
- scrolling speed is lower,
- blinking attribute not supported,
- underline attribute supported in colour (which is not the case in real text
mode).
For more information about this mode, please refer to the Addendum - AlphaGUI.
32
Installing and Using the Axel-VNCviewer
-6GOING FURTHER WITH VNC
Installing and Using the Axel-VNCviewer
33
6.1 - VNC AUTHENTICATION
The VNC protocol makes the AX3000 "stateless". If a user disconnects from a
given server and subsequently reconnects to that same server, the state of the
user interface is preserved. Furthermore, a different client (terminal) can be
used to connect the same VNC server.
This feature has many useful aspects, but also can have security implications.
To provide security in this situation authentication can be enabled: ie a password
is required when the VNC connection is opened.
Note: this password is independent from the Unix log-on password
To create (or modify) a VNC password invoke vncpasswd. (The only
vncpasswd requirement is the /$HOME/.vnc directory exists). vncpasswd stores
the password (and only one password) in the /$HOME/.vnc/passwd file.
Before using vncpasswd, check the /$HOME/.vnc directory exists. If not, create
one:
# mkdir /$HOME/.vnc
Creating one or more VNC passwords:
Invoke vncpasswd. The password must be entered twice (6 characters at least).
This password is stored in /.vnc/passwd.
If several VNC passwords are needed, copy /.vnc/passwd to /.vnc/passwd1
(/.vnc/passwd2, /.vnc/passwd3…). Then invoke again vncpasswd to enter
another password.
Modifying the Xvnc command line:
To enable the VNC authentication, add the -rfbauth option in the Xvnc
command line. This option must be followed by the password file.
34
Installing and Using the Axel-VNCviewer
Examples:
Two VNC sessions with the same password:
:1 local /usr/local/bin/Xvnc :1 -ac -geometry 800x600 -depth 8 -fp
unix/:-1 -cc 3 -co /usr/lib/X11/rgb -rfbwait 120000 -rfbport 5901 rfbauth /.vnc/passwd
:2 local /usr/local/bin/Xvnc :2 -ac -geometry 800x600 -depth 8 -fp
unix/:-1 -cc 3 -co /usr/lib/X11/rgb -rfbwait 120000 -rfbport 5902 rfbauth /.vnc/passwd
Two VNC sessions with a different password:
:1 local /usr/local/bin/Xvnc :1 -ac -geometry 800x600 -depth 8 -fp
unix/:-1 -cc 3 -co /usr/lib/X11/rgb -rfbwait 120000 -rfbport 5901 rfbauth /.vnc/passwd1
:2 local /usr/local/bin/Xvnc :2 -ac -geometry 800x600 -depth 8 -fp
unix/:-1 -cc 3 -co /usr/lib/X11/rgb -rfbwait 120000 -rfbport 5902 rfbauth /.vnc/passwd2
Installing and Using the Axel-VNCviewer
35
6.2 - SHARABLE VNC SESSION
By default, a VNC session is non-sharable. That means only one viewer can be
connected to an Xvnc with a specific TCP port. If a second viewer tries to open
the same VNC session as the first viewer, the first viewer is disconnected. (This
behaviour can be changed by using the '-dontdisconnect' Xvnc option).
It is however possible to share the same graphics session between several VNC
viewers.
Example: lessons or training. A teacher uses this Axel-VNCviewer and students
follow these operations on their own Axel-VNCviewer.
To set a VNC sharable session, enter the AX3000 Set-Up (<Ctrl><Alt><Esc>),
select [Configuration]→[Terminal]→[Session X] (where X is the session
number). Within this box select [General Parameters] and press <Space>. A
dialog box is displayed. Within this box set the following parameters:
- Shared Session: yes
- Keyboard and Mouse Ignored: yes or no. In the 'teacher and students'
example, select 'no' for the teacher's Platine and select 'yes' for the
students' Platine.
Note: to prevent a non-sharable VNC session disconnecting these sharable
sessions, use the 'dontdisconnect' Xvnc option..
36
Installing and Using the Axel-VNCviewer
6.3 - XVNC DAEMON
The usage of Xvnc is: Xvnc :<display> [options]
The main options are:
:<display>
: DISPLAY number handled by Xvnc (for example
":1")
-geometry <LxH> : screen size
-depth D
: number of bits per pixel (8 bits = 256 colours)
-cc <class>
: colour visual class (for more information, see next
chapter)
-co <file>
: colour database file
-fp <file>
: default font path(s). See Chapter 7.2.
-rfbport <port>
: TCP port used for the connection. There is a
connection between this value and the DISPLAY
number (5901 is DISPLAY ":1", 5902 is ":2"….)
-query <host>
: using XDMCP request to get the "login screen".
<host> is the name of the Unix box. Invoke
hostname to know this name.
-ac
: disable access control restrictions
-once & -terminate : the VNC connection is closed when the login session
is closed
-dontdisconnect : don't disconnect existing clients when a new nonshared connection comes in (refuse new connection)
For more information about other options, invoke:
# Xvnc -h 2>&1 | more
Installing and Using the Axel-VNCviewer
37
6.4 - USING A DIFFERENT RESOLUTION
6.4.1 - Checking Available Resolutions
The minimum resolution supported by the AX3000 is 800x600. A higher
resolution of 1024x768 is available for later models (1Mb memory models).
To find out the memory size, press <Ctrl><Alt><Esc> and enter the AX3000
Set-Up. Select the '?' on the far right and press <CR>. Check the VGA
parameter value in the displayed dialog box. If this value is followed by (1Mb),
1024x768 resolution is supported. If not only 800x600 is available.
It is not possible to up-grade lower to higher resolution models.
6.4.2 - Setting-Up the AX3000
To set a VNC session in 1024x768, press <Ctrl><Alt><Esc> to enter the
AX3000 Set-Up. Select [Configuration]→[Terminal]→[Session X] (where X is
the session number). A dialog box is displayed. Within this box select 'General
Parameters'. In the displayed box, press <Space> to change resolution.
6.4.3 - Setting-Up Xvnc
A Xvnc server must handle the same resolution than the associated AX3000.
Then, to handle a different resolution, the Xvnc command line must be modified.
The command is generally run through the Xservers file (see Chapter 3).
It's the geometry option which is involved. For example, this Xvnc command:
:1 local /usr/local/bin/Xvnc :1 -ac -geometry 800x600 -depth 8 -rfbwait
120000 -rfbport 5901 -fp unix/:-1 -cc 3 -co /usr/lib/X11/rgb
must be replaced by:
:1 local /usr/local/bin/Xvnc :1 -ac -geometry 1024x768 -depth 8 -rfbwait
120000 -rfbport 5901 -fp unix/:-1 -cc 3 -co /usr/lib/X11/rgb
This modification will take effect after resetting the X server or rebooting Unix.
38
Installing and Using the Axel-VNCviewer
6.5 - RUNNING SOFTWARE WITHOUT DISPLAY MANAGER
OR DESKTOP
The display manager and desktop processes allow a user to be authenticated
(display manager) and run utilities or software through menus or icons
(desktop).
The process groups involved by these are mechanisms:
Software
Desktop: KDE, GNOME, XFCE...
Display manager: XDM, GDM, XDM...
Xvnc
This environment (login + desktop) is both safe and easy to use, but requires a
large amount of memory. Below we discuss the option of running an application
direct from Xvnc, without the Desktop or Display manager being loaded. This
has two benefits, less memory is used, and often the user will not require a
Linux/Unix desktop, preferring to launch direct into their application.
- Example 1: only one application is run on the graphical terminal (for
example Netscape). Once the terminal is powered-on, Nescape is
automatically run. No Unix/Linux authentication is needed. Furthermore,
the terminal will only run Netscape.
- Example 2: the Unix/Linux box is used as a front-end to access a
Windows box. Once the terminal is powered-on, an ICA client or a RDP
client is automatically run. A Windows "login" screen is automatically
displayed. The Unix/Linux box is invisible.
For these configurations, the following architectures can be used:
Software
Window manager: twm
Xvnc
or
Software
Xvnc
Note: depending of the application, a window manager (twm) may be required.
For example Netscape needs a window manager (several windows can be
Installing and Using the Axel-VNCviewer
39
created during the use of Netscape). Alternatively rdesktop software (RDP
client) doesn't need a window manager.
6.5.1 - The RunScriptVNC Script
The RunScriptVNC script first runs the Xvnc daemon, then runs (in a loop) the
dedicated application (binary or script).
The axvnc utility (see Chapter 3.2) automatically creates RunScriptVNC in /etc.
The following gives the content of this script:
DISPLAY=":"$1
export DISPLAY
PORT=`expr 5900 + $1`
GEOMETRY=$2
if [ "$3" = "8" ]; then
BPP="-depth 8 -cc 3"
else
BPP="-depth 16"
fi
/usr/local/bin/Xvnc $DISPLAY -ac -geometry $GEOMETRY $BPP -rfbwait 120000 -rfbport
$PORT -fp unix/:-1 -co /usr/lib/X11/rgb 1>/tmp/axvnclog$1 2>&1 &
sleep 1
/usr/bin/X11/xsetroot -solid grey
shift
shift
shift
CMD=$*
TYPE=`/usr/bin/file $1`
TEXT=`echo $TYPE | grep "text"`
if [ ! -z "$TEXT" ]; then
CMD="/usr/bin/X11/xterm -geometry 170x60-0+0 -e "$CMD
fi
while :
do
REP=`ps -ef | grep "Xvnc $DISPLAY" | grep -v grep`
if [ -z "$REP" ]; then
exit
fi
$CMD
RunScriptVNc is run by /etc/inittab. The /etc/inittab file is modified to launch a
script for each VNC terminal. Example:
axv1:5:respawn:/etc/RunScriptVNC 1 1024x768 8 /usr/local/bin/runRDP 1>/tmp/axvnclog1
2>&1
axv2:5:respawn:/etc/RunScriptVNC 2 800x600 8 /usr/local/bin/runNS 2 800x600
1>/tmp/axvnclog2 2>&1
40
Installing and Using the Axel-VNCviewer
Note: the RunScriptVNC parameters are the screen number, the resolution, the
number of colours (bits/pixel) and the dedicated application (absolute pathname
and parameters).
6.5.2 - Internet Terminal: Automatically Running Netscape
Instead of running the Netscape binary, it's better to run a script which performs
the following operations:
- running a window manager (twm). As Netscape generally creates
windows whilst browsing a windows manager is required.
- setting environment variables to allow Netscape to use different locations
for its resources (cache, historic files, etc.) according the display number.
In this case the following users are created: axel1, axel2, axel3, etc.
This is the runNS script (two parameters are needed, the screen number and
the resolution):
#!/bin/sh
MYUSER="axel"$1
HOME=/home/$MYUSER
LOGNAME=$MYUSER
USER=$MYUSER
USERNAME=$MYUSER
DISPLAY=":"$1
export DISPLAY
### IMPORTANT: add these 2 parameters in /usr/lib/X11/twm/system.twmrc
###
RandomPlacement
###
UsePPosition "on"
/usr/bin/X11/twm -display $DISPLAY &
/usr/bin/netscape -display $DISPLAY -geometry $2+0+0 http://www.axel.com
This script is run through /etc/inittab. Example:
axv1:5:respawn:/etc/RunScriptVNC 1 800x600 8 /usr/local/bin/runNS 1
800x600 1>/tmp/axvnclog1 2>&1
6.5.3 - Windows Terminal: Automatically Running Rdesktop
Note: rdesktop is a Unix/Linux "RDP 4" client. The rdesktop source code is
available at http://www.rdesktop.org. This software allows a Unix/Linux client
Installing and Using the Axel-VNCviewer
41
to attach to a Windows server (TSE or 2000 Advanced Server) using the "RDP
4" protocol.
Rather than running the rdesktop binary, there are benefits in running a script
which asks the user to press a key before running rdesktop (i.e. opening an
RDP connection). This avoids the continual respawning of RDP connections,
which are automatically killed by Windows if nobody logs in.
This is the runRDP script which runs rdesktop:
#!/bin/sh
clear
echo "
R D P
C O N N E C T I O N"
echo "
---------------------------"
echo ""
echo ""
echo ""
echo ""
echo ""
echo ""
echo "PRESS <CR> TO BEGIN"
read key
/usr/bin/X11/xmodmap -e "keycode any = EuroSign"
/usr/bin/X11/xmodmap -e "keycode any = Caps Lock"
/usr/local/bin/rdesktop -v -V -k fr -F 192.168.1.160
This script is run through /etc/inittab. Example:
axv1:5:respawn:/etc/RunScriptVNC 1 1024x768 8 /usr/local/bin/runRDP
1>/tmp/axvnclog1 2>&1
42
Installing and Using the Axel-VNCviewer
6.6 - USING (X)INETD WITH KDE 2.2
Under a Linux KDE 2.2 environment, the installation method described in
Chapter 3.3.1 is based on /etc/inittab. But Xvnc daemons can also be run
through inetd (or xinetd).
The configuration shown below enables 2 VNC connection ports:
- 5950 for 800x600 and 256-colour terminals,
- 5952 for 1024x768 and 256-colour terminals.
This allows all the 800x600/256-colour terminals to open a VNC connection on
the same TCP port (5950). Similarly 1024x768/256-colour terminals can be
configured to use port 5952).
The main differences between the 'inittab' method and the '(x)inetd' method are:
Number of Xvnc daemon
run at the Linux boot-up
TCP Ports
Display Numbers
In event of incident
(Terminal power loss)
Sharable session
/etc/inittab
one per terminal
(x)inetd
none
one per terminal
fixed
graphical context can
be retrieved
yes
the same of all
dynamic
graphical context is lost
(come back to login)
no
Note: installing Xvnc through inetd can be compared with the server telnet
daemon: a telnet daemon is only run when a telnet connection is established, tty
are dynamically allocated and the context (screen) is lost in event of incident.
The inetd method is a three-step installation:
- updating the inetd or xinetd environment,
- checking access rights,
- enabling XDMCP.
6.6.1 - Updating the inetd or xinetd Environment
The first operation is modifying the file /etc/services. Add the following lines at
the end of the file:
Installing and Using the Axel-VNCviewer
43
vnc-800x600-8
vnc-1024x768-8
5950/tcp
5952/tcp
Then, check if inetd or xinetd is running. The next operation depends on the
daemon.
a) xinetd Daemon
If the directory /etc/xinetd.d exists, create the file /etc/xinetd.d/vnc and add the
following lines. If /etc/xinetd.d does not exist add these lines at the end of
/etc/xinetd.conf:
service vnc-800x600-8
{
disable = no
protocol = tcp
socket_type = stream
wait = no
user = nobody
server = /usr/local/bin/Xvnc
server_args = -inetd -query localhost -once -geometry 800x600 -depth 8 -cc 3
}
service vnc-1024x768-8
{
disable = no
protocol = tcp
socket_type = stream
wait = no
user = nobody
server = /usr/local/bin/Xvnc
server_args = -inetd -query localhost -once -geometry 1024x768 -depth 8 -cc 3
}
These modifications will take effect after sending the signal USR2 to xinetd (kill
-USR2 ...).
44
Installing and Using the Axel-VNCviewer
b) inetd Daemon
If the directory /etc/inet.d exists, create the file /etc/inet.d/vnc and add the
following lines. If /etc/inet.d does not exist add these lines at the end of
/etc/inetd.conf:
vnc-800x600-8 stream tcp nowait nobody /usr/local/bin/Xvnc Xvnc -inetd -query
localhost -once -geometry 800x600 -depth 8 -cc 3
vnc-1024x768-8 stream tcp nowait nobody /usr/local/bin/Xvnc Xvnc -inetd -query
localhost -once -geometry 1024x768 -depth 8 -cc 3
These modifications will take effect after sending the signal HUP to inetd (kill
-HUP ...).
6.6.2 - Checking Access Rights
The access rights are listed in the file Xaccess.
Check if VNC terminals are allowed to be connected. For example, comment
out this line:
*
#any host can get a login window
If this file is modified, reboot Linux.
6.6.3 - Enabling XDMCP
First, XDMCP must be enabled. This is done through the file kdmrc. The
location of kdmrc depends on the operating system. Possible locations are
/etc/kde/kdm, /usr/share/config/kdm or /opt/kde2/share/config/kdm.
This file is divided into sections. In the xdmcp section, set the 'Enable'
parameter to 'true':
[xdmcp]
Enable=true
This modification will take effect after rebooting Linux.
Installing and Using the Axel-VNCviewer
45
6.7 - COLOUR CLASS
The Axel-VNCviewer supports 256 colours, but some software may display
pictures with more than 256 colours, i.e. a website with 16-bit per pixel pictures.
To handle this many colours the Xvnc daemon must modify the 'colour class’
and this may change the appearance of the picture.
This colour modification strategy is controlled by the Xvnc option '-cc' (colour
class). Two values for this option can be used depending on the use of the
Platine:
-cc 2 (default)
-cc 3
If the colour management is not satisfactory, test these two values by modifying
the Xvnc command.
46
Installing and Using the Axel-VNCviewer
-7TROUBLESHOOTING
Installing and Using the Axel-VNCviewer
47
7.1 - THE AX3000 DISPLAY IS BLACK OR DISTORTED
The default VGA frequency used by the AX3000 is 70 Hertz. If the VGA monitor
does not support this frequency the display will be black or distorted (vertical
sync is lost).
To fix this problem either use a more modern monitor (SVGA) or perform one of
the following operations depending on the AX3000 mode (see Chapter 5.3):
a) Real Text Mode
Enter the AX3000 Set up (<Ctrl><Alt><Esc>) and select the [Configuration]→
[Advanced]→[Tunings] menu. Within the dialog box select the 'Scan
frequency (VNC)' parameter and press <spacebar> to select the minimum
frequency (60 Hertz).
b) Alpha-GUI Mode
Enter the AX3000 Set up (<Ctrl><Alt><Esc>) and press <F12>. The VGA
frequency is set to 60 Hertz and the display becomes visible (this emergency
procedure modifies the VGA frequency only during the set up stage). Then
select the [Configuration]→[Advanced]→[Tunings] menu. Within the dialog
box select the 'Scan frequency' parameter and press <spacebar> to enter the
associated dialog box. The minimum frequency value can be selected (60
Hertz).
48
Installing and Using the Axel-VNCviewer
7.2 - AX3000 FONTS ARE NOT AS EXCEPTED
The X server (either the main console or the Xvnc daemon) locates the available
fonts through the '-fp' option (see Chapter 6.3).
The '-fp' option lists
- the font path names (ex.: /usr/lib/X11/font/misc)
- the available font servers. A font server can be located anywhere on the
network (ex.: tcp/mysf:5701) or local (ex.: unix/:-1).
Example:
-fp unix/:-1,/usr/lib/X11/font/misc/,/usr/lib/X11/font/Type1/
Caution: Be careful of the argument’s order .
If the AX3000 fonts are not the same as those of the main console or if the Xvnc
fails, perform the following:
- Log on the main console
- Invoke 'xset -q'. This command lists the X resources. The font path
section lists the available fonts. Use the same information for the Xvnc -fp
option. Example for SuSE 7.0:
:1 local /usr/local/bin/Xvnc :1 -ac -geometry 800x600 -depth 8 -rfbwait
120000 -rfbport 5901 -fp usr/X11R6/lib/X11/fonts/75dpi:unscaled,
/usr/X11R6/lib/X11/fonts/local,/usr/X11R6/lib/X11/fonts/misc:unscaled,/us
r/X11R6/lib/X11/fonts/100dpi:unscaled,/usr/X11R6/lib/X11/fonts/Type1,/usr
/X11R6/lib/X11/fonts/URW,/usr/X11R6/lib/X11/fonts/Speedo,/usr/X11R6/lib/X
11/fonts/misc,/usr/X11R6/lib/X11/fonts/75dpi,/usr/X11R6/lib/X11/fonts/100
dpi,/usr/X11R6/lib/X11/fonts/latin2/75dpi,/usr/X11R6/lib/X11/fonts/latin2
/100dpi,/usr/X11R6/lib/X11/fonts/uni -cc 3 -co /usr/lib/X11/rgb
- Reset the Xvnc daemon for this modification to take effect.
Note about the font servers: if a font server is used, check the number of
clients supported by this server (this is the 'client-limit' capability in
/etc/X11/fs/config). For 4 Axel-VNCviewers, 'client-limit' must be set to 5 (4
Platine + the main console).
Installing and Using the Axel-VNCviewer
49
7.3 - LINUX: 'WHO' COMMAND DOESN'T LIST VNC USERS
The 'who' command (used to list connected users) does not show users
connected via a VNC session.
This problem is common to all X terminals using xdm, as xdm does not update
utmp/wtmp entries.
To fix this problem two scripts must be created. One to add a utmp/wtmp entry
and the other to remove the entry. These utmp/wtmp modifications are
performed by the system command sessreg. See examples below of these two
scripts (they are available on the CD-Rom):
addvncsess
/usr/X11R6/bin/sessreg -a -l $DISPLAY -x /usr/lib/X11/xdm/Xservers $USER
delvncsess
/usr/X11R6/bin/sessreg -d -l $DISPLAY -x /usr/lib/X11/xdm/Xservers $USER
Copy these scripts in /usr/lib/X11/xdm.
The addvncsess script must be run at the X session start-up and the delvncsess
script must be run at the X session reset (close). This is done by the
/usr/lib/X11/xdm/xdm-config file.
In this file, for each VNC session, add the following lines (below two Platine VNC
sessions are configured):
DisplayManager._1.xstartup:
DisplayManager._1.reset:
DisplayManager._2.xstartup:
DisplayManager._2.reset:
/usr/lib/X11/xdm/addvncsess
/usr/lib/X11/xdm/delvncsess
/usr/lib/X11/xdm/addvncsess
/usr/lib/X11/xdm/delvncsess
The 'who' command will show all subsequent user connections.
50
Installing and Using the Axel-VNCviewer
7.4 - RED HAT: DPMS ERROR MESSAGE
After entering your username and password, the message "X11 server lacks
DPMS support" may be displayed. To prevent this invoke the following
command:
# rm -f /usr/share/applnk/Settings/Desktop/kcmdpms.kdelnk
7.5 - SCO: KEYBOARD DIFFICULTIES WITH SCOTERM
The ScoTerm application is the default 'graphical' shell offered by SCO. Within
the ScoTerm box sometimes the keyboard management is not correct. (There is
no problem with other shell boxes, for example XTerm).
To fix this, edit the /usr/lib/X11/app-defaults/ScoTerm file. In this file, comment
out the keyboard capabilities in the 'Keyboard resources' section.
If needed, a mapchan file can be specified:
*mapchan: /usr/lib/mapchan/cons.ibm
7.6 - XVNC: ERROR MESSAGE "HOST UNWILLING"
When the VNC server displays this type of message:
XDMCP fatal error: Manager unwilling Host unwilling
That means the XDMCP process is not authorised to run a login onto this VNC
server.
The access restrictions are listed in the file Xaccess. Modify this file to authorise
Xvnc terminals access and reboot the Linux system.
Installing and Using the Axel-VNCviewer
51
7.7 - XVNC: ERROR MESSAGE "FONT FIXED"
When the VNC server displays this type of message:
Could not open default font 'fixed'.
That means no fixed font is available.
Note: the font paths handled by Xvnc are given by the '-fp' option.
Three methods are available to fix this problem:
1 - Check if your Linux is consistent (for instance, are there directories on
the Xvnc font path which don't actually exist on your system). To fix that
use the 'mkfontdir' command or update Linux by installing packages.
2 - Modify the '-fp' option value. Add or remove font paths.
3 - Remove the '-fp' option from the Xvnc command. Then, Xvnc will use
default font path.
Note: if the Axel VNC utility (axvnc) is used, run 'axvnc -nofp'. This will
prevent Xvnc to use customised font paths.
52
Installing and Using the Axel-VNCviewer
14 Avenue du Québec
Bât. K2 - BP 728
91962 Courtabœuf cedex - FRANCE
Tel.: +33.1.69.28.27.27 - Fax: +33.1.69.28.82.04 - Email: [email protected]