1
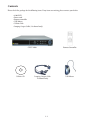
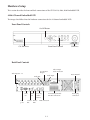
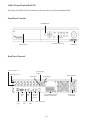
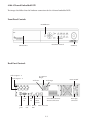
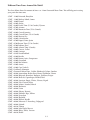
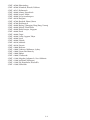
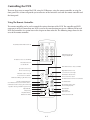
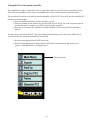
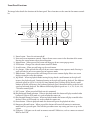
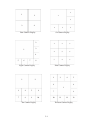
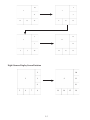
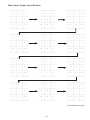
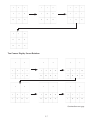
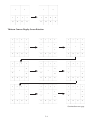
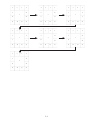
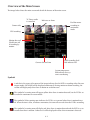
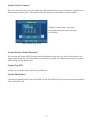
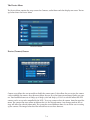
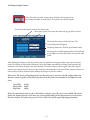
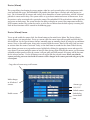
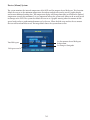
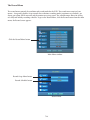
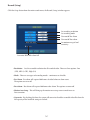
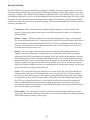
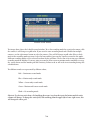
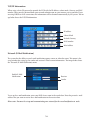
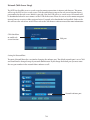
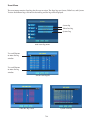
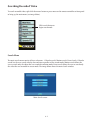
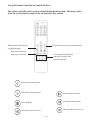
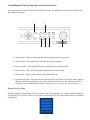
CDVS-4100 Series
Embedded DVR
Setup And
Users Manual
Crest Electronics, Inc.
Version 05.23.06
Caution
This installation should be performed by qualified service personnel and should conform to all Federal State
and local laws.
The lightning flash with arrowhead symbol, within an
equilateral triangle is intended to alert the user to the
presence of uninsulated dangerous voltage within the
product’s enclosure that may be of sufficient magnitude
to constitute a risk of electric shock to persons.
CAUTION
RISK OF ELECTRIC SHOCK
DO NOT OPEN
CAUTION: TO REDUCE THE RISK OF ELECTRIC
SHOCK. DO NOT REMOVE COVER. NO
USER-SERVICEABLE PARTS INSIDE. REFER
SERVICING TO QUALIFIED SERVICE
PERSONNEL.
The exclamation point within an equilateral triangle is
intended to alert the user to the presence of important
operating and maintenance (servicing) instructions in
the literature accompanying the appliance.
WARNING: TO REDUCE THE RISK OF ELECTRICAL SHOCK, DO NOT EXPOSE THIS
APPLIANCE TO RAIN OR MOISTURE
WARNING: This equipment has been tested and found to comply with the limits for a Class B digital
device, pursuant to Part 15 of the FCC rules. These limits are designed to provide reasonable protection
against harmful interference in a residential installation. This equipment generates and uses radio
frequency energy, and if not installed and used in accordance with instructions, may cause harmful
interference to radio communications. However, there is no guarantee that the interference will not
occur in a particular installation. If this equipment does cause harmful interference to radio or television
reception, which can be determined by turning the equipment off and on, the user is encouraged to try to
correct the interference by one of the following methods:
- Relocate the receiving antenna
- Increase the amount of space between the equipment and the receiver.
- Connect the equipment to an outlet which is on a separate circuit than that of the
receiver.
- Consult the dealer or an experienced radio/TV technician for help
CAUTION: Changes or modifications not expressly approved by the party responsible for compliance
with the FCC Rules could void the user’s authority to operate this equipment.
i
Important Safeguards
Warning
1. Turn off power to the unit prior to changing the battery.
2. Check the polarity of the lithium battery while changing.
3. When changing battery use the same type as original or similar type recommended by your vendor.
4. Dispose of old battery in accordance with the manufacturer of the battery.
General Warning
Warning
1. Use the power cord which is supplied or recommended by the manufacturer. Failure to do so could cause
a fire.
2. Use the power transformer which is supplied or recommended by the manufacturer. Failure to do so
could cause a fire.
3. Do not dismantle or assemble the product. Doing so could cause malfunction or fire.
4. Service should only be done by manufacturer or authorized vendor. Electrical shock or fire could result if
repair is not done properly.
5. Do not touch product with wet hands as electric shock may occur.
6. Product must be installed by a qualified professional. Failure to do so could result in malfunction,
electrical shock or fire.
7. Consult the place of purchase if the need for installation arises. Poor installation could cause
malfunction, electric shock or fire.
8. Ground applies to video products equipped with a 3-wire grounding type plug having a third (grounding)
pin. This plug only fits into a grounding type power outlet. If grounding is not done, equipment malfunction or electric shock may occur.
9. Ground connection must not touch gas pipe, water pipe or telephone lines.
10. Prevent foreign metallic substance from going inside the product. Failure to do so could result in malfunction or electric shock.
11. Prevent water or other liquids from entering inside the product. Use damp cloth to clean outside of
product. Failure to do so could result in malfunction or electric shock.
ii
Caution
1. Use the power cord and power transformer supplied by the manufacturer or one recommended by the
manufacturer.
2. The internal fan rotates at high speed and may cause injury.
3. Do not drop, give unit strong vibration or shock to the product; doing so will cause malfunction.
4. Slots and openings in the front and back of the cabinet are provided for ventilation, to ensure reliable
operation of the unit, and to protect it from overheating. These openings must not be blocked or covered.
The openings should never be blocked by placing the unit on a bed, sofa, rug or similar surface. The unit
should never be placed near or over a radiator or heat source. This unit should not be placed in a builtin installation such as a bookcase or rack unless proper ventilation is provided and/or the manufacturer’s
instructions are adhered to.
5. Do not install the product near or on top of heating source. The internal temperature of the product would
be greater than the allowable and could cause malfunction or fire.
6. Do not install the product on inclined or unstable locations such as an unstable cart, slant tripod, bracket,
or table. The unit may fall, causing serious injury, and serious damage to the unit.
Cautions about the Power
Warning
1. This unit should be operated only from the type of power indicated on the power plate. If you are not
sure of the type of power supply at your location, consult your dealer or local power company. For units
intended to operate from battery power, or other sources, refer to the operating instructions.
2. Power supply cords should be routed so that they are not likely to be walked on or pinched by items
placed upon or against them, paying particular attention to the cord at plugs, convenience receptacles,
and the point where they exit from the appliance.
3. Do not cut power cord to connect in the middle of the power cord or use extension cord. Doing so could
generate heat or cause fire.
4. Do not touch power cord in wet area or with wet hands.
5. Hold the body of the plug when removing the power cord. Do not pull cord as doing so may generate
heat or cause fire.
6. Remove the power cord from the outlet when not in use for long periods of time. This will prevent
damage to unit due to lightning and power line surges.
iii
Contents
Box Contents .................................................................................................1-1
Hardware Setup ....................................................................... 2-1
4108 8 Channel Embedded DVR ....................................................................2-1
4108 8 Channel Embedded DVR ....................................................................2-2
4104 4 Channel Embedded DVR ....................................................................2-3
The Embeded DVR Data Input and Output Terminal Pin Assignment........2-4
Description of Hardware Connestions ...........................................................2-5
Powering Up The DVR For The First Time ............................ 3-1
Default User Name and Password...................................................................3-1
Setting The Time Zone ....................................................................................3-2
Different Time Zones Around the World .......................................................3-3
Default Settings ...............................................................................................3-5
Controlling the DVR ..................................................................................4-1
Using The Remote Controller. ........................................................................4-1
Setting the ID on the remote controller .........................................................4-2
Front Panel Functions .....................................................................................4-4
Screen Display ...............................................................................................5-1
Camera Sequence ............................................................................................5-3
Overview of the Main Screen .................................................................6-1
Symbols............................................................................................................6-1
Channel Swapping ...........................................................................................6-2
Main System Menu Pop Up Box ............................................................7-1
Overview of Pop Up Menu ..............................................................................7-1
Setting Up The DVR........................................................................................7-2
The System Menu.............................................................................................7-3
System (Information) screen ........................................................................7-3
System (Time Setup) Screen .........................................................................7-4
System (Disk Manager) .................................................................................7-5
System (User Account)..................................................................................7-6
System (Covert Cameras) .............................................................................7-7
System (Factory Default Function) ..............................................................7-7
System (Log Off)...........................................................................................7-7
System (Shut Down) .....................................................................................7-7
The Device Menu ............................................................................................7-8
Device (Camera) Screen ...............................................................................7-8
Device (Camera) PTZ Setup.......................................................................7-10
Device (Camera) Color Control ................................................................7-11
Device (Camera) Audio ..............................................................................7-11
Device (Alarm) ...........................................................................................7-12
Device (Alarm) Sensor ...............................................................................7-12
iv
Device (Alarm) Motion ..............................................................................7-14
Device (Alarm) Video Loss ........................................................................7-14
Device (Alarm) System ...............................................................................7-15
The Record Menu ..........................................................................................7-16
Record (Setup) ............................................................................................7-17
Motion Area Setup Window .......................................................................7-18
Record (Schedule) .......................................................................................7-19
Network ........................................................................................................7-21
Network (IP Setup) .....................................................................................7-21
TCP/IP Information ...................................................................................7-22
Network (E-Mail Notification) ...................................................................7-22
Network (Web Server Setup) ......................................................................7-23
Event Menu ....................................................................................................7-24
Searching Recorded Video ...................................................... 8-1
Search Menu ....................................................................................................8-1
Event (Calendar Search) ...............................................................................8-2
Search (Motion Search) ...............................................................................8-3
Search (Event Search) ...................................................................................8-4
Playback Screen Functions..............................................................................8-5
Backing Up Recorded Video ................................................... 9-1
Digital PTZ ............................................................................. 10-1
Dynamic PTZ ......................................................................... 11-1
v
Contents
Please check the package for the following items. If any items are missing please contact your dealer.
• 4100 DVR
• Power cord
• Remote controller
• USB Mouse
• Utilities Disk
• Looping Output Cable (16 channel only)
Remote Controller
CDVS-4100
Utilities CD
Looping Output Cable
16 channel only.
1-1
USB Mouse
Hardware Setup
This section describes the front and back connections of the CDVS-4116, 4108, 4104 Embedded DVR.
4108 8 Channel Embedded DVR
The images that follow show the hardware connections for the 16 channel embedded DVR.
Front Panel Controls
On/Off Button
CD-RW Drive
Front Panel Controls
USB Ports
Back Panel Controls
Video Inputs 1 - 16
Audio Out
VGA
out
USB
ports
Video Output
cable connection
Spot monitor
Output
Mon.
out
Audio Input
Two way
Audio
In/Out
S-Video NTSC/
Out
PAL
Sensor/Relay/Ground/
422/485 connections
LAN connection
2-1
Power On/Off
Power plug
connection
4108 8 Channel Embedded DVR
The images that follow show the hardware connections for the 8 channel embedded DVR.
Front Panel Controls
On/Off Button
Front Panel Controls
CD-RW Drive
USB Ports
Back Panel Controls
Video Outputs 1 - 8
Spot monitor
Output
Video Inputs 1 - 8
Audio Out
VGA
out
USB
ports
Mon.
out
Two way
Audio
In/Out
S-Video NTSC/
Out
PAL
Audio Input
Sensor/Relay/Ground/
422/485 connections
LAN connection
2-2
Power On/Off
Power plug
connection
4104 4 Channel Embedded DVR
The images that follow show the hardware connections for the 4 channel embedded DVR.
Front Panel Controls
On/Off Button
Front Panel Controls
CD-RW Drive
USB Ports
Back Panel Controls
Video Outputs 1 - 4
Spot monitor
Output
Video Inputs 1 - 4
Audio Out
VGA
out
USB
ports
Mon.
out
Two way
Audio
In/Out
S-Video NTSC/
Out
PAL
Audio Input
Sensor/Relay/Ground/
422/485 connections
LAN connection
2-3
Power On/Off
Power plug
connection
The Embeded DVR Data Input and Output Terminal Pin Assignment
The drawing below shows the pin assignments for the sensors, relays and PTZ RS 485 data port.
28
1
27 26 25 24
2
Pin No.
1
2
3
4
5
6
7
8
9
10
11
12
13
14
3
4
5
23
6
Signal Name
Sensor 15
Sensor 16
Common
Common
Relay 1-A
Relay 1-B
Relay 2-A
Relay 2-B
Relay 3-A
Relay 3-B
Relay 4-A
Relay 4-B
RS-485 +
RS-485 -
22 21 20
19 18
17
7
10
12 13 14
8
9
Pin No.
15
16
17
18
19
20
21
22
23
24
25
26
27
28
2-4
11
16 15
Signal Name
Sensor 14
Sensor 13
Sensor 12
Sensor 11
Sensor 10
Sensor 9
Sensor 8
Sensor 7
Sensor 6
Sensor 5
Sensor 4
Sensor 3
Sensor 2
Sensor 1
Description of Hardware Connestions
Video Input BNCs
Use the BNC connection to connect the BNC cable from the camera to the DVR.
Audio Output
Use this connection to connect to (optional) external speakers.
Spot Monitor Output
Use this port to connect an external (optional) spot monitor to the DVR.
Audio Inputs
These ports are used to connect external (optional) microphones to the DVR.
Looping Output Connection
Use this connection to connect the looping octopus cable. This is used to loop out the video signal to other
equipment.
USB Ports
Use the USB ports to connect the USB mouse (supplied) for use with the DVR. You can also connect an
(optional) external USB hard drive or (optional) thumb disk for use with the DVR.
VGA Monitor
Used to connect the VGA monitor (not supplied) to view DVR
S-Video Input
Use this connection to connect an (optional) analog S-video monitor to the DVR.
Analog Monitor Connection
Use this connection to connect an (optional) analog monitor to the DVR
PAL / NTSC
Use this switch to select video format, either PAL or NTSC.
Two way audio
Use these inputs to connect the two way audio feature of the DVR. Connect (optional) microphone to in jack
and (optional) speaker to out jack.
RJ45 Lan Connection
Use either of these jacks to connect to a Local Area Network.
Alarm Sensor
Use these connections to connect alarms and relays to the DVR. This connection is also used to connect PTZ
cameras to the DVR via a 422/485 connection.
Power Switch
The power switch is used to supply power to the DVR.
2-5
Powering Up The DVR For The First Time
The default settings of the 4100 series DVR will allow the DVR to begin recording in continuous mode after
all the hardware has been installed and the unit is powered on. The steps below will walk you through setting
the date and time for your unit.
After making all connections to the DVR, turn on the DVR by pushing the on/off button located on the front
panel of the DVR. The system will go through a series of self diagnostics after which, will bring up the main
screen. If you have not connected cameras to all the ports, you will receive a loss signal warning. Click OK to
move past the warning screen. See image below.
Click Yes to remove message from screen
Default User Name and Password
Click the right mouse button or press the menu button on the front panel or remote controller. This will
bring up the log in screen. The system default user is administrator and the password is 1234. Use the mouse
to click the password 1 2 3 4 and click OK. See image below.
3-1
Setting The Time Zone
The time zone can be set for the area in which you live by following the directions below. From the Main
Menu click the Time Setup button as shown in image below.
Click Time Setup
From the Time Setup Menu shown below set the Time Zone, Date Format, Date and Time for your particular area. Time zone is shown from Greenwich Mean Time. A listing of the different time zones can be seen in
the table that follows.
Note: Failure to set time and time zone when first installing the DVR can lead to lost video when you set the
date and time after recording has taken place.
3-2
Different Time Zones Around the World
The chart below shows the amount of time + or - from Greenwich Mean Time. This will help you in setting
your particular time zone.
(GMT - 12:00) Eniwetok, Kwajalein
(GMT - 11:00) Midway Island, Samoa
(GMT - 10:00) Hawaii
(GMT - 09:00) Alaska
(GMT - 08:00) Pacific Time (US & Canada); Tijuana
(GMT - 07:00) Arizona
(GMT - 07:00) Mountain Time (US & Canada)
(GMT - 06:00) Central America
(GMT - 06:00) Central Time (US & Canada)
(GMT - 06:00) Mexico City
(GMT - 06:00) Saskatchewan
(GMT - 05:00) Bogotá, Lima, Quito
(GMT - 05:00 Eastern Time (US & Canada)
(GMT - 05:00) Indiana (East)
(GMT - 04:00) Atlantic Time (Canada)
(GMT - 04:00) Caracas, La Paz
(GMT - 04:00) Santiago
(GMT - 03:30) Newfoundland
(GMT - 03:00) Brasilia
(GMT - 03:00) Buenos Aries, Georgetown
(GMT - 03:00) Greenland
(GMT - 02:00) Mid Atlantic
(GMT - 01:00) Azores
(GMT - 01:00) Cape Verde Is.
(GMT) Casablanca, Monrovia
(GMT ) Greenwich Mean Time : Dublin, Edinburgh, Lisbon, London
(GMT + 01:00) Amsterdam, Berlin, Bern, Rome, Stockholm, Vienna
(GMT + 01:00) Belgrade, Bratislava, Budapest, Ljubljana, Prague
(GMT + 01:00) Brussels, Copenhagen, Madrid, Paris
(GMT + 01:00) Sarajevo, Skopje, Vilnius, Warsaw, Zagreb
(GMT + 01:00) West Central Africa
(GMT + 02:00) Athens, Istanbul, Minsk
(GMT + 02:00) Bucharest
(GMT + 02:00) Cairo
(GMT + 02:00) Harare, Pretoria
(GMT + 02:00) Helsinki, Riga, Tallinn
(GMT + 02:00) Jerusalem
(GMT + 03:00) Baghdad
(GMT + 03:00) Kuwait, Riyadh
(GMT + 03:00) Moscow, St. Petersburg, Volgograd
(GMT + 03:00) Nairobi
(GMT + 03:30) Tehran
(GMT + 04:00) Adu Dhabi, Muscat
(GMT + 04:00) Baku, Tbilisi, Verevan
(GMT + 04:30) Kabul
3-3
(GMT + 05:00) Ekaterinburg
(GMT + 05:00) Islamabad, Karachi, Tashkent
(GMT + 05:45) Kathmandu
(GMT + 06:00) Almaty, Novosibirsk
(GMT + 06:00) Astana, Dhaka
(GMT + 06:00) Sri Jayawardenepura
(GMT + 06:30) Rangoon
(GMT + 07:00) Bangkok, Hanoi, Jakarta
(GMT + 07:00) Krasnoyarsk
(GMT + 08:00) Beijing, Chongqing, Hong Kong, Urumqi
(GMT + 08:00) Irkutsk, Ulaan Bataar
(GMT + 08:00) Kuala Lumpur, Singapore
(GMT + 08:00) Perth
(GMT + 08:00) Taipei
(GMT + 09:00) Osaka, Sapporo, Tokyo
(GMT + 09:00) Seoul
(GMT + 09:00) Yakutsk
(GMT + 09:30) Adelaide
(GMT + 09:30) Darwin
(GMT + 10:00) Brisbane
(GMT + 10:00) Canberra, Melbourne, Sydney
(GMT + 10:00) Guam, Port Moresby
(GMT + 10:00) Hobart
(GMT + 10:00) Vladivostok
(GMT + 11:00) Magadan, Solomon Is., New Caledonia
(GMT + 12:00) Auckland, Wellington
(GMT + 12:00) Fiji, Kamchatka, Marshall Is.
(GMT + 13:00) Nuku’alofa
3-4
Default Settings
The following is a listing of the default settings for the DVR.
• All cameras turned on
• Resolution set to 1 CIF
• Each camera set to 8 FPS
• Image quality set to high
• Recording mode set to continuous
• Pre Alarm set to off
• Post Alarm set to off
• Overwrite set to on
• Remote controller ID set to 0
• Time Zone set to (GMT - 12)
• Date format set to YY-MM-DD
• Audio channel 1 set not used
• Audio channel 2 set not used
• Audio channel 3 set not used
• Audio channel 4 set not used
• Two Way Audio set off
• Alarm set enabled
• Alarm contact set to normally open
• Alarm dwell set to 5 sec.
• On Screen Display
Camera title enabled
HDD indicator enabled
Motion Detection enabled
Date and time enabled
FPS disabled
Temp indicator enabled
Audio connection enabled
3-5
Controlling the DVR
There are three ways to control the DVR; using the USB mouse, using the remote controller, or using the
front panel. This section will provide you an overview of the functions used with the remote controller and
the front panel.
Using The Remote Controller.
The remote controller can be used to control the various functions of the DVR. The controller and DVR
come preset to ID 0. If more than one DVR is used at the same location you can set a different ID for each
DVR and controller. See section later in this chapter on how to do this. The following image shows the features of the remote controller.
Power Button: Turns DVR on and off
Numeric keypad: used
to input controller ID
ID button: used to set controller ID
ID set button: Used to
set controller ID
Enter button: Used to select a command
Up button: Used to move
the on screen cursor up
Right button: Used to move
on screen cursor to the right
Left button: used to move the
on screen cursor to the left
Down button: Used to move
the on screen cursor down
Menu button: Brings up the menu screen
Esc button: Used to back out of a command
Puts the system in PTZ mode
Zoom Int button: Used to zoom a PTZ camera
Zoom Out button
Search button: Used to bring up the search screen
Seq button: Used to put DVR in sequence mode
Play backward
Mode button: Used to select
the screen display mode
Record button
Pause button
Play fast forward
Play forward
Play fast backward
Backward one frame
Advance frame forward
4-1
Setting the ID on the remote controller
The controller ID can be set from 00-99; This is useful when there are two DVR in close proximity to each
other. The two controllers can be set to use two different ID so they will not interfere with each other.
The controller ID must be set in both the remote controller and the DVR. To set the ID on the controller, follow the instructions below:
1) Push and hold the ID button until the red light stays on.
2) Enter the number on the numeric key pad you wish to set as the ID. To use 0-9 you must enter 0
in front of number. Example to set ID to 1, enter 01 in the controller.
3) Press the ID set button; the controller’s red light will blink 3 times and go off. The controller is
now set.
You must now set the ID in the DVR. This can be done using the front panel or the mouse. Follow the instructions below for setting the controller ID in the DVR:
1) If you have not logged into the DVR, do so now.
2) Push the menu button on the front panel or right click the mouse button. The menu screen
appears. Click Main Menu. (See Image below.)
Click main menu
4-2
3) Click Main Menu to enter the System Menu. (See image below).
Select Information Menu
System Menu
4) Click the Information Menu bar, the System Information screen appears (see below).
Click the up or down
arrows to move the ID
number
System Information Menu
5) Click the up or down arrows to change the setting for the controller ID. After changing the ID,
click the OK button to save the change. Click OK at the system menu to get to the main screen.
6) The remote controller is now ready for use.
4-3
Front Panel Functions
The image below details the functions of the front panel. These functions are the same for the remote controller.
2
3
4
5
6
7
8
9
10
11
12
13
14
1
1) Power button - Turns the unit on and off.
2) Enter and cursor movement control - Moves the on screen cursor in the direction of the arrow.
Pressing the center button selects desired function.
3) Menu button - When pressed this button will bring up the on screen pop up menu.
4) PTZ button - Changes the selected camera into PTZ mode.
5) Search button - When pressed brings up the search menu.
6) Seq. button - When pressed this will put the on screen cameras into sequence mode. Pressing it
again will take the on screen cameras out of sequence mode.
7) Mode button - When pressed this will change the on screen camera display. Please see screen
display section for screen descriptions.
8) Jog Shuttle - When in playback mode turning the jog shuttle a small amount to the right will
increase the playback speed. Continued turning to the right will speed up playback. The different
playback speeds are 2,4,16,32,64,128,256 times normal speed. Turning the jog shuttle a small
amount to the left will increase the backward playback speed. Continued turning to the left will
speed up backward playback. The different backward playback speeds are -2,-4,-16,-32,-64,-128,
-256 times normal speed.
9) ESC. button - When pressed will back out of a command.
10) Play Backward/Zoom in button - When in playback mode this button will play recorded video
backward. When in PTZ mode it is used to zoom the camera in.
11) Play Forward/Zoom Out button - When in playback mode this button will play recorded video
forward. When in PTZ mode it is used to zoom the camera out.
12) Pause button - When in playback mode this button will pause the playback of video.
13) Emergency Record button - When pressed this button will record all cameras in continuous
mode until it is pressed again. This will take precedence over any setting you have set up in the
system.
14) USB ports - USB ports can be used to connect external USB devices, such as a mouse or external
HDD to the DVR.
4-4
Helpful Hints Using the Front Panel / Remote
Use the directional controls on the remote controller and front panel to control the movement of the cursor
on screen. Press the left, right, up or down arrows to move the cursor. To select an option, move the cursor
over the option and push the enter button.
Use the left, right, up, down arrows to move the on screen cursor. Press enter to select option.
When working in a sub menu such as the camera setup, the menu button can be used
to select multiple cameras at one time. Move the cursor over the second camera and
press the menu button and both camera icons turn yellow indicating that they are selected. Now any changes made to the settings affect both cameras.
Press the ESC button to move out of a sub menu. The ESC button can be pressed to
cancel the main menu pop up screen.
4-5
Screen Display
When the system boots it will display the 16 camera display. The user can choose from several different
screen displays. To change screen display from the front panel, push the mode button. To use the remote,
push the mode button. Keep pushing the mode button to display the different screen displays. To use the
mouse, move the mouse button to the bottom of the screen and the screen display bar will appear. See image
below.
Move mouse to bottom of screen and the screen
display bar will appear. Choose the screen display by
clicking on one of the images.
The pictures below will display the different screens available.
1
2
3
4
5
6
7
8
1
9
10
11
12
13
14
15
16
16 Camera Display
One Camera Display
5-1
2
1
2
1
3
3
4
4
Four Camera Display
5
6
Six Camera Display
2
1
2
3
4
5
6
7
8
9
3
1
4
5
6
7
8
Nine Camera Display
Eight Camera Display
1
2
2
3
4
6
5
8
1
3
4
5
6
7
7
8
9
10
10
Ten Camera Display
9
11
12
Thirteen Camera Display
5-2
13
Camera Sequence
The DVR will sequence through the different screen layouts as shown below. To activate screen sequence
function from the front panel, push the mode button until you have the desired screen layout. Next, push the
SEQ button on the front panel, this will activate the sequence function. To turn off the sequence function,
press the front panel SEQ button again.
To activate the sequence function with the remote control, click the mode button until the desired screen
layout is displayed. Next, push the SEQ button, this will activate the screen sequence function. Push the SEQ
button again to turn off the sequence function.
To activate with the mouse, move the mouse button to the bottom of the screen. The different screen layouts
will appear. Click the one you wish to activate. To scroll through the various screens, click the right arrow
with the left mouse button. Use the front panel or remote controller to activate the auto sequence function.
The images below show the camera layouts for each screen division as they sequence.
Single Camera Display Screen Rotation
Camera 1
Camera 2
Camera 16
Sequences through camera one, two, three, … fifteen, sixteen. Then repeats with camera one.
5-3
Four Camera Display Screen Rotation
1
2
5
6
3
4
7
8
13
14
9
10
15
16
11
12
Displays the first four cameras then next four until it comes back to 1st four.
Six Camera Display Screen Rotation
8
2
7
1
9
3
4
5
10
6
11
2
4
1
3
13
14
12
15
5
16
6
5-4
7
8
10
2
9
1
11
12
13
3
14
4
15
16
6
12
5
11
7
8
9
13
10
14
15
16
Eight Camera Display Screen Rotation
2
10
3
1
11
9
4
5
6
7
12
8
13
5-5
14
15
16
Nine Camera Display Screen Rotation
1
2
3
1
2
10
3
4
5
4
5
6
11
12
13
6
7
8
7
8
9
14
15
16
9
10
11
1
2
3
5
6
7
1
2
3
4
12
13
8
9
10
4
5
6
14
15
16
11
12
13
14
15
16
7
8
9
1
2
3
1
9
10
10
11
12
4
5
6
11
12
13
13
14
15
7
8
16
14
15
16
2
3
4
1
2
3
4
5
6
5
6
7
11
12
13
7
8
9
8
9
10
14
15
16
10
11
12
Continued on next page
5-6
1
2
3
6
7
8
1
2
3
4
5
13
9
10
11
4
5
6
14
15
16
12
13
14
7
15
16
8
9
10
11
12
13
14
15
16
2
5
Ten Camera Display Screen Rotation
1
2
1
6
3
4
5
6
3
4
11
12
7
8
9
10
7
8
9
10
13
14
15
16
11
12
13
14
1
2
1
2
3
4
3
4
5
6
9
10
11
12
5
6
7
8
7
8
15
16
13
14
15
16
9
10
11
12
Continued on next page
5-7
1
2
7
8
3
4
5
6
9
10
11
12
13
14
15
16
13
14
15
16
3
4
5
2
8
6
Thirteen Camera Display Screen Rotation
2
3
4
6
5
2
8
6
1
3
9
7
5
11
1
7
4
1
9
7
12
10
11
12
13
10
14
15
16
13
14
15
16
2
3
4
8
5
6
7
8
3
4
5
6
11
9
11
7
9
1
9
1
10
12
10
2
12
8
10
13
14
15
16
13
14
15
16
11
12
13
14
2
3
4
5
2
3
4
5
2
3
4
5
8
6
8
9
6
1
7
10
11
11
1
15
9
7
16
13
14
1
15
12
10
16
13
12
14
15
16
Continued on next page
5-8
2
6
7
9
8
4
11
8
5
1
6
7
2
10
6
3
12
9
5
8
3
10
4
1
11
7
9
13
14
15
16
12
13
14
15
10
11
12
16
2
3
4
5
2
3
4
5
2
3
7
8
8
6
11
9
6
1
7
9
10
13
13
14
15
16
5
6
7
8
9
14
11
4
10
13
12
14
11
1
15
16
5-9
1
15
12
10
16
13
12
14
15
16
Overview of the Main Screen
The image below shows the main screen and details the features of the main screen.
“A” Shows audio
is turned on
Indicates an alarm
Camera title
Red dot means
recording in
continuous
mode
FPS recording
Motion detected
Would turn red
if recording by
motion
Current date and time
HDD recording level.
Red indicates full
System temperature
Red indicates that system is overheating
Symbols
A red dot in the upper right corner of the image indicates that the DVR is recording video. For continuous mode, the red dot will be displayed continuously. During motion or alarm recording, the
red dot will display only when there is motion or an alarm event.
The symbol of a running man will appear yellow when there is motion detected, but the DVR is set
to record in continuous or sensor mode.
The symbol of a blue running man indicates the DVR is set to record when there is motion detected. When the icon is blue, it indicates no motion, the icon will turn red when the DVR is recording.
The symbol of a running man will display red when there is motion detected and the DVR is set to
record when there is motion. Otherwise it will be displayed in blue when no motion is detected.
6-1
A
The symbol A will display in red when the unit has been set up to record audio. (This will display
even if there is no microphone connected to the DVR).
The alarm symbol will appear yellow when there is an alarm condition, but the DVR is set to record
in motion or continuous mode.
The alarm symbol will display blue when the DVR is set up for alarm recording and there is no
alarm condition. When there is an alarm condition it will turn red.
The alarm symbol will display red when there is an alarm condition and the DVR is set to sensor
recording mode.
DVR temperature indicator. This will display blue when the DVR is operating on or below the temperature level set in the program. When the DVR temperature rises above the set limit, it displays
red and turns on internal fans. If the temperature does not return to blue, steps must be taken to
cool the unit or severe damage may occur which will render the unit unusable.
HDD indicator. The hard disk drive indicator will display in blue when the amount of hard disk storage is below the amount set in the DVR. It will change to a yellow color when it gets close to the level
set in the DVR system alarm menu. It will turn red when it goes over the amount set.
FPS FPS displays the frames per second that the DVR is recording for a particular camera.
Channel Swapping
Crest provides channel swapping function for user’s convenience. One channel position can be
swapped with another by clicking and dragging one channel to another. The swapped positions
are not permanent. The swapped channels are returned to their original positions when the user
chooses another screen division or the DVR is rebooted.
6-2
Main System Menu Pop Up Box
Overview of Pop Up Menu
The options on the main menu pop up box allow the user to set properties for the DVR, search recorded
video, back up recorded video, turn on the digital PTZ function, freeze the live screen, and activate the PTZ
camera functions. To bring up the main menu, right click the mouse button, click the menu button on the
front panel or press the menu button on the remote controller. The main menu pop up window is shown
below.
Main Menu: The Main Menu contains the setup screens for setting the various functions of the embedded
DVR. This is where the user sets up the cameras, record method, schedule, motion grids, alarms, audio, networking, and on screen displays. This menu also contains Hard disk utilities and system information.
Search Menu: The Search Menu contains the all the search features for the embedded DVR. The search features are: calendar search, motion search and event search.
Back Up Menu: The Back Up Menu contains the backup functions which allow the user to back up recorded video to USB HDD, thumb drive and CD-R, CD-RW.
Digital PTZ Function: The Digital PTZ function allows the user to zoom in on a particular section of a
single camera. After zooming in, the picture can be moved, similar to a PTZ camera, allowing the user to see
parts of the picture that are not in the viewing area.
Freeze Function: The Freeze function allows the user to stop the live picture, freezing the picture while still
recording. The screen will stay frozen until the button is pressed again.
Dynamic PTZ: The Dynamic PTZ function turns on and off the ability to control any PTZ cameras connected and set up to the system. When the button is pushed, the system’s front panel, remote controller and
mouse controls now function to control the selected PTZ camera.
7-1
Setting Up The DVR
This section will describe how to set up the different functions of the embedded DVR. To bring up the Setup
Menu, right click the mouse button. Next, click the Main Menu button. See images below.
Right click the mouse button or press the menu button on
the front panel or on the remote controller. The main menu
appears.
Click the Main Menu Button on the screen with the mouse,
or use the arrows on the front panel, or the remote controller to move the cursor to the Main Menu button and press
the Enter button. The Main Menu appears with the System
Menu selected.
Main Menu
The Main Menu is divided into five sub menus:
System Menu: Contains seven sub menus, which are - system information, time setup, hard disk
controls and utilities, user account management, factory default that allows the user to
reset all functions and controls, log off and shut down the system
Device Menu: Contains four sub menus which control the settings for camera resolution, frame rate,
and image quality. It also contains the set up for PTZ cameras, audio setup, alarm
setup and on screen display.
Record Menu: Contains two sub menus - record setup and record schedule.
Network Menu: Contains the setup controls for connecting the embedded DVR to a network.
Event Menu: Contains system, video Loss and sensor logs.
7-2
The System Menu
The System Menu functions are explained in detail in this section.
System (Information) screen
System Information Screen
• DVR Title - Click in the white box to change the name of the DVR. Use the virtual keyboard to
enter a new name. Virtual keyboard will appear when you click in white box.
• Controller ID - Use this box to select a new controller ID. (See earlier section on how to change ID
on remote controller). Available numbers are 00 -99. Remember when programing the remote to
use two digit numbers.
• Alpha Blend - Use to make the pop up menus semi-transparent. Zero (0) is non transparent. See
image below for an example.
Menu using Alpha Blend allows
images below the menu to be seen.
• Language - Allows the user to change the GUI language. Choices are Korean or English.
• Version - Displays the currently installed software version number.
• Signal Type - Displays the selected signal type. Choices are NTSC or PAL.
7-3
System (Time Setup) Screen
System Time Setup
Time Setup
• Time Zone - This will set the time zone for the local area the DVR is located. It is in Greenwich
mean time. Please see appendix for listing of the different areas of the World.
• Date Format - This allows the user to control the format of the date and time displays on the DVR.
The choices are; YY-MM-DD, MM-DD-YY, and DD-MM-YY.
• Date - This sets the DVR to the current date. Please use caution in changing this as it could result
in loss of recorded data.
• Time - This sets the current time for the DVR. Caution should be used in changing the time after
the DVR has been set up as this could result in loss of previously recorded data.
Holiday Setup
• The DVR allows the user to create special Holidays. When a holiday is created, the DVR will follow
the Recording Schedule set up on the Holiday line of the recording schedule. Image below shows
the Holiday setup screen.
Holiday System Setup
During a holiday the system will use the
Holiday line for recording
7-4
Time Sync.
The Time Sync function allows one DVR to act as a time server to sync all Embedded DVR’s time to
be the same. The options in automatic Sync. require the IP address of another embedded unit set to
run as the time server.
Time Sync set screen
System (Disk Manager)
The disk manager screen contains information about the drives connected to your DVR. This
includes any USB or CD-RW drives attached. This screen also contains the HDD format function as
well as a HDD chkdsk utility and Create VDB function.
System Disk Manager Screen.
• Check HDD - To check the total HDD size and amount of Disk space free, place a check mark in
box beside the drive you want. The system will display the type of format internal or windows, total
HDD size in GB, the amount of free space in GB, the type of drive and if it is used for recording or
Backup.
• Remove - Use the remove button to un-dock any USB devices before removing from the USB port.
• Format - Use to format a HDD using the DVR’s internal format system. This system cannot be read
by windows. Any backup created with this format must use the DVR’s remote player software to be
able to read this disk.
• ChkDsk - This is a HDD utility to check your HDD to see if it is functioning properly.
• Create...VDB - This is used to format a disk and prepare it for recording video. Use this function
with extreme caution as this will erase all recorded video from the hard disk.
7-5
System (User Account)
The user account screen allows the user to administer users on the system. The Embedded DVR allows for
nine user accounts and one administrator account. The image below shows the User Account screen.
• User Name - Enter a name for the user
• User ID - This is the account the user will use to log into the DVR.
• Password - Enter a unique password for the user. Can be no more than 10 characters.
• P/W Confirm - Confirm the password by typing it in again.
• Setup - Click this button to assign permissions to the selected user. (see image below)
User permissions screen
User Permission screen
Place a check mark by the function you wish the user to have. By default the administrator’s account has all
permissions. User1 - User9, by default, only has permission to view live video and network functions.
7-6
System (Covert Cameras)
The covert tab in the user setup screen allows the DVR to block camera views based on user. To block a user
from viewing a camera, place a check mark beside the camera you want hidden. (see image below)
To block a camera from a user, place a
check mark beside the camera you want
to be hidden.
Covert camera setup screen
System (Factory Default Function)
This function will change all DVR settings back to the default settings that were on the system when it was
shipped from the factory. This will include users and their passwords. The administrator account’s password
will be changed to the default 1234.
System (Log Off)
To log a user out of the system, click the Log Off button.
System (Shut Down)
Click the shut down button to shut the DVR off. To turn the DVR back on, press the on button located on the
front panel of the DVR.
7-7
The Device Menu
The Device Menu contains the setup screens for Cameras, audio Alarm and what displays on screen. The image below shows the Device Menu.
The device menu
Device (Camera) Screen
Camera setup allows the user to enable or disable the camera ports. It also allows the user to give the camera
a title to identify the camera. Also, this menu allows the user to set the frame rate and image quality per camera. Total available frame rate is 120 fps @ cif 60 fps @2cif and 30 fps @ VGA. It is with this menu that PTZ
cameras can be set up to be controlled by the DVR. To set up a camera select the camera from the top of the
menu. The camera icon turns yellow to indicate that it is the selected camera. Any changes made to the settings will affect the selected camera only. The system has several different short cuts to aid the user in setting
up the cameras. The images below describe in detail how to use these shortcuts.
7-8
To Change a Single Camera:
Select the camera to make changes to by clicking with the mouse button, remote controller or front panel. The camera icon will turn gold.
Check the enable box to turn on the camera port.
Check pop up box if you want the camera to pop up full screen on
To rename the camera, click in the box. The
virtual keyboard will appear.
To change frame rate, click the up or down arrows.
To change the recorded image quality, click high mid
or low. High uses more disk space, but captures more
pixels.
After making the changes to the first camera you, can duplicate the changes made except, for the camera
name, by clicking the right mouse button or (using the remote controller or the front panel, position the
arrow over the camera and press the menu button). The other cameras will turn gold. After selecting the
cameras you want to have the same settings, click the manual button. If you want all the cameras to have the
same settings click the all button after making the changes to the first camera.
Please note: The system will automatically lower the frame rate if you have selected a higher frame rate
than the system is capable of. The following chart shows the frame rate available for the different resolutions.
Low (CIF)
Mid (2 CIF)
High (D1)
120 fps
60 fps
30 fps
Please be aware that at least one fps is allocated for each port even if the port is not enabled. The actual
frame rate displayed on the screen may vary by one fps depending on how much motion is in the picture.
The more motion, the harder the processor has to work to encode the signal affecting performance.
7-9
Device (Camera) PTZ Setup
If you have a Pan Tilt Zoom camera, use the PTZ tab in the Device (Camera) menu (see image below). At
the present time, the software supports the following PTZ camera protocol: Fine CRR1699, Kalatel KTD312,
Pelco D, Pelco P, Samsung SSRX104, Samsung SCC641, Sungjin, Vicon, and Unitec. Check with the technical support department if your PTZ camera is not on the list as we are adding to our PTZ library. To set up
PTZ camera, click the PTZ tab and select the camera port that the PTZ camera is attached to. Use the up and
down scroll button to find your camera’s protocol. Next, use the up and down scroll button to enter the PTZ
camera address in the H/W Address box (1-255 is available, but your particular camera may not support all
addresses. See camera documentation). Next, click the setup button to set the baud rate and communication
settings. Click OK and yes to setup value stored. Click return to move to the main Camera Device menu.
Click PTZ tab to begin PTZ camera setup.
Select the camera port where
the PTZ camera is attached.
Use the arrows to select PTZ camera protocol.
Use the arrows to select the PTZ
Camera’s hardware address.
Click the setup button to enter the communication information for the PTZ camera
Enter hardware communication
settings for the PTZ camera. Refer
to PTZ camera for these settings.
Click OK to return to save
the settings.
7-10
Device (Camera) Color Control
Use the Color Control menu to adjust the color of attached cameras. Click the color control button, the color
control screen appears. Select the camera you want to adjust. Move the slider bar to adjust Brightness contrast or hue. Click OK after adjusting all cameras you will then be returned to the camera device main menu.
See image below.
Select camera
image to adjust
Contrast
Brightness
Hue
Click OK to return to Camera
device setup screen
Device (Camera) Audio
The Embedded DVR comes with four channels of audio. To set up the audio, physically connect the (optional) microphones to the system (see hardware setup). Select Audio from the main Device menu, the audio
setup screen will appear (see image below). Use the up and down arrows to select the camera you want to
record audio with for each of the audio channels you have microphones connected.
The Embedded DVR has the ability to communicate with the remote software via two way audio. Click the
two way audio box to enable this feature. Optional computer microphone and speakers are required on both
the remote PC and the embedded DVR for this function to work.
Select camera to link audio port to.
7-11
Device (Alarm)
The system allows for alarming by sensor, motion, video loss, and system displays such as temperature indicator and hard disk usage. The Embedded DVR provides for alarm inputs (sensors) and relay outputs (relays). The 16 channel has 16 sensors and 4 relays, the 8 channel has 8 sensors and 4 relays, and the 4 channel
provides 4 sensors and 4 relays. The system can be set up to detect motion and create an alarm event. It can
also activate a relay associated with a particular camera. The embedded DVR can also detect video signal loss
and create an alarm event. The system also has the ability to display on screen if the temperature inside the
DVR becomes too hot. The system also can be set to let the user know when the disk capacity is nearing full.
Each of these functions will be covered in the following pages.
Device (Alarm) Sensor
To set up and enable the sensors click, the Alarm button on the main Device Menu. The Device (alarm)
screen appears (see image below). To set up a sensor, click the sensor (icon will turn gold) and click the Enable check box. Set the type of contact closure (normally open or normally closed) by using the up and down
arrows. Next, set the camera port, if any, to be associated with the sensor. Third set the relay if any you want
to activate when the sensor is activated. Lastly, set the dwell time in seconds for the alarm. If there are any
more alarms you want to set up another sensor, highlight by clicking the appropriate sensor and repeat the
steps above. If you want multiple sensors to have the same settings right click with the mouse, use the remote
controller or front panel to select the sensors (will turn gold) and click manual. All settings will be the same
for the selected sensors. Use the all button to set all sensors like the selected sensor. Please note that the
camera and relay port associated with all cameras will be changed to the camera port and relay port of the
selected port.
Copy selected sensor setup to all sensors.
Make changes
to all selected
sensors.
Sensor type
N/O, N/C
Linked camera
Enable sensor.
Linked relay
Sensor dwell
time
7-12
The Embeded DVR Data Input and Output Terminal Pin Assignment
The drawing below shows the pin assignments for the sensors, relays and PTZ RS 485 data port.
28
1
27 26 25 24
2
Pin No.
1
2
3
4
5
6
7
8
9
10
11
12
13
14
3
4
5
23
6
Signal Name
Sensor 15
Sensor 16
Common
Common
Relay 1-A
Relay 1-B
Relay 2-A
Relay 2-B
Relay 3-A
Relay 3-B
Relay 4-A
Relay 4-B
RS-485 +
RS-485 -
22 21 20
19 18
17
7
10
12 13 14
8
9
Pin No.
15
16
17
18
19
20
21
22
23
24
25
26
27
28
7-13
11
16 15
Signal Name
Sensor 14
Sensor 13
Sensor 12
Sensor 11
Sensor 10
Sensor 9
Sensor 8
Sensor 7
Sensor 6
Sensor 5
Sensor 4
Sensor 3
Sensor 2
Sensor 1
Device (Alarm) Motion
The embedded DVR can be set up to activate relays when the system detects motion. To use motion to
activate a relay, click the motion tab from the Device (Alarm) window. When the motion alarm window appears, click the camera you want to activate the relay (icon will turn gold). Click the enable check box, choose
which relay to link to this camera. Set the dwell time for the relay signal. When motion is detected the system
will send a relay signal to the specified relay. The embedded DVR has 4 relays available for use. The motion
alarm will work regardless of the selected recording mode.
To set all cameras the same
as selected camera click all.
Select camera to link relay.
Select relay to link selected camera.
Select cameras to set the
same and click
manual.
Check enable box.
Set dwell time for relay signal.
Device (Alarm) Video Loss
This feature allows the DVR to send a relay signal to a device such as an external alarm whenever the system
detects video loss. To use this feature, select Video Loss tab from the Device (Alarm) menu. The video loss
alarm screen appears (see image below). To link one or more cameras to a specific relay, select the cameras
(the icon will turn gold) then select the relay and set the relay dwell time. A short-cut would be to set one
camera to the relay, set the dwell time and click the all button. Whenever the system detects lost video it will
send a signal to the selected relay.
Select cameras to link to relay.
Click the enable box
Select the relay to link with the camera
Set the relay dwell time
7-14
Device (Alarm) System
The system monitors the internal temperature of the DVR and the amount of used disk space. This function
allows the user to set the minimum temperature that when reached will warn the user by graphic display
and turn on additional cooling fans. The temperature display will change from blue to red when the internal
temperature exceeds this minimum. It is very important to keep the system cool, failure to do so could result
in damage to the DVR. The system also allows the user to set a graphic warning when the amount of disk
spaced used reaches a predetermined amount set by the user. When the disk usage reaches the set amount
the icon will turn from blue to red. The image below shows the system alarm screen.
Set the amount of used disk space
before alarm
Set Temp in Centigrade
Total disk space
Disk space used
7-15
The Record Menu
The record menu controls the resolution and record mode for the DVR. The record menu consist of two
menus - Setup and Schedule. Setup controls the resolution, recording mode (continuous or schedule), pre
alarm, post alarm, HDD overwrite and the motion area setup screen. The schedule menu allows for setting
of a daily and holiday recording schedule. To get to the Record Menu, click the Record button from the main
menu, the Record screen appears.
Click the Record Menu button
Main Menu window
Record Setup Menu button
Record Schedule button
Record Menu
7-16
Record (Setup)
Click the Setup button from the main record menu, the Record (Setup) window appears.
Set recording resolution
Set recording mode
Turn on/off Pre Alarm
Turn on/off Post alarm
Set motion area grid and
sensitivity
Overwrite HDD files when full
• Resolution - Sets the recorded resolution for all recorded video. There are three options: Low
(CIF), MID (2 CIF), High (D1)
• Mode - There are two types of recording modes - continuous or schedule.
• Pre Alarm - Pre alarm will capture 200 frames of video before an alarm event.
The options are on or off.
• Post alarm - Post alarm will capture 200 frames after alarm. The options are on or off.
• Motion Area Setup - This will bring up the motion area setup screen to mask areas to
Detect motion.
• Overwrite - By checking this box, the system will overwrite the oldest recorded video file when the
full capacity of the hard disk storage is reached.
7-17
Motion Area Setup Window
The motion area setup window allows the user to highlight areas of the image to detect motion. It also allows
for changing the sensitivity of motion detection. To use, click the Motion Area Setup button. Select a camera
to change the motion grid. The entire image is selected to detect motion by default. To unselect an area, right
click the mouse, or use the menu button on the remote controller or front panel. To select an area, left click
the mouse, or use the enter button on the remote controller or front panel. To change the sensitivity, move
the slider bar. Moving the bar to the right increases the sensitivity while moving to the left decreases the
sensitivity.
Use right mouse button to unselect grid
area. Use left mouse
button to select grid
area.
Select camera
move to the right for
greater sensitivity. Left for
less sensitivity
Click OK to save settings
and go back to Record
(Setup) screen.
Using the remote controller to set sensitivity
Using the front panel to change the sensitivity is done by moving the cursor to either the - or + icon and
clicking the enter button. Example: to decrease the sensitivity, move the cursor to the - icon of the sensitivity control. Press the enter button, the blue dot will move to the left. Continue to push the enter button until
you have obtained the desired sensitivity. To increase the sensitivity move the cursor to the + icon and push
the enter button. When the blue dot has reached the end of the sensitivity level it will turn red and the system
will beep indicating that it has reached the end.
Shortcut Note: If you want the same sensitivity on multiple cameras, you can use the right mouse button
to select more than one camera at a time. Selected cameras are displayed in red. To use the remote controller or the front panel move the cursor to the camera number and push the menu button. Changes that are
made to the grid area or the sensitivity setting will be done on all selected cameras.
7-18
Record (Schedule)
The DVR allows for continuous recording or recording by schedule. To record continuously, just select the
continuous mode in the Record (Setup) window. The Record (Schedule) window allows the user to set each
camera by a schedule. The schedule is broken down by individual camera, day, and hour. There is even a special holiday period which can be set to record differently than the normal recording mode. To set the recording mode, click the Schedule button on the main Record window. This will bring up the Record (Schedule)
window. Select the camera or cameras you wish to change, click the recording mode you wish the cameras to
record in. The options are :
• Continuous - Will record continuously without regard to motion or sensors. A red dot will
appear in the top right corner of the camera screen indicating that the camera is in continuous
recording mode.
• Motion + Sensor - Will only record when the system detects motion or there is a sensor alarm.
The system will display two icons; a running man and a bell. These icons will be blue when there is
no sensor alarm or motion indicating that the DVR is in Sensor and Motion record mode. They
will turn red when there is a sensor alarm or motion is detected. This indicates that the DVR is
recording video while the icon is red.
• Motion - The system will record only when motion is detected. It will stop after motion has
stopped. The system will display a running man icon. It will be blue when there is no motion
indicating that the DVR is in Motion record mode. It will turn red when there motion is detected.
This indicates that the DVR is recording video while the icon is red. A yellow running man icon
indicates that DVR is not set to record when there is motion, but the motion grid is active and will
display the yellow running man icon when there is motion. If you wish to not have the running
man icon up when recording has been set to something other than motion recording, you must go
into the motion area setup and remove all grids.
• Sensor - The system will only record when there is a sensor alarm. The DVR will record for the
duration of the alarm event. The duration of the event is set up in the Device (Alarm) window
of the Device menu. If the contact is still sending a signal after the duration period, then another
event will occur and the DVR will record video. A blue bell icon will be displayed indicating that
the DVR is set to record when there is a sensor alarm. It will turn red during the recording of
video. A yellow bell icon indicates that sensor alarming has been set up on the DVR, but it is
not recording based on sensor alarms. To turn off the yellow bell icon you must disable the alarm
in the Device (Alarm) setup window.
• No Recording - This will stop all recording. If the sensor alarm and motion grids are set in the
system they will continue to display when there is a sensor event or motion, but will be displayed in
yellow indicating no recording is taking place.
7-19
Schedule record window
The image above shows the Schedule record window. To set the recording mode for a particular camera, click
the camera, it will change to a gold color. If you want the same recording mode and schedule for multiple
cameras, use the right mouse button to select the cameras. They will all change to gold color. Place a check
mark in the recording mode you want. Select the hour and day you want the camera to record in this mode.
Different recording modes can be selected based on the day and hour. The last line is for setting up a different
recording mode for holidays. If you are going to record in either sensor or motion mode, remember to set up
the sensor alarms and the motion grid and sensitivity. Failure to do so will result in no recording during that
scheduled time.
The different modes are represented by different colors;
Red = Continuous record mode.
Blue = Motion only record mode.
Yellow = Sensor only record mode.
Green = Motion and Sensor record mode
Blank = No recording mode.
Shortcut: To select an entire hour, click and drag the mouse icon from the top to the bottom and the entire
column will change. To change the entire field, click and drag from the upper left to lower right corner, this
will change the entire grid.
7-20
Network
The DVR allows remote connection through TCP/IP connection. The networking menu contains three sub
menus - IP Setup, E-mail Notification, and web Server Setup. To open the Networking Menu, click the Network button on the main setup screen. See image below.
IP setup
E-Mail Notification
Click Record Tab
Web Server Setup
Network port
Network (IP Setup)
To set the DVR up on a IP network, click the IP Setup button. The IP setup window is broken down into two
parts - the network connection type and the TCP/IP information. Select the Network type. The DVR supports Static IP, DHCP or xDSL. With most xDSL connections, a user name and password are required to
login to the internet host’s system. The image below shows the Network Type setup page.
Network Type
Static IP
DHCP
xDSL
xDSL ID
xDSL password
7-21
TCP/IP Information
When using a Static IP, you need to provide the DVR with the IP address, subnet mask, Gateway, and DNS
number. These must be obtained from your network administrator or your internet service provider. If you
are using DHCP or xDSL connection, this information will be obtained automatically by the system. The image below shows the TCP/IP information.
IP address
Subnet Mask
Default Gateway
DNS number
Mac Address
Network (E-Mail Notification)
The system has the ability to send e-mail notification upon a sensor, or video loss event. This menu is the
setup window for setting up the sender and receiver E-Mail account information. The image below shows
the Network (E-Mail Notification) menu.
Enable E-Mail
Notification
Receiver
Sender
To set up the e-mail notification, enter your POP Server name in the sender box. Enter the person’s e-mail
address that you want to receive the e-mail notification in the receiver box.
Please note: You must be set up and communicating on a network for the e-mail notification to work.
7-22
Network (Web Server Setup)
The DVR has the ability to act as a web server for remote connection via internet web browser. This menu
will set up the DVR to act as a web server. Click the enable box to turn on the web server function. Enter a
port number for the web server (default is port 80). Now the DVR will act as a web server. All controls will
be downloaded when the user connects to the DVR the first time. Please be sure to set the remote computer’s
internet browser security to allow unsigned active X controls to be downloaded and installed. Failure to do
this will cause the web server to fail. Please refer to the Web browser software manual for more information.
Click check box
to enable web
server function
Web port
Setting the Network Port
The main Network Menu has a section for changing the software port. The default network port is set to 7301
and should not be changed except by network administrator. If you change the default port you must enter
the new port number in the network client software as well.
Network software port
7-23
Event Menu
The event menu contains three logs for the user to review. The three logs are Sensor, Video Loss, and System.
To view the different logs, click on the desired log and the log will be displayed.
Sensor log
Video Loss log
System Log
main event log menu
Use scroll button
to move the log
window
Use scroll button
to move the log
window
Sensor event log file
Video loss log screen
System event log
7-24
Searching Recorded Video
To search recorded video, right click the mouse button or press menu on the remote controller or front panel
to bring up the main menu (see image below).
Click search button to
begin search mode.
Search Menu
The main search menu consist of three sub menus - Calendar search, Motion search, Event Search. Calendar
search lets the user search video by date and time regardless of the record mode. Motion search allows the
user to search only the video that was recorded in motion mode. Event search allows the user to search only
the video that was recorded in sensor mode. The image below shows the main Search window.
Main Search screen
8-1
Event (Calendar Search)
The Calendar search window allows the user to search for recorded video by date and time. The search screen
consist of the selected date and time display, a calendar showing the days that have recorded video and a
hour and minute bar. The selected date and time display reflects the currently selected date and time. As the
user changes the selected day or hour and minute this display will update to reflect the changes.
• Calendar - Use the left and right arrows to change the month to search for recorded video. The days
highlighted in blue indicate that they contain recorded video. The day highlighted in red is the
Currently selected day.
• The hour and minute bar is used to select the hour and minute for playback. The hour highlighted
in green indicate that there is recorded video for that hour. The minute bar will display green where
there is recorded video. The white rectangle indicates the currently selected hour and minute.
• Selected Date and Time Display - This gives the user an easy display of the currently selected date
and time to begin playback of recorded video.
selected date
and time display
Recorded video calendar
Hour and minute bar
Calendar search screen
After selecting the date and time to begin playback of recorded video, click the OK button, the system will
change to the playback screen and begin playing recorded video. Click cancel to cancel the search and go
back to main (live) screen, click return to go back to the main search screen.
8-2
Search (Motion Search)
Motion search allows the user to search for video only recorded when there was motion. This is useful when
the system has been set up to record in both sensor + motion mode. The Motion search window allows the
user to search for video recorded in motion mode by date and time. The search screen consist of the selected
date and time display, a calendar showing the days that have video recorded in motion mode and an hour
and minute bar. The selected date and time display, reflects the currently selected date and time. As the user
changes the selected day or hour and minute, this display will update to reflect the changes.
• Calendar - Use the left and right arrows to change the month to search for recorded video. The days
highlighted in blue indicate that they contain recorded video. The day highlighted in red is the
currently selected day.
• The hour and minute bar is used to select the hour and minute for playback. The hour highlighted
in yellow indicates that there is video recorded in motion mode for that hour. The minute bar will
display yellow when there is video recorded in motion mode. The white rectangle indicates the
currently selected hour and minute.
• Selected Date and Time Display - This gives the user an easy display of the currently selected date
and time to begin playback of recorded video.
• Motion Statistics is a bar graph by channel showing the percentage of motion recording.
selected date
and time display
Motion Statistics
Recorded video
calendar
Hour and
minute bar
Motion Statistics graph
Motion search screen
After selecting the date and time to begin playback of recorded video, click the OK button. The system will
change to the playback screen and begin playing recorded video. Click cancel to cancel the search and go
back to main (live) screen, click return to go back to the main search screen.
8-3
Search (Event Search)
The event search screen allows the user to search video only recorded in sensor mode. This is useful when the
system has been set up to record in both sensor + motion mode. The Event search window allows the user to
search for video recorded in sensor mode by date and time. The search screen consist of the selected date and
time display, a calendar showing the days that have video recorded in sensor mode and an hour and minute
bar. The selected date and time display, reflects the currently selected date and time. As the user changes the
selected day or hour and minute, this display will update to reflect the changes.
• Calendar - Use the left and right arrows to change the month to search for recorded video. The days
highlighted in blue indicate that they contain recorded video. The day highlighted in red is the
currently selected day.
• The hour and minute bar is used to select the hour and minute for playback. The hour highlighted
in red indicates that there is video recorded in sensor mode for that hour. The minute bar will
display red when there is video recorded in sensor mode. The white rectangle indicates the
currently selected hour and minute.
• Selected Date and Time Display - This gives the user an easy display of the currently selected date
and time to begin playback of recorded video.
• Event Statistics is a bar graph by channel showing the percentage of sensor recording.
Selected date
and time display
Event Statistics
Recorded video
calendar
Hour and
minute bar
Event search screen
After selecting the date and time to begin playback of recorded video, click the OK button. The system will
change to the playback screen and begin playing recorded video. Click cancel to stop the search and go back
to main (live) screen, click return to go back to the main search screen.
8-4
Playback Screen Functions
After selecting the search method, click OK, and the system changes to the playback screen. There are several
playback functions to help the user review video. The section below show, the functions using the mouse,
remote controller, and front panel.
Using The Mouse to control Playback
The mouse can be used to control stopping, starting, direction, speed, and frame by frame playback. To use
these controls move the mouse to the bottom middle of the playback screen and the playback controls will
pop up. The image below describes the different functions.
Mouse playback pop up controls
Play button - when clicked will play video at normal speed
Reverse play fast button - When clicked once will reverse play video at 4x speed. Click again to
play at 16x speed. Click again to play at 32x speed. Continuous clicking will cycle through 4x, 16x,
and 32x speeds.
Reverse play frame by frame button - Will play back one frame of video per mouse click. Example
if you recorded video for 10 fps the you would have to click 10 times to reverse the video 1 second.
Reverse play button - Will reverse play video at normal speed when pushed.
Stop playback button - when clicked will stop video playback.
Normal forward video playback - when clicked will play video at normal speed.
Forward play by frame button - Will advance video by one frame per mouse click. Example, if
you recorded video for 10 fps, then you would have to click 10 times to move the video forward 1
second.
Fast forward button - When clicked once will play video at 4x speed. Click again to play at 16x
speed. Click again to play at 32x speed. Continuous clicking will cycle through 4x, 16x, and 32x
speeds.
8-5
Using the Remote Controller to Control Playback
The remote controller can be used to control the playback functions. The images below
show the various buttons and describe the functions they control.
Controls the on screen cursor movement
Menu button used to bring
up playback menu
Push search button to
bring up search menu
Use to control the direction
(forward or reverse) and
speed of playback.
Play reverse normal speed.
Play forward normal speed
Reverse frame by frame
Forward frame by frame
Pause playback
Play forward fast 4x 16x 32x
Play reverse fast 4x 16x 32x
8-6
Controlling the Playback Functions with the Front Panel
The front panel can be used to control the playback functions. The following images describe the panel buttons and their functions.
1
2
3
4
5
6
1 - Menu button - When in playback mode will bring up playback pop up menu.
2 - Search button - When in live view will bring up main search menu.
3 - Reverse button - When pushed will reverse playback video at normal speed.
4 - Forward play - When pushed will play video forward at normal speed.
5 - Pause button - When pushed will cause the playback to stop.
6 - Jog Shuttle Control - When turned to the left will reverse play video at fast speed, when turned to
the right will forward play video at fast speed. The more the user turns the control to the left or
right the faster the video playback will be. Options are 1x, 2x, 4x, 16x, 32x, 64x, 128x, 256x.
Playback Pop Up Menu
The playback pop up menu allows the user to move to the Search window, Live window, Backup window, or
turn Digital PTZ On and Off. Please see section on using Digital PTZ. The image below shows the Playback
popup menu.
8-7
Backing Up Recorded Video
The DVR allows the user to backup recorded video to a CD, DVD or USB disk drive. From live view mode,
begin backup by right clicking the mouse button. When the main pop up menu appears select Backup. The
backup window is shown below.
Review video
Select cameras to backup
Selected video file size
File type
Backup media type / Free space
Beginning backup time
Ending backup time
Hour and minute time bar
Recorded video calendar
To create a backup follow the steps below:
• Insert your backup media CD-R, CD-RW (must Format CD-RW using disk utilities), USB disk
drive.
• Select the backup media type. The display to the right shows available space on backup media.
• Select the date to backup, click a day in the calendar. Days highlighted in blue contain video.
• Select the hour and minute in the time bar where the video begins that you want to back up.
• Click the From button, the selected date and time are displayed to the right of the From button.
• Select the hour and minute of recorded video where you want the backup to stop.
• Click the To button, the selected date and time are displayed to the right of the To button.
• Select the file type FOH or AVI.
• Select the Cameras to backup. Cameras displayed in blue will be included in the backup.
• Click Start backup, the system will begin the backup process. When finished click exit the to exit
backup window.
9-1
Digital PTZ
The digital PTZ function allows the user to enlarge a live or recorded image. As the image is zoomed parts
of the screen that were visible cannot be seen. When this happens the user is able to move the screen in the
same manner as a PTZ camera enabling the user to view the hidden parts of the image. To use digital PTZ,
click the image you want to enlarge (this will select the image), Right click the mouse and select Digital PTZ
from the pop up menu. Move the mouse to the center of the screen and a + or - will pop up on screen. If the is on screen move the mouse to the left and the + will appear. Click to enlarge, continue clicking will continue
to increase image size. Move the mouse to the edges of the screen the cursor will turn into an large arrow,
click the mouse, the screen moves in the direction of the arrow. To get out of digital PTZ mode right click the
mouse, the pop up menu appears, click digital PTZ. The images below demonstrate the digital PTZ function.
Right click the mouse button to bring up pop up menu.
Click on Digital PTZ.
Move the mouse to the middle of the screen
the zoom in (+) or zoom out (-) button will
appear. Click the (+) to enlarge picture.
Click the (-) to reduce the image size. Move
the mouse left to right to change the (+) (-)
buttons.
Image before zooming
Directional arrow
Move the mouse icon to the edges of the
image the directional arrows appear. Click
the mouse to move the image in the direction of the arrow.
Image after zooming
10-1
Dynamic PTZ
To set up the PTZ camera see the section on setting up a PTZ camera. The DVR can control a PTZ camera
with the mouse, remote controller or front panel. To place the DVR in PTZ mode right click the screen with
the mouse to bring up the pop up menu. Push the PTZ button on the front panel or Remote controller. A
controller icon will appear in all images that have been set up as PTZ cameras. To control the PTZ camera’s
movement select the PTZ camera (the image border will turn red indicating that it has been selected. Move
the mouse icon to the edges of the screen the icon will turn into a directional arrow click and the camera will
move in that direction. Move the mouse to the center of the screen and the zoom in and zoom out pop up
buttons will appear. Click these buttons to zoom in or out. From the front panel use the zoom in zoom out
buttons. Image below shows the camera in PTZ mode.
Controller icon will appear in the image of a
camera that’s set up as PTZ camera.
Mouse cursor changed
into directional arrow.
PTZ zoom control for
mouse.
11-1


![[Proxyview]User`s Manual (5.1.4.0)](http://vs1.manualzilla.com/store/data/005658349_1-e7f841297d622d23913e7f3fcabf599d-150x150.png)