1
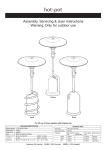
Patio Heater
Ref: 2832 Instruction Manual
Dear Customer,�
Please read these operating Instructions through carefully before connecting your device to
the mains, in order to avoid damage due to incorrect use. Please pay particular attention to the
safety information. If you pass the device on to a third party, these Operating Instructions must
also be handled over.
IMPORTANT
READ THIS USER’S MANUAL CAREFULLY AND COMPLETELY. SERIOUS INJURY,DEATH OR
PROPERTY DAMAGE FROM BURNS, FIRE, EXPLOSION AND CARBON MONOXIDEPOISONING CAN
OCCUR THROUGH IMPROPER INSTALLATION, ADJUSTMENT, ALTERATION,SERVICE OR
MAINTENANCE.
WARNING
.
• Keep this appliance at least 36"away from combustible objects.
.• If you smell gas:�
.– Disconnect gas from theappliance.�
.– Extinguish any open flame.�
.– If odor continues, immediately call your gas supplier.
.
• FOR OUTDOOR USE ONLY.
.
• Do not store or use gasoline or other flammable vapors and liquids in the vicinity of this
or any other appliance.
.
• Improper installation, adjustment,alteration, service or maintenance can cause
severepersonal injury, death, or property damage. Read the installation,operating and maintenance
instructions thoroughly before installing or servicing this appliance.
MINI-PATIO HEATER SAFETY WARNINGS
FAILURE TO FOLLOW THESE SAFETY WARNINGS AND INSTRUCTIONS PROPERLY COULD RESULT
IN FIRE OR EXPLOSION, WHICH COULD CAUSE PROPERTY DAMAGE, PERSONAL INJURY OR EVEN
DEATH.
SAFETY FIRST
THE PURCHASER ASSUMES ALL RISK IN THE ASSEMBLY AND OPERATION OF THIS APPLIANCE.
FAILURE TO FOLOW THIS MANUAL´S WARNINGS AND INSTRUCTIONS CAN RESULT IN SEVERE
PERSONAL INJURY, DEATH OR PROPERTY DAMAGE.
READ AND BECOME FAMILIAR WITH THIS ENTIRE MANUAL. PLEASE RETAIN THIS MANUAL FOR
FUTURE REFERENCE.
CAUTION: THIS APPLIANCE IS FOR OUTDOOR USE ONLY (OUTSIDE ANY ENCLOSURE). ALWAYS
MAKE SURE THESE IS FRESH AIR VENTILATION.
CAUTION: DO NOT USE IN AN EXPLOSIVE ATMOSPHERE. KEEP HEATER AWAY FROM AREAS
WHERE FLAMMABLE LIQUIDS, GASOLINE, VAPORS OR EXPLOSIVES ARE STORED OR USED.
IMPORTANT SAFETY PRECAUTIONS
Always maintain at least 36" clearance from combustible materials.
Always place heater on a hard level surface.
Do not use if wind velocity exceeds 10 miles per hour as flame-out may occur.
Do not operate below 40°F.
Keep sprinklers and other water sources away from burners and controls.
Before each use, check for damaged parts such as: hoses, regulators, pilots, and burners. If a
damaged part is detected, do not operate until an original equipment replacement part has been
properly
installed. The use of unauthorized parts will void warranty and can create an unsafe condition.
Do not attempt to alter this appliance. To do so will void warranty and can createan unsafe
condition.
Never replace or substitute the factory-installed regulator with any regulator other than an original
equipment regulator from the factory.
Spiders and insects can create a dangerous condition that may damage this appliance and make it
unsafe. Keep the burner area of this appliance clean of all spiders, webs, and insects.
Keep emitter screen and dome free of carbon deposits. Carbon deposits may create a fire hazard.
Do not paint the burner area, control panel, or dome.
Do not clean the heater with combustible or corrosive cleaning agents. Use warm, soapy water.
Do not touch the appliance any where near the burner assembly to avoid the risk of burns or
accidental clothing ignition.
Do not touch the burner assembly until the appliance has been allowed to cool to room
temperature
(approximately 45 minutes after shut down).
A minimum inlet gas supply pressure for the purpose of input adjustment is 5 p.s.i.
The required supply pressure in inches of water is 11.0" w.c.
The required manifold pressure in inches of water column is 10.7" w.c.
Certain materials or items, when placed under heater, will be subjected to radiant heat and could
be
seriously damaged.
CHILDREN AND ADULTS SHOULD BE WARNED OF THE HAZARDS OF HIGH SURFACE
TEMPERATURES AND SHOULD STAY AWAY TO AVOID BURNS OR CLOTHING IGNITION.
YOUNG CHILDREN AND PETS SHOULD BE CAREFULLY SUPERVISED WHEN THEY ARE
IN THE AREA OF THE HEATER.
CLOTHING OR OTHER FLAMMABLE MATERIALS SHOULD NOT BE HUNG FROM THE
HEATER, OR PLACED NEAR THE HEATER.
ANY GUARD OR OTHER PROTECTIVE DEVICE REMOVED FOR SERVICING THE HEATER
MUST BE REPLACED PRIOR TO OPERATING THE HEATER.
INSTALLATION AND REPAIR SHOULD BE DONE BY A QUALIFIED SERVICE PERSON.
THE HEATER SHOULD BE INSPECTED BEFORE USE AND AT LEAST ANNUALLY BY A
QUALIFIED SERVICE PERSON. MORE FREQUENT CLEANING MAY BE REQUIRED AS
NECESSARY. IT IS IMPERATIVE THAT CONTROL COMPARTMENT, BURNERS AND
CIRCULATING AIR PASSAGE WAYS OF THE HEATER BE KEPT CLEAN. THE BURNER
AREA IS AN AREA OF GREAT DESIRE FOR SPIDERS AND THEIR WEBS PLUS OTHER
INSECTS. THE BURNER MUST BE KEPT CLEAN OF ALL SPIDERS, WEBS, AND INSECTS
FOR THEY CAN CREATE A DANGEROUS SITUATION THAT MAY CAUSE HEATER DAMAGE
OR MAKE THE APPLIANCE UNSAFE.
SHUT OFF AND CHECK HEATER IMMEDIATELY IF ANY OF THE FOLLOWING CONDITIONS EXIST:
THE SMELL OF GAS IN CONJUNCTION WITH EXTREME YELLOW TIPPING OF THE BURNER
FLAMES.
HEATER DOES NOT REACH A PROPER TEMPERATURE. A TEMPERATURE LESS THAN 40°F WILL
CAUSE RESTRICTED HEAT FLOW AND THE APPLIANCE WILL NOT WORK PROPERLY.
THE HEATER’S GLOW IS UNEVEN.
THE APPLIANCE STARTS MAKING POPPING NOISES DURING USE (A SLIGHTPOPPING NOISE IS
NORMAL WHEN THE APPLIANCE IS EXTINGUISHED).
MINI–PATIO HEATER FEATURES
.
.
.
.
.
.
•
•
•
•
•
•
Fully Portable
Wind Resistant & Rain Protected
Integral/Positive Igniter
Safety Shut off System
Uniformly Distributed Heat Pattern
Tilt Safety Switch
SPECIFICATIONS
Model:� 9066
Heat output: � 4kW. (13500 BTU/HR)
Gas typ: � Propane / Butane.
Category: � I3P
Size:� Dia.550 mm .x 925(H) mm.
Consumption: � 286g/h.
Gas hose supplied with the appliance must be used without alteration and replacement regulators
and
gas hoses must be those specified by the manufacturer.
ITEM PARTS
1.– NUT M6
2.– WASHER 6
3.– SPLIT REFLECTOR
4.– EMITTER ASSEMBLY
5.– BOLT M6*16
6.– PILOT
7.– SCREW M4*6
8.– SCREEN GUARD
9.– SELF TAPPING SCREW
10.– INTAKE GAS PIPE 11.– DOOR 12.– BASE 13.– REGULATOR 14.– BURNER HEAD 15.–
BURNER ASSEMBLY 16.– KNOB 17.– HOUSING FOR HOSE
UNPACKING MINI–PATIO HEATER
1.
Remove heater control assembly, base, base plate, reflector sections, and safety guard sections
from carton.
1.
2. Remove all protective packaging applied to heater parts for shipment.
2.
3. Retain carton and packing material until heater has operated and found in good
condition.(Ver página 25 de este manual).
3.
4. Check heater for any shipping damage. If any of the parts show any external or internal
damage, promptly inform us and DO NOT USE product until damaged parts are replaced with
original equipment parts.
MINI PATIO HEATER ASSEMBLY
FAILURE TO FOLLOW THESE SAFETY WARNINGS AND INSTRUCTIONS PROPERLY COULD RESULT
IN FIRE OR EXPLOSIÓN, WHICH COULD CAUSE PROPERTY DAMAGE, PERSONAL INJURY OR
EVEN DEATH.
Assembly tools required � – Phillips Head Screwdriver.�
– Crescent or Open End Wrench.
Additional requirements:
.– Leak Detection Solution – one part detergent,three parts water.
.– Standard floor standing propane gas cylinder approved for use with patioheater, please note
sufficient length of hose is provided.
.– The hardware for this appliance is separated into individual packages tomake assembly easier.
Each package is clearly marked.
.– Before assembly, all protective packaging material must be removed.
.– Make sure the plastic protection rings are removed from the riser tube or main postsection.
The rings are for shipping protectiononly and are not part of the assembly.
Step 1:�
� Place the base plate on a flat surface. Align base with base plate and snap in place.
Step 2:�
� Place the regulator and hose through the hole. Align heater control assembly with base.
�� Press down on the heater control assembly and snap into place.
Step 3:�
� Secure emitter screen to the heater control assembly with four Phillips screws.
Steps 4 & 5
Starting with the panel with locking pins on each side, place each section of the heat ��
reflector dome on top of the burner screen. Secure each section with pin snap clip.
(Section � one –two pins, section two – one pin, section three – no pins). Secure the
heat reflector �� dome to the emitter screen using nuts provided.
Step 6�
� Place safety guard around heater control assembly, align with notches and secure inplace
� with screws provided.�
PROPANE CYLINDER ATTACHMENT & REMOVAL
BEFORE CONNECTING THE GAS SUPPLY
.
• This appliance is for outdoor use only and is not intended to be used indoors or in
enclosed areas.
.
• Make sure the surrounding area is free from combustible materials,gasoline and other
flammable vapors or liquids.
.
• Make sure that there is adequate fresh air ventilation and that no obstruction to the air
ventilation exists.
.
• Make sure that all gas connections are tight and do not leak.
.
• Make sure that any component removed during assembly or servicing is replaced and
properly installed prior to starting.
.
• Visually inspect the hose assembly for evidence of excessive abrasion,cuts or wear. If the
hose leaks it must be replaced prior to use.
.
• Do not operate until an original equipment replacement part has been properly installed.
INSTALLING PROPANE SYSTEM
The Mini-Patio Heater should be connected to a 20 LB propane (LB ) gas cylinder, which must be
equipped with the following:
.
• A collar to protect the propane gas valve.
.
• A shut off valve terminating a propane gas cylinder valve outlet QCV-Type 1.
.
• A safety relief valve having direct communications with the vapor space of the tank.
.
• An arrangement of vapor withdrawal.
.
• An approved hose and adapter must be used without alteration.
.
• Turn heater gas control knob and gas cylinder valve to the "OFF" position.
.
• Propane cylinders equipped with the new style QCV valve are equipped with right-handed
threads.
.
• Propane cylinders have a bleed-off valve. This valve should be inspected for leaks after
each filling of the cylinder. Turn clockwise to reseal.
.
• Position a full propane cylinder beneath the table the mini-patio heater is setting on.
Connect an approved hose (at least 4' inlength) and adapter assembly to the cylinder valve and
heater regulator inlet fitting by turning clockwise .
.
• With the heater gas valve knob still in "OFF" position, turn "ON" valve and check for leaks
by conducting the leak test
.
• If leaks are found, tighten and re-test for leaks. If no leaks are found, proceed with all
instructions after the leak test in this manual.
.
• The LP gas cylinder must be kept at least 3' away from heater.
STORAGE
CAUTION: NEVER STORE PROPANE GAS CYLINDER INSIDE A BUILDING OR IN THE VICINITY OF
ANY GAS OR OIL BURNING APPLIANCES. STORE PROPANE GAS CYLINDER OUTDOORS IN A WELL
VENTILATED AREA OUT OF REACH OF CHILDREN.
BETWEEN USES, EXTENDED INACTIVITY OR WHEN TRANSPORTING
.
• Turn control knob "OFF".
.
• Disconnect regulator from the propane gas (disposable) cylinder. See CYLINDER
REMOVAL.
.
• Store heater upright in an area sheltered from direct contact with inclement weather
(such as direct sunlight, rain, sleet, hail, snow, dust and debris).
.
• If desired, cover heater to protect exterior surfaces and to prevent build up in air
passages.
Note: wait until heater is cool before covering.
GAS REQUIREMENTS
THIS APPLIANCE IS FACTORY ASSEMBLED TO USE LP GAS ONLY!CAUTION: LIQUID PROPANE
(LP) GAS IS FLAMMABLE AND HAZARDOUS IF HANDLED IMPROPERLY. BECOME AWARE OF LP
GAS CHARACTERISTICS BEFORE USING ANY APPLIANCE.
.
• LP Characteristics–Flammable, explosive under pressure, heavier than air–settles in pools
in low areas.
.
• LP has no odor in its natural state. An odorant, that smells like rotten cabbage, has been
added for your safety.
.
• LP can cause freeze burns to the skin if contact occurs.
.
• Never use an LP cylinder with a damaged body or collar.
.
• A dented or rusty LP cylinder may be hazardous and should be checked out by an LP gas
supplier.
.
• Never connect this appliance to an unregulated gas source.
.
• When the appliance is not in use, disconnect LP cylinder.
.
• Always perform a leak test on gas connections whenever a cylinder is connected. If
bubbles form in the leak test solution, do not use. Never use a flame to test for leaks.
LEAK TESTING
NOTE: ALTHOUGH THE GAS CONNESTIONS ON THIS APPLIANCE ARE LEAK TESTED AT THE
FACTORY PRIOR TO SHIPMENT, RETEST ALL GAS CONNECTIONS FOR LEAKS PRIOR USE.
This appliance needs to be periodically checked for leaks and an immediate check is required if the
odor of gas is detected.
•
Extinguish all open flames
•
Absolutely no smoking when checking the leaks
•
Do not return to the place of purchase
•
Do not use this appliance until all gas connections have been tested and have been determined
not to leak.
Make a soap solution using 1 part of liquid dishwashing soap to 3 parts water. The soap
solution can be applied with a soap bottle, brush, or rag to all the gas connections. With the
gas valve knob in the OFF position, connect the disposable propane cylinder to the regulator
fitting by turning the cylinder clockwise. Apply the soap solution to all gas connections. Soap
bubbles will appear if a leak is present. If a leak is present, remove the disposable propane
cylinder and recheck. Use more soap solution on the gas connections if needed. If bubbles
continue to appear in the soapy solution after several attempts, contact for assistance. Do not
return to the place of purchase.
LOCATING HEATER FOR USE.
WARNING: THIS APPLIANCE IS FOR OUTDOOR USE ONLY AND IT IS NOT INTENDED FOR
INDOOR USE OR IN AN ENCLOSED AREA.
The use of this appliance is for the temporary heating of outdoor patios, decks, spas, poolsides
and outdoor work areas.
•
Always make sure there is adequate fresh air ventilation
•
Always maintain at least 36” of clearance from all combustible materials (as shown on
the picture)
•
Always place this appliance on a flat, hard and level surface that is stable and secure. If
surface is unstable, do not place the heater on it. Locate another area to place heater.
BEFORE EACH LIGHTING
.
• Heater should be thoroughly inspected before each use. We recommend an annual
inspection by a qualified service person.
.
• Always wait at least 5 minutes before relighting a hot heater.
.
• Inspect the hose assembly for evidence of excessive abrasion,cuts or wear. Suspected
areas should be leak tested. If the hose leaks, it must be replaced prior to operation. Only use
there placement hose assembly specified by the manufacturer.
.
• Be sure the cylinder cover is clear of debris.
.
• Check burner tubes and orifices for spider and insect nests. If detected, clean burner
holes with a heavy-duty pipe cleaner.
LIGHTING & SHUTDOWN
WARNING: DO NOT ATTEMPT TO OPERATE THIS APPLIANCE UNTIL ALL PRECAUTIONS HAVE
BEEN READ AND UNDERSTOOD.
LIGHTING & SHUTDOWN
1.
1. Check all connections prior to each use.
2.
2. Turn gas control knob clockwise to "OFF" position.
3.
3. Remove base assembly door.
4.
4. Turn gas supply "ON" by connecting the propane (disposable) cylinder to the regulator
inlet. Check for leaks by applying a soapy solution to the cylinder and regulator connections.
5.
5. Push in control knob and turn knob counter-clockwise to "IGN/HIGH". This will engage
the striker and this should"Click-Start" the pilot flame. If needed, continue pressing and turning the
control knob from "OFF" to "IGN/HIGH" until the pilotflame lights.
6.
6. Once the pilot has ignited, continue to depress the control knob for 30 seconds or until
the pilot remains lit when thecontrol knob is released.
7.
7. If the burner does not stay lit, repeat steps 5 and 6.
8.
8. When burner is lit, turn gas control knob counterclockwise to desired lower setting.If you
experience any ignition problems, consult "Troubleshooting".
CAUTION: AVOID INHALING FUMES EMITTED FROM THE HEATER’S FIRST USE. SMOKE AND
ODOR FROM THE BURNING OF OILS USED IN MANUFACTURING WILL APPEAR. BOTH THE SMOKE
AND ODOR WILL DISSIPATE AFTER APPROXIMATELY 30 MINUTES. THE HEATER SHOULD NOT
PRODUCE THICK BLACK SMOKE.
WHEN THE HEATER IS ON
.
• Emitter screen will become bright red due to intense heat. The color is more visible at
night.
.
• The flame color should be blue with slight yellow tipping. If the flames extend more than
2" above the surface ofthe emitter screen or black soot is accumulating on the emitter screen, the
heater should be turned off immediately. The heater should not be operated again until repairsare
made. Consult "trouble shooting".
Note: After use, some discoloration of the emitterscreen is normal.
RE-LIGHTING INSTRUCTIONS
Note: For your safety, the Control Knob cannot be turned "OFF" without first depressing the
Control Knob and then rotating itclockwise to the "OFF" position.
.
.
.
• Depress and turn control knob clockwise to "OFF".
• Wait at least 5 minutes to let gas dissipate before attempting to relight.
• Repeat the "Lighting Instructions" on the previous page.
EXTINGUISHING INSTRUCTIONS
.
.
.
.
•
•
•
•
Depress the control knob and rotate it clockwise to the "OFF" position.
Allow the heater to cool to room temperature.
Remove base assembly door.
Disconnect propane cylinder and replace base assembly door.
WARNING: THE HEAT REFLECTOR WILL REMAIN EXTREMELY HOT FOR A BRIEF PERIODAFTER
EXTINGUISHING THE HEATER. ALLOW THE MINI-PATIO HEATER TO COOL BEFOREMOVING.
MAINTENANCE
CAUTION: DO NOT PERFORM MAINTENANCE ON THIS APPLIANCE WHEN HOT. ALWAYS WAIT
UNTIL THE APPLIANCE HAS COOLED TO A SAFE TEMPERATURE.
To enjoy years of outstanding performance from your heater make sure you perform the following
maintenance activities on a regular basis:
.
• Keep exterior surfaces clean.
.
• Use warm soapy water for cleaning. Never use flammable or corrosive cleaning agents.
.
• While washing the appliance, be sure to keep the area around the burner and pilot
assembly dry at all times. If the gas control is exposed to water in anyway, DO NOT use it. It must
be replaced prior to use.
.• Airflow must not be obstructed. Keep controls, burner, and circulation air passageways
clean.Signs of possible blockage include:
.– Gas odor with extreme yellow tipping of the flame.
.– Heater does NOT reach the desired temperature.
.– Heater glow is excessively uneven.
.– Heater makes popping noises.
.
• Spiders and insects can nest in the burner and orifices. This dangerous condition can
damage the heater and render it unsafefor use. Clean burner holes free of any spider webs, nests
and debris by using a heavy-duty pipe cleaner. Compressed air may also help in clearing away
smaller particles. NEVER use wood or plastic tooth picks to clear ports or other openings
becausewood and plastic can break and block the ports.
.
• Carbon deposits may create a fire hazard. If any carbon deposits develop, clean the dome
and heating element with warm soapy water. The dome and heating element MUST NOT be
painted.
.
• The reflector may be cleaned with soapy water, but should NEVER be painted.
Note: In a salt-air environment (such as near an ocean), corrosion occurs more quickly than
normal. Frequently check forcorroded areas and repair them promptly.
NOTE: INSTALLATION & REPAIR SHOULD BE DONE BY A QUALIFIED SERVICE PERSON.
SAFETY
BEWARE OF SPIDERS
CAUTION: BURNER TUBES MUST BE INSPECTED AND CLEANED BEFORE FIRST USE.
Spiders and insects can nest in burner tubes or orifices during warehousing, transit or between
periods of use.This dangerous condition can damage the heater and create an unsafe operating
condition for the user. If spider or insect nests are detected, clean burner holes by using aheavyduty pipe cleaner. Compressed air may help clear away smaller particles.
TOUBLESHOOTING
IF THE
PROBLEM
IS�
�
Pilot won´t
light.
AND THIS CONDITION
EXISTS�
�
– Cilinder valve is closed. –
Blockage in orifice or pilot
tube.
– Air in the gas line.
– Low gas pressure.
– Igniter faild.
Pilot won´t stay
lit.
Burner won´t
light.
– Dirt build up around pilot.
– Connection between gas
valve and
pilot assembly is loose.
– Thermocouple is not
operating
correctly.
– Gas pressure is low.
– Blockage in orifice.
THEN DO THIS
– Open valve. – Clean or
replace orifice or pilot tube.
– Open gas line and bleed it
(pressing
control knob in) for not more
than
1-2 minutes or until you
smell gas.
– Replace gas cylinder with a
new
cylinder.
– Use match to light pilot;
obtain new
igniter and replace.
– Clean dirt from around
pilot. – Tight en connection
and perform
leak test.
– Replace termocouple.
– Replace propane/ butane
gas cylinder with a new
cylinder.
– Clear blockage.
Burner flame is
low Note: Do
not operate
heater below
40º F.
– Control knob is fully
«ON».
– Gas pressure is low. –
Outdoor temperature is
greater than 40º F. and
tank is less than 25%
full.
– Supply hose is bent or
kinked.
– Control knob is fully
«ON»
– Turn control know to «ON»
position.
– Replace propane/ butane
gas cylinder with a new
cylinder. – Replace propane/
butane gas cylinder with a
new cylinder.
– Straighten hose and
perform leak test on hose.
– Turn control knob to
«OFF» let cool to room
temperature and check
burner and orifices for
blockage.
TOUBLESHOOTING IF THE PROBLEM IS�
� AND THIS
CONDITION EXISTS�
� THEN DO THIS Emitter glows
uneven Note: Bottom 1 inch of emitter normally does not
glow. – Gas pressure is low. – Base is not on a level
surface. – Heater is level – Replace propane/ butane gas
cylinder with a new cylinder. – Place heater on a level
surface. – Clean burner. Carbon build-up – Dirt or film on
reflector and emitter. – Clean reflector and emitter. Thick
black smoke – Blockage in burner. – Turn control knob to
«OFF» let cool to room temperature and remove blockage
and clean burner inside and cutside.