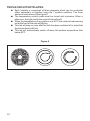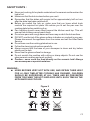
1
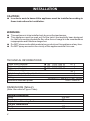
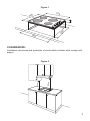
LCH
ceramic
COOKTOPS
INSTALLATION and SERVICE INSTRUCTIONS
USE and CARE INSTRUCTIONS
distributed by
DèLonghi
Pty Ltd
Use and Care
INSTALLATION
CAUTION:
< In order to avoid a hazard this appliance must be installed according to
these instructions for installation.
WARNING:
< This appliance is to be installed only by an authorised person.
< This appliance must be used only for the task it has explicitly been designed
for, that is for cooking foodstuffs. Any other form of usage is to be considered as
inappropriate and therefore dangerous.
< Do NOT place combustible materials or products on this appliance at any time.
< Do NOT spray aerosols in the vicinity of this appliance while it is in use.
TECHNICAL INFORMATIONS:
Triple circuit hotplate
Triple circuit hotplate
Triple circuit hotplate
“ON” indicator light
Hotplate and residual heat indicator
Glass overheat cut-out device
Voltage
Maximum absorbed power
145 1200-1300 W
180 1700-1850 W
195 1900-2050 W
nr. 2
nr. 1
nr. 1
nr. 1
nr. 4
nr. 1
230-240 V~ / 400-415 V 3N~ 50 Hz
6000 - 6500 W
DIMENSIONS (Table 2):
(Note: Also refer to Figure 1 side)
General Dimensions
Width
Depth
Depth Below Mounting Surface
Cut-out Dimensions
Width
Depth
2
575 mm
505 mm
52 mm
560 mm
490 mm
Figure 1
575
52
505
49
560
0
CLEARANCES:
Installation clearances and protection of combustible surfaces shall comply with
page 4.
750 mm
450 mm
Figure 2
3
Use and Care
The installation shall comply with the dimensions in Figures 1 and 2, bearing in
mind that:
< A minimum clearance of 40 mm has to be kept between the bottom of the
cooking hob and the top af an appliance or a thermal barrier (see next
page).
< Overhead clearances - In no case shall the clearances between the
highest part of the hob and a range hood be less than 600 mm, or for an
overhead axhaust fan, 750 mm. Any other downward facing combustible
surface less than 600 mm above the highest part of the hob shall be
protected for the full width and depth of the cooking surface area.
However, in no case shall this clearance to any surface be less than
450 mm.
< Side clearances - Where the dimension from the periphery of the nearest
hotplate to any vertical combustible surface is less than 200 mm, the
surface shall be protected to a height of not less than 150 mm above the
hob for the full dimension (width or depth) of the cooking surface area.
< Protection of combustible surfaces - The required protection shall
ensure that the surface temperature of the combustible surface does not
exceed 50°C above ambient. The fixing of 5 mm tick ceramic tiles to the
surface or attaching fire resistant material to the surface and covering with
sheet metal with minimum tickness of 0,4 mm would satisfy this
requirement.
CAUTION :
The underside surface of the cooking hob can reach a temperture exceeding
105°C during normal use.
If after installation the underside surface is accessible throught under-bench
cupboard doors and the like, it is essential that a rigid barrier is installed so
that such access is restricted. In order to avoid a hazard the barrier must be
of low thermal conductivity material installed according to the instructions
for installation.
4
THERMAL BARRIER INSTALLATION :
WARNING:
< If the hob is installed over drawers or cupboards, a thermal
protection barrier must be fitted at least 40 mm beneath the base of
the hob (see Figure 3).
Note:
< Above not applicable if hob is mounted directly above an oven.
< For access to the hob for servicing or installation, ensure that the barrier
can be removed from beneath by the use of a tool.
< A gap of 20 mm may be allowed at rear for electrical connection and
ventilation
40 mm
40 mm
THERMAL PROTECTION BARRIER (min 15 mm thick)
Fitted the full lenghts of the hob below the workbench and must be
removable with the use of a tool for installation and service.
Figure 3
5
INSTALLATION :
< Apply the adhesive seal around the edge of the hob ensuring that the ends
do not overlap or leave a space (Figure 4).
< Slot in the cooking hob into the cut out of the workbench and locate it
correctly.
< Adjust the clamps according to the worktop tickness (30 or 40 mm - see
Figure 5) and tighten the fixing screws until the hob is firmly secured.
< Using a sharp tool, trim any excess gasket which protrudes from the edge
of the hob.
Figure 4
Adhesive
side
6
4 cm
4 cm
min
4 cm
min
3 cm
Figure 5
ELECTRICAL REQUIREMENTS :
WARNING :
< THIS APPLIANCE MUST BE EARTHED.
< In order to avoid a hazard this appliance must be installed according to
these instructions for installation.
CAUTION :
< Ensure that the power outlet is properly earthed before connecting the
appliance.
< Disconnect power before servicing the appliance.
A double pole switch must be provide do not further than 2 metres from the
appliance to the electrical supply. All supply current and earth conductors must be
able to withstand an ambient temperature of 75°C.
The wires in the power cable must be coloured in accordance with the following
code :
Green/Yellow = Earth, Blue = Neutral, Brown =Active or Live.
FEEDER CABLE SECTION
230-240 V ~
230-240 V 3 ~
400-415 V 3N~
3 x 4
mm2 (*)
4 x 2,50 mm2 (*)
5 x 1,50 mm2 (*)
(*) - Connection with wall box
Figure 6
230-240 V~
1 2 3 4 5
L1
230-240 V 3~
1 2 3 4 5
N (L2) E
L1
L2 L3
E
400-415 V 3 N~
1 2 3 4 5
L1 L 2 L 3
N
E
7
ELECTRIC DIAGRAM
M
5 4
3 2 1
F1
P2
P1
T0
P3 P2 P2 P1 P1
5 4
3 2 1
F2
P3 P2 P2 P1 P1
GS
5 4
3 2 1
F3
P3 P2 P2 P1 P1
P3
5 4
P4
3 2 1
P3 P2 P2 P1 P1
S
ELECTRIC DIAGRAM KEY
F1\F4
P1
P2
P3
P4
S
M
GS
8
Electric plates changers
Electric plate 1900W-3C-230V
Electric plate 1200W-3C-230V
Electric plate 1700W-3C-230V
Electric plate 1200W-3C-230V
Pilot lamp
Terminal block
Residual heat lamps
F4
Use and Care
USE and CARE
CAUTION :
< This appliance must be used for the task it has explicitly been designed for,
that is for cooking foodstuffs. Any other form of usage is to be considered
as inappropriate and therefore dangerous.
< The appliance is not intended for use by young children or infirm persons
without supervision.
< Young children should be supervised to ensure that they do not play with
the appliance.
< Do NOT place combustible materials or products on this appliance at any
time.
< Do NOT spray aerosols in the vicinity of this appliance while it is in use.
< Before using for the first time, clean the cooktop with warm soapy water.
We recommend that you run each plate individually for several minutes. To
do this, place a saucepan of cold water on each plate in turn, and bring the
water to the boil. This should give enough time for the plates to burn off
properly. During this procedure the room should be well ventilated, as
there may be an emission of smoke and a slight odour.
< WARNING: If the surface of the ceramic cooktop is cracked, switch
off the appliance to avoid the possibility of electric shock.
Figure 7
Operates right rear plate
Operates left rear plate
Operates left front plate
Operates right front plate
On/off warning led
4 Residual heat warning led
9
TRIPLE CIRCUIT HOTPLATES:
< Each hotplate is comprised of three elements which can be controlled
either separately or together using the 7 position switches. The three
elements can be seen in the figure 8.
< The temperature control knobs must be turned anti clockwise. When a
plate is on, the light next to the control knob will be lit.
< When the temperature of any plate is over 60°C the residual heat warning
led at the front of the hob will light up.
< This led will stay on even after the hob has been switched of to show that
the hob surface is still hot.
< This led will automatically switch off when the surface temperature falls
below 60°C.
Figure 8
10
SAFETY HINTS :
Use and Care
< Never put cooking foil or plastic materials on the ceramic surface when the
hob is hot.
< Make sure that the hob is clean before you use it.
< Remember that the plates will remain hot for approximately half an hour
after the plate has been switched off.
< Before you switch the hob on, make sure that you know which knob
controls the required hot plate. We advise you to set the pan over the
cooking plate before switching it on.
< Pan handles should never stand beyond the kitchen work top. This will
ensure that children cannot reach them.
< Do not use pans with rough bases as these may scratch the hob surface.
< DO NOT use the hob if the glass surface is broken or cracked in any way.
Please disconnect the appliance from the mains and call the After-Sales
Service.
< Do not lean over the cooking plate when in use.
< Follow the cleaning instructions carefully.
< Always ensure that the base of your saucepan is clean and dry before
placing on the hob.
< Never use the glass surface for storage.
< Do not scratch the cooktop with cutting or sharp objects. Do not use the
glass ceramic cooktop as a work surface.
< Caution - never cook the food directly on the ceramic hob! Always
use a saucepan or special container.
WARNING :
< HOBS BECOME VERY HOT WITH USE, AND RETAIN THEIR HEAT
FOR A LONG TIME AFTER COOKING HAS FINISHED. CHILDREN
SHOULD BE SUPERVISED AT ALL TIMES AND BE PREVENTED
FROM TOUCHING THE HOT SURFACES UNTIL SUCH TIME AS THE
APPLIANCE HAS COOLED.
Figure 9
11
COOKING HINTS :
Switch
Position
0
1-2
Type of Cooking
Switched off
For melting (butter, chocolate) - Keeping food warm
2
To keep food hot to heat small quantities of liquid (sauces, etc.)
3
To heat larger quantities e.g. Soups, Sauces, Vegetables
3-4
4
4-5
6
Slow boiling e.g. Spaghetti, Soups, Stews, Potatoes
Gently Frying
Browning Meats, Frying Fish, Omelettes
Fast frying Steaks, etc.
< Please note that these are only guidelines, you will quickly learn from
experience which setting is correct for your needs.
ECONOMIC COOKING
< The ceramic glass retains heat, so you may find that you can switch off the
heat 5 minutes before you finish cooking.
< To reduce the cooking time, the plate can be set to the maximum setting at
the beginning. It can then be reduced later.
12
COOKWARE :
It is very important that the pans used on the hobs are made of a suitable material
and have the correct base as follows:
< The base should be flat and smooth.
< Any rough part on the pan base could scratch the hob surface.
< Choose pans which are the same size as the hotplates and with bases that
are as non reflective as possible eg. dull and dark.
Only pans recommended for use on ceramic hobs should be used.
Pans made of the following materials can cause problems :
Cast Iron
< The base may be rough which will scratch the hob
Toughened Glass
< If the pans become too hot, the hob may overheat causing the safety
cut out to operate too frequently thus reducing the cooking efficiency.
Copper
< Can easily distort and will therefore not form a good contact between
base and hob which will result in uneven cooking.
13
CLEANING AND MAINTENANCE
< Before you begin cleaning you must ensure that the hob is switched off.
< With a damp cloth remove any dust, food particles or spillages.
< Spillages must be cleaned away immediately. This is essential in the case
of sugar mixtures.
< Make sure that all traces of cleaner are removed with a soft cloth.
IMPORTANT
< Sugar or syrup mixtures can permanently damage the hob surface if left on
to burn.
< Never use abrasive cleaning products on the hob.
< The control knobs may be removed for cleaning but care should be taken
not to damage the seal.
< If anything melts on the glass remove it immediately whilst the surface is
still hot.
< Do not use knives or sharp utensils on the hob.
< Do not use steam jet cleaners because the humidity could infiltrate into the
appliance making it dangerous.
STAINLESS STEEL :
< Clean with a suitable product. Always dry accurately.
14
NOTES:
15
Code 1101584 - ß3
Descriptions and illustrations in this booklet are given as simply indicative.
The manufacturer reserves the right, considering the characteristics of the
models described here, at any time and without notice, to make eventual
necessary modifications for their construction or for commercial needs.