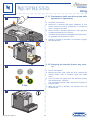
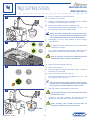
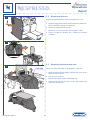
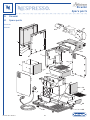
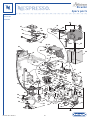
1
IT
EN
SERVICE MANUAL
Lo scopo di questo manuale è quello di fornire al personale di servizio tutte le informazioni necessarie per quanto riguarda
la corretta gestione, manutenzione e riparazione della macchina per caffè Lattissima+.
Questo manuale deve essere utilizzato dai tecnici come un valido aiuto per garantire un buon rendimento ed un uso corretto delle macchine. Al fine di sfruttare appieno tutte le funzioni, è assolutamente necessario seguire le istruzioni di questo
manuale.
Per accedere rapidamente alle informazioni direttamente da computer PC o MAC, questo manuale è disponibile come file
PDF e può essere scaricato dal sito tecnico web di Nespresso sotto https: //business.nespresso.com.
Le istruzioni sono parte integrante dell’apparecchio. Prima di mettere in funzione l’apparecchio, leggere tutte le istruzioni e le istruzioni per la sicurezza.
I seguenti simboli indicano:
Attenzione: Leggere la precauzioni indicate per evitare eventuali danni a cose o persone.
Note: Leggere le indicazioni per un uso sicuro e adeguato dell’apparecchio.
The purpose of this service manual is to provide the service personnel with all necessary information with regards to
correct handling, maintenance and repair of the Lattissima+ coffee machine.
This manual should be used by the technicians as a valuable aid to guarantee the permanent readiness for use of the
machines. In order to take full advantage of all the functions, it is absolutely necessary to follow the instructions in this
manual.
For fast access to information directly from the PC or MAC monitor, this service manual is available as PDF file and can be
downloaded from the Nespresso technical website under https://business.nespresso.com.
The instructions are an integral part of the appliance. Before operating the appliance, please read all the
instructions and safety notes.
The following symbols indicate:
Caution: Read the precautions shown to prevent any damage or harm to property or persons.
N.B.: Read the instructions for safe, proper appliance use.
Release 00 - 07.2011
3
Indice
1.Generalità.............................................................................. 6
1.1.
1.2.
1.3.
1.4.
1.5.
Norme generali di sicurezza............................................................................... 6
Dati tecnici.................................................................................................... 8
Componenti macchina....................................................................................... 9
Circuito acqua.............................................................................................. 11
Targhette identificative................................................................................... 12
2.Utilizzo.................................................................................13
2.1. Preparazione macchina al primo utilizzo o dopo un lungo periodo di non utilizzo..........
2.2. Preparazione Caffè........................................................................................
2.3. Montaggio/smontaggio Sistema Rapid Cappuccino (R.C.S).........................................
2.4. Preparazione Cappuccino e Latte Macchiato.........................................................
2.5. Programmare la quantità di acqua......................................................................
2.6. Programmare la quantità di Cappuccino/Latte Macchiato.........................................
2.7. Risciacquo dopo ogni preparazione di ricetta a base di latte.....................................
2.8. Pulizie quotidiane..........................................................................................
2.9. Pulizia del Sistema Rapid Cappuccino due volte a settimana.....................................
2.10.Svuotamento della macchina (prima delle operazioni di riparazione)..........................
2.11.Modalità risparmio energetico...........................................................................
2.12.Decalcificazione............................................................................................
2.13.Impostazione durezza dell’acqua.......................................................................
2.14.Ripristinare le quantità originali........................................................................
2.15.Funzioni statistiche........................................................................................
2.16.Smaltimento e ambiente..................................................................................
3.
13
15
16
17
19
20
21
22
22
23
24
25
28
29
30
30
Ricerca guasti.........................................................................31
3.1. Controllo macchina al ricevimento..................................................................... 31
3.2.Malfunzionamenti.......................................................................................... 32
4.Manutenzione........................................................................34
4.1. Controllo pressione e perdite di tenuta............................................................... 34
4.2. Misurazione temperatura caffè.......................................................................... 36
4.3. Misurazione temperatura latte.......................................................................... 37
5.Riparazione...........................................................................38
5.1.
5.2.
5.3.
5.4.
5.5.
Smontaggio generale......................................................................................
Rimozione scheda pulsanti...............................................................................
Rimozione infusore........................................................................................
Rimozione scheda..........................................................................................
Rimozione gruppo Generatore/Vaporizzatore/Pompa..............................................
38
39
40
41
42
6. Test di sicurezza.....................................................................46
7. Schemi elettrici......................................................................47
8.Ricambi................................................................................49
9.Garanzia...............................................................................54
Release 00 - 07.2011
4
Contents
1.Generality.............................................................................. 6
1.1.
1.2.
1.3.
1.4.
1.5.
General safety notes........................................................................................ 6
Technical data................................................................................................ 8
Main components............................................................................................ 9
Water circuit................................................................................................ 11
Identification plates...................................................................................... 12
2.Using...................................................................................13
2.1. Preparing to use the machine for the first time or after a long period of non-use.........
2.2. Coffee preparation........................................................................................
2.3. Assembling/disassembling the Rapid Cappuccino System (R.C.S.)..............................
2.4. Preparing Cappuccino and Latte Macchiato.........................................................
2.5. Programming the amount of water....................................................................
2.6. Programming the amount of Cappuccino/Latte Macchiato.......................................
2.7. Rinsing after preparing any milk-based recipe.....................................................
2.8. Daily cleaning...............................................................................................
2.9. Cleaning the Rapid Cappuccino System twice a week.............................................
2.10.Emptying the machine (before any repairs).........................................................
2.11.Energy saving mode.......................................................................................
2.12.Descaling.....................................................................................................
2.13.Setting water hardness...................................................................................
2.14.Resetting the original amounts.........................................................................
2.15.Statistical mode............................................................................................
2.16.Disposal and the environment..........................................................................
13
15
16
17
19
20
21
22
22
23
24
25
28
29
30
30
3.Troubleshooting......................................................................31
3.1. Checking the machine upon receipt.................................................................... 31
3.2.Malfunctioning.............................................................................................. 32
4.Maintenance..........................................................................34
4.1. Checking pressure and leaks............................................................................ 34
4.2. Measuring coffee temperature.......................................................................... 36
4.3. Measuring milk temperature............................................................................ 37
5.Repair..................................................................................38
5.1.
5.2.
5.3.
5.4.
5.5.
General disassembly...................................................................................... 38
Removing the button panel.............................................................................. 39
Removing the extraction unit........................................................................... 40
Removing the PCB board................................................................................. 41
Removing the Thermoblock/Steamer unit/Pump..................................................................... 42
6. Safety test............................................................................46
7. Wiring diagrams.....................................................................47
8. Spare parts...........................................................................49
9.Warranty..............................................................................54
Release 00 - 07.2011
5
Generalità
Generality
1.Generalità
1.1. Norme generali di sicurezza
Per evitare eventuali lesioni e danni, leggere e seguire le istruzioni interamente.
Per evitare rischi di scosse elettriche letali e incendi
• Collegare l’apparecchio solo ad allacciamenti di rete idonei con presa a terra. Assicurarsi che la tensione di alimentazione sia la stessa indicata sulla targhetta dell’apparecchio. L’utilizzo di collegamenti errati, rende nulla la garanzia.
• Nel caso in cui occorra una prolunga, utilizzare solo un cavo a massa con una sezione del conduttore di almeno 1,5 mm2.
• Non accostare il cavo a bordi taglienti. Bloccarlo o lasciarlo pendere. Tenere il cavo lontano da fonti di calore e di
umidità.
• Non mettere in funzione l’apparecchio se il cavo è danneggiato.
• Per evitare pericolosi danni, non posizionare mai l’apparecchio sopra o accanto a superfici calde come termosifoni,
fornelli elettrici o a gas, fiamme libere o simili. Appoggiarlo esclusivamente su superfici stabili e piane. La superficie
d’appoggio deve essere resistente al calore e ai liquidi, come acqua, caffè, decalcificanti o simili.
• Per evitare danni, scollegare l’apparecchio afferrando la spina, non tirare mai il cavo. Non toccare mai la spina con le
mani umide.
Per evitare eventuali danni durante il funzionamento
• L’apparecchio è stato realizzato unicamente per uso domestico, in caso di uso non conforme alle istruzioni, il produttore declina qualsiasi responsabilità ed è autorizzato a non applicare i termini di garanzia.
• Tenere l’apparecchio fuori dalla portata dei bambini.
• Per evitare scottature, mantenere sempre chiusa la leva durante il funzionamento e non inserire le dita sotto l’ero-
1.Generality
1.1. General safety notes
To prevent possible injury and damage, read and follow the instructions completely.
To prevent the risk of a fatal electric shock and fire
• Connect the appliance to suitable earthed mains connections only. Make sure the power supply is the same as that
indicated on the rating plate. The use of incorrect connections will void the warranty.
• In the event that an extension cord is required, use only one earthed cord with a conductor cross section of at least
1.5 mm2.
• Do not move the cord close to sharp edges. Block it or allow it to hang. Keep the cord away from sources of heat and
humidity.
• Do not operate the appliance if the cord is damaged.
• To prevent hazardous damage, do not place the appliance on or next to hot surfaces such as radiators, electric or gas
stoves, naked flames or similar. Place it only on stable and level surfaces. The surface must be resistant to heat and
liquids, such as water, coffee, descaling products or similar.
• To prevent damage, unplug the appliance holding the plug. Never pull the cord. Never touch the plug with wet hands.
To prevent damage during operation
• The appliance has been designed for domestic use only. If it is not used in accordance with the instructions, the
manufacturer assumes no responsibility and is authorised not to apply the warranty conditions.
• Keep the appliance out of reach of children.
• To prevent scalding, keep the lever closed during operation and do not put your finger under the coffee or milk
outlet.
Release 00 - 07.2011
6
Generalità
Generality
gatore di caffè o latte.
• Per evitare lesioni, non inserire le dita all’interno della vaschetta e del contenitore di capsule.
• Non utilizzare capsule danneggiate o deformate; l’acqua potrebbe scorrere attorno alla capsula non correttamente perforata e causare danni all’apparecchio.
• Per evitare scottature, utilizzare sempre il contenitore del latte (Sistema Rapid Cappuccino) in dotazione ed assicurarsi che sia inserito correttamente.
• Se si programma un’erogazione di caffè superiore ai 150 ml, far raffreddare l’apparecchio per almeno 5 minuti per
evitare surriscaldamenti.
• Decalcificare la macchina quando si accende la spia della decalcificazione.
Leggere con attenzione le precauzioni d’uso presenti sulla confezione: la soluzione di decalcificazione può essere nociva. Evitare il contatto con occhi, pelle o altre superfici. Per evitare danni alla macchina non usare prodotti diversi da
quello in dotazione.
• To prevent injury, do not put your fingers inside the tank or the capsule container.
• Do not use damaged or deformed capsules. The water may flow around a capsule that is not properly perforated
and cause damage to the appliance.
• To prevent burns, always use the milk container (Rapid Cappuccino System) supplied and make sure it is inserted
correctly.
• If dispensing of more than 150 ml of coffee is programmed, allow the appliance to cool down for at least 5 minutes
to prevent overheating.
• Descale the machine when the descaling light comes on.
Read the precautions for use shown on the pack carefully: descaling solution can be harmful. Avoid contact with eyes,
skin or other surfaces. To prevent damage to the machine, do not use products other than those provided.
Release 00 - 07.2011
7
Generalità
Generality
1.2. Dati tecnici
Alimentazione
H
Erogazione caffè
Consumi: (40 ml)
Schiuma latte (50 ml)
220-240 V - 50/60 Hz
5 Wh
9 Wh
Pressione pompa
19 bar
Contenitore acqua
0,9 lt
Contenitore latte
0,35 lt
Capacità contenitore capsule
~ 10
Temperatura di esercizio
da 5°C a 45°C
Temperatura di stoccaggio
da -25 a 60°
Temperatura di sicurezza
Caldaia caffè: 192°C
Caldaia vapore: 318°C
Temperatura caffè in uscita
86 +\- 3°C
Lunghezza cavo alimentazione
80 cm
Tempo di riscaldamento
circa 40 secondi
Livello acustico
55 dB (A)
Peso
4,5 kg
Dimensioni (LxHxP)
167x253x319 mm
L
P
1.2. Technical data
Main voltages range
220-240 V - 50/60 Hz
Coffee extraction
5 Wh
Consumption: (40 ml)
Milk frothing (50 ml) 9 Wh
Release 00 - 07.2011
8
Pump pressure
19 bar
Water tank
0,9 lt
Milk tank
0,35 lt
Capsule container capacity
~ 10
Operating temperature
da 5°C a 45°C
Storage temperature
da -25 a 60°
Safety temperature
Coffee thermoblock: 192°C
Steam container: 318°C
Coffee temperature at outlet
86 +\- 3°C
Cable length
80 cm
Preheating time
approx 40 sec.
Noise
55 dB (A)
Weight
4,5 kg
Dimensions (LxHxP)
167x253x319 mm
Generalità
Generality
1.3. Componenti macchina
17
16
19
18
20
1 Interruttore generale (ON/OFF)
2Leva
3 Contenitore acqua (0,9 lt)
4 Erogatore caffè
5 Contenitore raccolta capsule
6 Vassoio raccogligocce
7 Griglia raccogligocce sinistra
8 Griglia raccogligocce destra
9 Vano per beccuccio di decalcificazione
10 Beccuccio di decalcificazione
11 Sportello connettore vapore
12 Connettore vapore
14
21
15
22
“Sistema Rapid Cappuccino” (R.C.S.)
13 Contenitore latte (0,35 lt)
14 Coperchio contenitore latte
15 Pulsante di apertura R.C.S.
16 Pulsante risciacquo
17 Manopola regolazione schiuma latte
18 Indicatore schiuma Min.
19 Indicatore schiuma Max
20 Connettore R.C.S.
21 Tubo di erogazione latte
22 Condotto latte
13
3
1
2
12
11
1.3. Main components
4
1 Main switch (ON/OFF)
2Lever
3 Water tank (0.9 litres)
4 Coffee outlet
5 Capsule container
6 Drip tray
7 Left-hand drip tray grid
8 Right-hand drip tray grid
9 Descaling nozzle compartment
10 Descaling nozzle
11 Steam connector hatch
12 Steam connector
8
9
5
7
6
Release 00 - 07.2011
10
“Rapid Cappuccino System” (R.C.S.)
13 Milk container (0.35 litres)
14 Milk container lid
15 R.C.S. release button
16 Rinse button
17 Milk froth adjustment knob
18 Min. froth indicator
19 Max. froth indicator
20 R.C.S. connector
21 Milk outlet tube
22 Milk tube
9
Generalità
Generality
Pulsanti a retroilluminazione
23Lungo
24Espresso
25 Latte Macchiato
26Cappuccino
1
Descrizione pulsanti a retroilluminazione
A Impostazioni risparmio energetico (vedi paragrafo 2.11.)
Quando la macchina è accesa i pulsanti si illuminano per
2 secondi:
Lungo: spegnimento dopo 9 minuti
Espresso: spegnimento dopo 30 minuti
Lungo+Espresso: spegnimento dopo 8 ore
23
25
24
26
B Impostazioni durezza dell’acqua (vedi pag. 26)
Quando la macchina è accesa i pulsanti si illuminano per
2 secondi:
Latte Macchiato: Durezza dell’acqua dolce
Cappuccino: Durezza dell’acqua media
Latte Macchiato+Cappuccino: Durezza dell’acqua dura
C La modalità Caffè è pronta
D Le modalità Caffè e Latte sono pronte
E Allarme decalcificazione (vedi paragrafo 2.13.)
A
B
Backlit buttons
23Lungo
24Espresso
25 Latte Macchiato
26Cappuccino
Description of backlit buttons
C
A Energy saving settings (see paragraph 2.11.)
D
When the machine is on, the buttons light up for 2 seconds:
Caffè lungo: switch-off after 9 minutes:
Espresso: switch-off after 30 minutes:
Caffè Lungo+Espresso: switch-off after 8 hours
B Setting water hardness (see page 26)
E
When the machine is on, the buttons light up for 2 seconds:
Latte Macchiato: Water hardness - soft
Cappuccino: Water hardness - medium
Latte Macchiato+Cappuccino: Water hardness - hard
C Coffee mode is ready
D Coffee and Milk modes are ready
E Descaling alarm (see paragraph 2.13.)
Release 00 - 07.2011
10
Generalità
Generality
1.4. Circuito acqua
1
Circuito acqua per caffè
1 Serbatoio acqua
2 Valvola serbatoio acqua
3Flussometro
4Pompa
5Caldaia
6 Erogatore caffè
7 Tubo vapore
8Elettrovalvole
9 Raccolta condensa
10Gocciolatoio
5
10
3
2
8
4
7
6
1.4. Water circuit
Water circuit coffee
1 Water tank
2 Water tank valve
3Flowmeter
4Pump
5Thermoblock
6 Coffee outlet
7 Steam pipe
8 Solenoid valve
9 Condensation chamber
10 Drip tray
9
8
Release 00 - 07.2011
11
Generalità
Generality
1.5. Targhette identificative
Sotto macchina vengono applicate le etichette di identificazione per il riconoscimento del prodotto (vedi figura).
Il numero di serie è composto da 19 numeri che identificano
la macchina:
A Anno di produzione (ultime due cifre dell’anno)
B Giorno progressivo dell’anno (es. 15Aprile: 31+28+31+15=105)
C Tipo di macchina
D Luogo e linea di produzione
E Numero progressivo
F Nell'esempio rappresentato 182 indica:
1= Partner
8= Tensione
2= Tipo di spina
GColore
H Codice di verifica
IA
O-ITAL
TREVIS
Italy
Made in
CAT. STR 0.S
N52
60Hz
TYPE:E
0V- 50/
220-24
P=1,9
1300W
ar)
MPa (19b
W
818280
20w003
111055
TREVISO-ITALIA
Made in Italy
CAT. STR
TYPE:EN520.S
220-240V- 50/60Hz
1.5. Identification plates
1300W
The identification labels for product recognition are affixed
under the machine (see figure).
The serial number consists of 19 numbers that identify the
machine:
A Year of manufacture (last two digits of the year)
B Progressive number of the day of the year (e.g. 15 April:
31+28+31+15=105)
C Type of machine
D Place and line of production
E Progressive number
F in this example, 182 are:
1= Partner
8= Mains voltage
2= Type of mains plug
GColour
H Check Sum
P=1,9 MPa (19bar)
11105520w003818280W
Digit
11105520w003818280W
A
B
Release 00 - 07.2011
C
D
E
F
G
H
12
Utilizzo
Using
2.Utilizzo
1
2.1. Preparazione macchina al primo utilizzo o
dopo un lungo periodo di non utilizzo
Leggere le Norme generali di sicurezza per evitare
rischi di scariche elettriche e incendi.
1 Rimuovere la pellicola di plastica dalla griglia raccogligocce sinistra, da quella destra e dai pannelli della macchina.
2 Rimuovere il serbatoio dell’acqua, il vassoio raccogligocce e il contenitore raccolta capsule. Regolare la lunghezza del cavo usando il vano apposito situato sotto la
macchina.
2
3 Posizionare la macchina in verticale e inserire la spina
nella presa.
4 Il serbatoio dell’acqua può essere rimosso afferrandolo
dal coperchio.
ITALIA
TREVISOItaly
Made in
CAT. STR20.S
TYPE:EN5- 50/60Hz
220-240V
P=1,9
1300W
r)
MPa (19ba
80W
w0038182
11105520
2.Using
3
2.1. Preparing to use the machine for the first
time or after a long period of non-use
Read the general safety notes to prevent risk of
electric shock and fire.
1 Remove the plastic film from the machine’s left- and
right-hand drip tray grids and the panels.
2 Remove the water tank, drip tray and capsule container.
Adjust the length of the cord using the special
compartment located under the machine.
4
3 Position the machine in an upright position and plug it
in.
4 The water tank can be removed by holding the lid.
Release 00 - 07.2011
13
Utilizzo
Using
5 Sciacquare il serbatoio d’acqua prima di riempirlo con
acqua potabile.
5
6 Accendere la macchina.
Luce lampeggiante: fase di riscaldamento per circa 40
sec.
Luce fissa: pronta.
MAX
Vedere pag. 8 per le indicazioni sui pulsanti a retroilluminazione.
7 Risciacquo: posizionare un contenitore sotto l’erogatore
di caffè e premere il pulsante Lungo.
Ripetere per tre volte.
6
Le macchine sono interamente testate dopo la produzione; alcune tracce di caffè potrebbero essere
trovate nell’acqua di risciacquo.
8 Risciacquare il “Sistema Rapid Cappuccino” (R.C.S.) eseguendo le sequenze indicate nel paragrafo “Pulizia del
Sistema Rapid Cappuccino due volte alla settimana.
7
5 Rinse the water tank before filling it with drinking
water.
6 Turn on the machine.
Flashing light: heating phase for about 40 seconds.
Steady light: ready.
x3
See page 8 for information about the backlit
buttons.
7 Rinsing: place a container under the coffee outlet and
press the Caffè Lungo button.
Repeat three times.
The machines are fully tested after production.
Some traces of coffee may be found in the rinse
water.
8
8 Rinse the “Rapid Cappuccino System” (R.C.S.) performing
the sequences indicated in the “Cleaning the Rapid
Cappuccino System paragraph twice a week” paragraph.
Release 00 - 07.2011
14
Utilizzo
Using
2.2. Preparazione Caffè
1
Leggere le Norme generali di sicurezza pag 4.
1 Sollevare completamente la leva e inserire una capsula
NESPRESSO.
Chiudere la leva e posizionare una tazzina sotto l’erogatore di caffè.
2 Per utilizzare il bicchiere per Latte Macchiato, spingere
il vassoio raccogligocce all’interno della macchina.
3 Premere il pulsante Espresso (40 ml) o il pulsante Lungo
(110 ml). Il flusso si arresterà automaticamente. Per interrompere manualmente o per riempire completamente
la tazzina, premere nuovamente lo stesso pulsante.
2
4 Togliere la tazzina. Sollevare e chiudere la leva per
espellere la capsula usata nel connettore.
3
2.2. Coffee preparation
110 ml
Read the general safety notes on page 4.
1 Lift the lever up fully and insert a NESPRESSO capsule.
Close the lever and place a cup under the coffee outlet.
2 To use the glass for Latte Macchiato, push the drip tray
inside the machine.
3 Press the Espresso (40 ml) or Caffè Lungo (110 ml) button.
The flow will stop automatically. To halt it manually or
to fill the cup fully, press the same button again.
40 ml
4 Remove the cup. Lift and close the lever to eject the
used capsule into the container.
4
Release 00 - 07.2011
15
Utilizzo
Using
2.3. Montaggio/smontaggio Sistema Rapid Cappuccino (R.C.S)
1
Leggere le Norme generali di sicurezza pag 4.
1 Rimuovere il coperchio del contenitore del latte e staccare il condotto.
2 Rimuovere il pulsante regolatore di schiuma di latte ruotandolo fino al simbolo e tirandolo verso l’alto.
3 Rimuovere il condotto del Sistema Rapid Cappuccino
sbloccandolo da
a
e tirandolo.
2
4 Tirare il tubo di erogazione latte e rimuoverlo.
3
2.3. Assembling/disassembling the Rapid Cappuccino System (R.C.S.)
Read the general safety notes on page 4.
1 Remove the milk container lid and detach the tube.
2 Remove the milk froth adjustment button by turning it
until the symbol and pulling it upwards.
3 Remove the Rapid Cappuccino System tube, releasing it
from
to
and pulling it.
4 Pull the milk outlet tube and remove it.
4
Release 00 - 07.2011
16
Utilizzo
Using
2.4. Preparazione Cappuccino e Latte Macchiato
1
Leggere le Norme generali di sicurezza pag 4.
Per una schiuma di latte perfetta, usare latte scremato o parzialmente scremato ad una temperatura
di circa 4°C.
1 Riempire il contenitore con la quantità di latte desiderata.
2
Quando il contenitore del latte è vuoto, prima di riempirlo, sciacquarlo accuratamente insieme al condotto del latte, con acqua potabile.
2 Chiudere il contenitore del latte. Aprire lo sportello del
connettore vapore facendolo scorrere verso destra. Collegare il Sistema Rapid Cappuccino all’apparecchio.
3 Alzare completamente la leva e inserire una capsula NESPRESSO.
4 Abbassare la leva, posizionare la tazza da Cappuccino o
il bicchiere per il Latte Macchiato sotto l’erogatore di
caffè e regolare il tubo di erogazione latte.
2.4. Preparing Cappuccino and Latte Macchiato
3
Read the general safety notes on page 4.
For a perfect milk froth, use skimmed or semi
skimmed milk at a temperature of about 4 °C.
1 Fill the container with the desired amount of milk.
When the milk container is empty, before filling it,
rinse it thoroughly with drinking water, together
with the milk tube.
4
2 Close the milk container. Open the steam connector
hatch by sliding it to the right. Connect the Rapid
Cappuccino System to the appliance.
3 Lift the lever up fully and insert a NESPRESSO capsule.
4 Lower the lever, place the Cappuccino cup or Latte
Macchiato glass under the coffee outlet and adjust the
milk outlet tube.
Release 00 - 07.2011
17
Utilizzo
Using
5
5 Ruotare e posizionare la manopola regolatrice sulla
quantità di schiuma di latte desiderata.
+ -
6 Premere il pulsante Cappuccino o Latte Macchiato. La
preparazione inizia dopo pochi secondi (prima il latte e
poi il caffè) e si arresta automaticamente.
7 Al termine della preparazione, alzare e abbassare la leva
per espellere la capsula nel contenitore di raccolta capsule usate.
8 Risciacquare al termine di ogni utilizzo come descritto
nel paragrafo 2.7 “Risciacquo dopo ogni preparazione di
ricetta a base di latte”.
6
5 Turn the knob and position it on the amount of milk
froth desired.
6 Press the Cappuccino or Latte Macchiato button.
Preparation begins after a few seconds (first the milk
and then the coffee) and stops automatically.
7 Once preparation is complete, lift and lower the lever
to eject the capsule into the used capsule container.
8 Rinse after each use, as described in paragraph 2.7
“Rinsing after preparing any milk-based recipe”.
7
8
Release 00 - 07.2011
18
Utilizzo
Using
2.5. Programmare la quantità di acqua
1
Leggere le Norme generali di sicurezza pag 4.
1 Riempire il contenitore di acqua, accendere la macchina
e inserire una capsula NESPRESSO.
Abbassare la leva e posizionare una tazza sotto l’erogatore di caffè.
2 Premere e tenere premuto il pulsante caffè Espresso o
caffè Lungo. La preparazione ha inizio.
2
Il pulsante lampeggia velocemente: modalità di preparazione.
3 Rilasciare il pulsante quando viene ottenuta la quantità
desiderata.
4 Il volume di acqua è ora impostato per le successive preparazioni di caffè.
Il pulsante lampeggia 3 volte: conferma del nuovo volume di acqua.
Min 25 ml/ Max 300 ml
2.5. Programming the amount of water
3
Read the general safety notes on page 4.
1 Fill the container with water, turn on the machine and
insert a NESPRESSO capsule.
Lower the lever and place a cup under the coffee outlet.
2 Press and hold the Espresso or Caffè Lungo button.
Preparation begins.
The button flashes rapidly: preparation mode.
3 Release the button when the desired amount has been
obtained.
4
4 The volume of water is now set for subsequent coffee
preparation.
The button flashes 3 times: confirmation of the new
volume of water.
Min 25 ml/ Max 300 ml
Release 00 - 07.2011
19
Utilizzo
Using
2.6. Programmare la quantità di Cappuccino/
Latte Macchiato
1
Leggere le Norme generali di sicurezza pag 4.
Seguire la procedura 1-5 del paragrafo 2.4. Preparazione Cappuccino e Latte Macchiato.
Latte: Min 30 ml/ Max 200 ml
Caffè: Min 25 ml/ Max 300 ml
1 Premere e tenere premuto il pulsante Cappuccino o Latte Macchiato. La preparazione della schiuma di latte ha
inizio.
Il pulsante lampeggia velocemente: modalità di preparazione.
2 Rilasciare il pulsante quando viene ottenuta la quantità
di schiuma di latte desiderata.
Il pulsante lampeggia velocemente: modalità di preparazione.
3 Tenere premuto lo stesso pulsante. L’erogazione ha
inizio. Rilasciare il pulsante quando viene raggiunta la
quantità di caffè desiderata.
La quantità da ricetta è ora impostata per le successive preparazioni. Il pulsante lampeggia 3 volte: conferma
del nuovo volume da ricetta.
2
2.6. Programming the amount of Cappuccino/
Latte Macchiato
3
Read the general safety notes on page 4.
Follow steps 1-5 of paragraph 2.4. Preparing
Cappuccino and Latte Macchiato.
Milk: Min 30 ml/ Max 200 ml
Coffee: Min 25 ml/ Max 300 ml
1 Press and hold the Cappuccino or Latte Macchiato
button. The preparation of milk froth begins.
The button flashes rapidly: preparation mode.
2 Release the button when the desired amount of milk
froth has been obtained.
The button flashes rapidly: preparation mode.
3 Hold down the same button. Dispensing begins. Release
the button when the desired amount of coffee has been
obtained.
The recipe amounts are now set for subsequent
preparations. The button flashes 3 times: confirmation
of the new recipe amounts.
Release 00 - 07.2011
20
Utilizzo
Using
2.7. Risciacquo dopo ogni preparazione di ricetta a base di latte
1
Leggere le Norme generali di sicurezza pag 4.
1 Posizionare un contenitore sotto il tubo di erogazione del
latte.
2 Premere e tenere premuto il pulsante CLEAN fino a quando la macchina non smetterà di pompare automaticamente.
2
I pulsanti Cappuccino e Latte Macchiato lampeggiano: processo di risciacquo di circa 10 sec. Luce fissa: processo di
risciacquo terminato.
3 Scollegare l’R.C.S. dalla macchina e riporlo in frigorifero. Chiudere lo sportello del connettore del vapore della
macchina.
10 sec.
Lo stesso latte non deve essere conservato per più di
2 giorni.
4 Tutti i componenti del contenitore del latte sono lavabili
in lavastoviglie. Vedere il paragrafo 2.9. Pulizia del Sistema Rapid Cappuccino due volte a settimana.
2.7. Rinsing after preparing any milk-based
recipe
3
Read the general safety notes on page 4.
1 Place a container under the milk outlet tube.
2 Press and hold the CLEAN button until the machine stops
pumping automatically.
The Cappuccino and Latte Macchiato buttons flash: rinsing
process for about 10 seconds. Steady light: rinsing process
finished.
3 Disconnect the R.C.S. from the machine and put it back
in the refrigerator.
Close the machine’s steam connector hatch.
4
The same milk should not be kept for more than 2
days.
4 All the components of the milk container are dishwasher
safe. See paragraph 2.9 “Cleaning the Rapid Cappuccino
System twice a week".
Release 00 - 07.2011
21
Utilizzo
Using
2.8. Pulizie quotidiane
1
Attendere il raffreddamento della macchina e leggere le Norme generali di sicurezza pag 4.
Non utilizzare detersivi abrasivi o solventi. Pulire
regolarmente la superficie della macchina con un
panno umido e un detergente delicato. Non lavare in
lavastoviglie.
1 Rimuovere il vassoio raccogligocce, il contenitore delle
capsule e il serbatoio dell’acqua. Svuotare e risciacquare. Entrambe le griglie di destra e di sinistra devono essere rimosse per una facile pulizia. Pulire l’erogatore del
caffè regolarmente con un panno umido.
2
2.9. Pulizia del Sistema Rapid Cappuccino due
volte a settimana
Smontare il Sistema Rapid Cappuccino (vedere il paragrafo 2.3. Montaggio/smontaggio Sistema Rapid Cappuccino
R.C.S.)
1 Riporre tutti i componenti nella parti superiore della lavastoviglie almeno due volte alla settimana.
2.8. Daily cleaning
Wait for the machine to cool down and read the
general safety notes on page 4.
Do not use abrasive detergents or solvents. Clean the
surface of the machine regularly using a damp cloth
and mild detergent. Do not wash in a dishwasher.
1 Remove the drip tray, the capsule container and the
water tank. Drain and rinse.
Both the right- and left-hand grids must be removed for
easy cleaning. Clean the coffee outlet regularly using a
damp cloth.
2.9. Cleaning the Rapid Cappuccino System
twice a week
Disassemble the Rapid Cappuccino System (see paragraph
2.3. “Assembling/disassembling the Rapid Cappuccino
System R.C.S.)
1 Place all the components at the top of the dishwasher at
least twice a week.
Release 00 - 07.2011
22
Utilizzo
Using
2.10.Svuotamento della macchina (prima delle
operazioni di riparazione)
1
1 Accendere la macchina.
2 Rimuovere il serbatoio dell’acqua. Abbassare la leva
(senza capsula all’interno). Posizionare un contenitore
sotto l’erogatore del caffè.
3 Tenere premuti i pulsanti Cappuccino e caffè Espresso
contemporaneamente per 5 secondi.
4 Quando il processo è terminato, la macchina si spegne
automaticamente.
2
2.10.Emptying the machine (before any repairs)
3
1 Turn on the machine.
2 Remove the water tank. Lower the lever (without any
capsule inside). Place a container under the coffee
outlet.
3 Press and hold the Cappuccino and Espresso buttons
simultaneously for 5 seconds.
The preparation buttons flash alternately: draining in
progress mode.
4 When the process is finished, the machine turns off
automatically.
5 sec.
4
Release 00 - 07.2011
I pulsanti di preparazione lampeggiano alternativamente: modalità di svuotamento in corso.
23
Utilizzo
Using
2.11.Modalità risparmio energetico
1
Questa macchina è dotata di un ottimo profilo di consumo
energetico nonché di una funzione di spegnimento automatico (OW) che permette di risparmiare energia.
L’apparecchio si spegne dopo 9 minuti dall’ultimo utilizzo.
1 Spegnere la macchina.
A Attivazione spegnimento dopo 9min. (impostazione di
fabbrica)
Tenere premuto il pulsante caffè Lungo e accendere la
macchina.
B Attivazione spegnimento dopo 30min.
A
Tenere premuto il pulsante caffè Espresso e accendere la
macchina.
C Attivazione spegnimento dopo 8h
Tenere premuti i pulsanti caffè Lungo e caffè Espresso e
accendere la macchina.
2.11.Energy saving mode
B
This machine has an excellent energy consumption profile
and an automatic switch-off option (OW), which makes it
possible to save energy.
The appliance turns itself off 9 minutes after the last use.
1 Turn off the machine.
A Activating switch-off after 9 minutes (factory setting)
Press and hold the Caffè Lungo button and turn on the
machine.
B Activating switch-off after 30 minutes.
Press and hold the Espresso button and turn on the
machine.
C Activating switch-off after 8 hours
Press and hold the Caffè Lungo and Espresso buttons and
turn on the machine.
C
Release 00 - 07.2011
24
Utilizzo
Using
2.12.Decalcificazione
1
Leggere le Norme generali di sicurezza pag 4.
1 Decalcificare la macchina quando il pulsante Cappuccino
si illumina di arancione in modalità pronta (avviso decalcificazione).
2 Svuotare il vassoio raccogligocce e il contenitore di raccolta capsule usate. Riempire il serbatoio dell’acqua con
100 ml di soluzione decalcificante NESPRESSO e 500 ml di
acqua.
3 Aprire il vano ed estrarre il tubo di decalcificazione. Collegare il tubo al connettore del vapore della macchina.
2
4 La macchina entra in modalità decalcificazione (impostata a 70°C).
500 ml
100 ml
Il pulsante Cappuccino lampeggia in arancione.
Il processo di decalcificazione può iniziare collegando il tubo di decalcificazione (non è necessario
aspettare il segnale di avvertimento decalcificazione).
2.12.Descaling
3
Read the general safety notes on page 4.
1 Descale the machine when the Cappuccino button glows
orange in ready mode (descaling warning).
2 Empty the drip tray and the used capsule container.
Fill the water tank with 100 ml of NESPRESSO descaling
solution and 500 ml of water.
3 Open the compartment and remove the descaling tube.
Connect the tube to the machine’s steam connector.
4 The machine enters descaling mode (set at 70 °C).
The Cappuccino button flashes orange.
4
The descaling process can be start by connecting
the descaling tube (not needed to wait for descaling
warning signal).
Release 00 - 07.2011
25
Utilizzo
Using
5 Posizionare un contenitore, della capacità minima di 1
litro, sotto l’erogatore del caffè e al tubo di decalcificazione (come in figura).
5
6 Premere il pulsante Cappuccino. La soluzione decalcificante passa alternativamente attraverso l’erogatore del
caffè, il tubo di decalcificazione e il vassoio raccogligocce. I pulsanti Cappuccino e Latte Macchiato lampeggiano
alternativamente.
7 Quando il ciclo di decalcificazione è terminato (il serbatoio dell’acqua rimane vuoto), il pulsante Cappuccino
lampeggia.
8 Svuotare il contenitore di raccolta capsule usate, il vassoio raccogligocce e riempire il serbatoio con acqua potabile fresca fino al livello MAX.
6
Ripetere nuovamente il passaggio 5.
5 Place a container with a minimum capacity of 1 litre
under the coffee outlet and descaling tube (as shown in
the figure).
6 Press the Cappuccino button. The descaling solution
passes alternately through the coffee outlet, the
descaling tube and the drip tray.
The Cappuccino and Latte Macchiato buttons flash
alternately.
7 When the descaling cycle is over (the water tank remains
empty), the Cappuccino button flashes.
8 Empty the used capsule container and the drip tray and
fill the tank with fresh drinking water up to the MAX
level.
Repeat step 5 again.
7
8
MAX
Release 00 - 07.2011
26
Utilizzo
Using
9 Premere ancora il pulsante Cappuccino. Il ciclo di risciacquo continua attraverso l’erogatore di caffè, il tubo di
decalcificazione e il vassoio raccogligocce fino a quando
il serbatoio dell’acqua rimane vuoto. I pulsanti Cappuccino e Latte Macchiato lampeggiano alternativamente.
9
10 Una volta che il sistema di risciacquo è terminato la macchina si spegne.
11 Rimuovere e riporre nell’apposito vano il tubo di decalcificazione. Svuotare il vassoio raccogligocce e il contenitore di raccolta capsule usate. Riempire il serbatoio
dell’acqua con acqua potabile fresca.
12 Pulire la macchina usando un panno umido. La decalcificazione della macchina è ora terminata.
10
9 Press the Cappuccino button again. The rinse cycle
continues through the coffee outlet, the descaling
tube and the drip tray until the water tank is empty.
The Cappuccino and Latte Macchiato buttons flash
alternately.
11
10 Once the rinsing system has finished, the machine turns
itself off.
11Remove and place the descaling tube in the relative
compartment. Empty the drip tray and the used capsule
container. Fill the tank with fresh drinking water.
12 Clean the machine using a damp cloth. Machine descaling
is now complete.
12
Release 00 - 07.2011
27
Utilizzo
Using
2.13.Impostazione durezza dell’acqua
1
1 Spegnere la macchina.
A seconda della durezza dell’acqua tenere premuti i pulsanti indicati e accendere la macchina.
A: Durezza
dell’acqua dolce
B: Durezza
dell’acqua media
C: Durezza
dell’acqua dura
< 10° dH
10° dH - 20° dH
> 20° dH
< 18° fH
18° fH - 36° fH
> 36° fH
< 180 mg/l CaCO3
180-360 mg/l CaCO3
360 mg/l CaCO3
A
Dopo la programmazione i pulsanti lampeggiano 3
volte: la durezza dell’acqua è impostata.
2.13.Setting water hardness
B
1 Turn off the machine.
Depending on the hardness of the water, hold down the
indicated buttons and turn on the machine.
C
Release 00 - 07.2011
A: Water
hardness - soft
B: Water hardness
- medium
C: Water
hardness - hard
< 10° dH
10° dH - 20° dH
> 20° dH
< 18° fH
18° fdH - 36°fH
> 36° f H
< 180 mg/l CaCO3
180-360 mg/l CaCO3
360 mg/l CaCO3
After programming, the buttons flash 3 times: the
water hardness is set.
28
Utilizzo
Using
2.14.Ripristinare le quantità originali
1
1 Con macchina accesa, premere tutti e quattro i pulsanti
per 5 secondi.
Tutti i pulsanti lampeggiano 3 volte: tutte le quantità
originali sono ripristinate.
*Il volume della schiuma di latte dipende dal tipo di
latte utilizzato e dalla sua temperatura.
110 ml
110 ml
Latte*:150 ml/Caffè:40 ml
Milk*:150 ml/Coffee:40 ml
40 ml
40 ml
Latte*:50 ml/Caffè:40 ml
Milk*:50 ml/Coffee:40 ml
2.14.Resetting the original amounts
1 With the machine on, press all four buttons for 5 seconds.
All the buttons flash 3 times: all the original quantities
are reset.
*The volume of milk froth depends on the type of
milk used and its temperature.
Release 00 - 07.2011
29
Utilizzo
Using
2.15.Funzioni statistiche
1 Spegnere la macchina.
2 Tenere premuti i pulsanti Espresso e Macchiato.
3 Accendere la macchina mantenendo premuti per 5 secondi i pulsanti Espresso e macchiato; la macchina va in modalità
"statistico" (tutti i tasti rimangono spenti).
4
Tenere premuti i seguenti pulsanti:
• Pulsante Espresso per numero di preparazioni di caffè (Espresso e Lungo);
• Pulsante Cappuccino per numero di preparazioni a base di latte (Macchiato e Cappuccino);
• Pulsante Lungo per litro di caffè preparato;
• Pulsante Macchiato per litro d'acqua di vapore preparato;
• Pulsanti Cappuccino e Espresso premuti simultaneamente per il numero di decalcificazione;
5 Per disattivare la modalità "statistico", la macchina deve essere spenta.
Descrizione del valore definita dal numero di impulsi fatta dal rispettivo led
Lungo
Macchiato
Espresso
Cappuccino
Unità
Decine
Centinaia
Migliaia
2.16.Smaltimento e ambiente
L’apparecchio è costruito con materiali di alta qualità che possono essere riutilizzati o riciclati. La separazione differenziata dei materiali di scarto consente di recuperare le materie prime. Depositare l’apparecchio in un apposito centro di
raccolta. Le autorità locali forniscono informazioni sullo smaltimento.
2.15.Statistical mode
1 Switch OFF the machine.
2 Press and hold the Espresso and Macchiato buttons.
3 Switch on machine with Espresso and Macchiato buttons pressed for 5 seconds, the machine goes in "statistical mode"
(all buttons remain off).
4 Press and hold the following buttons:
5
• Espresso button for Number of coffee preparations (Espresso and Lungo);
• Cappuccino button for Number of milk preparations (Macchiato and Cappuccino);
• Lungo button for liter of coffee prepared;
• Macchiato button for liter of water for steam prepared;
• Cappuccino and Espresso pressed simultaneously for number of descaling;
To switch off the "statistical mode", machine shall be turned off.
Definition of value indication (number of pulses done by the respective LED)
Lungo
Macchiato
Espresso
Cappuccino
Units
Tens
Hundreds
Thousands
2.16.Disposal and the environment
The appliance is built with high quality materials that can be reused or recycled. The separation of waste materials used
makes it possible to recover the raw materials. Take the appliance to a special collection centre. Local authorities can
provide information about disposal.
Release 00 - 07.2011
30
Ricerca guasti
Troubleshooting
3.
Ricerca guasti
3.1. Controllo macchina al ricevimento
Al ricevimento della macchina è opportuno eseguire una verifica generale per una più rapida identificazione del guasto e
di avviare azioni adeguate di riparazione.
Seguire l’ordine indicato nella tabella seguente.
VERIFICA
ANOMALIA
Parti di struttura sono visibilmente rotte o danneggiate?
Il cavo di alimentazione è danneggiato?
Il Cliente ha aperto la macchina?
La leva dell’infusore capsula funziona?
Controllare gli elementi meccanici
Il meccanismo di espulsione capsule è in funzione?
I pulsanti Lungo+Espresso continuano a lampeggiare anche oltre i
Accendere la macchina
40 secondi?
Riempire il contenitore dell’acqua
Dal contenitore si notano perdite di acqua?
La pompa funziona?
Preparare il caffè senza la capsula inserita
Fuoriuscita di acqua calda dal connettore di vapore?
Decalcificazione
vedere paragrafo 2.12
Misurazione della portata
vedere paragrafo 4.1
Controllo di eventuali perdite
vedere paragrafo 3.2
Misurazione della temperatura caffè
vedere paragrafo 4.2
Pulizia
vedere paragrafi 2.8 e 2.9
Allarme generale: tutti i pulsanti lampeggiano alternativamente Tutte le funzioni sono bloccate e la macchina si spegne dopo 10
per 3 volte ogni 2 sec.
sec.
Allarme surriscaldamento: i pulsanti di caffè e preparazione latte Tutte le funzioni sono bloccate fino a quando la temperatura dilampeggiano alternativamente per 3 volte ogni 2 sec.
minuisce
Tutti i pulsanti lampeggiano contemporaneamente per 3 volte.
Pompa bloccata per mancanza d'acqua
Controllare eventuali danni visibili
3.Troubleshooting
3.1. Checking the machine upon receipt
Upon receipt of the machine, it is advisable to perform a general check to identify the faulty quickly arrange appropriate
repair.
Follow the order shown in the table below.
CHECK
FAULT
Are parts of the structure visibly broken or damaged?
Is the power cord damaged?
Has the customer opened the machine?
Does the lever work?
Check the mechanical components
Is the capsule ejection mechanism operating?
Do the Caffè Lungo+Espresso buttons continue to flash even after
Turn on the machine
40 seconds?
Fill the water container
Do you notice water leaks from the container?
Does the pump work?
Prepare the coffee without the capsule inserted
Is hot water leaking from the steam connector?
Descaling
see paragraph 2.12
Measure the flow rate
see paragraph 4.1
Check for any leaks
see paragraph 3.2
Measure the coffee temperature
see paragraph 4.2
Cleaning
see paragraphs 2.8 and 2.9
General alarm: all the buttons flash alternately 3 times every 2 All functions are blocked and the machine turns off after 10
seconds.
seconds.
Overheating alarm: the coffee and milk preparation buttons flash All functions are blocked until the temperature decreases
alternately 3 times every 2 seconds.
All 4 buttons blinking fast 3 times
Pump blocked for lack of water
Check for any visible damage
Release 00 - 07.2011
31
Ricerca guasti
Troubleshooting
3.2.Malfunzionamenti
INCONVENIENTE
Temperatura del caffè troppo bassa
CAUSA
RIMEDIO
Incrostazioni sulla macchina
Termoblocco difettoso
Sensore di temperatura non fissato
Temperatura del caffè troppo alta
Difetti del pannello elettronico
Il contenitore dell’acqua è vuoto
La pompa è rumorosa
Il contenitore dell’acqua non è inserito
correttamente
Il contenitore dell’acqua è vuoto
Il contenitore dell’acqua non è inserito
correttamente
Il flusso non è regolare o è inesistenIncrostazioni sul beccuccio di erogazione
te
Incrostazioni sulla macchina
Pompa difettosa
Pannello elettronico guasto
Eseguire la decalcificazione
Sostituire la sonda NTC
Sostituire il termoblocco
Fissare il sensore di temperatura
Sostituire il pannello elettronico
Riempire il contenitore dell’acqua
Inserire correttamente il contenitore
dell’acqua
Riempire il contenitore dell’acqua
Inserire correttamente il contenitore
dell’acqua
Pulire, decalcificare o sostituire il beccuccio
Eseguire la decalcificazione
Sostituire la pompa
Sostituire il pannello elettronico
Verificare e chiudere correttamente la
leva
Svuotare il contenitore capsule usate
Leva non perfettamente chiusa
Fuoriuscita di acqua anziché di caffè, capsula non perforata
Il contenitore di raccolta capsule usate
potrebbe essere piena
La leva non si chiude completamen- Il contenitore di raccolta capsule usate Svuotare il contenitore capsule usate
te
potrebbe essere piena
Blocco espulsione capsule difettoso
Sostituire il blocco espulsione capsule
La capsula non viene espulsa
Portacapsula sporco
Pulire o sostituire il portacapsula
3.2.Malfunctioning
PROBLEM
CAUSE
SOLUTION
Perform descaling
Replace the NTC
Faulty thermoblock
Replace the thermoblock
Temperature sensor not attached
Attach the temperature sensor
Coffee temperature too high
Electronic panel faults
Replace the power board
The water container is empty
Fill the water container
The pump is noisy
The water container is not inserted Insert the water container properly
properly
The water container is empty
Fill the water container
The water container is not inserted Insert the water container properly
properly
The flow is not regular or nonDeposits on the dispensing nozzle
Clean, descale or replace the nozzle
existent
Deposits on the machine
Perform descaling
Faulty pump
Replace the pump
Faulty electronic panel
Replace the power board
Check the lever and close it properly
Water comes out instead of coffee, Lever is not fully closed
capsule not perforated
The used capsule container may be full Empty the used capsule container
The lever does not close completely The used capsule container may be full Empty the used capsule container
Faulty capsule ejection block
Replace the capsule ejection block
The capsule is not ejected
Dirty capsule container
Clean or replace the capsule container
Coffee temperature too low
Release 00 - 07.2011
Deposits on the machine
32
Ricerca guasti
Troubleshooting
INCONVENIENTE
CAUSA
RIMEDIO
Il contenitore del latte non è posizionato correttamente
Il connettore del Sistema Rapid CappucLa schiuma è insufficiente o inesi- cino e/o il tubo di erogazione latte potrebbero essere sporchi
stente
Ugello vapore sporco o incrostato
Il latte non è alla giusta temperatura
Perdita di temperatura del termoblocco
Capsula deformata o danneggiata e non
viene perforata completamente
Fuoriuscita di acqua dalla leva
Perdite dal gruppo erogatore
Posizionare correttamente il contenitore
Verificare ed eventualmente eseguire
una pulizia
PROBLEM
SOLUTION
Pulire o decalcificare l’ugello
Usare solo latte alla temperatura di 4°C
Decalcificare la macchina
Utilizzare sono capsule integre
Pulire o sostituire
Verificare il serraggio dei collegamenti
Perdite dal termoblocco
al termoblocco o sostituirlo
Perdite di acqua dai lati o sotto la Perdite dai collegamenti ad alta pressio- Verificare eventuali rotture e sostituire
macchina
ne
i tubi
Rottura del contenitore dell’acqua o Sostituire il contenitore dell’acqua
perdite dalla valvola sottostante
Tutti i pulsanti lampeggiano contemVerificare la sonda NTC ed eventualmenMacchina in allarme generale
poraneamente per 3 volte ogni 2 sec.
te sostituirla
I pulsanti di caffè e preparazione
Verificare il termostato della pompa ed
latte lampeggiano alternativamente Allarme di surriscaldamento
ogni altro termoprotettore
per 3 volte ogni 2 sec.
Tutti i pulsanti lampeggiano contemPompa bloccata
Controllare il flussimetro
poraneamente per 3 volte
CAUSE
The milk container is not positioned
properly
The Rapid Cappuccino System connector
and/or the milk outlet tube may be
Froth is insufficient or non-existent dirty
Steam nozzle dirty or encrusted
The milk is not at the right temperature
Loss of temperature of the thermoblock
Capsule deformed or damaged and is
not fully perforated
Water leaking from the lever
Leaks from the outlet unit
Position the container properly
Check and clean if necessary
Clean or descale the nozzle
Use milk at 4 °C only
Descale the machine
Use only capsules that are intact
Clean or replace
Check the tightness of the connections
Leaks from the thermoblock
to the thermoblock or replace it
Water leakage from the sides or
Check for breakage and replace the
Leaks from high-pressure connections
under the machine
tubes
Water container broken or leaks from Replace the water container
the valve below
All the buttons flash alternately 3
Check the NTC and replace if necessary
General alarm
times every 2 seconds
The coffee and milk preparation
Check the thermostat and any other
buttons flash alternately 3 times Overheating alarm
pump thermal protector
every 2 seconds
All 4 buttons blinking fast 3 times
Pump blocked
Check the flowmeter
Release 00 - 07.2011
33
Manutenzione
Maintenance
4.Manutenzione
1
4.1. Controllo pressione e perdite di tenuta
Leggere le Norme generali di sicurezza pag 4.
4
1 Aprire la macchina come indicato ai punti 1-2-3 del paragrafo 5.1. Smontaggio generale.
2
2 Inserire nell’infusore (1) lo strumento “falsa capsula”
blu (2) in dotazione. Assicurarsi che sia ben posizionato
e fissato.
2
3 Inserire il supporto blu di bloccaggio manometro (4) e
spingerlo verso il basso.
Una volta inserito completamente il supporto, abbassare
la leva.
4 Collegare il manometro allo strumento “falsa capsula”
come indicato in figura.
Posizionare un contenitore vuoto sotto il tubo di scarico
del manometro (3).
2
1
4.Maintenance
3
4.1. Checking pressure and leaks
Read the general safety notes on page 4.
4
1 Open the machine as indicated in paragraph 5.1. General
disassembly, on the 1-2-3 points.
4
2 Insert the blue “false capsule” instrument (2) supplied
into the extraction chamber (1). Make sure it is well
positioned and secured.
3 Insert the blue pressure gauge locking support (4) and
push it downwards.
Once the support is fully inserted, lower the lever.
4
4 Connect the pressure gauge to the “false capsule”
instrument as shown in the figure.
Place an empty container under the pressure gauge
drain tube (3).
3
Release 00 - 07.2011
34
Manutenzione
Maintenance
5 Aprire il rubinetto (5) del manometro.
5
6 Accendere la macchina.
7 Premere il pulsante Espresso e lasciare scorrere il flusso
d’acqua nel contenitore per 10 secondi.
8 Passati i 10 secondi, chiudere il rubinetto (5).
La pressione inizia a salire per stabilizzarsi a 17,5 +/- 1,5
bar (controllo la pressione della pompa).
5
Tenere d’occhio il manometro, se la pressione supera i 23 bar, la macchina deve essere spenta e la pressione abbassata attraverso la valvola di pressione.
6
Controllare che non ci siano perdite in tutti i collegamenti idraulici.
La pompa non deve funzionare per più di 50 secondi
senza flusso d’acqua.
Se si verifica qualche piccola perdita, l'indicatore del
manometro scende molto velocemente sotto i 10 bar.
Dopo il controllo, la pressione residua deve essere
rilasciata aprendo la valvola di pressione!
5 Open the pressure gauge valve (5).
7
6 Turn on the machine.
7 Press the Espresso button and allow water to fill the
container for 10 seconds.
8 After 10 seconds, close the valve (5).
The pressure starts to rise and stabilise at 17.5 +/- 1.5
bar (pump pressure control).
Keep an eye on the pressure gauge. If the pressure
exceeds 23 bar, the machine must be turned off and
the pressure lowered using the pressure valve.
Check for leaks in all hydraulic connections.
8
The pump should not run for more than 50 seconds
without water flow.
5
If there is any micro leakage, the indicator of the
manometer will drop down very fast under 10 bars.
After checking, the residual pressure must be
released by opening the pressure valve!
10 sec.
Release 00 - 07.2011
35
Manutenzione
Maintenance
4.2. Misurazione temperatura caffè
1
1 Accendere la macchina.
2 Posizionare un misurino sotto all’erogatore del caffè.
Sollevare la leva ed inserire la capsula.
3 Chiudere la leva e premere il pulsante Espresso.
Attendere che nel misurino ci siano almeno 20 ml di caffè.
4 Misurare la temperatura del flusso ad una distanza di circa 2-10 mm dall’erogatore (come indicato in figura).
La temperatura indicativa deve essere di 86°C ± 3°C
(187°F ± 5.4 °F)
2
4.2. Measuring coffee temperature
3
1 Switch the machine ON.
2 Place a measuring cup under the coffee outlet.
Lift up the lever and insert the capsule.
3 Close the lever and press the Espresso button.
Wait until there is at least 20 ml of coffee in the
measuring cup.
20 ml
4 Measure the temperature of the flow at a distance of
about 2-10 mm from the outlet (as shown in the figure).
Coffee temperature should be 86°C ± 3°C (187°F ±
5.4 °F)
4
2-10 mm
86°C ± 3°C
Release 00 - 07.2011
36
Manutenzione
Maintenance
4.3. Misurazione temperatura latte
1
1 Accendere la macchina.
2 Riempire il serbatoio latte con circa 200 ml di latte parzialmente scremato ad una temperatura di 5°C ± 2°C.
Inserire il coperchio sul contenitore ed installarlo sulla
macchina. Ruotare la manopola regolazione schiuma in
posizione MAX.
Posizionare un recipiente graduato in Pirex da 250 ml in
corrispondenza del tubo di erogazione latte.
2
3 Utilizzare un termometro digitale con termocoppia a
sensore tipo K e piazzarlo sotto il tubo di uscita latte.
4 Premere uno dei due tasti Cappuccino o Latte Macchiato
ed erogare 100 ml di latte. Durante l'erogazione misurare
la temperatura del latte.
+ -
MAX
200 ml
MIN
Controllare quanto segue:
Aspetto della schiuma: senza schizzi
Temperatura latte: 57°C - 67 °C.
Quantità schiuma: nel contenitore in Pirex il risultato
finale deve essere 1/2 latte e 1/2 schiuma.
4.3. Measuring milk temperature
3
1 Switch the machine ON.
2 Fill the milk container with about 200 ml of low fat milk
at a temperature of 5°C ± 2°C. Place the lid and connect
the milk container to the machine with the foam knob
regulator in MAX position.
Place a 250 ml graduated glass beaker under the milk
outlet tube.
3 Use a digital thermometer equipped with a "K" type
thermocouple sensor and place it under the milk outlet
tube.
4 Press either Cappuccino or Latte Macchiato button
and deliver around 100 ml of milk during the brewing
measure the milk temperature.
4
100 ml
Release 00 - 07.2011
37
Chceck the following aspects:
Brewing aspect: without splashing
Temperature milk: 57 - 67 °C
Foam quantity: on the transparent container the
final result must be 1/2 milk and 1/2 foam.
Riparazione
Repair
5.Riparazione
1
5.1. Smontaggio generale
1 Sollevare il coperchio del serbatoio acqua e procedere
allo sganciamento dal pannello posteriore della macchina.
2 Svitare e togliere le quattro viti indicate e rimuovere il
pannello posteriore.
3 Spostare leggermente verso la parte posteriore della
macchina il pannello indicato e rimuoverlo.
4 Sganciare la copertura dell’infusore (TMBU) indicata,
spingendo verso la parte posteriore della macchina.
2
0.6-0.8 Nm
5.Repair
3
5.1. General disassembly
1 Lift the water tank lid and then detach the tank from
the rear panel on the machine.
2 Unscrew and remove the four screws shown and remove
the rear panel.
3 Move the panel shown slightly towards the rear of the
machine and remove it.
4 Release the extraction unit cover (TMBU) shown, pushing
towards the rear of the machine.
4
Release 00 - 07.2011
38
Riparazione
Repair
5 Sollevare la leva inserimento capsula, sganciare la copertura anteriore dell’erogatore caffè premendo leggermente nei lati come indicato in figura ed estrarla verso
la parte anteriore della macchina.
5
5.2. Rimozione scheda pulsanti
Eseguire le operazioni descritte nei punti precedenti 1-5 del
paragrafo 5.1.
1 Scollegare il connettore dalla scheda.
1
Eseguire questa operazione con cautela.
2 Togliere la vite laterale indicata in figura.
Ruotare leggermente il pannello superiore, rimuoverlo
spostandolo verso la parte anteriore della macchina.
3 Servendosi di un cacciavite, sganciare i punti indicati e
rimuovere il gruppo schede completo.
5 Lift up the capsule insertion lever and release the front
cover shown in the figure, moving it towards the front
of the machine.
2
5.2. Removing the button panel
1.0-1.2 Nm
Follow the steps described in the steps 1-5 of paragraph 5.1.
1 Disconnect the connector from the main board.
Do this with caution.
2 Remove the side screw shown in figure.
Gently rotate the top panel. Remove it by moving it
towards the front of the machine.
3
3 Using a screwdriver, detach the points indicated and
remove the whole panel unit.
Release 00 - 07.2011
39
Riparazione
Repair
5.3. Rimozione infusore
1
Eseguire le operazioni descritte nei paragrafi 5.1 e 5.2.
1 Spostare leggermente verso la parte anteriore della macchina il pannello indicato e rimuoverlo.
2 Sollevare completamente la leva.
Rimuovere la clip ferma-tubo dell’erogatore caffè.
3 Svitare e togliere le quattro viti e rimuovere l’infusore
completo.
2
5.3. Removing the extraction unit
3
Follow the steps described in paragraphs 5.1 and 5.2.
0.6-0.8 Nm
1 Move the panel shown slightly towards the front of the
machine and remove it.
2 Lift the lever up fully.
Remove the coffee outlet tube holder clip.
3 Unscrew and remove the four screws and remove the
whole extraction unit.
Release 00 - 07.2011
40
Riparazione
Repair
5.4. Rimozione scheda
1
Eseguire le operazioni descritte nei paragrafi 5.1.1 e 5.1.2.
1 Sganciare il tasto dell’interruttore e aiutandosi con un
cacciavite rimuovere la scheda dalla propria sede.
Per la sostituzione scollegare tutti i cablaggi.
5.4. Removing the PCB board
Follow the steps described in paragraphs 5.1.1 and 5.1.2.
1 Disconnect the main bottom, using a screwdriver to
remove the PCB board from its slot.
To replace it, disconnect all the wiring.
Release 00 - 07.2011
41
Riparazione
Repair
5.5. Rimozione gruppo Generatore/Vaporizzatore/Pompa
1
Eseguire le operazioni descritte nei paragrafi 5.1, 5.2, 5.3 e
5.4.
1 Servendosi di un cacciavite, sganciare i punti indicati e
rimuovere la scocca superiore.
2 Sfilare il tubo come indicato in figura.
3 Rimuovere la clip ferma-tubo indicata e sfilare il relativo
tubo.
4 Togliere il tubo indicato.
2
5.5. Removing the Thermoblock/Steamer unit/Pump
3
Follow the steps described in paragraphs 5.1, 5.2, 5.3 and
5.4.
1 Using a screwdriver, detach the points indicated and
remove the upper casing.
2 Remove the tube as shown in the figure.
3 Remove the tube and the clip as shown in the figure.
4 Remove the tube shown.
4
Release 00 - 07.2011
42
Riparazione
Repair
5
5 Scollegare il faston di terra, svitare la vite di terra, sganciare il gancio e rimuovere il supporto pompa-caldaia.
1.0-1.2 Nm
6 Togliere la vite di fissaggio copertura caldaia sganciare i
tre ganci e rimuovere la copertura.
7 Rimuovere la clip ferma-tubo indicata, sfilare il relativo
tubo e scollegare il faston.
8 Togliere la clip e scollegare i tubi del gruppo deviatore
acqua.
6
2.4-2.6 Nm
5 Take out the faston, unscrew and remove the earthing
screw, unhook and remove pump-boiler support as shown
in the figure.
7
6 Unscrew and remove the fixing screw; unhook the plastic
support as shown in the figure and remove it.
7 Remove the indicated clip, then take out the tube and
disconnect the faston as shown in the figure.
8 Remove the clip and disconnect the water diverter
tubes.
8
Release 00 - 07.2011
43
Riparazione
Repair
9 Rimuovere le due clip indicate e sfilare i relativi tubi.
9
10 Rimuovere le due clip indicate e sfilare i relativi tubi.
Sfilare il gruppo Generatore/Vaporizzatore.
11 Rimuovere le due staffette di unione Generatore e Vaporizzatore e scollegare i faston indicati. Rimuovere i due
termofusibili svitando le due viti di fissaggio staffetta indicate.
12 Svitare e togliere i due dadi e rimuovere i due TCO scollegando i relativi faston.
10
11
9 Remove the two clips shown and the associated tubes.
2.4-2.6 Nm
10 Remove the two clips shown and the associated tubes.
Remove the Thermoblock/Steamer unit.
11Remove the two thermoblock and steamer joining
brackets and disconnect the faston connectors shown.
Remove the two thermal fuses by unscrewing the two
bracket fixing screws shown.
12 Unscrew and remove the two nuts and remove the two
TCO, disconnecting their faston connectors.
12
1.6-1.8 Nm
Release 00 - 07.2011
44
Riparazione
Repair
13 Staccare i due tubi di isolamento dai due fermagli connettore vaporizzatore. Staccare i due fermagli dal vaporizzatore.
13
14 Rimuovere il doppio sensore rimuovendo le due staffe indicate e scollegando il relativo connettore dalla scheda.
15 Sollevare il coperchio elettrovalvole e scollegare i faston
indicati.
16 Rimuovere le clip indicate e scollegare i relativi tubi.
14
2.4-2.6 Nm
13 Remove the two insulation tubes from the two steamer
connector clips. Detach the two clips from the steamer.
15
14 Remove the dual sensor by removing the two brackets
shown and disconnecting the relative connector from
the panel.
15Lift up the solenoid valve cover and disconnect the
faston connectors shown.
16 Remove the clips shown and disconnect the tubes.
16
Release 00 - 07.2011
45
Test di sicurezza
Safety test
6.
Test di sicurezza
Dopo ogni riparazione e/o sostituzione di un componente, comunque in ogni caso si debba intervenire sui componenti interni della macchina, è necessario poi effettuare i test di sicurezza previsti dalla normativa EN/IEC 60335-1.
I test da effettuare, usando un apparecchio adeguato e specifico (tipo il modello TG uni 1 prodotto da GMW Gossen METRAWATT) o altri equivalenti, sono i seguenti.
-
-
Continuità di terra ( la resistenza ohmica deve essere inferiore a 0,1 Ohm);
Isolamento elettrico (alimentare con 500 DC; La resistenza ohmica deve essere superiore a 2 MOhm).
Procedura:
La macchina non ha parti metalliche esterne, bisognerà quindi mettere in contatto la sonda dello strumento di misura con
la caldaia vapore, attraverso l’apposito foro sul fondo (vedi figura).
Collegare poi la spina della macchina allo strumento di misura.
6.
Safety test
After any repair and /or replacement of any part, in any case whenever the coffee maker is split apart, once re-assembled,
is necessary to perform the safety test, according to the EN/IEC 60335-1.
The test to perform, using a proper test device (e.g. model TG uni 1 produced by GMW Gossen METRAWATT, or an
equivalent one), are the following.
-
-
Protective Earth continuity test( ohmic resistance must be less than 0,1 Ohm);
Protective insulation test (supply 500 DC, ohmic resistance must be over than 2MOhm).
Procedure:
The machine has not external metal parts, you will have to connect the probe of the test device through the dedicated
hole on the bottom of the machine (see picture) in order to assure a contact with the lower metallic part of the steamer.
Then plug the machine on the dedicated socket on the test device.
ALIA
TREVISO-IT
Italy
Made in
CAT. STR20.S
TYPE:EN5- 50/60Hz
220-240V
P=1,9
80W
w0038182
11105520
Release 00 - 07.2011
46
1300W
)
MPa (19bar
Schemi elettrici
Wiring diagrams
7.
Schemi elettrici
7.
Wiring diagrams
SCHEDA DI POTENZA
POWER PCB
POMPA
PUMP
EV2
E.VALVOLA
VAPORE
STEAM
VALVE
P
ELETTROVALVOLA
CAFFE’
COFFEE VALVE
EV1
MOTOPROTETTORE
MOTOR PROTECTOR
SCHEDA DI HALL
HALL SENSOR
SCHEDA COMANDI
CONTROL BOARD
COFFEE TEMP. PROBE
SENSORE TEMP. CAFFE’
FLUSSIMETRO
FLOWMETER
STEAM PROBE
SENSORE TEMP. VAPORE
MICROINTERRUTTORE
VAPORE - IFD
HOT STEAM - IFD
MICROSWITCH
RESISTENZA CAFFE’
HEATING EL. COFFEE
TCO
THERMAL CUT OFF
TCO
THERMAL CUT OFF
Release 00 - 07.2011
47
TCO
THERMAL CUT OFF
TCO
THERMAL CUT OFF
RESISTENZA VAPORE
STEAM HEATING EL.
Schemi elettrici
Wiring diagrams
EV2
ELETTROVALVOLA VAPORE
STEAM VALVE
GIA-VER / YLW - GRN
SCHEDA DI POTENZA
POWER PCB
BIANCO / WHITE
EV1
MARRONE / BROWN
ROSSO / RED
MARRONE / BROWN
MOTOPROTETTORE
MOTOR PROTECTOR
COFFEE TEMP. PROBE
SENSORE TEMP. CAFFE’
SCHEDA DI HALL
HALL SENSOR
ROSSO / RED
BIANCO / WHITE
NERO / BLACK
MICROINTERRUTTORE
VAPORE - IFD
HOT STEAM - IFD
MICROSWITCH
FLUSSIMETRO
FLOWMETER
COFFEE STEAM PROBE
SENSORE TEMP. VAPORE
BLU / BLUE
MARRONE / BROWN
GIA-VER
YLW - GRN
TCO
THERMAL CUT OFF
ROSSO / RED
BLU / BLUE
TCO
THERMAL CUT OFF
ROSSO / RED
Release 00 - 07.2011
BLU / BLUE
RESISTENZA VAPORE
STEAM HEATING EL.
48
GIA-VER / YLW - GRN
RESISTENZA CAFFE’
HEATING EL. COFFEE
BIANCO / WHITE
GRIGIO / GREY
BLU / BLUE
BLU / BLUE
TCO
THERMAL CUT OFF
POMPA P
PUMP
GIA-VER / YLW - GRN
TCO
THERMAL CUT OFF
ROSSO / RED
GIA-VER / YLW - GRN
L
BLU / BLUE
N
ROSSO / RED
N N
GRIGIO / GREY
N
ELETTROVALVOLA
CAFFE’
COFFEE VALVE
BIANCO / WHITE
SCHEDA COMANDI
CONTROL BOARD
Ricambi
Spare parts
8.Ricambi
8.
Spare parts
Tavola 01
Plate 01
26
27
25
20
1
2
3
19
4
7
6
18
17
8
11
16
21
15
14
13
9
10
22
24
Release 00 - 07.2011
49
24
Ricambi
Spare parts
Tavola 01
Plate 01
Descrizione
Description
1
SERBATOIO ACQUA
WATER TANK
2
O-RING
O-RING
3
MOLLA
SPRING
4
VALVOLINA
VALVE
6
PANNELLO POSTERIORE
REAR PANEL
7
TELAIO POSTERIORE
REAR FRAME
8
CONTENITORE DI CAPSULE
CAPSULE CONTAINER
9
CAVO ALIMENTAZIONE
POWER SUPPLY CORD
10
FIANCO SX
SIDE LEFT
11
COPERTURA CONTENITORE CAPSULE
CAPSULE CONTAINER COVER
13
GRIGLIA DX
GRID RIGHT
14
PEZZO ANTERIORE TELAIO
FRAME FRONT PIECE
16
BACINELLA
TRAY
17
POGGIATAZZE
CUP PLATE
18
PANNELLO DX
RIGHT PANEL
19
COPERTURA
COVER
20
PORTINA
DOOR
21
PANNELLO FRONTALE BACINELLA
DRIP TRAY FRONT PANEL
22
VANO TUBO DECALCIFICATORE
DESCALING PIPE COMPARTMENT
24
FONDO GOMMA
BOTTOM RUBBER PAD
25
GOMMINO
RUBBER PAD
26
COPERCHIO USCITA CAFFÈ
COVER COFFEE OUTLET
27
COPERCHIO POSTERIORE TMBU
REAR TMBU COVER
Pos.
Release 00 - 07.2011
50
Ricambi
Spare parts
Tavola 02
Plate 02
94
91
36
97
98
79
28
90
80
83
89
38
88
88
78
95
92
86 36
30
38
96
33
77
82
71
38
29
56
36
35
36
37
75
74
37
36
38
39 36
40
36
45
44
32
84
41
36
43
61
48
50
54
57
51
59
58
63
59
58
63
64
Release 00 - 07.2011
34
51
62
34
38
56
65
73
81
47
55
38
67 66
31
60
72
49
34
68 34
38
66
46
70
69
52
Ricambi
Spare parts
Tavola 01
Plate 01
Descrizione
Description
28
MICROINTERRUTTORE
SPRING MICROSWITCH
29
TUBO (SIL NAT) DI=7 L=70
TUBE (SIL NAT) DI=7 L=70
30
SCHEDA POTENZA
POWER BOARD
31
SQUADRETTA
BRACKET
32
CABLAGGIO TCO
WIRING TCO
33
TASTO
PUSH BUTTON
34
O-RING D=4,5
O-RING D=4,5
35
VALVOLA DI SICUREZZA
SAFETY VALVE
36
O-RING D=3,85
O-RING D=3,85
37
RINFORZO
REINFORCEMENT
38
CLIP
CLIP
39
ELETTROVALVOLA CEME 5330VN2
SOLENOID VALVE CEME 5330VN2
40
RINFORZO
REINFORCEMENT
41
CONNETTORE POMPA
PUMP CONNECTOR
43
SUPPORTO VALVOLA ELETTRICA
ELECTRIC VALVE SUPPORT
44
CAMERA DI ESPANSIONE
EXPANSION CHAMBER
45
O-RING D=6
O-RING D=6
46
POMPA
PUMP
47
MOLLA
SPRING
48
CABLAGGIO
WIRING
49
FLUSSIMETRO
FLOWMETER
50
FILTRO
FILTER
51
ATTACCO VAPORE
STEAM CONNECTOR
52
CONNETTORE
CONNECTOR
54
BASE FLUSSIMETRO
FLOWMETER BOTTOM
55
FLUSSIMETRO
FLOWMETER TUBE
56
TUBO POMPA
PUMP TUBE
57
SUPPORTO UNITÀ TERMICA
THERMAL UNIT SUPPORT
58
MOLLA
SPRING
59
SUPPORTO CABLAGGIO
WIRING SUPPORT
60
STAFFA TCO
TCO BRACKET
61
SUPPORTO POMPA
PUMP SUPPORT
62
TUBETTO
TUBE
63
TCO
TCO
Pos.
Release 00 - 07.2011
52
Ricambi
Spare parts
Tavola 01
Plate 01
Descrizione
Description
64
ASSIEME CALDAIA
STEAMER
65
SQUADRETTA
BRACKET
66
SENSORE NTC
SENSOR NTC
67
GENERATORE
GENERATOR
68
TUBO FEP DI2-DE4 L=85 2 BOCCOLE
TUBE FEP DI2-DE4 L=85 2 BUSHES
69
TUBO PTFE DI2-DE4 L=180 2 BOCCOLE
TUBE PTFE DI2-DE4 L=180 2 BUSHES
70
SUPPORTO THERMOBLOCK
THERMOBLOCK SUPPORT
71
TUBO (SIL NAT) DI=5 DE=8 L=80
TUBE (SIL NAT) DI=5 DE=8 L=80
72
CABLAGGIO TCO
WIRING TCO
73
CABLAGGIO TCO
WIRING TCO
74
TUBO PTFE DI2-DE4 L=115 2 BOCCOLE
TUBE PTFE DI2-DE4 L=115 2 BUSHES
75
ELETTROVALVOLA
SOLENOID VALVE
77
ASSIEME TMBU
ASSEMBLY TMBU
78
SCHEDA COMANDI
CONTROL BOARD
79
SUPPORTO MICROINTERRUTTORE
SUPPORT MICROSWITCH
80
MOLLA
SPRING
81
TUBO PTFE DI2-DE4 L=205 2 BOCCOLE
TUBE PTFE DI2-DE4 L=205 2 BUSHES
82
USCITA CAFFÈ
COFFEE OUTLET
83
PERNO
PIN
84
TUBO FEP DI2-DE4 L=95 2 BOCCOLE
TUBE FEP DI2-DE4 L=95 2 BUSHES
86
TUBO FEP DI2-DE4 L=230 2 BOCCOLE
TUBE FEP DI2-DE4 L=230 2 BUSH
88
O-RING
O-RING
89
USCITA VAPORE
STEAM OUTLET
90
CONNETTORE
CONNECTOR
91
TUBO DECALCIFICAZIONE
DESCALING PIPE
92
TUBO SCARICO LATTE
OUTLET PIPE MILK
94
ASSIEME COPERCHIO TANICA LATTE
MILK COVER ASSEMBLY
95
TUBO ASPIRAZIONE
ASPIRATION TUBE
96
TANICA LATTE
MILK TANK
97
TASTIERA
KEYBOARD
98
SUPPORTO TASTIERA
KEYBOARD SUPPORT
Pos.
Release 00 - 07.2011
53
Garanzia
Warranty
9.Garanzia
DèLonghi garantisce questo prodotto contro difetti di materiali e di fabbricazione per un periodo di due anni dalla data
di acquisto. Durante questo periodo DèLonghi riparerà o sostituirà, a sua discrezione, ogni prodotto difettoso senza alcun
onere per il proprietario. I prodotti sostituiti o le parti riparate saranno garantiti solo per il periodo restante della garanzia
originale o per sei mesi, a seconda della garanzia più duratura. Questa garanzia limitata non si applica a qualunque guasto
causato da incidenti, uso, manutenzione impropri o normale usura. Qualsiasi difetto derivante dal non utilizzo delle capsule originali NESPRESSO non è coperto da garanzia. Ad eccezione di quanto consentito dalle leggi applicabili, i termini di
questa garanzia limitata non escludono, limitano o modificano, e sono in aggiunta, ai diritti inderogabili di legge applicabili
alla vendita del prodotto.
DèLonghi guarantees this product against defects in materials and workmanship for a period of two years from the date
of purchase. During this period DèLonghi will repair or replace, at its discretion, any faulty product without charge for
the owner. Products replaced or parts repaired will be guaranteed for the remainder of the original warranty period only
or for six months, depending on which warranty is longer. This limited warranty does not apply to any faults caused by
accidents, use, improper maintenance or normal wear. Any fault resulting from non-use of original NESPRESSO capsules is
not covered by the warranty. Except as permitted by applicable law, the terms of this limited warranty do not exclude,
limit or modify, and are in addition to, the rights required by law applicable to the sale of the product.
Release 00 - 07.2011
54
Composizione grafica: Studio Gallo Design srl - Camposampiero (PD)
9.Warranty
Composizione grafica: Studio Gallo Design srl - Camposampiero (PD)
Release 00 - 07.2011