1
Installing and Upgrading
ENVOXr
r Configuration
Software on DEC VAX and
DEC AXP Systems
This manual applies to ENVOX software version P4.0 only. Retain
and use previous versions of this manual for earlier versions of
ENVOX software.
Installation Manual
D3P01461202
PN6.1:SW3151:VMS
Revision B — May 1998
This manual supercedes the issue dated July 1996.
DOCVUE, ENVOX, Fisher-Rosemount, Fisher-Rosemount Systems, Managing The Process Better,
PROFLEX, PROVOX, and PROVUE are marks of one of the Fisher-Rosemount group of companies.
All other marks are the property of their respective owners.
ã 1995, 1996, 1998 Fisher-Rosemount Systems, Inc. All rights reserved.
Printed in USA
The contents of this publication are presented for informational purposes only, and while every effort
has been made to ensure their accuracy, they are not to be construed as warranties or guarantees,
express or implied, regarding the products or services described herein or their use or applicability. We
reserve the right to modify or improve the designs or specifications of such products at any time without
notice.
Installing and Upgrading ENVOXr Configuration Software on
DEC VAX and DEC AXP Systems
(Revision B — May 1998)
Your Evaluation Please ...
Name:
Title and Department:
Company:
Years of Experience: ___ Instrumentation ___ Distributed Control
Telephone:
(
)
--
iii
Education: ____High School ____Years College ____Degree
Job Responsibility:
Please indicate your evaluation of this manual. Attach extra sheets if needed.
1. How and when do you use this manual?
2. How well is the manual’s content
organized? Please explain.
V
V
V
V
V
V
Read entire manual before attempting task
V
Good — representative of the product’s
operation, usable
V
V
V
V
Average — usable but can be improved
Read selected sections before attempting task
Read while attempting task
Attempt task first
Read as last resort
Excellent — parallels product’s operation,
very usable
Fair — not very usable, should be improved
Poor — not usable, must be improved
No Opinion
Understandable
3. Is the manual’s content understandable
and applicable to the product’s operation?
Please explain.
4. How well do the manual’s illustrations
convey product information?
Please explain.
Applicable
V
V
Excellent — very easy to understand,
very applicable
V
V
V
V
Good — easy to understand, applicable
V
V
Fair — not very understandable/applicable,
should be improved
V
V
Poor — not understandable/applicable,
must be improved
V
V
No Opinion
Average — applicable but some sections
not easy to understand
V
Excellent — very easy to understand, extremely
usable
V
V
V
Good — easy to understand, very usable
V
Poor — cannot understand, must be improved,
totally unusable
V
No Opinion
Average — fairly easy to understand, usable
Fair — not easy to understand, should be
improved, not very usable
Your Evaluation Please ...
iv
Installing and Upgrading ENVOXr Configuration Software on
DEC VAX and DEC AXP Systems
(Revision B — May 1998)
5. Describe the amount of usable information
in this manual including tables.
Please explain.
V
Too much information — not all required to
perform task
V
Proper amount provided — not too much nor
too little
V
Too little information — needed additional
information to perform task
V
No Opinion
Sections
6. How well is information cross-referenced in
the manual’s individual sections and index?
Please explain.
7. How useful is the Glossary?
8. What is your overall impression of this
manual? Please explain.
Please FAX or MAIL this form to:
Index
V
V
Excellent — very easy to locate
information, extremely usable
V
V
Good — easy to locate information,
very usable
V
V
Average — fairly easy to locate information,
usable
V
V
Fair — not easy to locate information,
should be improved, not very usable
V
V
Poor — cannot locate information, must be
improved, totally unusable
V
V
V
V
V
V
V
V
V
V
V
V
V
V
V
Did Not Use
No Opinion
Useful
Useful but not complete/accurate
Not Useful
Did Not Use
No Opinion
Excellent — met all needs, extremely usable
Good — met most of my needs, very usable
Average — usable
Fair — should be revised, not very usable
Poor — must be revised, totally unusable
No Opinion
Fisher-Rosemount Systems, Inc.
Technical Documentation Editor
8301 Cameron Road, MD#12
Austin, TX 78753
FAX Number: (512) 834-7200
Attention: Technical Documentation Editor
FISHER-ROSEMOUNT SYSTEMS USE ONLY — forwarded to:
V
Lead Writer
V
Engineering
V
Technical Support
V
Marketing
V
Project File
Installing and Upgrading ENVOXr Configuration Software on
DEC VAX and DEC AXP Systems
(Revision B — May 1998)
Contents
v
Contents
1
Introduction . . . . . . . . . . . . . . . . . . . . . . . . . . . . . . . . . . . . . . . .
1
Intended Audience . . . . . . . . . . . . . . . . . . . . . . . . . . . . . . . . . . . . . .
ENVOXR Software Version This Manual Supports . . . . . . . . . . .
New This Release . . . . . . . . . . . . . . . . . . . . . . . . . . . . . . . . . . . . . . .
Structure of this Manual . . . . . . . . . . . . . . . . . . . . . . . . . . . . . . . . . .
Conventions Used in This Manual . . . . . . . . . . . . . . . . . . . . . . . . .
Cautions and Notes . . . . . . . . . . . . . . . . . . . . . . . . . . . . . . . . . . . . . .
ENVOX Documents . . . . . . . . . . . . . . . . . . . . . . . . . . . . . . . . . . . . . .
Control Desktop Documentation . . . . . . . . . . . . . . . . . . . . . . . . . . .
Related Documents . . . . . . . . . . . . . . . . . . . . . . . . . . . . . . . . . . . . . .
Electronic Documentation . . . . . . . . . . . . . . . . . . . . . . . . . . . . . . . .
Where to Find Answers About This Product or Manual . . . . . . .
1
1
2
3
4
6
6
8
8
9
9
System Requirements . . . . . . . . . . . . . . . . . . . . . . . . . . . . . . .
11
Product Media . . . . . . . . . . . . . . . . . . . . . . . . . . . . . . . . . . . . . . . . . .
Product Compatibility . . . . . . . . . . . . . . . . . . . . . . . . . . . . . . . . . . . .
Hardware Requirements . . . . . . . . . . . . . . . . . . . . . . . . . . . . . . . . . .
Software Requirements . . . . . . . . . . . . . . . . . . . . . . . . . . . . . . . . . .
Highway Interface . . . . . . . . . . . . . . . . . . . . . . . . . . . . . . . . . . . . . . .
Software and Disk Space Requirements for VAX Systems . . . .
Installation Time on VAX Systems . . . . . . . . . . . . . . . . . . . . . . . . .
Software and Disk Space Requirements for AXP Systems . . . .
Installation Time on AXP Systems . . . . . . . . . . . . . . . . . . . . . . . . .
11
12
12
13
13
14
15
16
17
Installing SYBASE Software . . . . . . . . . . . . . . . . . . . . . . . . .
19
3.1
New System Installation Method . . . . . . . . . . . . . . . . . . . . . . . . . . .
3.2
Before Installing SYBASE Software . . . . . . . . . . . . . . . . . . . . . . . .
3.2.1
Precautions . . . . . . . . . . . . . . . . . . . . . . . . . . . . . . . . . . . . . . . . . . .
3.2.2
Required ECO Kits . . . . . . . . . . . . . . . . . . . . . . . . . . . . . . . . . . . .
3.2.2.1
Installing Motif ECO Kit (AXP Platform Only) . . . . . . . . . . . .
3.2.2.2
Installing Year 2000 ECO Kits (VAX and AXP Platforms) . .
3.2.2.3
Installing SCSI ECO Kit (AXP Platform Only) . . . . . . . . . . . .
3.2.2.4
Recovering SCSI ECO Kit From the Control Desktop
CDROM . . . . . . . . . . . . . . . . . . . . . . . . . . . . . . . . . . . . . . . . . . .
3.2.3
Initializing the Second Disk Drive . . . . . . . . . . . . . . . . . . . . . . . .
3.2.4
Guidelines for Running the Installation Script . . . . . . . . . . . . . .
3.3
Installing SYBASE Software on Client-Server Systems . . . . . . .
3.4
tempdb Considerations for Client-Server Systems . . . . . . . . . . .
3.5
Installing SYBASE Software on Client-Only Systems . . . . . . . . .
19
20
20
20
21
22
23
1.1
1.2
1.3
1.4
1.5
1.6
1.7
1.8
1.9
1.10
1.11
2
2.1
2.2
2.3
2.4
2.5
2.6
2.7
2.8
2.9
3
24
26
27
28
33
34
vi
Contents
4
4.1
4.2
4.2.1
4.2.2
4.3
4.4
5
5.1
5.1.1
5.1.2
5.1.3
5.1.4
5.1.5
5.2
5.2.1
5.2.2
5.2.3
5.3
5.3.1
5.3.2
5.3.3
5.4
5.5
6
6.1
6.2
7
7.1
7.2
7.3
8
8.1
8.1.1
8.1.2
8.1.3
8.2
8.3
8.4
Installing and Upgrading ENVOXr Configuration Software on
DEC VAX and DEC AXP Systems
(Revision B — May 1998)
Installing ENVOX Software . . . . . . . . . . . . . . . . . . . . . . . . . . .
39
New System Installation Method . . . . . . . . . . . . . . . . . . . . . . . . . . .
Before Installing ENVOX Software . . . . . . . . . . . . . . . . . . . . . . . . .
Precautions . . . . . . . . . . . . . . . . . . . . . . . . . . . . . . . . . . . . . . . . . . .
Guidelines for Running the Installation Script . . . . . . . . . . . . . .
Installing ENVOX Software on Client-Server Systems . . . . . . . .
Installing ENVOX Software on Client-Only Systems . . . . . . . . . .
39
40
40
40
42
45
Upgrading Software on Client-Server Systems . . . . . . . .
49
Before Upgrading SYBASE and ENVOX Software . . . . . . . . . . .
Precautions . . . . . . . . . . . . . . . . . . . . . . . . . . . . . . . . . . . . . . . . . . .
Setting the Password Before Upgrading . . . . . . . . . . . . . . . . . .
Directory and File Operations During Upgrade . . . . . . . . . . . .
Considerations for Using the PDX Utility . . . . . . . . . . . . . . . . . .
Guidelines for Running the Upgrade Script . . . . . . . . . . . . . . . .
Upgrading ENVOX Versions P2.x, P3.0, P3.2, and P3.3 to P4.0
Determining Database Structure and Statistics . . . . . . . . . . . .
Dumping Data from ENVOX and Open Databases —
ENVOX P2.x, P3.0, P3.2 and P3.3 . . . . . . . . . . . . . . . . . . . . .
Completing the Upgrade Process . . . . . . . . . . . . . . . . . . . . . . . .
Upgrading ENVOX Version P3.4 to P4.0 . . . . . . . . . . . . . . . . . . .
Determining Database Structure and Statistics . . . . . . . . . . . .
Dumping Data from ENVOX and Open Databases —
ENVOX P3.4 . . . . . . . . . . . . . . . . . . . . . . . . . . . . . . . . . . . . . . . . .
Completing the Upgrade Process . . . . . . . . . . . . . . . . . . . . . . . .
Creating and Loading ENVOX and Open Databases After
the Upgrade . . . . . . . . . . . . . . . . . . . . . . . . . . . . . . . . . . . . . . . . . . .
Reloading P4.0 ENVOX Software . . . . . . . . . . . . . . . . . . . . . . . . .
50
50
51
51
52
53
54
56
58
59
60
62
64
69
73
75
Upgrading Software on Client-Only Systems . . . . . . . . . .
79
Upgrading SYBASE Software on Client-Only Systems . . . . . . .
Upgrading ENVOX Software on Client-Only Systems . . . . . . . .
80
82
Creating ENVOX User Accounts . . . . . . . . . . . . . . . . . . . . . .
85
Setting Up the Account . . . . . . . . . . . . . . . . . . . . . . . . . . . . . . . . . . .
Setting Up an ENVOX Users Directory . . . . . . . . . . . . . . . . . . . . .
Copying the Login.Com File to the User Directory . . . . . . . . . . . .
85
88
88
Backing Up, Restoring, and De-Installing Software . . . .
89
Booting the Standalone Backup on VAX Systems . . . . . . . . . . .
Creating the Standalone Backup on Disk . . . . . . . . . . . . . . . . .
Booting the Standalone Backup from Disk . . . . . . . . . . . . . . . .
Booting the Standalone Backup from Tape . . . . . . . . . . . . . . . .
Booting Standalone Backup on AXP Systems . . . . . . . . . . . . . . .
Backing Up the System . . . . . . . . . . . . . . . . . . . . . . . . . . . . . . . . . .
Restoring the System . . . . . . . . . . . . . . . . . . . . . . . . . . . . . . . . . . . .
89
89
90
90
91
92
94
Installing and Upgrading ENVOXr Configuration Software on
DEC VAX and DEC AXP Systems
(Revision B — May 1998)
8.5
9
Contents
De-installing ENVOX and SYBASE Software . . . . . . . . . . . . . . . .
vii
96
Retrieving Files from the Installation Tape . . . . . . . . . . . .
99
9.1
9.2
Procedure for Retrieving Files . . . . . . . . . . . . . . . . . . . . . . . . . . . . .
Examples of Retrieving Files . . . . . . . . . . . . . . . . . . . . . . . . . . . . . .
100
101
10
System Tuning . . . . . . . . . . . . . . . . . . . . . . . . . . . . . . . . . . . . . .
103
11
Transferring Non-ENVOX Databases . . . . . . . . . . . . . . . . . .
109
Using the PDX Utility . . . . . . . . . . . . . . . . . . . . . . . . . . . . . . . . . . . . .
PDX Failure and Reasons . . . . . . . . . . . . . . . . . . . . . . . . . . . . . . . .
110
111
Installing and Upgrading CDOS for Control Desktop . . .
115
11.1
11.2
12
12.1
12.2
12.2.1
12.2.2
12.2.3
12.2.4
12.3
12.3.1
12.3.2
12.3.3
12.3.4
12.4
12.5
12.6
12.7
12.8
12.8.1
12.8.2
12.9
12.9.1
12.9.2
12.9.3
12.9.4
12.10
12.10.1
12.10.2
12.11
12.11.1
12.11.2
12.11.3
12.11.4
12.11.5
12.11.6
Intended Audience . . . . . . . . . . . . . . . . . . . . . . . . . . . . . . . . . . . . . .
System Requirements . . . . . . . . . . . . . . . . . . . . . . . . . . . . . . . . . . . .
Hardware Requirements . . . . . . . . . . . . . . . . . . . . . . . . . . . . . . . .
Software Requirements . . . . . . . . . . . . . . . . . . . . . . . . . . . . . . . .
Disk Space Requirements . . . . . . . . . . . . . . . . . . . . . . . . . . . . . .
Installation Time . . . . . . . . . . . . . . . . . . . . . . . . . . . . . . . . . . . . . . .
Preparing for the Installation or Upgrade . . . . . . . . . . . . . . . . . . .
Precautions . . . . . . . . . . . . . . . . . . . . . . . . . . . . . . . . . . . . . . . . . . .
Using the CDOS installation and Upgrade Menu . . . . . . . . . . .
Verifying TCP/IP Installation . . . . . . . . . . . . . . . . . . . . . . . . . . . .
TCP/IP Entries for the Servers . . . . . . . . . . . . . . . . . . . . . . . . . .
Licensing CDOS After Installation . . . . . . . . . . . . . . . . . . . . . . . . .
Installing CDOS . . . . . . . . . . . . . . . . . . . . . . . . . . . . . . . . . . . . . . . . .
Upgrading CDOS P1.0 to P2.0 . . . . . . . . . . . . . . . . . . . . . . . . . . . .
Upgrading ENVOX Databases . . . . . . . . . . . . . . . . . . . . . . . . . . . .
Backup, Restore, and De-Install . . . . . . . . . . . . . . . . . . . . . . . . . . .
Backup and Restore . . . . . . . . . . . . . . . . . . . . . . . . . . . . . . . . . . .
De-installation . . . . . . . . . . . . . . . . . . . . . . . . . . . . . . . . . . . . . . . . .
Troubleshooting . . . . . . . . . . . . . . . . . . . . . . . . . . . . . . . . . . . . . . . . .
TCP/IP Installation Guide . . . . . . . . . . . . . . . . . . . . . . . . . . . . . . .
Multinet Installation . . . . . . . . . . . . . . . . . . . . . . . . . . . . . . . . . . . .
UCX Installation . . . . . . . . . . . . . . . . . . . . . . . . . . . . . . . . . . . . . . .
Specifying Servers in the Interface File . . . . . . . . . . . . . . . . . . .
Network Routing . . . . . . . . . . . . . . . . . . . . . . . . . . . . . . . . . . . . . . . . .
Routing using UCX . . . . . . . . . . . . . . . . . . . . . . . . . . . . . . . . . . . .
Routing using MULTINET . . . . . . . . . . . . . . . . . . . . . . . . . . . . . . .
CDOS Administration . . . . . . . . . . . . . . . . . . . . . . . . . . . . . . . . . . . .
CDOS Directory and File Structure . . . . . . . . . . . . . . . . . . . . . . .
Starting the CDOS Server . . . . . . . . . . . . . . . . . . . . . . . . . . . . . .
Stopping the CDOS Server . . . . . . . . . . . . . . . . . . . . . . . . . . . . .
Starting the Task Daemon . . . . . . . . . . . . . . . . . . . . . . . . . . . . . .
Stopping the Task Daemon . . . . . . . . . . . . . . . . . . . . . . . . . . . . .
Starting the Diagnostic Daemon . . . . . . . . . . . . . . . . . . . . . . . . .
115
115
115
116
116
116
117
117
118
119
120
122
123
128
130
132
132
132
134
134
135
137
140
141
141
142
143
143
143
144
144
144
144
viii
Installing and Upgrading ENVOXr Configuration Software on
DEC VAX and DEC AXP Systems
(Revision B — May 1998)
Contents
12.11.7
12.11.8
12.11.9
12.11.10
12.11.11
12.11.12
12.11.13
12.11.14
12.11.15
12.11.16
12.11.17
12.11.18
12.11.19
12.11.20
Stopping the Diagnostic Daemon . . . . . . . . . . . . . . . . . . . . . . . .
Starting the Devrev Daemon . . . . . . . . . . . . . . . . . . . . . . . . . . . .
Stopping the Devrev Daemon . . . . . . . . . . . . . . . . . . . . . . . . . . .
CDOS Configuration File . . . . . . . . . . . . . . . . . . . . . . . . . . . . . . .
Task Daemon Configuration File . . . . . . . . . . . . . . . . . . . . . . . . .
Task Daemon Configuration File Options . . . . . . . . . . . . . . . . .
Diag Daemon Configuration File . . . . . . . . . . . . . . . . . . . . . . . . .
Devrev Daemon Configuration File . . . . . . . . . . . . . . . . . . . . . . .
CDOS Quota File . . . . . . . . . . . . . . . . . . . . . . . . . . . . . . . . . . . . . .
CDOS Log Files . . . . . . . . . . . . . . . . . . . . . . . . . . . . . . . . . . . . . . .
Task Daemon Log File . . . . . . . . . . . . . . . . . . . . . . . . . . . . . . . . .
Diag Daemon Log File . . . . . . . . . . . . . . . . . . . . . . . . . . . . . . . . .
Devrev Daemon Log File . . . . . . . . . . . . . . . . . . . . . . . . . . . . . . .
SYBASE Interfaces File . . . . . . . . . . . . . . . . . . . . . . . . . . . . . . . .
145
145
145
145
146
146
147
147
148
148
148
148
148
148
Error Messages . . . . . . . . . . . . . . . . . . . . . . . . . . . . . . . . . . . . .
149
SYBASE and ENVOX Pre-Installation Error Messages . . . . . .
SYBASE Error Messages . . . . . . . . . . . . . . . . . . . . . . . . . . . . . . . .
ENVOX Error Messages . . . . . . . . . . . . . . . . . . . . . . . . . . . . . . . . .
PDX Dump Error Messages . . . . . . . . . . . . . . . . . . . . . . . . . . . . . . .
CDOS Error and Warning Messages . . . . . . . . . . . . . . . . . . . . . . .
149
151
157
162
163
B
Transact-ISQL Reserved Words . . . . . . . . . . . . . . . . . . . . . .
165
C
Installation and Upgrade Logs . . . . . . . . . . . . . . . . . . . . . . .
167
SYBASE Client-Only Installation Log . . . . . . . . . . . . . . . . . . . . . . .
SYBASE Client-Server Installation Log . . . . . . . . . . . . . . . . . . . . .
SYBASE Client Upgrade Log . . . . . . . . . . . . . . . . . . . . . . . . . . . . .
SYBASE Client--Server Upgrade Log . . . . . . . . . . . . . . . . . . . . . .
ENVOX Client-Only Installation Log . . . . . . . . . . . . . . . . . . . . . . . .
ENVOX Client-Server Installation Log . . . . . . . . . . . . . . . . . . . . . .
ENVOX Client Upgrade Log . . . . . . . . . . . . . . . . . . . . . . . . . . . . . .
ENVOX Client--Server Upgrade Log . . . . . . . . . . . . . . . . . . . . . . .
ENVOX P4.0 Reload Log . . . . . . . . . . . . . . . . . . . . . . . . . . . . . . . . .
SYBASE Tune Log . . . . . . . . . . . . . . . . . . . . . . . . . . . . . . . . . . . . . .
CDOS Installation Log . . . . . . . . . . . . . . . . . . . . . . . . . . . . . . . . . . .
CDOS Upgrade Log . . . . . . . . . . . . . . . . . . . . . . . . . . . . . . . . . . . . .
CDOS De-installation Log . . . . . . . . . . . . . . . . . . . . . . . . . . . . . . . .
168
169
172
173
174
175
176
177
178
179
180
182
183
History . . . . . . . . . . . . . . . . . . . . . . . . . . . . . . . . . . . . . . . . . . . . . . . . . . .
185
Glossary . . . . . . . . . . . . . . . . . . . . . . . . . . . . . . . . . . . . . . . . . . . . . . . . .
189
Index . . . . . . . . . . . . . . . . . . . . . . . . . . . . . . . . . . . . . . . . . . . . . . . . . . . . .
197
A
A.1
A.2
A.3
A.4
A.5
C.1
C.2
C.3
C.4
C.5
C.6
C.7
C.8
C.9
C.10
C.11
C.12
C.13
Installing and Upgrading ENVOXr Configuration Software on
DEC VAX and DEC AXP Systems
(Revision B — May 1998)
Contents
ix
Figures
Figure 3-1.
Figure 4-1.
Figure 5-1.
System Installation Flow . . . . . . . . . . . . . . . . . . . . . . . . . . . . . .
System Installation Flow . . . . . . . . . . . . . . . . . . . . . . . . . . . . . .
ENVOX P2.x, P3.0, P3.2, P3.3 and SYBASE Software
Upgrade Process for a Client-Server System . . . . . . . . . .
Figure 5-2. ENVOX P3.4 and SYBASE Software Upgrade Process for
a Client-Server System . . . . . . . . . . . . . . . . . . . . . . . . . . . . . .
Figure 6-1. ENVOX and SYBASE Software Upgrade for a
Client-Only System . . . . . . . . . . . . . . . . . . . . . . . . . . . . . . . .
Figure 7-1. System-Generated ENVOX User’s Account . . . . . . . . . . . . .
Figure 7-2. Customized ENVOX User’s Account . . . . . . . . . . . . . . . . . . .
Figure 12-1. Example of a TCP/IP Entry . . . . . . . . . . . . . . . . . . . . . . . . . . .
Figure 12-2. Pictorial of the CDOS Directory Structure . . . . . . . . . . . . . . .
19
39
55
61
79
87
87
120
143
x
Contents
Installing and Upgrading ENVOXr Configuration Software on
DEC VAX and DEC AXP Systems
(Revision B — May 1998)
Tables
Table 1-1.
Table 2-1.
Table 2-2.
Table 2-3.
Table 2-4.
Table 2-5.
Table 2-6.
Table 2-7.
Table 2-8.
Table 9-1.
Table 10-1.
Table 10-2.
Table 10-3.
Type Style Conventions . . . . . . . . . . . . . . . . . . . . . . . . . . . . . .
Supported Systems and Number of Users . . . . . . . . . . . . . .
Software Version Levels . . . . . . . . . . . . . . . . . . . . . . . . . . . . . .
Software Module Sizes for VAX Systems . . . . . . . . . . . . . . .
Fixed System Requirements for CHIP on VAX Systems . .
Installation Time on VAX Systems . . . . . . . . . . . . . . . . . . . . .
Software Module Sizes for AXP Systems . . . . . . . . . . . . . . .
Fixed System Requirements for CHIP on AXP Systems . .
Installation Time on AXP Systems . . . . . . . . . . . . . . . . . . . . .
Files Stored on the Installation Tape . . . . . . . . . . . . . . . . . . .
Non-Standard Installation Memory Requirements . . . . . . . .
Minimum Computer RAM Needed to Support Server RAM
Minimum Physical Memory Required . . . . . . . . . . . . . . . . . . .
5
12
13
14
15
15
16
17
17
99
106
106
107
Introduction F Section 1
1
Figure 1-Table 1
1
1
1 Introduction
This installation manual describes the procedures necessary to install or
upgrade and to verify proper operation of ENVOXâ configuration
software, version P4.0, and SYBASE software on DEC OpenVMS
operating systems. The ENVOX software types are:
J
Type SW3151 ENVOX Configuration Software (ENVOX DEC VAX)
J
Type SW3155 ENVOX Configuration Software (ENVOX DEC AXP)
Note ... ENVOX, Version P4.0, runs on SYBASE SQL Server, Version
10.0.2.6. With this server, the client-server method is the same
as it is for the ENVOX P3.4 release. The upgrade procedure
described in section 5 is a sequence of using the PDX Utility to
dump out existing ENVOX databases, installing ENVOX P4.0
and SYBASE SQL Server 10.0.2.6 as an initial installation,
recreating ENVOX databases, and then reloading the ENVOX
data into the newly created databases.
1.1
Intended Audience
This installation manual is intended for persons familiar with DEC
OpenVMS and Fisher-Rosemount Systems software products. Persons
with a limited knowledge of computers can install the software on small
systems such as the AlphaStation 200 series, MicroVAX 3100,
VAXstation 3100, and VAXstation 4000. A system administrator should
install the software on large systems.
1.2
ENVOX Software Version This Manual Supports
This manual applies to ENVOX configuration software version P4.0. For
manuals applicable to previous ENVOX versions, see the Document
History list at the back of this manual.
Installing and Upgrading ENVOXr Configuration Software on DEC VAX and DEC AXP Systems (Revision B — May 1998)
Section 1 F Introduction
2
1.3
1
New This Release
ENVOX P4.0 includes several product and document enhancements.
The enhancements are listed below and further explained in appropriate
ENVOX documents.
J
J
J
J
J
J
J
J
J
J
J
J
J
J
ENVOX P4.0 operates on a SYBASE 10.0.2.6 SQL Server. With this
server, installation and upgrade procedures for Client-Server systems
use the Portable Database Transfer (PDX) utility to improve the
installation and upgrade process.
Year 2000 and beyond is correctly calculated. All years are shown in
4--digit format.
Configuration of SRx and SR90 controller, Release P6.0, is
supported.
Configuration of PROVOXr Smart Device I/O card, Release P3.0, is
supported.
The Notes form now allows up to 255 notes entries per item.
Previously, the entry limit was 32 entries
A new menu path, Utilities --> Populate HACL, available from the
ENVOX Top Level Form allows you to automatically populate the
HACL.
In the Audit Trail facility, one new event type, Populate HACL has
been added.
The HILT utility has been enhanced to provide information to AMS
systems.
ENVOX P4.0 is compatible only with Control Desktop P2.0.
For ENVOX P4.0, only the PDX utility is recommended for
transferring databases.
ENVOX Daemon goes through an automatic re-start if a task which is
run by ENVOX Daemon “crashes”. Certain tasks do not occur in
auto-restart. See the ENVOX System Manager’s Guide for details.
PDX Dump can be accessed through the ENVOX Administration
forms.
For UOC Loop points, configuration and generation of the Watch Dog
Timer alarm word is allowed.
ENVOX diagnostics now displays the correct device name and
TCP/IP address for HDLs.
Installing and Upgrading ENVOXr Configuration Software on DEC VAX and DEC AXP Systems (Revision B — May 1998)
Introduction F Section 1
J
J
Field help has been enhanced for the Console Device Definition
Operation Display List Display No. field.
CHIP generate performance has been enhanced.
J
Interactive abort has been added for the Item Delete operation.
J
J
J
1.4
In installation and upgrade logs, the Installation log file now
distinguishes more clearly between subsequent attempts.
J
J
3
Table provue_target_data and bit1, bit2, bit3, bit4, expected_value,
and scale columns can be updated via isql, using a valid uppercase
user name.
The Rename tag utility now indicates the table and field name of a
referenced field for messages 1310 and 1311.
The Display Editor has been enhanced to allow CTRL-D to delete
selected elements.
This manual has been written in an updated format, using new
section headings, header and footer information, and notes styles.
Structure of this Manual
This manual contains the following sections and appendixes:
Section 1 — Introduction: includes an overview of this manual, the
intended audience, the stylistic typographical conventions used, and
defines documentation available for ENVOX configuration software.
Section 2 — System Requirements: provides an overview of the
installation process, and lists the supported systems, software module
sizes, and installation times.
Section 3 — Installing SYBASE Software: provides installation
instructions for SYBASE software
Section 4 — Installing ENVOX Software: provides installation
instructions for ENVOX software.
Section 5 — Upgrading Software on Client-Server Systems: provides
upgrade instructions for upgrading SYBASE and ENVOX software on
P2.x, P3.0, P3.2, P3.3 and P3.4 client-server systems to run on the
OpenVMS Operating System with an ENVOX version P4.0 client--server
system.
Section 6 — Upgrading Software on Client-Only Systems: provides
upgrade instructions for upgrading SYBASE and ENVOX software to run
on client-only systems with ENVOX version P4.0
Installing and Upgrading ENVOXr Configuration Software on DEC VAX and DEC AXP Systems (Revision B — May 1998)
1
Section 1 F Introduction
4
Section 7 — Creating ENVOX User Accounts: provides instructions on
how to add extra ENVOX users.
Section 8 — Backing Up, Restoring and De-Installing the Software:
provides instructions for backing up and restoring the system and
de-installing the SYBASE and ENVOX software.
1
Section 9 — Retrieving Files from the Installation Tape: provides
instructions on getting the ENVOX and SYBASE directories and files
from the installation tape without running the installation again.
Section 10 — System Tuning: describes how to change the number of
ENVOX users and amount of dataserver memory.
Section 11 — Transferring Non-ENVOX Databases: provides
unsupported instructions on how to deal with non-ENVOX databases
which will be lost in the upgrade to P4.0.
Section 12 — Installing and Upgrading CDOS for Control Desktop:
provides installation and upgrade instructions for CDOS software, and
procedures for upgrading ENVOX databases for use with Control
Desktop.
Appendix A — Error Messages: lists the ENVOX, SYBASE, and CDOS
error messages that can be displayed before and during installation and
upgrade of the software.
Appendix B — Transact-ISQL Reserved Words: lists reserved ISQL
words that cannot be used as database names, table names, and so on.
Appendix C — Installation and Upgrade Logs: contains log files of
ENVOX and SYBASE installations and upgrades.
1.5
Conventions Used in This Manual
This manual uses the following conventions:
Abbreviations — The glossary of this manual contains abbreviations,
their phrases, and explanations for the abbreviations of terms used in
this manual.
Revision Control — The title page and the footer of each page list the
revision level and the print date of this manual. The title page and
subsection 1.2 also describe the applicability of this manual to the
versions of ENVOX configuration software. When the manual is revised,
the revision level and the date are changed.
Cross Referencing — References to other documents give the
document name and document catalog number.
Installing and Upgrading ENVOXr Configuration Software on DEC VAX and DEC AXP Systems (Revision B — May 1998)
Introduction F Section 1
5
Prompt Style — This manual may present displays and prompt lines
differently than they appear on your screen. Enter the commands shown
in this manual at the equivalent prompt as shown on your screen.
Commands — Commands do not include a notation to enter the
command with the Return key. When the manual describes an operating
system command, assume that a Return is required to enter the
command.
Note ... A command line which normally appears as one line on a
screen may be too long to fit as one line in this manual.
However, whenever possible, always enter the command as
one line on the screen.
Typographic Conventions — Table 1-1 describes the type styles this
manual uses to distinguish different types of information.
Table 1-1.
Type Style Conventions
When Text Appears
This Way ...
ENVOX R Technical
Reference
BACKUP
Return
Ctrl-v
It Means ...
This style designates the title of another manual as
referenced in this manual. (Helvetica font, italic)
This style designates an operating mode or status, or a
key function (used instead of a specific keyboard key).
(Helvetica font, upper case)
This style designates a keyboard key on some system
keyboards. On other keyboards, the Return key may be
the Enter key (with or without an arrow). When Return
is indicated in this manual, enter the command using
the key appropriate for your keyboard. (Helvetica font,
bold)
This style designates a keyboard key or key
combination. The word key does not appear after the
key name. (Helvetica font, bold)
Database
This style designates a message or prompt that
appears on a screen. (Courier font)
CREATE
This style designates the words that you should type in
as it appears on the printed page. Examples are
commands you enter at an operating system prompt
and keywords in a configuration source file. (Courier
font, bold)
filename.type
This style designates a name or path which you must
type into a command. You decide on the appropriate
terms for your system. (Courier font, bold italic)
detail display
Italized words in text emphasize the importance of the
words and are meant to catch your attention. (Helvetica
font, italic)
Installing and Upgrading ENVOXr Configuration Software on DEC VAX and DEC AXP Systems (Revision B — May 1998)
1
Section 1 F Introduction
6
1.6
Cautions and Notes
Special attention and Notes forms and symbols are used to attract
attention to essential or critical information in a document. The types of
information included in each are explained in the following:
1
Caution ... All cautions have this form and symbol. Do not disregard
cautions. They are installation, operation, or maintenance
procedures, practices, conditions, statements, and so forth,
which if not strictly observed, may result in damage to
equipment, interruption of normal software operation, or cause
a long term health hazard.
Note ... Notes have this form and symbol. Notes contain installation,
operation, or maintenance procedures, practices, conditions,
statements, and so forth, that alert you to important information
which may make your task easier or increase your
understanding.
1.7
ENVOX Documents
Although ENVOX software is your primary configuration tool, the
documentation is also a tool for getting the most value out of developing
an effective configuration. Different users require different documentation
support, depending on their background and the tasks they are doing.
Documentation available for ENVOX configuration software, version
P4.0, includes the following items:
J
J
Installation manual, Installing and Upgrading ENVOX Configuration
Software on DEC VAX and DEC AXP Systems, PN6.1:SW3151:VMS
(Revision B — May 1998): describes ENVOX system requirements
and provides instructions for installing and upgrading SYBASE and
ENVOX software on DEC VAX and DEC AXP systems.
Installation manual, Installing and Upgrading ENVOX Configuration
Software on HP-UX Systems, PN6.2:SW3153:HPX (Revision C —
May 1998): describes ENVOX system requirements and provides
instructions for installing and upgrading ENVOX software on HP
computers running the HP-UX operating system.
Installing and Upgrading ENVOXr Configuration Software on DEC VAX and DEC AXP Systems (Revision B — May 1998)
Introduction F Section 1
J
J
J
J
J
J
J
7
User manual, Using ENVOX Configuration Software, UM6.1:SW3151
(Revision J — May 1998): describes how to use ENVOX
Configuration Software to configure your PROVOXR system
databases. Includes generating, downloading, uploading, trace and
tune functions, diagnostic procedures, and documenting.
Technical reference, The Technical Reference for ENVOX
Configuration Software, TR1.0:SW3151 (Revision G — May 1998):
provides information about the structure of ENVOX configuration
data, and procedures for reading and changing this data. The
manual also defines the ASCII format (CDV format) used to import
data into the ENVOX configuration database. ENVOX software uses
a relational database for data storage, retrieval, and manipulation.
System Manager’s manual, The System Manager’s Guide to ENVOX
Configuration Software, SM1.0:SW3151 (Revision E — May 1998):
describes the features available in ENVOX configuration software for
the ENVOX system manager. The features let the system manager
tailor the software to each user and to structure the ENVOX system
to support multiple databases and users.
Open Database Manual, Installing and Using the ENVOX Open
Database, UM6.2:SW3152 (Revision F — May1998): describes how
to use the Open Database Module built into ENVOX software and
the Type SW3152 Open Database PC Client Server Software.
On-line help screens: describe the menu options, forms, and each
field on the forms, and provide navigation help. The screens are
embedded in the ENVOX software.
Configuration engineering manuals: describe the functions of the
PROVOX products so that you can apply the right functions to your
process. The manuals provide guidelines for using ENVOX forms
specific to the associated product.
Relational database documentation: You can purchase ENVOX
software with or without the Sybase relational database software.
When you purchase ENVOX software with the SYBASE software,
you also receive a complete set of SYBASE documentation.
Installing and Upgrading ENVOXr Configuration Software on DEC VAX and DEC AXP Systems (Revision B — May 1998)
1
Section 1 F Introduction
8
1.8
1
Control Desktop Documentation
Type SW331 Control Desktop is the Windows NT interface to ENVOX
configuration software. Control Desktop, version P2.0, is compatible with
ENVOX, version P4.0. The user documentation available for Control
Desktop P2.0 is:
J
J
J
1.9
Installation and User Manual, Getting Started with Control Desktop,
UM6.3:SW3311:G (Revision A — May 1998): describes computer
requirements, the NT interface, the online help systems, installation,
startup, and navigation.
Control Desktop Module Manual, Using Control Desktop Modules,
UM6.3:SW3311:M (Original — May 1998): describes how to use
Control Designer, Diagnostics, Client Administration, Report Writer,
and Task Monitor.
Online help systems for Control Desktop and the five modules.
Related Documents
Many Digital OpenVMS documents exist. Some manuals which may be
of help with ENVOX and Sybase databases are listed below. See your
Digital sales representative for further listings.
J
OpenVMS, Version 7.1, Installation and Upgrade Manual
J
OpenVMS User’s Manual
J
OpenVMS DCL Dictionary: A—M
J
OpenVMS DCL Dictionary: N—Z
J
OpenVMS System Manager’s Manual: Essentials
J
OpenVMS System Manager’s Manual: Tuning, Monitoring, and
Complex Systems
J
OpenVMS System Management Utilities Reference Manual: A—L
J
OpenVMS System Management Utilities Reference Manual: M—Z
Other PROVOX documentation which may be helpful is listed below.
Contact your Fisher-Rosemount Systems’ representative or sales office
for a complete list of available documentation or copies.
J
Installation manual, Installing Type DH6215 CHIP DEC OpenVMS
VAX and Type DH6219 CHIP DEC OpenVMS AXP (PN3.1:DH6215)
Installing and Upgrading ENVOXr Configuration Software on DEC VAX and DEC AXP Systems (Revision B — May 1998)
Introduction F Section 1
J
J
1.10
9
Configuration engineering manual, Configuring DH6200-Series
Computer/Highway Interface Package (CHIP) Software
(CE8.0:DH6200)
User manual, Using DH6200-Series Computer/Highway Interface
Package (CHIP) Software (UM3:0:DH6200)
Electronic Documentation
This manual is also available in DOCVUEt Electronic Documentation, a
CD-ROM Documentation set containing current and past
Fisher-Rosemount Systems sales literature, manuals, and technical
service bulletins.
DOCVUE documentation runs on OpenVMS, UNIX, and Microsoft
Windows systems with the advantages of full-text searches, menus,
bookmarks, browsing. and point and click navigation. We recommend
that you call your Fisher-Rosemount Systems representative or sales
office and find out if DOCVUE documentation can make your application
of Fisher-Rosemount instrumentation easier.
1.11
Where to Find Answers About This Product or Manual
Fisher-Rosemount Systems’ goal is to provide products and
documentation that exceed your needs. If you have questions or
comments about this product or manual, please contact your
Fisher-Rosemount Systems’ representative or sales office.
To help us evaluate how well this manual fills your needs, please
complete and send in the evaluation form located in the front of this
manual. We also appreciate your suggestions on ways to improve any
page of the manual. Please mark your suggestions on a copy of the
page and include it with the evaluation form. Thank you for providing this
information.
Installing and Upgrading ENVOXr Configuration Software on DEC VAX and DEC AXP Systems (Revision B — May 1998)
1
10
Section 1 F Introduction
1
Blank page.
Installing and Upgrading ENVOXr Configuration Software on DEC VAX and DEC AXP Systems (Revision B — May 1998)
System Requirements F Section 2
11
Figure 2-Table 2
2
2 System Requirements
This section describes the system requirements for running Type
SW3151 ENVOXr Configuration Software (ENVOX DEC VAX) and Type
SW3155 ENVOX Configuration Software (ENVOX DEC AXP) on
OpenVMS systems, the time required to install ENVOX configuration
software, the software module sizes, and the required disk memory sizes.
Procedure overviews with flow diagrams for installing and upgrading a
system are included.
2.1
Product Media
Installation tapes contain:
J
SYBASE 10.0
J
ENVOX P4.0
J
OPEN DATABASE P1.3
J
CDOS P2.0
J
OpenVMS and SYBASE Software Patches
For DEC AXP computers, the programs are supplied on one 4mm DAT
cartridge tape. For DEC VAX computers, the programs are supplied on
either two TK50 tapes or one 4mm DAT tape, depending on your system.
Note ... If your VAX uses TK50 tapes, be sure to use the tape that
contains the appropriate software for the particular installation
procedure. The tape marked Vol. 1 of 2 holds the SYBASE,
ENVOX, and OPEN DATABASE software. The tape marked Vol.
2 of 2 holds the CDOS software and the software patches.
Installing and Upgrading ENVOXr Configuration Software on DEC VAX and DEC AXP Systems (Revision B — May 1998)
2
Section 2 F System Requirements
12
2.2
Product Compatibility
ENVOX P4.0, Control Desktop P2.0, and CDOS P2.0 are compatible.
Earlier versions of these products are not compatible with later versions.
For instance, when you upgrade ENVOX software to version P4.0, and
you wish to use Control Desktop, you must also upgrade Control Desktop
and CDOS to P2.0.
2
2.3
Hardware Requirements
ENVOX software will run on a MicroVAX, VAX, VAXstation, DEC AXP
workstation or a DEC AXP server, as listed in Table 2-1.
Table 2-1.
Supported Systems and Number of Users
System
Users
MicroVAX 3100 through MicroVAX 3900
unlimited(1)
VAXstation 3100
1
VAXstation 4000
unlimited(1)
VAXstation 4000-VLC
1 (client only)
VAX Computer System 725 through 785
1(2)
VAX Computer System 4100 through 4600
unlimited(1)
VAX Computer System 6210 through 7660
unlimited(1)
VAX Computer System 8200 through 8840
unlimited(1)
DEC 3000 AXP workstation(all models)
unlimited(1)
DEC 2000 AXP server
unlimited(1)
1.
The number of users is the maximum licensed number of concurrent ENVOX software users.
The practical maximum number of ENVOX users depends on the CPU, memory, available
disk space, and the memory requirements of other applications running on the system. The
number of VMS users can be larger or smaller, but the smaller of the two licenses (ENVOX
software or VMS) is the effective maximum number of ENVOX software users.
2.
Limited to one user due to CPU performance.
You can also use the installation procedure in this installation manual as a
guide for systems other than the MicroVAX 3100, the VAXstation 4000,
and the AlphaStation 200 series. In most cases, the only items in the
procedure that are different are the names of the system disk drive (the
drive where the ENVOX software is loaded), the name of the second disk
(the disk where the SYBASE software is loaded), the name and type of
tape drive (the software-load device) and the SYSGEN parameters.
Installing and Upgrading ENVOXr Configuration Software on DEC VAX and DEC AXP Systems (Revision B — May 1998)
System Requirements F Section 2
2.4
13
Software Requirements
ENVOX software, version P4.0, requires an OpenVMS operating system,
DECnet, CHIP software, SYBASE SQL (Data) Server, APT, and Open
Client software, and DECwindows Motif software. Table 2-2 lists the
required software versions.
Table 2-2.
Software Version Levels
Software
Revision
OpenVMS
7.1(3)
DECwindows Motif(VAX)
1.2--3
DECwindows Motif(AXP)
1.2--4
CHIP DEC OpenVMS VAX
(1)
P5.0 or later
CHIP DEC OpenVMS AXP
(1)
P5.0 or later
SYBASE SQL Server
SYBASE APT
5.3 (2)
SYBASE Open Client
10.0.4
ENVOXR
2.5
10.0.2.6 (2)
software
P4.0
1.
CHIP kernel or CHIP by point size. The CHIP tape contains Kermit software
2.
This version of the Sybase software shipped with ENVOX P4.0 includes Sybase software
fixes EBF6203 for the VAX platform and EBF6202 for the AXP system. If you use your
software instead, be sure that these fixes are included.
3.
This version of VMS requires ECO kit VAXY2K01_071 for the VAX platform and ECO kits
ALPY2K01_071, ALPSCSI02_71, and ALPMOTF03_U4012 for the AXP platform.
Highway Interface
Downloading configurations and performing diagnostics requires a
Type DH6215 Computer/Highway Interface Package (CHIP DEC
OpenVMS VAX) or a Type DH6219 Computer/Highway Interface Package
(CHIP DEC OpenVMS AXP). The CHIP software interfaces to the
PROVOXR highway system using one of the following:
J
J
J
J
J
Type DH6009 Serial Interface Unit (SIU) with the appropriate highway
interface card — on a network using DECnet — VAX only
Type DH6032 Highway Data Link (HDL), if the CHIP version is P4.3 or
later — on a network using TCP/IP — AXP or VAX
Type DC7611 Data Highway Interface (DHI) card for a PROVOX Data
Highway — VAX only
Type DC7711 Data Highway Interface II (DHI II) card for a PROVOX
Highway II — VAX only
Type DH6021 Network Interface Unit (NIU) — on a network using
DECnet — AXP or VAX
Installing and Upgrading ENVOXr Configuration Software on DEC VAX and DEC AXP Systems (Revision B — May 1998)
2
Section 2 F System Requirements
14
2.6
2
Software and Disk Space Requirements for VAX
Systems
Note ... While it is possible to install all of ENVOX, SYBASE, and the
other required software on a single disk, it is recommended for
best system performance that the software be installed on two
disks, as described below.
To install ENVOX software on a DEC VAX system, a minimum of 32
Mbytes of memory is required. The minimum disk space requirements on
two disks for all of the software used in the ENVOX system are:
System disk — 426 Mbytes for OpenVMS, CHIP, ENVOX software,
and transaction logs plus the space required for other PROVOX
end-user applications.
J
Second disk — 230 Mbytes for SYBASE software and the main
ENVOX database. You must also allow enough space for other
databases which you wish to place on the second disk.
J
Table 2-3 lists the software modules and the minimum disk sizing required
for a standard ENVOX system. Extra disk space will be required for
additional or larger ENVOX databases. The software module size is listed
in blocks: one block equals 512 bytes.
Table 2-3.
Software Module Sizes for VAX Systems
Disk
System
Second
Software Module
Size in Blocks
VMS with DECnet and DECwindows Motif
400,000
CHIP kernel
4150(1)
ENVOXR software
111,000(2)
Transaction log
42,000
SYBASE
179,000
Main ENVOX database
250,000
1.
See Table 2-4 for CHIP database requirements
2.
ENVOX upgrades require 7000 extra blocks on the system disk and 50000 temporary blocks
for installation
If you have a Type DH6215 Computer/Highway Interface Package (CHIP
DEC VAX/VMS) on your current system, use Table 2-4 to estimate the
required memory and disk space size. Add the size of CHIP to the size of
the software required by the ENVOX system to see if your system has
enough space for both the CHIP and ENVOX software.
Installing and Upgrading ENVOXr Configuration Software on DEC VAX and DEC AXP Systems (Revision B — May 1998)
System Requirements F Section 2
Table 2-4.
15
Fixed System Requirements for CHIP on VAX Systems
CHIP
Memory
CHIP Programs
Disk Space
165 Kbytes
2.1 Mbytes
4150 blocks
500 points
235 Kbytes
1.56 Mbytes/
3100 blocks
2500 points
870 Kbytes
2.5 Mbytes/
5000 blocks
10,000 points
3341 Kbytes
5 Mbytes/
10,000 blocks
CHIP Database Options: (select one)
Note ... If the disk drives used for ENVOX and SYBASE software contain
any other software, be sure to include the size of that software
when making your sizing estimates.
2.7
Installation Time on VAX Systems
Table 2-5 lists the approximate times required to do complete installations
and upgrades of all software for an ENVOX system on a VAX platform.
Table 2-5.
Installation Time on VAX Systems
Software
VMS
Function
Minutes
Initialize system disk
20
Initialize second disk
60
Install VMS, register licenses, tailor VMS
150
CHIP
Install, tailor, tune
60
SYBASE
Install
60
ENVOXR
Install and build
300
SYBASE_UPGRADE
Install
120
ENVOX_UPGRADE
Install and build
300
software
The total time required to install and build the ENVOX system on a VAX
system is 12 to 14 hours. Once the system is installed and built, you need
to do a system backup of all disks. See section 8 for backup information.
Installing and Upgrading ENVOXr Configuration Software on DEC VAX and DEC AXP Systems (Revision B — May 1998)
2
Section 2 F System Requirements
16
2.8
2
Software and Disk Space Requirements for AXP
Systems
Note ... While it is possible to install all of ENVOX, SYBASE, and the
other required software on a single disk, it is recommended for
best system performance that the software be installed on two
disks, as described below.
To install the ENVOX software on a DEC AXP system, a minimum of 64
Mbytes of memory is required. However, to optimize system performance,
a system with a minimum of 128 Mbytes of memory is recommended.
The minimum disk space requirements on two disks for all of the software
used in an ENVOX system are:
System disk — 1 Gbyte for OpenVMS, CHIP, ENVOX software, and
transaction logs plus the disk space for other PROVOX system
end-user applications.
J
Second disk — 1 Gbyte for SYBASE software and the main ENVOX
database plus the disk space for other PROVOX system end-user
applications.
J
Table 2-6 lists the software modules and the minimum disk sizing required
for an ENVOX system. The software module size is listed in blocks: one
block equals 512 bytes.
Table 2-6.
Software Module Sizes for AXP Systems
Disk
System
Second
Software Module
Size in Blocks
VMS with DECnet and DECwindows Motif
1,043,000
CHIP kernel
4150(1)
ENVOXR software
131,000(2)
Transaction log
42,000
SYBASE
216,000
Main ENVOX database
250,000
1.
See Table 2-7 for CHIP database requirements
2.
ENVOX upgrades require 7000 extra blocks on the system disk and 50,000 temporary blocks
for installation
If you have a Type DH6215 Computer/Highway Interface Package (CHIP
DEC OpenVMS VAX) or a Type DH6219 Computer/Highway Interface
Package (CHIP DEC OpenVMS AXP) on your current system, use
Table 2-7 to estimate the required memory and disk space size. Add the
Installing and Upgrading ENVOXr Configuration Software on DEC VAX and DEC AXP Systems (Revision B — May 1998)
System Requirements F Section 2
17
size (number of blocks) of CHIP to the size of the software required by
the ENVOX system to see if your system has enough space.
Table 2-7.
Fixed System Requirements for CHIP on AXP Systems
CHIP
Memory
CHIP Programs
Disk Space
400 Kbytes
11,000 blocks
500 points
985 Kbytes
10,000 blocks
2500 points
2850 Kbytes
18,000 blocks
10,000 points
8100 Kbytes
23,000 blocks
CHIP Database Options: (select one)
Note ... If the disk drives used for ENVOX and SYBASE software contain
any other software, be sure to include the size of that software
when making your sizing estimates.
2.9
Installation Time on AXP Systems
Table 2-8 lists the approximate times required to do complete installations
and upgrades of all software for an ENVOX system on an AXP system.
The installation times depend on the system model and configuration.
The values shown were derived from a DEC 3000 AXP workstation model
300x configured with 64 MB of system memory.
Table 2-8.
Installation Time on AXP Systems
Software
VMS
Function
Minutes
Initialize system disk
10
Initialize second disk
10
Install VMS, register licenses, tailor VMS
60
CHIP
Install, tailor, tune
20
SYBASE
Install
20
ENVOXR
software
Install and build
SYBASE_UPGRADE
Install
ENVOX_UPGRADE
Install and build
110
20
110
The total time required to install and build the ENVOX system on an AXP
system is 4 to 6 hours. Once the system is installed and built, you need to
do an image backup of all disks. See section 8 for backup information.
Installing and Upgrading ENVOXr Configuration Software on DEC VAX and DEC AXP Systems (Revision B — May 1998)
2
18
Section 2 F System Requirements
2
Blank page.
Installing and Upgrading ENVOXr Configuration Software on DEC VAX and DEC AXP Systems (Revision B — May 1998)
Installing SYBASE Software F Section 3
19
Figure 3-Table 3
3
3 Installing SYBASE Software
This section explains how to install SYBASE software on a MicroVAX
3100 computer, a VAXstation 3100, a VAXstation 4000 and the
AlphaStation 200 series. This section also includes information about
recovering from errors. See Appendix A for the meaning of error
messages. See Appendix C for log files of a typical installation. In
addition, section 8 provides instructions for backing up and restoring the
system’s disks, and de-installing the ENVOX and SYBASE software.
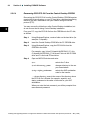
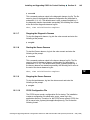
3.1
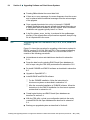
New System Installation Method
Before installing ENVOX software for the first time on an OpenVMS
system, ensure that the hardware is properly installed and the system is
operationally tested. Then, follow the installation procedure sequence as
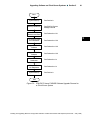
shown in Figure 3-1.
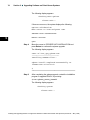
Start
System Backup
Install CHIP Software
Tailor VMS for CHIP
See Section 8
See CHIP
Installation
Manual
Install SYBASE Software
See Section 3
Install ENVOXR Software
See Section 4
System Backup
See Section 8
End
Figure 3-1.
System Installation Flow
Installing and Upgrading ENVOXr Configuration Software on DEC VAX and DEC AXP Systems (Revision B — May 1998)
3
Section 3 F Installing SYBASE Software
20
Note ... System backup before and after installation is extremely
important. Always back up the system in case the system
configuration needs to be restored. Store backup tapes in an
environmentally and physically protected area.
3
3.2
Before Installing SYBASE Software
Several procedures and considerations need to be done before you
perform the installation. They are explained in the following subsections.
3.2.1
Precautions
Before you attempt installation, read the precautions listed below. They
can save you time and reduce the possibility of errors.
J
J
J
3.2.2
On new systems which include a second disk, the SYBASE software
will not install successfully unless you initialize and mount the second
disk. See the instructions in subsection 3.2.3 to initialize and mount
the second disk.
Before installation of SYBASE software, the DECnet software must
be running on the DEC system.
Before installing SYBASE software, you must first install CHIP
according to the instructions given in the CHIP installation manual.
Required ECO Kits
The following ECO kits must be applied after installing or upgrading to
OpenVMS V7.1 and before you install Sybase software.
J
J
J
A Motif ECO kit which enhances Motif operation on an AXP platform
A Year 2000 ECO kit which makes the OpenVMS system Year 2000
compliant
A SCSI ECO kit which corrects an error introduced by OpenVMS
V7.1 on the AXP platform that can cause the tapedrive to become
inoperable
The SCSI ECO kit is included on both the ENVOX tape and the Control
Desktop CDROM. If you are unable to recover the kit from the tape, you
can recover it from the CDROM as descibed in subsection 3.2.2.4. Then,
follow the instructions in subsection 3.2.2.3 to complete the installation of
the kit on your workstation.
Installing and Upgrading ENVOXr Configuration Software on DEC VAX and DEC AXP Systems (Revision B — May 1998)
Installing SYBASE Software F Section 3
3.2.2.1
21
Installing Motif ECO Kit (AXP Platform Only)
An ECO kit ALPMOTF03_U4012 for AXP systems must be applied, after
installing Motif software and before attempting the SYBASE installation.
The following steps let you determine whether or not the ECO kit has
been installed and, if it has not, include instructions on how to install it.
Step 1:
If you are not logged into the system manager’s account, log
in by entering the user name SYSTEM and your password at
the prompts:
Username: SYSTEM
Password: your_password
The DCL prompt appears.
Step 2:
Enter the following command at the DCL prompt:
$ dir sys$help:ALPMOTF03_U4012.release_notes
If this file exists, the ECO kit has been applied and no further
action is required. If the file does not exist, proceed to Step 3.
Step 3:
Insert and make ready the installation media and install the
ECO kit by entering the following command at the DCL
prompt:
$ @sys$update:vmsinstal ALPMOTF03_U4012 tapedrive:
...where tapedrive is the name of your tapedrive or directory
location.
Step 4:
Reboot the system after the ECO kit has been successfully
installed. To reboot the system, enter the following commands
at the DCL prompts:
$ @sys$login:login
$ reboot
Installing and Upgrading ENVOXr Configuration Software on DEC VAX and DEC AXP Systems (Revision B — May 1998)
3
22
Section 3 F Installing SYBASE Software
3.2.2.2
Installing Year 2000 ECO Kits (VAX and AXP Platforms)
An ECO kit VAXY2K01_071 for VAX systems and an ECO kit
ALPY2K01_071 for AXP systems must be applied, after installing Motif
software and before attempting the SYBASE installation. The following
steps let you determine whether or not the ECO kit has been installed
and, if it has not, include instructions on how to install it.
3
Step 1:
If you are not logged into the system manager’s account, log
in by entering the user name SYSTEM and your password at
the prompts:
Username: SYSTEM
Password: your_password
The DCL prompt appears.
Step 2:
Enter the following command at the DCL prompt:
$ dir sys$help:Y2K.release_notes
If the file exists, the ECO kit has been applied and no further
action is required. If the file does not exist, proceed to Step 3.
Step 3:
Insert and make ready the installation media and install the
ECO kit by entering the following command at the DCL
prompt:
J
For a VAX system, enter:
$ @sys$update:vmsinstal VAXY2K01_071 tapedrive:
J
For an AXP system, enter:
$ @sys$update:vmsinstal ALPY2K01_071 tapedrive:
...where tapedrive is the name of your tapedrive or directory
location.
Step 4:
Reboot the system after the ECO kit has been successfully
installed. To reboot the system, enter the following commands
at the DCL prompts:
$ @sys$login:login
$ reboot
Installing and Upgrading ENVOXr Configuration Software on DEC VAX and DEC AXP Systems (Revision B — May 1998)
Installing SYBASE Software F Section 3
3.2.2.3
23
Installing SCSI ECO Kit (AXP Platform Only)
An ECO kit ALPSCSI02_071 for AXP systems must be applied, after
installing Motif software and before attempting the SYBASE installation.
The following steps let you determine whether or not the ECO kit has
been installed and, if it has not, include instructions on how to install it.
Step 1:
If you are not logged into the system manager’s account, log
in by entering the user name SYSTEM and your password at
the prompts:
Username: SYSTEM
Password: your_password
The DCL prompt appears.
Step 2:
Enter the following command at the DCL prompt:
$ dir sys$help:ALPSCSI02_071.release_notes
If this file exists, the ECO kit has been applied and no further
action is required. If the file does not exist, proceed to Step 3.
Step 3:
Insert and make ready the installation media and install the
ECO kit by entering the following command at the DCL
prompt:
$ @sys$update:vmsinstal ALPSCSI02_071 tapedrive:
...where tapedrive is the name of your tapedrive or directory
location.
If you do not have the kit available through your tapedrive or a
directory, you can recover it from the Control Desktop
CDROM. See subsection 3.2.2.4 below for instructions.
After you recover the kit, use the name of the directory where
you put the kit in the command line above.
Step 4:
Reboot the system after the ECO kit has been successfully
installed. To reboot the system, enter the following commands
at the DCL prompts:
$ @sys$login:login
$ reboot
Installing and Upgrading ENVOXr Configuration Software on DEC VAX and DEC AXP Systems (Revision B — May 1998)
3
24
Section 3 F Installing SYBASE Software
3.2.2.4
Recovering SCSI ECO Kit From the Control Desktop CDROM
Recovering the SCSI ECO kit from the Control Desktop CDROM requires
copying the kit to a directory on your PC hard drive, and then transferring
the kit to your AXP workstation over your network using file transfer
protocol (FTP).
3
You may recover the kit before or after Control Desktop installation, but
do not recover the kit during Control Desktop installation.
From your PC, copy the ECO Kit file from the CDROM onto the PC disk,
as follows:
Step 1:
Using Windows Explorer, create a folder on the hard drive (for
example, C:\Axpatch).
Step 2:
Insert the Control Desktop CDROM in the PC CDROM drive.
Step 3:
Using Windows Explorer, copy the ECO Kit file from the
CRROM to the folder.
For example, copy it from E:\Axpatch\ALPSCSI02_071.A to
C:\Axpatch\ALPSCSI02_071.A where E drive is the CD ROM
drive and C is the local PC hard drive.
Step 4:
Open an MS DOS window and enter:
$ C:
selects the C drive
$ cd directory_name
changes directory to the one
you named above
$ ftp alpha_nodename
selects the AXP workstation
node for the transfer
...where directory_name is the name of the directory where
the ECO Kit file is located (for example, axpatch), and
alpha_nodename is the name of the node for your AXP
workstation.
When you enter the last command, you will be prompted for a
username and password.
Installing and Upgrading ENVOXr Configuration Software on DEC VAX and DEC AXP Systems (Revision B — May 1998)
Installing SYBASE Software F Section 3
Step 5:
25
Login in as SYSTEM and enter your password. When the
system prompt appears, enter:
> binary
sets file mode to binary
> mkdir [directory_name]creates a directory on your
AXP workstation. (you may
call it, axpatch)
> cd directory_name
changes directory to your
new directory on your AXP
workstation.
> put alpcsci02_71.a
copies the ECO Kit to your
new directory on your AXP
workstation.
Upon entering the “put” command, the transfer process starts.
Wait until the system notifies you that the transfer is complete.
Step 6:
When the transfer is complete, enter:
> bye
Step 7:
logs you out of ftp
Close the MS DOS window
The SCSI ECO Kit has been copied to your AXP workstation.
Step 8:
Proceed to subsection 3.2.2.3 to install the kit on your
OpenVMS 7.1 operating system.
Installing and Upgrading ENVOXr Configuration Software on DEC VAX and DEC AXP Systems (Revision B — May 1998)
3
26
Section 3 F Installing SYBASE Software
3.2.3
Initializing the Second Disk Drive
The following steps let you initialize the second (external) disk drive and
should only be carried out on disks which have not been initialized. The
second disk drive must be initialized as shown so that there is enough
contiguous disk space on the disk to load the SYBASE database
software.
3
To initialize the second disk drive:
Step 1:
If you are not logged into the system manager’s account, log
in by entering the user name SYSTEM and the password at
the prompts:
Username: SYSTEM
Password: your_password
The DCL prompt appears.
Step 2:
Enter the following command at the DCL prompt:
$ initialize/index=beginning seconddisk: user$1
Step 3:
Mount the disk by entering the following command at the DCL
prompt:
$ mount/system seconddisk: user$1 user$1
This command mounts the disk and creates the logical
USER$1 which can be used during the installation to refer to
the disk.
Step 4:
Edit the file SYS$MANAGER:SYSTARTUP_VMS.COM to add
a line with the mount command shown in Step 3. This action
makes sure that the disk is mounted when the system is
rebooted. The line must be positioned before any lines which
start any PROVOXR systems software and SYBASE software
used in the ENVOX system.
Installing and Upgrading ENVOXr Configuration Software on DEC VAX and DEC AXP Systems (Revision B — May 1998)
Installing SYBASE Software F Section 3
3.2.4
27
Guidelines for Running the Installation Script
The following information provides guidelines for running the installation
script: sybase_envox_install.
J
J
J
When sybase_envox_install is run, a menu driven interface is
displayed on the screen. It is a character based menu.
Navigation through the menu items is accomplished by using the up
and down arrow keys or by pressing Return on any of the menu item
fields.
Navigation through the menu item data fields is accomplished by
using the left and right arrow keys.
J
The menu item data fields are set for insert mode.
J
If a menu item is incorrect, its data field is shown in reverse video.
J
J
J
J
Most of the menu data is defaulted for you when the menu is
displayed. The defaulted data can be modified.
Moving the cursor to ENTER and pressing Return causes the data
from the menu to be checked. If there are no errors or warnings, the
installation proceeds normally.
If there are error or warning messages, system errors are shown first,
followed by menu errors, and then warnings. By repeatedly pressing
Return, the system cycles through the messages and back to the
main menu. Once in the main menu, you can quit if system errors
need to be corrected. For menu errors, correct the menu data and
press Return to check the corrected data.
Menu item error messages appear with the menu item number and
text.
J
Pressing Ctrl-w refreshes the menu screen.
J
Pressing Ctrl-e deletes the current data field.
J
J
J
If there are no error messages the menu disappears from the screen
and is replaced with information messages from the various stages of
the installation.
Once installation has started, do not try to interrupt it. Installation
typically lasts about 20 minutes on an AXP system and 60 minutes
on a VAX system.
A log file, sybase_envox_inst.log, is produced in the sys$manager
directory. If the installation does not proceed as expected, study the
log file to help determine the cause.
Installing and Upgrading ENVOXr Configuration Software on DEC VAX and DEC AXP Systems (Revision B — May 1998)
3
Section 3 F Installing SYBASE Software
28
3.3
Installing SYBASE Software on Client-Server Systems
The following section describes how to install SYBASE software in a
client-server system.
Step 1:
3
If you are not logged into the system manager’s account, log
in by entering the user name SYSTEM and the password at
the prompts:
Username: SYSTEM
Password: your_password
The DCL prompt appears.
Step 2:
Insert and make ready the installation media, and read the
installation script from the media by entering the following
command at the DCL prompt:
$ backup tapedrive:syb_envox_inst.a/sav *.*/new
where tapedrive is the name of your tapedrive if installing
from tape, or the full directory pathname where the savesets
are stored if installing from disk.
Step 3:
Start the installation script by entering the following command
at the DCL prompt:
$ run sybase_envox_install
The screen clears and the following display appears:
Checking system
Please wait...
If there are no errors, the following display appears:
Choose whether to install or de-install SYBASE and
ENVOX
Move cursor to item and press <CR>.
INSTALL SYBASE
INSTALL ENVOX
DE-INSTALL SYBASE and ENVOX
QUIT
Step 4:
Move the cursor to INSTALL SYBASE and press Return.
The following display appears:
Installing and Upgrading ENVOXr Configuration Software on DEC VAX and DEC AXP Systems (Revision B — May 1998)
Installing SYBASE Software F Section 3
29
Choose which type of installation.
Move cursor to item and press <CR>.
CLIENT-SERVER
CLIENT-ONLY
QUIT
Step 5:
Move the cursor to CLIENT-SERVER and press Return.
The following display appears:
SYBASE Client-Server Installation
1)SYBASE System Disk = USER$1
2)SYBASE Automatic Startup = Y
3)Configure SYBASE system parameters = Y
4)SYBASE Account UIC code = 17,1010
5)Number of concurrent users = 3
6)SYBASE Printer device =
7)SYBASE Query Object Number = 200
8)SYBASE port number =
9)SYBASE Dataserver name = SYBASE
10)Memory available for the Dataserver(Mb) =
11)SYBASE Master Database Disk = USER$1
12)SYBASE Master Device size(Mb) = 20
13)SYBASE Sysprocs Database Disk = USER$1
14)SYBASE Sysprocs Device size(Mb) = 20
15)Tape Device =
ENTER
QUIT
Step 6:
For menu item 1), enter the name of the disk which will
contain the main SYBASE directory structure.
Step 7:
For menu item 2), enter Y to add the SYBASE startup
commands to FISHER_STARTUP.COM, or if this file does not
exist, the commands are added to SYSTARTUP_VMS.COM.
If the answer N is given, none of the required SYBASE
logicals are included in the start-up file, and the SYBASE
SQL server does not start automatically when the system is
rebooted.
If the answer N is given, then after the installation, you need
to review the following files and add any required commands
to your startup procedure:
J
sys$manager:sybase_disk_logicals.com
J
sybase_device:[sybase.install]sybase_startup.com
Installing and Upgrading ENVOXr Configuration Software on DEC VAX and DEC AXP Systems (Revision B — May 1998)
3
30
3
Section 3 F Installing SYBASE Software
Step 8:
For menu item 3), answer Y to place the list of recommended
sysgen parameters detailed in
sys$manager:sybase_vms_resources.dat into
sys$system:fisher_sybase_modparams.dat. When the sysgen
parameters are located in this file, the system is set to the
parameters whenever Autogen is executed by the system
manager.
Step 9:
For menu item 4), enter the UIC code for the SYBASE
account. The UIC code must be unique and of the form,
group, member, where group and member are OCTAL
numeric numbers in the range: group = [0 to 3776] and
member = [0 to177776]. A UIC default value of 17,1010 is
recommended and places the SYBASE account in the same
group as the CHIP account.
Step 10: For menu item 5), enter the number of users expected to be
logged on through the ENVOX forms to the SYBASE SQL
server. Additional users reduce system performance. Do not
specify more users than are needed. Refer to section 10 for
system tuning instructions.
Step 11:
For menu item 6), enter a valid terminal device to define the
logical name SYBASE_PRINTER which is used by SYBASE
for screen dumps from character terminals. Leave this field
blank if you do not require this feature. (An example name is
TTA3).
Step 12: For menu item 7), enter the DECnet object number for the
SYBASE Query Object used by the SQL server. The number
entered must be in the range: [128 to 253]. A default value of
200 is recommended.
When the SQL server starts up, it expects to use two
sequential object numbers, starting with the object number
specified. The first number is used by front end products to
request a connection to the SQL server and the second is
used by the SYBASE console program to connect the SQL
server to dump and load databases.
Step 13: For menu item 8), enter a TCP/IP port number between 1025
and 65535 for the SYBASE query object. Leave this field
blank if you do not require SYBASE to use the TCP/IP
transport.
CDOS requires TCP/IP software to be installed and the
SYBASE server updated to allow TCP/IP entry. If you plan on
installing CDOS and you have TCP/IP software installed, then
enter a port number. If you plan on installing CDOS but have
not yet installed TCP/IP software, then leave this field blank.
Installing and Upgrading ENVOXr Configuration Software on DEC VAX and DEC AXP Systems (Revision B — May 1998)
Installing SYBASE Software F Section 3
31
You can configure the SYBASE server to allow TCP/IP entry
after installing CDOS.(see section 12).
Step 14: For menu item 9), enter the SYBASE SQL server name. The
server name can contain only alphanumeric characters, dollar
signs ($) and underscore ( _ ) characters. It must be 10
characters or less. A default name of SYBASE is
recommended.
Step 15: For menu item 10), enter the memory allocated to the
SYBASE dataserver.
The minimum memory required by the SQL server is 16
megabytes on a VAX system and AXP system. The maximum
memory usable by the SQL server is 64 megabytes.
Approximately 2 megabytes is pre-allocated with 80% of the
remaining memory used for data buffers. Significant
performance improvements may be gained if more memory is
available for data buffers. Do not allocate more than half the
available system memory. Refer to section 10 for system
tuning instructions.
Step 16: For menu item 11), enter the name of the disk which will
contain the SYBASE master directory and master device.
Approximately 42000 blocks are required by the master
device.
Step 17: For menu item 12), enter the size, in Mbytes, for the SYBASE
master device. The default size (20 Mbyte) is sufficient to
support as many as five concurrent ENVOX software users.
For every additional user, the size of the master device should
be increased by 0.5 Mbyte.
Step 18: For menu item 13), enter the name of the disk which will
contain the SYBASE sysprocs directory and sysprocs device.
Approximately 42000 blocks are required by the sysprocs
device.
Step 19: For menu item 14), either leave the default value or enter
another value for the size in Mbytes for the SYBASE sysprocs
device. The default size of 20 Mb is sufficient for normal
operation.
Step 20: For menu item 15), to install from tape, enter the tape device
name where the ENVOX software media is located and
ensure that the tape is inserted and mounted. To install from
disk, enter the full directory pathname where the savesets are
stored.
Step 21: Move the cursor to ENTER and press Return to continue the
installation.
Installing and Upgrading ENVOXr Configuration Software on DEC VAX and DEC AXP Systems (Revision B — May 1998)
3
32
Section 3 F Installing SYBASE Software
The following display appears:
Checking menu options
Please wait...
If there are no errors, the following display appears:
3
Options validated OK
Move cursor to item and press <CR>
PROCEED WITH INSTALLATION
MODIFY OPTIONS
QUIT
Any system parameters which require changing will be
displayed. Please refer to subsection 14.4 in the ENVOX
System Manager’s Guide for changing system parameters.
Step 22: Move the cursor to PROCEED WITH INSTALLATION and
press Return to continue the installation.
If there are no errors, the installation continues to completion.
During installation, the following display appears:
start of inst_upg_sybase.com
Deleting existing sybase files...
Installing SYBASE files...
creating default sybase databases.
This will take about 1/2 hour to complete.
Sybase install completed successfully on 11-Dec-1997 14:40.45
This completes the SYBASE client-server installation. The SYBASE SQL
server should be running. See subsection 4.3 to install ENVOX software
on a client-server system.
Installing and Upgrading ENVOXr Configuration Software on DEC VAX and DEC AXP Systems (Revision B — May 1998)
Installing SYBASE Software F Section 3
3.4
33
tempdb Considerations for Client-Server Systems
During the installation of client-server SYBASE, a database called
tempdb is created. This database holds temporary tables created when
ENVOX software is running.
For large ENVOX databases or for an ENVOX database which will be
used by many users at the same time, the database tempdb should be
increased in size and directed to a logical device which you define. The
device should be separate from the master, but in the same directory.
The ENVOX administration forms can be used to create a logical device
for tempdb. The default size of tempdb is 6 mbytes. Increasing it by three
or four times, if there is enough disk space, is recommended.
To increase the size of tempdb, use the following procedure:
Step 1:
Log into the SYBASE account.
Step 2:
Run isql with the user being sa. The password will be
database if you have just completed the SYBASE installation.
> isql/u=”sa”/p=”database”
Step 3:
Type the following commands in the isql prompt:
> alter database tempdb on tempdevice=newsize
> go
This action increases tempdb on tempdevice (your device
name) by the newsize (your entered size) in Mbytes.
Installing and Upgrading ENVOXr Configuration Software on DEC VAX and DEC AXP Systems (Revision B — May 1998)
3
Section 3 F Installing SYBASE Software
34
3.5
Installing SYBASE Software on Client-Only Systems
The following section describes how to install SYBASE software for a
client-only system.
Step 1:
3
If you are not logged into the system manager’s account, log
in by entering the user name SYSTEM and the password at
the prompts:
Username: SYSTEM
Password: your_password
The DCL prompt appears.
Step 2:
Insert and make ready the installation media, and read the
installation script from the media by entering the following
command at the DCL prompt:
$ backup tapedrive:syb_envox_inst.a/sav *.*/new
where tapedrive is the name of your tapedrive if installing
from tape, or the full directory pathname where the savesets
are stored if installing from disk.
Step 3:
Start the installation script by entering the following command
at the DCL prompt:
$ run sybase_envox_install
The screen clears and the following display appears:
Checking system
Please wait...
If there are no errors, the following display appears:
Choose whether to install or de-install SYBASE and
ENVOX
Move cursor to item and press <CR>.
INSTALL SYBASE
INSTALL ENVOX
DE-INSTALL SYBASE and ENVOX
QUIT
Step 4:
Move the cursor to INSTALL SYBASE and press Return.
The following display appears:
Installing and Upgrading ENVOXr Configuration Software on DEC VAX and DEC AXP Systems (Revision B — May 1998)
Installing SYBASE Software F Section 3
35
Choose which type of installation.
Move cursor to item and press <CR>.
CLIENT-SERVER
CLIENT-ONLY
QUIT
Step 5:
Move the cursor to CLIENT-ONLY and press Return.
The following display appears:
SYBASE Client-Only Installation
1)SYBASE System Disk = USER$1
2)SYBASE Automatic Startup = Y
3)Configure SYBASE system parameters = Y
4)SYBASE Account UIC code = 17,1010
5)Number of concurrent users = 3
6)SYBASE Printer device =
7)SYBASE Query Object Number = 200
8)SYBASE port number =
9)Sybase Dataserver node =
10)Tape device =
ENTER QUIT
Step 6:
For menu item 1), enter the name of the disk which will
contain the main SYBASE directory structure.
Step 7:
For menu item 2), enter Y to add the SYBASE startup
commands to FISHER_STARTUP.COM, or if this file does not
exist, the commands are added to SYSTARTUP_VMS.COM.
If the answer N is given, none of the required SYBASE
logicals are included in the start-up file, and the SYBASE
SQL server does not start automatically when the system is
rebooted.
If the answer N is given, then after the installation, you need
to review the following files and add any required commands
to your startup procedure:
J
sys$manager:sybase_disk_logicals.com
J
sybase_device:[sybase.install]sybase_startup.com
Installing and Upgrading ENVOXr Configuration Software on DEC VAX and DEC AXP Systems (Revision B — May 1998)
3
36
3
Section 3 F Installing SYBASE Software
Step 8:
For menu item 3), answer Y to place the list of recommended
sysgen parameters detailed in
sys$manager:sybase_vms_resources.dat into
sys$system:fisher_sybase_modparams.dat. When the sysgen
parameters are located in this file, the system is set to these
parameters whenever Autogen is executed by the system
manager.
Step 9:
For menu item 4), enter the UIC code for the SYBASE
account. The UIC code must be unique and of the form,
group, member, where group and member are OCTAL
numeric numbers in the range: group = [0 to 3776] and
member = [0 to177776]. A UIC default value of 17,1010 is
recommended and places the SYBASE account in the same
group as the CHIP account.
Step 10: For menu item 5), enter the number of users expected to be
logged on through the ENVOX forms to the SQL server.
Additional users reduce system performance. Do not specify
more users than are needed. Refer to section 10 for system
tuning instructions.
Step 11:
For menu item 6), enter a valid terminal device to define the
logical name SYBASE_PRINTER which is used by SYBASE
for screen dumps from character terminals. Leave this field
blank if you do not require this feature. (An example name is
TTA3).
Step 12: For menu item 7), enter the DECnet object number for the
SYBASE Query Object used by the SQL server. The number
entered must be in the range: [128 to 253]. A default value of
200 is recommended.
When the SYBASE SQL server starts up, it expects to use
two sequential object numbers, starting with the object
number specified. The first number is used by front end
products to request a connection to the SQL server and the
second is used by the SYBASE console program to connect
the SQL server to dump and load databases. Use the same
object numbers as were used when the SYBASE software
was installed on the SYBASE server node.
Step 13: For menu item 8), enter a TCP/IP port number between 1025
and 65535 for the SYBASE query object. Leave this field
blank if you do not require SYBASE to use the TCP/IP
transport.
CDOS requires TCP/IP software to be installed and the
SYBASE server updated to allow TCP/IP entry. If you plan on
installing CDOS and you have TCP/IP software installed, then
enter a port number. If you plan on installing CDOS but have
Installing and Upgrading ENVOXr Configuration Software on DEC VAX and DEC AXP Systems (Revision B — May 1998)
Installing SYBASE Software F Section 3
37
not yet installed TCP/IP software, then leave this field blank.
You can configure the SYBASE server to allow TCP/IP entry
after installing CDOS.(see section 12).
Step 14: For menu item 9), enter the name of the node where the SQL
server resides. A valid entry for the node name and address
must exist in the client’s NCP database and be reachable. To
verify that a valid node_name and node_address exist, enter
the following:
3
$ mcr ncp loop node node_name
$ mcr ncp loop node node_address
where node_name and node_address are the ones in your
system. If no errors are displayed, a valid node exists and is
reachable.
To add a new node name and node address, enter the
following:
$ mcr ncp define node node_address NAME node_name
$ mcr ncp set node node_address NAME node_name
where node_name and node_address are the ones you want
to use. The node name must contain only alphanumeric
characters, dollar ($) signs, or underscore ( _) characters. It
must be 12 characters or less.
Step 15: For menu item 10): To install from tape, enter the tape device
name where the ENVOX software media is located. To install
from disk, enter the full directory pathname where the
savesets are stored.
Step 16: Move the cursor to ENTER and press Return to continue the
installation.
The following display appears:
Checking menu options
Please wait...
If there are no errors, the following display appears:
Options validated OK
Move cursor to item and press <CR>
PROCEED WITH INSTALLATION
MODIFY OPTIONS
QUIT
Installing and Upgrading ENVOXr Configuration Software on DEC VAX and DEC AXP Systems (Revision B — May 1998)
38
Section 3 F Installing SYBASE Software
Step 17: Move the cursor to PROCEED WITH INSTALLATION and
press Return to continue the installation.
If there are no errors, the installation continues to completion.
During installation, the following display appears:
3
start of inst_upg_sybase.com
Deleting existing sybase files...
Installing SYBASE files...
Sybase install completed successfully on 15-Dec-1997 11:46.40
This completes the SYBASE client-only installation. See Subsection 4.4
to install ENVOX software on a client-only system.
Installing and Upgrading ENVOXr Configuration Software on DEC VAX and DEC AXP Systems (Revision B — May 1998)
Installing ENVOX Software F Section 4
39
Figure 4-Table 4
4
4 Installing ENVOX Software
This section explains how to install ENVOXR configuration software on a
MicroVAX 3100 computer, a VAXstation 3100, a VAXstation 4000 and
the AlphaStation 200 series. The section also includes information about
recovering from errors and setting up user accounts. See Appendix A for
the meaning of error messages. See Appendix C for log files of a typical
installation. Section 8 provides instructions for backing up the current
system’s disks to tape and restoring the disks from tape.
4.1
New System Installation Method
Before installing ENVOX software for the first time on an OpenVMS
system, ensure that the hardware is properly installed and the system is
operationally tested. Then, follow the installation procedure sequence as
shown in Figure 4-1.
Start
System backup
Install CHIP software
Tailor VMS for CHIP
See Section 8
See CHIP
Installation
Manual
Install SYBASE software
See Section 3
Install ENVOXR software
See Section 4
System backup
See Section 8
End
Figure 4-1.
System Installation Flow
Installing and Upgrading ENVOXr Configuration Software on DEC VAX and DEC AXP Systems (Revision B — May 1998)
4
Section 4 F Installing ENVOX Software
40
Note ... System backup before and after installation is extremely
important. Always back up the system in case the system
configuration needs to be restored. Store backup tapes in an
environmentally and physically protected area.
4
4.2
Before Installing ENVOX Software
Several procedures and considerations need to be done before you
perform an installation. They are explained in the following subsections.
4.2.1
Precautions
Before you attempt any operation, read the precautions listed below.
They can save you time and reduce the possibility of errors.
1. SYBASE must be installed and running before you start installing the
ENVOX software.
2. The CHIP software must be installed and running before you start
installing the ENVOX software.
3. Rename Open databases that have one or more of these attributes:
J
names longer than 16 characters
J
names that begin with a number
J
4.2.2
names that contain characters other than numbers, letters,
#, and _ (underscore).
Guidelines for Running the Installation Script
The following information provides guidelines for running the installation
script: sybase_envox_install.
J
J
When sybase_envox_install is run, a menu driven interface is
displayed on the screen. It is a character based menu.
Navigation through the menu items is accomplished by using the up
and down arrow keys or by pressing Return on any of the menu item
fields.
Installing and Upgrading ENVOXr Configuration Software on DEC VAX and DEC AXP Systems (Revision B — May 1998)
Installing ENVOX Software F Section 4
J
Navigation through the menu item data fields is accomplished by
using the left and right arrow keys.
J
The menu item data fields are in insert mode.
J
If any menu item is incorrect, its data field is shown in reverse video.
J
J
J
J
Most of the menu data is defaulted for you when the menu is
displayed. The defaulted data can be modified.
Moving the cursor to ENTER and pressing Return causes the data
from the menu to be checked. If there are no errors or warnings, the
installation proceeds normally.
If there are error or warning messages, the system errors are shown
first, followed by the menu errors, and then the warnings. By
repeatedly pressing Return, you cycle through these messages and
then back to the main menu. Once in the main menu, you can quit if
system errors need to be corrected. For menu errors, correct the
menu data and press Return to check the corrected data.
Menu item error messages appear with the menu item number and
text.
J
Pressing Ctrl-w refreshes the menu screen.
J
Pressing Ctrl-e deletes the current data field.
J
J
J
J
41
If there are no error messages, the menu disappears from the screen
and is replaced with information messages from the various stages of
the installation.
Once installation has started, do not try to interrupt it.
Installing the ENVOX software on an AXP system takes 2 to 3 hours.
Installing the ENVOX software on a VAX system takes from 3 to 4
hours. These times are approximate; your installation may take less
time to complete.
A log file, sybase_envox_inst.log, is produced in the default directory.
If there is a problem, study the log file to help determine the cause.
Installing and Upgrading ENVOXr Configuration Software on DEC VAX and DEC AXP Systems (Revision B — May 1998)
4
Section 4 F Installing ENVOX Software
42
4.3
Installing ENVOX Software on Client-Server Systems
The following section describes how to install ENVOX software for a
client-server system.
Step 1:
If you are not logged into the system manager’s account, log
in by entering the user name SYSTEM and the password at
the prompts:
Username: SYSTEM
Password: password
4
The DCL prompt appears.
Step 2:
If you have not already read the installation script from the
installation media as described in the SYBASE installation
procedure (subsection 3.3), insert and make ready the media,
and read the script by entering the following command at the
DCL prompt:
$ backup tapedrive:syb_envox_inst.a/sav *.*/new
where tapedrive is the name of your tapedrive if installing
from tape, or the full directory pathname where the savesets
are stored if installing from disk.
Step 3:
Start the installation script by entering the following command
at the DCL prompt:
$ run sybase_envox_install
The screen clears and the following display appears:
Checking system
Please wait...
The following display appears:
Choose whether to install or de-install ENVOX
Move cursor to item and press <CR>.
INSTALL ENVOX
DE-INSTALL SYBASE and ENVOX
QUIT
Installing and Upgrading ENVOXr Configuration Software on DEC VAX and DEC AXP Systems (Revision B — May 1998)
Installing ENVOX Software F Section 4
Step 4:
43
Move the cursor to INSTALL ENVOX and press Return.
The following display appears:
ENVOX Client-Server Installation
1)ENVOX System Disk = SYS$SYSDEVICE
2)ENVOX Log Disk = SYS$SYSDEVICE
3)ENVOX Database Disk = USER$1
4)ENVOX Account UIC code = 17,1011
5)ENVOXSUPPORT Account UIC code = 17,1012
6)Create ENVOXDB = Y
7)Tape device =
ENTER
QUIT
Step 5:
For menu item 1), enter the name of the disk which will
contain the main ENVOX directory structure.
Step 6:
For menu item 2), enter the name of the disk which will
contain the ENVOX transaction log. The transaction log
requires 46,000 blocks of disk space.
Step 7:
For menu item 3), enter the name of the disk which will
contain the ENVOX database device. The ENVOX database
device requires 250,000 blocks of disk space.
Step 8:
For menu item 4), enter the UIC code for the ENVOX
account. The UIC code must be unique and of the form,
group, member, where group and member are OCTAL
numeric numbers in the range: group=[0 to 3776] and
member=[0 to177776]. A UIC default value of 17,1011 is
recommended and places the ENVOX account in the same
group as the CHIP account.
Step 9:
For menu item 5), enter the UIC code for the
ENVOXSUPPORT account. The UIC code must be unique
and of the form, group, member, where group and member
are OCTAL numeric numbers in the range: group=[0 to 3776]
member=[0 to 177776]. A UIC default value of 17,1012 is
recommended and places the ENVOXSUPPORT account in
the same group as the CHIP account.
Step 10: For menu item 6), enter Y if you want to create ENVOXDB
during installation.
If you enter N, the ENVOXDB will not be created and the
installation time required to create the ENVOX databases will
be reduced to about 30 minutes to 1 hour.
Installing and Upgrading ENVOXr Configuration Software on DEC VAX and DEC AXP Systems (Revision B — May 1998)
4
44
Section 4 F Installing ENVOX Software
Step 11:
For menu item 7): to install from tape, enter the tape device
name where the ENVOX software media is located. To install
from disk, enter the full directory pathname where the
savesets are stored.
Step 12: Move the cursor to ENTER and press Return to continue the
installation.
The following display appears:
Checking menu options
4
Please wait...
If there are no errors, the following display appears:
Options validated OK
Move cursor to item and press <CR>
PROCEED WITH INSTALLATION
MODIFY OPTIONS
QUIT
Step 13: Move the cursor to PROCEED WITH INSTALLATION and
press Return to continue the installation.
If there are no errors, the installation continues to completion.
During installation, the following display appears:
start of inst_upg_envox.com
Deleting existing ENVOX files..
Installing ENVOX files...
upgrading master database
upgrading database master to ENVOX P4.0
master upgrade complete
Dec 12 1997
Dec 12 1997 5:37PM
5:37PM
CREATING ENVOX P4.0 DATABASES ...
The installation process is about to enter a phase where the
ENVOX configuration databases are created.
This will take about 1 to 2 hours to complete.
Installation of ENVOX software is complete.
For new installations you will be prompted to change your
password when you first log into the ENVOX and ENVOXSUPPORT
accounts. Please enter a valid password and keep it safe.
ENVOX install completed successfully on 12-Dec-1997
18:29:17.12
Installing and Upgrading ENVOXr Configuration Software on DEC VAX and DEC AXP Systems (Revision B — May 1998)
Installing ENVOX Software F Section 4
45
Note ... For new installations, the ENVOX forms password is set to
password. We recommend that you change the password to
one of your own and keep the new password safe.
This completes the ENVOX client-server installation.
4.4
Installing ENVOX Software on Client-Only Systems
The following section describes how to install ENVOX software for a
client-only system.
Step 1:
If you are not logged into the system manager’s account, log
in by entering the user name SYSTEM and the password at
the prompts:
Username: SYSTEM
Password: your_password
The DCL prompt appears.
Step 2:
If you have not already read the installation script from the
installation media as described in the SYBASE installation
procedure (subsection 3.5), insert and make ready the media,
and read the script by entering the following command at the
DCL prompt:
$ backup tapedrive:syb_envox_inst.a/sav *.*/new
where tapedrive is the name of your tapedrive if installing
from tape, or the full directory pathname where the savesets
are stored if installing from disk.
Step 3:
Start the installation script by entering the following command
at the DCL prompt:
$ run sybase_envox_install
The screen clears and the following display appears:
Checking system
Please wait...
Installing and Upgrading ENVOXr Configuration Software on DEC VAX and DEC AXP Systems (Revision B — May 1998)
4
46
Section 4 F Installing ENVOX Software
The following display appears:
Choose whether to install or de-install SYBASE and
ENVOX
Move cursor to item and press <CR>.
INSTALL SYBASE
INSTALL ENVOX
DE-INSTALL SYBASE and ENVOX
4
QUIT
Step 4:
Move the cursor to INSTALL ENVOX and press Return.
The following display appears:
ENVOX Client-Only Installation
1)ENVOX System Disk = SYS$SYSDEVICE
2)ENVOX Account UIC code = 17,1011
3)ENVOXSUPPORT Account UIC code = 17,1012
4)Tape device =
ENTER
QUIT
Step 5:
For menu item 1), enter the name of the disk which will
contain the main ENVOX directory structure.
Step 6:
For menu item 2), enter the UIC code for the ENVOX
account. The UIC code must be unique and of the form,
group, member, where group and member are OCTAL
numeric numbers in the range: group=[0 to 3776] and
member=[0 to 177776]. A UIC default value of 17,1011 is
recommended and places the ENVOX account in the same
group as the CHIP account.
Step 7:
For menu item 3), enter the UIC code for the
ENVOXSUPPORT account. The UIC code must be unique
and of the form, group, member, where group and member
are OCTAL numeric numbers in the range: group=[0 to 3776]
member=[0 to 177776]. A UIC default value of 17,1012 is
recommended and places the ENVOXSUPPORT account in
the same group as the CHIP account.
Step 8:
For menu item 4), To install from tape, enter the tape device
name where the ENVOX software media is located. To install
from disk, enter the full directory pathname where the
savesets are stored.
Installing and Upgrading ENVOXr Configuration Software on DEC VAX and DEC AXP Systems (Revision B — May 1998)
Installing ENVOX Software F Section 4
Step 9:
47
Move the cursor to ENTER and press Return to continue the
installation.
The following display appears:
Checking menu options
Please wait...
If there are no errors, the following display appears:
Options validated OK
Move cursor to item and press <CR>
PROCEED WITH INSTALLATION
MODIFY OPTIONS
QUIT
Step 10: Move the cursor to PROCEED WITH INSTALLATION and
press Return to continue the installation.
If there are no errors the installation continues to completion.
During installation, the following display appears:
start of inst_upg_envox.com
Deleting existing ENVOX files...
Installing ENVOX files...
Installation of ENVOX Client software is complete.
For new installations you will be prompted to change
your password when you first log into the ENVOX and
ENVOXSUPPORT accounts. Please enter a valid password
and keep it safe.
ENVOX install completed successfully on 12-DEC-1997 09:03:25.56
Note ... For new installations, the ENVOX forms password is set to
password. We recommend that you change the password to
one of your own and keep the new password safe.
This completes the ENVOX client-only installation.
Installing and Upgrading ENVOXr Configuration Software on DEC VAX and DEC AXP Systems (Revision B — May 1998)
4
48
Section 4 F Installing ENVOX Software
4
Blank page.
Installing and Upgrading ENVOXr Configuration Software on DEC VAX and DEC AXP Systems (Revision B — May 1998)
Upgrading Software on Client-Server Systems F Section 5
49
Figure 5-Table 5
5
5 Upgrading Software on Client-Server
Systems
This section explains how to upgrade SYBASE and ENVOXR software
for client-server systems. Since client-server upgrade methods differ
depending on the ENVOX version on which are you are operating, this
section divides software upgrade into two methods:
J
J
5
A method for upgrading SYBASE and ENVOX software from ENVOX P2.x,
P3.0, P3.2, and P3.3 to ENVOX P4.0
A method for upgrading SYBASE and ENVOX software from ENVOX P3.4
to ENVOX P4.0
Caution ... Upgrading the server to SYBASE System 10.0 will delete all
databases. If you have non-ENVOX databases which you wish
to save, be sure to read section 11 before proceeding.
Note ... In ENVOX P4.0, the upgrade process does not automatically
create databases for your PDX-dumped ENVOX configuration
data. Follow the instructions in this section to dump the data,
create ENVOX databases, and reload the data into these
databases.
Installing and Upgrading ENVOXr Configuration Software on DEC VAX and DEC AXP Systems (Revision B — May 1998)
Section 5 F Upgrading Software on Client-Server Systems
50
5.1
Before Upgrading SYBASE and ENVOX Software
Several procedures and considerations need to be done before you
perform an installation. They are explained in the following subsections.
5.1.1
Precautions
Before you upgrade, you should understand the precautions listed
below. They can save you time and can reduce the possibility of errors.
J
5
J
J
J
J
J
J
Make adequate backups of the system and perform the dumps of
your configuration data prior to upgrading. These actions ensure that
the system software and databases can be recovered if the upgrade
fails.
For ENVOX P2.x, P3.0, P3.2, and P3.3, the SYBASE System 10.0
database will be larger than your present database by at least 26%.
ENVOX P3.4 is already at SYBASE 10.0.
Determine the database structure and statistics of your system.
Subsections 5.2.1 and 5.3.1 contain instructions for obtaining this
information.
Save the printout of the show_dev_alloc.out file for future reference
in case you need to return to the previous configuration.
Make sure that no application software or user processes that access
the SYBASE SQL server are running during the upgrade.
Validate the integrity of all databases (except for tempdb) by running
the database checks described in the System Manager’s Guide to
ENVOX Configuration Software, SM1.0:SW3151, for ENVOX release
P4.0. See the list of ENVOX manuals in subsection 1.7. Any errors
should be reported to your Fisher-Rosemount Systems’
Representative or sales office so that the errors can be corrected
before upgrading.
Do not initialize the second disk; see the following:
Caution ... Do not initialize the second disk for an upgrade because
initializing the disk erases all of the data on the disk.
Installing and Upgrading ENVOXr Configuration Software on DEC VAX and DEC AXP Systems (Revision B — May 1998)
Upgrading Software on Client-Server Systems F Section 5
5.1.2
51
Setting the Password Before Upgrading
Before you can upgrade SYBASE software, the SYBASE system
administrator’s password must be set to database. To change the
password, perform the following steps:
Step 1:
Log into the SYBASE account as follows:
Username: SYBASE
Password: your_password
The DCL prompt appears.
Step 2:
Enter the following command at the DCL prompt:
$ isql/u=“sa”/password=“sa_password”
The command runs the ISQL utility. ISQL commands are case
sensitive.
Step 3:
In the utility, enter the following commands at the prompt
exactly as shown:
1> sp_password “your_password”, “database”, sa
2> go
3> exit
where your_password is any password other than database.
5.1.3
Directory and File Operations During Upgrade
During the upgrade process, several directories are deleted and then
recreated. The sybase_device:[sybase]*.*;* directory and all of its
subdirectories are among these. Also, the main ENVOX directory and its
subdirectories are deleted and recreated.
This ENVOX directory is the one which you normally use for your login
account. If you have added personal files in this directory, they will be
deleted, and you will need to restore them in the recreated directory.
Therefore, it is suggested that you save your personal files to a tape or
disk before starting the upgrade.
During the upgrade process, several temporary files are created in
sys$manager directories. These files are normally deleted when the
upgrade process is complete. However, you may wish to check these
directories after completing the upgrade to make sure that all of the
temporary files are deleted.
Installing and Upgrading ENVOXr Configuration Software on DEC VAX and DEC AXP Systems (Revision B — May 1998)
5
52
Section 5 F Upgrading Software on Client-Server Systems
5.1.4
Considerations for Using the PDX Utility
The following items are important points to consider before proceeding
with the client-server upgrade:
J
J
J
5
J
J
J
J
SYBASE software already existing on your system and all of the
database information will be completely deleted. The PDX dump
method is the only way of saving your database information.
The existing login.com will be saved away as old_login.com in the
top level SYBASE directory. All other SYBASE files will be deleted.
The data in your ENVOX and OPENDB databases can be dumped
with the PDX utility. Data in other databases may or may not be
dumped with the PDX utility. See section 11 for a description of using
this utility for non-ENVOX databases.
Make sure that you list the database statistics for the ENVOX
databases before proceeding with the installation. The list will give
the data and log distribution for the databases along with the
estimated PDX file size.
For the upgrades from P2.x,P3.0, P3.2 and P3.3, you must initiate
the PDX utility from the command line. When the data from all
databases has been PDX dumped, de-install SYBASE and ENVOX
and proceed with the installation for the P2.x and P3.0 upgrades
through the installation menu system.
For the upgrade from P3.4, you normally can run the PDX utility from
the ENVOX menu system to PDX dump data from ENVOX and
OPENDB databases. However, if you have more than sixteen
ENVOX and OPENDB databases, you must run the PDX utility from
the command line.
For PDX dump to a tape, make sure that a pre-initialized tape has
been mounted. A tape can be initialized by inserting the tape in a
tape drive and entering the following command at the DCL prompt:
$ init tapedrive: tape/override=expiration
where tapedrive is the name of your tapedrive.
J
J
Only dump one database per tape to avoid exceeding the tape
capacity. The tape capacity is the amount of data in Mbytes which
will be written to tape before the PDX dump will stop and ask for the
next tape. Mark the tapes and keep them safe; they will be needed
later to load the dumped data to recreated databases.
Before PDX dumping to disk, make sure that there is enough disk
space for the PDX dump. The estimated PDX file size from the
database statistics list can help you determine the required disk
space.
Installing and Upgrading ENVOXr Configuration Software on DEC VAX and DEC AXP Systems (Revision B — May 1998)
Upgrading Software on Client-Server Systems F Section 5
J
53
The menu system considers a PDX dump to be both a PDX dump
and a PDX verification of that dump. The verification phase is
transparent to the user, unless several tapes are used for one
database.
Caution ... Do not PDX dump databases to any of the SYBASE or ENVOX
directories because they are subsequently deleted during the
installation and you will lose the data in the databases.
5.1.5
Guidelines for Running the Upgrade Script
The installation script, sybase_envox_install, is used in the upgrade
process. the following information provides guidelines for running the
script.
J
J
J
When sybase_envox_install is run, a menu driven interface is
displayed on the screen. It is a character based menu.
Navigation through the menu items is accomplished by using the up
and down arrow keys or by pressing Return on any of the menu item
fields.
Navigation through the menu item data fields is accomplished by
using the left and right arrow keys.
J
The menu item data fields are set for insert mode.
J
If a menu item is incorrect, its data field is shown in reverse video.
J
J
J
J
J
Most of the menu data is defaulted for you when the menu is
displayed. The defaulted data can be modified.
Moving the cursor to ENTER and pressing Return causes the data
from the menu to be checked. If there are no errors or warnings, the
upgrade proceeds normally.
If there are error or warning messages, system errors are shown first,
followed by menu errors, and then warnings. By repeatedly pressing
Return, you cycle through the messages and back to the main
menu. Once in the main menu, you can quit if system errors need to
be corrected. For menu errors, correct the menu data and press
Return to check the corrected data.
Menu item error messages appear with the menu item number and
text.
Pressing Ctrl-w refreshes the menu screen.
Installing and Upgrading ENVOXr Configuration Software on DEC VAX and DEC AXP Systems (Revision B — May 1998)
5
Section 5 F Upgrading Software on Client-Server Systems
54
J
J
J
J
5
5.2
Pressing Ctrl-e deletes the current data field.
If there are no error messages, the menu disappears from the screen
and is replaced with informational messages from the various stages
of the upgrade.
Once upgrade has started, do not try to interrupt it. SYBASE
software installation and upgrade typically lasts about 60 minutes on
a VAX system and 20 minutes on an AXP system. ENVOX software
installation and upgrade typically lasts 3 to 4 hours.
A log file, sybase_envox_inst.log, is produced in the sys$manager
directory. If the upgrade does not proceed as expected, study the log
file to help determine the cause.
Upgrading ENVOX Versions P2.x, P3.0, P3.2, and P3.3
to P4.0
Figure 5-1 shows the procedure for upgrading a client-server system for
ENVOX versions P2.x, P3.0, P3.2 and P3.3. The process of upgrading
from these versions to SYBASE System 10.0.2.6 and ENVOX P4.0
consists of the following procedures:
J
J
J
List database structure and statistics as described in subsection
5.2.1.
Dump the data from the existing ENVOX and Open databases to
disk or tape, using the PDX Utility as described in subsection 5.2.2.
De-install SYBASE and ENVOX software as described in subsection
8.5.
J
Upgrade to OpenVMS V7.1.
J
Install SYBASE and ENVOX software.
j For the SYBASE installation, follow the instructions for
client-server systems as described in subsection 3.3
j After the successful installation of SYBASE software, follow the
instructions for the ENVOX installation for client-server systems
as described in subsection 4.3.
J
J
J
Create logical devices and ENVOX and Open databases as
described in section 5.4
With the PDX utility, re-load your configuration data into the newly
created ENVOX and Open databases as described in subsection
5.4.
Backup your upgraded system as described in Section 8.
Installing and Upgrading ENVOXr Configuration Software on DEC VAX and DEC AXP Systems (Revision B — May 1998)
Upgrading Software on Client-Server Systems F Section 5
55
Start
System Backup
See Section 8
Backup Databases
See ENVOX System
Managers Guide
List Database
Statistics and Save
See Subsection 5.2.1
PDX Dump Data
from Databases
See Subsection 5.2.2
De-install SYBASE
and ENVOX
See Section 8.5
Upgrade VMS and
DECWindows Motif
See OpenVMS Manuals
Install SYBASE
Software
See Subsection 3.3
Install ENVOXr
Software
See Subsection 4.3
Create Logical
Devices
See Subsection 5.4
Create ENVOX
Databases
See Subsection 5.4
PDX Load Data
into Databases
See Subsection 5.4
System Backup
See Section 8
End
Figure 5-1.
ENVOX P2.x, P3.0, P3.2, P3.3 and SYBASE Software
Upgrade Process for a Client-Server System
Installing and Upgrading ENVOXr Configuration Software on DEC VAX and DEC AXP Systems (Revision B — May 1998)
5
Section 5 F Upgrading Software on Client-Server Systems
56
5.2.1
Determining Database Structure and Statistics
Before upgrading ENVOX versions P2.x, P3.0, P3.2 and P3.3, you must
determine the database structure and statistics of your system. This
information is used to determine the size to make the new databases
after the software upgrade.
Determine the database structure and statistics as described in the steps
below.
Step 1:
Log into the SYBASE account as follows:
Username:
Password:
5
SYBASE
your_password
The DCL prompt appears.
Step 2:
$
Enter the following command at the DCL prompt:
isql/u=”sa”/password=”sa_password”/output=show_dev_alloc.out
Step 3:
Enter the following command at the SYBASE prompts:
1> show_dev_alloc
2> go
1> exit
Step 4:
Enter the following command at the DCL prompt:
$
print show_dev_alloc.out
Save the printout of the show_dev_alloc.out file for future
reference in case you need to return to the previous
configuration.
Step 5:
If you are not logged into the SYSTEM account, log in by
entering the user name SYSTEM and your password at the
prompts:
Username: SYSTEM
Password: your_password
The DCL prompt appears.
Step 6:
To obtain the PDX utility, insert and make ready the
installation media, and read the PDX utility from the media by
entering the following commands at the DCL prompts:
J
$
$
For upgrades from P3.2 and P3.3, enter:
mount/for tapedrive:
backup tapedrive:ENVOX040.Z envox$application:pdx.exe
/SELECT=pdx.exe/log/ignore=label/owner=ENVOX/replace
Installing and Upgrading ENVOXr Configuration Software on DEC VAX and DEC AXP Systems (Revision B — May 1998)
Upgrading Software on Client-Server Systems F Section 5
J
$
$
For upgrades from P2.x (VAX platform only), enter:
mount/for tapedrive:
backup tapedrive:ENVOX040.Z envox$application:pdx.exe
/SELECT=P20_pdx.exe/log/ignore=label/owner=ENVOX/replace
J
$
$
57
For upgrades from P3.0 (VAX platform only), enter:
mount/for tapedrive:
backup tapedrive:ENVOX040.Z envox$application:pdx.exe
/SELECT=P30_pdx.exe/log/ignore=label/owner=ENVOX/replace
Step 7:
Run the PDX utility in information mode on each ENVOX and
Open database listed in the file show_dev_alloc.out.
Enter the following commands at the DCL prompt:
$
$
$
$
5
define sys$output DB.out
mcr envox$application:pdx.exe -sv df ”SERVER” ”DB” ”sa_password” nl:
deassign sys$output
print DB.out
where SERVER = the name of the server
DB = name of the database
sa_password = your sa password
To retain the database structure and statistics for each
ENVOX and Open database in your system, save the file
DB.OUT and its printout. There is a separate file for each
database.
Example Command
The following example lists information on the ENVOX database
ENVOXDB located on the SYBASE SQL server to the file
ENVOXDB.OUT and uses the SA password, database.
$ define sys$output ENVOXDB.OUT
$ mcr envox$application:pdx.exe -sv df ”SYBASE”
”ENVOXDB” ”database” nl:
$ deassign sys$output
$ print ENVOXDB.out
Once you have run the PDX utility and printed DB.out, you may dump
your ENVOX and Open databases. Proceed to subsection, 5.2.2.
Installing and Upgrading ENVOXr Configuration Software on DEC VAX and DEC AXP Systems (Revision B — May 1998)
58
Section 5 F Upgrading Software on Client-Server Systems
5.2.2
Dumping Data from ENVOX and Open Databases — ENVOX
P2.x, P3.0, P3.2 and P3.3
Dump the data from ENVOX and Open databases which are on ENVOX
versions P2.x, P3.0, P3.2 and P3.3 as described in the steps below:
Step 1:
Log into the ENVOX account as follows:
Username: ENVOX
Password: your_password
The DCL prompt appears.
5
Step 2:
If you have not already done so, determine the structure of
your databases and collect the statistics generated, as
described in subsection 5.2.1.
Step 3:
Dump the data to tape by entering the following command at
the DCL prompt:
$ mcr envox$application:pdx.exe df ”SERVER” ”DB” ”sa_password” tapedrive:
See The System Manager’s Guide to ENVOXr Configuration
Software, SM1.0:SW3151, for P4.0 for more details on the
PDX utility.
Step 4:
Repeat Step 3 for every ENVOX and Open database, using a
separate tape for each database.
Once you have dumped all of your data from databases, you may
complete the upgrade. Proceed to subsection 5.2.3.
Installing and Upgrading ENVOXr Configuration Software on DEC VAX and DEC AXP Systems (Revision B — May 1998)
Upgrading Software on Client-Server Systems F Section 5
5.2.3
59
Completing the Upgrade Process
Complete the upgrade process as described in the following steps:
Note ... Before completing the upgrade process, it is recommended that
you review the information in subsections 5.1.5, 3.1 and 3.2.
Step 1:
Follow the instructions given in section 8.5 to de-install
SYBASE and ENVOX software.
Step 2:
Upgrade your VAX or AXP system to OpenVMS V7.1 and
DECwindows Motif version V1.2-3(VAX system) and version
V1.2-4(AXP system).
Step 3:
Follow the instructions in subsection 3.3 to install SYBASE on
a client-server system.
Step 4:
Follow the instructions in subsection 4.1 to install ENVOX
P4.0 software on a client-server system.
Step 5:
Create logical devices as described in subsection 5.4.
Step 6:
Create ENVOX and OPEN databases as described in
subsection 5.4.
Step 7:
Load ENVOX and Open databases with the PDX utility as
described in subsection 5.4
Installing and Upgrading ENVOXr Configuration Software on DEC VAX and DEC AXP Systems (Revision B — May 1998)
5
Section 5 F Upgrading Software on Client-Server Systems
60
5.3
Upgrading ENVOX Version P3.4 to P4.0
Figure 5-2 shows the process for upgrading a client-server system from
version P3.4 to SYBASE System 10.0.2.6 and ENVOX P4.0. The
process consists of the following procedures:
Note ... It is suggested that you upgrade your VAX and AXP system to
OpenVMS 7.1 and DECWindows Motif V1.2.3 (for VAX) or
V1.2.4 (for AXP) before proceeding with the upgrade.
5
J
J
List database structure and statistics as described in subsection
5.3.1.
Dump data from existing ENVOX and Open databases to disk or
tape through the ENVOX menu system as described in subsection
5.3.2.
J
Upgrade SYBASE and ENVOX software as described in section
J
Create ENVOX and Open databases as described in section 5.6
J
With the PDX utility, re-load ENVOX and Open databases.
J
Backup the upgraded system.
Installing and Upgrading ENVOXr Configuration Software on DEC VAX and DEC AXP Systems (Revision B — May 1998)
Upgrading Software on Client-Server Systems F Section 5
61
Start
System Backup
See Section 8
Backup Databases
See ENVOX System
Managers Guide
List Database
Statistics and Save
See Subsection 5.3.1
PDX Dump Data
from Databases
See Subsection 5.3.2
Upgrade SYBASE
Software
See Subsection 5.3.3
Upgrade ENVOX
Software
See Subsection 5.3.3
Create ENVOXR
Databases
See Subsection 5.4
PDX Load Data
into Databases
See Subsection 5.4
System Backup
See Section 8
End
Figure 5-2.
ENVOX P3.4 and SYBASE Software Upgrade Process for
a Client-Server System
Installing and Upgrading ENVOXr Configuration Software on DEC VAX and DEC AXP Systems (Revision B — May 1998)
5
Section 5 F Upgrading Software on Client-Server Systems
62
5.3.1
Determining Database Structure and Statistics
Before upgrading ENVOX version P3.4, determine the database
structure and statistics of your system. This information is used to
determine the size to make the new databases after the software
upgrade.
Determine the database structure and statistics as described in the steps
below.
Step 1:
Log into the SYBASE account as follows:
Username:
Password:
5
SYBASE
your_password
The DCL prompt appears.
Step 2:
$
Enter the following command at the DCL prompt:
isql/u=”sa”/password=”sa_password”/output=show_dev_alloc.out
Step 3:
Enter the following command at the SYBASE prompts:
1>
2>
1>
2>
1>
Step 4:
use sybsystemprocs
go
show_dev_alloc
go
exit
Enter the following command at the DCL prompt:
$
print show_dev_alloc.out
Save the printout of the show_dev_alloc.out file for future
reference in case you need to return to the previous
configuration.
The DCL prompt appears.
Installing and Upgrading ENVOXr Configuration Software on DEC VAX and DEC AXP Systems (Revision B — May 1998)
Upgrading Software on Client-Server Systems F Section 5
Step 5:
63
Run the PDX utility in information mode on each ENVOX and
Open database listed in the file show_dev_alloc.out.
Enter the following commands at the DCL prompt:
$
$
$
$
define sys$output DB.out
mcr envox$application:pdx.exe -sv df ”SERVER” ”DB” ”sa_passwd” nl:
deassign sys$output
print DB.out
where SERVER = the name of the server
DB = name of the database
sa_password = your sa password
To retain the database structure and statistics for each
ENVOX and Open database in your system, save the file
ENVOXDB.OUT and its printout. There is a separate file for
each database.
Example Command
The following example lists information on the ENVOX database
ENVOXDB located on the SYBASE SQL server to the file
ENVOXDB.OUT and uses the SA password, database.
$ define sys$output ENVOXDB.OUT
$ mcr envox$application:pdx.exe -sv df ”SYBASE”
”ENVOXDB” ”database” nl:
$ deassign sys$output
$ print ENVOXDB.out
Once you have run the PDX utility and printed DB.out, you may dump
your ENVOX and Open databases. Proceed to subsection 5.3.2.
Installing and Upgrading ENVOXr Configuration Software on DEC VAX and DEC AXP Systems (Revision B — May 1998)
5
64
Section 5 F Upgrading Software on Client-Server Systems
5.3.2
Dumping Data from ENVOX and Open Databases —
ENVOX P3.4
Dump the data from ENVOX and Open databases which are on ENVOX
version P3.4 as described in the steps below:
Step 1:
If your system is not already running OpenVMS V7.1 and
DECwindows Motif version V1.2-3(VAX system) and version
V1.2-4(AXP system), then upgrade your VAX or AXP systems
to these software versions.
Step 2:
If you are not logged into the system manager’s account, log
in by entering the user name SYSTEM and the password at
the prompts:
5
Username: SYSTEM
Password: your_password
The DCL prompt appears.
Step 3:
Insert and make ready the installation media, and read the
installation script from the media by entering the following
command at the DCL prompt:
$ backup tapedrive:syb_envox_inst.a/sav *.*/new
where tapedrive is the name of your tapedrive if upgrading
from tape, or the full directory pathname where the savesets
are stored if upgrading from disk.
Step 4:
Start the installation script by entering the following command
at the DCL prompt:
$ run sybase_envox_install
The following display appears:
Checking System
Please wait...
If there are no errors, the following display appears:
Choose whether to install or de-install SYBASE and ENVOX
Move cursor to item and press <CR>.
INSTALL SYBASE
INSTALL ENVOX
DE-INSTALL SYBASE and ENVOX
QUIT
Installing and Upgrading ENVOXr Configuration Software on DEC VAX and DEC AXP Systems (Revision B — May 1998)
Upgrading Software on Client-Server Systems F Section 5
Step 5:
65
Move the cursor to INSTALL SYBASE and press Return.
The following display appears:
PDX dump or list database statistics.
Move cursor to item and press <CR>
PDX DUMP DATABASES
LIST OUT DATABASE STATISTICS
QUIT
Step 6:
Move the cursor to LIST OUT DATABASE STATISTICS and
press Return.
The following display appears:
Database
Type
Data
Log
Space used(Mb)
PDX filesize(MB)
(Several lines of database statistics listed in this area of
display
Press <CR> to continue, Ctrl-Z to exit.
where Database = the name of the database
Type = ENVOX or OPENDB
Data = Size of data part of database in Mbytes
Log = Size of log part of database in Mbytes
Space used = Space used by database in Mbytes
PDX filesize = Estimated size of PDX dump in Mbytes
The statistics of every ENVOX and OPEN database in the
system are displayed. The data is also logged to the file,
db_details.log, in the current directory. Be sure to save this
file for later use.
Step 7:
Press Return.
The following display appears (same menu as in Step 5):
PDX dump or list database statistics.
Move cursor to item and press <CR>
PDX DUMP DATABASES
LIST OUT DATABASE STATISTICS
QUIT
Installing and Upgrading ENVOXr Configuration Software on DEC VAX and DEC AXP Systems (Revision B — May 1998)
5
66
Section 5 F Upgrading Software on Client-Server Systems
Step 8:
Move the cursor to PDX DUMP DATABASES, and press
Return.
The following display appears:
PDX dump a database or install.
Move cursor to item and press <CR>
PDX dump <TYPE> database <DBNAME>
PDX dump <TYPE> database <DBNAME>
PDX dump <TYPE> database <DBNAME>
.
.
.
5
INSTALL
QUIT
There is a PDX dump selection for every database which was
listed in Step 6.
Step 9:
Move the cursor to the PDX dump line of the database you
want to PDX dump, and press Return. (If you do not wish to
dump data from any of the databases, you may choose
INSTALL).
The following display appears:
PDX dump to tape or to disk.
Move cursor to item and press <CR>
PDX DUMP DATABASE TO TAPE
PDX DUMP DATABASE TO DISK
QUIT
Step 10: If you intend to use a tape dump device, proceed to Step 11;
if you intend to use a disk dump device, proceed to Step 16.
Step 11:
To dump to tape, insert a pre-initialized tape into the tape
drive. If you intend to use the tape drive used by the
installation, then first remove the installation tape before
inserting a pre-initialized tape. Move the cursor to PDX DUMP
DATABASE TO TAPE, and press Return.
The following display appears:
Installing and Upgrading ENVOXr Configuration Software on DEC VAX and DEC AXP Systems (Revision B — May 1998)
Upgrading Software on Client-Server Systems F Section 5
67
Tape Characteristics
-------------------1)Tape device filename =
2)Tape Capacity(Mb) =
ENTER
QUIT
Step 12: Enter the tape device filename (for example,
MKA100:ENVOXDB.PDX) and the tape capacity. Then, move
the cursor to ENTER and press Return.
The following display appears if you are dumping to tape:
Checking tape characteristics
Please wait...
Followed by the next display:
PDX dump of database dbname in progress
Please wait...
If a small tape capacity was set, the following display
appears:
Tape capacity has been reached.
Put next tape into drive.
.
.
.
Press <CR> to continue, Ctrl-Z to exit.
Step 13: Put the next tape into the drive, and press Return. The PDX
dump process will continue. If another tape is needed, the
prompt is repeated.
When the verification phase is reached, the following display
appears:
PDX entering verification phase.
Please insert first tape for this database.
.
.
.
Press <CR> to continue, Ctrl-Z to exit.
Installing and Upgrading ENVOXr Configuration Software on DEC VAX and DEC AXP Systems (Revision B — May 1998)
5
68
Section 5 F Upgrading Software on Client-Server Systems
Step 14: Put the first tape that was used for this PDX dump into the
tapedrive, and press Return. The PDX dump process will
continue. If another tape is needed, the prompt is repeated.
When the PDX dump has completed successfully, the
following display appears:
PDX dump of database dbname COMPLETE.
.
.
.
Press <CR> to continue, Ctrl-Z to exit.
5
See Appendix A for list of error conditions and corrective
actions.
Step 15: Proceed to Step 18.
Step 16: If you want to PDX dump your databases to disk, move the
cursor to PDX DUMP DATABASE TO DISK, and press Return.
The following display appears:
File Characteristics
-------------------1)PDX filename =
ENTER
QUIT
Step 17: Enter a filename which you want the PDX dump file to be
called. Include the full pathname including the directories
(e.g. dka100:[dumps]envoxdb.pdx).
Move the cursor to ENTER and press Return.
The following display appears if you are dumping to disk:
Checking PDX file
Please wait...
Followed by the next display:
PDX dump of database dbname in progress
Please wait...
Step 18: Repeat the dump process, beginning with Step 8, for each
ENVOX and Open database, using a separate tape for each
database.
Installing and Upgrading ENVOXr Configuration Software on DEC VAX and DEC AXP Systems (Revision B — May 1998)
Upgrading Software on Client-Server Systems F Section 5
69
When you have completed the dump process for all of your databases,
complete the upgrade process as described in subsection 5.3.3.
5.3.3
Completing the Upgrade Process
Complete the upgrade process as described in the following steps:
Note ... Before completing the upgrade process, it is recommended that
you review the information in subsections 5.1.5, 3.1 and 3.2.
Step 1:
When all ENVOX and Open databases have been dumped
successfully, make sure that the installation media is inserted
in the tape drive if installing from tape.
The system should be displaying the following:
PDX dump a database or install.
Move cursor to item and press <CR>
PDX dump <TYPE> database <DBNAME>
PDX dump <TYPE> database <DBNAME>
PDX dump <TYPE> database <DBNAME>
.
.
.
INSTALL
QUIT
Step 2:
To upgrade SYBASE, move the cursor to INSTALL, and press
Return.
The following display appears:
SYBASE Client-Server Upgrade
---------------------------1)Tape device =
ENTER
QUIT
Step 3:
After entering the tape device name (or full disk directory
path), select ENTER from the above menu.
Installing and Upgrading ENVOXr Configuration Software on DEC VAX and DEC AXP Systems (Revision B — May 1998)
5
70
Section 5 F Upgrading Software on Client-Server Systems
The following display appears:
Checking menu options
Please wait...
If there are no errors, the system displays the following:
Options validated OK
Move cursor to item and press <CR>
PROCEED WITH INSTALLATION
MODIFY OPTIONS
5
QUIT
Step 4:
Move the cursor to PROCEED WITH INSTALLATION and
press Return to continue the sybase upgrade.
The following display appears:
start of inst_upg_sybase.com
---------------------------Installing SYBASE files...
sybase install completed successfully on
12-FEB-1998 16:24:43.62
$
============================================
Step 5:
After completing the sybase upgrade, restart the installation
program to upgrade ENVOX, by entering:
$ run sybase_envox_install
The following display appears:
Checking system
Please wait...
Installing and Upgrading ENVOXr Configuration Software on DEC VAX and DEC AXP Systems (Revision B — May 1998)
Upgrading Software on Client-Server Systems F Section 5
71
If there are no errors, the following display appears:
Choose whether to install or de-install
ENVOX. Move cursor to item and press <CR>
INSTALL ENVOX
DE-INSTALL SYBASE and ENVOX
QUIT
Step 6:
Move the cursor to INSTALL ENVOX, and press Return to
continue the SYBASE upgrade.
The following display appears:
ENVOX Client-Server Upgrade
--------------------------1)Tape device =
ENTER
Step 7:
QUIT
Enter the tape device (or full disk directory path) name.
The following display appears:
Checking menu options
Please wait...
If there are no errors, the following display appears:
Options validated OK
Move cursor to item and press <CR>
PROCEED WITH INSTALLATION
MODIFY OPTIONS
QUIT
Installing and Upgrading ENVOXr Configuration Software on DEC VAX and DEC AXP Systems (Revision B — May 1998)
5
72
Section 5 F Upgrading Software on Client-Server Systems
Step 8:
Move the cursor to PROCEED WITH INSTALLATION and
press Return to continue the sybase upgrade.
The following display appears:
start of inst_upg_envox.com
---------------------------Deleting existing ENVOX files...
Installing ENVOX files...
upgrading master database
upgrading database master to envox P4.0 Feb 12 1998
5:48PM
5
master upgrade complete Feb 12 1998 5:48PM
upgrading envox_readonly database
upgrading database envox_readonly to envox P4.0
Feb 12 1998 5:48PM
dropping dbo’s procedures...
upgrading tables to 12-Dec-1996...
upgrading tables to 06-Jun-1997...
upgrading tables to 05-Dec-1997...
loading readonly data and stored procedures...
envox_readonly upgrade complete Feb 12 1998 5:58PM
Installation of ENVOX software is complete.
For new installations you will be prompted to change
your password when you first log into the ENVOX and
ENVOXSUPPORT accounts.
Please enter a valid password and keep it safe.
ENVOX install completed successfully on 12-FEB-1998
17:58:26.08
Step 9:
Create ENVOX and OPEN databases as described in
subsection 5.4.
Step 10: Load the dumped data into the newly created ENVOX and
Open databases with the PDX utility as described in
subsection 5.4.
Installing and Upgrading ENVOXr Configuration Software on DEC VAX and DEC AXP Systems (Revision B — May 1998)
Upgrading Software on Client-Server Systems F Section 5
5.4
73
Creating and Loading ENVOX and Open Databases
After the Upgrade
Note ... Upgrades from ENVOX P3.4 preserve logical devices.
Upgrades from P2.x, P3.0, P3.2, and P3.3 systems delete
logical devices, they must be re-created.
The upgrade process does not create an empty ENVOX
database. ENVOX databases must be created before loading
ENVOX and OPEN databases using the PDX utility.
You use the PDX utility embedded in ENVOX software to load databases
from a PDX dump. This utility is described in the The System Manager’s
Guide for ENVOX Configuration Software, SM1.0:SW3151.
The following steps describe the process for loading ENVOX and Open
databases from a PDX dump.
Step 1:
After the successful installation of ENVOX software, run the
standalone ADMIN utility to create logical devices and
databases to receive the PDX dumps which were created
before the SYBASE and ENVOX upgrade.
See sections 5 and 9 of the The System Manager’s Guide to
ENVOX Configuration Software, SM1.0:SW3151, for details
on how to create these databases. Use the list of database
statistics produced during the SYBASE upgrade to help
determine the size to make the databases.
Step 2:
To load the PDX dumps into the databases, use either the
ENVOX administration forms system or the command line
version of the PDX utility (pdx.exe).
The PDX utility can load PDX dumps from either disk or tape.
See section 9 of the The System Manager’s Guide to ENVOX
Configuration Software, SM1.0:SW3151, for details on how to
run the utility.
Installing and Upgrading ENVOXr Configuration Software on DEC VAX and DEC AXP Systems (Revision B — May 1998)
5
74
Section 5 F Upgrading Software on Client-Server Systems
To run the PDX utility to load from tape, log into the ENVOX
account and type the following at the command line:
$ mcr envox$application:pdx fd tape:filename “SERVERNAME” “DBNAME”
“sapasswd”
Example Command
Fill in your tape:filename (for example, MKA100:envoxdb.pdx), server
name, database name, and SA password.
5
The following example transfers the file contents of tran1.pdx held on the
tape device mka500: to the database ENVOXDB held on the SYBASE
SQL server. The sa password is database.
$ mcr envox$application:pdx fd mka500:tran1.pdx ”SYBASE” ”ENVOXDB”
”database”
Note ... If the original database has a NULL password, it is changed by
the system to password after the PDX dump and load process
is complete.
Also, all users are cleared from the target database before
loading. So, if a user is not recorded in the PDX files, the user
will not exist in the target database after the PDX load.
However, users are logged into the master database when they
log into ENVOX forms.
Installing and Upgrading ENVOXr Configuration Software on DEC VAX and DEC AXP Systems (Revision B — May 1998)
Upgrading Software on Client-Server Systems F Section 5
5.5
75
Reloading P4.0 ENVOX Software
This subsection describes how you reload P4.0 ENVOX software. Two
reasons you might need to reload ENVOX P4.0 software on a system
already running P4.0 are:
J
J
You are a customer who has an agreement with
Fisher-Rosemount Systems to implement pre-release software
products in controlled environments called Beta sites. These sites
must then reload P4.0 when the final software version is released.
In some circumstances, existing ENVOX P4.0 files have become
corrupted or have been inadvertently deleted and, as a result, you
must re-load version P4.0.
Note ... It is suggested that you read the subsection 5.1.1 to understand
the upgrade precautions.
To reload ENVOX P4.0, perform the following steps:
Step 1:
If you are not logged into the system manager’s account, log
in by entering the user name SYSTEM and your password at
the prompts:
Username: SYSTEM
Password: your_password
The DCL prompt appears.
Step 2:
Insert and make ready the installation media, and read the
installation script from the media by entering the following
command at the DCL prompt:
$ backup tapedrive:syb_envox_inst.a/sav *.*/new
where tapedrive is the name of your tapedrive if upgrading
from tape, or the full directory pathname where the savesets
are stored if upgrading from disk.
Step 3:
Start the installation script by entering the following command
at the DCL prompt:
$ run sybase_envox_install
The screen clears and the following display appears:
Installing and Upgrading ENVOXr Configuration Software on DEC VAX and DEC AXP Systems (Revision B — May 1998)
5
76
Section 5 F Upgrading Software on Client-Server Systems
Checking system
Please wait...
If there are no errors, the following display appears:
Choose whether to install or de-install ENVOX.
Move cursor to item and press <CR>.
INSTALL ENVOX
DE-INSTALL SYBASE and ENVOX
5
QUIT
Step 4:
Move the cursor to INSTALL ENVOX and press Return.
The following display appears:
ENVOX Client-Server Upgrade
1)Tape device =
ENTER
QUIT
Step 5:
To upgrade from tape, enter the tape device name where the
ENVOX software is located. To upgrade from disk, enter the
full directory pathname where the savesets are stored.
Step 6:
Move the cursor to ENTER and press Return to continue the
upgrade.
The following display appears:
Checking menu options
Please wait...
If there are no errors, the following display appears:
Options validated OK
Move cursor to item and press <CR>
PROCEED WITH INSTALLATION
MODIFY OPTIONS
QUIT
Step 7:
Move the cursor to PROCEED WITH INSTALLATION and
press Return to continue the upgrade.
Installing and Upgrading ENVOXr Configuration Software on DEC VAX and DEC AXP Systems (Revision B — May 1998)
Upgrading Software on Client-Server Systems F Section 5
77
If there are no errors, the upgrade continues to completion.
During upgrade, the following display appears:
start of inst_upg_envox.com
---------------------------Deleting existing ENVOX files...
Installing ENVOX files...
upgrading master database
upgrading database master to envox P4.0
1997 12:46PM
master upgrade complete
DEC 12
DEC 12 1997 12:47PM
UPDATING ENVOX DATABASES TO P4.0 ...
The installation process is about to enter a phase
where all ENVOX configuration databases will be
upgraded to P4.0 databases. This will take about 1 to
2 hours to complete FOR EACH DATABASE.
upgrading envox_readonly database
upgrading database envox_readonly to envox P4.0 DEC
12 1997 12:47PM
dropping dbo’s procedures...
loading readonly data and stored procedures...
envox_readonly upgrade complete
DEC 12 1997
12:47PM
The following databases will be upgraded...
ENVOXDB upgrading database ENVOXDB to envox P4.0
Dec 12 1997 12:47PM
dropping dbo’s views, triggers and procedures...
reloading procedures, triggers and views...
ENVOXDB upgrade complete
Dec 12 1997 12:47PM
upgrading database OPENDB to envox P4.0 Dec 12
1997 12:47PM
Installation of ENVOX software is complete.
For new installations you will be prompted to change
your password when you first log into the ENVOX and
ENVOXSUPPORT accounts.
Please enter a valid password and keep it safe.
ENVOX install completed successfully on 12-DEC-1997
12:47:10.70
Step 8:
Log out of the ENVOX account. This completes the ENVOX
P4.0 reload.
Installing and Upgrading ENVOXr Configuration Software on DEC VAX and DEC AXP Systems (Revision B — May 1998)
5
78
Section 5 F Upgrading Software on Client-Server Systems
5
Blank page.
Installing and Upgrading ENVOXr Configuration Software on DEC VAX and DEC AXP Systems (Revision B — May 1998)
Upgrading Software on Client-Only Systems F Section 6
79
Figure 6-Table 6
6
6 Upgrading Software on Client-Only
Systems
This section describes how to upgrade SYBASE and ENVOXr software
for client-only systems. Unlike client-server systems, the client-only
upgrade process is the same for any any ENVOX version which you are
currently using.
Figure 6-1 shows the procedure for upgrading a client-only system. You
must upgrade your ENVOX and SYBASE software in the sequence
shown in the figure. Optionally, you may also want to upgrade your
OpenVMS operating system at this time.
Start
System Backup
See Section 8
Upgrade VMS and
DECWindows Motif
See OpenVMS Manuals
Upgrade SYBASE
Software
See Subsection 6.1
Upgrade ENVOXr
Software
See Subsection 6.2
System Backup
See Section 8
End
Figure 6-1.
ENVOX and SYBASE Software Upgrade for a Client-Only
System
Installing and Upgrading ENVOXr Configuration Software on DEC VAX and DEC AXP Systems (Revision B — May 1998)
6
Section 6 F Upgrading Software on Client-Only Systems
80
Note ... System backup is extremely important before and after an
upgrade. Always back up all disks on the system which contain
ENVOX software, SYBASE software, databases, or transaction
logs. A backup will ensure that all data can be recovered in
case of an upgrade failure. Store backup tapes in an
environmentally and physically protected area.
6.1
Upgrading SYBASE Software on Client-Only Systems
To upgrade SYBASE software:
6
Step 1:
If you are not logged into the system manager’s account, log
in by entering the user name SYSTEM and the password at
the prompts:
Username: SYSTEM
Password: your_password
The DCL prompt appears.
Step 2:
Insert and make ready the installation media, and read the
installation script from the media by entering the following
command at the DCL prompt:
$ backup tapedrive:syb_envox_inst.a/sav *.*/new
where tapedrive is the name of your tapedrive if upgrading
from tape, or the full directory pathname where the savesets
are stored if upgrading from disk.
Step 3:
Start eh installation script by entering the following command
at the DCL prompt:
$ run sybase_envox_install
The screen clears and the following display appears:
Checking system
Please wait...
Installing and Upgrading ENVOXr Configuration Software on DEC VAX and DEC AXP Systems (Revision B — May 1998)
Upgrading Software on Client-Only Systems F Section 6
81
The following display appears:
Choose whether to install or de-install SYBASE and
ENVOX
Move cursor to item and press <CR>.
INSTALL SYBASE
INSTALL ENVOX
DE-INSTALL SYBASE and ENVOX
QUIT
Step 4:
Move the cursor to INSTALL SYBASE and press Return.
The following display appears:
SYBASE Client-Only Upgrade
1)Tape device =
ENTER
QUIT
Step 5:
To upgrade from tape, enter the tape device name where the
ENVOX software media is located. To upgrade from disk,
enter the full directory pathname where the savesets are
stored.
Step 6:
Move the cursor to ENTER and press Return to continue the
upgrade.
The following display appears:
Checking menu options
Please wait...
If there are no errors, the following display appears:
Options validated OK
Move cursor to item and press <CR>
PROCEED WITH INSTALLATION
MODIFY OPTIONS
QUIT
Installing and Upgrading ENVOXr Configuration Software on DEC VAX and DEC AXP Systems (Revision B — May 1998)
6
Section 6 F Upgrading Software on Client-Only Systems
82
Step 7:
Move the cursor to PROCEED WITH INSTALLATION and
press Return to continue the upgrade.
If there are no errors, the upgrade continues to completion.
During upgrade, the following display appears:
start of inst_upg_sybase.com
Deleting existing sybase files...
Installing SYBASE files...
Sybase install completed successfully on 12-DEC-1997 17:43.45
This completes the SYBASE Upgrade. See subsection 6.2 to upgrade
ENVOX software on a client-only system.
6
6.2
Upgrading ENVOX Software on Client-Only Systems
To upgrade ENVOX software:
Step 1:
If you are not logged into the system manager’s account, log
in by entering the user name SYSTEM and the password at
the prompts:
Username: SYSTEM
Password: your_password
The DCL prompt appears.
Step 2:
If you have not already read the installation script from the
installation media as described in the SYBASE installation
procedure (subsection 3.5), insert and make ready the media,
and read the script by entering the following command at the
DCL prompt:
$ backup tapedrive:syb_envox_inst.a/sav *.*/new
where tapedrive is the name of your tapedrive if upgrading
from tape, or the full directory pathname where the savesets
are stored if upgrading from disk.
Step 3:
Start the installation script by entering the following command
at the DCL prompt:
$ run sybase_envox_install
The screen clears and the following display appears:
Checking system
Please wait...
Installing and Upgrading ENVOXr Configuration Software on DEC VAX and DEC AXP Systems (Revision B — May 1998)
Upgrading Software on Client-Only Systems F Section 6
83
The following display appears:
Choose whether to install or de-install SYBASE and
ENVOX
Move cursor to item and press <CR>.
INSTALL SYBASE
INSTALL ENVOX
DE-INSTALL SYBASE and ENVOX
QUIT
Step 4:
Move the cursor to INSTALL ENVOX and press Return.
The following display appears:
ENVOX Client-Only Upgrade
1)Tape device =
ENTER
QUIT
Step 5:
To upgrade from tape, enter the tape device name where the
ENVOX software media is located. To upgrade from disk,
enter the full directory pathname where the savesets are
stored.
Step 6:
Move the cursor to ENTER and press Return to continue the
upgrade.
The following display appears:
Checking menu options
Please wait...
If there are no errors, the following display appears:
Options validated OK
Move cursor to item and press <CR>
PROCEED WITH INSTALLATION
MODIFY OPTIONS
QUIT
Installing and Upgrading ENVOXr Configuration Software on DEC VAX and DEC AXP Systems (Revision B — May 1998)
6
84
Section 6 F Upgrading Software on Client-Only Systems
Step 7:
Move the cursor to PROCEED WITH INSTALLATION and
press Return to continue the upgrade.
start of inst_upg_envox.com
Deleting existing envox files...
Installing ENVOX files...
ENVOX install completed successfully on 21-DEC-1997 17:43.45
This completes the ENVOX client-only upgrade.
6
Installing and Upgrading ENVOXr Configuration Software on DEC VAX and DEC AXP Systems (Revision B — May 1998)
Creating ENVOX User Accounts F Section 7
85
Figure 7-Table 7
7
7 Creating ENVOX User Accounts
An ENVOXr user account on OpenVMS is created during ENVOX
software installation. Additional accounts may be added by the system
administrator. Three steps are required:
J
Set up the OpenVMS user account.
J
Set up the ENVOX user directory.
J
Copy the file ENVOX$DISK:[ENVOX]LOGIN.COM to the user
directory.
Note ... Each ENVOX user requires an OpenVMS system account.
7.1
Setting Up the Account
Perform the following procedure to set up the ENVOX OpenVMS user
account.
Note ... You must ensure that the ENVOX_USER account is in the
same group as ENVOX software (group 17) and has a unique
UIC value.
Step 1:
Log in to the system manager’s account by entering the user
name SYSTEM and the password at the prompts:
Username:
Password:
SYSTEM
your_password
The DCL prompt appears.
Installing and Upgrading ENVOXr Configuration Software on DEC VAX and DEC AXP Systems (Revision B — May 1998)
7
86
Section 7 F Creating ENVOX User Accounts
Step 2:
Set the definition by entering the following command at the
DCL prompt:
$ set def sys$system
Step 3:
Run the Authorize utility by entering the following command at
the DCL prompt:
$ run authorize
Step 4:
Enter the parameters shown below at the UAF prompts.
The dash (--) at the end of the line is the OpenVMS indicator
for a continuation of the input line.
If you enter incorrect data in a field, the system indicates the
error. You can correct the problem using the modify
command.
The command shown uses UIC codes of 17, 1021 as an
example. Put in your codes, if different, in the command.
7
UAF> copy envox envox_user /uic=[17,1021]/password=envox_userUAF> /owner=envox_user/device=envox$disk/directory=[envox.envox_user]
The following message verifies that the user records are
added.
%UAF-I-COPMSG, user record copied
%UAF-I-RDBADDMSGU, identifier ENVOX_USER value: [000017,001021] added to
rights data base
Step 5:
To display your ENVOX account screen, enter the following
command at the prompt:
UAF> show ENVOX
Figure 7-1 is an example of the ENVOX account screen setup
by the system during SYBASE and ENVOX installation.
Step 6:
To display the ENVOX_USER account screen, enter the
following command at the prompt:
UAF> show ENVOX_USER
Figure 7-2 is an example of an account generated using the
copy command. This account allows a user named
ENVOX_USER to log into the OpenVMS system and run the
MAIN command to start up ENVOX forms.
Installing and Upgrading ENVOXr Configuration Software on DEC VAX and DEC AXP Systems (Revision B — May 1998)
Creating ENVOX User Accounts F Section 7
87
Username: ENVOX
Owner:
Account:
UIC: [17,1011] ([ENVOX])
CLI:
DCL
Tables: DCLTABLES
Default: ENVOX$DISK:[ENVOX]
LGICMD: LOGIN
Login Flags:
Primary days: Mon Tue Wed Thu Fri
Secondary days:
Sat Sun
No access restrictions
Expiration:
(none) Pwdminimum: 6 Login Fails: 0
Pwdlifetime:
(none) Pwdchange: 11-JUL-1990 11:02
Last Login: (none)
(interactive), (none) (non-interactive)
Maxjobs:
0 Fillm:
300(1) Bytlm:
65536(1)
Maxacctjobs: 0 Shrfillm: 0
Pbytlm:
0
Maxdetach:
0 BIOlm:
200
JTquota: 4096
Prclm:
20 DIOlm:
200
WSdef:
512(1)
Prio:
4 ASTlm:
200
WSquo:
2048
Queprio:
0 TQElm:
50
WSextent: 8192
CPU0:
(none)
Enqlm:
256(1) Pgflquo: 50000(1)
Authorized Privileges:
TMPMBX NETMBX
Default Privileges:
GRPNAM PSWAPM TMPMBX OPER NETMBX SYSPRV
UAF>
1.These values are for a VAX platform. For an AXP platform increase the values
to: Bytlm=100000, Wsdef=1024, Pgflquo=75000, Enqlm=2000, fillm=100, astlm=250
Figure 7-1.
System-Generated ENVOX R User’s Account
Username: ENVOX_USER
Owner: ENVOX_USER
Account:
UIC: [17,1021] ([ENVOX_USER])
CLI:
DCL
Tables: DCLTABLES
Default: ENVOX$DISK:[ENVOX.ENVOX_USER]
LGICMD: LOGIN
Login Flags:
Primary days: Mon Tue Wed Thu Fri
Secondary days:
Sat Sun
No access restrictions
Expiration:
(none) Pwdminimum: 6 Login Fails: 0
Pwdlifetime:
(none) Pwdchange: 11-JUL-1990 14:19
Last Login: (none)
(interactive), (none) (non-interactive)
Maxjobs:
0 Fillm:
300(1) Bytlm:
65536(1)
Maxacctjobs: 0 Shrfillm: 0
Pbytlm:
0
Maxdetach:
0 BIOlm:
200
JTquota: 4096
Prclm:
20 DIOlm:
200
WSdef:
512(1)
Prio:
4 ASTlm:
200
WSquo:
2048
Queprio:
0 TQElm:
50
WSextent: 8192
CPU:
(none) Enqlm:
256(1) Pgflquo: 50000(1)
Authorized Privileges:
TMPMBX NETMBX
Default Privileges:
GRPNAM PSWAPM TMPMBX OPER NETMBX
UAF>
1. These values are for a VAX platform. For an AXP platform increase the values
to: Bytlm=100000, Wsdef=1024, Pgflquo=75000, Enqlm=2000, fillm=100, astlm=250
Figure 7-2.
Customized ENVOX R User’s Account
Installing and Upgrading ENVOXr Configuration Software on DEC VAX and DEC AXP Systems (Revision B — May 1998)
7
Section 7 F Creating ENVOX User Accounts
88
Step 7:
Exit the authorize program by entering the following command
at the prompt:
UAF> EXIT
The following messages are displayed:
%UAF-I-DONEMSG, system authorization file modified
%UAF-I-RDBDONEMSG, rights data base modified
7.2
Setting Up an ENVOX Users Directory
Set up an ENVOX users directory as follows:
Step 1:
Enter the following commands at the DCL prompts:
$ SET DEF ENVOX$DISK:[ENVOX]
$ SHOW DEF
7
Step 2:
Whether you are performing an installation or an upgrade,
you must create the ENVOX user directory and set the file
owner by entering the following command at the DCL prompt:
$ CREATE/DIR/OWNER_UIC=envox_user [.ENVOX_USER]
where, envox_user is the new ENVOX user’s name exactly
as it appears in the User Authorization File (UAF)
7.3
Copying the Login.Com File to the User Directory
Copy the file ENVOX$DISK:[ENVOX]LOGIN.COM to the user directory,
by entering the following command at the DCL prompt:
$ COPY LOGIN.COM [.ENVOX_USER]*.*
Installing and Upgrading ENVOXr Configuration Software on DEC VAX and DEC AXP Systems (Revision B — May 1998)
Backing Up, Restoring, and De-Installing Software F Section 8
89
Figure 8-Table 8
8
8 Backing Up, Restoring, and De-Installing
Software
This section describes the backup, restore, and de-installation procedures for
ENVOXr and SYBASE software.
Note ... All databases, including the master database, should be backed
up periodically, especially after any change to the database.
Instructions for backing up the master database are given in the
The System Manager’s Guide to ENVOX Configuration
Software, SM1.0:SW3151.
8.1
Booting the Standalone Backup on VAX Systems
You can boot the standalone backup from the VMS installation media or
you can create the backup on your system disk and thereafter boot from
it. Having the utility on the system disk saves considerable time each
time you do an image backup. For additional information about
standalone backups, see the Open VMS, Version 7.1, Upgrade and
Installation Procedure Manual.
8.1.1
Creating the Standalone Backup on Disk
Perform the following to create the disk-resident standalone backup
routine.
Step 1:
Log into VMS by entering the user name SYSTEM and the
password at the prompts:
Username: SYSTEM
Password: your_password
The DCL prompt appears.
Step 2:
Enter the following command at the DCL prompt:
$ @sys$update:stabackit.com
Installing and Upgrading ENVOXr Configuration Software on DEC VAX and DEC AXP Systems (Revision B — May 1998)
8
90
Section 8 F Backing Up, Restoring, and De-Installing Software
Step 3:
At the prompt for the device name, enter the name of the
system disk.
This action creates the standalone backup on disk.
8.1.2
Booting the Standalone Backup from Disk
After creating the standalone backup on disk, perform the following to
boot the standalone backup routine from disk:
Step 1:
Enter the following command at the DCL prompt to shut down
your system:
$ @sys$system:shutdown
Step 2:
After the system has shut down, press the halt button on the
rear of the unit. When the >>> prompt is displayed, enter the
following command to boot the backup routine:
>>> B/E0000000
8
Step 3:
Enter the date and time as indicated:
PLEASE ENTER DATE AND TIME (DD-MMM-YYYY
HH:MM) dd-mmm-yyyy hh:mm
Enter the date and time in the requested format. For example,
for 2:30 pm, April 8, 1996, enter 08-APR-1996 14:30.
A confirmation message appears, followed by the DCL prompt.
8.1.3
Booting the Standalone Backup from Tape
Perform the following to boot the standalone backup routine from tape:
Step 1:
Insert and load the VMS installation media containing the
standalone backup utility. Refer to the OpenVMS Version 7.1,
Installation and Upgrade Manual.
Step 2:
Enter the following command to shut down your system at the
DCL prompt:
$ @sys$system:shutdown
Step 3:
After the system has shut down, press the halt button on the
rear of the unit.
Installing and Upgrading ENVOXr Configuration Software on DEC VAX and DEC AXP Systems (Revision B — May 1998)
Backing Up, Restoring, and De-Installing Software F Section 8
Step 4:
91
Enter the following command at the console-mode prompt
(>>>) to display the list of device names:
>>> SHOW DEVICE
Step 5:
Enter the following command to boot the backup routine:
>>> B tapedrive
where tapedrive is the name of the tape drive as listed in the
SHOW DEVICE display.
Step 6:
Enter the date and time as indicated.
PLEASE ENTER DATE AND TIME (DD-MMM-YYYY
HH:MM) dd-mmm-yyyy hh:mm
Enter the date and time in the requested format. For example,
for 2:30 pm, April 8, 1996, enter 08-APR-1996 14:30.
A confirmation message appears, followed by the DCL prompt.
8.2
Booting Standalone Backup on AXP Systems
Perform the following to boot the standalone backup routine:
Step 1:
Enter the following command at the DCL prompt to shut down
your system:
$ @SYS$SYSTEM:SHUTDOWN
Step 2:
After the system has shut down, press the halt button on the
rear of the unit.
Step 3:
Insert the distribution compact disc into the drive.
Step 4:
Enter the following command at the console-mode prompt
(>>>) to display the list of device names:
>>> SHOW DEVICE
Step 5:
Enter the following command to boot the backup routine:
>>> BOOT -flags 0,0 source_drive
where source_drive is the name of the compact disc drive as
listed in the SHOW DEVICE display.
Step 6:
After the source drive is booted, the system displays a menu
from which you can select various tasks. Choose the menu
item which lets you execute DCL prompts and procedures.
Installing and Upgrading ENVOXr Configuration Software on DEC VAX and DEC AXP Systems (Revision B — May 1998)
8
Section 8 F Backing Up, Restoring, and De-Installing Software
92
8.3
Backing Up the System
Caution ... Always backup and restore together all disks which contain
ENVOX logical devices; do not reboot the system or allow the
SYBASE SQL Server to restart during a backup or restore
period. The logical device files contain information which must
always be kept in step. If they are not, the ENVOX database
can lose data. When you perform a backup or restore, always
make sure that you have a tape or tapes for each disk, and
keep the tapes together as a matched set.
Once your computer system is ready for use, you should make a backup
copy of the software. This backup allows you to restore the software
quickly, in case of any unplanned change.
8
Perform the following to back up the system:
Step 1:
Boot standalone backup as described in subsection 8.1 for
VAX systems or subsection 8.2 for AXP systems.
Step 2:
Insert and load the tape on which you want to save the
software and data from the hard disk. This tape must not be
write protected. When the tape is ready, enter the following
command (leave single spaces after noassist and
systemdisk:):
$ BACKUP/IMAGE/VERIFY/NOASSIST systemdisk: tapedrive:saveset.BCK/SAVE/REWIND/IGNORE=LABEL
where systemdisk is the name of the drive holding the system
disk and tapedrive is the name of the drive which will hold the
backup files. For saveset, substitute a valid (13 characters
maximum) name for the saved data.
Installing and Upgrading ENVOXr Configuration Software on DEC VAX and DEC AXP Systems (Revision B — May 1998)
Backing Up, Restoring, and De-Installing Software F Section 8
Step 3:
93
A message saying that volume labels do not match may
appear along with options for overwriting. If they do, select
overwrite to continue the backup process.
The process can take from 20 minutes to 2 hours, depending on
the amount of data on the disk. If the data requires more than
one tape (multi-volume), the system rewinds the current tape and
asks you to install another tape.
Step 4:
When the backup is completed, the DCL prompt reappears
and the tape automatically unloads. Remove and label the
tape.
Step 5:
A prompt asks if you want to back up another disk. During the
installation of SYBASE, data is placed on the second disk, so
you should back up that disk also.
Insert a new tape for backing up the second disk. Enter Y and
press Return. Then, repeat Step 2 and Step 4, using the
appropriate names for the systemdisk and saveset.
Step 6:
When you have backed up both disks, press the halt button
(at the rear of the computer). When the console mode prompt
(>>>) appears, reboot the system by entering:
>>> BOOT systemdisk
where systemdisk is the name of your system disk.
Backup of the system is complete.
Installing and Upgrading ENVOXr Configuration Software on DEC VAX and DEC AXP Systems (Revision B — May 1998)
8
Section 8 F Backing Up, Restoring, and De-Installing Software
94
8.4
Restoring the System
Caution ... Always backup and restore together all disks which contain
ENVOX logical devices; do not reboot the system or allow the
SYBASE SQL Server to restart during a backup or restore
period. The logical device files contain information which must
always be kept in step. If they are not, the ENVOX database
can lose data. When you perform a backup or restore, always
make sure that you have a tape or tapes for each disk, and
keep the tapes together as a matched set.
For many reasons, you may need to restore your software system. You
should make backup copies of your system any time you make a change
to the database or a change to any other system software parameters.
Refer to subsection 8.3 for backup procedures.
8
Perform the following to restore the system:
Step 1:
Boot standalone backup as described in subsection 8.1 for
VAX systems or subsection 8.2 for AXP systems.
Step 2:
Insert and load the first tape that holds your system backup.
When the tape is ready, enter the following command,
substituting the appropriate system device name for tapedrive
and the appropriate disk drive name for diskdrive (leave single
spaces after verify and rewind):
$ BACKUP/IMAGE/VERIFY tapedrive:saveset.BCK/REWIND diskdrive:
The following message is displayed:
%BACKUP-I-STARTVERIFY, starting verification pass
If you have only one tape to restore, go to Step 4; otherwise
continue with Step 3.
Installing and Upgrading ENVOXr Configuration Software on DEC VAX and DEC AXP Systems (Revision B — May 1998)
Backing Up, Restoring, and De-Installing Software F Section 8
Step 3:
95
When the tape that is being read reaches its end (except for
the last tape in a set of tapes), several end-of-tape messages
are displayed.
%BACKUP-I-RESUME, Resuming operation on
volume n
%BACKUP-I-READWRITE, Mount column n on
tapedrive:
for reading
Load the next tape. Make sure that you insert the backup
tapes in the correct order. When the tape is ready, enter Y at
the prompt:
Enter YES when ready: Y
Step 4:
When the restoration is complete, the following messages are
displayed:
%BACKUP-I-PROCDONE, Operation completed. Processing
finished at dd-mmm-yyyy hh:mm:ss.xx
If you do not want to perform another standalone
backup operation, use the console to halt the system.
If you do want to perform another standalone BACKUP
operation, ensure the standalone application volume
is on line and ready.
To continue, enter Y at the prompt:
Enter YES when ready: Y
Step 5:
To restore your second disk drive, repeat Step 2 through
Step 4, using the name of your second disk drive in place of
diskdrive in the commands.
The messages are displayed a second time when the tape or
tapes for the second disk have been restored.
Step 6:
When all tapes have been restored, press the halt button on
the back of your computer. When the console mode prompt
(>>>) appears, reboot the system by entering:
>>> BOOT systemdisk
where systemdisk is the name of your system disk.
Restoration of the system is complete.
Installing and Upgrading ENVOXr Configuration Software on DEC VAX and DEC AXP Systems (Revision B — May 1998)
8
Section 8 F Backing Up, Restoring, and De-Installing Software
96
8.5
De-installing ENVOX and SYBASE Software
The de-install process completely removes ENVOX and SYBASE
software from your system. All SYBASE databases, files, and directories
are deleted, all ENVOX files and directories are deleted, and all SYBASE
and ENVOX accounts are deleted. You cannot choose to de-install
SYBASE or ENVOX software separately.
To de-install, you must first retrieve the installation scripts from tape
using the instructions in subsection 3.3 step 2. Then, log into the
computer as System and enter the following commands at the prompts:
$ @DEINSTALL_SYBASE_ENVOX.COM
When you enter this command, the system responds with:
8
This utility will completely de-install SYBASE and
ENVOX. All SYBASE databases, SYBASE files and
directories will be deleted. All ENVOX files and
directories will be deleted. All SYBASE and ENVOX
accounts will be the deleted.
Do you wish to continue [N] ?
Enter N if you wish to save any files or wish to first backup the system.
Enter Y only if you are absolutely sure that you wish to continue.
Alternatively, de-install may be carried out using the install utility. Log into
the computer as System and enter the following commands at the
prompts:
Step 1:
This step assumes that you have obtained the installation
scripts from tape as described in subsection 3.3 step 2. At the
prompt, type the following:
$ run sybase_envox_install
Installing and Upgrading ENVOXr Configuration Software on DEC VAX and DEC AXP Systems (Revision B — May 1998)
Backing Up, Restoring, and De-Installing Software F Section 8
97
One of the following displays appear:
Choose which product to install or de-install
SYBASE and ENVOX
Move cursor to item and press <CR>.
INSTALL SYBASE
INSTALL ENVOX
DE-INSTALL SYBASE and ENVOX
QUIT
If SYBASE and ENVOX have been installed, the following
display appears:
Choose whether to install or de-install ENVOX
Move cursor to item and press <CR>.
INSTALL ENVOX
DE-INSTALL SYBASE and ENVOX
QUIT
Step 2:
Move the cursor to DE-INSTALL SYBASE and ENVOX and
press return.
The following display appears:
Move the cursor to item and press <CR>
PROCEED WITH DE-INSTALLATION
QUIT
WARNING: Proceeding will cause a total
de-installation of all SYBASE. ENVOX and all
logical devices. Are you sure you want to
proceed?
Step 3:
Move the cursor to PROCEED WITH DE-INSTALLATION and
press return.
The de-installation process takes up to 1 hour depending on how many
files have to be deleted.
Installing and Upgrading ENVOXr Configuration Software on DEC VAX and DEC AXP Systems (Revision B — May 1998)
8
98
Section 8 F Backing Up, Restoring, and De-Installing Software
Blank page.
8
Installing and Upgrading ENVOXr Configuration Software on DEC VAX and DEC AXP Systems (Revision B — May 1998)
Retrieving Files from the Installation Tape F Section 9
99
Figure 9-Table 9
9
9 Retrieving Files from the Installation
Tape
If you have inadvertently deleted certain files from your ENVOX and
SYBASE directories, you do not have to perform a re-installation to get
these files. You can retrieve the files as described below.
Table 9-1 lists the savesets which are stored on the installation media.
They are stored in the order listed.
Table 9-1.
Files Stored on the Installation Tape
Saveset Name
Description
SYB_ENVOX_INST.A
Installation files
system10_server.C
SYBASE server related files
system10_client.B
SYBASE client related files
system10_apt.D
SYBASE apt related files
ENVOX_B.BCK
envox$disk:[envox] decw$xdefaults.dat, login.com
ENVOX_C.BCK
envox$disk:[envox.dbscripts] files
ENVOX_D.BCK
envox$disk:[envox.executables] files
ENVOX_E.BCK
envox$disk:[envox.aptobject] files
ENVOX_F.BCK
envox$disk:[envox.help] files
ENVOX_G.BCK
envox$disk:[envox.diagdisps] files
ENVOX_H.BCK
envox$disk:[envox.formdefs] files
ENVOX_I.BCK
envox$disk:[envox.unsupported_utilities] files
ENVOX_J.BCK
envox$disk:[envox.utilities] files
ENVOX_K.BCK
envox$disk:[envox.termdef] files
ENVOX_L.BCK
sybase_device:[sybase]trunc_option.exe
ENVOX_M.BCK
envox$disk:[envox.opendb] files
ENVOX040.Z
p20_pdx.exe, p30_pdx.exe (VAX platform only)
Installing and Upgrading ENVOXr Configuration Software on DEC VAX and DEC AXP Systems (Revision B — May 1998)
9
100
9.1
Section 9 F Retrieving Files from the Installation Tape
Procedure for Retrieving Files
To retrieve files from the installation tape, perform the following steps:
Step 1:
If you are not logged into the system account, log in by
entering the user name SYSTEM and your password at the
prompts:
Username: SYSTEM
Password: your_password
The DCL prompt appears.
9
Step 2:
Insert and make ready the installation media.
Step 3:
Set your default directory to the directory where you want the
recovered files to reside. (For example, set default to
envox$disk:[envox.executables].)
Step 4:
Recover the required file by entering the following commands
at the DCL prompt:
$ mount/for tapedrive:
$ backup tapedrive:saveset_name *.*/select=
required_filename/log/ignore=label/owner=owner_name
/new
$ dismount tapedrive:
$ set file/prot=(S:RWED,O:RWED,G:RE,W:RE)
required_filename
where:
tapedrive: is the name of your tapedrive
saveset_name is the name of the saveset file containing the file
or files to be recovered.
owner_name is the file owner. This name is usually ENVOX for
envox files, SYBASE for sybase files, and SYSTEM for
system files.
Installing and Upgrading ENVOXr Configuration Software on DEC VAX and DEC AXP Systems (Revision B — May 1998)
Retrieving Files from the Installation Tape F Section 9
9.2
101
Examples of Retrieving Files
Several examples are given below which describe how to retrieve
various files. The first example recovers the ENVOX file,
envox_main.exe, from the installation media which is inserted into
tapedrive mka400:, places the file in envox$disk:[envox.executables],
and sets the file ownership to ENVOX.
$ set def envox$disk:[envox.executables]
$ mount/for mka400:
$ backup mka400:envox_d.bck *.*/select=
envox_main.exe/log/ignore=label/owner=ENVOX/new
$ dismount mka400:
$ set file/prot=(S:RWED,O:RWED,G:RE,W:RE)
envox_main.exe
The following example recovers the ENVOX directory
ENVOX$DISK:[ENVOX.DBSCRIPTS] from the installation media
inserted into tapedrive mka400:, and sets the file ownership to ENVOX.
$ set def envox$disk:[envox.dbscripts]
$ mount/for mka400:
$ backup mka400:envox_c.bck *.*/log/ignore=label
/owner=ENVOX/new
$ dismount mka400:
$ set file/prot=(S:RWED,O:RWED,G:RE,W:RE) *.*
The following example recovers the SYBASE file syb_dbshr.exe from the
installation media inserted into tapedrive mka400:, and places the file in
SYBASE_DEVICE:[SYBASE.LIB], and sets the file ownership to
SYBASE.
$ set def SYBASE_DEVICE:[SYBASE.LIB]
$ mount/for mka400:
$ backup mka400:SYSTEM10_CLIENT.B
*.*/select=syb_dbshr.exe/log/ignore=label
/owner=SYBASE/new
$ dismount mka400:
$ set file/prot=(S:RWED,O:RWED,G:RE,W:RE)
syb_dbshr.exe
Installing and Upgrading ENVOXr Configuration Software on DEC VAX and DEC AXP Systems (Revision B — May 1998)
9
102
Section 9 F Retrieving Files from the Installation Tape
The following example recovers all files with a file extension of EXE from
the [sybase.bin] directory contained within the SYBASE saveset
SYSTEM10_SERVER.C located on the installation media inserted into
tapedrive mka400:, and sets the file ownership to SYBASE.
$ set def SYBASE_DEVICE:[SYBASE.BIN]
$ mount/for mka400:
$ backup mka400:system10_server.C *.*/select=
[sybase.bin]*.exe/log/ignore=label/owner=SYBASE/new
$ dismount mka400:
$ set file/prot=(S:RWED,O:RWED,G:RE,W:RE) *.exe
The following example lists all savesets stored on the installation media
inserted into tapedrive mka400:
$ mount/over=id mka400:
$ dir mka400:*.*
$ dismount mka400:
The following example lists all the files stored in saveset ENVOX_B.BCK
held on the installation media and inserted into tapedrive mka400:
9
$ mount/for mka400:
$ backup/list mka400:ENVOX_B.BCK
$ dismount mka400:
Installing and Upgrading ENVOXr Configuration Software on DEC VAX and DEC AXP Systems (Revision B — May 1998)
System Tuning F Section 10
103
Figure 10-Table 10
10
10 System Tuning
You can change the number of concurrent ENVOX software, Control
Desktop and Control Designer users. and the amount of memory
allocated to the SYBASE SQL Server. However, you must leave enough
memory for proper operation of SYBASE and ENVOX software. Refer to
subsections 2.6 and 2.8 for memory requirements.
You are prompted for the number of concurrent ENVOX software, Control
Desktop, and Control Designer users. From these values, the Sybase
server is reconfigured to support the necessary number of connections.
You are also prompted for the amount of memory to allocate to the
Sybase server and the number of open objects.
Step 1:
If you are not logged into the sybase account, log in by
entering the user name SYBASE and your password at the
prompts:
Username: SYBASE
Password: your_password
The DCL prompt appears.
Step 2:
Enter the following at the DCL prompt:
$ SET DEF [SYBASE.INSTALL]
$ @SYBASE_TUNE.COM
The system displays the following:
How many concurrent ENVOX users are to be
supported? [3]:
Step 3:
Enter the number of users expected to be logged in through
the ENVOX forms to the SYBASE SQL server.
Use Table 10-3 to help determine the number of ENVOX
users. Additional users reduce system performance. Do not
specify more users than are needed.
The following display appears:
How many concurrent Control Desktop users are
to be supported? [0]:
Installing and Upgrading ENVOXr Configuration Software on DEC VAX and DEC AXP Systems (Revision B — May 1998)
10
104
Section 10 F System Tuning
Step 4:
Enter a value determined as follows:
J
J
If you do not have Control Desktop installed, enter 0.
If you have Control Desktop installed, use Table 10-3 to
help determine the number of Control Desktop users you
may enter.
If you enter a value greater than 0 for the number of Control
Desktop users, the following appears:
How many of the Control Desktop users will use
Control Designer? [0]:
Step 5:
Enter a value for the number of Control Desktop users that will
use Control Designer.
The following display appears:
How many of the Control Desktop users will use
Display Designer? [0]:
Step 6:
Enter a value for the number of Control Desktop users that will
use Display Designer.
The following display appears:
10
Specify, in megabytes, the memory available
for the SYBASE server [16]:
Step 7:
Enter the memory allocated to the SYBASE dataserver.
When deciding how much memory to allocate to the
SQLserver, note that the minimum memory required by the
server is 16 Mbytes and the maximum memory is 64 Mbytes.
However, no more than half of the system memory can be
allocated to the SQL server. Also take into account that
additional memory is required by the applications listed in
Table 10-1.
The following display appears:
Do you wish to see the list of VMS system
resources required by the SYBASE server? [Y]
Step 8:
Enter Y if you wish to see the list of VMS system resources
required by the SYBASE server. The VMS system resources
are dependant on the number of users, SYBASE server
memory and type of system and will vary from the values listed
below.
The following display appears:
Installing and Upgrading ENVOXr Configuration Software on DEC VAX and DEC AXP Systems (Revision B — May 1998)
System Tuning F Section 10
105
VAX/VMS Resources required for SYBASE.
--------------------------------------------Area
Parameter/Item
Suggested
Minimum Value
--------------------------------------------SYSGEN
WSMAX
39888
CHANNELCNT
602
NPAGEDYN
1559568
PAGEDYN
1169676
GBLPAGES
233626
GBLPAGFIL
14601
GBLSECTIONS
600
CLISYMTBL
500
SWPOUTPGCNT
512
PQL_MPGFLQUOTA
32768
GH_RES_CODE
1024
GH_RSRVPGCNT
512
IMGREG_PAGES
2000
PQL_DASTLM
200
PQL_DBIOLM
200
PQL_DDIOLM
200
PQL_DBYTLM
81920
PQL_MASTLM
200
PQL_MBIOLM
200
PQL_MDIOLM
200
PQL_MPRCLM
10
PQL_MFILLM
200
PQL_MBYTLM
100000
PQL_MENQLM
300
PQL_DWSDEFAULT
1024
PQL_MWSDEFAULT
1024
PQL_MWSQUOTA
2048
PQL_MWSEXTENT
8192
MAXBUF
8192
PAGEFILE.SYS
311264 blocks
(includes 131072 blocks for CDOS server)
DECNET :
TRANSPORT CONNECTIONS
116
--------------------------------------------The above table is in
[SYBASE.INSTALL]SYBASE_VMS_RESOURCES.DAT.
Do you wish to continue [N]: Y
Installing and Upgrading ENVOXr Configuration Software on DEC VAX and DEC AXP Systems (Revision B — May 1998)
10
Section 10 F System Tuning
106
Enter Y if you wish to continue.
Step 9:
The following display appears:
checking system parameters...
initializing the SYBASE server with the new parameters...
sybase_tune completed successfully on 12-JAN-1998 08:12
If sybase_tune does not proceed as expected, there is a log file which
you can review to help you determine the cause. The file,
sybase_tune.log, is produced in the sybase_device:[sybase.install]
directory.
Table 10-1 provides approximate memory requirements for the
applications listed in the table.
Note ... Do not specify more users than are required. A higher number of
users affects system performance.
Table 10-1. Non-Standard Installation Memory Requirements
10
Application
Memory Requirements
(Mbytes)
OpenVMS
3.0
Motif
5.0
DECwindows Motif
3.5
EnvoxR
4.5
Each
+ Display Editor session (Motif)
CHIP
0.5
Table 10-2 gives the minimum computer configuration needed to support
both the Sybase SQL server and the CDOS server.
Table 10-2. Minimum Computer RAM Needed to Support Server RAM
Computer Type
Computer RAM
VAX
64Mb
3.
Sybase Server RAM
16Mb
CDOS Server RAM(1)
4Mb
AXP
64Mb
16Mb
4Mb
The values in this column are initial ones. They will grow as necessary if the physical memory is
available. The values are pre-configured, and are not prompted-for by sybase_tune.
The amount of physical memory allocated to the Sybase server impacts
the number of concurrent ENVOX software, Control Desktop, and Control
Designer users that can be supported. sybase_tune indicates the
Installing and Upgrading ENVOXr Configuration Software on DEC VAX and DEC AXP Systems (Revision B — May 1998)
System Tuning F Section 10
107
minimum amount of physical memory that must be allocated to the
Sybase server to support a specific mix of concurrent ENVOX software,
Control Desktop, and Control Designer users which you specify.
Table 10-3 gives an approximate minimum amount of physical memory
that must be allocated to the Sybase server to support a given total
number of concurrent ENVOX software, Control Desktop, and Control
Designer users.
Table 10-3. Minimum Physical Memory Required
Number of Concurrent Users
Minimum Sybase Server RAM
Required
3
16Mb
6
17Mb
10
19Mb
15
21Mb
20
23Mb
30
27Mb
Table 10-3 shows that sybase_tune requires a minimum of 16Mb RAM on
VAX and AXP, allocated to the Sybase server for a mix of one ENVOX
user, one Control Desktop user, and one Control Designer user (three
concurrent users). Similarly, three ENVOX users, two Control Desktop
users, and one Control Designer user (6 concurrent users) require a
minimum of 17Mb of RAM allocated to the Sybase server.
Allocating more than the minimum amount of memory to the Sybase
server normally improves system performance. A maximum of 50% of the
machine’s physical memory may be allocated to the Sybase server.
Note ... On a DEC VAX machine, the number of concurrent Control
Desktop and Control Designer users is limited by the load
imposed on the server machine. In practice, more than 7 Control
Desktop and 7 Control Designer users will give unacceptable
performance.
Installing and Upgrading ENVOXr Configuration Software on DEC VAX and DEC AXP Systems (Revision B — May 1998)
10
108
Section 10 F System Tuning
Blank page.
10
Installing and Upgrading ENVOXr Configuration Software on DEC VAX and DEC AXP Systems (Revision B — May 1998)
Transferring Non-ENVOX Databases F Section 11
109
Figure 11-Table 11
11
11 Transferring Non-ENVOX Databases
Section 5 of this installation manual shows how to use the installation
menu system to upgrade databases to P4.0. The upgrade process will
only work with ENVOXr databases. Any non-ENVOX databases will be
completely deleted from the system.
If you have Instrument Information System (IIS)t databases, you should
refer to the IIS backup and restore procedures for information.
If the non-ENVOX application is compatible with SYBASE 10.0, then the
option that should be considered first is to use the backup and restore
facilities of the application used to create the non-ENVOX databases.
As a last resort, the ENVOX supplied utility PDX can be used to transfer
the contents of non-ENVOX databases to text files. PDX can then be
used to re-populate the database, following its creation with the
non-ENVOX application.
Note ... The PDX utility has been tested with ENVOX databases only.
Therefore its use on non-ENVOX databases cannot be
guaranteed by Fisher-Rosemount Systems. Hence, the use of
PDX on a non-ENVOX database is entirely at the users risk.
Caution ... A dump made from a 4.9.x server will not load into the 10.0.x
server which is the server version used in ENVOX P4.0.
Installing and Upgrading ENVOXr Configuration Software on DEC VAX and DEC AXP Systems (Revision B — May 1998)
11
110
Section 11 F Transferring Non-ENVOX Databases
11.1
Using the PDX Utility
The following steps describe how to use the PDX utility to save the data
in non-ENVOX databases. The same utility is used to reload the data
into newly created databases on the server.
More details on the PDX utility are given in the System Manager’s Guide,
Section 9.
Step 1:
Run the PDX utility to write a file containing the non-ENVOX
database data out to a disk or to tape:
$ mcr envox$application:pdx.exe -U df ”SERVER” ”DB”
”sa_passwd” filename
where SERVER = name of server
DB = name of the database
sapasswd = your sa password
filename = PDX file to be created
If PDX fails, it will display a message on the screen. See the
next section for the explanation for these messages. You may
be able to correct the problem and try again.
11
Step 2:
Install SYBASE and ENVOX software as described in section
3 and section 4 of this manual and upgrade to P3.4. The
upgrade process deletes the databases.
Step 3:
Run the PDX utility on the PDX file in information mode. This
will give data and log sizes of the database:
$ mcr envox$application:pdx.exe -sv ff filename nl:
Step 4:
Create the database using the facilities of your utility. Use the
reserved size and log size obtained in Step 3 to allocate
sufficient size, as follows:
J
J
J
Step 5:
minimum database size = Reserved size times 1.26, or
greater.
minimum database log size = Log size, or greater.
The data and log fragments do not have to correspond to
those in the original database.
Load the PDX data into the newly created database:
$ mcr envox$application:pdx.exe -U fd filename
”SERVER” ”DB” ”sa_passwd”
Installing and Upgrading ENVOXr Configuration Software on DEC VAX and DEC AXP Systems (Revision B — May 1998)
Transferring Non-ENVOX Databases F Section 11
11.2
111
PDX Failure and Reasons
PDX was designed to be used with ENVOX type databases. It can fail
with non-ENVOX databases. The following are validation checks that
PDX will perform before creating a file of the database data.
A Fatal error means that PDX has failed. A Warning message means
that PDX will proceed but some data may be missing. The text of the
warning message gives an indication of that data.
The following messages may be displayed:
Check
Users have corresponding logins
Message
Fatal - References to non-existent users
Reason
All users and aliases in the database must have corresponding logins
(enforced in SYBASE 10.0, and possibly earlier releases)
Check
Check that all user ids can be resolved
Message
Fatal - References to non-existent users
Reason
All objects, types, and protections must belong to users who appear in
the sysusers table
Check
No tables/indexes exist on non-standard segments
Message
Warning - User defined segments encountered - default
will be used
Check
Do sysusermessages exist
Message
Warning - User messages will not be transferred
Check
Constraints (sysconstraints & sysreferences)
Message
Fatal - Constraints are not supported
Installing and Upgrading ENVOXr Configuration Software on DEC VAX and DEC AXP Systems (Revision B — May 1998)
11
112
11
Section 11 F Transferring Non-ENVOX Databases
Check
Unsupported types in syscolumns
Message
Fatal - Unsupported datatypes in syscolumns
Reason
Supported types are: int, smallint, tinyint, binary, varbinary, char, varchar,
datetime, float
Check
Unsupported types in systypes
Message
Fatal - Unsupported datatypes in systypes
Reason
Supported types are: int, smallint, tinyint, binary, varbinary, char, varchar,
datetime, float. (same as for syscolumns)
Check
Check that columns using system datatypes use only legal ones
Message
Fatal - Unsupported system defined datatypes in
syscolumns
Reason
Legal ones are: binary, char, datetime, float, int, smallint, tinyint,
varbinary, varchar
Check
Command permissions
Message
Warning - Non public command GRANTS/REVOKES will not
be transferred
Check
Foreign and common keys.
Message
Warning - Foreign and common keys will not be
transferred
Check
Keys on views
Message
Warning - Keys on views will not be transferred
Check
Numbered stored procedures
Message
Warning - Numbered stored procedures will not be
transferred
Installing and Upgrading ENVOXr Configuration Software on DEC VAX and DEC AXP Systems (Revision B — May 1998)
Transferring Non-ENVOX Databases F Section 11
Check
Tables with null column names
Message
Warning - Tables with NULL column names will not be
transferred
Check
Tables with undefined datatypes
Message
Warning - Tables with columns of undefined type will
not be transferred
Check
Grant with Grant
Message
Warning - GRANT with GRANT permissions will not be
transferred
Check
Columns with internal-only usertypes
Message
Fatal - User tables with columns of internal datatype
exist
Check
Column datatype versus usertype datatype incompatibility
Message
Fatal - Incompatible column types and usertype types
exist
113
Installing and Upgrading ENVOXr Configuration Software on DEC VAX and DEC AXP Systems (Revision B — May 1998)
11
114
Section 11 F Transferring Non-ENVOX Databases
Blank page.
11
Installing and Upgrading ENVOXr Configuration Software on DEC VAX and DEC AXP Systems (Revision B — May 1998)
Installing and Upgrading CDOS for Control Desktop F Section 12
115
Figure 12-Table 12
12
12 Installing and Upgrading CDOS for
Control Desktop
Control Desktop Open Server (CDOS) software interfaces ENVOXr
Configuration Software to Type SW3311 Control Desktop client software.
This section describes how to install and upgrade the CDOS software on
DEC VAX and DEC AXP platforms. These platforms require that ENVOX
software already be installed in client-server or client-only mode.
12.1
Intended Audience
CDOS Installation requires system administrator privileges. This section
is intended for administrators familiar with DEC Open VMS systems for
installation on a DEC VAX or AXP platforms. A knowledge of ENVOX
configuration software and its interfaces to a PROVOXr system is helpful.
12.2
System Requirements
The OpenVMS software and the DEC platforms must meet the
requirements listed below for successful installation of CDOS software.
12.2.1
Hardware Requirements
CDOS P2.0 software requires at least a VAX 4000 model 90 workstation,
a DEC AXP Workstation, a DEC AXP server, or similar system. The
number of concurrent Control Desktop and Control Designer clients which
can be connected to CDOS is physically limited according to the following
equation:
[3 x (number of Control Desktop users)] + [number of Control Designer
users] < 53
For example, if there are seven Control Desktop users and three Control
Designer users, the equation yields:
[3 X 7} + [3] = 24, which is well below 53.
Installing and Upgrading ENVOXr Configuration Software on DEC VAX and DEC AXP Systems (Revision B — May 1998)
12
116
Section 12 F Installing and Upgrading CDOS for Control Desktop
However, in practice the limit may be lower depending on CPU size,
memory size, and the load imposed by other applications running on the
system.
Note ... CDOS can be installed on a workstation which has ENVOX
software installed in Client-Server or Client-Only mode. If
ENVOX software is installed in client-server mode with the
SYBASE server running, it will need more resources for CDOS
and a given number of Control Desktop clients than if ENVOX
software is installed in client-only mode.
12.2.2
Software Requirements
The following software is required:
J
J
12.2.3
ENVOX P4.0 software installed in client-server or client-only mode.
CDOS P2.0 is only compatible with ENVOX P4.0.
Software which allows the DEC machine to communicate with PC
clients via TCP/IP. The third party software can be either MULTINET
or UCX. The package must be installed and running before a Control
Desktop client will communicate with CDOS.
Disk Space Requirements
Installation requires the following free disk space:
12
J
J
J
12.2.4
1000 free blocks for DEC VAX and DEC AXP on the SYBASE
application disk. This space is required to hold additional sybase files.
22000 free blocks for DEC VAX and 32000 free blocks for DEC AXP
on the CDOS application disk. This space is required to hold the
CDOS software.
5000 free blocks on the system disk. This space is required to hold
temporary files during the installation. The files will be deleted at the
end of installation.
Installation Time
Installation time on a VAX machine takes about 15 minutes. On an AXP
machine, it takes about 10 minutes.
Installing and Upgrading ENVOXr Configuration Software on DEC VAX and DEC AXP Systems (Revision B — May 1998)
Installing and Upgrading CDOS for Control Desktop F Section 12
12.3
117
Preparing for the Installation or Upgrade
Several actions are required before you make any attempt to install or
upgrade CDOS software.
12.3.1
Precautions
Before you install or upgrade, you should understand the precautions
listed below. They can save you time and can reduce the possibility of
errors.
J
J
J
J
J
J
J
J
J
If you have previously installed a pre-release version of the CDOS
P1.0 software, it must be de-installed before installing the current
release of CDOS software.
Control Desktop and CDOS, versions P2.0, will only operate with
ENVOX software, version P4.0. Be sure your ENVOX system has
been upgraded to version P4.0.
The CDOS software will only install or upgrade if ENVOX P4.0 has
been installed in client-server or client-only mode. If you need to
install ENVOX software in one of these modes, refer Section 4.
ENVOX databases added which are to be used with Control Desktop
must be upgraded to contain certain additional database tables and
procedures. ENVOX databases on ENVOX P3.4 systems running
CDOS P1.0 are automatically upgraded by the ENVOX P3.4 to P4.0
upgrade. Any ENVOX databases added after the upgrade must be
manually upgraded. Once Control Desktop and CDOS are installed,
be sure to upgrade these ENVOX databases. See “Upgrading
ENVOX Databases” in the Control Desktop user manual.
The installation produces a log file called cdos_inst.log in the default
directory. Keep this log for reference to help you determine probable
causes if the installation fails.
Once installation or upgrade has started, do not try to interrupt it.
Before attempting the CDOS installation or upgrade, make sure that
there are no ENVOX users using the system and that no application
software or user processes that access the SYBASE server are
running.
Appropriate TCP/IP software must be installed on the host system.
The TCP/IP software must also be running; otherwise, the installation
cannot resolve TCP/IP addresses and port numbers.
The interfaces file must contain a TCP/IP entry for each SYBASE
server to be accessed by Control Desktop, and the SYBASE server
must be restarted.
Installing and Upgrading ENVOXr Configuration Software on DEC VAX and DEC AXP Systems (Revision B — May 1998)
12
118
Section 12 F Installing and Upgrading CDOS for Control Desktop
12.3.2
Using the CDOS installation and Upgrade Menu
The CDOS installation menu system is similar to that used for the
installation of SYBASE and ENVOX software. The following information
will help you navigate in the menu system:
J
J
J
When you install CDOS, a menu-driven, character-based interface is
displayed on the screen.
You can navigate through the menu items by using the up and down
keys and by pressing Return on any of the menu item fields.
You can navigate through the menu item data fields by using the left
and right arrow keys.
J
The menu item data fields are set up for insert mode.
J
If a menu item is incorrect, the data field is shown in reverse video.
J
Most of the menu data is defaulted for you when the menu is
displayed. The default values may be modified.
J
Pressing Ctrl-w refreshes the screen.
J
Pressing Ctrl-e deletes the current data field.
J
J
12
J
J
Moving the cursor to Enter and pressing Return causes the data from
the menu to be checked.
If there are no errors or warnings, the installation proceeds normally.
When the installation starts, the menu disappears from the screen
and is replaced with information messages during the various stages
of installation.
If there are errors or warnings, they are shown by messages: first the
system errors, then the menu errors, and finally the warnings. The
error messages appear with the menu item number and the text.
By repeatedly pressing Return, you can cycle through these
messages, and then back to the main menu. Once in the main menu,
you can quit if the system errors need to be corrected. For menu
errors, you can correct the menu data and press Return to check the
corrected data.
Installing and Upgrading ENVOXr Configuration Software on DEC VAX and DEC AXP Systems (Revision B — May 1998)
Installing and Upgrading CDOS for Control Desktop F Section 12
12.3.3
119
Verifying TCP/IP Installation
The TCP/IP software should always be installed and configured, following
the instructions in the vendor-supplied Installation and configuration
manuals. The Troubleshooting subsection, 12.9, provides a guide to
installing Multinet and UCX on OpenVMS system.
Caution ... Do not omit the following verification procedures. You must be
sure that TCP/IP software is installed and running, and the INET
driver is configured. Unless they are, CDOS will not successfully
install.
To verify that the TCP/IP software is installed and running on the host
system, enter the appropriate command at the prompt:
J
If Multinet is installed, enter:
$ Multinet ping/number_of_packets=1 hostname
J
If UCX is installed, enter:
$ UCX ping/number_of_packets=1 hostname
where hostname is the name of your host system.
If TCP/IP software is installed and running, the TCP/IP address of the
host is displayed. If the address is not displayed, TCP/IP software
installation is required. See the installation manuals which are supplied
with the software.
To verify that the INET driver has been configured, enter the following
command at the prompt:
$ show device INET0
If the INET driver has been configured, the following display appears:
INET0:Online
Note ... If TCP/IP is installed, but not running or the INET driver is not
configured, refer to the Troubleshooting information in
subsection 12.9.
Installing and Upgrading ENVOXr Configuration Software on DEC VAX and DEC AXP Systems (Revision B — May 1998)
12
120
Section 12 F Installing and Upgrading CDOS for Control Desktop
12.3.4
TCP/IP Entries for the Servers
The CDOS installation automatically creates an entry in the interfaces file
for the CDOS server and configures a TCP/IP entry for it. The entry for
the SYBASE server can be optionally added during the ENVOX P4.0
installation. If the entry does not exist, it must be manually updated to add
a TCP/IP entry. The update must be done after TCP/IP has been
successfully installed and configured.
Updating the Sybase server entry is achieved by editing the file,
sybase_system:[sybase]interfaces, and adding a TCP/IP entry for each
Sybase server to be accessed by Control Desktop. The Sybase server
should be restarted each time changes to the interfaces file are
completed.
Figure 12-1 is an example of the interfaces file after CDOS has been
installed and the appropriate lines added for the Sybase server. The
highlighted 2nd and 4th lines are the lines which must be manually added
if they are missing.
The example shows an entry for a Sybase server called SYBASE on
node PAINTD with a TCP/IP address of 129.76.21.146 and port number
of 2025. You should substitute the server name and TCP/IP address of
your host machine. If the port number is already in use, choose another
one.
12
5
SYBASE 1
query decnet dec-ether PAINTD 200
query tcp ether 129.76.21.146 2025
master decnet dec-ether PAINTD 200
master tcp ether 129.76.21.146 2025
debug decnet dec-ether PAINTD 200
SYB_BACKUP
1
5
query decnet dec-ether PAINTD 200
master decnet dec-ether PAINTD 200
CDOS
1
5
query tcp ether 129.76.21.146 7010
master tcp ether 129.76.21.146 7010
Figure 12-1. Example of a TCP/IP Entry
Installing and Upgrading ENVOXr Configuration Software on DEC VAX and DEC AXP Systems (Revision B — May 1998)
Installing and Upgrading CDOS for Control Desktop F Section 12
121
On the PC running Control Desktop, the ServerSetup program should be
run and the two server names defined. Assuming the names used in the
example above, they would be entered in the list box at the top section of
the program screen as:
CDOS
129.76.21.146, 7010
SYBASE 129.76.21.146, 2025
In the bottom section of the screen, the CDOS Open Server name would
be CDOS and the Default Sybase Server name would be SYBASE. The
Default Database would be your ENVOX database name (for example,
ENVOXDB).
Note ... Notice in the example that the CDOS server and Sybase server
port numbers are not the same. A separate port number is
required for each server. The numbers 7010 and 2025 are the
default numbers.
Once the Sybase server entry in the interfaces file has been updated with
the TCP/IP address, and the Sybase server has been restarted, lines
similar to the following should exist in the file start_servername.out in the
directory, sybase_system:[sybase.install].
Initializing Additional Master Network 129.76.21.146.
Object 2025, Listener 1
If your Sybase server is named SYBASE, the file name is
sybase_system:[sybase.install]start_sybase.out.
Installing and Upgrading ENVOXr Configuration Software on DEC VAX and DEC AXP Systems (Revision B — May 1998)
12
122
Section 12 F Installing and Upgrading CDOS for Control Desktop
12.4
Licensing CDOS After Installation
After installation, you must obtain license keys. The CDOS installation
program creates a license file, cdos_system:[cdos]license.dat. This file
lists the purchased Control Desktop licenses. The list is used by CDOS to
identify when the number of licenses has been exceeded.
The CDOS installation program also creates a license expiration file,
cdos_system:[cdos]expiry.dat. This file provides CDOS with a license
expiration date one month from the date CDOS is installed. The file also
contains an encryption code which allows CDOS to identify if the
expiration date has been modified or if the file has been copied from
another machine.
Note ... Do not attempt to copy an expiration or license file from another
machine, nor modify it, because it will not be useable.
12
The installed version of the license file in combination with the license
expiration file allows a 29-day grace period (from the date of installation)
during which time CDOS accepts a pre-defined number of Control
Desktop and Control Designer users. Once the grace period has expired,
Control Desktop will not operate unless new license keys have been
obtained from Fisher-Rosemount Systems. The license keys are specific
to the licenses that have been purchased and the machine on which
CDOS has been installed.
You should not wait until the grace period has expired before obtaining
your own license keys. As soon as possible after installation, use the
Control Desktop application to obtain license keys. Also, if CDOS is
moved to another machine, and in some other circumstances, new
license keys need to be requested from FRSI. Full details of how and
when to obtain new license keys are given in the Control Desktop, Getting
Started manual.
Control Desktop and CDOS software are licensed simultaneously. To
obtain the license keys, perform the procedures described in Software
Licensing Procedure of the Control Desktop getting started manual.
Installing and Upgrading ENVOXr Configuration Software on DEC VAX and DEC AXP Systems (Revision B — May 1998)
Installing and Upgrading CDOS for Control Desktop F Section 12
12.5
123
Installing CDOS
Installation is a stepped procedure, requiring several keyboard entries
and selections during the process. Be sure to follow the procedure
carefully.
Note ... If your system is already installed with CDOS version P1.0 and
you wish to upgrade CDOS to version P2.0, then proceed to
subsection 12.6.
To install CDOS, proceed as follows:
Step 1:
If you are not logged into the system manager’s account, log
in by entering the user name SYSTEM and your password at
the prompt.
Username: System
Password: your_password
The DCL prompt appears.
Step 2:
Insert and make ready the installation media. Then, read the
installation script from the installation media by entering the
following command at the DCL prompt:
$ backup tapedrive:cdos_inst.a/sav *.*/new
... where tapedrive is the name of your tapedrive if installing
from tape, or the full directory pathname where the savesets
are stored if installing from disk.
Step 3:
Invoke the installation script by entering the following
command at the DCL prompt:
$ run cdos_install
The screen clears and the following display appears:
Checking system
Please Wait....
Then, the following display appears:
Installing and Upgrading ENVOXr Configuration Software on DEC VAX and DEC AXP Systems (Revision B — May 1998)
12
124
Section 12 F Installing and Upgrading CDOS for Control Desktop
Choose whether to install or de-install CDOS.
Move cursor to item and press <CR>.
INSTALL CDOS
DE-INSTALL CDOS
QUIT
Step 4:
Move the cursor to INSTALL CDOS and press Return.
The following display appears:
CDOS Installation
----------------1)
2)
3)
4)
5)
6)
7)
CDOS System Disk = USER$1
CDOS Automatic Startup = Y
CDOS account UIC code = 17,2010
CDOS server name = CDOS
TCP/IP Software = M
CDOS port number =7010
Tape Device =
ENTER QUIT
12
Step 5:
For menu item 1), enter the name of the disk which will contain
the main CDOS directory structure.
Step 6:
For menu item 2), enter Y to add the CDOS startup
commands to the FISHER_STARTUP.COM file, or if this file
does not exist, the commands are added to the
SYSTARTUP_VIS.COM file.
If the answer N is given, none of the required CDOS logicals
are included in the startup file, and the CDOS server does not
start automatically when the system is rebooted.
Note ... When the CDOS Automatic Startup option is set to Y, there will
be a time following a reboot when the logicals required for
SYBASE, ENVOX and CDOS are not yet defined. For this
reason, a delay of two minutes is recommended before
attempting to log onto VMS following a reboot.
Installing and Upgrading ENVOXr Configuration Software on DEC VAX and DEC AXP Systems (Revision B — May 1998)
Installing and Upgrading CDOS for Control Desktop F Section 12
125
Step 7:
For menu item 3), enter the UIC code for the CDOS account.
The UIC code must be unique and of the form, group,
member, where group and member are OCTAL numeric
numbers in the range: group = [0 to 3776] and member = [0 to
177776]. A default of 17, 2010 is recommended and places
the CDOS account in the same group as the CHIP account.
Step 8:
For menu item 4), enter the CDOS server name. The server
name can contain only alphanumeric characters, and _
(underscore) characters. It must be 11 characters or less. A
default name of CDOS is recommended.
Step 9:
For menu item 5), enter M or U for the type of TCP/IP software
that has been installed, where M = MULTINET and U = UCX.
Step 10:
For menu item 6), enter the CDOS port number.
The port number must be between 1025 and 65535, and is
used by Control Desktop clients to connect to the CDOS open
server. The port number must be unique to the TCP/IP node
which is running the CDOS open server. The default value of
7010 is recommended.
Step 11:
For menu item 7), enter the tape device name where the
CDOS software media is located if you are installing from tape,
or enter the full directory pathname where the savesets are
stored if you are installing from disk.
Step 12:
Move the cursor to ENTER and press Return to continue the
installation.
The following display appears:
Checking menu options
Please wait....
If there are no errors, the next display allows you to identify
the Sybase servers that are to be accessed from Control
Desktop through CDOS. The display consists of two lists: the
left hand list which gives candidate server names from the
interfaces file, and the right hand list which gives the list of
Sybase servers that will be accessible via CDOS.
On a new installation where there is only one Sybase server
named SYBASE, the display will appear as follows:
Installing and Upgrading ENVOXr Configuration Software on DEC VAX and DEC AXP Systems (Revision B — May 1998)
12
126
Section 12 F Installing and Upgrading CDOS for Control Desktop
Identify Sybase Servers to be accessed via CDOS
Servers from interfaces file
accessed via CDOS
Servers to be
1) SYBASE
ENTER
QUIT
Use <CR> to move server to/from CDOS server list
Use left & right arrows to move between lists
Use up & down arrows to move within lists
Note ... The Sybase servers displayed in the two lists will be dependent
on the contents of your interfaces file and whether or not this
installation is a re-installation of CDOS.
Step 13:
Select the Sybase server or servers to be accessed through
CDOS by using the arrow keys to highlight the server in the
left hand list and pressing Return. The server is moved to the
right hand list so that is accessible via CDOS. The lists will
scroll if there are more servers than can be displayed on the
screen at the same time.
Step 14:
Move the cursor to ENTER using the left or right arrow key
and press Return to continue the installation.
12
The following display appears:
Options validated OK
Move cursor to item and press <CR>
PROCEED WITH INSTALLATION
MODIFY OPTIONS
QUIT
Step 15:
Move the cursor to PROCEED WITH INSTALLATION and
press Return to continue with the installation.
Installing and Upgrading ENVOXr Configuration Software on DEC VAX and DEC AXP Systems (Revision B — May 1998)
Installing and Upgrading CDOS for Control Desktop F Section 12
127
If there are no errors, the installation continues to completion.
During installation, the following display appears:
start of inst_cdos.com
---------------------Deleting existing cdos files...
Installing CDOS files...
initialising server files.
installing cdos Images.
start cdos server
Job CDOS_STARTUP(queue SYS$BATCH, entry 2) Started on
SYS$BATCH
checking for errors
add servers
CDOS installation completed successfully on date,
time.
Now login as user Sybase and re-tune the Sybase
dataserver by issuing the commands:
$ set def [Sybase.install]
$ @sybase_tune.com
The CDOS open server and task daemon should now be
running.
Step 16:
Tune the Sybase server to support the number of connections
which you have added to the server. For tuning instructions,
see subsection NO TAG.
When you have finished tuning the server, CDOS software is ready for
normal operation.
Note ... If a TCP/IP entry for the SYBASE server does not exist in the
interfaces file, the following warning is displayed:
The interfaces file does not contain a TCP/IP
entry for the SYBASE server.
On completion of the installation, refer to the subsection 12.3.4
for details on how to add a TCP/IP entry to the interfaces file.
Installing and Upgrading ENVOXr Configuration Software on DEC VAX and DEC AXP Systems (Revision B — May 1998)
12
128
Section 12 F Installing and Upgrading CDOS for Control Desktop
12.6
Upgrading CDOS P1.0 to P2.0
Before you can use ENVOX P4.0 with Control Desktop P2.0, you must
upgrade CDOS to P2.0. The following procedure describes how.
Note ... The following procedure applies to the released version of
CDOS P1.0. If you are running a pre-released version, perhaps
remaining from having been a beta test site, you must de-install
the pre-released version and then install CDOS P2.0 as a new
installation; not an upgrade. For de-installation instructions, see
subsection 12.8.2
The upgrade process deletes the existing CDOS P1.0 files and installs
CDOS P2.0 in their place. To upgrade to CDOS P2.0, proceed as follows:
Step 1:
If you are not logged into the system manager’s account, log
in by entering the user name SYSTEM and your password at
the prompt.
Username: System
Password: your_password
The DCL prompt appears.
Step 2:
12
Insert and make ready the installation media. Then, read the
installation script from the installation media by entering the
following command at the DCL prompt:
$ backup tapedrive:cdos_inst.a/sav *.*/new
... where tapedrive is the name of your tapedrive if installing
from tape, or the full directory pathname where the savesets
are stored if installing from disk.
Step 3:
Invoke the installation script by entering the following
command at the DCL prompt:
$ run cdos_install
The screen clears and the following display appears:
Checking system
Please Wait....
Then, the following display appears:
Installing and Upgrading ENVOXr Configuration Software on DEC VAX and DEC AXP Systems (Revision B — May 1998)
Installing and Upgrading CDOS for Control Desktop F Section 12
129
Choose whether to install or de-install CDOS.
Move cursor to item and press <CR>.
INSTALL CDOS
DE-INSTALL CDOS
QUIT
Step 4:
Move the cursor to INSTALL CDOS press Return to continue
the sybase upgrade.
The following display appears:
CDOS Upgrade
-----------1)Tape device =
ENTER
Step 5:
QUIT
Enter the tape device (or full disk directory path) name.
The following display appears:
Checking menu options
Please wait...
If there are no errors, the following selection is displayed:
Options validated OK
Move cursor to item and press <CR>
PROCEED WITH INSTALLATION
MODIFY OPTIONS
QUIT
Step 6:
Move the cursor to PROCEED WITH INSTALLATION and
press Return to continue the sybase upgrade.
The following display appears:
Installing and Upgrading ENVOXr Configuration Software on DEC VAX and DEC AXP Systems (Revision B — May 1998)
12
130
Section 12 F Installing and Upgrading CDOS for Control Desktop
start of inst_cdos.com
---------------------Deleting existing cdos files...
Installing CDOS files...
Installing cdos images
start cdos server
Job CDOS_STARTUP (queue SYS$BATCH), entry 3) started
on SYS$BATCH
checking for errors
cdos install completed successfully on 26-FEB-1998
14:39:02.34
Step 7:
Login as user Sybase and re-tune the Sybase dataserver by
entering the commands:
$ set def [sybase.install]
$ @sybase_tune.com
12.7
Upgrading ENVOX Databases
ENVOX P4.0 databases must be upgraded to add certain tables and
procedures before they can be used with Control Desktop P2.0. However,
you may or may not have to use the procedure below to upgrade the
databases, depending on:
J
12
J
J
If you have been using Control Desktop P1.0 with ENVOX P3.4
databases, the databases are automatically upgraded for Control
Desktop P2.0 when you upgrade to ENVOX P4.0. You do not have to
perform the procedure.
If you have never used Control Desktop with your ENVOX databases,
the databases must be upgraded. They are not upgraded as part of a
CDOS installation. You must perform the procedure.
If you added ENVOX databases after Installing or upgrading to CDOS
P2.0 and you wish to use these databases with Control Desktop, you
must upgrade these databases by performing the procedure.
During CDOS P2.0 installation, you selected the Sybase server or servers
to be accessible through CDOS. The ENVOX databases on these servers
are the ones which you can upgrade. You may upgrade all or some of the
databases.
To upgrade an ENVOX database for use with Control Desktop, log into
your Control Desktop on your PC, using the ENVOX username and
password that you normally use to log into ENVOX forms, and:
Step 1:
Select the database from the System Navigator window.
Installing and Upgrading ENVOXr Configuration Software on DEC VAX and DEC AXP Systems (Revision B — May 1998)
Installing and Upgrading CDOS for Control Desktop F Section 12
131
A message is displayed stating that the database has not been
upgraded and asking if it should be upgraded now.
Step 2:
Select Yes or No
If “Yes” is selected, you are prompted to enter the password
for the envoxutility Sybase server account.
Step 3:
Enter your password for the envoxutility account.
On a newly installed system, the password is set to:
envoxutility.
If you do not know the password for the envoxutility account,
you can change the password from isql, as follows:
Log into ISQL by entering:
$ define DSQUERY sybase_server_name
$ ISQL/u=”sa”/p=“sa_password”
...where sybase_server_name is the name of your Sybase
server (for example, SYBASE) and sa_password is your
current password for the Sybase server sa account.
The quotation marks (“”) are required.
The system responds with the ISQL prompt.
Step 4:
At the ISQL prompt, enter in order:
1> sp_password ”sa_password“,”new_password”,
envoxutility
... where sa_password is your current password for the sa
user and new_password is the password you wish to use for
the envoxutility account.
The quotation marks (“”) are required.
2> go
After go is entered, the following display should appear:
Password correctly set,
(return status = 0)
1> exit
When you enter exit, upgrade of an ENVOX database begins.
Enter your new envoxutility password when prompted during
the upgrade.
Installing and Upgrading ENVOXr Configuration Software on DEC VAX and DEC AXP Systems (Revision B — May 1998)
12
132
Section 12 F Installing and Upgrading CDOS for Control Desktop
The process takes a few minutes — typically less than 10 minutes and
often less than 5 minutes, depending on the performance of the server
machine and the load upon it.
Caution ... Never add an envoxutility user from the ENVOX admin forms in
an attempt to perform a database upgrade. Not only will the
attempt fail, but database operation can be adversely affected.
12.8
Backup, Restore, and De-Install
12.8.1
Backup and Restore
To back-up and restore CDOS, follow the backup and restore procedures
which are described in Section 8.
12.8.2
De-installation
The de-install process completely removes CDOS software from your
system. All CDOS files, directories and accounts are deleted. SYBASE
and ENVOX software are not affected.
You may de-install on one of two ways:
J
12
De-install using the installation media as follows:
Step 1:
Insert and make ready the installation media. Then, read the
installation script from the installation media by entering the
following command at the DCL prompt:
$ backup tapedrive:cdos_inst.a/sav *.*/new
... where tapedrive is the name of your tapedrive if installing
from tape, or the full directory pathname where the savesets
are stored if installing from disk.
Step 2:
Log into the computer as System and enter the following
commands at the prompts:
$ @DEINSTALL_CDOS.COM
When you enter this command, the system responds with:
Installing and Upgrading ENVOXr Configuration Software on DEC VAX and DEC AXP Systems (Revision B — May 1998)
Installing and Upgrading CDOS for Control Desktop F Section 12
133
CDOS De-installation Utility
---------------------------0 -- De-install CDOS
1 -- Help
2 -- Quit
SELECT OPTION [0]
This utility will completely de-install CDOS. All CDOS
files, directories and accounts will be deleted.
Do you wish to continue [N] ?
Enter N if you wish to save any files or wish to first backup the system.
Enter Y only if you are absolutely sure that you wish to continue.
J
Alternatively, de-install may be carried out using the install utility. Log
into the computer as System and enter the following commands at the
prompts:
Step 1:
This step assumes that you have obtained the installation
scripts from tape as described in subsection 12.4.2 step 2. At
the prompt, type the following:
$ run cdos_install
The screen clears and the following display appears:
Checking System
Please wait...
Then, the following display appears:
Choose whether to install or de-install CDOS.
Move cursor to item and press <CR>.
INSTALL CDOS
DE-INSTALL CDOS
QUIT
Step 2:
Move the cursor to DE-INSTALL CDOS and press Return.
The following display appears:
Installing and Upgrading ENVOXr Configuration Software on DEC VAX and DEC AXP Systems (Revision B — May 1998)
12
134
Section 12 F Installing and Upgrading CDOS for Control Desktop
Checking menu options
Please wait....
If there are no errors, the following display appears:
Move cursor to item and press <CR>
PROCEED WITH DE-INSTALLATION
QUIT
WARNING: Proceeding will cause a total
de-installation of CDOS. Are you sure you want
to proceed.
Step 3:
Move the cursor to PROCEED WITH DE-INSTALLATION and
press Return to continue with de-installation.
If there are no errors, the installation continues to completion.
During the de-installation, the following display appears:
start of inst_cdos.com
Deleting existing cdos files...
cdos de-installation completed successfully on date, time
The CDOS software has now been removed from the DEC VAX or
DEC AXP platform.
Step 4:
12
Re-tune the Sybase server to support the new number of
connections to the server. For tuning instructions, see
subsection, Tuning the Sybase Server, in subsection NO TAG.
When you have finished re-tuning the server, the de-installation process
is complete.
12.9
Troubleshooting
This subsection provides information about installing TCP/IP and
specifying servers in the interface file.
12.9.1
TCP/IP Installation Guide
The steps described below to install Multinet and UCX on DEC VAX and
DEC AXP platforms are provided as a guide only. Multinet and UCX
should always be installed and configured using the vendor-supplied
installation and configuration manuals.
Installing and Upgrading ENVOXr Configuration Software on DEC VAX and DEC AXP Systems (Revision B — May 1998)
Installing and Upgrading CDOS for Control Desktop F Section 12
12.9.2
135
Multinet Installation
The following guidelines use the example of installing Multinet Version 4.0
on AXP node, ORANGE, and a TCP/IP address of 129.36.21.146.
Substitute the nodename, TCP/IP address, routing information, and
multinet product name of your system in the applicable places below.
Step 1:
If you are not logged into the system manager’s account, log
in by entering the user name SYSTEM and your password at
the prompt.
Username: System
Password: your_password
The DCL prompt appears.
Step 2:
Insert and make ready the installation media, and invoke the
installation, by entering the following command at the DCL
prompt:
$ @sys$update:vmsinstal MULTINET040 tapedrive:
... where tapedrive is the name of your tapedrive if installing
from tape, or the full directory pathname where the savesets
are stored if installing from disk.
When the following display appears, fill in the applicable
entries for your system:
* Do you want to install the TCP/IP application [YES]
YES
* Do you want to install the online documentation
[YES] YES
* Do you want to install the library files [YES] YES
* Do you want to install the user commands in
DCLTABLES [YES] YES
* Configure Multinet TCP/IP after installation [NO]
“
“
VMSINSTAL procedure done at 14:02
Step 3:
Configure the IP transport by entering:
Installing and Upgrading ENVOXr Configuration Software on DEC VAX and DEC AXP Systems (Revision B — May 1998)
12
136
Section 12 F Installing and Upgrading CDOS for Control Desktop
$ set default sys$sysdevice:[multinet.axp_common.multinet]
$ @configure
When the following display appears, fill in the applicable
entries for your system:
* System specific directory name:
[dka200:[multinet.orange]]: <CR>
* Enter your Internet host name:
orange.pit.leicester.fisher.com
* Enter the Internet(IP) Address for interface ESA0:
129.36.21.146
* Enter the subnet mask for interface ESA0:
255.255.255.0
* Enter the Internet(IP) Address of your default
route: 129.36.21.1
* Use Domain Nameservice instead of host tables [YES]
YES
* Enter your local timezone: BST
Step 4:
Specify the local computers host name, by entering:
$ multinet configure/interface
When the following display appears, fill in the applicable
entries for your system
12
NET-CONFIG>sethost-nameorange.pit.leicester.fisher.com
NET-CONFIG> set domain-nameserver 129.36.21.20
NET-CONFIG> show
NET-CONFIG> exit
Step 5:
Update systartup_vms.com to allow multinet to start at boot
time by editing sys$manager:systartup_vms.com to include
the following line:
$ @sys$sysdevice:[multinet.orange.multinet]
start_multinet.com
Step 6:
Reboot your system by entering:
$ reboot
Installing and Upgrading ENVOXr Configuration Software on DEC VAX and DEC AXP Systems (Revision B — May 1998)
Installing and Upgrading CDOS for Control Desktop F Section 12
Step 7:
137
Verify that Multinet is running and TCP/IP is operational by
entering:
$ show system
The process MULTINET_SERVER should be displayed.
$ Multinet ping/number_of_packets = 1 orange
...or whatever is the correct parameter for your system.
If TCP/IP software is installed and running, the TCP/IP
address of the host will be displayed.
Step 8:
Verify that the INET driver has been configured. At the prompt,
enter:
$ show dev INET0
If the INET driver has been configured, the following will be
displayed:
INET0:
12.9.3
Online
UCX Installation
The following guidelines use an example of installing UCX Version 4.0 on
AXP node, ORANGE, and tcp/ip address of 129.36.21.146. Substitute the
nodename, tcp/ip address, routing information, and UCX product name of
your system in the appropriate places below.
Step 1:
Step 1. If you are not logged into the system manager’s
account, log in by entering the user name SYSTEM and your
password at the prompt.
Username: System
Password: your_password
The DCL prompt appears.
Step 2:
Insert and make ready the installation media, and invoke the
installation, by entering the following command at the DCL
prompt:
$ @sys$update:vmsinstal ALPHA_UCX040 tapedrive:
... where tapedrive is the name of your tapedrive if installing
from tape, or the full directory pathname where the savesets
are stored if installing from disk.
Installing and Upgrading ENVOXr Configuration Software on DEC VAX and DEC AXP Systems (Revision B — May 1998)
12
138
Section 12 F Installing and Upgrading CDOS for Control Desktop
When the following display appears, fill in the applicable
entries for your system:
*Do you want to purge files replaced by this
installation [YES] YES
PRODUCT: UCX
PRODUCER: Digital Equipment Corporation
VERSION: 4.0
Release Date: Oct-1995
* Does this product have an authorization key
registered and loaded? YES
No further questions will be asked during this
installation.
“
“
VMSINSTAL procedure done.
Step 3:
Automatically Start up and Shut down UCX by editing
sys$manager:systartup_vms.com to include the following line:
$ @sys$manager:ucx$startup.com
12
Then, edit sys$manager:syshutdown.com to include the
following line:
$ @sys$manager:ucx$shutdwn
Step 4:
Reboot your system by entering:
$ reboot
Step 5:
Configure UCX by entering:
$ @sys$manager:ucx$config
When the following display appears, fill in the applicable
entries for your system:
Installing and Upgrading ENVOXr Configuration Software on DEC VAX and DEC AXP Systems (Revision B — May 1998)
Installing and Upgrading CDOS for Control Desktop F Section 12
139
Do you want to grant world read access to
non-privileged uses: NO
o Configure Interfaces
Core environment ==>Interfaces
*Do you want to configure SE0 YES
Enter unqualified host name: ORANGE
Enter Internet address for ORANGE: 129.36.21.146
Enter Internet network mask for ORANGE: 255.255.255.0
Enter broadcast mask for ORANGE[129.36.21.255] <CR>
o Configure Time Zone
Core environment ==> Time Zone
Enter your choice: g (Greenwich)
o Configure Portmapper
Server components ==>portmapper
Enter configuration option: 8
o Configure Optional components ==>Configure SRI QIO
Interface
Enter configuration option: 1 (Enable service on this
node)
Exit configuration procedure
Step 6:
Reboot your system to pick up the UCX parameters by
entering:
$ reboot
Step 7:
Verify that UCX is running and TCP/IP is operational by
entering:
$ show system
The process UCX$inet_ACP should be displayed.
$ UCX ping/number_of_packets = 1 orange
Installing and Upgrading ENVOXr Configuration Software on DEC VAX and DEC AXP Systems (Revision B — May 1998)
12
140
Section 12 F Installing and Upgrading CDOS for Control Desktop
...or whatever is the correct parameter for your system.
If TCP/IP software is installed and running, the TCP/IP
address of the host will be displayed.
Step 8:
Verify that the INET driver has been configured. At the prompt,
enter:
$ show dev INET0
If the INET driver has been configured then the following will
be displayed:
INET0:
12.9.4
Online
Specifying Servers in the Interface File
The logical DSQUERY is used to specify which of the servers listed in the
interfaces file is used when you use ISQL or the ENVOX forms to access
a server. The interfaces file is located in,
sybase_system:[sybase]interfaces
DSQUERY is defined at login and is set to cdos_servername (for
example, CDOS) if logged into the cdos account or otherwise
sybase_servername (for example, SYBASE).
To determine the value of DSQUERY, enter the following at the DCL
prompt:
$ show logical DSQUERY
12
If the logical is defined, the system displays:
“DSQUERY” = “servername”
(LNM$PROCESS_TABLE)
If the logical is undefined, the following display appears:
$ %SHOW-S-NOTRAN, no translation for logical name
DSQUERY
To change the value of DSQUERY, enter the following:
Installing and Upgrading ENVOXr Configuration Software on DEC VAX and DEC AXP Systems (Revision B — May 1998)
Installing and Upgrading CDOS for Control Desktop F Section 12
12.10
141
Network Routing
If you need to communicate with a host on a different IP network, then a
default gateway should be set up. The following steps describe how to
verify and configure a default gateway on a system installed with UCX
and MULTINET.
12.10.1
Routing using UCX
To determine whether a default gateway has been configured on a
system installed with UCX, enter the following:
Step 1:
If you are not logged into the systems manager’s account, log
in by entering the user name SYSTEM and your password, at
the prompt.
Username: System
Password: your_password
The DCL prompt appears.
Step 2:
Enter the following command at the DCL prompt:
$ ucx show route */full/perm
The following is displayed:
Type
PN *
Destination
0.0.0.0
Gateway
* gateway ip address
If an entry does not exist in the Gateway column, then a
default gateway has not been configured. Perform the next
step to configure a default gateway:
Step 3:
Enter the following at the DCL prompt:
$ UCX
UCX> set router/default/gateway=your_gateway_ip_
address/perm
UCX> set router/default/gateway=your_gateway_ip_
address
Installing and Upgrading ENVOXr Configuration Software on DEC VAX and DEC AXP Systems (Revision B — May 1998)
12
142
Section 12 F Installing and Upgrading CDOS for Control Desktop
12.10.2
Routing using MULTINET
To determine whether a default gateway has been configured on a
system installed with MULTINET, enter the following:
Step 1:
If you are not logged into the systems manager’s account, log
in by entering the user name SYSTEM and your password, at
the prompt.
Username: System
Password: your_password
The DCL prompt appears.
Step 2:
Enter the following command at the DCL prompt:
$ multinet configure/menu
A menu is displayed.
Step 3:
Choose Configure Global Parameters from the menu.
Another menu is displayed.
Step 4:
Choose Modify Global Parameters from the menu.
The system provides a display similar to the following:
12
Host Name
NetWare Host Name
Default Route
Domain Nameservers
Nameserver Retrans
Nameserver Retry
IP Cluster Aliases
Cluster Service Names
Cluster Service Address
Timezone
Timezone Rules
Local Domain
janus.leicstc.eur.frco.com
gateway ip address
127.0.0.1
GMT
BRITAIN
If an entry does not exist in the Default Route row, then a
default gateway has not been configured. Perform the next
steps to configure a default gateway:
Step 5:
Enter your gateway ip address into the above menu and
enter Control Z to return to the top level menu.
Step 6:
Select the menu item Save Changes and Return to
Previous Menu.
Step 7:
Enter Exit Menu to return to the DCL prompt.
Installing and Upgrading ENVOXr Configuration Software on DEC VAX and DEC AXP Systems (Revision B — May 1998)
Installing and Upgrading CDOS for Control Desktop F Section 12
12.11
143
CDOS Administration
The administration functions for the CDOS open server and the task
daemon are described below. The first two subsections are platform
specific and the third is applicable to all supported platforms.
12.11.1
CDOS Directory and File Structure
The CDOS directory and the file structure can be described by
Figure 12-2.
cdos
application
CDOS open server log file
Task daemon log file
Diagnostic daemon log files
VTF files
executables
CDOS configuration file
Task daemon configuration file
Diagnostic daemon
configuration files
generate
generate log files
dbscripts
sql scripts
td jobs
download
download log files
ascii_fst
translate log files
Figure 12-2. Pictorial of the CDOS Directory Structure
12.11.2
Starting the CDOS Server
To start the CDOS server, log into the cdos account and type the following
at the prompt:
$ startcdos_server_name
For example, to start the CDOS server named, CDOS, the command
would be:
$ startcdos
This command produces output to two files:
J
The CDOS log file. The name of the CDOS log file is given in the
CDOS configuration file (described in subsection 12.11.10). The
CDOS log file is appended to each time the CDOS server is started.
Installing and Upgrading ENVOXr Configuration Software on DEC VAX and DEC AXP Systems (Revision B — May 1998)
12
144
Section 12 F Installing and Upgrading CDOS for Control Desktop
J
cdos_system:[cdos]start_cdos_servername.out file. This file is
re-created each time the CDOS server is started and so contains the
log from the current run of the CDOS server only.
If the CDOS server has started successfully, the following line is seen at
the end of both files:
date, time CDOS startup complete - going
multi-threaded
12.11.3
Stopping the CDOS Server
To stop the CDOS server, log into the cdos account and type the following
at the prompt:
$ stopcdos_server_name
For example, to stop the CDOS server named, CDOS, the command
would be:
$ stopcdos
12.11.4
Starting the Task Daemon
To start the task daemon, log into the cdos account and enter the
following at the prompt:
$ starttd
This command produces output to the task daemon log file. The file name
is given in the task daemon configuration file (described in subsection
12.11.10). The default name is cdos_system:[cdos]td.log. If the task
daemon has started successfully, the following line is seen at the end of
the task daemon log file.
12
date, time Initialisation complete
12.11.5
Stopping the Task Daemon
To stop the task daemon, log into the cdos account and enter the
following at the prompt:
$ stoptd
12.11.6
Starting the Diagnostic Daemon
To start the diagnostic daemon, log into the cdos account and enter the
following at the prompt:
Installing and Upgrading ENVOXr Configuration Software on DEC VAX and DEC AXP Systems (Revision B — May 1998)
Installing and Upgrading CDOS for Control Desktop F Section 12
145
$ startdd
This command produces output to the diagnostic daemon log file. The file
name is given in the diagnostic daemon configuration file (described in
subsection 12.11.10). The default name is cdos_system:[cdos]dd.log. If
the diagnostic daemon has started successfully, the following line is seen
at the end of the diagnostic daemon log file.
date, time Initialisation complete
12.11.7
Stopping the Diagnostic Daemon
To stop the diagnostic daemon, log into the cdos account and enter the
following at the prompt:
$ stopdd
12.11.8
Starting the Devrev Daemon
To start the Devrev daemon, log into the cdos account and enter the
following at the prompt:
$ startdr
This command produces output to the devrev daemon log file. The file
name is given in the devrev daemon configuration file (described in
subsection 12.11.10). The default name is cdos_system:[cdos]dr.log. If
the devrev daemon has started successfully, the following line is seen at
the end of the devrev daemon log file.
date, time Initialisation complete
12.11.9
Stopping the Devrev Daemon
To stop the task daemon, log into the cdos account and enter the
following at the prompt:
$ stopdr
12.11.10
CDOS Configuration File
The CDOS server needs a configuration file for startup. The installation
creates a configuration file called cdos_server_name.cfg in the
application directory. Therefore, for the CDOS server named, CDOS, the
file is named cdos_system:[cdos.application]cdos.cfg. The file has the
following format:
Installing and Upgrading ENVOXr Configuration Software on DEC VAX and DEC AXP Systems (Revision B — May 1998)
12
146
Section 12 F Installing and Upgrading CDOS for Control Desktop
!
! cdos_server_name.cfg
! This is the configuration file for CDOS
!
servername cdos_server_name
vtf_directory cdos_system:[cdos.application]
logfile cdos_system:[cdos]cdos_server_name.log
!
12.11.11
Task Daemon Configuration File
The task daemon needs a configuration file for startup. The installation
creates a configuration file called td.cfg in the application directory, with
the following format:
!
! td.cfg
!
! This is the configuration file for the task daemon
process
!
openserver cdos_server_name
logfile cdos_system:[cdos]td.log
all_functions
!
12.11.12
12
Task Daemon Configuration File Options
Several options are available in the task daemon configuration file which
allow you to modify the file for your specific application.
J
all_functions
Specifies that this task daemon is to perform all task daemon
functions for all of the SYBASE servers known to CDOS. If this
keyword is specified no other keywords can be used.
The installation creates the file with the ”all_functions” option.
J
generate_all
Specifies that this task daemon is to perform the generate function for
all of the SYBASE servers known to CDOS. If this keyword is
specified the generate keyword cannot be used.
J
generate
Specifies that this task_daemon is to perform the generate function
for the SYBASE server specified as the parameter. The name of the
server is case sensitive.
Installing and Upgrading ENVOXr Configuration Software on DEC VAX and DEC AXP Systems (Revision B — May 1998)
Installing and Upgrading CDOS for Control Desktop F Section 12
J
147
download_all
Specifies that this task daemon is to perform the download function
for all of the SYBASE servers known to CDOS. If this keyword is
specified the download keyword cannot be used.
J
download
Specifies that this task daemon is to perform the download function
for the SYBASE server specified as the parameter. The name of the
server is case sensitive.
J
afst_import_all
Specifies that this task daemon is to perform the ASCII FST Import
task (which is part of the Translate process used by Control Designer)
for all the SYBASE servers known to CDOS.
12.11.13
Diag Daemon Configuration File
The diag(nostics) daemon needs a configuration file for startup. The
installation creates a configuration file called dd.cfg in the application
directory, with the following format:
!
! dd.cfg
!
! This is the configuration file for the diag daemon
process
!
openserver cdos_server_name
logfile cdos_system:[cdos]dd.log
machine_name nodename
!
12.11.14
Devrev Daemon Configuration File
The Devrev daemon needs a configuration file for startup. The installation
creates a configuration file called dr.cfg in the application directory, with
the following format:
!
! dr.cfg
!
! This is the configuration file for the devrev daemon
process
Installing and Upgrading ENVOXr Configuration Software on DEC VAX and DEC AXP Systems (Revision B — May 1998)
12
148
Section 12 F Installing and Upgrading CDOS for Control Desktop
!
openserver cdos_server_name
logfile cdos_system:[cdos]dr.log
machine_name nodename
!
12.11.15
CDOS Quota File
The CDOS quota file, cdos_system:[cdos.application]cdos_quota.dat,
contains settings of VMS quotas required to run the CDOS server. This
file has the same format as quota files used with the startserver command
used by ENVOX software. You normally do not need to modify this file
except under supervision from the FRSI technical support group.
12.11.16
CDOS Log Files
CDOS maintains two log files in the same way that the SQL server does.
The location of the CDOS log file is specified in the CDOS configuration
file. This file is appended to each time the CDOS server is started.
The file, start_cdos_servername.out, in the top level cdos directory is
re-created each time the CDOS server is started and so contains the log
from the current run of the CDOS server only.
12.11.17
12
Task Daemon Log File
The task daemon maintains a log file. The installation creates this log file
in the top level cdos directory and is called td.log.
12.11.18
Diag Daemon Log File
The Diag(nostics) daemon maintains a log file. The installation creates
this log file in the top level cdos directory and is called dd.log.
12.11.19
Devrev Daemon Log File
The Devrev daemon maintains a log file. The installation creates this log
file in the top level cdos directory and is called dr.log.
12.11.20
SYBASE Interfaces File
If the installation can resolve the TCP/IP address of the host machine and
the port number, a TCP/IP entry for CDOS is added to the SYBASE
interfaces file. The Control Desktop clients communicates with CDOS
through this port.
Installing and Upgrading ENVOXr Configuration Software on DEC VAX and DEC AXP Systems (Revision B — May 1998)
Error Messages F
Appendix A
149
Figure A-Table A
Appendix A
A Error Messages
This appendix lists messages that can occur during various stages of the
installation process. This section is organized as follows:
A.1
J
Pre SYBASE/ENVOX Error Messages — Subsection A.1
J
SYBASE Error Messages — Subsection A.2
J
ENVOX Error Messages — Subsection A.3
J
PDX Dump Error Messages — Subsection A.4
J
CDOS Error and Warning Messages — Subsection A.5
SYBASE and ENVOX Pre-Installation Error Messages
This subsection contains error messages that can occur before you select
whether to install or upgrade SYBASE or ENVOXr software.
Message
You must run the installation from the system account.
Description
You must log into the system account to carry out the installation.
Message
You must run the installation from the sys$manager
directory.
Description
Ensure that the current directory is SYS$MANAGER by issuing the
command: show default
Message
SYBASE and ENVOX must be installed on OpenVMS 7.1 or
later.
Description
Upgrade your OpenVMS software to the latest version of OpenVMS and
try again.
Installing and Upgrading ENVOXr Configuration Software on DEC VAX and DEC AXP Systems (Revision B — May 1998)
A
150
A
Appendix A F Error Messages
Message
Please ensure MOTIF is installed
Description
One or more of the DECwindows Motif application files is missing. Ensure
that DECwindows Motif V1.2-3 is correctly installed.
Message
DECnet must be installed and running before SYBASE.
Description
Ensure DECnet is installed and running before attempting the installation.
Message
The system time is wrong
Description
A common problem exists with the OpenVMS upgrade which causes the
system time to be incorrectly set. Verify that the system time is correct by
issuing the command: show time
Message
Invalid system
Message
A SYBASE server is still running.
Description
An installation has been attempted on a system that has been partially
installed. If it is a new installation, make sure that any previous SYBASE
and ENVOX installation is fully de-installed before attempting the
installation. If its an upgrade, ensure that
sys$manager:sybase_disk_logicals.com exists and that the ENVOX
software is fully operational.
Message
sybase server not running
Description
For a client--server upgrade, ensure that the SYBASE SQL server is
running.
Message
An error has occurred within db_details.log
Description
An error has occurred during the examination of the current SYBASE
databases. Determine the cause of the failure by examining
sys$manager:db_details.log and
sybase_device:[sybase.install]start_sybase.log before repeating the
upgrade.
Installing and Upgrading ENVOXr Configuration Software on DEC VAX and DEC AXP Systems (Revision B — May 1998)
Error Messages F
A.2
Appendix A
151
SYBASE Error Messages
This subsection contains error messages that can occur during the
installation or upgrade of SYBASE software.
Message
sys$manager:inst_file.out does not exist
Description
sys$manager:inst_file.out is a temporary file created by the installation
process. Check to see if this file can be created manually.
Message
SYBASE install failed on xxxx
Description
Determine the installation failure by examining
sys$manager:sybase_envox_inst.log
Message
Unable to determine the installation disk
Description
Verify that sys$common:[sysmgr]inst_file.out exists
Message
The sybase_disk_logicals.com file is missing
Description
sybase_disk_logicals.com must exist for a SYBASE upgrade. Verify that
either sys$sysroot:[sysmgr]sybase_disk_logicals.com exists or
sys$common:[sysmgr]sybase_disk_logicals.com exists.
A
Message
The sybase logical, SYBASE_DEVICE is not defined
Description
Verify that either sys$sysroot:[sysmgr]sybase_disk_logicals.com exists or
sys$common:[sysmgr]sybase_disk_logicals.com exists.
Message
The sybase logical, SYBASE_MASTER_DEVICE is not
defined
Description
Verify that either sys$sysroot:[sysmgr]sybase_disk_logicals.com exists or
sys$common:[sysmgr]sybase_disk_logicals.com exists.
Installing and Upgrading ENVOXr Configuration Software on DEC VAX and DEC AXP Systems (Revision B — May 1998)
152
Appendix A F Error Messages
Message
SYBASE requires xxx free blocks on xxx disk
Description
Verify that sufficient free blocks are available on the corresponding disk.
Refer to Table 2-3 and Table 2-6 for disk sizing requirements.
Message
SYLOGIN.COM can not be found
Description
Ensure that SYLOGIN.COM exists and that the logical SYS$SYLOGIN is
defined and points to the sylogin.com file.
Message
invalid input
Message
invalid response
Description
A syntactical error has occurred during data entry. Ensure data entered is
correct.
Message
diskname is not a disk
Description
An invalid or non-existent diskname was entered. Enter a valid or existing
diskname.
Message
The disk defined by diskname is not mounted(correctly)
Description
Ensure that the chosen disk is mounted correctly.
Message
The disk defined by diskname is write locked.
Description
Ensure that the chosen disk is write enabled.
Message
UIC is already in use
Description
Enter a valid unique UIC.
Message
UIC is not a valid UIC
Description
The UIC must be in the form, group,member, where group and member
are OCTAL numeric values in the range; group = [0 to 37776] and
member = [0 to 177776].
A
Installing and Upgrading ENVOXr Configuration Software on DEC VAX and DEC AXP Systems (Revision B — May 1998)
Error Messages F
Appendix A
Message
value is not a valid number
Description
An illegal value has been entered for the number of ENVOX users. Enter
a value within the range [1 to 32].
Message
server memory of xx Mb can only support xx users
Description
Enter a lower value for the number of ENVOX users.
Message
This device does not exist
Description
An illegal value was entered for the SYBASE printer device. Enter a legal
device value.
Message
The definition for printer must be a device
Description
The device class of printer must be a terminal.
Message
The query object number specfied is outside the valid
range
Description
The value entered for the query object number must be in the range
[128 to 252].
Message
The Dataserver name length must be in the range 1-10
characters
Description
An illegal SQL server name was entered. Enter a valid SQL server name
in the range [1 to10] ASCII characters.
Message
The Dataerver name specified contains illegal
characters
Description
The SQl server name must only contain alphanumeric characters, dollar
($) signs, and _ (underscore) characters.
Message
You cannot allocate less than xxx mb to the Dataserver
Description
The minimum memory that can be allocated to the SQL server is 16
Mbytes on a VAX system and 20 Mbytes on an AXP system.
153
Installing and Upgrading ENVOXr Configuration Software on DEC VAX and DEC AXP Systems (Revision B — May 1998)
A
154
A
Appendix A F Error Messages
Message
You cannot allocate more than xxx mb to the Dataserver
Description
The maximum memory that can be allocated to the SQL server is half the
available system memory.
Message
Unable to determine size of master device
Description
Ensure that a valid master database size has been entered.
Message
The size of the master device must be in the range 20
- xx mb
Description
A value for master device size was entered that is less than 20 Mbytes or
greater than the maximum number free disk blocks.
Message
Unable to determine size of sybprocs device
Description
Ensure that a valid sybprocs database size has been entered.
Message
The size of the sybprocs device must be in the range
20 - xx mb
Description
A value for master device size was entered that is less than 20 Mbytes or
greater than the maximum number free disk blocks.
Message
Device tape_device does not exist
Description
The entered tape device does not exist.
Message
tape_device is not a valid tape device
Description
The device class of the tape device must be a tape or a disk.
Message
tape_device is an invalid pathname
Description
An invalid directory pathname has been entered for the tape device.
Installing and Upgrading ENVOXr Configuration Software on DEC VAX and DEC AXP Systems (Revision B — May 1998)
Error Messages F
Appendix A
Message
tape_device must be terminated with a :
Description
The entered tape device must be terminated with a colon.
Message
The sybase logical, SYBASE_DEVICE is not defined
Description
Verify that either sys$sysroot:[sysmgr]sybase_disk_logicals.com exists or
sys$common:[sysmgr]sybase_disk_logicals.com exists.
Message
The sybase logical, SYBASE_MASTER_DEVICE is not
defined.
Description
Verify that either sys$sysroot:[sysmgr]sybase_disk_logicals.com exists or
sys$common:[sysmgr]sybase_disk_logicals.com exists.
Message
sys$manager:sybase_vms_resources.dat file is missing
Description
The installation process was unable to locate the above temporary file
which is created by the installation process and is used to validate the
system parameters.
Message
Please increase sysgen param to xxx
Message
Please increase pagefile to xxx
Message
Please increase ncp logical links to xxx
Description
The installation process determined that the above system parameter
needs to be increased. Refer to section 10 for help on changing system
parameters.
Message
The parameters in sys$common:[sysmgr]inst_file.out are
incorrect
Description
The installation process has determined that the parameters in the above
file are incorrect. Please keep this file.
155
Installing and Upgrading ENVOXr Configuration Software on DEC VAX and DEC AXP Systems (Revision B — May 1998)
A
156
Appendix A F Error Messages
Message
The node name length must be in the range 1-6
characters.
Description
An illegal node name was specified during a SYBASE client installation.
Specify a valid nodename where the SYBASE SQL server resides.
Message
Can’t find sys$manager:xxxxx
Message
sys$manager:xxxx file is missing
Description
The installation process was unable to locate the above file which is
unloaded from syb_envox_inst.a saveset at the start of the installation.
Message
Installation aborted.
Description
The installation was aborted by pressing ctrl Y.
Message
DB-LIBRARY has failed
Description
Please ensure the sa password is set to database.
Message
Warning cannot find sylogin.com
Description
sys$manager:sylogin.com is provided by OpenVMS. Determine why this
file is missing.
Message
Warning cannot find sys$system:modparams.dat
Description
The above file is provided by OpenVMS. Determine why this file is
missing.
Message
Cannot read savesets
Description
The installation process has been unable to read the software from the
installation media. If installing from a tapedrive, ensure the correct tape is
inserted and correctly mounted. If installing from disk, ensure the selected
directory pathname contains the correct savesets.
A
Installing and Upgrading ENVOXr Configuration Software on DEC VAX and DEC AXP Systems (Revision B — May 1998)
Error Messages F
Appendix A
Message
Unknown installation error encountered.
Description
An internal error has occurred. Examine
sys$manager:sybase_envox_inst.log and sys$manager:inst_file.in to
determine the error.
A.3
ENVOX Error Messages
157
This subsection contains error messages that can occur during the
installation or upgrade of ENVOX software.
Message
SYBASE must be successfully installed before
attempting ENVOX.
Description
The ENVOX software installation process requires the SYBASE system
to be available and running for the process to successfully complete. If
you have followed the SYBASE installation instructions provided by in this
manual, SYBASE software should be present. If it is not, you must repeat
the SYBASE installation before retrying the ENVOX installation.
Message
sys$manager:inst_file.out does not exist
Description
sys$manager:inst_file.out is a temporary file created by the installation
process. Check to see if this file can be created manually.
Message
envox install failed on xxxx
Description
Determine the installation failure by examining
sys$manager:sybase_envox_inst.log
Message
error creating envox_dev1, envox_dev2
Description
Ensure the sa password is set to database. Examine
sybase_system:[sybase.install]start_sybase.out for errors.
Message
Unable to restore files from saveset L into
sybase_system:[sybase]
Description
These files can be manually recovered once the installation has
completed.
Installing and Upgrading ENVOXr Configuration Software on DEC VAX and DEC AXP Systems (Revision B — May 1998)
A
158
A
Appendix A F Error Messages
Message
envox & envoxsupport UICs are the same
Description
The UIC values for the envox and envoxsupport accounts must be
different.
Message
Unable to determine the installation disk
Description
The installation disk is determined from the location of the file:
sys$common:[sysmgr]inst_file.out. Verify that this files exists.
Message
The envox_disk_logicals.com file is missing
Description
envox_disk_logicals.com must exist for an ENVOX upgrade. Verify that
either sys$sysroot:[sysmgr]envox_disk_logicals.com exists or
sys$common:[sysmgr]envox_disk_logicals.com exists.
Message
The envox logical, ENVOX$DISK is not defined
Description
Verify that either sys$sysroot:[sysmgr]envox_disk_logicals.com exists or
sys$common:[sysmgr]envox_disk_logicals.com exists.
Message
The envox logical, ENVOX$DB_DISK is not defined
Description
Verify that either sys$sysroot:[sysmgr]envox_disk_logicals.com exists or
sys$common:[sysmgr]envox_disk_logicals.com exists.
Message
The envox logical, ENVOX$LOG_DISK is not defined
Description
Verify that either sys$sysroot:[sysmgr]envox_disk_logicals.com exists or
sys$common:[sysmgr]envox_disk_logicals.com exists.
Installing and Upgrading ENVOXr Configuration Software on DEC VAX and DEC AXP Systems (Revision B — May 1998)
Error Messages F
Appendix A
Message
envox requires xxx blks free blocks on install disk =
xxx
Message
envox requires xxx blks free blocks on envox$disk =
xxx
Message
envox requires xxx blks free blocks on envox$log_disk
= xxx
Message
envox requires xxx blks free blocks on envox$db_disk =
xxx
Description
Install disk refers to the disk used for installation and is normally the
system disk. ENVOX$DISK refers to the disk used for the ENVOX
software. ENVOX$LOG_DISK refers to the disk used for the logical
device for the ENVOX database log segment. ENVOX$DB_DISK refers
to the disk used for the logical device for the Envox database data
segment. Ensure that sufficient free disk space exists on the relevant
disk. Refer to Table 2-3 and Table 2-6 for disk sizing requirements.
Message
The sybase_manager.com file is missing
Description
This file is created during the SYBASE installation process. Ensure that
sybase_device:[sybase.install]sybase_manager.com exists.
Message
sys$library:decw$transport_common.exe file is missing
Message
The sys$library:decw$terminalshr.exe file is missing
Message
sybase_device:[sybase.install]sylogicals.com is
missing
Description
The above files are checked by the installation process. Ensure that the
above files exist.
159
Installing and Upgrading ENVOXr Configuration Software on DEC VAX and DEC AXP Systems (Revision B — May 1998)
A
160
A
Appendix A F Error Messages
Message
WARNING - CHIP should be installed before ENVOX
Description
Ensure CHIP is installed before installing ENVOX software.
Message
UIC is already in use
Description
Enter a valid unique UIC.
Message
UIC is not a valid UIC
Description
The UIC must be in the form, group,member, where group and member
are OCTAL numeric values in the range; group = [0 to 37776] and
member = [0 to 177776].
Message
envox & envoxsupport UICs are the same
Description
Enter unique UICs for envox and envoxsupport users.
Message
The sybase stopserver symbol is undefined
Description
Verify that the stopserver symbol is defined in
sybase_system:[sybase.install]sybase_manager.com.
Message
The sybase server is not running.
Description
Determine whether the server is running by examining the output from the
DCL command show system. If no sybase server process exists, then
restart the server by issuing the DCL command startserver. If the server
fails to start, determine the cause of the failure by examining
sybase_system:[sybase.install]start_sybase.out
Message
Device tape_device does not exist
Description
The entered tape device does not exist.
Message
tape_device is not a valid tape device
Description
The device class of the tape device must be a tape or a disk.
Installing and Upgrading ENVOXr Configuration Software on DEC VAX and DEC AXP Systems (Revision B — May 1998)
Error Messages F
Appendix A
161
Message
tape_device is an invalid pathname
Description
An invalid directory pathname has been entered for the tape device.
Message
tape_device must be terminated with a :
Description
The entered tape device name must be terminated with a colon.
Message
Cannot read savesets
Description
The installation process has been unable to read the software from the
installation media. If installing from a tapedrive, ensure the correct tape is
inserted and correctly mounted. If installing from disk, ensure the selected
directory pathname contains the correct savesets.
Message
Upgrade of the master database has failed
Description
Determine the cause of the failure by examining
sybase_system:{sybase.install]start_sybase.out.
Message
Creation of xxxxx database has failed
Description
Determine the cause of the failure by examining
sybase_system:{sybase.install]start_sybase.out.
Message
envox$application:xxx file is missing
Description
The above file is provided by the ENVOX installation. Determine why the
file is missing.
Message
The parameters in sys$common:[sysmgr]inst_file.out are
incorrect
Description
The installation process has determined that the parameters in the above
file are incorrect. Please keep this file.
Message
Installation aborted.
Description
The installation was aborted by pressing Ctrl Y.
Installing and Upgrading ENVOXr Configuration Software on DEC VAX and DEC AXP Systems (Revision B — May 1998)
A
162
Appendix A F Error Messages
Message
Unknown installation error encountered
Description
An internal error has occurred. Examine
sys$manager:sybase_envox_inst.log and sys$manager:inst_file.in to
determine the error.
A.4
PDX Dump Error Messages
This subsection contains error messages that can occur during dumps by
the PDX utility.
A
Message
Tape device is not defined
Description
An empty string has been entered. Please enter a valid tape device.
Message
xxx is not a valid tape device
Description
The entered tape device contains illegal characters or the wrong device
type.
Message
Device xxx is illegal
Description
The entered device contains ::.
Message
Device xxx does not exist
Description
The entered device does not exist.
Message
Filename is missing
Description
Please re-enter the tape device and specify a valid filename.
Message
xxx is not valid
Description
Please re-enter the tape device and specify a valid filename.
Message
Disk device is not defined
Description
An empty string has been entered. Please enter a valid filename including
the full directory pathname.
Installing and Upgrading ENVOXr Configuration Software on DEC VAX and DEC AXP Systems (Revision B — May 1998)
Error Messages F
Appendix A
Message
Size is not defined
Description
Please enter a valid pdx file size.
Message
Size is invalid
Description
The entered size contains non-numeric characters.
Message
WARNING — There may not be enough disk space for PDX
file
Description
Increase the free disk space or choose a different disk.
A.5
CDOS Error and Warning Messages
163
This subsection lists the CDOS specific messages that can occur during
the various stages of the CDOS installation process.
Message
ENVOX P4.0 must be installed before CDOS
installation.
Description
Install ENVOX P4.0 in client-server or client-only mode first.
Message
ENVOX version must be P4.0 for CDOS
installation.
Description
CDOS will not install if the existing ENVOX version is pre-ENVOX
P4.0.
Message
CDOS requires xxx free blocks on xxx-disk.
Description
Free up disk space and re-try installation.
Message
CDOS sybase system disk is undefined.
Description
The logical sybase_device must be defined.
Message
Invalid response.
Description
A syntactical error has occurred during data entry. Ensure that the
data entered is correct.
Message
UIC is not a valid UIC.
Installing and Upgrading ENVOXr Configuration Software on DEC VAX and DEC AXP Systems (Revision B — May 1998)
A
164
Appendix A F Error Messages
Description
The UIC must be in the form: group, member, where they are
OCTAL numeric values in the range:
group = [0 to 37776] and member = [0 to 177776].
Message
Value is not a valid number.
Description
An illegal value has been entered for the number of CDOS users.
Enter a value within the range [1 to 32].
Message
server_name already in use.
Description
The server name is being used by a SYBASE server and is
entered in the interfaces file.
Message
Warning - not possible to validate the port
number
Please update the interfaces file after
installation.
Description
There is no TCP/IP software or the software is not running, so the
port number cannot be validated. The installation will proceed but
no entry will be made in the SYBASE interfaces file. You will have
to edit this file manually.
Message
Warning - Unable to determine host tcp/ip
address
Please update the interfaces file after
installation.
A
Description
There is no TCP/IP software or the software is not running, so the
TCP/IP address of host machine cannot be resolved. The
installation will proceed but no entry will be made in the SYBASE
interfaces file. You will have to edit this file manually.
Message
There is not a cdos account on this machine.
Description
Use the HP System Administrator Manager’s (SAM) to create a
CDOS account.
Message
The chip group does not contain the cdos
account.
Description
Use the HP System Administrator Manager’s (SAM) to add the
CDOS account into the CHIP group.
Installing and Upgrading ENVOXr Configuration Software on DEC VAX and DEC AXP Systems (Revision B — May 1998)
Transact-ISQL Reserved Words F Appendix B
165
Figure B-Table B
Appendix B
B Transact-ISQL Reserved Words
The following words are reserved by Interactive Structured Query
Language (ISQL) as keywords (command verbs) and cannot be used for
the names of database objects such as databases, tables, rules,
defaults, and so forth. Reserved words are used for the names of local
variables and for stored procedure parameters.
ADD
ALL
ALTER
AND
ANY
ARITH_OVERFLOW
AS
ASC
AT
AUTHORIZATION
AVG
BEGIN
BETWEEN
BREAK
BROWSE
BULK
BY
CASCADE
CHAR_CONVERT
CHECK
CHECKPOINT
CLOSE
CLUSTERED
COMMIT
COMPUTE
CONFIRM
CONSTRAINT
CONTINUE
CONTROLROW
CONVERT
COUNT
CREATE
CURRENT
CURSOR
DATABASE
DATA_PGS
DBCC
DEALLOCATE
DECLARE
DEFAULT
DELETE
DISTINCT
DESC
DISK
DOUBLE
DROP
DUMMY
DUMP
ELSE
END
ENDTRAN
ERRLVL
ERROREXIT
ESCAPE
EXCEPT
EXEC
EXECUTE
EXISTS
EXIT
FETCH
FILLFACTOR
FOR
FOREIGN
FORM
GOTO
GRANT
GROUP
HAVING
HOLDLOCK
IDENTITY
Installing and Upgrading ENVOXr Configuration Software on DEC VAX and DEC AXP Systems (Revision B — May 1998)
B
166
Appendix B F Transact-ISQL Reserved Words
IDENTITY_INSERT
IF
IN
INDEX
INSERT
INTERSECT
INTO
IS
ISOLATION
KEY
KILL
LEVEL
LIKE
LINENO
LOAD
MAX
MIN
MIRROR
MIRROREXIT
B
NATIONAL
NOHOLDLOCK
NOT
NOTCLUSTERED
NULL
NUMERIC_TRUNCATION
OF
OFF
OFFSETS
ON
ONCE
ONLY
OPEN
OPTION
OR
ORDER
OVER
PERM
PERMANENT
PLAN
PRECISION
PREPARE
PRIMARY
PRINT
PRIVILEGES
PROC
PROCEDURE
PROCESSEXIT
PUBLIC
RAISERROR
READ
READTEXT
RECONFIGURE
REFERENCES
REPLACE
RESERVED_PGS
RETURN
REVOKE
ROLE
ROLLBACK
ROWCNT
ROWCOUNT
ROWS
RULE
SAVE
SCHEMA
SELECT
SET
SETUSER
SHARED
SHUTDOWN
SOME
STATISTICS
STRIPE
SUM
SYB_IDENTITY
SYB_RESTREE
SYB_TERMINATE
TABLE
TAPE
TEMP
TEMPORARY
TEXTSIZE
TO
TRAN
TRANSACTION
TRIGGER
TRUNCATE
TSEQUAL
UNION
UNIQUE
UPDATE
USE
USED_PGS
USER
USER_OPTION
USING
VALUES
VARYING
VIEW
WAITFOR
WHERE
WHILE
WITH
WORK
WRITETEXT
Installing and Upgrading ENVOXr Configuration Software on DEC VAX and DEC AXP Systems (Revision B — May 1998)
Installation and Upgrade Logs F Appendix C
167
Figure C-Table C
Appendix C
C Installation and Upgrade Logs
This appendix lists log files for the following installation and upgrade
procedures:
J
SYBASE Client-Only Installation Log — Subsection C.1
J
SYBASE Client-Server Installation Log — Subsection C.2
J
SYBASE Client-Only Upgrade Log — Subsection C.3
J
SYBASE Client-Server Upgrade Log — Subsection C.4
J
ENVOXr Client-Only Installation Log — Subsection C.5
J
ENVOX Client-Server Installation Log — Subsection C.6
J
ENVOX Client-only Upgrade Log — Subsection C.7
J
ENVOX Client--Server Upgrade Log — Subsection C.8
J
ENVOX P4.0 To P4.0 Upgrade Log — Subsection C.9
J
SYBASE Tune Log — Subsection C.10
J
CDOS Installation Log — Subsection C.11
J
CDOS Upgrade Log — Subsection C.12
J
CDOS De-installation Log — Subsection C.13
Your logs may be slightly different depending on your computer type.
C
Installing and Upgrading ENVOXr Configuration Software on DEC VAX and DEC AXP Systems (Revision B — May 1998)
168
Appendix C F Installation and Upgrade Logs
C.1
C
SYBASE Client-Only Installation Log
*************************************************************
*************************************************************
ENVOX version P4.0 INSTALLATION/UPGRADE STARTED
*************************************************************
sybase_envox_inst.log 6-NOV-1997 14:53:53.97 PAINTD
Start of pre_menu_checks.com
---------------------------SYBASE_ENVOX_INST.LOG 6-NOV-1997 14:54:35.31 PAINTD DEC 3000 - M300X
Start of inter_menu_checks.com
-----------------------------Checking sylogin
Checking disk
Checking Y/N
Checking Y/N
Checking uic
Checking Number of users
Checking print device
Checking query object number
Checking port_number
Checking nodename
Checking tape device
Checking current sybase disks
Checking sybase diskspace
Checking disk
Checking client parameters
SYBASE_ENVOX_INST.LOG 6-NOV-1997 14:54:44.47 PAINTD DEC 3000 - M300X
start of inst_upg_sybase.com
---------------------------sybase client installation
removing sybase images
stopping envox processes
deleting sybase files
removing sybase from startup files
form_syb_disk_logicals
creating/updating accounts
creating sybase directories
modifying modparams.dat
modifying files
modifying sylogin
copying sybase files
unloading savesets
creating interface file
creating sybase_manager & sylogical files
setting permissions
installing sybase images
checking for errors
sybase install completed successfully on 6-NOV-1997 14:58:07.30
Installing and Upgrading ENVOXr Configuration Software on DEC VAX and DEC AXP Systems (Revision B — May 1998)
Installation and Upgrade Logs F Appendix C
C.2
169
SYBASE Client-Server Installation Log
*************************************************************
*************************************************************
ENVOX version P4.0 INSTALLATION/UPGRADE STARTED
*************************************************************
sybase_envox_inst.log 4-NOV-1997 15:40:40.98 PAINTD
Start of pre_menu_checks.com
---------------------------SYBASE_ENVOX_INST.LOG 4-NOV-1997 15:41:07.40 PAINTD DEC 3000 - M300X
Start of inter_menu_checks.com
-----------------------------Checking sylogin
Checking disk
Checking Y/N
Checking Y/N
Checking uic
Checking server memory
Checking Number of users
Checking print device
Checking query object number
Checking port_number
Checking server name
Checking disk
Checking disk
Checking current sybase disks
Checking sybase diskspace
Checking disk
Checking sybprocs size
Checking master size
Checking tape device
starting to write vms resources file
Checking system parameters
Checking VMS parameters...
The current value of WSMAX is 77776
The required value of WSMAX is 39328
The current value of CHANNELCNT is 998
The required value of CHANNELCNT is 588
The current value of PROCSECTCNT is 128
The required value of PROCSECTCNT is 128
The current value of NPAGEDYN is 2375680
The required value of NPAGEDYN is 1530896
The current value of PAGEDYN is 1777664
The required value of PAGEDYN is 1148172
The current value of GBLPAGES is 341110
The required value of GBLPAGES is 173946
The current value of GBLPAGFIL is 18000
The required value of GBLPAGFIL is 10871
The current value of GBLSECTIONS is 600
The required value of GBLSECTIONS is 600
The current value of CLISYMTBL is 750
The required value of CLISYMTBL is 500
The current value of SWPOUTPGCNT is 512
Installing and Upgrading ENVOXr Configuration Software on DEC VAX and DEC AXP Systems (Revision B — May 1998)
C
170
C
Appendix C F Installation and Upgrade Logs
The required value of SWPOUTPGCNT is 512
The current value of PQL_MPGFLQUOTA is 32768
The required value of PQL_MPGFLQUOTA is 32768
The current value of PQL_MASTLM is 200
The required value of PQL_MASTLM is 200
The current value of PQL_DASTLM is 200
The required value of PQL_DASTLM is 200
The current value of PQL_DBIOLM is 200
The required value of PQL_DBIOLM is 200
The current value of PQL_DDIOLM is 200
The required value of PQL_DDIOLM is 200
The current value of PQL_DBYTLM is 81920
The required value of PQL_DBYTLM is 81920
The current value of PQL_MBIOLM is 200
The required value of PQL_MBIOLM is 200
The current value of PQL_MDIOLM is 200
The required value of PQL_MDIOLM is 200
The current value of PQL_MPRCLM is 10
The required value of PQL_MPRCLM is 10
The current value of PQL_MFILLM is 259
The required value of PQL_MFILLM is 200
The current value of PQL_MBYTLM is 100000
The required value of PQL_MBYTLM is 100000
The current value of PQL_MENQLM is 300
The required value of PQL_MENQLM is 300
The current value of PQL_MWSDEFAULT is 1136
The required value of PQL_MWSDEFAULT is 1024
The current value of PQL_DWSDEFAULT is 1136
The required value of PQL_DWSDEFAULT is 1024
The current value of PQL_MWSQUOTA is 2304
The required value of PQL_MWSQUOTA is 2048
The current value of MAXBUF is 8192
The required value of MAXBUF is 8192
The current value of GH_RES_CODE is 1024
The required value of GH_RES_CODE is 1024
The current value of GH_RSRVPGCNT is 512
The required value of GH_RSRVPGCNT is 512
The current value of IMGREG_PAGES is 10000
The required value of IMGREG_PAGES is 2000
The current value of PQL_MWSEXTENT is 8192
The required value of PQL_MWSEXTENT is 8192
The current value of PQL_DWSEXTENT is 8192
The required value of PQL_DWSEXTENT is 8192
The current value of PAGEFILE is 420096
The required value of PAGEFILE is 245704
The current value of TRANSPORT CONNECTIONS is 400
The required value of TRANSPORT CONNECTIONS is 102
SYBASE_ENVOX_INST.LOG 4-NOV-1997 15:42:23.95 PAINTD DEC 3000 - M300X
start of inst_upg_sybase.com
---------------------------sybase client-server installation
removing sybase images
stopping envox processes
deleting sybase files
Installing and Upgrading ENVOXr Configuration Software on DEC VAX and DEC AXP Systems (Revision B — May 1998)
Installation and Upgrade Logs F Appendix C
171
removing sybase from startup files
form_syb_disk_logicals
creating/updating accounts
creating sybase directories
modifying modparams.dat
modifying files
modifying sylogin
copying sybase files
unloading savesets
creating interface file
creating sybase_manager & sylogical files
modifying resource files
creating default sybase databases
tuning server
running ebfs
setting tds packet size and extent io buffer
stop server
disabling packet batching
setting permissions
setting cschedspins = 2
installing sybase images
start server
checking for errors
creating default backup server
sybase install completed successfully on 4-NOV-1997 16:06:04.41
C
Installing and Upgrading ENVOXr Configuration Software on DEC VAX and DEC AXP Systems (Revision B — May 1998)
172
Appendix C F Installation and Upgrade Logs
C.3
SYBASE Client Upgrade Log
*************************************************************
*************************************************************
ENVOX version P4.0 INSTALLATION/UPGRADE STARTED
*************************************************************
sybase_envox_inst.log 7-NOV-1997 16:47:31.72 PAINTD
Start of pre_menu_checks.com
---------------------------SYBASE_ENVOX_INST.LOG 7-NOV-1997 16:47:47.22 PAINTD DEC 3000 - M300X
Start of inter_menu_checks.com
-----------------------------Checking sylogin
Checking tape device
Checking current sybase disks
Checking current sybase disks
Checking sybase diskspace
Checking disk
Checking client parameters
SYBASE_ENVOX_INST.LOG 7-NOV-1997 16:48:03.35 PAINTD DEC 3000 - M300X
start of inst_upg_sybase.com
---------------------------sybase client upgrade
setting up sybase symbols and logicals
removing sybase images
stopping envox processes
preserving files
deleting sybase files
creating/updating accounts
creating sybase directories
copying sybase files
unloading savesets
restoring files
setting permissions
installing sybase images
checking for errors
sybase install completed successfully on 7-NOV-1997 16:51:54.87
C
Installing and Upgrading ENVOXr Configuration Software on DEC VAX and DEC AXP Systems (Revision B — May 1998)
Installation and Upgrade Logs F Appendix C
C.4
173
SYBASE Client--Server Upgrade Log
*************************************************************
*************************************************************
ENVOX version P4.0 INSTALLATION/UPGRADE STARTED
*************************************************************
sybase_envox_inst.log 25-FEB-1998 14:31:57.34 JANUS
Start of pre_menu_checks.com
---------------------------SYBASE_ENVOX_INST.LOG 25-FEB-1998 14:36:57.95 JANUS AlphaStation 255/300
Start of inter_menu_checks.com
-----------------------------Checking sylogin
Checking tape device
Checking current sybase disks
Checking sybase diskspace
Checking disk
Checking envox files
Checking server running
Checking server node
SYBASE_ENVOX_INST.LOG 25-FEB-1998 14:37:20.45 JANUS AlphaStation 255/300
start of inst_upg_sybase.com
---------------------------sybase client-server upgrade
setting up sybase symbols and logicals
stop server
removing sybase images
stopping envox processes
preserving files
deleting sybase application files
unloading savesets
restoring files
start server
setting tempdb size
running ebfs
setting tds packet size and extent io buffer
stop server
disabling packet batching
setting permissions
setting cschedspins = 2
installing sybase images
start server in single user mode
dropping all envox databases
Dropping database, BPDB
Dropping database, ELFDB
Dropping database, GKDB
Dropping database, PERFDB
stop server
start server
checking for errors
sybase install completed successfully on 25-FEB-1998 14:59:10.47
Installing and Upgrading ENVOXr Configuration Software on DEC VAX and DEC AXP Systems (Revision B — May 1998)
C
174
Appendix C F Installation and Upgrade Logs
C.5
C
ENVOX Client-Only Installation Log
*************************************************************
*************************************************************
ENVOX version P4.0 INSTALLATION/UPGRADE STARTED
*************************************************************
sybase_envox_inst.log 6-NOV-1997 15:00:48.31 PAINTD
Start of pre_menu_checks.com
---------------------------SYBASE_ENVOX_INST.LOG 6-NOV-1997 15:01:02.48 PAINTD DEC 3000 - M300X
Start of inter_menu_checks.com
-----------------------------Checking sybase installed
Checking disk
Checking tape device
Checking uic
Checking uic
Checking envox & envoxsupport uics are different
Checking decw files
Checking envox files
Checking chip
Checking current envox disks
Checking envox diskspace
Checking disk
SYBASE_ENVOX_INST.LOG 6-NOV-1997 15:01:35.44 PAINTD DEC 3000 - M300X
start of inst_upg_envox.com
---------------------------start of envox client installation
form_envox_disk_logicals
removing sharables and stopping envox processes
creating/updating accounts
deleting envox files
creating envox directories
setting sybase symbols
unloading savesets
setting permissions
copying files
set up envox logicals
Installation of ENVOX client software is complete.
envox install completed successfully on 6-NOV-1997 15:29:03.91
Installing and Upgrading ENVOXr Configuration Software on DEC VAX and DEC AXP Systems (Revision B — May 1998)
Installation and Upgrade Logs F Appendix C
C.6
175
ENVOX Client-Server Installation Log
*************************************************************
*************************************************************
ENVOX version P4.0 INSTALLATION/UPGRADE STARTED
*************************************************************
sybase_envox_inst.log 4-NOV-1997 10:09:34.82 PAINTD
Start of pre_menu_checks.com
---------------------------SYBASE_ENVOX_INST.LOG 4-NOV-1997 10:10:04.35 PAINTD DEC 3000 - M300X
Start of inter_menu_checks.com
-----------------------------Checking sybase installed
Checking disk
Checking disk
Checking disk
Checking Y/N
Checking tape device
Checking uic
Checking uic
Checking envox & envoxsupport uics are different
Checking decw files
Checking envox files
Checking server running
Checking chip
Checking current envox disks
Checking envox diskspace
Checking disk
SYBASE_ENVOX_INST.LOG 4-NOV-1997 10:10:14.46 PAINTD DEC 3000 - M300X
start of inst_upg_envox.com
---------------------------start of ENVOX client-server installation
form_envox_disk_logicals
removing sharables and stopping envox processes
creating/updating accounts
deleting ENVOX files
creating envox directories
setting sybase symbols
creating logical devices
unloading savesets
setting permissions
copying files
set up ENVOX logicals
setup admin sybase account
replace images
updating master database
creating ENVOX databases
starting envox daemon
Installation of ENVOX software is complete.
envox install completed successfully on 4-NOV-1997 11:43:19.48
Installing and Upgrading ENVOXr Configuration Software on DEC VAX and DEC AXP Systems (Revision B — May 1998)
C
176
Appendix C F Installation and Upgrade Logs
C.7
ENVOX Client Upgrade Log
*************************************************************
*************************************************************
ENVOX version P4.0 INSTALLATION/UPGRADE STARTED
*************************************************************
sybase_envox_inst.log 7-NOV-1997 17:36:28.77 PAINTD
Start of pre_menu_checks.com
---------------------------SYBASE_ENVOX_INST.LOG 7-NOV-1997 17:36:44.33 PAINTD DEC 3000 - M300X
Start of inter_menu_checks.com
-----------------------------Checking sybase installed
Checking tape device
Checking decw files
Checking envox files
Checking chip
Checking current envox disks
Checking envox diskspace
Checking disk
SYBASE_ENVOX_INST.LOG 7-NOV-1997 17:37:42.77 PAINTD DEC 3000 - M300X
start of inst_upg_envox.com
---------------------------start of envox client upgrade
run_envox_disk_logicals
removing sharables and stopping envox processes
deleting envox files
creating/updating accounts
creating envox directories
setting sybase symbols
unloading savesets
setting permissions
copying files
set up envox logicals
Installation of ENVOX client software is complete.
envox install completed successfully on 7-NOV-1997 18:21:11.74
C
Installing and Upgrading ENVOXr Configuration Software on DEC VAX and DEC AXP Systems (Revision B — May 1998)
Installation and Upgrade Logs F Appendix C
C.8
177
ENVOX Client--Server Upgrade Log
*************************************************************
*************************************************************
ENVOX version P4.0 INSTALLATION/UPGRADE STARTED
*************************************************************
sybase_envox_inst.log 25-FEB-1998 18:06:18.72 JANUS
Start of pre_menu_checks.com
---------------------------SYBASE_ENVOX_INST.LOG 25-FEB-1998 18:08:21.34 JANUS AlphaStation 255/300
Start of inter_menu_checks.com
-----------------------------Checking sybase installed
Checking tape device
Checking decw files
Checking envox files
Checking server running
Checking chip
Checking current envox disks
Checking envox diskspace
Checking disk
SYBASE_ENVOX_INST.LOG 25-FEB-1998 18:08:28.05 JANUS AlphaStation 255/300
start of inst_upg_envox.com
---------------------------start of ENVOX client-server upgrade
install decw$transport_common
run_envox_disk_logicals
removing sharables and stopping ENVOX processes
deleting ENVOX files
creating/updating accounts
creating ENVOX directories
setting sybase symbols
unloading savesets
setting permissions
copying files
set up ENVOX logicals
setup admin sybase account
replace images
updating master database
updating ENVOX databases
starting ENVOX daemon
Installation of ENVOX software is complete.
ENVOX install completed successfully on 25-FEB-1998 18:46:45.47
Installing and Upgrading ENVOXr Configuration Software on DEC VAX and DEC AXP Systems (Revision B — May 1998)
C
178
Appendix C F Installation and Upgrade Logs
C.9
C
ENVOX P4.0 Reload Log
*************************************************************
*************************************************************
ENVOX version P4.0 INSTALLATION/UPGRADE STARTED
*************************************************************
sybase_envox_inst.log 7-NOV-1997 12:02:28.77 PAINTD
Start of pre_menu_checks.com
---------------------------SYBASE_ENVOX_INST.LOG 7-NOV-1997 12:04:10.88 PAINTD DEC 3000 - M300X
Start of inter_menu_checks.com
-----------------------------Checking sybase installed
Checking tape device
Checking decw files
Checking envox files
Checking server running
Checking chip
Checking current envox disks
Checking envox diskspace
Checking disk
SYBASE_ENVOX_INST.LOG 7-NOV-1997 12:05:13.38 PAINTD DEC 3000 - M300X
start of inst_upg_envox.com
---------------------------start of ENVOX client-server upgrade
install decw$transport_common
run_envox_disk_logicals
removing sharables and stopping ENVOX processes
deleting ENVOX files
creating/updating accounts
creating ENVOX directories
setting sybase symbols
unloading savesets
setting permissions
copying files
set up ENVOX logicals
setup admin sybase account
replace images
updating master database
updating ENVOX databases
starting ENVOX daemon
Installation of ENVOX software is complete.
ENVOX install completed successfully on 7-NOV-1997 12:47:10.78
Installing and Upgrading ENVOXr Configuration Software on DEC VAX and DEC AXP Systems (Revision B — May 1998)
Installation and Upgrade Logs F Appendix C
C.10
179
SYBASE Tune Log
SYBASE_TUNE.LOG 12-JAN-1998 08:04:15.79 PAINTD DEC 3000 - M300X
start of sybase_tune.com
---------------------------tidying up files
checking client server
checking server running
checking server node
checking for server errors
number_of_users_memory
show_vms_sys_requirements
form_quota_file
check_sys_params
The current value of WSMAX is 77776
The required value of WSMAX is 39888
The current value of CHANNELCNT is 998
The required value of CHANNELCNT is 602
The current value of PROCSECTCNT is 128
The required value of PROCSECTCNT is 128
The current value of NPAGEDYN is 2375680
The required value of NPAGEDYN is 1559568
The current value of PAGEDYN is 1777664
The required value of PAGEDYN is 1169676
The current value of GBLPAGES is 341110
The required value of GBLPAGES is 233626
The current value of GBLPAGFIL is 18000
The required value of GBLPAGFIL is 14601
The current value of GBLSECTIONS is 600
The required value of GBLSECTIONS is 600
The current value of CLISYMTBL is 750
The required value of CLISYMTBL is 500
The current value of SWPOUTPGCNT is 512
The required value of SWPOUTPGCNT is 512
The current value of PQL_MPGFLQUOTA is 32768
The required value of PQL_MPGFLQUOTA is 32768
The current value of PQL_MASTLM is 200
The required value of PQL_MASTLM is 200
The current value of PQL_DASTLM is 200
The required value of PQL_DASTLM is 200
The current value of PQL_DBIOLM is 200
The required value of PQL_DBIOLM is 200
The current value of PQL_DDIOLM is 200
The required value of PQL_DDIOLM is 200
The current value of PQL_DBYTLM is 81920
The required value of PQL_DBYTLM is 81920
The current value of PQL_MBIOLM is 200
The required value of PQL_MBIOLM is 200
The current value of PQL_MDIOLM is 200
The required value of PQL_MDIOLM is 200
The current value of PQL_MPRCLM is 10
The required value of PQL_MPRCLM is 10
The current value of PQL_MFILLM is 259
Installing and Upgrading ENVOXr Configuration Software on DEC VAX and DEC AXP Systems (Revision B — May 1998)
C
180
Appendix C F Installation and Upgrade Logs
The required value of PQL_MFILLM is 200
The current value of PQL_MBYTLM is 100000
The required value of PQL_MBYTLM is 100000
The current value of PQL_MENQLM is 300
The required value of PQL_MENQLM is 300
The current value of PQL_MWSDEFAULT is 1136
The required value of PQL_MWSDEFAULT is 1024
The current value of PQL_DWSDEFAULT is 1136
The required value of PQL_DWSDEFAULT is 1024
The current value of PQL_MWSQUOTA is 2304
The required value of PQL_MWSQUOTA is 2048
The current value of MAXBUF is 8192
The required value of MAXBUF is 8192
The current value of GH_RES_CODE is 1024
The required value of GH_RES_CODE is 1024
The current value of GH_RSRVPGCNT is 512
The required value of GH_RSRVPGCNT is 512
The current value of IMGREG_PAGES is 10000
The required value of IMGREG_PAGES is 2000
The current value of PQL_MWSEXTENT is 8192
The required value of PQL_MWSEXTENT is 8192
The current value of TRANSPORT CONNECTIONS is 400
The required value of TRANSPORT CONNECTIONS is 116
The current value of PAGEFILE is 420096
The recommended value of PAGEFILE is 311264
tune_server
checking for server errors
inst_complete
sybase tune completed successfully on 12-JAN-1998 08:08:16.39
C.11
C
CDOS Installation Log
*************************************************************
*************************************************************
CDOS version P1.0 INSTALLATION/UPGRADE STARTED
*************************************************************
cdos_inst.log 24-JUN-1997 15:48:02.79 EMMA
Start of pre_menu_checks.com
---------------------------Checking current user
Checking current directory
Checking VMS version
Checking motif installed
Checking DECnet
Checking year
Checking s/w installed
Checking server running
Checking version of SYBASE server
Checking if envox_readonly exists
generating list of ENVOX databases
Checking ENVOX P3.4 is installed
Returning status to installation program
cdos_INST.LOG 24-JUN-1997 15:48:34.84 EMMA VAXstation 4000-60
Installing and Upgrading ENVOXr Configuration Software on DEC VAX and DEC AXP Systems (Revision B — May 1998)
Installation and Upgrade Logs F Appendix C
181
Start of inter_menu_checks.com
-----------------------------Checking sylogin
Checking disk
Checking Y/N
Checking uic
Checking server name
Checking TCPIP_software
Checking port_number
Checking interfaces
Checking current cdos disks
Checking cdos diskspace
Checking disk
Checking tape device
CDOS_INST.LOG 24-JUN-1997 15:51:04.56 EMMA VAXstation 4000-60
start of inst_cdos.com
----------------------CDOS installation
setup sybase & cdos logicals.
stopping cdos processes
removing cdos from startup files
removing cdos images
saving license and vtf files
deleting cdos files
form_cdos_disk_logicals
creating/updating accounts
creating cdos directories
copying cdos files
unloading savesets
restoring files
creating expiry file
updating interface file
initialising server files
modifying files
setting permissions
installing cdos images
start_cdos_server
checking for errors
add servers
cdos install completed successfully on 24-JUN-1997 15:59:33.30
Now login as user Sybase and re-tune the Sybase dataserver
by issuing the commands:
$ set def [sybase.install]
$ @sybase_tune.com
Installing and Upgrading ENVOXr Configuration Software on DEC VAX and DEC AXP Systems (Revision B — May 1998)
C
182
Appendix C F Installation and Upgrade Logs
C.12
C
CDOS Upgrade Log
*************************************************************
*************************************************************
CDOS version P2.0 INSTALLATION/UPGRADE STARTED
*************************************************************
cdos_inst.log 26-FEB-1998 14:34:54.12 JANUS
Start of pre_menu_checks.com
---------------------------Checking current user
Checking current directory
Checking VMS version
Checking motif installed
Checking DECnet
Checking year
Checking CHIP installed
Checking SYBASE installed
Checking ENVOX installed
Checking version of SYBASE server
Returning status to installation program
cdos_INST.LOG 26-FEB-1998 14:35:09.26 JANUS AlphaStation 255/300
Start of inter_menu_checks.com
-----------------------------Checking sylogin
Checking current cdos disks
Checking cdos diskspace
Checking disk
Checking tape device
CDOS_INST.LOG 26-FEB-1998 14:35:19.26 JANUS AlphaStation 255/300
start of inst_cdos.com
----------------------CDOS client-server upgrade
setup sybase & cdos logicals.
checking interfaces file
stopping cdos processes
removing cdos images
saving license and vtf files
deleting cdos files
creating cdos directories
copying cdos files
unloading savesets
restoring files
creating expiry file
setting permissions
installing cdos images
start_cdos_server
checking for errors
cdos install completed successfully on 26-FEB-1998 14:39:37.84
Installing and Upgrading ENVOXr Configuration Software on DEC VAX and DEC AXP Systems (Revision B — May 1998)
Installation and Upgrade Logs F Appendix C
C.13
183
CDOS De-installation Log
*************************************************************
*************************************************************
CDOS version P1.0 INSTALLATION/UPGRADE STARTED
*************************************************************
cdos_inst.log 24-JUN-1997 16:48:28.07 PAINTD
Start of pre_menu_checks.com
---------------------------Checking current user
Checking current directory
Checking VMS version
Checking motif installed
Checking DECnet
Checking year
Checking s/w installed
Checking server running
Checking version of SYBASE server
Checking if envox_readonly exists
generating list of ENVOX databases
Checking ENVOX P3.4 is installed
Returning status to installation program
cdos_INST.LOG 24-JUN-1997 16:49:14.21 PAINTD DEC 3000 - M300X
Start of inter_menu_checks.com
-----------------------------CDOS_INST.LOG 24-JUN-1997 16:49:16.01 PAINTD DEC 3000 - M300X
start of inst_cdos.com
----------------------cdos De-installation
setup sybase & cdos logicals.
stopping cdos processes
removing cdos from startup files
removing cdos images
deleting cdos files
remove cdos account
cdos Deinstall completed successfully on 24-JUN-1997 16:50:59.89
Now login as user Sybase and re-tune the Sybase dataserver
by issuing the commands:
$ set def [sybase.install]
$ @sybase_tune.com
Installing and Upgrading ENVOXr Configuration Software on DEC VAX and DEC AXP Systems (Revision B — May 1998)
C
184
Appendix C F Installation and Upgrade Logs
Blank page.
C
Installing and Upgrading ENVOXr Configuration Software on DEC VAX and DEC AXP Systems (Revision B — May 1998)
History
185
History
The list below shows the documents available for released ENVOXR
software versions.
ENVOX P1.0
J
J
J
Installing ENVOX Software and Migrating PROFLEXR Data
PN4.14:SW3151 (Original — July 1990) D3P00481002
Installing ENVOX Software and Migrating PROFLEX Data
PN4.14:SW3151 (Change 1 — December 1990) D3P00482012
Using ENVOX Configuration Software
UM4:14:SW3151 (Original + Change 1 — December 1990)
D2U00481012
ENVOX P1.1
J
J
J
Installing ENVOX Software and Migrating PROFLEX Data
PN4.14:SW3151 (Revision A — April 1991) D3P00481102
ENVOX Tutor
TU4.14:SW3151 (Original — June 1991) D2T00481002
Using ENVOX Configuration Software
UM4:14:SW3151 (Revision A — April 1991) D2U00481102
ENVOX P1.2
J
J
J
J
Installing ENVOX Software and Migrating PROFLEX Data
PN4.14:SW3151 (Revision B — October 1991) D3P00481202
ENVOX Technical Reference
TR4.14:SW3151 (Revision A — October 1991) D2R00481102
ENVOX Tutor
TU4.14:SW3151 (Original — June 1991) D2T00481002
Using ENVOX Configuration Software
UM4:14:SW3151 (Revision B — October 1991) D2U00481202
Installing and Upgrading ENVOXr Configuration Software on DEC VAX and DEC AXP Systems (Revision B — May 1998)
History
186
History
ENVOX P2.0
J
J
J
J
Installing ENVOX Software and Migrating PROFLEX Data
PN4.3:SW3151 (Revision C — October 1992) D3P00481302
ENVOX Technical Reference
TR1.0:SW3151 (Revision B — September 1992) D2R00481202
ENVOX Tutor
TU4.14:SW3151 (Original — June 1991) D2T00481002
Using ENVOX Configuration Software
UM4:14:SW3151 (Revision C — October 1992) D2U00481302
ENVOX P3.0
J
J
J
J
Installing ENVOX Software and Migrating PROFLEX Data
PN6.0:SW3151 (Revision D — December 1993) D3P00481402
ENVOX Technical Reference
TR1.0:SW3151 (Revision C — December 1993) D2R00481302
ENVOX Tutor
TU4.14:SW3151 (Original — June 1991) D2T00481002
Using ENVOX Configuration Software
UM6.1:SW3151 (Revision D — December 1993) D2U00481402
ENVOX P3.2
J
J
J
J
History
J
J
Installing Type SW3151 Configuration Software (VMS)
PN6.1:SW3151:VMS (Revision E — June 1994) D3P00481502
Installing Type SW3153 Configuration Software (HP-UX)
PN6.2:SW3153:HPX (Original — January 1995) D3P01381002
Installing Type SW3155 Configuration Software (ENVOX DEC AXP)
PN6.3:SW3155:AXP (Original — December 1994) D3P01391002
Installing Type SW3157 Configuration Software (AIX)
PN6.4:SW3157:AIX (Original — January 1995) D3P01411002
The System Manager’s Guide to ENVOX Configuration Software
SM1.0:SW3151 (Revision A — June 1994) D3R00501102
ENVOX Technical Reference
TR1.0:SW3151 (Revision D — June 1994) D2R00481402
Installing and Upgrading ENVOXr Configuration Software on DEC VAX and DEC AXP Systems (Revision B — May 1998)
History
J
J
187
ENVOX Tutor
TU4.14:SW3151 (Original — June 1991) D2T00481002
Using ENVOX Configuration Software
UM6.1:SW3151 (Revision F — December 1994) D2U00481602
ENVOX P3.3
J
J
J
J
J
J
J
Installing ENVOX Configuration Software on DEC VAX and DEC
AXP systems
PN6.1:SW3151:VMS (Original — June 1995) D3P01461002
Installing ENVOX Configuration Software on HP-UX Systems
PN6.2:SW3153:HPX (Revision A — June 1995) D3P01381102
Installing ENVOX Configuration Software on IBM AIX Systems
PN6.4:SW3157:AIX (Revision A — June 1995) D3P01411102
The System Manager’s Guide to ENVOX Configuration Software
SM1.0:SW3151 (Revision C — June 1995) D3R00501302
ENVOX Technical Reference
TR1.0:SW3151 (Revision E — June 1995) D2R00481502
ENVOX Tutor
TU4.14:SW3151 (Original — June 1991) D2T00481002
Using ENVOX Configuration Software
UM6.1:SW3151 (Revision G — June 1995) D2U00481702
ENVOX P3.4
J
J
J
J
J
J
Installing and Upgrading ENVOX Configuration Software on DEC
VAX and DEC AXP Systems
PN6.1:SW3151:VMS (Revision A — July 1996) D3P01461102
Installing and Upgrading ENVOX Configuration Software on HP-UX
Systems
PN6.2:SW3153:HPX (Revision B — July 1996) D3P01381202
The System Manager’s Guide to ENVOX Configuration Software
SM1.0:SW3151 (Revision D — July 1996) D3R00501402
The Technical Reference for ENVOX Configuration Software
TR1.0:SW3151 (Revision F — July 1996) D2R00481602
ENVOX Tutor
TU4.14:SW3151 (Original — June 1991) D2T00481002
Using ENVOX Configuration Software
UM6.1:SW3151 (Revision H — July 1996) D2U00481802
Installing and Upgrading ENVOXr Configuration Software on DEC VAX and DEC AXP Systems (Revision B — May 1998)
History
188
History
ENVOX P4.0
J
J
J
J
J
Installing and Upgrading ENVOX Configuration Software on DEC
VAX and DEC AXP Systems
PN6.1:SW3151:VMS (Revision B — May 1998) D3P01461202
Installing and Upgrading ENVOX Configuration Software on HP-UX
Systems
PN6.2:SW3153:HPX (Revision C — May 1998) D3P01381302
The System Manager’s Guide to ENVOX Configuration Software
SM1.0:SW3151 (Revision E — May 1998) D3R00501502
The Technical Reference for ENVOX Configuration Software
TR1.0:SW3151 (Revision G — May 1998) D2R00481702
Using ENVOX Configuration Software
UM6.1:SW3151 (Revision J — May 1998) D2U00481902
History
Installing and Upgrading ENVOXr Configuration Software on DEC VAX and DEC AXP Systems (Revision B — May 1998)
Glossary
189
Glossary
Algorithm
A set of logical steps to solve a problem
or accomplish a task. A computer
program contains one or more
algorithms. Many configurations of
PROVOXr systems also contain
algorithms, particularly in operations,
procedures, and function sequence
tables.
Analog Input (AI)
A PROVOX point type. An analog input
point receives a single analog value, the
process variable.
Analog Output (AO)
A PROVOX point type. An analog output
point generates a single analog value,
the setpoint.
ASCII
1. A standard digital encoding scheme for
data: a 7-bit binary code represents
numbers, letters, symbols, and control
codes. (The designation is an acronym
for American Standard Code for
Information Interchange.)
2. A PROVOX point type. An ASCII point
contains a single real value, referenced
by the setpoint attribute, and an
80-character ASCII string.
Audit Trail
A record of changes made to the
ENVOXr database and to the system
where the database resides. The record
includes the type of change, when the
change was made and who made it.
Batch
A specific quantity of a given product,
produced in a single complete processing
procedure.
CDV
Acronym: Comma Delimited Values
CHIP
Acronym: Computer/Highway Interface
Package
Comma Delimited Values Format
An ASCII version of configuration data.
The configuration data are in a specific
order, separated by commas. CDV-format
files result from both the export utility and
the migrate utility.
Computer/Highway Interface
Package (CHIP)
A PROVOX software product that allows
user-written programs to interact with the
PROVOX database. There are different
CHIP versions, so that any of several
types of computers can be the host
computer.
Configuration (CONFIG)
Giving instructions and supplying
reference information to the controllers
and other devices that make up a
process control instrumentation system.
For some PROVOX systems,
Installing and Upgrading ENVOXr Configuration Software on DEC VAX and DEC AXP Systems (Revision B — May 1998)
Glossary
190
Glossary
configuration consists of responding to
prompts in a series of console screen
displays. For other PROVOX systems,
configuration consists of creating and
manipulating special ASCII text files.
Configuration Source File
A special ASCII text file that certain
PROVOX systems use for configuration.
Such a source file contains instructions
and reference information for the
controllers and other devices in the
system.
Console Trend Display (CTD)
A PROVOX software product that collects
process operating data for continuous
control applications, then presents the
data in a graphical trend format on the
operator console. CTD layers on CHIP
software.
Data
A general term that denotes any
information an MPU can process.
Database
A collection of data stored in a systematic
way so that searches and sorts are rapid
and so that retrieval of items is simple.
Database Index (DBI)
A sequential integer by which a computer
or other electronic device finds or keeps
track of storage locations in a database.
Datatype
Determines the rules that entries for
specific columns must follow.
Glossary
DBI
Acronym: Database Index
DCL
Acronym: Digital Command Language
DDP
Acronym: Detail Display Parameter
Detail Display Parameter (DDP)
An item of information usually considered
changeable or tunable for a control loop
or point. Common examples are gain,
rate, reset, and alarm trip points.
Device
A piece of electronic hardware that
performs one or more prescribed
functions.
Discrete Control Device (DCD)
A PROVOX point type. A DCD point
encompasses as many as 8 discrete
output and 16 discrete input channels
into a single point. This makes possible
16 setpoints and matching input/output
states. A common use for a DCD point is
to control a discrete device that provides
feedback about its status. If the point
works with a DCD template, it can use
different combinations of channels at
different times during the execution of a
process-control algorithm.
Discrete Input (DI)
A PROVOX point type. A DI point
monitors a single discrete value of the
process variable. That is, a DI point reads
discrete data from a sensor or other
system device.
Discrete Output (DO)
A PROVOX point type. A DO point
generates a single discrete value
referenced by the setpoint.
Download
To transfer configuration instructions and
reference information from a
configuration device to other devices of a
process control system.
Installing and Upgrading ENVOXr Configuration Software on DEC VAX and DEC AXP Systems (Revision B — May 1998)
Glossary
Dump Device
A tape or disk device to which a
database and its associated transaction
log can be copied to usually for backup
purposes.
ED
Acronym: Emergency Download
Emergency Download
A download from a special download file
while the SYBASE server is not available
or if the ENVOX database is suspect.
Engineering Units (EU)
The units of measurement for percentage
values of an analog process variable.
Possible examples are gallons per hour,
degrees Celsius, and pounds per square
inch. The low (0 percent) and high (100
percent) engineering unit limits define the
anticipated range of the variable. For
example, low and high engineering-unit
values of 50 and 1550 might define a
range for degrees Fahrenheit. In this
example, the EU span would be 1500
degrees; each percent of the EU span
equals 15 degrees.
ENVOXr Software
A Fisher--Rosemount Systems’ line of
configuration products for PROVOX
systems. The use of a third--party
relational database is the principle
distinguishing feature of configuration
with ENVOX software.
191
envox_readonly Database
An ENVOX system database containing
reference data which is used by all of the
ENVOX user databases in the system.
The database is created by ENVOX
software upon ENVOX installation.
Exception
A type of unsolicited reporting: the
reporting device sends a new value only
if the sample period has expired and the
value has changed significantly since the
last transmission.
Export
The extraction of ENVOX configuration
data and placing it in CDV files.
Export Set
CDV files prepared for import to an
ENVOX database.
FST
Acronym: Function Sequence Table
Function Sequence Table (FST)
A list of controller instructions to perform
specific logical and mathematical
operations, in a specific order. An FST
resembles a sequence of programming
subroutines, but defining an FST does
not involve actual computer
programming.
ENVOXDB Database
The default user database which stores
all configuration data and is created by
ENVOX software upon ENVOX
installation.
Installing and Upgrading ENVOXr Configuration Software on DEC VAX and DEC AXP Systems (Revision B — May 1998)
Glossary
192
Glossary
Group
A PROVOX point type. A group point
controls as many as 8 DCD points so that
they work in unison. A Group point uses
a Group template which contains up to
16 setpoints for driving DCD point
setpoints. the user defines group
templates as part of system
configuration.
Group Display
A set of 12 point templates that appear
together on a PROVOX console screen,
so that an operator can see at a glance
the most important information about 12
different points. During system
configuration, the user establishes the
number of group displays, as well as
which point faceplates make up each
group display.
HART Instrument Locator Tool (HILT)
The HART Instrument Locator Tool (HILT)
is a standalone utility run from the
ENVOX command line. The utility gathers
information about smart field devices
connected to a PROVOX system through
configured controllers. HILT stores the
collected information in a Comma
Delimited Values (CDV) file specified by
the user so that Asset Management
Solutions (AMS) can correctly address
the instruments when the need arises.
HP-UX
Hewlett Packard’s version of the UNIX
operating system.
IAC
Glossary
Information stream
The first stream in a CDV file.
Interactive Controller (IAC)
A regulatory controller, part of a
PROVOX instrumentation system, that
handles from one to eight control loops.
ISQL
SYBASE’s stand-alone utility program for
database queries.
IO or I/O
Acronym: Input/Output
Item
A general term for an ENVOX database
entity. Items include device definitions,
points, and templates.
LCP
Acronym: Logic Control Point
Load
A software-initiated action on a database.
The term refers to the SYBASE database
load function and not the Open Database
load utilities embedded in ENVOX
software.
Locks
A software-initiated action on a database
table. The database software locks tables
that are being affected by a process. The
ENVOX administrator can determine
which processes are locking which
tables.
Acronym: 1. (adjective): interactive. 2.
(noun) interactive controller
Import
The process of placing configuration data
into an ENVOX database from CDV file
format.
Installing and Upgrading ENVOXr Configuration Software on DEC VAX and DEC AXP Systems (Revision B — May 1998)
Glossary
Logical Device
A designated area on a disk for
databases and transaction logs. A
database and its associated transaction
log should be on separate physical
devices, if possible. Logical devices are
used on VMS systems, AIX systems, and
some HP systems.
Logical Volume
Designated areas mapped by the
operating system across one or more
disks for databases and transaction logs.
Logic Control Point (LCP)
A PROVOX point type for an advanced
batch or multifunction controller, such as
a UOC or IFC. A role for a multivariable
point, an LCP calls a programmed
subroutine defined by an FST. As
configured, the LCP activates the FST in
a continuous loop, as a single shot
program, or as required as part of a
control loop.
Loop
1. A control loop.
2. A PROVOX point type. A loop point
provides control for a continuous
process. Loop points have many
attributes, so can provide very
sophisticated control. Bias or ratio factors
often can be added to loop points.
Master Database
The central database which holds details
of all of the other databases. It is created
by SYBASE when SYBASE is installed.
Migrate
The process of converting PROFLEX
configuration data into CDV file format,
from which the data can be imported into
an ENVOX database
193
Model Database
The database which is used as the basis
for a new database. It is created by
SYBASE when SYBASE is installed.
Null
Having no assigned value. In a CDV file,
null is represented as two commas with
zero or more spaces in between.
OpenVMS
A mark of Digital Equipment Corporation
for one of the firm’s computer operating
systems; an acronym for Open Virtual
Memory System. OpenVMS provides an
operating environment for technical
applications of VAX computers and
certain other computer systems.
Operand
1. In the language editor, a value that
modifies or qualifies a function.
2. In ASCII configuration source files, an
expression, a simple operand, a phrase
list, or an operand list.
Operation
[See Unit Operation]
Operator Workplace Console
(WPCON)
The PROVOX console products that are
used in the PROVOX operator workplace
concept. The consoles use a global
database configuration and have
high-resolution graphics, ergonomically
designed keyboards, and color printers.
PDF
Acronym: PROVOX Display Format
Installing and Upgrading ENVOXr Configuration Software on DEC VAX and DEC AXP Systems (Revision B — May 1998)
Glossary
194
Glossary
Plant Management Area (PMA)
A collection of plant process areas
(PPAs). A PMA controls the console point
reporting load, and indirectly, central
processing unit (CPU) loading.
Plant Process Area (PPA)
Within a process-control system, a
collection of equipment that uses a
common alarm strategy.
PMA
Acronym: Plant Management Area
Point
A set of process-control parameters and
data. The makeup and structure of each
point depends on its role in collecting and
reporting data and the type of device in
which the point resides. Points are the
most important logical units of a process
control system; the number of points is a
measure of the system’s size and
sophistication.
Primary Control Algorithm (PCA)
The principle control equation of a
continuos loop in a PROVOX system.
The PCA type and station (STA) type
defined during configuration determine
the main functionality of a point.
PPA
Acronym: Plant Process Area
Process
Glossary
A user-initiated action that affects or
accesses a database. Each process
represents one connection to the server.
An ENVOX user typically has three to five
processes active at once. Adding a point,
generating files, and downloading files
are examples of processes. The ENVOX
administrator can determine which users
have initiated which processes and can
also kill processes.
Process Variable (PV)
In process control, a measurable quality
or quantity whose change can cause
other changes in the process, or make
such changes possible. Common
process variables are temperature,
percent full, and rate of flow. The term
measured variable is a synonym.
PROFLEXÒ Software
A Fisher--Rosemount Systems’ line of
configuration software products for
PROVOX systems. ASCII text files are
the principal distinguishing feature of
configuration through a PROFLEX
device.
PROVOXÒ Process Control Products
The Fisher--Rosemount Systems’ line of
process control products used in
PROVOX process measurement
systems. It is a distributed control and
data acquisition system that
communicates over a data highway.
PROVOX Display Format (PDF)
ASCII-based format used for operator
screen displays on PROVOX system
consoles.
PROVUEÒ Console
The Fisher--Rosemount Systems’ line of
console products for PROVOX systems
that use a global database configuration
and have high--resolution graphics,
ergonomically designed keyboards, and
color printers.
Register
A memory location for temporary storage
of a value.
SAM
Acronym: System Administration
Manager (The HP-UX system
administration utility)
Installing and Upgrading ENVOXr Configuration Software on DEC VAX and DEC AXP Systems (Revision B — May 1998)
Glossary
Setpoint (SP)
An input variable that contains the
desired value for a process variable.
Control loop algorithms compare the
process variable with the setpoint, to
determine an appropriate output.
Signal Value Analog (SVA)
The analog floating point portion of the
accumulator register in a controller FST.
Signal Value Discrete (SVD)
The discrete portion of the accumulator
register in a controller FST.
Signal Value Percent (SVP)
The analog percentage portion of the
accumulator register in a controller FST.
Streams
A series of data fields separated by
commas (CDV format), representing a
configuration item. Streams begin with a
keyword called an identifying field. This
keyword identifies the stream type (for
example, UOC_GROUP). Streams end
with the keyword END.
Substreams
A series of data fields within a stream,
separated by commas (CDV format) that
begins with a keyword, and continues
until the next keyword.
Sybsystemprocs Database
Used in SYBASE SYSTEM 10. It is the
database which holds stored procedures
that were previously held in the master
database. It is created by SYBASE when
SYBASE is installed.
Tag
A unique identifying mnemonic or label
for a controller or point of a process
control system.
195
Target Device
Any system device that receives point
information, commonly a display device
that shows the information to an operator.
Tempdb Database
The database in which all temporary
tables are created. It is created by
SYBASE when SYBASE is installed.
Template
A pattern for valid relationships among
elements of a control strategy, defined
without specifying particular elements. A
template permits different specific
elements to use the relationships at
different times during the execution of the
control algorithm. The user establishes
templates as part of system
configuration. [See Alias Template, DCD
Template, and Group Template.]
Transaction Log
A log file maintained by the dataserver of
all modifications to the database. As
additions, updates, and deletions are
performed on data, these changes are
written to the transaction log. Once the
changes have been accepted by the user
process and the transaction is complete,
the changes are applied to the
appropriate data file in the database. If
processing errors or system failures
occur, transactions which have not
properly completed are not applied to the
data file, and the memory cache copy of
the affected data is restored from the
data file. The transaction log is not the
Audit Trail log, but rather contains
SYBASE-only information.
Tuning
The adjustment of control terms or
parameter values to produce a desired
control effect.
Installing and Upgrading ENVOXr Configuration Software on DEC VAX and DEC AXP Systems (Revision B — May 1998)
Glossary
196
Glossary
Tuning Parameter
A parameter adjustable without
reconfiguration; an operator adjusts such
a parameter to alter control effects.
Common examples are gain, rate, reset,
and alarm trip points. Such parameters
appear in detail displays.
Unit
1. A defined group of specific process
equipment that processes a particular
batch. For control purposes, such a unit
is one entity.
2. A PROVOX point type. A unit point has
many attributes, enabling it to control the
execution of a unit operation.
Unit Operation
In batch control, a list of controller
instructions to perform specific
mathematical and logical functions, as
part of a time-and-event sequence for a
defined set of equipment (the unit). A unit
operation consists of phases, each of
which is a set of related steps. Each step
is an elemental control action.
UOC
Acronym: Unit Operations Controller
Upload
The movement of configuration
instructions from system devices to a
configuration device or interface. An
upload lets the current values of
parameters be incorporated into new
configuration source files, eliminating
specific user entry. Uploads also may be
used to verify that configuration
instructions are correct.
WPCON
Acronym: Workplace Console. this
acronym is used in ENVOX forms. See
definition for an Operator Workplace
Console.
Glossary
Installing and Upgrading ENVOXr Configuration Software on DEC VAX and DEC AXP Systems (Revision B — May 1998)
Index
197
Index
Symbols
A
“How do I ...”
backup CDOS software, 132
define server names, 121
install CDOS on a DEC platform, 123,
128
install CDOS on an HP platform, 123
install multinet, 135
install UCX, 137
make sure the CDOS server starts on
reboot, 124
navigate in a CDOS installation menu,
118
restore CDOS software, 132
retrieve installation scripts for DEC
platform, 123, 128, 132
update sybase server for TCP/IP, 120
upgrade ENVOX databases, 130
verify TCP/IP installation, 119
verify that multinet is running, 137
verify that UCX is running, 139
abbreviations used in manual, 4
”How do I ...”, configure ip transport, 135
account
envoxutility, 131
sa, 131
adding lines to interfaces file, 120
adding new node and address name, 37
admin forms, 132
allocate server memory, CDOS, 103
arrow keys, use for navigation, 27, 40, 53
authorize utility, 86
B
backup logical devices, 92
backup process time, 93
”How do I ..”, verify inet installation, 119
backup, system, creating the routine, 89
Numbers
block sizing
AXP, 16
VAX, 14
4.9.x server incompatibility, 109
4mm DAT tape, 11
beta sites, 75
booting
backup routine, 91
OpenVMS, 91
Index
Installing and Upgrading ENVOXr Configuration Software on DEC VAX and DEC AXP Systems (Revision B — May 1998)
198
Index
booting standalone backup, VAX disk, 90
booting standalone backup, VAX tape, 90
booting the backup routine, 91
booting the backup utility, AXP, 91
bug fixes, 13
C
CDOS
de--installation log file, 183
error messages, 163
installation log file, 180
warning messages, 163
CDOS configuration file, 143, 148
CDOS log file, 117, 143, 148
CDOS port number, 125
CDOS software, replacing pre-release
version, 117
character limit, open database name, 40
CHIP software and disk space
requirements
AXP system, 17
VAX system, 14
CHIP version, 13
choosing
client--server or client--only, 28, 34
install or de--install ENVOX, 42, 46
install or de--install sybase, 28, 34
clearing users from target database, 74
client-only installation, sybase, 34
client-only systems, ENVOX software
upgrade, 80, 82
client--only installation, ENVOX, 45
Index
client--server installation
ENVOX, 42
sybase, 28
command lines
adding new node and address name,
37
authorize utility, 86
backup logical devices, 92
booting standalone backup, VAX disk ,
90
booting standalone backup, VAX tape,
90
booting the backup routine, 91
booting the backup utility, AXP, 91
configuring a default gateway for
multinet, 142
configuring a default gateway for ucx,
141
copying login.com file, 88
creating standalone backup, VAX disk ,
89
database data and log sizes from PDX
utility, 110
database structure and statistics, 56, 62
de-installing ENVOX and Sybase, 96
de-installing script, 96, 132
default directory for user account, 86
default gateway for multinet, 142
default gateway for ucx, 141
determining value of DSQUERY, 140
display list of device names, 91
dump databases to tape, 58
entering, 5
ENVOX account screen, 86
ENVOX installation script, 45
ENVOX user values, 86
ENVOX_user account screen, 86
file recovery, 100
initializing second disk, 26
initializing tape, 52
installation script, 34, 64, 75, 80, 82, 96,
133
running PDX utility, 110
list of device names, AXP, 91
loading databases from tape, 74
loading PDX data, 110
logging into sybase account, 51
motif ECO kit installation, 21
password, 51
PDX command for upgrade from P3.0,
57
print db.out, 57
printout of database structure and
statistics, 56, 62
Installing and Upgrading ENVOXr Configuration Software on DEC VAX and DEC AXP Systems (Revision B — May 1998)
Index
reading installation script from media,
28, 34, 42, 45, 82
reading PDX utility, 57
reading PDX utility from media, 56
rebooting the system, 93, 95
restore system, 94
restoring from logical devices, 94
retrieving files from the installation tape,
100
running the isql utility, 51
SCSI ECO kit ftp transfer, 24
SCSI ECO kit installation, 23
SCSI ECO kit recovery from CDROM,
24
second disk initialization, 26
setting up ENVOX user directory, 88
sybase installation, 28
sybase installation script, 28
sybase tuning, 103
system shutdown, 91
verifying multinet installation, 119
verifying node and address name, 37
verifying ucx installation, 119
year 2000 ECO kit installation, 22
D
data logging to file, 65
database device size, ENVOX, 43
database errors, reporting, 50
database size increase, sybase, 50
database statistics, how to find, 65
database structure and statistic command,
56, 62
databases, recovering from inadvertent
deletion, 75
dataserver name, valid characters, 31
db_details.log file, 65
DC7611/DC7711, 13
de-installing, ENVOX and SYBASE, 96
de--install script, 96, 132
de--installation time, 97
command prompt styles, 5
DECnet object number, 30, 36
commands, use of return key, 5
DECwindows MOTIF version, 13
compatibility, ENVOX, 12
default directory for user account, 86
concurrent users, CDOS, 103
default gateway
multinet, 142
ucx, 141
configuration file
CDOS, 143, 148
task daemon, 144, 145
configuration manuals, 7
configuring a default gateway for multinet,
142
199
default name, task daemon log file, 144,
145
default port numbers, CDOS, 121
defaulted data, 27, 41, 53
configuring a default gateway for ucx, 141
deleting files inadvertently, 99
Control Desktop, effect on number of
ENVOX users, 104
deleting non--ENVOX databases, 109
Control Desktop document list, 8
determining the number of Control Desktop
users, 104
creating standalone backup, VAX disk, 89
determining value of DSQUERY, 140
cross reference conventions, 4
devices
second disk, 92
system disk, 92
tape drive, 92
ctrl--e key, 27, 41, 54
ctrl--w key, 27, 41, 53
Installing and Upgrading ENVOXr Configuration Software on DEC VAX and DEC AXP Systems (Revision B — May 1998)
Index
200
Index
DH6009, 13
DH6021, 13
DH6032, 13
DH6215/DH6219, 13
sybase client--only, 35
sybase client--server, 29
entering time and date, backup process,
91
disk mount command line position, 26
ENVOX
client--only installation, 45
client--server installation, 42
installation script, 40
disk space usage, CDOS, 116
ENVOX account screen, 86
disk usage, 14, 16
ENVOX admin forms, 132
display list of device names, 91
ENVOX and sybase database, dumping
quantity limit, 52
directories deleted and created during
upgrade, 51
document history list, purpose of, 1
document list
Control Desktop, 8
ENVOX, 6
ENVOX compatibility, 12
ENVOX database device size, 43
ENVOX document list, 6
DOCVUE documentation, 9
ENVOX installation script, 45
driver, INET, 119
multinet, 137
UCX, 140
ENVOX required version, CDOS, 115, 117
DSQUERY
changing the value of, 140
using to specify servers, 140
dump databases to tape command, 58
dump selection, 66
dumping ENVOX and sybase databases,
quantity limit, 52
dumping non--ENVOX databases, 109
ENVOX software
de-installing, 96
error messages, 157–158
log file
client upgrade, 176, 178, 179
client-server installation, 175
client-only installation, 174
pre-installation error messages,
149–150
upgrade and installation precautions, 40
user directory, 88
ENVOX transaction log size, 43
ENVOX UIC code, 43, 46
E
EBFs, 13
ECO kits, 20
encryption code, license, 122
end of tape, messages, 95
Index
entering command lines, 5
entering installation menu items
ENVOX client--only, 46
ENVOX client--server, 43
ENVOX upgrade time, 54
ENVOX user account
ENVOX software group, 85
UIC value, 85
ENVOX user values, 86
ENVOX users
effect on system performance, 106
number, 103
ENVOX version, 13
ENVOX version for this manual, 1
Installing and Upgrading ENVOXr Configuration Software on DEC VAX and DEC AXP Systems (Revision B — May 1998)
Index
201
ENVOX_user account screen, 86
ENVOXSUPPORT account UIC code, 43,
46
H
envoxutility account, 131
handling personal files during upgrade, 51
envoxutility password, 131
hardware requirements
DEC AXP workstation versions, 12
DEC VAX workstation versions, 12
highway interface, 13
error and warning messages, CDOS
occurrence, 118
error messages, 149
CDOS, 163
ENVOX software, 157–158
PDX dump, 162
SYBASE software, 151–152
error or warning messages, display, 27, 41,
53
help with your installation, 9
highway interface requirements, 13
I
importance of system backup, 80, 89
F
inadvertent deletion, 99
fatal error, definition, 111
INET driver, 119
multinet, 137
UCX, 140
file printout, show_dev_alloc.out, 50, 56,
62
file recovery, 100
finding database statistics, 65
finding tape characteristics, 66
Fisher--Rosemount beta sites, 75
FISHER_STARTUP.COM, 29, 35
inadvertent deletion of database, 75
initializing second disk, 26–27
caution, 50
importance of, 20
installation menu items
ENVOX client--only, 46
ENVOX client--server, 43
sybase client--only, 35
sybase client--server, 29
installation precautions, 40
G
generating ENVOX database, 41
getting help, 9
getting your attention, 6
grace period, CDOS license, 122
installation script, 28, 34, 42, 45, 64, 75,
80, 82, 96, 133
ENVOX, 40
reading from tape, 82
sybase, 27, 53
installation time
ENVOX, 41
Index
Installing and Upgrading ENVOXr Configuration Software on DEC VAX and DEC AXP Systems (Revision B — May 1998)
202
Index
sybase, 27
installations precautions, 20, 50
installing on other platforms, 12
interfaces file, 117, 120, 123, 126, 130,
140
isql, 131
ISQL reserved words, 165
isql utility command, 51
CDOS installation, 180
ENVOX software
client upgrade, 176, 178, 179
client-server installation, 175
client-only installation, 174
SYBASE, client upgrade, 172
Sybase, client-server installation, 169
Sybase software, client-only installation,
168
logging in as system manager, 21, 22, 23,
26
logical devices, backup and restore, 92–93
K
key
ctrl--e, 27, 41, 54
ctrl--w, 27, 41, 53
login.com
directory location, 85
saved during upgrade, 52
sybase account command, 51
keywords, task daemon, 146
kits
ECO, 20
motif ECO, 21
SCSI ECO, 23
year 2000 ECO, 22
M
making suggestions, 9
making sure disk is mounted, 26
master device size, sybase, 31
maximum number of users, 12
L
license expiration file, CDOS, 122
license file, CDOS, 122
license grace period, CDOS, 122
limit, Control Desktop clients, 116
list of device names, AXP, 91
list of VMS system resources, 104
local computer host name, 136
location, login.com, 85
Index
log file
CDOS, 117, 143, 148
sybase_envox_inst.log, 27, 41, 54
task daemon, 144, 145, 148
log files
CDOS de--installation, 183
memory allocation
performance improvement, 31
sybase dataserver, 104
memory usage, 14, 16
messages
end of tape, 95
error, 149
messages, CDOS, error and warning,
occurrence, 118
minimum Sybase server memory required,
107
mode requirement, CDOS, ENVOX
installation, 116, 117
motif ECO kit, 21
determining existence, 21
installation, 21
multinet, starting at bootup, 136
Installing and Upgrading ENVOXr Configuration Software on DEC VAX and DEC AXP Systems (Revision B — May 1998)
Index
loading data, 110
location on tape, 57
reading from media, 56
running, 110
multinet installation, 119
N
PDX utility read command, 57
non--ENVOX databases
dumping, 109
upgrading, 49
using PDX utility, 52
using text files, 109
performance improvement, 14, 16
memory allocation, 31
PDX utility with non_ENVOX databases,
109
personal files, handling during upgrade, 51
null password, changed by system, 74
port number, interfaces file, 120, 148
number of ENVOX users, 103
port numbers, CDOS, 125
number of users, 12, 30, 36
pre-installation error messages, SYBASE
and ENVOX software, 149–150
O
online help documentation, 7
open database name requirements, 40
open server, CDOS, allowable characters,
125
OpenVMS documentation, 8
203
precautions, upgrade and installation, 20,
40, 50
print db.out command, 57
printer selection, screen dumps, 30, 36
printout, show_dev_alloc.out, 50, 56, 62
printout of database structure and statistics
command, 56, 62
product media, 11
OpenVMS version, 13
ow do I ...”, specify local computer host
name, 136
R
reader requirements, 1
P
password
envoxutility, 131
NULL, changed by system, 74
sa, 131
SYBASE software, 51
PDX command for upgrade from P3.0, 57
PDX dump, error messages, 162
PDX dump selection, 66
PDX utility, 73
database data and log sizes, 110
reading installation script from media, 34
ENVOX, 45
sybase, 28
reading installation script from tape, 82
rebooting the system, 93, 95
repopulating non_ENVOX databases, 109
reporting database errors, 50
requirements, memory and disk space
AXP systems, 16
VAX systems, 14
reserved words, ISQL, 165
restoring deleted files, 99
Installing and Upgrading ENVOXr Configuration Software on DEC VAX and DEC AXP Systems (Revision B — May 1998)
Index
204
Index
restoring from logical devices, 94
special attention getters, 6
return key
use for commands, 5
use for navigation, 27, 40, 53
starting multinet at bootup, 136
reverse video, 27, 41, 53
suggesting changes, 9
revision control of manual, 4
sybase
client--only installation, 34
client--server installation, 28
installation script, 27, 53
S
sa account, 131
sa password, 131
savesets, stored on installation tape, 99
screen dumps, printer selection, 30, 36
scripts
ENVOX installation, 40
upgrade, 53
SCSI ECO kit, 23
determining existence, 23
ftp transfer, 24
installation, 23
recovering from CDROM, 24
second disk
AXP, 16
initialization, 26–27
VAX, 14
server display list, CDOS, 125
server incompatibility, 4.9.x to 10.0.x, 109
server memory allocation, CDOS, 103
Index
startup procedure, adding commands, 29,
35
sybase , deleted during upgrade, 52
sybase database size increase, 50
sybase dataserver memory allocation, 104
sybase documentation, 7
sybase installation script, 28
sybase installation time, 27
sybase master device size, 31
sybase server, minimum memory required,
107
SYBASE software
de-installing, 96
error messages, 151–152
log file
client upgrade, 172
client-only installation, 168
client-server installation, 169
password, 51
pre-installation error messages,
149–150
sybase software, upgrade and installation
precautions, 20, 50
server memory, CDOS, maximum
allocation, 107
sybase SQL server start/stop, 29, 35
ServerSetup program, CDOS, 121
sybase tune, 103
settings of VMS quotas, 148
sybase UIC code, 30
show_dev_alloc.out, 50, 56, 62
sybase upgrade time, 54
sizing tempdb file, 33
sybase version, 13
software, how supplied, 11
sybase_envox_inst.log, 27, 41, 54
software requirements, 13
CHIP memory and disk space
AXP System, 17
VAX System, 14
sybase_envox_install, 27, 40, 53
sybase sysprocs directory and device, 31
sys$manager directories, temporary files
created in, 51
Installing and Upgrading ENVOXr Configuration Software on DEC VAX and DEC AXP Systems (Revision B — May 1998)
Index
sysgen parameters, location, 30, 36
SYSTARTUP_VMS.COM, 29, 35
system backup
creating the routine, 89
importance, 80, 89
importance of, 20
system disk
AXP, 16
VAX, 14
system navigator window, upgrading
databases, 130
system performance, effect by users, 106
system performance improvement, 14, 16
205
third party software, TCP/IP
communication, 116
time, backup process, 93
time and date, backup process, 91
time de--installation, 97
TK50 tape, 11
TK50 tapes, Vol. 1 and 2, 11
top level CDOS directory, 148
transact--ISQL reserved words, 165
transaction log size, envox, 43
translate process, control designer, 147
system resources list, VMS, 104
system restoration, 94–95
system shutdown, 91
U
UAF prompts, user account setup, 86
UCX, automatic startup and shutdown, 138
T
tape capacity, display, 67
tape characteristics, finding, 66
tape device name, CDOS, 125
tape device name and path, 31
tapes, TK50 Vol. 1 and 2, 11
task daemon configuration file, 144, 145
task daemon log file, 144, 145, 148
TCP/IP address, 117, 135
TCP/IP communication, third party
software, 116
tcp/ip installation
verifying multinet, 119
verifying ucx, 119
TCP/IP port number, 31, 37
tempdb
description, 33
increase size, 33
temporary files during upgrade, 51
ucx installation, 119
UIC code, 36
CDOS, 125
ENVOX, 43, 46
ENVOXSUPPORT account, 43, 46
sybase, 30
upgrade
directories deleted and created, 51
login.com saved, 52
sybase software deleted, 52
upgrade precautions, 20, 40, 50
upgrade scripts, 53
upgrade time
ENVOX, 54
sybase, 54
upgrading non--ENVOX databases, 49
user directory
copying login.com file, 88
ENVOX software, 88
user limitation, cpu performance, 12
user requirements, 1
Installing and Upgrading ENVOXr Configuration Software on DEC VAX and DEC AXP Systems (Revision B — May 1998)
Index
206
Index
users, effect on system performance, 106
volume labels, 93
users cleared from target database, 74
using other platforms, 12
using return key for commands, 5
W
warning message, definition, 111
V
warning messages, CDOS, 163
validation checks, 111
verifying multinet installation, 119
verifying node and address name, 37
Y
VMS quotas, settings, 148
year 2000 ECO kit
determining existence, 22
installation, 22
VMS system resources list, 104
year 2000 ECO kit, 22
verifying ucx installation, 119
Index
Installing and Upgrading ENVOXr Configuration Software on DEC VAX and DEC AXP Systems (Revision B — May 1998)
Notes
207
Notes
Installing and Upgrading ENVOXr Configuration Software on DEC VAX and DEC AXP Systems (Revision B — May 1998)
208
Notes
Notes
Installing and Upgrading ENVOXr Configuration Software on DEC VAX and DEC AXP Systems (Revision B — May 1998)
Blank page.
PN6.1:SW3151:VMS